javascriptTips1
Must Watch!
MustWatch
Map an Array of Arrays
While dealing with data in bulk, there can be a requirement to map the data based on a particular attribute.
For instance, filtering the data based on identical cities or remapping and updating the records efficiently.
In such cases, mapping an array of arrays assists in relating and updating the content from time to time.
This blog will discuss the approaches for mapping an array of arrays.
How to Map an Array of Arrays Using JavaScript?
To map an array of arrays, apply the following approaches:
“forEach()” and “push()” methods.
“flatMap()” method.
Method 1: Map an Array of Arrays Using forEach() and push() Methods
The “forEach()” method implements a function for each array element and the “push()” method is utilized to push an element in an array.
These methods can be combined to iterate along each array element and append them into a null array.
Syntax
array.forEach(function(current, index, array), this)
In the above-given syntax:
function: It is the function that needs to be executed for each item in an array.
current: This parameter indicates the current value in an array.
index: It points to the current element’s index.
array: It corresponds to the current array.
this: It refers to the value that needs to be forwarded to the function.
array.push(item1, item2)
In this syntax:
“item1”, “item2” refers to the items that need to be appended to the array.
Example
Let’s overview the below-given example:
<script>
const arr = [
[1, 2, 3],
['a', 'b', 'c'],
['x', 'y', 'z']
]
console.log('The given array is: ' , arr);
let combineArray = [];
arr.forEach((item) => combineArray.push(...item));
console.log('The mapped array of arrays is: ' , combineArray);</script>
In the above code block:
Create an array named “arr” having three arrays contained in it.
Create another null array named “combineArray” that needs to be mapped with an array of arrays.
Now, apply the “forEach()” method to iterate along the elements in the associated array of arrays.
Finally, the iterated elements created in the previous step will be copied and appended to the declared null array via the “spread(…)” operator and the “push()” method, respectively.
Output
![]() In the above output, it can be seen that the null array is mapped with the declared array of arrays.
In the above output, it can be seen that the null array is mapped with the declared array of arrays.
Method 2: Map an Array of Arrays Using flatMap() Method
The “flatMap()” method flattens the input elements of an array into a new array.
This method can simply map the associated array elements into a new array.
Syntax
flatMap((element, index, arr) =>
In the above-given syntax:
element: It corresponds to the current element.
index: It points to the index of the current element.
array: It indicates the current array.
Example
Let’s go through the below-stated code:
<script>
const arr = [
['a', 'b', 'c'],
[1, 2, 3],
['m', 'n', 'o']
];
console.log('The given array is: ' , arr);
let combineArray = arr.flatMap(x => x);
console.log('The mapped array of arrays is: ' , combineArray);</script>
In the above lines of code:
Likewise, create an array of arrays and display it.
In the next step, apply the “flatMap()” method to map the elements of the associated array into the array named “combineArray”.
Finally, display the resultant array mapped with the declared array’s elements.
Output
![]() It can be seen that the provided array of arrays is mapped into a new array.
It can be seen that the provided array of arrays is mapped into a new array.
Conclusion
To map an array of arrays, apply the “forEach()” and “push()” methods in combination or the “flatMap()” method.
The former approach iterates through the array elements and appends them into a null array.
The latter approach maps the associated array elements simply into a new array.
This blog discussed the strategy for mapping an array of arrays with the help of JavaScript.
How to Detect a Mobile Device With JavaScript
Sometimes, programmers need to determine a web app for the presence of a mobile device mode.
For this purpose, agent detection can be used.
However, it is not advised to use User Agent detection for current web apps.
The better solution for the discussed issue is to utilize the JavaScript built-in API for detecting media called “window.matchMedia()”.
It is an efficient and simplest way to detect mobile devices.
This post will describe the procedure for detecting a mobile device using JavaScript.
How to Detect a Mobile Device With JavaScript?
Using the “window.matchMedia()” method with CSS media queries to detect mobile devices in a web app with JavaScript.
The matchMedia() method provides a new MediaQueryList object, which can be used to identify whether or not the document matches the media query string and to keep track of it so that you can tell when it does or doesn’t match.
Syntax
Follow the mentioned syntax for detecting the mobile device in a web app:
window.matchMedia()
This method outputs a new list of “MediaQuery” objects that verify if the document matches the media query string.
Example
In the JavaScript file, use a conditional statement where we will check the width of the device’s screen.
It is considered a mobile device if the screen is 768px or less than 768px.
Match this screen size with the returned media query list from the matchMedia() method.
If it matches, show an alert message “Mobile Mode”; else, it is a “Desktop Mode”:
if (window.matchMedia("(max-width: 768px)").matches){
alert("Mobile Mode");
document.write("You are using a mobile device.");}else{
alert("Desktop Mode");
document.write("You are using desktop.");}
Output
![]() The above GIF shows when we have adjusted the document window, and the viewport is equivalent to the 768px.
As a result, an alert message “Mobile mode” has been displayed.
The above GIF shows when we have adjusted the document window, and the viewport is equivalent to the 768px.
As a result, an alert message “Mobile mode” has been displayed.
Conclusion
For detecting mobile device mode on a web app, use the “window.matchMedia()” method with CSS media queries.
It returns a new MediaQueryList object, which can be used to identify whether or not the document matches the media query string and to keep track of it so that you can tell when it does or doesn’t match.
This post described the procedure for detecting a mobile device with JavaScript.
How to Count Certain Elements in an Array
When working with arrays, developers frequently come into situations where they need to count the number of instances of a given element in the array.
This element could be a number, object, string, or boolean value.
JavaScript offers some built-in methods that help programmers to perform this task.
This blog will demonstrate the methods for counting specific elements in an array.
How to Count Certain Elements in an Array?
To count certain elements in an array, use the following methods:
filter() method
reduce() method
for loop
Method 1: Count Certain Elements in an Array Using filter() Method
To count certain elements in an array, use the “filter()” method.
This method iterates through each array element and filters out elements that meet the condition.
It gives a new array that contains filtered elements depending on a condition.
Syntax
Use the following syntax for using the filter() method:
filter((element) => { /* ...*/ })
Example
Let’s create an array of numbers:
var array = [1, 2, 3, 5, 2, 5, 9, 8, 3, 5, 2, 5];
Store element in a variable “element” that will be searched in an array:
var element = 5;
Invoke the filter() method and check the existence of the element in a callback function:
array = array.filter(value => value == element);
Now, print the resultant filtered array on the console:
console.log(array);
The given output displays the array which filtered out the number “5” from an array:
![]()
Method 2: Count Certain Elements in an Array Using reduce() Method
filter() method gives an array of matched elements, not the exact count of the specified element.
However, the “reduce()” method counts a certain element in an array.
It is the most effective method to find the number of occurrences/instances of each element/value in an array.
It takes a callback function that iterates through every element and finds the occurrence of the specified element.
Syntax
For using the reduce() method, utilize the given syntax:
reduce((accumulator, currentValue) => { /* ...*/ })
Example
Call the reduce() method on an array and find the total occurrences of the element “5” in an array:
var array = [1, 2, 3, 5, 2, 5, 9, 8, 3, 5, 2, 5].reduce((count, value) =>
(value == 5 ? count + 1 : count), 0)
Finally, print the total count of the element “5” in an array using the “console.log()” method:
console.log("The element '5' in an array occurs " + array + " times");
The output indicates that the total count of element “5” in an array is “4”:
![]()
Method 3: Count Certain Elements in an Array Using for Loop
You can also use the traditional “for” loop for counting the specific element in an array.
It permits iterating through every element in an array and comparing it with the particular element that will be needed.
Syntax
Follow the syntax to use the “for” loop:
for(var i = 0; i < array.length; ++i){}
Example
Set count to 0:
var count = 0;
Iterate the array until its length and compare elements with the particular element that is “5” to check the total number of occurrences in an array:
for(var i = 0; i < array.length; ++i){
if(array[i] == element)
count++;}
Lastly, print the count on the console:
console.log(count);
Output
![]() We have compiled all the instructions relevant to counting the specific element in an array.
We have compiled all the instructions relevant to counting the specific element in an array.
Conclusion
To count certain elements in an array, use the “filter()” method, “reduce()” method, or the traditional “for” loop.
filter() method filters the elements that match the specified element, while the reduce() method or the for loop gives the total number of occurrences of the particular element.
This blog demonstrated the methods for counting specific elements in an array.
How to Check if an Array Includes a Value
While coding with JavaScript, there are some situations in which programmers need to determine whether the element exists in the array or not.
For this, JavaScript provides various pre-built methods, such as the includes() method or the indexOf() method, that help to check an array’s particular element.
This post will illustrate the different ways to verify whether an array includes a value.
How to Check if an Array Includes a Value?
To determine if an array includes a value, use the following methods:
includes() method
indexOf() method
some() method
Method 1: Check if an Array Includes a Value Using includes() Method
To check if an array includes a value, use the “includes()” method.
If an array contains a particular element/value, the includes() method returns true.
Moreover, it is a case-sensitive method.
Syntax
Follow the given syntax to verify the value included in an array or not:
array.includes(element)
Example
Create an array of prime numbers called “primeNumberArray”:
var primeNumberArray = [1, 2, 3, 5, 7, 9, 11, 13, 15];
Check whether “11” includes in an array using the “includes()” method:
primeNumberArray.includes(11);
The output displays “true”, which means “11” exists in an array:
![]()
Method 2: Check if an Array Includes a Value Using indexOf() Method
You can also use the “indexOf()” method to verify whether the specified value is included in an array or not.
This method returns “-1” if an element cannot be found, else it returns the initial index in the array at which it can be located.
Syntax
Follow the below-given syntax to use the indexOf() method:
array.indexOf(element)
Example
Invoke the indexOf() method with value “11”, if the returned value is not equal to -1, it means the specified element exists in the array:
primeNumberArray.indexOf(11) !== -1;
Output
![]()
Method 3: Check if an Array Includes a Value Using some() Method
Another way is to utilize the “some()” method to determine the value included in an array.
This method determines if the array contains at least one member that satisfies the test set by the given function.
It returns “true” if it identifies an element in the array for which the specified function returns true, otherwise, it returns “false”.
Syntax
Use the given syntax for utilizing the some() method to check the value included in an array:
array.some((element) => { /* ...*/ })
Example
Invoke the some() method to identify whether “11” includes in an array or not:
primeNumberArray.some(value => value === 11);
The output indicates that the specified element includes in an array:
![]() We have compiled all the essential instructions related to verifying if an array includes a value.
We have compiled all the essential instructions related to verifying if an array includes a value.
Conclusion
To check if an array includes a value, use the “includes()” method, “indexOf()” method, or the “some()” method.
All of these methods give “true” if the particular element/value is included in an array, else they return “false”.
In this post, we illustrated the different ways to verify whether a specified value includes an array.
Convert String With Commas to Array
A string is often regarded as a data type and is frequently implemented as an array data structure composed of bytes (or words) that uses character encoding to hold a sequence of components, typically characters.
Programmers often need to convert the comma-separated strings to an array.
To do this, JavaScript gives a predefined method called the split() method.
This article will describe the procedure for converting the string with a comma to an array.
How to Convert String With Commas to Array?
For converting string with commas to an array, use the “split()” method.
It is used to split a text based on any separator and convert it into an array of substrings and return a new array.
Syntax
Use the given syntax to convert a string with commas to an array:
split(separator)
Here, the separator is comma “,”.
Example
Create a comma-separated string:
var string = "Monday, Tuesday, Thursday, Friday, Saturday, Sunday";
Invoke the split() method by passing a comma as a separator:
var array = string.split(',');
Finally, print the array on substrings on the console:
console.log(array);
The output indicates that the comma-separated string has been successfully converted to an array:
![]() When the split() method is used on an empty string, it produces an array containing an empty string rather than an empty array:
When the split() method is used on an empty string, it produces an array containing an empty string rather than an empty array:
![]() If you want to retrieve an empty array when the string is empty, you can add a filter() function after the split method:
If you want to retrieve an empty array when the string is empty, you can add a filter() function after the split method:
![]() That’s all about the conversion of a string with commas to an array.
That’s all about the conversion of a string with commas to an array.
Conclusion
To the conversion of string with commas to an array, utilize the “split()” method.
It is used to split a text based on any separator and convert it into an array of substrings and return a new array.
If the string is empty, use the filter() method to get an empty array, while the split() method gives an array of empty strings.
This article described the procedure for converting the string with commas to an array.
Check Whether a String Matches a Regex in JS
For searching and pattern matching, regular expressions are used.
When searching for a string or character within a sentence, the regex matches are taken into account.
From a technical standpoint, we use a regular expression to extract the substring from a specified string.
This article will illustrate different methods to check whether the string matches a regex.
How to Check Whether a String Matches a Regex in JS?
To verify whether the string matches a regex or not, use the given-mentioned methods:
test() method
match() method
exec() method
Method 1: Check Whether a String Matches a Regex Using test() Method
To verify whether a string matches a regex, use the “test()” method.
The test() method searches for a match among a regular expression/regex pattern and a string.
It outputs “true” if the match exists/found else, it returns “false”.
Syntax
Use the given syntax to verify string matches the regex or not using the test() method:
pattern.test(string)
Example
Create two strings “string1” and “string2”:
var string1 = "https://linuxhint.com/";var string2 = "Welcome To Linuxhint";
Create patterns of regular expression for strings:
var regexPattern1 = /^(https?):/;var regexPattern2 = /i/g;
Here, “regexPattern1” will check whether the string contains “https?” in the specified string and the “regexPattern2” will determine whether the particular string contains “i” or not.
Call the “test()” method by passing strings to determine whether the strings match the pattern.
If it gives “true”, it indicates that the string matches the pattern.
If it gives “false”, it means the string does not match the regex pattern:
var result1 = regexPattern1.test(string1);var result2 = regexPattern2.test(string2);
Print the result on the console using the “console.log()” method:
console.log(result1);
console.log(result2);
The given output displays “true” for both strings, which signifies that the strings match the respective regex patterns:
![]()
Method 2: Check Whether a String Matches a Regex Using match() Method
You can also use the “match()” method to verify whether a string matches a regex pattern or not.
This method matches the string against the pattern and gives an array containing the matches.
If the particular string does not match/satisfy with the given expression, it outputs null.
Syntax
Use the following syntax for the match() method:
string.match(pattern)
Example
Create a string:
var string = "Welcome To Linuxhint.
It is a best Platform to Learn Skills";
Create a pattern that asks for subsets that contain the letter “e” followed by another letter:
var regexPattern = /e\w/g;
Invoke the match() method by passing the regex pattern as a parameter and store the resultant matches in a variable “result”:
var result = string.match(regexPattern);
Print the matches on the console:
console.log(result);
The output displays all the possible matches of the string with the pattern:
![]()
Method 3: Check Whether a String Matches a Regex Using exec() Method
You can also utilize the “exec()” method.
The exec() method looks for matches in a string.
If a match exists, this function returns the first match; otherwise, it returns null.
Syntax
If you want to get only the first match of the string, use the given syntax:
pattern.exec(string);
Example
In the given example, the string is searched according to the regex pattern with the help of the exec() method and returns the first match if it exists:
var result = regexPattern.exec(string);
As you can see, the output shows only the first match of the string:
![]() We have provided all the essential instructions to verify whether a string matches a regex.
We have provided all the essential instructions to verify whether a string matches a regex.
Conclusion
To check whether a string matches a regex, use the “test()” method, “match()” method, or the “exec()” method.
test() method outputs “true” if the specified string matches a regex.
match() method returns the array of matches of the string, while the exec() method gives only the first match.
In this article, we illustrated different methods to check whether the string matches a regex or not.
What is a Flag Variable?
While programming, the developers try to embed different functionalities according to the requirements.
For instance, to check if some of the included functionality is missing out or not.
In programming, a flag variable serves as a signal when your function is executing to look out for any unusual situation.
These flag variables are used in almost all programming languages.
This blog will discuss the use of a flag variable.
What is a Flag Variable?
A flag variable mainly acts as a boolean variable to have a value till a particular condition is satisfied.
This variable is used to direct the execution of a function or statement and check for particular circumstances when the function is running.
Let’s move on to the following examples to get a better understanding of the stated variable.
Example 1: Utilization of Flag Variable Along With the Specified Value
In this example, a check will be applied on the flag variable based on a particular condition, including the specified value.
Then, the corresponding result will be displayed accordingly:
<script>
let flagVariable = 0;for(var i = 0; i < 5; i++) {
if(i == 2) {
flagVariable++;
}}if(flagVariable) {
alert("This alert is displayed with the help of the flag variable");}</script>
In the above code block:
Firstly, initialize the flagVariable with “0”.
After that, apply a “for” loop till a specified number such that upon a particular condition, the initialized flag variable is incremented by ”1” at each iteration via “if” loop.
Lastly, based on the “for” loop and if the flag is up, i.e., “>0”, the stated message will be displayed via the “alert” dialogue box.
Output
![]() It can be observed that, upon the satisfied condition, the stated message has been displayed.
Example 2: Utilization of Flag Variable Along With the User-defined Value
In this particular example, the “for” loop will be iterated till the number specified by the user and the corresponding outcome will be displayed:
<script>
let flagVariable = 0;
let rang = prompt('Enter the number', '')
for(var i = 0; i < rang; i++) {
if(i == 2) {
flagVariable++;
}
}
if(flagVariable) {
alert("This alert is displayed with the help of flag variable");
}</script>
In the above code snippet:
Likewise, initialize the flag variable with “0”.
After that, input a number from the user that will act as an end limit for the “for” loop.
In the next step, apply a “for” loop and iterate till the user-defined limit.
It is such that if the user-defined number is less than “2”, the “if” condition remains false.
In the other case, i.e., “>2”, the initialized flag variable will be incremented, and the added message will be displayed.
Output
It can be observed that, upon the satisfied condition, the stated message has been displayed.
Example 2: Utilization of Flag Variable Along With the User-defined Value
In this particular example, the “for” loop will be iterated till the number specified by the user and the corresponding outcome will be displayed:
<script>
let flagVariable = 0;
let rang = prompt('Enter the number', '')
for(var i = 0; i < rang; i++) {
if(i == 2) {
flagVariable++;
}
}
if(flagVariable) {
alert("This alert is displayed with the help of flag variable");
}</script>
In the above code snippet:
Likewise, initialize the flag variable with “0”.
After that, input a number from the user that will act as an end limit for the “for” loop.
In the next step, apply a “for” loop and iterate till the user-defined limit.
It is such that if the user-defined number is less than “2”, the “if” condition remains false.
In the other case, i.e., “>2”, the initialized flag variable will be incremented, and the added message will be displayed.
Output
![]() As evident, the prompt dialogue box will appear when the input number is evaluated as greater than “2”.
As evident, the prompt dialogue box will appear when the input number is evaluated as greater than “2”.
Conclusion
In JavaScript, a flag variable specifies a value until a certain condition is met.
The functionality of the flag variable has been discussed by iterating through a “for” loop till the specified limit or till a user-defined limit.
This blog illustrated the implementation of a flag variable using JavaScript.
What is the “double tilde” (~~) Operator?
JavaScript provides multiple functionalities to cater to a particular requirement.
In this regard, the “double tilde(~)” operator provides functionality for rounding off a number just like the “Math.floor()” method.
Both methods are identical, with differences in the execution speed depending on the browser being utilized.
This article will discuss using the “double tilde(~~)” operator.
What is the “double tilde” (~~) Operator?
The “double tilde(~~)” operator is a double “NOT bitwise” operator.
It is an alternative to the “Math.floor()” method for positive numbers and the “Math.ceil()” method for negative numbers.
Instead of using Math, you can utilize this operator for calculating the integer part of a fractional number.
Example 1: Use of Double Tilde (~~) Operator Upon the User-defined Number
In this example, a user-defined number will be evaluated upon for the single as well as the double tilde(~~) operator:
<script>
let a = prompt('Enter the value of a:', '')
let b = 0;
b = ~a
a = ~b
window.alert('This is two time single tilded value a = ' + a);
b = ~~a
alert('This is double tilded value b = ' + b);</script>
In the above code snippet:
Firstly, input a number from the user via prompt.
Initialize another variable with “0”.
After that, the user-defined value will be tilde two times using a “single tilde (~)” operator.
In the next step, display the corresponding result in the dialog box.
Finally, apply the “double tilde (~~)” operator upon the user-defined value and display it via an alert.
Output
![]() In the above output, it can be observed that the outcome of both the “single tilde(~)” and “double tilde(~~)” operators is the same since the single tilde is applied twice.
Example 2: Use of Double Tilde (~~) Operator Along With the Math.floor() Method
In this particular example, the specified value will be evaluated via the “double tilde(~~)” operator and the “Math.floor()” method and their difference will be observed:
<script>
let x = 2.4;
Let y = ~~x;
z = Math.floor(x);
console.log('This is the value of y: ', y);
console.log('This is the value of z: ', z);</script>
In the above lines of code:
Firstly, specify the stated value.
In the next step, apply the “double tilde (~~)” operator and store the resultant value in the variable “y”.
Likewise, apply the “Math.floor()” method upon the initialized value and store it in a variable “z”.
Lastly, display the resultant outcome against each of the functionality.
Output
In the above output, it can be observed that the outcome of both the “single tilde(~)” and “double tilde(~~)” operators is the same since the single tilde is applied twice.
Example 2: Use of Double Tilde (~~) Operator Along With the Math.floor() Method
In this particular example, the specified value will be evaluated via the “double tilde(~~)” operator and the “Math.floor()” method and their difference will be observed:
<script>
let x = 2.4;
Let y = ~~x;
z = Math.floor(x);
console.log('This is the value of y: ', y);
console.log('This is the value of z: ', z);</script>
In the above lines of code:
Firstly, specify the stated value.
In the next step, apply the “double tilde (~~)” operator and store the resultant value in the variable “y”.
Likewise, apply the “Math.floor()” method upon the initialized value and store it in a variable “z”.
Lastly, display the resultant outcome against each of the functionality.
Output
![]() It can be observed that both the “double tilde operator(~~)” and the “Math.floor()” method yielded the same output.
It can be observed that both the “double tilde operator(~~)” and the “Math.floor()” method yielded the same output.
Conclusion
The “double tilde (~~)” operator is a double NOT bitwise operator.
It is an alternative to the “Math.floor()” method for positive numbers and “Math.ceil()” method for negative numbers.
This operator is utilized with the single tilde operator(~) in the former approach and the Math.floor() method in the latter approach to observe the difference.
This blog explained the use of the double tilde(~) operator.
What is the Infinity Property Used for
A unique value called “Infinity” is used to represent mathematical infinity (∞) and overflow values or uncountable numbers.
More than any finite integer, infinity is larger.
When a number crosses the highest limit for a number 1.797693134862315e+308, it hits infinity.
This tutorial will describe the infinity property.
What is the Infinity Property Used for?
JavaScript Infinity is a numeric value that can be assigned to any variable in the same manner that other numbers can be assigned to variables.
When you add any number in Infinity by assigning it to any variable, it outputs “Infinity”:
var sum = Infinity + 18
Output
![]() The Infinity is a global object that has the attribute of infinite length.
Technically, Infinity is categorized as a Window object property:
The Infinity is a global object that has the attribute of infinite length.
Technically, Infinity is categorized as a Window object property:
![]() Of course, infinity is not the same as other numbers; it is greater than any finite number.
Let’s see the below-given GIF, where it can be observed that when “1” exceeds the length of 308, it gives an Infinity:
Of course, infinity is not the same as other numbers; it is greater than any finite number.
Let’s see the below-given GIF, where it can be observed that when “1” exceeds the length of 308, it gives an Infinity:
![]()
Classification of Infinity
Infinity is classified as positive Infinity “+Infinity” and negative Infinity “-Infinity”.
If the number exceeds 1e308, it will give Infinity or +Infinity, while if the negative number exceeds -1e308, it gives -Infinity:
![]() Let’s see how the Infinity works in the arithmetical operations.
Let’s see how the Infinity works in the arithmetical operations.
How Does Infinity Property Work With Arithmetical Operations?
Take 10 power of 1000 which will output Infinity because the returned value exceeds the limit:
const infiniteNumber = Math.pow(10, 1000);
Output
![]() If you will divide any finite number with zero, it will also return Infinity:
const division = 1/0;
Output
If you will divide any finite number with zero, it will also return Infinity:
const division = 1/0;
Output
![]() Sometimes, when you use infinity with any finite number, such as divide any number with infinity, it gives a finite number “0”;
const division = 100/Infinity;
Output
Sometimes, when you use infinity with any finite number, such as divide any number with infinity, it gives a finite number “0”;
const division = 100/Infinity;
Output
![]() Infinity is not used as an iterable object, such as a “for-of” loop, if you try to utilize it, it will give an error “Uncaught TypeError: Infinity is not iterable”:
Infinity is not used as an iterable object, such as a “for-of” loop, if you try to utilize it, it will give an error “Uncaught TypeError: Infinity is not iterable”:
![]()
Bonus Tip
Infinity is used in a “for” loop, but it is not recommended, as it creates an infinite loop.
Sometimes, the browser warns that the script has an infinite loop and will attempt to escape it.
While most of the time, it crashes the browser:
for (let i=0; i<Infinity; i++) {
// Infinite loop}
That’s all about the Infinity property used.
Conclusion
Infinity is a unique numeric value that is greater than any finite number.
Infinity is classified as positive Infinity “+Infinity” and negative Infinity “-Infinity”.
If the number exceeds 1e308, it will give Infinity or +Infinity, while if the negative number exceeds -1e308, it outputs -Infinity.
It is used in arithmetic operations and conditional statements but not used as an iterable object.
This tutorial described the JavaScript infinity property.
How to Detect Browser Back Button Event
While testing the web application, programmers need to track every step.
For instance, going back to the previous page or refreshing the page using the browser’s buttons at the top left corner of your browser are denoted by arrows (forward arrow, backward arrow, loop arrow).
More specifically, they may want to detect browser back button events.
This article will describe the procedure to detect browser back button events.
How to Detect Browser Back Button Event?
To detect browser back button events, use the “onbeforeunload” event.
This event is triggered while the page is getting ready to unload.
It enables you to show a message in a confirmation dialogue box informing the user whether you want to stay on the current page or leave it.
You can also utilize this event for detecting the back button press event.
Example
In the HTML body tag, call the “onbeforeunload” event and invoke the function “backButtonEvent()”:
<body onbeforeunload = "backButtonEvent()">
In the JavaScript file, define a function that will be invoked when the onbeforeunload event gets triggered and print the message in console:
function backButtonEvent() {
console.log("Browser back button is clicked...");}
Here, you can see when the back button of the browser is clicked, a message has been displayed on the console before moving back:
![]() We have compiled all the necessary information related to detecting the browser back button event.
We have compiled all the necessary information related to detecting the browser back button event.
Conclusion
To detect browser back button events, use the “onbeforeunload” event.
It occurs when the page is getting ready to be unloaded.
Call this event in the <body> tag that will invoke the defined function on the onbeforeunload event.
This article described the procedure to detect browser back button events.
How to Convert Binary to Decimal
The computers are compatible with the binary form.
Likewise, human beings easily understand numbers in decimal form.
More specifically, the conversion of binary into decimal is of great aid in decoding the encoded data in binary form.
This way, the converted data can be utilized effectively instead of wasted.
This blog will discuss the approaches to convert binary numbers into decimals using JavaScript.
How to Convert/Transform Binary to Decimal?
To convert binary digits into decimal numbers, apply the following methods:
“parseInt()” method.
“Math.pow()” method.
Method 1: Convert Binary to Decimal Using parseInt() Method
The “parseInt()” method parses a value as a string and gives the first integer.
This method can convert the user-defined binary number into decimals by specifying the particular number system.
Syntax
parseInt(string, radix)
In this syntax:
“string” corresponds to the value that needs to be converted.
“radix” is an optional parameter for the type, which should be between 2 to 36.
Example
Let’s go through the following example:
<div style="text-align: center;">
<h3 id="output"></h3></div><script>
let binaryNumber = prompt("Enter Binary Number", "101011");
if (binaryNumber != null) {
output.innerHTML ="The decimal digit is " + parseInt(binaryNumber, 2);
}</script>
In the above code block:
Firstly, include the “<div>” element and adjust it to center.
Also, include a heading to accumulate the resultant output.
In the JavaScript code, input the binary digit from the user via prompt.
After that, apply a check upon the input number, so it is not “null”.
Lastly, apply the “parseInt()” method to apply the required conversion by specifying the number system “2”.
Lastly, fetch the “<h3>” element such that the associated “innerHTML” property will display the resultant conversion as a heading.
Output
![]() It can be observed that the user-defined binary number has been converted into a decimal number.
It can be observed that the user-defined binary number has been converted into a decimal number.
Method 2: Convert Binary to Decimal Using Math.pow() Method
The “Math.pow()” method assigns the value of the first parameter as the power of the second parameter.
This method can be implemented to iterate through the passed binary number and apply the power upon the contained “1” in it.
Syntax
Math.pow(base, power)
“base” refers to the base that is “2” in this case.
“exponent” refers to the power of the base.
Example
Let’s overview the below-stated example:
function BinaryToDecimal(binary) {
let decimal = 0;
let binaryLength = binary.length;
for (let i = binaryLength - 1; i >= 0; i--) {
if (binary[i] == '1')
decimal += Math.pow(2, binaryLength - 1 - i);
}
return decimal;
}
console.log('The converted decimal value is:', BinaryToDecimal("101000"));
In the above code snippet:
Define a user-defined function named “BinaryToDecimal()”.
The function parameter points to the passed binary number that is to be converted/transformed.
In the function definition, store the length of the passed binary number via the “length” property.
In the “for” loop, iterate through the particular binary number from the last.
After that, apply the condition such that upon the occurrence of “1” in the binary number, the power of “2” is added to it using the “Math.pow()” method.
However, the iterated “0” in it (binary number) remains the same.
Algorithm: 101000=> (2^ (6-1-3)) + (2^ (6-1-0) => 4+32 = 40.
Finally, invoke the defined function by passing the stated binary number as an argument.
Output
![]() The desired conversion is achieved, as computed before.
The desired conversion is achieved, as computed before.
Conclusion
To convert binary digits into decimal numbers, apply the “parseInt()” method or the “Math.pow()” method.
The parseInt() method performs the desired conversion upon the user input value, and the Math.pow() method iterates through the passed binary numbers and adds the power of “2”.
This blog discussed the approaches for converting binary digits into decimal numbers using JavaScript.
Filter Array of Objects With Another Array of Objects
While programming, there can be a requirement to fetch some common elements based on a specific attribute.
For instance, accessing the names based on a particular area.
In such cases, filtering an array of objects with another array of objects assists in making the data accessible.
This blog will describe how to filter an array object with another array of objects.
How to Filter an Array of Objects With Another Array of Objects Using JavaScript?
The array of objects can be filtered with another array of objects using the “filter()” and “some()” methods in combination.
The filter() method creates a new array having elements that pass a particular test provided by a function.
The some() method verifies if the array elements pass a particular test.
These methods can be applied to filter the arrays of objects and fetch the elements from both arrays based on a particular condition via the strict equality(===) operator:
Example
Let’s go through the below-stated example to understand the stated concept:
<script>const firstArray = [
{ month: 1, monName: 'January' },
{ month: 2, monName: 'February' },
{ month: 3, monName: 'March' }];const secondArray = [
{ month: 1, monName: 'January' },
{ month: 2, monName: 'February' },
{ month: 4, monName: 'April' }];const thirdArray = firstArray.filter((elem) => {return secondArray.some((ele) => {return ele.month === elem.month&& ele.monName === elem.monName;
});});
console.log(thirdArray);</script>
In this code block:
Firstly, create an array of objects named “firstArray” having the stated elements in the form of “key-value” pairs.
Likewise, create another objects array named “secondArray” having the values in the same format.
Now, create another array named “thirdArray”.
Here, associate the “filter()” method with the “firstArray” by referring to its elements.
Similarly, apply the “some()” method and point to the elements in the associated array.
Return the values from both arrays which satisfy the stated condition via the strict equality operator (===).
It is such that the common values from both the arrays against the keys “month, monName” will be returned.
Output
![]() The output shows that the common values against the particular keys are returned.
The output shows that the common values against the particular keys are returned.
Conclusion
To filter an array of objects with another array of objects, use the “filter()” method and “some()” method in combination.
It is such that the former method is applied on the first array and the latter method upon the second array such that the values passing the provided test are returned.
This blog discussed the procedure for filtering an object’s array with another object’s array using JavaScript.
Find and Remove Objects in an Array Based on a Key Value
In some situations, programmers are required to find out any object based on key values or just keys or values from an array and remove them from an array.
For this purpose, JavaScript offers some prebuilt methods, such as the filter() method and findIndex() with the splice() method.
This post will describe the methods to find and remove objects in an array based on a key value
How to Find and Remove Objects in an Array Based on a Key Value?
To find and remove objects in an array, use the following methods:
splice() method with findIndex() method
filter() method
Method 1: Find and Remove Objects in an Array Based on a Key-Value Using splice() Method With findIndex() Method
To find and remove the objects from an array, use the “splice()” method with the “findIndex()” method of the Array object.
splice() method is utilized for adding and removing elements from an array, and the findIndex() method is an iterative method that offers a callback function to iterate the elements.
This method outputs the index of the particular element.
Syntax
For finding the index of an element in an array, use the below-given syntax:
findIndex((element) => { /* ...*/ })
For removing an element from an array, use the given syntax of the splice() method:
splice(index, deleteCount)
In the above syntax:
“index” is the position of the specified element to remove.
“deleteCount” is the total number of elements to be deleted.
Example
Here, first, we will create an array of objects:
const arrayObj = [{name: 'Bob', id: 11},{name: 'Carl', id: 5},{name: 'Aliice', id: 3},{name: 'Alice', id: 1}];
Call the “findIndex()” method to find the object based on the key (id) and value (3) and store it in a variable “indexOfObject”:
const indexOfObject = arrayObj.findIndex(object => {return object.id === 3;});
Then, print the index of the object:
console.log("The index of object that contains id:3 is " + indexOfObject);
Now, for removing that object from an array, call the “splice()” method by passing the index of the object and the count “1” that indicates only one element of an array will be removed:
arrayObj.splice(indexOfObject, 1);
Finally, print the array on the console:
console.log(arrayObj);
The output displays the index of the specified object that is “2” and removes that object from an array successfully:
![]()
Method 2: Find and Remove Objects in an Array Based on a Key-Value Using filter() Method
Use the “filter()” method to find and remove the objects in an array.
filter() method creates a new array containing elements that fulfill the specified criteria.
Syntax
Follow the given syntax for using the “filter()” method:
filter((element) => { /* ...*/ })
Example
Call the filter() method to filter out the elements of an array whose id is not equal to “3”:
const newArrayObj = arrayObj.filter(object => {return object.id !== 3;});
Print the resultant array on the console:
console.log(newArrayObj);
Output
![]() That’s all about finding and eliminating objects in an array based on the key value.
That’s all about finding and eliminating objects in an array based on the key value.
Conclusion
To find and remove objects in an array, use the “splice()” method with the “findIndex()” method or the “filter()” method.
filter() method filters out the elements that fulfill the given criteria.
While the findIndex() method finds out the element’s index, and the splice() method removes it from an array.
In this post, we described the methods to find and remove objects in an array based on a key value.
How to Capture the Right-Click Event
When a user right-clicks on a web page, a context menu or right-clicks menu appears.
Developers often need to take some action when a user performs a right-click on a web application element.
Therefore, they must track/capture the right-click on the website.
This tutorial will illustrate the procedure for capturing the right-click event.
How to Capture the Right-Click Event?
Use the “window.addEventListener()” method by passing the event “contextmenu”.
Whenever the user attempts to initiate a context menu by clicking the right mouse button, the contextmenu event is triggered.
Example 1: Capture the Right-Click Event Using the addEventListener() Method With the alert() Method
For capturing a right-click on a web page, use the “window.addEventListener()” method to attach/add an event handler to an element.
Then, show the result that the user right-clicks on the page using the “alert()” method.
It will display the message in a dialog box that will pop up on the screen with the “OK” button:
window.addEventListener('contextmenu', (event) => {
alert('mouse right-clicked');});
The output displays an alert message when we right-click on the page and then opens the default context menu:
![]()
Example 2: Capture the Right-Click Event Using addEventListener() Method With console.log() Method
Here, we will capture the right-click event and output a message to the console:
window.addEventListener('contextmenu', (event) => {
console.log('mouse right-clicked');});
Output
![]()
Example 3: Restrict the Right-Click to Display Default Menu
In this example, we will see restrict the default context menu to open on the right click using the “preventDefault()” method:
window.addEventListener('contextmenu', (event) => {
event.preventDefault();
alert('mouse right-click is prevented');});
As you can see in the output, the default context menu does not appear on the mouse right-click:
![]()
Example 4: Open Custom Context Menu on Mouse Right-Click
Here, the output shows a custom context menu on the mouse right-click event.
More specifically, follow the link to create a custom context menu:
![]() That’s all about capturing the right-click event.
That’s all about capturing the right-click event.
Conclusion
To Capture the right-click event, use the“window.addEventListener()” method by passing the event “contextmenu”.
The contextmenu event is triggered when a user attempts to initiate a context menu by clicking the right mouse button.
In this tutorial, we illustrated the procedure for capturing the right-click event.
How to Add Image in HTML via JavaScript
While creating a web page or site, there can be a requirement to append an image to a particular element.
For instance, associating an image with an action creates effects.
In such situations, adding images in HTML via JavaScript is of great aid in integrating multiple elements, thereby making the site stand out.
This blog will discuss the procedure to add an image in HTML via JavaScript.
How to Add an Image in HTML Using JavaScript?
The following methods are used to add images in HTML documents using JavaScript:
“appendChild()” method.
“querySelector()” method.
Method 1: Add Image in HTML Document via JavaScript Using appendChild()
The “appendChild()” method adds or appends the element from the child node into the parent node.
This method can display the image such that the specified image is appended to an element in the HTML code.
Example
Let’s overview the following example:
<body><h5>This image is added by using Javascript in HTML document:</h5><div id="myImg"></div></body><script>
var img = document.createElement("img");
img.src = "sun.jpg";
var src = document.getElementById("myImg");
src.appendChild(img);</script>
In the above code snippet:
Within the HTML file, add a “<div>” element having the id “myImg” within the <body> tag.
In the next step, apply the “createElement()” method to create an element node named “img”.
After that, the “src” attribute will specify the path of the image.
The “getElementById()” method, in the next step, will access the included “<div>” element by its “id”.
Lastly, the “appendChild()” method will append the specified image to the accessed element in the previous step.
Output
![]()
Method 2: Add Image in HTML Document via JavaScript Using querySelector()
The “querySelector()” method accesses an element based on the CSS selector.
It can also be applied to access the HTML element directly and associate an image by specifying it.
Example
The below-given example illustrates the stated concept:
<body><h5>This image is added in HTML by using Javascript:</h5><img></img></body><script>const myImg = document.querySelector("img")
myImg.src ="sun.jpg";</script>
In the above lines of code:
Include a heading and an “<img>” element, as stated.
In the JavaScript code, access the included element created in the previous step via the “querySelector()” method.
Finally, apply the “src” attribute to include an image via path.
Output
![]() It can be seen that the image is appended to the “<img>” element in HTML via JavaScript.
It can be seen that the image is appended to the “<img>” element in HTML via JavaScript.
Conclusion
To add an image in HTML using JavaScript, apply the “src” attribute combined with the “appendChild()” or the “querySelector()” method.
The former method appends the image to an element in HTML with the help of a created node.
The latter method accesses the HTML element directly and associates an image with it.
This blog discussed the procedure to add images in HTML via JavaScript.
What is the JavaScript Equivalent to a C# HashSet
HashSet is an unordered group of unique/distinct elements in C#.
It facilitates the implementation of sets and stores data in a hash table.
This is a collection/group of the generic type.
It is typically used to avoid adding duplicate elements to a collection.
This post will describe the data structure that is equivalent to the C# HashSet.
What is the JavaScript Equivalent to a C# HashSet?
A JavaScript “Set” is equivalent/same as a HashSet in C#.
A JavaScript Set is a collection of unique/distinct values.
Only one instance of each value is allowed in a Set.
More specifically, a Set can contain any data type value, including object references or primitive values.
Syntax
For creating a Set, use the below syntax:
new Set()
“Set” Methods to Perform Various Operations
There are several ways to use the “Set” data structure to carry out different tasks.
add() method: It is used to add new elements in a Set.
If the same element/object is already present in the Set, it does not add it again.
delete() method: For deleting any specified element, use the “delete()” method.
After deleting, it outputs “true”.
clear() method: It removes/eliminates all elements from a Set.
has() method: For verifying whether the element exists in the Set or not, use the “has()” method.
size: It gives the number of all the existing elements of the Set.
Example 1: Add Elements in Set
Create a new Set using the “new Set()” constructor:
let jsSet = new Set();
Call the add() method to add elements in Set:
jsSet.add(8);
jsSet.add(20);
jsSet.add(14);
jsSet.add(23);
jsSet.add(11);
jsSet.add(11);
As you can see, we have added six elements in Set, but the output shows the “5” elements because Set does not contain duplicate values:
![]()
Example 2: Delete an Element From Set
Here, we will delete “14” from Set using the “delete()” method:
jsSet.delete(14);
The output shows “true”, which means “14” is successfully deleted from Set:
![]()
Example 3: Check if Set Contains Specific Element
Now, check whether “14” exists in Set or not.
For that, call the “has()” method:
jsSet.has(14)
Output displays “false,” which means “14” is deleted from the created jsSet:
![]()
Example 4: Remove All Elements From Set
For removing all the elements from Set, use the “clear()” method:
jsSet.clear()
Example 5: Check Set Size
Check the size of the Set using the “size” property:
jsSet.size
The output shows “0”, which means all the elements of the Set are deleted:
![]() That’s all about the JavaScript Sets.
That’s all about the JavaScript Sets.
Conclusion
A JavaScript “Set” is equivalent/same to a C# HashSet.
HashSet is an unordered group of unique/distinct elements in C#.
Similarly, the Set is a collection of unique values.
Only one instance of each value is allowed in a Set.
This post described the data structure that is equivalent to the C# HashSet.
TypeError: regex test is not a function
In JavaScript, the “test()” method executes a search for a match between a regular expression and a given string.
It gives “true” if the particular string matches the given pattern; if not, it gives “false”.
The test() method can only be used for properly formatted regular expressions.
Otherwise, it outputs a TypeError.
This tutorial will define the occurrence and solution of the error “regex test is not a function” TypeError.
How Does the Error “regex test is not a function” Occur?
When you call the “test()” method on a string type value, it will throw an error “regex test is not a function”.
In such a scenario, the regex pattern or the regular expression is not wrapped in quotes.
Example
Create a variable “regex” and store a regular expression for performing specific action:
const regex = '\d{10}$';
Create a string to store a number that will be checked against the pattern:
const string = '090078601';
Call the “test()” method by passing the string as an argument to check whether it matched with a pattern or not:
const result = regex.test('string');
Print the result on the console using the “console.log()” method:
console.log(result);
The output shows an error because the regex pattern is declared as a string, not in a proper regex format:
![]()
How to Fix “regex test is not a function” Error?
To fix the above-mentioned error, call the test() method on the regular expression.
The regular expression or the regex pattern declared between two forward slashes.
It will act as a string when you declare it in a single or double quote.
In the given example, we will verify whether the number contains 10 digits using the regular expression or regex pattern.
First, we will create a variable regex for storing regular expressions:
const regex = /^\d{10}$/;
In the above-given pattern:
“/” forward slash indicates the start and the end of the pattern.
“^” represents the start of the number.
“d” denotes digits.
“{}” indicates the limit that is “10”.
“\” backslash character is the escape character.
“$” indicates the end of the pattern string.
Create a variable “string” to store the number:
const string = '090078601';
Call the test() method on the regex pattern to test the string:
const result = regex.test('string');
Finally, print the result on the console:
console.log(result);
The output displays “false” because the number is not 10 digits:
![]() We have compiled all the essential instructions to solve the mentioned error.
We have compiled all the essential instructions to solve the mentioned error.
Conclusion
The specified typeError encounters when calling the “test()” method on a string type value rather than a regular expression or regex pattern.
The regular expression or the regex pattern declared between two forward slashes.
The regular expression or regex pattern is not wrapped in quotes.
Therefore, it acts as a string when you declare it in a single or double quote.
In this tutorial, we have defined the occurrence and solution of the error.
TypeError: callback is not a function
A callback function is a function that is passed as an argument to another function and then invoked from inside the outer function to finish a task or activity.
When the callback argument of a function is provided, but the function is called without supplying the callback as a parameter, the “TypeError: callback is not a function” will appear.
This article will demonstrate:
How Does TypeError: callback is not a function Occur?
How to fix TypeError: callback is not a function?
How Does “TypeError: callback is not a function” Occur?
The “TypeError: callback is not a function” occurs when the callback is provided to a function as an argument.
Still, the function is called without passing the callback as a parameter.
Example
Here, we will define a function “calculation()” that takes “callback” as a parameter but doesn’t provide a callback when invoking the function:
function calculation(callback){
return callback();}
Call the “calculation()” function:
calculation();
The output shows an error:
![]() Let’s see how to fix the above-mentioned error.
Let’s see how to fix the above-mentioned error.
How to Fix “TypeError: callback is not a function”?
To solve the specified error, define the callback function using the arrow function and then return it to the defined function:
function calculation(callback = () => {}){
return callback();}
Call the function:
calculation();
Or you can define the callback function inside the function call:
calculation(() => {});
It can be observed that the mentioned error has been resolved successfully:
![]() Here, we will perform an addition operation in a callback function by passing two parameters “a” and “b” and then call it by passing two arguments “5” and “8”:
function calculation(callback = (a, b) => {
var sum = a + b;
console.log("Sum is: " + sum);}) {
return callback(5, 8);}
Output
Here, we will perform an addition operation in a callback function by passing two parameters “a” and “b” and then call it by passing two arguments “5” and “8”:
function calculation(callback = (a, b) => {
var sum = a + b;
console.log("Sum is: " + sum);}) {
return callback(5, 8);}
Output
![]() That’s how you fix the specified type error.
That’s how you fix the specified type error.
Conclusion
The “TypeError: callback is not a function” occurs when a function’s callback argument is specified, but the function is called without passing the callback as a parameter.
For solving the specified error, define the callback function using the arrow function and then return it to the defined function.
This article demonstrated the occurrence and solution for the given error.
prop() vs attr()
jQuery is a lightweight library of JavaScript that is easy to use, and its objective is “write less, do more”.
It provides various functionalities to make the site responsive.
In such a manner, the “prop()” and “attr()” methods are very useful for keeping the value constant or updating it, respectively.
For instance, updating the field values while filling a particular form.
This blog will state the differences between the prop() and attr() methods.
Core Differences Between prop() and attr()
Following are the differences between prop() and attr() methods:
| prop() | attr() |
|---|
| The prop() method can change the value of the element. | The attr() method, on the other hand, does not affect the element’s value. |
| It shows the current value of the HTML code. | It shows the default set value. |
| This method is used as a syntax of properties to change the value. | This method is used for the attribute. |
Check out the given example to get practically get to know about the prop() and attr() differences.
Example: prop() and attr() Upon the Input Text Field
In this example, we will apply the “attr()” and “prop()” methods upon the input text fields separately.
Let’s see how both methods work:
<div style="margin-top: 70px;text-align: center"><h3>attr() method will not change the text field value</h3><button id="btnOne">Click Me</button><p id="attr" style="height: 20px;width: auto"></p><h3>prop() method will change the text field value</h3><button id="btnTwo">Click Me</button><p id="prop" style="height: 20px;width: auto"></p></div>
In the above HTML lines of code:
Include the “<div>” element and perform the stated styling.
Also, include a heading.
The added “<input>” is an HTML element that takes a value from the user, and “type” corresponds to the attribute referring to the input data should be text.
The “id” attribute is specified to access the text field.
Also, set the stated default value with the “value” attribute.
Also, include the button to trigger the functionalities.
After that, include the “<p>” tag to accumulate the outcome corresponding to the “attr()” method.
Likewise, replicate the included functionalities for displaying the outcome of the “prop()” method via the “input text” field.
Now, let’s move on to the JavaScript code:
<script src="https://ajax.googleapis.com/ajax/libs/jquery/3.6.1/jquery.min.js"></script><script>
$(document).ready(function(){
$('#btnOne').click(function() {
$("#attr").text($('#inputText').attr('value') + " - Default Value ");
});});
$(document).ready(function(){
$('#btnTwo').click(function() {
$("#prop").text($('#textInput').prop('value') + " - Current value");
});});
In the above code block, apply the following steps:
Include the jQuery library within the “<script>” tag to apply its methods via the “src” attribute.
After that, apply the “ready()” method, which will execute the stated function as soon as the Document Object Model(DOM) has been loaded.
Now, access the created button such that the stated function executes upon the button click via the “click()” method.
In the function definition, access the input text field by its “id” and return its text content via the “text()” method.
Also, apply the “attr()” method to access the “value” attribute of the fetched input text field.
In this case, the value will remain the same irrespective of the user-defined text.
Likewise, repeat the discussed procedure for the “prop()” method, as applied to the “attr()” method.
In this case, the user-defined text in the text field will be updated with the set value and appended to the fetched “<p>” element by its id.
Output
![]() The output shows that the “attr()” method doesn’t change the original state, whereas the “prop()” method displays the updated value.
The output shows that the “attr()” method doesn’t change the original state, whereas the “prop()” method displays the updated value.
Conclusion
The “attr()” method does not change the element’s value attribute.
On the other hand, the “prop()” method updates it.
Both methods have their pros and cons depending on the user’s requirements.
This blog stated the differences between the attr() and prop() methods with the help of an example.
Print Specific Part of Web Page
The developers often allow printing only the specific portion of a web page’s content, such as any payment plans or a piece of particular information.
Normally, the traditional method to print can be used for printing, like the print command.
However, it does not allow you to print the particular content unless you use a Screenshot tool to capture and print.
This approach can be helpful, however, it decreases the readability of the text.
This tutorial will illustrate the procedure to print a particular part of a web page using JavaScript.
How to Print a Specific Part of a Web Page?
To print the specific part of the web page with high quality:
Use the “getElementById()” method to get the reference of the content element.
Then, utilize the “window.open” method, which opens the print window with the specified size.
“window.document.write” writes the text in the window.
“window.document.close” closes the document.
“window.focus()” sets the focus on the print window’s content.
Finally, use the “window.print()” for printing the content.
Example
In an HTML file, first, create a div in a web page with some content:
<div id="divPrint">
<p>Linuxhint is the best website for learning skills.
<br>
It provides multiple Programming Languages to learn skills such as </p>
<ul class="centerBullets">
<li>HTML/CSS</li>
<li>JavaScript</li>
<li>Java</li>
<li>Python</li>
</ul>
</div>
Create a print button outside the div and attach an “onclick” event with it that calls the function “print()” while it is clicked:
<div>
<button id="print" onclick="print()">Print</button><br><br>
</div>
After executing the above-given code, the web page will look like as follows:
![]() Now, in the JavaScript file, or the tag, add the given lines of code:
function print () {
var printDiv = document.getElementById("divPrint");
var printWindow = window.open('', '', 'left=0, top=0, width=800, height=500, toolbar=0, scrollbars=0, status=0');
printWindow.document.write(printDiv.innerHTML);
printWindow.document.close();
printWindow.focus();
printWindow.print();}
In the above code snippet:
First, define the “print()” method that is invoked when the “onclick” event is triggered.
Get the element (div) that you want to print by passing its assigned id to the “getElementById()” method.
Call the “window.open()” method and pass the window size according to your requirement.
Pass the reference of the div element to the “window.document.write()” method with the “innerHTML” property to write the content on the print window.
Then, close the document using the “window.close()” method.
Set focus on the print window using the “window.focus()” method.
Finally, call the “print” method of the window object to print the specified content.
Output
Now, in the JavaScript file, or the tag, add the given lines of code:
function print () {
var printDiv = document.getElementById("divPrint");
var printWindow = window.open('', '', 'left=0, top=0, width=800, height=500, toolbar=0, scrollbars=0, status=0');
printWindow.document.write(printDiv.innerHTML);
printWindow.document.close();
printWindow.focus();
printWindow.print();}
In the above code snippet:
First, define the “print()” method that is invoked when the “onclick” event is triggered.
Get the element (div) that you want to print by passing its assigned id to the “getElementById()” method.
Call the “window.open()” method and pass the window size according to your requirement.
Pass the reference of the div element to the “window.document.write()” method with the “innerHTML” property to write the content on the print window.
Then, close the document using the “window.close()” method.
Set focus on the print window using the “window.focus()” method.
Finally, call the “print” method of the window object to print the specified content.
Output
![]() That’s all about printing the specified part of the web page.
That’s all about printing the specified part of the web page.
Conclusion
To print the specific part of the web page, use the “getElementById()” method to get the reference of the element of the content.
Then, use the “window’s” methods, including “window.open”, “window.document.write”, “window.document.close”, “window.focus()”, and “window.print()”.
In this tutorial, we illustrated the procedure for printing a particular part of a web page using JavaScript.
Obtain Field (td) Values by Clicking on Table Row
Sometimes, the specific data, particular row data, or the specific column from the HTML table on the website is required to perform some functionalities.
For instance, saving the edited values to the database.
To do this, JavaScript offers an effective and small library called “jQuery”.
This article will describe the process of getting all the table row values.
How to Obtain Field (td) Values by Clicking on Table Row?
“<td>” is the table date or the cells of a table row.
To get the <td> values by clicking on the table row, use the JavaScript library called “jQuery”.
It is a compact, fast and effective JavaScript library.
In jQuery, use the “text()” method for getting the values of cells.
Example
In HTML file, create a table using
tag that stores the student’s information:
<center><table id="getRowData" border="2">
<thead>
<th>Id</th>
<th>Name</th>
<th>Roll #</th>
<th>Age</th>
<th>Admission Date</th>
</thead>
<tbody>
<tr>
<td>1</td>
<td>Robert</td>
<td>23</td>
<td>15</td>
<td>16, Jan 2000</td>
<th><button class="getRow">getRowData</button></th>
</tr>
<tr>
<td>2</td>
<td>Rohnda</td>
<td>20</td>
<td>13</td>
<td>18, Feb 2003</td>
<th><button class="getRow">getRowData</button></th>
</tr>
<tr>
<td>3</td>
<td>Stephen</td>
<td>19</td>
<td>18</td>
<td>24, Jan 2008</td>
<th><button class="getRow">getRowData</button></th>
</tr></tbody></table></center>
In the <head> tag, add the “jQuery” library using the “src” attribute:
<script src="https://cdnjs.cloudflare.com/ajax/libs/jquery/3.6.1/jquery.min.js"></script>
In <script> tag or file, use the given lines of code:
$(document).ready(function(){
$("#getRowData").on('click', '.getRow', function(){
var currentRow=$(this).closest("tr");
var rCell1=currentRow.find("td:eq(0)").text();
var rCell2=currentRow.find("td:eq(1)").text();
var rCell3=currentRow.find("td:eq(2)").text();
var rCell4=currentRow.find("td:eq(3)").text();
var rCell5=currentRow.find("td:eq(4)").text();
var rowData = "rowCell1: " + rCell1 +"\n"+ "rowCell2: " + rCell2 +"\n" + "rowCell3: " + rCell3 + "\n" + "rowCell4: " + rCell4 + "\n" + "rowCell5: " + rCell5;
alert(rowData);
});});
In above code snippet:
First, call the “ready()” method to make a function available after the document is loaded.
Get the table using its id “getRowData” and generate a “click” event on the button using its assigned class “getRow” that invokes a function on the click event.
In function, pass the row as an object.
Then, get the values of each cell using the “text()” method.
Combine all the data in a variable “rowData” using the concatenation operator.
Finally, show all the data in an alert() method.
Output
![]() That’s all about getting the <td> values by clicking on the table row.
That’s all about getting the <td> values by clicking on the table row.
Conclusion
For getting the <td> values, by clicking on the table row, use the JavaScript library called “jQuery”.
jQuery offers the “text()” method that can be utilized for getting the values of cells.
In this article, we described the process to get all the table row values.
map() Method Returns Undefined [Fixed]
The map function is used to map one value to another, and it returns a new array, and elements of arrays are the result of the callback function.
If you will not return anything from the callback function, it returns an “undefined”.
This article will explain the occurrence and the solution to the mentioned error.
How Does “map() Method Returns Undefined” Occur?
As you know, the map() method returns an array that contains elements/values returned by the callback function.
So, when you return nothing from the callback function to the method, it will give “undefined”.
Example
In the given example, first, we will create an array of odd numbers:
const array = [1, 3, 5, 7, 9];
Then, call the map() method, and in the callback function, we will multiply all the array elements with “2”:
const newArray = array.map(element => {
var result = element * 2;});
Finally, print the resultant array on the console:
console.log(newArray);
The output shows the undefined values in an array because nothing is returned from the callback function:
![]()
How to Fix “map() Method Returns Undefined” Issue?
To fix the above-discussed issue, return the value from the callback function to the map() method.
Here, we will call the map() method and return the result to the method after multiplying every element of an array with “2”.
const newArray = array.map(element => {
var result = element * 2;
return result;});
Output
![]() That’s all about fixing the map method returns undefined.
That’s all about fixing the map method returns undefined.
Conclusion
The map() method returns undefined when you will not return anything in the callback function to the method.
To fix it, you must return the value from the callback function to the map() method.
Because the map() method gives an array that contains the values/elements returned by the callback function.
In this article, we explained the occurrence and the solution to the mentioned error.
JS Map Return Object
A Map is a collection/group of key-value pairs in which any sort of data can be used for the keys.
It remembers the order in which the keys were originally inserted.
A key in the Map can only appear once, and it is distinct from the rest of the Map’s collection.
Key-value pairs iterate through a Map object.
Moreover, Map values can be set using the “map.set()” method.
This post will describe the methods for converting JavaScript maps into objects.
How Does a JS Map Return an Object?
JavaScript Map returns an object using the following methods:
Array.from() method with reduce() method
map.entries() method with reduce() method
Method 1: JS Map Return an Object Using Array.from() Method With reduce() Method
To return an object from a Map, first, convert it into an array using the “Array.from()” method and then call the “reduce()” method.
The reduce() method calls the callback function called “reducer” on every array element of Map and returns the key-value pairs to the reduce() method.
The Array.from() is a static method of an Array object.
It creates a new array instance from iterable objects such as Map and Set.
Example
First, create a new Map object:
let map = new Map();
Add elements in Map in a key-value pair using the set() method:
map.set(1, "JavaScript");
map.set(2, "HTML");
map.set(3, "CSS");
Call the Array.from() method with reduce() method to convert the map to an object:
let object = Array.from(map).reduce((obj, [key, value]) => {
obj[key] = value;
return obj;}, {});
Finally, print the object on the console:
console.log(object);
The output indicates that the map is successfully converted to an object:
![]()
Method 2: JS Map Return an Object Using the map.entries() Method With reduce() Method
Another way to return an object from a JavaScript Map is to use the “map.entries()” method with the “reduce()” method.
The entries() method outputs a new iterator object that comprises the [key, value] pairs in an array, and the reduce() method calls the reducer callback function on each element of Map.
It returns the key-value pairs to the reduce() method.
Example
Here, we will call the map.entries() method with reduce() method for converting a map to an object:
let object = [...map.entries()].reduce((obj, [key, value]) => {
obj[key] = value;
return obj;}, {});
Output
![]() That’s all about JS Map return Objects using JavaScript.
That’s all about JS Map return Objects using JavaScript.
Conclusion
JavaScript Map returns an object using the “Array.from()” method with the “reduce()” method or the “map.entries()” method with the “reduce()” method.
Both of these approaches efficiently return an object from a Map while the map.entries() method with reduce() method is fast.
This post described the methods for converting JavaScript maps into objects.
JavaScript: Set Data Structure: Intersect
A JavaScript Set is a set of distinct values.
In a Set, each value can only appear once.
A Set can hold any data type’s value.
More specifically, Intersection (A ∩ B) generates a set containing the members of the first set “A” that also exist in the second set “B”.
This post will define the intersection of sets.
How to Intersect the JavaScript Set Data Structure?
To get the intersection of two sets, use the below-mentioned methods:
filter() method with has() method
for loop
Method 1: Intersection of Two Sets Using filter() Method With has() Method
To get the intersection of the two sets, use the “filter()” method with “has()” method.
The filter() method filters the elements from “sets” by iterating over the sets.
Whereas has() method checks whether the element exists/included in the set.
Example
First, create two sets, “setA” and “setB” using “Set()” constructor:
var setA = new Set([1, 5, 3, 9, 11]);var setB = new Set([11, 18, 12, 26, 5]);
Define a function “setsIntersection” by passing two sets as parameters:
Use the spread operator to convert the set into an array and then call the filter method on it.
The callback function of the filter() method calls the has() method, which determines whether or not the value is included in the second Set.
filter() method outputs an array that contains values in both sets.
Finally, call the Set() constructor for converting the returned array to a set:
function setsIntersection(set1, set2) {
const intersection = new Set([...set1].filter(element => set2.has(element)));
return intersection;}
Call the defined function by passing sets as arguments:
console.log(setsIntersection(setA, setB));
As you can see, 5 and 11 is the only common digits in setA and setB:
![]()
Method 2: Intersection of Two Sets Using for Loop
The most common and traditional method is to use the “for” loop.
Example
Here, we will check whether the element of setA is present in the setB using the has() method.
If the element of setA is found in setB, add them in a new Set using the “add()” method:
for(var x of setA) {
if(setB.has(x)) {
setsIntersection.add(x);}
Output
![]() That’s all about the intersection of the JavaScript Sets intersection.
That’s all about the intersection of the JavaScript Sets intersection.
Conclusion
To get the intersection of two sets, use the “filter()” method with the “has()” method or the “for” loop.
In both approaches, the has() method is the main key to getting the intersection.
The has() method verifies whether the specified element exists in the Set or not.
This post defined the intersection of sets.
JavaScript – script Tag – async & defer
While testing a web page or the site, there can be a requirement to observe the elapsed time in loading functionalities.
For instance, appending the added functionalities to a certain limit.
In such cases, the script tags “async” and “defer” attributes play a vital role in assisting the developer to a great extent.
This article will describe the difference between async and defer attributes using JavaScript.
JavaScript – script Tag – async & defer
The “async” and “defer” are the attributes of the “<script>” tag, and both have different functionalities:
The “async” attribute allows DOM to fetch and execute the script while executing the HTML.
The “defer” attribute downloads the script file, waits to finish the DOM execution, and then executes the script file.
Example
Let’s go through the following example:
<head><script async src="async.js" ></script><script defer src="defer.js" ></script></head><div>
<!--Create 463 buttons--></div>
In the above lines of code:
Include the “<script>” tags referring to the separate external files “async.js” and “defer.js” within the “<head>” tag.
After that, we will create “463” buttons by coding “button{click}*463” and then press tab.
Let’s discuss the “async” attribute’s functionality:
let asyncValue = document.querySelectorAll('button');
console.log(`Async attribute button count: ${asyncValue.length}`);
In the async.js file, apply the following steps:
Access the created buttons using the “querySelectorAll()” method.
After that, apply the “length” property in combination with the “template literals” to display the count of the buttons such that the script will be executed while the page continues the parsing.
Now, check out the “defer” attribute’s functionality:
let deferValue = document.querySelectorAll('button');
console.log(`Defer attribute button count: ${deferValue.length}`);
In the above lines of code, consider the below-stated steps:
Likewise, access the created buttons via the “querySelectorAll()” method.
Similarly, repeat the discussed procedure for returning the button count via the “length” property.
In this scenario, the script file will run after the DOM parsing is fully completed.
Output
![]() The difference between both of the stated attributes can be analyzed with the help of the generated count.
The difference between both of the stated attributes can be analyzed with the help of the generated count.
Conclusion
In the “async” attribute, the script executes while the page is still parsing, whereas the “defer” attribute waits until the Document Object Model(DOM) is fully executed.
This write-up stated the differences between the “async” and “defer” attributes with the help of examples.
Is there a Way to Select the Sibling Node?
While integrating various functionalities in a web page, there can be a requirement to relate them to define their purpose.
For instance, relating the same elements gives the user a clear understanding.
In such situations, selecting sibling nodes assists in simplifying the code complexity, thereby utilizing the current resources effectively.
This blog will discuss the approaches to select sibling nodes.
Is there a Way to Select the Sibling Node?
Yes! To select a sibling node, apply the following approaches:
“parentNode” property and “spread(…)” operator
“nextElementSibling” property
Method 1: Selecting the Sibling Nodes Using parentNode Property and spread(…) Operator
The “parentNode” property gives the element’s parent node.
This property can be applied combined with the “spread operator(…)” to access the parent node of the fetched element and return its sibling nodes.
Example
Let’s understand the stated concept practically:
<div id="myDiv" style="text-align: center">
<h5 id="days">Sunday</h5>
<h6 id="programs">HTML</h6>
<h5>Monday</h5>
<h6>CSS</h6>
<h6>JavaScript</h6>
<h5>Tuesday</h5>
<h5>Wednesday</h5>
<h6>jQuery</h6></div>
const myDay = document.getElementById("days").parentNode.querySelectorAll(" h5");
console.log('The sibling nodes are:', [...myDay].map(e => e.innerText));
In the above code block:
Specify the “<div>” element as a parent node with “id” and “style” as its attributes.
Also, include the “<h5>” and “<h6>” elements having the stated ids.
In the JS code, access the “<h5>” element via the “getElementById()” method.
Also, apply the “parentNode” property and “querySelectorAll()” method in combination to access the parent node of the fetched element and return all of its (<h5>) sibling nodes.
Lastly, apply the combined “spread operator(…)” and “map()” methods to store the outcome of the previous step in another array.
Output
![]() In the above output, it can be seen that all the sibling nodes of “<h5>” are displayed.
In the above output, it can be seen that all the sibling nodes of “<h5>” are displayed.
Method 2: Select Sibling Node With nextElementSibling Property Using JavaScript
The “querySelector()” method outputs the first element matching a CSS selector and the “nextElementSibling” property returns the next element in a similar tree level.
In combination, these approaches can be implemented to access a specific element and return its immediate sibling node.
Syntax
node.nextElementSibling
In the above syntax, the next sibling of the associated node will be returned.
Let’s overview the below-stated example:
<div>
<p>Radio</p>
<p>Watch</p>
<p class="current">Television</p>
<p>Electricity</p>
<p>Computer</p>
<p>mobile</p></div>
const current = document.querySelector('.current');
const nextSibling = current.nextElementSibling;
console.log("The sibling node is:", nextSibling);
In the above code snippet:
Include the “<div>” element and justify it to “center”.
After that, specify the “<p>” elements behaving as sibling nodes.
Also, specify a particular element having the allocated “class”.
In the JavaScript part of the code, access the particular node specified by class using the “querySelector()” method.
In the next step, apply the “nextElementSibling” property to return the immediate sibling with respect to the fetched element.
Finally, display the corresponding sibling node.
Output
![]() The above output signifies that the corresponding sibling node has been successfully retrieved.
The above output signifies that the corresponding sibling node has been successfully retrieved.
Conclusion
To select the sibling node, apply the combined “parentNode” property and “spread(…)” operator or the “nextElementSibling” property.
The former approach accesses the parent node of the fetched element and returns its sibling nodes.
The latter approach gives the next sibling against the accessed node.
This blog explained the approaches to select the sibling nodes.
How to Get Text of an Input Text Box During onkeypress
In some scenarios, developers need to get the text from the text boxes while pressing the keys.
For this purpose, JavaScript allows events for key pressing, including onkeyup, onkeydown, and onkeypress events.
More specifically, onkeypress and onkeydown perform the same, while the onkeyup is slightly different from these two.
This blog will describe the procedure for getting the text of an input box during the onkeypress.
How to Get Text of an Input Text Box During onkeypress?
When a user hits on the keyboard’s key, the onkeypress event occurs.
So, use the “onkeypress” event to access the text of the text box during onkeypress.
The following is the sequence of events associated with the onkeypress event:
onkeydown
onkeyup
onkeypress
onkeydown and onkeypress are the same; they occur when the user hits a key on the keyboard.
While onkeyup is slightly different from these two, it occurs when the user releases the key on the keyboard.
Syntax
Follow the given syntax for the onkeypress event:
onkeypress = "functionName()"
Example
In the given example, we will first create an input box, assign an id “txtbox” and attach an “onkeypress” event that will call the “getValue()” method:
<input type="text" id="txtbox" onkeypress="getValue()"><br><br>
Create a <p> tag with the id “fetchedText” where the fetched text from the input box will appear:
<p id="fetchedText"></p>
In the JavaScript file or <script> tag, define a function “getValue()” that will trigger the “onkeypress” event.
Get the value of a text box using its assigned id with the help “getElementById()” method.
Then, display the text using the “innerText” property:
function getValue() {
var tbValue = document.getElementById("txtbox");
var value = tbValue.value;
document.getElementById("fetchedText").innerText = value;}
The output indicates that the text of an input box is successfully getting on the onkeypress event:
![]() You can also use the onkeyup() event to get the text of an input text box during onkeypress.
The onkeyup occurs when the user releases the key on the keyboard:
<input type="text" id="txtbox" onkeyup="getValue()">
Output
You can also use the onkeyup() event to get the text of an input text box during onkeypress.
The onkeyup occurs when the user releases the key on the keyboard:
<input type="text" id="txtbox" onkeyup="getValue()">
Output
![]() That’s all about getting the text of an input box during onkeypress.
That’s all about getting the text of an input box during onkeypress.
Conclusion
To retrieve the text of an input text box during onkeypress, use the “onkeypress” event.
When a user hits on the keyboard’s key, the onkeypress event is triggered.
Also, use the “onkeyup” event to get the textbox’s text during onkeypress.
onkeydown and onkeypress are the same, while onkeyup is slightly different from these two.
It occurs when the user releases the key on the keyboard.
This blog described the procedure for getting the text of an input box during the onkeypress.
How to Use textarea Input
In HTML, the element <textarea> defines a multi-line text input control.
The “cols” and “rows” attributes define the dimensions of a text area.
It is frequently used in a form to gather user inputs such as reviews or comments.
To get the textarea input, you have to use the “getElementById(‘id’)” method with the “value” attribute.
This post will describe the method to use the input of the textarea.
How to Use Textarea Input?
For using the textarea input, you have to perform two main operations:
Get the entered textarea input value
Set the new value in the textarea
Example
In an HTML file, first, create a textarea and assign a value “Linuxhint”:
<textarea id="txtArea" name="txtArea" rows="5" cols="55">Linuxhint</textarea><br><br>
Create two buttons “Get the Text” and “Add new Text”, that will call the functions “getText()” and “setText()”, respectively, on the button’s click event:
<button id="get" onclick="getText()">Get the Text</button><button id="set" onclick="setText()">Add new Text</button>
After executing the above HTML code, the page will look like as follows:
![]() Now, in the JavaScript file, define a function “getText()” that will trigger on the click event.
Here, we will get the input value using the “getElementById()” method and show it in the “alert()” method:
function getText() {
var text = document.getElementById("txtArea").value;
alert(text);}
Define a function “setText()” that will trigger on the “Add new Text” button and set the specified text in the text area:
function setText() {
var text = document.getElementById("txtArea").value = “Linuxhint is the best Website for Learning Skills”;}
The output shows that the pre-entered value of the textarea is displayed in the alert message by clicking the “Get the Text” button.
Then, we set the new input value in the text area using the “Add new Text” button.
Lastly, the input textarea value is fetched using the “Get the Text” button:
Now, in the JavaScript file, define a function “getText()” that will trigger on the click event.
Here, we will get the input value using the “getElementById()” method and show it in the “alert()” method:
function getText() {
var text = document.getElementById("txtArea").value;
alert(text);}
Define a function “setText()” that will trigger on the “Add new Text” button and set the specified text in the text area:
function setText() {
var text = document.getElementById("txtArea").value = “Linuxhint is the best Website for Learning Skills”;}
The output shows that the pre-entered value of the textarea is displayed in the alert message by clicking the “Get the Text” button.
Then, we set the new input value in the text area using the “Add new Text” button.
Lastly, the input textarea value is fetched using the “Get the Text” button:
![]() That’s all about using textarea input.
That’s all about using textarea input.
Conclusion
To use the textarea input, you have to get the input values or set the input value to the textarea.
For getting the textarea input, use the “getElementById(‘id’)” method with the “value” attribute and for setting the input value, use the “getElementById(‘id’).value = ‘text’”.
This post described the method to use the input of the textarea.
How to Reload the div Without Reloading Entire Page in jQuery
While creating multiple web pages for a site, there can be a requirement to replicate the data.
For instance, utilizing the same data on a different web page upon the triggered event.
In such situations, reloading the div without reloading the entire page assists in managing the data effectively, thereby saving time.
This blog will discuss the approaches to reload the div without reloading the entire page.
How to Reload the div Without Reloading the Entire Page in jQuery?
The “div” can be reloaded without reloading the entire page using jQuery’s “on()” method in combination with the “load()” method.
The on() method associates one or more event handlers for the elements, and the load() method loads the content into the fetched element.
These methods can be combined to access the div and reload it upon the triggered event.
Example
Let’s overview the following HTML code:
<body><h2>This is how to reload the div without reloading entire page</h2><div id="myDiv"><p>JavaScript is a programming language which contains functions, variables, events and objects etc.</p></div><button>reload</button></body>
In the above code block:
Include the stated heading.
Also, specify the “<div>” element having the attribute ”id”.
After that, include the paragraph within the “<p>” tag and a button to trigger the desired functionality.
Now, let’s move on to the JavaScript code:
<script src="https://ajax.googleapis.com/ajax/libs/jquery/3.6.1/jquery.min.js"></script><script>
$("button").on("click", function(){
$('#myDiv').load(' #myDiv')
alert('Reloaded')});
In this code snippet
Include the jQuery library via the “src” attribute.
Access the created button and associate the “on()” method.
This will invoke the mentioned function upon the button click, as evident from the attached event “click”.
In the function definition, access the included “<div>” element and load it again using the “load()” method by referring to its “id”.
Resultantly, the included div will be reloaded again upon the button click, and the stated message via the alert dialogue box will be displayed.
Output
![]() It can be observed that the div is successfully reloaded without reloading the entire page.
It can be observed that the div is successfully reloaded without reloading the entire page.
Conclusion
To reload the div without reloading the entire page, use the “on()” method in combination with the “load()” method.
These methods can be utilized to reload the content of the div upon the triggered event by accessing it and referring to it again.
This blog described the method to reload the div without reloading the entire page.
How to Output Numbers With Leading Zeros
Any number having 0’s before the non-zero digit or a string is known as a leading zero.
For instance, 008, 05, 000XXX, and so on.
Sometimes, developers must show errors during testing with leading zeros strings or numbers.
JavaScript allows performing the mentioned operation using the addition (+) operator or the padStart() method.
This blog will describe the methods to get the numbers with leading zeros.
How to Output Numbers With Leading Zeros?
To get the numbers with leading zeros, use the given methods:
Addition (+) operator
padStart() method
Method 1: Output Numbers With Leading Zeros Using Addition Operator
The addition operator “+” is used for concatenating numbers or strings.
It can also be used to concatenate the number with leading zeros.
Syntax
Follow the provided syntax for using the addition operator:
var number = "zeros" + number
Example
Create a variable “numLeadingZeros” and concatenate the number with zeros using the addition operator:
var numLeadingZeros = "00" + 5;
Print the concatenated number on the console:
console.log("Number with leading zeros: " + numLeadingZeros);
As you can see the output displays a number with leading zeros:
![]() Note: If you want to add leading zeros with the negative number then use the “slice()” method with the addition operator.
First, use the slice() method to cut the (-) sign from the string.
Then, add the zeros to the number.
After that, again add the (-) sign with the string using the (+) operator:
const numLeadingZeros = '-' + '00' + String(-3).slice(1);
Print the number on the console:
console.log("Number with leading zeros: " + numLeadingZeros);
The output indicates that the negative number is successfully concatenated with leading zeros:
Note: If you want to add leading zeros with the negative number then use the “slice()” method with the addition operator.
First, use the slice() method to cut the (-) sign from the string.
Then, add the zeros to the number.
After that, again add the (-) sign with the string using the (+) operator:
const numLeadingZeros = '-' + '00' + String(-3).slice(1);
Print the number on the console:
console.log("Number with leading zeros: " + numLeadingZeros);
The output indicates that the negative number is successfully concatenated with leading zeros:
![]()
Method 2: Output Numbers With Leading Zeros Using padStart() Method
To get the number with leading zeros, use the JavaScript “padStrat()” method.
This method pads/joins the current string with another string (as often as necessary) until the resultant string is the specified length.
The padding is added from the beginning of the given string.
Syntax
Use the below-given syntax for padding the strings using the padString() method:
padStart(targetLength, padString)
Here:
“targetLength” is the final length of the resultant string after padding.
“padString” is the string that will pad with the given string.
Example
First, create a variable “numLeadingZeros” and store a number:
var numLeadingZeros = '5';
Then, call the “padStart()” method by passing the total length of the resultant string that is “3” and the padString “0” that will be padded with the given string “5”:
console.log("Number with leading zeros: " + numLeadingZeros.padStart(3, '0'));
Output
![]() We have provided all the essential information related to getting the number with leading zeros.
We have provided all the essential information related to getting the number with leading zeros.
Conclusion
For adding and getting the number with leading zeros, use the addition operator (+) or the JavaScript “padStart()” method.
For the negative numbers, use the “slice()” method with the addition operator (+).
This blog describes the methods to get the numbers with leading zeros.
How to Save HTML Page as PDF Using JavaScript
While creating websites, web designers must provide the option for users to save a form or page as a PDF.
For instance, websites that offer college and university admissions use this option, asking users to fill out the application online, download it as a PDF file, and then submit it on campus.
This post will describe the method to save the HTML page as a PDF.
How to Save HTML Page as PDF Using JavaScript?
To save an HTML page as PDF, use the JavaScript libraries “jspdf” with “html2canvas”.
jspdf is a JavaScript-based open-source library for creating PDF documents.
It offers several possibilities for creating PDF files with specific characteristics.
It includes a variety of plugins to support various methods of PDF creation, while html2canvas is a JavaScript library that generates a view from the data on the page.
Example
In an HTML file, first, we will create a web page having the following table:
<table id="printTable" border="2">
<thead>
<th>Id</th>
<th>Name</th>
<th>Designation</th>
<th>Joining Date</th>
<th>Age</th>
</thead>
<tbody>
<tr>
<td>1</td>
<td>John</td>
<td>HR</td>
<td>16May2000</td>
<td>26</td>
</tr>
<tr>
<td>2</td>
<td>Rohnda</td>
<td>Manager</td>
<td>23June2005</td>
<td>24</td>
</tr>
<tr>
<td>3</td>
<td>Stephen</td>
<td>Accountant</td>
<td>20September2008</td>
<td>26</td>
</tr></tbody></table> <br>
Now, create a “Print” button that will call the “print()” method on the click event to convert the HTML page to a PDF file:
<button id="printButton" onclick="print()">Print</button>
For converting the HTML page to PDF, add the “jspdf” and “html2canvas” libraries to the <head> tag in the HTML file.
For the “jspdf” library, use the below code:
<script src="https://cdnjs.cloudflare.com/ajax/libs/jspdf/2.5.1/jspdf.umd.min.js "></script>
For the “html2canvas” library, use the below link:
<script src="https://cdnjs.cloudflare.com/ajax/libs/html2canvas/1.4.1/html2canvas.min.js"></script>
In the JavaScript file or the <script> tag, add the following code:
window.jsPDF = window.jspdf.jsPDF;var docPDF = new jsPDF();function print(){var elementHTML = document.querySelector("#printTable");
docPDF.html(elementHTML, {
callback: function(docPDF) {
docPDF.save('HTML Linuxhint web page.pdf');
},
x: 15,
y: 15,
width: 170,
windowWidth: 650});}
In the above code:
First, JavaScript must load the jsPDF class and use the jsPDF object.
Then, define a “print()” function that will trigger the button click.
Using the “querySelector()” method, we will get the HTML content from a specified element by ID.
Create a PDF file by converting the HTML content of the selected area of the website.
Then, download and save the HTML content as a PDF file.
The output indicates that the HTML web page is successfully converted into a PDF file:
![]() That’s all about saving the HTML web page as a PDF.
That’s all about saving the HTML web page as a PDF.
Conclusion
To save the HTML web page as PDF, use the JavaScript “jspdf” library with the “html2canvas” library.
jspdf is an open-source library used for converting the HTML page to PDF, while html2canvas is used for creating a view based on the page’s data.
This post described the method to save the HTML page as a PDF.
Unexpected End of Input Error
In JavaScript or any other language, while writing the code, programmers frequently forget to add parentheses, semicolons, and other formatting components.
In such a scenario, executing the code will trigger the “Unexpected end of input error”, which means you have missed the semicolon or any of the closing parentheses.
This post will discuss:
How does “Unexpected End of Input Error” occur?
How to fix the “Unexpected End of Input Error” error?
How Does “Unexpected End of Input Error” Occur?
There are two main reasons for the occurrence of the “Unexpected end of input error”:
forgetting to add a closing quotation, bracket, or parenthesis.
attempting to parse a JSON response that is empty.
Error Occurs Due to Forgetting the Formatting Components
The most common reason for this error is forgetting the formatting components, including closing brackets, parenthesis, semicolons, quotes, and so on.
Example
In this example, we will define a function “calculation” with four parameters and return the value by performing the specified operation, and then calls the function in the “console.log()” method:
function calculation(p1, p2, p3, p4){return p1*(p2+p3)/p4;
console.log('Calculation: ' + calculation(2, 5, 8, 6) );
In the above code, we forget to add the closing bracket of the function before calling it in the console.log() method.
The output displays an error because of the missing bracket:
![]()
Solution
To fix this error, just see your code thoroughly and add the missing formatting components and then execute it again:
function calculation(p1, p2, p3, p4){return p1*(p2+p3)/p4;}
console.log('Calculation: ' + calculation(2, 5, 8, 6) );
Now, you can see that the result is printed on the console:
![]()
Error Occurs While Attempting to Parse a JSON Empty Response
When you try to parse the empty response from the server using the “parse() or $.parseJSON” method.
It will give the same error.
Let’s see the related example.
Example
Here, we will parse the empty response using the “JSON.parse()” method by passing an empty string:
console.log(JSON.parse(''));
Output
![]()
Solution
To fix this error while attempting to parse an empty JSON response, use the “try/catch” block.
In the given example, we will print the error message in the catch() block:
try {const result = JSON.parse('');
console.log(result);} catch {
console.log('Error: parsing an empty response');}
Here, you can see that the catch block is executed, and the statement is shown on the console except for throwing an error:
![]() That’s all about the unexpected end-of-input error.
That’s all about the unexpected end-of-input error.
Conclusion
The “Unexpected end of input error” occurs due to two main reasons: one is forgetting to add a closing quotation, bracket, or parenthesis, which is the most common reason, and also it occurs while attempting to parse an empty JSON response.
In this post, we discussed the reason and the related solution.
Uncaught TypeError: Cannot set properties of null at getElementById()
While executing code blocks, there can be situations where various types of errors occur, which become a bottleneck in implementing the code functionalities.
These errors include displaying an uninitialized value, accessing the element before specifying it, etc.
One such error is the “Uncaught TypeError: Cannot set properties of null at getElementById()”, which will be discussed and resolved in this article.
How Does the Uncaught TypeError: Cannot set properties of null at getElementById() Occur?
The “Uncaught TypeError: Cannot set properties of null at getElementById()” might occur for the following reasons:
Prior Access of Element.
Incorrect Access of Id.
Example 1: Occurrence of Uncaught TypeError: Cannot set properties of null at getElementById() due to Prior Access of Element
In this example, the error encountered due to access of the particular element before specifying it will be discussed:
<script>
document.getElementById("head").innerHTML = "JavaScript Content";</script><center><body><h2 id = "head">Linuxhint Website</h2></body></center>
Apply the following steps, as given in the above lines of code:
Firstly, include the JavaScript code block within the “<script>” tag.
Here, access the element corresponding to the stated “id” using the “getElementById()” method.
Also, apply the “innerHTML” property to update the content of the accessed element.
In the HTML code within the “<body>” tag, include a heading having the specified “id”.
Upon executing the code, the type error “Cannot set properties of null at getElementById()” will occur.
This is because the element “<h2>” is accessed before it is even specified.
Output
![]() In the above output, it can be seen that the stated error is displayed due to prior access to the element.
In the above output, it can be seen that the stated error is displayed due to prior access to the element.
Solution
The above-encountered error in this case can be resolved by sequencing the code such that the element is specified before it is accessed.
The following example illustrates the stated concept:
<center><body><h2 id = "head">Linuxhint Website</h2></body></center><script>
document.getElementById("head").innerHTML = "JavaScript Content";</script>
The above code is identical to the previous code with the change in the placement of code blocks.
It is such that the “<h2>” element is specified before it is accessed in the JavaScript code.
Output
![]() As seen, the encountered error is resolved, and the updated content via the “innerHTML” property is displayed.
As seen, the encountered error is resolved, and the updated content via the “innerHTML” property is displayed.
Example 2: Occurrence of Uncaught TypeError: Cannot set properties of null at getElementById() due to Incorrect Access of Id
The stated error can also be encountered by accessing the id incorrectly.
Let’s go through the below-stated example:
<marquee id= "para">Java</marquee><script type="text/javascript">
document.getElementById('#para').innerText= "Script";</script>
In the above code snippet:
Include a “<marquee>” element having the stated “id” and text value.
In the JS part of the code, access the included element in the previous step using the “getElementById()” method.
The “id” format here is not correct, considering the method for accessing the particular element.
Here, the “innerText” property displays the stated text value.
Output
![]() In this output, it can be verified that the applied property did not affect the element due to incorrect id format.
In this output, it can be verified that the applied property did not affect the element due to incorrect id format.
Solution
The mentioned error in this particular scenario can be resolved by specifying the id correctly while accessing the element:
<marquee id= "para">Java</marquee><script type="text/javascript">
document.getElementById('para').innerText= "Script";</script>
Implement the below-stated steps, as stated in the above code:
Include the “<marquee>” element having the given “id”.
In the JavaScript code snippet, access the element, in the previous step by specifying the element’s “id” correctly via the “getElementById()” method.
Finally, apply the “innerText” property and display the stated text content, which will be updated in this case.
Output
![]() In the above output, it can be visualized that the updated text content is displayed.
In the above output, it can be visualized that the updated text content is displayed.
Conclusion
The “Uncaught TypeError: Cannot set properties of null at getElementById()” can be resolved by specifying the element before accessing it or by specifying the id in the correct format.
After doing so, the corresponding functionalities can be executed in both cases.
This blog guided about resolving the Uncaught TypeError: Cannot set properties of null at getElementById().
TypeError: object.forEach is Not a Function
In JavaScript, the “forEach()” method executes a given function once for every array element.
The forEach() method is used on each Array, Set, or Map’s element.
If you try to utilize this method on any other type, it will throw an error “object.forEach is not a function”.
So, use it on arrays, maps, or sets or convert the values to these types and then apply this method to them.
This article will define the mentioned error and its possible solutions.
How Does “TypeError: object.forEach is not a function” Occur?
When a value that is not an Array, Map, or Set is used, the “forEach()” method such as “Object” and so on, the “TypeError: object.forEach is not a function” occurs.
Let’s test the stated cause practically.
Example
In the given example, first, we will create an object with its properties in key-value pair:
const object = {
name: 'Stephen',
rollno: 11,
subject: 'Commerce'};
Then, print its properties/entries on the console using the forEach() method:
object.forEach(o => {
console.log(o);});
As you can see in the output, an error is encountered because the forEach method is not applicable for objects:
![]()
How to Fix the Specified Error?
To solve the above-discussed error, use Object’s methods such as “Object.keys()” to get keys in an array, “Object.values()” for getting values of the object, or “Object.entries()” for retrieving all the entries of an object.
Moreover, the “Array.from()” method converts the specified object into an array of objects.
Let’s try an example to solve this issue.
Example 1: Fix the Mentioned Error Using an Object.entries() Method
In this example, we will get the entries of an object using the “Object.entries()” method with the “forEach()” method that returns an array of object’s entries in key-value pairs:
Object.entries(object).forEach(en => {
console.log(en);});
It will not give an error, because the Object.entries() method converts the values in an array and the forEach() method is used to execute the given function on every element.
The output indicates that the forEach() method is successfully run on the Object using the Object.entries() method:
![]() Note: forEach method is also applied for getting keys and values of an object using the Object.keys() and Object.values() method.
Now, let’s see if you don’t want to get an object’s keys, values, or entries, so what would you do? See the given example!
Note: forEach method is also applied for getting keys and values of an object using the Object.keys() and Object.values() method.
Now, let’s see if you don’t want to get an object’s keys, values, or entries, so what would you do? See the given example!
Example 2: Fix the Mentioned Error Using Array.from() Method
To fix this error, convert the object into an array of objects and then apply the forEach() method on it using the “Array.from()” method.
It will print all the properties of an object without giving an error.
Let’s first convert the object into an array of objects:
const object = [{
name: 'Stephen',
rollno: 11,
subject: 'Commerce'}]
Call the forEach() method:
Array.from(object).forEach(ob => {
console.log(ob);});
Output
![]() We have compiled all the best possible solutions to fix the specified error.
We have compiled all the best possible solutions to fix the specified error.
Conclusion
The mentioned error occurs when you try to use the “forEach()” method on a value that is not an Array, Set, or Map.
To fix this error, use the “Array.from()” method to convert the object to an array and then use the forEach() method on it.
This article described the occurrence and solution of the mentioned error.
Where to Place JavaScript in an HTML File
While designing a web page or site, the developers often find it convenient to integrate HTML and JavaScript codes according to the included functionalities.
For instance, placing the code concerning a specific functionality related to the code or appending the same functionality to multiple web pages in the site.
In such scenarios, the placement of JavaScript in an HTML file is of great aid.
This guide will illustrate the approaches to place JavaScript in an HTML file.
Where to Place JavaScript in an HTML file?
The placement of JavaScript in an HTML file can be in the:
“<head>” tag.
“<body>” tag.
External “js file”.
Approach 1: Placement of JavaScript Within <head> Tag in an HTML file
In this approach, the placement of the JavaScript part of the code within the “<head>” tag will be illustrated.
Example
Let’s have an overview of the below-given demonstration:
<head><script type="text/javascript">
function placementJs(){
alert("The placement of JavaScript is within <head> tag")}</script></head><body><center><button onclick= "placementJs()">Click Me</button></center></body>
In the above code snippet:
Include the JavaScript part of the code within the “<head>” tag with the help of the “<script>” tag.
In the JS code, define a function named “placementJs()”.
In its definition, display the stated message via the alert dialogue box.
Lastly, in the HTML code, create a button having an “onclick” event which will redirect to the defined function in the previous step upon the button click.
Output
![]() In the above output, it can be seen that the JS code is working properly by placing it within the “<head>” tag.
In the above output, it can be seen that the JS code is working properly by placing it within the “<head>” tag.
Approach 2: Placement of JavaScript Within <body> Tag in an HTML file
In this approach, the placement of JavaScript code within the “<body>” tag in an HTML file will be discussed.
Example
The below-given example illustrates the stated concept:
<body><center><button onclick= "placementJs()">Click Me</button></center><script type="text/javascript">
function placementJs(){
alert("The placement of JavaScript is within <body> tag")}</script></body>
In the above lines of code:
Within the “<body>” tag, likewise, create a button invoking the function placementJs() with the help of the “onclick” event.
In the JavaScript code block, declare a function named “placementJs()”.
This function will be invoked upon the button click and display the stated message via an alert.
Output
![]()
Approach 3: Placement of JavaScript as an External file
This particular approach involves the placement of a JavaScript code block as an external JS file having the particular file name with an extension “.js” in the “src” attribute.
Example
Let’s go through the following example:
<body><center><button onclick= "placementJs()">Click Me</button></center></body><script type="text/javascript" src = externalfile.js></script>
In the above HTML code:
Recall the discussed approach for creating a button redirecting to the JavaScript function “placementJs()”.
After that, integrate the JavaScript functionalities with the help of an external JS file linked with the stated file name in the “src” attribute.
Let’s move on to the below-given JS code:
function placementJs(){
alert("This is an external JavaScript file")}
In the above code block:
Define a function named “placementJS()”.
In its definition, display the stated message via alert upon the button click.
This approach will resultantly return the same outcome by embedding both the HTML and JavaScript files.
Output
![]() We have offered authentic information related to placing JavaScript in an HTML file.
We have offered authentic information related to placing JavaScript in an HTML file.
Conclusion
The placement of JavaScript in an HTML file can be in the “<head>” tag, the “<body>” tag, or as an external “js file” by specifying the “src”.
The JavaScript code acts the same when placed in either of the stated tags.
However, placing JavaScript as an external js file assists in the re-usability of code.
This blog guided related to the placement of JavaScript in an HTML file.
What are escape and unescape String Functions
In JavaScript, escape() and unescape() methods are used to encode and decode strings.
The JavaScript method unescape() can be used to restore the original string after using the escape() function to make a string accessible for transmission over a network.
This article will describe the escape and unescape functions.
What are escape String Functions?
The “escape()” function encodes the string to make it accessible for network transmission.
It encodes all the non-ASCII characters to their two or four-digit hexadecimal numbers.
Moreover, a blank space is converted to “%20” by the escape function.
Syntax
Follow the given syntax to use the escape() method:
escape(string)
Here, “string” is the parameter passed in a method for encoding.
Example
First, create a string named “str”:
var str = "(Welcome to Linuxhint!)";
Print the string on the page using the “document.write()” method:
document.write("String: " + str + "<br />");
Call the escape() method by passing a string as an argument and store the resultant encoded string in a variable “encodeStr”:
var encodeStr = escape(str);
Finally, print the encoded string on the page:
document.write("Encoded String: " + encodeStr + "<br />");
The output shows the original and encoded strings.
Here, you can see that the “spaces” converted to “%20”, “(“ to “%28”, “!” to “%21” and “)” to “%29”:
![]()
What are unescape String Functions?
The unescape() method decodes the string in its original state.
It converts all the hexadecimal values to the relevant character that they represent.
Some browsers do not support this method, so for that, you can utilize the “ decodeURIComponent()” or “decodeURI()” as a replacement.
Syntax
Use the below-mentioned syntax for decoding the encoded string using unescape() method:
unescape(encodedString)
It takes an encoded string as a parameter.
Example
Here, call the unescape() method by passing an encoded string “encodeStr” as an argument:
var decodeStr = unescape(encodeStr);
Print the decoded string on the page:
document.write("Decoded String: " + decodeStr);
The output displays original, encoded, and decoded strings:
![]() That’s all about escape and unescape functions.
That’s all about escape and unescape functions.
Conclusion
The escape and unescape functions are used for encoding and decoding the strings to make a string accessible for transmission over a network.
The escape() method converts all the non-ASCII values to their hexadecimal numbers, and the unescape() method will convert the encoded string into its original string by converting hexadecimal values to their non-ASCII characters.
In this article, we described the escape and unescape functions.
TypeError: innerHTML is not a Function
For displaying HTML content, the “innerHTML” property is used.
It can be utilized as “element.innerHTML = text”.
If you try to use the innerHTML as a function, such as “innerHTML(text)”, you will encounter an error stating that “innerHTML is not a function” because innerHTML is a property, not a function.
This tutorial will discuss the mentioned error and its solution.
How Does “TypeError: innerHTML is not a function” occur?
When we try to invoke the innerHTML property as a function, we get the mentioned error.
Let’s see an example of how this error is encountered.
Example
In the given example, we will show the current time on the web page using JavaScript.
For this, first, create an element <p> in an HTML file by assigning id “time”:
<p id="time"></p>
In <script> tag or a JavaScript file, first, create a Date object using the Date constructor:
const date = new Date();
Then, get the reference of the HTML element where we will want to show time with the help of the “getElementById()” method and calls the “innerHTML” property as a function by passing the Date’s method “toLocaleTimeString()” which will show a time on the web page:
document.getElementById("time").innerHTML(date.toLocaleTimeString());
Executing the above code will not display time on the page and throw an error that will be shown in the “console” window:
![]() Now, let’s see in the given section how to fix this error!
Now, let’s see in the given section how to fix this error!
How to Fix the “innerHTML is not a function” Error?
To fix the above-discussed issue, set the innerHTML attribute of the relevant DOM element, such as “element.innerHTML = text”.
Example
Assign the value to the innerHTML property/attribute by getting the DOM element with the help of the “getElementById()” method by passing the element’s assigned id:
document.getElementById("time").innerHTML = date.toLocaleTimeString();
Output
![]() That’s all about the innerHTML is not a function error and the solution.
That’s all about the innerHTML is not a function error and the solution.
Conclusion
The specified error occurs when you will try to invoke the innerHTML property as a function.
To fix this issue, set the innerHTML attribute of the relevant DOM element, such as “element.innerHTML = text”.
In this tutorial, we discussed the TypeError: innerHTML is not a function, how it occurs and how to fix it.
setInterval Vs setTimeout
Scheduling is the broad term for any task planned for a future time period., there are functions for executing at predetermined intervals or times called setTimeout() and setInterval() that can be used to plan tasks for a specific time.
Both methods allow you to run a piece of JavaScript code or function at a specific time in the future.
This article will explain the setInterval and setTimeout and their common differences.
What is setInterval?
The “setInterval()” runs a JavaScript expression continuously every “X” interval.
It repeats a specific function at every particular time interval.
Syntax
Follow the below-given syntax for the setInterval() method:
window.setInterval(function, time);
Two parameters are accepted by this method:
function: The first parameter is the function to be executed.
time: The duration between each execution, measured in milliseconds.
Example
Here, we will set the timer by setting the time interval on a button’s click event:
<button onclick="setInterval(timer, 1000);">Click here</button>
Create a <p> tag element and assign an id “time” where the time will be shown:
<p id="time"></p>
In the JavaScript file, write the below lines of code:
function timer() {const date = new Date();
document.getElementById("time").innerHTML = date.toLocaleTimeString();}
In the above code snippet:
First, define a function called “timer()”.
Create a new Date object utilizing the Date() constructor.
Then, access the element where time will be shown using its id with the help of the “getElementById()” method and set the innerHTML property to set the time by calling the Date’s “toLocaleTimeString()” method.
In the output, you can see that the time is displayed after a specific time interval on the click event:
![]()
What is setTimeout?
The “setTimeout” method is used to call the function after a particular time.
It only runs once after a specific amount of time.
Syntax
Follow the provided syntax for the setInterval() method:
window.setInterval(function, time);
It takes two parameters:
function: The function that needs to be executed
time: The length of the duration between each execution, measured in milliseconds.
Example
Call the setTimeout() method on the click event by passing the function and the time in milliseconds:
<button onclick="setTimeout(print, 2000);">Click here</button>
Create an element using the <p> tag:
<p id="text"></p>
Output
![]()
setInterval Vs setTimeout
The primary task of “setTimeout” is to call the function after a specified amount of time.
In contrast, “setInterval” is frequently used to perform a function after a predetermined amount of time.
The main difference between the setTimeout and setInterval is that setTimeout only runs once after a specific time.
However, the setInterval function can be used repeatedly.
Conclusion
“setTimeout()” and “setInterval()” are the JavaScript predefined methods for scheduling the tasks.
The “setInterval()” repeats a given function at every given time interval, while the “setTimeout” method is used to call the function once after a specified amount of time.
This article explained the setInterval and setTimeout and their common differences.
Pure functions Vs Impure functions
While programming, a function plays a vital role in organizing and sorting the overall code.
This function can be pure or impure depending upon appending a particular functionality to an element or generating a different outcome at each iteration.
Let’s discuss the differences between JavaScript pure and impure functions, in detail.
What are Pure Functions?
“Pure functions” always give the same result upon the passed arguments, which are the same.
It does not rely on any external state or data.
It relies on its input arguments only.
These particular functions are predictable.
In the case of the same input, the result can be predicted irrespective of the number of times the function is invoked.
Advantages of Pure Functions
Here is a list of some of the advantages of pure functions:
A pure function is executed as a solely independent function giving the same output for identical inputs.
The pure functions are relatively easier to read and debug as they don’t rely on any external code snippet.
Pure functions can be easily re-utilized in different code sections without altering their contents.
Example: Pure Function
Let’s overview the following code explaining the use of pure function:
<script type="text/javascript">
function addNumbers(x, y) {return x * y;}
console.log("The resultant addition becomes:", addNumbers(2, 3))</script>
In the above code snippet:
Define a function named “addNumbers()” having the stated parameters.
In its definition, return the multiplication of the arguments which will be passed.
Finally, access the function having the passed arguments that need to be multiplied.
Output
![]() In this output, it can be seen that there is no external involvement of any variable or state which might affect the function.
In this output, it can be seen that there is no external involvement of any variable or state which might affect the function.
What are JavaScript Impure Functions?
“Impure function” affects/changes the internal state of one of its arguments.
Moreover, it also affects the function with an external value.
Advantages/Pros of Impure Functions
Have a look at the advantages of impure functions:
Impure functions reduce space complexity.
In impure functions, the state can be altered to utilize the parent variable and call for the function compiling.
Example: Impure Function
In this particular example, the usage of an impure function will be discussed:
<script type="text/javascript">
var outNum = 3;
function addNumbers(num){return outNum += num;}
console.log("The resultant addition becomes:", addNumbers(2))</script>
In the above code block:
Initialize the stated integer value.
In the next step, define a function named “addNumbers()” having the stated parameter.
In the function definition, add the number outside the function’s scope to the passed argument.
Lastly, access the defined function having the stated passed argument.
Output
![]()
Core Differences Between Pure and Impure Functions
Following are some core differences between the stated functions:
| Pure Functions | Impure Functions |
| Pure functions have no such side effects. | This function can have various side effects. |
| These functions are convenient to read and debug. | The impure functions are somewhat difficult to read and debug. |
| They always return some value. | These functions might take effect without returning any value. |
| Pure functions always give the same result irrespective of the number of times it is accessed/invoked. | Impure functions, on the other hand, return a different result on each consecutive function call. |
| These functions are easy to debug. | These functions are somewhat challenging to debug. |
That was all essential information regarding pure and impure JavaScript functions.
Conclusion
Pure functions are solely based on their own functionalities, whereas Impure functions affect the function with an external value.
The former functions can be utilized to return a generic outcome.
The latter functions can be applied to give a different result upon each access.
This blog explained the differences between pure and impure functions.
How to Write HTML Code Dynamically Using JavaScript
As you know, JavaScript is a dynamic scripting language.
To provide dynamic functionality to web pages, HTML code can be written using HTML elements, and CSS attributes can be utilized in combination with HTML elements to customize your web page.
JavaScript’s “createElement()” method allows you to create HTML elements, and the “innerHTML” property allows you to write content for web pages.
This tutorial will describe the methods to write HTML code dynamically using JavaScript.
How to Write HTML Code Dynamically Using JavaScript?
To write HTML code using JavaScript, use the following methods:
Using document.createElement() method
innerHTML property
Method 1: Write HTML Code Dynamically Using document.createElement() Method
JavaScript’s “document.createElement()” method with the “textContent” property is used to write an HTML code dynamically.
Using the createElement() method, you can create a certain HTML element, and the textContent property is used to set the text content.
Syntax
Use the given syntax to create an HTML element:
document.createElement('tagName')
Example
Here, first, we will create a paragraph in a JavaScript file using the HTML <p> tag passed in a “createElement()” method:
const text = document.createElement('p');
Use the textContent property to set the text in a paragraph:
text.textContent = "Welcome To Linuxhint";
Finally, print the text on the webpage using the “document.write()” method:
document.write(text.textContent);
Here, you can see in the output we successfully write the text on the web page using JavaScript:
![]()
Method 2: Write HTML Code Dynamically Using innerHTML Property
To write HTML code dynamically, use the JavaScript “innerHTML” property.
It is the simplest approach to change the content of an HTML element.
It supports all browsers.
Syntax
Follow the given syntax to use the innerHTML property:
innerHTML = "text"
Example
In the HTML file, first, create a button that will call the defined function “heading()” on the click event:
<button onclick="heading()">Click here</button>
Create a paragraph using <p> tag where the text will be shown from the JavaScript and assign an id to it:
<p id="heading"></p>
Define a function “heading()” in a JavaScript file.
Get the reference of the HTML element using its assigned id with the help of the “getElementById()” method and apply an “innerHTML” property on it:
function heading(){
document.getElementById('heading').innerHTML="<h1>Welcome To Linuxhint</h1>";}
Output
![]() We have compiled all the essential information related to writing the HTML code dynamically using JavaScript.
We have compiled all the essential information related to writing the HTML code dynamically using JavaScript.
Conclusion
To write HTML code dynamically, use the “document.createElement()” method with the “textContent” property or the “innerHTML” property.
In the first method, you don’t need any HTML code, while in the innerHTML property, you need to access the HTML element and perform an operation on it.
In this tutorial, we described the methods to write HTML code using JavaScript dynamically.
How to Validate Pin Code and Mobile Number
On websites, there can be multiple HTML forms for getting the user’s data.
While gathering user data, the main problem/difficulty is data validation before submitting it to the database.
For validating data, you can use regular expressions using JavaScript.
This tutorial will describe the method for validating pin codes and mobile numbers using JavaScript.
How to Validate Pin Code and Mobile Number?
To validate the Pin code and Mobile number, use the “regular expressions” with the “match()” method.
The match() method matches the value to the regular expression, if it gets matched, the method will return true, or else it will give false.
Regex Pattern to Validate Pin Code
Pin codes are usually 4-digit, 5-digit, or 6-digit codes.
Here, we will write the regex for validating the 6-digit pin code:
/^\d{6}$/
In the above pattern:
“/” forward slash character is utilized to refer to the boundaries of the regular expression/pattern.
“^” represents the start of the number.
“d” denotes digits.
“{}” indicates the limit that is “6”.
“\” backslash character is the escape character.
“$” indicates the end of the string.
Regex Pattern to Validate Mobile Number
It is essential to validate the phone/mobile number on an HTML form.
A valid phone number may be available in various formats, depending on the area.
Follow the link to check out the different regexes to validate the phone numbers.
Here, we will discuss the two common formats one is just numbers with a length of 10:
/^\d{3}\d{3}\d{4}$/
The above regex indicates that you can enter just 10 digits as a phone number without any delimiter such as space, or any special character including “+”, “–” or “()”.
Example
Let’s first design the web page and then use JavaScript to validate the pin code and mobile number.
Go to your HTML file and paste the following code there:
<form name="form" action="#"><input type="text" id="pin" placeholder="Enter your PIN" autocomplete="off"><br> <br><input type="text" id="number" placeholder="Enter your 10 digit Mobile Number" autocomplete="off"><br><br><button type="submit" onclick="validation()">Submit</button></form>
In the above code:
First, create a form with the action “#” which means the data will not be sent anywhere.
Create two input fields, one for the pin code and the other for the mobile number.
Create a “submit” button that will call the “validation()” method to validate the pin code and mobile number.
The HTML page will look like as follows:
![]() In the <script> tag or the JavaScript file, paste the following lines of code:
functionvalidation(pin, mobile) {
var pin = document.getElementById('pin').value;
var mobileNumber = document.getElementById('number').value;
pinRegexPattern = /^\d{6}$/;
mobRegexPattern = /^\d{3}\d{3}\d{4}$/;if(pin.match(pinRegexPattern) && mobileNumber.match(mobRegexPattern) )
{
alert("Pin and Mobile number is Validated!");
returntrue;
}if(pin.match(pinRegexPattern) 6){
alert("Pin must be 6 digits!");
returntrue;
}else
{
alert("You have entered an invalid Pin and mobile number!");
returnfalse;
}}
In the above snippet:
First, define a function “validation” with two parameters, “pin” and “mobile”.
Get the input values of the text fields, such as the mobile number and pin code.
Define regex patterns for both the pin code and the mobile number.
Now, in a conditional statement, check the input values of the pin code and mobile number, and call the match() method by passing the regex that will verify whether the value matches the pattern.
If it matches, the method will output true, else returns false.
You can see in the output if the pin code is less than or greater than the limit “6”, an alert pops up.
If the pin and mobile number match the given pattern, it will show the message for validation:
In the <script> tag or the JavaScript file, paste the following lines of code:
functionvalidation(pin, mobile) {
var pin = document.getElementById('pin').value;
var mobileNumber = document.getElementById('number').value;
pinRegexPattern = /^\d{6}$/;
mobRegexPattern = /^\d{3}\d{3}\d{4}$/;if(pin.match(pinRegexPattern) && mobileNumber.match(mobRegexPattern) )
{
alert("Pin and Mobile number is Validated!");
returntrue;
}if(pin.match(pinRegexPattern) 6){
alert("Pin must be 6 digits!");
returntrue;
}else
{
alert("You have entered an invalid Pin and mobile number!");
returnfalse;
}}
In the above snippet:
First, define a function “validation” with two parameters, “pin” and “mobile”.
Get the input values of the text fields, such as the mobile number and pin code.
Define regex patterns for both the pin code and the mobile number.
Now, in a conditional statement, check the input values of the pin code and mobile number, and call the match() method by passing the regex that will verify whether the value matches the pattern.
If it matches, the method will output true, else returns false.
You can see in the output if the pin code is less than or greater than the limit “6”, an alert pops up.
If the pin and mobile number match the given pattern, it will show the message for validation:
![]() Now, we will use another pattern for validating mobile phone numbers that are the length of 13, including delimiter (+) that will denote the country code:
/^[\+][0-9]{2}[0-9]{3}[0-9]{3}[0-9]{4}$/
In the above regex pattern:
“^” marks the beginning of the string.
The boundaries of the regular expression are indicated by the forward slash character “/”.
“{}” represents the limit.
“$” indicates that the string has ended.
“[0-9]{2}...” represents the two digits next to the delimiter + in ranging from 0 to 9.
In JavaScript code, we will use the same above code by replacing only the “mobileRegexPattern”:
mobRegexPattern = /^[\+][0-9]{2}[0-9]{3}[0-9]{3}[0-9]{4}$/;
Output
Now, we will use another pattern for validating mobile phone numbers that are the length of 13, including delimiter (+) that will denote the country code:
/^[\+][0-9]{2}[0-9]{3}[0-9]{3}[0-9]{4}$/
In the above regex pattern:
“^” marks the beginning of the string.
The boundaries of the regular expression are indicated by the forward slash character “/”.
“{}” represents the limit.
“$” indicates that the string has ended.
“[0-9]{2}...” represents the two digits next to the delimiter + in ranging from 0 to 9.
In JavaScript code, we will use the same above code by replacing only the “mobileRegexPattern”:
mobRegexPattern = /^[\+][0-9]{2}[0-9]{3}[0-9]{3}[0-9]{4}$/;
Output
![]() That was all about validating the pin code and mobile number.
That was all about validating the pin code and mobile number.
Conclusion
To validate pin codes and mobile numbers, use the “regular expressions” with the “match()” method, which will match the input values to the given pattern; if it matches, it returns true, or else it gives false.
In this tutorial, we described the method for validating pin codes and mobile numbers using JavaScript.
How to Extract a Number From a String
In the programming phase using JavaScript, there can be a situation to get rid of the contained garbage values in the bulk data.
For instance, decoding the encoded data to utilize it or sorting the data to make it readable/understandable.
In such situations, extracting a number from a string does wonders in utilizing the contained data and managing the memory effectively.
This blog will discuss the approaches to extract a number(s) from a string using JavaScript.
How to Extract a Number(s) From a String Using JavaScript?
To extract a number from a string, implement the following approaches combined with the “regular expression”:
“replace()” method.
“match()” method.
Approach 1: Extract/Retrieve a Number From a String Using replace() Method
The “replace()” method locates a particular value in a string value and replaces it.
This method can be utilized to replace all the contained non-digit characters with a null string and display the new value.
Syntax
string.replace(locate, new)
In the above syntax:
“locate” corresponds to the value that needs to be replaced with the “new” value in the associated string.
Example
Let’s overview the following example:
<script type="text/javascript">let string = "Linux123hint";let extractNum = string.replace(/\D/g, '');
console.log("The extracted number is:", extractNum);</script>
In the above code snippet:
Initialize the stated string value.
In the next step, apply the “replace()” method.
Its first parameter, “\D” and “g”, combined will do a global search for the non-digit characters and replace them with an empty string, specified as its second parameter.
Lastly, display the extracted digits from the specified string value.
Output
![]() As seen in the above output, the included numbers in the string value are extracted and displayed.
As seen in the above output, the included numbers in the string value are extracted and displayed.
Approach 2: Extract/Retrieve a Number From a String Using match() Method
The “match()” method matches a particular string based on a regular expression.
This method can be implemented to match the numbers in a string and return the first full match.
Syntax
string.match(search)
In this syntax, “search” points to the value that needs to be searched for.
Example
The below given example explains the concept:
<script type="text/javascript">let string = "Java 456 Script";let extractNum = string.match(/\d+/);
console.log("The extracted number is:", extractNum[0])</script>
In the above code block:
Likewise, initialize the stated string value having numbers.
After that, apply the “match()” method as the stated regular expression to search for the “digits(0-9)” in the string value.
Finally, display the resultant extracted numbers from the string.
Note that the associated “[0]” indicates that the outcome contains the first full match.
Output
![]() The above output indicates that the desired requirement is achieved.
The above output indicates that the desired requirement is achieved.
Conclusion
The “regular expression” in combination with the “replace()” method or the “match()” method can be utilized to extract a number from a string.
The former approach replaces the contained string characters with an empty string, thereby extracting the numbers.
The latter approach retrieves the first match from the string value that corresponds to the regular expression.
This write-up explained the approaches to extract/pick out a number from a string using JavaScript.
How to Export a Function
Sometimes, developers create multiple files and want to export some functions from one file to another file.
JavaScript allows exporting and importing the functions or variables using the “export” or “import” keywords.
For exporting functions, either define a function with the export keyword or export the already defined function.
This blog will explain the method to export a function.
How to Export a Function?
To export a JavaScript function, there are two ways.
Define a function with the “export” keyword
Export the already defined function
Syntax
To export a function, use the given syntax for defining the function with the “export” keyword
export function functionName() { /* ...*/ }
Follow the below-given syntax to export the already defined function:
export {functionName}
Example 1: Export Already Defined Function
We have two JavaScript files, “info.js” and “JSfile.js”.
In the given example, first, we will define a function in an “info.js” file for getting the user information using the “prompt()” method:
function getInformation(name, id){
name = prompt('Enter Your Name');
id = prompt('Enter Your id');
console.log(name);
console.log(id);}
Now, export the function from the “info.js” file in “JSfile.js”:
export {getInformation};
The output shows that the function is successfully exported:
![]() Let’s see the second way to export the function using the “export” keyword.
Example 2: Export Function With Export Keyword
Here, we will define the function “getInformation()” in “info.js” with an “export” keyword that will “import” in the <script> tag:
export function getInformation(name, id){
name = prompt('Enter Your Name');
id = prompt('Enter Your id');
console.log(name);
console.log(id);}
In the <script> tag, import the function from “info.js”:
<script type="module">
import {getInformation} from './info.js';
console.log(getInformation());</script>
Output
Let’s see the second way to export the function using the “export” keyword.
Example 2: Export Function With Export Keyword
Here, we will define the function “getInformation()” in “info.js” with an “export” keyword that will “import” in the <script> tag:
export function getInformation(name, id){
name = prompt('Enter Your Name');
id = prompt('Enter Your id');
console.log(name);
console.log(id);}
In the <script> tag, import the function from “info.js”:
<script type="module">
import {getInformation} from './info.js';
console.log(getInformation());</script>
Output
![]() That’s all about exporting JavaScript functions from one JS file to another.
That’s all about exporting JavaScript functions from one JS file to another.
Conclusion
To export a JavaScript function, there are two ways: one is defining a function with the “export” keyword, and the other is exporting the already defined function.
The function with the export keyword is imported in a JavaScript file or a script tag using “import {functionName} form ‘path’”.
In this blog, we have explained the method to export a function.
How to Create User Input in the JavaScript Console
Sometimes, developers need user input using a prompt on the web page.
To do so, use the “prompt()” method the browser provides and is supported by JavaScript.
You can use the same method if someone asks for input from the user while working in the JavaScript console.
This tutorial will describe the way for creating user input in the JavaScript console.
How to Create User Input in the JavaScript Console?
In the JavaScript console, user input can be created by using the “prompt()” method.
This approach displays a dialogue box that requests input from the user.
If the user clicks “OK”, it returns the input value, else, it returns null.
Syntax
Use the given syntax for taking user input on the console:
prompt(text)
It accepts “text” as a parameter that will be displayed in the dialog box.
Return Value
It returns the entered input value if the user clicks the “OK” button, else its outputs “null”.
Example 1: Create User Input on Console and Store in Variable
In the following example, call the “prompt()” method by passing a text string that will be displayed in the dialog box and store the returned value in a variable “consoleInput”:
const consoleInput = prompt("What is your name?");
The output displays the dialog box that prompts the user for input:
![]() Example 2: Get User Input and Display on Console
Here, for retrieving the entered input value returned by the “prompt()” method, we will call the “alert()” method afterward:
alert(`Your name is ${consoleInput}`);
Output
Example 2: Get User Input and Display on Console
Here, for retrieving the entered input value returned by the “prompt()” method, we will call the “alert()” method afterward:
alert(`Your name is ${consoleInput}`);
Output
![]() That’s all about creating user input in the JavaScript console.
That’s all about creating user input in the JavaScript console.
Conclusion
In the JavaScript console, user input can be created by using the “prompt()” method.
If the user clicks on “OK”, it gives the entered value as an output.
Otherwise, it gives “null”.
For getting the input value, use the JavaScript “alert()” method.
This tutorial described the way for creating user input in the JavaScript console.
How to Create Multiline String
In JavaScript, string manipulation is the simplest and most straightforward to learn but the most challenging to master.
Multiline String enhances readability.
For example, breaking up a large paragraph into points makes the text easier to read.
More specifically, to create multiline strings, utilize the “\n” and “\n” with the “+” operator in case of multiple strings or template literals.
This post will define the methods to create multi line strings.
How to Create a Multiline String?
For creating a multiline string, use the following methods:
Using \n
Using concatenation operator (+) with “\n”
Using template string literal
Method 1: Create Multi-line String Using (\n)
Use the “\n” in a string or a paragraph for creating the multiline strings.
Let’s see the given example to understand this approach.
Syntax
For creating multiline strings from a paragraph, use the given syntax:
var string = "str\n str"
Example
Here, we will create a variable “multipleStr” that stores a paragraph/multiple strings as a single string.
Now, we want to split it into multiline strings, so we will use “\n”:
var multipleStr = "Welcome To Linuxhint\n > Welcome to JavaScript Tutorials\n >> How to Create Multiple strings";
Finally, print the resultant multiline strings in the console using the “console.log()” method:
console.log(multipleStr);
The output indicates that the string is successfully split into multiline strings:
![]()
Method 2: Create Multiline String Using Concatenation Operator (+) With (\n)
Multiple strings can be concatenated using the concatenation operator (+) with (\n) surrounded inside the single or double quotes to create a multiline string.
Syntax
For creating multiline strings by concatenating strings, use the given syntax:
var string = "str\n" + "str"
Example
When we will combine multiple strings using the concatenation operator (+), it will not create multiline strings and return all the strings as a single one-line string:
var multipleStr = 'Welcome To Linuxhint' +
'> Welcome to JavaScript Tutorials' +
'>> How to Create Multiple strings';
As you can see in the output, the concatenation operator just joined the multiple strings in a single string:
![]() So, we will use (\n) in the multiple strings with (+) operator:
var multipleStr = 'Welcome To Linuxhint\n' +'> Welcome to JavaScript Tutorials\n' +'>> How to Create Multiple strings';
Print the multiple strings as a single string but in multiple lines (multiline string):
console.log(multipleStr);
Output
So, we will use (\n) in the multiple strings with (+) operator:
var multipleStr = 'Welcome To Linuxhint\n' +'> Welcome to JavaScript Tutorials\n' +'>> How to Create Multiple strings';
Print the multiple strings as a single string but in multiple lines (multiline string):
console.log(multipleStr);
Output
![]()
Method 3: Create Multiline String Using Template String Literal
For creating multiline strings, use the template string literals.
Template literals are the backtick (“) character, which reduces the need for concatenation or escaping characters.
Syntax
Use the following syntax for template string literals:
var str = `string`
Example
Here, we will store a string using the backtick character called string template literals:
var multipleStr = `Welcome To Linuxhint>Welcome to JavaScript Tutorials>>How to Create Multiple strings`;
The output displays string in a multiline string:
![]() That’s all about creating multiline strings.
That’s all about creating multiline strings.
Conclusion
To create a multiline string, use the ”\n” concatenation operator (+) with “\n” or the template string literals.
The template string literals or backticks reduce the need for concatenation or escaping characters.
This post defined the methods for creating multiline strings.
How to Calculate Percentage Between Two Numbers?
While solving mathematical problems, there can often be a requirement to compute the percentage between two numbers to compare them.
For instance, analyzing the difference between one number with respect to another.
In such situations, calculating the percentage between two numbers using JavaScript does wonder in analyzing and utilizing the data effectively.
This write-up will explain the procedure to compute the percentage between two numbers.
How to Calculate/Compute Percentage Between Two Numbers?
To calculate the percentage between two numbers, apply the following approaches:
“User-defined” function.
“toFixed()” method.
“round()” method.
Approach 1: Calculate Percentage Between Two Numbers Using User-defined Function
This approach can be utilized to calculate the percentage between two numbers by passing the numbers that need to be computed as function arguments.
Example
Let’s overview the below example:
<script type="text/javascript">function getPercent(x, y) {
return (x / y) * 100;}
console.log("The percentage between two numbers is:", getPercent(10, 27));</script>
In the above lines of code:
Declare a function named “getPercent()” having the parameters “x” and “y”.
In its definition, compute the percentage by dividing the passing numbers and multiplying their result with “100”.
Lastly, invoke the particular function by passing the stated numbers as function arguments.
The outcome will indicate the percentage of the first passed argument with respect to the passed second argument.
Output
![]() In the above output, it can be visualized that the first passed argument 10 is “37.037%” of the second passed argument 27.
In the above output, it can be visualized that the first passed argument 10 is “37.037%” of the second passed argument 27.
Approach 2: Calculate Percentage Between Two Numbers Using toFixed() Method
The “toFixed()” method transforms a number into a string.
This method can be implemented to return the resultant percentage up to two decimal places.
Example
The below-given example explains the stated concept:
<script type="text/javascript">let getPercent = (25 / 80) * 100;
console.log("The percentage between two numbers to two decimal places is:", getPercent.toFixed(2));</script>
In the above code snippet:
Divide the stated numbers and multiply them by 100.
After that, apply the “toFixed()” method to return the corresponding percentage up to two decimal places, as evident in its parameter.
Finally, display the resultant percentage of the former number with respect to the latter number, as discussed in the previous approach.
Output
![]() In this output, it can be seen that the resultant percentage has two decimal places.
In this output, it can be seen that the resultant percentage has two decimal places.
Approach 3: Calculate Percentage Between Two Numbers Using Math.round() Method
The “Math.round()” method rounds the specified number to the closest/nearest integer.
This method can be utilized to yield the computed percentage to the nearest integer.
Syntax
Math.round(a)
In the given syntax:
“a” represents the number that needs to be rounded.
Example
The following example illustrates the stated concept:
<script type="text/javascript">function getPercent(x, y) {
return Math.round((x / y) * 100);}
console.log("The percentage between two numbers is:", getPercent(10, 27));</script>
Implement the below-stated steps, as given in the above code block:
Firstly, declare a function named “getPercent()” having the stated parameters.
In the function definition, compute the percentage between the passed arguments and apply the “round()” method to them.
This will, eventually, return the resultant percentage value to the nearest integer, thereby neglecting the decimal places.
Output
![]() The above output signifies that the desired functionality is achieved.
The above output signifies that the desired functionality is achieved.
Conclusion
The “User-defined” function, the “toFixed()” method, or the “Math.round()” method are used to compute the percentage between two numbers using JavaScript.
These approaches can be utilized to perform the desired functionality upon the passed arguments, returning the outcome up to two decimal places or rounding it to the nearest integer respectively.
This article explained the approaches to compute the percentage between two numbers using JavaScript.
How do I Empty an Array
The way arrays operate is super interesting.
Even though JavaScript allows us to construct new arrays, there are some circumstances in which you might wish to keep using the old array even after emptying it.
Several methods can be used to do this, including assigning the original array to an empty array, setting the length of an array to 0, using the splice() method, and popping the array by using the pop() method.
This article will explain the methods to empty the JavaScript array.
How to Empty an Array?
For emptying an array, use the following ways:
Set length to 0
Using pop() method
Using splice() method
Assign array to an empty array
Method 1: Empty an Array by Setting the length to 0
To empty an array, set the value of the length property of an array to 0.
This approach is used when you want to empty/clear the objects separately, and the memory implications don’t matter.
Syntax
Use the given syntax to set the length of an array to zero:
array.length = 0
Example
First, we will create a number array:
var array = [2, 4, 5, 1, 6, 9];
Set the length of an array to 0:
array.length = 0;
Finally, print the array on the console:
console.log(array);
The output indicates that the array is now empty:
![]()
Method 2: Empty an Array Using pop() Method
Use the “pop()” method to empty an array.
This method can be utilized when time is not the user’s main concern because the pop() method pops the elements from an array one by one, which will take time.
Syntax
Given syntax is used for the pop() method:
pop()
Example
We will use the same above-created array.
Call the pop() method in the while loop and iterate over an entire array until the array length exceeds zero:
while(array.length > 0) {
array.pop();}
Output
![]()
Method 3: Empty an Array Using the splice() Method
To empty an array, use the “splice()” method.
It can be utilized to eliminate any element from an array.
Syntax
Follow the below-provided syntax for using the “splice()” method:
splice(rIndex, count, elements)
Here,
“rIndex” is the position of an element that will be removed.
“count” is the number of counts of how many elements you want to eliminate from the array.
“elements” are the new elements that will be added/ inserted into an array.
Example
Here, we will only remove all the elements/items from an array.
So, we will pass the “0” and the length of an array.
“0” is the starting index of an array and “array.length” is the count which means removing all elements of an array until index 0:
array.splice(0, array.length);
It can be observed that the elements are successfully removed from an array:
![]()
Method 4: Empty an Array by Assigning Array to an Empty Array
If you want to empty an array quickly, simply assign the created array to an empty array:
Syntax
Use the following syntax for assigning an array to an empty array:
array = [];
Example
Assign the array to the empty array:
array = [];
Output
![]() We have compiled all the essential information related to emptying an array.
We have compiled all the essential information related to emptying an array.
Conclusion
To empty an array, “set the length of an array to 0”, use the “pop()” method, “splice()” method, or “assign an array to an empty array”.
The last method is the fastest method to empty the array, while the pop() method is the slowest method as it pops elements one by one and takes more time.
In this article, we explained the methods to empty the array.
Difference Between the substr() and substring()
While dealing with bulk data, you may need to extract the data based on a particular attribute.
For instance, sorting the data based on actual/surname or extracting a part of the data.
In such situations, substr() and substring() methods assist in accessing the required data conveniently via indexing.
This write-up will clear out the differences between the “substr()” and “substring()” methods.
What is substr() Method?
The “substr()” method returns the specified number of characters from the particular index in the given string.
This method performs the extraction from the set first parameter to the specified length as its second parameter.
Syntax
string.substr(start, length)
In the above syntax:
“start” refers to the position from where to start the extraction.
“length” corresponds to the number of characters that need to be extracted.
What is substring() Method?
The “substring()” method fetches the string characters between two specified indexes and outputs a new string in return.
This particular method extracts the characters between the start and end(excluding) set parameters that refer to the indexes.
Syntax
string.substring(start, end)
In this syntax:
“start” refers to the position from where to start the extraction.
“end” indicates the position where the extraction needs to end, excluding it.
Core Differences Between the substr() and substring()
Here is the table comprising the core differences between the substr() and substring():
| substr() |
substring() |
| It is utilized to extract a part of the string. |
It is utilized to extract the specified substring within a string. |
| Its parameters refer to the starting index and the length till which the characters need to be extracted, respectively. |
Its parameters point to the substring’s start and end positions which need to be extracted, excluding the end index. |
| It handles the negative indexes |
It cannot handle negative indexes. |
Let’s analyze the difference between both methods with the help of examples:
Example 1: Checking substr() and substring() on Positive Indexes
In this example, the difference between both methods will be analyzed based on the specified positive indexes as parameters:
<script type="text/javascript">
let get = "JavaScript";
console.log("The substr value becomes:", get.substr(1,2));
console.log("The substring value becomes:", get.substring(1,2));</script>
In the above code snippet:
Initialize a string value, as stated.
After that, associate the “substr()” method with the declared value in the previous step having the stated parameters.
The added parameters indicate that from the index “1” onwards, two values will be extracted.
Likewise, associate the “substring()” method with the initialized string value having the same parameters.
This particular method will extract the string characters between the stated parameters.
It is such that the value at index “1” will be fetched, thereby ignoring the specified last index “2”.
Output
![]() In the above output, the difference in the output of both methods can be observed according to the explanation.
In the above output, the difference in the output of both methods can be observed according to the explanation.
Example 2: Checking substr() and substring() on Negative Indexes
In this particular example, the difference in both methods will be observed on the negative indexes:
<script type="text/javascript">
let get = "JavaScript";
console.log("The substr value becomes:",get.substr(-3,3));
console.log("The substring value becomes:",get.substring(-3, 3));
console.log("The substring value becomes:",get.substring(0, 3));</script>
Apply the following steps, as given in the above lines of code:
Similarly, initialize the stated string value.
In the next step, likewise, apply the “substr()” method having a negative index of “-3” as its first parameter and “3” as its second parameter.
The first parameter, “-3”, points to the string character at the third index from the last, i.e., “i”.
The second parameter will result in extracting three characters from “i” onwards.
Now, similarly, associate the “substring()” method with the declared string value.
This particular method will treat the negative index “-3” as the first index.
The last two lines of code referring to “-3” and “0” as start indexes, respectively, will give the same outcome.
Output
![]() The last two outcomes signify that the “substring()” method does not facilitate the negative indexes, and hence, the difference in both methods is clear.
The last two outcomes signify that the “substring()” method does not facilitate the negative indexes, and hence, the difference in both methods is clear.
Conclusion
The “substr()” method extracts the string characters from the set index till the specified length, and the “substring()” method fetches the characters between the set indexes.
The former method has the edge over the latter method as it handles the characters from the end as well.
This article stated the differences between the substr() and substring() methods with the help of examples.
Difference Between JavaScript and ECMAScript
JavaScript and ECMAScript(European Computer Manufacturers Association Script) are both interrelated programming languages.
Both of these languages are supported by the latest web browsers, and hence, these languages can be integrated to make a responsive web page or site.
This write-up will clear out the differences between JavaScript and ECMAScript.
JavaScript
JavaScript is a scripting language that came into effect in Netscape 2.0 in 1995 with the name “LiveScript”.
This language has been embedded in various web browsers.
JavaScript is utilized on both the client and server-side platforms.
Moreover, it runs on browsers only, and every browser contains a JavaScript interpreter, thereby supporting it.
JavaScript is an implementation of the ECMAScript’s standard.
ECMAScript
It is a programming language that can be utilized for client-side scripting over the “WWW(world wide web)”.
ECMAScript language includes structured and prototype-based features.
It provides a standard for scripting languages like “JavaScript”.
It is a language specification, and JavaScript is a language that is based on ECMAScript.
Core Differences Between JavaScript and ECMAScript
Here is the table stating the differences between the stated programming languages:
| JavaScript | ECMAScript |
| It is a client-side-based scripting language. | It is considered a standard for scripting languages, such as JavaScript. |
| It is based on a prototype. | It is utilized for scripting on WWW(world wide web). |
| It is less secure. | It is comparatively more secure. |
| It is usually utilized for the front-end. | ES is the subset of JavaScript, and so it is also used for front-end. |
| It is ES standard’s implementation. | It is a specification. |
We have stated the differences between JavaScript and ECMAScript programming languages.
Conclusion
“JavaScript” and “ECMAScript” are both programming languages.
ECMAScript is the scripting language’s standard, and JavaScript is the implementation of this standard(ECMA).
These languages are such that one(JavaScript) is based on another(ECMAScript).
This blog explained the differences between JavaScript and ECMAScript in detail.
TypeError: includes is not a function
In JavaScript, there can be a need to search for a specific value from the data.
For instance, looking for a particular record to utilize.
In such a situation, there can be an error encountered when you search for values other than string or array.
So, this article will state the approaches to resolve the encountered TypeError: includes is not a function.
What is the includes() Method?
The “includes()” method outputs true in return if the particular value is included in the string.
Syntax
string.includes(value)
In the above-given syntax, the includes() method will look for the specified “value” in the “string”.
How Does the TypeError: includes is not a function Occur?
The “includes is not a function” type error occurs when the includes() method is accessed on a value that is neither of the type “string” nor “array”.
To resolve the error/query, transform the value into a string or array before accessing the method.
Example:
In this example, the particular encountered error will be displayed for demonstration:
<script type="text/javascript">
let get = 12if (get.includes(1)){
console.log("true")}else{
console.log("false")}</script>
In the above code snippet:
Initialize an integer value.
In the next step, apply the “includes()” method to check for the contained integer in the initialized value previously.
The corresponding message in the “if/else” condition will be displayed upon the satisfied and unsatisfied condition, respectively.
Output
![]() As the includes() method does not handle values other than string or array.
Hence, the stated error is displayed upon the included integer value.
As the includes() method does not handle values other than string or array.
Hence, the stated error is displayed upon the included integer value.
How to Handle the Error Exception?
To handle the stated error’s exception, apply the following approaches in combination with the “includes()” method:
“typeof” operator.
“isArray()” method.
The “typeof” operator gets the variable’s data type, and the “isArray()” method analyzes whether the specified object is an array or not.
The former approach can be applied to check for the string data type, and the latter approach is for the contained value in an array.
Syntax
Array.isArray(ob)
In the above syntax:
“ob” points to the object that needs to be tested.
Example 1: Checking if the Value is String
In this example, the error’s exception will be handled by applying a check for the string datatype upon the initialized value:
<script type="text/javascript">
let get = 12;
let compute = typeof get === 'string' ? get.includes(1) : false;
console.log(compute);</script>
In the above lines of code:
Specify the string value.
In the next step, apply the “typeof” operator to check if the data type of the specified value in the previous step is “string”.
This will be accomplished with the help of the “ternary” operator.
Upon the condition is true, the first expression will be executed after “?”.
Elsewise, the expression after the “:” will come into effect.
This will result in displaying the boolean value “false” after “:” as the stated condition is not satisfied.
Output
![]() In this output, it is clear that the latter expression is executed upon the unsatisfied condition.
In this output, it is clear that the latter expression is executed upon the unsatisfied condition.
Example 2: Checking if the Value is Contained in an Array
In this particular example, the error’s exception will be handled by checking for the value contained in an array:
<script type="text/javascript">
let get = [1, 2]
let compute = Array.isArray(get) ? get.includes(1) : false;
console.log(compute);</script>
In the above lines of code:
Declare an array of the stated integer values.
After that, associate the “isArray()” method with the declared array to check for the condition via the “ternary” operator.
In this case, the condition will be truthy, and so, the first expression after the “?” will come into effect.
This particular expression will return “true” as the specified integer value is included in the array.
Output
![]() The above output indicates that the applied condition is true, and the stated value is contained in an array.
The above output indicates that the applied condition is true, and the stated value is contained in an array.
How to Resolve the TypeError: includes is not a function Using JavaScript?
To resolve the stated type error, apply the following approaches combined with the “includes()” method:
“toString()” method.
“Array.from()” method.
Approach 1: Resolve the Type Error Using toString() Method
The “toString()” method gives a number in the form of a string.
This method can be implemented to resolve the stated error by converting the integer value into a string and returning true against the method.
Syntax
number.toString(radix)
In the above syntax:
“radix” is the “base” to use.
Example
The following example illustrates the stated concept:
<script type="text/javascript">
let get = 12if (get.toString().includes('1')){
console.log("true")}else{
console.log("false")}</script>
Apply the below-given steps, as stated in the above code:
Initialize the stated integer value.
After that, associate the “toString()” method with the initialized value to convert it into a string.
Now, apply the “includes()” method to the converted string value in the previous step.
This will resultantly execute the “if” condition as the applied conditions in the previous steps are satisfied.
Output
![]()
Approach 2: Resolve the Type Error Using Array.from() Method
The “Array.from()” method gives an array from an object having the array’s length as its parameter.
This method can be utilized to place the integer values in an array and apply a check on them.
Syntax
Array.from(object, map, value)
In this syntax:
“object” is the object that needs to be transformed into an array.
“map” indicates the map function that needs to be mapped on each element.
“value” signifies the value that needs to be utilized as “this” for the map function.
Example
Let’s go through the below-stated example:
<script type="text/javascript">
let get = [1, 2];
let compute = Array.from(get).includes(1);
console.log(compute);</script>
In the above code block:
Add the stated values in an array named “get”.
Now, apply the combined “Array.from()” and “includes()” methods to check for the included integer in the array.
As a result, the boolean value “true” will be displayed as the condition is satisfied for the “includes()” method.
Output
![]() This particular output signifies that the required functionality is achieved.
This particular output signifies that the required functionality is achieved.
Conclusion
The “includes()” method combined with the “toString()” or the “Array.from()” methods can be utilized to solve the TypeError: includes is not a function using JavaScript.
The stated error occurs on values other than string or array.
So, this write-up converted those values into string and array, and so the stated error was resolved.
This blog explained the procedure of resolving the TypeError: includes is not a function using JavaScript.
How to Update URL Using JavaScript
In the update process of a web page or site, there can be a requirement to redirect the user to a different web page.
For instance, replacing the outdated URL with an updated one or invoking a different page/site with respect to the updated content accordingly.
In such situations, redirecting to another web page assists in simplifying the redirecting processes on the user and the developer’s end.
This blog will illustrate the approaches to update the URL using JavaScript.
How to Update URL Using JavaScript?
To update the URL using JavaScript, apply the following approaches in combination with the “href” attribute:
“location.replace()” method.
“setTimeout()” and “location.assign()” methods.
Approach 1: Update URL Using location.replace() Method
The “href” attribute specifies the URL of the current page, and the “location.replace()” method replaces the current URL with a new one.
These approaches can be applied to remove the current specified URL by replacing it with a new one which will come into effect.
Example
Let’s overview the following example:
<script type="text/javascript">
window.location.href = ("http://www.youtube.com")
window.location.replace("http://www.google.com")</script>
In the above code snippet:
Firstly, specify the stated URL via the “href” attribute.
After that, apply the “replace()” method to replace the URL added in the previous step with a new one.
This will result in removing the former URL from the history and redirecting it to the updated URL.
This functionality is performed such that there is no going back to the URL specified via the “href” attribute.
Output
![]() In this output, it can be seen that the latter URL is fetched, thereby removing the former one.
In this output, it can be seen that the latter URL is fetched, thereby removing the former one.
Approach 2: Update URL Using setTimeout() and location.assign() Methods
The “setTimeout()” method invokes a function after the set time, and the “location.assign()” method loads a new document.
These methods can be implemented to redirect to the assigned updated URL allocated to the specified URL after the set time.
Syntax
setTimeout(func, millisec, p1, p2)
In the above-given syntax:
“func” corresponds to the function that needs to be accessed.
“millisec” refers to the time interval in milliseconds to execute.
“p1” and “p2” point to the additional parameters.
Example
Let’s go through the below given example:
<script type="text/javascript">
let get = setTimeout(function (){
window.location.href = ("http://www.youtube.com")
location.assign("http://www.google.com");}, 5000)</script>
Apply the following steps, as given in the above code:
In the first step, apply the “setTimeout()” method to the stated function such that the function executes after 5000 milliseconds = “5” seconds.
In the function definition, specify the stated URL using the “href” attribute.
In the next step, apply the “location.assign()” method to update the URL and redirect to the page corresponding to the newly assigned URL.
This will resultantly invoke the latter URL in the code after 5 seconds.
Output
![]() As seen, the function is invoked after the set time, and the assigned URL is invoked.
As seen, the function is invoked after the set time, and the assigned URL is invoked.
Conclusion
The “href” attribute in combination with the “location.replace()” method or the “setTimeout()” and “location.assign()” methods can be used to update the URL using JavaScript.
The former approach can be utilized to remove the set URL and replace it with a new one.
The latter approach can be applied to assign a new URL such that the assigned URL comes into effect after the set time.
This blog explained how to update the URL using JavaScript.
How to Push an Object to an Array
In JavaScript, the array is a data structure for storing multiple data, like strings, objects, and so on.
In some situations, programmers need to add data at run time in an array.
For this purpose, JavaScript offers multiple predefined methods that help push data in the array at any position, the start of the array, the end of the array, or at any specified index.
This post will demonstrate the methods to push/append an object to an array.
How to Push/Add an Object to an Array?
Utilize the given JavaScript predefined methods to push an object to an array:
push() method
splice() method
unshift() method
Method 1: Push an Object to an Array Using push() Method
To push an object to an array, use the “push()” method.
It is used to add new elements at the end/last of an array.
Syntax
Use the following syntax to push the object into an array:
array.push(object)
For multiple objects, use the given syntax:
array.push(object1, object2, ......
objectN)
Example 1: Push Multiple Objects to an Empty Array
In the given example, first, create an empty array:
const arr = [];
Now, create three objects “obj1”, “obj2”, and “obj3”:
const obj1 = {name: 'Stephen', id: 15};const obj2 = {name: 'Robert' ,id: 5};const obj3 = {name: 'Susan' ,id: 11};
Call the push() method and pass these three objects as an argument to push them in an array:
arr.push(obj1, obj2, obj3);
Lastly, print the array on the console:
console.log(arr);
The output shows that the objects are successfully added to an array:
![]()
Example 2: Push a Single Object to an Array
Here, we will see how to push a single object into an array.
First, we will create an array of objects:
const arr = [{name: 'Robert' ,id: 5},{name: 'Susan' ,id: 11}];
Create an object that will be added to an array:
const obj1 = {name: 'Stephen', id: 15};
Call the push() method and pass the object to push it in an array:
arr.push(obj1);
Finally, print the array using the “console.log()” method:
console.log(arr);
It can be observed that the pushed object is appended at the end of an array:
![]()
Method 2: Push an Object to an Array Using splice() Method
Use the “splice()” method to push an object to an array.
The JavaScript splice() method is used to simultaneously add and remove elements from an array or add an object at any index in an array.
Syntax
Follow the given syntax to use the splice() method:
Array.splice(index, removeCount, object)
Here:
“index” is the position where the element or an object will be added.
“removeCount” is the number of elements that will be eliminated from an array from the starting index.
“object” is the object that will be appended to an array.
Example
Call the “splice()” method and pass the index “1”, removeCount “0”, and “obj1” for appending object obj1 at the 1st index of an array by removing zero elements/objects:
arr.splice(1, 0, obj1);
Here, you can see that the obj1 is added at the 1st index by removing any object from an array:
![]()
Method 3: Push an Object to an Array Using unshift() Method
Another method to push an object to an array is the “unshift()” method.
This JavaScript method will append or push an object or the list of objects at the start of an array.
Syntax
The given syntax is used to add an object at the start of an array:
array.unshift(object)
Example
Call the “unshift()” method and pass the object as a parameter:
arr.unshift(obj1);
The output indicates that the appended object is placed at the beginning of the array:
![]() We have gathered all the best solutions to push an object to an array.
We have gathered all the best solutions to push an object to an array.
Conclusion
To push an object to an array, use the “push()” method, “splice()” method, or the “unshift()” method.
The push() method adds the object at the end of the array, unshift() is used to add the object at the start of an array, and for adding an object at any place in an array, use the splice() method.
In this post, we demonstrated the methods to push/add an object to an array.
Is There Any Method to Get Keys of an Object
Object is an entity with various properties that indicate an object’s traits., the “Object” class can store various key-value pair collections and complicated entities.
The Object class has several built-in methods that can be used to perform a variety of activities.
This study will discuss if there is any JavaScript method for getting an object’s keys.
Is There Any Method to Get the Keys of an Object?
Yes! There is a method for getting the keys of an object called the “Object.keys()” method.
It accepts an object from the user as an argument and returns an array of strings that contains the names of all the object’s enumerable attributes.
Syntax
Use the following syntax for getting the object’s keys:
Object.keys(object);
The “object” in the above syntax is a user-specified object with enumerable properties that will be returned by this method.
Example 1: Get the Keys of an Object Using the Object.keys() Method
First, create an object named “info” with key-value pairs:
var info = {
name: 'John',
age: 28,
email: 'john@gmail.com'};
Call the “Object.keys()” method and pass the object “info” as a parameter for returning the keys:
const result = Object.keys(info);
Finally, print the keys of the object on the console:
console.log(result);
The output shows that the keys of an object “info” are successfully retrieved:
![]() Example 2: Get the Keys of an Object With Random Key Ordering Using an Object.keys() Method
The “Object.keys()” method also sorts the keys in ascending order.
Here, the object contains properties with random key ordering:
const object = {
15: 'JavaScript',
8: 'HTML',
23: 'CSS' };
Call the Object.keys() method by passing the object as an argument:
const result = Object.keys(object);
As you can see in the output, keys are retrieved in ascending order:
Example 2: Get the Keys of an Object With Random Key Ordering Using an Object.keys() Method
The “Object.keys()” method also sorts the keys in ascending order.
Here, the object contains properties with random key ordering:
const object = {
15: 'JavaScript',
8: 'HTML',
23: 'CSS' };
Call the Object.keys() method by passing the object as an argument:
const result = Object.keys(object);
As you can see in the output, keys are retrieved in ascending order:
![]() In order to obtain an object’s keys, we have gathered all the necessary data.
In order to obtain an object’s keys, we have gathered all the necessary data.
Conclusion
Yes! The “Object.keys()” method can be used to retrieve an object’s keys.
It takes a user-defined object as an argument and outputs an array that stores the keys of the object.
In this article, we answered the question if there is any method for getting the keys of an object or not.
How to Display Image With JavaScript
JavaScript is a dynamic scripting language used for dynamic effects on websites.
Moreover, the web pages contain images using the HTML <img> tag.
Sometimes the page takes a long time to load, so developers prefer to add images using JavaScript image tags that load dynamically and take less time to load or display on any click.
This article will describe the process for displaying images using JavaScript.
How to Display an Image With JavaScript?
For displaying images with JavaScript, use the “createElement()” method to create an HTML element node.
To achieve this, it takes “img” as a parameter.
Syntax
For creating an element node, use the given syntax:
document.createElement(type)
Example 1: Display Image With JavaScript
In this example, there is no need to add an HTML code because we will add an image using JavaScript.
For this purpose, write out the following code in the JavaScript file:
function displayImage(src, width, height) {
var img = document.createElement("img");
img.src = src;
img.width = width;
img.height = height;
document.body.appendChild(img);}
In the above code snippet:
Define a function “displayImage()” with image source “src”, “width”, and “height” as a parameter.
Add an image tag or element utilizing the “createElement()” method.
Set the image properties like source, width, and height of an image.
Then, add the image to the HTML body using the “document.body.appendChild()” method.
Now, call the function “displayImage()” and pass the height, width, and source of an image as an argument:
displayImage('2.jpg', 320, 250);
Output
![]() In the next example, check out how to show an image on a button click.
Example 2: Display Image on Button Click With CSS Class
This example is all about how a CSS class can be used to display an image and how the image will appear when the button is clicked.
First, we will create a button in an HTML file that calls the “displayImage()” function when the button is clicked:
<button onclick="displayImage('2.jpg');">Click</button>
Let’s create a CSS class “imageFeatures” to set the image attributes such as “length”, and “width” of an image:
.imageFeatures{
width: 320;
height: 250;}
Define a function “displayImage()” with a single parameter src.
Then, add an image element using the createElement() method, and set the source of an image.
Now, add the class “imageFeatures” for setting the image attributes using the “classList.add()” method.
Finally, append the image tag in a document using the “document.body.appendChild()” method:
function displayImage(src) {
var img = document.createElement("img");
img.src = src;
img.classList.add("imageFeatures");
document.body.appendChild(img);}
As you can see, the image is displayed on the button click without any delay:
In the next example, check out how to show an image on a button click.
Example 2: Display Image on Button Click With CSS Class
This example is all about how a CSS class can be used to display an image and how the image will appear when the button is clicked.
First, we will create a button in an HTML file that calls the “displayImage()” function when the button is clicked:
<button onclick="displayImage('2.jpg');">Click</button>
Let’s create a CSS class “imageFeatures” to set the image attributes such as “length”, and “width” of an image:
.imageFeatures{
width: 320;
height: 250;}
Define a function “displayImage()” with a single parameter src.
Then, add an image element using the createElement() method, and set the source of an image.
Now, add the class “imageFeatures” for setting the image attributes using the “classList.add()” method.
Finally, append the image tag in a document using the “document.body.appendChild()” method:
function displayImage(src) {
var img = document.createElement("img");
img.src = src;
img.classList.add("imageFeatures");
document.body.appendChild(img);}
As you can see, the image is displayed on the button click without any delay:
![]() We have displayed the image with the help of JavaScript.
We have displayed the image with the help of JavaScript.
Conclusion
To display an image with JavaScript, use the “createElement()” method for creating an image tag.
More specifically, the createElement() method is used to create an element node.
In this article, we described the process for displaying images using JavaScript.
Count Elements in an Array That Match a Condition Using JavaScript
An array is a common data structure to store data.
Sometimes, developers want to count the elements in an array on a specific condition, such as how many positive numbers or negative numbers exist in the array, the even/odd numbers from the number array, and so on.
This post will describe the methods for counting elements in an array that matches the particular condition.
How to Count Elements in an Array that Match/Satisfy the Condition Using JavaScript?
To count elements in an array that matches the specific condition, use the following methods:
filter() method with a length property
reduce() method
Method 1: Count Elements in an Array that Match a Condition Using filter() Method With length Property
To count elements in an array based on condition, use the “length” property with the “filter()” method.
The filter() method iterates the array’s elements and checks the specified condition, and then the length property gets the count of the number of existing elements that match the condition.
The filter() method gives an array of true values returned by the callback function of the original array.
Syntax
Use the given syntax for the filter() method with length property for counting the elements in an array:
filter((element, index) => { // Statements }).length
The “filter()” method takes two parameters “element” and “index” and calls a call back function:
“element” is the current element of the array that is being processed.
“index” is the position of the current element.
The callback function executes every array’s element, and it returns value to the filter() method.
Example
First, create an array of numbers:
var array = [-8, -4, -2, 0, 2, 4, 6, 8, 10];
Call the filter() method and count the elements greater than 0 by checking the condition:
const count = array.filter(arr => {if (arr > 0) {return true;}return false;}).length;
Print the resultant count on the console:
console.log(count);
The output displays “5”, which means there are 5 elements in an array greater than 0:
![]()
Method 2: Count Elements in an Array that Match a Condition Using reduce() Method
For counting elements in an array based on condition, there is another method called the “reduce()” method.
The reduce() method first calls a callback function on each array’s element and gives a single value as an output.
Syntax
The syntax of reduce() method is as follows:
reduce((accumulator, currentValue, currentIndex, array) => { // statement }
The “reduce()” method takes four parameters and invokes a call back function:
“accumulator” is the resultant value of the previous call of the callback function.
“currentValue” is the current element that is being processed.
“currentIndex” is the position of the current element.
“array” is the specified array.
Here, in the given example, we will say “elements” as an accumulator and “arr” as an array where the reduce() method is called upon.
Example
Call the reduce() method on the array and count the elements by checking the array elements greater than 0.
If the condition is true, the callback function adds 1 in the existing element and returns to the “reduce()” method:
const count = array.reduce((elements, arr) => {if (arr > 0) {return elements + 1;}return elements;}, 0);
Finally, print the count on the console:
console.log(count);
Output
![]() We have gathered essential instructions relevant to counting the array elements based on the specific condition.
We have gathered essential instructions relevant to counting the array elements based on the specific condition.
Conclusion
To count array elements, use the “length” property with the “filter()” method and “reduce()” method.
Both reduce() and filter() methods use a callback function that will execute for every array’s element and return values to the method.
In this post, we described the methods for counting elements in an array that matches the particular condition.
Compare Dates Without Time
While programming, there can be a requirement to sort the countries based on an identical date regardless of the elapsed time.
For instance, maintaining a record of the countries having a minimal difference in their time zones.
In such situations, comparing dates without time assists in analyzing the countries based on date only.
This write-up will discuss the approaches to comparing dates irrespective of time using JavaScript.
How to Compare Dates Without Time Using JavaScript?
To compare dates without time, apply the following approaches in combination with the “Date()” constructor:
“toDateString()” method.
“setUTCHours()” and “getTime()” methods.
The stated approaches will now be discussed one by one!
Approach 1: Compare Dates Without Time Using toDateString() Method
The “Date()” constructor, along with the “new” keyword, is used to create a new date object.
The “toDateString()” method accesses the date from a date object as a string, excluding the time.
These approaches can be utilized to extract the date from the user-defined date(including time) and compare them(dates).
Example
Overview of the following example:
<script type="text/javascript">
let getDate1 = new Date('2010-07-15 23:15:10');
let getDate2 = new Date('2010-07-15 22:10:05');if(getDate1.toDateString() === getDate2.toDateString()){
console.log("The Dates are same!")}else{
console.log("The Dates are not same!")}</script>
In the above lines of code:
Create two new date objects with the help of the “new” keyword and the “Date()” constructor, respectively.
Specify the stated dates in the constructor’s parameter having a contrast of the time in them.
In the next step, associate the “toDateString()” method with each of the created date objects to extract the dates and compare them via the “strict equality(===)” operator.
Upon the true condition, the “if” condition will execute.
In the other scenario, the “else” statement will display the relevant output.
Output
![]() In the above output, it can be seen that the condition is satisfied regardless of the different times.
In the above output, it can be seen that the condition is satisfied regardless of the different times.
Approach 2: Compare Dates Without Time Using setUTCHours() and getTime() Methods
The “setUTCHours()” method sets the date object’s hour with respect to UTC.
The “getTime()” method calculates the number of milliseconds elapsed since January 1, 1970 and returns it.
These methods can be applied to compare the dates by converting the set time to the universal time.
This will resultantly perform the comparison irrespective of the time.
Syntax
Date.setUTCHours(hour, min, sec, millisec)
In the above syntax:
The parameters correspond to the integers representing the “hour”, “minutes”, “seconds”, and “milliseconds”, respectively.
Example
Let’s go through the below-stated example:
<script type="text/javascript">
let getDate1 = new Date('2022-01-23T08:35:20');
let getDate2 = new Date('2022-01-23T10:30:45');
let withoutTime1 = new Date(getDate1.getTime());
let withoutTime2 = new Date(getDate2.getTime());
withoutTime1.setUTCHours(0, 0, 0, 0);
withoutTime2.setUTCHours(0, 0, 0, 0);if(withoutTime1.getTime() == withoutTime2.getTime()) {
console.log('The Dates are same!');}else if (withoutTime1.getTime() > withoutTime2.getTime()) {
console.log('date1 comes after date2');}else if (withoutTime1.getTime() < withoutTime2.getTime()) {
console.log('date1 comes before date2');}else {
console.log('The Dates are not same');}</script>
In the above code snippet:
Recall the discussed approach for creating date objects and specify the date and time.
In the next step, create two new date objects to fetch the time from the associated date objects using the “getTime()” method.
After that, apply the “setUTCHours()” method to set the fetched time of both dates to universal time.
As a result, the comparison of dates will be performed irrespective of the set time.
Now, in the “if/else” condition, fetch the set universal time of both the dates and associate them with the set dates before.
This will compare the dates based on the stated conditions and display the corresponding message accordingly.
Output
![]() In the above output, as evident, the former date equals the latter date regardless of the set time.
In the above output, as evident, the former date equals the latter date regardless of the set time.
Conclusion
The “Date()” constructor combined with the “toDateString()” method or the “setUTCHours()” and “getTime()” methods can be used to compare dates without time.
The former method can be applied to extract the dates from the created date objects(including time) and compare them.
The latter methods can be utilized to allocate universal time to the fetched time such that the dates are compared regardless of time.
This blog guided you to compare dates irrespective of time using JavaScript.
Check if Specific Class Exists on the Page Using JavaScript
During website development, sometimes programmers worry about why the desired outcome is not shown on the page, so they have to check whether the specific class is added to the particular page or element or not.
To do so, JavaScript provides some methods for class verification of an element or a page, such as contains() method and the length property with the getElementsByClassName() method.
This blog will define the methods to determine whether the specific class exists on the page using JavaScript.
How to Check if Specific Class Exists on the Page Using JavaScript?
To verify if the particular class exists, use the following JavaScript methods:
document.getElementsByClassName() with length property.
contains() method
Method 1: Check if a Specific/Particular Class Exists on the Page Using document.getElementsByClassName() With length Property
Use the “getElementsByClassName()” method with the “length” property to determine whether the particular class exists on the page or not.
The getElementsByClassName() method is used for selecting the elements with the class name, and then it is checked to see if the collection’s length attribute is larger than 0.
If it outputs “yes”, the class is present on the page.
Syntax
Follow the given syntax for using the getElementsByClassName() method with the length property:
document.getElementsByClassName('className').length
Pass the class name as a parameter that needs to be verified.
Example
In an HTML file, first design the page.
Here, we will add an image as a logo on the header by using a div element and <img> tag:
<div class="flex-item1"><imgsrc="https://linuxhint.com/wp-content/uploads/2019/11/Logo-final.png" /></div>
Then, set the title on the header:
<div class="flex-item2"><p class="sec">Check if Specific Class Exists on the Page Using JavaScript</p></div>
After that, create a button on the page that will call the “checkClassExists()” function which tells whether the specific class exists on the page or not:
<button onclick="checkClassExists()">Click here!</button>
Executing the above HTML code gives the following page on the browser:
![]() Now, in the JavaScript file or the <script> tag, use the following code:
function checkClassExists(){const classCheck = document.getElementsByClassName('flex-item1').length > 0;if (classCheck) {
alert(' class "flex-item1" exists on page');} else {
alert(' class "flex-item1" does not exist on page');}}
In the above code:
First, define a function “checkClassExists()” that will trigger the button click.
Create a variable that stores the result to check the class “flex-item1” by using the “getElementsByClassName()” method and then check to see if the collection’s “length” attribute is larger than 0.
Now, show an alert message for class existence and not existing on the page.
If the resultant value in the variable is greater than 0, it shows “class “flex-item1″ exists on page”.
Else, an alert message will show “class “flex-item1″ does not exist on page”.
Output
Now, in the JavaScript file or the <script> tag, use the following code:
function checkClassExists(){const classCheck = document.getElementsByClassName('flex-item1').length > 0;if (classCheck) {
alert(' class "flex-item1" exists on page');} else {
alert(' class "flex-item1" does not exist on page');}}
In the above code:
First, define a function “checkClassExists()” that will trigger the button click.
Create a variable that stores the result to check the class “flex-item1” by using the “getElementsByClassName()” method and then check to see if the collection’s “length” attribute is larger than 0.
Now, show an alert message for class existence and not existing on the page.
If the resultant value in the variable is greater than 0, it shows “class “flex-item1″ exists on page”.
Else, an alert message will show “class “flex-item1″ does not exist on page”.
Output
![]() To verify if the specified element contains the particular class, check the next section.
To verify if the specified element contains the particular class, check the next section.
Method 2: Check if the Specific Class Exists on the Page Using contains() Method
To determine whether a particular class exists on a web page, use the “contains()” method of the “classList” property.
Pass the class name in the contains() method, and it gives true if the class name exists in the specified element else, it returns false.
Syntax
Use the following syntax for the contains() method:
classList.contains('className')
Example
As we know, all the content of the web page is inside the <body> tag, so we will first fetch the body element using its assigned id:
<body id="pg"><div><button onclick="checkClassExists()">Click here!</button></div>
Define a function and fetch the body element by passing the assigned id “pg” in the “getElementById()” method, then calls the “contains()” method by passing the class “divStyle” to check whether this class exists in the entire <body> tag or not:
function checkClassExists(){const classCheck = document.getElementById('pg');if (classCheck.classList.contains('divStyle')) {
alert(' class "divStyle" exists on page');} else {
alert(' class "divStyle" does not exist on page');}}
The output shows that the “body” element/tag does not contain the “divStyle” class:
![]() We have compiled the essential information related to verifying a particular class on the page using JavaScript.
We have compiled the essential information related to verifying a particular class on the page using JavaScript.
Conclusion
To determine if the particular class exists on the page, utilize the “document.getElementsByClassName()” method with the “length” property or the “contains()” method.
The first method is the most commonly used for this purpose.
The contains() method is used for any specific element.
In this blog, we defined the methods to determine whether the specific class exists on the page using JavaScript.
Add Class to Clicked Element Using JavaScript
While creating a responsive web page or site, there can be a requirement to append various functionalities or effects upon user action or automatically.
For instance, highlighting a specific section or element upon click/hover.
In such situations, adding class to a clicked element using JavaScript is of great aid in engaging the users on a website and making it(site) stand out.
This write-up will discuss the approaches to add a class to a clicked element using JavaScript.
How to Add Class to Clicked Element Using JavaScript?
The “addEventListener()” method, in combination with the “classList” property and the “add()” method, can be applied to add a class to the clicked element using JavaScript.
The addEventListener() method associates an event with an element.
The classList property gives the CSS class names of an element.
Whereas the add() is a classList method used to add tokens to the list.
These approaches can be applied to attach an event and add a class to the element(s) based on that event.
Syntax
element.addEventListener(event, listen, use);
In the given syntax:
“event” refers to the specified event.
“listen” is the function that needs to be invoked.
“use” is the optional value.
Let’s elaborate on the concept with the help of the following examples!
Example 1: Add a Single Class to Clicked Element
In this example, a single class will be added to the clicked element(s):
<body><center><input type="text" class= "defaultclass1" placeholder="Type Text..."><br><br><textarea class= "defaultclass2" placeholder="Type Text..."></textarea><br><br><button>Click Me</button></body></center><script type="text/javascript">
document.addEventListener('click', function classClicked(event) {
event.target.classList.add('addedClass');});</script><style type="text/css">
.addedClass {
background-color: greenyellow;}</style>
In the above code snippet:
Firstly, include the “<input>” and “<text area>” elements, having the stated classes, respectively.
Also, include a button in the next step.
In the JS code block, apply the “addEventListener()” method to attach an event “click” to the function named “classClicked()”.
Also, pass the object “event” as a function’s parameter.
In the function definition, associate the “event” object with the “target” property.
These approaches access the DOM elements upon the event trigger.
Resultantly, the associated “classList” property and “add()” method will add the specified class to the element(s) upon click.
In the CSS code, style the class to be appended, i.e., addedClass.
Output
![]() As observed in the above output, upon clicking the elements, the particular class is added to the elements.
As observed in the above output, upon clicking the elements, the particular class is added to the elements.
Example 2: Add Multiple Classes to Clicked Element
In this particular example, multiple classes will be added to the clicked element(s):
<body><center><h3 class = "defaultclass1">Linuxhint Website</h3><h3 class = "defaultclass2">JavaScript</h3><h3 class = "defaultclass3">Blogs</h3></body></center><script type="text/javascript">
document.addEventListener('click', function classClicked(event) {
event.target.classList.add('addedclass1', 'addedclass2','addedclass3');});</script><style type="text/css">
.addedclass1{
background-color: lightblue;}
.addedclass2{
text-align: center;}
.addedclass3{
padding: 50px;}</style>
Apply the following steps, as given in the above code:
Include the stated “<h3>” elements having the specified classes.
In the JavaScript code block, likewise, attach an event “click” to the function classClicked() using the “addEventListener()” method.
Recall the discussed approaches to access elements on the DOM.
Now, apply the “classList” property and “add()” method having multiple classes as its parameters.
This will result in appending the stated multiple classes to the clicked element(s).
In the CSS code, specify the classes that need to be added to the element(s) and perform the stated styling.
Output
![]() In this particular output, multiple classes are appended to each of the “<h3>” elements upon the event trigger.
In this particular output, multiple classes are appended to each of the “<h3>” elements upon the event trigger.
Conclusion
The “addEventListener()” method, in combination with the “classList” property and the “add()” method, can be applied to add a class to the clicked element using JavaScript.
These approaches can be implemented to add single or multiple classes to element(s) based on the attached event.
This write-up demonstrated to add a class to the clicked element using JavaScript.
How to Initialize a Map With Values
In the record maintenance processes, there can be a requirement to maintain the data having values against a particular attribute.
For instance, to solve algorithm and data structure problems like graphs and minimal distance.
In such situations, initializing a map with values using JavaScript assists in logically maintaining the records and utilizing the current resources effectively.
This write-up will discuss the approaches to initializing a map with values.
How to Initialize a Map With Values Using JavaScript?
To initialize a map with values, apply the following approaches in combination with the “Map()” constructor:
“set()” method.
“Object.entries()” method.
“Array” approach.
Let’s discuss each of the stated approaches one by one!
Approach 1: Initialize a Map With Values Using set() Method
The “set()” is a map’s method that sets the key values in a map.
This method can be utilized to set the map values in a “key-value” pair with the help of the created map object.
Example
Let’s overview the following example:
<script type="text/javascript">
let initMap = new Map()
initMap.set('Name', 'Harry')
initMap.set('Age', '18')
initMap.set('City', 'Los Angeles')
console.log("The initialized map is:", initMap)</script>
In the above lines of code:
Create a new map object with the help of the “new” keyword and the “Map()” constructor, respectively.
In the next step, apply the map’s “set()” method to initialize the stated values in a “key-value” pair.
Lastly, display the initialized map values.
Output
![]() In the above output, it can be observed that the map values are set accordingly.
In the above output, it can be observed that the map values are set accordingly.
Approach 2: Initialize a Map With Values Using Object.entries() Method
The “Object.entries()” method gives an object array in the form of enumerable [key, value] pairs.
This method can be utilized to initialize a map from the created object.
Syntax
Object.entries(ob)
In the above syntax:
“ob” refers to the object whose values in the form of “key-value” pairs need to be returned.
Example
Let’s go through the below-stated demo:
<script type="text/javascript">
let object = {name: 'Lisa', Gender: 'Female'};
let initMap = new Map(Object.entries(object));
console.log("The initialized map is:", initMap);</script>
Perform the following steps, as given in the above code:
Create an “object” having the stated properties and their respective values.
In the next step, likewise, create a new map named “initMap”.
Also, apply the “Object.entries()” method to return the object values from the created object in the form of “key-value” pairs and add them to the map.
Finally, display the map created from the object on the console.
Output
![]() Here, it can be seen that the object values are transformed into the map successfully.
Here, it can be seen that the object values are transformed into the map successfully.
Approach 3: Initialize a Map With Values Using Array Approach
This approach can be implemented to create a map from the declared array.
Example
The below-given example explains the stated concept:
<script type="text/javascript">
let initMap = new Map([['Language', 'French'],['Country', 'Germany']]);
console.log("The initialized map is:", initMap);</script>
In the above code snippet:
Declare an array of the specified values.
This array will be contained in the created map object via the “Map()” constructor, as discussed.
Lastly, display the created map from an array.
Output
![]() The above output signifies that the array is converted into the map.
The above output signifies that the array is converted into the map.
Conclusion
The “set()” method, the “Object.entries()” method or the “Array” approach can be applied to initialize a map with values.
The set() method can be utilized to simply set the values via the created object, whereas the Object.entries() method and the array approach can be implemented to create a map from the object and array, respectively.
This tutorial explained how to initialize/create a map with values.
Get the Hours and Minutes From a Date
In JavaScript, there can be a requirement to fetch a specific attribute from the date.
For instance, displaying the time only with respect to the current or user-specified date.
Moreover, fetching the time in a 12-hour am/pm format is comparatively convenient in analyzing the time effectively.
In such cases, getting the hours and minutes from a date using JavaScript assists in extracting attributes from the date.
This blog will discuss the approaches to fetching hours and minutes from a date using JavaScript.
How to Get the Hours and Minutes From a Date Using JavaScript?
The hours and minutes can be fetched from a date using the “Date()” constructor in combination with the following approaches:
“getHours()” and “getMinutes()” methods.
“toLocaleString()” method.
Let’s illustrate each of the approaches one by one!
Approach 1: Get the Hours and Minutes From a Date Using getHours() and getMinutes() Methods
The “getHours()” method gives the hour from 0 to 23 of the current date, and the “getMinutes()” method gives the minutes from 0 to 59 in a date in return.
These methods can be utilized in combination to simply fetch the hours and minutes from the current or the user-specified date.
Syntax
Date.getHours()
In the above syntax:
The current hours with respect to the date will be retrieved.
Date.getMinutes()
In the given syntax:
The current minutes with respect to date will be fetched.
Example 1: Get the Hours and Minutes From the Current Date
In this example, the hours and minutes will be fetched from the current date with the help of the “Date()” constructor:
<script type="text/javascript">
let currDate = new Date();
let hoursMin = currDate.getHours() + ':' + currDate.getMinutes();
console.log("The hours and minutes from the current Date is:", hoursMin);</script>
Apply the following steps, as stated in the above code:
Create a new date object to fetch the current date and time with the help of the “new” keyword and the “Date()” constructor, respectively.
In the next step, associate the “getHours()” and the “getMinutes()” methods with the fetched date and display it.
This will resultantly extract the hours and minutes from the current date.
Output
![]() In the above output, it can be seen that the hours and minutes in the current date are identical to the fetched hours and minutes.
In the above output, it can be seen that the hours and minutes in the current date are identical to the fetched hours and minutes.
Example 2: Get the Hours and Minutes From the Specified Date
In this particular example, the hours and minutes will be extracted from the specified date:
<script type="text/javascript">
let currDate = new Date('January 16, 2023 09:45:00');
console.log("The current Date is:", currDate)
let hoursMin = currDate.getHours() + ':' + currDate.getMinutes();
console.log("The hours and minutes from the specified Date is:", hoursMin);</script>
Implement the below-stated steps, as given in the above code snippet:
Likewise, create a new date object via the constructor, specify the stated date and time and display it.
In the next step, similarly, apply the “getHours()” and “getMinutes()” methods to fetch the hours and minutes from the specified date.
Finally, display the hours and minutes corresponding to the specified date and time.
Output
![]() The hours and minutes on the specified date match with the fetched time, thereby satisfying the given requirement.
The hours and minutes on the specified date match with the fetched time, thereby satisfying the given requirement.
Approach 2: Get the Hours and Minutes From a Date Using toLocaleString() Method
The “toLocaleString()” method gives a number in the form of a string using the local language format.
This method utilizes the “Date” object to initialize the date to a particular time zone.
Moreover, you can implement this method to get the hours and minutes from the current date in the “am/pm” format.
Syntax
date.toLocaleString(locales, options)
In the given syntax:
“date” corresponds to the variable in which the date object is stored.
“locales” refer to the different time zones.
“options” indicate the object with formatting options.
Example
Let’s overview the following example:
<script type="text/javascript">
let currDate = new Date();
console.log("The current Date is:", currDate)
let hoursMin = currDate.toLocaleTimeString('en-US', {
hour: '2-digit',
minute: '2-digit',});
console.log("The hours and minutes from the current Date in am/pm format is:", hoursMin);</script>
In the above lines of code:
Recall the discussed approach to fetch the current date and time and display it.
After that, apply the “toLocaleTimeString()” method having the stated time zone and the allocated digits of hours and minutes, respectively.
As a result, the hours and minutes will be displayed in 2 digits each in “am/pm” format.
Lastly, display the hours and minutes corresponding to the current date.
Output
![]() The above output signifies that the hours and minutes are displayed in “12 hours” format.
The above output signifies that the hours and minutes are displayed in “12 hours” format.
Conclusion
The “Date()” constructor in combination with the “getHours()” and “getMinutes()” method or the “toLocaleString()” method can be utilized to get the hours and minutes from a date.
The former approach can be applied to simply extract the hours and minutes from the current or user-specified date.
The latter approach can be implemented to perform the desired requirement in the “am/pm” format.
This blog explained how to get the hours and minutes from a date using JavaScript.
TypeError: Date.getTime is not a Function
The date.getTime() method is utilized to give the milliseconds that have passed since the first of January 1970.
The date and time information is stored in the newly created Date object.
When this date object’s getTime() method is invoked, it gives the number that represents milliseconds since January 1970.
(Unix Epoch).
This blog will illustrate:
How does “TypeError: Date.getTime is not a function” occur?
How to fix the “TypeError: Date.getTime is not a function” error?
How Does the “TypeError: Date.getTime is not a Function” Error Occur?
JavaScript throws an error “TypeError: date.getTime is not a function” when the getTime() method calls on the non-Date object values.
Let’s practically check out the stated reason.
Example
In the following example, create a variable “date” that stores UNIX epoch timestamps using the “Date.now()” method.
Here, the Date.now() method gives the UNIX timestamp in an integer number:
var date= Date.now();
Print the UNIX epoch timestamp on the console:
console.log(date);
Now, call the “getTime()” method on the integer type UNIX timestamp and store it in the variable named “time”:
var time = date.getTime();
Print the time on the console using the “console.log()” method:
console.log(time);
As you can see in the output, the “date.getTime is not a function” error occurred because the getTime() method only calls on the values of the Date object:
![]()
How to Fix the “TypeError: Date.getTime is not a Function” Error?
To fix the error, first, convert the value to a Date object before invoking the getTime() method or ensure that the getTime() method is only called on valid/properly formatted date objects.
Example
Create a new Date object and pass the UNIX timestamp by getting Date.now() method as an argument.
It will convert the integer type UNIX date into a Date object:
var gt = new Date(date);
Invoke the “getTime()” method and store the output time in variable “time”:
var time = gt.getTime();
Print the resultant time on the console:
console.log("Current Time: " + time);
It can be observed that the stated error has been resolved successfully:
![]() We have compiled the essential details relevant to the specified error and its solution.
We have compiled the essential details relevant to the specified error and its solution.
Conclusion
When the getTime() method is invoked on the non-Date object values, an error occurs “TypeError: date.getTime is not a function”.
To fix the error, first, convert the date value into a Date Object utilizing the Date() constructor and then utilize it.
In this blog, we illustrated how the TypeError: Date.getTime is not a function that occurs and its relevant solution.
Sort the Keys of an Object
Some developers prefer to set the object properties(key-value) names in alphabetical order.
It helps to discover or compare necessary properties more quickly.
More specifically, JavaScript provides some ways to get the object keys and then sort them in the desired order.
This blog post will describe the procedure for sorting the JavaScript object keys.
How to Sort the Keys of an Object?
To sort the object keys, use the “sort() method with the “Object.keys()” method.
In this combination, the Object.keys() method gives the array of keys of the object in the same sequence as it is initialized, whereas the “sort()” method will sort all the keys in ascending order(alphabetically).
Syntax
Follow the given syntax for sorting the object keys:
Object.keys(obj).sort()
Example 1: Sort the Keys of an Object Using sort() Method
Create an object with key-value pairs:
var object = {"JavaScript": 5,"Java": 23,"Python": 20,"HTML": 7,"CSS": 8}
Call the sort() method with the Object.keys() method by passing the object as an argument:
var sortedKeys = Object.keys(object).sort();
Finally, print the sorted keys on the console:
console.log(sortedKeys);
The output displays the alphabetically sorted object keys:
![]() Whereas the simple Object.keys() method returns the keys of the object:
var sortedKeys = Object.keys(object);
Output
Whereas the simple Object.keys() method returns the keys of the object:
var sortedKeys = Object.keys(object);
Output
![]() If you want to get the entries (key-value pairs) of an object in a sorted form, follow the given section.
If you want to get the entries (key-value pairs) of an object in a sorted form, follow the given section.
Example 2: Sort the Keys and Display the Corresponding Values of an Object Using reduce() Method
To sort the keys with values of an object, use the “reduce()” method with the “sort()” method.
The sort() method returns the sorted array of keys of the object, and the reduce() method is used to iterate through the sorted object keys array and assign each key-value pair to an object:
var sortedKeys = Object.keys(object).sort().reduce((objEntries, key) => {
objEntries[key] = object[key];return objEntries;}, {});
The output shows the sorted keys with their values of an object:
![]() We have gathered all the necessary information for sorting the object keys.
We have gathered all the necessary information for sorting the object keys.
Conclusion
To sort the object keys, use the “sort()” method with the “Object.keys()” method.
The Object.keys() method gives the array of keys of the object while the sort() method will sort all the keys in ascending order, and in terms of the alphabetic keys, it will sort in alphabetically.
This tutorial described the procedure for sorting the object keys.
Sort an Array of Objects by Date Property
Sometimes, developers store Date objects in an array of objects in random sequence, and they want to sort the dates in any specific order, such as ascending order or descending order.
To do this, JavaScript provides the sort() method for sorting the objects.
This tutorial will describe the procedure for sorting the array of objects by Date property.
How to Sort JavaScript Array of Objects by Date Property?
For sorting objects in an array by Date property, subtract the two dates by calling the “sort()” method on an array.
The array is modified when sorted in place using the sort() method and returned as the sorted array.
More specifically, when two values are compared, the sort() method passes the values to the compare function and orders the values based on the (negative, zero, positive) result it returns.
Syntax
Follow the given syntax for sorting the array of objects:
sort((a, b) => { a.date - b.date} )
Here, in the arrow function, subtract the first date object from the second date object.
It returns output in (+ve, -ve, or 0).
If the resultant value is -ve, “a” is ordered before “b”.
If the result is +ve, “b” is sorted ahead of “a”.
Example 1: Sort an Array of Objects in Ascending Order by Date Property Using sort() Method
In this example, we will sort an array of objects in ascending order.
First, create an array of objects named “array” that stores three objects containing Date objects with ids:
const array = [{id: 5, date: new Date(2008, 2, 23)},{id: 11, date: new Date(2010, 11, 20)},{id: 15, date: new Date(2000, 10, 08)},];
Call the “sort()” method to sort an array of objects by a date property using the arrow function:
const ascSort = array.sort((obj1, obj2) =>
obj1.date - obj2.date,);
Finally, print the sorted array on the console:
console.log(ascSort);
The output indicates that the Date objects are sorted in ascending order:
![]()
Example 2: Sort an Array of Objects in Descending Order by Date Property Using sort() Method
For sorting the array in descending order, we will subtract the second date object from the first date object:
const ascSort = array.sort((obj1, obj2) =>
obj2.date - obj1.date,);
Output
![]() We have gathered all the necessary information relevant to sort the array of objects by Date property.
We have gathered all the necessary information relevant to sort the array of objects by Date property.
Conclusion
For sorting an array of objects by Date property, use the “sort()” method by calling it on an array and subtracting the two date objects.
When two values are compared, the sort() method passes the values to the compare function and orders the values based on the (negative, zero, positive) result it returns.
In this tutorial, we described the procedure for sorting the array of objects by Date property.
Remove the Focus From an Element Using JavaScript
While updating a web page or site, there can be an update requirement to remove the focus from element(s) in the Document Object Model(DOM).
For instance, prioritizing the updated elements over the outdated ones on a web page.
In such scenarios, removing the focus from an element using JavaScript is of great aid in making amendments to a site.
This blog will explain the procedure to remove the focus from an element using JavaScript.
How to Remove the Focus From an Element?
To remove the focus from an element, apply the following approaches in combination with the “blur()” method:
“getElementById()” method.
“activeElement” property and “optional chaining(?.)” operator.
Approach 1: Remove the Focus From an Element Using getElementById() Method
The “blur()” method removes the focus from the associated element, and the “getElementById()” method returns an element having the specified “id”.
These methods can be applied in combination to fetch the focused element and remove the focus from it with the help of the user-defined function.
Syntax
document.getElementById(element)
In the given syntax:
“element” corresponds to the element that needs to be fetched against the particular “id”.
Example
Let’s overview the following example:
<center><body><input type="radio" id="head" autofocus> This is a webpage<br><br><button onclick="removeFocus()">Click Me</button></center></body><script type="text/javascript">
function removeFocus(){const input = document.getElementById('head');
input.blur();}</script>
In the above lines of code:
Include an “<input>” element having the stated attributes.
The “type” attribute signifies that the element is a “radio” button.
The “autofocus” is a boolean attribute that adds focus to the associated element.
In the next step, create a button having an “onclick” event which will redirect to the function removeFocus().
In the JS code, define a function named “removeFocus()”.
In the function definition, access the contained element by its “id” using the “getElementById()” method.
Lastly, apply the “blur()” method to the fetched element.
This will resultantly remove the focus from the <input> element upon the button click.
Output
![]() In the output, it can be seen that the focus from the radio button is omitted upon the button click.
In the output, it can be seen that the focus from the radio button is omitted upon the button click.
Approach 2: Remove the Focus From an Element Using activeElement Property and optional chaining(?.) Operator
The “activeElement” property gives the HTML element that has focus, and the “optional chaining(?.)” operator checks for a particular condition.
These approaches can be utilized in combination to apply a check upon the focused element(s) and blur them accordingly.
Example
Let’s go through the below-stated example:
<center><body><input type= "checkbox" >Python<br><br><input type= "checkbox" autofocus>JavaScript<br><br><button onclick="removeFocus()" >Click the button to remove focus</button><br><br></center></body><script type="text/javascript">
function removeFocus(){
document.activeElement?.blur();}</script>
In the above code snippet:
Include two “<input>” elements having the allocated attribute “type” as a “checkbox”.
The boolean attribute “autofocus” is allocated to the latter checkbox, as stated.
Next, create a button having an “onclick” event accessing the function named removeFocus().
In the JS code part, define a function named “removeFocus()”.
In its definition, apply the combined “activeElement” property and the “optional chaining(?.)” operator to check for all of the focused element(s) within the code.
The associated “blur()” method will blur the located focused element(s) upon the button click.
Output
![]() In the output, the focus from the stated checkbox is removed upon the click of the button.
In the output, the focus from the stated checkbox is removed upon the click of the button.
Conclusion
The “blur()” method combined with the “getElementById()” method or the “activeElement” property and “optional chaining(?.)” operator can be utilized to remove/omit the focus from an element.
The former approach can be applied to get the focused element and remove the focus from it upon the button click.
The latter approach can be utilized to check the focused element(s) and blur it.
This write-up explains how to remove/omit focus from an element.
Push Element in an Array if it Does not Exist Using JavaScript
Sometimes, arrays and other data structures store duplicate values.
So, to avoid duplication, programmers try to verify whether the specified element exists in the array or not and then insert an element in the array if the particular element does not exist.
For this purpose, JavaScript provides some pre-built methods, such as includes() and indexOf() methods.
This post will describe the methods to push the element if it does not exist in the array.
How to Push Element in an Array if it Does not Exist/Occur Using JavaScript?
If the element does not exist in an array, push them into an array using the following methods:
includes() method with push() method
indexOf() method with push() method
Let’s examine the working of these methods one by one!
Method 1: Push Element in an Array if it Does not Exist Using includes() Method With push() Method
Use the “includes()” method with the “push()” method to check if the specific element exists in the array or not.
If the element does not occur, push it into the array.
The includes() method gives a boolean value “true” when the element exists in the array else it gives “false”.
Syntax
Use the given syntax for the includes() method:
array.includes(element)
For the push() method, use the given syntax:
array.push(element)
In the above syntax, the “element” is an argument that needs to be checked in an array, whether it exists or not; if it doesn’t, then push it into an array.
Example
In the following example, first, create an array of programming languages:
const array = ["HTML", "CSS", "JavaScript", "Java"];
Create variable “element” to store a value “java”:
const element = "java";
Call the includes() method and pass the value as an argument.
If the “java” exists in the array, it returns “true” and stores it in a variable “elementExists”:
const elementExists = array.includes(element);
Now, in the conditional statement, check if the element “java” does not exist in the array, then push it by calling the “push()” method:
if (!elementExists) {
array.push(element);}
Finally, print the array on the console:
console.log(array);
As you know, JavaScript is a case-sensitive scripting language, so “Java” and “java” are not equal.
As a result, the “includes()” method gives “false()” and the “push()” method pushes it in an array:
![]() If the variable stores “Java”, the includes() method gives “true” because it already exists in the array and nothing will be pushed in the array:
const element = "Java";
Output
If the variable stores “Java”, the includes() method gives “true” because it already exists in the array and nothing will be pushed in the array:
const element = "Java";
Output
![]()
Method 2: Push Element in an Array if it Does not Exist Using indexOf() Method With push() Method
Another method to verify and push the element in an array is the “indexOf()” method with the “push()” method.
The indexOf() method gives “-1” as an output if the provided element does not occur in the array.
Syntax
Follow the given syntax for the indexOf() method:
array.indexOf(element)
Example
Here, we will check if the value of the “array.indexOf(element)” is equivalent to the “-1”; it will push the element in an array:
if (array.indexOf(element) === -1) {
array.push(element);}
As the “Java” element is already present in the array, the “indexOf()” method gives “1” which doesn’t satisfy the added condition, so, nothing will be added to the array:
![]() We have compiled all the essential instructions related to pushing the element if it does not exist in an array.
We have compiled all the essential instructions related to pushing the element if it does not exist in an array.
Conclusion
To verify if the provided element exists in an array or not, use the “includes()” and “indexOf()” methods, and if it is not present in the array, then push it into an array using the “push()” method.
The includes() method returns “true” if an element exists; else, it returns “false” while the indexOf() method gives “1” when the element is present else, its outputs “-1”.
In this post, we described the methods to push the element if it does not exist in the array.
Make includes() Case Insensitive
While creating a survey form, there can be a requirement to input the data from the user irrespective of the case to provide ease on the user’s end.
For instance, searching for data or part of it based on partial information.
This, resultantly, displays all the relevant data irrespective of the case.
In such situations, making includes() case insensitive provides an ease to both the developer and the end-user.
This tutorial will discuss the approaches to make includes() case insensitive using JavaScript.
How to Make includes() Case Insensitive?
To make includes() case insensitive, apply the following approaches in combination with the “includes()” method:
“toLowerCase()” method.
“toUpperCase()” method.
Let’s discuss each of the stated approaches one by one!
Approach 1: Make includes() Case Insensitive Using toLowerCase() Method
The “includes()” method returns true if the specified value is present in the string, and the “toLowerCase()” method converts the given string into lowercase letters.
These methods can be applied in combination to transform both the specified and user-defined string values into lower cases such that the outcome becomes case-insensitive.
Syntax
string.includes(value)
In the above-given syntax, the includes() method will search for the given “value” in the “string”.
Example 1: Make includes() Case Insensitive Upon Specified Values
In this example, the specified string values will be tested for the required condition:
<script type="text/javascript">
let get1 = 'JavaScript';
let get2 = 'ScRiPt';if (get1.toLowerCase().includes(get2.toLowerCase())) {
console.log("True")}</script>
Apply the below-stated steps, as given in the above code-snippet:
Specify the stated string values having both the uppercase and lowercase values.
In the next step, associate the “toLowerCase()” method with each of the specified string values.
Also, apply the “includes()” method such that the specified string values are transformed into the lower case, and the method returns true.
This will resultantly enable the case insensitivity and will print out “true” on the console.
Output
![]() In the above output, it is evident that the includes() have become case insensitive, thereby returning true.
In the above output, it is evident that the includes() have become case insensitive, thereby returning true.
Example 2: Make includes() Case Insensitive Upon User-Defined Values
In this particular example, the user-defined string values will be checked for the required condition:
<script type="text/javascript">
let get1 = prompt("Enter first string value:");
let get2 = prompt("Enter second string value:");if (get1.toLowerCase().includes(get2.toLowerCase())) {
console.log("True")}</script>
Implement the following steps, as provided in the above lines of code:
Input the string values from the user.
After that, recall the discussed approach for enabling case insensitivity with the help of the “toLowerCase()” and “includes()” methods as used in the previous example.
Lastly, display “True” upon the inclusion of the second string value within the first.
Output
![]() In the above output, the required condition is fulfilled irrespective of the case.
In the above output, the required condition is fulfilled irrespective of the case.
Approach 2: Make includes() Case Insensitive Using toUpperCase() Method
The “toUpperCase()” method converts a string to uppercase letters.
Combining the method with the “includes()” method can convert the specified or user-defined string values into uppercase, thereby enabling the case insensitivity for the “includes()” method.
Example 1: Make includes() Case Insensitive Upon Specified Values
In this example, the specified string values having both the upper and lower cases will be checked for the added condition:
<script type="text/javascript">
let get1 = 'Linuxhint';
let get2 = 'lInUx';if (get1.toUpperCase().includes(get2.toUpperCase())) {
console.log("True")}</script>
In the above code snippet:
Specify the stated string values.
In the next step, associate the “toUpperCase()” method with the string values in the previous step.
Also, apply the “includes()” method such that after the conversion to upper case, the requirement becomes true, thereby enabling case insensitivity.
Finally, display the corresponding output upon the satisfied condition.
Output
![]() As seen in the above output, the second string value is included in the first one after the conversion.
As seen in the above output, the second string value is included in the first one after the conversion.
Example 2: Make includes() Case Insensitive Upon User-Defined Values
In this demo, the user-defined values will be checked for the added condition:
<script type="text/javascript">
let get1 = prompt("Enter first string value:");
let get2 = prompt("Enter second string value:");if (get1.toUpperCase().includes(get2.toUpperCase())) {
console.log("True")}</script>
In the above lines of code:
Input the string values from the user.
After that, similarly, apply the “toUpperCase()” and “includes()” methods to perform the transformation such that the case insensitivity becomes enabled.
Lastly, display the corresponding output upon the satisfied condition.
Output
![]() The above output signifies that the desired requirement is achieved.
The above output signifies that the desired requirement is achieved.
Conclusion
The “includes()” method combined with the “toLowerCase()” method or the “toUpperCase()” method can be used to make the includes() case insensitive.
These approaches can be utilized to transform the specified or user-defined string values into lower and upper cases, respectively to enable case insensitivity for the “includes()” method.
This blog is guided to make includes() case insensitive.
Remove the First Element From an Array
Developers frequently want to utilize the basic program code for removing entries from an array.
Sometimes, there is a situation faced by programmers remove the first element from an array so that they can append the required element at the start.
To do this, JavaScript offers some prebuilt methods, such as the shift() method and slice() method.
This post will demonstrate the methods for removing the first element from an array using JavaScript.
How to Remove the First/1st Element From an Array?
For removing the 1st element from an array, use the given JavaScript methods:
shift() method
slice() method
Method 1: Remove the 1st Element From an Array Using shift() Method
To remove the 1st element of an array, use the JavaScript prebuilt “shift()” method.
It removes an array’s first element and returns it with shifted elements.
Syntax
Use the given syntax for removing the 1st element of an array:
array.shift()
Example
In the given example, we will create the following “array”:
var array = ['Java', 'JavaScript', 'HTML', 'CSS'];
Call the shift() method that will remove the first element of an array and store that element in a variable “removeFirstElement”:
var removeFirstElement = array.shift();
Print the resultant shifted array on the console:
console.log(array);
Also, print the element that has been removed from the array on the console:
console.log(removeFirstElement + " is removed from the Array");
The output indicates that the “Java” is successfully eliminated from the array:
![]()
Method 2: Remove the First Element From an Array Using slice() Method
Another method for removing the 1st element from an array is the “slice()” method.
It returns the array of elements between the first and the last provided indexes.
Syntax
Follow the given syntax for a slice() method
slice(firstIndex, lastIndex)
In the above-given syntax:
“firstIndex” is the index of the starting element where the array will split.
“lastIndex” is the last index of an array for splitting.
Example
Call the “slice()” method by passing “1”, which is the first index of the array, to get the slice of the array starting from the 1st index by removing the element from the 0th index:
var removeFirstElement = array.slice(1);
Print the resultant array on the console:
console.log(removeFirstElement);
Output
![]() That’s all about removing the 1st element from an array.
That’s all about removing the 1st element from an array.
Conclusion
For removing the 1st element from an array, utilize the “shift()” method or the “slice()” method.
The shift() method removes the first element and returns the array with shifted elements, while the slice() method slices the array by passing the start and the end indexes.
In this post, we have demonstrated the methods for removing the 1st element from an array using JavaScript.
Remove Object From an Array by its Value in
While dealing with the data in bulk, there can be a requirement to remove some entries due to an update.
For instance, removing the values based on a particular attribute or property.
This results in accessing the relevant data conveniently and deleting unwanted entries.
In such situations, removing an object from an array by its value is very helpful in accessing the data instantly and saving the memory.
This article will discuss the approaches to removing an object from an array by its value.
How to Remove/Eliminate an Object From an Array by its Value?
To eliminate an object from an array by its value, apply the following approaches:
“findIndex()” and “splice()” methods.
“filter()” method.
“pop()” method.
Let’s discuss each of the stated approaches one by one!
Approach 1: Remove an Object From an Array by its Value Using findIndex() and splice() Methods
The “findIndex()” method returns the index (position) of the element without making any amendments to the original array.
The “splice()” method adds/removes the particular array elements and affects the original array, as well.
These methods can be utilized to locate the object’s index that needs to be removed.
After that, the particular object is spliced based on the specified number.
Syntax
array.findIndex(func(currVal, index, array), value)
In this syntax:
“func” refers to the function that needs to be called for each item in an array.
The function parameters refer to the current value’s index in the specified array.
“value” indicates the value that must be passed to the function as “this”.
array.splice(index, num, new)
In the above-given syntax:
“index” points to the position where the items are supposed to be added or removed.
“num” represents the item’s number.
“new” corresponds to the new elements as a replacement.
Example
Let’s follow the below-stated code:
<script type="text/javascript">let givenArray = [{age: 18}, {age: 20}, {age: 25}];let removeObject = givenArray.findIndex(object => {
return object.age === 18;});
console.log("The index of the object to be removed is:", removeObject);
givenArray.splice(removeObject, 1);
console.log("The array after removing object by value becomes:", givenArray);</script>
In the above code snippet:
Declare an array of objects having the stated properties.
In the next step, associate the “findIndex()” method with the declared array in the previous step.
This will lead to iterating through each element(object) in an array.
As a result, the index of the particular object from the array will be displayed that matches the stated value against the property, i.e., 18.
After that, apply the “splice()” method by referring to the fetched index, which will remove the particular object against that index.
Note that “1” specifies the number of objects that need to be removed.
Lastly, display the resultant object’s array.
Output
![]() In the above output, it can be seen that the index of the particular object is displayed, and it is removed later on.
In the above output, it can be seen that the index of the particular object is displayed, and it is removed later on.
Approach 2: Remove an Object From an Array by its Value Using filter() Method
The “filter()” method creates a new array of items that pass a particular test.
This method can be applied to filter the object that needs to be removed based on a condition via the comparison operator.
Syntax
array.filter(func(val), this)
Here:
“func” points to the function that will redirect to the function for filtering.
“val” is the current element’s value.
“this” indicates the value passed to the function.
Example
Let’s overview the below-stated example:
<script type="text/javascript">let givenArray = [{size: 35}, {size: 40}, {size: 45}];
console.log("The given array is:", givenArray)let newArray = givenArray.filter(object => {
return object.size !== 45;});
console.log("The array after removing object by value becomes:", newArray);</script>
Apply the following steps, as given in the above lines of code:
Likewise, declare an array of objects and display it.
After that, apply the “filter()” method by referring to the elements(objects).
Now, filter the associated array such that a new array is formed based on the satisfied condition via the “not equal(!==)” comparison operator.
Lastly, display the filtered array.
Output
![]() The above output indicates that the new array of filtered objects is formed.
The above output indicates that the new array of filtered objects is formed.
Approach 3: Remove an Object From an Array by its Value Using pop() Method
The “pop()” method eliminates the last element in an array and also affects the original array.
This method can be utilized to pop a particular object from the array and creates an updated array with the removed object.
Example
The below-given example illustrates the discussed concept:
<script type="text/javascript">let givenArray = [{name: "Harry"},{name: "David"}]let newArray = givenArray.pop(object =>{
return object.name = "Harry"})
console.log("The array after removing object by value becomes:", newArray);</script>
In the above code snippet:
Similarly, declare an array of objects having the stated properties.
In the next step, apply the “pop()” method to remove the particular object having the stated value against the property “name”.
As a result, only one object will be left in the resultant array “newArr”.
Finally, display the updated object’s array, i.e., newArr.
Output
![]() The above output signifies that the desired requirement is fulfilled.
The above output signifies that the desired requirement is fulfilled.
Conclusion
The “findIndex()” and “splice()” methods, the “filter()” method, or the “pop()” method can be applied to remove an object from an array by its value.
These approaches remove a particular object based on indexing, filtering it via the not equal(!==) operator, or simply popping it upon a condition, respectively.
This article explained the approaches to removing/eliminating an object from an array by its value using JavaScript.
How to Convert Map Values to an Array
JavaScript maps are introduced in ES6.
It stores Key-value pairs in an ordered list.
The usage of maps can be extremely helpful in storing basic key-value pairs like IDs and usernames.
Moreover, JavaScript provides a couple of methods for how to iterate for retrieving a Map’s values because JavaScript Map objects are iterable.
This tutorial will describe the procedure for converting the map’s values into an array.
How to Convert/Transform Map Values into an Array Using JavaScript?
To transform the values of a map to an array, use the below-stated methods:
Array.from() method
Spread operator
Method 1: Convert Map Values to an Array Using Array.from() Method
For converting the values of a map to an array, use the “map.values()” method with the “Array.from()” method.
The map.values() method is used to get the values of the map and the Array.from() method converts these values to an array.
Syntax
Follow the given syntax for converting map values to an array:
Array.from(map.values())
Example
Create a new map object using the Map() constructor:
var map = new Map();
Set the entries in a key-value pair in the map using the “set()” method:
map.set('1', 'Name');
map.set('2', 'Age');
map.set('3', 'Email');
map.set('4', 'Contact#');
Call the “values()” method in the “Array.from()” method to get the map values and converts them into an array and store it in a variable “mapValues”:
var mapValues = Array.from(map.values());
Finally, print the map values in an array on the console:
console.log(mapValues);
The output indicates that the values of the map are successfully converted into an array:
![]()
Method 2: Convert Map Values to an Array Using Spread Operator
Another way to transform the map’s values into an array is to use the “spread operator” with the “map.values()” method.
The map.values() method first gets the map’s values, and the spread operator will copy all the map values into an array.
Syntax
Use the below-provided syntax for converting map values to an array using the spread operator:
[...map.values()]
Example
Call the “map.values()” method with the “spread operator” that will convert the values of the map into an array:
var mapValues = [...map.values()];
Output
![]()
Bonus Tip
If you want to convert keys or all the map entries into an array, follow the below section.
Convert Keys of Map to an Array Using Array.from() Method
For converting the keys of the map and all the entries (key-value pairs) of the map into an array, use the “map.Keys()” method and the “map.entries()” method with the “Array.from()” method.
The map.Keys() method gets the keys of the map and the map.entries() method is used to retrieve the map’s entries in a key-value pair.
Example
For converting map keys, call the “map.Keys()” method in the “Array.from()” method:
const keys = Array.from(map.keys());
Call the map.entries() method as an argument in Array.from() method for converting all the map entries into an array:
const entries = Array.from(map.entries());
The output shows that the keys and entries of the map are successfully converted into an array:
![]()
Convert Map Keys to an Array Using Spread Operator Method
Let’s see the method to convert map keys and all the map entries into an array, using the “spread operator”.
Example
Call the “map.Keys()” method with the spread operator and store the resultant array in variable mapKeys:
var mapKeys = [...map.keys()];
For converting map entries in an array using the “map.entries()” method with the spread operator:
const mapEntries = [...map.entries()];
Output
![]() We have compiled all the necessary information related to converting map values to an array and also map keys and entries into an array using JavaScript.
We have compiled all the necessary information related to converting map values to an array and also map keys and entries into an array using JavaScript.
Conclusion
To convert the map values to an array, use the “map.values()” method with the “Array.from()” method or the “spread operator”.
The map.values() method is used to get the map’s values and the Array.from() method converts these values to an array while the spread operator copies all the map values to an array.
This tutorial describes the procedure for converting the values of a map to an array.
How to Check if a Value is a Number
While programming, there can be a requirement to sort the data based on various data types.
For instance, appending the type of data identical to the contained data, thereby managing the records effectively.
In such cases, checking if a value is a number assists in maintaining the overall document design and analyzing the records effectively.
This write-up will demonstrate the approaches to verify if a value is a number.
How to Check/Verify if a Value is a Number Using JavaScript?
To verify if a value is a number using JavaScript, apply the following approaches:
“typeOf” operator.
“isFinite()” method.
Let’s illustrate the stated approaches one by one!
Approach 1: Check/Verify if a Value is a Number Using typeOf Operator
The “typeof” operator gets the variable’s data type.
This operator can be utilized to apply a check upon the specified value by referring to the desired data type.
Note: 5 different data types can contain values:
string
boolean
number
function
object
Example
Let’s overview the following example:
<script type="text/javascript">
let givenValue = 7;if (typeof givenValue === 'number') {
console.log("The value is a number");} else {
console.log("The value is not a number");}</script>
Apply the below-stated steps, as provided in the above code:
Firstly, initialize the stated value.
After that, apply the “typeof” operator upon the specified value to check if it is of the “number” data type with the help of the “strict equality(===)” operator.
The stated message in the “if” condition will be displayed upon the satisfied condition.
Elsewise, the “else” condition will execute.
Output
![]() Hence, it is proved that the specified value “7” is of data type “number”.
Hence, it is proved that the specified value “7” is of data type “number”.
Approach 2: Check if a Value is a Number Using isFinite() Method
The “isFinite()” method returns true if a value is a finite number.
This method can be implemented with an associated “Number” to check if the given value is of a type of number and is finite(countable).
Syntax
isFinite(val)
In this syntax:
“val” refers to the value that needs to be tested.
Example
The below-stated example explains the discussed concept:
<script type="text/javascript">
let givenValue = 3;if (Number.isFinite(givenValue)) {
console.log("The value is a number");} else {
console.log("The value is not a number");}</script>
In the above code block:
Likewise, initialize the stated value.
In the next step, apply the “isFinite()” method to check if the specified number is number and finite(countable).
Lastly, the “if” and “else” conditions will execute upon the satisfied and unsatisfied conditions, respectively.
Output
![]() The above output proves that the desired requirement is achieved.
The above output proves that the desired requirement is achieved.
Conclusion
The “typeOf” operator or the “isFinite()” method can be implemented to check if the provided value is a number.
The former approach can be utilized to check the value based on its data type.
The latter approach can be applied to perform the desired requirement by checking the finite(countable) number of digits in the value.
This article demonstrated the approaches to check if a value is a number using JavaScript.
How to Change Image on Hover
On web pages, changing images on the hover effect is a common task.
The specific task of toggling images on the hover is mostly used on web pages.
To do this, use the HTML attributes “onmouseover” and “onmouseout” to trigger functions.
This post will demonstrate the procedure to change the image on hover.
How to Change an Image on Hover?
For changing the image on the hover, use the “onmouseover” event.
When the mouse/cursor is moved through an HTML element or one of its children, the onmouseover event is triggered.
Example 1: Change Image on Hover
In an HTML file, use the <img> tag to show the image on a web page.
Attach the “onmouseover” event that will call the JavaScript function when the mouse hovers over the image:
<img id='menuImg' src="1.jpg" onmouseover="hover(this);"/>
In a JavaScript file, define a function “hover” with the parameter “img”.
In the defined function, set the image that will be shown on the hover:
function hover(img){
img.src = "2.jpg"}
As you can see, in the output, when we hover over the current image, it suddenly changes:
![]() Example 2: Toggle the Image on Hover
In the above example, the image changes when the mouse is hovering over the image, and the same image remains.
Now, in this example, the first image will reappear when the mouse moves out of the image.
This effect is called the toggling effect.
For this purpose, we will use the “onmouseover” and “onmouseout” HTML properties:
<img id='menuImg' src="1.jpg" onmouseover="hover(this);" onmouseout="hoverOut(this)"/>
“onmouseover” calls the “hover()” function while, the “onmouseout” event calls the function “hoverOut()”:
function hoverOut(img){
img.src = "1.jpg"}
The output shows that the image is successfully changed when the mouse is over the image and it is changed when the mouse is going out of the image:
Example 2: Toggle the Image on Hover
In the above example, the image changes when the mouse is hovering over the image, and the same image remains.
Now, in this example, the first image will reappear when the mouse moves out of the image.
This effect is called the toggling effect.
For this purpose, we will use the “onmouseover” and “onmouseout” HTML properties:
<img id='menuImg' src="1.jpg" onmouseover="hover(this);" onmouseout="hoverOut(this)"/>
“onmouseover” calls the “hover()” function while, the “onmouseout” event calls the function “hoverOut()”:
function hoverOut(img){
img.src = "1.jpg"}
The output shows that the image is successfully changed when the mouse is over the image and it is changed when the mouse is going out of the image:
![]() That was all about the changing image on hover.
That was all about the changing image on hover.
Conclusion
For changing the image on hover, use the “onmouseover” event.
For toggling effect, use the “onmouseover” attribute with “onmouseout” event.
When the mouse/cursor is moved through an element or one of its children, the onmouseover event is triggered, while when the mouse/pointer is moved out of an element, the onmouseout event occurs.
In this post, we demonstrated the procedure for changing the image on hover.
Date.getDay() Returns Wrong Day [Fixed]
Date Objects are a platform-independent representation of a single moment in time.
More specifically, the Date Object contains several built-in methods for retrieving the day, month, year, time, and so forth, including getDate(), getDay(), getMonth(), getYear(), and others.
However, sometimes, the Date.getDay() method returns the wrong day.
This tutorial will discuss:
Why Does the Date.getDay() Method Returns the Wrong Day?
How to Fix If Date.getDay() Returns the Wrong Day?
Why Does the Date.getDay() Method Returns the Wrong Day?
Date.getDay() method gives the wrong day as an output because the getDay() method outputs the weekday for the particular date related to local time.
It outputs an integer number (0-6), which corresponds to the weekday for the particular date, where 0 represents Sunday, 1 denotes Monday, 2 for Tuesday, and so on.
Now, let’s practically illustrate the discussed issue.
Example
In the given example, first, create a new Date object using the Date() constructor and pass the date “21 Nov 2020” as an argument:
var date = new Date('21 Nov 2020');
Call the “getDay()” method to print the date of the month on the console:
console.log(date.getDay());
The output gives the wrong day of the month, it shows “6” which indicates the day of 21st Nov 2020 as “Saturday”, while we want to get the day of the month “21”:
![]()
How to Fix If Date.getDay() Returns the Wrong Day?
To fix this issue, utilize the “getDate()” method instead of “getDay()” to get the accurate value for the day of the month.
This method gives an integer number (1 to 31) that represents the day of the month for the specified date.
Example
Call the “getDate()” method of the Date Object:
console.log(date.getDate());
The output indicates that the “getDate()” method fetched the correct date of the month as “21”:
![]() We have provided the necessary details on the discussed issue with an appropriate solution.
We have provided the necessary details on the discussed issue with an appropriate solution.
Conclusion
If the Date.getDay() returns the wrong day, then utilize the “getDate()” method instead of “getDay()” as the getDay() method gives the number (0-6) corresponding to the day of the week for the particular date while the “getDate()” method gives the integer number (1 to 31) which denotes the day of the month for the specified date.
This post discussed why the Date.getDay() method returns the wrong day and how to fix it.
Convert Integer to Its Character Equivalent
The process of converting an integer to its equivalent character or the other way around assists in accessing the alphabetic characters and the numbers instantly.
For instance, this technique can be of great aid in designing a confidential combination or encoding the data.
Also, it is of great aid in reducing the overall code complexity as well.
This tutorial will discuss the approaches to converting an integer to its character equivalent using JavaScript.
How to Convert/Transform Integer to Its Character Equivalent Using JavaScript?
To convert an integer to its equivalent character, apply the combined “charCodeAt()” and “String.fromCharCode()” methods.
The charCodeAt() method gives the character’s Unicode at a specific index in a string, whereas the String.fromCharCode() method transforms the Unicode values into characters.
These methods can be applied in combination to return the corresponding character against the passed integer with respect to the specified character via a user-defined function.
Syntax
string.charCodeAt(index)
In the above syntax:
“index” refers to the character’s index.
String.fromCharCode(num1, num2)
In the given syntax:
“num1”, “num2” correspond to one or more Unicode values to be converted.
Example 1: Convert Integer to Its Character Equivalent (Lowercase) Using JavaScript
In this example, the passed integer will be converted into the equivalent character in lowercase:
<script type="text/javascript">function convertintChar(integer) {
let character = 'a'.charCodeAt(0);
console.log("The character code is:", character);
return String.fromCharCode(character + integer);}
console.log("The character equivalent of the integer is:", convertintChar(2)); </script>
In the above lines of code:
Define a function named “convertintChar()” having the stated parameter.
The function parameter points to the integer, which needs to be converted into its equivalent character.
In the function definition, specify the stated character and apply the “charCodeAt()” method having “0” as its parameter, which points to the character’s index.
This method will return the Unicode of the associated character and display it.
After that, apply the “String.fromCharCode()” method to convert the computed Unicode value, in the previous step, into a character.
The “+” sign in the method’s parameter indicates that the passed integer will be added to the specified character discussed before and return the corresponding character with respect to it.
Lastly, access the defined function by passing the stated number to perform the desired requirement.
Output
![]() In the above output, the integer “2” is converted into its equivalent character “c”.
Note that 0,1,2 correspond to the characters “a”, “b”, “c”, and so on.
Example 2: Convert Integer to Its Character Equivalent(Uppercase) Using JavaScript
In this particular example, likewise, the passed integer will be converted into its equivalent character but in the upper case:
<script type="text/javascript">function convertintChar(integer) {
let character = 'A'.charCodeAt(0);
console.log("The character code is:", character);
return String.fromCharCode(character + integer);}
console.log("The character equivalent of the integer is:", convertintChar(0)); </script>
Perform the following steps, as given in the above code:
Define a function having the stated parameter, as we did in the previous example.
In its definition, specify the character in the upper case and associate it with the “charCodeAt()” method, as discussed before.
Then, repeat the discussed approaches as stated previously for converting the passed integer “0” into its character equivalent.
Output
In the above output, the integer “2” is converted into its equivalent character “c”.
Note that 0,1,2 correspond to the characters “a”, “b”, “c”, and so on.
Example 2: Convert Integer to Its Character Equivalent(Uppercase) Using JavaScript
In this particular example, likewise, the passed integer will be converted into its equivalent character but in the upper case:
<script type="text/javascript">function convertintChar(integer) {
let character = 'A'.charCodeAt(0);
console.log("The character code is:", character);
return String.fromCharCode(character + integer);}
console.log("The character equivalent of the integer is:", convertintChar(0)); </script>
Perform the following steps, as given in the above code:
Define a function having the stated parameter, as we did in the previous example.
In its definition, specify the character in the upper case and associate it with the “charCodeAt()” method, as discussed before.
Then, repeat the discussed approaches as stated previously for converting the passed integer “0” into its character equivalent.
Output
![]() In the above output, the character code of “A” is 65, and the equivalent character of the passed integer “0” is “A”.
Example 3: Convert Character Back to Its Integer Equivalent Using JavaScript
If there is a requirement to convert the character back to its equivalent integer, follow the below-stated steps:
<script type="text/javascript">function convertcharInt(ch) {
let character = 'a'.charCodeAt(0);
console.log("The character code is:", character);
return ch.charCodeAt(0) - character;}
console.log("The integer equivalent of the character is:", convertcharInt('a')); </script>
Implement the following steps, as given in the above code:
Define a function named “convertcharInt()” having the given parameter, which corresponds to the passed character that needs to be converted into the equivalent integer.
In the function definition, similarly, return the Unicode of the associated character and display it.
Also, subtract the character code of the character “a” from the character code of the passed character to fetch the character’s equivalent integer.
Lastly, access the defined function by passing the character “a” to get its equivalent integer.
Output
In the above output, the character code of “A” is 65, and the equivalent character of the passed integer “0” is “A”.
Example 3: Convert Character Back to Its Integer Equivalent Using JavaScript
If there is a requirement to convert the character back to its equivalent integer, follow the below-stated steps:
<script type="text/javascript">function convertcharInt(ch) {
let character = 'a'.charCodeAt(0);
console.log("The character code is:", character);
return ch.charCodeAt(0) - character;}
console.log("The integer equivalent of the character is:", convertcharInt('a')); </script>
Implement the following steps, as given in the above code:
Define a function named “convertcharInt()” having the given parameter, which corresponds to the passed character that needs to be converted into the equivalent integer.
In the function definition, similarly, return the Unicode of the associated character and display it.
Also, subtract the character code of the character “a” from the character code of the passed character to fetch the character’s equivalent integer.
Lastly, access the defined function by passing the character “a” to get its equivalent integer.
Output
![]() The above output signifies that the desired functionality is achieved.
The above output signifies that the desired functionality is achieved.
Conclusion
The “charCodeAt()” and the “String.fromCharCode()” methods can be implemented in combination to convert the integer to its character equivalent.
These methods are utilized to return both the lowercase and uppercase characters corresponding to the passed integers.
This blog is guided to convert/transform an integer to its equivalent character.
Convert Array of Starings to Array of Numbers
While handling the data in bulk, there can be a possibility of some garbage data in the form of unwanted characters or numbers.
For instance, sorting the data based on data types.
Also, in the case of decoding encoded data.
In such situations, converting an array of strings into an array of numbers is of great aid in reducing the code complexity and utilizing the resources appropriately.
This blog will demonstrate the approaches to transform a string’s array into a number’s array using JavaScript.
How to Convert/Transform Array of Strings to Array of Numbers Using JavaScript?
To transform a string’s array into a number’s array using JavaScript, implement the below-stated approaches:
“map()” method.
“forEach()” and “push()” methods.
“reduce()” and “concat()” methods.
Let’s demonstrate the stated methods one by one!
Approach 1: Convert/Transform Array of Strings to Array of Numbers Using JavaScript via map() Method
The “map()” method executes a function once for each array item without any change in the default array.
This method can be applied to simply map the string values in the associated array into an array of numbers.
Syntax
array.map(func(currValue, index, array), value)
In the above-given syntax:
“func” refers to the function that needs to be called for each item in an array.
The function parameters refer to the current value’s index in the specified array.
“value” indicates the value that must be passed to the function.
Example
Let’s overview the following example:
<script type="text/javascript">
let strArray = ['10', '20', '30'];
console.log("The given array of strings is:", strArray)
let numArray = strArray.map(Number)
console.log("The array of numbers become:", numArray);</script>
Declare an array of strings having the stated values and display it.
After that, apply the “map()” method having “Number” as its parameter, which will transform the associated array of strings into numbers.
Finally, display the array of strings converted into numbers.
Output
![]() In this output, it can be seen that the string’s array is converted into numbers.
In this output, it can be seen that the string’s array is converted into numbers.
Approach 2: Convert/Transform Array of Strings to Array of Numbers Using forEach() and push() Methods
The “forEach()” method applies a function for each element in an array.
The “push()” method is used to add an item in an array at the start.
These methods combined can be implemented to iterate along the given string’s array, convert them into numbers and push them into an empty array.
Syntax
array.forEach(function(current, index, array), this)
Here:
function: It is the function that needs to be called for each element in an array.
current: This parameter signifies the current array value.
index: It points to the current element’s index.
array: It refers to the current array.
this: It corresponds to the value being passed to the function.
array.push(it1, it2)
In this syntax:
“it1, and “it2” point to the items that need to be added to the array.
Example
Let’s go through the below-stated example:
<script type="text/javascript">
let strArray = ['20', '40', '60'];
console.log("The given array of strings is:", strArray)
let numArray = [];
strArray.forEach(string => {
numArray.push(Number(string));});
console.log("The array of numbers become:", numArray);</script>
In the above lines of code:
Initialize the array consisting of the stated string values and display it.
Also, create an empty array named “numArr”.
In the next step, apply the “forEach()” method to iterate along the values of the associated array.
After that, the iterated values in the previous step will be converted into numbers via “Number”.
Now, the “push()” method will append the converted numbers into the allocated empty array, as discussed before.
Lastly, display the array appended with the numbers.
Output
![]() The above output indicates that the desired requirement is fulfilled.
The above output indicates that the desired requirement is fulfilled.
Approach 3: Convert/Transform Array of Strings to Array of Numbers Using reduce() and concat() Methods
The “reduce()” method calls a function for the elements in an array to give a reduced value, in return.
The “concat()” method concatenates/merges multiple arrays or string values.
The combination of these methods can iterate along the string’s array, concatenate the values so that they are converted into numbers, and then append them into a separate array.
Syntax
array.reduce(func(total, Value, Index, array), value)
In this particular syntax:
“func” refers to the function that needs to be called for each array element.
The function arguments correspond to the current value’s index in the specified array.
“value” corresponds to the value passed to the function.
array1.concat(string)
In the given syntax:
“string” represents the string value that needs to be concatenated.
Example
The following example explains the stated concept:
<script type="text/javascript">
let strArray = ["15", "25", "35", "45"];
console.log("The given array of strings is:", strArray)
let numArray = strArray.reduce( (first, last ) => first.concat(+last), [])
console.log("The array of numbers become:", numArray);</script>
In the above lines of code:
Declare the specified string’s array and display it.
In the next step, apply the “reduce()” and “concat()” methods as a combination.
This will resultantly iterate along the associated array and concatenate the array items such that they are transformed into numbers.
Now, the converted numbers in the previous step will be appended into a null array represented by “[ ]”.
Finally, display the array of appended numbers on the console.
Output
![]() In this particular output, it can be seen that the allocated null array is filled with the numbers.
In this particular output, it can be seen that the allocated null array is filled with the numbers.
Conclusion
The “map()” method, the “forEach()” and “push()” methods, or the “reduce()” and “concat()” methods can be used to transform a string’s array to a number’s array.
The map() method simply maps the associated array values into numbers.
Whereas the other two approaches iterate along the given string’s array, convert them into numbers, and append the converted values into an allocated null array.
This tutorial explained to transform a string into a number’s array.
Check if Object is Not instanceof Class
While dealing with complex codes, there can be ambiguity regarding the object integrated with a particular class.
For instance, locating a specific object with respect to the class or the other way around.
In such cases, checking if an object is not an instance of the class does wonders in accessing the relevant data instantly.
This article will demonstrate the concept of checking whether an object is a class instance or not.
How to Check/Verify if an Object is Not an instanceof Class?
To check whether an object is an instance of the class or not, apply the following approaches in combination with the “instanceof” operator:
“Logical Not(!)” operator.
“Boolean Value”.
Let’s illustrate each of the approaches one by one!
Approach 1: Check/Verify if an Object is Not an instanceof Class Using the Logical Not(!) Operator
The “instanceof” operator is used to verify the object’s type at runtime.
The “logical” operators are used to analyze the logic between values.
More specifically, the logical “not(!)” operator gives the value “true” if a false value is indicated.
These approaches can be utilized in combination to check the type of the created object with respect to a particular class.
Syntax
name instanceof type
In the above syntax:
“name” points to the object’s name.
“type” corresponds to the object’s type.
Example
Let’s overview the below-stated example:
<script type="text/javascript">class Car {}class Bike {}
let instClass = new Bike();if (!(instClass instanceof Car)) {
console.log("Object is not an instance of class Car");} else {
console.log("Object is an instance of class Car");}</script>
In the above lines of code:
Create two classes named “Car” and “Bike”, respectively.
In the next step, create an object named “instClass” with the help of the “new” keyword and the “Bike()” constructor, respectively referring to the class “Bike”.
Now, apply the logical “not(!)” operator along with the “instanceof” operator to check for the object’s instance with respect to the stated class.
Upon the satisfied condition, the “if” condition will execute.
In the other scenario, the “else” statement will be displayed.
Output
![]() As evident from the output, the created object is the instance of the class “Bike” and not the “Car”.
As evident from the output, the created object is the instance of the class “Bike” and not the “Car”.
Approach 2: Check if an Object is Not an instanceof Class Using Boolean Value
The values “true” and “false” represent the boolean values.
These values can be utilized to apply a check upon the object with respect to the class based on a boolean value and display the corresponding result.
Example
The below-given example illustrates the stated concept:
<script type="text/javascript">class college{}class university{}
let instClass = new college();if (instClass instanceof university == false){
console.log("Object is not an instance of class university")}else {
console.log("Object is an instance of class Car");}</script>
In the above code snippet:
Likewise, create two classes named “college” and “university”, respectively.
After that, similarly, create an object of the class “college” named “instClass”.
Now, apply the “instanceof” operator to check for the object’s instance with the help of the allocated boolean value “false”.
Upon the satisfied condition, the former statement will be displayed.
Otherwise, the latter statement in the “else” condition will execute.
Output
![]() The above output indicates that the desired requirement is fulfilled.
The above output indicates that the desired requirement is fulfilled.
Conclusion
The “instanceof” operator combined with the “Logical Not(!)” operator or the “Boolean Value” can be used to verify if an object is not an instance of the class.
These approaches can be applied to create an object referring to one of the classes and check its instance.
After that, the corresponding result with respect to the logical not(!) operator or the boolean value, respectively, is returned.
This blog is guided to verify whether an object is an instance of the class or not.
Check if Body has a Specific Class Using JavaScript
While designing a web page or the site, there can be a possibility to sort similar functionalities against a dedicated class at the developer’s end.
For instance, allocating a particular web page to the same element but with a distinct class to make things relevant.
In such situations, checking if a body has a specific class assists in accessing various functionalities easily and in the updating processes as well.
This article will demonstrate the approaches to check if a body has a specific class using JavaScript.
How to Check if Body has a Specific Class Using JavaScript?
To check if a body has a specific class using JavaScript, apply the following approaches:
“classList” property and “contains()” method.
“getElementsByTagName()” and “match()” methods.
“jQuery”.
Let’s illustrate each of the approaches one by one!
Approach 1: Check if Body has a Specific Class Using classList Property and contains() Methods
The “classList” property gives the CSS class names of an element.
Whereas the “contains()” method gives true if a node is a descendant.
These methods combined can be applied to access the contained class in the associated element.
Syntax
node.contains(desnode)
In the above syntax:
“desnode” corresponds to the node descendant of the associated node.
Example
Let’s have an overview of the below-given example:
<center><body class= "contain"><h2>This is Linuxhint Website</h2></center></body><script type="text/javascript">if (document.body.classList.contains('contain')){
console.log("The body element has class");} else{
console.log("The body element does not have class");}</script>
Apply the below-stated steps, as given in the above code:
Firstly, include a “<body>” element having the set attribute “class”.
Also, add a heading within the particular element(<body>).
In the JS code, apply the “classList” property combined with the “contains()” method.
This will resultantly access to the class of the associated “<body>” element based on the specified class name in the method’s parameter.
Upon the satisfied condition, the “if” condition will execute.
Contrarily, the “else” statement code block will execute.
Output
![]() In the above output, it can be seen that the particular class is included in the “<body>” element.
In the above output, it can be seen that the particular class is included in the “<body>” element.
Approach 2: Check if Body has a Specific Class Using getElementsByTagName() and match() Methods
The “getElementsByTagName()” method gives a collection of all elements having a particular tag name.
The “match()” method matches the specified value with the string.
These methods can be utilized to access the required element by its tag and check for the specific class.
Syntax
document.getElementsByTagName(tag)
In the provided syntax:
“tag” represents the element’s tag name.
Example
The following example demonstrates the discussed concept:
<center><body class="contains"><img src="template2.png" ></center></body><script type="text/javascript">
let get = document.getElementsByTagName("body")[0].className.match(/contains/)if (get) {
console.log("The body element has class");} else {
console.log("The body element does not have class");}</script>
In the above code snippet:
Likewise, include a “<body>” element having the specified class.
Also, contain an image with the set dimensions within the stated element in the previous step.
In the JavaScript lines of code, access the “<body>” element by its tag using the “getElementsByTagName()” method.
The “[0]” indicates that the first element corresponding to the stated tag in the previous step will be fetched.
The “className” property and the “match()” method will match for the stated class in its parameter against the “<body>” element.
The former statement in the “if” condition will execute upon the satisfaction of all the conditions in the previous steps.
Otherwise, the latter statement will be displayed.
Output
![]() The above output indicates that the applied condition for a specific class is satisfied.
The above output indicates that the applied condition for a specific class is satisfied.
Approach 3: Check if Body has a Specific Class Using jQuery
This approach can be implemented to access the required element directly and locate the specific class against it with the help of its method simply.
Example
Let’s go through the below-given example:
<script src="https://ajax.googleapis.com/ajax/libs/jquery/3.5.1/jquery.min.js"></script><center><body class="contains"><textarea placeholder="Type any text..."></textarea></center></body>if ($("body").hasClass("contains")){
alert("The body element has class")}else{
alert("The body element does not have class")}</script>
In the above lines of code:
Include the “jQuery” library to utilize its functionalities.
Similarly, include the “<body>” element having the stated class.
Also, add a “<textarea>” element within the stated element in the previous step.
In the JS code, access the “<body>” element.
Also, apply the “hasClass()” method to search for the stated class in the fetched element.
This will resultantly alert the former message upon the satisfied condition.
In the other case, the latter statement will be displayed.
Output
![]() The above output implies that the desired requirement is achieved.
The above output implies that the desired requirement is achieved.
Conclusion
The “classList” property and “contains()” method, the “getElementsByTagName()” and “match()” methods, or the “jQuery” can be used to check if a body has a specific class using JavaScript.
These approaches can be utilized to search for the particular class within an element by referring to the corresponding element directly, by its tag, or using the jQuery method.
This blog explained to check if a body has a specific class
Add 1 Day to a Date Using JavaScript
JavaScript offers a Date object to perform various manipulations using date and time.
However, sometimes a programmer may need to add a day to the current or the specified date.
For this purpose, JavaScript provides a number of methods, including methods for adding days, months, or years to a specified or current date.
This article will demonstrate the methods to add a day to date using JavaScript.
How to Add 1 Day to a Date Using JavaScript?
For adding 1 day to a Date, use the given predefined JavaScript methods:
setDate() method
Date.now() method
Let’s see how these methods will add a day-to-date.
Method 1: Add 1 Day to a Date Using setDate() Method
To add 1 day to a Date, use the “setDate()” method with the “getDate()” method.
The getDate() method gets the day from the specified date, and the setDate() method sets the day of the month to the next day by adding 1 to the existing date.
Syntax
Follow the given syntax for adding 1 day in a Date using the setDate() method:
date.setDate(date.getDate() + 1);
Example 1: Add 1 Day to a Current Date
In the following example, first create a new Date object using the Date() constructor, which comprises the current date:
const date = new Date();
Print the date on the console:
console.log("Today: " + date);
Call the “getDate()” method to get the day from the date in the “setDate()” method and add “1” to it:
date.setDate(date.getDate() + 1);
Finally, print the new date on the console using the “console.log()” method:
console.log("Add 1 day: " + date);
The output shows that 1 day is successfully added to the current date:
![]() Example 2: Add 1 Day to a Specified Date
Create a Date object by passing date any date, such as “23 June 2022” as an argument, and then execute the same code block:
const date = new Date("23 June 2022");
The output gives the “24 June 2022” date by adding “1” day in the specified date:
Example 2: Add 1 Day to a Specified Date
Create a Date object by passing date any date, such as “23 June 2022” as an argument, and then execute the same code block:
const date = new Date("23 June 2022");
The output gives the “24 June 2022” date by adding “1” day in the specified date:
![]()
Method 2: Add 1 Day to a Date Using Date.now() Method
Another method for adding a day to a Date is the “now()” method of the Date object.
It gives time in milliseconds.
For adding a day, you have to add the milliseconds to the current date.
Syntax
Use the given syntax to add a day to Date using the Date.now() method:
new Date(Date.now() + (3600 * 1000 * 24))
Here, the Date.now() method gives the milliseconds of the current date and adds the milliseconds of a day in it to get the updated date.
Example
Create a new date object by passing the “Date.now()” method by adding milliseconds of a day as an argument:
const add1 = new Date(Date.now() + (3600 * 1000 * 24));
Print the updated date on the console:
console.log("Add 1 day: " + add1);
The output indicates that the date is now updated:
![]() We have compiled all the methods to add 1 day in a date using JavaScript.
We have compiled all the methods to add 1 day in a date using JavaScript.
Conclusion
To add 1 day to date, use the pre-built JavaScript “setDate()” with the “getDate()” method and “Date.now()” method of the Date object.
The getDate() method gets the day from the given date, and the setDate() method sets the day of the month to the next day by adding 1 to an existing day.
Whereas the Date.now() method gives time in milliseconds.
This article demonstrated the methods to add a day to date using JavaScript.
Show a Hidden Div on Hover Using JavaScript
While developing websites, there are some situations where some information is hidden and displayed on mouse hover over a certain line or element.
So, the question that can come to your mind is how web developers do that.
As JavaScript is a dynamic scripting language, it offers some ways to make dynamic changes to web pages.
For instance, you can use a JavaScript “mouseover” event listener to perform specific tasks.
This post will describe the procedure to show a hidden div on hover using JavaScript.
How to Show a Hidden Div on Hover Using JavaScript?
Use the following methods to show a hidden div on hover:
mouseover event listener with visibility property
mouseover event listener with display property
Let’s examine how these approaches work.
Method 1: Show a Hidden Div on Hover Using mouseover Event Listener With visibility Property
Use the “visibility” property along with the event listener called “mouseover”.
Set the “visible” value of the visibility property to show the div, and to hide the div, set the value as “hidden”.
Syntax
Follow the given syntax for showing the hidden div on hover:
element.style.visibility = 'visible';
Example
First, create a paragraph using <p> tag that will show a hidden div while hovering on it.
Assign an id “hover” to it that will use to get the reference of the element:
<p style="color:red;" id="hover">Hover on me! I will show an Interesting thing</p>
Create a div, which will be shown while hovering over the paragraph.
Set its display property to “none”, which indicates the element will be hidden
<div style="display:none;" id="hide">
<p>To learn JavaScript, follow the Linuxhint tutorials.
It will be very helpful for you.</p>
</div>
After executing the above HTML code, the output will be as follows:
![]() The above output shows only the content of the <p> tag, the <div> tag’s content is hidden because of the “display: none”:
Now, in the JavaScript file, fetch the first element where the div element will be displayed on the hover event using its “id”:
const hover = document.getElementById('hover');
Then, get a reference to the div element that will appear when hovering over the line, and store it in a variable “hiddenDiv”:
const hiddenDiv = document.getElementById('hide');
Set the “visibility” property of the “hiddenDiv” that stores a reference of the “div” element as “visible” on the “mouseover” event that will be called while hovering over the line:
hover.addEventListener('mouseover', function handleMouseOverEvent() {
hiddenDiv.style.visibility = 'visible';});
After hovering over the line, set the “visibility” property of the “hiddenDiv” as “hidden” on the “mouseout” event that will hide the div element while the cursor is away from the line:
hover.addEventListener('mouseout', function handleMouseOutEvent() {
hiddenDiv.style.visibility = 'hidden';});
The given output shows that the hidden div is successfully shown on hover using the mouseover event with visibility property:
The above output shows only the content of the <p> tag, the <div> tag’s content is hidden because of the “display: none”:
Now, in the JavaScript file, fetch the first element where the div element will be displayed on the hover event using its “id”:
const hover = document.getElementById('hover');
Then, get a reference to the div element that will appear when hovering over the line, and store it in a variable “hiddenDiv”:
const hiddenDiv = document.getElementById('hide');
Set the “visibility” property of the “hiddenDiv” that stores a reference of the “div” element as “visible” on the “mouseover” event that will be called while hovering over the line:
hover.addEventListener('mouseover', function handleMouseOverEvent() {
hiddenDiv.style.visibility = 'visible';});
After hovering over the line, set the “visibility” property of the “hiddenDiv” as “hidden” on the “mouseout” event that will hide the div element while the cursor is away from the line:
hover.addEventListener('mouseout', function handleMouseOutEvent() {
hiddenDiv.style.visibility = 'hidden';});
The given output shows that the hidden div is successfully shown on hover using the mouseover event with visibility property:
![]()
Method 2: Show a Hidden Div on Hover Using mouseover Event Listener With display Property
Another way to show a hidden div on hover is to use the “display” property with the “mouseover” event listener.
To show the hidden div, set the value of the display property as “block”.
Syntax
Use the given syntax for the display property to show the div element:
element.style.display = 'block';
Example
After getting the references of the div element and the paragraph where the hover event will perform, set the “block” as the value of the display property of the div element on the “mouseover” event listener:
hover.addEventListener('mouseover', function handleMouseOverEvent() {
hiddenDiv.style.display = 'block';});
For hiding the div again, set “none” as the display property value:hover.addEventListener(‘mouseout’, function
handleMouseOutEvent() {
hiddenDiv.style.display = 'none';});
Output
![]() We have compiled all the necessary information related to showing the hidden div on hover using JavaScript.
We have compiled all the necessary information related to showing the hidden div on hover using JavaScript.
Conclusion
To show a hidden div on hover, the “mouseover” event listener with the “visibility” property and the “display” property is used.
While using the visibility property for showing the hidden div, set the value “visible”, and for using the display property, set the value “block”.
This post described the procedure to display a hidden div on hover.
Round a Number (up or down) to the Nearest 100
While solving mathematical problems, simple decimal point numbers does wonders in performing calculations.
Also, in the case of keeping the value precise and simple simultaneously.
In such cases, rounding a number up or down to the nearest 100 returns the numbers which are comparatively easier to work with, thereby omitting the unnecessary details.
This blog will demonstrate the approaches to round the number up or down to the nearest 100 using JavaScript.
How to Round a Number (up or down) to the Nearest 100 Using JavaScript?
A number can be rounded(up or down) to the nearest 100 using the following approaches:
“round()” method.
“floor()” and “Math.ceil()” methods.
Approach 1: Round a Number up/down to the Nearest 100 Using Math.round() Method
The “Math.round()” method rounds the specified number into the nearest integer.
This method can be applied to round the particular number to the nearest up or down integer depending upon the passed number with the help of a user-defined function.
Syntax
Math.round(x)
In the given syntax:
“x” represents the number that needs to be rounded.
Example
Let’s follow the below-given example:
<script type="text/javascript">function roundNumber(number) {return Math.round(number / 100) * 100;}
console.log("The nearest up or down number is:", roundNumber(149));
console.log("The nearest up or down number is:", roundNumber(151));</script>
Perform the following steps in the above lines of code:
Declare a function named “roundNumber()” has the number to be rounded as its parameter.
In its definition, firstly divide the passed number by “100” and round it.
The rounded number will then be multiplied by 100 to get the rounded number again to the nearest 100.
Finally, access the defined function by passing the stated numbers as its parameter.
This will result in rounding the specified numbers to the nearest 100.
Output
![]()
![]() From the above output, it can be observed that the specified numbers are rounded to the nearest “100”.
From the above output, it can be observed that the specified numbers are rounded to the nearest “100”.
Approach 2: Round a Number up/down to the Nearest 100 Using Math.ceil() and Math.floor() Methods
The “Math.ceil()” method rounds a number to the nearest up integer and the “Math.floor()” method rounds a number such that the nearest down integer is returned.
These methods can be implemented such that the nearest up or down rounded number is achieved first and then multiplied by 100 to get the rounded number nearest to 100.
This is applicable with the help of separate functions.
Syntax
Math.ceil(a)
In the given syntax:
“a” corresponds to the number to be rounded to the nearest up integer.
Math.floor(x)
In the above syntax:
“x” points to the number to be rounded to the nearest down integer.
Example
The following example illustrates the discussed concept:
<script type="text/javascript">function roundUp(number){return Math.ceil(number / 100) * 100;}function roundDown(number){return Math.floor(number / 100) * 100;}
console.log("The rounded up number is:", roundUp(149));
console.log("The rounded down number is:", roundDown(151));</script>
In the above code snippet:
Declare a function named “roundUp()” that has the number to be rounded up to the nearest 100.
In its definition, apply the “ceil()” method such that the passed number is first divided by 100 and rounded to the nearest up integer.
After that, it is multiplied by 100 to get the rounded number nearest to 100.
Likewise, define a function named “roundDown()”.
Here, similarly, repeat the approach in the previous step, but this time, the rounded-up number to the nearest 100 will be computed using the “floor()” method.
Lastly, access both defined functions having the passed values to round them to an up or down number to the nearest 100, respectively.
Output
![]()
![]() In the above output, it is evident that the numbers are rounded up or down respectively.
In the above output, it is evident that the numbers are rounded up or down respectively.
Conclusion
The “Math.round()” method or the “Math.floor()” and “Math.ceil()” methods can be utilized to round a number(up or down) to the nearest 100.
The former method can be implemented to simply round a number up as well as down to the nearest 100 depending upon the passed number.
The latter methods can be applied to round a number up and down, respectively, with the help of separate functions.
This tutorial explains how to round a number up or down to the nearest 100 using JavaScript.
How to Check if the Type is Boolean Using JavaScript
Boolean expressions represent logical entities and have two possible outcomes, true and false.
For verifying the type of the variable, you can use different JavaScript approaches in your program, including the “typeof” operator, strict equality operator (===), or the “tostring.call()” method.
This post will describe the methods to check if the type of variable is boolean or not using JavaScript.
How to Check/verify if the Type is Boolean Using JavaScript?
To determine if the variable type is boolean or not, use the following predefined methods:
typeof operator
strict equality operator (===)
call() method
Let’s examine the working of the above methods.
Method 1: Check if the Type is Boolean Using typeof Operator
Utilize the “typeof” operator to determine if the variable type is boolean or not.
More specifically, this operator can compare the variable type to the specified type with the help of the strict equality operator.
Syntax
Follow the given syntax to use the typeof operator:
typeof x === 'boolean'
Example
Create a variable “a” and assign value “true”:
var a = true;
Call the “typeof” operator in the “console.log()” method with a strict equality operator to check whether the value of the variable “a” is boolean or not:
console.log(typeof a === 'boolean');
The output displayed “true” which indicates the variable is boolean:
![]()
Method 2: Check if the Type is Boolean Using Strict Equality Operator (===)
To determine if the type of variable is boolean, use the “===” operator.
The strict equality operator compares variables based on both their type and their value, and it returns a boolean value.
Syntax
For strict equality operator, use the below syntax:
x === true;
Example
Check the variable with a strict equality operator with the boolean value “true”:
console.log(a === true);
The output displays “true” as both operands of the strict equality operator are the same in terms of type and value:
![]()
Method 3: Check if the Type is Boolean Using tostring.call() Method
To determine whether a variable is a boolean or not, utilize the “tostring.call()” method.
It works or behaves similarly to the typeof operator.
Syntax
The toString.call() method can be used with the following syntax:
toString.call(x) === '[object Boolean]'
Here, pass the variable “x” as an argument to the method and match it with “[object data_type]”.
Example
Call the toString.call() method by passing the variable and then matching it with the ‘[object Boolean]’.
If it gets matched, the method will return “true” else, “false”:
console.log(toString.call(a) === '[object Boolean]');
The corresponding output will be as follows
![]() All the necessary information is compiled related to verifying the type of the variable, is it boolean or not?
All the necessary information is compiled related to verifying the type of the variable, is it boolean or not?
Conclusion
To check if the type is boolean, use the “typeof” operator, “strict equality” operator (===), or “tostring.call()” method.
All these approaches give effective results; however, the “typeof” operator is the most commonly used method to determine the variable type.
This post described the methods to check if the type of variable is boolean or not using JavaScript.
Get Element by ID by Partially Matching String Using JavaScript
Web pages having multiple functionalities generally require lengthy codes.
In such a case, allocating a common identity or a part of it to multiple elements assists the developer to a great extent.
For instance, allocating a part of the id, which is the same in all the elements, to access them at the same time.
In such cases, getting an element by id by partially matching the string is of great aid in simplifying the code complexity.
This blog will discuss the approach to get element by id by partially matching string.
How to Get/Fetch an Element by id by Partially Matching String?
The element can be fetched by id by partially matching the string using the “document.querySelectorAll()” method.
This method fetches all the elements matching a CSS selector(s) and returns a node list.
Syntax
document.querySelectorAll(selectors)
In the above syntax:
“selectors” refer to one or more CSS selectors.
Example 1: Get Element by Partially Matching the id From the Start
In this example, the “document.querySelectorAll()” method can be utilized to fetch the element by specifying its string id from the start and not the full id:
<img src= "template3.png" id= "image"><script type="text/javascript">
let get = document.querySelectorAll(`[id^="im"]`);
console.log("The element is:", get);</script>
Perform the following steps in the above code snippet:
Firstly, specify the “<img>” element by specifying its source via the “src” attribute and the stated “id”.
After that, in the JavaScript code, access the specified element by its “id” from the start using the “querySelectorAll()” method.
Note that “^” matches the start.
Finally, display the element fetched by its partial string id from the start on the console.
Output
![]() In the above output, it can be observed that the corresponding element and its id are displayed on the console.
In the above output, it can be observed that the corresponding element and its id are displayed on the console.
Example 2: Get Element by Partially Matching the id From End
In this example, the “document.querySelectorAll()” method can be applied likewise to get the element by partially matching the string id from the end:
<img src= "template3.png" id= "image"><script type="text/javascript">
let get = document.querySelectorAll(`[id$="ge"]`);
console.log("The element is:", get);</script>
Implement the following steps in the above lines of code:
Recall the discussed approach for including the image having the stated “id”.
In the JS code, access the included “<img>” element by specifying its id from the end using the “querySelectorAll()” method.
Note that the “$” in the code matches the id from the end.
Lastly, display the corresponding element on the console.
Output
![]() The above output indicates that the desired requirement is achieved.
The above output indicates that the desired requirement is achieved.
Example 3: Get Element by Partially Matching the Contained id
In this demonstration, the corresponding element will be fetched by partially matching the string id from any of the positions:
<img src= "template3.png" id= "image"><script type= "text/javascript">
let get = document.querySelectorAll(`[id*="ma"]`);
console.log("The element is:", get);</script>
In the above code:
Likewise, include the stated image having the assigned “id”.
In the JavaScript code, access the element by partially matching the “id” having the stated string value in it.
Note that “*” matches the id from any position.
Finally, display the fetched element.
Output
![]() The fetched element in the above output verifies that the specified “id” is matched with the element’s id from any of the positions.
The fetched element in the above output verifies that the specified “id” is matched with the element’s id from any of the positions.
Conclusion
The “document.querySelectorAll()” method can be utilized to fetch an element by its id by matching the string partially using JavaScript.
This method can be implemented to partially match the contained string in an id from start, end, or from any position to fetch an element.
This tutorial explained how to fetch an element by id by matching a string partially.
Hide an Element After a Few Seconds Using JavaScript
While designing a responsive web page, there can be a requirement to hide some added functionalities after a certain time to create effects.
For instance, alerting a user via the pop-up message for a limited time does wonders in grabbing the user’s attention, thereby refraining from being offended.
In such scenarios, hiding an element after a few seconds using JavaScript helps make a web page or the site stand out.
This tutorial will explain the concept of hiding an element after a few seconds using JavaScript.
How to Hide an Element After a Few Seconds?
The following approaches can be utilized to hide an element after a few seconds using JavaScript:
“setTimeout()” method with the “display” property.
“setTimeout()” method with the “visibility” property.
“jQuery” methods.
Let’s discuss the stated approaches one by one!
Approach 1: Hide an Element After a Few Seconds Using setTimeout() Method With the display Property
The “setTimeout()” method invokes a function after the specified assigned time.
Whereas the “display” property sets the specified element’s display type.
These approaches can be implemented to allocate a set time to the fetched element so that it hides after the specified time.
Syntax
setTimeout(func, milli, par1, par2)
In the above-given syntax:
“func” indicates the function that needs to be accessed.
“milli” corresponds to the time interval in milliseconds to execute.
“par1” and “par2” point to the additional parameters.
Object.style.display='none'
In the above syntax:
The display property of the “Object” is assigned as “none”.
Example
The following example illustrates the stated concept:
<center><body><img src= "template5.png" id= "element"></center></body><script type="text/javascript">
setTimeout(() => {
let get = document.getElementById('element');get.style.display = 'none';}, 5000);</script>
Apply the below-given steps, as given in the above code:
Firstly, include an “<img>” element having the “src” and “id” as its attributes.
In the JS code, apply the “setTimeout()” method to the stated lines of code.
The set time, in this case, will be 5000 milliseconds = “5” seconds.
Within the method, access the included element by its “id” using the “getElementById()” method.
After that, assign the “display” property associated with the fetched element as “none”.
This will resultantly hide the “<img>” element after 5 seconds from the Document Object Model(DOM).
Output
![]() As observed in the above output, the included “<img>” element hides after “5” seconds.
As observed in the above output, the included “<img>” element hides after “5” seconds.
Approach 2: Hide an Element After a Few Seconds Using setTimeout() Method With the visibility Property
The “visibility” property sets the visibility of an element.
This property can be applied combined with the “setTimeout()” method to hide the fetched element after the set time.
Syntax
Object.style.visibility = 'hidden'
In this syntax:
The visibility of the specified “Object” is assigned as “hidden”.
Example
Let’s go through the below-stated example:
<center><body><table border = "2px" id= "element"><tr><th>ID</th><th>Name</th><th>Age</th></tr><tr><td>1</td><td>David</td><td>18</td></tr></table></center></body><script type="text/javascript">
setTimeout(() => {
let get = document.getElementById('element');get.style.visibility = 'hidden';}, 3000);</script>
Perform the following steps, as given in the above lines of code:
Include the “<table>” element having the attributes “border” and “id”.
Also, contain the stated values in the table within the “<tr>”, “<th>”, and “<td>” tags.
In the JavaScript code, similarly, apply the “setTimeout()” method with a set time of “3” seconds.
After that, invoke the “getElementById()” method to fetch the included element, as discussed.
Lastly, apply the “visibility” property and allocate it as “hidden”.
This will hide the associated element after 3 seconds.
Output
![]() In the above output, it is evident that the “table” element hides after the set time.
In the above output, it is evident that the “table” element hides after the set time.
Approach 3: Hide an Element After a Few Seconds Using jQuery Methods
The “jQuery” method can be applied to hide the corresponding element by fetching it directly and fading it out after the added time.
Example
Let’s overview the following example:
<script src="https://ajax.googleapis.com/ajax/libs/jquery/3.5.1/jquery.min.js"></script><center><body><h2 id= "element">This is Linuxhint Website</h2></center></body><script type="text/javascript">
$(element).show().delay(5000).fadeOut();</script>
In the above code snippet:
Include the “jQuery” library to utilize its methods.
Include the “<h2>” element having the stated “id”.
In the JS code, access the included element directly using its id.
After that, apply the “show()” method, which will display the fetched element.
The “delay()” and the “fadeOut()” methods will be applied in combination to hide the associated element after the set delay time(“5” seconds).
Output
![]() The above output signifies that the added text gets hidden after five seconds.
The above output signifies that the added text gets hidden after five seconds.
Conclusion
The “setTimeout()” method with the “display” property, the “setTimeout()” method with the “visibility” property, or the “jQuery” methods can be used to hide an element after a few seconds.
The setTimeout() method combined with the display or visibility property can hide the fetched element after the set time.
Whereas the jQuery methods can fetch the element directly, display it, and then hide it by fading it out.
This article explained how to hide an element after a few seconds using JavaScript.
Get the Month Name From a Date
In JavaScript, the months are represented as (0-11), which is quite challenging to guess, especially in the case of multiple dates in a code.
In the other scenario, there can be a requirement to fetch the month with respect to a particular time zone.
In such cases, getting the month name from a date is of great aid in providing ease to the end developer.
This tutorial will discuss the approaches to fetching the name of a month from a date using JavaScript.
How to Get the Month Name From a Date Using JavaScript?
The month name from the date can be fetched using the following approaches:
“toLocaleString()” method.
“getMonth()” method.
“DateTimeFormat()” constructor.
Let’s discuss the stated approaches one by one!
Approach 1: Get the Month Name From a Date Using toLocaleString() Method
The “toLocaleString()” method gives a number in the form of a string via the local language format.
This method can be applied to fetch the month name from the date object holding the current or the specified date.
Syntax
date.toLocaleString(locales, options)
In the above syntax:
“date” points to the variable holding the date object.
“locales” correspond to the time zones.
“options” refers to the object having the option of formatting.
Example 1: Get the Month Name From the Current Date
In this example, the month name will be fetched from the “current” date:
<script type="text/javascript">
let date = new Date();
console.log("The current date is:", date)
let getMonth = date.toLocaleString('default', {
month: 'long',});
console.log("The month is:", getMonth);</script>
Apply the following steps, as given in the above code:
Create a new date object with the help of the “new” keyword and the “Date()” constructor, respectively, and display it.
In the next step, apply the “toLocaleString()” method and associate it with the variable containing the date object.
The options parameter in the method’s parameter will be set to “month”.
This will result in fetching the month with respect to the current date.
Finally, display the corresponding month on the console.
Output
![]()
![]() In the above output, it can be observed that the month “November” matches both the current date and the fetched month from the date.
Example 2: Get the Month Name From the Specified Date
In this particular example, the month name will be extracted from the “specified” date:
<script type="text/javascript">
let date = new Date(2021, 2, 25);
let getMonth = date.toLocaleString('default', {
month: 'long',});
console.log("The month is:", getMonth);</script>
Apply the below-given steps, as given in the above lines of code:
Specify the stated date with the help of the “Date()” constructor, as discussed.
Recall the discussed approach in the previous example for extracting the month from the associated variable holding the date object.
Lastly, display the corresponding month with respect to the specified date.
Output
In the above output, it can be observed that the month “November” matches both the current date and the fetched month from the date.
Example 2: Get the Month Name From the Specified Date
In this particular example, the month name will be extracted from the “specified” date:
<script type="text/javascript">
let date = new Date(2021, 2, 25);
let getMonth = date.toLocaleString('default', {
month: 'long',});
console.log("The month is:", getMonth);</script>
Apply the below-given steps, as given in the above lines of code:
Specify the stated date with the help of the “Date()” constructor, as discussed.
Recall the discussed approach in the previous example for extracting the month from the associated variable holding the date object.
Lastly, display the corresponding month with respect to the specified date.
Output
![]()
![]() As the months are represented from (0-11), hence “2” here indicates the month “March”.
As the months are represented from (0-11), hence “2” here indicates the month “March”.
Approach 2: Get the Month Name From a Date Using getMonth() Method
The “getMonth()” method gives the month (0 to 11) of a date, in return.
This method can be implemented to display the corresponding month from the array against the passed date with the help of the user-defined function.
Example
Let’s overview the below-stated example:
<script type="text/javascript">
let fetchMonth = function(date){
monthList = [ "January", "February", "March", "April", "May", "June", "July", "August", "September", "October", "November", "December" ];return monthList[date.getMonth()];};
console.log("The month is:", fetchMonth(new Date("5/8/2012")));
console.log("The month is:", fetchMonth(new Date("7/13/2022")));</script>
Implement the following steps, as stated in the above code snippet:
Define an inline function named “fetchMonth()” having “date” as its parameter, which will contain the passed date and fetch the month against it.
In the function definition, create an array named “monthList” having all the calendar months.
After that, apply the “getMonth()” method and associate it with the passed date to extract the month with respect to it(date).
Finally, access the defined function by passing the dates specified with the help of the “Date()” constructor.
Output
![]()
![]() The above output indicates that the desired requirement has been fulfilled.
The above output indicates that the desired requirement has been fulfilled.
Approach 3: Get the Month Name From a Date Using Intl.DateTimeFormat Constructor
The “Intl.NumberFormat()” constructor creates a new object, thereby enabling the formatting of a number that is language-sensitive.
This approach can be applied to pass the target date to the “format()” method and format it based on the passed option.
Syntax
Intl.NumberFormat(locales, options)
In the above syntax:
“locales” refer to time zones.
“options” correspond to the formatting options.
Example
Have a look at the following code:
<script type="text/javascript">
console.log("The month is:", new Intl.DateTimeFormat('en-US', {month: "long"}).format(new Date(2022, 3, 15)))</script>
Apply the below-stated steps, as provided in the above code statement:
Apply the “DateTimeFormat()” constructor having the stated time zone and the option “month” as its parameters.
The “format()” method will format the date specified in the “Date()” constructor according to the stated time zone.
Hence, the corresponding “month” against the date will be displayed on the console.
Output
![]()
![]() In the above output, the month “April” refers to the specified numeric month “3” in the Date.
In the above output, the month “April” refers to the specified numeric month “3” in the Date.
Conclusion
The “toLocaleString()” method, the “getMonth()” method, or the “Intl.DateTimeFormat()” constructor can be used to fetch the month name from a date.
The toLocaleString() method can be utilized to get the month name from the current or the specified date.
The getMonth() method fetches the month from the passed date directly.
Whereas the Intl.DateTimeFormat() constructor can be implemented to format the date based on the added option.
This blog explained the methods to fetch the name of the month from a date.
How to Pad a Number With Leading Zeros
While solving mathematical problems, there can be a requirement to return some precise value or a value having a particular size limit.
For instance, returning the set of elements having the same size to contain the small and large values simultaneously.
In such cases, padding a number with leading zeros is very effective in dealing with complex data sets.
This blog will illustrate the approaches to pad a number with leading zeros using JavaScript.
How to Pad a Number With Leading Zeros Using JavaScript?
The number can be padded with leading zeros by using the following approaches in combination with the “padStart()” method:
“String()” method with a “User-defined” function.
“toString()” method.
Let’s discuss each of the stated approaches one by one!
Approach 1: Pad a Number With Leading Zeros Using String() Method With a User-defined Function
The “padStart()” method is utilized to pad two strings.
Whereas the “String()” method transforms a value into a string.
These methods can be utilized combined with a “user-defined” function to pad the given number with the specified number of leading zeros.
Syntax
string.padStart(length, pad)
In the above-given syntax:
“length” corresponds to the final string’s length.
“pad” refers to the string which will be padded.
Example
Let’s go through the below-given example:
<script type="text/javascript">
let number = 5;function padNum(number, Length) {return String(number).padStart(Length, '0');}
console.log("The padded number with leading two zeros is:",padNum(number, String(number).length + 2 ));
console.log("The padded number with leading three zeros is:", padNum(number, String(number).length + 3));</script>
Implement the following steps as given in the above code snippet:
Firstly, initialize the stated number to be padded with the leading zeros.
In the next step, define a function named “padNum()” having the given parameters.
In the function parameters, the “number” represents the number to be padded, and the “Length” indicates the length of the leading zeros to be padded.
In the function definition, convert the passed number into the string using the “String()” method.
Also, apply the “padStart()” method to pad “zeros” with respect to the passed length.
After that, access the defined function by passing the specified number and the number of zeros to be padded via the “length” property, respectively.
Resultantly, the specified number will be padded with 2 and 3 zeros, respectively.
Output
![]()
![]() As seen, the specified number is padded with the number of leading zeros passed as parameters.
As seen, the specified number is padded with the number of leading zeros passed as parameters.
Approach 2: Padding a Number With Leading Zeros Using toString() Method
The “toString()” method gives a number in the form of a string.
This method can be implemented in combination with the “padStart()” method to transform the user-defined number into a string and pad the number of leading zeros with it.
Syntax
number.toString(radix)
In the above syntax:
“radix” points to the “base” that needs to be utilized.
Example
Let’s overview the below given example:
<script type="text/javascript">
let num = prompt("Enter a number:")
console.log("The padded number with leading zeros is:", num.toString().padStart(4, '0'));</script>
Implement the following steps in the above code:
Input the number to be padded from the user via prompt.
After that, apply the “toString()” method to convert the user-entered number into a string.
Also, apply the “padStart()” method to pad “4”, leading zeros to the entered number.
Output
![]() It can be observed that the resultant number is padded with the number of leading zeros entered by the user via prompt.
It can be observed that the resultant number is padded with the number of leading zeros entered by the user via prompt.
Conclusion
The “padStart()” method combined with the “String()” method and “user-defined” function or the “toString()” method can be used to pad a number with leading zeros.
The former approach can be implemented to pad the specified number as the number of leading zeros via function.
The latter approach can be applied to simply pad the user-defined number with a particular number of leading zeros.
This tutorial explained how to pad a specified and user-defined number with leading zeros using JavaScript.
Format a Date as YYYY-MM-DD
There are generally three types of JavaScript date input formats, including ISO format (YYYY-MM-DD, e.g., 2000-01-23), short format (DD/MM/YYYY, e.g., 23/01/2000), and long date (MM DD YYYY, e.g., Jan 23, 2000, or 23 Jan 2000) format.
However, the most commonly used date format is ISO (The International Standard) date format which follows the YYYY-MM-DD format.
This tutorial will demonstrate the methods to set the date in a YYYY-MM-DD format.
How to Format a Date as YYYY-MM-DD?
To format the date as YYYY-MM-DD, use the following JavaScript predefined methods:
Concatenation of the getFullYear(), getMonth(), and getDate() methods
toLocaleDateString() method
Method 1: Format a Date as YYYY-MM-DD Using the Concatenation of the getFullYear(), getMonth(), and getDate() Methods
For converting the date to ISO format YYYY-MM-DD, use the “getFullYear()”, “getMonth()” and “getDate()” methods of the Date object.
These methods get the month, year, and date of the respective given date.
In the upcoming examples, we will show you how it works and what we could do for a 2-digit month and date.
Syntax
The following syntax is used for the getFullYear(), getMonth(), and getDate() methods:
date.getFullYear()
date.getMonth() + 1
date.getDay()
In the above syntax:
The “getFullYear()” method gives the year in 4 digits of the specified date.
The “getMonth()” method outputs the month from 0 to 11 of date.
“getDay()” method returns a day of the week.
Example 1: Format a Date Using the Concatenation of the getFullYear(), getMonth(), and getDate() Methods
Create a new Date object by passing a specific date in the short date format as a parameter that will be formatted:
var date = new Date("8 Sep 2000");
Get the year, month, and date from the given date using the JavaScript getFullYear(), getMonth(), and getDate() methods:
var dateFormat = date.getFullYear() + "-" + (date.getMonth()+1) + "-" + date.getDate()
Finally, print the resultant date on the console:
console.log(dateFormat);
The output shows it is not in proper format as the month and the date is not in the 2-digit format:
![]() Let’s see how to get the month and date in a 2-digit format.
Example 2: Format a Date Using the Concatenation of the getFullYear(), getMonth(), and getDate() Methods in YYYY-MM-DD Format
Here, we will utilize all the JavaScript getFullYear(), getMonth(), and getDate() methods and set the append 0 as a prefix if the month and date are less than 10:
var dateFormat = date.getFullYear() + "-" +((date.getMonth()+1).length != 2 ? "0" + (date.getMonth() + 1) : (date.getMonth()+1)) + "-" + (date.getDate().length != 2 ?"0" + date.getDate() : date.getDate());
Lastly, print the resultant date on the console using the “console.log()” method:
console.log(dateFormat);
Output
Let’s see how to get the month and date in a 2-digit format.
Example 2: Format a Date Using the Concatenation of the getFullYear(), getMonth(), and getDate() Methods in YYYY-MM-DD Format
Here, we will utilize all the JavaScript getFullYear(), getMonth(), and getDate() methods and set the append 0 as a prefix if the month and date are less than 10:
var dateFormat = date.getFullYear() + "-" +((date.getMonth()+1).length != 2 ? "0" + (date.getMonth() + 1) : (date.getMonth()+1)) + "-" + (date.getDate().length != 2 ?"0" + date.getDate() : date.getDate());
Lastly, print the resultant date on the console using the “console.log()” method:
console.log(dateFormat);
Output
![]() Let’s try another method to format the date in YYYY-MM-DD format.
Let’s try another method to format the date in YYYY-MM-DD format.
Method 2: Format a Date as YYYY-MM-DD Using the toLocaleDateString() Method
Use the “toLocaleDateString()” method to convert the date to the YYYY-MM-DD format.
It gives a language-sensitive date representation string as an output.
In this method, set the “option” parameter to “2-digit“, which will return month and day in 2 digits if the value is less than 10.
Syntax
Follow the given syntax for using the toLocaleDateString() method:
toLocaleDateString(locales, options)
In the above syntax:
“locales” is a string.
“options” is an object that adjusts the output format.
Example
Call the “toLocaleDateString()” method and retrieve the year from the given date and store it in a variable “getYear”:
var getYear = date.toLocaleString("default", { year: "numeric" });
Similarly, get the month and date from the date using the “toLocaleDateString()” method and store them in variables, respectively:
var getMonth = date.toLocaleString("default", { month: "2-digit" });var getDay = date.toLocaleString("default", { day: "2-digit" });
Now, set the date in a specific format by accessing variables that store the year, month, and day in a specified format:
var dateFormat = getYear + "-" + getMonth + "-" + getDay;
Print the resultant date on the console:
console.log(dateFormat);
The output shows that the date is successfully converted into YYYY-MM-DD format
![]() We have provided all the best possible solutions to format a Date as in YYYY-MM-DD.
We have provided all the best possible solutions to format a Date as in YYYY-MM-DD.
Conclusion
To set the format of a date as YYYY-MM-DD, use the “toLocaleDateString()” method or the concatenation of the “getFullYear()”, “getMonth()” and “getDate()” methods.
In the toLocaleDateString() method, set the “option” parameter to the “2-digit” number for month and date while, in the second approach, append leading zero to the resultant value if it is less than 10.
This tutorial demonstrated the methods to set the date in a YYYY-MM-DD format.
Convert a Date to Another TimeZone Using JavaScript
A time zone belongs to the region that follows a standard local time recognized by law throughout the nation.
Some countries have their own time zone, and some countries, such as the United States or Canada, even have several time zones.
On a web page, developers may need to convert dates from one time zone to any other specified time zone for different purposes.
This post will describe the method for converting a date to any other specified time zone using JavaScript.
How to Convert a Date to Another Specified Time Zone Using JavaScript?
To convert a date to another timezone, use the given methods:
toLocaleString() method
format() method
Let’s discuss these methods in detail!
Method 1: Convert a Date to Another Time Zone Using toLocaleString() Method
For converting the date to any specified time zone, use the “toLocaleString()” method.
It will change the date from one timezone to another.
The toLocaleString() method returns a string that converts the date based on the locale and parameters passed in.
Syntax
Follow the given syntax for the “toLocaleString()” method to convert the date to another timezone:
toLocaleString("en-US", {timeZone: "country’sName"})
Example
First, create a new date object using the Date() constructor that returns the current date, and stores it in a variable “date”:
var date = new Date();
Print the current date on the console:
console.log('Current datetime: ' + date);
Call the “toLocaleString()” method to convert the date to “America/New_York” timezone and store the resultant date and time in variable “timeZoneUSA”:
var timeZoneUSA = date.toLocaleString(“en-US”, {timeZone: “America/New_York”});
Print the resultant date in the “America/New_York” timezone on the console:
console.log('USA datetime: ' + timeZoneUSA);
The output indicates that the date is successfully converted to the specified timeZone:
![]()
Method 2: Convert a Date to Another Time Zone Using format() Method
Another way to convert the date to another time zone is the “format()” method.
It converts one time zone to another.
Syntax
The following syntax is used for the format() method:
Dateobj.format(date)
Example
First, call the “Intl.DateTimeFormat” object to set the timezone in which the date will be converted into that timezone as it enables language-sensitive date and time formatting.
Here, we will convert the date to the “America/New_York” timezone:
var intlDateObj = new Intl.DateTimeFormat('en-US', {timeZone: "America/New_York"});
Then, call the format() method with the specified timezone and “date” as a parameter:
var timeZoneUSA = intlDateObj.format(date);
Print the resultant converted timezone on the console:
console.log('USA date: ' + timeZoneUSA);
Output
![]() We have gathered all the necessary information related to the conversion of a Date object to another timezone.
We have gathered all the necessary information related to the conversion of a Date object to another timezone.
Conclusion
For conversion of Date to any other timezone, use the “toLocaleString()” method or the “format()” method.
Both methods return the string of the date into the specified timezone.
This post described the methods for converting the current date to any other specified time zone using JavaScript.
Insert String at Specific Index of Another String
While dealing with the records in bulk, there can be a requirement to correct or format the data.
For instance, arranging or utilizing the contained data with respect to a particular attribute or adding meaning to it.
Moreover, in the case of encoding the data or a part of it.
In such scenarios, inserting a string at the specified index of another string using JavaScript assists in utilizing the current resources effectively.
This tutorial will discuss the approaches to inserting a string at the specified index of another string.
How to Insert/Add a String at the Specified Index of Another String Using JavaScript?
The string can be inserted at a particular index of another string using the following approaches:
“slice()” method.
“substring()” method.
“split()” and “splice()” methods.
The stated approaches will be illustrated one by one!
Approach 1: Insert a String at the Specified Index of Another String Using slice() Method
The “slice()” method accesses the selected array elements in the form of a new array without changing the original array.
This method can be implemented to slice the string value with respect to the specified index and append another string value to it.
Syntax
array.slice(start, end)
In the given syntax:
“start” and “end” point to the start and end positions, respectively.
Example
Let’s overview the following example:
<script type="text/javascript">let string = 'Linux';let specIndex = 5;let output = string.slice(0, specIndex) + 'hint';
console.log("The resultant string becomes:", output);</script>
Perform the below-stated steps, as given in the above code:
Firstly, specify the stated string value and the initialized index.
After that, apply the “slice()” method such that the stated string value is sliced with the help of the specified index.
Also, the string value “hint” will be inserted into the initialized value at the index “5”.
Finally, display the resultant string value.
Output
![]() In the above output, it can be observed that the string value “hint” is appended to the value “Linux” at the specified index.
In the above output, it can be observed that the string value “hint” is appended to the value “Linux” at the specified index.
Approach 2: Insert a String at the Specified Index of Another String Using substring() Method
The “substring()” method extracts the string characters from start to end without changing the original array.
This method can be implemented to insert a string at a particular index and then merge the remaining part of the original string.
Syntax
string.substring(start, end)
In the given syntax:
“start” and “end” refer to the start and end positions, respectively.
Example
Go through the following example:
<script type="text/javascript">let string = 'JScript';let specIndex = 1;let result = string.substring(0, specIndex) + 'ava' + string.substring(specIndex);
console.log("The resultant string becomes:", result);</script>
Apply the below-given steps, as stated in the above code-snippet:
Likewise, specify the stated string value and the index.
After that, apply the “substring()” method such that the first character is accessed from the string value.
Also, insert the string value “ava” and add it to the extracted character in the previous step.
Finally, append the remaining part of the specified string value in the first step by referring to the initialized index “1”.
This will accumulate the particular string within the specified string value with respect to the passed index.
Output
![]() In the above outcome, the “ava” string value has been appended after the first character, and the resultant string becomes “JavaScript”.
In the above outcome, the “ava” string value has been appended after the first character, and the resultant string becomes “JavaScript”.
Approach 3: Insert a String at the Specified Index of Another String Using split() and slice() Methods
The “split()” method splits a particular string into a substring array.
Whereas the “splice()” method replaces the existing array elements with the updated ones.
These methods can be applied in combination to insert a string value at the start of another string value by splitting the string into an array, splicing, and joining it.
Syntax
string.split(separator, limit)
In the given syntax:
“separator” refers to the string that needs to be used for splitting.
“limit” corresponds to the integer that limits the number of splits.
array.splice(index, num, item1,..item n)
Here:
“index” refers to the item’s index.
“num” refers to the number of items.
“Item1” and “item n” refer to the items.
Example
Let’s overview the following example:
<script type="text/javascript">let string = "hint";let appendString = "Linux";let specIndex = 0;
string = string.split('');
string.splice(specIndex, 0, appendString);let result = string.join('');
console.log("The resultant string becomes:", result)</script>
In the above code snippet:
Specify a string value “hint”.
In the next step, initialize another string value that needs to be inserted into the stated value in the previous step.
Also, initialize the value of the index.
After that, apply the “split()” method to split the associated string value into an array of characters.
Now, invoke the “splice()” method such that the string value in its parameter is inserted at the specified index of the associated string value “hint”.
Lastly, apply the “join()” method to merge the string characters and display the resultant string value.
Output
![]() It can be observed that we have successfully inserted a string at the specified index.
It can be observed that we have successfully inserted a string at the specified index.
Conclusion
The “slice()” method, the “substring()” method, or the “split()” and “slice()” methods can be used to add/insert a string at the specified index of another string.
The slice() or substring() methods can be applied to perform the desired requirement by simply slicing or accessing the string characters with respect to the specified index.
Whereas the split() and slice() methods can be utilized to insert a string value at the start of another string value by splitting the string into an array, splicing, and joining it.
This blog guided related to inserting a string at a particular index of another string.
How to Check if an Array Index Exists
While working with arrays, developers may need to check the index of an array whether exists or not before storing the value or performing any other activity.
To do so, it is required to check the specified array index with undefined; if it gets matched with the specified index, it means the index exists in the array while being equal to undefined means the index does not exist.
This tutorial will discuss the method to check if the specified index of an array exists or not using JavaScript.
How to Check/Verify if an Array Index Exists?
To check if an array index exists, we will go see the provided examples.
Example 1: Check an Array Index that does not Exist Using an undefined Keyword
Create an array of numbers:
var array = [4, 6, 8, 12];
Check if the index “5” exists in the array.
If it exists in the array, the value of the specified index will be returned; if not, then its outputs “undefined”:
if (array[5] !== undefined) {
console.log(array[5]);}
As the output shows “undefined” means the specified array index does not exist in the array:
![]()
Example 2: Check an Array Index Exists Using an undefined Keyword
Now, we will check for the index “2” in the same code; it will return the value at that index because the length of the array is “3”:
if (array[2] !== undefined) {
console.log(array[2]);}
The output displays value at the specified index as it exists:
![]()
Example 3: Check an Array Index Using Length Property
Another way is to check the array’s length with the help of the “length” property.
Here, we access the 5th index of the array while the actual length of the array is “3”.
If the length of the array is greater than “4”, then there should be an index “5” present having some value; otherwise, print the else statement:
if (array.length > 4) {
console.log(array[5]);}else{
console.log("The index 5 does not exist in array because the length of array is less than 5");}
Output
![]() We have compiled the different ways to determine whether the array index exists.
We have compiled the different ways to determine whether the array index exists.
Conclusion
To determine if an array index is present, fetch the array at the index and verify if the returned result is not equal to “undefined”.
If the result is equal to undefined, it means the array index does not exist and vice versa.
Another way to perform the same operation is to use the “length” property.
In this tutorial, we discussed the ways to check whether an array index exists.
TypeError: startsWith is not a Function
The String type object has a method called the “startsWith()” method that can be utilized to verify whether a string starts with a particular character.
If you apply this method to any other type to verify whether it starts with the specified non-string parameter, it will throw an error.
This tutorial will discuss:
How Does the “TypeError: startsWith is not a Function” Error Occur?
How to Fix the “TypeError: startsWith is not a Function” Error?
How Does the “TypeError: startsWith is not a Function” Error Occur?
JavaScript throws a “TypeError: startsWith is not a function” if the “startsWith()” method is called on a value that is not of the string type.
Let’s see an example to justify the added statement.
Example
Here, first, we will create a variable that stores a number:
const string = 927354138;
Call the “startWith()” method and pass “9” as a string argument to check whether the string starts with “9”:
const startStr = string.startsWith('9');
Print the result on the console:
console.log(startStr);
It can be observed that we have encountered the discussed error as the “startsWith()” method is called on a string type value:
![]()
How to Fix the “TypeError: startsWith is not a Function” Error?
To fix the error, use the “toString()” method with the “startsWith()” method.
The toString() method will convert the input value into string type because the startsWith() method only accepts the string type values as argument.
Syntax
Use the below-provided syntax to fix the error:
toString().startsWith(searchString)
The “searchString” is the character that has to be found at the start of the string.
Return Value
The “toString()” method returns a string representing the object.
The “startsWith()” method returns “true” if the “searchString” is at the beginning of the string else, it returns “false”.
Example
Call the startsWith() method with the “toString()” method that will convert the input into the string:
const startStr = string.toString().startsWith('9');
Output
![]() We have provided the necessary information related to the stated error and the relevant solution.
We have provided the necessary information related to the stated error and the relevant solution.
Conclusion
The “TypeError: startsWith is not a function” occurs when the method is called on the non-string type values, as the “startsWith()” method is only used for the string type values.
So, to fix this error, use the “toString()” method with the startsWith() method for converting the specified value into the string type before further processing.
In this tutorial, we defined the reason behind the stated error and the method to fix it.
Split a String With Multiple Separators Using JavaScript
The splitting string is the practice of breaking up a text string in a systematic manner so that each of the text’s components can be treated separately.
Sometimes developers need to split the long strings based on the multiple separators that contain the strings.
To do so, JavaScript provides a split() method.
This blog post will define the methods for splitting a JavaScript string with multiple separators.
How to Split a JavaScript String With Multiple Separators?
For splitting a JavaScript string with multiple separators, use the below-mentioned methods:
split() method
split() method with replaceAll() method
Let’s examine the above methods individually.
Method 1: Split a JavaScript String With Multiple Separators Using split() Method
For splitting strings with multiple separators, use the “split()” method.
The split() method splits the strings into an array of substrings based on the separators.
Syntax
Use the below-given syntax for the split() method:
split(separator)
Here, “separator” is the character, or the regex pattern utilized for splitting the string.
Return Value
It returns an array of substrings.
Example
Create a variable “string” that contains a string with multiple separators, including “spaces”, “!” and “_”:
var string = "Welcome! to the Linuxhint_Website";
Call the split() method by passing a regular expression that contains separators including “!”, “\s” (spaces), “_”.
var splitString = string.split(/[!\s_]+/);
Print the split strings on the console:
console.log(splitString);
The output shows that the string is successfully split into substrings with separators:
![]() If you are not interested in using regular expressions, then follow the below section to split string with multiple separators.
If you are not interested in using regular expressions, then follow the below section to split string with multiple separators.
Method 2: Split a JavaScript String With Multiple Separators Using split() Method With replaceAll() Method
Use the split() method with the replaceAll() method to split the JavaScript string with multiple separators.
The replaceAll() method replaces the separators with a single character, and then the split() method will split the string on the single character.
Syntax
Follow the given syntax for splitting the string with multiple separators using the split() and replaceAll() method:
replaceAll(separator, replacer).split(separator)
Example
In the following example, first, we will replace all the separators with a single separator “$” using the “replaceAll()” method and then split the string based on the single separator “$”:
var splitString = string.replaceAll(';', '$').replaceAll(',', '$') .split('$');
Output
![]() We have gathered all the best possible solutions to split the string with multiple separators.
We have gathered all the best possible solutions to split the string with multiple separators.
Conclusion
To split the JavaScript string with multiple separators, utilize the simple “split()” method, or the “split()” method with the “replaceAll()” method.
The split() method takes a regex pattern of multiple separators while the second approach will first replace all separators with one unified separator and then split on the base of the single separator.
The “split()” method with a regex pattern is an efficient way to split the strings with multiple separators.
In this blog post, we define the methods for splitting a string with multiple separators using JavaScript.
Sort the Keys in a Map Using JavaScript
A map is a unique object that holds items in key-value pairs.
Both primitive data and object data can be stored within the map.
The key-value pair is returned in the same sequence as they were inserted when iterating through the map object.
For sorting keys in maps in ascending and descending order, use the sort() and reverse() methods.
This post will define the methods to sort the map keys using JavaScript.
How to Sort the Map Keys Using JavaScript?
For sorting the keys in the map, utilize the given JavaScript pre-built methods:
sort() method
reverse() method
Let’s look at the working of these methods.
Method 1: Sort the Keys in a Map Using sort() Method
To sort the keys in the map in ascending order, use the “sort()” method with the spread operator “…” in the map object.
It is utilized to get an array of the Map’s entries to sort using the sort() method.
Syntax
The following syntax is used for sorting the map keys in ascending order:
new Map([...map.entries()].sort())
Example
Create a map in a key-value pair:
let map = new Map([
[10, 'JavaScript'],
[13, 'CSS'],
[23, 'HTML'],]);
Create a new map object and call the sort() method with the spread operator as a parameter that gets the map entries for sorting and storing the returned sorted array in variable “ascMapKeys”:
var ascMapKeys = new Map([...map.entries()].sort());
Print the array of sorted map keys on the console:
console.log(ascMapKeys);
Output
![]() If you want to sort the keys of the map in descending order, follow the given section.
If you want to sort the keys of the map in descending order, follow the given section.
Method 2: Sort the Keys in a Map Using reverse() Method
For sorting map keys in descending order, use the “reverse()” method with a spread operator.
The reverse() method reverses the order of the elements in an array.
Syntax
Use the given syntax for sorting the array in reverse order using the reverse() method:
new Map([...map.entries()].reverse())
Example
Call the reverse() method in the new map object as an argument to reverse the order of the keys:
var descMapKeys = new Map([...map.entries()].reverse());
Finally, print the resultant array of reverse order keys:
console.log(descMapKeys);
The output indicates that the keys are successfully sorted in descending order:
![]() We have gathered all the necessary information for sorting the map keys.
We have gathered all the necessary information for sorting the map keys.
Conclusion
To sort the keys in the map in ascending order, use the “sort()” method, and for descending order, utilize the “reverse()” method with a spread operator.
More specifically, the spread operator gets an array of the Map’s entries to sort in ascending and descending order.
In this post, we defined the methods to sort the keys in the map using JavaScript.
Conclusion
Set Multiple Attributes on an Element Using JavaScript
Attributes define additional features or properties of an HTML element, such as color, width, height, and so on.
To provide an attribute to the element, name-value pairs, such as “name = value”, are used where the attribute’s value should be enclosed in quotation marks.
So, to set the value of an attribute on the specified element, use the “Element.setAttribute()” method.
This post will illustrate the procedure to set the multiple attributes on an HTML element using JavaScript.
How to Set Multiple Attributes on an Element Using JavaScript?
To set multiple attributes on an element simultaneously, first, create an object with the attribute names and values.
Get a list of the object’s keys as an array with the “Object.keys()” method, then, set all the attributes on the specified HTML element with the “setAttribute()” method.
Syntax
The given syntax is used for the setAttribute() method:
element.setAttribute(attrName, attrValue);
The above syntax contains two parameters: “name” and “value”.
“attrName” is the name of the new attribute.
“attrValue” is the value of the new attribute.
This method will create a new attribute and assign it a value.
If the specified attribute already exists, then its value will get updated.
Use the given syntax for the Object.keys() method:
Object.keys(object)
It returns an array of a given object.
Example 1: Set Multiple Attributes on an Element Using forEach() Method With setAttribute() Method
First, create an element in the HTML file:
<button id="button">LINUXHINT</button>
Currently, the web page will look like this:
![]() In JavaScript code, first, create an object named “elementAttributes” and add the attributes with names and values to the object.
Here, we will add the style attribute, the name of the element, and the disable property for the button element:
const elementAttributes = {
style: 'background-color: rgb(153, 28, 49); color: white;',
name: 'LinuxButton',
disabled: '',};
Now, define a function named “setMultipleAttributesonElement” where first call the “Object.keys()” method for getting the array of the object’s keys and then utilize the “forEach()” method to iterate through the array and finally call the “setAttribute()” method to set all the defined attributes on the specified HTML element.
function setMultipleAttributesonElement(elem, elemAttributes) {Object.keys(elementAttributes).forEach(attribute => {
elem.setAttribute(attribute, elemAttributes[attribute]);});}
Fetch the button using its assigned id with the help of the “getElementById()” method:
const button = document.getElementById('button');
Invoke the defined function “setMultipleAttributesonElement” and pass the element as the first argument and the object of attributes as the second argument:
setMultipleAttributesonElement(button, elementAttributes);
The output shows that the multiple attributes of a button are successfully added:
In JavaScript code, first, create an object named “elementAttributes” and add the attributes with names and values to the object.
Here, we will add the style attribute, the name of the element, and the disable property for the button element:
const elementAttributes = {
style: 'background-color: rgb(153, 28, 49); color: white;',
name: 'LinuxButton',
disabled: '',};
Now, define a function named “setMultipleAttributesonElement” where first call the “Object.keys()” method for getting the array of the object’s keys and then utilize the “forEach()” method to iterate through the array and finally call the “setAttribute()” method to set all the defined attributes on the specified HTML element.
function setMultipleAttributesonElement(elem, elemAttributes) {Object.keys(elementAttributes).forEach(attribute => {
elem.setAttribute(attribute, elemAttributes[attribute]);});}
Fetch the button using its assigned id with the help of the “getElementById()” method:
const button = document.getElementById('button');
Invoke the defined function “setMultipleAttributesonElement” and pass the element as the first argument and the object of attributes as the second argument:
setMultipleAttributesonElement(button, elementAttributes);
The output shows that the multiple attributes of a button are successfully added:
![]() You can also set multiple attributes on an element without creating a separate object for the attributes.
To do this, follow the below example.
You can also set multiple attributes on an element without creating a separate object for the attributes.
To do this, follow the below example.
Example 2: Set Multiple Attributes on an Element Using for Loop With setAttribute() Method
Define a function with two parameters in a JavaScript file and use a for loop to set multiple attributes inside it by calling the “setAttribute()” method:
function setMultipleAttributesonElement(elem, elemAttributes) {for(let i in elemAttributes) {
elem.setAttribute(i, elemAttributes[i]);}}
Retrieve the button using its assigned id:
const button = document.getElementById('button');
Call the defined function by passing the button element and multiple attributes in the form of name-value pairs:
setMultipleAttributesonElement(button, {"style": "background-color: rgb(153, 28, 49); color: white;", "disabled":"", "name": "LinuxButton"});
Output
![]() We have compiled all the essential information related to setting the multiple attributes on an HTML element using JavaScript.
We have compiled all the essential information related to setting the multiple attributes on an HTML element using JavaScript.
Conclusion
The JavaScript predefined setAttribute()” method is used to set single or multiple attributes for an element.
To set the multiple attributes on an element, first, create an object that contains attributes in the form of names-values.
Get the keys of objects in an array using the “Object.keys()” method, then set all the attributes on the specified elements with the “setAttribute()” method.
In this post, we have illustrated the procedure to set multiple attributes on an HTML element using JavaScript.
How to Get a Random Float in a Range Using JavaScript
Generating random numbers is a very common practice, especially while solving mathematical problems.
More specifically,, there can be a requirement to generate a random number within the specified limit to avoid garbage values.
In such a case, getting a random float in a range using JavaScript effectively gets the precise value.
This tutorial will discuss the approach to get a random float in a range using JavaScript with the help of examples.
How to Get/Fetch a Random Float Number in a Range?
The “Math.random()” method can be applied to get a random float in range using JavaScript.
This method gives a random number between 0 (included) and 1 (excluded).
Example 1: Get Random Float Within the Passed Range
This example can be implemented with the help of the “parseFloat()” method.
This method parses a value in the form of a string and gives the first number in return.
Syntax
parseFloat(value)
In the above syntax:
“value” refers to the value that needs to be parsed.
In the following illustration, the random float value will be extracted based on the range of the passed values as function arguments:
<script type="text/javascript">function randomRange(min, max) {
let cal = (Math.random() * (max - min) + min);
return parseFloat(cal);}
console.log("The random float in the range is:", randomRange(2.5, 3.5));
console.log("The random float in the range is:", randomRange(5.5, 7.5));
console.log("The random float in the range is:", randomRange(8.5, 9.5));</script>
Apply the below-stated steps in the above code:
Define a function named “randomRange()” having the stated parameters, where the “min” and “max” parameters point to the range within which the random float number will be returned.
In its(function) definition, apply the “Math.random()” method to return the random number between 0 and 1.
The further algorithm in the code statement, when applied with the stated method, will return the random number between the passed range.
Algorithm: (0.5) *(3.5 – 2.5) + 2.5 = 3 (falls within the range).
In the above algorithm, “0.5” is assumed to be the generated random value.
Lastly, the resultant value will be parsed.
Output
![]()
![]() In the above output, the float values within the passed range have been displayed.
In the above output, the float values within the passed range have been displayed.
Example 2: Get Random Float Within the Specified Range
In this particular example, the random float value will be returned with respect to the specified range values:
<script type="text/javascript">function randomRange(){
let minValue = 1.5,
maxValue = 2.5,
cal = Math.random() * (maxValue - minValue) + minValue;
alert(cal);};
randomRange();</script>
Implement the following steps in the above lines of code:
Declare a function named “randomRange()”.
In its definition, assign the “min” and “max” ranges, respectively.
In the next step, likewise, apply the “Math.random()” method and the stated algorithm to generate the random numbers which fall between the specified min and max ranges.
Algorithm: (0.5) *(2.5 – 1.5) + 1.5 = 2
In the above algorithm, “0.5” is assumed to be the generated random number.
Finally, display the resultant random float value within the specified range via an alert.
Output
![]()
![]() In the above output, it can be seen that the random numbers being generated fall between the specified range.
In the above output, it can be seen that the random numbers being generated fall between the specified range.
Conclusion
The “Math.random()” method can be applied with the passed or the specified range to get a random float in range using JavaScript.
This method can be implemented to generate the random number such that the number falls between the passed or specified float values.
This article discussed the approaches to get a random float in a range using JavaScript.
Parse a String With Commas to a Number
While programming, there can be a requirement to sort the junk data such that a value of integer type is retrieved.
For instance, in the case of decoding a set of data to utilize it effectively.
In such situations, parsing a string with commas to a number is of great aid in utilizing the current resources smartly and performing multiple operations simultaneously.
This tutorial will discuss the approaches for parsing a string with commas to a number using JavaScript.
How to Parse a String With Commas into a Number Using JavaScript?
The string can be parsed with commas to a number by using the following approaches in combination with the “parseFloat()” method:
“replace()” method and “regular expression”.
“replaceAll()” method.
Let’s discuss each of the approaches one by one!
Approach 1: Parse a String With Commas to a Number Using replace() Method
The “parseFloat()” method parses a value in the form of a string and gives the first number in return.
Whereas the “replace()” method searches for a particular value in the provided string and then replaces it.
These methods can be applied along with the regular expression to parse the specified and user-defined string value with commas into a number by doing a global search for the contained commas in the string value.
Syntax
parseFloat(value)
In the above syntax:
“value” refers to the value that needs to be parsed.
string.replace(search, new)
In the above-given syntax:
“Search” is the value that will be replaced with the stated “new” value in the provided string.
Example 1: Parse a Specified String With Commas to a Number
In this example, the provided string value having commas in it will be parsed into a number:
<script type="text/javascript">
let string = '9,00,0000.2';
console.log("The given string is:", string)
let toNum = parseFloat(string.replace(/,/g, ''));
console.log("The parsed string with commas into a number is:", toNum);</script>
Perform the following steps, as given in the above code:
Firstly, initialize the stated string value and display it.
After that, apply the “replace()” method to do a global search for the contained commas in the associated string value and replace them such that the value becomes merged.
The “parseFloat()” method will parse the resultant string value in the previous step into a number.
Output
![]() In the above output, it can be observed that the commas in the specified string value are omitted first, and then it is parsed into a number.
In the above output, it can be observed that the commas in the specified string value are omitted first, and then it is parsed into a number.
Example 2: Parse a User-defined String With Commas to a Number
In this particular example, the user-defined string value having commas will be parsed into a number:
<script type="text/javascript">
let string = prompt("Enter the string to be parsed");
console.log("The given string is:", string)
let toNum = parseFloat(string.replace(/,/g, ''));
console.log("The parsed string with commas into a number is:", toNum);</script>
Implement the below-given steps, as stated in the code:
Input the string value from the user that needs to be parsed into the number and display it.
In the next step, likewise, repeat the discussed approach in the previous example for replacing the contained commas in the string value.
Lastly, display the resultant parsed string value into a number via the “parseFloat()” method.
Output
![]() The above output indicates that the user-input string value is parsed into the number successfully.
The above output indicates that the user-input string value is parsed into the number successfully.
Approach 2: Parse a String With Commas to a Number Using the replaceAll() Method
The “replaceAll()” method gives a new string with all pattern matches replaced by the specified replacement.
This method can be implemented to replace all the contained commas in the provided string simply, such that the string value becomes merged and is then parsed into a number.
Syntax
str.replaceAll(pattern, replace)
Here,
“pattern” refers to the regex or a substring that needs to be replaced.
“replace” corresponds to the replacement that needs to be done upon the pattern.
Example
Let’s overview the below-stated example:
<script type="text/javascript">
let string = '3,00,23.2';
console.log("The given string is:", string)
let toNum = parseFloat(string.replaceAll(',', ''));
console.log("The parsed string with commas into a number is:", toNum);</script>
In the above code snippet:
Similarly, specify the stated string value and display it.
After that, apply the “replaceAll()” method to replace all the contained commas in the string value such that the string value becomes merged.
Also, apply the “parseFloat()” method to parse the resultant string value in the previous step into a number.
Output
![]()
![]() We have provided the easiest method for parsing a spring with commas to a number.
We have provided the easiest method for parsing a spring with commas to a number.
Conclusion
The “parseFloat()” method in combination with the “replace()” method and regular expression or the “replaceAll()” method can be used to parse a string with commas to number.
The former approach utilizes the regular expression to search for the commas globally and perform the desired requirement.
The latter approach can be implemented to meet the requirement by simply specifying the parameters accordingly.
This article guided about parsing a string with commas to a number using JavaScript.
Get the Current Year for Copyright Using JavaScript
On web pages, updating the year in the copyright notice is a tricky task for developers, as it needs to be changed every year.
Many people don’t focus to update the copyright year every year.
However, with the provided solution in the given article, developers don’t need to change it every year as it will be done automatically.
This article will define the method for getting the current year for copyright on the web page using JavaScript.
How to Get the Current Year for Copyright Using JavaScript?
For getting the current year for copyright, use the JavaScript “getFullYear()” method of the Date Object.
It gives the number as output representing the year of the given date.
Syntax
Follow the given syntax for getting the current year:
new Date().getFullYear()
Example
First, we will create a new Date object that will return the current date:
let date = new Date();
Now, call the “getFullYear()” method to get the current year of the current date:
console.log(date.getFullYear());
The given output shows that the current year is “2022”:
![]() In the above part of the example, we have seen how the “getFullYear()” method gives the year.
Let’s retrieve the year of the current year for the copyright on the web page.
To do so, first, create a “div” in the HTML file that will show as a footer on the web page.
Assign an id “copyrightYear” and set the background color using the RGB code:
<div id="copyrightYear" style="background-color:rgb(112, 109, 109)"></div>
In the JavaScript file, use the below lines of code for getting the current year with the copyright:
const copyrightFooter = `
<p>
Copyright ${new Date().getFullYear()} Linuxhint
</p>
`;
In the above code snippet, the variable “copyrightFooter” uses backticks instead of single quotes to create a template string that stores an HTML “p” element, where the <p> tag contains the copyright message with the current year.
Now, display the current year with copyright on the web page using the “innerHTML” property by getting the reference of div using its assigned id with the help of the “getElementById()” method:
document.getElementById('copyrightYear').innerHTML = copyrightFooter;
Output
In the above part of the example, we have seen how the “getFullYear()” method gives the year.
Let’s retrieve the year of the current year for the copyright on the web page.
To do so, first, create a “div” in the HTML file that will show as a footer on the web page.
Assign an id “copyrightYear” and set the background color using the RGB code:
<div id="copyrightYear" style="background-color:rgb(112, 109, 109)"></div>
In the JavaScript file, use the below lines of code for getting the current year with the copyright:
const copyrightFooter = `
<p>
Copyright ${new Date().getFullYear()} Linuxhint
</p>
`;
In the above code snippet, the variable “copyrightFooter” uses backticks instead of single quotes to create a template string that stores an HTML “p” element, where the <p> tag contains the copyright message with the current year.
Now, display the current year with copyright on the web page using the “innerHTML” property by getting the reference of div using its assigned id with the help of the “getElementById()” method:
document.getElementById('copyrightYear').innerHTML = copyrightFooter;
Output
![]() We have provided the method for getting the current year for copyright using JavaScript.
We have provided the method for getting the current year for copyright using JavaScript.
Conclusion
To get the current year for copyright, use the “Date().getFullYear()” method.
The getFullYear() method of the Date object gives the current year of the current date.
In this article, we defined the methods for getting the current year for copyright.
Split a String Keeping the Whitespace
While sorting the data, there can be a need to allocate the fields for multiple values.
For instance, reserving the slots for the first names or surnames.
Moreover, in the case of improving the readability of the data in bulk.
In such cases, splitting a string and keeping the whitespace is very helpful in arranging and accessing the data effectively.
This blog will explain the approaches to split a string keeping the whitespace.
How to Split a String and Keep the Whitespace?
The string can be split keeping the whitespaces by using the “split()” method in combination with the following approaches:
“join()” method.
“Regular Expression”.
Let’s follow each of the approaches one by one!
Approach 1: Split a String Keeping the Whitespace Using join() Method
The “split()” method splits a string into a substring array, and the “join()” method gives an array in the form of a string.
These methods can be implemented to split a string into a substrings array, join the substrings again based on the characters, and then split again such that a character accumulates whitespace.
Syntax
string.split(separator, limit)
In the given syntax:
“separator” refers to the string that needs to be used for splitting.
“limit” corresponds to the integer that limits the number of splits.
Example
Let’s follow the below-given example:
<script type="text/javascript">
let string = 'linux hint website';
console.log("The given string is:", string)
let compute = string.split(' ')
let split = compute.join('& &').split('&')
console.log("The splitted string is:", compute);
console.log("The splitted string with whitespaces is:", split);</script>
Apply the following steps as given in the above lines of code:
Specify a string value and display it.
In the next step, apply the “split()” method having a blank space as its argument.
This will result in splitting the given string based on the blank spaces in it and converting it into a substrings array.
After that, apply the “join()” method and pass the stated characters as its argument.
This will resultantly join the substrings having the stated characters.
The “split()” method, again when applied, will split one “&” character, and the other character will accumulate the whitespace.
Finally, the splitted string with the whitespaces will be returned.
Output
![]() In the above output, it can be observed that the split string values are separated by the whitespaces.
In the above output, it can be observed that the split string values are separated by the whitespaces.
Approach 2: Split a String Keeping the Whitespace Using Regular Expression
This approach can be utilized combined with the “split()” method to split the provided string into an array of substrings separated by whitespace with the help of a regular expression.
Example
Let’s overview the following example:
<script type="text/javascript">
let string = 'Java JavaScript';
console.log("The given string is:", string)
let split = string.split(/(\s)/);
console.log("The splitted string with whitespaces is:", split);</script>
Implement the following steps in the above code snippet:
Likewise, specify the stated string value and display it.
After that, apply the “split()” method in combination with the specified regular expression within the “//” slashes.
Lastly, the “\s” searches for whitespace, and hence the given string is split into a substrings array separated by whitespace and displayed.
Output
![]() The above output signifies that the desired requirement is fulfilled.
The above output signifies that the desired requirement is fulfilled.
Conclusion
The “split()” method, in combination with the “join()” method or the “regular expression”, can be applied to split a string keeping the whitespace.
The former approach can be implemented to split the string into substrings, join the substrings again based on the particular characters, and then split again such that a character accumulates whitespace.
The latter approach can be utilized to search for white space in a string with the help of regex and splitting the string value based on that.
This blog demonstrates how to split a string and keep the whitespaces.
Split a Full Name Into First and Last
In some situations, the HTML form on a web page takes only a single text field to get the full name of the user.
Then, the developer needs to separate the name into first and last names.
For this purpose, JavaScript offers predefined methods, including the “split()” method and “substring()” methods, that can assist you.
This post will discuss the procedure to split the name into the first name and last name using JavaScript.
How to Split a Full Name Into First and Last Using JavaScript?
For splitting a full name between the first name and last name, use the following JavaScript methods:
split() method
substring() method
Let’s examine these methods one by one.
Method 1: Split the Name Into First Name and Last Name Using split() Method
To split the name into its first name and last name/ surname, use the “split()” method.
The split() method accepts a pattern and divides the String into an ordered list of substrings by searching for the pattern, then stores these substrings in an array and gives the array as an output.
Syntax
Use the following syntax for the split() method:
split(separator)
The separator is any character or pattern based on which the string will be split.
Return Value
It returns an array of separated words based on the separator.
Example
Create a variable “name” that contains a full name:
var name="Susan Cain";
Call the “split()” method and pass the “space” as a separator where the string will split:
var names = name.split(' ');
Print the split string “name” as first name and last name using the array indexes.
As we know that the split method returns an array of a list of words, so, access them using indexes:
console.log("First Name = "+ names[0]);
console.log("Last Name = "+ names[1]);
The output shows that the name is successfully split into first name and last name:
![]()
Method 2: Split the Name Into First Name and Last Name Using substring() Method
Another method to split the name into the first name and the last name is the “substring()” method.
The substring() method gives the portion of the string between the given start and end indexes or up to the string’s end.
Syntax
Follow the given syntax for the substring() method:
substring(startIndex, endIndex)
In the given syntax:
The “startIndex” is the index of the character from where the substring will be started.
“endIndex” is the end of the substring.
Return Value
It outputs a new string containing the desired portion of the input string.
Example
Create a variable “space” that will store the index of the space using the “indexOf()” method:
var space = name.indexOf(" ");
Call the “substring()” method to get the first name from the name by passing the starting index as “0” and the end index is the index of the space:
var firstName = name.substring(0, space);
To get the second part of the string or the last name, use the “substring()” method:
var lastName = name.substring(space + 1);
Print the first name and last name on the console:
console.log("First Name = "+ firstName);
console.log("Last Name = "+ lastName);
Output
![]() We have provided the easiest method related to splitting a full name into first and last names.
We have provided the easiest method related to splitting a full name into first and last names.
Conclusion
To split a full name into two parts, first name and last name, use the “split()” method and “substring()” method.
The split() method gives the array of split words in an ordered list of substrings, while the substring() method gives the string as a substring in between the start and the end indexes.
This post discussed the procedure to split the name into two parts: first name and last name using JavaScript.
Remove all Elements With Specific Class Using JavaScript
While updating a web page or the site, there are certain elements associated with functions that need to be removed instantly.
For instance, omitting a particular functionality(having multiple effects) from a web page upon the button click.
In such situations, removing all elements with a specific class using JavaScript is a very useful feature in making a website user-friendly and saving time.
This blog will illustrate the approaches to remove all elements with specific classes using JavaScript.
How to Remove all Elements With a Specific Class Using JavaScript?
To remove all elements with a specific class using JavaScript, implement the following approaches in combination with the “forEach()” and “remove()” methods:
“querySelectorAll()” method.
“Array.from()” and “getElementsByClassName()” methods.
Let’s illustrate the stated methods one by one!
Approach 1: Remove all Elements With Specific Class Using querySelectorAll() Method
The “forEach()” method applies a function for each element contained in an array.
The “remove()” method omits an element from the document.
Whereas the “querySelectorAll()” method fetches all the elements matching a CSS selector(s) and gives a node list in return.
These methods can be applied in combination to fetch various elements with identical classes, iterate through each element and remove them upon the button click.
Syntax
array.forEach(function(current, index, array), this)
In the above-given syntax:
function: It is the function that is to be executed for each element in an array.
current: This parameter signifies the current array value.
index: It points to the current element’s index.
array: It refers to the current array.
this: It corresponds to the value being passed to the function.
document.querySelectorAll(selectors)
In the given syntax:
“selectors” corresponds to one or more than one CSS selector.
Example
Let’s go through the following example:
<center><body><h2 class= "elem">This is an Image</h2><img src="template5.png" class="elem"><br><button onclick="removeElements()">Click to remove Elements</button><br><br></body></center><script type="text/javascript">function removeElements(){
let get = document.querySelectorAll('.elem');get.forEach(element => {
element.remove();});}</script>
Apply the following steps in the above code snippet:
In the HTML code, the “<h2>” and “<img>” elements, respectively have the same classes.
Also, create a button having an “onclick” event invoking the function removeElements().
Now, in the JS code, declare a function named “removeElement()”.
In its definition, apply the “querySelectorAll()” method and point to the specified class against the elements as stated in the first step.
After that, invoke the “forEach()” method to access each element via iteration.
Lastly, apply the “remove()” method to remove the iterated elements in the previous step against the fetched class.
This will result in removing all elements having the particular class upon the button click.
Output
![]() In the above output, it can be observed that the visible elements on the Document Object Model are removed upon the button click.
In the above output, it can be observed that the visible elements on the Document Object Model are removed upon the button click.
Approach 2: Remove all Elements With Specific Class Using Array.from() and getElementsByClassName() Methods
The “Array.from()” method returns an array from an object having the length of the array as its parameter.
The “getElementsByClassName()” method gives an element’s collection with a specified class name(s).
These methods can be combined to access the elements by class and return and remove them by iterating through them.
Syntax
Array.from(object, map, value)
In the above-given syntax:
“object” refers to the object to be converted into an array.
“map” corresponds to the map function that needs to be mapped on each item.
“value” points to the value to be utilized as “this” for the map function.
document.getElementsByClassName(class)
In the given syntax:
“class” represents the element’s class name.
Example
Let’s move on to the following example:
<center><body><h2 class="elem">Remove the Elements</h2><input type= "text" class= "elem" placeholder="Enter Text..."><br><input type= "checkbox" class= "elem"><br><br><button onclick="removeElements()">Click to remove Elements</button><br></body></center><script type="text/javascript">function removeElements(){
let get = Array.from(document.getElementsByClassName('elem'));get.forEach(element => {
element.remove();});}</script>
In the above lines of code:
Likewise, include the “<h2>”, and the “<input>” elements having the same classes.
Similarly, create a button with an “onclick” event redirecting to the function removeElements().
In the JavaScript code, define a function named “removeElements()”.
In its definition, apply the “Array.from()” and “getElementsByClassName()” methods in combination to return the fetched elements against the specified class in the form of an array.
After that, apply the “forEach()” and “remove()” methods to iterate through the elements in the previous step and remove them upon the button click, respectively.
Output
![]() The above output signifies that the desired functionality is fulfilled.
The above output signifies that the desired functionality is fulfilled.
Conclusion
The “forEach()” and “remove()” methods combined with the “querySelectorAll()” method or “Array.from()” and “getElementsByClassName()” methods can be used to remove all elements with specific classes using JavaScript.
The former methods can be applied to access the elements by class directly and remove them by iterating along them thereby involving less code complexity.
The latter methods can be implemented in combination to access the elements by class, return them in the form of an array and remove them by iterating through them.
This article explained how to remove all elements with a specific class using JavaScript.
How to Set Focus of an HTML Form Element
Focus on the element refers to the section of the currently active page.
In the present document, one HTML element can be focused on at a time, which could be a window, text box, or button.
In HTML forms, the input field should be an active element, as many elements do not allow focusing by default.
So, for focusing on the elements, use the HTMLElement.focus() method.
This blog post will illustrate the process of setting the focus on an element of an HTML form.
How to Set Focus of an HTML Form Element?
For setting focus to an element of an HTML form, the JavaScript focus() method can be used.
To do so, call this method while passing it the object of the element that needs to be focused.
Syntax
Follow the below-mentioned method to focus on an element of an HTML form:
HTMLElement.focus()
Let’s try some examples to see how to set focus on an element while on page loading or on the hover of an element.
Example 1: Set Focus of an HTML Form Element on Page Load
In the given example, we will set focus on the input text field on the page load.
So, create a form with an input text field that will be active while the page loads:
<form>
<input type="text" id="text" placeholder="Enter Name..."></form>
The HTML form will look like this:
![]() As you can see, the above output shows an input field that is not active.
So, to focus on this text box, use the below-given JavaScript code:
window.onload = function() {
document.getElementById("text").focus();}
In the above lines of code:
Define a function on the “window.onload” event.
Call the “focus()” method by fetching the HTML element “text box” using its assigned id with the help of the “getElementById()” method.
The corresponding output will be as follows:
As you can see, the above output shows an input field that is not active.
So, to focus on this text box, use the below-given JavaScript code:
window.onload = function() {
document.getElementById("text").focus();}
In the above lines of code:
Define a function on the “window.onload” event.
Call the “focus()” method by fetching the HTML element “text box” using its assigned id with the help of the “getElementById()” method.
The corresponding output will be as follows:
![]() The above GIF indicates that the text box is active on the page load.
Next, let’s see how to set focus on the input field while hovering on the element.
Example 2: Set Focus of an HTML Form Element on hovering the Element
To set the focus on the text box while hovering on it, use the “onmouseover” event listener:
<form>
<input type="text" id="text" placeholder="Enter Name..." onmouseover="elementFocus()"></form>
Define a function named “elementFocus()” that will trigger while the mouseover event occurs:
function elementFocus() {
document.getElementById("text").focus();}
The output shows that the textbox will be active while the mouse hovers on it:
The above GIF indicates that the text box is active on the page load.
Next, let’s see how to set focus on the input field while hovering on the element.
Example 2: Set Focus of an HTML Form Element on hovering the Element
To set the focus on the text box while hovering on it, use the “onmouseover” event listener:
<form>
<input type="text" id="text" placeholder="Enter Name..." onmouseover="elementFocus()"></form>
Define a function named “elementFocus()” that will trigger while the mouseover event occurs:
function elementFocus() {
document.getElementById("text").focus();}
The output shows that the textbox will be active while the mouse hovers on it:
![]() We have provided the essential information related to focusing the HTML element in an HTML form using JavaScript.
We have provided the essential information related to focusing the HTML element in an HTML form using JavaScript.
Conclusion
To set focus on an element of an HTML form, use the “HTMLElement.focus()” method.
It can be set on the HTML elements such as “textbox”, “button” and so on.
You can set focus on the element while on the page load or any other event.
This blog illustrated the process to set focusing on an element of an HTML form.
How to Get Element by Attribute
While developing websites, there are some situations where programmers/developers need to get the elements using their assigned attributes such as “id”, “class”, and so on.
To do this, use the JavaScript “querySelector()” method.
This tutorial will explain the process for getting the HTML element by attribute using JavaScript.
How to Get Element by Attribute?
To get an element by attribute, the “querySelector()” method is used.
It returns the document’s first element that matches the particular attribute.
This method selects a particular tag with a specific attribute value.
The parameters that need to be passed are the “TagID”, “class”, and so on.
Syntax
Use the below-mentioned syntax for getting the element by attribute:
document.querySelector("[myAttribute=value]");
In the above syntax, pass the attribute with its assigned value as a parameter.
Example
In the HTML file, first, create a “div” element using the <div> tag and assign an id “divId” to it.
Create a button inside the div element and attach an “onclick” event that will trigger the “getElement()” method for getting the element:
<div id="divId">Click to Get Element<br><br>
<button onclick="getElement()">Click</button></div>
For styling the div, we will use the below lines of code:
#divId {
padding: 10px;
height: 100px;
width: 200px;
margin: auto;
background-color: pink;}
The corresponding output will be as follows:
![]() In the JavaScript file, define a function “getElement()” that will trigger while the button is clicked.
Call the “querySelector()” method and pass the attribute “id” and its value “divId” as an argument and store the resultant element in a variable “element”:
function getElement(){
var element = document.querySelector('[id="divId"]');
alert(element); }
The given output shows that the attribute “divId” belongs to an element “div”:
In the JavaScript file, define a function “getElement()” that will trigger while the button is clicked.
Call the “querySelector()” method and pass the attribute “id” and its value “divId” as an argument and store the resultant element in a variable “element”:
function getElement(){
var element = document.querySelector('[id="divId"]');
alert(element); }
The given output shows that the attribute “divId” belongs to an element “div”:
![]() If you want to see all the elements inside the specific element, instead of calling the alert() method use the “console.log()” method that will show the element including its child elements.
function getElement(){
var element = document.querySelector('[id="divId"]');
console.log(element); }
Output
If you want to see all the elements inside the specific element, instead of calling the alert() method use the “console.log()” method that will show the element including its child elements.
function getElement(){
var element = document.querySelector('[id="divId"]');
console.log(element); }
Output
![]() The above GIF shows the HTML “div” element that has an attribute with the value “divId”, with its child elements in the console by clicking on the button.
The above GIF shows the HTML “div” element that has an attribute with the value “divId”, with its child elements in the console by clicking on the button.
Conclusion
For getting an element by attribute, use the JavaScript predefined “querySelector()” method.
It is used to select a particular tag with a specific attribute value.
This tutorial explains the process for getting the HTML element by attribute using JavaScript.
How to Check if a Value is Falsy
While performing mathematical calculations, there can be a requirement to get rid of the falsy values to get the precise result.
For instance, minimizing the errors and garbage values in a particular computation.
Moreover, there can be a requirement to assign values to the allocated resources.
In such cases, checking if a value is falsy is of great aid in minimizing the margin of error and managing the resources effectively.
This write-up will illustrate the approaches to check if a value is falsy using JavaScript.
How to Check/Verify if a Value is Falsy Using JavaScript?
To check if a value is falsy, apply the following approaches in combination with the logical “not(!)” operator:
“if/else” condition.
“every()” method.
Let’s follow each of the approaches one by one!
What are the Falsy Values?
The below-stated values are considered as “falsy”:
False
0
-0
empty string
Null
Undefined
NaN
Now, look at the discussed approaches!
Approach 1: Check if a Value is Falsy Using if/else Condition
“Logical” operators are used to analyze the logic between values.
More specifically, the logical “not(!)” operator gives the value “true” if a falsy value is indicated.
This operator can be utilized in combination with the “if/else” condition to apply a check upon the specified and user-defined values for “falsy” values and return the corresponding boolean values as a result.
Example 1: Check if the Specified Value is Falsy
In the following example, a specified value will be checked for the falsy value:
<script type="text/javascript">
let get = 0;if (!get) {
console.log('The value is falsy');} else {
console.log('The value is not falsy');}</script>
Implement the following steps in the above code snippet:
Firstly, specify the falsy value “0”.
After that, apply the logical “not(!)” operator along with the “if/else” condition to apply a check upon the specified value.
Upon the satisfied condition, the “if” statement will execute.
In the other scenario, the “else” condition will come into effect.
Output
![]() In the above output, it can be seen that the specified value is “falsy”.
Example 2: Check if the User-defined Value is Falsy
In this example, the user-defined value will be evaluated for the required condition:
<script type="text/javascript">
let a = prompt("Enter a value:");switch (a){
case 'null':
alert('The value is falsy');
break;
case 'false':
alert('The value is falsy');
break;
case '1':
alert("The value is not falsy")
break;} </script>
Perform the following steps as given in the above code snippet:
Firstly, ask the user to input a value to be checked for the stated condition.
After that, apply the “switch” statement and check for various “falsy” values entered by the user via stated cases.
Upon the matched values of the user with the “case” in the switch statement, the corresponding message within the case will be displayed via an alert.
Output
In the above output, it can be seen that the specified value is “falsy”.
Example 2: Check if the User-defined Value is Falsy
In this example, the user-defined value will be evaluated for the required condition:
<script type="text/javascript">
let a = prompt("Enter a value:");switch (a){
case 'null':
alert('The value is falsy');
break;
case 'false':
alert('The value is falsy');
break;
case '1':
alert("The value is not falsy")
break;} </script>
Perform the following steps as given in the above code snippet:
Firstly, ask the user to input a value to be checked for the stated condition.
After that, apply the “switch” statement and check for various “falsy” values entered by the user via stated cases.
Upon the matched values of the user with the “case” in the switch statement, the corresponding message within the case will be displayed via an alert.
Output
![]()
Approach 2: Check if a Value is Falsy Using every() Method
The “every()” method invokes a function for each element in an array.
This method can be implemented in combination with the logical “not(!)” operator to check for each of the values in an array for the given requirement and return the corresponding result.
Syntax
array.every(function(current, index, array), this)
In the above-given syntax:
function: It is the function to be executed for each array element.
current: it corresponds to the current value in an array.
index: It is the current element’s index.
array: It refers to the current array.
this: the value passed to the function.
Example
Let’s overview the below-given example:
<cript type="text/javascript">
let givenArray = [0, undefined, false, -0, NaN];
let givenArray2 = [0, 1, "Harry"];
output = givenArray.every(item => !item);
output2 = givenArray2.every(item => !item);
console.log(output);
console.log(output2); </script>
In the above code snippet:
In the first step, declare an array having all the possible “falsy” values in it.
Also, declare another array having the stated values.
After that, apply the “every()” method to apply a check upon each array item with the help of the logical “not(!)” operator.
The above step will be executed upon both declared arrays.
If all the contained values in an array are found “falsy”, the boolean value “true” will be displayed.
In the other case, the boolean value “false” will be logged on the console.
Output
![]() The above output signifies that all the values in the first array are “false”, but it is not the case in the second array.
The above output signifies that all the values in the first array are “false”, but it is not the case in the second array.
Conclusion
The logical “not(!)” operator in combination with the “if/else” condition or the “every()” method can be applied to check if a value is falsy.
The former approach can be implemented to apply a check upon the specified or the user-defined value for the stated requirement.
The latter approach evaluates the output by checking each of the contained values in an array for the desired requirement.
This tutorial demonstrated the approaches to check if a value is falsy.
Get Month and Date in 2 Digit Format
In some situations, the date and month needed to get in a specified format, such as the 2-digit is the most common format., the Date object offers different methods to get the date, month, and year, such as “getMonth()”, “getDate()”, and “getYear()”.
To return the date and month in 2 digits, JavaScript provides the “padStart()” method or the “slice()” method.
This post will describe the methods for getting the date and month in a 2-digit format using JavaScript.
How to Get Month and Date in 2 Digit Format?
To get the date and month in 2-digit format, use the below-provided JavaScript predefined methods:
padStart() method
slice() method
Let’s see how these methods will work.
Method 1: Get Month and Date in 2 Digit Format Using padStart() Method
For getting the date and month in 2-digit format, use the “padStart()” method with the “getMonth()” and “getDate()” methods.
The getDate() method gives the day of the month (from 1 to 31) for the particular date, whereas the getMonth() method gives the month (based on local time) for the specified date.
The padStart() method appends another string to the existing string until it reaches the defined length.
Syntax
The following syntax is used for the padstart() method:
padStart(length, padStr)
In the above syntax:
The “length” is the defined length of the resultant string.
“padStr” is the string that will append.
Here, we don’t need to append any string with a date so, we will pass “0” as a padString.
Example
First, create a date object by passing the date in a constructor of the Date Object:
var date = new Date('Jan 8, 2022');
Call the “getMonth()” method to get the month of the specified date and then call the “padStart()” method by passing “2” as the length of the date which is the first argument and “0” as a second argument which sets month in 2-digit format and stores it in variable “monthIn2Digit”:
var monthIn2Digit = String(date.getMonth() + 1).padStart(2, '0');
Here, we have added 1 to the return value of the getMonth method because the getMonth() method outputs an integer between 0 (January) and 11 (December).
Call the “getDate()” method with the “padStart()” method by passing “2” as the length of the date, which is the first argument, and “0” as a second argument and store it in the variable “dateIn2Digit”:
var dateIn2Digit = String(date.getDate()).padStart(2, '0');
Finally, print the month and the date on the console using the “console.log()” method:
console.log("Month in 2 digits " + monthIn2Digit);
console.log("Date in 2 digits " + dateIn2Digit);
The output indicates that the date and month have been successfully fetched in 2 digit format:
![]()
Method 2: Get Month and Date in 2 Digit Format Using slice() Method
To get the date and month in 2-digit format, use the “slice()” method with the “getMonth()” and “getDate()” methods.
The slice() method cuts a part of a string and outputs it as a new string.
Syntax
Follow the given syntax for the slice() method:
slice(start, end)
Here:
“start” indicates the starting point for the extraction.
It is an essential parameter.
“end” defines the point at which the extraction should end.
It is an optional parameter.
Example
Call the getMonth() method with the slice() method by passing “-2” as an argument to get the month in 2-digit format.
As the slice() method only extracts the strings, “0” is used to append before the resultant month and slice it to length 2.
It will help to get the month from 0-9 in two digits:
var monthIn2Digit = ("0" + (date.getMonth() + 1)).slice(-2);
For date, call the getDate() method with slice() method and store the resultant date in “dateIn2Digit”:
var dateIn2Digit = ("0" + date.getDate()).slice(-2);
Print the date and month on the console:
console.log("Month in 2 digits " + monthIn2Digit);
console.log("Date in 2 digits " + dateIn2Digit);
Output
![]() We have compiled the necessary information related to getting the month and date in a 2-digit format.
We have compiled the necessary information related to getting the month and date in a 2-digit format.
Conclusion
To get the date and month in 2-digit format, use the “padStart()” method or the “slice()” method with the “getMonth()” and “getDate()” methods.
The getMonth() and the getDate() methods give the date and month of the specified date, and the padStart() or the slice() methods give the resultant date and month in 2 digits format.
This post described the methods for getting the date and month in a 2-digit format using JavaScript.
Get Attribute of a Parent Node Using JavaScript
While dealing with complex codes, there is often a requirement to access the attribute(s) of a particular parent node against multiple child nodes to apply its functionalities.
In such a case, utilizing the set attributes becomes convenient rather than assigning them repeatedly.
Moreover, getting the attribute of a parent node using JavaScript assists in making the access feasible and utilizing the assigned attributes effectively.
This tutorial will discuss the approaches to get the attribute of a parent node using JavaScript.
How to Get Attribute of a Parent Node Using JavaScript?
The attribute of the parent node can be fetched by using the following approaches:
“parentElement” property with the “getAttribute()” method.
“closest()” and “getAttribute()” methods.
“jQuery” methods.
Approach 1: Get Attribute of a Parent Node Using parentElement Property With the getAttribute() Method
The “parentElement” property gives the parent element of the associated element.
Whereas the “getAttribute()” method returns the value of an element’s attribute.
These methods can be applied in combination to access the child node and get the particular attribute of the parent node by referring to the child node.
Syntax
element.getAttribute(name)
In the above-given syntax:
“name” points to the attribute’s name.
Example
Let’s overview the following example:
<div id="parentnode"><h3 id="childnode">This is Linuxhint Website</h3></div> <script type="text/javascript">
let get = document.getElementById('childnode');
let parentNode = get.parentElement.getAttribute('id');
console.log("The attribute of parent node is:", parentNode); </script>
In the above code snippet:
Firstly, include the “<div>” element having the stated “id” which will be considered as the “parent” node.
In the next step, specify the “<h3>” element having the specified “id”, which will be treated as the “child” node.
In the JS code, access the child node by its “id” via the “getElementById()” method.
After that, associate the “parentElement” property and the “getAttribute()” methods to the fetched child node.
This will result in fetching the specified attribute of the parent node by referring to the child node.
Output
![]() In the above output, it can be observed that by referring to the “id” of the parent node, the corresponding set attribute is displayed.
In the above output, it can be observed that by referring to the “id” of the parent node, the corresponding set attribute is displayed.
Approach 2: Get Attribute of a Parent Node Using closest() and getAttribute() Methods
The “closest()” method searches the elements in a DOM tree matching a specific CSS selector.
This method can be implemented in combination with the “getAttribute()” method to search for the closest element to the particular child element and fetch its(parent node) attribute.
Syntax
element.closest(selectors)
In the above syntax:
“selectors” correspond to one or more than one CSS selectors.
Example
Let’s go through the following example:
<div id="parentnode" style="text-align: center;"><h3 id="childnode">This is an Image</h3><img src="template5.png" id = "childnode"></div><script type="text/javascript">
let get = document.getElementById('childnode');
let parentNode = get.closest('#parentnode').getAttribute('style');
console.log("The attribute of parent node is:", parentNode); </script>
Apply the following steps as given in the above lines of code:
Likewise, include the parent node and two child nodes having the stated “ids”, respectively.
In the JavaScript code, access the child nodes, as discussed, using the “getElementById()” method.
In the next step, apply the “closest()” method referring to the “id” of the parent element.
This will result in accessing the closest element having the stated id.
Also, apply the “getAttribute()” method to fetch the specified “attribute” of the accessed parent element in the previous step.
Lastly, display the corresponding parent node’s attribute.
Output
![]() From the above output, it can be seen that the parent node’s attribute “style” is fetched.
From the above output, it can be seen that the parent node’s attribute “style” is fetched.
Approach 3: Get Attribute of a Parent Node Using jQuery Methods
This approach can be applied to access the child node directly and access the attribute of the parent node by referring to it via separate methods.
Example
The following example illustrates the stated concept:
<script src="https://ajax.googleapis.com/ajax/libs/jquery/3.5.1/jquery.min.js"></script><div id="parentnode"><div id="childnode"><input type="text" id = "childnode" placeholder="Enter text..."></div></div><script type="text/javascript">
alert($(childnode).parent().attr('id'))</script>
In the above code:
Include the “jQuery” library to apply its methods.
After that, specify the parent and child node likewise.
The input “text” field here will act as the “child” node.
In the JS code, access the child element, i.e., input text field.
The “parent()” and the “attr()” methods will locate the specified attribute in the parent element and display it via an alert.
Output
![]() The above output signifies that the desired requirement is achieved.
The above output signifies that the desired requirement is achieved.
Conclusion
The parentElement property with the getAttribute() method can redirect to the parent node and fetch its particular attribute.
The closest() and getAttribute() methods can fetch the closest element with respect to the associated child element and fetch its attribute.
Whereas the jQuery methods can access the child node directly and use separate methods for each function to perform the desired requirement.
This blog explains how to get the attribute of a parent node.
Get an Element by href Attribute Using JavaScript
While updating a web page or the website, there can be various elements against the same “href” attribute, which need to be fetched to specify a different URL within the attribute.
Moreover, this functionality is also helpful in the case of web pages involving various links which need to be changed from time to time.
In such cases, getting an element by the href attribute assists in accessing the element, thereby utilizing the current resources and memory effectively.
This article will demonstrate the approaches to get an element by the href attribute using JavaScript.
How to Get an Element by href Attribute?
The element can be fetched by the “href” attribute using the “document.querySelectorAll()” method.
This method fetches all the elements matching a CSS selector(s) and returns a node list.
More specifically, the stated method can be implemented to access the specified href attribute against the “<a>” anchor element and display the corresponding element.
Syntax
document.querySelectorAll(selectors)
In the given syntax:
“selectors” corresponds to one or more than one CSS selector.
Example 1: Get an Element by href Attribute
In this example, the “<a>” anchor element will be fetched by accessing the “href” attribute via the stated method:
<a href="https://google.com">Google</a><script type="text/javascript">
let get = document.querySelectorAll('[href="https://google.com"]');
console.log("The element fetched by href attribute is:", get);</script>
In the above code snippet:
Firstly, specify the “href” attribute and the stated “URL” respectively, within the anchor “<a>” element.
In the JS code, access the href attribute by applying the “document.querySelectorAll()” method having the specified URL in the previous step as its parameter.
Lastly, display the corresponding element, i.e., “<a>” against the specified href attribute.
Output
![]() In the above output, it can be seen that the corresponding “<a>” element is retrieved with the help of the specified href attribute.
Example 2: Get an Element by Matching the href Attribute Partially
In this example, the corresponding element will be fetched by specifying the href attribute partially as well:
<a href="https://google.com">Google</a><script type="text/javascript">
let get = document.querySelectorAll('[href*="google.com"]');
console.log("The element fetched by the partial href attribute is:", get); </script>
Perform the following steps in the above code:
Firstly, likewise, include the “href” attribute and specify the stated “URL” within the “<a>” element.
In the JavaScript code, access the stated element by specifying the href attribute against it partially using the “document.querySelectorAll()” method.
Finally, display the corresponding element, i.e., “<a>” against the specified partial attribute.
Output
In the above output, it can be seen that the corresponding “<a>” element is retrieved with the help of the specified href attribute.
Example 2: Get an Element by Matching the href Attribute Partially
In this example, the corresponding element will be fetched by specifying the href attribute partially as well:
<a href="https://google.com">Google</a><script type="text/javascript">
let get = document.querySelectorAll('[href*="google.com"]');
console.log("The element fetched by the partial href attribute is:", get); </script>
Perform the following steps in the above code:
Firstly, likewise, include the “href” attribute and specify the stated “URL” within the “<a>” element.
In the JavaScript code, access the stated element by specifying the href attribute against it partially using the “document.querySelectorAll()” method.
Finally, display the corresponding element, i.e., “<a>” against the specified partial attribute.
Output
![]() The above output signifies that the stated element is fetched properly by partially specifying the href attribute.
The above output signifies that the stated element is fetched properly by partially specifying the href attribute.
Conclusion
The “document.querySelectorAll()” method can be implemented to get an element by specifying full or partial “href” attributes using JavaScript.
This method can be utilized to fetch the element with the help of the contained href attribute in it.
The same functionality can be performed by specifying the partial href attribute as well.
This blog explained to get an element by href attribute.
Cannot Use Import Statement Outside Module
Modules are chunks of JavaScript code written in a file.
JavaScript modules facilitate the modularization of code by separating the entire code into modules that can be loaded from anywhere.
Modules are used for maintaining, debugging, and reusing code.
Every module consists of a piece of code that executes upon loading.
This tutorial will describe:
What is “Cannot use import statement outside a module”?
How Does “Cannot use import statement outside a module” Error Occur?
How to Fix “Cannot use import statement outside a module” Error?
What is “Cannot Use Import Statement Outside Module”?
The “Cannot use import statement outside a module” is an error that you may face while importing any statement from outside of the module.
How Does “Cannot Use Import Statement Outside Module” Occur?
This error occurs while trying to use ES6 features in a JavaScript project as modules are a newer version included in ES6, in which each module is defined by a unique “.js” file.
To import or export classes with their properties, functions, variables, or other components between files and modules, utilize the “import” or “export” statement in a module.
Let’s see how this error occurs:
Example
We have a JavaScript module “data.js” that contains the class “Data” and a method “addData()” that will import in a JavaScript project in a <script> tag using the “import” keyword:
<script>
import data from 'data.js'
data.addData();</script>
The given output shows that while importing the module, the “Cannot use import statement outside a module” error occurs:
![]() Let’s see the solution to fix this error.
Let’s see the solution to fix this error.
How to Fix “Cannot use import statement outside a module” Error?
To fix the “Cannot use import statement outside a module” error, set the type attribute of the <script> tag to the module in HTML code.
Now, you can use the syntax of the ES6 module in your JavaScript code:
<script type="module" src="">
import data from 'data.js'
data.addData();</script>
The given window shows that the error has been resolved successfully:
![]() We have compiled the essential information related to the stated error and provided the relevant solution
We have compiled the essential information related to the stated error and provided the relevant solution
Conclusion
The “SyntaxError: Cannot use import statement outside a module” occurs when you use the ES6 Modules syntax in a script that was not loaded as a module.
To resolve this error and use ES6 module imports, set the type of attribute of the <script> tag to the module in HTML code.
This tutorial described what the “cannot use import statement outside a module” error is, how it occurs and how to fix it.
Add Minutes to a Date
While programming, there can be a requirement to display the date of multiple regions automatically.
For instance, the option for changing the region manually from time to time is not provided while dealing with code.
To achieve this, adding minutes to date is of great aid in setting the minutes with respect to various regions.
This blog will explain the procedure of adding minutes to date.
How to Add Minutes to a Date?
To add minutes to date, apply the following approaches:
“setMinutes()” and “getMinutes()” methods.
“User-defined” function.
“getTime()” method.
Approach 1: Add Minutes to a Date Using setMinutes() and getMinutes() Methods
The “setMinutes()” method sets the date minutes, and the “getMinutes()” method gives the minutes from 0 to 59 in a date.
These methods can be applied to set the date such that a particular set of minutes become added to the fetched minutes in the date.
Syntax
Date.setMinutes(min, sec, millisec)
In the above syntax:
“min”, “sec”, and “millisec” refer to the set time format.
Date.getMinutes()
In the given syntax:
The current minutes with respect to the will be fetched.
Example
Let’s overview the following example:
<script type="text/javascript">
let currentDate = new Date();
console.log("The current date and time is:",currentDate)
currentDate.setMinutes(currentDate.getMinutes() + 25);
console.log("The new date and time after the added minutes become:", currentDate);</script>
Apply the below-given steps as stated in the code snippet:
Firstly, specify the “new” keyword and apply the “Date()” constructor side by side to fetch the current date and time and display it.
After that, apply the “setMinutes()” method to set the minutes such that “25” minutes will be added to the fetched minutes via the “getMinutes()” method in the current date.
Lastly, display the date and time with added minutes in it.
Output
![]() In the above output, it can be visualized that the stated minutes are added to the current time.
In the above output, it can be visualized that the stated minutes are added to the current time.
Approach 2: Add Minutes to a Date Using User-Defined Function
This approach can be implemented to add the passed minutes in the current date upon invoking the function.
Example
The below-given example illustrates the stated concept:
<script type="text/javascript">function addMinutes(date, minutes) {
date.setMinutes(date.getMinutes() + minutes);
return date;}
let currentDate = new Date();
console.log("The current date and time is:", currentDate)
let updateDate = addMinutes(currentDate, 10);
console.log("The new date and time after the added minutes become:", updateDate);</script>
In the above lines of code:
Define a function named “addMinutes()” having the stated parameters.
In its definition, apply the “setMinutes()” and “getMinutes()” methods in combination.
The stated methods will work in such a way that the passed minutes as arguments will be added to the current date.
After that, likewise, fetch the current date and time via the “Date” constructor and display it.
Finally, invoke the defined function by passing the fetched date in the previous step and the stated minutes, respectively, as arguments.
This will add “10” minutes to the fetched current date.
Output
![]() From the above output, the time difference of “10” minutes in both statements can be observed.
From the above output, the time difference of “10” minutes in both statements can be observed.
Approach 3: Add Minutes to a Date Using getTime() Method
The “getTime()” method gives the number of milliseconds elapsed since January 1, 1970.
This method can be utilized to add the user-defined minutes to the current date.
Example
Let’s go through the below-stated example:
<script type="text/javascript">
let addMinutes = prompt("Enter the minutes to add")
let currentDate = new Date();
console.log("The current date and time is:",currentDate)
let updateDate = new Date(currentDate.getTime() + addMinutes * 60000)
console.log("The new date and time after the added minutes become:",updateDate)</script>
Perform the following steps as given in the above code:
Firstly, ask the user to enter the minutes to be added.
In the next step, fetch the current date similarly via the “Date()” constructor and display it.
After that, apply the “getTime()” method by referring to the fetched date in the previous step.
This will extract the current time from the date.
Also, access the user-defined minutes and multiply them such that the entered minutes become added properly.
Note: Algorithm(x * 60000 => 20 * 60000=>1200000 milliseconds = [20 minutes].
In the above algorithm, “x” represents the user-defined number.
Lastly, add the user input minutes to the extracted time from the date, which will resultantly add the minutes to the current date.
Output
![]() The above output signifies the time difference of “20” minutes in both statements.
The above output signifies the time difference of “20” minutes in both statements.
Conclusion
The “setMinutes()” and “getMinutes()” methods, the “user-defined” function, or the “getTime()” method can be applied to add minutes to date.
The setMinutes() and getMinutes() methods can be utilized to get the minutes from the date and add the particular minutes to them.
The user-defined function can be implemented to add the passed minutes as the function’s argument to the date.
Whereas the getTime() method can be applied by taking the user input minutes and appending them to the current date.
This blog explained how to add minutes to date.
Remove Null Values From an Array
In arrays, removing null values (including empty strings, null, undefined, and so on) is an important task for developers.
To do so, JavaScript provides some methods, such as a traditional for loop that will iterate the array and add the values in a new array, the forEach() method, or the filter() method.
This tutorial will illustrate the methods for removing null values from JavaScript arrays.
How to Remove Null Values From JavaScript Array?
To remove null values from an array, use the below-given JavaScript built-in methods:
filter() method
for loop
forEach() method
Method 1: Remove Null Values From JavaScript Array Using filter() Method
Use the “filter()” method for removing null values from an array.
It creates and returns a new array by adding the elements that fulfill the requirements specified in the function.
Syntax
Follow the given syntax for the filter() method:
array.filter(function(currentValue, index, array))
In the above syntax:
A “function” that will be executed for every element of the array.
The “currentValue” displays the current element’s value.
“index” is the presently selected element’s index.
“array” is the array containing the current element.
“index” and “array” are the optional arguments, while “function” and “currentValue” are mandatory.
Example
Create an array containing numbers and null values:
var array = [1, , "", 2, 56, 13, 44, null, undefined, 85];
Call the filter() method with an arrow function as a call back function which selects only the elements that will not equal to the keyword “null” and stores it resulting in variable “res”:
var res = array.filter(elements => {
return elements !== null;});
Print the resultant array on the console:
console.log(res);
The output displays an array that removes the “null” value:
![]() Now, remove all the null, undefined, and empty values from an array, and add these multiple conditions with the AND “&&” operator:
var res = array.filter(elements => {
return (elements != null && elements !== undefined && elements !== "");});
The given output shows that all the specified values from an array are successfully removed:
Now, remove all the null, undefined, and empty values from an array, and add these multiple conditions with the AND “&&” operator:
var res = array.filter(elements => {
return (elements != null && elements !== undefined && elements !== "");});
The given output shows that all the specified values from an array are successfully removed:
![]()
Method 2: Remove Null Values From JavaScript Array Using for Loop
Use the most traditional method to iterate the array using the “for” loop with the “push()” method.
It will iterate the array until its length and push the elements into a newly created array.
Syntax
The following syntax of the “for” loop is used for removing null values from an array:
for () {// return statements}
Example
First, create an empty array:
var resArray = [];
Use the for loop to iterate the array and get the non-null values and add them to a newly created array using the “push()” method:
for (let i = 0; i < array.length; i++) {
if (array[i]) {
resArray.push(array[i]);
}}
console.log(resArray);
The output indicates that the for loop efficiently returns the array excluding the null values:
![]()
Method 3: Remove Null Values From an Array Using forEach() Method
For removing null values from an array, use the “forEach()” method with the “push()” method.
For each element of an array, it calls a callback function.
Syntax
Follow the given-provided syntax for the forEach() method:
array.forEach(function(currentValue, index, arr)
In the above syntax,
A function to execute for every element of the array.
The “currentValue” is the current element’s value.
“index” is the index of a presently selected element.
“array” is the array containing the current element.
“function” and “currentValue” are mandatory, while “index” and “array” are the optional parameters.
Example
Create an empty array to hold all array elements that are not null:
var resArray = [];
Then, call the “forEach()” method to iterate the array and verify that the element under consideration is not null inside the forEach() method.
Then, push that element of the array into the empty array if the criteria are met:
array.forEach(elements => {
if (elements !== null) {
resArray.push(elements);
}});
Print the resultant array on the console:
console.log(resArray);
The output shows an array without the “null” value:
![]() Now, eliminate all the other undefined values from an array by specifying the following condition:
array.forEach(elements => {
if (elements != null && elements !== undefined && elements !== "") {
resArray.push(elements);
}});
Output
Now, eliminate all the other undefined values from an array by specifying the following condition:
array.forEach(elements => {
if (elements != null && elements !== undefined && elements !== "") {
resArray.push(elements);
}});
Output
![]() We compiled all the best methods for removing the null values from an array.
We compiled all the best methods for removing the null values from an array.
Conclusion
To remove null values from an array, use the JavaScript prebuilt methods, including the “filter()” method, “for” loop, or “forEach()” method.
The array.filter() method is the most used method for removing the null values from an array.
The “for” loop is the traditional method to iterate the array and add the elements except for null values in an array using the “push()” method.
This tutorial illustrated the methods for removing null values from JavaScript arrays.
Join non-Empty Strings With a Separator
In JavaScript, use the “join()” method along with the “filter()” method to join the non-empty strings with a separator.
The filter() method is used to add the non-empty strings to an array before using the join() method to join them with a separator because the join() method only joins strings, including empty strings.
This article will describe the procedure to combine non-empty JavaScript strings with a separator.
How to Join/Combine non-Empty JavaScript Strings With a Separator?
The “join()” method is used to join strings, but it does not eliminate the empty strings; it only combines them.
So, to eliminate empty strings and combine only non-empty strings with a separator, first, add the strings to an array and call the “filter()” method with the join() method.
The filter() method filters only true values (non-empty strings) from an array.
Syntax
For joining non-empty strings with a separator, use the given syntax:
array.filter(Boolean).join(separator)
In the above syntax:
First, add the strings to an array using the Array.filter() method.
The filter method takes a function and calls it for each element in the array.
It will return an array of no empty strings.
The filter method uses a Boolean object as a function, which converts all false values (empty strings) to false and all true values (non-empty strings) to true.
At the last, use the Array.join() method to join the array elements.
The array elements in an array are joined into a string by the join method, which accepts a separator as an argument.
Example
In the given example, first, create five strings, two of which will be empty:
var string1 = "Linuxhint";
var string2;
var string3 = "Learn";
var string4 = "";
var string5 = "JavaScript";
Now, join all the strings with a separator, first pass all the strings in an array and then call the “filter()” method with the “join()” method and store the result in variable “nonEmptyStringArray”:
var nonEmptyStringArray = [string1, string2, string3, string4, string5]
.filter(element => Boolean(element)).join(',');
Print the result on the console using the “console.log()” method:
console.log(nonEmptyStringArray);
The output indicates that using the “filter()” method with the “join()” method, non-empty strings are successfully joined with a separator:
![]() Now, let’s see what will happen when we use only the “join()” method for joining the non-empty strings.
Join all the strings by passing them in an array and call the “join()” method with a separator (“,”):
var joinNonEmptyString = [string1, string2, string3, string4, string5].join(',');
Print the result on the console:
console.log(joinNonEmptyString);
The output indicates that the “join()” method joins all the strings including empty strings.
That’s why for joining non-empty strings, we use the “filter()” method with the “join() “method:
Now, let’s see what will happen when we use only the “join()” method for joining the non-empty strings.
Join all the strings by passing them in an array and call the “join()” method with a separator (“,”):
var joinNonEmptyString = [string1, string2, string3, string4, string5].join(',');
Print the result on the console:
console.log(joinNonEmptyString);
The output indicates that the “join()” method joins all the strings including empty strings.
That’s why for joining non-empty strings, we use the “filter()” method with the “join() “method:
![]() We have provided the essential instructions related to joining the non-empty strings with a separator.
We have provided the essential instructions related to joining the non-empty strings with a separator.
Conclusion
To join the non-empty strings with a separator, use the “filter()” method with the “join()” method.
The join() method only joins the strings, including empty strings, so to eliminate empty strings, use the filter() method that will add the non-empty strings to an array and join them with a separator using the join() method.
This article describes the procedure to combine non-empty JavaScript strings with a separator.
How to Get the Length of a Map
While programming, there can be a requirement to limit the size of a particular map so that its access can be made convenient.
For instance, adjusting the length in such a way that access to each of the key-value pairs becomes feasible.
In such case scenarios, getting the length of a map is of great aid in managing the data and memory effectively.
This article will demonstrate the approaches to get the length of a map.
How to Get the Map’s Length Using JavaScript?
A “map” holds key-value pairs in which there is no limitation upon the data type of keys.
The “size” property can be utilized to find the length of a map.
This property gives the number of elements within a map.
More specifically, it will be utilized here to calculate the length of the map by simply referring to the created map.
Syntax
x.size
In the above-given syntax:
“x” refers to the map to be computed for the size.
Example 1: Calculate the Length/Size of Map
In this particular example, the length of the created map will be computed by simply associating the “size” property with it:
<script type="text/javascript">let mapSize = new Map();
mapSize.set('id', 1);
mapSize.set('name', 'Harry');
mapSize.set('age', 23);
console.log("The length of the map is:", mapSize.size);</script>
In the above code snippet:
Firstly, create a new map object via the “new” keyword and the “Map()” constructor, respectively.
Now, apply the “set()” method to set the stated values for the keys in a map.
The orientation in the map is in the form of “key-value” pairs.
Lastly, associate the “size” property with the created map “mapSize” to return the length of the map.
Output
![]() In the above output, it can be observed that the length of the map is identical to the number of set values in the map.
Example 2: Calculate the Length/Size of Map Based on Condition
This example can be implemented to compute the map’s length based on the condition applied to a specific “key” in a map.
Let’s go through the following example:
<script type="text/javascript">let mapSize = new Map();
mapSize.set('id', 1);
mapSize.set('name', 'Harry');if (mapSize.has("id")){
console.log("The length of the map is:", mapSize.size - 1)}else{
console.log("The length of the map is:", mapSize.size)}</script>
Implement the following steps in the above code snippet:
Recall the discussed steps in the previous example for creating a new map object and setting the values for the stated “keys”.
After that, apply the “has()” method to locate the specified key within the map.
Upon the satisfied condition, apply the “size” property such that “1” is subtracted from the map’s computed length.
In the other scenario, the “else” condition will execute, referring to the default length.
Output
In the above output, it can be observed that the length of the map is identical to the number of set values in the map.
Example 2: Calculate the Length/Size of Map Based on Condition
This example can be implemented to compute the map’s length based on the condition applied to a specific “key” in a map.
Let’s go through the following example:
<script type="text/javascript">let mapSize = new Map();
mapSize.set('id', 1);
mapSize.set('name', 'Harry');if (mapSize.has("id")){
console.log("The length of the map is:", mapSize.size - 1)}else{
console.log("The length of the map is:", mapSize.size)}</script>
Implement the following steps in the above code snippet:
Recall the discussed steps in the previous example for creating a new map object and setting the values for the stated “keys”.
After that, apply the “has()” method to locate the specified key within the map.
Upon the satisfied condition, apply the “size” property such that “1” is subtracted from the map’s computed length.
In the other scenario, the “else” condition will execute, referring to the default length.
Output
![]() It is evident in the above output that the particular “key” is included in the map, and hence, the “if” condition is executed.
It is evident in the above output that the particular “key” is included in the map, and hence, the “if” condition is executed.
Conclusion
The “size” property can be utilized to get the length of a map directly or by placing an exception upon the map key.
This property can simply be applied to the created map to count the number of elements in a map and return the corresponding length.
It can also be applied based on a particular condition upon the map keys.
This tutorial demonstrates how to fetch the map’s length.
Convert an ISO String to a Date Object
To interact with date and time, including days, months, years, hours, minutes, seconds, and milliseconds, JavaScript offers the Date object.
It is used to keep track of dates and execute different tasks on them.
More specifically, ISO is an abbreviation for the International Organization for Standardization.
According to the ISO standard, the year is placed first in the date string, followed by the smallest term.
To convert a date object from an ISO string using JavaScript, utilize the constructor of the Date object.
This article will teach the methods for converting a Date Object from an ISO string using JavaScript.
How to Convert/Create a Date Object From an ISO String?
For converting an ISO string to a Date object, use the given JavaScript Date Object methods:
Date() constructor
parse() method
Method 1: Convert Date Object From an ISO String Using Date() Constructor
For converting an ISO string to a Date Object, the constructor of the Date() object is used.
For conversion, pass the ISO string to the “newDate()” method.
Syntax
Use the following syntax for the Date() constructor:
new Date(ISOdateString);
It takes the date in an ISO format as a parameter.
Return Value
It gives a new Date object.
Example
Create a string that stores the date in an ISO format:
const isoString = '2022-10-10';
Call the date constructor by passing the ISO string and store the date object in the variable “dateObj”:
const dateObj = new Date(isoString);
Print the resultant date object on the console:
console.log(dateObj);
The output indicates that the ISO string is successfully converted to the Date object using the Date() constructor:
![]()
Method 2: Convert Date Object From an ISO String Using Date.parse() Method
For the conversion of the Date object from an ISO string, the “Date.parse()” method is used.
The parse() method analyzes a date string and outputs the milliseconds since midnight on January 1, 1970.
Syntax
Follow the given-provided syntax to use the parse() method:
Date.parse(ISOdateString);
In the above syntax, “ISOdateString” is the date in an ISO string format.
Return Value
It gives back a value that is the sum of the milliseconds since January 1st, 1970, at 00:00:00 UTC, and the date obtained by analyzing the available string used to denote a date.
It gives NaN while receiving an argument with an invalid date format.
Example
Pass the ISO string in a parse() method to get the Date object in milliseconds:
const dateObj = Date.parse(isoString);
Print the result on the console:
console.log(dateObj);
Output
![]() We have compiled the essential information related to converting an ISO string to a date object.
We have compiled the essential information related to converting an ISO string to a date object.
Conclusion
In the conversion of the Date object from an ISO string, the constructor of the Date Object as “newDate()” or the “Date.parse()” method is used.
The parse() method gives the sum of the milliseconds from January 1st, 1970, at 00:00:00 UTC, and the date as a string, while Date() gives the new Date object.
This article teaches the methods for converting an ISO string to a Date Object using JavaScript.
Convert a Date string to a Timestamp Using JavaScript
While programming, there can be a requirement to fetch the date, day, year, hours, second, and milliseconds.
For instance, storing the timestamp value to get the precise date and time.
In such cases, converting a date string into a timestamp is very helpful in saving operational time and memory.
This blog will explain how to transform a date string value into a timestamp value.
How to Convert/Transform a Date String into a Timestamp?
To transform a date string into a timestamp value, implement the following methods:
“getTime()” method.
“parse()” method.
Approach 1: Convert a Date String to a Timestamp Using getTime() Method
The “getTime()” method calculates the number of milliseconds since January 1, 1970 and returns it.
This method can be applied to return the number of milliseconds till the specified date.
Example
Let’s overview the following example:
<script type="text/javascript">let dateString = '2022-11-11';let date = new Date(dateString);
console.log("The date is:", date)let timestamp = date.getTime();
console.log("The converted date string to timestamp in milliseconds is:", timestamp)
console.log("The converted date string to timestamp in seconds is:", timestamp/1000)</script>
Implement the following steps as given in the above code snippet:
Specify the date string in the first step.
After that, pass the specified date string as the parameter of the “Date” constructor and display it.
Next, apply the “getTime()” method to get the value of the time stamp with respect to the specified date string.
Finally, display the timestamp value in milliseconds and seconds, respectively.
Output
![]() From the above output, it can be observed that the value of the timestamp is retrieved with respect to the specified data string.
From the above output, it can be observed that the value of the timestamp is retrieved with respect to the specified data string.
Approach 2: Convert/Transform a Date String to a Timestamp Value Using Date.parse() Method
The “Date.parse()” method parses a date string and gives the difference of time since 1st January 1970.
This method can be applied likewise to compute the value of the timestamp from the specified date as the function’s argument.
Syntax
Date.parse(string)
In the given syntax:
“string” corresponds to the string referring to the date.
Example
Let’s move on to the below-stated example:
<script type="text/javascript">function timeStamp(date){let get = Date.parse(date);
console.log("The converted date string to timestamp in milliseconds is:", get)
console.log("The converted date string to timestamp in seconds is:", get/1000)}
console.log(timeStamp('11/11/2022'));</script>
In the above lines of code:
Declare a function named “timeStamp()” having the date that needs to be converted into a timestamp as its parameter.
In its definition, pass the function’s parameter to the “parse()” method to compute the value of the time stamp from the passed date.
Lastly, display the timestamp value in milliseconds and seconds, respectively.
Output
![]() The above output signifies that we have successfully converted the date string to a timestamp.
The above output signifies that we have successfully converted the date string to a timestamp.
Conclusion
The “getTime()” method or the “Date.parse()” method can be utilized to transform a date string into a timestamp value.
The former method can be implemented to pass the value of the date string to the constructor and compute the value of the time stamp by referring to it(constructor).
The latter method can be applied to calculate the timestamp’s value from the specified date with the help of a user-defined function.
This tutorial explained how to transform a date string value to a timestamp.
Clear img src Attribute Using JavaScript
While designing an interactive web page or site, there can be a requirement to transition between various elements from time to time.
For instance, in the process of adding captcha and image recognition techniques or hiding a particular element for the appropriate utilization of the Document Object Model(DOM).
In such cases, clearing img src attribute is beneficial in ensuring the accessible document design and making the site stand out.
This blog will explain how to clear the image src attribute using JavaScript.
How to Clear img src Attribute Using JavaScript?
To clear the img src attribute using JavaScript, the following approaches can be utilized:
“removeAttribute()” method.
“display” property.
“visibility” property.
Let’s follow each of the approaches one by one!
Approach 1: Clear img src Attribute Using removeAttribute() Method
The “removeAttribute()” method removes the attribute from an element.
This method can be utilized to clear a particular attribute resulting in removing the specified image upon the button click.
Syntax
element.removeAttribute(name)
In the given syntax:
“name” refers to the attribute’s name.
Example
Let’s follow the below-stated example:
<center><body><img id="attr" src="template4.png" /><br><br><button onclick="clearAttribute()">Click to clear the Img src attribute</button></center></body><script type="text/javascript">function clearAttribute(){
let get = document.getElementById('attr');
get.removeAttribute('src', '');}</script>
In the above code snippet:
Specify the stated image having the specified “id” and the “src” attribute.
Also, create a button with an attached “onclick” event invoking the clearAttribute() function.
In the JavaScript code, define a function named “clearAttribute()”.
In its definition, access the included image via “id” using the “getElementById()” method.
Finally, apply the “removeAttribute()” method to remove the “src” attribute, which will result in clearing the image upon the button click.
Output
![]() The above output signifies that the image specified in the “src” attribute clears upon the button click.
The above output signifies that the image specified in the “src” attribute clears upon the button click.
Approach 2: Clear img src Attribute Using display Property
The “display” property returns the display type of the associated element.
This property can be utilized to assign a value to the corresponding element such that the contained attribute is cleared upon the button click.
Syntax
object.style.display = value
In the given syntax:
“value” refers to the assigned value to the display property.
Example
Let’s overview the following example:
<center><body><img id="img" src="template3.png" /><br><br><button onclick="clearAttribute()">Click to clear the Img src attribute</button></center></body><script type="text/javascript">function clearAttribute(){
const img = document.getElementById('img');
img.style.display = 'none';}</script>
In the above lines of code, implement the following steps:
Recall the approaches for including an image via the “src” attribute and creating a button having an “onclick” event.
In the JavaScript code, define the function “clearAttribute()”.
In its definition, similarly, access the included image using the “getElementById()” method.
Lastly, assign the value “none” to the display property.
This will result in clearing the image specified in the “src” attribute.
Output
![]() The above output indicates that the desired functionality is achieved.
The above output indicates that the desired functionality is achieved.
Approach 3: Clear img src Attribute Using visibility Property
The “visibility” property assigns the value such that an element becomes visible or not.
This property can be implemented to hide the associated element, thereby disabling the image specified in the “src” attribute within the element.
Syntax
object.style.visibility = value
In the above-given syntax:
“value” points to the assigned value to the associated element.
Example
The below-given example illustrates the stated concept:
<center><body><img id="img" src="template5.png" /><br><br><button onclick="clearAttribute()">Click to clear the Img src attribute</button></center></body><script type="text/javascript">function clearAttribute(){
let get = document.getElementById('img');
get.style.visibility = 'hidden';}</script>
In the above lines of code:
Likewise, specify the stated image having the specified “id” and the “src” attribute.
Also, associate an “onclick” event with the created button redirecting to the clearAttribute() function.
In the JavaScript part of the code, define a function named “clearAttribute()”.
Here, similarly, access the included image using the “getElementById()” method.
Finally, assign the value “hidden” to the associated element, i.e., image.
This will resultantly hide the image specified in the “src” attribute, thereby clearing it upon the button click.
Output
![]() The specified image is cleared from DOM upon the button click, thereby clearing the “src” attribute.
The specified image is cleared from DOM upon the button click, thereby clearing the “src” attribute.
Conclusion
The “removeAttribute()” method, the “display” property, or the “visibility” property can be applied to clear img src attribute using JavaScript.
The removeAttribute() method can be utilized to remove the ”src” attribute which will result in clearing the specified image in it as well.
The display property hides the display thereby clearing the image upon the button click.
The visibility property hides the associated element resulting in clearing the contained “src” attribute as well.
This blog is guided to clear the img src attribute.
Split a String and get the Last Array Element
While programming, there can be a requirement to fetch a particular value i.e., surname, etc.
For instance, in the process of formatting, updating, and deleting the data or a part of it.
In such cases, splitting a string and getting the last array element can assist in sorting the data appropriately, thereby improving readability.
This blog will illustrate the approaches to split a string and fetch the last element from an array.
How to Split a String and Fetch the Last Array Element?
A string can be split and the last array element can be fetched by using the following approaches in combination with the “split()” method:
“pop()” method.
“Regular Expression”.
“Indexing” technique.
“slice()” method.
Approach 1: Split a String and Get the Last Array Element Using pop() Method
The “split()” method splits a string into a substrings array, and the “pop()” method is used to return the last element from an array.
These methods can be combined to split the provided string into an array and then fetch the last array element.
Syntax
string.split(separator, limit)
In the given syntax:
“separator” refers to the string that needs to be used for splitting.
“limit” points to the integer that limits the number of splits.
Example
Let’s go through the following example:
<script type="text/javascript">
let string = 'Python,Java,JavaScript';
console.log("The given string is:", string)
let split = string.split(',');
console.log("The string array becomes:", split);
let splitLast = split.pop();
console.log("The last array element is:", splitLast);</script>
In the above code snippet:
Specify the stated string value and display it.
After that, apply the “split()” method to split the string based on the argument and contain the split string in an array.
Finally, apply the “pop()” method to fetch the last array element from the splitted strings array.
Output
![]()
![]() From the above output, it can be observed that the last array element is fetched.
From the above output, it can be observed that the last array element is fetched.
Approach 2: Split a String and Get the Last Array Element Using Indexing Technique
The “split()” method can be combined with the indexing technique to similarly split the provided string value and point to the last array element manually via indexing it.
Example
The below-given example explains the stated concept clearly:
<script type="text/javascript">
let string = 'New,York,City';
console.log("The given string is:", string)
let split = string.split(',');
console.log("The string array becomes:", split)
console.log("The last array element is:", split[2])</script>
In the above lines of code:
Recall the discussed approaches for specifying and splitting the string into an array.
From the splitted array, point to the last array element with the help of its index.
This will result in returning the last array element from the array.
Output
![]()
![]() In the above output, it can be observed that the desired requirement is achieved.
In the above output, it can be observed that the desired requirement is achieved.
Approach 3: Split a String and Get the Last Array Element Using Regular Expression
The “regular expression” technique, in combination with the “split()” method, can be implemented to search for the expressions in the given string and split the string based on that.
Example
Let’s follow the given example:
<script type="text/javascript">const string = 'one/two/three';
console.log("The given string is:", string)
let splitLast = (string.split(/[s/]+/));
console.log("The string array becomes:", splitLast)
console.log("The last array element is:", splitLast.pop())</script>
Implement the following steps in the above code:
Likewise, specify the stated string value and display it.
After that, search for the regular expression within the square brackets[ ] in the specified string.
Also, apply the “split()” method for splitting the string based on the regular expression and contain it in an array.
Lastly, apply the “pop()” method to get the last array element.
Output
![]()
![]() The specified string value is splitted based on the regular expression “/”.
The specified string value is splitted based on the regular expression “/”.
Approach 4: Split a String and Get the Last Array Element Using slice() Method
The “slice()” method accesses the selected array elements in the form of a new array without changing the original array.
This method can be applied with the “split()” method to similarly split the specified string into an array of strings and access the last array element by referring to its index.
Syntax
array.slice(start, end)
In the given syntax:
“start” and “end” correspond to the start and end positions, respectively.
Example
Let’s overview the below-given example:
<script type="text/javascript">
let string = 'Linux,hint';
console.log("The given string is:", string)
let split = string.split(',');
console.log("The string array becomes:", split)
let splitLast = split.slice(-1)
console.log("The last array element is:", splitLast);</script>
Perform the following steps in the above lines of code:
Repeat the discussed steps for specifying and splitting a string in the form of an array.
After that, apply the “slice()” method by referring to the index of the last array element.
This will resultantly fetch the last array element.
Output
![]()
![]() The above output indicates that the last array element is retrieved successfully.
The above output indicates that the last array element is retrieved successfully.
Conclusion
The pop() method can be implemented to access the last array element most conveniently.
The regular expression approach can be utilized to search for the regex in the string and split the string based on that.
The indexing technique points to the index of the last array element manually and returns it.
The slice() method can be applicable by slicing the array element by referring to its index.
This tutorial discussed how to split a string and get the last element from an array.
Split a String and get the First Array Element
In the process of sorting the data in bulk or in the case of separating the entries based on various attributes, there can be misspelled words.
In such case scenarios, splitting a string and getting the first array element is very effective in the proper formatting, improved readability of data, and managing the data in a readable manner.
This blog will explain the approaches to split a string and get the first element from an array.
How to Split the Specified String and Get the First Array Element?
A string can be split and the first array element can be fetched by using the following approaches in combination with the “split()” method:
“Indexing” technique.
“shift()” method.
“slice()” method
Approach 1: Split a String and Get the First Array Element Using Indexing Technique
The “split()” method splits a particular string into a substrings array.
This method can be applied in combination with indexing to split the provided string into multiple strings in an array and then fetch the first string value by indexing it.
Syntax
string.split(separator, limit)
In the above syntax:
“separator” refers to the string that needs to be used for splitting.
“limit” points to the integer that limits the number of splits.
Example
Let’s overview the following example:
<script type="text/javascript">
let string = 'Linux,hint,Website';
console.log("The given string is:", string)
let split = string.split(',');
console.log("The array of the given string becomes:", split)
console.log("The first array element is:", split[0])</script>
According to the above code snippet:
Specify the stated string value and display it.
After that, apply the “split()” method such that the given string is split into multiple string values and then contained in an array.
Lastly, retrieve the first array element by specifying its index and display it.
Output
![]()
![]() From the above output, it can be observed that the given string is split into an array, and the first array element is fetched.
From the above output, it can be observed that the given string is split into an array, and the first array element is fetched.
Approach 2: Split a Particular String and Get the First Array Element Using shift() Method
The “shift()” method removes or deletes the first array item and changes the original array as well.
This method can be utilized in combination with the “split()” method to split the given string into an array of strings and access the first array element directly.
Example
The below-given example explains the discussed concept:
<script type="text/javascript">
let string = "Java,Script"
console.log("The given string is:", string)
let first = string.split(",");
console.log("The array of the given string becomes:", first)
console.log("The first array element is:", first.shift());</script>
Go through the following steps:
Firstly, specify a string value and display it.
Likewise, apply the “split()” method and display the array of the split string values.
Finally, invoke the “shift()” method to fetch the first array element directly.
Output
![]()
![]()
Approach 3: Split a String and Get the First Element From an Array Using slice() Method
The “slice()” method accesses the selected array elements in the form of a new array without changing the original array.
This method can be applied in combination with the “split()” method to similarly split the specified string into an array of strings and access the first array element with respect to the passed indexes.
Syntax
array.slice(start, end)
In the given syntax:
“start” and “end” correspond to the start and end positions, respectively.
Example
Let’s follow the below-stated example:
<script type="text/javascript">
let string = "Split,a,string"
console.log("The given string is:", string)
let first = string.split(",");
console.log("The array of the given string becomes:", first)
console.log("The first array element is:", first.slice(0,1));</script>
In the above lines of code:
Recall the discussed approaches for specifying a string and splitting it.
After that, apply the “slice()” method with the stated parameters referring to the index of the first array element.
This will resultantly access to the first array element from the split string.
Output
![]()
![]() From the above output, it is evident that the first array element is retrieved.
From the above output, it is evident that the first array element is retrieved.
Conclusion
The indexing technique can be implemented to split the string into an array of strings and point to the first array element.
The combined shift() method can be utilized to similarly split the string and directly retrieve the first array element.
The slice() method, in combination, can be applied to perform the desired requirement by pointing to the index of the first array element.
This tutorial explained how to split a specific string and get the first array element.
Get the Text of an HTML Element Using JavaScript
Sometimes, developers need to set or get the text of an HTML element to perform various tasks.
To get the text of an element, utilize the “textContent” property with innerHTML and innerText properties.
The element.textContent is a DOM Level 3 feature that is fully supported in all browsers.
This article will explain the procedure for getting the text of an element using JavaScript.
How to Get the Text of an HTML Element Using JavaScript?
Utilize the following approaches for getting the text of an element using JavaScript:
textContent property with innerHTML property
textContent property with innerText property
Method 1: Get the Text of an HTML Element Using textContent Property With innerHTML Property
The text content of the specified node and its descendants can be set or returned using the “textContent” attribute.
It returns a concatenation of each child node’s text content.
However, an empty string is returned as an output in case the element is empty.
Syntax
Follow the given syntax to utilize the “textContent” property for getting the text of the HTML element:
element.textContent
Example
In the following example, we will create an unordered list with child elements <li>.
It will show clearly that the “textContent” property can return the text content of the node’s descendants:
<ul style= display:inline-block; id="list"><li>HTML</li><li>CSS</li><li>JavaScript</li><li>Node JS</li><li>React</li></ul><br>
Create a button, and attach an “onclick” event to it that will trigger the defined “getText()” method:
<button onclick="getText()">Get the text</button>
Create a paragraph by assigning an id to it, where the output will be displayed:
<p id="text"></p>
After executing the above HTML code, the output will be as follows:
![]() Now, in a JavaScript file, first, get the element using the “getElementById()” method and then fetch its text with the help of the “textContent” property and store it in a variable “text”.
Then, call the “innerHTML” property that will print the text on the specific field in a single row with spaces.
function getText(){
var text = document.getElementById("list").textContent;
document.getElementById("text").innerHTML = text;}
The corresponding output will be as follows:
Now, in a JavaScript file, first, get the element using the “getElementById()” method and then fetch its text with the help of the “textContent” property and store it in a variable “text”.
Then, call the “innerHTML” property that will print the text on the specific field in a single row with spaces.
function getText(){
var text = document.getElementById("list").textContent;
document.getElementById("text").innerHTML = text;}
The corresponding output will be as follows:
![]() Let’s check out the second method!
Let’s check out the second method!
Method 2: Get the Text of an HTML Element Using textContent Property With innerText Property
To get the text in the same format as shown on a webpage, like in a list form, use the “innerText” property with the “textContent” property.
Syntax
The following syntax is utilized for the innerText property:
element.innerText
Example
In the JavaScript file, first, define a function “getText()” that will trigger on the button click to get the text content of the element unordered list:
function getText(){
var text = document.getElementById("list").textContent;
document.getElementById("text").innerText = text;}
Output
![]() The above GIF signifies that the “innerText” property with the “textContent” property gets the text of an HTML element in the list format.
The above GIF signifies that the “innerText” property with the “textContent” property gets the text of an HTML element in the list format.
Conclusion
To get the text of an HTML element, use the “textContent” property with the “innerHTML” and “innerText” properties.
The innerHTML will print the text of an element in an inline order, while the innerText prints the text in the same format.
This article explained the procedure for getting the text of an element using JavaScript.
Get the Max id in an Array of Objects
The Array object makes it possible to keep multiple values in a single variable., for getting the max id in an array of objects, use the “max()” method with spread operator and map() method, “forEach()” method, and the “reduce()” method.
This post will describe the methods for obtaining the max id from an array of objects.
How to Get the Max id in an Array of Objects?
For getting the max id in an array of objects, use the following methods:
max() method
forEach() method
reduce() method
Method 1: Get the Max id in an Array of Objects Using max() Method
Before using the max() method, use the “Array.map()” method to get the array of ids from an array of objects, and then apply the “max()” method with the “spread operator” to it.
The spread operator is utilized because the max() method accepts comma-separated numbers as parameters, unpack the elements of the array in the max() method using the spread operator, and then calls the max() method that will find and return the largest element “id”.
Syntax
For using the max() method to get the max id from an array of objects, follow the below-mentioned syntax:
Math.max(...idOfthearrayofObjects);
In the above syntax:
The spread operator copies all the elements from an array of ids.
The max() method returns the max id from an array.
Example
Create an array of objects named “arrObj”:
var arrObj = [{id: 8, year: 2000},{id: 14, year: 2020},{id: 23, year: 2005},{id: 20, year: 2012}];
Then, first, map the ids of the array of objects “arrObj” in an array using the “map()” method:
var arrObjIds = arrObj.map(elements => {return elements.id;});
Print the array of ids on the console:
console.log(arrObjIds);
The output shows the ids of the array of objects:
![]() Now, find the largest id from the mapped array of ids using the “max()” method by passing an array with a spread operator in the max() method as an argument:
var maxId = Math.max(...arrObjIds);</tr></tbody></table>
Finally, print the largest id on the console:[cce_bash escaped="true" theme="blackboard" nowrap="0"]
console.log(maxId);
The output displays “23” which is the largest id in an array of objects:
Now, find the largest id from the mapped array of ids using the “max()” method by passing an array with a spread operator in the max() method as an argument:
var maxId = Math.max(...arrObjIds);</tr></tbody></table>
Finally, print the largest id on the console:[cce_bash escaped="true" theme="blackboard" nowrap="0"]
console.log(maxId);
The output displays “23” which is the largest id in an array of objects:
![]()
Method 2: Get the Max id in an Array of Objects Using forEach() Method
To get the max id from an array of objects, use the “forEach()” method.
It executes a provided function once for every element of an array.
Syntax
The following syntax is used for getting the max id by using the forEach() method:
forEach((element) => {//statements})
Example
Consider the same array of objects named “arrObj” and then create a variable “maxId” by assigning the value “0”:
let maxId = 0;
Call the forEach() method and iterate every array’s element to find the max id by comparing it with the variable “maxId”:
arrObj.forEach(elements => {if (elements.id > maxId) {
maxId = elements.id;}});
Finally, print the max id from an array of objects using the “console.log()” method:
console.log(maxId);
The output displays the max id of the array of objects named “arrObj” that is “23”:
![]()
Method 3: Get the Max id in an Array of Objects Using reduce() Method
Another method for getting the max id in an array of objects using the “reduce()” method.
The reduce() method produces a single output value by running a reducer function on each element of the array.
Syntax
Follow the given syntax for using the reduce() method:
reduce((accumulator, currentValue) => {// statements})
Here:
reduce() method calls the reducer function which is the user-defined callback function that accepts two parameters “accumulator” and the “currentValue”.
“accumulator” is the resultant value referred to by the previous call to the callback function.
“currentValue” indicates the current element value.
Example
Call the reduce() method, which operates a callback function on each array element in order, passing in the result of the previous element’s calculation.
When the reducer is applied to all array elements, the outcome is a single value:
var maxId = arrObj.reduce((arr, oId) => {return (arr = arr> oId.id ? arr : oId.id);});
Output
![]() That was the essential information related to getting the max id of an array of objects.
That was the essential information related to getting the max id of an array of objects.
Conclusion
To get the max id in an array of objects, use the “max()” method with the “map()” method, the “forEach()” method or the “reduce()” method.
These methods perform well for getting the largest id from an array of objects.
This post described the methods for getting the max id from an array of objects.
Get Child Elements by Tag Name Using JavaScript
While programming, there can be multiple elements against the same tag name which need to be fetched to perform specific functionality.
These elements can be utilized for associating the parent and child elements.
In such case scenarios, getting child elements by tag name using JavaScript is of great aid in simplifying the code complexity and providing a utility to the end user.
This tutorial will explain the approaches to get child elements by tag name.
How to Get Child Elements Using Tag Name?
To get child elements by tag name, apply the following methods:
“querySelectorAll()”
“getElementById()” and “getElementsByTagName()” methods.
Method 1: Get Child Elements by Tag Name Using querySelectorAll() Method
The “querySelectorAll()” method fetches all the elements matching a CSS selector(s) and returns a node list.
This method can be applied to get the corresponding child elements by referring to the “id” of the parent element and the tag name of the child elements in one go.
Syntax
document.querySelectorAll(selectors)
In the given syntax:
“selectors” corresponds to one or more than one CSS selector.
Example
Let’s check out the following example:
<div id="parentElement"><h3>This is an image</h3><img src="template5.png"></img></div><script type="text/javascript">let get = document.querySelectorAll('#parentElement h3, img');
console.log("The child elements are:", get);</script>
In the above code snippet:
Include the “div” element having the stated “id”.
Also, add a heading and an image as “child” elements, respectively.
In the JavaScript code, access the “div” element(parent) by its “id” and the heading(child) and image(child) by their “tag” name.
This will return the child elements fetched by the tag names in the last step.
Output
![]() The above output signifies that the child elements are fetched successfully.
Let’s move on to the next approach for achieving the same functionality.
The above output signifies that the child elements are fetched successfully.
Let’s move on to the next approach for achieving the same functionality.
Method 2: Get Child Elements by Tag Name Using getElementById() and getElementsByTagName() Methods
The “getElementById()” method gives an element having the corresponding id, and the “getElementsByTagName()” method returns a collection of all elements having the tag name.
These methods can be implemented likewise to fetch the parent element by its id and the child elements by their tag name.
But here, separate methods are required to perform the specified functionality separately.
Syntax
document.getElementById(ID)
In the above syntax:
“ID” points to the associated element’s “id”
document.getElementsByTagName(tag)
In the provided syntax:
“tag” represents the element’s tag name.
Example
Let’s go through the following example:
<table id = "tbl" border="2px"><tr><td>Name</td><td>Age</td><td>City</td></tr><tr><td>Harry</td><td>25</td><td>Los Angeles</td></tr></table><script type="text/javascript">let get = document.getElementById('tbl').getElementsByTagName('td')
console.log("The child elements are:", get);</script>
Apply the following steps as given in the above code:
Specify the “table” element(parent) having the specified “id”.
After that, add the “table data” <td> element having the specified data within the “table row” <tr> element.
In the JavaScript code, firstly, fetch the parent element by its id using the “getElementById()” method.
Also, access the child element by its tag name using the “getElementsByTagName()” method simultaneously.
This will result in fetching all the child elements corresponding to the stated tag name.
Output
![]() In the above output, it can be observed that all the “td” child elements within the table(parent) are fetched successfully.
In the above output, it can be observed that all the “td” child elements within the table(parent) are fetched successfully.
Conclusion
The “querySelectorAll()” method, the “getElementById()”, or the “getElementsByTagName()” methods can be utilized to get child elements by tag name using JavaScript.
The former method can be applied to access the parent element by its id and the child elements by their tag names separately.
The latter methods can be implemented to get the id of the parent element and tag names of the child elements using separate methods for each functionality.
This blog demonstrated to fetch the child elements by tag name.
Check if the number is Not Greater than 0
Sometimes, programmers need to determine whether a given number is greater than zero.
To do so,, use conditional operators, such as less than equal to (<=) or greater than (>), with the NOT (!) operator.
This blog post will define the process to determine whether the number is not greater than 0.
How to Check if the Number is not Greater than 0?
To verify the number is greater than 0, use the “NOT” (!) operator with a conditional operator greater than, or the less than equal conditional operator is used.
The NOT (!) operator can also be utilized to negate the result, it gives “true” if the given number is not greater than 0, else, “false” is returned.
To determine whether a number is not greater than 0, use the less than equal to “<=” operator.
If the given number is not larger than zero, its outputs “true”.
Example 1: Determine Whether the Number is not Greater than 0 Using NOT (!) Operator
Create a variable “num” and assign a value “8”:
var num = 8;
Check the number greater than “0” using the greater than operator (“>”) and then negate it with the help of the not(“!”) operator.
If it gives “false”, it means the number is greater than zero; if it outputs “true”, it means the number is not greater than zero:
console.log(!(num > 0));
The output shows “false”, which signifies that the number “8” is greater than zero:
![]() Set the value of a variable to “-2”:
var num = -2;
Check whether “-2” is greater than zero or not using the NOT (!) operator:
console.log(!(num > 0));
The output displays “true”, which means the number “-2” is not greater than zero:
Set the value of a variable to “-2”:
var num = -2;
Check whether “-2” is greater than zero or not using the NOT (!) operator:
console.log(!(num > 0));
The output displays “true”, which means the number “-2” is not greater than zero:
![]() Example 2: Determine Whether the Number is not Greater than 0 Using less than equal to “<=” Operator
Here, in the following example, we will use the less than equal to “<=” operator to check if the number entered by the user is greater than zero or not.
First, create a button in the HTML file that will prompt the user to get the number by clicking on the button.
Then, attach an “onclick” event to the button that will trigger while on the click event occurs:
<button onclick = "negNumber()">Click to Check for a Number</button>
In the JavaScript file or the <script> tag, use the following lines of code:
function negNumber(){
let get = prompt("Enter a number:")
if(get <= 0){
alert("The number is not greater than 0")
}
else{
alert("The number is greater than 0")
}}
In the above code snippet:
Define a function named “negNumber()”.
Utilize the “prompt()” method to obtain the value from the user.
Check the condition using a conditional statement and the operator; if the entered value is less than or equal to 0, display an alert message that the number is not greater than 0.
In the else statement, show an alert message that the specified number is larger than 0.
The corresponding output will be as follows:
Example 2: Determine Whether the Number is not Greater than 0 Using less than equal to “<=” Operator
Here, in the following example, we will use the less than equal to “<=” operator to check if the number entered by the user is greater than zero or not.
First, create a button in the HTML file that will prompt the user to get the number by clicking on the button.
Then, attach an “onclick” event to the button that will trigger while on the click event occurs:
<button onclick = "negNumber()">Click to Check for a Number</button>
In the JavaScript file or the <script> tag, use the following lines of code:
function negNumber(){
let get = prompt("Enter a number:")
if(get <= 0){
alert("The number is not greater than 0")
}
else{
alert("The number is greater than 0")
}}
In the above code snippet:
Define a function named “negNumber()”.
Utilize the “prompt()” method to obtain the value from the user.
Check the condition using a conditional statement and the operator; if the entered value is less than or equal to 0, display an alert message that the number is not greater than 0.
In the else statement, show an alert message that the specified number is larger than 0.
The corresponding output will be as follows:
![]() We have gathered all the essential instructions related to verifying whether the number is greater than 0 or not using JavaScript.
We have gathered all the essential instructions related to verifying whether the number is greater than 0 or not using JavaScript.
Conclusion
For verifying, if the number is not greater than 0, use the “NOT” (“!”) operator with the conditional operator greater than “>” or the less than equal to “<=” conditional operator.
Both approaches give a boolean value “true” or “false” when the number is greater or not greater than zero.
This blog post defined the process to determine whether the number is not greater than 0.
Find Element by Content Using JavaScript
While dealing with the data in bulk, there can be a possibility of ambiguity in locating the element against the contained content while accessing it.
In such a case, checking out each of the elements becomes challenging.
For instance, integrating the element with a particular chunk of content.
In such situations, finding elements by content using JavaScript aids in accessing the data conveniently.
This blog will discuss the approaches to find elements by content using JavaScript.
How to Find Elements by Content Using JavaScript?
To find elements by content using JavaScript, the following approaches are in combination with the “querySelectorAll()” method and the “textContent” property:
“includes()” method.
“from()” and “match()” methods.
Approach 1: Find Element by Content Using includes() Method
The “querySelectorAll()” method fetches all the elements matching a CSS selector(s) and returns a node list.
Whereas the textContent gives the text content of the particular node, and the includes() method returns “true” if the specified string is included in a particular string.
These approaches can be applied in combination to access the “div” element, access the included text, and append the element to a null array upon the satisfied condition.
Syntax
document.querySelectorAll(selectors)
In the given syntax:
“selectors” corresponds to one or more than one CSS selector.
string.includes(value)
Here, the includes() method will search for the given “value” in the associated “string”.
Example
Let’s go through the following demonstration:
<div>Linux Hint</div><script type="text/javascript">let givenText = 'Linux Hint';let include = [];
for (let div of document.querySelectorAll('div')) {
if (div.textContent.includes(givenText)) {
include.push(div);
}}
console.log("The Element is:", include);</script>
Perform the following steps as given in the above code snippet:
In the first step, specify the “div” element having the stated content in text form.
In the JS code, initialize the string value that needs to be matched for the text content within the “div” element.
After that, declare an empty array named “include”.
In the next step, apply the “querySelectorAll()” method and the “for…of” loop to fetch the “div” element by tag and iterate through it, respectively.
Now, apply the “textContent” property and the “includes()” method in combination to check if the initialized string value is included in the “div” element.
If so, the element will be appended to the created “null” array via the “push()” method.
Output
![]() From the above output, it is evident that the element is pushed into the array upon the satisfied condition.
From the above output, it is evident that the element is pushed into the array upon the satisfied condition.
Approach 2: Find Element by Content Using Array.from() and match() Methods
The “Array.from()” method returns an array from an object having the length of the array as its parameter.
The “match()” method matches a string with a regular expression.
These methods can be implemented likewise to access the element by matching the content of the particular string value with the element’s text content.
Syntax
Array.from(object, map, value)
In the above-given syntax:
“object” points to the object to be converted into an array.
“map” corresponds to the map function that needs to be mapped on each item.
“value” is the value to be utilized as “this” for the map function.
string.match(match)
In the given syntax:
“match” refers to the value required to be searched.
Example
Let’s overview the below-given example:
<body><h3>This is JavaScript related stuff</h3></body><script type="text/javascript">let givenText = 'JavaScript';let get = Array.from(document.querySelectorAll('h3'));let include = []let match = get.find(cont => {
if (cont.textContent.match(givenText)){
include.push(cont)}});
console.log("The Element is:", include);</script>
Perform the following steps in the above lines of code:
Likewise, include the “<h3>” element.
In the JavaScript code, similarly, initialize the stated string value.
In the next step, apply the “from()” method having the “querySelectorAll()” method as its parameter, which will fetch the “<h3>” element by its tag, and the former method will convert the result into an array.
After that, initialize a “null” array.
Also, apply the “find()” method to iterate through the array returned in the previous step.
The “textContent” property and the “match()” method will match the value of the specified string with the text contained in the accessed element.
Upon the satisfied condition, the “<h3>” element will be appended to the created null array, as discussed before.
Output
![]() The above output indicates that the desired requirement is fulfilled.
The above output indicates that the desired requirement is fulfilled.
Conclusion
The combined “querySelectorAll()” method and the “textContent” property can be applied with the “includes()” method or “Array.from()” and “match()” methods to find elements by content using JavaScript.
This tutorial explained how to find elements by content using JavaScript with the help of different examples.
Check if the Element was Clicked Using JavaScript
While creating forms, programmers may want to add a restriction on the submit button when clicked multiple times, and sometimes there are some situations where the programmers need to check whether the button is clicked or not, like during testing.
To do so, use the click event on the element with the help of the event listener.
This tutorial will demonstrate how to check the element is already clicked using JavaScript.
How to Check if the Element was Clicked Using JavaScript?
To check if an element is clicked, associate the click event listener with the element after getting the element’s reference using the getElementById() method.
Let’s check out some examples for a clear understanding.
Example 1: Check if the Element was Already Clicked
In the HTML file, first, create a simple form with an input text field and a button:
<input type="text" name="name" id="name" placeholder="Enter name">
Create a submit button with the id “submit” that will be used to access the reference of the button:
<button id = "submit">Submit</button>
In the JavaScript file, add the below-given code:
var submitButton = document.getElementById('submit');
let buttonClicked = false;
submitButton.addEventListener('click', function handleClick() {
console.log('Submit button is clicked');
if (buttonClicked) {
console.log('Submit button has already clicked');
}
buttonClicked = true;});
In the above code block:
First, get the reference of the button using the “getElementById()” method.
Create a variable “buttonClicked” and set it as “false”.
Call the “addEventListener()” that will handle the click event by defining the “handleClick()” function.
Print the message on the first button and click on the defined function.
When the same button is clicked again, print the message “Submit button has already clicked”.
Change the status of the “buttonClicked” property to “true”.
The output for the given code will be as follows:
![]() Example 2: Restrict the Button Click After a Single Click
To restrict the submit button click, write the below-provided code in the JavaScript file or the <script> tag:
var submitButton = document.getElementById('submit');
let buttonClicked = false;
submitButton.addEventListener('click', function handleClick() {
if (buttonClicked) {
return;
}
console.log('Submit button is clicked');
buttonClicked = true;});
In the above-given code:
First, get the submit button reference using its assigned id with the help of the “getElementById()” method.
Create a new variable called “buttonClicked” and assign its value to “false”.
In the “addEventListener()” method, define a function called “handleClick()” to manage to click events.
After the button is clicked, set the value of the “buttonClicked” property to “true”.
In this scenario, when the button is clicked for the first time, the added message will be displayed.
In the other case, nothing will happen while clicking the same button again and again:
Example 2: Restrict the Button Click After a Single Click
To restrict the submit button click, write the below-provided code in the JavaScript file or the <script> tag:
var submitButton = document.getElementById('submit');
let buttonClicked = false;
submitButton.addEventListener('click', function handleClick() {
if (buttonClicked) {
return;
}
console.log('Submit button is clicked');
buttonClicked = true;});
In the above-given code:
First, get the submit button reference using its assigned id with the help of the “getElementById()” method.
Create a new variable called “buttonClicked” and assign its value to “false”.
In the “addEventListener()” method, define a function called “handleClick()” to manage to click events.
After the button is clicked, set the value of the “buttonClicked” property to “true”.
In this scenario, when the button is clicked for the first time, the added message will be displayed.
In the other case, nothing will happen while clicking the same button again and again:
![]() All the necessary information related to checking if the element is already clicked or not using JavaScript is provided in this post.
All the necessary information related to checking if the element is already clicked or not using JavaScript is provided in this post.
Conclusion
To check the element is already clicked, use the addEventListener() method on the element after getting the element’s reference using the getElementById() method.
Moreover, the value of the checked property of the button can also assist in this regard.
This tutorial described the procedure to check if the element is already clicked using JavaScript.
Check if an img src is Empty Using JavaScript
While designing an attractive web page or site, certain images and effects can be applied to make a website stand out.
In such a case, the process of checking whether the images are included in a web page or not manually becomes challenging and time-consuming.
However, you can use JavaScript in such a situation to keep up with the given requirements and save time effectively.
This article will demonstrate the approaches to check if an img src is empty
How to Check if an img src is Empty Using JavaScript?
To check if an img src is empty using JavaScript, the following approaches in combination with the “getAttribute()” method can be utilized:
“logical operator(!)”.
“null” datatype.
Let’s discuss each of the approaches one by one!
Approach 1: Check if an img src is Empty Using logical operator(!)
The “getAttribute()” method gives the value of an element’s attribute.
Whereas the “logical” operators are used to analyze the logic between the variables or values.
More specifically, the “logical not(!)” operator can be utilized to check if a particular attribute is included or empty in an element.
Syntax
element.getAttribute(name)
In the given syntax:
“name” refers to the attribute’s name.
Example 1: Check for a Single src Attribute in an Image
In this example, a specific attribute, i.e., src, will be checked for the stated requirement:
<img id="img"><script type="text/javascript">
let get = document.getElementById('img');
let getAttr = img.getAttribute('src');if (!getAttr) {
console.log('The img src is empty');} else {
console.log('The img src is not empty');}</script>
In the above lines of code:
Firstly, specify the “<img>” element having the stated “id”.
In the JS code, access the specified image element by its “id” using the “getElementById()” method.
In the next step, apply the “getAttribute()” method specifying the attribute “src” as its parameter, which will be checked for the stated requirement.
After that, apply the “if-else” condition such that the former statement specified in the “if” condition is displayed upon the “src” attribute being empty in the fetched image.
In the other scenario, the “else” condition will be executed.
Output
![]() In the above output, it can be observed that the “src” attribute in the image is empty.
Example 2: Check for Multiple src Attributes in the Images
In this example, two images having empty and non-empty “src” attributes will be checked:
<img id="image1"><br><br><img src="template4.PNG" id = image2><script type="text/javascript">
let get = document.getElementById('image1');
let get1 = document.getElementById('image2');
let getAttr = get.getAttribute('src');
let getAttr1 = get1.getAttribute('src');if (!getAttr && !getAttr1) {
console.log('Either of the image srcs is empty');} else {
console.log('The img src is not empty');}</script>
Apply the following steps in the above code snippet:
Firstly, specify the “<img>” element having the stated “id” as its attribute.
Likewise, include another “<img>” element having the “src” and “id” attributes, respectively.
In the JavaScript code, access both included images by their “ids” in the “getElementById()” method.
After that, apply the “getAttribute()” method upon each of the fetched images to locate the “src” attribute.
Now, apply the condition to check that if the “src” attribute is not contained in both images, the former statement is displayed with the help of the “&&” operator.
In the other scenario, the “else” condition executes.
Output
In the above output, it can be observed that the “src” attribute in the image is empty.
Example 2: Check for Multiple src Attributes in the Images
In this example, two images having empty and non-empty “src” attributes will be checked:
<img id="image1"><br><br><img src="template4.PNG" id = image2><script type="text/javascript">
let get = document.getElementById('image1');
let get1 = document.getElementById('image2');
let getAttr = get.getAttribute('src');
let getAttr1 = get1.getAttribute('src');if (!getAttr && !getAttr1) {
console.log('Either of the image srcs is empty');} else {
console.log('The img src is not empty');}</script>
Apply the following steps in the above code snippet:
Firstly, specify the “<img>” element having the stated “id” as its attribute.
Likewise, include another “<img>” element having the “src” and “id” attributes, respectively.
In the JavaScript code, access both included images by their “ids” in the “getElementById()” method.
After that, apply the “getAttribute()” method upon each of the fetched images to locate the “src” attribute.
Now, apply the condition to check that if the “src” attribute is not contained in both images, the former statement is displayed with the help of the “&&” operator.
In the other scenario, the “else” condition executes.
Output
![]() It can be seen that the “src” attribute in both images is not empty as specified by the message on the console.
It can be seen that the “src” attribute in both images is not empty as specified by the message on the console.
Approach 2: Check if a src in an img is Empty Using Null DataType.
The “null” data type denotes a null value.
This data type can be utilized in combination with the “getAttribute()” method and the “equality(==)” operator to check for the stated requirement by allocating the value null to the “src” attribute and verifying it.
Example
The following example illustrates the stated concept:
<img id= "image"><script type="text/javascript">
let get = document.getElementById('image');
let getAttr = get.getAttribute('src');if (getAttr == null) {
console.log('The img src is empty');} else {
console.log('The img src is not empty');}</script>
Now, implement the following steps in the above code snippet:
Recall the discussed approaches for including the “<img>” element and fetching it via the “getElementById()” method.
After that, likewise, access the “src” attribute from the fetched image using the “getAttribute()” method.
In the next step, check if the src attribute in the image is empty with the help of the “null” value.
In case, if the added condition is satisfied, the code added in the “if” block will be executed.
In the other scenario, similarly, the “else” condition will come into effect.
Output
![]() The above output signifies that the stated requirement is fulfilled.
The above output signifies that the stated requirement is fulfilled.
Conclusion
The “getAttribute()” method in combination with the “logical” operator(!) or the “null” data type can be used to check if an img src is empty.
The former approach can be implemented to check for the “src” attribute directly upon single and multiple images.
The latter approach can be applied to perform the desired requirement by assigning a “null” value to the fetched attribute and confirming it.
This blog explains how to check if a src in an img is empty using JavaScript.
Check if an Element is Disabled Using JavaScript
In the updating processes of a web page or the site, certain functionalities need to be disabled from time to time.
Conversely, enabling the disabled functionalities for the utilization of the current resources.
In such cases, checking if an element is disabled using JavaScript assists in accessing the elements effectively, thereby saving time at the developer’s end.
This blog will illustrate the concepts to check if an element is disabled using JavaScript.
How to Check if an Element is Disabled?
To check if an element is disabled, apply the following approaches:
“disabled” property.
“getAttribute()” method.
“jQuery”.
Let’s discuss the stated approaches one by one!
Approach 1: Check if an Element is Disabled Using disabled Property
The “disabled” property disables the associated element.
This property can be utilized alongside a condition to apply a check upon the fetched element for the stated requirement and execute the corresponding condition.
Example
Let’s go through the following example:
<center><body>
<input disabled type= "text" id= "isdis" placeholder="Enter text..." >
</body></center><script type="text/javascript">
let get= document.getElementById('isdis');if (get.disabled) {
console.log('The element is disabled!');} else {
console.log('The element is not disabled!');}</script>
In the above code snippet:
Specify an “input” text field having the attributes disabled, id and placeholder, respectively.
In the JS code, access the included element via its “id” using the “getElementById()” method.
After that, associate the “disabled” property with the fetched element to apply a condition for the stated requirement.
Upon the satisfied condition, the former condition will execute.
In the other scenario, the message against the “else” condition will be displayed.
Output
![]() In the above output, it can be observed that the input text field element is disabled, as evident in the Document Object Model(DOM) and console, respectively.
In the above output, it can be observed that the input text field element is disabled, as evident in the Document Object Model(DOM) and console, respectively.
Approach 2: Check if an Element is Disabled Using getAttribute() Method
The “getAttribute()” method returns the value of an element’s attribute.
This method can be applied to perform the stated requirement by locating the corresponding attribute in an element.
Syntax
element.getAttribute(name)
In the above-given syntax:
“name” corresponds to the attribute’s name.
Example
The following example illustrates the stated concept:
<center><body><button id="isdis" disabled = "true">Click Me</button></body></center><script type="text/javascript">
let get = document.getElementById('isdis');if (get.getAttribute('disabled')) {
console.log("The element is disabled!");} else {
console.log("The element is not disabled!");}</script>
In the above lines of code:
Firstly, include a “button” element having the attributes “id” and “disabled”, respectively.
Here, assign the boolean value “true” to the disabled attribute.
In the JavaScript code, access the included button element using the “getElementById()” method, as discussed.
Now, apply the “getAttribute()” method to locate the attribute “disabled” within the fetched element in the previous step.
Likewise, the corresponding conditions will execute upon the satisfied and unsatisfied requirements.
Output
![]() As seen above, the button is disabled on the DOM, and so is the corresponding message on the console.
As seen above, the button is disabled on the DOM, and so is the corresponding message on the console.
Approach 3: Check if an Element is Disabled Using jQuery
The “jQuery” approach can be implemented to access the included element directly and check for a particular attribute.
Example
Let’s overview the below-given example:
<textarea disabled id="isdis"></textarea><script src="https://ajax.googleapis.com/ajax/libs/jquery/3.5.1/jquery.min.js"></script><body></body><script type="text/javascript">if ($('#isdis').attr('disabled')) {
alert("The input field is disabled")}else{
alert("The input field is not disabled")}</script>
Follow the stated steps in the above lines of code:
Firstly, include a text area element having the stated attributes.
Also, include the “jQuery” library to utilize its functionalities.
In the JS code, access the element in the first step by its “id” directly.
After that, associate the “attr()” method with the fetched element such that the stated attribute in its parameter is located in the element.
Lastly, the corresponding message will be displayed via the alert dialogue box.
Output
![]() Upon verification, the corresponding element turned out to be disabled in the above output.
Upon verification, the corresponding element turned out to be disabled in the above output.
Conclusion
The “disabled” property, the “getAttribute()” method, or the “jQuery” approach can be utilized to check if an element is disabled using JavaScript.
The disabled property can be implemented alongside the condition to apply a check upon the accessed element.
The getAttribute() method performs the stated requirement by locating the corresponding attribute within an element.
Whereas the jQuery approach accesses the element and likewise checks for a particular attribute in it.
This tutorial explained how to check if an element is disabled.
Check if all Object Properties are Null
While handling the data, there is often a requirement to free up the consumed memory by removing unnecessary data.
For instance, assigning the values to the null properties can assist in utilizing the present resources effectively.
In such case scenarios, checking if all object properties are null reduces the overall compile time and improves memory management.
This blog explains how to check if all object properties are null using JavaScript.
How to Check if All Object Properties are Null Using JavaScript?
To check if all the object properties are null, invoke the “Object.values()” method in your program.
The Object.values() method takes an object and returns its own enumerable property’s values in the form of an array.
This method can be applied to accept an object as a parameter and check if each of its included properties holds a value “null”.
Syntax
Object.values(obj)
In the above syntax:
“obj” refers to the object whose property values will be returned.
Example 1: Check If All Object Properties are Null
Let’s overview the below-stated example:
<script type="text/javascript">
let object = {x: null,y: null};
let objProp = Object.values(object).every(value => {if (value === null) {
return true;}return false;});
console.log(objProp); </script>
According to the above code snippet:
Create an object named “object” having the stated properties.
In the next step, apply the “Object.values()” method, taking the created object as an argument.
After that, the “every()” method will be applied to check for each object value through iteration.
If all the values are equal to “null”, a boolean value “true” will be displayed.
In the other case, “false” will be displayed on the console.
Output
![]() From the above output, it is proved that all the object properties hold “null” values.
Example 2: Check If Object Properties are Null, Undefined, or False
This example will check for multiple values within the object and return the corresponding result:
<script type="text/javascript">
let object = {x: null, y: undefined, z: false};
let objProp = Object.values(object).every(value => {if (value === null || value === undefined || value === false) {
return true;}
return false;});
console.log(objProp);</script>
Perform the following steps as given in the above lines of code:
Likewise, create an object named “object” having the stated properties and assigned values.
After that, similarly, apply the “Object.values()” method such that the created object is checked for each of the specified values against a property in the stated condition with the help of the “OR(||)” operator.
In the case of a value being “null”, “undefined”, or “false”, a boolean value “true” will be returned.
In the other scenario, the value “false” will be displayed.
Output
From the above output, it is proved that all the object properties hold “null” values.
Example 2: Check If Object Properties are Null, Undefined, or False
This example will check for multiple values within the object and return the corresponding result:
<script type="text/javascript">
let object = {x: null, y: undefined, z: false};
let objProp = Object.values(object).every(value => {if (value === null || value === undefined || value === false) {
return true;}
return false;});
console.log(objProp);</script>
Perform the following steps as given in the above lines of code:
Likewise, create an object named “object” having the stated properties and assigned values.
After that, similarly, apply the “Object.values()” method such that the created object is checked for each of the specified values against a property in the stated condition with the help of the “OR(||)” operator.
In the case of a value being “null”, “undefined”, or “false”, a boolean value “true” will be returned.
In the other scenario, the value “false” will be displayed.
Output
![]() In the above output, it can be observed that the added conditions are evaluated as true, so, the boolean value “true” is returned.
In the above output, it can be observed that the added conditions are evaluated as true, so, the boolean value “true” is returned.
Conclusion
The “Object.values()” method can be implemented to check if all the object properties are null, undefined, or false.
The discussed first example verifies if all the values of the object properties are null.
Whereas the other example applies a condition to check for various values against the corresponding object properties.
This tutorial explained to check whether all the properties in an object are null.
Check if a Value is Not Equal to 0 Using JavaScript
The mathematical computations often involve an exception to avoid the “0” values for getting the precise calculation.
For instance, avoiding a particular calculation from being “nullified” or returning a garbage value.
In such case scenarios, checking if a value is not equal to 0 using JavaScript is a very convenient approach to minimizing the chance of encountering an error.
This tutorial will discuss the approaches to check if a value is not equal to 0 using JavaScript.
How to Check if a Value is Not Equal to 0?
To check if a value is not equal to 0 using JavaScript, the following approaches can be applied in combination with the “comparison” operators:
“if/else” condition.
“Ternary” operator.
Let’s discuss each of the approaches one by one!
Approach 1: Check if a Value is Not Equal to 0 Using if/else Condition
The “comparison” operator (==) is used to check if the two operands are equal or not, and the “if/else” condition checks for the specified condition.
These approaches can be applied in combination to apply a condition upon the specified or user-defined value and display the corresponding message.
Example 1: Check if the Specified Value is Not Equal to 0
In this example, the specified value will be checked for the stated requirement:
<script type="text/javascript">
let value = 0;if (value != 0) {
console.log('The value is not zero');} else {
console.log('The value is zero');}</script>
Perform the following steps as given in the above lines of code:
In the first step, specify the stated value that needs to be checked.
After that, apply the “if/else” condition along with the “comparison” operator(==) to check if the particular value equals “0”.
If so, the stated statement in the “if” condition will be logged on the console.
Otherwise, the “else” condition will come into effect.
Output
![]() In the above output, it can be observed that the applied condition works properly, referring to the specified value.
Example 2: Check if the User Entered Value is Not Equal to 0
This example will illustrate the stated requirement with the help of a user-defined value:
</div><script type="text/javascript">
let get = prompt("Enter the value:")if (get == 0) {
console.log('The value is zero');} else {
console.log('The value is not zero');}</div></script>
In the above code snippet:
Firstly, input the value from the user to be checked if it equals “0” or not.
Now, repeat the steps discussed in the previous example for applying a condition upon the user-defined value with the help of the “if/else” condition and the “comparison” operator(==).
Finally, display the corresponding message referring to the redirected condition.
Output
In the above output, it can be observed that the applied condition works properly, referring to the specified value.
Example 2: Check if the User Entered Value is Not Equal to 0
This example will illustrate the stated requirement with the help of a user-defined value:
</div><script type="text/javascript">
let get = prompt("Enter the value:")if (get == 0) {
console.log('The value is zero');} else {
console.log('The value is not zero');}</div></script>
In the above code snippet:
Firstly, input the value from the user to be checked if it equals “0” or not.
Now, repeat the steps discussed in the previous example for applying a condition upon the user-defined value with the help of the “if/else” condition and the “comparison” operator(==).
Finally, display the corresponding message referring to the redirected condition.
Output
![]() From the above output, it is evident that both of the specified conditions work properly.
From the above output, it is evident that both of the specified conditions work properly.
Approach 2: Check if a Value is Not Equal to 0 Using Ternary Operator
The “ternary” operator is a conditional operator having the same functionality as “if/else”.
This operator can be implemented to apply a condition upon the specified value and return the corresponding output with the help of the “comparison” operator (!=).
Syntax
condition ? <expression> : <expression>
In the above syntax:
The former expression represents the “true” expression
The latter expression refers to the “false” expression.
Example
Let’s overview the below-given example:
<script type="text/javascript">
let value = 5;
let get = (value != 0) ?
console.log('The value is not zero'):
console.log('The value is zero');</script>
Implement the following steps as given in the above demonstration:
Likewise, specify the stated value.
In the next step, apply the “ternary” operator alongside the comparison operator(!=) to check if the specified value in the previous step equals “0” or not.
Upon the satisfied condition, the former statement will be displayed, referring to the “ternary” operator’s syntax.
The latter statement will be logged on the console in the other scenario.
Output
![]() The above output signifies that the desired requirement is fulfilled.
The above output signifies that the desired requirement is fulfilled.
Conclusion
The comparison operators in combination with the “if/else” condition or the “Ternary operator can be applied to check if a value is not equal to 0 using JavaScript.
The former approach can be implemented to apply a condition upon the specified or the user-defined value for fulfilling the desired requirement.
The latter approach can be utilized likewise to apply a condition such that upon the satisfied and unsatisfied conditions, the first and the second statements are displayed, respectively.
This blog demonstrated to check if a value is not equal to 0.
Check if a Number is Between Two Numbers
While performing mathematical computations, there can be a requirement to compare different numbers based on some particular attribute.
For instance, sorting some data based on age.
In such cases, checking if a number is between two numbers is of great aid in determining the equality or difference between the values.
This write-up will demonstrate the approaches to check if a number is between two numbers.
How to Check if a Number is Between Two Numbers Using JavaScript?
To check if a number is between two numbers using JavaScript, the following approaches can be utilized:
“&&” comparison operator.
“Ternary” operator.
“Math.min()” and “Math.max()” methods.
Let’s demonstrate the stated approaches one by one!
Approach 1: Check if a Number is Between Two Numbers Using && Comparison Operator
The “&&” operator evaluates a result based on all stated conditions.
This operator can be utilized to apply a condition upon the specified number to check if it is between the other two specified numbers or not.
Example
Let’s follow the below-given example:
<script type="text/javascript">
let numBet = 50;
let min = 40;
let max = 60;if (numBet > min && numBet < max) {
console.log('The number is between the two numbers');} else {
console.log('The number is not between the two numbers');}</script>
Implement the following steps in the above code snippet:
Firstly, specify a number that needs to be checked for the required condition.
After that, initialize the stated numbers to be compared with the number in the previous step.
In the next step, apply the “if/else” condition and the “&&” operator to check whether the specified number is between the minimum and maximum numbers, respectively.
Upon the satisfied condition, the “if” condition will execute.
In the other scenario, the “else” condition will come into effect.
Output
![]() In the above output, it can be observed that the specified number is in between the two stated numbers.
In the above output, it can be observed that the specified number is in between the two stated numbers.
Approach 2: Check if a Number is Between Two Numbers Using Ternary Operator
The “ternary operator” is a conditional operator having the same functionality as “if/else”.
This operator can be applied likewise to execute a condition upon the function arguments and return the corresponding output with the help of the “&&” operator and “template literals”.
Syntax
condition ? <expression> : <expression>
In the above syntax:
The former expression represents the “true” expression
The latter expression refers to the “false” expression.
Example
Let’s move on to the following example:
<script type="text/javascript">function numBet(minNum, betNum, maxNum){
(betNum > minNum && betNum < maxNum) ?
console.log(`The number ${betNum} is between ${minNum} and ${maxNum}`)
: console.log("The number is not between the two numbers");}
numBet(10,20,30);</script>
In the above lines of code:
Define a function named “numBet()” having the stated parameters for comparing the numbers.
In its definition, likewise, apply a condition upon a particular passed number for checking if it is between the other two numbers with the help of the “&&” operator.
The former statement will execute upon the satisfied condition with the help of the “template literals”.
In the other scenario, the latter statement will be displayed.
Output
![]() The above output signifies that the number passed as an argument is between the other two passed numbers.
The above output signifies that the number passed as an argument is between the other two passed numbers.
Approach 3: Check/Verify if a Number is in Between Two Numbers Using Math.min() and Math.max() Methods
The “Math.min()” method gives the number having the lowest value, and the “Math.max()” method gives the number having the highest value.
These methods can be implemented to input a number from the user and compare it with the minimum and maximum of the passed numbers with the help of a user-defined function.
Syntax
Math.min(num1, num2,...)
Math.max(num1, num2,...)
In the above syntax:
“num1” and “num2” refer to the numbers to be compared for the minimum and maximum values, respectively.
Example
Let’s go through the below-given example:
<script type="text/javascript">
let get = prompt("Enter a number")function numBet(a, b) {
var min = Math.min(a, b),
max = Math.max(a, b);
if (get>min && get<max){
console.log("The number is between the two numbers")
}
else{
console.log("The number is not between the two numbers")}};
console.log(numBet(500,600));</script>
Apply the following steps as given in the above code:
Firstly, input a number from the user using the “prompt” box.
In the next step, define a function named “numBet()” having the stated parameters.
In the function definition, get the minimum and maximum of the passed numbers as function arguments.
After that, recall the discussed approach for applying a condition upon the stated numbers with the help of the “&&” operator.
Finally, access the defined function having the passed arguments to be compared with the user input value.
Output
![]() In the above output, both of the conditions work properly upon the user-defined number.
In the above output, both of the conditions work properly upon the user-defined number.
Conclusion
The “&&” comparison operator, the “ternary” operator, or the “Math.min()” and “Math.max()” methods can be used to check if a number is in between two numbers using JavaScript.
The && operator can be utilized simply to compare a particular number with the other two specified numbers.
The ternary operator also performs the same operation.
Whereas Math.min() and Math.max() can be implemented to compute the minimum and maximum of the parameters and compare them with the user-defined number.
This tutorial explained to verify if a number is in between two numbers using JavaScript.
Change the Background Color of an Input Field Using JavaScript
While developing websites, most developers prefer to style web pages by changing the text color, background color of a web page, or HTML elements like buttons, input fields, and so on.
To do this, developers use CSS.
However, there can be a requirement to add styling to web pages using JavaScript.
For this purpose, you can utilize the “style.background” CSS property in the JavaScript code.
This post will define the method to change the background color of an input field using JavaScript.
How to Change the Background Color of an Input Field Using JavaScript?
Use JavaScript’s “style.background” CSS property to change any element’s background color, such as the input field.
A single-color value is utilized to specify the background-color attribute.
Syntax
Follow the given syntax to change the background color of an input field:
element.style.backgroundColor = "color"
In the above syntax, add the color using its name or RGB color code.
Example: Change the Background Color of an Input Field on a Button Click
First, add an input field and a button in the HTML file using the <input> and <button> tags.
Attach a click event to the button that will trigger a function called “color()”, which will change the color of the text field when the button is clicked:
<h3>Change the Background Color of an Input Field on a Button Click</h3><input type="text" id="txt" autocomplete="off"> <br><button onclick="color()">Click</button>
After executing the HTML code, the output will be as follows:
![]() In the JavaScript file, first, define the function “color” which will fetch the input field by specifying its id in the “getElementById()” method, and then set the background color to “pink”:
function color(){
var input = document.getElementById('txt');
input.style.backgroundColor = 'pink'; }
Output
In the JavaScript file, first, define the function “color” which will fetch the input field by specifying its id in the “getElementById()” method, and then set the background color to “pink”:
function color(){
var input = document.getElementById('txt');
input.style.backgroundColor = 'pink'; }
Output
![]() The above GIF shows the input field’s background color is changed when the button is clicked.
Bonus Tip
You can also use the “RGB” values to change the background color as follows:
input.style.backgroundColor = 'rgb(' + 233 + ',' + 185+ ',' + 193 + ')';
Output
The above GIF shows the input field’s background color is changed when the button is clicked.
Bonus Tip
You can also use the “RGB” values to change the background color as follows:
input.style.backgroundColor = 'rgb(' + 233 + ',' + 185+ ',' + 193 + ')';
Output
![]() We have gathered the instructions related to changing the background color of an input field using JavaScript.
We have gathered the instructions related to changing the background color of an input field using JavaScript.
Conclusion
For changing the background color of an input field, use the “style.background” CSS property.
Using this property, you can set the color of the background attribute using the RGB color code or the color name.
This post defined the method for changing the background color of an input field using JavaScript.
Check if Variable is of Function Type Using JavaScript
While dealing with complex codes, there is often an ambiguity in figuring out the difference between an inline function and a normal function.
For instance, checking for a variable created at runtime and assigned to a function.
In such cases, checking if a variable is of function type using JavaScript assists in figuring out and sorting the data appropriately.
This blog will demonstrate the approaches to verify if a variable is of function type.
How to Check if a Variable is of Function Type?
To check/verify if a variable is of function type, the following approaches can be utilized:
“typeOf” operator.
“instanceof” operator.
“object.prototype.tostring.call()” method.
Let’s follow each of the approaches one by one!
Approach 1: Check if Variable is of Function Type Using typeOf Operator
The “typeof” operator fetches the data type of a variable.
This operator can be utilized in combination with the strict equal operator(===) to apply a check upon a particular variable for its type.
Example
Let’s check out the following example:
<script type="text/javascript">function multiply(a, b) {
return a * b;}if (typeof multiply === 'function') {
console.log('The variable is of function type');} else{
console.log('The variable is not of function type');}</script>
Let’s go through the following steps as given in the above code:
Declare a function named “multiply()” having the stated parameters for multiplying two numbers.
In its definition, multiply the specified numbers passed as the function’s parameters.
After that, apply the “typeOf” operator with the help of a strict equal operator to verify if the type of the stated variable is “function”.
As a result, the corresponding message will be displayed upon the satisfied or unsatisfied condition, respectively.
Output
![]() In the above output, it can be observed that the variable “multiply” is of the function type.
In the above output, it can be observed that the variable “multiply” is of the function type.
Approach 2: Check if Variable is of Function Type Using instanceof Operator
The “instanceof” operator is used to check the type of a particular function, variable, etc., at run time.
This operator can be utilized to check for the passed parameter for its type by specifying its corresponding type and applying a check on it.
Syntax
Name instanceof Type
In the above syntax:
“Name” refers to the name of a variable/function.
“Type” corresponds to the type of a variable/function, i.e., string, etc.
Example
The below-given example illustrates the stated concept:
<script type="text/javascript">
let sampleFunc = function(){}function verifyFunction(x) {
if (x instanceof Function) {
alert("Variable is of function type");} else{
alert("Variable is not of function type");}}
verifyFunction(sampleFunc);</script>
In the above code snippet:
Firstly, define an inline function named “sampleFunc()”.
After that, declare another function named “verifyFunction()” having the stated parameter.
In its definition, apply the “instanceof” operator in the “if/else” condition.
Here, “x” represents the name of the passed parameter, and “Function” indicates its type, respectively.
Lastly, access the stated function by passing the inline function as its parameter.
This will resultantly display the corresponding message with respect to the specified type in the operator.
Output
![]() From the above output, it can be observed that the stated inline function is of the “function” type.
From the above output, it can be observed that the stated inline function is of the “function” type.
Approach 3: Check/Verify if Variable is of the Type Function Using object.prototype.tostring.call() Method
The “Object.prototype.toString()” method is used to return a string that can represent an object.
This method can be applied with the help of an object’s method such that the type of the object is returned.
Example
Let’s overview the following example:
<script type="text/javascript">
let sampleFunc = function() {}function verifyFunction(x) {
if (Object.prototype.toString.call(x) == '[object Function]') {
console.log("Variable is of function type");} else {
console.log("Variable is not of function type");}}
verifyFunction(sampleFunc);</script>
Perform the following steps as stated in the above lines of code:
Likewise, declare an inline function named “sampleFunc()”.
In the next step, define a function named “verifyFunction()” having the stated parameter.
In its definition, apply the “Object.prototype.toString.call()” method by referring to the function’s parameter.
The “Function” here represents the type of the particular function to be checked upon.
The added “if” condition executes if the passed parameter is a function.
In the other scenario, the “else” condition will get executed.
Output
![]() The above output indicates that the required functionality is achieved.
The above output indicates that the required functionality is achieved.
Conclusion
The “typeOf” operator, the “instanceof” operator, or the “object.prototype.tostring.call()” method can check/verify if a variable is of function type.
The typeOf operator can be combined with the strict equal operator to check for the type of a variable.
The instance of the operator checks for the passed variable by specifying its corresponding type and applying a check on it.
The object.prototype.tostring.call() method returns the type of the object.
This write-up provided the methods to verify if a variable is of function type using JavaScript.
Loop Through Object in Reverse Order Using JavaScript
An object is an entity that stores information in a key-value pair.
Objects are either iterated in forward or reverse order based on keys and values.
Use the Object’s static methods “Object.keys()” or “Object.values()” to extract keys or values of objects, apply the “reverse()” method to reverse the key-value pairs, and then finally apply “forEach()” loop to iterate over the array.
This article will illustrate the procedure for traversing objects in reverse order using JavaScript.
How to Loop Through Objects in Reverse Order Using JavaScript?
For the iterating objects in reverse order, use the two approaches:
Reverse order loop based on keys.
Reverse order loop based on values.
Let’s examine both approaches individually!
How to Loop Through Objects in Reverse Order Based on Object Keys?
To traverse the Object in reverse order based on the object’s keys, follow three steps:
Use the “Object’s” static method called “Object.keys()”: It takes an object as an argument and returns the array of the object’s keys.
Apply the “reverse()” method: It will reverse the order of the object’s keys.
Finally, apply the “forEach()” method to loop through the object.
Example
First, create an object “info” with key-value pairs:
const info = {
Name: 'John',
Age: '24',
ContactNo: '09345237816',};
Get the keys of the object using the “Object.keys()” method and reverse them by calling the “reverse()” method and store them in a variable “reverseBaseonKeys”:
const reverseBaseonKeys = Object.keys(info).reverse();
Finally, traverse the reversed object keys using the “forEach()” method:
reverseBaseonKeys.forEach(key => {
console.log(key, info[key]);});
Output
![]() The above output indicates that the object keys with their corresponding values are successfully traversed in print on the console in reverse order.
The above output indicates that the object keys with their corresponding values are successfully traversed in print on the console in reverse order.
How to Loop Through Objects in Reverse Order Based on Object Values?
There is another approach for looping through objects in reverse order based on the object’s values.
To traverse the Object in reverse order based on the object’s values, follow the below-given three steps:
Use the “Object’s” static method called “Object.values()”: It takes an object as an argument.
It returns the array of the object’s values.
Apply the “reverse()” method, which will reverse the order of the object’s values.
Finally, apply the “forEach()” method to loop through the object.
Example
Here, use the same Object “info” and get the values of the object “info” using the “Object.values()” method and reverse them by calling the “reverse()” method and finally, store the resultant array in a variable “reverseBaseonKeys”:
const reverseBasedonValues = Object.values(info).reverse();
Traverse the reversed object values using the “forEach()” method:
reverseBasedonValues.forEach(value => {
console.log(value, info[value]);});
Output
![]() The above output shows the values of the object in reverse order.
The above output shows the values of the object in reverse order.
Conclusion
To loop through the object in reverse order, use the Object’s static methods “Object.keys()” or “Object.values()” to extract keys or values of objects, reverse then using the “reverse()” method and then finally apply “forEach()” loop to iterate over the array.
This article illustrated the procedure for traversing objects in reverse order based on keys and values using JavaScript.
How to Get First Character From a String
During website development, developers need to get the string characters.
Sometimes, it is required to access the first or last character or a substring of a string.
Here, the string’s first character is required.
To do so, the JavaScript predefined methods are used, including the Bracket Notation ([ ]), charAt() method, or the substring() method.
This article will demonstrate the methods for getting the first letter of a string.
How to Get the First Character From a String?
To get the string’s first character, utilize the following methods:
Bracket Notation ([ ])
charAt() method
substring() method
Let’s see how the above methods work.
Method 1: Get First Character From a String Using Bracket Notation ([ ])
In JavaScript, bracket notation ([ ]) is the basic approach for getting the first character from a string.
To do so, pass the “0” index.
Syntax
Use the given syntax for getting the first character from a string using the bracket notation:
string[0]
Here, “0” is the index of the string for getting the first letter of the string.
Example
First, creates a string and store it in a variable “string”:
let string = "Welcome to LinuxHint";
Get the first character of a string using the bracket notation ([ ]) by passing the index of the first character that is “0” and store it in a variable “firstChar”:
let firstChar = string[0];
Print the first letter of the string on the console using the “console.log()” method:
console.log("First Character of a string is " + "'" + firstChar + "'");
The output displays “W”, which is the first character of the string:
![]() Let’s see the second method to get the first character of the string.
Let’s see the second method to get the first character of the string.
Method 2: Get the First Character From a String Using charAt() Method
For getting the string’s first character, use the “charAt()” method.
It gives the character as an output in a string at a particular position called index.
For the first character, pass the “0” index as a parameter in the charAt() method.
Syntax
Follow the given syntax for the charAt() method:
string.charAt(index)
Here, pass the index “0” for the first element of the string.
Example
Call the charAt() method by passing 1st index of the string with the created string and storing the result in a variable “firstChar”:
let firstChar = string.charAt(0);
The corresponding output shows that “W” is the string’s first character:
![]()
Method 3: Get First Character From a String Using substring() Method
Another method for getting the string’s first letter is the “substring()” method.
It extracts characters from start to end between two indexes and returns the substring.
Syntax
The following syntax is used for the substring() method:
string.substring(start, end)
Example
Call the “substring()” method by passing two indexes, “0”, the first index of the string, and “1”, which is the second index of the string, as parameters.
It will split the string between these indices:
let firstChar = string.substring(0, 1);
The output indicates that the first letter is successfully retrieved using the substring() method.
![]() All the relevant information is compiled to get the first letter of the string.
All the relevant information is compiled to get the first letter of the string.
Conclusion
To get the first character from a string, use the JavaScript pre-built methods, including the Bracket Notation ([ ]), charAt() method, or the substring() method.
All these ways successfully retrieve the first letter of the string.
This article demonstrated the methods for getting the first character from a string with examples.
Check if String Ends With Substring
Sometimes, programmers need to identify whether the created strings contain the specified string or start or end with the specified substring.
To do this,, different predefined methods exist., the “endsWith()” method is the most utilized method for identifying whether the substring is present at the end of the string.
This blog post will help to learn the procedure to check if a substring is present at the end of the string.
How to Check if String Ends With Substring?
To determine if the string ends with a substring, use the following methods:
endsWith() method
substring() method
indexOf() method
Let’s check out these methods!
Method 1: Check if Substring Present at the End of the String Using endsWith() Method
Use the “endsWith()” method to check whether the string ends with the substring or not.
It takes a substring that will be checked in the string, whether the string ends with it or not, as an argument.
Its outputs “true” or “false” if the substring is present or not at the end of the string respectively.
Syntax
Follow the below-given syntax for the “endsWith()” method:
string.endsWith(searchString, length)
In the above syntax, the specified method takes two parameters:
The “searchString” is the searched string that will be searched in the string.
It is a mandatory parameter.
“length” is an optional attribute of the string, which means the default value is the length of the string.
Return Value
The endsWith() method outputs “true” when the string ends with the substring and “false” when it does not exist in the string.
Example
Create a string stored in a variable “string”:
var string = 'Learn JavaScript from Linuxhint';
Create a variable “substring” that stores a part of the string as a substring:
var substring = 'Linuxhint';
Call the “endsWith()” method with string and pass a substring in it as an argument, that will check whether the string ends with the specific substring or not:
var result = string.endsWith(substring);
Print the resultant value using the “console.log()” method:
console.log(result);
Output
![]() The above output displays “true”, which indicates that the string ends with the specified substring.
The above output displays “true”, which indicates that the string ends with the specified substring.
Method 2: Check if Substring Present at the End of the String Using substring() Method
To determine whether the string ends with the substring, utilize the “substring()” method.
It is utilized to retrieve the string between the specified indexes, so, subtract the length of the substring from the string’s length.
If the returned string is the same as the specified substring, it is true, indicating that it ends with a substring.
Syntax
Use the given syntax to check whether the string ends with a substring or not with the help of the “substring()” method:
string.substring(string.length - subString.length) === subString;
In the above syntax, subtract the length of the substring from the length of the string, if the resultant string is equivalent to the specified substring, it means the string ends with a substring.
Return value
If a substring is present at the end of the string, it outputs “true”, else, “false” is returned.
Example
After specifying the string and substring, define a function “stringEnds()” with two parameters, the string “str” and the substring “subStr”, then, invoke the “substring()” method and return the resultant value to the function:
function stringEnd(str, subStr) {return str.substring(str.length - subStr.length) === subStr;};
Call the defined function by passing a string as a first argument that will be checked and substring as a second argument that needs to be searched at the end of the given string:
console.log(stringEnd(string, substring));
Output
![]() The above output displays “true” which means, the string ends with the specified substring.
The above output displays “true” which means, the string ends with the specified substring.
Method 3: Check if Substring Present at the End of the String Using indexOf() Method
Another method for determining whether the string ends with the substring or not is the “indexOf()” method.
It gives the position of the first instance of a value in a string.
For checking if the substring is present at the end of the string, it takes a “substring” and the difference of the string’s length with the substring’s length as parameters.
If the resultant value equals “-1”, it means the substring does not present at the end of the string.
Syntax
Follow the given syntax for the “indexOf()” method:
string.indexOf(searchValue, string.length - searchValue.length) !== -1;
Here, “searchValue” is the “substring” that will be looked up at the string’s end.
Return Value
If the substring cannot appear in the string, it returns “-1”, else, it returns “1”.
Example
Define a function “stringEnds()” with two parameters, the string “str” and the substring “subStr”, then invoke the “indexOf()” method and returns the resultant value to the function:
function stringEnd(str, subStr) {return str.indexOf(subStr, str.length - subStr.length) !== -1;};
Invoke the defined function “stringEnd()” by passing a string and substring as arguments:
console.log(stringEnd(string, substring))
Output
![]() All the relevant information is gathered related to identifying whether the string ends with a substring or not.
All the relevant information is gathered related to identifying whether the string ends with a substring or not.
Conclusion
To determine if the string ends with the substring, use JavaScript predefined methods, including the “endsWith()” method, “substring()” method, or “indexOf()” method.
All of these methods give back the boolean value “true” as an output if the string ends with the specified substring, else, it outputs “false”.
This tutorial helps to learn the procedure for checking whether the string ends with a substring or not using JavaScript.
Check if event.target has a Specific Class Using JavaScript
Sometimes, the programmer may want to check if the element that triggered the event (the event.target) matches the selector they care about.
How to do this? JavaScript offers some predefined methods such as “contains()” and “matches()” methods to identify the specific selector in a target event.
This post will explain the methods to determine whether the event.target has a particular class or not using JavaScript.
How to Check if event.target has a Specific Class Using JavaScript?
To determine if the event.target has a particular class, use the following JavaScript predefined methods:
contains() method
matches() method
Let’s see how these methods work for determining class in an event.target.
Method 1: Check if event.target has a Specific Class Using contains() Method
To determine whether an element belongs to a specific class, use the “contains()” method of the “classList” object.
The contains() method is used to identify whether a specified item is present in the collection.
Its outputs “true” if the item is present, else, it gives “false”.
It is the most efficient way for determining an element’s class.
Syntax
Follow the below-given syntax to determine whether the event.target has a specific class or not using the contains() method:
event.target.classList.contains('class-name')
In the above syntax:
“event.target” is a triggered event that will be checked whether it contains the specific class or not.
The “class-name” identifies the name of the CSS class that is a part of the triggered event.
Return value
It returns “true” if the triggered event has the specified class; otherwise, it returns “false”.
Example
First, create three “div” elements in an HTML file using the HTML <div> tag:
<div class="center div div1Style" id="div1"> 1<div class="div div2Style" id="div2"> 2<div class="div div3Style" id="div3"> 3</div></div></div>
Style the elements using CSS styling.
To do so, create a CSS class “.div” for all the div elements:
.div {
padding: 10px;
height: 100px;
width: 100px;
margin: 10px;}
Create a “.center” class for setting the elements in the center of the page:
.center {
margin: auto;}
Now, for styling, every div individually creates a CSS class for them.
For the first div, set the background color “red” in the “div1Style” class:
.div1Style{
background-color: red;}
For the second div, set the background color “radish pink” using the “rgba(194, 54, 77)” code in the “div2Style” class:
.div2Style{
background-color: rgb(194, 54, 77);}
Set the background color “pink” of the third div by creating the “div3Style” class:
.div3Style{
background-color: pink;}
After running the above HTML code, the output will look like this:
![]() Now, in a JavaScript file or a “script” tag, use the below-provided code to check whether the event.target has a specific class or not:
document.addEventListener('click', function handleClick(event) {
var hasClass = event.target.classList.contains('center');
alert("This div contains 'center' class: " + hasClass);});
In the above code snippet:
First, attach an event listener on a click event that will handle every click on DOM.
Then, check whether the triggered event has the CSS class “center” or not with the help of the “classList.class()” method.
Output
Now, in a JavaScript file or a “script” tag, use the below-provided code to check whether the event.target has a specific class or not:
document.addEventListener('click', function handleClick(event) {
var hasClass = event.target.classList.contains('center');
alert("This div contains 'center' class: " + hasClass);});
In the above code snippet:
First, attach an event listener on a click event that will handle every click on DOM.
Then, check whether the triggered event has the CSS class “center” or not with the help of the “classList.class()” method.
Output
![]() The above GIF shows that div1 contains the “center” class as it shows “true”, while div2 and div3 display “false” in the alert box, which means they do not contain the “center” class.
The above GIF shows that div1 contains the “center” class as it shows “true”, while div2 and div3 display “false” in the alert box, which means they do not contain the “center” class.
Method 2: Check if event.target has a Specific Class Using matches() Method
Another JavaScript predefined method called “matches()” can be used to check whether a specific class belongs to an element or an event.
The “class-name” is the only parameter needed to determine whether an element or a target event includes a certain class or not.
Syntax
The below-given syntax is utilized for the matches() method:
event.target.matches('.class-name')
In the above syntax,
“event.target” is a triggered event that will be checked whether it contains the specific class or not.
The “class-name” indicates the name of the CSS class that is a part of the triggered event.
The matches() method takes the class’s name together with a dot (.) that denotes the word “class”.
Return value
If the target event has a class, it returns “true” else, “false” is returned.
Example
In a JavaScript file or a script tag, use the below lines of code to check whether the event.target has a specific class or not by using the “matches()” method:
document.addEventListener('click', function handleClick(event) {
var hasClass = event.target.matches('.div3Style');
alert("This div's class matches the 'div3Style' class: " + hasClass);});
In the above lines of code:
First, attach an event listener on a click event that will handle every click on DOM.
Then, check whether the “div3Style” CSS class exists in a triggered event using the “matches()” method.
If it is present, the alert() shows a message with “true”, else “false”.
Output
![]() The above GIF shows that only div3 contains the “div3Style” class as it shows “true”.
The above GIF shows that only div3 contains the “div3Style” class as it shows “true”.
Conclusion
To determine whether a triggered event has a specified class, use the JavaScript “contains()” method or the “matches()” method.
However, the contains() method is one of the most useful approaches used to determine an element’s class.
Both methods return “true” if the triggered event has a class else “false” is returned.
This post explained the methods to determine whether the event.target has a particular class or not using JavaScript.
Add Element to Array at Specific Index
While working with JavaScript arrays, sometimes, it is necessary to add an item at a particular index., multiple methods exist to add an element at the start or the end of the array, but it is a bit difficult in the middle of an array.
There is no way in the Array object to add an element to a certain index; hence the built-in “splice()” method can be utilized.
This tutorial will explain the way to add an element in an array at a certain index using JavaScript.
How to Add an Element at a Particular Index Array?
The direct insertion of a new element into an array at any given index is not supported by any built-in method.
To do so, use the “splice()” method, which modifies an array’s contents by eliminating, adding, or replacing new items at any specified index.
It also updates the array that invokes it rather than creating a new one.
Syntax
Use the given syntax for the splice() method:
array.splice(index, no_of_EliminatedItems, item1, ...
itemN)
In the above syntax:
The “index” is where the new element will be positioned.
The “no_of_EliminatedItems” is the number of elements that must be removed from the array.
It is an optional argument.
The “item1, … itemN” are the elements that will be added to an array.
Return Value
The splice() method returns an updated array with new elements at the specific index.
Example 1: Add an Element to an Array at a Specific Index Using the splice() Method
Create an array “number”:
var number = [0, 1, 2, 8, 9];
Call the “splice()” method by passing index “3” as the first argument which is the starting index of the elements that will be added in an array, “0” as a second argument, which indicates no element will be deleted from the array, and then “3, 4, 5” are the elements that need to be added in an array:
number.splice(3, 0, 3, 4, 5);
Print the updated array on the console using the “console.log()” method:
console.log(number);
Output
![]() The output indicates that the elements are successfully added to an array from index 3.
The output indicates that the elements are successfully added to an array from index 3.
Example 2: Add an Array to an Array at a Specific Index Using the splice() Method
Create an array “num” and add all of its elements in the “number” array:
var num = [3, 4, 5, 6, 7];
Use the spread operator (…) in the splice() method as a third argument that will copy all the elements of the “num” array into the “number” array:
number.splice(3, 0, ...num);
Print the resultant array on the console:
console.log(number);
Output
![]() The above output shows that all elements of an array “num” are successfully added in the “number” array at the 3rd index.
The above output shows that all elements of an array “num” are successfully added in the “number” array at the 3rd index.
Conclusion
The JavaScript “splice()” is used to add the element at a specified index which modifies the array by eliminating, adding, or replacing elements from an array.
This tutorial explained the procedure for adding an element in an array at a specific index using JavaScript.
Hide element when clicked outside using JavaScript
While designing a web page or website, there can be a requirement to make an element present in the DOM all the time but in a non-visible manner.
For instance, filling some particular fields, which become enabled when clicked outside.
In such cases, hiding elements when clicked outside using JavaScript is very helpful, especially in securing a site.
This write-up will guide about hiding elements when clicked outside.
How to Hide an Element When Clicked Outside?
To hide an element when clicked outside, the following approaches can be utilized:
“addEventListener()” method with “display” property.
“onclick” event and “display” property.
“addEventListener()” and “add()” methods.
“jQuery()” methods.
Let’s look at each of the mentioned approaches one by one!
Approach 1: Hide Element When Clicked Outside Using addEventListener() Method with display Property
The “addEventListener()” method attaches an event to the specified element, whereas the “display” property returns the display type of an element.
These approaches can be implemented to associate an event with an element such that the corresponding element hides upon the event trigger.
Syntax
element.addEventListener(event, listener, use)
In the given syntax:
“event” points to the specified event.
“listener” is the function that will be redirected to.
“use” is the optional parameter.
Example
Let’s overview the following example for the explained concept:
<center><body><h3>Click Outside the Image to hide it!</h3><img src= "template2.png" id="box"></body></center><script type="text/javascript">
document.addEventListener('click', function clickOutside(event) {
let get = document.getElementById('box');
if (!get.contains(event.target)) {
get.style.display = 'none';
}});</script>
In the above code snippet:
Include an “image” element with the specified “id”.
In the JavaScript code, attach an event to the function named “clickOutside()” using the “addEventListener()” method.
In the next step, access the included element by its “id” using the “getElementById()” method.
Finally, refer to the function’s parameter “event” and apply the condition.
The condition will be such that if the click is triggered outside the element, the “display” property hides the element.
Output
![]() From the above output, it can be observed that the included image hides upon clicking outside it.
From the above output, it can be observed that the included image hides upon clicking outside it.
Approach 2: Hide Element When Clicked Outside Using onclick Event and display Property
An “onclick” event invokes a function upon a click, and the “display” property similarly returns the display type of an element.
These approaches can be combined to hide the paragraph upon clicking outside it with the help of a function.
Example
Let’s go through the following example:
<center><h3>Click Outside the Paragraph to hide it!</h3><p id="hide" style="width: 300px">JavaScript is a very effective programming language.
It is very helpful in designing a web page or a site.
It can also be integrated with HTML to implement some added functionalities as well.</p></center><script>
window.onload = function(){
var get = document.getElementById('hide');
document.onclick = function(e){if(e.target.id !== 'hide'){
get.style.display = 'none';
}
};};</script>
Perform the following steps as given in the above lines of code:
Include the stated heading.
Also, contain the element, i.e., paragraph with the specified “id” and adjusted dimensions.
In the JavaScript code, apply the “onload” event such that the defined function is invoked upon the loaded window.
In the function definition, likewise, access the paragraph using the “getElementById()” method.
Next, attach an “onclick” event such that the associated function executes upon the click.
In the function definition, similarly, apply the condition with the help of the fetched element’s “id” such that if the click is triggered outside the paragraph, the element, aka “paragraph”, hides.
Output
![]() From the above output, it is evident that the paragraph hides upon clicking outside it.
From the above output, it is evident that the paragraph hides upon clicking outside it.
Approach 3: Hide Element When Clicked Outside Using addEventListener() and add() Method
The “addEventListener()” method, as discussed, attaches an event to the specified element and the “add()” method adds one or more than one token to the list.
These methods can be implemented to similarly attach an event to the function and append the CSS styling to it.
Syntax
element.addEventListener(event, listener, use)
In the given syntax:
“event” corresponds to the specified event.
“listener” is the function that will be redirected to.
“use” is the optional parameter.
Example
Let’s follow the below-stated example:
<center><body><h3>Click Outside the Image to hide it!</h3><div class="img"><img src="template3.png"></body> </div></center><script type="text/javascript" >const box = document.querySelector(".img")
document.addEventListener("click", function(event) {if (event.target.closest(".img")) return
box.classList.add("hidden")})</script>
In the above code snippet:
Likewise, include the stated heading.
Also, contain the stated image within the “div” element having the specified “class”.
In the JavaScript code, access the “div” element by its “class” using the “querySelector()” method.
In the next step, likewise, attach an event to the function using the “addEventListener()” method.
Also, apply the condition such that if the attached event triggers, the “classList” property along with its method “add()” invokes the CSS styling, thereby hiding the image when clicked outside it.
In CSS, perform the styling for hiding the element upon the triggered event:
<style type="text/css">
.hidden{
display: none;}</style>
Output
![]() The visibility of the image can be observed when clicked on it and when clicked outside.
The visibility of the image can be observed when clicked on it and when clicked outside.
Approach 4: Hide Element When Clicked Outside Using jQuery() Methods
The jQuery methods can be utilized to directly fetch an element and hide it upon clicking outside it.
Example
The following example explains the stated concept:
</script src="https://ajax.googleapis.com/ajax/libs/jquery/3.5.1/jquery.min.js"> </script><body><center><h2 id="para">This is Linuxhint Website</h2></body></center><script type="text/javascript">
$(document).click(function(){
$("#para").hide(); });
$("#para").click(function(e){
e.stopPropagation(); });</script>
Perform the following steps:
Firstly, add the “jQuery” library to apply its methods.
Also, include the stated heading with the specified “id”.
In the JavaScript code, associate the “click()” method with the function.
Within the function, access the included heading and apply the “hide()” method to hide it.
Recall the same approach as the previous step for accessing the heading.
Here, apply the “stopPropagation()” method, which will result in achieving the desired functionality upon the click.
Output
![]() That was all about hiding elements when clicked outside.
That was all about hiding elements when clicked outside.
Conclusion
The “addEventListener()” method with “display” property, an “onclick” event and the “display” property, “addEventListener()” and “add()” methods or the “jQuery()” methods can be used to hide an element when clicked outside using JavaScript.
This blog guided about the procedure to hide elements when clicked outside.
Get the Sum of an Array of Numbers
An array is used to store different items of the same data type, such as an array of strings containing values of string data types, an array of numbers containing numeric values or an integer data type, and so on.
In some situations, programmers need to add all the elements of a number array.
Therefore, the question is, how to calculate and get the sum of the number of array elements?
This tutorial will explain the methods for calculating the sum of the array’s elements.
How to Calculate the Sum of an Array of Numbers?
The sum of an array of numbers can be calculated in a variety of ways, including:
for loop
for-of loop
forEach loop
reduce() method
Let’s check out each of them one by one!
Method 1: Calculate the Sum of an Array of Numbers Utilizing for Loop
To calculate the sum of an array of numbers, the most basic and traditional method is the “for” loop.
In this approach, iterate the array to the length and add them.
Syntax
Utilize the following syntax to use the for loop:
for (i = 0; i < lengthOfArray; i++){// statement}
Example
Create an array of numbers:
var array = [8, 14, 20, 23];
Create a variable “arrayElementSum” and set its initial value to 0:
var arrayElementSum = 0;
Add the elements of an array by iterating the array until the array’s length using for loop:
for (var i = 0; i < array.length; i++) {
arrayElementSum += array[i];}
Print the sum of the array’s elements using the “console.log()” method:
console.log(arrayElementSum);
Output
![]() The output shows the sum of all the elements in an array as “65”.
The output shows the sum of all the elements in an array as “65”.
Calculate the Sum of an Array of Numbers Utilizing for-of Loop
Instead of a “for” loop, there are more best approaches, such as the “for-of” method.
Example
Let’s use the for-of loop for each iteration of the array to add the array elements:
for (const sum of array) {
arrayElementSum += sum;}
Output
![]() The output indicates that with the help of the “for-of” loop, the elements of an array that are successfully added and displayed “65” as their sum.
The output indicates that with the help of the “for-of” loop, the elements of an array that are successfully added and displayed “65” as their sum.
Calculate the Sum of an Array of Numbers Utilizing forEach Loop
A “forEach” loop can be used as an alternative method to calculate the sum of an array of numbers.
It is a predefined method.
Example
Use the same array created in the previous example and loop across the array using the array.forEach() loop method:
array.forEach(sum => {
arrayElementSum += sum;});
Output
![]()
Method 2: Calculate the Sum of an Array of Numbers Utilizing reduce() Method
The array of numbers can alternatively be summed using JavaScript’s array “reduce()” method.
The “reduce()” method utilizes a reducer function to produce a single output value by calling it on each array element.
It iterates through the numbers in an array, just like the for a loop.
Syntax
Follow the below-provided syntax for using the reduce() method:
reduce(function(preValue, currentValue, currentIndex, array) => {// statement}, initialValue)
In the above syntax:
The method takes two parameters, the callback function, or the initialValue.
The callback function further calls some parameters, including “preValue”, “currentValue”, “currentIndex”, and an “array”, where the last two parameters are optional.
Example
Use the below lines of code while using the “reduce()” method for adding the elements of the array:
var arrayElementSum = array.reduce(function(a, b){
return a + b;
}, 0);
To iterate across the array, use the reduce() method on Array.
Set the reduction method’s initial value to 0.
It returns the sum of the current value and the collected value at the end of each iteration.
Output
![]() That’s all about getting the array of numbers’ sum.
That’s all about getting the array of numbers’ sum.
Conclusion
For getting the sum of the elements of a number array, the “for” loop, “for-of” loop, “forEach” loop, or the “reduce()” method is used.
Iterative loops are useful for calculating the sum of array elements because they seek to consider each element separately.
All the mentioned approaches are discussed in this article with examples.
Get the Substring Before a Specific Character
While dealing with the data in bulk, there can be a possibility of garbage data or entries involving unwanted characters.
For instance, there are encoded values that need to be decoded.
In such cases, extracting a part of the value can greatly aid.
In such a scenario, getting the substring before a specific character can assist in omitting the encoded values, thereby saving the memory.
This tutorial will discuss the approaches to get the substring before a specific character.
How to Get the Substring Before a Specific Character?
The get the substring before a specific character, apply the following approaches:
“substring()” and “indexOf()” methods.
“split()” method.
The stated approaches will be illustrated one by one!
Approach 1: Get the Substring Before a Specific Character Using substring() and indexOf() Methods
The “substring()” method extracts the string characters from start to end without changing the original array, and the “indexOf()” method outputs the index of the specified array element and returns “-1” if not found.
These methods can be applied in combination to locate the index of the character in a string and get the substring value before it.
Syntax
string.substring(start, end)
In the given syntax:
“start” and “end” refer to the start and end positions, respectively.
string.indexOf(search)
In the above syntax, “search” indicates the index of the fetched array element.
Example
Let’s overview the below-given example:
<script type="text/javascript">
let string = 'linux@hint';
console.log("The given string is:", string)
let subBefore= string.substring(0, string.indexOf('@'));
console.log("The substring before the specific character is:", subBefore);</script>
In the above code snippet:
Specify a string value having the character “@” in it and display it.
In the next step, apply the “substring()” method.
In its parameters, specify the start and end positions.
In its second parameter, apply the “indexOf()” method to locate the contained character in the provided string, which will refer to the string’s end position.
This will resultantly display the substring’s value before the character @.
Output
![]() In the above output, it can be observed that the substring’s value before the specified character is retrieved.
In the above output, it can be observed that the substring’s value before the specified character is retrieved.
Approach 2: Get the Substring Before a Specified Character via split() Method
The “split()” method splits a string into a substring array.
This method can be implemented to split the provided string into an array based on the specified character and access the value of the substring before it.
Syntax
string.split(separator, limit)
In the above syntax:
“separator” refers to the string that needs to be used for splitting.
“limit” points to the integer limiting the number of splits.
Example 1: Get the Substring Before the Specified Character
In this example, the value of the substring before the specified character will be returned.
Let’s follow the below-given example:
<script type="text/javascript">
let string = 'JavaScript$Python';
console.log("The given string is:", string)
let subBefore = string.split('$')[0];
console.log("The substring before the specific character is:",subBefore);</script>
In the above lines of code:
Likewise, specify a string value with an included character value in between and display it.
After that, apply the “split()” method to split the provided string into a substrings array based on the character.
Also, specify the index as “0” to access the first array element.
This will result in getting the substring value before the specific character.
Output
![]() From the above output, it is evident that the first substring value from an array is retrieved before a specific character in the provided string.
From the above output, it is evident that the first substring value from an array is retrieved before a specific character in the provided string.
Example 3: Get the Substring Before all the Specified Characters
This example will return the value of substrings before all the specified characters.
Let’s go through the below given an example:
<script type="text/javascript">
let string = 'harry_and_james';
console.log("The given string is:", string)
let subBefore = string.split('_')[0];
let subBefore1 = string.split('_')[1];
console.log("The substrings before the specific character are:", subBefore + subBefore1);</script>
Implement the following steps in the above lines of code:
Specify a string value having the stated characters and display it.
After that, apply the “split()” method separately for each of the contained characters.
This will result in getting the substring value from an array before the specified characters with respect to the specified indexes.
Finally, add both substrings before the first and second characters, respectively.
Output
![]() The above output indicates that the substring values are fetched before both specified characters.
The above output indicates that the substring values are fetched before both specified characters.
Conclusion
The “substring()” and “indexOf()” methods or the “split()” methods can be implemented to get the substring value before a specific character.
The former approach can be utilized to locate the index of the character in a string and get the substring’s value before it.
The latter approach can be applied to split the given string into a substrings array based on the specified character and then access the value of the substring before it(character).
This tutorial demonstrated how to get the substring value before a specific character.
Get the Second to Last Element in Array
In the record maintaining processes, there can be a need to fetch a part of data from a bulk instantly.
For instance, sorting the data for update purposes, etc.
In such case scenarios, getting the second to last array element is very helpful in accessing data and making a document accessible, thereby improving readability.
This write-up will explain the procedures to get the second to last element in an array using JavaScript.
How to Get the Second to Last Array Element?
The second to last array element can be fetched using the following approaches:
“length” property.
“at()” method.
“slice()” method
“Indexing” technique.
The stated approaches will be demonstrated one by one!
Approach 1: Get the Second to Last Element in Array Using length Property
The “length” property returns the string’s length.
This property can be applied as a reference such that the second last element is retrieved.
Example
Let’s follow the below-stated example:
<script type="text/javascript">
let array = ['harry', 'james', 'lisa'];
console.log("The given array is:", array)
let secLast = array[array.length - 2];
console.log("The second last array element is:", secLast);</script>
In the above code snippet:
Declare an array having the stated values and display it.
After that, apply the “length” property so that the index of the second last element is computed, i.e., “1”.
As a result, the value against the corresponding index will be retrieved and displayed.
Output
![]() The above output signifies that the second last element from an array is extracted.
The above output signifies that the second last element from an array is extracted.
Approach 2: Get the Second to Last Element in Array Using at() Method
The “at()” method points to the index of a value.
This method can be implemented to simply access the second last value by specifying the corresponding index as its parameter.
Syntax
at(index)
In the given syntax:
“index” refers to the array element’s index.
Example
Let’s go through the following example:
<script type="text/javascript">
let array = ['w', 'x', 'y', 'z'];
console.log("The given array is:", array)
let secLast = array.at(2);
console.log("The second last array element is:", secLast);</script>
Perform the following steps in the above lines of code:
Likewise, define an array and display it.
In the next step, apply the “at()” method by referring to the second last element’s index.
Lastly, display the value against the corresponding index.
Output
![]() The above output indicates that the desired functionality is achieved.
The above output indicates that the desired functionality is achieved.
Approach 3: Get the Second to Last Element in Array Using slice() Method
The “slice()” method accesses the selected array elements in the form of a new array without changing the original array.
This method can be applied to slice the array elements with the help of the indexed parameters such that the second last array element is returned.
Syntax
array.slice(start, end)
In the given syntax:
“start” and “end” correspond to the start and end positions, respectively.
Example
Let’s go through the below-given example:
<script type="text/javascript">
let array = ['Python', 'Java', 'JavaScript'];
console.log("The given array is:", array)
let secLast = array.slice(1,2);
console.log("The second last array element is:", secLast);</script>
In the above code snippet:
Declare an array having the stated values and display it.
After that, apply the “slice()” method pointing to the initial and final positions, respectively.
This will result in displaying the second last array element after slicing.
Output
![]() The above output indicates that the array element “Java” is returned, corresponding to the second last array element.
The above output indicates that the array element “Java” is returned, corresponding to the second last array element.
Approach 4: Get the Second to Last Element in Array Using Indexing Technique
This technique can be utilized to directly access the second last array element with the help of its index.
Example
Let’s move to the following code:
<script type="text/javascript">
let array = ['Audi', 'BMW', 'Volkswagon'];
console.log("The given array is:", array)const secLast = array[1];
console.log("The second last array element is:", secLast);</script>
Apply the following steps in the above code:
Likewise, declare an array having the stated values and display it.
After that, access the second last array element by referring to its index, i.e., “1” in this case.
This will resultantly return the second last array element.
Output
![]() The given requirement is fulfilled in the above output.
The given requirement is fulfilled in the above output.
Conclusion
The length property can be applied to access the second last array element by taking the array’s length as a reference.
The at() method can be implemented to directly point to the corresponding element’s index, which will result in fetching the value.
The slice() method can be applicable to access the element by referring to the start and end positions in an array.
The indexing technique simply accesses the element from its index manually.
This blog explains how to get the second to last element from an array.
Get the Intersection of Two Arrays
While dealing with data in bulk, its access becomes somewhat challenging.
For instance, fetching a particular data set based on the same attribute, such as name.
Also, there can be a requirement to utilize the contained data in the future.
In such cases, getting the intersection of two arrays is of great aid in managing the resources effectively, accessing the data conveniently, and saving time.
This write-up will demonstrate the approaches to get the intersection of two arrays.
How to Get the Intersection of Two Arrays?
The intersection of two arrays can be computed by applying the “filter()” method in combination with the following:
“includes()” method.
“indexOf()” method.
“User-defined” function.
Let’s discuss each of the approaches one by one!
Approach 1: Get the Intersection of Two Arrays Using includes() Method
The “filter()” method returns a new array having the elements that achieve the functionality provided by a function.
Whereas the “includes()” method returns true if a specified value is included in a string.
These methods can be utilized to apply a check on a particular array with respect to the other array for the contained common values.
Syntax
array.filter(function(current, index, arr), this)
In the above syntax:
“function” refers to the function to be executed for each array element.
“current” points to the current element’s value.
“index” is the current element’s index.
“arr” corresponds to the current element’s array.
“this” indicates the value passed to the function.
string.includes(value)
In the given syntax:
The includes() method will search for the “value” in the “string”.
Example
Let’s overview the below-stated example:
<script type="text/javascript">
var arrayFirst = [5, 6, 7];
var arraySecond = [7, 8, 9];
var intersection = arrayFirst.filter(item => arraySecond.includes(item))
console.log("The intersection of elements become: ", intersection);</script>
In the above code snippet:
Firstly, declare two arrays having the stated values.
After that, apply the “filter()” and “includes()” methods in combination.
This will be done by passing a value “item” and applying a check on the latter array for the included common values with respect to the former array.
Finally, display the intersection of two arrays.
Output
![]() In the above output, it can be observed that the intersection of both arrays is retrieved.
In the above output, it can be observed that the intersection of both arrays is retrieved.
Approach 2: Get the Intersection of Two Arrays Using indexOf() Method
The “indexOf()” method outputs the index of the specified array element and returns “-1” if not found.
This method can be implemented by applying a condition to the indexes of the common array elements.
Syntax
string.indexOf(search)
In the above syntax:
“search” corresponds to the index of a particular array element.
Example
Let’s go through the following example:
<script type="text/javascript">
var arrayFirst = [ 4, 5, 6, 7, 8];
var arraySecond = [ 5, 6, 7, 8 ];
var intersection = arrayFirst.filter(item => arraySecond.indexOf(item) !== -1)
console.log("The intersection of elements become: ", intersection);</script>
In the above code snippet:
Likewise, declare two arrays having the specified values.
In the next step, apply the “filter()” method referring to the former array and similarly apply the “indexOf()” method upon the latter array.
This will result in extracting the common elements from the second array matching the first array elements considering the exception of the index, i.e., “not found”.
Output
![]()
Approach 3: Get the Intersection of Two Arrays Using User-defined Function
This approach can be utilized to perform the required functionality by passing the declared arrays as user-defined function parameters.
Example
Let’s follow the below-stated example:
<script type="text/javascript">
function arrayIntersection(one, two){
var set = new Set(two);return one.filter(item => set.has(item));};
var arrayFirst = [ 1, 2];
var arraySecond = [ 3, 4, 5 ];
var intersection = arrayIntersection(arrayFirst, arraySecond);
console.log("The intersection of elements become: ", intersection);</script>
Perform the following steps in the above code snippet:
Declare a function named “arrayIntersection()” having the stated parameters.
The function parameters point to the arrays, which will be declared later in the code.
In the function definition, create a new set object with the help of the keyword “new” and the “Set” constructor, respectively.
In the next step, apply the “filter()” and “has()” methods such that the array elements are extracted based on the intersection.
In the further code, declare two arrays having the stated values.
Also, access the defined function and pass the declared arrays as its parameters.
This will resultantly return the intersection of both arrays.
Output
![]() It can be observed that since no element was common in both the arrays, hence a “null” array is returned.
It can be observed that since no element was common in both the arrays, hence a “null” array is returned.
Conclusion
The includes() method and the indexOf() method can be implemented to get the intersection of two arrays based on the common values against the indexes.
The user-defined function can be applied by applying the required functionality separately in a custom function and passing the declared arrays as its(function) parameter.
This tutorial demonstrated how to compute the intersection of two arrays using JavaScript.
Get the Index of a Character in a String
While dealing with the data in bulk, there can be some lengthy values.
For instance, dealing with the actual and surnames may require omitting, utilizing, or updating a particular character from a string value.
In such cases, getting the index of a character in a string using JavaScript is of great aid in making the search convenient, thereby saving time.
This blog will demonstrate how to get the index of a string character using JavaScript.
How to Get the Index of a Character in a String?
The index of a string character using JavaScript can be fetched with the help of the “indexOf()” method.
The “indexOf()” method returns the index of the specific array element.
Also, it returns “-1” if not found.
Syntax
string.indexOf(search)
In the above syntax:
“search” corresponds to the index of the fetched element in an array.
Example 1: Get the Index of a Specific Character in a String Using JavaScript
In this example, the index of the specified character as the method’s parameter will be returned.
Let’s overview the following example:
<script type="text/javascript">
let string = 'JavaScript';
let index = string.indexOf('c');
console.log("The index of the specified character is:", index);</script>
In the above lines of code:
Specify the stated string value.
After that, apply the “indexOf()” method having the specified character within the string as its parameter.
Finally, display the index of the corresponding string character.
Output
![]() From the above output, it can be seen that the index of the specified character is returned.
From the above output, it can be seen that the index of the specified character is returned.
Example 2: Get the Index of a User-Defined Character in a String Using JavaScript
This example will compute the index of the user-defined character within the specified string value.
Let’s follow the below-given example:
<script type="text/javascript">
let string = 'Linuxhint';
let get = prompt("Enter the character to get its index ?")
let index = string.indexOf(get);
console.log("The index of the entered character is:",index);</script>
In the above code snippet:
Likewise, specify the stated string value.
In the next step, ask the user to enter the character for computing its index.
After that, apply the “indexOf()” method to fetch the index of the user-entered character contained in the specified string.
Finally, display the index of the user-entered character.
Output
![]() From the above output, it is evident that the index of the character “h” is retrieved.
From the above output, it is evident that the index of the character “h” is retrieved.
Example 3: Get the Index of All the String Characters Using JavaScript
In this example, the index of all the string characters will be fetched with the help of a “for” loop.
Let’s go through the following example:
<script type="text/javascript">
let string = 'Linuxhint';for (let i = 0;i<= string.length;i++){
let index = string.indexOf(string[i]);
console.log("The index of the string characters are:", index);}</script>
Check out the following steps as given in the above code:
Likewise, specify the stated string value.
In the next step, apply a “for” loop such that the string characters are accessed and iterated upon.
Finally, apply the “indexOf()” method to iterate along each of the characters one by one and display their indexes.
Output
![]() The above output indicates that the string comprises 9 characters.
The last index “-1”, signifies that there are no more string characters.
The above output indicates that the string comprises 9 characters.
The last index “-1”, signifies that there are no more string characters.
Conclusion
The “indexOf()” method can be implemented to get the index of a specified, user-defined, or all the characters in a string using JavaScript.
The index of a specific character can be fetched by referring to its index simply.
The user-entered approach requires the user’s involvement to get the required index.
Also, the index of all the string characters can be retrieved one by one with the help of looping.
This blog is guided to get the index of a string character using JavaScript.
Create a Zero filled Array
In the record maintenance phase, there comes a time when a part of the data is no longer needed to utilize later, keeping the data template intact.
In addition to that, performing some mathematical operation i.e.
multiplication to return a null array, etc.
In such case scenarios, creating a zero-filled array is a very smart approach to cope with such cases effectively, thereby saving time.
How to Create a Zero filled Array Using JavaScript?
To create a zero filled array, the following approaches can be applied:
“fill()” method.
“for” loop.
“Array.from()” method.
“apply()” and “map()” methods.
Let’s go through each of the mentioned approaches one by one!
Approach 1: Create a Zero filled Array Using fill() Method
The “fill()” method fills the array elements with the specified value.
This method can be applied to create an array via a constructor and fill it with the specified value.
Syntax
array.fill(value, start, end)
In the above syntax:
“value” points to the value that needs to be filled.
“start” and “stop” indicate the start and end indexes.
Example
Let’s overview the below-stated example:
<script type="text/javascript">
let zeroArray = new Array(length);
zeroArray.fill(0);
console.log("The resultant array becomes:", zeroArray)</script>
Perform the following steps as stated in the above code snippet:
Create a new array object with the help of the “Array” constructor.
Also, specify “length” as its parameter.
After that, apply the “fill()” method to the created array and pass the “0” value as its parameter, which will create a zero filled array.
Output
![]() In the above output, it can be observed that the resultant array is filled with “0”.
In the above output, it can be observed that the resultant array is filled with “0”.
Approach 2: Create a Zero filled Array Using for Loop
The “for” loop is also utilized to iterate along the items.
This approach can be implemented to iterate along the array elements and allocate them the value “0”.
Example
Let’s observe the following example:
<script type="text/javascript">
let zeroArray = []for (i = 0; i<6; i++){
zeroArray[i] = 0}
console.log("The resultant array becomes:", zeroArray)</script>
In the above lines of code:
Create an empty array.
In the next step, apply the “for” loop to iterate along the array elements and assign them “0” to transform the null array to a zero filled array.
Lastly, display the resultant array consisting of all zeros.
Output
![]() From the above output, it is evident that the initialized array is transformed into a zero filled array.
From the above output, it is evident that the initialized array is transformed into a zero filled array.
Approach 3: Create a Zero filled Array Using Array.from() Method
The “Array.from()” method returns an array from an object having the length of the array as its parameter.
This method can be utilized to return a zero filled array by mapping “0” to the array elements.
Syntax
Array.from(object, map, value)
In the above-given syntax:
“object” refers to the object to be converted into an array.
“map” corresponds to the map function that needs to be mapped on each item.
“value” is the value to be utilized as “this” for the map function.
Example
Let’s follow the below-given example:
<script type="text/javascript">const zeroArray = Array.from(Array(5), () => 0)
console.log("The resultant array becomes:", zeroArray);</script>
In the above code snippet, consider the following steps:
In the first step, apply the “Array.from()” method, and as its first parameter, specify the array having the specified length, i.e., 5.
In its second parameter, “0” indicates that the array elements will be filled with the value “0”.
This will result in creating an array of “5” elements having the value “0”.
Output
![]() Here, it can be observed that the array is filled with five elements having the value ”0”.
Here, it can be observed that the array is filled with five elements having the value ”0”.
Approach 4: Create a Zero filled Array Using apply() Method
The “apply()” method accesses the specified function with a given value “this”, and the “map()” method invokes a function for each array element.
These methods can similarly allocate “null” values to the particular array elements and map “0’s” to them.
Syntax
apply(this, args)
In the above syntax:
“this” refers to the value of “this” provided for the function call.
“args” correspond to the arguments with which the function will be invoked.
array.map(function(current, index, array), this)
In the given syntax:
“function” is the function that needs to be executed for each array element.
“current” points to the current element’s value.
“index” and “array” correspond to the index of the current element in an array.
“this” refers to the value to be passed to the function.
Example
Let’s observe the following example:
<script type="text/javascript">const zeroArray = Array.apply(null, Array(5)).map(() => 0);
console.log("The resultant array becomes:", zeroArray);</script>
In the above code lines:
Firstly, apply the “apply()” method.
In its parameters, assign the “null” value to each array element.
After that, apply the “map()” method to map “0” to each of the array elements resulting in the creation of a zero filled array.
Output
![]() From the above output, the required functionality is implemented correctly.
From the above output, the required functionality is implemented correctly.
Conclusion
The “fill()” method, the “for” loop approach, the “Array.from()” method, or the combined “apply()” and “map()” methods can be applied to create a zero filled array.
The fill() method creates an array with the help of a constructor and fills the array with “0”.
The for loop accesses the array elements by iterating along them and assigning them “0”.
The Array.from() method can apply by mapping “0” to the array elements.
The combination of the apply() and map() methods assign “null” values to the array elements and then map “0’s” to them.
This tutorial explains how to create a zero filled array using JavaScript.
Convert an Object to a Query String Using JavaScript
Creating URL and query string parameters is a common task for JavaScript programmers.
Moreover, using a layered object with key-value pairs is a logical method for creating query string parameters., for the conversion of an object to a query string, use the “toString()” method of the “URLSearchParams()” constructor or the “Object.keys()” method with “map()” and “join()” method are used.
This article will describe the ways for converting objects to query strings using JavaScript.
How to Convert an Object to a Query String Using JavaScript?
For conversion of an object to a query string, use the following methods:
toString() method of the URLSearchParams() constructor
Object.keys() method with map() and join() methods
Let’s examine these methods individually!
Method 1: Conversion of an Object to a Query String Using toString() Method of the URLSearchParams() Constructor
Use the “toString()” method of the “URLSearchParams” interface for converting objects to query strings because it is the most straightforward method.
The global object contains the URLSearchParams class, which is a component of the URL module.
The “URLSearchParams” interface offers effective methods for interacting with a URL’s query string.
It can modify and add query string parameters.
Syntax
Follow the given syntax for “URLSearchParams” interface:
new URLSearchParams(object).toString()
Here, pass the “object” to the constructor of the “URLSearchParams” interface, which will convert the key-value pairs into a string using the “toString()” method.
Return Value
A string containing a query string valid for insertion in a URL is returned by the “URLSearchParams().toString()” method.
Example
Create an object with properties “name”, “age”, and “email”:
var object = {
name: 'Mari',
age: 28,
email: 'mari@gmail.com'};
Call the toString() method with URLSearchParams() constructor by passing the object as an argument to the constructor and store the result in the variable “objString”:
const objString = '?' + new URLSearchParams(object).toString();
Print the string on the console using the “console.log()” method:
console.log(objString);
Output
![]() The output shows that the object is successfully converted to the string.
The output shows that the object is successfully converted to the string.
Method 2: Conversion of an Object to a Query String Using Object.keys() Method with map() and join() Methods
Another approach to convert an object to a string is the “Object.keys()” method with “map()” and “join()” methods.
The “Object.keys()” method is used to retrieve the array of object’s keys.
The “map()” method is used for iterating over the array, and the “join()” method is used to join all the results by an ampersand “&“symbol.
Example
Use the below lines of code for converting an object to a query string:
const objString = '?' + Object.keys(object).map(key => {
return `${key}=${encodeURIComponent(object[key])}`;
}).join('&');
In the above code:
First, get the keys of the object using the “Object.keys()” method.
Then, iterate over the array of keys using the “map()” method.
Use the “encodeURIComponent()” method to encode the query parameter values.
Finally, join all the results using the “join()” method by an ampersand “&” symbol.
Output
![]() That was the essential information related to the conversion of a string from an object using JavaScript.
That was the essential information related to the conversion of a string from an object using JavaScript.
Conclusion
To convert an object to a string, use the “toString()” method of the URLSearchParams() interface or the “Object.keys()” method with map() and join() methods.
The second approach is suitable for supporting old browsers, while the first approach is used for new browsers.
This article describes the ways to convert objects to query strings using JavaScript.
Convert a String to a Date object
While keeping records in databases, it is sometimes necessary to convert a string into a date format.
The string could be either a date value returned from the API or a value saved as a string in the database.
More specifically, the Date Object is used to track dates and execute operations on them.
This tutorial will teach you how to change a string into a Date object.
How to Convert a Date object?
For converting a string to a Date object, use the following methods:
Date.parse() method
Date() Constructor
Let’s check them out one by one!
Method 1: Convert a String to a Date object Using Date.parse() Method
The “ Date.parse()” method is used to create a Date object from a string.
The parse() method of the Date object parses a date string and gives the number of milliseconds as an output since midnight on January 1, 1970.
It follows the “YYYY-MM-DD” format for the date.
Syntax
Follow the below-given syntax for the parse() method:
Date.parse(dateString);
In the above syntax, “dateString” is the date added as a string.
Return Value
It returns a value that is the sum of the milliseconds from January 1, 1970, 00:00:00 UTC, and the date derived by parsing the specified string used to represent a date.
It returns NaN while passing an invalid date format as an argument.
Example
Create a variable “strToDate” and call the “Date.parse()” method by passing a string as a date:
let strToDate = Date.parse("20-11-2022");
Print the converted date stored in a variable using the “console.log()” method:
console.log(strToDate);
Output
![]() The above output gives “NaN” because the string doesn’t match the Date format.
Now, pass the string in a proper format in a parse() method:
let strToDate = Date.parse("2022-11-20");
Output
The above output gives “NaN” because the string doesn’t match the Date format.
Now, pass the string in a proper format in a parse() method:
let strToDate = Date.parse("2022-11-20");
Output
![]() The output shows a sum of the milliseconds from January 1, 1970, 00:00:00 UTC, and the date “2022-11-20”.
The output shows a sum of the milliseconds from January 1, 1970, 00:00:00 UTC, and the date “2022-11-20”.
Method 2: Convert a String to a Date object Using Date() Constructor
The most frequently used method for creating a Date object from a string is the constructor of the Date object.
To create a Date object from a string, pass the string to the Date() constructor as an argument in a proper format.
Syntax
The following syntax for the Date() constructor:
new Date(dateString);
It takes the date in a string as a parameter.
Return Value
It outputs a new Date object.
It gives “Invalid Date” while passing an invalid date format as an argument.
Example
Invoke the Date() constructor by passing date in a string format as an argument and store the returned Date object in a variable “strToDate”:
let strToDate = new Date("23-02-2022");
Print the resultant Date object on the console using the “console.log()” method:
console.log(strToDate);
Output
![]() The above output gives “Invalid Date” because the string doesn’t match the Date format.
Now, pass the date in a proper format in a Date constructor:
let strToDate = new Date("2022-02-23");
Output
The above output gives “Invalid Date” because the string doesn’t match the Date format.
Now, pass the date in a proper format in a Date constructor:
let strToDate = new Date("2022-02-23");
Output
![]() The output displayed a new Date object.
The output displayed a new Date object.
Conclusion
For creating a Date object from a string, use the “Date()” constructor or the “parse()” method of the Date object.
The parse() method parses a date as a string and gives a date in milliseconds from January 1, 1970, and the date is derived by parsing the specified string used to represent a date.
The Date() constructor gives a new Date object and commonly utilized method for converting a string to a Date object.
Both methods are thoroughly explained in this article with examples.
How to Add ID to Element Using JavaScript
In JavaScript, the “id” attribute is significant because it identifies a specific element that can be found using the “getElementById()” method.
The id in the HTML page needs to be unique because it is used later to access the HTML element’s values and the related content.
This post will describe the procedure for adding an Id to an element.
How to Add ID to Element Using JavaScript?
To add the id to an element, the “setAttribute()” method is used.
It requires two parameters, the “name” of the attribute is the first parameter, such as “id” and its value is a second parameter, such as “abc”.
Syntax
The given syntax id used for the setAttribute() method:
element.setAttribute("id", "value")
There are two ways for adding an Id to an element:
Add id by creating a new element using JavaScript
Add id to the existing HTML element
The given examples will demonstrate both ways one by one!
Example 1: Add ID by Creating New Element Using setAttribute() Method
In this example, we will create an HTML heading by JavaScript and set its id and the innerText for the DOM element.
In the JavaScript file, create an HTML element “h3” using the “createElement()” method:
const element = document.createElement('h3');
Set the unique id to the heading using the “setAttribute()” method:
element.setAttribute("id", "heading");
Here, the method takes two arguments:
The “id” is the first argument that is the attribute name.
The “heading” is the value of the id as a second attribute.
Get the reference of the HTML body tag using the “querySelector()” method:
var body = document.querySelector('body');
Add the heading “h3” to the body, using the “appendChild()” method by passing the element as an argument:
body.appendChild(element);
Now, set the text for the element that will show on the DOM using the “getElementsByTagName()” with the “innerHTML” property:
document.getElementsByTagName("h3")[0].innerHTML="Welcome to Linuxhint!";
Output
![]() The output signifies that the heading is successfully created with its id that is set by using the “setAttribute()” method.
The output signifies that the heading is successfully created with its id that is set by using the “setAttribute()” method.
Example 2: Add ID to Existing Element Using setAttribute() Method
Let’s try to add a new id to the existing HTML element.
In an HTML file, create a heading with <h3> tag and assign an id to it using the “id” attribute:
<h3 id="heading">Welcome to Linuxhint!</<strong>h3</strong>>
The corresponding HTML output will be:
![]() Now, in the JavaScript file, first, get the reference of the element using its assigned id with the help of the “getElementById()” method and store it in a variable “setId”:
var setId = document.getElementById("heading");
Set the new id “heading1” to the element using the “setAttribute()” method:
setId.setAttribute("id","heading1");
Output
Now, in the JavaScript file, first, get the reference of the element using its assigned id with the help of the “getElementById()” method and store it in a variable “setId”:
var setId = document.getElementById("heading");
Set the new id “heading1” to the element using the “setAttribute()” method:
setId.setAttribute("id","heading1");
Output
![]() The above output indicates that the id of the HTML element heading is now “heading1” which is set by the JavaScript “setAttribute()” method.
The above output indicates that the id of the HTML element heading is now “heading1” which is set by the JavaScript “setAttribute()” method.
Conclusion
For adding an id to an element, use the JavaScript “setAttribute()” method.
There are two ways for adding an id to an element, add an id by creating a new element or add an id to the existing HTML element.
This post described the procedure for adding an ID to an element.
Set the “disabled” Attribute Using JavaScript
While creating web pages or sites involving user interaction, there can be a requirement to fill out a form or a questionnaire having case-sensitive fields.
For instance, inputting name, password, etc.
In addition, restricts the user from entering a field or submitting a form if a particular requirement is satisfied.
In such case scenarios, setting the disabled attribute using JavaScript becomes very helpful in providing a mode of communication between the developer and the end user.
This article will illustrate how to set the disabled attribute.
How to Set the “disabled” Attribute?
The “disabled” attribute can be set with the help of the “setAttribute()” method.
The setAttribute() method assigns a particular value to an attribute.
This method can be applied to assign an element a particular attribute.
Syntax
element.setAttribute(name, value)
In the above syntax:
“name” specifies the attribute’s name.
“value” corresponds to the new attribute’s value.
Let’s follow the below-given examples.
Example 1: Set the “disabled” Attribute of an Input Field
In this example, a single input field will be disabled upon the button click.
Let’s observe the below-given example:
<center><body><input type= "text" id= "input" placeholder= "Enter Text..."><br><br><button onclick="setDisable()">Click to disable the Field</button></body></center><script type="text/javascript">function setDisable(){let get = document.getElementById('input');
get.setAttribute('disabled', '');}</script>
In the above lines of code:
Include an input field having the specified “id” and a “placeholder” value.
Also, create a button having an attached “onclick” event redirecting to the function setDisable().
In the JavaScript part of the code, declare a function named “setDisable()”.
In its definition, access the included input field using its “id” in the “getElementById()” method.
Lastly, apply the “setAttribute()” method such that the fetched element in the previous step is assigned the attribute “disabled”.
This will result in disabling the input field upon the button click.
Output
![]() From the above output, it can be observed that the input field becomes disabled upon the button click.
Example 2: Set the “disabled” Attribute With the Help of a Boolean Value
In this example, the disabled attribute will be allocated a boolean value to perform the desired functionality.
The following example explains the stated concept:
<center><body><textarea id="input">Enter Text...</textarea><br><br><button onclick="setDisable()">Click to disable the Field</button></body></center><script type="text/javascript">function setDisable(){let get = document.getElementById('input');
get.setAttribute('disabled', true);}</script>
According to the above code snippet:
Allocate an input “textarea” element having the stated “id”.
Also, create a button having an “onclick” event which will invoke the function setDisable().
In the JavaScript part of the code, define a function named “setDisable()”.
In its definition, similarly, access the included text area, apply the “setAttribute()” method and assign it a boolean value “true”, respectively.
This will resultantly disable the input text area upon the button click.
Output
From the above output, it can be observed that the input field becomes disabled upon the button click.
Example 2: Set the “disabled” Attribute With the Help of a Boolean Value
In this example, the disabled attribute will be allocated a boolean value to perform the desired functionality.
The following example explains the stated concept:
<center><body><textarea id="input">Enter Text...</textarea><br><br><button onclick="setDisable()">Click to disable the Field</button></body></center><script type="text/javascript">function setDisable(){let get = document.getElementById('input');
get.setAttribute('disabled', true);}</script>
According to the above code snippet:
Allocate an input “textarea” element having the stated “id”.
Also, create a button having an “onclick” event which will invoke the function setDisable().
In the JavaScript part of the code, define a function named “setDisable()”.
In its definition, similarly, access the included text area, apply the “setAttribute()” method and assign it a boolean value “true”, respectively.
This will resultantly disable the input text area upon the button click.
Output
![]() The “disabled” attribute is set in a proper manner.
Example 3: Set the “disabled” Attribute to Multiple Elements
This example will result in setting the “disabled” attribute such that various elements will become disabled upon the button click at the same time.
Let’s overview the below-given example:
<center><body><input type= "text" class= "input"><input type= "text" class= "input"><input type= "checkbox" class= "input"><br><br><button onclick= "setDisable()">Click to disable the Fields</button></body></center><script type="text/javascript">function setDisable(){let get = document.getElementsByClassName("input")for (let input of get){
input.setAttribute('disabled', '');}}</script>
Go through the following steps as given in the above code snippet:
Firstly, include the input “text fields” and a “checkbox” element, respectively having the specified class.
Likewise, create a button having an “onclick” event invoking the function setDisable().
In the JavaScript part of the code, declare a function named “setDisable()”.
In its definition, access the included elements using the “getElementsByClassName()” method.
After that, apply the “for” loop.
Within the loop, apply the “setAttribute()” method such that all the included elements become disabled upon the button click.
Output
The “disabled” attribute is set in a proper manner.
Example 3: Set the “disabled” Attribute to Multiple Elements
This example will result in setting the “disabled” attribute such that various elements will become disabled upon the button click at the same time.
Let’s overview the below-given example:
<center><body><input type= "text" class= "input"><input type= "text" class= "input"><input type= "checkbox" class= "input"><br><br><button onclick= "setDisable()">Click to disable the Fields</button></body></center><script type="text/javascript">function setDisable(){let get = document.getElementsByClassName("input")for (let input of get){
input.setAttribute('disabled', '');}}</script>
Go through the following steps as given in the above code snippet:
Firstly, include the input “text fields” and a “checkbox” element, respectively having the specified class.
Likewise, create a button having an “onclick” event invoking the function setDisable().
In the JavaScript part of the code, declare a function named “setDisable()”.
In its definition, access the included elements using the “getElementsByClassName()” method.
After that, apply the “for” loop.
Within the loop, apply the “setAttribute()” method such that all the included elements become disabled upon the button click.
Output
![]() From the above output, it is evident that all the elements become disabled upon the button click.
From the above output, it is evident that all the elements become disabled upon the button click.
Conclusion
The “setAttribute()” method can be implemented by taking different parameters to set the disabled attribute using JavaScript.
This method can be applied to an input field with or without an assigned boolean value.
It can also be utilized to disable multiple elements at the same time.
This tutorial explained how to set the disable attribute using JavaScript.
Get the First 3 Characters of a String
In the data handling and updation processes, there can be a requirement to work with some part of the data and not the remaining chunk.
For instance, you need to utilize the current data to create or add new data.
In such cases, getting the first three string characters assists in utilizing the current resources, managing time, and saving memory effectively.
How to Get the First 3 Characters of a String Using JavaScript?
To get the first three string characters, the following approaches can be utilized:
“substring()” method
“slice()” method
“for” loop
Let’s check them out individually!
Approach 1: Get the First 3 Characters of a String Using substring() Method
The “substring()” method extracts the string characters from start to end without changing the original array.
This method can be applied to point to the string indexes and extract the characters from them.
Syntax
string.substring(start, end)
In the given syntax:
“start” and “end” refer to the start and end positions, respectively.
Example
Let’s follow the below-stated example:
<script type="text/javascript">
let string = "JavaScript";
console.log("The given string is: ", string)
let updString = string.substring(0, 3);
console.log("The first 3 characters of the string are:", updString);</script>
In the above code snippet:
Specify the stated string value and display it.
In the next step, apply the “substring()” method.
Also, specify the “indexes” of the provided string value such that the first three characters are extracted from it.
Finally, display the resulting string value.
Output
![]()
![]() In the above output, it can be observed that the first three characters from the specified string are extracted.
In the above output, it can be observed that the first three characters from the specified string are extracted.
Approach 2: Get the First 3 Characters of a String Using the slice() Method
The “slice()” method accessed the selected array elements in the form of a new array without changing the original array.
This method can similarly perform the required functionality by pointing to the string indexes as its parameter.
Syntax
array.slice(start, end)
In the given syntax:
“start” and “end” correspond to the start and end positions, respectively.
Example
Let’s overview the following example:
<script type="text/javascript">
let string = "Characters";
console.log("The given string is:", string)
let updString = string.slice(0, 3);
console.log("The first 3 characters of the string are:", updString);</script>
Perform the following steps as given in the above code snippet:
Firstly, assign the stated string value and display it.
After that, apply the “slice()” method such that the included string value is sliced with respect to the specified values in its parameters referring to the string’s indexes.
Lastly, display the spliced string value.
Output
![]()
![]() From the above output, it is evident that the required characters are extracted successfully.
From the above output, it is evident that the required characters are extracted successfully.
Approach 3: Get the First 3 Characters of a String Using for Loop
The “for” loop is used to access the elements by iterating along them.
This approach can be utilized to access the required string characters by iterating along them.
Example
Let’s follow the below-stated example:
<script type="text/javascript">
let string = "Linuxhint"
console.log("The given string is:", string)for(let i = 0;i<=2;i++){
console.log(string.charAt(i))}</script>
In the above code snippet, perform the following steps:
Allocate the string value and display it as discussed in the previous approaches.
In the further code, point to the first three string characters by iterating through them.
Lastly, apply the “charAt()” method and pass the accessed string characters in the previous step as its parameter and display them.
Output
![]()
![]() From the above output, it can be seen that the string characters are iterated one by one and displayed.
From the above output, it can be seen that the string characters are iterated one by one and displayed.
Conclusion
The “substring()” method, “slice()” method, or “for” loop approach can be implemented to get the first 3 characters of a string using JavaScript.
The substring() method performs the stated functionality by referring to the string indexes as its parameter.
Similarly, the slice() method fetches the stated characters with respect to the index values in the method’s parameters.
The for loop accesses the required string characters by iterating along them one by one.
This blog explained how to get the first 3 string characters using JavaScript.
Get the Index of the Min Value in an Array
While programming, there can be a requirement to sort an array in an ascending or descending manner, especially while solving mathematical problems.
For instance, in the case of locating multiple entries and sorting them.
In such scenarios, getting the index of the min value in an array is very helpful in accessing, locating, and sorting the data.
This tutorial will discuss the approaches to get the min value in an array.
How to Get the Index of the Min Value in an Array?
The min value’s index in an array can be fetched by applying the following approaches:
“Math.min()” and “indexOf()” methods
“for” loop
“reduce()” method
The mentioned approaches will now be illustrated one by one!
Approach 1: Get the Index of the Min Value in an Array Using Math.min() and indexOf() Methods
The “Math.min()” method returns the number having the most minimum value.
Whereas the “indexOf()” method outputs the index of the specified array element and returns “-1” if not found.
These methods can be utilized to compute the minimum value from an array first and then return its corresponding index.
Syntax
Math.min(num1, num2,...)
In the given syntax:
“num1, num2” represent the numbers that need to be compared.
string.indexOf(search)
In the above syntax:
“search” corresponds to the index of the fetched array element.
Example 1: Get the Min Value’s Index in an Array Using the Math.min() Method, indexOf() Method and spread Operator
Let’s overview the below-stated example:
<script type="text/javascript">
let array = [20, 40, 10];
let minimum = Math.min(...array);
let minIndex = array.indexOf(minimum);
console.log("The index of the minimum value is:", minIndex);</script>
In the above code snippet:
Declare an array having contained values in it.
After that, apply the “Math.min()” method.
In its parameter, apply the “spread” operator to unpack the array values and fetch the minimum value.
Finally, apply the “indexOf()” method to return the corresponding minimum value’s index in an array.
Output
![]()
Example 2: Get the Min Value’s Index in an Array Using Math.min(), indexOf() and apply() Methods
Let’s follow the below-given example:
<script type="text/javascript">
let array = [10, 20, 30];
let minimum = Math.min.apply(null, array);
let minIndex = array.indexOf(minimum);
console.log("The index of the minimum value is:", minIndex);</script>
Perform the following steps in the above code snippet:
Likewise, declare an array having the stated values.
In the next step, apply the “Math.min()” and “apply()” methods in combination.
This will result in taking the arguments in the form of an array and returning the minimum of the values.
Finally, apply the “indexOf()” method to return the corresponding index against the minimum value extracted in the previous step.
Output
![]() From the above output, it can be seen that the index against the minimum value “10” is retrieved.
From the above output, it can be seen that the index against the minimum value “10” is retrieved.
Approach 2: Get the Index of the Min Value in an Array Using for Loop
This approach can be implemented to iterate along the array values and compare each of the values to get the minimum value and return its index.
Example
Let’s overview the following example:
<script type="text/javascript">const array = [30, 20, 50, 70, 10, 40, 17];
let value = array[0];
let minIndex = 0;for (let i= 0; i < array.length; i++) {if (array[i] < value) {
minIndex = i;}}
console.log("The index of the minimum value is:", minIndex);</script>
In the above code snippet:
Declare an array of the stated values.
In the next step, refer to the first array value and initialize the value of the index as well.
Further, apply the “for” loop to iterate along the array items.
The loop will check for the minimum value with respect to the first array value.
It will continue to iterate till the most minimum value is accessed referring to the “if” condition.
Resultantly, the value of the index will be updated according to the fetched minimum value from an array.
Output
![]()
![]() The desired requirement is achieved in the above output.
The desired requirement is achieved in the above output.
Approach 3: Get the Index of the Min Value in an Array Using reduce() Method
The “reduce()” method executes a reducer function for array elements.
This method can be applied to check for each array value for the minimum value such that the array will be reduced to the minimum value’s index.
Syntax
array.reduce(function(total, value, index, array), this)
In the above syntax:
“function” refers to the function to be executed for each array element.
“total” corresponds to the initial value.
“value” is the current element.
“index” points to the current element’s index.
“array” is the element’s array.
“this” indicates the value to be passed to the function.
Example
Let’s follow the below-given example:
<script type="text/javascript">
let array = [2, 4, 1];
let minIndex = array.reduce((index, value, i, array) =>
value < array[index] ? i : index, 0);
console.log("The index of the minimum value is:", minIndex);</script>
Let’s move toward the explanation of the above code:
Declare an array likewise.
In the next step, apply the “reduce()” method having the stated parameters.
Here, a condition will be applied to the element’s indexes in an array, and the array will be reduced down to the minimum value’s index.
Finally, after the successful check, the index of the minimum value will be displayed.
Output
![]()
![]() In the above output, it can be observed that the minimum value’s index is displayed.
In the above output, it can be observed that the minimum value’s index is displayed.
Conclusion
The Math.min() and indexOf() methods can be applied to compute the minimum value from an array and then return its corresponding index via the spread operator or the apply() method.
The for-loop approach can access the array values by iterating along them and comparing each of the values to get the minimum value’s index.
The reduce method can be applied by reducing the array till the minimum value is retrieved.
This blog explained how to get the min value’s index in an array.
How to Generate a Random Number Between Two Numbers
The extraction of a single number using any mathematical algorithm is known as random number generation.
The random number is an unexpected or unpredictable value generated by a computer.
Many applications need to create random numbers, such as gaming websites, testing purposes, and so on.
Some applications generate random numbers to utilize the OTP to validate the user, like banking apps and so on.
This blog post will define methods for creating random numbers between two numbers.
How to Generate a Random Number Between Two Numbers?
In JavaScript, there are different methods for generating a random number, including:
“Math.random()” method
“Math.floor()” method
Let’s discuss these methods one by one!
Method 1: Generate a Random Number Between Two Numbers Using Math.random() Method
The “Math.random()” method is used for creating random numbers between two numbers.
It generates random positive double data type values between “0.0” and “1.0”.
Syntax
The below-given syntax can generate a random number using the “Math.random()” method:
Math.random();
For generating a random number between two numbers, utilize the given syntax:
Math.random() * (max_num - min_num) + min_num;
In the above syntax, “max_num” represents the maximum number, and “min_num” denotes the minimum number.
Return Value
It outputs random pseudo numbers rather than true values inside the range.
Example
Let’s generate a random number between “83” and “23” using the “random()” method:
Math.random() * (83-23) + 23;
Output
![]() The above output displays a floating-point random number “48.04761034288709” between two numbers “83” and “23”.
If the user wants to get the random number in an integer format! Follow the below section.
The above output displays a floating-point random number “48.04761034288709” between two numbers “83” and “23”.
If the user wants to get the random number in an integer format! Follow the below section.
Method 2: Generate a Random Number Between Two Numbers Using Math.floor() Method
Another method for generating random numbers between two numbers, use the “Math.floor()” method with the “Math.random()” method.
It will convert the randomly generated floating point number to an integer.
Syntax
Follow the given-provided syntax of the “Math.floor()” method to generate an integer random number:
Math.floor(Math.random() * (max_num - min_num + 1) + min_num);
The above syntax:
First, call the “Math.random()” method for generating a random number.
Then, convert it to an integer by rounding off the returned floating-point number by the “Math.random()” method.
Example
Let’s generate a random number between two numbers, “55” and “20”, using the “Math.floor()” method:
Math.floor(Math.random() * (55 - 20 + 1) + 20);
Output
![]() The above output indicates that the “Math.floor()” method gives an integer random number between two numbers.
The above output indicates that the “Math.floor()” method gives an integer random number between two numbers.
Conclusion
To generate a random number between two numbers, use the “random()” method of the Math object that will generate a decimal random between two specified numbers, and for converting it to an integer number, use the “Math.floor()” method with random() method.
This post defines these methods with proper examples for creating random numbers between two numbers.
Remove Everything After Specific Character
In JavaScript coding, programmers often need to remove everything after a certain word, character, or number.
To do so, JavaScript offers some pre-built methods, including the “split()” method, the “substring()” and the “slice()” method with the “indexOf()” method or the “replace()” method with regex.
This blog will describe the methods to remove everything after a specified character.
How to Remove Everything After a Specific Character?
For removing everything from a string after a specific character, use the following predefined JavaScript methods:
split() method
substring() method with indexOf() method
slice() method with indexOf() method
replace() method with regex
Let’s discuss these methods individually.
Method 1: Remove Everything After Specific Character Using split() Method
To remove the remaining part of the string after the specific character, the “split()” method is used.
The split() method accepts a pattern or a character as an argument that splits a String into a list of substrings in ordered form by searching for that pattern or character.
This method gives an array of split substrings.
Syntax
Follow the given syntax for the split() method
split(separator)
Here, “separator” is any character or a pattern for splitting the string.
Example
Create a variable “string” to store a string:
var string = 'Welcome! to Linuxhint';
Call the “split()” method by passing the character (“!”) for splitting the string.
It will return the array of substrings that contains “welcome” and “to Linuxhint”.
Since we only need the string’s part before the (“!”), and remove the other part, so we accessed the array at index 0:
var str = string.split('!')[0];</tr></tbody></table>
Print the output on the console using the “<strong>console.log()</strong>” method:[cce_bash escaped="true" theme="blackboard" nowrap="0"]
console.log(str);
The output indicates that the string is successfully removed the remaining part of the string after the specific character (“!”):
![]()
Method 2: Remove Everything After Specific Character Using substring() Method With indexOf() Method
Use the “substring()” method with the “indexOf()” method for removing the part of the string after the specified character.
The substring() method takes two parameters, the “startIndex” and the “endIndex”, and gives a subset of the string as output between the start and the last indexes.
The indexOf() method points to the exact position of the specified character.
Syntax
The following syntax is used for the substring() method:
substring(startIndex, endIndex)
In the above syntax:
The “startIndex” indicates the substring’s starting index.
“endIndex” is the end index of the substring.
Example
Invoke the substring() method, passing the start and the end indexes as arguments.
Here, for removing the remaining string after the specific character, we will utilize the “indexOf()” method for getting the index of the particular character (“!”) as an end index for the substring:
var str = string.substring(0, string.indexOf('!'));
The output displays the string’s part before the specified character (“!”):
![]()
Method 3: Remove Everything After Specific Character Using slice() Method With indexOf() Method
To remove everything after the particular character, use the “slice()” method with the “indexOf()” method.
It is similar to the “substring()” method with the indexOf() method.
It slices the string as a substring based on the start and the end indexes.
Syntax
Use the following syntax for the slice() method:
slice(startIndex, endIndex)
In the above syntax:
The “startIndex” is the starting index of the substring.
“endIndex” is the substring’s end index.
Example
Call the slice() method by passing the “0” as a start index, and for the last index, call the “indexOf()” method by passing (“!”) as an argument:
var str = string.slice(0, string.indexOf('!'));
Output
![]()
Method 4: Remove Everything After Specific Character Using replace() Method
Finally, use the “replace()” method for removing the part of the string after the character.
It searches for a specified expression or pattern in the given string and replaces it with a replacement.
Syntax
Use the below-given syntax for the replace() method:
replace(searchPattern, replaceValue)
In the above syntax:
“searchPattern” is the value that will be searched in a string.
“replaceValue” is the value that is utilized as a replacement.
Example
Invoke the “replace()” method by passing the pattern for the character (“!”):
var str = string.replace(/\!.*/, '');
The corresponding out will be as follows:
![]() We have compiled all the essential information related to removing everything after the character.
We have compiled all the essential information related to removing everything after the character.
Conclusion
For removing everything after the specific character in a string, use the “split()” method, the “substring()” and the “slice()” method with the “indexOf()” method, or the “replace()” method with regex.
All these methods work best for removing the remaining string after the character from a string.
This blog describes the methods to remove everything after a specific character from a string.
Remove all Styles From an Element using JavaScript
In the process of updating a web page or the site, there can be a requirement to remove all the styling or a part of it from a particular element.
In addition to that, adding effects and warning/error messages upon the mouse click or hover.
In such cases, removing all styles from an element using JavaScript does wonder in grabbing the user’s attention and making the website stand out.
This blog will discuss the approaches to remove all styles from an element.
How to Remove/Omit all Styles From an Element?
To remove all styles from an element, the following approaches can be utilized:
“removeAttribute()” method.
“style” property.
“jQuery” methods.
Let’s follow each of the approaches one by one!
Approach 1: Remove all Styles From an Element Using removeAttribute() Method
The “removeAttribute()” method omits an attribute from an element.
This method can be applied to omit all the included styles from a specific element.
Syntax
element.removeAttribute(name)
In the given syntax:
“name” refers to the attribute’s name.
Example
Let’s overview the following example:
<center><body><h3 id="head" style= "background-color: lightblue;">This is Linuxhint Website</h3></center></body><script type="text/javascript">
const box = document.getElementById('head');
box.removeAttribute('style');</script>
In the above code snippet:
Include the stated heading having the specified “id” and the “style” attribute.
In the JavaScript part of the code, access the included heading from its “id” using the “getElementById()” method.
In the next step, apply the “removeAttribute()” method having the attribute “style” as its parameter.
This will result in removing the specified styling from the heading.
Before Removing Style
![]() After Removing Style
After Removing Style
![]() From both of the above image snippets, the difference before and after the style removal can be observed.
From both of the above image snippets, the difference before and after the style removal can be observed.
Approach 2: Remove Specific Styles From an Element Using style Property
The “style” property gives the value of an element’s style attribute.
This property can be implemented to remove a particular property contained in the style attribute.
Syntax
element.style.property = value
In the above syntax:
“value” corresponds to the value referring to the property specified.
Example
Let’s go through the following example:
<center><body><p id= "box" style= "width: 500px; background-color: lightsalmon;">JavaScript is a very effective programming language.
It is very helpful in designing a web page or the site.
It can also be integrated with HTML to implement some added functionalities as well.</p><br><button onclick = "removeStyle()">Remove Specific Style </button></body></center><script type="text/javascript">function removeStyle(){
const box = document.getElementById('box');
box.style.width = null;}</script>
Perform the following steps as given in the above lines of code:
Include a paragraph element having the specified “id” and the “style” attribute consisting of the stated properties.
Also, create a button with an attached “onclick” event invoking the function removeStyle().
In the next step, access the contained paragraph by using its “id” in the “getElementById()” method.
Lastly, assign the property “width” as “null”.
This will remove the width property within the “style” attribute of the paragraph upon the button click.
Output
![]() In the above output, the “width” of the paragraph is removed upon the button click.
In the above output, the “width” of the paragraph is removed upon the button click.
Approach 3: Remove all Styles From an Element Using jQuery
The jQuery approach can be applied to fetch the included element directly and remove its styling upon the button click.
Example
The below-given example explains the stated concept.
<script src="https://ajax.googleapis.com/ajax/libs/jquery/3.5.1/jquery.min.js"></script><center><body><h3>Before Removing Style</h3><img src= "template4.png" id = "image" style= "height:400px;width:700px"></div><br><br><button id="button">Remove Style</button><br></body></center><script type="text/javascript">
$("#button").on('click', function() {
$("#image").removeAttr("style");});</script>
In the above lines of code:
Include the stated heading.
Also, add the specified image having the “id” and its set dimensions in the “style” attribute.
After that, create a button having the specified “id”.
In the jQuery part of the code, access the created button.
Upon the button click, the stated function will be triggered.
In the function definition, access the contained image by its “id” directly.
Also, apply the “removeAttr()” method having the attribute “style” as its parameter.
This will result in neglecting the image’s set dimensions, thereby removing the element’s style upon the button click.
Output
![]() From the above output, it is evident that the image’s set dimensions within the “style” attribute do not affect the button click.
From the above output, it is evident that the image’s set dimensions within the “style” attribute do not affect the button click.
Conclusion
The “removeAttribute()” method, the “style” property, or the “jQuery” approach can be utilized to remove all styles from an element using JavaScript.
The removeAttribute() method can be applied to remove all the styling from the accessed element directly.
The style property can be implemented to remove a particular style within the “style” attribute from an element.
The jQuery approach can be applied to achieve the same functionality.
This tutorial explains how to remove/omit all styles from a specific element.
TypeError: This is Not a Function
Sometimes, while executing code, programmers encounter an error called “typeError: This is not a function”.
This happens when the programmer tries to access a value from a function, but the function is not defined in the scope or default library, or it is called with typo mistakes, or some methods are not valid for some objects but trying to use them also causes this error.
This article will define the specified JavaScript typeError: this is not a function.
What is TypeError: This is Not a Function?
TypeError is a common JavaScript error that happens when a programmer tries to call a function that has not been initialized or incorrectly initialized or when a function or method is called with a typo.
Let’s look at examples that will illustrate how this type of error occurs.
Example 1: TypeError Occurs Due to Typo
In the HTML file, first, create a radio button with the id “checkbox” that will select by clicking on the button:
<input type="radio" id="checkbox"> JavaScript <br><br>
Create a button by attaching an “onclick()” event that will trigger the defined function called “select()” which will select the radio button on button click:
<button type="button" onclick="select()">Yes</button>
In a JavaScript file or a script tag, define a function named “select()” in which first, access the id of the radio button using the “getElementById()” method and store it in a variable “input”.
Then, set the “checked” property “true”:
function select() {
let input = document.getElementbyID('checkbox');
input.checked = true;}
Output
![]() The above output shows an error “TypeError: document.getElementbyID is not a function” while clicking on the button because the method is called with a typo mistake.
It is getElementById() not getElementbyID().
The above output shows an error “TypeError: document.getElementbyID is not a function” while clicking on the button because the method is called with a typo mistake.
It is getElementById() not getElementbyID().
How to fix it?
Now, let’s fix the above error by calling the method with the correct spellings:
function select() {
let input = document.getElementById('checkbox');
input.checked = true;}
Output
![]() The above output snippet shows that the radio button is successfully checked by clicking on the button.
The above output snippet shows that the radio button is successfully checked by clicking on the button.
Example 2: TypeError Occurs Because Certain Methods Only Work for a Particular Object
Some predefined methods are not accessible for all objects, like the “map()” method, which will work with Array objects only.
So, accessing them will also trigger the specified error.
For a better understanding, see the below example!
Create an object with key-value pairs:
let object = {x: 23, y: 14, z: 20};
Call the “map()” method that will return the values of an object multiplied by 2:
let product = object.map(function(obj) {
return obj * 2;});
Print the result on the console:
console.log(product);
Output
![]() The above output shows “TypeError: object.map is not a function” because the “map()” method is not accessible by objects; it will work for the Arrays.
Let’s see “map()” method works for arrays or not.
To check it out, first, create an array of numbers:
let array = [23, 14, 20, 8, 4];
Invoke the “map()” method that will return the numbers multiplied by 2:
let product = array.map(function(n) {
return n * 2;});
Print the result on the console utilizing the “console.log()” method:
console.log(product);
The above output shows “TypeError: object.map is not a function” because the “map()” method is not accessible by objects; it will work for the Arrays.
Let’s see “map()” method works for arrays or not.
To check it out, first, create an array of numbers:
let array = [23, 14, 20, 8, 4];
Invoke the “map()” method that will return the numbers multiplied by 2:
let product = array.map(function(n) {
return n * 2;});
Print the result on the console utilizing the “console.log()” method:
console.log(product);
Output
![]() The above output snippet shows the “map()” method works for the array objects.
All the essential information gathered for the JavaScript typeError: this is not a function.
The above output snippet shows the “map()” method works for the array objects.
All the essential information gathered for the JavaScript typeError: this is not a function.
Conclusion
TypeError is a common JavaScript error that happens in some scenarios, including when a programmer tries to call a function that has not been initialized or has been incorrectly initialized or when a function or method is called with a typo.
Some methods are not valid for some objects but trying to use them also causes this error.
This article defines the specified typeError: this is not a function.
Set Background Image of a Div via Function
In the process of making attractive and responsive websites stand out, there is a requirement to add images to the Document Object Model(DOM) upon triggering the functionalities.
This eventually leads to making the user stay on the site and explore it, which results in increased traffic in favor of the developer.
In such case scenarios, setting the background image of a div via JavaScript functions does wonder in providing added functionalities.
This article will explain the approaches to set the background image of a div via a function.
How to Set the Background Image of a Div via Function?
The background image of a div via a function can be set by using the following approaches:
“style.backgroundImage” property.
“setAttribute()” method.
Approach 1: Set the Background Image of a Div With the Help of a Function Using the style.backgroundImage Property
The “backgroundImage” property returns the element’s background image.
This property can be utilized to fetch the “div” element with the help of a user-defined function and apply a background image to it.
Syntax
object.style.backgroundImage = "url('URL')|back|initial|inherit"
In the given syntax:
“url” refers to the image file’s location.
“back” points to the background image.
“initial” refers to the property’s default value.
“inherit” indicates the inheritance of the property from its parent element.
Example
Let’s follow the below-given example:
<center><div id="head" style= "height:250px;width:250px;"><h2>This is Linuxhint Website</h2><button onclick= "divBackground()">Click to See Effect</button></div></center>
In the above code snippet, perform the following steps:
Include the “div” element with the specified “id” and adjusted dimensions.
After that, include the stated heading.
Also, create a button with an attached “onclick” event redirecting to the function divBackground().
Let’s move to the JavaScript part of the code:
<script>function divBackground(){
document.getElementById("head").style.backgroundImage = 'url("template3.PNG")';}</script>
In the above code snippet:
Declare a function named “divBackground()”.
In its definition, access the included “div” element by its “id” using the “document.getElementById()” method.
Lastly, apply the “style.backgroundImage” property with the specified image’s location as “url”.
This will result in setting the background image to the included heading and button in the “div”.
Output
![]() In the above output, it is evident that the background image is applied to the contained “heading” and “button” within the “div”.
In the above output, it is evident that the background image is applied to the contained “heading” and “button” within the “div”.
Approach 2: Set Background Image of a Div via Function Using setAttribute() Method
The “setAttribute()” method sets a new value to an attribute.
This method can be applied to set the attribute as a “background image” to the contained table in the “div” element.
Syntax
element.setAttribute(name, value)
In the above syntax:
“name” refers to the attribute’s name.
“value” points to the attribute’s value.
Example
Let’s have a look at the following lines of code:
<div id="head"><table border="2"><tr><th>Sr.No</th><th>Name</th><th>City</th></tr><tr><td>1</td><td>David</td><td>Los Angeles</td></tr></table><br><button onclick= "backgroundImage()">Click to See Effect</button></div>
In the above code snippet:
Include the “div” element with the specified “id”.
Also, contain the stated “table” within the “div” with the specified values of “table-header” and “table-data”.
In the next step, create a button with an attached “onclick” event invoking the function backgroundImage().
Let’s continue to the JavaScript part of the code:
<script type="text/javascript">function backgroundImage() {
document.getElementById('head').setAttribute("style", "background-image: url('template3.PNG')")}</script>
In the above code snippet, perform the following steps:
Declare a function named “backgroundImage()”.
In its definition, access the “div” element by its “id” using the “document.getElementById()” method.
After that, apply the “setAttribute()” method with the specified image’s path as discussed and the “style” attribute as its parameter.
Output
![]() From the above output, it can be observed that the background image is added to the table upon the button click.
From the above output, it can be observed that the background image is added to the table upon the button click.
Conclusion
The “style.backgroundImage” property or the “setAttribute()” method can be utilized to set the background image of a div via function.
The former approach can be implemented to fetch the “div” element with the help of a user-defined function and apply a background image to it.
The latter method can be utilized to set the background image of the included table by setting its (image) attributes.
This tutorial explains how to set the background image of a div with the help of a function using JavaScript.
The preg_match Function
In JavaScript, there is no such built-in function as the “preg_match()” function of PHP, but the same functionality can be achieved for checking the string’s match portion.
It can be utilized to search for specific string values, especially in the case of bulk data, where it provides much convenience.
In addition to that, this functionality assists a lot in accessing some specific data or part of it instantly for performing some operation, thereby saving time and hassle.
How to Use the preg_match Function?
The preg_match function’s functionality can be implemented by using the following approaches:
“regular expression” pattern with “match()” method.
“includes()” method.
Approach 1: Use the preg_match Function Using Regular Expression Pattern With match() Method
The “match()” method matches a string with a regular expression.
This method can be applied to match the specified or user-entered string value with the assigned regular expression and log the corresponding result.
Syntax
string.match(match)
In the given syntax:
“match” refers to the value to be searched for.
Example 1: Using Regular Expression Pattern With match() Method on the Specified String Value
In this example, the specified string value will be matched with the regular expression value and the corresponding message will be logged in the “if/else” condition.
Let’s observe the below-stated example:
<script type="text/javascript">
let stg = 'linuxhint';
let regex = /linux/gi;if (stg.match(regex)){
console.log("The String is Matched") }else{
console.log("Not Matched")}</script>
In the above code snippet, perform the following steps:
Specify the stated string in a variable named “stg”.
In the next step, allocate a regular expression to be matched for.
In the further code, apply the “match()” method to match the string value with the regular expression.
If matched, the “if” condition will be invoked.
In the other case, the “else” condition will come into effect.
Output
![]() In the above output, it can be observed that the “regex” matches the specified string value.
Example 2: Using Regular Expression Pattern With match() Method on the User-Entered Value
In this example, the user-entered value will be matched with the regular expression.
Let’s heed the below-stated example:
<script type="text/javascript">
let stg = prompt("Enter the string value: ");
let regex = /linux/gi;if (stg.match(regex)){
alert("The String is Matched") }else{
alert("Not Matched")}</script>
In the above code lines:
In the first step, allow the user to enter a “string” value to be matched with the specified regular expression.
In the further steps, repeat the discussed steps for matching the entered string value and returning the corresponding message.
Output
In the above output, it can be observed that the “regex” matches the specified string value.
Example 2: Using Regular Expression Pattern With match() Method on the User-Entered Value
In this example, the user-entered value will be matched with the regular expression.
Let’s heed the below-stated example:
<script type="text/javascript">
let stg = prompt("Enter the string value: ");
let regex = /linux/gi;if (stg.match(regex)){
alert("The String is Matched") }else{
alert("Not Matched")}</script>
In the above code lines:
In the first step, allow the user to enter a “string” value to be matched with the specified regular expression.
In the further steps, repeat the discussed steps for matching the entered string value and returning the corresponding message.
Output
![]() From the above output, it is evident that the entered string value matches the regular expression.
From the above output, it is evident that the entered string value matches the regular expression.
Approach 2: Use the preg_match Function Using includes() Method
The “includes()” method checks if a string contains a specified string and returns the corresponding boolean value.
This method can be implemented to check if the searched value is included in the specified string value.
Syntax
string.includes(search, start)
In the above syntax:
“search” refers to the string to search for.
“start” corresponds to the start position.
Example
Let’s focus on the following example:
<script type="text/javascript">
let stg = 'linuxhint';if (stg.includes("linux")){
console.log("The String is Matched") }else{
console.log("Not Matched")}</script>
In the above code, perform the following steps:
Firstly, assign the stated string value.
Also, apply the “includes()” method.
In its parameter, pass the string value to be searched for.
If the searched value is included in the specified string value, the “if” condition executes.
In the other scenario, the “else” condition will come into effect.
Output
![]() From the above output, it can be observed that the searched string value is included in the specified string value.
From the above output, it can be observed that the searched string value is included in the specified string value.
Conclusion
The “regular expression” pattern with the “match()” method or the “includes()” method can be applied to implement the same functionality as the preg_match function.
The former approach can match the specified or user-entered string value with the allocated regular expression and return the corresponding outcome.
The latter approach can be implemented to check if the specified string value is included in the searched value and log the message accordingly.
This blog explained the identical implementation of the preg_match function.
Define Do Nothing to Keep User on the Same Page
Sometimes, the user unintentionally presses the cross button, so the user gets an alert message asking them whether they want to stay here or close the tab with the “OK” and “Cancel” options.
If the user clicks the “OK” button, the tab closes, if they click “Cancel”, perform nothing, and keep them on the same page.
How do developers do this?
This article will demonstrate the methods to do nothing and stay on the same page using JavaScript.
Define Do Nothing to Keep User on the Same Page
Use the following approaches for keeping the user on the same page:
window.close() method
void(0)
Method 1: Do Nothing to Keep the User on the Same Page Using window.close() Method
Use the JavaScript predefined method of the window object called “window.close()”.
It closes the current window.
Syntax
For “window.close()” method uses the below-provided syntax:
window.close();
Example
First, create an HTML page that contains a heading and a button that will act as a cross (x) tab button.
Attach an “onclick” property with the button that will call the JavaScript function named “stayonPage()”:
<h3>Keep User on the Same Page</h3><label>Click cancel to stay on the same page</label> <br><br><button onclick="stayonPage()">Click here</button>
By executing the above code, the output will be like this:
![]() Then, in the JavaScript file using the below lines of code:
function stayonPage() {if (confirm("Do you want to close the page?")){
window.close();
}}
In the above code snippet:
Define a function “stayonPage()”.
Check the condition by calling the JavaScript “confirm()” method that will show a message with the “OK” and “Cancel” option buttons.
Call the “window.close()” method in the body of the conditional statement.
If the user click on the “OK” button, it closes the tab, if they click on the “Cancel” button, it will do nothing and keep them on the same page.
Output
Then, in the JavaScript file using the below lines of code:
function stayonPage() {if (confirm("Do you want to close the page?")){
window.close();
}}
In the above code snippet:
Define a function “stayonPage()”.
Check the condition by calling the JavaScript “confirm()” method that will show a message with the “OK” and “Cancel” option buttons.
Call the “window.close()” method in the body of the conditional statement.
If the user click on the “OK” button, it closes the tab, if they click on the “Cancel” button, it will do nothing and keep them on the same page.
Output
![]() The above output shows that while clicking on the “Cancel” button, nothing happened.
The above output shows that while clicking on the “Cancel” button, nothing happened.
Method 2: Do Nothing to Keep the User on the Same Page Using void(0) Method
The “void(0)” is an operator that returns undefined and it will do nothing.
This prevents the current window from refreshing and loading a new page.
Syntax
The following syntax is utilized for keeping the user on the same page with the help of void(0):
void(0);
Example
The below-given lines of code are used file, for keeping the user on the same webpage:
function stayonPage() {if (confirm("Do you want to close the page?")){void(0);
}}
In the above snippet:
First, define a function “stayonPage()”.
Check the condition by calling the JavaScript “confirm()” method that will display a message with the “OK” and “Cancel” option buttons.
Call the “void(0)” in the body of the conditional statement.
It returns undefined and nothing will happen.
Output
![]()
Conclusion
For defining do nothing to keep users on the same webpage, use the JavaScript predefined method of the Window object called “window.close()” and the JavaScript “void(0)” operator.
It returns undefined and it stops refreshing the current web page or loads a new page.
This article demonstrates the methods to do nothing and stay on the same page using JavaScript.
Const Function Expression
A function is a sequence of commands that perform an operation or calculate a value.
A function statement declares a function that will be executed only when called.
A function expression is extremely like a function declaration except that a function expression is a function of a variable and executes the function using the variable’s name.
This tutorial will describe the JavaScript const function expression.
What is Const Function Expression?
The const function expression is the function assigned to a “const” variable.
The “const” keyword was introduced in ES6.
Variables or functions defined with “const” cannot be “redeclared”, or “reassigned” and are “block-scoped”.
A value is created as a read-only reference by the “const” declaration.
Syntax
For using a “const” function expression, use the below-given syntax:
const varName = function (parameters){// return statement}
In const function expression syntax:
“varName” is the name of a constant variable for the const function expression.
Let’s try an example to see what is the const function expression and how it works.
Example
Create a variable “func” with the keyword “const”, and assign a function with three parameters to it, that will return the product of three numbers:
const func = function (x,y,z){return x * (y * z);}
Execute the function with a variable name by passing numbers “2”, “8”, and “4” as arguments:
console.log(func(2, 8, 4));
Output
![]() The output displays the product of numbers passed in a const function expression on the console.
As discussed above, the keyword “const” doesn’t allow “redeclared” and “reassigned”.
Here, in below code snippet, define a new function expression that will return the sum of the three numbers and store it in an already created constant variable “func”:
func = function (x,y,z){return x + (y + z);}
While calling the function with the variable name, it will display an error:
console.log(func(12, 6, 24));
Output
The output displays the product of numbers passed in a const function expression on the console.
As discussed above, the keyword “const” doesn’t allow “redeclared” and “reassigned”.
Here, in below code snippet, define a new function expression that will return the sum of the three numbers and store it in an already created constant variable “func”:
func = function (x,y,z){return x + (y + z);}
While calling the function with the variable name, it will display an error:
console.log(func(12, 6, 24));
Output
![]() The output shows an error because of assigning a new function expression to the “func” variable.
The output shows an error because of assigning a new function expression to the “func” variable.
Conclusion
The const function expression is the function assigned to a “const” variable.
A function expression is extremely like a function declaration except that a function expression is a function of a variable and executes using the variable’s name.
When a function expression is assigned to a const variable, the function definition is unchanged because the const variable cannot be changed.
Get Element Value Using JavaScript
Sometimes, programmers want to change the value of any element, so they need first to get the element and then, check the value of the specified element.
After that apply the operations to them.
To get the element’s reference and its value, JavaScript offers some predefined methods or properties.
This tutorial will explain how to get the value of an element using JavaScript.
How to Get Element Value Using JavaScript?
For getting the value of an HTML element, use the “value” property of the HTMLDataElement interface.
For getting reference of the element, multiple methods are used
getElementById() method
getElementByClass() method
getElementByTagName() method
querySelector() method
querySelectorAll() method
Here, the most commonly used methods with the “value” property will be discussed.
Example 1: Get Element Value Using value Property With getElementById() Method
To get the value of the element, use the “value” property with the “getelementById()” method for getting the reference of the element using its assigned “id”.
First, create a form in HTML file, with an input field and a button that will show the entered value in the text field on the “click” event:
<form><input type="text" id="text" placeholder="Enter some text..."><br><br><button onclick="getElementValue()">Get Value of Input Field</button></form>
Follow the below given lines of code:
function getElementValue() {
var value = document.getElementById("text").value;
alert(value);}
In the above code snippet:
First, define a function “getElementValue()”.
Then, fetch the element with its id “text” and retrieve its value utilizing the “value” property and store it in a variable “value”.
Finally, show the value of the element in an alert message.
Output
![]() The above output indicates that the value of the element is successfully fetched using the value property with the getElementById() method.
How to get the reference of the element without any specified id? Follow the below section.
The above output indicates that the value of the element is successfully fetched using the value property with the getElementById() method.
How to get the reference of the element without any specified id? Follow the below section.
Example 2: Get Element Value Using value Property With querySelector() Method
Another way to get a reference to an element to get its value is to use the “querySelector()” method.
It takes a “selector” of an element’s name as an argument and gives the document’s first element that matches the given selector.
Here, first, create a drop-down menu using the <select> tag, and a button that will trigger the “getElementValue()” function for getting the value of selected option:
Select the Language you want to learn:<select><option>HTML</option><option>CSS</option><option>JavaScript</option><option>Java</option><option>Python</option></select> <br><br><button onclick="getElementValue()">Get Value of Input Field</button>
In the JavaScript file, use the following code:
function getElementValue() {
var value = document.querySelector("select").value;
alert(value);}
In the above lines of code:
Define a function “getElementValue()”.
Then, call the “querySelector()” method by passing a selector “select” element with the “value” property, that gets the selected value of the drop-down menu.
Lastly, show the selected value of the element in an alert message.
The output displays the selected values in an alert message:
![]()
Conclusion
To get the value of the DOM’s element, use the “value” property of the HTMLDataElement interface with different methods for getting reference of the element, such as “getElementById()” method, “getElementByClass()” method, or the “querySelector()” method.
This tutorial explained the procedure for getting the element value using JavaScript.
Dynamic Object Key
An object is an entity that stores data in key-value pairs., object keys and values can be created multiple ways, including assignment using dot or bracket notation or object literals during initialization.
But sometimes an object key needs to be added dynamically.
This blog post will define the dynamic object key.
How to Set Dynamic Object Key?
In the ES6 version of JavaScript, developers can dynamically set the JavaScript property keys for their objects using the Bracket notation.
Syntax:
Follow the given syntax for setting a dynamic object key with bracket notation:
[keyVar] = keyName;
In the given syntax:
“keyVar” is the variable name that stores the name of the key that will be added dynamically in the object.
“keyName” is the name of a key that will be set dynamically in an object.
Example 1:
First, create a variable “newKey” for storing the name of the key “skill”:
var newKey = 'skill';
Then, create an object “info”, with properties “name”, “age”, and “email”.
Add another attribute of an object using the key “skill” that will dynamically add in an object:
var info = {
name: 'John',
age: 28,
email: 'john@gmail.com',
[newKey]: 'JavaScript'};
Call the “console.log()” method by passing an object as an argument for printing all the properties of the object in a key-value pair:
console.log(info);
Output
![]() The above output shows that the dynamic key “skill” is successfully added and accessed in an object:
The above output shows that the dynamic key “skill” is successfully added and accessed in an object:
Example 2:
Let’s print the value of the key “skill” stored in the “info” object:
console.log(info.skill);
Output
![]() The output indicates that the object “info” successfully accesses the value of the “newKey” variable and stores it as a dynamic key.
The output indicates that the object “info” successfully accesses the value of the “newKey” variable and stores it as a dynamic key.
Conclusion
For adding an object key dynamically, use the bracket notation.
First, store the key in a variable and then specify the variable name in bracket notation to set a key with value as a key-value pair in an object.
This blog post defines the dynamic object key.
Enable/Disable Input fields Using JavaScript
While creating a form or a questionnaire, there is a requirement to prompt the user at a certain point while filling in an input field.
For instance, limiting the number of characters within a field i.e.
“Contact No”.
In addition to that, for applying a prerequisite condition to fill a particular field, etc.
In such case scenarios, enabling/disabling input fields is a very convenient approach for both the developer and user’s end.
This tutorial will explain the approaches to enable/disable input fields using JavaScript.
How to Enable/Disable Input Fields Using JavaScript?
To enable/disable input fields using JavaScript, the following approaches can be utilized in combination with the “disabled” property:
“onclick” event.
“addEventListener()” method.
Approach 1: Enable/Disable Input Fields Using JavaScript Using onclick Event
An “onclick” event is used to redirect to the specified function.
This event can be applied to invoke the corresponding function for enabling and disabling input fields upon the button click.
Example
Let’s have a look at the below-stated example:
<center><h2>Enable/Disable Text Field</h2><body><input type= "text" id = "input" placeholder= "Enter Text..." ><br><br><button onclick="enableField()">Click to Enable Text Field</button><button onclick="disableField()">Click to Disable Text Field</button></body></center>
In the above-stated code, perform the following steps:
Include an input “text” field having the specified “id” and “placeholder” values.
Also, create two separate buttons with attached “onclick” events redirecting to two different functions for enabling and disabling the input fields respectively.
Let’s continue to the JavaScript part of the code:
<script type="text/javascript">
function disableField(){
let get= document.getElementById("input")
get.disabled = true;}
function enableField(){
let get= document.getElementById("input")
get.disabled = false;}</script>
In the above code snippet, perform the following steps:
Declare a function named “disableField()”.
In its definition, access the created input field by its “id” using the “document.getElementById()” method
In the next step, apply the “disabled” property and assign it the boolean value “true”.
This will result in disabling the input field upon the button click.
Similarly, define a function named “enableField()”.
In its definition, similarly, repeat the step discussed for accessing the input field.
Here, assign the “disabled” property as “false”.
This will result in enabling the disabled input field.
Output
![]() In the above output, it can be observed that the input field is disabled and enabled properly upon the corresponding button click.
In the above output, it can be observed that the input field is disabled and enabled properly upon the corresponding button click.
Approach 2: Enable/Disable Input Fields Using JavaScript Using addEventListener() Method
The “addEventListener()” method is used to attach an event to the element.
This method can be implemented to disable and enable an input field based on the attached event and the specified “key”.
Syntax
element.addEventListener(event, function, use)
In the above syntax:
“event” refers to the name of the event.
“function” points to the function to execute.
“use” is the optional parameter.
Example
Let’s observe the below-stated example:
<center><body><h2>Enable/Disable Text Field</h2><input type= "text" id = "input" placeholder= "Enter Text..."></body></center>
In the above lines of code:
Include the stated heading.
In the next step, repeat the method discussed in the previous approach for including an input field having the specified “id” and “placeholder” values.
Let’s move on to the JavaScript part of the code:
<script type="text/javascript">
let get= document.getElementById("input")
get.addEventListener("keydown", (e) =>{if(e.key == ""){
get.disabled = false}else if(e.key == "Enter"){
get.disabled = true}})</script>
In the above code snippet, perform the following steps:
Access the input field by its “id” using the “document.getElementById()” method.
In the next step, apply the “addEventListener()” method and attach an event named “keydown”.
In the further code, assign the “disabled” property as “false” for enabling the input field.
Lastly, in the “else” condition, allocate the “disabled” property as “true” for disabling the enabled input field upon pressing the “Enter” key.
Output
![]() From the above output, it is evident that the input field becomes disabled upon pressing the “Enter” key.
From the above output, it is evident that the input field becomes disabled upon pressing the “Enter” key.
Conclusion
The “disabled” property in combination with the “onclick” event or the “addEventListener()” method can be applied to enable/disable input fields using JavaScript.
The former approach can be utilized to redirect to the corresponding function to enable/disable the input field upon the button click.
The latter approach can be implemented to perform the required functionality based on the attached event and the specified “key”.
This article explains how to enable/disable input fields.
Dump Object
While dealing with the data in bulk, there comes a situation where there is a need to output the object’s properties and its associated values to clear and sort things out.
In addition to that, in the case of updating data of a particular object and observing the change in it side by side.
In such case scenarios, dumping an object is very helpful in instantly accessing and manipulating the data.
This blog will explain how to dump objects.
How to Dump Object?
An object can be dumped using the following methods:
“console.log()” method.
“console.dir()” method.
“console.table()” method.
“JSON.stringify()” method.
“Object.entries()” method.
Go through the mentioned methods one by one!
Approach 1: Dump Object Using console.log() Method
The “console.log()” method is used to log some value on the console.
This method can be applied to dump the object by containing the object along with its properties as its argument and logging it.
Example
Let’s observe the following example:
<script type="text/javascript">
console.log({name: "Harry", age: "22", city: "Los Angeles"})</script>
In the above code snippet, perform the following steps:
Contain the object along with its properties named “name”, “age” and “city”.
Finally, dump the contained object on the console.
Output
![]() In the above output, it can be observed that the contained object is dumped on the console.
In the above output, it can be observed that the contained object is dumped on the console.
Approach 2: Dump Object Using console.dir() Method
The “console.dir()” method logs an interactive list of the properties contained in the specified object.
This method is specifically meant for displaying objects and can also similarly be implemented to dump the contained object on the console.
Example
Let’s follow the below-given example:
<script type="text/javascript">
console.dir({name: "Harry", age: "22", city: "Los Angeles"})</script>
In the above code lines, perform the following steps:
Recall the discussed procedure in the previous approach to contain an object’ properties.
Finally, dump the contained object with the stated properties on the console.
Output
![]() From the above output, it is evident that the stated object is dumped successfully.
From the above output, it is evident that the stated object is dumped successfully.
Approach 3: Dump Object Using console.table() Method
The “console.table()” method logs the contained data in the form of a table.
This method can be used in such a way that every element contained in an object’s array will be a row, and the first column in the table will refer to the array’s properties corresponding to the index.
Example
Follow the below-given steps:
<script type="text/javascript">
console.table({name: "Harry", age: "22", city: "Los Angeles"})</script>
In the above code:
Recall the discussed approach for specifying the object’s properties and values.
Finally, display the contained object as a table.
Output
![]() From the above output, it can be observed that the contained properties and values of an object are dumped in the form of a table.
From the above output, it can be observed that the contained properties and values of an object are dumped in the form of a table.
Approach 4: Dump Object Using JSON.stringify() Method
The “JSON.stringify()” method is used to transform a JavaScript object into a string.
This method can be applied to dump the object as a string on the console.
Example
Let’s move on to the below-stated example:
<script type="text/javascript">
console.log(JSON.stringify({name: "Harry", age: "22", city: "Los Angeles"}))</script>
In the above-performed steps:
Revive the discussed method for allocating the object’s properties.
Also, apply the “JSON.stringify()” method to dump the object in the form of a string.
Output
![]() In the above output, it can be observed that the object is dumped as a “string”.
In the above output, it can be observed that the object is dumped as a “string”.
Approach 5: Dump Object Using Object.entries() Method
The “Object.entries()” method gives an array of objects in the form of enumerable [key, value] pairs.
This method can be utilized to dump the object in its argument in the form of “key-value” pairs.
Example
Follow the below-stated example:
<script type="text/javascript">const objectExample = {name: "Harry", age: "22", city: "Los Angeles"}
console.log(Object.entries(objectExample))</script>
In the above code snippet, perform the following steps:
Define an object named “objectExample” having the stated properties.
Finally, apply the “Object.entries()” method to dump the created object in the form of an array.
Output
![]() From the above output, it can be verified that the required functionality is achieved.
From the above output, it can be verified that the required functionality is achieved.
Conclusion
The “console.log()” method, the “console.dir()” method, the “console.table()” method, the “JSON.stringify()” method or the “Object.entries()” method can be utilized to dump objects.
The first two methods can be utilized to directly dump the object on the console.
The console.table can be applied to dump the object as a table.
The JSON.stringify() can be implemented to dump the object in the form of a string.
However, the Object.entries() method can be used to dump the object in the form of an array.
This tutorial explains how to dump objects.
How to Build a Simple Calculator?
Building a simple calculator is very helpful in resolving complicated problems.
In addition to that, it eases problem-solving, especially in the case of complex mathematical queries.
Moreover, it assists a lot in daily life problems i.e figuring and analyzing monthly budgets, etc.
In such cases, it does wonders to provide the user’s convenience and save time.
How to Build a Simple Calculator?
A simple calculator can be designed using the following approaches:
“if/else” condition
“User-defined” function.
Approach 1: Build a Simple Calculator via if/else Condition
This approach can be utilized to get the operator value from the user and return the corresponding calculated value based on the “if/else” condition.
Example
Let’s observe the below-stated example:
<script type="text/javascript">
var a = prompt('Enter the Operator to perform the Operation: "/,*,+,-"')
var num1=prompt('Enter the 1st number:')
var num2=prompt('Enter the 2nd number:')if (a=='/'){
console.log("The division is: ", num1 / num2)}
elseif (a=='*'){
console.log("The multiplication is: ", num1 * num2)}
elseif (a=='+'){
console.log("The addition is: ", num1 + num2)}
elseif (a=='-'){
console.log("The subtraction is: ", num1 - num2)}else{
console.log('N/A')}</script>
In the above code-snippet, perform the following steps:
In the first step, prompt the user to enter the value of the operator to operate on the numbers.
Similarly, take the two values from the user to be operated upon with respect to the operator.
In the further code, apply a condition upon each of the operators to return their functionalities upon entering the value of the operator.
Upon specifying the operator in the prompt dialogue box, it will result in redirecting to the corresponding operator in the “if/else” condition and return the precise calculation.
Output
![]() From the above output, it is evident that the accurate calculation is returned with respect to the entered operator’s value.
From the above output, it is evident that the accurate calculation is returned with respect to the entered operator’s value.
Approach 2: Build a Simple Calculator via User-defined Function
This approach can be implemented to allow the user to input the numbers and invoke the corresponding function upon the button click.
Here, there will be a separate button and function for each functionality.
Example
Let’s follow the below example:
<center><body><button style="background-color: lightblue">Click to return the Sum</button><button style="background-color: lightgrey">Click to return the Subtraction</button><button style="background-color: lightcoral">Click to return the Multiplication</button><button style="background-color: lightgreen">Click to return the Division</button>
let num1= prompt('Enter the 1st number:')
let num2= prompt('Enter the 2nd number:')
functionaddNums(){
alert(num1 + num2)}
functionsubtractNums(){
alert(num1 - num2)}
functionmultiplyNums(){
alert(num1 * num2)}
functiondivideNums(){
alert(num1 / num2)}</script>
In the above lines of code:
Create the buttons for each of the operators with attached “onclick” events redirecting to the corresponding functions.
In the JavaScript part of the code, likewise, define a function for each of the operators.
In the function definitions, return the corresponding calculation upon the button click via the alert dialogue box.
Output
![]() In the above output, it can be observed that the calculated value is returned upon clicking the corresponding operator button.
In the above output, it can be observed that the calculated value is returned upon clicking the corresponding operator button.
Conclusion
The “if/else” condition or the “user-defined” function approach can be implemented to build a simple calculator.
The former approach can be utilized to apply a condition upon the operators and return the corresponding calculated value.
The latter approach can be applied to define a function for each of the operators and return the computed value upon the button click.
This write-up explained how to build a simple calculator.
How keycodes work?
Keycodes work by assigning a particular key code value to the corresponding key.
This functionality helps restrict the user from entering an invalid value, especially when filling out a form or a questionnaire.
Similarly, prompting the end-user of the enabled “caps lock” when filling a case-sensitive field.
What are keycodes?
JavaScript assigns a numeric code to every key contained in a keyboard.
Key codes for alphanumeric and function keys are numbered consecutively.
In this blog, the working of the following keycodes against the particular keys will be explained:
| Key |
Key Code |
| Tab |
9 |
| Enter |
13 |
Syntax
event.keyCode
In the above syntax:
“event” refers to the attached event to the particular key against the key code.
How do keycodes Work?
The working of keycodes can be carried out by using the “addEventlistener()” method in combination with the following methods:
“getElementById()” method.
“querySelector()” method.
Approach 1: Working of Keycodes Using the getElementById() Method
The “addEventListener()” method attaches an event to the element, and the “getElementById()” method accesses an element having the specified “id”.
These methods can be utilized to access the input text field and detect the particular key with the help of the assigned key code and an attached event.
Syntax
element.addEventListener(event, listener, use);
In the above syntax:
“event” indicates the attached event.
“listener” corresponds to the function that will be invoked.
“use” is the optional value.
document.getElementById(element)
In the given syntax:
“element” corresponds to the “id” to be fetched against the particular element.
Example
Let’s focus on the below-stated example:
<textarea id="text"></textarea><h2 id="head">Detect Tab Key</h2>
let get= document.getElementById("text");
let result= document.getElementById("head");
get.addEventListener("keydown", (e) => { if (e.keyCode === 9){
result.innerText= "Tab Key Pressed";}else {
result.innerText= "Tab Key Not Pressed";}});
In the above code-snippet:
Allocate an input “text” field with the specified “id” and “placeholder” value.
In the next step, include the stated heading to contain the message displayed on the Document Object Model(DOM) upon the detection of the particular key.
In the JavaScript part of the code, access the input “text” field and the included heading by their “id’s” using the “getElementById()” method.
After that, attach an event named “keydown” to the “input” text field using the “addEventListener()” method.
Also, apply the “keyCode” property and assign it the key code of the “Tab” key.
This will result in displaying the stated message in the “if” condition as a heading upon detecting the tab key via the “innerText” property.
In the other case, the “else” condition will execute.
Output
![]() From the above output, it can be observed that the detection of the “Tab” key is being done successfully.
From the above output, it can be observed that the detection of the “Tab” key is being done successfully.
Approach 2: Working of Keycodes Using the querySelector() Method
The “querySelector()” method gets the first element that matches a CSS selector.
This method can be utilized to similarly access the input text field and attach an event to it, resulting in the detection of the specified key based on the key code.
Syntax
document.querySelector(CSS selectors)
In the above given syntax:
“CSS selectors” refers to one or more than one CSS selectors.
Example
Let’s observe the following example step-by-step:
<h2>Detect Enter Key</h2>
let get= document.querySelector("input");
let result= document.querySelector("h2");
get.addEventListener("keydown", (e) => { if (e.keyCode === 13){
result.innerText= "Enter Key Pressed";}else {
result.innerText= "Enter Key Not Pressed";
}});
In the above lines of code, perform the following steps:
Recall the discussed steps for including an input text field and a heading.
In the JavaScript part, similarly access the allocated input field and the heading using the “querySelector()” method.
In the next step, attach an event named “keydown” to the “input” text field” using the “addEventListener()” method.
Also, specify the “key code” of the “Enter” key via the “keyCode” property.
This will result in displaying the corresponding message in the “if” condition upon the detected “Enter” key.
In the other case, the “else” condition will remain in effect.
Output
![]() In the above output, it can be observed that upon the detection of the “Enter” key, the heading changes, thereby making the detection successful.
In the above output, it can be observed that upon the detection of the “Enter” key, the heading changes, thereby making the detection successful.
Conclusion
The “addEventListener()“ method in combination with the “getElementById()” method, or the “querySelector()” method can be implemented to ensure the working of keycodes.
The former approach can be utilized to access the input text field and detect the specific key via key code with the help of an attached event.
The latter approach can be applied to access the input text field and attach an event to it, which will detect the specific key based on its key code.
This tutorial explained the working of key codes.
hasOwnProperty
The “hasOwnProperty” is very helpful as it can be assigned with any object by just utilizing the string as an argument.
Moreover, it returns true if the value is available to the object instantly and returns false otherwise.
In addition to that, it allows testing only for properties that are manually created for the current object.
This tutorial will explain the use of hasOwnProperty.
What is hasOwnProperty?
The “hasOwnProperty()” method is used to check whether the object’s specified property is its own property.
This method returns the boolean value “true” even if the property’s value is “null” or “undefined” and it returns “false” in case of the inherited properties.
Syntax
object.hasOwnProperty(property)
In the given syntax:
“property” refers to the property to test.
Example 1: Applying hasOwnProperty to Compute the Length of the Dictionary
This particular example can be utilized to access the name-value pairs of an object and compute the dictionary’s length based on that.
Let’s follow the stated example:
<script type="text/javascript">
var dict = { Name: 'David',
Age: 'JavaScript'};
var count = 0;for (var i in dict) {if (dict.hasOwnProperty(i)) count++;}
console.log('The length of the dictionary is:', count);</script>
In the above lines of code, perform the following steps:
Firstly, create the stated dictionary with the specified name-value pairs.
In the next step, initialize the “count” with 0.
After that, apply a “for” loop to iterate along the created dictionary.
Within the loop, apply the “hasOwnProperty()” method by referring to the contained “name-value” pairs within the dictionary.
Also, increment the count with “1” to iterate through each of the pairs.
This will result in accessing the object’s properties in the dictionary and returning its length.
Output
![]() From the above output, it can be observed that the desired requirement is achieved.
From the above output, it can be observed that the desired requirement is achieved.
Example 2: Applying hasOwnProperty Upon the Object Properties
This example can be applied to return the boolean value corresponding to the assigned object properties.
In this example, follow the stated steps:
<script type= "text/javascript">
let object = {};
object.name = undefined
object.age = 42;
object.person = null
console.log(object.hasOwnProperty("name"));
console.log(object.hasOwnProperty("age"));
console.log(object.hasOwnProperty("person"));
console.log(object.hasOwnProperty("toString"));</script>
In the above code snippet:
Assign the object properties i.e.
name, age, person, etc.
with the “undefined”, “integer” and “null” values respectively.
Apply the “hasOwnProperty()” method to each of them with an additional “inherited” property named “toString”.
As this method returns a “true” boolean value against the “undefined” and “null” values, the resultant values can be observed in the below output.
Output
![]() In the above output, as the boolean value “false” is returned against the “inherited” properties, so the “toString” is returned false.
In the above output, as the boolean value “false” is returned against the “inherited” properties, so the “toString” is returned false.
Conclusion
The hasOwnProperty() method is applied to check whether the object’ specified property is its own property by returning a boolean value.
This method can be implemented in various scenarios.
A few of these are elaborated in this tutorial.
In the first section, this method has been applied to iterate through the object’s properties in a dictionary and compute its length.
In the other section, the stated method returns the boolean value corresponding to the assigned object properties.
This write-up explained the use of hasOwnProperty.
ParentNode Property
ParentNode Property
The “parentNode” property gives the parent node of the specified element or a node and it is a read-only property.
Syntax
element.parentNode
In the given syntax:
“element” corresponds to the element whose parent node is to be fetched.
Example 1: Find the Parent Node of the Elements
This example will lead to fetching the parent node of the included heading and an image within the “div” element.
Let’s follow the below-stated example:
<body><div id = "head1"><h3 id = "head2">This is Linuxhint Website</h3><img id = "head3" src= "template4.png"></div></body>
In the above code snippet, perform the following steps:
Specify the stated div with the specified “id”.
In the next steps, contain the “heading” and an “image” having the specified “id’s” within the “div” element.
Let’s move on to the JavaScript part of the code:
<script type="text/javascript">
let getHeading = document.getElementById("head2");
let getImage = document.getElementById("head3");
console.log("The Parent Node of heading is: ", getHeading.parentNode)
console.log("The Parent Node of image is: ", getImage.parentNode)</script>>
In the above code snippet:
Access the included heading and image by their “id’s” using the “document.getElementById()” method.
Finally, apply the “parentNode” property upon the contained heading and image to display their parent node.
Output
![]() In the above output, it can be observed that the parent node of both the heading and image are logged.
Example 2: Find the Parent Element of the Selected Option
This example will retrieve the parent element of all the contained options upon the button click.
Let’s follow the below-stated example step-by-step:
<body><p>Select one of the following language:</p><select class='options'><option>Python</option><option>Java</option><option>JavaScript</option></select><br><button onclick="getParent()">Click to get Parent</button><br><h3 id= "head">>/h3></body>
In the above lines of code:
Specify the “class” of the “select” element.
In the next step, include the stated options within the element in the previous step.
After that, create a “button” with an attached “onclick” event redirecting to the function getParent().
Also, specify the stated heading with an “id” to contain the message with the corresponding parent element on the Document Object Model(DOM).
<script>function getParent(){
var get = document.querySelector(".options");
var option= get.options[get.selectedIndex];
var fetch = document.getElementById("head");
fetch.innerHTML= "Parent element of the selected option is : " + option.parentNode.nodeName + " element";}</script>
Let’s continue to the JavaScript part of the code:
Declare a function named “getParent()”.
In its definition, access the “select” element using the “document.querySelector()” method.
In the next step, apply the “selectedIndex” property to return the selected option’s index in a drop-down list.
After that, access the allocated heading for displaying the parent element using the “document.getElementById()” method.
Lastly, apply the “innerHTML” property combined with the “parentNode.nodeName” to get the name of the parent element.
In the further part, style the stated elements and adjust their dimensions:
<style>
html{
height:100%;}
body{
text-align:center;}
.drop-down{
width:35%;
border:2px solid #fff;
font-weight:bold;
padding:8px;}</style>
Output
In the above output, it can be observed that the parent node of both the heading and image are logged.
Example 2: Find the Parent Element of the Selected Option
This example will retrieve the parent element of all the contained options upon the button click.
Let’s follow the below-stated example step-by-step:
<body><p>Select one of the following language:</p><select class='options'><option>Python</option><option>Java</option><option>JavaScript</option></select><br><button onclick="getParent()">Click to get Parent</button><br><h3 id= "head">>/h3></body>
In the above lines of code:
Specify the “class” of the “select” element.
In the next step, include the stated options within the element in the previous step.
After that, create a “button” with an attached “onclick” event redirecting to the function getParent().
Also, specify the stated heading with an “id” to contain the message with the corresponding parent element on the Document Object Model(DOM).
<script>function getParent(){
var get = document.querySelector(".options");
var option= get.options[get.selectedIndex];
var fetch = document.getElementById("head");
fetch.innerHTML= "Parent element of the selected option is : " + option.parentNode.nodeName + " element";}</script>
Let’s continue to the JavaScript part of the code:
Declare a function named “getParent()”.
In its definition, access the “select” element using the “document.querySelector()” method.
In the next step, apply the “selectedIndex” property to return the selected option’s index in a drop-down list.
After that, access the allocated heading for displaying the parent element using the “document.getElementById()” method.
Lastly, apply the “innerHTML” property combined with the “parentNode.nodeName” to get the name of the parent element.
In the further part, style the stated elements and adjust their dimensions:
<style>
html{
height:100%;}
body{
text-align:center;}
.drop-down{
width:35%;
border:2px solid #fff;
font-weight:bold;
padding:8px;}</style>
Output
![]() In the above output, it can be observed that the parent element of each of the selected options is retrieved.
In the above output, it can be observed that the parent element of each of the selected options is retrieved.
Conclusion
The “parentNode” property returns the parent node of the specified element or the corresponding parent element itself.
The parent node of the element can be fetched by applying the “parentNode” property directly.
The parent element can be retrieved by applying the “parentNode.nodeName” property upon the selected option.
This tutorial explained the use of the parentNode property.
JavaScript Refresh Page Timer
Implementing a refresh page timer is very helpful as it lets users ensure that the content on the particular site is relevant and up to date.
In addition, it assists in updating a web page or a site in the automation phase.
Likewise, it allows the end-users to access the latest content on a particular site timely.
How to Implement Refresh Page Timer?
To implement refresh page timer JavaScript, the following approaches can be utilized:
“setTimeout()” method.
“onload” event.
“setInterval()” method.
Approach 1: Implement Refresh Page Timer via setTimeout() Method
The “setTimeout()” method redirects to a function after the set time.
This approach can be applied to redirect to the specified function upon the button click and refresh the page after the set time.
Syntax
setTimeout(function, milliseconds, par1, par2)
In the given syntax:
“function” indicates the accessed function.
“milliseconds” refers to the time interval to execute.
“par1” and “par2” correspond to the additional parameters.
Example
Let’s follow the below-stated example:
<center><title>Page Refresh every 4 Seconds</title><h2>This Page will refresh after every 4 seconds!</h2><button onclick= "refreshTimer()">Click to enable the refresh page timer</button></center><script>function refreshTimer(){
setTimeout("location.reload(true);", 4000);}</script>
In the above code snippet, perform the following steps:
Include the stated “title” and “heading”.
Also, create a button with an attached “onclick” event redirecting to the function refreshTimer().
In the JavaScript part of the code, declare a function named “refreshTimer()”.
In its definition, apply the “setTimeout()” method.
In its parameter, apply the “location.reload()” method with the set boolean value.
In its other parameter, specify the stated time.
This will result in refreshing the page after every “4 seconds” upon the button click.
Output
![]() In the above output, it can be observed that the page refreshes after every 4 seconds.
In the above output, it can be observed that the page refreshes after every 4 seconds.
Approach 2: Implement Refresh Page Timer Using Onload Event
An “onload” event comes into effect when an object is loaded.
This approach can be utilized to refresh the page after the page load with respect to the set timer value.
Syntax
object.onload = function(){myScript};
In the given syntax:
“function” corresponds to the accessed function when the object is loaded.
Example
Observe the stated steps in the below example:
<center><body onload = "JavaScript:refreshTimer(8000);"><h2>This Page will refresh after every 8 seconds!</p></body></center><script type = "text/JavaScript">
function refreshTimer( timer ) {
setTimeout("location.reload(true);", timer);}</script>
In the above lines of code:
Apply the “onload” event to the function refreshTimer() having the set timer as its parameter.
This will result in invoking the specified function upon the loaded page.
Also, specify the stated heading.
In the JavaScript part of the code, define a function named “refreshTimer().”
In its definition, similarly, repeat the discussed step in the previous approach for applying the “setTimeout()” method having the stated parameters.
Here, “timer” refers to the passed parameter value of the timer.
Output
![]() From the above output, it is evident that after the page is loaded, it refreshes after 8 seconds.
From the above output, it is evident that after the page is loaded, it refreshes after 8 seconds.
Approach 3: Implement Refresh Page Timer Using setInterval() Method
The “setInterval()” method redirects to a function at specified time intervals.
This method can be applied repeatedly and refresh the page after the set timer’s limit.
Syntax
setInterval(function, milliseconds, par1, par2)
In the above syntax:
“function” points to the accessed function.
“milliseconds” refers to the specific time interval to execute.
“par1” and “par2” correspond to the additional parameters.
Example
Let’s follow the below-stated example:
<center><body><h2>This Page will refresh after every 5 seconds!</h2><h2 style="background-color: lightblue;" id = "head"></h2></center></body><script type="text/javascript">
let timer= 1;
setInterval(() => {
document.getElementById('head').innerText= timer;
timer++;
if(timer > 5)
location.reload();}, 1000);</script>
In the above code snippet:
Include the stated headings for displaying the message and containing the timer to be incremented respectively.
In the JavaScript part of the code, initialize the timer with “1”.
In the next step, apply the “setInterval()” method.
Also, fetch the specified heading by its “id” using the “getElementById()” method to contain the timer.
Increment the timer such that after the “5 seconds” count, the page is refreshed via the “location.reload()” method.
Output
![]() In the above output, it can be observed that the page refreshes after 5 seconds.
In the above output, it can be observed that the page refreshes after 5 seconds.
Conclusion
The “setTimeout()” method, an “onload” event, or the “setInterval()” method can be utilized to implement a refresh page timer.
The setTimeout() method can be implemented to invoke a function upon the button click and refresh the page after the set time.
An onload event can be applied to implement the timer upon the page load and refresh it according to the set timer value.
The setInterval() method can repeatedly refresh the page after the set timer’s limit.
This blog explains how to implement a refresh page timer.
Palindrome | Explained
A string is considered a palindrome if it is read the same from forward as well as backward.
For example, dad, pop, etc.
Checking if a string is a palindrome is very helpful in coping with the repeated character values consuming the memory.
For instance, removing the unwanted character values based on the palindrome check.
This blog will explain to check if a given or a user-entered string is a palindrome.
How to Check if a String is Palindrome?
To check if a given or a user-entered string is a palindrome, apply the following approaches:
“split()” and “reverse()” methods.
“User-defined()” function.
Approach 1: Check if a String is Palindrome Using the split() and reverse() Methods
The “split()” method splits a given string into a substring array.
The “reverse()” method reverses the order of the elements in an array.
These methods can be applied to split the string value into characters, reverse them and then concatenate them into a string again.
Syntax
string.split(separator, limit)
In the given syntax:
“separator” refers to the string to be utilized for splitting.
“limit” indicates the integer limiting the number of splits.
array.reverse()
In the above syntax:
“array” corresponds to the array to be reversed.
Example 1: Check if a Specified String is Palindrome
In this particular example, a specified string will be split into characters, reversed, and then merged again into a string to be checked as a palindrome.
Let’s follow the below-stated example:
let string = "ana";
let strPal = string.split("").reverse().join("");if (string === strPal) {
console.log("The string is a palindrome");} else {
console.log("Not a palindrome");}
In the above code snippet:
Specify the stated string value.
In the next step, apply the “split()” method for splitting the specified string.
Also, apply the “reverse()” method to reverse the characters in the string to check the behavior of the given string as a palindrome.
After that, concatenate the reversed string value using the “join()” method.
Finally, apply the condition that if the original string equals the reversed string, the palindrome condition is satisfied.
Output
![]() From the above output, it can be verified that the specified string is a palindrome.
Example 2: Check if a User-Entered String is Palindrome
This example will execute its functionalities upon the user-entered string value.
Let’s observe the following lines of code:
let string = prompt("Enter the string value");
let strPal = string.split("").reverse().join("");if (string === strPal) {
alert("The string is a palindrome");} else {
alert("Not a palindrome");}
In the above lines of code, perform the following steps:
Ask the user to input a string value via the “prompt” dialogue box.
After that, repeat the discussed procedure in the previous example for splitting, reversing, and joining the string value.
Lastly, display the corresponding message with respect to the entered string value.
Output
From the above output, it can be verified that the specified string is a palindrome.
Example 2: Check if a User-Entered String is Palindrome
This example will execute its functionalities upon the user-entered string value.
Let’s observe the following lines of code:
let string = prompt("Enter the string value");
let strPal = string.split("").reverse().join("");if (string === strPal) {
alert("The string is a palindrome");} else {
alert("Not a palindrome");}
In the above lines of code, perform the following steps:
Ask the user to input a string value via the “prompt” dialogue box.
After that, repeat the discussed procedure in the previous example for splitting, reversing, and joining the string value.
Lastly, display the corresponding message with respect to the entered string value.
Output
![]() In the above output, both scenarios of palindrome and non-palindrome string values are covered.
In the above output, both scenarios of palindrome and non-palindrome string values are covered.
Approach 2: Check if a String is Palindrome Using User-Defined Function
This approach can be utilized to check the stated requirement by applying the functionalities in a user-defined function.
Example 1:
In the following example, follow the stated steps:
function stringPalindrome(string) {
const lengthString = string.length;
for (let i = 0; i < lengthString; i++) {
if (string[i] !== string[lengthString - 1 - i]) {
console.log("Not a palindrome");
}
}
console.log("The string is a palindrome");}
stringPalindrome("pop")
stringPalindrome("larry")
In the stated example, perform the following steps:
Define a function named “stringPalindrome()” having the “string” to be checked for palindrome as its argument.
In its definition, compute the length of the passed string.
Also, apply a “for” loop to iterate along the string characters.
In the next step, compare the first and last characters contained in a string using “indexing” and display the corresponding result.
Lastly, access the defined function with the passed string value which will be checked for “palindrome”.
Output
![]() From the above output, the behavior of both strings can be observed.
Example 2:
In this example, follow the below-stated code snippet:
function stringPalindrome(s) {
var lenString = s.length;
var x = 0;
var y = lenString - 1;
while (x < y) {
if (s[x] != s[y]) {
console.log("The string is not a palindrome") ;}
x += 1;
y -= 1;}
console.log("The string is a palindrome");}
stringPalindrome("dad")
stringPalindrome("harry")
In the above line of code:
Declare a function named “stringPalindrome()” having the string value to be checked for palindrome as its parameter.
In its definition, compute the string’s length.
Also, initialize the values for “x” and “y”.
The value of “y” will be assigned such that the string values are indexed properly.
After that, compare the first and last character values contained in the passed string value.
Finally, access the defined function having the passed string value as its parameter.
Output
From the above output, the behavior of both strings can be observed.
Example 2:
In this example, follow the below-stated code snippet:
function stringPalindrome(s) {
var lenString = s.length;
var x = 0;
var y = lenString - 1;
while (x < y) {
if (s[x] != s[y]) {
console.log("The string is not a palindrome") ;}
x += 1;
y -= 1;}
console.log("The string is a palindrome");}
stringPalindrome("dad")
stringPalindrome("harry")
In the above line of code:
Declare a function named “stringPalindrome()” having the string value to be checked for palindrome as its parameter.
In its definition, compute the string’s length.
Also, initialize the values for “x” and “y”.
The value of “y” will be assigned such that the string values are indexed properly.
After that, compare the first and last character values contained in the passed string value.
Finally, access the defined function having the passed string value as its parameter.
Output
![]() In the above output, it can be observed that both conditions are checked upon the passed string value.
In the above output, it can be observed that both conditions are checked upon the passed string value.
Conclusion
The “split()” and “reverse()” methods or the “user-defined” function approach can be utilized to check if a string is a palindrome.
The former approach split the specified and user-input string into characters and then reverse and join the contained characters to apply a check for palindrome.
The latter approach can be implemented to compare the first and last characters contained in the string iteratively.
This tutorial explained the approaches to check if the given or user-entered string is a palindrome.
Override a Function
JavaScript does support overriding instead of overloading.
Defining multiple functions with the same name is referred to as “function overriding”.
When multiple functions are overridden, the JavaScript compiler calls the last one while calling the function.
This is because JavaScript is an interpreted language.
In inheritance, the same named child class method overrides the parent class’s method.
This post will describe the process for overriding a function.
How to Override a Function?
In JavaScript, the following functions can be overridden
the JavaScript Predefined methods
the User-defined function
Parent class functions/methods
How to Override the JavaScript Predefined Methods?
In JavaScript, the predefined methods will also be overridden.
For overriding the built-in methods, create a function with the same name and then perform actions.
Example
Here, override the “alert()” method which is a prebuilt method of JavaScript:
function alert() {
console.log("This is the overridden function");};
Call the “alert()” method:
alert();
Output
![]() While calling the “alert()” method, the overridden alert() will be called as shown in above output:
While calling the “alert()” method, the overridden alert() will be called as shown in above output:
How to Override the User-defined Functions?
For overriding the user-defined function, let’s go over an example.
Example
Define a function “sum” with three parameters “a”, ”b” and “c” and it returns the sum of three numbers:
function sum(a, b, c) {
return a + b + c;}
Override the function “sum” by defining a new function with the same name with two parameters ”a” and “b”:
function sum(a, b) {
return a + b;}
Call the function “sum” by passing three numbers “5”, “10” and “3” as arguments:
console.log(sum(5, 10, 3));
Upon executing this code, the output is as:
![]() The output displays “15” because the overridden function with two parameters “sum(a, b)” is called when calling the function “sum”.
The output displays “15” because the overridden function with two parameters “sum(a, b)” is called when calling the function “sum”.
How to Override a Function Using Inheritance?
In inheritance, the method of the parent class is overridden in the child class with the same name, same return type, and parameters.
Let’s see an example of how a child class can override a method from a parent class.
Example
Create a class “Calculation” with method “calc”:
class Calculation{
calc() {
console.log("Let's start calculations:");
}}
Create a child class “square” that will extend with the parent class “Calculation”.
Define a function in the child class with the same name, “calc”, with a parameter as in the parent class.
This function will calculate the square of a number:
class square extends Calculation{
calc(x) {
console.log(x*x);
}}
Create an object “sq” of the child class “square”:
var sq = new square();
Call the “calc” method by passing “6” as an argument:
sq.calc(6);
The corresponding output will be:
![]() It is observable in the output that the method calc() of the parent class was overridden by the calc() method of the child class
It is observable in the output that the method calc() of the parent class was overridden by the calc() method of the child class
Conclusion
In JavaScript, the “Predefined” methods, “User-defined” functions, and “Parent class functions/methods” are overridden by creating the functions with the same name.
However, the number of parameters can vary.
The parent class’s function or method is overridden by the child’s method.
This post describes the process for overriding functions.
Jump to Anchor
While creating a web page or the site, there is a need to redirect the user to a specific page multiple times or to a particular page at some point.
In addition to that, making the relevant content accessible to the end-user instantly.
In such cases, jumping to anchor is helpful in saving the time and effort at the user’s end.
This blog will explain the approaches to jump to anchor.
How to Jump to Anchor?
Jumping to anchor can be achieved by using the following approaches:
“getElementById()” method.
“location.href” property.
Approach 1: Jump to Anchor Using the getElementById() Method
The “getElementById()” method accesses an element with the specified “id”.
This method can be applied to fetch the anchor element and redirect to the specified site upon the button click.
Syntax
document.getElementById(element)
In the given syntax:
“element” refers to the “id” to be fetched against the particular element.
Example
In this particular example, follow the stated steps:
<center><body><a href= "https://www.google.com/" id= "jump">Proceed to Google Site</h2><br><br><img src= "template1.png"><br><button onclick= "jumpAnchor()">Jump to Anchor</button></body></center><script type= "text/javascript">function jumpAnchor(){
var get = document.getElementById('jump')}</script>
In the above lines of code, perform the following steps:
Within the “<a>” tag, specify the stated site having an allocated “id” with the help of the “href” attribute.
Also, include an image and create a button having an attached “onclick” event invoking the function jumpAnchor().
In the JavaScript part of the code, access the “anchor” element by its “id” using the “document.getElementById()” method.
This will result in jumping to the anchor part upon the button click.
Output
![]() From the above output, it can be observed that upon the button click, the page is redirected to the “URL” thereby performing the functionality of the “anchor” element.
From the above output, it can be observed that upon the button click, the page is redirected to the “URL” thereby performing the functionality of the “anchor” element.
Approach 2: Jump to Anchor Using the location.href Property
The “location.href” property returns the URL of the current page.
This property can be utilized to access the passed “id” upon the function which will be accessed and jump to it.
Example
Let’s follow the below-given code-snippet:
<center><body><h2 id= "head1">This is an Image</h2><img src="template4.png"></img><h2 id= "head2">This is a paragraph</h2><p>JavaScript is a very effective programming language.
It can be integrated with HTML to perform added functionalities for making an overall web page or the site attractive and responsive.</p><a onmouseover= "jumpAnchor('head1');">Jump to First</a><br><br><a onmouseover= "jumpAnchor('head2');">Jump to Second</a></body></center>
Include a heading with a specific “id” and an image.
Similarly, in the next step, include another heading with a specific “id” and a paragraph.
Attach an “onmouseover” event to the “anchor” element invoking the function jumpAnchor() which contains the stated “id” as its parameter.
Similarly, repeat the above step for another “anchor” element with a function having the specified “id”.
Let’s continue to the JavaScript part of the code:
<script type="text/javascript">function jumpAnchor(id){
var get = location.href;
location.href = "#" + id; }</script>
In the above code-snippet:
Declare a function named “jumpAnchor()”.
In its parameter, “id” refers to the id to jump to when the function will be accessed in the “anchor” element.
In its definition, the “location.href” property will be utilized to jump to the top(“#”) of the corresponding “id” discussed in the previous step.
Output
![]() In the above output, it can be observed that upon hovering the mouse on “Jump to First”, the document is jumped to the top of the corresponding anchor.
In the above output, it can be observed that upon hovering the mouse on “Jump to First”, the document is jumped to the top of the corresponding anchor.
Conclusion
The “getElementById()” method or the “location.href” property can be utilized to jump to an anchor and perform its functionalities.
The former method redirects the document to the specified site upon the button click.
The latter approach can be implemented to get the passed “id” upon the accessed function within the “anchor” element and jump to it.
This write-up explained the approaches to jump to anchor.
JavaScript Window Print Page Button
The “Window Print page Button” is used to print the page’s content., the predefined method “window.print()” is used for this purpose.
By clicking on the window print page button, a dialogue box will appear with the print option.
It will print the content of the current window except for unwanted elements such as horizontal menus, navigation bars, ads, and other such elements.
This post will describe the JavaScript window print page button and its functionality.
JavaScript Window Print Page Button
“Window Print Page Button” displays a print dialog box to print the current page.
This will print all the contents of the page.
Syntax
The syntax of the “Window Print Page Button” is as follows:
window.print()
Example
Create some content with a button in the HTML file.
First, create heading using <h3> HTML tag:
<h3>Keep User on the Same Page</h3>
Add a label using <label> tag:
<label>Click the cancel button and stay on the same page</label> <br><br>
After that create a “Print” button by attaching an “onClick()” event that will call the JavaScript “window.print()” method:
<button onclick="window.print()">Print</button>
The output after executing the HTML file looks like this:
![]() Output
Output
![]() While clicking on the “Print” button, the output shows that the print dialog box appears to be printing this page.
After printing, the document looks like this:
While clicking on the “Print” button, the output shows that the print dialog box appears to be printing this page.
After printing, the document looks like this:
![]() The above output shows the content of the printed page, but the “window.print()” method didn’t print the navigation bar.
The above output shows the content of the printed page, but the “window.print()” method didn’t print the navigation bar.
Conclusion
The “Window Print page Button” can be implemented with the help of the print() method of the window object.
This window.print() method only serves one purpose, and that is to print out the contents of the current webpage on the browser.
Whenever this method is invoked, it opens the print dialogue box and allows the user to choose the desired print options.
However, this window.print() method doesn’t print any navigation bars, ads, and other elements of the same type.
This post describes the JavaScript window print page button and its functionality.
JavaScript Valid Variable Names
A “Variable” is a storage location that can store data values that can change during program execution.
Each variable is assigned an identifier (name) in memory that can be used to access the value stored there., there are certain rules for declaring variable identifiers or names acceptable to the language.
This tutorial will illustrate the valid variable names.
Rules for Declaring Variable Names
For declaring variables, a user must follow the below-given rules:
The variable name starts with a letter (a-z or A-Z) in either lowercase or uppercase.
As “name” and “Name” are two different variables due to the case sensitivity of variable names.
It is also declared with an underscore (_) or a dollar sign ($) such as “_name”, “$name”, “first_name”.
No other characters such as spaces, symbols, or punctuation marks are allowed at the beginning of the variable’s name.
Declaring variables with numbers (0-9) is not allowed such as “1stname”.
JavaScript-reserved keywords are not allowed for variable name declarations.
A variable name is not limited in length.
Valid Variable Names
Here, some valid names of variables are shown in the following table:
| Valid Variable Names |
|---|
| name |
| _name |
| name12 |
| first_name |
| $name |
Let’s see an example of declaring a variable with a valid name.
Example
Create a variable named “first” and store a string “Linuxhint” in it.
Print it by passing the variable name to the “console.log()” method:
![]() This shows that the name of the variable is valid, that’s why it prints the stored value of a variable.
This shows that the name of the variable is valid, that’s why it prints the stored value of a variable.
Invalid Variable Names
The invalid variable names are shown in the given table:
| Invalid Variable Names |
|---|
| name# |
| first-name |
| ^name |
| 1st |
Example
Create a variable named “1st” and store a string “Linuxhint” in it.
Print it by passing the variable name to the “console.log()” method.
It will return an error as the variable declares an invalid name:
![]()
Conclusion
In JavaScript, variable names have some rules that must be followed.
They can be started with letters (a-z or A-Z), Dollar sign ($), and underscore (_).
Declaring variables using numbers (0-9) or special characters such as symbols like (^, -) is not allowed., variable names are case-sensitive.
This tutorial illustrates valid variable names.
How to Merge Objects
JavaScript is not a class-based object-oriented language, it’s an object-oriented language.
However, it still has ways to use Object Oriented Programming (OOP).
“Objects” are standalone entities with properties and methods.
In some situations, developers need to merge objects to perform certain tasks.
For merging objects, JavaScript offers various default methods.
This tutorial will demonstrate the methods for merging objects.
How to Merge Objects?
To merge objects, use the following methods:
Object.assign() method
Spread operator.
Let’s see the working of these methods individually.
Method 1: Merge Objects Using Object.assign() Method
To merge the objects in a single object, use the “Object.assign()” method.
There is no need to create a separate object for merging.
It takes the object as a target and merges all other objects.
Syntax
Follow the below-provided syntax for merging objects using the Object.assign() method:
Object.assign(target, source1, source2, ...);
The above syntax shows
“target” is the target object where all other objects will merge.
“source1, source2,..” are the objects that will merge into a target object.
Return Value
It will return the target object after merging other objects.
Example
Create two objects named “info” and “info1” with corresponding properties:
var info = {
name: 'John',
age: 28,
email: 'john@gmail.com'};var info1 = {
skills: 'JavaScript',
qualification:'BSCS'};
Merge the object “info1” to object “info” by passing them to the “Object.assign()” method.
The object “info” is the target object, and the “info1” is the source:
var candidateInformation = Object.assign(info , info1);
Print the merged object on the console using the “console.log()” method:
console.log(candidateInformation);
The output indicates that the object “info1” is successfully merged into the object “info”:
![]()
Method 2: Merge Objects Using Spread Operator
There is another way to merge the objects, by using the spread operator, which is indicated by three dots (…).
It constructs a new object by combining all the properties of the objects that are passed.
To understand the spread operator, look at the syntax.
Syntax
Use the following syntax for the spread operator:
var a = {...obj}
Example
Here, merge the objects “info” and “info1” with the help of the spread operator (…) and store it in a variable “candidateInformation”:
var candidateInformation = {...info, ...info1};
Print the new object stored in the variable, using the “console.log()” method:
console.log(candidateInformation);
The output shows that the objects are successfully merged
![]()
Conclusion
For merging objects, the “Object.assign()” method or the “Spread operator” is used.
In the Object.assign() method, the objects are merged in the targeted object specified in its argument.
The second method creates a new resultant object by passing the objects with the spread operator.
This tutorial demonstrates the methods for merging objects.
How to Infinite Scroll?
While designing a web page, a user’s attention matters a lot.
In addition to that, creating a better viewing experience of the web page as compared to pagination.
In the other case, making the page compatible with mobile devices as well which are available to the users “24/7”.
In such case scenarios, implementing infinite scroll is a great functionality allowing the user to engage with “content” conveniently.
This blog will explain the approach to implement infinite scroll.
How to Implement Infinite Scroll?
The infinite scroll can be implemented by using the following approaches:
“addEventListener()” and “appendChild()” methods.
“onscroll” event and “scrollY” property.
Approach 1: Infinitely Scroll Using addEventListener() and appendChild() Methods
The “addEventListener()” method is used to attach an event to the specified element.
The “appendChild()” method appends a node to the element’s last child.
These methods can be applied to attach an event to the list and append the list items as the last child in it.
Syntax
element.addEventListener(event, listener, use);
In the given syntax:
“event” refers to the specified event.
“listener” points to the function which will be invoked.
“use” is the optional value.
element.appendChild(node)
In the above syntax:
“node” refers to the node to be appended.
Example
Let’s follow the below-stated example:
<center><body><h3>Infinitely Scroll List</h3><ul id= 'scroll'></ul></body></center>
In the above code, perform the following steps:
Include the stated heading.
Also, allocate the “id” named “scroll” to the unordered list.
Let’s move on to the JavaScript part of the code:
<script type="text/javascript">var get = document.querySelector('#scroll');var add = 1;var infiniteScroll = function() {
for (var i = 0; i = get.scrollHeight) {
infiniteScroll();
}});
infiniteScroll();</script>
In the above js code snippet:
Access the “list” specified before by its “id” using the “document.querySelector()” method.
In the next step, initialize the variable “add” with “1”.
Also, declare an inline function named “infiniteScroll()”.
In its definition, iterate a “for” loop such that “20” items are contained in a list.
After that, create an element node named “li” and increment it by “1” referring to the initialized variable “add” such that it is appended to the created “list” as a child using the “appendChild()” method.
In the further code, attach an event named “scroll”.
Upon the triggered event, the stated function will be invoked.
Lastly, in the function definition, apply the functionalities to detect the list when it is scrolled to the bottom.
For styling the list, perform the following steps:
<style type="text/css">
#scroll {
width: 200px;
height: 300px;
overflow: auto;
margin: 30px;
padding: 20px;
border: 10px solid black;}
li {
padding: 10px;
list-style-type: none;}
li:hover {
background: #ccc;}</style>
In the above lines, style the list and adjust its dimensions.
Output
![]() From the above output, it can be observed that the items are incrementing in an infinite manner and so is the scrolling.
From the above output, it can be observed that the items are incrementing in an infinite manner and so is the scrolling.
Approach 2: Infinitely Scroll Using onscroll Event with scrollY Property
The “onscroll” event triggers when the scrollbar of an element is being scrolled.
The “scrollY” property computes and returns the pixels which are consumed in scrolling a document from the window’s upper left corner.
These approaches can be utilized to attach an event to the body element and scroll by applying a condition to the vertical pixels.
Syntax
object.onscroll = function(){code};
In the above syntax:
“object” refers to the element to be scrolled.
Example
Let’s follow the below stated steps:
<center><body><h2>This is Linuxhint Website</h2><img src= "template3.png"></body></center>
In the above code snippet:
Include the stated heading.
Also, specify an image to be displayed on the Document Object Model(DOM).
Let’s continue to the JavaScript part of the code:
<script type="text/javascript">var body = document.querySelector("body");
body.onscroll = function () {
if (window.scrollY > (document.body.offsetHeight - window.outerHeight)) {
console.log("Infinite Scrolling Enabled!");
body.style.height = document.body.offsetHeight + 200 + "px";
}}</script>
In the above code lines, perform the following steps:
Access the “body” element in which the stated heading and image are contained using the “document.querySelector()” method.
After that, attach an “onscroll” event to it.
Upon the triggered event, the stated function will be invoked.
In the function definition, each time the user scrolls down, the number of pixels will be checked.
If the pixels become greater than the body’s and window’s height, append “200px” to the body’s current height to scroll it infinitely.
Output
![]() In the above output, it is evident that the scroll is implemented infinitely upon the DOM.
In the above output, it is evident that the scroll is implemented infinitely upon the DOM.
Conclusion
The combination of the “addEventListener()” and “appendChild()” methods or the combined “onscroll” event and “scrollY” property can be utilized to implement infinite scroll.
The former approach can be utilized to associate an event and append the list of items as a child as soon as the list is scrolled to the bottom.
The latter approach can be applied to attach an event to the “body” element and scroll by checking the vertical pixels and appending some pixels as well to scroll infinitely.
This tutorial explains how to infinitely scroll.
How to Increment by 2 in for Loop
Most programs need to repeatedly execute code unless an end condition is satisfied.
Loops are used in programming languages to repeat a block of code.
The code block is iterated by using “for”, “while”, or “do-while” loops.
The three basic looping structures are the “block” or the body of the loop, the “condition”, and the “looping keyword”, such as for, while, and so on.
This article will describe the “for” loop’s increment statement by 2.
How to Increment by 2 in for Loop?
The “for” statement constructs a loop with three optional arguments “initializer”, “conditional-statement” and the “final-expression” enclosed in parentheses and spaced by semicolons.
The final expression is utilized to change the counter’s value.
Syntax
For the increment by 2 in “for” loop, use the below-provided syntax:
for (var i = 0; i < 10; i += 2){
// statement}
In the above syntax:
i=0 is called initializer, use “var” or “let” instead of “const” because it will throw an Uncaught TypeError: Assignment to constant variable.
i<10 is the conditional statement that must be executed before every loop iteration.
i+=2 is the final expression that increments by 2.
Example 1:
Let, print the even numbers between 0 and 10 using “for” loop, incrementing by 2:
for (var i = 0; i < 10; i += 2) {
console.log(i);}
Output
![]() The above output indicates that the loop increments by 2 and prints an even number between 0 and 10.
Example 2:
Create an array of number 1 to 10:
var array = [1,2,3,4,5,6,7,8,9,10]
Here, iterate the loop over an array until its length, incrementing by 2:
for (var i = 0; i < array.length; i += 2) {
console.log(array[i]);}
The output displays an odd numbers between 1 and 10 from an array:
The above output indicates that the loop increments by 2 and prints an even number between 0 and 10.
Example 2:
Create an array of number 1 to 10:
var array = [1,2,3,4,5,6,7,8,9,10]
Here, iterate the loop over an array until its length, incrementing by 2:
for (var i = 0; i < array.length; i += 2) {
console.log(array[i]);}
The output displays an odd numbers between 1 and 10 from an array:
![]()
Conclusion
A “for” loop is utilized to repeatedly run a given block of code a certain number of times.
It has three optional arguments, the initializer, the conditional statement, and the incremental or decremental expression.
To increment by 2 in a for loop, use the “i += 2” as a final or incremental expression statement.
This article described the for loop’s increment statement by 2.
How to Hide JavaScript Code in View Source
Hiding code from other users or developers is an important task.
If the developer doesn’t take precautions with their code, they make life easy for attackers and other programmers to clone their code.
But even if the programming processes or the source code is one extra click away from the attackers, that means extra security.
This post will describe the process for hiding the JavaScript code in the view source.
How to Hide JavaScript Code in View Source?
First, to hide JavaScript code in the view source, see how to open the view source in the Developer’s tool.
On the web page, there are several ways to open the view source and see the relevant code.
The first way is to “right-click” on the page and click on the “View Page Source” option in a “contextMenu” or use the shortcut key “Ctrl+U”:
![]() It will show the full fledged source code of the page in a new tab as shown below:
It will show the full fledged source code of the page in a new tab as shown below:
![]() The second way is to “right-click” on the page and click on the “Inspect” option from a “contextMenu” or use the shortcut keys “F12”, and “Ctrl+Shift+I”.
The second way is to “right-click” on the page and click on the “Inspect” option from a “contextMenu” or use the shortcut keys “F12”, and “Ctrl+Shift+I”.
![]() While clicking the “Inspect” option, it will open the below-given window with options, where the user can see the code.
While clicking the “Inspect” option, it will open the below-given window with options, where the user can see the code.
![]() Let’s add functionality to prevent right-clicking and hotkeys on a web page from opening the “View Page Source” option.
Use the below lines of code to prevent the right-click on a web page:
document.addEventListener("contextmenu", (e) => {
e.preventDefault();}, false);
The above code snippet:
First, invoke the “addEventListener()” method by passing the reference of the “context Menu”.
Then, call the “preventDefault()” method and set it “false”, which means it stops the default right-click event/option.
The below code snippet prevents the shortcut key including “Ctrl+Shift+I”, “Ctrl+U” and ”F12”:
document.addEventListener("keydown", (e) => {
if (e.ctrlKey || e.keyCode==123) {
e.stopPropagation();
e.preventDefault();
}});
Output
Let’s add functionality to prevent right-clicking and hotkeys on a web page from opening the “View Page Source” option.
Use the below lines of code to prevent the right-click on a web page:
document.addEventListener("contextmenu", (e) => {
e.preventDefault();}, false);
The above code snippet:
First, invoke the “addEventListener()” method by passing the reference of the “context Menu”.
Then, call the “preventDefault()” method and set it “false”, which means it stops the default right-click event/option.
The below code snippet prevents the shortcut key including “Ctrl+Shift+I”, “Ctrl+U” and ”F12”:
document.addEventListener("keydown", (e) => {
if (e.ctrlKey || e.keyCode==123) {
e.stopPropagation();
e.preventDefault();
}});
Output
![]() The above GIF indicates that no action is taken during “right-click” or shortcut keys:
Now, let’s see how to hide the source code if the user uses the below option.
The above GIF indicates that no action is taken during “right-click” or shortcut keys:
Now, let’s see how to hide the source code if the user uses the below option.
![]() The snippet above shows another way to open “Developer Tools” other than right-clicking and hotkeys.
To hide the JavaScript code from this option, use the given steps:
Step 1: JavaScript Code
Create a JavaScript file for the JavaScript code relevant to the page’s functionality.
Here, we created a JavaScript file called “JSfile.js, where all the JavaScript code will be placed:
alert("The JavaScript code is not visible in View Source");
Step 2: Hide JavaScript Code
Now, hide the JavaScript file by following these lines of code in a <script> tag:
let scriptElement = document.createElement("script");
scriptElement.type = "text/javascript";
scriptElement.src = "JSfile.js";
document.body.appendChild(scriptElement);
In the above code snippet:
Create a new script element, using the “createElement()” method.
Add the JavaScript code file “JSfile.js”, in the newly created script element as a child element by calling the “appendChild()” method.
Output
The snippet above shows another way to open “Developer Tools” other than right-clicking and hotkeys.
To hide the JavaScript code from this option, use the given steps:
Step 1: JavaScript Code
Create a JavaScript file for the JavaScript code relevant to the page’s functionality.
Here, we created a JavaScript file called “JSfile.js, where all the JavaScript code will be placed:
alert("The JavaScript code is not visible in View Source");
Step 2: Hide JavaScript Code
Now, hide the JavaScript file by following these lines of code in a <script> tag:
let scriptElement = document.createElement("script");
scriptElement.type = "text/javascript";
scriptElement.src = "JSfile.js";
document.body.appendChild(scriptElement);
In the above code snippet:
Create a new script element, using the “createElement()” method.
Add the JavaScript code file “JSfile.js”, in the newly created script element as a child element by calling the “appendChild()” method.
Output
![]() The above GIF indicates that in the sidebar of the “Source” tab, after opening the “Developers Tool”, there is no “JS file.js”, because it is now a child element of the script element.
The above GIF indicates that in the sidebar of the “Source” tab, after opening the “Developers Tool”, there is no “JS file.js”, because it is now a child element of the script element.
Conclusion
To hide JavaScript code in the view source, disable the hotkeys such as “Ctrl+Shift+I”, “Ctrl+U” and ”F12” that are used to open the developer’s tools to view the source code, and the right-click context menu on the webpage.
Or store the JavaScript code file in another script tag.
This post describes the process for hiding the JavaScript code in the view source.
How to Get User Agent
Getting a user agent is very helpful as it retrieves web content for end users.
Moreover, it can also be used to transfer information about the device requesting a network thoroughly.
In addition to that, changing the user agent also gives protection against target specific malware.
In such cases, getting the user agent is very helpful.
This blog will explain the approaches to get user agents.
How to Get a User Agent?
The “userAgent” property gives the header of the user-agent which is sent to server by the browser.
User agent can be fetched using the “userAgent” property in different scenarios.
These scenarios are as follows:
Example 1: Get User Agent Using User-Defined Function
This particular example can be applied to get the user agent of two different browsers with the help of a user-defined function.
Let’s have a look at the following code-snippet:
<h3>Get User Agent</h3><button onclick="userAgent()">Click to get User Agent</button><h3 id="usag" style="background-color: lightblue;"></h3>
In the above code:
In the first step, include the stated heading.
After that, create a button with an attached “onclick” event invoking the user-defined function userAgent().
In the next step, include the heading with the specified “id” in order to contain the resultant “user agent”.
Let’s continue to the JavaScript part of the code:
function userAgent(){
let get = navigator.userAgent;
document.getElementById("usag").innerHTML = "User-agent is: " + get;}
In the above js code, perform the following steps:
Declare a function named “userAgent()”.
In its definition, apply the “userAgent” property which will return the information about the name of the browser, version etc.
Output (For Chrome Browser)
![]() Output (For Microsoft Edge Browser)
Output (For Microsoft Edge Browser)
![]() From the above outputs, the difference of user agent in both the browser’s can be observed.
Example 2: Get User Agent Using Switch Statements
The “switch” statement is used to apply various conditions upon the actions.
This statement can be applied to apply a check upon various browsers in order to return the corresponding user agent.
Syntax
string.indexOf(search, start)
In the given syntax:
“search” refers to the string to be searched.
“start” indicates the start position.
Example
Let’s step on to the following example.
In the following example, perform the following steps:
Include the “heading” to contain the resultant message.
Create a function and apply the “switch” statement with the specified “boolean” value as its parameter.
In its definition, apply a check on the stated “browsers” by handling the exception of “-1” i.e no value found.
Also, apply the “indexOf()” method to check the contained string in its parameter in the resultant user agent.
This condition will result in configuring the corresponding browser.
After that, apply the “userAgent” property along with the “toLowerCase()” method to get the user agent of the corresponding browser and transform it to lower case.
Finally, apply the “innerText” property to display the corresponding browser name along with its user agent.
<body><h3></h3></body>
-1:
return "MS Edge";
case agent.indexOf("edg/") > -1:
return "Edge ( chromium based)";
case agent.indexOf("opr") > -1 && !!window.opr:
return "Opera";
case agent.indexOf("chrome") > -1 && !!window.chrome:
return "Chrome";
case agent.indexOf("safari") > -1:
return "Safari";
default: return "other";}})(window.navigator.userAgent.toLowerCase());
document.querySelector("h3").innerText="You are using "+ browserName +" browser";
console.log(window.navigator.userAgent.toLowerCase());</script>
Output(For Chrome Browser)
From the above outputs, the difference of user agent in both the browser’s can be observed.
Example 2: Get User Agent Using Switch Statements
The “switch” statement is used to apply various conditions upon the actions.
This statement can be applied to apply a check upon various browsers in order to return the corresponding user agent.
Syntax
string.indexOf(search, start)
In the given syntax:
“search” refers to the string to be searched.
“start” indicates the start position.
Example
Let’s step on to the following example.
In the following example, perform the following steps:
Include the “heading” to contain the resultant message.
Create a function and apply the “switch” statement with the specified “boolean” value as its parameter.
In its definition, apply a check on the stated “browsers” by handling the exception of “-1” i.e no value found.
Also, apply the “indexOf()” method to check the contained string in its parameter in the resultant user agent.
This condition will result in configuring the corresponding browser.
After that, apply the “userAgent” property along with the “toLowerCase()” method to get the user agent of the corresponding browser and transform it to lower case.
Finally, apply the “innerText” property to display the corresponding browser name along with its user agent.
<body><h3></h3></body>
-1:
return "MS Edge";
case agent.indexOf("edg/") > -1:
return "Edge ( chromium based)";
case agent.indexOf("opr") > -1 && !!window.opr:
return "Opera";
case agent.indexOf("chrome") > -1 && !!window.chrome:
return "Chrome";
case agent.indexOf("safari") > -1:
return "Safari";
default: return "other";}})(window.navigator.userAgent.toLowerCase());
document.querySelector("h3").innerText="You are using "+ browserName +" browser";
console.log(window.navigator.userAgent.toLowerCase());</script>
Output(For Chrome Browser)
![]() Output (For Microsoft Edge Browser)
Output (For Microsoft Edge Browser)
![]() In the above outputs, it is evident that both the browsers are detected along with their user agents.
All the convenient approaches have been discussed to get user agent.
In the above outputs, it is evident that both the browsers are detected along with their user agents.
All the convenient approaches have been discussed to get user agent.
Conclusion
The “user agent” can be fetched for various browsers with the help of “user-defined” function as well as the “switch” statement.
The former example is simple and can be implemented to get the user agent of the corresponding browser and return it as a heading.
The latter approach handles multiple browsers based on the contained string value in them and returns the user agent of the corresponding browser.
This write-up explains how to get a user agent.
How to Get Text Area Value?
In the process of designing responsive web pages or sites, there is a need to prompt the user of the entered data in order to ensure the correct entered data.
For instance, confirming the typed mails and passwords.
In the other case, logging an error or warning upon a selected option which might lead to some serious consequence i.e virus etc.
In such case-scenarios, getting text area value is very helpful in maintaining data privacy.
This write-up will explain the approaches to get text area value.
How to Get Text Area Value?
The text area value can be fetched using the following approaches:
“getElementById()” method.
“addEventListener()” method.
“jQuery”.
Approach 1: Get Text Area Value Using the getElementById() Method
The “getElementById()” method accesses an element with the specified “id”.This method can be implemented to fetch the input text field and return the entered value in it.
Syntax
document.getElementById(element)
In the given syntax:
“element” refers to the “id” to be fetched against the particular element.
Example
Let’s have a look at the following example:
Let’s apply the following steps in the below code:
<h3>Get text area value</h3>
Type Something: <input type="text" id= "txt" placeholder="Enter Text..."><button onclick= "textareaValue()">Get Value</button>
Perform the following steps:
In the first step, specify the stated heading.
After that, include the input text field with the specified “id” and “placeholder” value.
Also, create a button with an attached “onclick” event redirecting to the function textareaValue()
Let’s move forward to the JavaScript part of the code:
<script>function textareaValue() {
let get = document.getElementById("txt").value
alert(get) }</script>
In the above JavaScript code:
Declare a function named “textareaValue()”.
In its definition, access the input text field by its specified id using the “getElementById()” method.
Also, apply the “value” property in order to retrieve the entered text value.
Finally, display the text area value via the “alert” dialogue box.
Output
![]() In the above output, it can be observed that the entered value is fetched via alert dialogue box.
In the above output, it can be observed that the entered value is fetched via alert dialogue box.
Approach 2: Get Text Area Value Using the addEventListener() Method
The “addEventListener()” method is used to associate an “event” with an element.
This method can be utilized to attach an event to the function such that the text area value is fetched upon each input side by side on the console.
Syntax
element.addEventListener(event, function, exec)
In the above syntax:
“event” points to the event name.
“function” indicates the function to run upon the trigger of an event.
“exec” is the optional parameter.
Example
Let’s follow the below-given example step-by-step:
<label for="txt">Type Something:</label><br><br><textarea id="txtarea" rows="5" cols="25" placeholder=" Enter Text..."></textarea><script type="text/javascript">
let get = document.getElementById('txtarea');
console.log(get.value);get.addEventListener('input', function textareaValue(event) {
console.log(event.target.value);});</script>
In the above code-snippet:
Specify the stated label.
Also, allocate the “textarea” element with the specified value of “id” and “placeholder” and adjust its dimensions as well.
In the JavaScript part of the code, access the specified textarea in the previous step and display it using the “value” property.
In the next step, attach an event “text” to the fetched “text area” using the “addEventListener()” method and apply it to the function “textareaValue()”.
The “event” in its argument passes information about the event which is triggered.
This will result in logging each of the entered text values side by side.
Output
![]() From the above output, the “fetching” of each of the entered text values can be observed.
From the above output, the “fetching” of each of the entered text values can be observed.
Approach 3: Get Text Area Value Using jQuery
“jQuery” can be applied to access the input text field and trigger its functionalities as soon as the Document Object Model(DOM) is loaded.
Example
Let’s follow the below-given example:
<script src="https://ajax.googleapis.com/ajax/libs/jquery/3.6.0/jquery.min.js"></script>
Type Something: <input type="text" id="txt" placeholder= "Enter Text..."> <button >Get Value</button>
In the above lines of code, perform the following steps:
Include the jQuery library in order to apply its methods.
Specify the “input” as text field with the specified values of “id” and “placeholder” as discussed before.
Also, create a button in order to get the value upon the button click.
Move on to the JavaScript part of the code:
<script>
$(document).ready(function(){
$("button").click(function(){
console.log( $("input:text").val()); });});</script>
Follow the stated steps:
Apply the “ready()” method in order to apply the further methods upon the loaded DOM.
Access the created button and attach the “click()” method to it which will execute the stated function in its parameter.
The click() method will access the specified input text field and log the entered text value on the console.
Output
![]() Hence, the type’s value is logged on the console.
These were all the different ways of getting the value of the text area with the help of JavaScript.
Hence, the type’s value is logged on the console.
These were all the different ways of getting the value of the text area with the help of JavaScript.
Conclusion
The “getElementById()” method, the “addEventListener()” method or the “jQuery” can be utilized to get text area value.
The getElementById() method can be implemented to access the input text field and display the entered text area value via alert.
The addEventListener() method can be utilized to attach an “input” event which will get the text value upon each input side by side.
The jQuery can be applied to access the button directly and retrieve the entered text value upon the button click on the console.
This tutorial explains how to get text area value.
How to Combine Arrays using JavaScript
The array is a typical data structure in various programming languages, such as JavaScript.
It keeps an ordered list of indexed elements.
In some cases, programmers must combine or merge the elements of several arrays into a single array.
This post will explain the methods to combine arrays using JavaScript.
How to Combine Arrays Using JavaScript?
For combining or merging two or more arrays, JavaScript offers some prebuilt methods, listed below:
concat()
Spread Operator
Method 1: Combine Arrays Using concat() Method
To combine multiple arrays in a single array, use the “concat()” method.
It is the most basic and straightforward way to combine multiple arrays.
Syntax
Follow the given syntax for combining the arrays using the concat() method:
array1.concat(array2, array3, ....., arrayN)
It takes multiple arrays as parameters and combines them into a single array.
Return value
It returns a new array without affecting the original arrays.
Example
Create three arrays, an array of even numbers, odd numbers, and a prime number:
var even = [2, 4, 6, 8]
var odd = [1, 3, 5, 7]
var prime = [11, 13, 17]
Call the “concat()” method by passing “even” and “prime” arrays to combine them in an “odd” array and store the resultant array in variable “combineArray”:
var combineArray = odd.concat(even, prime);
Print the combined array on the console using the “console.log()” method:
console.log(combineArray);
Output
![]() The above output indicates that the arrays “even” and “prime” are successfully combined with the array “odd”.
The above output indicates that the arrays “even” and “prime” are successfully combined with the array “odd”.
Method 2: Combine Arrays Using Spread Operator
Another way to combine arrays is the “spread operator”.
The spread operator is three dots that copy all the array’s elements into another array.
It is the most efficient way of combining or merging multiple arrays.
Syntax
Use the below syntax for the spread operator to combine multiple arrays in a single array:
[...array1, ...array2, ...array3, ...arrayN]
Example
Use the above-created three arrays named “even”, “odd”, and “prime”.
That contains even numbers, odd numbers, and prime numbers lists.
Now, combine all these arrays using the spread operator:
var combineArray = [...even, ...odd, ...prime];
Output
![]() The output indicates that the arrays have been successfully concatenated into a single array.
The output indicates that the arrays have been successfully concatenated into a single array.
Conclusion
For combining multiple arrays into a single array, use the “concat()” method or the “spread operator”.
The spread operator is an efficient way to combine arrays.
It copies all the array’s elements into another array.
The concat() method is the most basic and straightforward way to combine or merge elements of arrays.
This post explains the methods to combine arrays using JavaScript.
How to Get Current Year
The current day, date, and time along with the device’s time zone are returned by JavaScript’s Date object.
Developers sometimes need to obtain the year in the standard order, whether the current year or the year following a given date.
There are various ways to get the values of the Date object, including “getHours()”, “getFullYear()”, “getMonth()”, and many more to access the values of the Date object
This article will explain how to get a current year.
How to Get the Current Year?
To determine the current year, use the “Date.getFullYear()” method.
According to local time, it returns the year of the specified day.
The “getFullYear()” method returns an absolute number as its value.
Syntax
The below-given syntax is used to get the current year:
Date.getFullYear()
Return Value
It returns the four-digit integer value between 1000 and 9999 which indicates the year.
Example 1: Get Current Year
First, create a new Date object that returns the current date and time in the time zone that corresponds to the device:
var getYear = new Date();
Invoke the getFullYear() method with the date object, it gives the current year from the date:
console.log(getYear.getFullYear());
Output
![]() The above output displays “2022” which is the current year.
But what If the user wants to get the year of the specified data in a specific format? In that case, follow the next example.
Example 2: Get Year of a Specified Date
Here, the constructor of the Date object is called by passing a custom date:
var getYear = new Date('Jan 14, 98 05:12:11');
Call the getFullYear() method with the date object, it gives the year from the specified date in a standard format:
console.log(getYear.getFullYear());
The corresponding output will look like this:
The above output displays “2022” which is the current year.
But what If the user wants to get the year of the specified data in a specific format? In that case, follow the next example.
Example 2: Get Year of a Specified Date
Here, the constructor of the Date object is called by passing a custom date:
var getYear = new Date('Jan 14, 98 05:12:11');
Call the getFullYear() method with the date object, it gives the year from the specified date in a standard format:
console.log(getYear.getFullYear());
The corresponding output will look like this:
![]() As the above output shows “1998” is the standard format of the year.
As the above output shows “1998” is the standard format of the year.
Conclusion
To determine the current year, use the “Date.getFullYear()” method.
It will return an absolute number (four-digit integer) value.
It gives the year of the current date as well as the specified date as an output.
This article explains the procedure to get the current year.
How to Filter Table
While creating a large HTML table on the page, it is important to include a Filter functionality for a better user experience.
To do this, use JavaScript to filter records in a table by searching any table record in a search box.
Additionally, JavaScript code provides fewer lines of code to work efficiently.
This blog post will define the process of filtering the table.
How to Filter Table?
Let’s see an example explaining how to filter a table.
Example
First, create a search bar in an HTML document with the “onkeyup” property that call the “filterTableFunc()” when the key is released:
<input type="text" id="search" onkeyup="filterTableFunc()" placeholder="Search....." ><br><br>
Create a table that stores employee data using the <table> tag, and assign an id “employeeData”:
<table id="employeeData" border="1">
<tr>
<th>Name</th>
<th>Email</th>
<th>Gender</th>
<th>Designation</th>
<th>Joining Date</th>
</tr>
<tr>
<td>John</td>
<td>john@gmail.com</td>
<td>Male</td>
<td>CPA</td>
<td>5/5/2020</td>
</tr>
<tr>
<td>Stephen</td>
<td>stephen@gmail.com</td>
<td>Male</td>
<td>HRM</td>
<td>21/10/2020</td>
</tr>
<tr>
<td>Mari</td>
<td>mari78@gmail.com</td>
<td>Female</td>
<td>HRM</td>
<td>16/05/2022</td>
</tr>
<tr>
<td>Rhonda</td>
<td>rhonda12@hotmail.com</td>
<td>Male</td>
<td>CFA</td>
<td>23/06/2022</td>
</tr></table>
After executing the HTML file, the output will look like this:
![]() After that, let’s add functionality to the filter table.
In a JavaScript script file or a tag, use the below code that will filter the table’s data based on search:
function filterTableFunc() {
var filterResult = document.getElementById("search").value.toLowerCase();
var empTable = document.getElementById("employeeData");
var tr = empTable.getElementsByTagName("tr");
for (var i = 1; i < tr.length; i++) {
tr[i].style.display = "none";
const tdArray = tr[i].getElementsByTagName("td");
for (var j = 0; j -1) {
tr[i].style.display = "";
break;
}
}
}}
In the above-given code:
First, define a function “filterTableFunc()”.
Access the search bar using its id “search” to get the entered value and convert it into a lowercase using the “toLowerCase()” method.
Get a reference to the table where the filter operation will be performed using its id “employeeData”.
Then, get the table rows using the “getElementsByTagName” method.
Iterate through the table up to its length, get the data for each table entry, and check if the stored value of the table is equal to the searched value.
If it is, then display it.
Output
After that, let’s add functionality to the filter table.
In a JavaScript script file or a tag, use the below code that will filter the table’s data based on search:
function filterTableFunc() {
var filterResult = document.getElementById("search").value.toLowerCase();
var empTable = document.getElementById("employeeData");
var tr = empTable.getElementsByTagName("tr");
for (var i = 1; i < tr.length; i++) {
tr[i].style.display = "none";
const tdArray = tr[i].getElementsByTagName("td");
for (var j = 0; j -1) {
tr[i].style.display = "";
break;
}
}
}}
In the above-given code:
First, define a function “filterTableFunc()”.
Access the search bar using its id “search” to get the entered value and convert it into a lowercase using the “toLowerCase()” method.
Get a reference to the table where the filter operation will be performed using its id “employeeData”.
Then, get the table rows using the “getElementsByTagName” method.
Iterate through the table up to its length, get the data for each table entry, and check if the stored value of the table is equal to the searched value.
If it is, then display it.
Output
![]() The above output indicates that the filter operation has been successfully applied to the table.
The above output indicates that the filter operation has been successfully applied to the table.
Conclusion
A table can be filtered by iterating through the table data and returning the relevant data.
This filtering is done through a function called upon a specific event.
This approach will work in such a way that on identical data entered, the corresponding data from the table is fetched, regardless of the case sensitivity in the input text field.
This post describes an approach that can be used to filter a table.
How to Create Table Dynamically
A dynamic table is a table that changes its number of rows depending on the input received at run time.
Some websites or online applications, such as business websites, need to create a table dynamically while adding some data or information.
It can be done using JavaScript, as JavaScript is a scripting language that uses dynamic typing.
This blog post will demonstrate the process for creating a dynamic table.
How to Create a Table Dynamically?
Let’s see an example explaining how a dynamic table will be created.
Example
To begin, write the following lines in a new HTML document to create a form that takes data and then shows it in a table by adding it dynamically:
<div id="myform">
<h4>Fill the below form:</h4>
<label>Name:</label>
<input type="text" id="name"><br><br>
<label>Gender:</label>
<input type="text" id="gender"><br><br>
<label>Designation:</label>
<input type="text" id="designation"><br><br>
<label>Joining Date:</label>
<input type="date" id="date"><br><br>
<button id="add" value="Add">Add Data to Table</button></div>
In the above code snippet:
First, create a heading “Fill the below form:”.
Create input fields for “Name”, “Gender”, “Designation”, and “JoiningDate” with assigned id’s “name”, “gender”, “designation”, and “date” respectively, to take the input values from the user.
These ids are used for getting the reference of the elements.
Then, create a button with the “onclick” property that will call the “addTableRow()” function in a script file, to add and show the data in a table:
Here, in the HTML file, write these lines of code to create a table structure, where data will be dynamically added:
<div>
<h4>Employee Record</b></h4>
<center>
<table id="tableData" border="1" cellpadding="2">
<tr>
<td><b>Name</b></td>
<td><b>Gender</b></td>
<td><b>Designation</b></td>
<td><b>Joining Date</b></td>
</tr>
</table>
</center></div>
In the above code:
Create a table with the id “tableData” that will be used in the script file to get the reference of this table and then add the data to it.
The table contains four columns, “Name”, “Gender”, “Designation”, and “Joining Date” that will store data according to column names.
Running the HTML file will result in the following browser output:
![]() Let’s add functionality for creating tables dynamically using JavaScript.
In the script file or tag, use the below code that will create a table dynamically:
function addTableRow() {
var name = document.getElementById("name");
var gender = document.getElementById("gender");
var designation = document.getElementById("designation");
var date = document.getElementById("date");
var table = document.getElementById("tableData");
var rowCount = table.rows.length;
var row = table.insertRow(rowCount);
row.insertCell(0).innerHTML= name.value;
row.insertCell(1).innerHTML= gender.value;
row.insertCell(2).innerHTML= designation.value;
row.insertCell(3).innerHTML= date.value;}
In the above snippet:
First, define a function “addTableRow()” that will trigger the click event of the HTML button.
Then, get the reference of all input fields one by one using their respective assigned ids using the “getelementById()” method and store them in variables.
These variables will be used to get the value of the input fields using the HTML “value” property and set them in the individual cells in the table using the “innerHTML” property.
Add rows in a table utilizing the “table.rows.length” property and then store values in it.
Output
Let’s add functionality for creating tables dynamically using JavaScript.
In the script file or tag, use the below code that will create a table dynamically:
function addTableRow() {
var name = document.getElementById("name");
var gender = document.getElementById("gender");
var designation = document.getElementById("designation");
var date = document.getElementById("date");
var table = document.getElementById("tableData");
var rowCount = table.rows.length;
var row = table.insertRow(rowCount);
row.insertCell(0).innerHTML= name.value;
row.insertCell(1).innerHTML= gender.value;
row.insertCell(2).innerHTML= designation.value;
row.insertCell(3).innerHTML= date.value;}
In the above snippet:
First, define a function “addTableRow()” that will trigger the click event of the HTML button.
Then, get the reference of all input fields one by one using their respective assigned ids using the “getelementById()” method and store them in variables.
These variables will be used to get the value of the input fields using the HTML “value” property and set them in the individual cells in the table using the “innerHTML” property.
Add rows in a table utilizing the “table.rows.length” property and then store values in it.
Output
![]() The above output indicates that the dynamic table is successfully created by adding data in a form using JavaScript.
The above output indicates that the dynamic table is successfully created by adding data in a form using JavaScript.
Conclusion
The dynamic table is created using the different HTML properties with JavaScript predefined methods.
First, create a form in an HTML file and then get the reference of the fields using JavaScript predefined methods such as the “getElementById()” method and then retrieve their entered values using the “value” property.
Set these values in a table’s respective columns using the “innerHTML” property.
This blog post demonstrates the process for creating a dynamic table.
JavaScript for…in VS for…of Loop
Looping plays a vital role in accessing the items to retrieve some value based on condition.
This result is performing some operation upon a particular string or an object conveniently.
Moreover, it is also effective in iterating along the data in bulk thereby saving time.
In such cases, “for…in” and “for…of” loops provide great functionalities in smartly accessing data.
This blog will explain the differences between for…in and for…of loop with the help of examples.
JavaScript for…in VS for…of Loop
The “for…in” loop is helpful in case of iterating through the properties of an object.
When iterated through a string, it returns the indexes corresponding to the string values rather than the string values.
The “for…of” loop, on the other hand, is not preferred for iterating through object properties.
Rather, it loops through the values of an iterable object.
However, it is suitable for iterating along the string values as it accesses them easily and returns the contained characters separately as well.
Syntax
for (variable in string) {}
In the given syntax:
“variable” refers to the contained characters in a string.
“string” corresponds to the string value to be iterated upon.
for (variable of iterable) {}
In the above syntax:
“variable” points to the value of the next property which is to be assigned to the variable at each iteration.
“iterable” indicates the object having iterable properties.
Example 1: Iterating the for…in and for…of Loops Over the String Value
This example will explain the behavior of both the stated loops upon iterating them over the specified string value.
for…in Loop
Let’s follow the below-given example of the “for…in” loop:
<script type="text/javascript">let string = "Linuxhint";for(items in string) {
console.log(items);}</script>
In the above code snippet:
Assign the stated string value named “Linuxhint”.
After that, apply the “for…in” loop to iterate along the string characters.
Upon logging, the result will instead point to the indexes at which the string characters are stored.
Output
![]() From the above output, it can be observed that the string indexes are retrieved instead.
From the above output, it can be observed that the string indexes are retrieved instead.
for…of Loop
Let’s observe the behavior of the “for…of” loop upon iterating through the specified string value below:
<script type="text/javascript">let string = "Linuxhint";for(items of string) {
console.log(items);}</script>
In the above lines of code, perform the following steps:
Likewise, specify the stated string value.
In the next step, apply the “for…of” loop to iterate along the initialized string value.
Finally, the output will result in fetching the characters directly which are contained in a string and displaying them.
Output
![]() In the above output, it is evident that the string values are returned.
Example 2: Iterating for…in and for…of Loop Over the Object
In this particular example, iterate both loops over the created object and observe the resultant output against each of them.
In the above output, it is evident that the string values are returned.
Example 2: Iterating for…in and for…of Loop Over the Object
In this particular example, iterate both loops over the created object and observe the resultant output against each of them.
for…in Loop
Let’s observe the behavior of the “for…in” loop by iterating it through an object.
Let’s follow the below-stated example:
<script type="text/javascript">let objData = {
Name: "Harry",
Id: 1,
age: 25,}for(data in objData) {
console.log(data, objData[data]);}</script>
In the above lines of code:
Create an object named “objData” with the properties named (Harry, Id, and age) and the corresponding values.
In the next step, apply the “for…in” loop to access the object’s properties as well as the corresponding values.
The first parameter in the “log()” method corresponds to the object’s property and the other refers to its corresponding value.
As a result, both the object properties and values will be logged on the console.
Output
![]() In the above output, it can be observed that the object’s properties and the corresponding values are displayed on the console.
In the above output, it can be observed that the object’s properties and the corresponding values are displayed on the console.
for…of Loop
Let’s check out the iteration of the “for…of” loop over the object.
Have a look at the following JavaScript code:
<script type="text/javascript">let objData = {
Name: "Harry",
Id: 1,
age: 25,}for(data of objData) {
console.log(data, objData[data]);}</script>
In the above code snippet, perform the following steps:
Recall the steps for creating an object in the previous example.
In the next step, apply the “for…of” loop similarly to iterate along the object properties and the corresponding values.
This will result in throwing an error which can be seen in the below output.
Output
![]() From the above output, it can be observed that the accessed object is not iterable.
From the above output, it can be observed that the accessed object is not iterable.
Conclusion
The “for…of” loop can be utilized to loop over the strings and the “for…in” loop can be suitable to loop over objects.
The former loop directly accesses the characters contained in a string and returns them.
The latter loop can be utilized to loop over objects to access their properties and the corresponding values conveniently.
This tutorial explained the differences between for..in and for…of loop.
JavaScript Escape Backslash
Escaping backslash is of great aid in splitting a string into multiple halves and utilizing the data effectively.
For instance, splitting a string value to perform some operation on some part of the string.
In addition, it is also useful in fetching the accurate path and URL.
Also, it reduces the code complexity by making the overall code readable.
This write-up will explain the methods to escape backslash using JavaScript.
How to Escape Backslash?
The backslash can be escaped using the following methods:
“split()” method.
“replace()” method.
Method 1: Escape Backslash Using the split() Method
The “split()” method splits a string into a new array of substrings.
This method can be applied to escape the backslash detected in the string, resulting in two separate string values.
Syntax
string.split(separator, limit)
In the given syntax:
“separator” refers to the string used for splitting.
“limit” points to the integer limiting the number of splits.
Side Note: A backslash, when placed “twice”, i.e.
(\\), is detected as a single backslash.
In the other case, a backslash has no effect upon specifying it “once” only i.e.
( \ ).
Example
Let’s follow the below-stated example:
<script type="text/javascript">let givenString = 'This is Linux \\ hint \ Website';
console.log("The string with the backslash is: ", givenString)
updString = givenString.split("\");
console.log("The string with the escaped backslash is: ", updString)
</script>
In the above code-snippet, follow the stated steps:
Assign a string value having a single and double “backslashes” in it and display it.
In the next step, apply the “split()” method having two backslashes as its argument.
This will result in splitting the contained backslashes in the string.
Finally, display the string with escaped backslashes.
Output
![]() In the above output, it can be observed that the backslashes are escaped in the resultant string, and a single string is split into two strings.
In the above output, it can be observed that the backslashes are escaped in the resultant string, and a single string is split into two strings.
Method 2: Escape Backslash Using the replace() and replaceAll() Methods
The “replace()” method looks a string for a value and replaces it without changing it.
The “replaceAll()” method gives a new string in return with all pattern matches.
Syntax
string.replace(search, new)
In the above syntax:
“search” refers to the value searched for.
“new” points to the replaced value.
string.replaceAll(search, new)
In the given syntax:
“search” points to the string value.
“new” is the value to be replaced.
Example 1: Escape Backslash Using the replace() Method
This example can be implemented to replace the contained “backslashes” in a string with a comma.
Let’s follow the below-given example:
<script type="text/javascript">let givenString = 'Java\Script \\ Website';
console.log("The string with the backslash is: ", givenString)
updString = givenString.replace("\", ',');
console.log("The string with the escaped backslash is: ", updString)
</script>
In the above code snippet:
Specify the stated string value having the “backslashes” in it and display it.
In the next step, apply the “replace()” method having the backslashes as its first argument in order to replace it with its second argument i.e comma.
Finally, display the comma-separated string value having no backslash in it.
Output
![]() From the above output, it can be observed that the contained backslashes are omitted.
Example 2: Escape Backslash Using the replaceAll() Method
This example will be applied to replace all the contained backslashes in a given string with a comma.
Follow the below-stated example.
<script type="text/javascript">let givenString = 'Java\Sc\\ript \\ Website';
console.log("The string with the backslash is: ", givenString)
updString = givenString.replaceAll("\", ',');
console.log("The string with the escaped backslash is: ", updString)
</script>
In the above lines of code, follow the stated steps:
Repeat the discussed approaches to assign a backslash contained string.
Apply the “replaceAll()” method to replace all the contained backslashes in a string with a comma.
Lastly, display the resulting string value.
Output
From the above output, it can be observed that the contained backslashes are omitted.
Example 2: Escape Backslash Using the replaceAll() Method
This example will be applied to replace all the contained backslashes in a given string with a comma.
Follow the below-stated example.
<script type="text/javascript">let givenString = 'Java\Sc\\ript \\ Website';
console.log("The string with the backslash is: ", givenString)
updString = givenString.replaceAll("\", ',');
console.log("The string with the escaped backslash is: ", updString)
</script>
In the above lines of code, follow the stated steps:
Repeat the discussed approaches to assign a backslash contained string.
Apply the “replaceAll()” method to replace all the contained backslashes in a string with a comma.
Lastly, display the resulting string value.
Output
![]() In the above output, it is evident that all the contained backslashes in the specified strings are replaced with a comma.
In the above output, it is evident that all the contained backslashes in the specified strings are replaced with a comma.
Conclusion
The backslash is an escape character and can be escaped from the string using the “split()” and “replace()” methods.
The former method can be utilized to split the given string in two halves based on the contained backslash.
The latter method can be implemented to replace a single or all the contained backslashes from a string with a comma.
This tutorial explains how to escape backslashes.
How to Convert Seconds to Minutes?
While measuring the time intervals, there is a need to get a precise minute value which is easy to judge and notice the time in a better way.
For instance, while dealing with long time intervals i.e (in a race), the elapsed minutes are convenient and quick to judge a performance as compared to calculating the seconds.
In such cases, converting seconds to minutes is very helpful in calculating the time more effectively.
This blog will explain the techniques to convert seconds to minutes.
How to Convert Seconds to Minutes Using JavaScript?
The seconds can be converted to minutes using “Math.floor()” method in combination with the following:
“Basic conversion”.
“toString()” and “padStart()” methods.
Approach 1: Convert Seconds to Minutes Using Basic Conversion
The “Math.floor()” method rounds a number to the nearest down integer i.e (5.6 = 5).
This approach can be applied to calculate the precise calculation upon the specified seconds value and user-input value.
Syntax
Math.floor(a)
In the above syntax:
“a” refers to the number to be computed upon.
Example 1: Convert Specified Seconds to Minutes
In this particular example, the calculations for resultant minutes will be computed upon the specified seconds.
Let’s follow the below-given example:
<script type="text/javascript">var secTime = 60;var computeMinutes = Math.floor(secTime/60);var result = secTime % 60;
console.log("The converted minutes are:", computeMinutes + " minutes " + result + " seconds.")</script>
In the above code-snippet:
Assign the seconds as “60”.
Apply the “Math.floor()” method to return the precise calculation upon the division of the specified seconds by 60(number of seconds in 1 minute).
In the next step, compute the seconds along with the minutes by returning the remainder.
Finally, display the resultant minutes and seconds with respect to the specified seconds.
Output
![]() From the above output, it can be observed that the required functionality is achieved (60 seconds = 1 minutes)
Example 2: Convert Seconds to Minutes Using User-Input Value
This example uses the same calculations for converting seconds to minutes.
The difference is that it takes the “user-input” value as seconds and computes the corresponding minutes based on that.
Let’s follow the below-given example step-by-step:
<center><h3 id = "head">The converted minutes are : </h3></center><script type="text/javascript">var get = prompt("Enter the seconds:")var head = document.getElementById("head")var computeMinutes = Math.floor(get/60);var result = get % 60;
head.innerText += computeMinutes + " minutes " + result + " seconds."</script>
In the above code-snippet:
Include the stated heading with the specified “id”.
In the JavaScript part of the code, ask the user to input the value of “seconds” via “prompt” dialogue box.
In the next step, access the included heading by its “id” using the “getElementById()” method.
Recall the discussed steps for computing the minutes and display the resultant value of “minutes” as a heading using the “innerText” property.
Output
From the above output, it can be observed that the required functionality is achieved (60 seconds = 1 minutes)
Example 2: Convert Seconds to Minutes Using User-Input Value
This example uses the same calculations for converting seconds to minutes.
The difference is that it takes the “user-input” value as seconds and computes the corresponding minutes based on that.
Let’s follow the below-given example step-by-step:
<center><h3 id = "head">The converted minutes are : </h3></center><script type="text/javascript">var get = prompt("Enter the seconds:")var head = document.getElementById("head")var computeMinutes = Math.floor(get/60);var result = get % 60;
head.innerText += computeMinutes + " minutes " + result + " seconds."</script>
In the above code-snippet:
Include the stated heading with the specified “id”.
In the JavaScript part of the code, ask the user to input the value of “seconds” via “prompt” dialogue box.
In the next step, access the included heading by its “id” using the “getElementById()” method.
Recall the discussed steps for computing the minutes and display the resultant value of “minutes” as a heading using the “innerText” property.
Output
![]() In the above output, it is evident that the seconds are computed precisely.
In the above output, it is evident that the seconds are computed precisely.
Approach 2: Converting Seconds Into Minutes Using toString() and padStart() Methods
The “toString()” method returns a number in the form of a string.
The “padStart()” method is applied to pad two strings together.
These methods can be applied to convert the resultant minutes into the string and pad them with the desired “0’s”
Syntax
number.toString(radix)
In the above syntax:
“radix” refers to the “base” to utilize.
string.padStart(length, pad)
In the given syntax:
“length” indicates the length of the final string.
“pad” points to the string to be padded.
Example
Let’s observe the functionality of the below-given example:
<script type="text/javascript">var secTime = 80;var computeMinutes = Math.floor(secTime/60);var result = secTime % 60;
console.log("The converted minutes are:", computeMinutes.toString().padStart(2, '0')+":"+ result.toString().padStart(2, '0'));</script>
In the above-given code, perform the following steps:
Assign the seconds in a variable named “secTime”.
Repeat the discussed steps for computing the precise minutes and seconds.
In the next step, apply the “toString()” method in order to return both the minutes and seconds as a string.
Also, apply the “padStart()” method.
The “2” in its parameter indicates the number of “0’s” in its latter argument to pad with both the minutes and seconds.
Output
![]() From the above output, it can be observed that the minutes and seconds are padded accordingly and returned as a string.
These were the different ways of converting seconds into minutes.
From the above output, it can be observed that the minutes and seconds are padded accordingly and returned as a string.
These were the different ways of converting seconds into minutes.
Conclusion
The “Math.floor()” method in combination with the “basic conversion” upon the specified and the user-input value of “seconds” or with the “toString()” and “padStart()” methods can be utilized to convert seconds to minutes.
The former approach can be applied to compute the accurate minutes corresponding to the specified or user-entered value of seconds respectively.
The latter methods can be utilized in combination to compute the minutes based on the initialized seconds and convert the resultant minutes into the string and pad them with the desired “0’s”.
This write-up explains how to convert seconds to minutes.
JavaScript call vs apply vs bind
While programming, there are situations where there is a need to integrate the functionalities of an object with a user-defined function.
Moreover, applying some added functionality to the created object or its property to apply some operation without changing it.
In such cases, JavaScript provides the “call()”, “apply()”, and “bind()” methods to cope with such situations.
This article will discuss the differences between the call(), apply() and bind() methods.
JavaScript call() vs apply() vs bind() Methods
Call() Method
The “call()” method invokes a function with a specified context.
This method can be applied to integrate the functionalities of an object and a function by accessing the function having the referred object as a function’s parameter along with the passed parameters simultaneously.
Syntax
call(ref, args)
In the given syntax:
“ref” refers to the value to be utilized as “this” when calling a function.
“args” points to the arguments for the function.
Example
Let’s follow the below-stated example:
<script type="text/javascript">let object = { integer: 2 };function sumNum(x, y){
console.log("The sum becomes:", this.integer + x + y)}
sumNum.call(object, 4, 11);</script>
In the above code snippet, perform the following steps:
Create an object having the stated property.
After that, declare a function named “sumNum()” having the stated parameters.
In its definition, use “this” to refer to the created object’s property and add the placed parameters to it.
Finally, access the function and the “call()” method by referring to the created object and the passed parameter.
This will add the parameter values to the object property’s value.
Output
![]() From the above output, it can be observed that the sum of the values of the object’s property and the pass parameters are returned.
From the above output, it can be observed that the sum of the values of the object’s property and the pass parameters are returned.
Apply() Method
This method is identical to the “call()” method.
The difference in this method is that it takes the function parameters in the form of an array.
Syntax
apply(ref, array)
In the above syntax:
“ref” refers to the value to be utilized as “this” when calling a function.
“array” indicates the arguments in the form of an array with which the function will be called.
Example
Let’s have a look at the following example:
<script type="text/javascript">let object = { integer: 2 };function sumNum(x, y){
console.log("The sum becomes:", this.integer + x + y)}
sumNum.apply(object, [4, 11]);</script>
In the adobe code snippet, perform the following steps:
Repeat the discussed steps in the example of the “call()” method for creating an object, declaring a function with parameters, and referring to the object.
Finally, access the defined function by containing the referred object as its first parameter and the function’s parameter values in the form of an array.
This will similarly result in returning the sum of the object and passed parameter values.
Output
![]() From the above output, it is evident that the desired sum is returned.
From the above output, it is evident that the desired sum is returned.
Bind() Method
The “bind()” method does not execute a function immediately, rather, it returns a function that can be executed later on.
Syntax
bind(ref, args)
In the above syntax:
“ref” corresponds to the value to be passed as “this” parameter to the target function.
“args” refers to the arguments for the function.
Example
Let’s follow the given example to understand clearly:
<script type="text/javascript">
var object = { integer: 2 };function sumNum(x, y){
console.log("The sum becomes:", this.integer + x + y)}
const updFunction = sumNum.bind(object, 4, 11);
updFunction();</script>
In the above JavaScript code, perform the following steps:
Recall the discussed steps for creating an object and defining a function having the stated parameters.
In the next step, apply the “bind()” method and repeat the same procedure for containing the created object and the passed parameter values to return the sum.
Here, store the performed functionalities in the previous step in an “inline” function named “updFunction()” which can be utilized later as well.
Output
![]() In the above output, it is evident that upon calling the stated “inline” function, the sum is returned as a result.
Example: Applying call(), apply() and bind() With the Same Object and Function
In this example, apply the discussed methods on a single object with the help of a function.
Let’s follow the below-given example step-by-step:
<script type="text/javascript">
var object = { integer: 2 };function sumNum(x, y){
console.log("The sum becomes:", this.integer + x + y)}let call = sumNum.call(object, 2, 4);let apply = sumNum.apply(object, [2, 4]);let bind = sumNum.bind(object, 2, 4)let bindStore = bind();</script>
In the above lines of code, perform the following steps:
Revive the discussed steps for creating an object, declaring a function having the stated parameters.
In the further code, access the defined function with each discussed method.
It can be observed that all three methods are applied differently along with the function but yield the same output, as evident below.
Output
In the above output, it is evident that upon calling the stated “inline” function, the sum is returned as a result.
Example: Applying call(), apply() and bind() With the Same Object and Function
In this example, apply the discussed methods on a single object with the help of a function.
Let’s follow the below-given example step-by-step:
<script type="text/javascript">
var object = { integer: 2 };function sumNum(x, y){
console.log("The sum becomes:", this.integer + x + y)}let call = sumNum.call(object, 2, 4);let apply = sumNum.apply(object, [2, 4]);let bind = sumNum.bind(object, 2, 4)let bindStore = bind();</script>
In the above lines of code, perform the following steps:
Revive the discussed steps for creating an object, declaring a function having the stated parameters.
In the further code, access the defined function with each discussed method.
It can be observed that all three methods are applied differently along with the function but yield the same output, as evident below.
Output
![]() From the above output, it can be seen that all the methods give the same output.
From the above output, it can be seen that all the methods give the same output.
Conclusion
The “call()” and “apply()” methods can be implemented to integrate the functionalities of an object and a function by passing the parameter values simply and in the form of an array, respectively.
The “bind()” method can also be applied similarly.
The additional functionality in this method is that it is stored in a function to be utilized later.
This tutorial explained the differences between the call(), apply() and bind() methods.
How to Sort an ES6 Map?
While dealing with the data in bulk, there is a requirement to sort the data to be identified properly.
For instance, in fetching a specific name based on a character.
In addition to that, it enhances the visualization, analysis, and reduces the consumed time.
In such a case, sorting an ES6 map is an efficient technique for searching specific data.
This blog will explain how to sort an ES6 Map.
How to Sort an ES6 Map Using JavaScript?
An “ES6 map” can be sorted by creating a new map object and applying it in combination with the “spread” operator and the “sort()” method.
Example 1: Sort an ES6 Map By Alphabetical Characters
This example will explain how to sort a map by alphabetical characters.
Syntax
set(key, value);
In the above syntax:
“key” and “value” correspond to an object or a variable of any data type.
Let’s follow the below-stated code:
<script type="text/javascript">
var sortMap = new Map();
sortMap.set("d", "55");
sortMap.set("b", "75");
sortMap.set("c", "65");
sortMap.set("a", "85");
var updatedMap = new Map([...sortMap].sort());
console.log(updatedMap);</script>
In the above code snippet, perform the following steps:
Create a new “map” object using the “Map()” constructor.
After that, set the stated alphabetical characters along with the stated values in the form of “key-value” pairs.
In the next step, create a new “map” object and place the set values in it using the “spread” operator.
Also, apply the “sort()” method to sort the alphabet characters and display the updated map.
Output
![]() From the above output, it can be observed that the map is sorted based on alphabetic characters.
Example 2: Sort an ES6 Map By Numbers
This example will lead to sorting a map by numbers.
Let’s observe the below-given example:
<script type="text/javascript">
var sortMap = new Map();
sortMap.set("3", "Harry");
sortMap.set("1", "David");
sortMap.set("2", "Teena");
var updatedMap = new Map([...sortMap.entries()].sort());
console.log(updatedMap);</script>
In the above code snippet:
Repeat the discussed steps in the previous example for creating a new “map” object and setting the values in it using the “set()” method.
In the next step, similarly, apply the “spread” operator and the “sort()” method for sorting the map based on the set numbers.
The additional “entries()” method here results in returning the map as “key-value” pairs.
Output
From the above output, it can be observed that the map is sorted based on alphabetic characters.
Example 2: Sort an ES6 Map By Numbers
This example will lead to sorting a map by numbers.
Let’s observe the below-given example:
<script type="text/javascript">
var sortMap = new Map();
sortMap.set("3", "Harry");
sortMap.set("1", "David");
sortMap.set("2", "Teena");
var updatedMap = new Map([...sortMap.entries()].sort());
console.log(updatedMap);</script>
In the above code snippet:
Repeat the discussed steps in the previous example for creating a new “map” object and setting the values in it using the “set()” method.
In the next step, similarly, apply the “spread” operator and the “sort()” method for sorting the map based on the set numbers.
The additional “entries()” method here results in returning the map as “key-value” pairs.
Output
![]() In the above output, it is evident that the map is sorted based on the numbers.
In the above output, it is evident that the map is sorted based on the numbers.
Conclusion
An “ES6 map” can be sorted by applying the map object combined with the “spread” operator and the “sort()” method upon the alphabets and numbers.
This can be achieved by creating a new map object and setting the values in it in the form of “key-value” pairs and then sorting them based on the contained alphabetic characters in the first example and the numbers in the other example.
This blog explains how to sort an ES6 map.
How to Convert Date to UTC
UTC stands for “Universal Time Coordinate”.
It is a standard time that is used in every country.
In some applications, such as chat applications, developers need to represent the time in UTC format.
It can be achieved using the JavaScript prebuild methods of the Date object.
This post will define the process of converting local date to UTC format.
How to Convert Date to UTC?
To convert a date to UTC, use the below-given JavaScript predefined methods:
Date.UTC() method
toUTCString() method
Let’s discuss these methods one by one.
Method 1: Convert Date to UTC Using Date.UTC() Method
The first approach to converting the date to UTC is the “Date.UTC()” method.
It is a static predefined method of the Date object that converts the specified date-time to UTC in milliseconds.
It accepts the date with time as an argument and then returns it in milliseconds from January 1, 1970, to the specified date-time.
Syntax
Use the below-given syntax for Date.UTC() method to convert the date to UTC:
Date.UTC(year, mon, day, hour, min, sec, ms)
In the above syntax,
The “year” will be a four-digit integer such as “2022”.
“mon” is an integer number between 1-12 representing the “month”.
“day” is an integer between 1-31, indicating the day of the month.
“hours” indicates an integer number between 0 and 23, and the default value of hours is set as 0.
“min” represents “minutes” between 0 and 59, and the default value is 0.
“sec” is the seconds between 0 and 59, and the default value of seconds is 0.
“ms” is the milliseconds between 0 and 999, the default value is set as 0
The “min, sec, and ms” are optional parameters but linked with one another, if use “ms”, then it is mandatory to use “sec” and “min”.
Return Value
It returns a number representing the date-time in milliseconds from January 1, 1970, to the specified date-time.
Example
Call the “Date.UTC()” method by passing date-time “2022, 1, 5, 12, 11, 14” as an argument and store the returned value in variable “utcDate”:
var utcDate = Date.UTC(2022, 1, 5, 12, 11, 14);
Print the resultant UTC in milliseconds on the console using the “console.log()” method:
console.log(utcDate);
The corresponding output will be:
![]()
Method 2: Convert Date to UTC Using toUTCString() Method
Another method to convert the Date to UTC is the “toUTCString()” method.
It converts the local date-time to UTC format as a string according to universal time.
It is the easiest way to convert local time to UTC.
Syntax
Follow the given syntax for the “toUTCString()” method:
dateObject.toUTCString()
It calls with the date object that returns the current date and time, and it takes no parameters.
Return Value
It returns a string that represents the date-time in UTC format “GMT” time zone.
Example
First, create a variable “localDate” that stores the current date-time by calling the “new Date()”, the constructor of the Date object:
var localDate = new Date();
Call the “toUTCString()” method with variable “localDate” that stores the current date-time and stores the resultant time in variable “utcDate”:
var utcDate = localDate.toUTCString();
Print the UTC time on the console:
console.log(utcDate);
The output displays UTC date-time:
![]()
Conclusion
To convert date to UTC, use the JavaScript predefined methods, “Date.UTC()” method or “toUTCString()” method.
The Date.UTC() returns time in milliseconds, while the toUTCString() method gives date-time as a string.
It is the simple, easiest, and most commonly used method to convert date-time to UTC.
while the Date.UTC is only for demonstration purposes, the user shouldn’t use it.
This post defines the process of converting local date to UTC format with examples.
How to Convert a String to Boolean
Sometimes boolean values are stored in databases as strings, and programmers may use those values to perform specific actions on websites or applications.
In that situation, before using those strings in logical operations, they must be converted into boolean values.
This tutorial will demonstrate the methods for converting string to boolean using JavaScript.
How to Convert/Transform a String Into Boolean Using JavaScript?
Use the following methods for converting a string into a boolean using JavaScript:
Strict equality operator (===)
Double not (!!) operator
Boolean Object
Let’s see how these methods will work.
Method 1: Convert a String to Boolean Using Strict Equality (===) Operator
The “Strict equality” (===) Operator or the “identity” operator is utilized for converting a string to a boolean value.
It verifies whether the left-hand side value becomes equal to the right-hand side value.
If yes! it returns “true” else, it returns “false”.
Syntax
The syntax for the strict equality operator is as follows.:
a === b
Return value
Its outputs “true” if the compared values consist of the same value and type.
Example 1:
Create a variable named “string” that stores a boolean value “true” as a string:
var string = 'true';
Compare the string to the string “true” using the “Strict equality” (===) Operator.
Only if the string is “true”, the output will be allocated a boolean value “true”:
var result = string === 'true';
Print the result on the console using the “console.log()” method:
console.log(result);
Output
![]() The output displays “true”, as the strict equality returns true when both operands are equal in terms of the type and value.
Example 2:
In variable “string”, store boolean value “false”:
var string = 'false';
Compare the string “false” with the string “true”:
var result = string === 'true';
Output
The output displays “true”, as the strict equality returns true when both operands are equal in terms of the type and value.
Example 2:
In variable “string”, store boolean value “false”:
var string = 'false';
Compare the string “false” with the string “true”:
var result = string === 'true';
Output
![]() The output shows “false” because the strict equality operator returns true if the string is actually “true”.
The output shows “false” because the strict equality operator returns true if the string is actually “true”.
Method 2: Convert a String to Boolean Using Double NOT (!!) Operator
To convert string to boolean, there is another method, known as a double exclamation (!!) that is a double NOT (!!) operator.
It returns a boolean value by reversing the result of a single NOT operator.
Syntax
The syntax for the double NOT (!!) operator is as follows:
!!string
In the above syntax:
The first (!) operator changes it to an inverted boolean value.
The second (!) operator inverts the inverted boolean value.
In other words, it is now the actual Boolean value of the object.
Example 1:
Create a variable “string” and store a boolean value “true” as a string in it:
var string = 'true'
Use the double NOT (!!) operator with string to convert into a boolean value:
console.log(!!string);
Output
![]() Output displays “true”, as in (!!) operator, first (!) converts “true” into “false”, then the second (!) again converts it into “true”.
Output displays “true”, as in (!!) operator, first (!) converts “true” into “false”, then the second (!) again converts it into “true”.
Method 3: Convert a String to Boolean Using Boolean Object
For converting the string to a boolean, use the JavaScript built-in “Boolean” object.
It is a wrapper object for boolean values.
Syntax
The syntax for converting string to boolean with the help of a Boolean object is as follows:
Boolean(string)
It takes a string as an argument and returns a boolean value.
It returns “true” if the passed string is not empty.
For an empty string, it returns “false”.
Example 1:
Create a variable “string” and store a boolean value “true” as a string in it:
var string = 'true'
Call the Boolean wrapper by passing the string:
Boolean(string);
Output
![]() The output returns a boolean value “true”, as the passed string is not empty.
Example 2:
Store the boolean value “false” in a variable “string”:
var string = 'false'
Invoke the Boolean wrapper by passing the string:
Boolean(string);
The corresponding output will be:
The output returns a boolean value “true”, as the passed string is not empty.
Example 2:
Store the boolean value “false” in a variable “string”:
var string = 'false'
Invoke the Boolean wrapper by passing the string:
Boolean(string);
The corresponding output will be:
![]()
Conclusion
To convert a string to a boolean, use the “Strict equality” operator (===) that compares the specified string to the string “true” and it returns a boolean value “true” if the compared values are of the same type and value.
The “Double not” (!!) operator returns a boolean value by reversing the result of a single NOT operator, or JavaScript “Boolean” Object that returns a boolean value “true” if the passed string is not an empty string else return “false”.
This tutorial demonstrates the methods for converting string to boolean using JavaScript.
How to Check/Uncheck the Checkbox Using JavaScript
The checkbox is a type of HTML input element that allows the user to select one of several options.
Sometimes, there can be a situation where the checkboxes need to be checked or unchecked in the case of filling a questionnaire, quiz, or some applications that need to check any specific or all the permissions simultaneously to proceed further.
This write-up will describe the procedure to check and uncheck the checkbox using JavaScript.
How to Check/Uncheck the Checkbox Using JavaScript?
To check or uncheck the checkboxes, use the “checked” attribute.
First, get the reference of the HTML element “checkbox” with the help of its assigned “id” using the “getElementById()” method, and then, apply the “checked” property on its value.
Example 1: Check/Uncheck the Single Checkbox
First, create an HTML file, with the following lines of code:
<h3>Click buttons to check or uncheck the checkbox</h3><input type="checkbox" id="checkbox"> Agree with terms and condition <br><br><button type="button" onclick="check()">Yes</button><button type="button" onclick="uncheck()">No</button>
In the above code:
Create a checkbox, with the id “checkbox” that will be used to access the element “checkbox” to perform actions.
Create two buttons, “Yes” and “No”, to check or uncheck the checkbox that will trigger the function “check()” and “uncheck()” respectively on the click event.
After executing the above code, the output will be like this:
![]() Next, define the functions to perform actions on the checkbox in the JavaScript file or the tag.
To check the checkbox, use the below lines of code:
function check() {
let input = document.getElementById('checkbox');
input.checked = true;}
In the above code:
Define a function “check()” that will trigger the button click to check the checkbox.
Inside the body of the function, get the reference of the checkbox using its id “checkbox” with the help of the “getElementById()” method and store it in a variable “input”.
Check the checkbox by setting the “checked” property “true”.
To uncheck the checkbox by clicking the “No” button, use the below-given code:
function uncheck() {
let input = document.getElementById('checkbox');
input.checked = false;}
The above code snippet:
Define a function “uncheck()” that will trigger the button click to uncheck the checkbox.
Inside the body of the function, get the reference of the checkbox using its id “checkbox” with the help of the “getElementById()” method and store it in a variable “input”.
Uncheck the checkbox by setting the “checked” property “false”.
Lastly, define a function to uncheck the checkbox by default on the page load using the “window.onload” event:
window.onload = function() {
window.addEventListener('load', check, false);}
Output
Next, define the functions to perform actions on the checkbox in the JavaScript file or the tag.
To check the checkbox, use the below lines of code:
function check() {
let input = document.getElementById('checkbox');
input.checked = true;}
In the above code:
Define a function “check()” that will trigger the button click to check the checkbox.
Inside the body of the function, get the reference of the checkbox using its id “checkbox” with the help of the “getElementById()” method and store it in a variable “input”.
Check the checkbox by setting the “checked” property “true”.
To uncheck the checkbox by clicking the “No” button, use the below-given code:
function uncheck() {
let input = document.getElementById('checkbox');
input.checked = false;}
The above code snippet:
Define a function “uncheck()” that will trigger the button click to uncheck the checkbox.
Inside the body of the function, get the reference of the checkbox using its id “checkbox” with the help of the “getElementById()” method and store it in a variable “input”.
Uncheck the checkbox by setting the “checked” property “false”.
Lastly, define a function to uncheck the checkbox by default on the page load using the “window.onload” event:
window.onload = function() {
window.addEventListener('load', check, false);}
Output
![]() The output signifies that the checkbox is checked and unchecked successfully while clicking on the buttons.
Example 2: Check/Uncheck Multiple Checkboxes
Let’s see an example of how to check or uncheck all the checkboxes at the same time.
First, create an HTML file, and then create multiple checkboxes and a button with the id “toggle” that will toggle the checkbox to check or uncheck:
<h3>Click button to check or uncheck all the checkboxes</h3><input type="checkbox" class="checkbox"> Check or uncheck me<br><input type="checkbox" class="checkbox"> Check or uncheck me<br><input type="checkbox" class="checkbox"> Check or uncheck me<br><input type="checkbox" class="checkbox"> Check or uncheck me<br><input type="checkbox" class="checkbox"> Check or uncheck me<br><br><input type="button" id="toggle" value="Click to toggle the checkboxes">
The corresponding output will be:
The output signifies that the checkbox is checked and unchecked successfully while clicking on the buttons.
Example 2: Check/Uncheck Multiple Checkboxes
Let’s see an example of how to check or uncheck all the checkboxes at the same time.
First, create an HTML file, and then create multiple checkboxes and a button with the id “toggle” that will toggle the checkbox to check or uncheck:
<h3>Click button to check or uncheck all the checkboxes</h3><input type="checkbox" class="checkbox"> Check or uncheck me<br><input type="checkbox" class="checkbox"> Check or uncheck me<br><input type="checkbox" class="checkbox"> Check or uncheck me<br><input type="checkbox" class="checkbox"> Check or uncheck me<br><input type="checkbox" class="checkbox"> Check or uncheck me<br><br><input type="button" id="toggle" value="Click to toggle the checkboxes">
The corresponding output will be:
![]() After that, in a JavaScript file or <script> tag, add the below code to check or uncheck the list of checkboxes with a single click.
First, get the reference of the button by using its id “toggle” and store it in a variable “button” and then attach an onclick event and invoke a function “checkAllBoxes” that will check the list of checkboxes and then calls the next function “uncheckAllBoxes”:
var button = document.getElementById("toggle");
button.onclick = checkAllBoxes;
To check the checkboxes, use the below-given code
function checkAllBoxes() {
var input = document.querySelectorAll('.checkbox');
for (var i = 0; i < input.length; i++) {
input[i].checked = true;
}this.onclick = uncheckAllBoxes;}
In this above code:
First, define a function “checkAllBoxes()” that will trigger on the button click to check all the checkboxes.
Inside the body of the function, get the references of all checkboxes using their assigned classes “checkbox” with the help of the “querySelectorAll()” method and store it in a variable “input”.
Iterate the checkboxes and set the “checked” property “true” to check all the checkboxes.
After checking all checkboxes, call the other function “uncheckAllBoxes” on the click event to toggle the button.
To uncheck the list of the checkbox by clicking the button, use the below lines of code:
function uncheckAllBoxes() {
var input = document.querySelectorAll('.checkbox');
for (var i = 0; i < input.length; i++) {
input[i].checked = false;
}this.onclick = checkAllBoxes; }
In this above code snippet:
Define a function “uncheckAllBoxes()” that will trigger on the button click to uncheck all the checkboxes.
Inside the body of the function, get the references of all checkboxes using their assigned classes “checkbox” with the help of the “querySelectorAll()” method and store it in a variable “input”.
Iterate the checkboxes and set the “checked” property “false” to uncheck all the checkboxes.
After that, call the other function “checkAllBoxes” on the click event to toggle the button.
Output
After that, in a JavaScript file or <script> tag, add the below code to check or uncheck the list of checkboxes with a single click.
First, get the reference of the button by using its id “toggle” and store it in a variable “button” and then attach an onclick event and invoke a function “checkAllBoxes” that will check the list of checkboxes and then calls the next function “uncheckAllBoxes”:
var button = document.getElementById("toggle");
button.onclick = checkAllBoxes;
To check the checkboxes, use the below-given code
function checkAllBoxes() {
var input = document.querySelectorAll('.checkbox');
for (var i = 0; i < input.length; i++) {
input[i].checked = true;
}this.onclick = uncheckAllBoxes;}
In this above code:
First, define a function “checkAllBoxes()” that will trigger on the button click to check all the checkboxes.
Inside the body of the function, get the references of all checkboxes using their assigned classes “checkbox” with the help of the “querySelectorAll()” method and store it in a variable “input”.
Iterate the checkboxes and set the “checked” property “true” to check all the checkboxes.
After checking all checkboxes, call the other function “uncheckAllBoxes” on the click event to toggle the button.
To uncheck the list of the checkbox by clicking the button, use the below lines of code:
function uncheckAllBoxes() {
var input = document.querySelectorAll('.checkbox');
for (var i = 0; i < input.length; i++) {
input[i].checked = false;
}this.onclick = checkAllBoxes; }
In this above code snippet:
Define a function “uncheckAllBoxes()” that will trigger on the button click to uncheck all the checkboxes.
Inside the body of the function, get the references of all checkboxes using their assigned classes “checkbox” with the help of the “querySelectorAll()” method and store it in a variable “input”.
Iterate the checkboxes and set the “checked” property “false” to uncheck all the checkboxes.
After that, call the other function “checkAllBoxes” on the click event to toggle the button.
Output
![]() The output indicates that the list of checkboxes is successfully checked or unchecked with a single button.
The output indicates that the list of checkboxes is successfully checked or unchecked with a single button.
Conclusion
To check or uncheck the checkboxes, use the “checked” property.
After getting the reference of the element “checkbox” using its “id” with the help of the “getElementById()” method, check the checkbox by setting the “checked” attribute to “true”.
Similarly, set the “checked” attribute to “false” to uncheck the checkbox.
This write-up describes the procedure to check and uncheck the checkbox using JavaScript.
How to Change the Page Title
The “Page title” refers to the brief summary of a web page displayed at the top of a browser tab.
The document’s title is specified using the <title> tag.
The page’s tab or the browser’s title bar displays the title, which should be text only.
While navigating website pages, the page’s title should be changed according to its content.
This blog post will define the procedure for changing the page title.
How to Change the Page Title?
For changing the page title, use the below-given methods:
document.title property
querySelector() method
Let’s see how these methods work.
Method 1: Change the Page Title Using document.title Property
The document’s title can be changed or retrieved using the “document.
title” attribute.
The page’s title can be changed by providing the new name or title as a string to this attribute.
Syntax
Follow the given syntax for using the property “document.title” to change the page title:
document.title = "newTitle";
Example
Create a button in HTML file that will change the page title on the click event:
<button onclick="changeTitle">Click to Change the Title of the Page</button>
Here, the page title of the created HTML page is “Document” that will be changed by clicking on the button:
![]() In JavaScript file, define a function, “changeTitle()” where set the new title for the page that will be changed using the “document.title” attribute:
function changeTitle() {
document.title = 'LinuxHint';}
Output
In JavaScript file, define a function, “changeTitle()” where set the new title for the page that will be changed using the “document.title” attribute:
function changeTitle() {
document.title = 'LinuxHint';}
Output
![]() The above output shows that the page title is successfully changed on the button click.
The above output shows that the page title is successfully changed on the button click.
Method 2: Change the Page Title Using querySelector() Method
There is another way to change the page title, using the “querySelector()” method with the “textContent” attribute.
This method takes a DOM element as an argument and then changes the page’s current title using the textContent property.
Syntax
Use the following syntax to change the page title using the “querySelector()” method:
document.querySelector('title').textContent = "newTitle";
Example
Define a function “changeTitle()” and set the new title for the page by choosing “title” element in “querySelector()” method:
function changeTitle() {
document.querySelector('title').textContent = 'LinuxHint';}
Output
![]() It can be observed from the output that the page’s title has been changed using JavaScript.
It can be observed from the output that the page’s title has been changed using JavaScript.
Conclusion
To change the page title, use the “document.title” property or the “querySelector()” method with the “textContent” property.
For changing the page title, the “document.title” attribute is the most widely utilized method.
It quickly changes the page’s title, while the second method first fetches the title element and then changes its value This blog post demonstrates the ways to change the title of the page.
How to Change Iframe Source?
While creating a web page or the site, there is a requirement to redirect the end-user to a different web page to access the relevant/searched “content”.
In addition to that, providing various functionalities to the user at the same time thereby making accessibility feasible.
In such case scenarios, changing the iframe source does wonders in providing the user ease in terms of time and hassle.
This blog will explain how to change the iframe source.
What is an Inline Frame?
An “inline frame” is used to contain another specified document within the current document.
This results in switching the web pages based on the stated links.
How to Change Iframe Source?
Iframe source can be changed using the following approaches along with the “getElementById()” method:
“Passed parameter” Technique.
“selectedIndex” Property.
Approach 1: Change Iframe Source Using Passed Parameter Technique
This technique can be utilized to switch to the specified page by placing the corresponding page link as a function’s parameter when accessed with the help of a button.
Example
Let’s follow the below-stated example:
<center><h2>Change the iframe source</h2><iframe id= "webpage" src="https://linuxhint.com/detect-tab-key-javascript/" frameborder="0" scrolling="no"></iframe><br><br><button onclick="changeIframe('https://linuxhint.com/category/linux-commands/')">Click to display Linux Commands Page</button><br></br></center>
In the above lines of code, perform the following steps:
Specify the stated link in the “<inline frame>” tag along with the adjusted dimensions.
Also, create a button with an attached “onclick” event redirecting to the function changeIframe() having the specified link as its parameter.
This will result in directing the page to the stated link upon the button click.
Let’s continue to the JavaScript part of the code:
<script type="text/javascript">function changeIframe(change) {
document.getElementById('webpage').src = change;}</script>
In the above code snippet:
Declare a function named “changeIframe()”.
In its definition, access the specified link in the “inline frame” element using the “document.getElementById()” method.
After that, apply the “src” attribute and allocate the stated link upon the function access to the accessed link using the parameter “change”.
This will result in switching the pages with respect to the specified links upon the button click.
Output
![]() In the above output, it can be observed that the pages are switched upon clicking the button.
In the above output, it can be observed that the pages are switched upon clicking the button.
Approach 2: Change Iframe Source Using selectedIndex Property
The “selectedIndex” property returns the selected option’s index in a drop-down list.
This property can be applied to redirect to the specified link with respect to the value of the selected option from the dropdown list.
Example
Let’s observe the following example:
<center><body><iframe id="webpage" src="https://linuxhint.com/detect-tab-key-javascript/" frameborder="0" scrolling="no"></iframe><br><br><select id= "links"><option value= "https://linuxhint.com/auto-refresh-web-page-every-5-seconds-javascript/">Switch to Article 1<option value= "https://linuxhint.com/convert-array-to-object-javascript/">Switch to Article 2</select><br><br><button onClick="changeIframe();">Change Iframe Src</button><br><br></body></center>
In the above lines of code, perform the following steps:
Recall the step for specifying the stated link within the “<iframe>” tag having the specified “id” and adjusted dimensions.
In the next step, include the “select” element having the specified “id” to create a drop-down list.
After that, contain the “option” element for defining the option’s value.
Specify the stated links as the “value” of the option element.
Also, create a button having an “onclick” event which will invoke the function changeIframe().
Let’s move on to the JavaScript part of the code:
<script type="text/javascript">function changeIframe() {
var get = document.getElementById("links");
var dropDown = get.options[get.selectedIndex].value;
document.getElementById("webpage").src= dropDown ;}</script>
In the above code snippet:
Define a function named “changeIframe()”.
In its definition, access the specified “select” element by its “id” using the “document.getElementById()” method.
In the next step, apply the “selectedIndex” and the “value” properties to redirect to the value i.e.
link against the corresponding selected option.
Output
![]() From the above output, it is evident that the pages are switching properly with respect to the “options” value upon the button click.
From the above output, it is evident that the pages are switching properly with respect to the “options” value upon the button click.
Conclusion
The “getElementById()” method in combination with the passed parameter technique or the “selectedIndex” property can be used to change the Iframe source.
The former technique can be utilized to redirect to the passed link as the function’s parameter upon the button click.
The latter approach can be implemented to switch to the corresponding links with respect to the selected option from the dropdown list.
This tutorial explains how to change the iframe source.
How to Assign a Function to a Variable
Functions are the basic components of JavaScript.
A function is a collection of statements that executes an action or calculates a value.
It can be easily reused by simply calling it., there are three types of functions, a named function, an arrow function, and an anonymous function., the anonymous and the arrow functions are assigned to a variable.
This blog post will provide a JavaScript example of how to assign a function to a variable.
How to Assign a Function to a Variable?
There are two different types of functions, that will be used by assigning them to variables:
Assign an anonymous function to a variable
Assign an arrow function to a variable
Let’s see how to assign these function types to a variable.
Assign an Anonymous Function to a Variable
An “anonymous” function is the simplest type of function that can be assigned to a variable.
As indicated by the name, the function will declare without the name.
Syntax
Follow the given syntax for assigning an anonymous function to a variable:
var variable_name = function(){};
Example 1: Assign an Anonymous Function to a Variable Without Parameter
Create a variable “sum” and assign an anonymous function to it.
In the function, create two variables “a” and “b” by assigning values “12” and “8” respectively, and finally, return the sum of two numbers “a” and “b”:
var sum = function() {
var a = 12;
var b = 8;
return a + b;}
Call the function by a variable name “sum” with braces ”()” that denotes the function:
console.log(sum());
The output displays “20” while calling the anonymous function assigned to a variable:
![]() Example 2: Assign an Anonymous Function to a Variable With Parameter
Here, assign an anonymous function to the variable with two parameters “a” and “b”.
It will return the sum of two numbers that will be passed during the function call as an argument:
var sum = function(a, b) {
return a + b;}
Call the anonymous function using variable “sum” by passing number “4” as a first argument “a” and “6” as the second argument “b”:
console.log(sum(4 , 6));
The corresponding output will be:
Example 2: Assign an Anonymous Function to a Variable With Parameter
Here, assign an anonymous function to the variable with two parameters “a” and “b”.
It will return the sum of two numbers that will be passed during the function call as an argument:
var sum = function(a, b) {
return a + b;}
Call the anonymous function using variable “sum” by passing number “4” as a first argument “a” and “6” as the second argument “b”:
console.log(sum(4 , 6));
The corresponding output will be:
![]()
Assign an Arrow Function to a Variable
The “arrow function” is the second way to apply the function to the variable.
The only difference between the arrow function and the anonymous function is that it will create without using the keyword “function” and instead use an arrow.
The arrow function has the shortest syntax for function declaration.
Syntax
Use the following syntax for assigning the arrow function to the variable:
var variable_name = (parameters) => {};
Example 1: Assign an Arrow Function to a Variable Without Parameter
Create a variable “sum” and assign an arrow function to it.
In the function, create two variables “a” and “b” by assigning values “9” and “12” respectively, and lastly, return the sum of two numbers “a” and “b”:
var sum = () => {
var a = 9;
var b = 12;
return a + b;}
Call the function by a variable name “sum”:
console.log(sum());
The output displays “21” while calling the arrow function without parameters assigned to a variable:
![]() Example 2: Assign an Arrow Function to a Variable With Parameter
Create an arrow function with variables “a” and “b” that will return the sum of two numbers.
It is the same as the anonymous function with parameters but without the “function” keyword:
var sum = (a, b) => {
return a + b;}
Invoke the arrow function using the variable name “sum”:
console.log(sum(23 , 20));
Output
Example 2: Assign an Arrow Function to a Variable With Parameter
Create an arrow function with variables “a” and “b” that will return the sum of two numbers.
It is the same as the anonymous function with parameters but without the “function” keyword:
var sum = (a, b) => {
return a + b;}
Invoke the arrow function using the variable name “sum”:
console.log(sum(23 , 20));
Output
![]()
Conclusion
Two different types of functions can be assigned to a variable.
These are the “anonymous” function and an “arrow” function.
An anonymous function is assigned with or without parameters while the arrow function is assigned to the variable with parameters.
This blog post demonstrates the process of assigning a function to a variable
How to Add Hours to Date Object
The Date object returns the current day, date, and time (with time zone) on the device., there are some situations where developers need to add hours to a Date object.
The Date object offers a number of methods, including “setHours()”, “getTime()”, “setMonth()”, and many more to access or change the values of the Date object, such as time, hour, minute, time zone, and others.
This post will describe the process to add hours to a date object.
How to Add Hours to Date Object?
For adding hours to a Date object, use the given below JavaScript predefined methods:
getTime() method
setHours() method
Let’s look at the working of the above-mentioned methods.
Method 1: Add Hours to Date Object Using getTime() Method
To add hours to the Date object, the “getTime()” method is used.
It represents the time for the given date in universal time.
It returns time in milliseconds:
Syntax
Use the following syntax for the getTime() method:
Date.getTime()
Example
Create a new date object and store it in a variable “date”:
var date = new Date();
In order to add hours to a date object, define a function “addHoursToDate()” with a parameter “hour”, call the ”setTime()” method of date object then first obtain the current time using the “getTime()” method, and then, add hours’ of milliseconds to it:
function addHoursToDate(hour){
date.setTime(date.getTime() + hour * 60 * 60 * 1000);
return date;}
Print today’s date using “console.log()” method:
console.log("Today's Date:", date);
Call the function “addHoursToDate()” by passing “2” hours:
addHoursToDate(2);
Print the new date and time by adding 2 hours in it on the console:
console.log("Add Hours in date:", date);
The corresponding output will be:
![]()
Method 2: Add Hours to Date Object Using setHour() Method
There is another Date object’s method “setHour()” used for adding hours to date.
It sets the hours for a date according to local time.
Syntax
For setHours() method, use the given syntax:
Date.setHours(hours, min, sec, ms)
In the above syntax:
“hours” indicates an integer number between 0 and 23.
“min” represents minutes between 0 and 59.
“sec” is the seconds between 0 and 59.
“ms” is the milliseconds between 0 and 999.
The “min, sec, and ms” are optional parameters but linked with one another, if use “ms”, then it is mandatory to use “sec” and “min”.
Example
In order to add hours to a date object, define a function “addHoursToDate()” with a parameter “hour”, and get the value of hours by passing a number as an argument in the “setHours()” method:
function addHoursToDate(hour){
date.setHours(hour);}
Call the function “addHoursToDate()” by passing “2” hours to add in the date:
addHoursToDate(2);
Print the new date and time by adding 2 hours in it on the console using “console.log()” method:
console.log("Add 2 Hours to date:", date);
Output
![]()
Conclusion
To add hours to a date object, use the JavaScript Date object’s predefined methods including “getTime()” method or “setHours()” method.
The setHours() method sets the hours in date according to local time while the getTime() method returns time in milliseconds and represents the time in universal time.
This post described the process for adding hours to a date object.
Double Exclamation Operator Example
Everyone is familiar with the single exclamation mark (!) sign called the logical “not” operator, which is used to reverse a boolean value such as “!true” returns “false”, while “!false” returns “true”.
The double exclamation mark (!!) symbols also called “the double bang”, or “double shots” change the value of a truthy or falsy into “true” or “false“.
It’s a simple way to convert a variable to a boolean (true or false) value.
This study will define the double exclamation.
What is Double Exclamation Operator?
The double exclamation mark (!!) is not a JavaScript operator, it is a double, not (!) operator because the not (!) operator is used twice in the double exclamation operator (!!).
The first (!) operator changes it to an inverted boolean value.
The second (!) operator inverts the inverted boolean value.
In other words, it is now the actual Boolean value of the object.
Falsy values
In JavaScript, the undefined, 0, null, NaN, and empty strings (‘’) are the false values.
Truthy values
The truth values of JavaScript are 1, a non-empty string, any non-zero number, arrays, objects, and so on.
Let’s look at the examples of double exclamation.
Example 1:
Create a variable “a” and assign a boolean value “false”:
var a = false
Use the double not(!) operator or double exclamation(!!) with the variable:
!!a;
The output gives the boolean value “false”:
![]() In the above output, the value of variable “a” is first inverted to “true” then, the second (!) operator again inverts it into “false”.
Here, the below table represents the outcome of all the truthy and falsy JavaScript values using the Double Exclamation !! JavaScript:
In the above output, the value of variable “a” is first inverted to “true” then, the second (!) operator again inverts it into “false”.
Here, the below table represents the outcome of all the truthy and falsy JavaScript values using the Double Exclamation !! JavaScript:
| Value | !!Value |
| true | true |
| false | false |
| 0 | false |
| 1 | true |
| undefined | false |
| null | false |
| ‘’ | false |
| ‘Linuxhint’ | true |
Let’s see how the double exclamation works on different values and data types.
Example 2: Applying (!!) on Boolean Values
Let’s check the effect of double exclamation (!!) on boolean values:
![]()
Example 3: Applying (!!) on Integer Values
Pass the integers 0 and 1 to the “console.log()” method with a double exclamation (!!) and will see the result:
![]()
Example 4: Applying (!!) on null or undefined Values
Let’s see the effect of double exclamation (!!) on the null or undefined values:
![]()
Example 5: Applying (!!) on String Values
Look at the effect of the double exclamation (!!) on an empty string and a string passing to the “console.log()” method:
![]() We have compiled the essential instructions related to the double exclamation (!!) sign.
We have compiled the essential instructions related to the double exclamation (!!) sign.
Conclusion
The double exclamation mark (!!) also known as “the double bang”, or “double shots” is the double not (!) operator that changes the value of a truthy or falsy statement into “true” or “false“.
It is converted to an inverted boolean value using the first (!) operator.
Then, the second (!) operator inverts the inverted boolean value.
Finally, it gives the same results as boolean expressions (True, False).
This study defined the double exclamation.
Group an Array of Objects
Sometimes, the developers need to organize an array of objects according to a particular key or property value.
JavaScript offers some predefined methods and libraries to do this, including the “reduce()” method or the “groupBy()” method from the lodash library.
This tutorial will demonstrate methods for grouping JavaScript objects in an array.
How to Group an Array of Objects?
To group an array of objects, use the following methods:
reduce() method
groupBy() method from the lodash library
Let’s understand the working of these methods one by one.
Method 1: Group an Array of Objects Using reduce() Method
The most commonly used method for grouping the array of objects is the “reduce()” method.
It is invoked with the call-back function.
It reduces the array of objects grouped by specified type.
The reduce() method is powerful but a little complex to understand.
Syntax
Use the following syntax for the reduce() method to group an array of objects:
reduce(previousValue, currentValue)
Return value
It returns the sum of all grouped elements in an array.
Example
Create an array of objects “array” with properties, names, and categories:
const array = [{ name: "Apple", category: "Fruits" },{ name: "Orange", category: "Colors" },{ name: "Mango", category: "Fruits" },{ name: "Peach", category: "Colors" },{ name: "Orange", category: "Fruits" },{ name: "Grapes", category: "Fruits" },];
Call the “reduce()” method with the call back arrow function that will group the objects based on the “category” key, and store them in a variable “groupArrayObject”:
const groupArrayObject = array.reduce((group, arr) => {
const { category } = arr;
group[category] = group[category] ?? [];
group[category].push(arr);
return group;},{});
Print the resultant array on the console using the “console.log()” method:
console.log(groupArrayObject);
Output
![]() From the above output, the resultant array has two minimized arrays “Colors” and “Fruits”.
Simply click on the array head next to the minimized array’s name to expand it:
From the above output, the resultant array has two minimized arrays “Colors” and “Fruits”.
Simply click on the array head next to the minimized array’s name to expand it:
![]() Now the output shows two objects, “Colors” and “Fruits,” that contain 2 and 4 arrays, respectively.
Now the output shows two objects, “Colors” and “Fruits,” that contain 2 and 4 arrays, respectively.
Method 2: Group an Array of Objects Using groupBy() Method
Another method for grouping an array of objects is the “groupBy()” method.
The groupBy() method will be used in the npm project with the “lodash” library.
It is simpler to understand and takes fewer lines of code.
Syntax
Follow the below-mentioned syntax for the groupBy() method to group the array of objects:
_.groupBy(list, key)
In the above syntax,
The “list” is an array of objects.
The “key” is the property of the objects by which the elements will be grouped.
Return Value
It returns the multiple collections grouped by a given key.
Example
Use the following commands to include the lodash library in your npm Project:
$ npm i -g npm
$ npm i --save lodash
Then, add the lodash library in the JavaScript file with the following line:
var _ = require("lodash");
After that, simply use the following lines of code:
const array = [{ name: "Apple", category: "Fruits" },{ name: "Orange", category: "Colors" },{ name: "Mango", category: "Fruits" },{ name: "Peach", category: "Colors" },{ name: "Orange", category: "Fruits" },{ name: "Grapes", category: "Fruits" },];
let output = _.groupBy(array, "category");
console.log(output);
In this code snippet:
Create an array of objects called “array”.
Call the “groupBy()” method by passing an array of objects “array” and a key “category” in it, which groups all the elements related to the categories.
Run the above code, and the output will be:
![]() It can be easily observed that the objects have now been grouped based on their “Category” key’s value.
It can be easily observed that the objects have now been grouped based on their “Category” key’s value.
Conclusion
For grouping, an array of objects, use the “reduce()” method or the “groupBy()” method.
The reduce() method is the most commonly used method for grouping an array of objects, while the groupBy() method requires less code and is easier to understand, but it will execute in the npm project with the lodash library.
This tutorial demonstrated the methods to group JavaScript objects in an array.
Get Height of the Div Element
Getting the height of the div element is very helpful in applying a proper layout to the document object model (DOM) which makes a website stand out and results in attracting the user’s attention.
For instance, creating a particular web page or website, the added features and functionalities require proper formatting to be accumulated without altering the document design.
This write-up will demonstrate the approaches to get the height of the div element.
How to Get Height of the Div Element?
The following approaches can be utilized to get the height of the div element:
“offsetHeight” Property.
“clientHeight” Property.
“scrollHeight” Property.
“jQuery” Approach.
Approach 1: Get Height of the Div Element Using the offsetHeight Property
The “offsetHeight” property returns the outer height of an element including the padding as well as the borders.
This property can be implemented to compute the height of the accessed heading upon the button click.
Syntax
element.offsetHeight
Here, “element” corresponds to the element to be computed for the height.
Example
In the below example:
Specify the following div with an assigned class.
Also, include the specified heading within to be calculated for the “height”.
Now, create a button with an “onclick” event invoking the function divHeight().
After that, allocate the headings in order to display the computed height:
<center><div class= "element"><h2 style= "background-color: aliceblue;">This is Linuxhint Website</h2></div><button onclick= "divHeight()">Get the Height of the Div Element</button><h3>The Height of the Div Element is:</h3><h3 id= "head"></h3></center>
In the further js code:
In the below given js code, declare a function named “divHeight()”.
In its definition, access the assigned div by its class using the “document.querySelector()” method and the heading for the computed height using the “document.getElementById()” method.
After that, apply the “offsetHeight” property to compute the outer height of the specified heading and display it in the allocated heading discussed before using the “innerText” property:
function divHeight(){
let getDiv = document.querySelector('.element');
let get= document.getElementById("head")
let height = getDiv.offsetHeight;
get.innerText= +height}
Output
![]() In the above output, it is evident that the height is computed.
In the above output, it is evident that the height is computed.
Approach 2: Get Height of the Div Element Using the clientHeight Property
The “clientHeight” property, on the other hand, calculates the element’s inner height including the padding but excluding the borders.
This property can be similarly applied to the included image within the div element.
Syntax
element.clientHeight
Here, likewise “element” corresponds to the element to be computed for the height.
Example
Repeat the above-discussed approaches for specifying the “div” class.
Here, specify the following image to be computed for the “height”.
Likewise, allocate a heading for the computed height and create a button with an attached event “onclick” as discussed:
<div class= "element"><img src= "template3.PNG"></div><h3>The Height of Div Element is:</h3><h3 id= "head"></h3><button onclick= "divHeight()">Get the Height of the Div Element</button>
In the below given js function:
Define a function named “divHeight()”.
Repeat the above-discussed approaches for accessing the “div” element and the included heading.
After that, apply the “clientHeight” property to calculate the outer height of the image specified in the above code and return it as a heading:
function divHeight(){
let box = document.querySelector('.element');
let get= document.getElementById('head')
let height = box.clientHeight;
get.innerText= +height}
Output
![]() From the above output, it can be observed that the required functionality is achieved.
From the above output, it can be observed that the required functionality is achieved.
Approach 3: Get Height of the Div Element Using the scrollHeight Property
The “scrollHeight” property is identical to the “clientHeight” property as it returns the height of an element with the padding, but not the borders.
This property can be applied to the created table to calculate its height.
Syntax
element.scrollHeight
In the given syntax, “element” similarly corresponds to the element to be computed for the height.
Example
Firstly, include the “div” element with the specified “class” and an attached “onmouseover” event redirecting to the function divHeight().
Next, create a table with the specified heading and data values.
Similarly, revive the discussed method for allocating a heading to display the computed height in it:
<div class= "element" onmouseover= "divHeight()"><table border= "1px solid black" cellpadding= "10px"><tr><th>ID.</th><th>Name</th><th>Age</th></tr><tr><td>1</td><td>Harry</td><td>18</td></tr><tr><td>2</td><td>David</td><td>46</td></tr></table></div><br><h3 id= "head"></h3>
In the following js code, follow the stated steps:
Define the function named “divHeight()”.
Access the “div” element.
Finally, apply the “scrollHeight” property to return the height of the created table:
function divHeight(){
let getDiv = document.querySelector('.element');
let height = getDiv.scrollHeight;
console.log("The Height of the Div Element is: ", +height)}
Output
![]()
Approach 4: Get Height of the Div Element Using the jQuery Approach
This approach returns the height of the heading as well as the paragraph within the div element with the help of a jQuery library.
Example
In the below demonstration, include the specified jQuery library in order to apply its methods.
Next, specify the “div” and contain the following heading and paragraph in it to be calculated for the height.
After that, revive the discussed methods for creating a button and assigning a heading for the resultant height to be displayed in it:
<script src= "https://ajax.googleapis.com/ajax/libs/jquery/3.5.1/jquery.min.js"></script><div id= "element" style= "border: 2px solid;"><h2>JavaScript</h2>
JavaScript is a very effective programming language which can be integrated with HTML as well to perform various added functionalities in designing a particular web page or the website.
This results in attracting the users and enhancing the overall document design.</div><br><button type= "button">Get the Height of the Div Element</button><h3 id= "result"></h3>
In the below-given code:
In the jQuery code, apply the “ready()” method in order to execute the further code as soon as the Document Object Model(DOM) is loaded.
Now, apply the “click()” method which will execute the specified function upon the button click
Lastly, upon the button click, access the “div” element, and apply the “height()” method to it thereby returning its height:
$(document)
.ready(function() {
$("button").click(function(){
var divHeight = $("#element").height();
$("#result").html("The Height of the Div Element is: " + divHeight);});});
Output
![]() This write-up compiled the approaches to get the height of the div element.
This write-up compiled the approaches to get the height of the div element.
Conclusion
The “offsetHeight” property, the “clientHeight” property, the “scrollHeight” property, or the “jQuery” approach can be utilized to get the height of the div element.
The offsetHeight property can be applied to compute the outer height of the accessed heading upon the button click.
The clientHeight property and the scrollHeight property can be opted for computing the inner height of the element.
The jQuery approach can also be implemented by including its library and utilizing its methods for performing the required calculations.
This article demonstrated the approaches that can be applied to get the height of the div element.
How to Set onClick With JavaScript
An event is an action taken by a browser or a user.
The JavaScript concept of event handlers or listeners can be utilized to handle these events.
A certain event triggers the execution of an event listener.
One of these Event Listeners is “onClick.” When a user clicks on an element, an onClick event listener is triggered or executed.
This tutorial will define the procedure on how to set onClick with JavaScript.
How to Set onClick With JavaScript
To set the onclick with JavaScript, there are two different methods, which are:
The first method is to assign a value to the HTML element’s onclick attribute using JavaScript.
The second method is to explicitly add an event listener on the HTML event which checks for the “click” event.
Example 1: Assign a Value to the HTML Element’s onclick Attribute Using JavaScript
In the HTML file, create a heading and a button “Click me” with the id “js” which will trigger the JavaScript function while clicking on it.
<h2>Set onClick property With JavaScript</h2><button id="js">Click me</button>
In the following step, the created button will be accessed and an “onclick” attribute will be attached to it.
Upon the button click, the specified function will be executed and the “style.backgroundColor” property will change the button color as follows:
document.getElementById("js").onclick = function jsFunc() {
document.getElementById("js").style.backgroundColor = "Purple";}
The corresponding output will be:
![]()
Example 2: Explicitly Add an Event Listener on the HTML Event
Create a button “Click here!” and assigns an id “event” to it that will trigger the addEventListener() method on the “click” event:
<button id="event">Click here!</<strong>button</strong>>
Fetch the button using its id and then attach an “addEventListener()” method by passing a “click” event and a function “eventFunc” where the background color of the button will be changed:
document.getElementById("event").addEventListener("click", eventFunc);
function eventFunc() {
document.getElementById("event").style.backgroundColor = "Green";}
Output
![]()
Example 3: Using All onClick Methods at Once
In this example, the working of all the methods will be displayed at once.
First is the default way of adding the onclick attribute within the HTML tag itself.
After that, the two methods of setting the onclick attribute with the help of JavaScript have been demonstrated as well.
In the following example, create three buttons and see the functionality of the onclick attribute.
The first button “Click” will call the “htmlFunc()” on the click event.
The button “Click me” will be accessed with its assigned id “js” and then assign a value to the button’s onclick attribute using JavaScript.
The button “Click here!” will be accessed using the id “event” and then attach an “addEventListener()” method with it:
<button id="html" onclick="htmlFunc()">Click</button><br><br><button id="js">Click me</button><br><br><button id="event">Click here!</button>
The below function will trigger the “onclick” event of the button “Click”:
function htmlFunc() {
alert("The button clicked by HTML onClick event");}
On clicking the “Click Me” button, the following function will trigger where a warning message will be displayed.
document.getElementById("js").onclick = function jsFunc() {
alert("The button clicked by JavaScript onClick function");}
The given function will trigger the button “Click here!”:
document.getElementById("event").addEventListener("click", eventFunc);
function eventFunc() {
alert("The button clicked by JavaScript onClick with EventListener Method");}
The output will display alert messages on each button click:
![]()
Conclusion
To set the onclick with JavaScript, there are two different approaches, the first is to assign a value to the HTML element’s onclick attribute using JavaScript and the second approach is to explicitly add an event listener on the HTML event which checks for the “click” event.
This tutorial has defined the methods to set onClick with JavaScript along with examples.
How to Search Objects From an Array?
While programming, there can arise a situation where there is a need to extract some particular record or some data for some purpose or in case of removing it for some sort of an update.
For instance, accessing all the relevant data based on a specific property such as “city” etc.
In such case scenarios, searching objects from an array is a very smart approach for handling and accessing data instantly.
This blog will explain in detail the methods to search objects from an array
How to Search Objects From an Array?
The following methods can be applied to search objects from an array:
“forEach()” Method.
“find()” Method.
“filter” Method.
“for” Loop.
The mentioned approaches will be demonstrated one by one!
Method 1: Search Objects From an Array Using the forEach() Method
The “forEach()” method applies a function for each array element.
This method can be implemented to apply a check on the object’s property and return the corresponding value associated with it with the help of a passed parameter.
Syntax
array.forEach(function(currValue, index, arr), this)
function: It refers to the function to be executed for each array element.
currValue: This parameter refers to the current array value.
index: It indicates the index of the current element
array: The current array
this: It points to the value to be passed to the function.
In the given syntax, “function” refers to the function to be executed for each array element, the function’s parameter points to the index of the current value in an array, and “this” indicates the value to be passed to the function.
The below-given example illustrates the stated method.
Example
First, declare an array named “objArray” having the following object properties and their corresponding values:
var objArray = [
{ name:"Harry", id: 1, city: "London" },
{ name:"John", id: 2, city: "New York" },
{ name:"Sierra", id: 3, city: "Canberra" },];
Next, apply the “forEach()” method and pass the parameter “obj” which will then apply a condition upon the specified object’s property and return the corresponding value associated with it.
For instance, the value of the “name” property will return in this case by applying a check on the object property “city”:
objArray.forEach(obj =>{if(obj.city === "New York"){
console.log("The resident's name is:", obj.name);}});
Output
![]()
Method 2: Search Objects From an Array Using the find() Method
The “find()” method accesses the value of the first element that passes the provided test.
This method can also similarly be applied to apply a check upon the object property and return the value of a different property associated with it with the help of the passed parameter.
Syntax
array.find(function(currVal, index, arr),this)
function: It refers to the function to be executed for each array element.
currValue: This parameter refers to the current array value.
index: It indicates the index of the current element
array: The current array
this: It points to the value to be passed to the function.
Example
In the following example, likewise, define the following array of objects having the specified properties and values:
var objArray = [
{name: "David", designation:"Junior Developer", company: "Google"},
{name: "James", designation:"Senior Developer", company: "Youtube"},
{name: "Sara", designation:"Manager", company: "Google"},];
Now, repeat the discussed procedure in the previous method for returning an object value with the help of a passed parameter:
objArray.find(obj =>{if(obj.company === "Google"){
console.log("Google Employee:", obj.name);}});
Output
![]()
Method 3: Search Objects From an Array Using the filter() Method
The “filter()” method creates a new array filled with elements that are filtered.
This method can be applied to search and extract the filtered object value with respect to the applied condition.
Syntax
array.filter(function(currVal, index, arr), this)
function: It refers to the function to be executed for each array element.
currValue: This parameter refers to the current array value.
index: It indicates the index of the current element
array: The current array
this: It points to the value to be passed to the function.
Overview of the following example for the explained concept.
Example
Revive the discussed method for defining an array of objects:
var objArray = [
{ make:"HP", generation: 3 },
{ make:"DELL", generation: 4 },
{ make:"Lenovo", generation: 5 }];
After that, apply the “filter()” method upon the specified object property and referring to it, return the value corresponding to the object’s property associated with it:
objArray.filter(obj =>{if(obj.make === "HP"){
console.log("Laptop Generation:", obj.generation);}});
Output
![]()
Method 4: Search Objects From an Array Using the for Loop
This approach can be implemented to iterate along the objects array and search for a specific object by referring to the total “length” of an array.
The below-given example demonstrates the concept.
Example
Firstly, declare the following array of objects having the specified property and values as discussed in the previous methods:
var objArray = [{name: "Tim", class: 1 , age: 10},{name: "Larry", class: 2 , age: 12},{name: "Teena", class: 5 , age: 15},]
Now, apply a “for” loop along with the “length” property to search for a specific object.
In this case, the second object will be retrieved based on the applied condition and displayed it:
for (var i = 0; i < objArray.length; i++) {if (objArray[i].name == "Larry") {
console.log(objArray[i])break;}}
Output
![]() This article compiled the methods to search objects from an array.
This article compiled the methods to search objects from an array.
Conclusion
The “forEach()” method, the “find()” method, the “filter()” method, or the “for” loop can be applied to search objects from an array.
The forEach() method or the find() method can be applied to check upon the specific object property and return the object value of a different property associated with it with the help of the passed parameter.
The filter() method can be implemented to search for a specific object by extracting the filtered object value with respect to the applied condition and the for loop can be applied to a search on objects by referring to the total length of an array.
This write-up demonstrated the methods to search objects from an array
How to Round a Number to the Nearest 10
A number’s approximate calculation is known as rounding.
It helps make numbers clearer and simpler to understand.
According to the required accuracy of the calculation, numbers can be rounded to a specific value.
A number is rounded to the nearest tenth, the whole number is not changed, just the approximate value is changed.
This study will explain the procedure to round a number to the nearest 10.
How to Round a Number to the Nearest 10?
In JavaScript use the following methods, to round a number to the nearest 10:
Math.round() method
Math.ceil() method
Math.floor() method
Let’s see the working of the above-mentioned methods one by one!
Method 1: Round a Number to the Nearest 10 Utilizing Math.round() Method
In JavaScript the “round()” method of the “Math” type is used to round the decimal numbers as well as the whole numbers on the approximated value.
It rounds the integer to the next whole number.
Syntax
Follow the given syntax for using the round() method to round the number nearest to the 10:
Math.round(number / 10) * 10
The “Math.round()” method is invoked by passing the number divided by 10 as an argument that will round the result to the nearest whole number.
Then, multiply it by 10 which will round the result to the nearest 10.
Example
First, define a function named “roundToNearest10” with a parameter “number”.
Calls the Math.round() method that will return the approximated value that is nearest to the 10:
function roundToNearest10(number) {return Math.round(number / 10) * 10;}
Call the “roundToNearest10” function by passing a whole number “6745”.
It will first be divided by 10 and returns the “674.5” which will be rounded to “675” which is the nearest whole number of the 674.5.
The resultant value will then be multiplied by 10 to get the approximated value to the nearest 10:
console.log(roundToNearest10(6745));
The output will show “6750” which is the nearest 10 to the “6745”:
![]() Let’s pass the decimal value “89.9” in the function and see the rounded value:
console.log(roundToNearest10(89.9));
The output will print “90” by rounding the decimal number “89.9” to the nearest 10:
Let’s pass the decimal value “89.9” in the function and see the rounded value:
console.log(roundToNearest10(89.9));
The output will print “90” by rounding the decimal number “89.9” to the nearest 10:
![]()
Method 2: Round a Number to the Nearest 10 Utilizing Math.ceil() Method
To round a number to the nearest 10, the “Math.ceil()” method is used.
It will round the number to the upcoming largest integer.
If a decimal number is passed to the Math.ceil() method, it returns the whole number.
Syntax
The given syntax is used for the “ceil()” method:
Math.ceil(number / 10) * 10
It takes a number as an argument divided by 10 and then multiplies it with 10.
By dividing the number by 10 it will round the number to the next upcoming largest integer.
Then, multiply the resultant number by 10 for getting the number rounded up to the nearest 10.
Example
Invoke the “Math.ceil()” method in “roundToNearest10” function by passing number divided by 10 and then multiply it with 10 to round the number to the nearest 10:
function roundToNearest10(number) {return Math.ceil(number / 10) * 10;}
Call the “roundToNearest10” function and pass a number “6745” as an argument.
It will first be divided by 10 and returns the “674.5” which will be rounded to “675” due to the ceil () method that is the next largest integer of 674.5.
Then, the resultant number will be multiplied by 10 and get the approximated value to the nearest 10:
console.log(roundToNearest10(6745));
Output
![]() Similarly, the decimal number is also rounded to the nearest 10 using the Math.ceil() method.
Pass the number “78.02” as a parameter in the “roundToNearest10” function.
It will return “8” which is the next largest integer of the “7.802”, and then multiply the resultant number by 10 that is the approximated value to the nearest 10:
console.log(roundToNearest10(78.02));
The corresponding output will be:
Similarly, the decimal number is also rounded to the nearest 10 using the Math.ceil() method.
Pass the number “78.02” as a parameter in the “roundToNearest10” function.
It will return “8” which is the next largest integer of the “7.802”, and then multiply the resultant number by 10 that is the approximated value to the nearest 10:
console.log(roundToNearest10(78.02));
The corresponding output will be:
![]()
Method 3: Round a Number to the Nearest 10 Utilizing Math.floor() Method
There is another method “Math.floor()” that is used to round a number to the nearest 10.
It will round the number down to the nearest integer.
If a decimal integer is passed to the Math.floor() method, it returns the nearest whole integer.
Syntax
The following syntax is used for the floor() method:
Math.floor(number / 10) * 10
The method is called by passing the number divided by 10 as an argument that will round the resultant number down to the nearest integer.
Then, the resultant number will multiply by 10 which will return the number rounded to the nearest 10.
Example
In the defined function “roundToNearest10()”, call the “Math.floor()” method by passing number divided by 10 as an argument and then, multiply it with 10:
function roundToNearest10(number) {return Math.floor(number / 10) * 10;}
Pass the number “6745” as an argument in the defined function named “roundToNearest10()”.
It will first be divided by 10 and returns the “674.5” which will be rounded to “674” due to the floor() method that is the nearest down integer of 674.5.
Then, the resultant number “674” will be multiplied by 10 and get the approximated value to the nearest 10:
console.log(roundToNearest10(6745));
Output
![]() Pass the decimal number “-5.15” as a parameter in the “roundToNearest10” function.
It will return “7” which is the nearest down integer of the “7.802”, and then multiply the resultant number by 10 which is the approximated value to the nearest 10:
console.log(roundToNearest10(-5.15));
The output will be:
Pass the decimal number “-5.15” as a parameter in the “roundToNearest10” function.
It will return “7” which is the nearest down integer of the “7.802”, and then multiply the resultant number by 10 which is the approximated value to the nearest 10:
console.log(roundToNearest10(-5.15));
The output will be:
![]()
Conclusion
To round a number to the nearest 10, use the JavaScript’s predefined methods which include Math.round(), Math.ceil() and the Math.floor().
The Math.round() method rounds the number to the nearest whole integer The Math.ceil() method rounds the number to the next largest integer, while the Math.floor() method rounds the number to the nearest down integer.
All these methods will multiply by 10 to round the resultant number to the nearest 10.
In this study, the working of all these methods has been explained along with their examples.
How to Pause an Interval?
In the process of implementing various functionalities at the same time, there is a need to disable a particular functionality for some time.
This assists in observing the working of each functionality.
Sometimes, there is a requirement to display a specific functionality for a defined time and then disable it.
In such cases, pausing an interval is of great aid in coping with such situations.
How to Pause an Interval?
The following approaches can be utilized in combination with the “setInterval()” method to pause an interval:
“Boolean Value” approach.
The “jQuery” approach.
“clearInterval()” method.
Approach 1: Pause an Interval Using the setInterval() Method With Boolean Value Approach
The “setInterval()” method calls a particular function at specified intervals repeatedly.
This approach can be implemented to assign a particular boolean value to the function to be accessed which will result in pausing and removing the set interval.
Syntax
setInterval(function, milliseconds)
In the above syntax:
“function” refers to the function to execute and “milliseconds” is the time interval.
Example
To demonstrate this, create an HTML document and place the following lines inside it:
<center><body><span id = "head" style="font-weight: bold;">Seconds : </span><br><br><button onclick= "resumeInterval()">Resume</button><button onclick= "pauseInterval()">Pause</button></body></center>
In the above code:
Within the “<center>” tag, include the “span” element for including the seconds to be elapsed.
After that, create two buttons having the attached “onclick” event redirecting to two separate functions.
One of the created buttons will result in pausing the interval and the other will resume it.
Now, in the JavaScript part of the code:
varget = document.getElementById("head");
var paused = false;
var elapsedTime = 0;
var t = setInterval(function() {if(!paused) {
elapsedTime++;
get.innerText = "Elapsed Seconds: " + elapsedTime;}}, 1000);
functionresumeInterval(){
paused = false;}
functionpauseInterval(){
paused = true;}
In the above code snippet:
Access the “span” element by its specified “id” using the “document.getElementById()” method.
In the next step, assign a boolean value “false” to the “paused” variable.
Similarly, initialize the variable “elapsedTime” with “0” to increment it.
Now, apply the “setInterval()” method to the function and increment the initialized elapsed time in the form of seconds as the interval is set to (1000 milliseconds = 1 second)
In the next step, declare a function named “resumeInterval()”.
Here, assign the boolean value as “false” to the previously assigned variable “paused”.
This will result in resuming the paused interval upon the button click.
Similarly, define a function named “pauseInterval()” which will pause the set interval by assigning the boolean value likewise as discussed.
Output
![]() In the above output, it can be observed that the desired requirement is fulfilled.
In the above output, it can be observed that the desired requirement is fulfilled.
Approach 2: Pause an Interval Using the setInterval() Method with the jQuery Approach
This approach can be implemented to access the button directly, attach an event and assign a boolean value.
Syntax
setInterval(function, milliseconds)
In the above syntax:
“function” refers to the function to execute and “milliseconds” is the time interval.
Example
The following code-snippet demonstrated the concept:
<script src="https://ajax.googleapis.com/ajax/libs/jquery/2.1.1/jquery.min.js"></script><center><span id = "head" style="font-weight: bold;">Seconds : </span><br><br><button class="play">Resume</button><button class="pause">Pause</button></center>
In the above code:
Firstly, include the “jQuery” library.
In the next step, revive the discussed approach for including the “span” element in order to accumulate “seconds” in it.
After that, similarly, include two separate buttons for pausing and resuming the paused interval.
In the jQuery part, go through the following lines of the code:
var get = $('span');
var paused = false;
var elapsedTime = 0;
var t = window.setInterval(function() {if(!paused) {
elapsedTime++;
get.text("Elapsed Seconds: " + elapsedTime);}}, 1000);
$('.pause').on('click', function() {
paused = true;});
$('.play').on('click', function() {
paused = false;});
In the above code, follow the stated steps:
Fetch the “span” element by pointing to the “element’s” name.
In the further code, similarly, allocate a boolean value to the “paused” variable and initialize the elapsed time with “0”.
Now, revive the discussed approach for applying the “setInterval()” method to the function and similarly increment the elapsed time in the form of seconds.
Lastly, attach the “click” event to both the accessed buttons and assign the stated boolean value to each of the buttons using the jQuery “on()” method.
Output
![]() In the above-given output, it is evident that the timer is paused and resumed successfully.
In the above-given output, it is evident that the timer is paused and resumed successfully.
Approach 3: Pause an Interval Using the setInterval() Method with clearInterval() Method
The “clearInterval()” method clears the set timer in the setInterval() method.
This method can be utilized to pause the set interval “permanently”.
Syntax
setInterval(function, milliseconds)
In the above syntax:
“function” refers to the function to execute and “milliseconds” is the set time interval.
clearInterval(interval)
In the above syntax:
“interval” refers to the interval returned from the setInterval() method
Example
Go through the stated lines of code:
<center><body><span id = "head" style= "font-weight: bold;">Seconds : </span><br><br><button onclick= "pauseInterval()">Pause</button></body></center>
Here, repeat the discussed steps in the previous methods for including the “span” element.
In the next step, likewise, create a button with an “onclick” event invoking the function pauseInterval().
Perform the stated steps in the JavaScript part of the code:
varget = document.getElementById("head");
var elapsedTime = 0;
var t = setInterval(function() {
elapsedTime++;
get.innerText = "Elapsed Seconds: " + elapsedTime;}, 1000);
functionpauseInterval(){
clearInterval(t);}
In the first step, similarly, access the “span” element by its “id” using the “document.getElementById()” method.
Repeat the discussed methods for initializing the “elapsed” time, applying the “setInterval()” method, and incrementing the stated elapsed time according to the set interval.
Finally, declare a function named “pauseInterval()”.
Here, apply the “clearInterval()” method having the function “t” as its parameter upon which the interval is set.
This will result in pausing the set interval permanently.
Output
![]() Here, the timer is paused permanently.
We have compiled the approaches to pause an interval.
Here, the timer is paused permanently.
We have compiled the approaches to pause an interval.
Conclusion
The “boolean value” approach, the “jQuery” approach, or the “clearInterval()” method can be applied to pause an interval.
The first approach can be applied to assign a corresponding boolean value upon the accessed function to pause and resume the set timer.
The jQuery approach can be utilized to access the button directly, attach an event and assign a boolean value resulting in overall less code complexity.
The clearInterval() method can be implemented to pause the set interval permanently.
This tutorial explained the approaches to pause an interval.
How to Change the Mouse Pointer Using JavaScript
The mouse pointers or cursors are zoom-in, zoom-out, text, wait, pointer, help, not allowed, and many more.
It is used to inform users about mouse actions that can be performed anywhere, such as copying content, resizing tables, cells, text selection, etc.
The mouse cursor or pointer can be modified using the CSS “cursor” property with the help of the Document object by setting the value to the “document.body.style.cursor”.
This article will demonstrate the procedure for changing the mouse pointer using JavaScript.
How to Change the Mouse Pointer Using JavaScript?
For changing the mouse pointer, use the “cursor” property.
There are multiple predefined cursor types accessible.
A few of them are “pointer”, “not-allowed”, “default”, “resize”, and “move”.
The icons of these commonly used mouse pointers are shown in the below table:
![]() Syntax
Follow the given syntax to change the mouse pointer to use the “cursor” property:
document.style.cursor = value;
Here, the “value” is the predefined name of the cursor:
Syntax
Follow the given syntax to change the mouse pointer to use the “cursor” property:
document.style.cursor = value;
Here, the “value” is the predefined name of the cursor:
Example 1: Change the Mouse Pointer Using getElementById() Method
Change the mouse pointer on a specific text, use the JavaScript “cursor” property with the “getElementById()” method, which will fetch the element with the help of its assigned id.
Syntax
Use the following syntax to change the mouse pointer on a specific text:
document.getElementsById(id).style.cursor = value;
Here:
“id” is the element’s assigned id that is used to fetch the specific element.
“cursor” is the JavaScript property to change the mouse pointer.
In HTML file, create an unordered list where, the mouse pointer changes on the hover of text:
<h3 id="default">Mouse Pointer</h3><ul><li id="pointer">Pointer</li><li id="move">Move</li><li id="not-allowed">Not-allowed</li><li id="progress">Progress</li><li id="col-resize">Column-resize</li><li id="cell">Cell</li><li id="text">Text</li><li id="wait">Wait</li><li id="zoom-in">Zoom-in</li><li id="zoom-out">Zoom-out</li></ul>
The output shows the unordered list where the mouse pointer will change when the mouse hovers over the list items:
![]() Now, in <script> tag, fetch the list items with the help of their assigned id and then change the mouse pointer using “cursor” property:
document.getElementById("pointer").style.cursor = "pointer";
document.getElementById("move").style.cursor = "move";
document.getElementById("not-allowed").style.cursor = "not-allowed";
document.getElementById("progress").style.cursor = "progress";
document.getElementById("col-resize").style.cursor = "col-resize";
document.getElementById("cell").style.cursor = "cell";
document.getElementById("text").style.cursor = "text";
document.getElementById("wait").style.cursor = "wait";
document.getElementById("zoom-in").style.cursor = "zoom-in";
document.getElementById("zoom-out").style.cursor = "zoom-out";
document.getElementById("default").style.cursor = "default";
Output
Now, in <script> tag, fetch the list items with the help of their assigned id and then change the mouse pointer using “cursor” property:
document.getElementById("pointer").style.cursor = "pointer";
document.getElementById("move").style.cursor = "move";
document.getElementById("not-allowed").style.cursor = "not-allowed";
document.getElementById("progress").style.cursor = "progress";
document.getElementById("col-resize").style.cursor = "col-resize";
document.getElementById("cell").style.cursor = "cell";
document.getElementById("text").style.cursor = "text";
document.getElementById("wait").style.cursor = "wait";
document.getElementById("zoom-in").style.cursor = "zoom-in";
document.getElementById("zoom-out").style.cursor = "zoom-out";
document.getElementById("default").style.cursor = "default";
Output
![]()
Example 2: Change the Mouse Pointer Using querySelector() Method
In the following example, change the mouse pointer on any element without assigning an id, by utilizing the “querySelector()” method.
It takes an argument “selector” that is the HTML element where the cursor/pointer will change when the cursor will hover over it.
Syntax
Follow the given syntax to change the mouse pointer on a specific element:
document.querySelectorAll(selectors).style.cursor = value;
Create a button and attach an “onclick” event with it, which will call the function named “clickToLoad()”:
<h3>Mouse Pointer</h3><button onclick="clickToLoad()">Loading</button>
Define a function “clickToLoad()”, change the mouse pointer on a button click using the JavaScript “cursor” property with “querySelector()” method by passing a “button” as a selector:
function clickToLoad(){
document.querySelector("button").style.cursor = "wait";}
The output shows a “progress/wait” cursor on the button click:
![]()
Example 3: Change the Mouse Pointer Using getElementsByTagName() Method
Here, apply the mouse pointer on an element using the tag name with the help of the “getElementsByTagName()” method.
It will set the mouse pointer on the element without an onclick event.
Syntax
To set the mouse pointer on elements using a tag name, use the below-given syntax.
document.getElementsByTagName(tagName).style.cursor = value;
Create a button using the HTML button tag:
<button>Warning</button>
Call the “getElementsByTagName()” method by passing the tag name “button” and setting the index 0 which indicates apply it only to the first button on the web page:
document.getElementsByTagName("button")[0].style.cursor = "not-allowed";
The output indicates that when the cursor comes to the “Warning” button, the cursor will change:
![]()
Conclusion
To change the mouse pointer, the “style.cursor” property changes the value.
It sets the mouse cursor while the pointer is on the specified element.
You can use this property with different JavaScript methods including, getElementById() method, querySelector() method, and the getElementsByTagName() method depending on the situation.
This article demonstrated the procedure to change the mouse pointer using JavaScript.
JavaScript Destroy Object
Destroying an object is of great aid while dealing with the data in bulk.
For instance, this approach is also very helpful in releasing memory and the resources possessed by a particular object which are no longer needed.
Moreover, for omitting or accessing a particular value by referring to its property for updating or utilizing it respectively
This write-up will discuss the approaches that can be implemented to destroy an object.
How to Destroy Objects?
An object can be destroyed by using the following techniques:
“delete” operator.
“Manually” destroying the object.
Approach 1: Destroy Object Using the delete Operator
In this approach, a particular object property will be removed with the help of the delete operator and will return “undefined” upon accessing it.
This operator can be applied by specifying it just before an object’s property.
Example
Firstly, declare an array of objects having the specified properties and display it:
let testObject= {
name: "David",
age: 22};
console.log(testObject.name);
Next, apply the “delete” operator by referring to the specified object’s property.
This will result in deleting the corresponding object’s property:
delete testObject.name;
console.log(testObject.name);
Output
![]() In the above output, it can be observed that the object’s property “age” is omitted.
In the above output, it can be observed that the object’s property “age” is omitted.
Approach 2: Manually Destroying the Object
This technique can be utilized to define a custom function and pass the created object in its argument while accessing it.
Example
Firstly, declare the function named “destroyObject()” having the specified parameter.
In its definition, initialize the stated parameter as “undefined”:
function destroyObject(obj){
obj = undefined;}
Now, create the following object with the specified properties and display it:
testObject = {
x:1,
y:"David"}
console.log(testObject)
Finally, access the defined function by passing the created object as its argument.
This will result in displaying “undefined” on the console as the defined parameter in the function definition is assigned so.
Hence, the specified object when act as its(function) parameter will also act the same(undefined):
console.log(destroyObject(testObject))
Output
![]() We have provided the approaches to destroy an object.
We have provided the approaches to destroy an object.
Conclusion
An object can be destroyed by using the “delete” operator or manually destroying it.
The first approach is simple as it results in omitting a specific property from an object.
The latter approach, on the other hand, destroys the object along with all its associated properties with the help of a custom function.
This write-up demonstrated the concept of destroying objects.
JavaScript Count Up Timer
Timers play a great role in organizing our lifestyle to a great extent.
For instance, measuring time intervals, keeping a track of the elapsed time, and remaining time in case of a race, competition, etc.
In such cases, implementing a count up timer proves to be an effective tool for handling such types of scenarios for appropriate time management.
How to Implement a Count Up Timer?
The following approaches can be utilized to implement a count up timer:
“setInterval()” and “Math.floor()” Methods.
“setInterval()” and “parseInt()” Methods.
“jQuery” Approach.
In the section below, the mentioned approaches will be illustrated one by one!
Approach 1: Implement a Count Up Timer Using the setInterval() and Math.floor() Methods
The “setInterval()” method is applied to set a specific time interval upon a specific function to execute and the “Math.floor()” method returns the nearest down integer value.
These methods can be implemented to apply a time interval to a particular function and perform precise calculations for the proper execution of the timer.
Syntax
setInterval(function, milliseconds)
In the above syntax:
“function” refers to the function on which the time interval will be applied and “milliseconds” points to the set time interval.
The “Math.floor()” method takes the “value” to be formatted as its parameter.
Example
Go through the following code snippet for understanding the stated concept:
<center><body><h3 id= "countup">00:00:00</h3><button id="stoptimer" onclick="clearInterval(timer)">Stop Timer</button></body></center>
In the above demonstration,
Specify the heading containing the format of the count-up timer.
After that, create a button with an attached “onclick” event redirecting to the function “clearInterval()” method having the variable “timer” passed as its parameter which contains the “setInterval()” method.
This will result in clearing the set time interval upon the button click.
Now, go through the following JavaScript code snippet:
var seconds = 0
var timer = setInterval(upTimer, 1000);
function upTimer() {++seconds;
var hour = Math.floor(seconds / 3600);
var minute = Math.floor((seconds - hour * 3600) / 60);
var updSecond = seconds - (hour * 3600 + minute * 60);
document.getElementById("countup").innerHTML = hour + ":" + minute + ":" + updSecond;}
In the above code:
Initialize the seconds with “0”.
Also, apply the setInterval() method on the function upTimer() with a time interval of “1000” milliseconds.
After that, define a function named “upTimer()”.
In its definition, compute the “hour” by dividing it by the number of seconds in an hour and return the nearest down integer value using the “Math.floor()” method.
Similarly, compute the minutes by dividing the subtraction of both (the passed seconds in the timer and the number of seconds in an hour) by the total minutes in an hour.
The calculation for incrementing the seconds in the timer will be calculated in the last step.
All the above-discussed approaches can be evident as follows:
![]()
Working of Timer:
![]()
Approach 2: Implement a Count Up Timer Using the setInterval() and parseInt() Methods
The “setInterval()” method is similarly applied to set a specific time interval upon a particular function to execute and the “parseInt()” method parses a value as a string and returns the first integer.
These methods can be implemented such that the function executes at a particular interval and displays the timer count by parsing the digits properly in it.
Syntax
setInterval(function, milliseconds)
In the above syntax:
“function” refers to the function on which the time interval will be applied and “milliseconds” points to the set time interval.
parseInt(string, radix)
In the given syntax:
“string” refers to the string to be parsed.
“radix” value is “10” by default
Example
The below-given demonstration explains the stated concept:
<center><h3>Count Up Timer For One Hour</h3><div><h3 id = "countup"></h3><span id="minutes">Minutes</span>:<span id="seconds">Seconds</span></div></center>
In the above HTML code:
Within the “<center>” tag, specify the heading.
After that, include the “<span>” tag to accumulate the count up timer here with respect to the specified formatting for “minutes” and “seconds”.
Now, go through the following js code snippet:
var second = 0;
function upTimer ( count ) { return count > 9 ? count : "0" + count; }
setInterval( function(){
document.getElementById("seconds").innerHTML= upTimer(++second % 60);
document.getElementById("minutes").innerHTML= upTimer(parseInt(second / 60, 10));}, 1000);
In this part of the code:
Initialize the “seconds” with 0.
After that, define the function named “upTimer()”.
This function adds a leading zero and applies a check if the value passed to it is a single digit i.e (<9).
In such a case, it adds a leading zero.
The “setInterval()” method with a set interval of “1000” ms will be applied to the further code.
Here, the specified “span” element for the seconds and the minutes will be accessed respectively.
For “seconds”, the initialized seconds are incremented and the 60 points to the end limit for seconds.
After that, they are passed as a parameter to the function upTimer() and displayed in the DOM as a span time discussed before.
Similarly, in the case of “minutes”, compute the minutes.
Also, apply the “parseInt()” method to parse the minutes.
The first parameter in the method indicates the transition of the minute at the second i.e 60.
The second parameter as described in the syntax is by default set to 10
Executing the above code will produce the following results on the browser:
![]() It can be observed from the output that the count up timer is working perfectly.
It can be observed from the output that the count up timer is working perfectly.
Approach 3: Implement a Count Up Timer Using the jQuery Approach
In this approach, jQuery can be applied using its methods to perform the given requirement.
Syntax
$(selector).html()
In the given syntax:
“selector” refers to the “id” against the html element.
Example
The following lines of code explain the stated concept.
<script src= "https://ajax.googleapis.com/ajax/libs/jquery/2.1.1/jquery.min.js"></script><center><h3>Count Up Timer For 30 Minutes</h3><div id = "countup"><span id= "minutes">Minutes</span>:<span id= "seconds">Seconds</span></div></center>
In the above-given example,
First, include the “jQuery” library.
Now, similarly, repeat the above-discussed approach for specifying the “minutes” and “seconds” in the “<span>” tag.
var second = 0;
function upTimer (count) { return count > 9 ? count : "0" + count; }
setInterval( function(){
$("#seconds").html(upTimer(++second % 60));
$("#minutes").html(upTimer(parseInt(second / 30, 10)));}, 1000);
In the above js code:
Similarly, initialize the seconds with “0”.
Now, declare a function named “upTimer()”.
In its definition, revive the steps for applying a check on the number of digits.
Likewise, apply the “setInterval()” method with a “1000” milliseconds time interval on the specified function.
Here, apply the jQuery “html()” method to return the content (innerHTML) of the elements by referring to them as “seconds”, and “minutes” respectively.
Output
![]() In this write-up, all the approaches to create a count-up timer are illustrated.
In this write-up, all the approaches to create a count-up timer are illustrated.
Conclusion
The combination of “setInterval()” and “Math.floor()” methods, the “setInterval()” and “parseInt()” methods or the “jQuery” approach can be utilized to implement a count up timer using JavaScript.
The setInterval() and the Math.floor() methods can be implemented to apply a specific time interval to a particular function and perform accurate calculations for the proper execution of the timer.
The setInterval() and the parseInt() methods can be used to execute a function at specific intervals repeatedly and display the timer count properly.
The jQuery approach can be applied to integrate the HTML element and perform the required functionality.
This article demonstrated to implementation of a count up timer.
JavaScript Append Data to Div
While maintaining a webpage or website, there are situations where there is a requirement for an update from time to time.
In such a case, there is a need to append some data upon a particular input from the users to create and maintain the records.
In addition to that, appending data to div is also of great aid in integrating HTML with JavaScript to apply added functionalities.
How to Append Data to Div?
The following approaches can be utilized to append data to div:
“innerHTML” property.
“insertAdjacentHTML()” method.
“appendChild()” method.
“jQuery” approach.
Approach 1: Append Data to Div Using the innerHTML Property
The “innerHTML” property returns the element’s inner HTML content.This approach can be applied to append data to the included image and button in the “div” element upon the button click.
Syntax
element.innerHTML
In the given syntax:
“element” refers to the element to which the HTML content will be returned.
Example
Let’s have a look at the following lines of code:
<body><center><div id = "id"><img src= "template4.PNG"><br><br><button onclick = "appendData()">Click to Append Data</button><br><br></div></body></center>
In the above code:
Specify the “div” element with the specified “id”.
After that, include an image in the div element.
Also, create a button within the div element having an attached “onclick” event redirecting to the function appendData().
Move on to the JavaScript part of the code:
<script>
function appendData(){
var get = document.getElementById('id');
get.innerHTML += '<strong>This is an Image</strong>';}</script>
In the js part of the code, follow the below stated steps:
Declare a function named “appendData()”.
In its definition, access the “div” element from its id using the “document.getElementById()” method.
Finally, apply the “innerHTML” property to append the stated message along with the included image and created button in the “div”.
Output
![]() It can be observed in the above output that the stated message is appended with the image upon the button click.
It can be observed in the above output that the stated message is appended with the image upon the button click.
Approach 2: Append Data to Div Using the insertAdjacentHTML() Method
The “insertAdjacentHTML()” method inserts HTML data into the specified position.This method can be utilized to append the data at the end of the “div” upon selecting a specific option.
Syntax
element.insertAdjacentHTML(position, html)
In the above syntax:
“position” refers to the position relative to the element.
“html” points to the HTML to be inserted.
Example
Have a look at the following code snippet:
<body><center><div id = "id"><h3>Is JavaScript a programming language?</h3><input type="radio" onclick="appendData()">Yes<input type="radio">No<br><br></div></body></center>
In the above HTML code:
Repeat the discussed steps for including the “div” element having the specified “id”.
Also, include the specified heading in the “<h3>” tag.
After that, include two “radio” buttons with one invoking the function appendData().
This will result in appending the data only upon selecting the option “Yes”.
Move on to the JavaScript part of the code:
<script>
function appendData(){
var get = document.getElementById('id');
get.insertAdjacentHTML('afterend','<strong>Success!</strong');}</script>
In the above JS code, follow these steps:
Declare a function named “appendData()”.
In its definition, access the “div” element similarly using the “document.getElementById()” method.
Lastly, apply the “insertAdjacentHTML()” method by specifying the “position” as its first parameter to append the specified data.
In this scenario, the data will be appended at the end.
Output
![]() In the above output, it is evident that the “success” message is appended only upon clicking the option “Yes”.
In the above output, it is evident that the “success” message is appended only upon clicking the option “Yes”.
Approach 3: Append Data to Div Using the appendChild() Method
The “appendChild()” method appends a node element as the element’s last child.
This approach can be utilized to append the data similarly at the end upon the button click.
Syntax
element.appendChild(node)
In the given syntax:
“node” indicates the node to be appended.
Side note: An additional method “createTextNode()” will also be applied in the below example.
It is simply applied to create a text node.
Example
Let’s follow the below-given example below step by step:
<body><center><div id = "id"><h3>JavaScript</h3><br><button onclick = "appendData()">Click to Append Data</button><br><br></div></body></center>
In the above HTML code:
Recall the discussed approaches for including the “div” element having the specified “id” and a heading.
Similarly, include a button with the “onclick” event attached which will redirect to the function appendData().
Let’s follow the stated JavaScript part of the code:
<script>
function appendData(){
var get = document.getElementById('id');
var content = document.createTextNode("JavaScript is a very user-friendly programming language.
It can be integrated with HTML to provide some added functionalities as well.
It makes an overall web page or the website attractive.");
get.appendChild(content);}</script>
In this part of the code, perform the following steps:
Define a function named “appendData()”.
In its definition, similarly, access the “div” element as discussed.
In the next step, apply the “createTextNode()” method to create the specified text node.
Finally, append the created text node at the end of the “div”.
Output
![]() In the output, it is evident that the resultant paragraph is appended to the “div” upon the button click.
In the output, it is evident that the resultant paragraph is appended to the “div” upon the button click.
Approach 4: Append Data to Div Using jQuery Approach
The “jQuery” approach can be utilized to access the “div” element directly and append a heading in it(div) upon the button click.
Example
Let’s follow the below-given example below step by step:
<script src="https://ajax.googleapis.com/ajax/libs/jquery/3.5.1/jquery.min.js"></script><body><center><div id = "head"><h3>The Content on this site is: </h3><br><button onclick= "appendData()">Click to Append Data</button><br></div></body></center>
In the above code, follow the below stated steps:
Include the jQuery library for applying its methods.
Revive the steps for specifying the “div” element with the specified “id”.
Within the “div”, include the stated heading and a “button” with an “onclick” event invoking the function appendData().
Let’s continue to the JavaScript part of the code:
<script>
function appendData(){
$( "#head" ).append( "<h2>Relevant</h2>" );}</script>
In the above js part of the code, perform the following steps:
Define a function named “appendData()”.
In its definition, access the div element directly by its “id”.
After that, apply the “append()” method to the accessed “div” and include the stated heading in it.
Output
![]() In the output, the button click leads to appending the resultant heading in the “div”.
This write-up demonstrated the approaches to append data to div.
In the output, the button click leads to appending the resultant heading in the “div”.
This write-up demonstrated the approaches to append data to div.
Conclusion
The “innerHTML” property, the “insertAdjacentHTML()” method, the “appendChild()” method or the “jQuery” approach can be utilized to append data to div.
The innerHTML property can be utilized to append the data to the included image and a button in the “div” element upon the button click.
The insertAdjacentHTML() method can be applied to append the data with respect to the specified position as its parameter.
The appendChild() method in combination with the “createTextNode()” method can be utilized to create a text node first and then append it to the end of the div.
The jQuery approach can be used to fetch the div element directly and append a heading in it upon the button click.
This blog explained to append data to div.
How to Simulate a Click With JavaScript?
How to Simulate a Click With JavaScript?
The following approaches can be implemented to apply a click simulation:
“onclick” event.
“addEventListener()” method.
“click()” method.
Approach 1: Simulate a Click With JavaScript Using the onclick Event
An “onclick” event occurs when the button is pressed.
This approach can be applied to invoke a function upon the button click and increment the “click count” each time the button is clicked.
Side Note: An “onclick” event can simply be applied by attaching it with a particular function.
Example
Go through the following code snippet:
<center><h3 style= "background-color: lightblue;">Click Simulated <span class="count"></span> times</h3><button id= "btn1" onclick= "countClick()">Click Me!</button></center>
Include the specified heading along with a “<span>” tag to increment the “count” of clicks.
In the next step, create a button with an attached “onclick” event redirecting to the function countClick() which will be accessed upon the button click.
Now, let’s go through the following JavaScript code lines:
<script>
let clicks = 0;
function countClick(){
clicks = clicks + 1;
document.querySelector('.count').textContent= clicks;}</script>
In the above js part of the code:
Here, firstly initialize the clicks with “0”.
After that, declare a function named “countClick()”.
In its definition, increment the initialized “clicks” with “1”.
This will result in incrementing the count every time the button is clicked.
Lastly, access the “span” element using the “document.querySelector()” method.
Also, apply the “textContent” property to allocate the incremented click count discussed before to the span element.
The output will be as follows:
![]() The functionality of the incremented timer upon each click can be observed in the above output.
The functionality of the incremented timer upon each click can be observed in the above output.
Approach 2: Simulate a Click With JavaScript via addEventListener() Method
The “addEventListener()” method allocates an event handler to an element.
This method can be implemented by attaching a specific event to an element and alerting the user upon the trigger of the event.
Syntax
element.addEventListener(event, function)
In the given syntax:
“event” refers to the event name.
“function” points to the function to execute when the event occurs.
Example
The below-given demonstration explains the stated concept:
<center><body><a href= "#" id= "link">Click the link</a></body></center><script>
var get = document.getElementById('link');
get.addEventListener('click', () => alert('Click Simulated!'))</script>
In the above code:
Firstly, specify an “anchor” tag to include the specified link
In the JavaScript part of the code, access the created link using the “document.getElementById()” method.
Finally, apply the “addEventListener()” method to the accessed “link”.
The “click” event is attached in this case which will result in alerting the user upon clicking the created link.
Output
![]()
Approach 3: Simulate a Click With JavaScript Using the click() Method
The “click()” method performs a mouse-click simulation upon an element.
This method can be used to simulate a click directly to the attached buttons as the name specifies.
Syntax
element.click()
In the given syntax:
“element” points to the element upon which the click will be executed.
Example
The following code snippet explains the stated concept:
<center><body><h3>Did you find this page helpful?</h3><button onclick= "simulateClick()" id= "simulate">Yes</button><button onclick= "simulateClick()" id= "simulate">No</button><h3 id = "head" style= "background-color: lightgreen;"></h3></body></center>
First, include the stated heading within the “<center>” tag.
After that, create two different buttons with the specified id’s.
Also, attach an “onclick” event with both invoking the function simulateClick().
In the next step, include another heading with the specified “id” in order to notify the user as soon as the “click” is simulated.
Now, go through the below-given JavaScript lines:
<script>
function simulateClick(){
document.getElementById("simulate").click()
let get = document.getElementById("head")
get.innerText = "Click Simulated!"}</script>
Define a function “simulateClick()”.
Here, access the created buttons using the “document.getElementById()” method and apply the “click()” method to them.
Now, similarly, access the allocated heading and apply the “innerText” property to display the stated message as a heading upon the simulated click.
Output
![]() In the above output, it is evident that both created buttons simulate the click.
This blog demonstrates how to apply a click simulation using JavaScript.
In the above output, it is evident that both created buttons simulate the click.
This blog demonstrates how to apply a click simulation using JavaScript.
Conclusion
An “onclick” event, the “addEventListener()” method, or the “click()” method can be utilized to simulate a click with JavaScript.
An “onclick” event can be applied to simulate a click each time the button is clicked in the form of a counter.
The “addEventListener()” method can be used to attach an event to the link and notify the user upon the click simulation.
The “click()” method can be applied to the created buttons and performs the required functionality for each of the buttons.
This write-up explains how to apply a click simulation.
How to Check if a Variable is Undefined?
While dealing with complex code, there is a need to apply a check on the variables to observe their utilization in the code.
This process leads to removing unused variables.
Also, this check can be effective in associating a particular functionality with “undefined” due to any update, etc.
In such cases, checking if a variable is undefined is helpful in utilizing the memory effectively.
This blog will demonstrate the approaches to check the condition of undefined variables.
How to Check if a Variable is Undefined?
The following approaches can be utilized in combination with the “typeof” operator to apply a check upon the undefined variable:
Assigning with “property”.
“console.log()” method.
Approach 1: Checking Undefined Variable By Assigning it With a Property
This approach can be applied by assigning the variable a particular property and then checking its type.
Example
Overview of the following JavaScript code:
let x = undefined
console.log("The type of the variable is:", typeof x)
In the above code, perform the following steps:
Initialize the variable “x” with the property “undefined”.
Log the variable’s type on the console using the “typeof” operator.
This will result in giving the type of variable as undefined.
Output
![]() From the above output, it can be observed that the required functionality is “achieved”.
From the above output, it can be observed that the required functionality is “achieved”.
Approach 2: Checking Undefined Variable Using console.log() Method
The “console.log()” method is used to log a message on the console.
This method can be utilized to log the type of the created variable which is not initialized.
Example
Let’s follow the given example step by step:
let x;
console.log("The type of the variable is:", x)
Follow the stated steps in the above code:
Declare a variable named “x” without initializing it with some value.
Upon logging the variable on the console, it will return “undefined”.
Output
![]() In this output, it can be observed that just by declaring a variable and not initializing it, the variable will be considered “undefined”.
This write-up explained the approaches to check the condition of undefined variables.
In this output, it can be observed that just by declaring a variable and not initializing it, the variable will be considered “undefined”.
This write-up explained the approaches to check the condition of undefined variables.
Conclusion
Assigning a variable with property or the console.log() method can be utilized to check if a variable is undefined.
The former approach assigns a variable with the “undefined” property.
The latter approach can be applied to return the type of the uninitialized variable by logging it undefined on the console.
This tutorial demonstrates how to check the condition of an undefined variable.
How to Get the First Key Name of an Object?
In the record maintaining processes, there might come a situation where there is a need to associate a particular attribute with multiple values.
For instance, compiling the inter-related data having common features i.e name, city, etc.
In such cases, getting the first key name of an object is a very smart approach for accessing and manipulating the data effectively thereby saving time and memory.
This write-up will demonstrate the approaches to get the object’s first key name using JavaScript.
How to Get the First Key Name of an Object?
The following approaches can be utilized to get the object’s first key name using JavaScript:
“Object.keys()” method.
“Object.entries()” method.
“Custom Function” approach.
Approach 1: Get the Object’s First Key Name By Object.keys() Method
The “Object.keys()” method gives an array iterator object with the object’s keys.
This method, as the name specifies, can be utilized to access the object’s first key name directly by simply indexing it once.
Syntax
Object.keys(obj)
In the above syntax:
“obj” refers to an iterable object or the initialized dictionary.
Example
Go through the following code snippet:
let keyObj = { make: 'HP', generation: 2, RAM: "4GB" };
console.log("The object array is: ", keyObj)
console.log("The first key name of an object is:", Object.keys(keyObj)[0]);
Firstly, create an object with the specified “key-value” pair and display it.
Now, apply the “Object.keys()” method and index it with “0”.
This will result in accessing the object’s first key name directly.
Output
![]() In the above output, the object’s first key name is retrieved directly.
In the above output, the object’s first key name is retrieved directly.
Approach 2: Get the Object’s First Key Name Using the Object.entries() Method
The “Object.entries()” method is utilized to give the object’s key-value pairs passed as the parameter.
This method can be applied to access the object key name by indexing its corresponding value first.
Syntax
Object.entries(obj)
In this syntax:
“obj” indicates the object whose property [key – value] pairs are to be returned.
Example
Go through the following lines of code:
<script>
let keyObj = { name: 'David', id: 1, city: "London" };
console.log("The object array is: ", keyObj)
console.log("The first key name of an object is:", Object.entries(keyObj)[0][0])
console.log("The first key name and value of an object is:", Object.entries(keyObj)[0])</script>
First, define the object with the stated name value pairs and display it.
After that, apply the “Object.entries()” method by indexing it twice with “0” to access the first key name of the specified object.
In the next step, get both the key and values by applying the stated method in the previous step using the indexing once only.
This will result in accessing the name as well as the value with respect to the index.
Output
![]()
Approach 3: Get the First Key Name of an Object Using the Custom Function Approach
This approach can be applied to define a separate function for extracting the object’s key name by passing the created object and a specific value in it.
Example
The below-given code snippet illustrates the discussed concept:
<script>function getkeyObj(object, value) {
return Object.keys(object).find(key => object[key] === value);}
let keyObj = {city: 'Abu Dhabi', country: 'Dubai', };
console.log("The object array is: ", keyObj)
console.log("The first key name of an object is:",(getkeyObj(keyObj, 'Abu Dhabi')))</script>
In the above js code:
First, define a function named “getkeyObj()” with the specified parameters.
The “object” here refers to the created object and “value” refers to the value against the particular “key”.
In its definition, apply the “Object.keys()” method having the created object as its parameter.
Also, apply the “find()” method to extract the object’s key by comparing the corresponding object in which it is contained and the value against it(object key).
After that, initialize the object similarly with the stated “key-value” pairs and display it.
Finally, fetch the object’s first key name by passing the created object and the value against the first key name as the parameters of the defined function.
Output
![]() We have discussed the convenient approaches to get the object’s first key name.
We have discussed the convenient approaches to get the object’s first key name.
Conclusion
The “Object.keys()” method, the “Object.entries()” method, or the “custom function” approach can be utilized to get the object’s first key name.
The Object.keys() method is easy to implement and can be applied to access the key name directly as the name specifies.
The Object.entries() method can be implemented by indexing twice to access the key name of an object.
This approach is preferable in the case of accessing the values rather than the keys.
The custom function approach can be used to define a specific function and pass the name of the object and the key’s corresponding value to get it.
This blog demonstrates how to get the object’s first key name.
How to Format a Number?
In JavaScript, while dealing with mathematical problems, there are calculations involving complexities in the case of long digits and especially floating point numbers.
In the other case, for making a particular calculation more precise.
In such a scenario, formatting a number is very helpful in reducing the overall code complexity and in the precise calculation as well.
This write-up will illustrate the approaches that can be implemented to format a number.
How to Format a Number?
The following approaches can be implemented to format a number:
“toFixed()” Method.
“Intl.NumberFormat()” Constructor.
“toLocaleString()” Method.
“Regular Expression”
The mentioned approaches will now be illustrated one by one!
Example 1: Format a Number Using the toFixed() Method
This method can be applied to format the provided number in such a way that there are no decimal points left in it or a fixed number of digits are left in it after the decimal point.
First, specify the number to be formatted:
let formatNumber = 12.345678;
Next, apply the “toFixed()” method to format the given number such that no digits are left in it after the decimal point:
console.log("The formatted number is:", formatNumber.toFixed());
In this step, similarly, apply the same method by passing “2” in its parameter.
This will result in formatting a number to two decimal places:
console.log("The formatted number is:", formatNumber.toFixed(2));
Output
![]()
Example 2: Format a Number Using the Intl.NumberFormat() Constructor
The “Intl.NumberFormat()” constructor creates a new object that enables the formatting of a language-sensitive number.
This approach can be applied to format the given number based on the specified currency.
Firstly, specify the number to be formatted:
const formatNumber = 12345.67;
Now, apply the “Intl.NumberFormat()” approach to format the specified number with respect to the “US” currency and display it accordingly:
let numUpd = new Intl.NumberFormat('en-US', { style: 'currency', currency: 'USD' }).format(formatNumber);
console.log("The formatted currency is:", numUpd);
Output
![]() The “$” with the number indicates that the provided number is formatted in “US” currency.
The “$” with the number indicates that the provided number is formatted in “US” currency.
Example 3: Format a Number Using the toLocaleString() Method
The “toLocaleString()” method gives a date object in the form of a string.
This method can be applied to format a number into the specified language format.
Syntax
Date.toLocaleString(locales, options)
“locales” refer to the specific language format.
“options” points to the object to which the properties can be assigned.
In the below-given example, allocate the following number to the variable named “formatNumber”:
let formatNumber = 7323452568.283;
Now, apply the “toLocaleString()” method, specify the language format as “en-US” in its parameter, and display the resultant formatted number:
var us = formatNumber.toLocaleString('en-US');
console.log("The formatted number is:", us);
Output
![]()
Example 4: Format a Number Using the Regular Expression
This approach can be utilized along with the “replace()” method to place the commas between the provided numbers at the same intervals as a result.
First, initialize the following number:
var formatNumber = 445567788;
Now, apply the replace() method along with the regular expression.
The regular expression here will allocate “commas” to the initialized value by making a global search and return the comma-separated values thereby formatting the specified number:
console.log("The formatted number is:", String(formatNumber).replace(/(.)(?=(\d{3})+$)/g,'$1,'))
Output
![]() We have concluded the convenient approaches to format a number.
We have concluded the convenient approaches to format a number.
Conclusion
The “toFixed()” method, the “Intl.NumberFormat()” constructor, the “toLocaleString()” method, or the “regular expression” can be utilized to format a number.
The first method results in formatting the number such that there are no digits or fixed number of digits left in it after the decimal point.
The Intl.NumberFormat() constructor approach can be applied to format a number based on currency, and the toLocaleString() method can be implemented to format the specified number into the language specific format.
The regular expression technique can be applied to format the provided number in such a way to return the comma-separated values.
This blog demonstrated the methods to format a specified number.
How to Compare Strings
While programming, we often encounter situations where we have to compare two strings before performing an operation.
For instance, you can only permit a user to log in to a website if its name gets matched with the existing user names stored in the database.
In this particular situation, use the “Strict Equality operator” for comparing strings.
The functionality of JavaScript is not only limited to value-based comparison.
By utilizing the string “length” property, it can be easily checked if one string is greater or smaller than the other with respect to its length.
Moreover, you can also compare strings based on their alphabetical order using the “localeCompare()” method.
This write-up will explain different methods for comparing strings.
So, let’s start!
How to Compare Strings?
In JavaScript, strings can be compared based on their “value”, “characters case”, “length”, or “alphabetical” order:
To compare strings based on their values and characters case, use the Strict Equality Operator (===).
To compare strings based on their length, utilize the “length” property in combination with “Comparison operators”.
To compare strings based on alphabetical order, use the “localeCompare()” method.
Now, we will discuss each of the mentioned procedures in the next sections.
How to Compare Strings Using Strict Equality operator (===)?
The Strict Equality Operator “===” operator is primarily utilized to compare the value of two string operands.
The term “strict” distinguishes it from the equality operator “==“, as it strictly compares the values of strings without converting them into a common type.
Syntax of Strict Equality operator (===)
x === y
Here, the Strict Equality operator “===” will compare “x” and “y” values and return a “Boolean” value.
Example: How to compare strings using Strict Equality operator (===)
First of all, we will create two strings named “string1” and “string2” having the following values:
const string1 = 'linux';
const string2 = 'hint';
In the next step, we will compare “string1” and “string2” using the Strict Equality operator “===”:
console.log(string1 === string2);
As values of both strings are not equal, so the Strict Equality operator will return “false“:
![]() In the next statement, we will compare the “string1” value with the “linux” string:
console.log(string1 === 'linux');
Both values are equal according to their associated data type and characters case, so the strict equality operator will mark them as equal and return a “true” boolean value:
In the next statement, we will compare the “string1” value with the “linux” string:
console.log(string1 === 'linux');
Both values are equal according to their associated data type and characters case, so the strict equality operator will mark them as equal and return a “true” boolean value:
![]() If you want to perform “case-insensitive” comparison, convert both strings into lowercase with the help of the “toLowerCase()” method and then compare them:
const string3 = 'LINUX';
console.log(string1.toLowerCase() === string3.toLowerCase());
In this case, when the value of the “string3” is converted to lowercase, it becomes “linux,” which is equal to the “string1” value.
That’s why the execution of the above-given Equality operator will return “true”:
If you want to perform “case-insensitive” comparison, convert both strings into lowercase with the help of the “toLowerCase()” method and then compare them:
const string3 = 'LINUX';
console.log(string1.toLowerCase() === string3.toLowerCase());
In this case, when the value of the “string3” is converted to lowercase, it becomes “linux,” which is equal to the “string1” value.
That’s why the execution of the above-given Equality operator will return “true”:
![]()
How to Compare Strings length?
In JavaScript, the “length” property returns the specified string’s length (number of characters).
It can be used with the combination of different Comparison operators, such as the Greater than “>” operator and Less than “<” operator, to compare the length of the strings.
For instance, the below-given condition will check if the length of “string1” is greater than “string2” length or not:
console.log(string1.length > string2.length);
The string1 “linux” comprises five characters, and string2 “hint” contains four characters.
This states that the length of “string1” is greater than the length of “string2“, so after comparing length, the “Greater than” operator will return “true”:
![]() Now, let’s check out the method of comparing strings based on their alphabetical order.
Now, let’s check out the method of comparing strings based on their alphabetical order.
How to Compare Strings Using localeCompare() Method?
The JavaScript “localeCompare()” method is used to compare strings in the current locale based on the browser’s language settings.
This method returns a number which can be “-1”, “1”, or “0”, where “1” indicates that the left side string alphabetically comes before the right side string, “1” refers that the left side string comes afterward, and the value “0” signifies that both strings are equal.
Syntax of localeCompare() method
string1.localeCompare(string2);
The “localeCompare()” method accepts an argument “string2,” which will be compared with “string1”.
Example: How to compare strings using localeCompare() method
To demonstrate the usage of the localeCompare() method, firstly, we will define three strings, “string1”, “string2”, and “string3” with the following values:
var string1 = "car";
var string2 = "bus";
var string3 = "bus";
Then, we will pass “string2” as an argument to the “localeCompare()” method to compare it with “string1”:
console.log(string1.localeCompare(string2));
The “localeCompare()” method will return “1” because “string1” is alphabetically greater than “string2”:
![]() In contrast, if “string1” comes before “string2” or is smaller than the invoked “localeCompare()” method will return “-1”:
console.log(string2.localeCompare(string1));
Output
In contrast, if “string1” comes before “string2” or is smaller than the invoked “localeCompare()” method will return “-1”:
console.log(string2.localeCompare(string1));
Output
![]() Lastly, the “localeCompare()” method will return the value “0” when both strings are equal:
console.log(string3.localeCompare(string2));
Output
Lastly, the “localeCompare()” method will return the value “0” when both strings are equal:
console.log(string3.localeCompare(string2));
Output
![]() We have compiled different procedures for comparing strings.
You can choose any of them according to your requirements.
We have compiled different procedures for comparing strings.
You can choose any of them according to your requirements.
Conclusion
To compare strings, you can use the “Strict Equality operator (===)”, “length” property, and “localeCompare()” method, where the Strict Equality Operator compares strings based on their values, the length property in combination with Comparison operators compare strings based on their length (number of characters), and the localeCompare() method compare strings based on the alphabetical order.
This write-up explained different methods for comparing strings.
How to Export HTML Table to Excel Using JavaScript
Sometimes, developers need to export the HTML tables to an excel file that helps them to see the statistics/data of the website in a file format for the website’s reporting and use this file even while offline., there are multiple libraries available for multiple tasks.
Similarly, an HTML table can be easily converted to an Excel sheet format using a JavaScript library.
This tutorial will define the process for exporting the HTML table data to Excel using JavaScript.
How to Export HTML Table to Excel Using JavaScript?
For exporting a table from an HTML to an excel spreadsheet, use the JavaScript Library “SheetJS”.
It provides features to read, edit, and export spreadsheets while working in web browsers.
Add the below source of the “SheetJS” JavaScript Library in <head> tag of the project:
<script type="text/javascript" src="https://unpkg.com/xlsx@0.15.1/dist/xlsx.full.min.js"></script>
Let’s try an example to export an HTML table with data in a spreadsheet.
Example
First, create a table in HTML file, using <table> tag:
<table id="tblToExcl" border="2">
<thead>
<th>Id</th>
<th>Name</th>
<th>Grade</th>
<th>Roll#</th>
<th>Age</th>
</thead>
<tbody>
<tr>
<td>1</td>
<td>John</td>
<td>8</td>
<td>118</td>
<td>13</td>
</tr>
<tr>
<td>2</td>
<td>Rohnda</td>
<td>7</td>
<td>153</td>
<td>12</td>
</tr>
<tr>
<td>3</td>
<td>Stephen</td>
<td>9</td>
<td>138</td>
<td>14</td>
</tr>
</tbody></table>
Then, create a button by attaching an “onclick” event that will trigger the “htmlTableToExcel()” function to export the table into an Excel sheet:
<button id="button" onclick="htmlTableToExcel('xlsx')">Export HTML Table to EXCEL</button>
The output shows the table with data:
![]() The JavaScript code for exporting the data table into a sheet is as follows:
function htmlTableToExcel(type){
var data = document.getElementById('tblToExcl');
var excelFile = XLSX.utils.table_to_book(data, {sheet: "sheet1"});
XLSX.write(excelFile, { bookType: type, bookSST: true, type: 'base64' });
XLSX.writeFile(excelFile, 'ExportedFile:HTMLTableToExcel' + type);}
The above JavaScript code follows the given steps to export the table to the excel sheet:
Define a function “htmlTableToExcel()” in a <script> tag or the JavaScript file by passing the “type” as a parameter.
Then, fetch the table using its id “tblToExcl” with the help of the “getElementById()” method.
Convert the table into a sheet by calling the “table_to_book()” method.
Write the table data into the excel sheet and set the file’s name.
After clicking the button, the sheet will be downloaded.
The JavaScript code for exporting the data table into a sheet is as follows:
function htmlTableToExcel(type){
var data = document.getElementById('tblToExcl');
var excelFile = XLSX.utils.table_to_book(data, {sheet: "sheet1"});
XLSX.write(excelFile, { bookType: type, bookSST: true, type: 'base64' });
XLSX.writeFile(excelFile, 'ExportedFile:HTMLTableToExcel' + type);}
The above JavaScript code follows the given steps to export the table to the excel sheet:
Define a function “htmlTableToExcel()” in a <script> tag or the JavaScript file by passing the “type” as a parameter.
Then, fetch the table using its id “tblToExcl” with the help of the “getElementById()” method.
Convert the table into a sheet by calling the “table_to_book()” method.
Write the table data into the excel sheet and set the file’s name.
After clicking the button, the sheet will be downloaded.
![]() Open the downloaded file, the HTML table is now successfully exported to an excel sheet:
Open the downloaded file, the HTML table is now successfully exported to an excel sheet:
![]() It is clear from the screenshot above that the data has been successfully exported to an excel file with the help of JavaScript.
It is clear from the screenshot above that the data has been successfully exported to an excel file with the help of JavaScript.
Conclusion
For exporting an HTML table to an excel spreadsheet, use the JavaScript Library “SheetJS”.
It offers features for reading, editing, and exporting spreadsheets while working in web browsers.
Make sure that the data to be exported is written inside the HTML table.
The reason is that SheetJS takes the rows and columns from the Table tags of the HTML document.
This tutorial described exporting the HTML table data into an Excel sheet.
How to Display DateTime in 12 Hour AM/PM Format?
Displaying datetime in a 12 hour am/pm format is comparatively convenient to use for analyzing the time effectively.
Moreover, this approach reduces the confusion between morning and evening.
For instance, the “am/pm” both define some specific time interval and one can easily relate to the time which is not the case in the 24 hour format.
This write-up will explain the methods to display datetime in the format of 12 hour am/pm.
How to Display DateTime in the Format of 12 Hour AM/PM?
The following approaches can be applied to display datetime in the format of 12 hour am/pm:
“toLocaleString()” Method.
“toLocaleTimeString()” Method.
“Inline” Function.
Approach 1: Display DateTime in the Format of 12 Hour AM/PM Using the toLocaleString() Method
The “toLocaleString()” method returns a date object in the form of a string.
This method can be applied to return the current time in the US language format.
Syntax
Date.toLocaleString(locales, options)
In the given syntax,
“locales” refers to the specific language format.
“options” indicates the object to which the properties can be assigned.
Example
First, create a new date object using the “new Date()” constructor:
var time = new Date();
Now, apply the “toLocaleString()” method having the “US” language format and the assigned values of the time as its parameters.
Here, “hour12” indicates that the hour will be displayed in the 12-hour format.
This will result in displaying the current time in US time format:
console.log(time.toLocaleString('en-US', { hour: 'numeric', minute: 'numeric', hour12: true }));
Output
![]()
Approach 2: Display DateTime in the Format of 12 Hour AM/PM Using the toLocaleTimeString() Method
The “toLocaleTimeString()” method returns the time span of a date object as a string.
This method can be applied similarly to the toLocaleString() method by returning the default time against the specified date.
Example
In the following example, similarly, create a new date object using the “new Date()” constructor and specify the following date as its parameter in the sequence of “year”, “month” and “day” respectively.
After that, apply the “toLocaleTimeString()” method with the specified time format as its parameter as discussed in the previous method:
const dateTime = new Date(2022, 1, 1).toLocaleTimeString('en-US', {
hour: 'numeric', minute: 'numeric', hour12: true})
Finally, display the corresponding time resulting in the default time with respect to the specified date:
console.log(dateTime);
Output
![]()
Approach 3: Display DateTime in the Format of 12 Hour AM/PM Using the Inline Function
This approach can be implemented to apply a conditional operator to the am/pm format.
The below-given example illustrates the stated concept.
Example
const dateTime = (date) => {
let hours = date.getHours();
let minutes = date.getMinutes();
let ap = hours >= 12 ? 'pm' : 'am';
hours = hours % 12;
hours = hours ? hours : 12;
minutes = minutes.toString().padStart(2, '0');
let mergeTime = hours + ':' + minutes + ' ' + ap;return mergeTime;}
console.log(dateTime(new Date(2022, 1, 1)));
In the above demonstrated code:
First, define an “inline” function named “dateTime()”.
This function will take a date object as its parameter.
The “getHours()” method, in the next step, will return the current hour in the 24-hour format in the function.
Similarly, the “getMinutes()” method will retrieve the current minutes.
After that, create a variable named “ap” and adjust it to am or pm with respect to the value of hours.
In the next step, transform the hours to the format of “12-hour” with the help of the “%” operator for getting the remainder upon the division by 12.
In the further code, apply the “toString()” method to convert the computed minutes into a string, and use the “padStart()” method to pad the converted string with 0 if it’s only one digit.
Lastly, merge the calculated time by adding the computed hours, minutes, and the format(am/pm) respectively and display it:
Output
![]() We have concluded the approaches that can be utilized to display datetime in 12 hour am/pm format.
We have concluded the approaches that can be utilized to display datetime in 12 hour am/pm format.
Conclusion
The “toLocaleString()” method, the “toLocaleTimeString()” method or the “Inline” function can be implemented to display datetime in 12 hour am/pm format.
The first method can be opted to display the current time in the specific time format, the toLocaleTimeString() method can be applied to return the default time with respect to the specified date in the particular time format and the Inline function can be implemented to apply a conditional operator to the am/pm format.
This write-up compiled the approaches to display datetime in the format of 12 hour am/pm.
How to Count Number of Keys in Object
Objects are JavaScript’s non-primitive data type.
It helps to store multiple sets of data in the form of key-value pairs.
Keys are the properties of an object specified as a variable that is connected to the object.
Counting the number of keys or properties of an object is the common problem encountered.
This blog post will define the procedure for counting the number of keys in an object.
How to Count the Number of Keys in an Object?
For counting the number of keys in an object, use the following methods:
Object.keys() with length property
Combination of the “for” loop with the “in” keyword
Let’s have a look at each of these approaches one by one!
Method 1: Counting the Number of Keys in an Object Using the Object.keys() Method
The “Object.keys()” method gives an array as an output with strings as its elements that correspond to the enumerated properties already existing on the object.
The list of properties appears in the same order as when you manually loop through the object’s attributes.
For counting the number of keys in an object, the “Object.key()” method is utilized with the “length” property.
Syntax
Use the below-given syntax, to count the number of keys in an object:
Object.keys(object).length
“keys()” is the method of the “Object” type and the “object” is an argument whose keys/properties will be counted.
It returns the count of the number of keys in the object.
Example
First, create an object named “info” with four properties “firstName”, “lastName”, “age” and “contact” in the key-value pair:
const info = {
firstName: 'Stephen',
lastName: 'Cain',
age: 28,
contact: 090394809};
Call the “Object.keys()” method with the “length” property passing an object “info” as an argument that will count the keys in an object:
console.log(Object.keys(info).length);
The output displays “4” which is the count of keys in the object “info”:
![]() If you want only the names of keys in an object instead of count, simply call the “Object.keys()” method by passing an object as an argument:
console.log(Object.keys(info));
The output displays the names of the keys in the object in an array:
If you want only the names of keys in an object instead of count, simply call the “Object.keys()” method by passing an object as an argument:
console.log(Object.keys(info));
The output displays the names of the keys in the object in an array:
![]()
Method 2: Counting the Number of Keys in Object Using “for” Loop with “in” Keyword
The keys of an object are also counted using the “for” loop with the “in” keyword.
The “for” loop iterates over the object’s properties and the “in” keyword retrieves the properties from it.
To count the number of keys in an object using the “for_in” loop, follow the below syntax that will be used in the examples below.
Syntax
for(var key in Object) {
.........}
Example 1: Count Number of Keys in an Object
For counting the number of keys in an object, consider the same object “info” created in the above example.
Then, create a variable “count” and assign a value 0 to it:
var count = 0;
Pass the object “info” to the for_in loop:
for(var key in info) {
count++;}
Finally, print the count of keys in the object using “console.log()” method:
console.log(count);
Output
![]() Example 2: Count Number of Keys in an Inherited Objects
The “for” loop also counts inherited properties.
Here, we will create an object “employee” with two properties “gender”, and “joiningDate” that will inherit from the object “info”:
const employee = {
gender: 'male',
joiningDate: 'Jan,2020'};
Inherit the object “employee” with “info” using object’s property “__proto__”:
info.__proto__ = employee
Pass the object “info” to the “for_ in” loop and increment the count on each iteration.
It will also count the properties of the object “employee” because it inherits from the object “info”:
for(var key in info) {
count++;}
The output “6” indicates that this approach counts the keys of both objects’ “info” and its inherited object “employee”:
Example 2: Count Number of Keys in an Inherited Objects
The “for” loop also counts inherited properties.
Here, we will create an object “employee” with two properties “gender”, and “joiningDate” that will inherit from the object “info”:
const employee = {
gender: 'male',
joiningDate: 'Jan,2020'};
Inherit the object “employee” with “info” using object’s property “__proto__”:
info.__proto__ = employee
Pass the object “info” to the “for_ in” loop and increment the count on each iteration.
It will also count the properties of the object “employee” because it inherits from the object “info”:
for(var key in info) {
count++;}
The output “6” indicates that this approach counts the keys of both objects’ “info” and its inherited object “employee”:
![]() Example 3: Count Number of Keys in a Child Object
If you simply want to get the keys of the child object “employee”, use the “hasOwnProperty()” method inside the loop:
for(var key in employee) {
if (employee.hasOwnProperty(key)) {
count++;
}}
Output
Example 3: Count Number of Keys in a Child Object
If you simply want to get the keys of the child object “employee”, use the “hasOwnProperty()” method inside the loop:
for(var key in employee) {
if (employee.hasOwnProperty(key)) {
count++;
}}
Output
![]()
Conclusion
To count the number of keys in an object, use the “length” property of the JavaScript “Object” type method “keys()” as “Object.keys()” or the combination of “for” loop with the “in” keyword.
The “for_in” approach also counts inherited properties while the “Object.keys()” method does not count the linked properties; it just counts the object’s own properties.
In this blog post, we defined the procedure for counting the number of keys in an object.
How to Convert Character Code to ASCII Code?
Converting character codes to ASCII codes is very useful as it is the standard encoding format for electronic communication among computers.
Moreover, the ASCII code is universally accepted and convenient in the programming area as well.
In addition to that, it also does wonders in encoding some sort of data for ensuring data privacy.
How to Convert Character Code to ASCII Code?
The following methods can be applied to convert character code into ASCII code representation:
“charCodeAt()” method.
“codePointAt()” method.
In the section below, the mentioned approaches will be illustrated one by one!
Method 1: Convert Character Code into ASCII Code Representation Using the charCodeAt() Method
The “charCodeAt()” method gives the character’s Unicode with respect to the specified index.
This method can be utilized to convert the provided character into ASCII code by simply pointing to its index.
Syntax
string.charCodeAt(index)
In the given syntax:
“index” refers to the index of character.
Example 1: Converting Character Code into ASCII Code Representation Using JavaScript
In this example, go through the following code snippet:
let char = "x"
console.log("The converted ASCII code is:",char.charCodeAt(0))
First, initialize the variable named “char” with the specified character value.
Now, apply the “charCodeAt()” method by referring to its index i.e “0”.
This will result in converting the character “x” to its corresponding ASCII code which is “120” in this case.
Output
![]() Example 2: Converting Character Code into ASCII Code Representation Using JavaScript
In this example, convert the character to ASCII code by extracting it from a string value.
The following demonstration explains the stated concept.
let string = "Linuxhint"
console.log("The converted ASCII code is:", string.charCodeAt(2))
Firstly, initialize the string value as discussed in the previous example.
After that, apply the “charCodeAt()” method by passing the desired character’s index as its parameter.
This will result in converting the character “n” to ASCII code as specified by the index.
Output
Example 2: Converting Character Code into ASCII Code Representation Using JavaScript
In this example, convert the character to ASCII code by extracting it from a string value.
The following demonstration explains the stated concept.
let string = "Linuxhint"
console.log("The converted ASCII code is:", string.charCodeAt(2))
Firstly, initialize the string value as discussed in the previous example.
After that, apply the “charCodeAt()” method by passing the desired character’s index as its parameter.
This will result in converting the character “n” to ASCII code as specified by the index.
Output
![]()
Method 2: Convert Character Code to ASCII Code Using the codePointAt() Method
The “codePointAt()” method returns the character’s “Unicode” value at the string’s particular index.
This method can also similarly be applied to the previous method by referring to the character’s index.
Syntax
codePointAt(index)
In the given syntax:
“index” refers to the index of the character in a string.
Example 1: Converting Character Code into ASCII Code Representation
Go through the following code snippet:
let char = "a"
console.log("The converted ASCII code is:", char.codePointAt(0))
Follow the below-stated steps:
In the first step, allocate a character to the variable named “char”.
Now, apply the “codePointAt()” method by referring to the character’s index which will similarly convert the corresponding character to ASCII code.
Output
![]() Example 2: Converting Character Code From String into ASCII Code Representation Using JavaScript
This specific example will result in converting the character to ASCII code by extracting it from a string value.
The below-given code-snippet explains the stated concept:
let string = "David"
console.log("The converted ASCII code is:", string.codePointAt(4))
Follow the below-stated steps:
Store the following string value in a variable named “string”
Finally, apply the “codePointAt()” method by passing the index of the character “d” in this case.
This will return the ASCII code representation of the indexed character.
Output
Example 2: Converting Character Code From String into ASCII Code Representation Using JavaScript
This specific example will result in converting the character to ASCII code by extracting it from a string value.
The below-given code-snippet explains the stated concept:
let string = "David"
console.log("The converted ASCII code is:", string.codePointAt(4))
Follow the below-stated steps:
Store the following string value in a variable named “string”
Finally, apply the “codePointAt()” method by passing the index of the character “d” in this case.
This will return the ASCII code representation of the indexed character.
Output
![]() We have concluded the approaches to convert character code into ASCII code representation
We have concluded the approaches to convert character code into ASCII code representation
Conclusion
The “charCodeAt()” method or the “codePointAt()” method can be applied to convert character code or the extracted character code from string to ASCII code.
Both methods return the same outcome (ASCII representation) by indexing to the character in a string.
This tutorial demonstrated the approaches for converting character code into ASCII code representation using JavaScript.
How to Convert ASCII to Hexadecimal?
Converting ASCII to hexadecimal representation is very helpful as the latter representation is compact.
Moreover, this representation consumes less memory and so multiple numbers can be stored in computer systems.
In addition to that, their small size also makes input-output handling effective.
In the other case, the conversion from hexadecimal to binary is comparatively easier.
In such cases, this specific representation plays a great role in simplifying complex functionalities.
How to Convert ASCII to Hexadecimal?
The following methods can be used in combination with charCodeAt() and toString() methods to convert ASCII to hexadecimal:
stated methods.
“split()” and “map()” methods.
“for” loop approach.
Approach 1: Convert ASCII to Hexadecimal Using charCodeAt() and toString() Methods
The “charCodeAt()” method returns the character’s Unicode at a specified index in a string.
The “toString()” returns a number as a string.
These methods can be implemented to convert the ASCII representation of the specified characters into hexadecimal values.
Syntax
string.charCodeAt(index)
In the given syntax:
“index” refers to the index of character.
number.toString(radix)
In the above syntax:
“radix” points to the base to utilize.
Example
Go through the following code snippet:
function asciitoHex(ascii){
let result = ascii.charCodeAt(0);
let hex = result.toString(16);
console.log("The resultant Hex Value is: 0x" + hex);}
asciitoHex("W");
asciitoHex("e");
asciitoHex("b");
asciitoHex("!");
In the above js code:
Firstly, declare a function named “asciitoHex()” having the specified parameter.
This parameter refers to the character to be converted into hexadecimal.
In the function definition, apply the “charCodeAt()” method by referring to the required character’s index to be converted into hexadecimal.
After that, apply the “toString()” method to the specific character having the hexadecimal base i.e 16.
This method specifies the desired conversion “base”.
In the next step, display the corresponding hexadecimal representation of the values by adding the “0x” prefix (indicating hexadecimal) with each of them.
Finally, access the function with the specified characters which will be converted to hexadecimal.
Output
![]()
Approach 2: Convert ASCII to Hexadecimal Using charCodeAt() and toString() Methods in Combination With split() and map() Methods
The “split()” method splits a string into an array of substrings and the “map()” method accesses a function for each array element.
These methods can be applied by splitting the string value into characters and transforming it into the specified base using indexing.
Syntax
string.split(separator, limit)
In the given syntax:
“separator” refers to the string to be utilized for splitting.
“limit” is the integer limiting the number of splits
array.map(function(currVal, index, arr), this)
In the above syntax:
“function” refers to the function to be executed for each array element.
“currVal” points to the current value.
“index” is the current value’s index.
“arr” represents the array in which the current value is contained.
“this” is the value passed to the function.
Example 1: Convert ASCII to Hexadecimal Representation
Let’s have a look at the following code snippet:
unction ASCIItoHex(ascii) {
let hex = '';
let tASCII, Hex;
ascii.split('').map( i => {
tASCII = i.charCodeAt(0)
Hex = tASCII.toString(16);
hex = hex + Hex + ' ';});
hex = hex.trim();
console.log(hex);}
ASCIItoHex("Hello");
Firstly, revive the discussed methods for declaring a function having a parameter.
In its definition, initialize the variable “hex” to contain the converted hexadecimal value.
Also, initialize the other variables to perform various functionalities.
In the next step, apply the “split()” method to the parameter which will result in splitting the passed string.
After that, apply the “map()” method to convert each string value.
Likewise, repeat the discussed methods for pointing to the character and converting it into the specified base.
Finally, merge the split character values and display them in the hexadecimal representation.
Output
![]() Example 2: Convert Hexadecimal Back to ASCII Representation
The following code will revert the hexadecimal conversion to the ASCII representation.
Syntax
parseInt(value, radix)
In the given syntax:
“value” refers to the value to be parsed.
“radix” refers to the number system
Let’s have a look at the following lines of code:
function hextoASCII(ascii) {
let string = '';
ascii.split(' ').map( (i) => {
merge = parseInt(i, 16);
string = string + String.fromCharCode(merge);});
console.log("The resultant ASCII Value is:", string);}
hextoASCII("48 65 6c 6f ");
Repeat the discussed steps in the previous example for declaring a function, passing a parameter, and applying the “split()” and “map()” methods.
After that, apply the “parseInt()” method which parses a value in the form of a string.
This method will parse the hexadecimal radix(16) which will perform the desired conversion.
The “fromCharCode()” method in the next step will then transform the Unicode values into characters and display them.
Lastly, access the discussed function by passing the hexadecimal values in it as parameters.
This will result in returning the corresponding ASCII representation.
Output
Example 2: Convert Hexadecimal Back to ASCII Representation
The following code will revert the hexadecimal conversion to the ASCII representation.
Syntax
parseInt(value, radix)
In the given syntax:
“value” refers to the value to be parsed.
“radix” refers to the number system
Let’s have a look at the following lines of code:
function hextoASCII(ascii) {
let string = '';
ascii.split(' ').map( (i) => {
merge = parseInt(i, 16);
string = string + String.fromCharCode(merge);});
console.log("The resultant ASCII Value is:", string);}
hextoASCII("48 65 6c 6f ");
Repeat the discussed steps in the previous example for declaring a function, passing a parameter, and applying the “split()” and “map()” methods.
After that, apply the “parseInt()” method which parses a value in the form of a string.
This method will parse the hexadecimal radix(16) which will perform the desired conversion.
The “fromCharCode()” method in the next step will then transform the Unicode values into characters and display them.
Lastly, access the discussed function by passing the hexadecimal values in it as parameters.
This will result in returning the corresponding ASCII representation.
Output
![]()
Approach 3: Convert ASCII to Hexadecimal Using charCodeAt() and toString() Methods With for Loop
This approach can be implemented to iterate a loop along the specified characters and return the corresponding hexadecimal values.
Example
Go through the following lines of code:
function asciitoHex(ascii){
for (var n = 0; n < ascii.length; n ++) {
var hex = Number(ascii.charCodeAt(n)).toString(16);
return(hex);}}
console.log("The resultant Hex Value is: 0x" + asciitoHex('A'));
console.log("The resultant Hex Value is: 0x" + asciitoHex('t'));
In the above code, perform the following steps:
Firstly, revive the discussed approaches for defining a function having a parameter.
Now, iterate a “for” loop along the character to be passed in the function’s parameter with the help of the “length” property.
Similarly, apply the discussed methods for indexing the character and converting it into a particular representation via its base.
Output
![]() We have demonstrated the approaches to convert ASCII to hexadecimal.
We have demonstrated the approaches to convert ASCII to hexadecimal.
Conclusion
The “charCodeAt()” and “toString()” methods can be applied combined, also with the “split()” and “map()” methods, or with the “for” loop approach to convert ASCII to hexadecimal.
The first approach can be utilized to convert the ASCII representation of the specified characters into hexadecimal values.
The split() and map() methods can be applied in combination by splitting the string value into characters and transforming it into the specified base using indexing and similarly converting it back by parsing the hexadecimal radix.
The for loop technique can be used to iterate a loop along the specified characters and return the corresponding hexadecimal values.
This blog explains how to convert ASCII representation to hexadecimal.
How to Convert Array to String Without Commas?
While dealing with data in bulk, there are situations where the data is misspelled or contains an unwanted character in it.
In the other case, while decoding some data for using it or utilizing regular expression differently on multiple values.
In such cases, converting an array to a string without commas is of great aid in smartly handling such cases.
How to Convert Array to String Without Commas?
The following methods can be utilized for converting an array into a string without any commas:
The “join()” method with either “blank value” or “blank space”.
Combination of the “pop()” and the “push()” methods.
Combination of “split()” method with “join()” method.
Method 1: Convert Array to String Without Commas Using join() Method With Blank Value or Blank Space
The “join()” method merges the strings contained in an array and returns them in the form of a string.
This method can be utilized to return the merged string value directly without commas or placing a blank space in between the merged string values.
Syntax
array.join(separator)
In the given syntax:
“separator” refers to blank spaces, commas, etc.
Example 1: Convert Array to String With No Commas Using join() method With Blank Value
Go through the following code snippet:
let array = ['Le', 'sn', 'er'];
console.log("The given array is:", array)
let join = array.join("");
console.log("The array converted to string without commas is:", join);
console.log(typeof join);
In the above code:
First, declare an array having the following string values and display it.
After that, apply the “join()” method having “” as its parameter.
This will result in joining the string values without any commas or a blank space.
Finally, display the string values and confirm its type as well using the “typeof” operator.
Output
![]() Example 2: Convert Array to String With No Commas Using join() Method With Blank Space
Go through the following lines of code:
let array = ['Linux', 'hint'];
console.log("The given array is:", array)
let join = array.join(" ");
console.log("The array converted to string without commas is:", join);
console.log(typeof join);
Follow the below-stated steps:
Firstly, revive the discussed steps in the previous example for declaring and displaying an array of string values.
Likewise, apply the “join()” method having blank space separated commas(“”).
Resultantly, the string values will be displayed having a blank space in them and their type will also be returned as discussed previously.
Output
Example 2: Convert Array to String With No Commas Using join() Method With Blank Space
Go through the following lines of code:
let array = ['Linux', 'hint'];
console.log("The given array is:", array)
let join = array.join(" ");
console.log("The array converted to string without commas is:", join);
console.log(typeof join);
Follow the below-stated steps:
Firstly, revive the discussed steps in the previous example for declaring and displaying an array of string values.
Likewise, apply the “join()” method having blank space separated commas(“”).
Resultantly, the string values will be displayed having a blank space in them and their type will also be returned as discussed previously.
Output
![]() From the above output, it can be observed that a blank space is placed between the two different merged “string” values, and the type of the resultant string is also returned.
From the above output, it can be observed that a blank space is placed between the two different merged “string” values, and the type of the resultant string is also returned.
Method 2: Convert Array to String Without Commas Using pop() and push() Methods
The “pop()” method is used to extract some array element from its last index and the “push()” method is applied to insert an element in an array at the start index.
These methods can be applied to pop the string values from an array, append them in a new array and join them in the form of a string without commas.
Syntax
array.push(item1, item2)
In the given syntax:
item1 and item2 refer to the items to be added to the array.
Sidenote: Likewise, the “array.pop()” method extracts the added elements from an array.
Go through the below-given example:
let array = ['Script', 'va', 'Ja']
console.log("The given array is:", array)
let arrayNew = []
a=array.pop(0)
b=array.pop(1)
c=array.pop(2)
arrayNew.push(a, b, c)
let join = arrayNew.join("")
console.log("The new array becomes:", arrayNew)
console.log("The array converted to string without commas is:", join)
console.log(typeof join)
Follow the below-stated steps:
In the first step, similarly, declare an array of the string values and display it.
After that, create an empty array named “arrayNew”.
Now, apply the “pop()” method to extract the string values from the array.
In its parameter, “0” refers to the last string value, and so on.
In the next step, apply the “push()” method to insert the popped string values in the initialized empty array.
Finally, apply the “join()” method upon the array “arrayNew” and display the appended array as well as the resulting string value.
Output
![]()
Method 3: Convert Array to String With No Commas With the Combination of split() Method and join() Method
The “split()” method splits a string into a substring array.
This method can be used along with the “join()” method to split the commas in the joined string values by formatting them to comma-separated merged string values.
Syntax
string.split(separator, limit)
In the above syntax:
“separator” refers to the string to be used for splitting.
“limit” points to the integer limiting the number of splits.
Go through the following code snippet:
let array = ['We,b', 'si,te'];
let arrayNew = []
console.log("The given array is:", array)
let join = array.join('');
console.log("The array converted to string with commas is:", join);
let join2 = join.split(",").join('')
console.log("The array converted to string without commas is:", join2)
console.log(typeof join2);
In the above js code:
In the following demonstration, similarly, revive the above-discussed steps for declaring a string contained array and an empty array.
Similarly, apply the “join()” method and display the merged string value.
At this stage, the two strings in an array merge but the commas within them remain.
For handling this situation, apply the “split()” method having the comma as its parameter and simultaneously apply the “join()” method again.
This will result in appending the string values such that the required value is returned.
Output
![]() In the above output, it is evident that the first output did not produce the desired output.
After applying the split() method, the required string value is acquired.
We have compiled the approaches to convert an array to a string with no commas.
In the above output, it is evident that the first output did not produce the desired output.
After applying the split() method, the required string value is acquired.
We have compiled the approaches to convert an array to a string with no commas.
Conclusion
The “join()” method with blank value or blank space, the combination of the “pop()” and the “push()” method, or the combination of the “split()” method with join() method can be utilized to convert an array to string without commas.
The first approach merges the array strings directly or by placing the blank space between them.
The pop() and push() methods can be utilized to pop the string values from an array, push them into another array and join them in the form of a string without commas.
The split() method can be applied by splitting the commas from the merged string values and then displaying the updated string value without any commas contained in it.
This write-up demonstrates how to convert an array to a string with no commas.
Dictionary Length
While programming, there is often a need to handle the data in bulk.
Moreover, in analyzing the allocated data to multiple places.
In the other case, to utilize the memory effectively or in case of inserting or deleting some data.
In such cases, getting the dictionary’s length is very handy in handling such cases for effective resource utilization.
How to Get Dictionary Length?
The following approaches can be utilized to compute dictionary length:
“Object.keys()” method with “length” Property.
“for” loop with “hasownproperty()” method.
Approach 1: Get Dictionary Length Using the Object.keys() Method with length Property
The “Object.keys()” method returns an array iterator object with the keys of an object and the “length” property returns the length of the associated string, array, method, etc.
These methods can be applied along with each other to compute the length of the specified dictionary by directly accessing the specified keys in it.
Syntax
Object.keys(obj)
In the above syntax:
“obj” refers to an iterable object or the initialized dictionary.
String.length
In the given syntax:
“String” refers to a string, array, or method, etc.
Example
The following code snippet demonstrates the given requirement:
let lengthDict = {
name: 'Harry',
id: 1,
age: 25, }
console.log('The length of the dictionary is:', Object.keys(lengthDict).length);
In the given example,
Initialize the dictionary with the specified “key-value” pairs.
In the given example, “name”, “id” and “age” refer to the “keys” and similarly “Harry”, “1” and “25” point to the values.
Finally, apply the “Object.keys()” method and pass the created dictionary as its parameter.
Also, apply the “length” property to compute the specified dictionary’s length and display it.
Output
![]()
Approach 2: Get Dictionary Length Using the for Loop With hasownproperty() Method
The “for” loop is used to iterate along an array, dictionary, etc.
The “hasOwnProperty()” method is used to check whether the object’s specified property is its property or not.
These approaches can be implemented to calculate the dictionary’s length by iterating through it.
Syntax
object.hasOwnProperty( prop )
In the above syntax:
“prop” refers to the name in the form of a “string” or a “symbol” of the property to test.
Example
Go through the following lines of code to understand the stated concept.
var lengthDict = { Website: 'Linuxhint',
Content: 'JavaScript'};var count = 0;for (var i in lengthDict) {
if (lengthDict.hasOwnProperty(i)) count++;}
console.log('The length of the dictionary is:', count);
In the above code:
Firstly, create the following dictionary with the specified name-value pairs as discussed before.
Now, initialize the “count” with 0.
After that, apply a “for” loop to iterate along the created dictionary.
Within the loop, apply the “hasOwnProperty()” method by referring to the contained “name-value” pairs within the dictionary.
Also, increment the count with “1” to iterate through each pair.
This will result in accessing the stated pairs in the previous step and return the dictionary’s length.
Output
![]() We have compiled the approaches to compute the dictionary’s length.
We have compiled the approaches to compute the dictionary’s length.
Conclusion
The “Object.keys()” method with the “length” property or the “for” loop with the ”hasownproperty()” method can be implemented to get the dictionary length.
The Object.keys() method with length property approach can be implemented to compute the length of the dictionary by accessing the specified keys in it directly as the name of the method specifies.
The latter approach can be utilized by applying the for loop over the dictionary’s key-value pairs and returning the resultant length.
This blog explained the approaches to get dictionary length.
Count Array Element Occurrences
While working with arrays, there are some situations where the programmer needs to count the occurrences of the particular elements in an array.
JavaScript offers some built-in methods to do this such as iterating the array using for loop, for-of loop, reduce() method, or the filter() method with the length property.
This article will demonstrate the methods for counting an element occurrence of the array.
Count Array Element Occurrences
To count the array element occurrences, use the below-given methods:
filter() method
reduce() method
for loop method
Let’s discuss all the mentioned methods separately.
Method 1: Count Array Element Occurrences Using filter() Method
To count the occurrence of the specific element in an array, the “filter()” method is used.
It filtered down the given array’s elements that passed the test defined by the specified function.
Syntax
The following syntax is used for the filter() method to count the element occurrences in an array.
filter(element)
Here, the “element” is the array element currently being processed.
Return value
The elements that pass the test are returned in an array.
If none of the elements meet the criteria, it returns an empty array.
Example
First, create an array of random numbers named “array”:
var array = [2, 4, 6, 4, 17, 2, 6, 17, 4, 16, 8, 2, 4, 8];
In the next step, follow these lines of code:
function elementCount(arr, element){
return arr.filter((currentElement) => currentElement == element).length;};
In the above code snippet:
First, define a function “elementCount()” that takes two parameters, an array, and the searched element.
Then calls the “filter()” method with the “length” property that will filter the array and count the occurrences of the searched element.
Call the function “elementCount()” by passing “array” as the first argument, and the “6” is the second argument which is the searched element in an array:
console.log(elementCount(array, 6));
Output
![]() The output indicates that the occurrence of element “6” in an array is “2”.
The output indicates that the occurrence of element “6” in an array is “2”.
Method 2: Count Array Element Occurrences Using reduce() Method
The “reduce()” method is a useful method that can be utilized to efficiently calculate the number of occurrences of a specific element in an array.
Syntax
Follow the provided syntax for reduce() method:
reduce(currentValue, arr)
In the above syntax:
The “currentValue” is the current element’s value.
The “arr” is the array the current element belongs to.
Example
Define a function “elementCount()” that takes two parameters, an array and the searched element, and then calls the “reduce()” method that will count the occurrences of the searched element:
function elementCount(arr, element){
return array.reduce((currentElement, arrElement) =>
(arrElement == element ? currentElement + 1 : currentElement), 0);};
Call the function “elementCount()” in the “console.log()” method by passing “array” as the first argument and the “2” as the second argument which is the searched element in an array:
console.log(elementCount(array, 2));
Output
![]() The output indicates that the occurrence of element “3” in an array is “3”:
The output indicates that the occurrence of element “3” in an array is “3”:
Method 3: Count Array Element Occurrences Using for Loop
There is another method for counting array element occurrences is the “for” loop.
It is one of the most common methods for iterating over an array.
Syntax
Use the following syntax for the “for” loop:
for(var i = 0; i < array.length; i++) {// statements}
Example
Use the same array created in the previous example, now create an empty array named “elementCount”:
const elementCount = {};
In the next step, iterate the array over the length and count the occurrence of every element using the “for” loop:
for (var i = 0; i < array.length; i++) {
var element = array[i];
if (elementCount[element]) {
elementCount[element] += 1;
} else {
elementCount[element] = 1;
}}
Print the count of the occurrences of all the elements on the console using the “console.log()” method:
console.log(elementCount);
Output
![]() The above output shows the count of the occurrences of every element of an array.
To count the occurrence of the specific element, follow the below line of code:
console.log(elementCount[6]);
The output displays “2” which is the total count of the occurrence of element “6” in an array:
The above output shows the count of the occurrences of every element of an array.
To count the occurrence of the specific element, follow the below line of code:
console.log(elementCount[6]);
The output displays “2” which is the total count of the occurrence of element “6” in an array:
![]()
Count Array Element Occurrences Using for–of Loop
The “for-of” loop is the advanced form of the “for” loop.
It is a little bit easier, and it iterates over the values of an iterable object.
It is also used to count the number of total occurrences of every element in an array and a specified element.
Syntax
Follow the syntax below for the “for-of” loop:
for (var element of array) {// statements}
Example
Use the same array created in the previous example, now declare an empty array named “elementCount”:
const elementCount = {};
Now, use the “for-of” loop to iterate the array and count the occurrence of every element:
for (var element of array) {
if (elementCount[element]) {
elementCount[element] += 1;
} else {
elementCount[element] = 1;
}}
Print the count of the occurrence of each element in an array on the console using the “console.log()” method:
console.log(elementCount);
The output displays the count of the occurrences of every element of an array:
![]() To count the occurrence of the specific element, create a variable “countElement” and store “8” in it:
var countElement = 8;
Set the count to 0:
var elementCount = 0;
Iterate through the array using the for-of loop and increment the count if the “countElement” is present:
for (arr of array) {
if (arr == countElement) {
elementCount++;
}};
Print the resultant count on the console using the “console.log()” method:
console.log(elementCount);
Output
To count the occurrence of the specific element, create a variable “countElement” and store “8” in it:
var countElement = 8;
Set the count to 0:
var elementCount = 0;
Iterate through the array using the for-of loop and increment the count if the “countElement” is present:
for (arr of array) {
if (arr == countElement) {
elementCount++;
}};
Print the resultant count on the console using the “console.log()” method:
console.log(elementCount);
Output
![]() We have compiled the methods to count the element occurrences in an array.
We have compiled the methods to count the element occurrences in an array.
Conclusion
To count element occurrences in an array, use the “filter()” method with the “length” property, “reduce()” method, “for” loop, or the “for-of” loop.
The filter() and the reduce() methods are used for counting the occurrences of the specific element, while the for loop and the for-of loop is used for both, counting all the elements’ occurrences in an array and the specific element’s occurrences in an array.
This article demonstrated the methods for counting an element occurrence of the array.
Addition Assignment or += Operator
The addition assignment += operator adds the values from the operator’s right to the variable on the left.
Adding two numbers and assigning the output to a variable may be done simply using this addition assignment += operator.
It can be utilized to concatenate the strings and add numerical numbers.
This tutorial will demonstrate the addition assignment operator +=.
What is Addition Assignment or += Operator?
The addition assignment += operator is the short form for adding or concatenating the two variables and then assigning the resultant value to another variable.
As compared to the standard variable = X + Y, the addition assignment += operator is more feasible.
Syntax
The syntax of the addition assignment operator is:
a += b
Which is equivalent to:
a = a + b
Let’s try some examples of using the addition assignment += operator.
Example 1: Add Number in Variable using Addition Assignment += Operator
First, create a variable “val1” by assigning the value “11”:
var val1 = 11;
Add “15” in “val1” utilizing the += operator and print the resultant value on the console:
console.log(val1 += 15);
The output displays “26” after adding “15” into “11”:
![]() Example 2: Add Two Strings using Addition Assignment += Operator
Create a variable “str1” and store a string “Linux” in it:
var str1 = "Linux";
Now, add a string “hint” in a variable “str1” using addition assignment operator:
console.log(str1 += "hint");
The output indicates that the string “hint” is successfully concatenated with the string “Linux” that is stored in a variable “str1”:
Example 2: Add Two Strings using Addition Assignment += Operator
Create a variable “str1” and store a string “Linux” in it:
var str1 = "Linux";
Now, add a string “hint” in a variable “str1” using addition assignment operator:
console.log(str1 += "hint");
The output indicates that the string “hint” is successfully concatenated with the string “Linux” that is stored in a variable “str1”:
![]() Example 3: Add a String in a Number using Addition Assignment += Operator
Create a variable “val1” and assign a value “2”:
var val1 = 2;
Now, add a number “22” as a string in the variable “val1”.
It will concatenate with the value of val1:
console.log(val1 += '22');
Output
Example 3: Add a String in a Number using Addition Assignment += Operator
Create a variable “val1” and assign a value “2”:
var val1 = 2;
Now, add a number “22” as a string in the variable “val1”.
It will concatenate with the value of val1:
console.log(val1 += '22');
Output
![]() We have covered the basics of the addition assignment += operator.
We have covered the basics of the addition assignment += operator.
Conclusion
The addition assignment operator (+=) adds to a variable’s value.
It works just like writing x = x + y.
So basically, this addition assignment operator performs two actions simultaneously.
These actions add the values of the two operands and then store the result in the left operand.
Another interesting fact about the addition assignment operator is that the user can also use it to concatenate two string values.
This tutorial demonstrated the JavaScript addition assignment operator += and its uses.
How to Change Label Text Using JavaScript
In the process of filling out a particular form or a questionnaire, there are often situations when there is a need to display a particular answer or notification in response to the selected option.
For instance, dealing with multiple-choice questions, etc.
In such cases, changing the label text using JavaScript is very helpful in improving the accessibility of HTML forms and the overall document design.
How to Change Label Text Using JavaScript?
The following approaches can be utilized to change label text:
“innerHTML” property.
“innerText” property.
jQuery “text()” and “html()” methods.
Approach 1: Change Label Text Using innerHTML Property
The “innerHTML” property returns the inner HTML content of an element.
This property can be utilized to fetch the specific label and change its text to a newly assigned text value.
Syntax
element.innerHTML
In the above syntax:
“element” refers to the element upon which the specific property will be applied to return its HTML content.
Example
Go through the following code snippet to explain the stated concept clearly:
<center><body><label id = "lbl">DOM</label><br><br><button onclick= "labelText()">Click Here</button></body></center>
First, within the “<center>” tag, include the “label” with the specified “id” and “text” values.
After that, create a button with an attached “onclick” event invoking the function labelText().
Now, follow the below-given JavaScript code:
function labelText(){
let get = document.getElementById('lbl')
get.innerHTML= "The abbreviated name is Document Object Model";}
Declare a function named “labelText()”.
In its definition, access the id of the specified “label” using the “document.getElementById()” method.
Finally, apply the innerHTML property and assign a new “text” value to the accessed label.
This will result in transforming the label text to a new text value upon the button click.
Output
![]() In the above output, it can be observed that the text value of “label” is changed on both the DOM and in the code as well in the “Elements” section.
In the above output, it can be observed that the text value of “label” is changed on both the DOM and in the code as well in the “Elements” section.
Approach 2: Change Label Text Using the innerText Property
The “innerText” property returns the element’s text content.
This property can be implemented to allocate a user-input value entered in the input field to the assigned label’s text.
Syntax
element.innerText
In the above syntax:
“element” indicates the element upon which the specific property will be applied to return its textual content.
Example
The following example demonstrates the stated concept:
<center><body>
Enter a Name: <input type= "text" id= "name" value= "" autocomplete= "off"><p><input type= "button" id= "bt" value= "Change Label Text" onclick= "labelText()"></p><label id="lbl">N/A</label></body></center>
First, allocate an input text field having the specified “id”.
The “null” value here indicates that the value will be fetched from the user and setting autocomplete to “off” will avoid the suggested values.
After that, include a label having the specified “id” and “text” value.
Now in the JavaScript code snippet, perform the following steps:
function labelText() {
let get = document.getElementById('lbl');
let name = document.getElementById('name').value;
get.innerText = name;}
Define a function named “labelText()”.
In its definition, access the created label using the “document.getElementById()” method.
Similarly, repeat the above step to access the specified input text field and get the user-entered value from it.
Finally, assign the user-entered value from the previous step to the fetched label.
This will change the label text to the user-entered value in the input text field.
Output
![]() In the above output, it is evident that the desired requirement is achieved.
In the above output, it is evident that the desired requirement is achieved.
Approach 3: Change Label Text Using the jQuery text() and html() Methods
The “text()” method returns the text content of the selected elements.The “html()” method returns the innerHTML content of the selected elements.
Syntax
$(selector).text()
In this syntax:
“selector” points to the text content of the accessed element.
$(selector).html()
In the above-given syntax:
“selector” refers to the innerHTML of the accessed element.
Example
This example will illustrate the stated concept using jQuery methods.
Go through the below-given code snippet:
<script src="https://ajax.googleapis.com/ajax/libs/jquery/3.5.1/jquery.min.js"></script><center><body><label id = "lbl1">This is the following Website:</label><br><br><label id = "lbl2">Content:</label><br><br><button onclick= "labelText()">Click for Website</button><button onclick= "labelText2()">Click for Content</button></body></center>
Firstly, include the “jQuery” library to apply its methods.
After that, within the “<center>” tag, include two different labels with the specified “id” and text value against each of them.
Also, allocate separate buttons to each of the created labels.
Both the buttons will have an attached “onclick” event invoking two different specified functions.
Now, go through the following JavaScript code lines:
function labelText() {
$('#lbl1').text("Linuxhint") }function labelText2() {
$('#lbl2').html("JavaScript") }
In the first step, declare a function named “labelText()”.
In its definition, access the label against the fetched “id” and apply the “text()” method to it.
This will result in changing the text value of the label to the specified value in its parameter.
Similarly, define a function named “labelText2()”.
Here, similarly, repeat the above-discussed step for accessing the label.
In this case, apply the “html()” method.
This method will also work in the same way and return the specified text value thereby changing the label text.
Output
![]() In the above output, the first transformed text value of the label on the Document Object Model (DOM) corresponds to the jQuery “text()” method and the other is a result of the “html()” method.
We have compiled the approaches to change label text using JavaScript.
In the above output, the first transformed text value of the label on the Document Object Model (DOM) corresponds to the jQuery “text()” method and the other is a result of the “html()” method.
We have compiled the approaches to change label text using JavaScript.
Conclusion
The “innerHTML” property, the “innerText” property, or jQuery’s “text()” and “html()” methods can be utilized to change label text using JavaScript.
The innerHTML property can be applied to get the specific label and change its text content to a newly assigned text value.
The innerText property can be implemented to allocate a new text value to the accessed label thereby changing it.
The jQuery approach can be used to transform the label’s text value with the help of its two methods resulting in the same outcome in the form of two different allocated text values.
This write-up demonstrated the techniques to change label text using JavaScript.
How to Case Insensitive String Comparison
While writing the code, a developer may often need to compare two strings to ensure that specific tasks are completed.
Comparing strings without paying attention to their cases such as capital and lowercase letters are known as a case-insensitive comparison.
Many languages support string comparison with case sensitivity and insensitivity.
This article will illustrate the methods for case-insensitive comparison of strings.
How to Case Insensitive String Comparison?
For case-insensitive comparison of strings, use the following predefined methods:
localeCompare() method
toUpperCase() and toLowerCase() method
Regular expression with test() method
Let’s look at the working of each of the above-mentioned approaches separately.
Method 1: Case Insensitive String Comparison Using LocaleCompare() Method
The case-insensitive comparison of strings uses the “localeCompare()” method.
This method returns a number (positive, negative, or zero).
The strings are compared in a sorting order, if the reference string is longer than the comparison string or it comes after the compared string, it gives a positive number.
If the reference string is shorter, or comes before the compared string, it returns a negative number.
A zero should be returned if the reference string is equivalent to the compared string.
Syntax
Follow the given-provided syntax for the localeCompare() method:
string1.localeCompare(string2, locales, options)
Here,
“string2” is the compare string, where string 1 will be compared.
“locales” is the language tag.
“options” are the locale provided by the user while working with it.
Example
Create two strings “string1” and “string2”, with strings “linuxhint” and “LinuxHint” respectively:
var string1 = 'linuxhint';
var string2 = 'LinuxHint';
Compare string1 with string2 using the “localeCompare()” method and store the result in a variable “comp”.
The third argument of the method will set as “sensitivity: ‘base’” that indicates the compared strings base letters are not different:
var comp = string1.localeCompare(string2, undefined, { sensitivity: 'base' })
In conditional statement, check if the returned value of localeCompare() method is equivalent to zero, it prints “Strings are equal”, else, “Strings are not equal”:
if(comp == 0){
console.log("Strings are equal");} else {
console.log("Strings are not equal");}
Output
![]()
Method 2: Case Insensitive String Comparison Using toUpperCase() and toLowerCase() Method
The most used approaches for comparing case insensitive strings are toUpperCase() method or toLowerCase() Method.
They convert the strings into uppercase or lowercase and then compare them with the help of strict equality operators.
Syntax
For toUpperCase() method, use the following method:
string.toUpperCase();
Use the below syntax for toLowerCase() method.
string.toLowerCase();
Example: Case Insensitive String Comparison Using toUpperCase() Method
Consider the above created strings “string1” and “string2” and then compare them using the toUpperCase() method with strict equality operator:
if(string1.toUpperCase() === string2.toUpperCase()){
console.log("Strings are equal");} else {
console.log("Strings are not equal");}
The output indicates both the strings are equal by ignoring case:
![]() Example: Case Insensitive String Comparison Using toLowerCase() Method
Here, the strings are compared using the toLowerCase() method that will first convert the strings into lower case and then compare them using the === operator:
if(string1.toLowerCase() === string2.toLowerCase()){
console.log("Strings are equal");} else {
console.log("Strings are not equal");}
The corresponding output will be:
Example: Case Insensitive String Comparison Using toLowerCase() Method
Here, the strings are compared using the toLowerCase() method that will first convert the strings into lower case and then compare them using the === operator:
if(string1.toLowerCase() === string2.toLowerCase()){
console.log("Strings are equal");} else {
console.log("Strings are not equal");}
The corresponding output will be:
![]()
Method 3: Case-Insensitive String Comparison Using Regular Expression With test() Method
The predefined JavaScript “test()” method, which uses a regular expression, is another way to compare two strings.
Based on the specified regex, it determines whether strings are equal or not.
Syntax
Follow the given syntax for using a regular expression to compare the strings:
RegExp(string, "gi")
Here,
“RegExp” stands for “regular expression”.
“g” is the global variable that allows checking all the strings.
“i” is a flag variable that indicates a case should be ignored while using a string to match the pattern.
Example
First, create a new object of the RegExp() by passing a string and the regular expression as an argument:
var comp = new RegExp(string1, "gi");
Compare the strings using the test() method:
if(comp.test(string2)){
console.log("Strings are equal");} else {
console.log("Strings are not equal");}
Output
![]()
Conclusion
To compare case insensitive strings, use the JavaScript predefined methods including localeCompare() method, toUpperCase() and toLowerCase() method, or the test() method with Regular expression.
The “toUpperCase() and toLowerCase()” methods are the most used approach for comparing two case-insensitive strings.
This article illustrated the different ways for case-insensitive comparison of strings.
How to Cancel Events?
While updating a web page or the website, there are situations where some included links are no longer needed or become irrelevant.
In addition to that, managing the traffic of a particular website effectively.
In such cases, canceling the events does wonders in disabling some functionality and handling such case scenarios.
How to Cancel Events?
The following approaches can be utilized to cancel events:
“preventDefault()” method.
“Boolean Value” approach.
“stopPropagation()” method.
Approach 1: Cancel Events Using preventDefault() Method
The “preventDefault()” method cancels the attached event if it is cancel-able.
This method can be utilized to detach the attached event from the accessed link thereby preventing the action to be performed.
Syntax
event.preventDefault()
In the given syntax:
“event” refers to the event to be detached.
Example
Go through the below-given code-snippet:
<h3>The Click event will be cancelled!</h3><a id="site" href= "https://www.google.com/">Visit the Google Website</a>
document.getElementById("site").addEventListener("click", function(cancel){
cancel.preventDefault();});
Follow the below-stated steps:
Firstly, include the stated heading to be displayed on the Document Object Model(DOM).
After that, specify the “URL” using the “href” attribute.
Now, in the JavaScript part of the code, access the specified URL.
Also, attach a “click” event with the URL with the help of a function using the “addEventListener()” method.
Finally, the “preventDefault()” method will be applied with the help of the function’s parameter to detach the attached event.
Output
![]()
Approach 2: Cancel Events by Returning a Boolean Value
This approach can be implemented by returning the “false” boolean value upon the triggered event.
Example
The following lines of code demonstrate the stated concept:
<center><input type="text" placeholder= "Enter Text" oninput= "cancelEvent()"></center>function cancelEvent(){
return false;
alert("This statement will not be displayed")}
In the above code snippet:
First, within the “<center>” tag, allocate an input text field.
Also, attach an “oninput” event with the specified “placeholder” value.
This will result in invoking the specified function upon inputting the text.
Now, in the JavaScript part of the code, declare a function named “cancelEvent()”.
In its definition, return the boolean value “false” to cancel the included “event”.
Finally, specify the stated message in the alert box.
The returned boolean value will result in avoiding the dialogue box to be displayed.
Output
![]() In the above output, it can be observed that upon the accessed function, the alert dialogue box is not displayed thereby canceling the attached event.
In the above output, it can be observed that upon the accessed function, the alert dialogue box is not displayed thereby canceling the attached event.
Approach 3: Cancel Events Using stopPropagation() Method
The “stopPropagation()” method prevents the same event from being propagated.
This method can be utilized to stop propagating between the two divs upon checking the checkbox.
Syntax
event.stopPropagation()
Example
Observe the following lines of code:
<center><h3>Click on the Website to observe the change:</h3><div onclick="element2()">Linuxhint<div onclick="element1(event)">Website</div></div><br>
Check to Stop Propagation:<input type="checkbox" id="check"></center>
In the first step, similarly, include the stated heading.
Now, include two “div” tags with attached “onclick” events with each of them invoking two different functions element2() and element1().
Also, include a checkbox with the specified id.
This checkbox will result in stopping the propagation between two divs.
Now, look at the following JavaScript lines of code:
function element1(e) {
alert("You Clicked Website");
if (document.getElementById("check").checked) {
e.stopPropagation();
}}function element2() {
alert("You Clicked Linuxhint");}
In the above js code:
Define a function named “element1()”.
Here, the parameter “e” refers to the “event” being fired specified in the HTML part of the code.
In its definition, display the alert dialogue box having the stated message.
After that, access the created checkbox by its id using the “getElementById()” method.
Also, apply the “checked” property to it in order to check the condition of the checked checkbox.
Then, apply the “stopPropagation()” method referring to the parameter “e”.
This will result in stopping the propagation from one function to the other function.
Similarly, define another function “element2()” to be propagated upon.
This function will be functional before propagation only.
Output
![]() Here, observes the behavior upon clicking the div upon checking the checkbox.
We have compiled the approaches to cancel events.
Here, observes the behavior upon clicking the div upon checking the checkbox.
We have compiled the approaches to cancel events.
Conclusion
The “preventDefault()” method, the “boolean value” approach, or the “stopPropagation()” method can be utilized to cancel events.
The first method can be implemented to detach the attached event resulting in disabling the link.
The boolean value approach returns the “false” boolean value upon the triggered event.
The stopPropagation() method can be applied to stop propagating between the two divs with the help of an included checkbox.
This tutorial explained to cancel events.
Truncate a String
While working with the text, sometimes, there is a need to limit the number of characters of a string value.
If the string values exceed the limit, trim the remaining part.
Trimming or truncating is the process of cutting or eliminating parts of something to make it smaller.
To trim or truncate a string, JavaScript has some predefined methods including the substring() method or the split() method with the join() method.
This tutorial will illustrate the methods to truncate a JavaScript string.
Truncate a String
To truncate a string, use the following methods:
substring() method
Combination of split() and join() method
Let’s explain these methods in detail.
Method 1: Truncate a String Using substring() Method
The substring() method is a “String” type method and it trims the string between the specified indexes.
If the original string’s length exceeds the limit, it returns only that portion until the number of characters equals the specified limit:
Syntax
The given syntax is used for the “substring()” method:
substring(start, end)
It takes two parameters:
“start” is the start index of the substring
“end” is the last index where the string will be truncated.
Return Value: It will return a new trimmed string.
Example
First, create a variable “str1” that stores a string “Welcome to Linuxhint”:
var str1 = "Welcome to Linuxhint";
Define a function named “truncateString()” with two parameters, “string” and “limit”.
In this function, check the length of the string using the “length” property.
If the length of the string is greater than the specified limit, trim the string using the “substring()” method where the two arguments are passed, the start index of the string and the limit that will be the last index of the string:
function truncateString(string, limit){
if (string.length > limit){
str2 = string.substring(0,limit);
}
else{
return str1;
}return str2;}
Call the “truncateString()” function by passing string “str1” and limit “8”:
console.log(truncateString(str1, 8));
The output displays the trimmed string starting from the start index 0 and ending at the index 8:
![]()
Method 2: Truncate a String Using split() Method with join() Method
There is another method to truncate a string called the “split()” method which splits the string into an array of substrings on a specific character.
To join the substrings into a string, use the “join()” method
Syntax
Follow the given syntax of the split() method for tokenizing a string:
split(separator, limit);
Here, the “separator” is any specific character that is used as the separator parameter to specify where to split the string.
“limit” is an integer that indicates the number of splits.
It returns an array of substrings based on the passed arguments.
Example
Utilize the same string “str1” created in the above example, and then, call the split() method by passing an empty string (‘’) and limit “11” as arguments:
var str = str1.split('', 11);
The output shows an array of substrings of length 11:
![]() Now, join the array into a string using the join() method and store it in a variable “truncStr”:
var truncStr = str.join('');
Print the resultant string using the “console.log()” method:
console.log(truncStr);
Output
Now, join the array into a string using the join() method and store it in a variable “truncStr”:
var truncStr = str.join('');
Print the resultant string using the “console.log()” method:
console.log(truncStr);
Output
![]()
Conclusion
To truncate a string, use the “substring()” method, or the combination of the “split()” and “join()” methods.
The substring() method is the most common method for truncating the strings.
It trims the string between the specified indexes.
The split() method splits the strings into an array of substrings and the join() method is used to convert that array of substrings to the string.
This tutorial illustrated the methods for trimming JavaScript strings.
The Checkbox Onclick Events
The checkbox is an HTML input element that permits the user to choose one of several options.
As with HTML forms, there is a check box for gender, male or female.
Or sometimes, the terms and conditions must be approved before submitting the form.
The “onclick” event will be attached to the checkbox, and It will be triggered or executed when a checkbox is clicked.
This article will demonstrate the checkbox onclick event.
The Checkbox Onclick Events
The “onclick” is an event that will be triggered when the user checks the checkbox.
The onclick event will be attached with the checkbox by:
Using the onclick attribute within the HTML tag
Applying a function on the onclick attribute of an HTML element
Explicitly adding an event listener on the “click” event
Let’s use all these one by one.
Example 1: Checkbox Onclick Event Using the onclick Attribute Within the HTML Tag
Create a checkbox in an HTML file with the id “agree” and attach an “onclick” event with it which will execute the function checkClickFunc() written in the JavaScript part:
<h4>Onclick property in HTML by calling JavaScript function</h4><input type="checkbox" id="agree" onclick="checkClickFunc()">Agree terms and conditions
Use the below lines of code in a JavaScript file:
function checkClickFunc(){
var checkbox = document.getElementById('agree');
if (checkbox.checked == true)
{
alert("Checkbox is clicked");
}}
In the above code,
Create the function checkClickFunc() which is to be executed upon clicking the checkbox.
Using the “getElementById()” method, retrieve the checkbox by its id, “agree”.
Check the checkbox’s status by using the “checked” attribute.
If it’s “true”, show an alert message “Checkbox is clicked”.
Output
![]() Example 2: Checkbox Onclick Event by Applying a Function on the onclick Attribute of an HTML Element
In this example, JavaScript will be used to give a value to the onclick attribute of the HTML element rather than in the HTML tag.
Create a checkbox and assign an id to it that will later be accessed:
<h4>Checkbox Onclick using JavaScript</h4><input type="checkbox" id="agree"> Agree terms and conditions
In the following step, the checkbox will be accessed using its id “agree” and an “onclick” attribute will be attached to it.
Upon the checkbox click, the defined function will be executed, and an alert message will be shown:
document.getElementById("agree").onclick = function checkClickFunc() {
alert("Checkbox is clicked");}
The corresponding output will be:
Example 2: Checkbox Onclick Event by Applying a Function on the onclick Attribute of an HTML Element
In this example, JavaScript will be used to give a value to the onclick attribute of the HTML element rather than in the HTML tag.
Create a checkbox and assign an id to it that will later be accessed:
<h4>Checkbox Onclick using JavaScript</h4><input type="checkbox" id="agree"> Agree terms and conditions
In the following step, the checkbox will be accessed using its id “agree” and an “onclick” attribute will be attached to it.
Upon the checkbox click, the defined function will be executed, and an alert message will be shown:
document.getElementById("agree").onclick = function checkClickFunc() {
alert("Checkbox is clicked");}
The corresponding output will be:
![]() Example 3: Checkbox Onclick Event by Explicitly adding Event Listener on “click” Event
Here, the checkbox onclick event will be set using the JavaScript “addEventListener()” method:
<h4>Checkbox Onclick using JavaScript through addEventListener</h4><input type="checkbox" id="agree"> Agree terms and conditions
In the JavaScript file, use the given code:
document.getElementById("agree").addEventListener("click", checkClickFunc);function checkClickFunc() {
alert("Checkbox is clicked");}
In the above code snippet,
First, fetch the checkbox using its id and then attach an “addEventListener()” method by passing a “click” event and a function “checkClickFunc” which will be called on the checkbox click.
Define a function “checkClickFunc()”, which will be triggered while clicking the checkbox and shows an alert message:
Output
Example 3: Checkbox Onclick Event by Explicitly adding Event Listener on “click” Event
Here, the checkbox onclick event will be set using the JavaScript “addEventListener()” method:
<h4>Checkbox Onclick using JavaScript through addEventListener</h4><input type="checkbox" id="agree"> Agree terms and conditions
In the JavaScript file, use the given code:
document.getElementById("agree").addEventListener("click", checkClickFunc);function checkClickFunc() {
alert("Checkbox is clicked");}
In the above code snippet,
First, fetch the checkbox using its id and then attach an “addEventListener()” method by passing a “click” event and a function “checkClickFunc” which will be called on the checkbox click.
Define a function “checkClickFunc()”, which will be triggered while clicking the checkbox and shows an alert message:
Output
![]()
Conclusion
The Checkbox onClick Events are events performed when a checkbox is marked as “checked”.
These events are not applied by default on a check box element of the HTML document.
Therefore, the user must manually add the events to perform specific functionality.
There are three different ways of adding an “onclick” event and performing an action upon that event with the help of JavaScript.
This article explains these three methods along with examples.
Static Variables
A static variable is a class property used by the class itself rather than by any instances of the class.
The static variable is declared using the “static” keyword.
It will have a single static value that is set during initialization., a static variable is created to avoid duplication, it is useful for caches and fixed configuration.
This post will describe the static variables.
Static Variables
Use the “static” keyword to create a static function or a variable.
The static variables have a global scope and are initialized during runtime.
They are accessible throughout the entire script with the help of the class name.
Use the “this” keyword to invoke a static method or a variable within a static method.
Syntax
The static variable is declared using the following syntax:
static var;
Example 1:
Create a class named “MyExampleClass” with a static variable “a” and a static method “exampleMethod()” that will return a string:
class MyExampleClass {
static a = 'Welcome To Linuxhint';
static exampleMethod() {
return 'Static variable';
}}
Outside the class, print the static variable and call the static method with the class name using the “console.log()” method:
console.log("The value of static variable: "+ MyExampleClass.a);
console.log("The value returned by static method: "+ MyExampleClass.exampleMethod());
The output displays the value of the static variable and the returned value of the static method:
![]() Example 2:
In the following example, call the static variable in a static method using the “this” keyword:
class MyExampleClass {
static a = 'Welcome To Linuxhint';
static exampleMethod() {
return this.a;
}}
Output
Example 2:
In the following example, call the static variable in a static method using the “this” keyword:
class MyExampleClass {
static a = 'Welcome To Linuxhint';
static exampleMethod() {
return this.a;
}}
Output
![]()
Conclusion
In JavaScript, the static variables and functions are created using the “static” keyword.
It is the property of an object that is used by the class itself instead of its instances.
It will have a single static value and is initialized during runtime.
For calling the static variables, there is no need to create an instance or an object of the class because it will be called using the class name.
The static variables are called within a static method, using the “this” keyword.
In this post, we described the JavaScript static variables and how to access them.
Remove All Child Elements Using JavaScript
Removing child elements of a DOM element is a critical task for developers.
Sometimes, the user is required to add a feature that will remove all the data from the inserted list.
JavaScript makes it easy for developers by providing predefined methods to do the same thing.
This tutorial will explain the methods to remove all child elements of an HTML element using JavaScript.
How to Remove All Child Elements Using JavaScript?
For removing all child elements, use the following JavaScript approaches
removeChild() method
innerHTML property
Let’s understand the working of these approaches individually.
Method 1: Remove All Child Elements Using the removeChild() Method
The “removeChild()” method is the most common JavaScript method for removing the child elements of the DOM elements.
Iterate the DOM elements with a while or a for a loop.
On each iteration, it checks to see whether there is any child node left in the element and if so, it simply removes it.
Syntax
Follow the below-mentioned syntax for the removeChild() method to remove child elements of any HTML element:
removeChild(child)
Here, “child” is the child node of the element to be removed.
Example
First, create an unordered list in an HTML file using the HTML <ul> tag, the list items <li> are the child elements of the unordered list.
Then, create a button by attaching an “onclick” event to it, which will trigger a function to remove the child nodes of the element “ul”:
<div style="text-align:center;">
<ul class="ul" style="text-align:center;">
<li>OOP</li>
<li>HTML</li>
<li>CSS</li>
<li>JavaScript</li>
</ul> <br>
<button onclick = removeChildElements()>Remove child elements of Unordered list</button> </div>
To style the unordered list, the following CSS code is used:
.ul {
display: inline-block;
text-align: left;}
The HTML page will look like:
![]() In the JavaScript file, use the following code for removing all child nodes of the element:
function removeChildElements() {
var childElements = document.querySelector("ul");
var delChild = childElements.lastChild;
while (delChild) {
childElements.removeChild(delChild);
delChild = childElements.lastChild;
}}
In the above code:
First, define a function “removeChildElements()”.
Get the HTML element “ul” using the “querySelector()” method.
Iterate the element until the last child node, then remove all of them using the “removeChild()” method.
Output
In the JavaScript file, use the following code for removing all child nodes of the element:
function removeChildElements() {
var childElements = document.querySelector("ul");
var delChild = childElements.lastChild;
while (delChild) {
childElements.removeChild(delChild);
delChild = childElements.lastChild;
}}
In the above code:
First, define a function “removeChildElements()”.
Get the HTML element “ul” using the “querySelector()” method.
Iterate the element until the last child node, then remove all of them using the “removeChild()” method.
Output
![]() The above output indicates that all items in the list are being deleted successfully when the button is clicked.
For removing, only the first child node of the element, use the below lines of code:
function removeChildElements() {
var childElements = document.querySelector("ul");
childElements.removeChild(childElements.firstChild);}
In the above code snippet
Get the HTML element “ul” and pass the first child node to the “removeChild()” method as an argument.
Output
The above output indicates that all items in the list are being deleted successfully when the button is clicked.
For removing, only the first child node of the element, use the below lines of code:
function removeChildElements() {
var childElements = document.querySelector("ul");
childElements.removeChild(childElements.firstChild);}
In the above code snippet
Get the HTML element “ul” and pass the first child node to the “removeChild()” method as an argument.
Output
![]() The unordered list’s first child element is the only one removed in the output seen above.
The unordered list’s first child element is the only one removed in the output seen above.
Method 2: Remove All Child Elements Using the innerHTML Property
Another approach for removing all child nodes of any element is the “innerHTML” property.
Syntax
The following syntax is used for the innerHTML property:
innerHTML = ''
The empty string is set to the innerHTML property that will remove all the element’s child nodes.
Example
The below-given code is used for removing child nodes using the innerHTML property:
function removeChildElements() {
var childElements = document.querySelector("ul");
childElements.innerHTML = "";}
Output
![]() We gathered the best possible approaches for removing an element’s child nodes using JavaScript.
We gathered the best possible approaches for removing an element’s child nodes using JavaScript.
Conclusion
To remove all child elements of a DOM element, use the “removeChild()” method or the “innerHTML” property.
The removeChild() method is an effective and commonly used method for removing the element’s child node.
The innerHTML property is the simplest technique.
However, it shows that the items are removed, but the nodes remain inside, slowing things down.
This tutorial explained the methods for removing all child elements of an HTML element through JavaScript.
Phone Number RegEx
While verifying an HTML form, it is critical to validate the phone number.
Depending on the region, a valid phone number might have several formats.
There are general rules, such as limiting the number of digits or keeping the number to only numerical values.
However, in some situations, a telephone number might have a format that includes special characters such as a plus sign, dash, and parenthesis, or it can have a completely different format than other countries or regions.
This study will explain the regex for validating the phone number.
Phone Number RegEx
Regular expressions are the simplest method to validate phone numbers.
However, depending on the user’s preferences, phone numbers can be formatted in various ways.
Here are some regular expressions for phone number validation.
Example 1: Basic Phone Number Regex Validation
Here, the below-given regex patterns or the regular expressions allow only phone numbers with 10 digits.
No special characters, including spaces, are allowed.
Regex Pattern
Follow the given regex pattern for the basic phone number validation:
/^\d{10}$/
Or
/^\d{3}\d{3}\d{4}$/
Here is a breakdown of all the elements to help readers understand what it contains.
“^” denotes the start of the string
“/” forward slash character is used to indicate the regular expression’s boundaries
“d” stands for digits
“{}” indicates the limit
“\” backslash character is the escape character
“$” denotes the end of the string
Use any of the above regexes for the validating phone number without any special character or a delimiter.
In the HTML file, create a form using the below code:
<form id="form">
<h3>Basic Phone Regex Without any Delimiter</h3>
<label>Phone #:</label>
<input type="text" placeholder="Enter Phone number" id="number" autocomplete="off">
<p id="error" class="error msg">Please enter a valid phone number</p><br>
<button id="submit">Submit</button></form>
In the above code snippet,
First, create a form with the id “form”.
Then create an input text field for the input value and assign an id “number”.
A paragraph using <p> tag that will show an error when the input value is not valid.
Create a submit button with the id “submit”.
The following CSS classes are used for the error message:
.error{
color: red;}
.msg{
display:none;}
The HTML form will look like:
![]() In the JavaScript file, use the below lines of code:
function validatePhoneNumber(e) {
var pNumber = document.getElementById('number').value;
if (!phoneRegex(pNumber)) {
document.getElementById('error').classList.add('msg');
alert("submitted");
}
else {
document.getElementById('error').classList.remove('msg');
}
e.preventDefault();}
In this code snippet:
Define a function “validatePhoneNumber()”.
Get the value of the input field using the id “number” with the help of the “getElementById()” method and store it in a variable “pNumber”.
Call the function “phoneRegex()” by passing the input number “pNumber” as an argument, and check whether the input number is equal to the regex.
If yes! then shows an alert with the message “submitted” and adds the class “msg” using the “classList.add()” method that displays none.
If the condition is not true, show the error by calling the “classList.remove()” method, which will show an error.
After that, define a function called “phoneRegex()” where the regex pattern will be defined for the validating phone number:
function phoneRegex(input_str) {
var regPattern = /^\d{3}\d{3}\d{4}$/;
return regPattern.test(input_str);}
Lastly, call the function “validatePhoneNumber()” on the submit using the button’s id “submit” with the help of the “addEventListener()” method:
document.getElementById('form').addEventListener('submit', validatePhoneNumber);
Output
In the JavaScript file, use the below lines of code:
function validatePhoneNumber(e) {
var pNumber = document.getElementById('number').value;
if (!phoneRegex(pNumber)) {
document.getElementById('error').classList.add('msg');
alert("submitted");
}
else {
document.getElementById('error').classList.remove('msg');
}
e.preventDefault();}
In this code snippet:
Define a function “validatePhoneNumber()”.
Get the value of the input field using the id “number” with the help of the “getElementById()” method and store it in a variable “pNumber”.
Call the function “phoneRegex()” by passing the input number “pNumber” as an argument, and check whether the input number is equal to the regex.
If yes! then shows an alert with the message “submitted” and adds the class “msg” using the “classList.add()” method that displays none.
If the condition is not true, show the error by calling the “classList.remove()” method, which will show an error.
After that, define a function called “phoneRegex()” where the regex pattern will be defined for the validating phone number:
function phoneRegex(input_str) {
var regPattern = /^\d{3}\d{3}\d{4}$/;
return regPattern.test(input_str);}
Lastly, call the function “validatePhoneNumber()” on the submit using the button’s id “submit” with the help of the “addEventListener()” method:
document.getElementById('form').addEventListener('submit', validatePhoneNumber);
Output
![]() The above output signifies that the regex pattern for only phone numbers with 10 digits and without any special character or delimiter successfully works.
Example 2: Complex Phone Number Regex Validation
The below-given regex patterns or regular expressions allow phone numbers with 10 digits and special characters including plus sign, dash, and parenthesis.
Regex Pattern For Validating phone numbers With Delimiter dash (-)
The regex for validating phone numbers with 10 digits and a special character dash (-):
/^\d{3}[-]\d{3}[-]\d{4})$/
The pattern shows:
“^” denotes the start of the string
“/” forward slash character is used to indicate the regular expression’s boundaries
“d” stands for digits
“{}” indicates the limit
“[-]” indicates an allowed special character
“\” backslash character is the escape character
“$” denotes the end of the string
Add the above regex pattern in the “phoneRegex()” defined function:
function phoneRegex(input_str) {
var regPattern = /^\d{3}[-]\d{3}[-]\d{4})$/
return regPattern.test(input_str);}
The corresponding output will be:
The above output signifies that the regex pattern for only phone numbers with 10 digits and without any special character or delimiter successfully works.
Example 2: Complex Phone Number Regex Validation
The below-given regex patterns or regular expressions allow phone numbers with 10 digits and special characters including plus sign, dash, and parenthesis.
Regex Pattern For Validating phone numbers With Delimiter dash (-)
The regex for validating phone numbers with 10 digits and a special character dash (-):
/^\d{3}[-]\d{3}[-]\d{4})$/
The pattern shows:
“^” denotes the start of the string
“/” forward slash character is used to indicate the regular expression’s boundaries
“d” stands for digits
“{}” indicates the limit
“[-]” indicates an allowed special character
“\” backslash character is the escape character
“$” denotes the end of the string
Add the above regex pattern in the “phoneRegex()” defined function:
function phoneRegex(input_str) {
var regPattern = /^\d{3}[-]\d{3}[-]\d{4})$/
return regPattern.test(input_str);}
The corresponding output will be:
![]() Regex Pattern For Validating phone numbers With Delimiters Including dash (-), and Braces ()
The regex for validating phone numbers with 10 digits and special characters braces (), and dash (-):
/^\(?(\d{3})\)?[-]?(\d{3})[-]?(\d{4})$/
The pattern shows:
“^” denotes the start of the string
“/” forward slash character is used to indicate the regular expression’s boundaries
“d” stands for digits
“{}” indicates the limit
“[-]” indicates an allowed special character
“(?” also denotes as allowed in the input
“\” backslash character is the escape character
“$” denotes the end of the string
Append the above regular expression in the “phoneRegex()” defined function:
function phoneRegex(input_str) {
var regPattern = /^\(?(\d{3})\)?[-]?(\d{3})[-]?(\d{4})$/;
return regPattern.test(input_str);}
Output
Regex Pattern For Validating phone numbers With Delimiters Including dash (-), and Braces ()
The regex for validating phone numbers with 10 digits and special characters braces (), and dash (-):
/^\(?(\d{3})\)?[-]?(\d{3})[-]?(\d{4})$/
The pattern shows:
“^” denotes the start of the string
“/” forward slash character is used to indicate the regular expression’s boundaries
“d” stands for digits
“{}” indicates the limit
“[-]” indicates an allowed special character
“(?” also denotes as allowed in the input
“\” backslash character is the escape character
“$” denotes the end of the string
Append the above regular expression in the “phoneRegex()” defined function:
function phoneRegex(input_str) {
var regPattern = /^\(?(\d{3})\)?[-]?(\d{3})[-]?(\d{4})$/;
return regPattern.test(input_str);}
Output
![]() The above output accepts the special characters or delimiters in input, including braces and dashes with the 10 digits phone number.
It displays an error while the (+) sign is used in the input.
Regex Pattern For Validating phone numbers With All Delimiters Including dash (-), Brackets (), Dot (.), Spaces, and (+) Sign
The regex for validating phone numbers with 10 digit and special characters braces (), dash (-), dot(.), the plus (+) sign, and the space:
/^[\+]?[(]?[0-9]{3}[)]?[-\s\.]?[0-9]{3}[-\s\.]?[0-9]{4}$/
The pattern shows:
“^” denotes the start of the string
“/” forward slash character is used to indicate the regular expression’s boundaries
“d” stands for digits
“{}” indicates the limit
“[-]” indicates an allowed special character
“[(]?” also denotes as allowed in the input
“\s” denotes a space
“\.” indicates the dot
“\” backslash character is the escape character
“$” denotes the end of the string
Use the above pattern in the “phoneRegex()” defined function:
function phoneRegex(input_str) {
var regPattern = /^[\+]?[(]?[0-9]{3}[)]?[-\s\.]?[0-9]{3}[-\s\.]?[0-9]{4}$/;
return regPattern.test(input_str);}
Output
The above output accepts the special characters or delimiters in input, including braces and dashes with the 10 digits phone number.
It displays an error while the (+) sign is used in the input.
Regex Pattern For Validating phone numbers With All Delimiters Including dash (-), Brackets (), Dot (.), Spaces, and (+) Sign
The regex for validating phone numbers with 10 digit and special characters braces (), dash (-), dot(.), the plus (+) sign, and the space:
/^[\+]?[(]?[0-9]{3}[)]?[-\s\.]?[0-9]{3}[-\s\.]?[0-9]{4}$/
The pattern shows:
“^” denotes the start of the string
“/” forward slash character is used to indicate the regular expression’s boundaries
“d” stands for digits
“{}” indicates the limit
“[-]” indicates an allowed special character
“[(]?” also denotes as allowed in the input
“\s” denotes a space
“\.” indicates the dot
“\” backslash character is the escape character
“$” denotes the end of the string
Use the above pattern in the “phoneRegex()” defined function:
function phoneRegex(input_str) {
var regPattern = /^[\+]?[(]?[0-9]{3}[)]?[-\s\.]?[0-9]{3}[-\s\.]?[0-9]{4}$/;
return regPattern.test(input_str);}
Output
![]() We have compiled all the possible regex patterns or regular expressions for validating phone numbers.
We have compiled all the possible regex patterns or regular expressions for validating phone numbers.
Conclusion
Using Regular expressions is the simplest way to validate phone numbers.
There are a lot of checks that the developer can apply on the phone number with the help of regex.
The checks can be only numbers or numbers with special characters or delimiters, including dashes, braces, dots, spaces, and the plus sign.
This study explains different regexes that can validate the phone number.
Non-Breaking Space in an HTML String
In the phase of formatting a web page or website, there are some functionalities or included elements such as some specific text, images, videos, tables, etc which need not be split or spaced out between two lines.
In such a case, placing a non-breaking space in an HTML string is very helpful in preventing the text from proceeding to a new line/page.
This write-up will explain the working of various entities to add a non-breaking space in an HTML string.
How to Add a Non-Breaking Space in an HTML String?
A non-breaking space can be added to an HTML string by applying the following approaches:
“&ensp” and “&emsp” Entities
“ ” and “&thinsp” Entities
“ ” Entity
Example 1: Add a Non-Breaking Space in an HTML String Using the &ensp and &emsp Entities
The “&ensp” entity is used to place “two” blank spaces in an HTML string.
The “&emsp” entity places a wider space comprising “four” blank spaces in an HTML string.
These entities will be applied separately on two different HTML strings in the below example.
<center><h3 id= "element" onmouseover = "nonBreak()">Website</h3><h3 id= "element2" onmouseover = "nonBreak()">WebPage</h3></center>
In the above-given example, specify the following headings within the “<center>” tag attached with an “onmouseover” event invoking the function nonBreak()
Move on to the JavaScript part of the code:
<script>function nonBreak(){var element = document.querySelector('#element');var element2 = document.querySelector('#element2');
element.innerHTML = 'Web site';
element2.innerHTML = 'Web Page';}</script>
In the above js code,
Declare the function named “nonBreak()”.
In its definition, access the specified headings using the “document.querySelector()” method.
After that, apply the “&ensp” entity to break the string in such a way that exactly “2” blank spaces are placed at the specified entity’s position.
Similarly, apply the “&emsp” entity.
This entity at the specified position will apply “4” blank spaces in another string.
Output
![]()
Example 2: Add a Non-Breaking Space in an HTML String Using the   and &thinsp Entities
The “ ” entity can be applied to place a single blank space and the “&thinsp” entity also places a single blank space, but it is relatively thin.
In the following example, these entities will be applied on two different strings.
<center><h3 id="element" onmouseover = "nonBreak()">Python</h3><h3 id="element1" onmouseover = "nonBreak()">JavaScript</h3></center>
Firstly, repeat the above-discussed approaches for including the specified headings having an attached “onmouseover” event redirecting to the function nonBreak()
Follow the below JavaScript part of the code:
function nonBreak(){var element = document.querySelector('#element');var element1 = document.querySelector('#element1');
element.innerHTML = 'Python';
element1.innerHTML = 'JavaScript';}
In the above js code:
Define the function named “nonBreak()”.
Here, similarly, access the specified headings before using the “document.querySelector()” method.
Now, apply the “ ” entity to apply a single non-breaking space at the particular position in between the string value and display this updated value on the document object model(DOM) using the “innerText” property by replacing the specified same value without any space.
Similarly, apply the “&thinsp” entity to another string.
This will result in placing a relatively thinner single blank space in between and displaying it on the DOM as discussed in the previous step
Output
![]()
Example 3: Add a Non-Breaking Space in an HTML String Using the   Entity
The “ ” is a numeric entity that also places a single blank space.
This entity will be applied in the below-given example to separate the string value into two halves.
Follow the below-given code-snippet:
<center><h3 id= "element">JavaScript</h3><button onclick = "nonBreak()">Click to add non-breaking space>/button></center>function nonBreak(){var element = document.querySelector('#element');
element.innerHTML = 'JavaScript';}
First, include the following heading with the specified “id” to place the non-breaking spaces in it.
After that, create a button and attach an “onclick” event to it invoking the function nonBreak().
In the js code, declare a function named “nonBreak()”.
In its definition, access the specified heading by its “id” using the “document.querySelector()” method.
Finally, apply the numeric entity “ ” twice which will result in placing two blank spaces in between the string.
The “innerText” property will transform the specified HTML string on the DOM accordingly upon the button click.
Output
![]() This article demonstrated various entities that can place a non-breaking space in an HTML string.
This article demonstrated various entities that can place a non-breaking space in an HTML string.
Conclusion
The “&ensp” and “&emsp” entities, the “ ” and “&thinsp” entities, or the “ ” numeric entity can be utilized to place non-breaking space in an HTML string.
The &ensp and &emsp entities can be applied to place “2” and “4” blank spaces in an HTML string respectively.
The   and &thinsp entities can be implemented to place a single blank space and a comparatively thinner blank space respectively.
The   numeric entity can be used to place a single blank space as well.
This blog explained the implementation of various entities to apply non-breaking space in an HTML string.
Non-Breaking Space in a JavaScript String
Placing a “non-breaking space” is very effective in the case of relating a string value or associating it with another value.
Moreover, it also enhances readability and enhances concentration at the user’s end as well.
It also maintains the formatting of the overall document by manually placing the spaces and not advancing to the next line abruptly.
What is a Non-Breaking Space?
It is a space character that will avoid breaking into a new line and creates a space in a line that cannot be broken by the wrapped words.
How to Place a Non-Breaking Space in a JavaScript String?
The “\u00A0” Unicode character code approach can be opted for placing a non-breaking space in the JavaScript string.
This character code, when placed in a string value, places a single blank space only.
Example 1:
In the following example, initialize the following string value and apply the following character code specified in between the string value:
var string = "Linux \u00A0\u00A0\u00A0 hint";
Finally, display the resulting string value.
This will result in displaying the string value having “3” blank spaces which equal the number of the character code applied in between:
console.log(string);
Output
![]() We have demonstrated the approach to place a non-breaking space in a JavaScript string.
Example 2:
In this example, apply the “\u00A0” Unicode character code approach on multiple string values for placing the non-breaking spaces single or multiple times:
<center><h3>Python</h3><h3>Java</h3><h3>JavaScript</h3><button onclick = "nonBreak()">Click to apply non-breaking space</button></center>
In the above-given HTML code,
Within the “<center>” tag, specify the following headings to observe the difference before and after the applied Unicode character code.
After that, attach an “onclick” event invoking the function nonBreak()
Let’s move on to the JavaScript part of the code:
function nonBreak(){var string1 = "Py\u00A0thon";var string2 = "Ja\u00A0\u00A0va";var string3 = "Java\u00A0\u00A0\u00A0Script";
console.log("The string with 1 non-breaking space is:", string1)
console.log("The string with 2 non-breaking space is:", string2)
console.log("The string with 3 non-breaking space is:", string3)}
In the above js code:
Define the function named “nonBreak()”.
In its definition, initialize the specified string values.
The “character code” is applied in each of the string values with the change in only the number of times applied in each case.
Output
We have demonstrated the approach to place a non-breaking space in a JavaScript string.
Example 2:
In this example, apply the “\u00A0” Unicode character code approach on multiple string values for placing the non-breaking spaces single or multiple times:
<center><h3>Python</h3><h3>Java</h3><h3>JavaScript</h3><button onclick = "nonBreak()">Click to apply non-breaking space</button></center>
In the above-given HTML code,
Within the “<center>” tag, specify the following headings to observe the difference before and after the applied Unicode character code.
After that, attach an “onclick” event invoking the function nonBreak()
Let’s move on to the JavaScript part of the code:
function nonBreak(){var string1 = "Py\u00A0thon";var string2 = "Ja\u00A0\u00A0va";var string3 = "Java\u00A0\u00A0\u00A0Script";
console.log("The string with 1 non-breaking space is:", string1)
console.log("The string with 2 non-breaking space is:", string2)
console.log("The string with 3 non-breaking space is:", string3)}
In the above js code:
Define the function named “nonBreak()”.
In its definition, initialize the specified string values.
The “character code” is applied in each of the string values with the change in only the number of times applied in each case.
Output
![]() In the above output, the difference in the string format can be observed on the DOM and the console.
We have compiled the implementation of applying a non-breaking space in a JavaScript string.
In the above output, the difference in the string format can be observed on the DOM and the console.
We have compiled the implementation of applying a non-breaking space in a JavaScript string.
Conclusion
The “\u00A0b” character code approach can be implemented to place a single blank space in a JavaScript string.
It can be applied in different case scenarios of placing either single or multiple non-breaking spaces as well.
The specific character code functions like the normally used “Tab” key and is useful in providing a non-breaking space in a string rather than advancing to the next line.
This article explained the approach to applying a non-breaking space in a JavaScript string.
JavaScript String startsWith()
While developing apps, programmers need to check the starting word of the string or a substring of a string at a specific position.
JavaScript helps them to perform these types of operations with its predefined methods.
The “startWith()” method checks the start word or character of a string, whether it exists in a string or not.
This article will demonstrate the startsWith() method of the String type.
JavaScript String startsWith()
A String’s “startsWith()” method determines whether or not the string begins with the given characters.
It performs a case-sensitive search because it uses a case-sensitive approach.
It is specifically used to determine the start of a string.
The original string’s value is not affected by it.
Syntax
The following syntax is used for the startsWith() method:
startsWith(searchString)
Follow the below syntax to search at a particular index of a string:
startsWith(searchString, position)
In the above syntax:
The “searchString” is the string character or a substring that will be passed and check whether the string starts with it or not.
The “position” is the specified index where the string will be checked whether it starts with the specified character or substring.
Return Value
It returns a boolean value “true” as an output if the “searchString” exists in the string or returns “false” if it is not present in the string.
Example 1:
First, create a variable “string”, that stores the string “LinuxHint is the best Website for learning skills”:
var string = 'LinuxHint is the best Website for learning skills';
Check whether the string starts with the word “Linux” using the “startsWith()” method:
console.log(string.startsWith('Linux'));
The output displays “true” which shows the string starts with the word “Linux”:
![]() Example 2:
In this example, the “startsWith()” method is used with the second parameter, which defines the starting point for the search:
console.log(string.startsWith('L', 34));
The startsWith() method matches characters by case.
Therefore, it returns false as “L” and “l” are not in the same case:
Example 2:
In this example, the “startsWith()” method is used with the second parameter, which defines the starting point for the search:
console.log(string.startsWith('L', 34));
The startsWith() method matches characters by case.
Therefore, it returns false as “L” and “l” are not in the same case:
![]() We have covered all the essential information related to the String startWith() JavaScript method.
We have covered all the essential information related to the String startWith() JavaScript method.
Conclusion
The String’s “startWith()” method checks the start word or character of a string, whether it exists in a string or not.
It gives a boolean value “true” or “false” based on the search result.
It performs a case-sensitive search.
This article demonstrated the JavaScript startsWith() method of the String type with examples.
JavaScript Split String Into Array by Comma
The string is a collection of characters representing a single data and separated using separators such as commas, spaces, and so on.
While coding, the programmers sometimes need to change a string into an array.
JavaScript offers several methods to convert a string into an array, but the conversion of the string based on the separator is done by using the “split()” method.
This post will demonstrate the procedure to split a string into an array by a comma.
How to Split String Into an Array by Comma?
The “split()” method uses a separator to split a String into an ordered sequence of substrings.
The array containing these substrings is then returned.
It doesn’t change the original string in any way.
Syntax
Follow the given-provided syntax for the split() method:
string.split(',')
Here, comma (,) is the separator where the string will split.
Return Value
It returns an array of split strings.
Example 1:
Create a variable “string” that stores a comma-separated string:
var string = "Linuxhint, best Website, learning, Skills";
Call the “split()” method by passing “comma(,)” as an argument and store the result in a variable “array”:
var array = string.split(',');
Print the resultant array on the console using the “console.log()” method:
console.log(array);
Output
![]() The above output shows that the string splits into an array whenever a comma is encountered.
Example 2
In the following example, get the value of the splitted string at the specified index of the array:
console.log(array[2]);
Output
The above output shows that the string splits into an array whenever a comma is encountered.
Example 2
In the following example, get the value of the splitted string at the specified index of the array:
console.log(array[2]);
Output
![]() This blog has provided the necessary information related to the split() method to split the string into an array by comma.
This blog has provided the necessary information related to the split() method to split the string into an array by comma.
Conclusion
The “split()” method can be utilized to split a string into an array by comma.
The split() method splits the string into substrings based on the specified separator and gives back an array of the split substrings as an output.
The specified separator is passed inside the arguments of the split method, which in the given case will be a “comma”.
This post demonstrated the procedure to split the string into an array by a comma.
JavaScript Right Click Menu
A context menu or right-click menu opens when the user right-clicks on a web page.
Sometimes, developers may need to expand the default context menu but are unable to do so.
So, the developers create their custom menus.
A custom context menu gives the option to add unique features and helps the website or webpage look more adaptable and appropriate for the context.
This study will demonstrate the right-click menu and how to create a custom right-click menu.
What is the Default Right Click Menu on a Webpage?
When you click on a web page with the right button of your mouse, a box appears with various menu options, it is called a right-click menu or a default context menu:
![]() Let’s see an example of how to create a custom right-click menu on a webpage.
Creating a Custom Right-Click Menu with JavaScript
We will create a simple webpage with HTML and CSS and then create a custom right-click menu on the webpage using JavaScript.
We will position and style our custom right-click menu using CSS properties:
<h2>JavaScript Right Click Menu</h2><h4>To get a custom context menu, click anywhere on the page</h4>
Then, write the code for the custom right-click menu in a JavaScript file.
First, hide or block the default context menu on a webpage.
Call the “preventDefault()” method that prevents the default right-click menu from appearing while triggering the “contextmenu” event.
Call the defined function named “createMenuonRightClick()” for custom right-click menu with “e.clientX” and “e.clientY” arguments that shows the mouse position:
_currentMenuVisible = null;
document.addEventListener('contextmenu', e => {
e.preventDefault();
createMenuonRightClick(e.clientX,e.clientY);});
Define a function “createMenuonRightClick()” which will be launched upon the right-click of the user on the webpage:
function createMenuonRightClick(x, y) {
closetheOpenedMenu();
const menuElement = document.createElement('div');
menuElement.classList.add('contextMenu');
const menuListElement = document.createElement('ul');
const menuArray = ['Refresh', 'Open', 'Save', 'Copy', 'Help'];
for (var element of menuArray) {
var listElement = document.createElement('li');
listElement.innerHTML = '<a href="#">' + element + '</a>';
menuListElement.appendChild(listElement);
}
menuElement.appendChild(menuListElement);
document.body.appendChild(menuElement);
_currentMenuVisible = menuElement;
menuElement.style.display = 'block';
menuElement.style.left = x + "px";
menuElement.style.top = y + "px";}
Let’s go over what’s happening in the code mentioned above:
On the right click, the first thing is to close any other right-click or context menus that are currently opened on the page.
Then we create a new “div” which will host the custom right-click menu.
Then, inside the “div”, an unordered list is added that contains an array of lists that appear as a menu on the web page.
To close the context menu, click anywhere on the web page.
This will be handled using the “click” event which will be triggered when the user clicks on the webpage after opening the right-click menu.
This event handler calls the specified function “closetheOpenedMenu()”:
document.addEventListener('click', e => {
closetheOpenedMenu();});
Now, define a function “closetheOpenedMenu()” to close the right-click menu where call the “closeContextMenu()” method which will close the menu:
function closetheOpenedMenu() {
if (_currentMenuVisible !== null) {
closeContextMenu(_currentMenuVisible);
}}
The “closeContextMenu()” method is defined below:
function closeContextMenu(menu) {
menu.style.left='0px';
menu.style.top='0px';
document.body.removeChild(menu);
_currentMenuVisible = null;}
To style a context menu or right-click menu, apply CSS to various elements to make it look good.
First, add styling to the body tag to align the text in the center and set the background color:
body{
text-align:center;
background: #b7c4f1;}
Style the menu by setting the text color, background color, border, and position to “absolute”:
.contextMenu {
position: absolute;
width: 100px; height: auto;
color: #b7c4f1;
background: #344683;
border: 1px solid #344683;
display: none;}
Style the unordered list with list items to set the padding and margin:
.contextMenu ul {
padding: 0;
margin: 0;}
.contextMenu ul li {
border-bottom: #b7c4f1 1px solid;
padding: 0;
margin: 0;}
Set the border of the last option of the menu using the “border-bottom” property that will be none;
.contextMenu ul li:last-child{
border-bottom: none;}
Style the menu with an anchor tag.
.contextMenu ul li a {
text-align: left;
display: block;
padding: 5px 10px;
color: #b7c4f1;
text-transform: capitalize;
text-decoration: none;}
Set the background color of the list items on hover:
.contextMenu ul li a:hover {
background: #2777FF;}
As you can see in the output, clicking on a web page with the right mouse button displays a custom right-click menu:
Let’s see an example of how to create a custom right-click menu on a webpage.
Creating a Custom Right-Click Menu with JavaScript
We will create a simple webpage with HTML and CSS and then create a custom right-click menu on the webpage using JavaScript.
We will position and style our custom right-click menu using CSS properties:
<h2>JavaScript Right Click Menu</h2><h4>To get a custom context menu, click anywhere on the page</h4>
Then, write the code for the custom right-click menu in a JavaScript file.
First, hide or block the default context menu on a webpage.
Call the “preventDefault()” method that prevents the default right-click menu from appearing while triggering the “contextmenu” event.
Call the defined function named “createMenuonRightClick()” for custom right-click menu with “e.clientX” and “e.clientY” arguments that shows the mouse position:
_currentMenuVisible = null;
document.addEventListener('contextmenu', e => {
e.preventDefault();
createMenuonRightClick(e.clientX,e.clientY);});
Define a function “createMenuonRightClick()” which will be launched upon the right-click of the user on the webpage:
function createMenuonRightClick(x, y) {
closetheOpenedMenu();
const menuElement = document.createElement('div');
menuElement.classList.add('contextMenu');
const menuListElement = document.createElement('ul');
const menuArray = ['Refresh', 'Open', 'Save', 'Copy', 'Help'];
for (var element of menuArray) {
var listElement = document.createElement('li');
listElement.innerHTML = '<a href="#">' + element + '</a>';
menuListElement.appendChild(listElement);
}
menuElement.appendChild(menuListElement);
document.body.appendChild(menuElement);
_currentMenuVisible = menuElement;
menuElement.style.display = 'block';
menuElement.style.left = x + "px";
menuElement.style.top = y + "px";}
Let’s go over what’s happening in the code mentioned above:
On the right click, the first thing is to close any other right-click or context menus that are currently opened on the page.
Then we create a new “div” which will host the custom right-click menu.
Then, inside the “div”, an unordered list is added that contains an array of lists that appear as a menu on the web page.
To close the context menu, click anywhere on the web page.
This will be handled using the “click” event which will be triggered when the user clicks on the webpage after opening the right-click menu.
This event handler calls the specified function “closetheOpenedMenu()”:
document.addEventListener('click', e => {
closetheOpenedMenu();});
Now, define a function “closetheOpenedMenu()” to close the right-click menu where call the “closeContextMenu()” method which will close the menu:
function closetheOpenedMenu() {
if (_currentMenuVisible !== null) {
closeContextMenu(_currentMenuVisible);
}}
The “closeContextMenu()” method is defined below:
function closeContextMenu(menu) {
menu.style.left='0px';
menu.style.top='0px';
document.body.removeChild(menu);
_currentMenuVisible = null;}
To style a context menu or right-click menu, apply CSS to various elements to make it look good.
First, add styling to the body tag to align the text in the center and set the background color:
body{
text-align:center;
background: #b7c4f1;}
Style the menu by setting the text color, background color, border, and position to “absolute”:
.contextMenu {
position: absolute;
width: 100px; height: auto;
color: #b7c4f1;
background: #344683;
border: 1px solid #344683;
display: none;}
Style the unordered list with list items to set the padding and margin:
.contextMenu ul {
padding: 0;
margin: 0;}
.contextMenu ul li {
border-bottom: #b7c4f1 1px solid;
padding: 0;
margin: 0;}
Set the border of the last option of the menu using the “border-bottom” property that will be none;
.contextMenu ul li:last-child{
border-bottom: none;}
Style the menu with an anchor tag.
.contextMenu ul li a {
text-align: left;
display: block;
padding: 5px 10px;
color: #b7c4f1;
text-transform: capitalize;
text-decoration: none;}
Set the background color of the list items on hover:
.contextMenu ul li a:hover {
background: #2777FF;}
As you can see in the output, clicking on a web page with the right mouse button displays a custom right-click menu:
![]()
Conclusion
Since the default context menu cannot be expanded to add custom options, therefore, a custom right-click menu needs to be created to provide custom options to the user.
A custom right-click menu can easily be created at the mouse’s current position with the help of JavaScript and CSS.
In this blog post, a custom right-click menu has been created and the procedure is explained step by step.
JavaScript Profiler | Explained
In JavaScript, while dealing with codes involving complexities in them, there is a need for some sort of effective tool to analyze the compile time and memory consumed in carrying out each of the code functionality.
In such a case, the JavaScript profiler does wonder in handling various functionalities.
A few of these will be discussed in this article.
What is a JavaScript Profiler?
JavaScript profiler is a very efficient tool for understanding the code in a better way.
In addition to that, it assists a lot in the improved “execution speed” and notifying about the consumed “memory” and “time” against each of the performed functionality.
To summarize, it plays a great role in analyzing and optimizing the overall code effectively.
In the following section, the implementation of the JavaScript profiler upon various functionalities will be demonstrated.
We will apply the working of the JavaScript profiler to the following:
“switch” Statement.
“Specified Function”.
Tutorial for Executing the JavaScript Profiler
Right Click on the opened tab and click on the “Inspect Element”.
After that, point to the 3 dots in the upper right corner.
From the stated options, select More Tools -> JavaScript Profiler.
The “JavaScript Profiler” window will open as a result.
Now, click on the “start” option in the JavaScript profiler and execute the code functionalities.
Once the functionalities are executed, click on the “stop” option.
This will result in notifying the user of the consumed time against each of the functionality.
Demonstration
![]() Here, the profiler is applied to check the functionalities of the “alert” dialogue box and the attached “onmouseover” event.
Here, the profiler is applied to check the functionalities of the “alert” dialogue box and the attached “onmouseover” event.
Example 1: Applying JavaScript Profiler on the switch Statement
In the following example, the prompt/alert dialogue boxes and the “switch” statement will be applied to be catered to the JavaScript profiler.
Firstly, ask the user to input the name with respect to the provided cases:
var get = prompt("Enter the name:")
Next, include the “switch” statement to access the input value and display the corresponding message against the case upon the matched value:
switch(get){case "David":
alert("The name is David")
break;case "Alex":
alert("The name is Alex")
break;}
Output
![]() In the above output, it can be observed that the JavaScript profiler displays the time consumed in operating each of the functionality separately in the above-demonstrated code.
In the above output, it can be observed that the JavaScript profiler displays the time consumed in operating each of the functionality separately in the above-demonstrated code.
Example 2: Applying JavaScript Profiler on the Specified Function
In this example, check the consumed time of the JavaScript profiler in handling a particular function.
Firstly, specify the following heading having the stated “id” and justify it to the center using the “<center>” tag.
Also, attach an “onmouseover” event with the specified function.
This will result in accessing the function access() upon hovering the mouse over the specified heading:
<center><h3 id= "head" onmouseover= "access()">This is a Website</h3></center>
Now, declare the function named “access()”.
In its definition, fetch the included heading using the “document.getElementById()” method.
After that, apply the “innerText” property to transform the already specified heading to the updated one upon the mouse hover as follows:
function access(){var get= document.getElementById('head')get.innerText= "Linuxhint"}
Output
![]() We have compiled the concept of applying the JavaScript profiler to various code algorithms and noted the consumed time against each of them.
We have compiled the concept of applying the JavaScript profiler to various code algorithms and noted the consumed time against each of them.
Conclusion
The JavaScript profiler can be applied on the “switch” statement along with the prompt and alert dialogue boxes or upon the “specified function”.
From the discussed implementation, it can be observed that the latter approach consumes comparatively less time than the former approach.
This write-up demonstrated the implementation of the JavaScript profiler upon the various functionalities.
Check Whether an Element Contains a Class
Using classes in HTML allows elements to be grouped together and have the same styling or functionality.
As a result, changing the behavior of all elements participating in a class is as easy as writing or changing a single line of code.
In some cases, such as updating a style, users may need to verify whether a particular class is part of an element or not.
This tutorial will illustrate how to check if the element contains a class.
How to Check Whether an Element Contains a Class?
To verify whether an element contains a class, use the following methods:
contains() method
matches() method
Let’s understand the working of these methods individually.
Method 1: Check Whether an Element Contains a Class Using contains() Method
The “contains()” method of the “classList” object can be used to verify whether an element has a particular class name.
It is one of the most popular methods utilized to determine the class of an element.
Syntax
Follow the given syntax for the contains() method:
element.classList.contains('class-name')
Here,
“element” is an HTML element that will be checked whether it contains this specific class.
The “class-name” identify the name of the CSS class that the element is a part of
Return value
If the element has the class name, it returns “true”, else it gives back “false”.
Example
Create a button with classes “buttonSize” and “buttonStyle” for styling the button.
Attach an “onclick” event with the button that triggers the function to check whether the specified class is part of the button element or not:
<button class="buttonSize buttonStyle" onclick="classCheck()">Button</button>
Before the JavaScript code, the output will look like this:
![]() In a JavaScript file, simply write these lines of code:
function classCheck(){
const elementClass = document.querySelector('button');
if(elementClass.classList.contains('buttonStyle')){
alert("Yes! the button contains this 'buttonStyle' class");
}}
In the above code:
Define a function “classCheck()” that will be triggered on the button click.
Then, fetch the button using the “querySelector()” method and store it in a variable “elementClass”.
Call the “contains()” method by passing a specific class name like “buttonStyle” which will check whether it is part of the button or not.
If it returns “true”, an alert message will be displayed:
Output
In a JavaScript file, simply write these lines of code:
function classCheck(){
const elementClass = document.querySelector('button');
if(elementClass.classList.contains('buttonStyle')){
alert("Yes! the button contains this 'buttonStyle' class");
}}
In the above code:
Define a function “classCheck()” that will be triggered on the button click.
Then, fetch the button using the “querySelector()” method and store it in a variable “elementClass”.
Call the “contains()” method by passing a specific class name like “buttonStyle” which will check whether it is part of the button or not.
If it returns “true”, an alert message will be displayed:
Output
![]() The above output indicates that when the button is clicked, it shows that it has a “buttonStyle” class.
The above output indicates that when the button is clicked, it shows that it has a “buttonStyle” class.
Method 2: Check Whether an Element Contains a Class Using matches() Method
There is another method, “matches()”, that will determine whether the element has a particular class or not.
It takes a single parameter, the class name, to verify whether the element contains that class or not.
Syntax
The following syntax is utilized for the matches() method:
element.matches('.class-name')
In the above syntax,
The “element” is an HTML element that will be checked whether it contains this particular class or not.
The “class-name” indicates the name of the CSS class that the element is a part of.
The Name of the class is passed to the matches() method with a dot(.) that identifies “class”.
Return value
It also returns “true” if the or element has a class else, “false” is returned.
Example
In a JavaScript file, use the given lines of code to verify whether the element has the specific class or not by calling the matches() method:
function classCheck(){
const elementClass = document.querySelector('button');
if(elementClass.matches('.buttonStyle')){
alert("Yes! the button contains this 'buttonStyle' class");
}}
In the above code snippet:
First, define a function “classCheck()” that will be triggered on the button click.
Then, fetch the button using the “querySelector()” method and store it in a variable “elementClass”.
Call the “matches()” method by passing a specific class name like here, “buttonStyle” with a dot(.) before it, which will indicate that it is the class and check whether it is part of the button or not.
If the matches() method returns “true”, an alert message “Yes! the button contains this ‘buttonStyle’ class” will be displayed:
Output
![]()
Conclusion
To verify whether an element contains a class, use the JavaScript “contains()” method or the “matches()” method.
The contains() method is the most used method to determine the element’s class.
Both methods return “true” if the element has a class else “false” is returned.
This tutorial illustrated how to check if an element contains a class or not with detailed examples.
JavaScript getElementsByClassName
In JavaScript, the getElementsByClassName() method is very helpful for accessing the elements that match all the class names passed as arguments.
Moreover, it returns an HTMLCollection which contains every descendant element.
Furthermore, this method also assists in fetching the required HTML elements, storing them in variables, and performing the required functionality using JavaScript.
This write-up will guide about the implementation of the “getElementsByClassName()” method.
What is JavaScript getElementsByClassName() Method?
The “getElementsByClassName()” method returns the elements having the specified class name, which is passed as an argument.
It returns an object that resembles an array of all child items with the specified class names.
Additionally, it includes the HTML collection of all the child elements.
How to Use JavaScript getElementsByClassName() Method?
For the purpose of using JavaScript getElementsByClassName() method, follow the given syntax:
element.getElementsByClassName(classname)
In the given syntax, “classname” is the mandatory argument to be passed.
It is the string value that refers to single or multiple class names.
Example 1: Fetching a Single Element Using getElementByClassName() Method
In the following example, firstly, we will create a div, assign it a “Class” and add some text in it:
<div class= "Class">
Implementation of Class</div>
Now, apply the “getElementsByClassName()” method to access created div by passing the class name as argument:
var x= document.getElementsByClassName('Class');
Lastly, display the resultant value on the DOM using the “document.write()” method.
This will return an array-like object:
document.write(x);
The corresponding output will be:
![]() In the above output, the [object HTMLCollection] refers to the array-like object.
Example 2: Fetching Multiple Elements Using getElementsByClassName() Method
In the following example, firstly, we will add three checkboxes using the <input> tag, assign them the same class as “lang” and add the required text as shown below:
<input type= "checkbox" class= "lang" value= "Python">Python<br/><input type= "checkbox" class= "lang" value= "JavaScript">JavaScript<br/><input type= "checkbox" class= "lang" value= "HTML">HTML<br/>
Now, include an additional checkbox with the value “Select All” and attach an “onclick()” event to it so that when the checkbox is selected, the “check()” function is called with the argument “this” like follows:
<input type= "checkbox" onclick= 'check(this)'/>Select All<br/>
Next, in the JavaScript file, define a function called “check()” with a variable named “checkBox” as an argument referring to “this” specified before.
Now, access the checkbox using the document.getElementsByClassName() method and place the value of the class attribute “lang” as its argument.
finally, use a “for” loop to iterate each value in a checkbox and use the “checked” attribute to mark each value as checked:
function check(checkBox){
get = document.getElementsByClassName('lang');
for(var i=0;i<get.length;i++) {
get[i].checked = checkBox.checked;
}}
Output
In the above output, the [object HTMLCollection] refers to the array-like object.
Example 2: Fetching Multiple Elements Using getElementsByClassName() Method
In the following example, firstly, we will add three checkboxes using the <input> tag, assign them the same class as “lang” and add the required text as shown below:
<input type= "checkbox" class= "lang" value= "Python">Python<br/><input type= "checkbox" class= "lang" value= "JavaScript">JavaScript<br/><input type= "checkbox" class= "lang" value= "HTML">HTML<br/>
Now, include an additional checkbox with the value “Select All” and attach an “onclick()” event to it so that when the checkbox is selected, the “check()” function is called with the argument “this” like follows:
<input type= "checkbox" onclick= 'check(this)'/>Select All<br/>
Next, in the JavaScript file, define a function called “check()” with a variable named “checkBox” as an argument referring to “this” specified before.
Now, access the checkbox using the document.getElementsByClassName() method and place the value of the class attribute “lang” as its argument.
finally, use a “for” loop to iterate each value in a checkbox and use the “checked” attribute to mark each value as checked:
function check(checkBox){
get = document.getElementsByClassName('lang');
for(var i=0;i<get.length;i++) {
get[i].checked = checkBox.checked;
}}
Output
![]() We have compiled the use of the getElementsByClassName() method using various examples.
We have compiled the use of the getElementsByClassName() method using various examples.
Conclusion
The “getElementsByClassName()” method returns the elements having the specified class name, which is passed as an argument.
It returns an object that resembles an array of all child items with the specified class names.
You can utilize this method to select single or multiple HTML elements having the same class name.
This article explained the use of the getElementsByClassName() method using various examples.
How to Use \n in a JavaScript String
The use of \n is much needed when dealing with long string values.
More specifically, when designing a web page or a website where the placement of long paragraphs is required in the Document Object Model to manage the content.
Also, in the case of allowing the programmers to search for line breaks in the text files.
In such scenarios, using \n string can be helpful to maintain the proper format and enhance the overall document design.
This write-up will discuss the use of \n in a JavaScript string.
How to Use \n in a JavaScript String?
“\n” can be used in a JavaScript string by simply placing it between the string value.
In the other case, the same functionality can be applied using “template literals”.
Check out the following examples to have an idea about the stated concepts.
Example 1: Use \n in a JavaScript String by Placing it Between the String Value
In the following example, we will assign the string value in the variable named “string”.
Here, “\n” will divide the added string into two halves:
let string = "This is JavaScript\nIt is a programming language"
Finally, log the resultant string value separated with a new line:
console.log(string);
The corresponding output will be as follows:
![]() Alteratively, you can also apply the same functionality using “template literals”
Example 2: Use Template Literals in a JavaScript String
“Template Literals” use back-ticks (“) instead of (“”) to define a string and allows multi-line strings as well.
This technique can be implemented by dividing the specific string value into multi lines in order to add a new line.
In the below-given example, we will store a string value in a variable named “string”.
Also, divide the string value into multiple lines and log the corresponding string value on the console using template literals:
const string = `Linux Hint
This is a website`
console.log(string);
The output in this case will be as follows:
Alteratively, you can also apply the same functionality using “template literals”
Example 2: Use Template Literals in a JavaScript String
“Template Literals” use back-ticks (“) instead of (“”) to define a string and allows multi-line strings as well.
This technique can be implemented by dividing the specific string value into multi lines in order to add a new line.
In the below-given example, we will store a string value in a variable named “string”.
Also, divide the string value into multiple lines and log the corresponding string value on the console using template literals:
const string = `Linux Hint
This is a website`
console.log(string);
The output in this case will be as follows:
![]() We have compiled the examples to use \n and template literals for adding a new line in a JavaScript string.
We have compiled the examples to use \n and template literals for adding a new line in a JavaScript string.
Conclusion
To use \n, place it between the string value to add the rest of the part to the next line.
In the other case, you can also utilize the template literals to apply the same functionality using back-ticks and place the string value into multi-lines, which also outputs the same result.
This manual discussed the usage of \n and the template literals in a JavaScript string.
How to Tokenize a String
To address the issue of string tokenizing, some languages offer special classes., no dedicated classes or functions support tokenizing string problems.
However, we have an effective mechanism in the form of regular expressions.
Therefore, use regular expressions with a JavaScript predefined method to parse strings into tokens for tokenization.
This article will illustrate the procedure for JavaScript string tokenization.
How to Tokenize a String?
To tokenize a string, use the JavaScript built-in method named the “split()” method.
The JavaScript split() method splits a string into an array of substrings.
The original string is not changed.
It requires two optional parameters that indicate how the method should act.
How to Tokenize a String Using split() Method?
Follow the below syntax of the split() method for tokenizing a string:
string.split(separator, limit);
Here, the “separator” is an alphanumeric or non-alphanumeric character, such as a space, or a regex pattern, is used as the separator parameter to specify where to split the string.
“limit” is an integer that indicates the number of splits.
The method is invoked on a variable that has a string value with the help of dot notation.
It returns an array of substrings based on the arguments, and if no parameter is passed in the method, it will return the whole string.
Example 1
In the following example, first, create a variable “str” and store a string in it:
var str = "LinuxHint is the best website for learning skills";
Now, split the string into tokens using the “split()” method by passing (“ “) as an argument.
The space indicates that the string will be split as the space occurs:
var strToken = str.split(" ");
Finally, print the tokens on the console using the “console.log()” method:
console.log(strToken);
The output displays an array of substrings based on the separator “space” (“ ”):
![]() The split() method also takes the “regex pattern” as a separator instead of a specific character as an argument:
var strToken = str.split(/\W+/);
Here, in regex pattern, the forward slashes (/) indicates the start and end of a pattern, while the (\W) is the metacharacter that matches all the alphanumeric characters a-z, A-Z, 0-9 without white spaces.
While (+) indicates multiple matches.
Output
The split() method also takes the “regex pattern” as a separator instead of a specific character as an argument:
var strToken = str.split(/\W+/);
Here, in regex pattern, the forward slashes (/) indicates the start and end of a pattern, while the (\W) is the metacharacter that matches all the alphanumeric characters a-z, A-Z, 0-9 without white spaces.
While (+) indicates multiple matches.
Output
![]() If you want to get tokens of a specific length from a string, follow the given section.
Example 2
Now, tokenize a string of length three from a string.
To do this, use the “filter()” method with the “split()” method:
var strToken = str.split(" ").filter(function(token) {
return token.length == 3;});
Print the resultant tokens on console:
console.log(strToken);
The output indicates that only substrings of length 3 are returned from the string:
If you want to get tokens of a specific length from a string, follow the given section.
Example 2
Now, tokenize a string of length three from a string.
To do this, use the “filter()” method with the “split()” method:
var strToken = str.split(" ").filter(function(token) {
return token.length == 3;});
Print the resultant tokens on console:
console.log(strToken);
The output indicates that only substrings of length 3 are returned from the string:
![]()
Conclusion
To tokenize a string, you can use the “split()” method.
The split() method divides the string depending on its input “separator”.
It can split a string into a number of smaller strings depending on the arguments.
If the method receives no parameters, the entire string will be printed.
If you want to get tokens of a specific length from a string, use the “filter()” method with the split() method.
In this article, the process of tokenizing a string is illustrated with examples.
How to Scroll to an Element Using JavaScript
While surfing through the web pages, scrolling to an element keeps the user focused by grabbing their attention for a long period.
This functionality can be applied when a user needs to scroll using a single click only or, in the case of automation testing, to check the added content at the bottom of the page instantly.
In such scenarios, scrolling to an element adds functionality to be applied with a single click without much user interaction and saves time.
This manual will guide you to scroll to an element using JavaScript.
How to Scroll to an Element Using JavaScript?
To scroll to an element using JavaScript, you can utilize:
“scrollIntoView()” method
“scroll()” method
“scrollTo()” method
The mentioned approaches will be illustrated one by one!
Method 1: Scroll to an Element Using scrollIntoView() Method
The “scrollIntoView()” method scrolls an element into the visible area of the Document Object Model(DOM).
This method can be applied to get the specified HTML and apply the particular method to it with the help of the onclick event.
Syntax
element.scrollIntoView(align)
In the given syntax, “align” indicates the align type.
Example
In the following example, add the following heading using the “<h2>” tag:
<h2>Click the button to scroll to the element.</h2>
Now, create a button with an “onclick” event invoking the function “scrollElement():
<button onclick= "scrollElement()">Scroll Element</button><br>
After that, specify the image source and its id in order to be scrolled:
<image src= "review.PNG" id= "div">
Lastly, define a function named “scrollElement()” which will fetch the required element using the “document.getElementById()” method and apply the scrollIntoView() method on it in order to scroll the image:
function scrollElement(){
var element = document.getElementById("div");
element.scrollIntoView();}
CSS Code
In the CSS code, apply the following dimensions for adjusting the image size by referring to the image id “div”:
#div{
height: 800px;
width: 1200px;
overflow: auto;}
The corresponding output will be:
![]()
Method 2: Scroll to an Element Using window.scroll() Method
The “window.scroll()” method scrolls the window according to the coordinate values in the document.
This method can be implemented to fetch the image id, set its coordinates using a function, and scroll the specified image.
Syntax
window.scroll(x-coord, y-coord)
In the above syntax, “x-coord” refers to X coordinates, and “y-coord” indicates the Y coordinates.
The following example explains the stated concept.
Example
Repeat the same steps to add the heading, create a button, apply the onclick event and specify the image source with its id:
<h2>Click the button to scroll to the element.</h2><button onclick= "scrollElement()">Scroll Element</button><br><image src= "image.PNG" id= "div">
Next, define a function named “scrollElement()”.
Here, we will adjust the coordinates using the “window.scroll()” method by accessing the function named “Position()” and applying it on the fetched image element:
function scrollElement(){
window.scroll(0, Position(document.getElementById("div")));}
After that, define a function named “Position()” taking a variable obj as its argument.
Also, apply the “offsetParent” property, which will access the nearest ancestor that does not have a static position and return it.
Then, increment the initialized current top value with the help of the “offsetTop” property which will return the top position with respect to the parent(offsetParent) and return the value of “current top” when the added condition is evaluated as true:
function Position(obj){
var currenttop = 0;
if (obj.offsetParent){
do{
currenttop += obj.offsetTop;
}while ((obj = obj.offsetParent));
return [currenttop];
}}
Lastly, style the created container according to your requirements:
#div{
height: 1000px;
width: 1000px;
overflow: auto;}
Output
![]()
Method 3: Scroll to an Element Using scrollTo() Method
The “scrollTo()” method scrolls the specified document to assigned coordinates.
This method can similarly be implemented to get the element by using its id and performing the required functionality to scroll the particular image on the DOM.
Syntax
window.scrollTo(x, y)
Here, “x” and “y” point to the x and y coordinates.
Have a look at the following example.
Example
First, repeat the steps discussed above for adding a heading, button with an onclick event, and image as follows:
<h2>Click the button to scroll to the element.</h2><button onclick= "scrollElement()">Scroll Element</button> <br><img src= "image.JPG" id="div">
Next, define a function named “scrollElement()” and set the scroll by invoking Position() method in the scrollTo() method:
function scrollElement(){
window.scrollTo(0, Position(document.getElementById("div")));}
Last, define a function named Position() and similarly apply the above discussed steps for setting the coordinates of the specified image:
function Position(obj){
var currenttop = 0;
if (obj.offsetParent){
do {
currenttop += obj.offsetTop;
}while ((obj = obj.offsetParent));
return [currenttop];
}}
Output
![]() We have discussed all the convenient methods to scroll to an element using JavaScript.
We have discussed all the convenient methods to scroll to an element using JavaScript.
Conclusion
To scroll to an element, utilize the “scrollIntoView()” method to access the element and apply the specified functionality, the “window.scroll()” method to fetch the element, set its coordinates using a function, and scroll the image, or utilize the “scrollTo()” method in order to fetch the element and scroll it accordingly.
This blog demonstrated the concept to scroll to an element using JavaScript.
How to Replace Object in an Array
In JavaScript, Array is a commonly utilized data structure.
To manipulate data, you must know how to retrieve, add, and replace them in an array.
More specifically, you can replace or add one or more elements from an array using the JavaScript-predefined methods.
This blog post will describe the methods to replace objects arrays.
How to Replace Object in an Array?
To replace an object in an array, JavaScript provides some predefined methods that are as follows:
Using index
Using indexOf() method
Using or loop
Using splice() method
Let’s discuss the methods mentioned above one by one!
Method 1: Replace Object in an Array Using Index
This is the simplest method for replacing an element in an array.
Every element of an array can be accessed using an index, starting at 0.
In this approach, you must use square brackets to access an array element.
Syntax
Follow the given syntax for replacing the object using array index:
Array[index] = element;
Here, the element will be replaced in the specified index of the array.
Example
We will create an array named “colors” and then print it on the console using the “console.log()” method:
var colors = ["red", "blue", "green", "pink"];
console.log("Original Array: ", colors);
Next, replace an array’s element by passing the index of the array using bracket notation.
We will replace the element from the index “1” with “purple”:
colors[1] = "purple";
Print the new array on the console with the same length:
console.log("Replaced Array: ", colors);
The output signifies that the array’s object “blue” is successfully replaced with “purple”:
![]() Let’s move to the second method!
Let’s move to the second method!
Method 2: Replace Object in an Array Using indexOf() Method
There is another method “indexOf()” that will output the index of the specified element in an array.
If the passed argument cannot be located in an array, it outputs -1.
Therefore, if you don’t know the index of an element, use the indexOf() method to get the array’s specified index.
Syntax
The following syntax is used for the “indexOf()” method:
Array.indexOf("element");
Example
Here, we will use the same array of “colors” created in the previous example.
Now, get the index of the array’s object “red” using the “indexOf()” method and store it in a variable “colorIndex”:
const colorIndex = colors.indexOf("red");
Then, check array’s index if it is not equals to -1 then, replace array’s object “red” with “orange”:
if (colorIndex !== -1) {
colors[colorIndex] = 'orange';}
Lastly, print the new array by replacing array’s element:
console.log("New Array: ",colors);
Output
![]() Let’s see another method for replacing objects in an array.
Let’s see another method for replacing objects in an array.
Method 3: Replace Object in an Array Using for Loop
The object can be replaced in an array by utilizing the “for” loop.
It will iterate the array until the specified value does not occur; whenever the value gets matched with the array’s objects, the method replaces it with a new element.
Syntax
Use the below syntax of the for loop for replacing objects in an array:
for(var i=0; i<array.length; array++){
.....}
Example
Here, the same array named “colors” is used to replace the “pink” with any other object “black” using for loop:
for (let colorIndex = 0; index < colors.length; colorIndex ++) {
if (colors[colorIndex ] === 'pink') {
colors[colorIndex ] = 'black';
break;
}}
Then, print the resultant array using the “console.log()” method:
console.log("New Array: ",colors);
The output indicates that the original array’s object “pink” is replaced with the new object “black”:
![]() If you want to replace array elements from an array at any specified index, follow the next section.
If you want to replace array elements from an array at any specified index, follow the next section.
Method 4: Replace Object in an Array Using splice() Method
Use the JavaScript predefined method “splice()” to replace objects in an array.
It adds or removes the specified array elements and modifies the original array.
It is used in a combination of the indexOf() method to access the index of the specified array element and splice it.
Syntax
Follow the given syntax to utilize the splice() method for replacing elements in an array:
array.splice(startIndex, deleteCount, element1, ....., elementN)
Here, the “startIndex” is the location in the array where a new element should be placed, “deleteCount” indicates how many elements should be eliminated, and the “element1, ….., elementN” are the elements that need to be replaced.
Example
We will first get the index of the array’s object “green” by passing it in the “indexOf()” method and store it in variable “colorIndex”:
const colorIndex = colors.indexOf("green");
Then, call the splice() method and pass the index of element “green” that is stored in the variable colorIndex, which will be replaced, “1” is a deleteCount means eliminate just one element from an array and “White” as the replacer:
colors.splice(colorIndex, 1, 'White');
Lastly, print the new array on the console:
console.log("New Array: ",colors);
![]() We have gathered all the best approaches for replacing objects from JavaScript arrays.
We have gathered all the best approaches for replacing objects from JavaScript arrays.
Conclusion
To replace the object in an array, JavaScript provides some predefined methods, such as using the index of an array, the “indexOf()” method, the for loop, or the “splice()” method.
All of these methods effectively replaced an object from an array.
The first method is the most common way to replace elements from an array, but it is useful in small arrays whose indexes are known.
In this blog, we described the different ways to replace objects arrays.
How to Remove Commas From String
A comma is a punctuation mark used in long sentences to make them more readable.
It can be difficult for a developer to delete all the commas from a collection of strings manually.
To do so, JavaScript has certain predefined methods that help the developers remove commas from a text.
This post will describe the method for eliminating commas from a string.
How to Remove Commas From String?
To eliminate commas from a string, use the following JavaScript predefined methods:
replace() method
replaceAll() method
Combination of split() method with join() method
Let’s discuss all of the above-mentioned methods one by one.
Method 1: Remove Commas From String Using replace() Method
The “replace()” method simply replaces a string’s value with the defined string.
It requires two arguments, the value that will be replaced and the value to be utilized as a replacer.
By default, it just removes the first instance of the searched value.
However, with the help of regular expression, it can be made to remove all the occurrences of the searched term.
Syntax
Follow the below-mentioned syntax to use the replace() method for removing commas from the string:
replace("replaceValue","replacer");
Here, “replaceValue” is the searched value that will be replaced in a string, and the“replacer” is used to replace it.
It gives a new string with the replaced values as output.
Example
First, create a variable “str” and store a string “Linuxhint, is the best, website for learning, skills” in str:
var str = 'Linuxhint, is the best, website for learning, skills';
Call the replace() method by passing comma (,) and an empty string (‘’) as an argument in “console.log()” method:
console.log(str.replace(',', ''));
The given output removes just the first comma from a string:
![]() To remove all the commas from the string using the replace() method, pass the regex pattern “/\,/g” as a replaceValue instead of a comma (,):
console.log(str.replace(/\,/g, ''));
Here, in regular expression, the forward slashes (/) indicates the start and end of a regular expression, while the backslash (\) is used with comma (,) as an escape character, “g” is the global flag that represents to eliminate all commas from a string.
The output shows that all the commas from the string are removed:
To remove all the commas from the string using the replace() method, pass the regex pattern “/\,/g” as a replaceValue instead of a comma (,):
console.log(str.replace(/\,/g, ''));
Here, in regular expression, the forward slashes (/) indicates the start and end of a regular expression, while the backslash (\) is used with comma (,) as an escape character, “g” is the global flag that represents to eliminate all commas from a string.
The output shows that all the commas from the string are removed:
![]()
Method 2: Remove Commas From String Using replaceAll() Method
The “replaceAll()” method is another JavaScript built-in method.
It also requires two parameters, the value to be replaced and the value to be used as a replacer.
It is specifically utilized when it is necessary to replace all of the stated values at once without using a regex pattern.
Syntax
Follow the below-provided syntax for the replaceAll() method to eliminate commas from a string:
replaceAll("searchValue", "replaceValue");
In the above syntax, the “searchValue” is the substring to replace, and “replaceValue” is the value that is used as a replacer.
When a specific value is found in the string, it outputs a new string with the replaced values.
Example
Call the replaceAll() method by passing the comma (,) in the first argument and an empty string (‘’) in the second argument.
The replaceAll() method will replace all the commas from a string with an empty substring:
console.log(str.replaceAll(',', ''));
In the output, all the commas have now been removed:
![]()
Method 3: Remove Commas From String Using split() Method With join() Method
The “split()” with the “join()” method, is another procedure used for removing commas from the string.
The split() method returns an array.
This array contains components that represent parts of the strings when the split encounters a comma.
However, we require a string rather than an array.
For that, use the join() method with the split() method to convert the array to a string.
Syntax
The below-mentioned syntax is used for the split() method with the join() method:
split(",").join("")
The split() method will accept the comma as a parameter and return an array of substrings.
The arrays are rejoined into a string using JavaScript join() method by passing an empty string.
Example
Invoke the split() method with join() method in “console.log()” method by passing comma(,) and empty string(‘’) as an arguments:
console.log(str.split(',').join(''));
Output
![]()
Conclusion
To remove commas from a string value, use either the replace() method, the replaceAll() method or the combination of split() and join() method.
The replace() only removes the first comma from the string due to its default working.
However, with the help of a regular expression, it can be customized to remove all the commas from the given string.
The replaceAll() removes all the occurrences of a comma “,” from the entire string.
The duo of split() and join() also perform the same operation; however, they work differently.
All of these have been thoroughly explained in this post with examples.
How to Press Enter Key Programmatically
While going through the internet, we come across websites where it is required to fill a particular form.
In such cases, pressing enter key programmatically is very helpful to cope with the entered incomplete information beforehand.
Before proceeding to the next stage, this feature can also assist in filling the fields.
This manual will discuss the methods to programmatically hit the Enter key.
How to Press Enter Key Programmatically?
To press enter key programmatically using JavaScript, the following approaches can be utilized:
“document.addEventListener()” method
“document.querySelector()” method
“document.getElementById()” method
Go through the mentioned methods one by one!
Method 1: Press Enter Key Programmatically Using document.addEventListener() Method
The “document.addEventListener()” method merges an event handler to a document.
This method can be implemented to add the specified event to detect whenever the enter key is pressed.
Syntax
document.addEventListener(event, function)
In the above syntax, the term “event” refers to the event that will invoke the specified “function” when it gets triggered.
The idea stated above is shown in the example below.
Example
In the following example, we will apply the “document.addEventListener()” method and add an event named “keydown”.
This will result in notifying the user when the “Enter” key is pressed via alert:
document.addEventListener("keydown", (e) => {if (e.key == "Enter"){
alert("Enter Key is Pressed")
}});
The corresponding output will be:
![]()
Method 2: Press Enter Key Programmatically Using document.querySelector() Method
The “document.querySelector()” method gets the first element that a CSS selector matches.
This method can be utilized to access a particular element, change its value and display it on the Document Object Model(DOM) when the Enter key is pressed.
Syntax
document.querySelector(CSS selectors)
Here, “CSS selectors” refers to one or more than one CSS selectors.
Look at the following example.
Example
First, we will add the following heading using the “<h1>” tag:
<h1>Result</h1>
Next, apply the “document.querySelector()” method to access the specified heading:
let enterKey = document.querySelector("h1");
Now, attach an event named “keydown” using the “document.addEventListener()” method discussed in the previous method.
Here, also place a condition for the “Enter” key that check if the Enter key is pressed:
document.addEventListener("keydown", (e) => {
if (e.key == "Enter") {
enterKey.innerText = "Enter Key is Pressed";
}});
Output
![]() In the above output, it can be observed that the “innerText” property changes the DOM text upon pressing the “Enter” key.
In the above output, it can be observed that the “innerText” property changes the DOM text upon pressing the “Enter” key.
Method 3: Press Enter Key Programmatically Using document.getElementById() Method
The “document.getElementById()” method accesses an element with the specified id.
This method can be utilized to identify the Enter key when a user enters text in the input field.
Syntax
document.getElementById(elementID)
In the above-mentioned syntax, “elementID” represents the id of the element which we want to access.
Example
Firstly, include a heading using the “<h3>” tag:
<h3>Fill the input field</h3>
In the next step, create an input field for entering the text with the following “id” and “placeholder” values:
<input type= "text" id= "input" placeholder= "Enter some text">
Next, fetch the assigned id using the “document.getElementById()” method:
let enterKey= document.getElementById("input")
Finally, apply the “addEventListener()” method and attach the event named “keydown” on the input field to detect if the Enter key is pressed and notify it using the alert dialogue box:
enterKey.addEventListener("keydown", (e) =>{
if(e.key == "Enter"){
alert("Enter Key is Pressed")}})
Output
![]() We have compiled different methods to press Enter key programmatically.
We have compiled different methods to press Enter key programmatically.
Conclusion
To press enter key programmatically, utilize the “document.addEventListener()” method for attaching a particular event and notifying the user if the enter key is pressed via an alert, the “document.querySelector()” method to display the status of the pressed enter key on the DOM or the “document.getElementById()” method for applying an enter key verification on an input field.
This article demonstrated the methods to programmatically hit the Enter key.
How to Change the Class of an HTML Element With JavaScript?
In the phase of designing a web page or a website, there are certain situations where you no longer need to access some particular elements due to some update.
Moreover, when there is a need to assign more than one class to a specific element in html.
In such case-scenarios, changing the class of an HTML element is of great aid to cater such situations.
This blog will demonstrate the approaches to consider while changing an HTML element’s class.
How to Change the Class of an HTML Element With JavaScript?
To change the class of an HTML element with JavaScript, the following approaches can be applied:
“className” property.
“classList” property.
Approach 1: Change the Class of an HTML Element With JavaScript Using the className Property
This approach can come into effect by accessing the created class associated with an element and assigning it a different class.
The following example demonstrates the stated concept.
Example
In the below-given code within the “<body>” tag, include the following heading in the “<h2>” tag.
After that, create the specified button which will be assigned a default “class” which will be changed later in the code.
Also, assign it an “id” and an attached “onclick” event invoking the function Class().
Later in the code, include the following message in the “<h3>” tag to display it on the DOM upon the transformation of class:
HTML Code:
<body style="text-align: center;"><h2>Change Element's Class Name</h2>
<button class= "default class" onclick= "Class()"id="myButton">ClickMe</button><br>
<h3 style="background-color: lightgreen;">Old class name is: default class</h3>
</body>
In the JS code, declare a function named “Class()”.
Here, access the default class by its id using the “document.getElementById()” method.
The “className” property will transform the created class to the class named “newClass”.
Finally, the “innerText” property will display the following message along with the changed class:
JS Code:
function Class(){
document.getElementById('myButton').className = "newClass";
var access = document.getElementById('myButton').className;
document.getElementById('head').innerHTML = "New class name is: " + access;}
Output
![]() In the above-output, observe the change of the “class” on the right upon clicking the button in DOM.
In the above-output, observe the change of the “class” on the right upon clicking the button in DOM.
Approach 2: Change the Class of an HTML Element With JavaScript Using the classList Property
This particular approach can be implemented to remove the specified class and assign a new class to it thereby changing it.
Example
Firstly, repeat the above discussed methods for including a heading, creating a button with the assigned class, id and attached onclick event invoking the specified function.
Next, similarly add the heading section in the “<h3>” tag to notify the user of the changed class upon the button click:
HTML Code
<body style= "text-align: center;"><h2>Change Class of Element!</h2><button class="Website" onclick= "Class()" id="change">Click Me</button><h3 id="head" style= "background-color: lightgray;">Old class name is: Website</h3></body>
Now, declare a function named “Class()”.
In its definition, apply the “classList” property along with the “remove()” method to omit the accessed class named “Website” which corresponds to the created button.
In the next step, assign a new class to the same class using the discussed property with the “add()” method.
Lastly, display the changed class as discussed in the previous approach:
JS Code
function Class(){
document.getElementById('change').classList.remove("Website")
document.getElementById('change').classList.add("Linuxhint");
var access = document.getElementById('change').classList;
document.getElementById('head').innerHTML = "New class name is: " + access;}
Output
![]() This write-up meant to clear the concept of changing the HTML element’s class using JavaScript.
This write-up meant to clear the concept of changing the HTML element’s class using JavaScript.
Conclusion
The “className” and “classList” properties can be utilized to change the class of an HTML element.
The className property led to a faster approach in performing the desired requirement as compared to the classList property as it involved less code complexity.
The classList property, on the other hand, changed the default class with the help of additional two methods.
This article illustrated the approaches to change the HTML element’s class with JavaScript.
JavaScript Popup a Div Element in the Center of the Webpage
In the process of creating websites with added functionalities, there are various requirements to make a web page overall attractive to gain the user’s attention.
For instance, displaying an important message or notifying the user about a warning or alert.
In such scenarios, popping up a div element in the center of the web page using JavaScript is a handy feature.
This blog will explain the methods to pop up a div element at the web page’s center.
How to Popup a Div Element in the Center of the Webpage?
To pop up a div element at the webpage’s center, the following methods can be applied:
“document.querySelector()” Method
“document.getElementById()” Method
“JQuery”
The mentioned approaches will be demonstrated one by one!
Method 1: Popup a Div Element at the Webpage’s Center Using the document.querySelector() Method
The “document.querySelector()” method fetches the first element that matches the corresponding CSS selector.
This method can be utilized to access the “div” element to access the corresponding functionalities and display them.
Syntax
document.querySelector(CSS selectors)
Here, CSS selectors refer to “div”, which will be accessed.
The following example explains the stated concept.
Example
Firstly, assign the specified “class” and “id” to the added div element.
For the pop-up, assign the class named “popup” to the div element.
Then, include a heading specified in the “<h3>” tag and separate buttons for opening and closing the pop-up.
Also attach an “onclick” event to both buttons invoking the specified functions:
<div class= "struct" id= "div">
<div class= "prompt"><h3>This is a centered pop-up div element</h3><button onclick= "closeDiv()">Close PopUp</button>
</div></div><button onclick= "openDiv()">Show PopUp</button>
After that, declare a function named “openDiv()” to fetch the “div” element by passing its id in the “document.querySelector()” method and set its display as “block” to start the block at a new line and take up the screen width:
function openDiv(){
let get = document.querySelector('#div')
get.style.display = 'block'}
Similarly, define the “closeDiv()” function and repeat the above steps for closing the popup by specifying “none” as the display property value:
function closeDiv(){
let get = document.querySelector('#div')
get.style.display = 'none'}
Last, style the added divs according to your requirements:
<style>
{
height: 100%;
}
.struct {
position: absolute;
display: none;
top: 0;
right: 0;
bottom: 0;
left: 0;
background: darkred;
}
.prompt {
position: absolute;
width: 50%;
height: 50%;
top: 25%;
left: 25%;
text-align: center;
background: white;
} </style>
It can be seen that when the “Show PopUp” button is clicked, a new div element is popped up in the center of the web page:
![]()
Method 2: Popup a Div Element at the Webpage’s Center Using document.getElementById() Method
The “document.getElementById()” method gets an element with the specified id.
This method can be implemented to access the specified id for opening and closing the created popup.
Syntax
document.getElementById(elementID)
In the given syntax, “elementID” indicates the id of the particular element that needs to be fetched.
Example
Firstly, add two divs as we did previously.
Then, include an image and specify its path along with its dimensions to be contained within the popup.
After that, include the following buttons along with an “onclick” event as discussed in the previous method:
<div class= "struct" id= "div">
<div class= "prompt"><img src= "template.JPG" height= "300" width= "400"><button onclick="closeDiv()">Close PopUp</button>
</div></div><button onclick="openDiv()">Show PopUp</button>
Now, in the openDiv() and closeDiv() methods, utilize the document.getElementById() method for accessing the required div and set its display property value accordingly:
function openDiv(){
let get = document.getElementById('div')
get.style.display = 'block'}function closeDiv(){
let get = document.getElementById('div')
get.style.display = 'none'}
Lastly, style you web page as per your requirements:
<style>
html,
body{
height: 100%;
}
.struct {
position: absolute;
display: none;
top: 0;
right: 0;
bottom: 0;
left: 0;
background: grey;
}
.prompt {
position: absolute;
width: 50%;
height: 50%;
top: 25%;
left: 25%;
text-align: center;
background: white;
} </style>
Output
![]()
Method 3: Popup a Div Element at the Webpage’s Center Using jQuery
In this particular method, we will implement the required task by applying “jQuery” along with its methods for showing and hiding the created popup.
The following example illustrates the stated concept.
Example
First, include the “jQuery” library in the script tag:
<script src= "https://ajax.googleapis.com/ajax/libs/jquery/3.3.1/jquery.min.js"></script>
Likewise, assign the following class and id to the “div” element for the overall document and popup respectively.
Then, include the following paragraph within the popup.
Also, repeat the discussed methods for including the buttons invoking the specified functions upon triggering the “onclick” event:
<div class= "struct" id= "struct">
<div class= "prompt"><p>The web pages or sites you visit often let the user wait to display an important message or a warning before accessing the particular page.
For instance, asking a user to buy the membership or login before accessing the site's content.
In addition to that, appropriate management of traffic in the case of educational websites</p>
<button></div>
<button>Show PopUp</button>
Now, create a function named “openDiv()” that will access the div having “overlay” id and apply the “show()” method in order to display the created popup:
function openDiv(){
$('#struct').show();}
For closing the popup, define the function named “closeDiv()” and in its function definition, invoke the “hide()” method on the accessed id to close the popup:
function closeDiv() {
$('#struct').hide();}
Lastly, style your web page element accordingly:
<style>
html,
body{
height: 100%;
}
.struct {
position: absolute;
display: none;
top: 0;
right: 0;
bottom: 0;
left: 0;
background: powderblue;
}
.prompt {
position: absolute;
width: 50%;
height: 50%;
top: 25%;
left: 25%;
text-align: center;
background: white;
} </style>
Output
![]() We have discussed various creative methods to pop up a div element in the center of the webpage.
We have discussed various creative methods to pop up a div element in the center of the webpage.
Conclusion
To popup a div element in the center of the webpage, apply the “document.querySelector()” method or the “document.getElementById()” method to fetch the created div using its id to pop it up.
Moreover, you can also utilize the “jQuery” library to include a div element in the form of a popup by applying its built-in methods.
This blog demonstrated the methods that can be applied to pop up a div element at the webpage’s center.
How to Get Element by Type
There are several ways to get or fetch an element, including getElementById() and getElementByClass().
However, have you ever thought about getting the type of element? If so, then let us tell you that JavaScript offers the querySelectorAll() or getElementsByTagName() methods that can be utilized for the specified purpose.
This write-up will explain the methods for getting elements by type.
How to Get Element by Type?
For getting elements by type, use the following methods:
querySelectorAll() method
getElementsByTagName() method
Let’s check out each of the mentioned methods one by one!
Method 1: Get Element by Type Using querySelectorAll() Method
“querySelectorAll()” is a JavaScript predefined document method that returns the element objects that match with the specified selectors.
The querySelectorAll() and querySelector() methods work the same, but the main difference is that the querySelectorAll() gets all the elements matched with the selector while the querySelector() method returns only first matching element object.
Syntax
Follow the given syntax for the getting element by type using the querySelectorAll() method:
document.querySelectorAll(selectors);
Here, the “selector” is the type whose elements you want to get for example “input” or “input[type=text]”.
It will find out all the elements matched with the specified selector and return to the DOM.
You can pass multiple selectors separated by commas.
Example 1: Get one Element by Type
In the following example, we will create an input field “text” with id “Name” and value “John” and a heading:
<h3>Get Element by Type = input[type=text]</h3><input type="text" id="Name" value="John"><br><br>
Also, create three input type “radio” by assigning ids and values:
<input type="radio" id="html" value="HTML"> HTML <br><input type="radio" id="css" value="CSS"> CSS <br><input type="radio" id="js" value="JavaScript"> JavaScript <br>
Then, create a button by attaching “onclick” event that will trigger the user-defined method named “elementGetbyType()”:
<button onclick="elementGetbyType()">Click</button>
In a JavaScript file, first, call the “querySelectorAll()” method by passing a selector “input[type=text]” that will return all the elements of this type.
Then, define an “elementGetbyType()” method where an alert() method prints the message with the value of the specified selector:
var elementTypeSelector = document.querySelectorAll('input[type=text]');function elementGetbyType(){
alert("The HTML element input type text contains " + elementTypeSelector[0].value);}
The output displays “John” in alert message which is the value of the input type text field:
![]() Example 2: Get all Elements by Type
Now, get all the elements of the input type by passing “input” as an argument in the “querySelectorAll()” method:
var elementTypeSelector = document.querySelectorAll('input');
Print the values of the “input” selector including “text” and “radio” on console:
console.log(elementTypeSelector[0].value, elementTypeSelector[1].value, elementTypeSelector[2].value, elementTypeSelector[3].value);
Output
Example 2: Get all Elements by Type
Now, get all the elements of the input type by passing “input” as an argument in the “querySelectorAll()” method:
var elementTypeSelector = document.querySelectorAll('input');
Print the values of the “input” selector including “text” and “radio” on console:
console.log(elementTypeSelector[0].value, elementTypeSelector[1].value, elementTypeSelector[2].value, elementTypeSelector[3].value);
Output
![]()
Method 2: Get Element by Type Using getElementsByTagName() Method
There is another JavaScript predefined method called “getElementsByTagName()” that returns the element objects whose tag name matches the specified name.
Syntax
Use the following syntax to use the getElementByTagName() method:
document.getElementsByTagName(name);
Here, “name” is the tagName of an HTML attribute.
Example
In this example, we will get the value of the element by type using the “getElementsByTagName()” method, where we will pass the tag name “input” to get the values of the element to match with the specified tag name and store it in a variable “elementTypeSelector”.
Then, define an “elementGetbyType()” function, in which the for loop will iterate until the length of the selector and check the type of the selector; if it is equal to “radio”, then call the alert() method to print the values of the radio element:
var elementTypeSelector = document.getElementsByTagName('input');function elementGetbyType(){
for(let i = 0; i < elementTypeSelector.length; i++) {
if(elementTypeSelector[i].type == 'radio') {
alert("The HTML element input type radio contains " + elementTypeSelector[i].value);
}
}}
The output shows all the values of the input type radio:
![]() We have provided all the solutions for getting elements by type.
We have provided all the solutions for getting elements by type.
Conclusion
To get the elements by type, use the JavaScript predefined methods including, querySelectorAll() method or the getElementsByTagName() method.
The only difference between both of them is that the GetElementsByTagName() only fetched items whose defined tag name matches with the provided tag while querySelectorAll, which selects all elements.
In this write-up, we have explained the different approaches for getting elements by type.
How to Filter Objects?
While programming, we often want to remove the repeated or invalid values contained in an object or delete the objects holding certain values.
In such cases, filtering the objects can help to reduce the complexity and deleting the extra entries to make the code readable and understandable.
This blog will demonstrate the methods to filter objects.
How to Filter Object?
An object can be filtered by applying the “filter()” method:
With “search()” method
On “Object boolean values”
Based on the “condition”
Let’s check out each of the mentioned scenarios one by one!
Method 1: Filter Object by Applying filter() and search() Methods
The “filter()” method creates a new array of elements according to the applied condition.
Whereas the “search()” method searches the specified string in an array.
These methods can be used to search for a particular object value and filter it.
array.filter(function(current, index, arr), this)
In the given syntax, the “function” refers to the function that needs to be executed for each array item, and the argument values of the function refer to the “index” of the current element in an array and “this” is the value passed to the function.
string.search(value)
In the above syntax, the search() method searches for the “value” in the given string.
Example
Firstly, declare an array of objects with the “name” properties and corresponding values:
let objData = [{name: "Rock", id: "1", alive: true},{name: "John", id: "2", alive: true},{name: "David", id: "3", alive: false}]
After that, apply the filter() method on the value of the “alive” property in such a way that the object having the specified property’s boolean value as “false” will be filtered out from the array:
let objData= [{name: "Harry"},{name: "David"},{name: "Alisa"}]
Next, the “filter()” method will be applied having the value “item” as its argument which will be passed to the accessed objects array in such a way that the “search()” method will search for the specific object value “Harry” and filter it out using the former method:
let filterObj= objData.filter((item)=>item.name.search("Harry"))
Finally, the filtered objects will be displayed on the console:
console.log("The filtered objects are:", filterObj)
The corresponding output will be as follows:
![]() It can be seen that the specified value is filtered out from the given array of objects.
It can be seen that the specified value is filtered out from the given array of objects.
Method 2: Filter Object by Applying filter() Method Based on the Object’s Boolean Values
The “filter()” method can similarly be utilized in this method to filter the objects by accessing their specific properties and filtering them based on the corresponding boolean values of the added properties.
Example
In the following example, we will similarly declare an array of objects holding a string, numeric, and boolean type properties and their corresponding values:
let objData = [{name: "Rock", id: "1", alive: true},{name: "John", id: "2", alive: true},{name: "David", id: "3", alive: false}]
After that, apply the filter() method on the value of the “alive” property in such a way that the object having the specified property’s boolean value as “false” will be filtered out from the array:
const filterObj = objData.filter((item) => item.alive);
As a result, the filtered objects having the boolean value “true” will be logged on the console:
console.log("The filtered objects are:", filterObj);
Output
![]()
Method 3: Filter Object by Applying filter() Method Based on Condition
In this particular method, we will utilize the “filter()” method to filter out a particular object property based on the added condition in its argument.
Look at the following example for demonstration.
Example
First, declare an array of objects as follows:
let objData = [{name: "Rock", id: "1", alive: true},{name: "John", id: "2", alive: false},{name: "David", id: "3", alive: false}]
Next, apply the “filter()” method on the “id” property of the objData in such a way that objects having id less than three will be stored in the “filterObj” and the remaining will get obsolete:
let filterObj = objData.filter((item) => item.id < 3);
Last, log the filtered objects satisfying the above condition on the console:
console.log("The filtered objects are:", filterObj);
In the given output, it can be observed that the objects are filtered out based on the value of “id” irrespective of the assigned boolean values.
![]() We have discussed various methods to filter objects.
We have discussed various methods to filter objects.
Conclusion
To filter objects, apply the “filter()” and “search()” methods in combination to search for the object’s value and filter it.
Moreover, only the filter() can be utilized to filter out the property of an object based on the added conditions.
This write-up has explained three methods to filter objects.
How to Filter Object Arrays Based on Attributes
Arrays are data structures that make it possible to store different values in a single variable by storing information in a set of nearby memory addresses.
An array can hold a collection of data of the same type.
You can also store many objects with the same type and their attributes in an array, which can then be retrieved or filtered using various methods.
This study will discuss the methods to filter the object arrays based on attributes.
How to Filter Object Arrays Based on Attributes?
To filter object arrays based on attributes, use the following methods:
find() method
filter() method
Let’s examine all these methods individually.
Method 1: Filter Object Arrays Based on Attributes Using find() Method
The “find()” method is used to filter a single object from an array of objects that satisfy the given condition.
Here, we will examine the find() method with the arrow function (=>).
The arrow function is also an anonymous function, as it is defined without the function name.
Learn More about arrow Functions.
Syntax
To use the arrow function with filter() method follow the given syntax:
filter(currentElement => {
return conditional-statement;});
It returns the first element that matches the specified condition and if no element matches, it returns “undefined”.
Example:
First, we will create an array of objects named “employeeList”:
var employeeList = [
{id: 101, name: 'Rhonda', age: 20, dept: 'Audit'},
{id: 111, name: 'Susan', age: 28, dept: 'Accounts'},
{id: 191, name: 'Stephen', age: 32, dept: 'Audit'},
{id: 131, name: 'Napoleon', age: 20, dept: 'HR'}];
Filter the object based on attribute “dept” that is equal to “Audit” by using find() method:
var employee = employeeList.find(emp => {
return emp.dept === 'Audit';});
Lastly, print the filtered object on console using “console.log()” method:
console.log(employee);
The output displays the only first object that matches with the dept === ‘Audit’:
![]() If you want to access an attribute that does not exist in the object, In that case, the filter() method will return “undefined”:
If you want to access an attribute that does not exist in the object, In that case, the filter() method will return “undefined”:
![]() How to filter all the objects related to a given condition? Follow the next section.
How to filter all the objects related to a given condition? Follow the next section.
Method 2: Filter Object Arrays Based on Attributes Using filter() Method
To filter all the objects from an array based on attributes on the given condition, the JavaScript predefined “filter()” method is used.
Here, we will examine two approaches for applying a filter to an array of objects, an arrow function or a call-back function.
It receives each element passed to it by the filter() method, which internally loops through the array’s elements.
It adds the element to the returned array if the callback function returns true.
Syntax
The syntax of the filter() method is as follows:
filter(callback, object);
Here, the filter() method takes two parameters, “callback function”, which is the mandatory parameter, and “object”, which is an optional argument.
It outputs a new array that contains each element that meets the specified requirement.
If none of the elements satisfy the specified condition, it will return an empty array as an output.
To use filter() method with callback function for filtering object array based on attributes, use the following syntax:
var newArray = array.filter(function(currentElement){
return conditional-statement;});
The callback() function takes three parameters the “currentElement”, “index”, and an “array”.
The currentElement is the element in the array which is currently being processed by the callback function, and it is the mandatory argument.
In comparison, the index and array are optional parameters.
Example 1: Filter Object Arrays Based on Attributes Using filter() Method With Callback Function
We will use the same object array “employeeList” created in the previous example.
Now, we will use the filter() method with callback function to filter the array of object based on the attribute “name”:
var employee = employeeList.filter(function(emp){
return emp.name === 'Susan';});
Output
![]() Example 2: Filter Object Arrays Based on Attributes Using filter() Method With an Arrow Function
Here, we will use the filter() method with arrow function to filter the array of object based on the attribute “dept”:
var employee = employeeList.filter(emp => {
return emp.dept === 'Audit';});
The output shows all the data that matches the dept === ‘Audit’:
Example 2: Filter Object Arrays Based on Attributes Using filter() Method With an Arrow Function
Here, we will use the filter() method with arrow function to filter the array of object based on the attribute “dept”:
var employee = employeeList.filter(emp => {
return emp.dept === 'Audit';});
The output shows all the data that matches the dept === ‘Audit’:
![]() If you want to access the attribute that does not exist in the object it will returns an empty array:
If you want to access the attribute that does not exist in the object it will returns an empty array:
![]() We have gathered all the methods to filter an array of objects based on the attributes.
We have gathered all the methods to filter an array of objects based on the attributes.
Conclusion
To filter the object array based on attributes, use the JavaScript built-in methods such as “find()” method or “filter()” method.
The find() method outputs the first element that matches the specified condition, and if no element matches, it returns undefined.
In contrast, the filter() method gives a new array that contains elements that meet the specified condition.
If none of the elements satisfy the particular condition, it will give an empty array.
In this study, we have discussed the methods to filter the array of objects based on their attributes with examples.
How to Fade-In Div?
In the process of designing an attractive and user-friendly web page or a website, fading in and out some specific portion in the DOM makes it(website) stand out and eye-catching.
For instance, fading in some important information or content in order to be eye-catching on the user’s end.
In such a case, this functionality is very useful in increasing the traffic and ranking the website.
This write-up will provide a guideline to fade-in div.
How to Fade-In Div?
The fade-in div can be done upon the following approaches:
“Button Click”
“Window Load”
The stated approaches will be explained one by one!
Approach 1: Fade-In Div Upon the Button Click
In this approach, the specified image within the “div” will fade-in upon the click of the button with respect to the specified time interval.
The below-given example demonstrates the stated concept.
Example
First, include the “<center>” tag in order to center the specified heading and the “div”.
Also, attach an “onclick” event with the div redirecting to the function fade().
The specified image in the next step will fade-in:
<center><h2>This image will fade-in!</h2><div id= "fade" onclick= "fade()"><img src= "template4.PNG"></div></center>
Next, define the function named “fade()”.
In its definition, access the div element using its “id”.
After that, initialize the “opacity” with “0.1” and update it with 0.1 with respect to the set time interval(150 milliseconds).
A max limit will also be applied on the opacity in order to limit the fade-in for proper display of the “image” within the div:
function fade() {const element = document.getElementById('fade');
let Opacity = 0.1;
element.style.display = 'block';const timer = setInterval(function () {
if (Opacity >= 1){
clearInterval(timer);}
element.style.opacity = Opacity;
Opacity += Opacity * 0.1;}, 150);}
Output
![]()
Approach 2: Fade-In Div Upon the Window Load
This approach can be applied by accessing the specific function as soon as the Document Object Model(DOM) is loaded.
Overview the below-given example for the explained concept.
Example
In this particular example, similarly specify the “div” with the assigned id and fade-in the following heading contained in the div:
<div id= "body"><br><h1 style="color: green;">Welcome to Linuxhint Website</h1></div>
Now, similarly initialize the opacity and access the function fade() upon the window load using the “window.onload” event:
var opacity = 0;
window.onload = fade;
After that, declare the function named “fade()”.
Here, apply the “setInterval()” method.
In its parameter, include the function display() in order to be executed for the specified time interval in milliseconds:
function fade() {
setInterval(display, 500);}
Finally, define the function named “display()”.
In its definition, access the created “div” and similarly increment the opacity value based on the condition for its max limit such that the specified heading in div is faded-in clearly:
function display() {
var body = document.getElementById("body");
if (opacity < 1) {
opacity = opacity + 0.1;
body.style.opacity = opacity}}
The corresponding output will be:
![]() We have compiled the convenient approaches to fade-in div.
We have compiled the convenient approaches to fade-in div.
Conclusion
Fade-in div can be performed upon the “button click” or when the “DOM is loaded”.
The button click approach invokes a function upon the click and fade-in the image with respect to the set time interval.
The second approach fade-in the heading within the div in an automated manner as soon as the DOM is loaded.
This write-up demonstrated the approaches that can be performed to fade-in div.
How to Exit a for Loop
An efficient and simple method for executing something repeatedly is to use a loop., you may frequently need to exit a loop.
For instance, it is required to exit the loop iteration through an array of items or any other condition once a particular item is found.
To do so, JavaScript permits the use of the “break” keyword.
This post will illustrate the procedure to exit the for loop.
How to Exit a for Loop?
To terminate a for loop, the keyword “break” is used.
It terminates a loop or branching expression immediately.
When the break statement occurs in a loop, it immediately stops a loop.
This keyword is considered an important component of several conditional expressions, such as switches, loops, and so on.
Example 1
In the given example, we will print numbers 0 to 10 integers with the help of the “for” loop.
If the iterator variables reaches to the value “i”, the loop will suddenly break or exit due to the “break” statement:
for (i = 0; i < 10; i++) {
console.log(i);
if (i == 3) {
break;
}}
As you can see in the output, loop is terminated after printing “3”:
![]() Example 2
First, we will create an object “employee” with properties “name” and “id”:
var employee = [
{ name: 'Susan', id: 1},
{ name: 'Ariely', id: 2},
{ name: 'Mari', id: 3},
{ name: 'Rhonda', id: 4},
{ name: 'Stephen', id: 5},]
With the help of the for loop, we will print the names of employees.
However, if the name is equal to the “Rhonda”, the loop will exit because of the added “break” statement:
for (const e of employee) {
console.log(e);
if (e.name === "Rhonda") {
break ;
}}
The output displays the names of employees till the added condition is satisfied:
Example 2
First, we will create an object “employee” with properties “name” and “id”:
var employee = [
{ name: 'Susan', id: 1},
{ name: 'Ariely', id: 2},
{ name: 'Mari', id: 3},
{ name: 'Rhonda', id: 4},
{ name: 'Stephen', id: 5},]
With the help of the for loop, we will print the names of employees.
However, if the name is equal to the “Rhonda”, the loop will exit because of the added “break” statement:
for (const e of employee) {
console.log(e);
if (e.name === "Rhonda") {
break ;
}}
The output displays the names of employees till the added condition is satisfied:
![]() We have covered all the information related to existing for loop.
We have covered all the information related to existing for loop.
Conclusion
To exit a for loop, the keyword “break” is used, which terminates a loop immediately when a particular item is found.
It can be utilized to stop the execution control after a specific condition.
In this post, we will illustrate the procedure to exit the for loop with detailed examples.
How to Display Text When Checkbox Is Checked?
The websites you visit usually involve some sort of input type in order to display a corresponding message/answer or improve interactivity with the end-user.
In such scenarios, displaying text when the checkbox is checked is very helpful in notifying the user of the selected option, indicating a warning or alerting a success message etc.
This article will contemplate on the approaches that can be utilized to display text when a checkbox is checked.
How to Display Text When a Checkbox is Checked?
To display text when checkbox is checked, the following approaches can be considered:
“checked” property with the “display” and “innerText” properties.
“jQuery” approach with the “is()” method or “ready()” and “click()” methods.
The stated approaches will be explained one by one!
Method 1: Display Text When Checkbox is Checked Using the checked Property
The “checked” property returns the checked state of the specific checkbox.
This property can be utilized to check the checkbox and display the corresponding text against it.
Let’s discuss some examples which will explain the stated concept.
Example 1: Display Text When Checkbox is Checked Using the checked Property with the display Property
The “display” property displays the specified message with the associated element.
This property can be applied to display the corresponding message against the accessed element upon the checked checkbox.
The following example explains the discussed concept.
First, include the specified heading in the “<h3>” tag:
<h3>Display Text when the Checkbox is Checked</h3>
Next, allocate the input type as “checkbox” for the following three options.
Here, assign the specified “id” and attach an “onclick” event as well.
This event will invoke the specified function upon checking the checkbox:
<input type= "checkbox" id= "check1" onclick= "checkFunction()">Image<br><input type= "checkbox" id= "check2" onclick= "checkFunction()">Graph<br><input type= "checkbox" id= "check3" onclick= "checkFunction()">Line
After that, include the following paragraphs in the “<p>” tag with the specified id in order to display the corresponding message upon checking the particular checkbox:
<p id= "message1" style= "display:none">Image Option is Checked Now!</p><p id= "message2" style= "display:none">Graph Option is Checked Now!</p><p id= "message3" style= "display:none">Line Option is Checked Now!</p>
Here, declare a function named “checkFunction()”.
In its definition, apply the condition upon each of the checkboxes with the help of the “checked” property by accessing their id directly and similarly display the corresponding message as well against the fetched id of the assigned paragraphs using the “display” property:
function checkFunction(){
if (check1.checked == true){
message1.style.display = "block"; } else if (check2.checked == true){
message2.style.display = "block"; } else if (check3.checked == true){
message3.style.display = "block"; } else{
message.style.display = "none";}}
The corresponding output will be:
![]() From the output, it can be clearly observed that specific text is displayed when a specific checkbox is selected.
Example 2: Display Text When Checkbox is Checked Using the checked Property with the innerText Property
This property can be applied to access the specified checkboxes and notify the user of the checked option on the Document Object Model(DOM).
Example
Firstly, similarly include the following heading and checkboxes with the specified “id” and an “onclick” event redirecting to the function checkBox():
<h3 id= "msg">Display Text when the Checkbox is Checked</h3><input type= "checkbox" id= "check1" value= "Python" onclick= "checkBox()">Python<br><input type= "checkbox" id= "check2" value= "Java" onclick= "checkBox()">Java<br><input type= "checkbox" id= "check3" value= "JavaScript" onclick= "checkBox()">JavaScript<br><br>
After that, define a function named “checkBox()”.
The following function in the below step will fetch the id of the specified checkboxes using the “document.getElementById()” method.
Also, apply a check on each of the checkboxes.
For instance, if a particular checkbox is checked, the corresponding message against each of the checkbox will be displayed on the DOM via the “innerText” property:
function checkBox(){
get1= document.getElementById("check1")
get2= document.getElementById("check2")
get3= document.getElementById("check3")
get4= document.getElementById("msg")if(get1.checked == true){
get4.innerText= "Python Language Selected"}else if(get2.checked == true){
get4.innerText= "Java Language Selected"}else if(get3.checked == true){
get4.innerText= "JavaScript Language Selected"}}
Output
From the output, it can be clearly observed that specific text is displayed when a specific checkbox is selected.
Example 2: Display Text When Checkbox is Checked Using the checked Property with the innerText Property
This property can be applied to access the specified checkboxes and notify the user of the checked option on the Document Object Model(DOM).
Example
Firstly, similarly include the following heading and checkboxes with the specified “id” and an “onclick” event redirecting to the function checkBox():
<h3 id= "msg">Display Text when the Checkbox is Checked</h3><input type= "checkbox" id= "check1" value= "Python" onclick= "checkBox()">Python<br><input type= "checkbox" id= "check2" value= "Java" onclick= "checkBox()">Java<br><input type= "checkbox" id= "check3" value= "JavaScript" onclick= "checkBox()">JavaScript<br><br>
After that, define a function named “checkBox()”.
The following function in the below step will fetch the id of the specified checkboxes using the “document.getElementById()” method.
Also, apply a check on each of the checkboxes.
For instance, if a particular checkbox is checked, the corresponding message against each of the checkbox will be displayed on the DOM via the “innerText” property:
function checkBox(){
get1= document.getElementById("check1")
get2= document.getElementById("check2")
get3= document.getElementById("check3")
get4= document.getElementById("msg")if(get1.checked == true){
get4.innerText= "Python Language Selected"}else if(get2.checked == true){
get4.innerText= "Java Language Selected"}else if(get3.checked == true){
get4.innerText= "JavaScript Language Selected"}}
Output
![]()
Method 2: Display Text When Checkbox is Checked Using jQuery
This particular approach can be applicable by including a “jQuery” library and applying its methods.
Example 1: Display Text When Checkbox is Checked Using jQuery is() Method
This method can be applied to apply a condition on either of the checkboxes and notify the user accordingly.
The first step will be to include the “jQuery” library:
<script src="https://ajax.googleapis.com/ajax/libs/jquery/3.5.1/jquery.min.js"></script>
Now, specify the checkboxes referring to three different options.
An “onclick” event is attached to each of the checkbox in order to invoke the function checkFunction() upon checking a particular checkbox:
<input type="checkbox" id="check1" onclick="checkFunction()">Google<br><input type="checkbox" id="check2" onclick="checkFunction()">Linuxhint<br><input type="checkbox" id="check3" onclick="checkFunction()">Youtube
Finally, define a function named “checkFunction()”.
Here, apply an “OR(||)” condition.
This function will execute in such a manner that as soon as the specified checkbox is checked, an alert dialogue box will notify the user about it.
In the other case, the “else” condition will execute:
function checkFunction(){if ($('#check1')||('#check2')||('#check3').is(':checked')){
alert("A Checkbox is Checked");}else {
alert("CheckBox Not Checked");}}
Output
![]() Example 2: Display Text When Checkbox is Checked Using jQuery ready() and click() Methods
The “ready()” method specifies what happens when a ready event occurs and the Document Object Model is loaded.
The “click()” method, on the other hand, triggers the function to run when a click event occurs.
These methods can be implemented to click on the accessed checkbox and display the checkbox text and the corresponding value against it.
Syntax
$(document).ready(function)
In the given syntax, “function” refers to the function which is to execute after the DOM is loaded.
$(selector).click(function)
Here, likewise, the “function” points to the specific function to execute when the click event occurs.
Implementation
First, include the following jQuery library:
<script src= "https://ajax.googleapis.com/ajax/libs/jquery/3.5.1/jquery.min.js"></script>
Next, within the “<fieldset>” tag, specify the following labels and input types for each of the checkboxes:
<fieldset><legend>Programming Languages: </legend><label for= "Python">Python</label><input type= "checkbox" name= "outcome" value= "Python" /><label for= "JavaScript">JavaScript</label><input type= "checkbox" name= "outcome" value= "JavaScript" /><label for= "Java">Java</label><input type= "checkbox" name= "outcome" value= "Java" /></fieldset>
After that, create a button with the specified “class” and “id”:
<button class="demo" id="outcome" value="submit">Get Outcome</button>
Now, in the jQuery implementation, apply the “ready()” method such that when the DOM loads, the further steps become functional.
In the next step, apply the “click()” method and fetch the checkboxes by their specific names.
The “checked” property here will ensure that the checkbox is checked and return the corresponding value and text of the particular checkbox using the “val()” and “text()” methods respectively:
$(document).ready(function () {
$('#outcome').click(function () {
$('input[name="outcome"]:checked').each(function () {
let value = $(this).val();
let Text = $(`label[for="${value}"]`).text();
console.log(`The value of checkbox is ${value}`);
console.log(`The text of checkbox is ${Text}`);})});});
Output
Example 2: Display Text When Checkbox is Checked Using jQuery ready() and click() Methods
The “ready()” method specifies what happens when a ready event occurs and the Document Object Model is loaded.
The “click()” method, on the other hand, triggers the function to run when a click event occurs.
These methods can be implemented to click on the accessed checkbox and display the checkbox text and the corresponding value against it.
Syntax
$(document).ready(function)
In the given syntax, “function” refers to the function which is to execute after the DOM is loaded.
$(selector).click(function)
Here, likewise, the “function” points to the specific function to execute when the click event occurs.
Implementation
First, include the following jQuery library:
<script src= "https://ajax.googleapis.com/ajax/libs/jquery/3.5.1/jquery.min.js"></script>
Next, within the “<fieldset>” tag, specify the following labels and input types for each of the checkboxes:
<fieldset><legend>Programming Languages: </legend><label for= "Python">Python</label><input type= "checkbox" name= "outcome" value= "Python" /><label for= "JavaScript">JavaScript</label><input type= "checkbox" name= "outcome" value= "JavaScript" /><label for= "Java">Java</label><input type= "checkbox" name= "outcome" value= "Java" /></fieldset>
After that, create a button with the specified “class” and “id”:
<button class="demo" id="outcome" value="submit">Get Outcome</button>
Now, in the jQuery implementation, apply the “ready()” method such that when the DOM loads, the further steps become functional.
In the next step, apply the “click()” method and fetch the checkboxes by their specific names.
The “checked” property here will ensure that the checkbox is checked and return the corresponding value and text of the particular checkbox using the “val()” and “text()” methods respectively:
$(document).ready(function () {
$('#outcome').click(function () {
$('input[name="outcome"]:checked').each(function () {
let value = $(this).val();
let Text = $(`label[for="${value}"]`).text();
console.log(`The value of checkbox is ${value}`);
console.log(`The text of checkbox is ${Text}`);})});});
Output
![]() This write-up demonstrated the methods that can be utilized to display text when a checkbox is checked.
This write-up demonstrated the methods that can be utilized to display text when a checkbox is checked.
Conclusion
To display text when a checkbox is checked, apply the “checked” property along with the “display” property to display the specified message against the corresponding checkbox which will be checked or with the “innerText“ property to display the corresponding text on the DOM as soon as the checkbox is checked.
Also, you can utilize the jQuery approach with the “is()” method to apply an “OR” condition handling each of the checkbox or the “ready()” and “click()” methods to click on the fetched checkbox as soon as the DOM loads.
This blog demonstrated the methods to display text when a checkbox is checked.
JavaScript Remove Index From Array
While programming, there can be a requirement to work with complex arrays involving the data in bulk which needs to be accessed.
For instance, deleting a particular record to update the data or accessing a particular entry instantly.
In such scenarios, removing indexes from an array can be helpful in filtering out the data.
This article will demonstrate the methods to remove an index from an array.
How to Remove Index From Array?
An index can be removed from an array by using the following approaches with the “indexOf()” method:
“splice()” Method
“filter()” Method
“shift()” Method
“pop()” Method
We will now explain each of them one by one!
Method 1: Remove Index From Array Using splice() Method
The “indexOf()” method outputs the index of the specified array element and returns “-1” if not found, whereas the “splice()” method adds or removes the specified array elements and changes the original array.
These methods can be used in combination to access the index of the specified array element and splice it.
Syntax
string.indexOf(search)
In the above syntax, “search” indicates the index of the fetched array element.
array.splice(index, number, item n)
In the given syntax, “index” refers to the position where the elements need to be added or removed, “number” represents the number of items, and “item n” indicates the new elements as the replacement.
Example
In the below-given example, declare an array with the following entries and display it on the console:
const array = [1, 2, 3, 6, 4];
console.log("The original array is: ", array)
Now, access the index of the specified array element using the “indexOf()” method and print it:
const index = array.indexOf(6);
console.log("The index of the required element is:", index)
After that, splice the accessed index against the corresponding element.
Here “1” is passed as the second argument representing the number of elements we want to delete:
array.splice(index, 1);
Upon retrieving the removed index of the array element, the indexOf() method will return “-1”, which indicates that no value is found:
const indexUpd = array.indexOf(6);
Finally, display the updated array and access the removed index as well:
console.log("The original array becomes:", array)
console.log("The index of the removed array element is:", indexUpd)
The resultant output will be:
![]() In the above output, it can be observed that the specified index is removed and displayed as “-1” in the last statement referring to the definition of the “indexOf()” method.
Method 2: Remove Index From Array Using filter() Method
The “filter()” method can be implemented along with the “indexOf()” method to create a new array with elements excluding the filtered ones.
Both elements can be utilized to filter the indexed array element and display the updated array with the removed index.
Syntax
array.filter(function(Value), thisValue)
Here, “function” refers to the function that will invoke the function for filtering purposes, “Value” is the value of the current element, and “thisValue” corresponds to the value passed to the function.
Check out the following example.
Example
First, define an array and display its original values on the console:
var array = [1, 2, 3, 4, 5];
console.log("The original array is: ", array)
Next, apply the “filter()” method upon the declared array and access the third array element by indexing it as “2” and filter it:
array = array.filter(function(item){return item !== array[2]});
Now, access the index of the removed element.
This will result in returning a garbage value “-1”:
indexUpd= array.indexOf(3)
console.log("The index of the removed array element is:", indexUpd)
Lastly, print the updated array without the filtered item:
console.log("The array without removed indexed element becomes:", array)
Output
In the above output, it can be observed that the specified index is removed and displayed as “-1” in the last statement referring to the definition of the “indexOf()” method.
Method 2: Remove Index From Array Using filter() Method
The “filter()” method can be implemented along with the “indexOf()” method to create a new array with elements excluding the filtered ones.
Both elements can be utilized to filter the indexed array element and display the updated array with the removed index.
Syntax
array.filter(function(Value), thisValue)
Here, “function” refers to the function that will invoke the function for filtering purposes, “Value” is the value of the current element, and “thisValue” corresponds to the value passed to the function.
Check out the following example.
Example
First, define an array and display its original values on the console:
var array = [1, 2, 3, 4, 5];
console.log("The original array is: ", array)
Next, apply the “filter()” method upon the declared array and access the third array element by indexing it as “2” and filter it:
array = array.filter(function(item){return item !== array[2]});
Now, access the index of the removed element.
This will result in returning a garbage value “-1”:
indexUpd= array.indexOf(3)
console.log("The index of the removed array element is:", indexUpd)
Lastly, print the updated array without the filtered item:
console.log("The array without removed indexed element becomes:", array)
Output
![]() Method 3: Remove Index From Array Using shift() Method
The “shift()” method removes the first array element and changes the original array.
This method can be applied by removing the first array element and accessing its removed index.
The following example will illustrate the stated concept.
Example
Firstly, declare the specified array and display it:
var array = [1, 2, 3, 4, 5];
console.log("The original array is: ", array)
Next, apply the “shift()” method to remove the first array element and access its index using the “indexOf()” method as discussed before:
array.shift();indexUpd= array.indexOf(1)
Lastly, display the index of the omitted array element, which will result in “-1” and the updated array:
console.log("The index of the removed array element is:", indexUpd)
console.log("The array without removed indexed element becomes:", array)
Output
Method 3: Remove Index From Array Using shift() Method
The “shift()” method removes the first array element and changes the original array.
This method can be applied by removing the first array element and accessing its removed index.
The following example will illustrate the stated concept.
Example
Firstly, declare the specified array and display it:
var array = [1, 2, 3, 4, 5];
console.log("The original array is: ", array)
Next, apply the “shift()” method to remove the first array element and access its index using the “indexOf()” method as discussed before:
array.shift();indexUpd= array.indexOf(1)
Lastly, display the index of the omitted array element, which will result in “-1” and the updated array:
console.log("The index of the removed array element is:", indexUpd)
console.log("The array without removed indexed element becomes:", array)
Output
![]() Method 4: Remove Index From Array Using pop() Method
The “pop()” method pops the last array element and updates the original array as well.
This method can be applied to pop the last array element, access its index, and update the declared array.
Example
In the first step, repeat the above-discussed steps for declaring an array:
var array = [1, 2, 3, 4, 5];
console.log("The original array is: ", array)
Here, apply the “pop()” method to pop the last array element:
array.pop();
The following code statement will access the index of the popped array element as “5”
indexUpd= array.indexOf(5)
Last, access the index of the removed array element and display the updated array:
console.log("The index of the removed array element is:", indexUpd)
console.log("The array without removed indexed element becomes:", array)
Output
Method 4: Remove Index From Array Using pop() Method
The “pop()” method pops the last array element and updates the original array as well.
This method can be applied to pop the last array element, access its index, and update the declared array.
Example
In the first step, repeat the above-discussed steps for declaring an array:
var array = [1, 2, 3, 4, 5];
console.log("The original array is: ", array)
Here, apply the “pop()” method to pop the last array element:
array.pop();
The following code statement will access the index of the popped array element as “5”
indexUpd= array.indexOf(5)
Last, access the index of the removed array element and display the updated array:
console.log("The index of the removed array element is:", indexUpd)
console.log("The array without removed indexed element becomes:", array)
Output
![]() This blog demonstrated the methods to remove an index from an array.
This blog demonstrated the methods to remove an index from an array.
Conclusion
To remove an index from an array, apply the “splice()” method to splice the index of a particular array element, the “filter()” method to filter the indexed array element and return its index, the “shift()” method to remove the last array element, or the “pop()” method to remove the last array element along with its index.
This write-up has explained the approaches for removing an index from an array.
JavaScript querySelector | Explained
While writing HTML and JavaScript codes, it is often required to merge the functionalities of both files in order to perform the required functionality.
In such a case, the JavaScript “querySelector()” method does wonders in linking the HTML element with JavaScript with the help of the assigned id.
This functionality can be applied in cases when you want to access specific HTML elements to perform a specific operation on them using JavaScript.
This article will guide you about the working of the “querySelector()” method.
What is JavaScript querySelector() Method?
The “querySelector()” method gets the first element matching a CSS selector.
This method can be utilized to access a particular element, change its value upon a particular condition and display it on the Document Object Model(DOM).
How to Use JavaScript querySelector() Method?
Follow the below-given syntax for utilizing the querySelector() method:
document.querySelector(CSS selectors)
Here, “CSS selectors” refers to one or more than one CSS selectors.
We will now go through the examples for implementing the stated method to develop a clear understanding.
Example 1: Applying the querySelector() Method to Check if the Particular Key is Pressed
In the following example, we will firstly include an input field with the following placeholder value:
<input type= "text" placeholder= "Enter Text">
Then, add a heading using the “<h2>” tag:
<h2>Status</h2>
Next, fetch the created input field and the specified heading with the help of the “querySelector()” method:
let input= document.querySelector("input");let result= document.querySelector("h2");
After that, attach the event named “keydown” using the “addEventListener()” method to the input field.
Lastly, apply the condition for checking the specific key(Tab) and return the corresponding result on the DOM using the “innerText” property:
input.addEventListener("keydown", (e) => {if (e.key === "Tab"){
result.innerText= "Tab Key Pressed";}else {
result.innerText= "Tab Key Not Pressed";}});
This program will first fetch the input field and the added label using the querySelector() method and it can be observed that when the tab key is pressed, the innerText of the added label is changed:
![]() Example 2: Applying the querySelector() Method to Compute the Dimensions of an Image
In the following example, we will create a button and attach an onclick event to it which will access the imgSize() function when triggered:
<button type= "button" onclick= "imgSize();">Get Image Dimensions</button>
Now, specify the path and id of the image respectively:
<img src= 'template.jpg' id= "dim">
After that, define a function named “imgSize()”.
Here, access the image and fetch its dimensions using the width and height properties, respectively and display them on the alert dialogue box:
function imgSize(){
var dimensions= document.querySelector("#dim");
var width= dimensions.width;
var height= dimensions.height;
alert("Original , " + "Original923" data-lazy-src="https://linuxhint.com/wp-content/uploads/2022/10/JavaScript-querySelector-Explained-2.gif">
We have provided various examples to implement the JavaScript querySelector() method.
Example 2: Applying the querySelector() Method to Compute the Dimensions of an Image
In the following example, we will create a button and attach an onclick event to it which will access the imgSize() function when triggered:
<button type= "button" onclick= "imgSize();">Get Image Dimensions</button>
Now, specify the path and id of the image respectively:
<img src= 'template.jpg' id= "dim">
After that, define a function named “imgSize()”.
Here, access the image and fetch its dimensions using the width and height properties, respectively and display them on the alert dialogue box:
function imgSize(){
var dimensions= document.querySelector("#dim");
var width= dimensions.width;
var height= dimensions.height;
alert("Original , " + "Original923" data-lazy-src="https://linuxhint.com/wp-content/uploads/2022/10/JavaScript-querySelector-Explained-2.gif">
We have provided various examples to implement the JavaScript querySelector() method.
Conclusion
The “querySelector()” method gets the first element matching a CSS selector.
It can be utilized to access an element by specifying its id as an argument and then performing the required functionality on it using JavaScript code.
This manual explained the usage of the querySelector() method by implementing different case scenarios.
JavaScript prompt | Explained
While programming, there can be a chance that you may ask the user to enter a particular value using a prompt for performing various functionalities or conditions on it.
For instance, in the case of surfing the internet, there is a requirement to be fulfilled to access a particular web page or a site.
In such cases, the JavaScript prompt method does wonder in facilitating both the developer and the end user.
This blog will guide about the usage of prompt.
What is JavaScript prompt?
The “prompt()” method pops up a dialog box that prompts the user for input, and it gives a user-entered string having text in return, which can be an integer, float, or string.
It comprises two buttons, “OK” to submit the entered text and “Cancel” to submit “null” as the input field value when nothing is typed.
More specifically, the prompt box forces the user to read the specified message before accessing some particular functionality.
How to Use JavaScript prompt() Method?
Follow the below-given syntax to utilize the prompt() method of JavaScript:
prompt(text, defaultText)
In the above syntax, “text” refers to the specific text to be displayed in the dialogue box, and “defaultText” is the input text.
The below-given examples illustrate the stated concept.
Example 1: Using JavaScript prompt() Method to Get Input
In the following example, ask the user to input a number in the prompt box with the help of the prompt() method:
var inputNumber= prompt("Enter a Number: ")
Now, display the entered value on the Document Object Model(DOM) using “document.write()” method:
document.write("The Number is: ", inputNumber)
The corresponding output will be as follow:
![]() Example 2: Using JavaScript prompt() Method With an onclick Event
First, create a button named “Click Me” with an “onclick” event redirecting to the promptMethod() function:
<input type = "button" value = "Click Me" onclick = "promptMethod();" />
Next, define a function named “promptMethod()”.
Here, ask the user for the option to select and display it via alert dialogue box:
function promptMethod(){a= prompt(" Enter y for yes and n for no: ");
alert(a)}
Output
Example 2: Using JavaScript prompt() Method With an onclick Event
First, create a button named “Click Me” with an “onclick” event redirecting to the promptMethod() function:
<input type = "button" value = "Click Me" onclick = "promptMethod();" />
Next, define a function named “promptMethod()”.
Here, ask the user for the option to select and display it via alert dialogue box:
function promptMethod(){a= prompt(" Enter y for yes and n for no: ");
alert(a)}
Output
![]() Example 3: Using JavaScript prompt() Method Based on a Condition
In the following example, define a function named “promptMethod()” which will firstly ask the user to enter a value.
Here, a condition will be applied upon the division of the entered number by “2” in such a way that if the remainder is “0”, the entered number will be even; otherwise odd:
function promptMethod(){inputNumber= prompt(" Enter a number:");if (inputNumber%2 == 0){
document.write("The Entered Number is Even")}else if (inputNumber%2 != 0){
document.write("The Entered Number is Odd")}}
promptMethod();
Output
Example 3: Using JavaScript prompt() Method Based on a Condition
In the following example, define a function named “promptMethod()” which will firstly ask the user to enter a value.
Here, a condition will be applied upon the division of the entered number by “2” in such a way that if the remainder is “0”, the entered number will be even; otherwise odd:
function promptMethod(){inputNumber= prompt(" Enter a number:");if (inputNumber%2 == 0){
document.write("The Entered Number is Even")}else if (inputNumber%2 != 0){
document.write("The Entered Number is Odd")}}
promptMethod();
Output
![]() We have compiled the variations of using the JavaScript prompt() method.
We have compiled the variations of using the JavaScript prompt() method.
Conclusion
JavaScript “prompt()” method pops up a dialog box that prompts the user for input, and it gives a string in return containing the text entered by the user, which can be an integer, float, or string.
It comprises two buttons, “OK” to submit the entered text and “Cancel” to submit “null” as the input field value when nothing is typed.
This manual explained the usage of the prompt method.
How to Create Dropdown Using onchange
Have you ever encountered a web page or site which offers single or multiple options that need to be selected while filling out a questionnaire or a form? Enabling such options can assist in customizing a website to improve accessibility and user interaction.
More specifically, creating a dropdown using onchange does wonder in providing ease on the user’s end.
This blog will discuss the methodologies used to create dropdown using onchange.
How to Create Dropdown Using onchange?
You can create dropdown using onchange with the help of the following approaches:
Display the selected dropdown value using an “alert”
“document.getElementById()” Method
These approaches will be explained one by one!
Method 1: Create Dropdown Using onchange by Alerting the Selected Dropdown Value
This technique can be applied to alert the user about the selected dropdown option value with the help of a user-defined function.
The following example explains the stated concept.
Example
First of all, include the following heading in the “<h3>” tag:
<h3>Select a programming language from the given list:</h3>
Next, specify the “<select>” tag for selecting the particular option from the dropdown list.
Moreover, include the “onchange” event and invoke the specified function by passing the keyword “this” to it along with the option “value” of the dropdown.
Also, include the following options with the specified values in the “<option>” tag:
<select name= "type" onchange= "onchangeDropdown(this.value);"><option value= "Python">Python</option><option value= "Java">Java</option><option value= "JavaScript">JavaScript</option></select>
Last, define a function named “onchangeDropdown()” and passed the “value” as an argument.
In the function definition, the selected value will be displayed in the alert box::
function onchangeDropdown(value){
alert(value);}
Output
![]()
Method 2: Create Dropdown Using onchange Using document.getElementById() Method
The “document.getElementById()” method is used to fetch the element corresponding to the specified id.
This method can be implemented to get the selected option in the dropdown and display the corresponding value against it.
Syntax
document.getElementById("id")
Here, “id” refers to the id of the element that needs to be fetched.
Overview the following example.
Example
Firstly, include the following heading as discussed in the previous method:
<h3>Select a programming language from the given list:</h3>
The “<select>” tag here represents the dropdown menu, having an id and the associated “onchange” event redirecting to the specified function.
Then, add the required options in it:
<select id= "List" onchange= "onchangeDropdown()">
<option value= "Python">Python</option>
<option value= "Java">Java</option>
<option value= "JavaScript">JavaScript</option></select>
Here, assign the following “id” to the paragraph.
As soon as the option will be selected, a particular message will be displayed in this section along with the selected option:
<p id= "para"></p>
Finally, declare a function named “onchangeDropdown()”.
Here, fetch the select tag based on its “id” and display the corresponding value against the selected option from the dropdown.
In the next step, notify the user about the selected option by fetching the added paragraph element and writing the following message in it along with the option:
function onchangeDropdown(){
var x = document.getElementById("List").value;
document.getElementById("para").innerHTML = "The updated selection is: " + x;}
Output
![]() We have implemented creative methods to create dropdown using onchange.
We have implemented creative methods to create dropdown using onchange.
Conclusion
To create dropdown using onchange, display the selected dropdown value using an alert box or apply the “document.getElementById()” method.
The former approach can be utilized to notify the user about the selected dropdown option value with the help of a user-defined function.
The latter implementation fetches the selected option from the dropdown using its id and displays it.
This write-up demonstrated the methods to create dropdowns Using onchange.
How to Scroll to ID?
The websites or web pages often provide the functionality to redirect you to the specified section.
For instance, accessing the relevant page content in response to the search query from the user’s end.
This functionality is usually evident in the research-based websites where the content is too lengthy to go through.
Considering this, scrolling to id is very helpful in saving user’s time and accessing the related content instantly.
This blog will explain the methods to scroll to id.
How to Scroll to ID?
To scroll to id, the following methods can be applied:
“scrollIntoView()” Method.
“scrollIntoView()” Method with an “onclick” Event.
“scrollTo()” Method and its attributes.
The following approaches will demonstrate the stated concept one by one!
Method 1: Scroll to ID Using scrollIntoView() Method
This method can be implemented to access a particular paragraph via its id and scroll straight to it.
The following example illustrates the stated concept.
Example
Firstly, include the heading in the “<h3>” tag:
<h3>Python</h3>
Also, assign the specified “id” to the following paragraph in order to be scrolled:
<p id="para">Python is a very good language to start with programming.
This includes list, sublists, arrays, looping, functions, variables and much more.
Also, it includes various libraries and packages to integrate with various in-built functionalities and perform tasks.</p>
Similarly, repeat the above steps for including the following heading and paragraph respectively:
<h3>JavaScript</h3><p2>JavaScript is a scripting language which assists a lot in designing various interactive web pages.
It can be integrated with html to apply some added functionalities as well.
In this way, it attracts the end-user as well.</p2><br>
After that, specify the following image and adjust its dimensions:
<img src="template.JPG" ><br>
Also, utilize the “href” attribute along with the “<a>” tag in order to access the specified function:
<a href="javascript: scrolltoId()">Scroll to Paragraph</a>
Finally, declare the function named “scrolltoId()” to be accessed for scrolling.
In the function definition, access the paragraph id using the “document.getElementById()” method and apply the “scrollIntoView()” method upon the accessed id.
This will result in scrolling the DOM to the corresponding paragraph:
function scrolltoId(){
var access = document.getElementById("para");
access.scrollIntoView({behavior: 'smooth'}, true);}
The resultant output will be:
![]()
Method 2: Scroll to ID Using scrollIntoView() Method With an onclick Event
These methods can be applied in combination to fetch the id of a particular image and scroll to it upon the button click.
Example
In the following example, specify the following heading:
<h2>Click the button to scroll to the element.</h2>
Next, create the specified button along with an “onclick” event invoking the function scrolltoId():
<button onclick= "scrolltoId()">Scroll To Image</button><br>
Now, include the following images with the specified id’s and adjusted dimensions:
<image src= "template.JPG" id= "id1" height= "655" width= "955"><image src= "sample.JPG" id= "id2" height= "655" width= "955">
Finally, define the function named “scrolltoId()”.
Here, similarly access the assigned id of one of the images and scroll to it using the “scrollIntoView()” method:
function scrolltoId(){
var access = document.getElementById("id2");
access.scrollIntoView();}
Output
![]()
Method 3: Scroll to ID Using scrollTo() Method and its Attributes
The “scrollTo()” method scrolls the document to specified coordinates.
This method can be applied to scroll to the specified image using the method’s attributes.
Syntax
window.scrollTo(x, y)
In the given syntax, “x” and “y” indicate the horizontal and vertical coordinates represented in pixels respectively.
In the below-given example, both are assigned as “955”
To clear the concept, go through the following example.
Example
First, include the specified image within the specified “div” element and adjust its dimensions:
<div id= "img1"><img src= "sample.JPG" height= "955" width= "955"></div>
Similarly, repeat the above procedure with the following image:
<div id= "img2"><img src= "template.JPG" height= "955" width= "955"></div>
Next, using the “href” attribute, access the specified function within the “anchor(a)” tag:
<a href= "javascript: scrolltoId();">Scroll to Image</a><br><br>
Last, define the function named “scrolltoId()”.
Here, fetch the specified id corresponding to one of the included images.
Also, apply the “scrollTo()” method along with its attributes(scrollTop, scrollLeft) by referring to the id of the fetched image.
This will result in scrolling the DOM to the image against the fetched id:
function scrolltoId(){
var access = document.getElementById("img1");
window.scrollTo({
top: access.scrollTop,
left: access.scrollLeft});}
Output
![]() We have compiled various methods to scroll to id.
We have compiled various methods to scroll to id.
Conclusion
To scroll to id, apply the “scrolIntoView()” method to access the specified id of the paragraph and scroll to it, the “scrolIntoView()” method with an “onclick” event to scroll to the accessed image upon the button click or the “scrollTo()” method and its attributes to scroll to the accessed image by adjusting the attributes of the applied method.
This blog demonstrated the methods to scroll to id.
How to Create an Editable ComboBox
In JavaScript, the ComboBox is the combination of a drop-down list with an editable textbox.
It is added on web pages so that users can select an item from a specified drop-down list and can change its value by typing.
It can be utilized in replacement of the HTML <select> tag because text cannot be entered in the select field.
The JavaScript ComboBox also offers integrated filtering functionality and a wide range of filtering options with the help of “datalist”.
This blog will guide you through the process of creating an editable ComboBox.
How to Create an Editable ComboBox?
You can create an editable ComboBox with the help of “datalist”.
In HTM, use the <datalist> tag with <option> tag while, create a dataset element using the “document.createElement()” method with an array of options that will be added to the dropdown list.
Let’s examine a few examples of the stated concept.
Example 1: Create an Editable ComboBox in HTML
In this example, we will create a ComboBox for the list of fruits in HTML using the <datalist> tag.
To do so, add a heading, label, and an input field with the “fruits” list as the id of the datalist:
<h3> Combobox using HTML:</h3><label>Fruit List:</label><input type = "text" list="fruits">
Next, use the HTML <datalist> tag, assign it the “fruits” id and a list of required options:
<datalist id="fruits">
<option value="Pomegranate">
<option value="Apple">
<option value="Peach">
<option value="Apricot">
<option value="Grapes">
<option value="Banana">
<option value="Pear">
<option value="Kiwi">
<option value="Strawberry">
<option value="Cherry">
<option value="Orange">
<option value="Mango">
<option value="Melon">
<option value="Water Melon">
<option value="PineApple">
<option value="Avocado"></datalist>
As the dropdown list with multiple options needs extra effort to look into the provided options, the ComboBox allows you to filter the list side by side by typing in the text field:
![]() The above output shows the list of fruits.
We have typed “M” in the input field, which filtered out the fruit names that contain “M” or “m”.
As a result, we have selected the desired fruit name starting with the typed letter.
Example 2: Create an Editable ComboBox Using JavaScript
Here, we will perform the same task using JavaScript.
For this, we will first create a heading and a label.
Then, add an input text field and set its id “fruit” and the list “fruit_list”:
<h3> Combobox using HTML:</h3><label>Fruit List:</label><input type="text" id="fruit" list="fruit_list">
By following the given steps, we will create a ComboBox:
First, define a “comboBox()” function in a JavaScript file that contains an array of the dropdown options stored in variable “comboValues”.
Then, create an element “datalist” using the “document.createElement()” method.
After that, set the id of the comboList to “fruit_list” that is added in the HTML <input> tag.
Apply the forEach loop to append the dropdown option list by creating an element “option” for each of the added ComboBox values.
Invoke the comboBox() function at the end.
function comboBox(){
var comboValues = ['Pomegranate', 'Apple', 'Peach', 'Apricot', 'Grapes', 'Banana', 'Pear', 'Kiwi', 'Strawberry', 'Cherry', 'Orange', 'Mango', 'PineApple', 'Melon', 'Avocado', 'Water Melon'];
var comboList = document.createElement('datalist');
comboList.id = "fruit_list";
comboValues.forEach(comboValues =>{
var option = document.createElement('option');
option.innerHTML = comboValues;
option.value = comboValues;
comboList.appendChild(option);
})
document.body.appendChild(comboList);}
comboBox();
Output
The above output shows the list of fruits.
We have typed “M” in the input field, which filtered out the fruit names that contain “M” or “m”.
As a result, we have selected the desired fruit name starting with the typed letter.
Example 2: Create an Editable ComboBox Using JavaScript
Here, we will perform the same task using JavaScript.
For this, we will first create a heading and a label.
Then, add an input text field and set its id “fruit” and the list “fruit_list”:
<h3> Combobox using HTML:</h3><label>Fruit List:</label><input type="text" id="fruit" list="fruit_list">
By following the given steps, we will create a ComboBox:
First, define a “comboBox()” function in a JavaScript file that contains an array of the dropdown options stored in variable “comboValues”.
Then, create an element “datalist” using the “document.createElement()” method.
After that, set the id of the comboList to “fruit_list” that is added in the HTML <input> tag.
Apply the forEach loop to append the dropdown option list by creating an element “option” for each of the added ComboBox values.
Invoke the comboBox() function at the end.
function comboBox(){
var comboValues = ['Pomegranate', 'Apple', 'Peach', 'Apricot', 'Grapes', 'Banana', 'Pear', 'Kiwi', 'Strawberry', 'Cherry', 'Orange', 'Mango', 'PineApple', 'Melon', 'Avocado', 'Water Melon'];
var comboList = document.createElement('datalist');
comboList.id = "fruit_list";
comboValues.forEach(comboValues =>{
var option = document.createElement('option');
option.innerHTML = comboValues;
option.value = comboValues;
comboList.appendChild(option);
})
document.body.appendChild(comboList);}
comboBox();
Output
![]() It can be seen that we can also edit the ComboBox value after selecting it from the available list:
It can be seen that we can also edit the ComboBox value after selecting it from the available list:
![]() We have gathered the best solutions for creating an editable ComboBox and HTML.
We have gathered the best solutions for creating an editable ComboBox and HTML.
Conclusion
To create an editable ComboBox, you can use the element “datalist”.
In HTML, utilize the <datalist> tag with <option> tag while, you can create a datalist element using the “document.createElement()” method with an array of options that will be added to the dropdown list.
In this blog post, we have demonstrated the procedure of creating an editable CombBox as well as in HTML.
How to Convert Array to Set?
Maintaining the data and keeping it confidential is very vital while dealing with sensitive data.
In such a case-scenario, utilizing sets is very helpful as they do not allow any duplicate values thereby preserving the data.
In such a manner, converting an array to a set proves to be a great added functionality for securing various records in bulk.
This blog will demonstrate the concept of transforming an array to set.
How to Convert Array to Set?
To convert array to set, the following methods can be applied:
“map()” and “add()” Methods
“reduce()” Method
“spread()” Operator
In the section below, we will illustrate the mentioned approaches one by one!
Method 1: Convert Array to Set Using the map() and add() Methods
The “map()” method calls a function once for each element in an array without changing the original array and the “add()” method is used to append an element with the specified value.
These methods can be implemented to map each array element into a set by passing a value to it.
Syntax
array.map(function(currentValue, index, array), value)
In the given syntax, “function” refers to the function to be executed for each array element.
The function arguments refer to the index of the current value in the specific array and the “value” points to the value which is passed to the function.
The below-given following example demonstrates the stated concept.
Example
In this particular example, declare an array of integers and display it as follows:
var array = [1, 2, 3];
console.log("The given array is: ", array)
In the following step, the “new Set()” method will result in creating a new set:
var set = new Set();
After that, the “map()” and “add()” methods will map the array elements into the newly created set and the “forEach()” method will ensure that the mapping is done for each of the array element:
array.map(arrayelements => set.add(arrayelements)); set.forEach(item => {
console.log("The converted array to set is:", item);});
Output
![]()
Method 2: Convert Array to Set Using the reduce() Method
The “reduce()” method executes a function for array elements in order to return a compressed value.
This method can be applied by passing the value referring to the array elements to the created set.
Syntax
array.reduce(function(total, Value, Index, array), value)
The syntax of the “map()” method and the “reduce()” method is the same.
The additional parameter “total” here indicates the previously returned function value.
Overview the below-given example.
Example
First, create an array of the following integer and string values and display it:
var array = [32, 46, "Harry"];
console.log("The given array is: ", array)
Next, similarly create a new set using the “new Set()” method:
var set = new Set();
Now, apply the “reduce()” method and pass the value “item” to the “add()” method referring to the created set.
This will result in compressing the created array into the individual set values:
array.reduce((_, item) => set.add(item), null);
The “forEach()” method will likewise perform the conversion for each of the array element:
set.forEach(item => {
console.log("The converted array to set is:", item);});
Output
![]()
Method 3: Convert Array to Set Using the spread() Operator
The ES6 “spread operator (…)” is used to copy all or some part of an existing array into another array.
This approach can be implemented to unpack the accumulated set values into a newly created array.
Example
In the following example, define an array having the following string values and display it:
const array = ['Google', 'Youtube', 'Linuxhint'];
console.log("The given array is: ", array)
As discussed previously, create a new set having the initialized array as its argument:
const set = new Set(array);
Now, apply the “spread” operator upon the created set which will result in accumulating the set elements in an array again:
const updArray = [...set];
The following step will lead to display the set elements contained in an array:
console.log("The converted array to set is:", updArray);
Output
![]() In the above output, it is evident that the set values are displayed as an array thereby leaving no difference after the required conversion.
This blog explained different methodologies to opt for converting an array to set.
In the above output, it is evident that the set values are displayed as an array thereby leaving no difference after the required conversion.
This blog explained different methodologies to opt for converting an array to set.
Conclusion
To convert an array to set, apply the “map()” and “add()” methods to map each array element into the newly created set by passing a value, the “reduce()” method to compress the created array into individual set values or the “spread()” operator approach to accumulate the created array into the newly created set and displaying them as an array again.
This write-up demonstrated the approaches to convert an array to set.
How to Compare Objects
In JavaScript, an object is a non-primitive data type or entity that stores numerous data collections with properties.
Comparing numbers or texts is quite simple, but it is more difficult to compare two objects.
Since JavaScript can easily compare two strings, therefore, we will convert the objects into strings and then perform comparison operations.
This tutorial will demonstrate the methods for comparing objects.
How to Compare Objects?
To compare objects, utilize the “JSON.stringify()” method.
Using the JSON.stringify() method, the value/object is converted into a JSON string.
To determine whether the two objects are actually equivalent, compare the two outputs after using JSON.stringify() to convert the two objects into strings.
Syntax
Follow the below-mentioned syntax for comparing objects using JSON.stringify() method:
JSON.stringify(value)
The JSON.stringify() method takes only one parameter, which is “value”, which is the JavaScript object to be converted into a JSON string.
Example 1: Compare Objects With Same Properties
First, create two objects named “info” and “information” with the same properties “name” and “age”:
var info = {
name: "Stephen",
age: 25}var information = {
name: "Stephen",
age: 25}
Then, compare these two objects using JSON.stringify() method with a strict equality operator.
The JSON.stringify() method converts objects into strings and then compares the resultant strings using the strict equality operator that will compare on both its type and the value:
console.log(JSON.stringify(info) === JSON.stringify(information));
The output shows “true” that will indicate that both objects are equal:
![]() Example 2: Compare Objects With Same Properties but Different Places
In this example, first, add a property “contact” in object “information”:
var information = {
name: "Stephen",
contact: "2345667",
age: 25}
Then, compare the objects “info” and “information” using strict equality operator:
console.log(JSON.stringify(info) === JSON.stringify(information));
The output displays “false” because the placement of the object’s properties are not same:
Example 2: Compare Objects With Same Properties but Different Places
In this example, first, add a property “contact” in object “information”:
var information = {
name: "Stephen",
contact: "2345667",
age: 25}
Then, compare the objects “info” and “information” using strict equality operator:
console.log(JSON.stringify(info) === JSON.stringify(information));
The output displays “false” because the placement of the object’s properties are not same:
![]() Here, the question arises, why do we not use an equality operator for comparing objects instead of JSON.stringify() method? Follow the below section.
Here, the question arises, why do we not use an equality operator for comparing objects instead of JSON.stringify() method? Follow the below section.
Why are Objects not Compared Using the Equality Operator?
JavaScript offers two methods for comparison, one is compared by values, and the other one is by reference.
The primitive types (string, numbers) are compared by values.
As we know, the loose equality operator “==” compares data types by values, while the strict equality operator “===” compares primitive data types by both their type and the value.
Objects using comparison operators “==” and “===” cannot be compared because JavaScript compares objects based on their addresses, also known as compare by reference.
Let’s verify that the objects are not compared with equality operators (== and ===).
Example 1: Using Loose Equality Operator (==)
Here, we will compare both objects “info” and “information” that is created in the previous example, using loose equality operator(==):
console.log(info == information)
The output displays “false” because the objects are compared by reference:
![]() Example 2: Using the Strict Equality Operator (===)
Now, we will compare both objects using strict equality operator:
console.log(info === information)
Output
Example 2: Using the Strict Equality Operator (===)
Now, we will compare both objects using strict equality operator:
console.log(info === information)
Output
![]() As you can see that the equality operators do not compare the objects so, the JavaScript allows to compare objects by converting them into strings using the “JSON.stringify()” method.
We have provided the simplest solution for comparing objects.
As you can see that the equality operators do not compare the objects so, the JavaScript allows to compare objects by converting them into strings using the “JSON.stringify()” method.
We have provided the simplest solution for comparing objects.
Conclusion
To compare objects, you can utilize the “JSON.stringify()” method that will first convert a JavaScript value/object into a JSON string, and then you can compare the returned strings with the help of the strict equality operator.
As you know, JavaScript can easily compare two strings, but it is difficult to compare two objects.
To determine whether the two objects are actually equivalent, compare the two outputs after using JSON.stringify() to convert the two objects into strings.
In this manual, we demonstrated the methods for comparing objects.
How do I Fix JavaScript Errors?
While programming, errors are a must part of each code.
These mostly include syntax or logical errors, which can be resolved by simply correcting a misspelled variable or making a correct logic respectively.
As a beginner, fixing JavaScript errors is essential for the proper functioning of the desired code.
This blog will overview some common JavaScript errors and their fixes.
Types of JavaScript Errors
In JavaScript, you may have encountered the following types of errors:
Syntax Errors
Logical Errors
Let’s discuss them individually!
Syntax Errors
A syntax error occurs when there is a problem with grammar in the code.
These types of errors mostly arise due to misspelled keywords, missing/open brackets, or missing parentheses or punctuation.
Logical Error
A logical error arises when there’s a problem with the logic or flow of the program, like accessing the strings or functions which are not declared.
In these types of errors, the syntax is accurate, but the code is not the desired one, resulting in a program that runs but produces wrong results.
These types of errors are tricky to locate and are time-consuming if you do not find out the particular solution.
How do I Fix JavaScript Errors?
Most common JavaScript errors include the following:
Redeclaration of a variable
Using == instead of ===
Not applying brackets on the conditional statements
Using { } brackets instead of square brackets [ ] for arrays declaration
Reason: Redeclaration of let Variable
Redeclaring a variable causes an error as it is limited to the scope of a block statement and cannot be redeclared, as shown below:
![]()
Fix
This error can be fixed by using the keyword “var” instead of “let” to re-assign some different values.
Applying the same example implemented above with var will yield the following output:
![]()
Reason: Using == Instead of ===
This type of error involves using double equal or loose equality operator mistakenly or unknowingly instead of triple equal pr strict equality operator.
The loose equality operator tries to change the two values and make them match:
![]() In the above output, the program prints “True” because the loose equality operator converted the string value 20 to the integer value 20.
The same code using “===” will yield the undefined value as the strict equality operator first checks the type of the operands; if it is the same, then it goes for the value-based comparison:
In the above output, the program prints “True” because the loose equality operator converted the string value 20 to the integer value 20.
The same code using “===” will yield the undefined value as the strict equality operator first checks the type of the operands; if it is the same, then it goes for the value-based comparison:
![]()
Fix
This error can be fixed by using “===” in the case of checking whether two values are the same or not and applying “==” to equalize the two values.
Reason: Not Using Braces on the Conditional Statements
This type of error usually arises when there is one line of code, and the braces are not placed or are forgotten to be placed.
Example
In the given example, it can be observed that both console.log() statements are executed regardless of the applied “if” loop:
![]()
Fix
This type of error can be resolved by placing the braces every time the conditional statements are executed.
Reason: Using { } Brackets Instead of Square Brackets[ ] For Array Declaration
This is a very common mistake to not identify the specified bracket for declaring an array.
Example
In the following example, we can observe the result of placing the { } instead of [ ] brackets:
![]()
Fix
This error can be solved by placing the square brackets[ ] each time when an array is declared.
We have reviewed the most common JavaScript errors.
Conclusion
Redeclaration of a variable, using == instead of ===, not applying brackets on the conditional statements, and using { } brackets instead of square brackets [ ] for arrays declaration are some of the most commonly encountered JavaScript errors.
In the case of a JavaScript syntax error, try to resolve it by adding a bracket and correcting the misspelled word.
In the other case, where there is a logical error, try to resolve it by plotting an algorithm for it.
This article demonstrated the techniques to fix JavaScript errors.
How do I Make an Ordered JavaScript List?
While creating a web page or a website, you may need to display content in the table form in order to specify a value against a particular attribute.
More specifically, creating the table of contents for overviewing the document beforehand can save a lot of time.
In such cases, making an ordered list is very useful in improving the readability and accessible document design.
This write-up will demonstrate the methodologies used for making an ordered list.
How do I Make an Ordered JavaScript List?
To make an ordered list, the following approaches can be utilized with the “<ol>” tag:
“Numbers” and “Romans”
“Nesting” Method
“start” and “reverse” Attributes
Now, go through the mentioned methods one by one!
Method 1: Make an Ordered List Using <ol> Tag With Numbers and Romans
The “<ol>” tag defines an ordered list with various attributes like start and reverse.
This tag can be applied to create an ordered list using numbers and romans.
Example 1: Make an Ordered List Using Numbers
The numbered ordered list is created by default by simply specifying the “<ol>” tag.
In this example, we will utilize the <ol> tag and insert the list items in the contained “<li>” list tag:
<ol><li>Python</li><li>Java</li><li>JavaScript</li></ol>
This will result in the following output:
![]()
Example 2: Make an Ordered List Using Romans
For roman numbering, specify the type of the ordered list as “i”:
<ol type= "i">
Now, insert the list items in the “<li>” tag as discussed in the previous example:
<li>Python</li><li>Java</li><li>JavaScript</li>
Output
![]()
Method 2: Make an Ordered List Using <ol> tag With Nesting Method
The “nesting” method creates an ordered list by nesting the list items against a particular list item.
This method can be implemented to contain the list of items under a specific category.
To do so, first, use the “<ol>” tag and add the first list item in the <li> tag as discussed:
<ol><li>JavaScript</li>
Next, create another <ol> tag contained in the first tag in order to add a sub-list under the “JavaScript” item:
<ol><li>Classes</li><li>JSON</li><li>jQuery</li></ol>
Similarly, place another list item “Java” as the part of the parent list:
<li>Java</li>
Repeat the same process for creating the sub-list of the “Python” item:
<li>Python</li><ol><li>Variables</li><li>Functions</li></ol></ol>
Output
![]() In order to apply the <ol> tag with different attributes, follow the next section.
In order to apply the <ol> tag with different attributes, follow the next section.
Method 3: Make an Ordered List Using <ol> tag With Start and Reverse Attributes
The “<ol>” tag can be applied with the start attribute to start an ordered list based on the specified number.
The reverse attribute, however, reverses the ordered list indexes without any change in the list items.
Example 1: Make an Ordered List Using the Start Attribute
Firstly, add some text that needs to be displayed on the Document Object Model(DOM) inside the “<p>” tag:
<p>Task to perform:</p>
Next, specify the start attribute in order to start the ordered list with the number “2”:
<ol start= "2">
Finally, include the list items in the “<li>” tag:
<li>JavaScript</li><li>Ordered</li><li>List</li></ol>
Output
![]()
Example 2: Make an Ordered List Using the Reverse Attribute
Now, repeat the above steps by specifying the “<ol>” attribute as reversed only.
This will result in reversing the indexes of list items without any change in the list items:
<p>Task to perform:</p><ol reversed><li>JavaScript</li><li>Ordered</li><li>List</li></ol>
Output
![]() This blog compiled the methods to make an ordered list.
This blog compiled the methods to make an ordered list.
Conclusion
To make an ordered list, utilize the “<ol>” tag with numbers and romans for customizing the indexes of the specified list items, the “nesting” method to contain various list items under a particular list item, or applying the “start” and “reverse” attributes to start an ordered list with the specified index and reverse the indexes without any change in the list items respectively.
This manual demonstrated the methods to make an ordered list.
How do I call a JavaScript function on page load
Accessing various functionalities upon page load is required in many web pages and websites to ensure the working of various implemented algorithms.
Moreover, while performing automated testing of a website, this feature is very helpful in configuring the working of various operations inside a function and debugging them.
This article will demonstrate the methods to access a function on page load.
How do I call/invoke a function on page load?
To call a JavaScript function on page load, the following approaches can be utilized:
“window.onload” event
“document.addEventListener()” method
“body onload” event
We will now discuss each of the mentioned approaches one by one!
Method 1: Invoke a JavaScript Function Upon Page Load Using window.onload Event
The “window.onload” event occurs when the entire page along with its content loads.
More specifically, this event can be applied to access a specific function upon the page load.
Syntax
window.onload= function()
In the given syntax, “function” refers to the function that gets invoked when the window gets loaded.
The following example explains the discussed concept.
Example
In the following example, initialize the two variables with the given integer values:
var load1= 6;
var load2= 4;
Now, define a function named “pageonLoad()” and place the created variables as its argument.
Also, return the addition of the specified values against the variables:
function pageonLoad(load1, load2){return load1 + load2 ;}
Finally, apply the “window.onload” event such that when the page loads, the function is accessed, and the sum of the values is returned:
window.onload= function(){
console.log("The resultant value is:",)
console.log(pageonLoad(load1,load2));}
The corresponding output will be:
![]() The above output is a result of page onloading and accessed functions at the same time.
The above output is a result of page onloading and accessed functions at the same time.
Method 2: Access a Function on Page Load Using
document.addEventListener() Method
The “document.addEventListener()” method merges an event handler to a document.
This method can be implemented to add the specified event for loading the page and calling a particular function in return.
Syntax
document.addEventListener(event, function)
In the above syntax, “event” refers to an event that will trigger and invoke the specified “function”.
Look at the following example.
Example
First, assign the specified id named “load” to the div element:
<div id= "load"></div>
Next, access the created container by passing its id to the “document.getElementById()” method:
let load= document.getElementById("load");
After that, add an event named “DOMContentLoaded” using the “document.addEventListener()” method in order to load the page and access the function pageonLoad():
document.addEventListener( "DOMContentLoaded", pageonLoad());
Finally, define a function named “pageonLoad()”.
Here, display the following messages on the alert dialog box and on the Document Object Model(DOM) respectively upon the page load:
function pageonLoad(){
alert("Function Call on the page load.");
load.innerHTML= "Function body executed successfully on page load."}
Output
![]()
Method 3: Call a Function on Page Load Using body onload Event
The “body onload” event executes the specified function when the page loading process gets complete.
This technique can be applied to access multiple functions by placing them in a resultant function’s arguments and performing the desired functionality upon the page load.
Syntax
<body onload= "function()">
In the above syntax, “function()” refers to the function which will be called upon the page load.
The following example will clarify the concept.
Example
Firstly, apply the “body onload” event redirecting to the specified function “execute()”:
<body onload= "execute()">
Next, define a function named “pageonLoad1()” which returns a value:
function pageonLoad1(){return "3";}
Similarly, define a function named “pageonLoad2()” and return the specified value:
function pageonLoad2(){return "2";}
Now, define a function named “pageonLoad()” having the above defined functions as its arguments.
In this function, both the values returned from the accessed functions will be multiplied and returned:
function pageonLoad(pageonLoad1, pageonLoad2){return pageonLoad1() * pageonLoad2();}
Lastly, the defined function “execute()” will access the function “pageonLoad()” and log its functionalities(multiplication of both numbers):
function execute(){
console.log("The resultant value is: ")
console.log(pageonLoad(pageonLoad1,pageonLoad2));}
Output
![]() We have explained the methods to call a JavaScript function on page load.
We have explained the methods to call a JavaScript function on page load.
Conclusion
To call a function on page load using JavaScript, apply the “window.onload()” event to access the function upon the page load, the “document.addEventListener()” method to add a particular event for loading the page or the “body onload” event to merge the functionalities of functions in a single function.
This manual demonstrated the methods to access a function on page load.
Difference Between Inline and Anonymous Functions
JavaScript, the inline and anonymous functions are mostly utilized to apply a specific functionality or an event upon a particular function.
In addition to that, they are very useful in reducing code complexity and making it readable.
Also, these functions avoid namespace pollution and are convenient to access as well.
This article will discuss the inline and anonymous functions and their differences.
Inline and Anonymous Functions and their Differences
The “Inline” and “Anonymous” functions are nearly the same as both are created at runtime.
The difference is that the inline functions are stored in a specific variable which is not the case in anonymous functions.
Now, let’s study each of them one by one!
What are Inline Functions?
Inline functions are a type of anonymous function contained in a variable.
It is similarly created as the anonymous function and then contained in a specific variable.
The following examples will elaborate on the stated concept using the “setTimeout()” method.
Example: Using Inline Function
Firstly, we will include the heading in the “<h3>” tag and align it to center using the “<center>” tag:
<h3><center>The Inline function is stored in a variable</center></h3>
Next, store the specified function in the variable named “inlineFunc”.
In its function definition, alert the following message after the specified time out as “2” seconds:
let inlineFunc = function(){
alert ('This is Inline Function')};
setTimeout(inlineFunc, 2000)
It can be observed that the added message in the inline function is displayed in the alert box after two seconds:
![]()
Example 2: Using Inline Arrow Function
First, we will add a heading as discussed in the previous example:
<h3><center>The Inline arrow function is stored in a variable</center></h3>
Next, apply the arrow function and similarly store it in the variable named “inlineFunc”.
Also, apply the “setTimeout()” method to display the corresponding message after the stated time:
let inlineFunc = () => alert('This is Inline Arrow Function');
setTimeout(inlineFunc, 2000)
Output
![]()
What are Anonymous Functions?
The JavaScript anonymous functions are declared without any named identifier, as its name suggests.
Example: Using Anonymous Function
We will include the following heading in the center using the discussed tags in the previous examples:
<h3><center>Anonymous function is defined without any name identifier</center></h3>
After that, apply the “setTimeout()” method to the anonymous function(having no name).
Also, alert the following message after the set time which is two seconds:
setTimeout(function(){
alert('This is Anonymous Function')}, 2000);
Output
![]()
Example: Using Anonymous Arrow Function
As discussed in the previous methods, we will add a heading using the <h3> tag and align it in the center:
<h3><center>Anonymous arrow function is defined without any name identifier</center></h3>
Then, apply the “setTimeout()” method to the anonymous arrow function having the specified time out:
setTimeout(() =>alert('This is Anonymous Arrow Function'), 2000);
Output
![]() We have discussed the examples to implement the inline and arrow functions.
We have discussed the examples to implement the inline and arrow functions.
Conclusion
In JavaScript, the inline and anonymous functions are different in such a way that the inline functions are a type of anonymous function that is stored in a specific variable, whereas the anonymous function is a function without any name.
Both of the functions can be created at runtime.
This manual guided about the inline and anonymous functions and their differences.
Creating List of Objects
While maintaining a record, we often come across situations where we need to include the entries of multiple data types.
For instance, when we want to relate some feature with respect to a specific attribute.
In such a scenario, creating a list of objects becomes very efficient and flexible in the declaration.
This blog will illustrate the methods to create objects list.
How to Create a List of Objects?
To create a list of objects, the following approaches can be utilized:
“for” loop
“forEach()” method
“map()” method
The mentioned approaches will be discussed one by one!
Method 1: Create a List of Objects Using for Loop
The “for” loop is applied to iterate along all the items by specifying the start and end numbers or index.
This technique can be utilized to iterate along the list of objects by specifying the array length and displaying the values simultaneously.
Look at the following example.
Example
In the following example, we will create a list of objects named “objectList” having the following values:
let objectList = [
{ Name: 'Harry', id: 1 , city: "NewYork"},
{ Name: 'David', id: 2 , city: "Berlin"},
{ Name: 'John', id: 3 , city: "London"}];
Now, apply the “for” loop and the “length” property to iterate along the list objects and print the objects list on the console:
for (let i = 0; i < objectList.length; i ++ ){
console.log(objectList[i]);}
The corresponding output will be:
![]()
Method 2: Create a List of Objects Using forEach() Method
The “forEach()” method calls a function for each array element.
This method can be implemented to assign the created objects to each array item and append it to a newly created list.
The following example explains the stated concept.
Example
First, create an array named “objectList” with the following items:
var objectList = ["Linux Hint", "Google"];
Next, apply the “forEach()” method to the created array to call the specified function for each array element.
Here, “entry” in the function’s argument refers to the array values.
After that, an empty list named “newObj” will be declared to be appended to the list of objects.
Now, two object properties named “type” and “value” will be created in each iteration; the type is assigned as “Website”, and the value refers to “entry”(array values).
Therefore, a new list(newObj) will be appended with the objects and displayed:
objectList.forEach(function(entry) {
var newObj = {};
newObj['type'] = 'Website';
newObj['value'] = entry;
console.log(newObj)});
Output
![]()
Method 3: Create a List of Objects Using map() Method
The “map()” method calls a function once for each array element.
This method can be implemented to map the specific objects to array elements and append them to a newly created list.
Look at the following example.
Example
Firstly, create an array named “objectList” as discussed in the previous method:
var objectList = ["JavaScript", "Java", "Python"];
Next, apply the “map()” method in order to map the function on the array.
Also, create a null list named “newObj” and create two object properties in each iteration, as discussed in the previous method.
Finally, log the list of objects on the console:
objectList.map(function(entry) {
var newObj = {};
newObj['type'] = 'language';
newObj['value'] = entry;
console.log(newObj)});
Output
![]() We have discussed all the creative methods to create a list of objects.
We have discussed all the creative methods to create a list of objects.
Conclusion
To create a list of objects, utilize the “for” loop method to iterate along the list objects with the help of the length property, the “forEach()” method to relate the newly created objects with the array values and append it to a new list, or the “map()” method to map the function on the created array in order to access the array items, merge them with the created objects and append them in the objects list.
This blog demonstrated the methods to create an object’s list.
Breakpoints
Generally, during coding, sometimes the program does not execute the output or can get an unexpected result.
It is because the program has errors but does not show any error messages or hints about where to look for the errors.
These errors can be logical errors.
The breakpoints are used for debugging logical errors and verifying the working of the code to match the expected outcome.
Therefore, the Breakpoints can be used to stop the execution of the code at specific break/stop points, verify the output till that point and then move on to the next stop point.
This blog will demonstrate the breakpoints and its usage.
What are Breakpoints?
Breakpoints are the most fundamental debugging tools in the developer’s toolbox.
It is used to indicate the position where errors occur.
This allows the program to execute properly till it reaches the significant code block where an error might occur.
Let’s see how the breakpoint works.
How to Use breakpoints?
Follow the given steps to use breakpoints and identify the line of code on which the error occurred.
Step 1: Open the Debugger
All the current browsers provide a JavaScript debugger.
The debugger window allows setting breakpoints code.
First, open the debugger window called “DevTools”.
Right-click on the browser and select the “Inspect” option or by using the shortcut key “Ctrl+Shift+I” or you can simply press the “F12” key:
![]()
Step 2: Open Source Panel
Click on the “Sources” panel, which helps us debug JavaScript.
It has three main sections, “the file navigator” on the left side of the window, “the code editor section” on the right side of the window, and the “debugger section” on the bottom right of the window:
![]()
Step 3: Open the JavaScript File
From the “the file navigator” section, click on the “js” file, and it will open at the “the code editor section” on the right side of the window:
![]() Step 4: Set the breakpoints
Set a breakpoint on a line in “the code editor section” by clicking the line number column:
Step 4: Set the breakpoints
Set a breakpoint on a line in “the code editor section” by clicking the line number column:
![]() We have placed a breakpoint on line 6.
Here, the code will stop running.
Additionally, you can set multiple line-of-code breakpoints:
We have placed a breakpoint on line 6.
Here, the code will stop running.
Additionally, you can set multiple line-of-code breakpoints:
![]() In the given example, we will just set the breakpoints and run the code to see how it works.
After setting the breakpoint, the code execution will stop so that we can inspect the values.
Output
In the given example, we will just set the breakpoints and run the code to see how it works.
After setting the breakpoint, the code execution will stop so that we can inspect the values.
Output
![]() We have covered the basic instructions related to breakpoints.
We have covered the basic instructions related to breakpoints.
Conclusion
Breakpoints are one of the most fundamental debugging tools in the developer’s toolbox.
It is used to find the position of the logical error.
Simply place a breakpoint whenever you want the debugger to stop the current execution.
Open the Source panel in DevTools and set the breakpoint on the code editor section by clicking the line number column.
In this blog, we demonstrated the breakpoints and how to set breakpoints to debug the code.
AND(&&) Operator | Explained
While dealing with mathematical computations, the “&&” or AND operator is very helpful in computing the values.
In addition to that, this technique is much needed to apply a check upon a particular condition and place the exceptions where needed.
Furthermore, it can handle most of the code based on a particular condition effectively.
This blog will explain the use of && operator.
What is JavaScript AND(&&) Operator?
The “AND(&&)” operator performs logical AND operation on two boolean operands.
It returns true if both statements are true.
In the other case, if any of its values is false, the output value will be false.
Syntax
x && y
In the given syntax, “x” and “y” are the operands on which the && operator will be applied.
Truth Table of && Operator
| x |
y |
x && y |
| true |
true |
true |
| true |
false |
false |
| false |
true |
false |
| false |
false |
false |
Operator Precedence
The “AND(&&)” operator has comparatively higher precedence than the “OR(||)” operator in such a way that the && operator is executed before the || operator.
The following example explains the precedence concept.
Example
In this example, the statement (true && false) will execute first due to the higher precedence of the “AND(&&)” operator.
This will result in “false”:
true && (false || false)
Now, the statement becomes:
false || false
The “OR” of both the false statements will yield:
false
Now, let’s check out some examples related to the working of && operator.
Example 1: Applying AND(&&) Operator on the Boolean Values
In the following example, we will first assign “true” as boolean values to both variables named “x” and “y”.
Then, apply the “&&” operator.
As both of the values are true, so the resultant value will be true:
var x = true;
var y = true;
var result = x && y;
console.log(result)
Similarly, assign the following boolean values to the same variables and apply the “&&” operator.
This will result in “false” as one value is false:
x = true;
y = false;
result = x && y;
console.log(result)
Likewise, analyze the following conditions based on the discussed concept of “&&” operator and log the corresponding boolean value:
x = false;
y = true;
result = x && y;
console.log(result)
x = false;
y = false;
result = x && y;
console.log(result)
The corresponding output will be:
![]() In the above output, it is evident that only the first value is true which is a result of both the operands being true.
In the above output, it is evident that only the first value is true which is a result of both the operands being true.
Example 2: Applying AND(&&) Operator on the Initialized Value
In this example, initialize a value “1” to the following variable:
let x = 1;
Next, apply the “&&” operator with the following values to the initialized value and observe the result:
console.log("The resultant value is:", x &&= 2)
console.log("The resultant value is:", x &&= 1)
It can be seen that logical AND “&&=” operation is successfully applied in the both statement which updated the value of the x variable likewise:
![]()
Example 3: Applying AND(&&) Operator as a Condition
Firstly, ask the user to input a value via prompt:
input= prompt("Enter a value:")
Now, if the entered value satisfies both of the following conditions using “&&” operator, the “if” block will execute:
if (input > 5 && input < 10){
alert("True")}
In the other case, the below “else” block will execute:
else{
alert("False")}
Output
![]() We have compiled the easiest methods related to the usage of &&.
We have compiled the easiest methods related to the usage of &&.
Conclusion
In JavaScript, the && operator can be applied on the boolean values to compute the resultant value.
Also, it can be implemented upon the initialized value in order to utilize it and yield a desired value, or can be implemented as a condition to satisfy the given requirements.
This blog demonstrated the use of “&&” with the help of different examples.
addEventListener vs onclick
While creating web pages for a website, there can be a requirement to place some added functionalities for enhanced features.
For instance, in the case of automation testing, check the working of various functionalities upon the event trigger.
In such cases, JavaScript provides two important techniques which assist in making an overall document design accessible named as addEventListener() method and onclick event.
This manual will theoretically and practically compare the addEventListener and the onclick event.
addEventListener vs onclick
In JavaScript, the “addEventListener()” method and the “onclick” event both work for an event and can run a callback function when a button is clicked.
However, they are not completely the same.
The addEventListener() method includes an event in its argument.
Moreover, it can apply multiple event handlers to the same element and does not overwrite multiple event handlers simultaneously.
Whereas the onclick event is triggered when the user clicks on the corresponding button against the event.
It is just a property of the HTMLElement object and can be overwritten, unlike the addEventListener() method.
Syntax
element.addEventListener(event, listener, useCapture);
In the given syntax, “event” refers to the specified event, “listener” is the function that will be invoked, and “useCapture” is the optional value.
Syntax
HTML
<element onclick="myScript">
In the given syntax, “element” indicates the element with which the “onclick” event will be associated.
Here, “myScript” refers to the function that will be called upon which the onclick event will occur.
JavaScript
object.onclick = function(){myScript};
Similarly, in the above syntax, “object” refers to the object associated with the onclick event.
Core Differences Between addEventListener and onclick Event
| addEventListener |
onclick |
| addEventListener method can only be added. |
onclick can be included in HTML as well as. |
| addEventListener does not work in the older versions of some browsers. |
onclick is compatible with all browsers. |
| This function can attach multiple events to a particular element.
|
This event associates only a single event to an element.
|
| It cannot link HTML and JavaScript files. |
The onclick event can connect the functionalities of HTML and JavaScript. |
Now, let’s go through the following examples to understand the stated difference clearly.
Example: addEventListener() Method to Detect if the Particular Key is Pressed
In this particular example, apply the “document.addEventListener()” method and attach an event named “keydown” in its argument.
This will result in notifying the user via alert when the “Enter” key is pressed:
document.addEventListener("keydown", (e) => {if (e.key == "Enter"){
alert("Enter Key is Pressed")
}});
The corresponding output will be:
![]()
Example: Onclick Event to Change Button Color
In the following example, we will create a button having the “button” id.
Then, include an “onclick” event which will invoke the function buttonColor() upon the button click:
<button onclick= "buttonColor()" id= "button">Click Here</button>
Now, define a function named “buttonColor()”.
In the function definition, access the button using the “document.geElementById()” method.
Also, apply the style.backgroundColor property in order to to set the button’s color and assign it an RGB color code as its background:
function buttonColor() {
document.getElementById("button").style.backgroundColor= '#911';}
Output
![]()
Example: Onclick Event to Change Button Color Using JavaScript
The above-discussed example can be applied by adding the “onclick” event code.
To do so, firstly, create a button using the “<button>” tag:
<button id= "button">Click Here</button>
Now, fetch the created button using the “document.getElementById()” method and apply the “onclick” event on it.
Now, repeat all the further steps for changing the button’s color:
let button= document.getElementById("button")
button.onclick= function buttonColor() {
document.getElementById("button").style.backgroundColor= '#911';}
It will result in the same output:
![]() We have discussed the differences between addEventListener and onclick.
We have discussed the differences between addEventListener and onclick.
Conclusion
The main difference between addEventListener function and onclick event is that addEventListener can attach multiple events to a single HTML element, whereas the onclick event can only associate the click event with a button.
Moreover, addEventListener can only be utilized with the JavaScript code, and onclick event works in both HTML and JavaScript files.
This manual guided about addEventListener method and onclick event both theoretically and practically.
5 Best JavaScript Certifications in 2022
In today’s digital world, learning a particular skill is very much needed to keep up your potential.
More specifically, JavaScript is a very evolving language and is being used in various platforms for embedding different functionalities.
Getting JavaScript certification in 2022 is beneficial for skill acquisition and an opportunity to perform various functionalities and make money accordingly.
This tutorial will guide you about the 5 best JavaScript certifications in 2022.
5 Best JavaScript Certifications in 2022?
The 5 best JavaScript Certifications in 2022 are as follows:
W3Schools – “The JavaScript Developer Certificate”
“Interactivity with JavaScript” by the University of Michigan (Coursera)
“Modern JavaScript From the Beginning” (Udemy)
“Certified JavaScript Developer”
“Learn Intermediate JavaScript Nanodegree Program” (Udacity)
Let’s discuss each of them one by one!
1.
W3Schools -The JavaScript Developer Certificate
For learning web technologies, the JavaScript Developer Certificate by W3Schools is a great platform.
The W3Schools JavaScript certification program tests a candidate’s HTML DOM editing skills, apart from their understanding of JavaScript.
Moreover, every question on this particular certification is based on the platform’s free courses and assessments.
It is preferable for those candidates who show interest in obtaining JS certification.
The Interactivity with JavaScript certification introduces the JavaScript language, covering basic topics such as:
Variables
Loops
Debugging
Functions
Document Object Model (DOM)
DOM Events
This particular course requires students with a basic familiarity with HTML and CSS.
Also, no prior JavaScript knowledge is needed.
It comprises articles, video content, quizzes, several readings, and practice assignments.
There is also an option to enroll in this course for free and get a certification of completion by paying a small fee.
The Modern JavaScript From The Beginning certification is for anybody eager to learn JavaScript in a detailed way.
This is a full-fledged JavaScript course that has an easy-to-understand format that lets beginners start or develop their understanding from scratch without using any framework or library.
It covers the following course contents:
Basics of JavaScript
Object Oriented Programming
Regular Expressions
Async JS: Ajax, fetching, callbacks, promises, async/await, error handling
Arrow functions, Iterators, Maps & Sets
DOM Manipulation & UI Events
Local Storage
JavaScript Patterns
The Certified JavaScript Developer certification program offers the opportunity to learn advanced JavaScript concepts about the popular programming language of the web.
This certification is best for experienced JavaScript developers and those who want to improve their JS skills.
It covers the following topics:
Basic principles of programming
JavaScript fundamentals, including syntax, specifying data types, operators, control structures, and various expressions.
JavaScript arrays, functions, and indexed collections
JS in a web browser, performing event handling, Document Object Model, Browser Object Model, graphics and AJAX,
JavaScript Web APIs
Prototype-based object-oriented programming, such as classes and objects
The learn intermediate JavaScript Nanodegree program by Udacity prepares students in the fields of server-side application development, web development, and desktop development.
It is an intermediate certification based on an advanced set of JavaScript skills.
It is an excellent platform for learning the following:
JavaScript Object-oriented programming
Runtime functions
Functional programming
Modern functional JavaScript syntax and asynchronous Programming JavaScript frameworks, such as Vue, React, and Angular.
This blog summarized the 5 best certifications to opt for related to JavaScript in 2022.
Conclusion
5 best JS certifications are the W3Schools “The JavaScript Developer Certificate” and “Interactivity with JavaScript” by the University of Michigan (Coursera) can be opted for beginner-level learning, “Modern JavaScript From The Beginning” (Udemy) or Certified JavaScript Developer” from beginner to advanced level or the “Learn Intermediate JavaScript Nanodegree Program” (Udacity) certification for learning an advanced set of JavaScript skills.
How to Set Text area Value
While creating a web page or the website via JavaScript, there can be a situation where you want to set a specific text value in order to display some specific text or notification message for a specific time interval and then reset it.
For instance, displaying the correct answer in response to the provided question especially in the case of filling a form or a questionnaire.
In such cases, setting text area value is very helpful in assisting the end-user effectively.This article will focus on the approaches that can be utilized to set textarea value.
How to Set Textarea Value?
To set text area value, the following properties can be utilized:
“textContent” Property.
“value“ Property.
The stated properties will now be explained one by one!
Approach 1: Set Textarea Value Using the textContent Property
This approach can be implemented to fetch the allocated text and set it accordingly.
The following example illustrates the stated concept.
Example
Firstly, specify the “id” and “name” corresponding to the following text within the “<textarea>” tag:
<textarea id= "text" name= "text" style= "border-width: medium;">This is HTML</textarea>
Next, create a button and attach an “onclick” event invoking the specified function:
<button id= "btn" onclick= "settextValue()">Set Textarea Value</button>
After that, declare a function named “settextValue()”.
In its definition, get the “id” of the text specified before.
Finally, apply the “textContent” property and set the text value assigned before to the below-updated one:
function settextValue() {
document.getElementById('text').textContent= "This is JavaScript"}
Output
![]()
Approach 2: Set Textarea Value Using the value Property
In this particular approach, the text area value can be set by fetching the specified value and assigning it a newly initialized value.
Example
In the following example, similarly include the following value within the text area having the specified “id”:
<textarea id= "text" style= "border-width: medium;">Website</textarea>
Likewise, create the following button having an “onclick” event redirecting to the function setTextValue():
<button onclick= "settextValue()">Set Textarea Value</button>
Now, define the function named “settextValue()”.
Here, access the id of the specified text.
In the next step, assign a new text value to the variable named “valueUpdate”.
Lastly, apply the “value” property upon the fetched text area value and assign it the new value as follows:
function settextValue(){
var textUpdate = document.getElementById('text');
var valueUpdate = 'Linuxhint';
textUpdate.value = valueUpdate;}
Output
![]() We have concluded the convenient approaches to set text area value.
We have concluded the convenient approaches to set text area value.
Conclusion
The “textContent” property or the “value“ property can be applied to set the text area value.
The former approach accesses the specified text area value and sets it abruptly.
The latter approach, on the other hand, initializes a new text value and assigns it to the fetched text area value.
We recommend you implement the first approach which includes overall less code complexity and is easy to implement as well.
This article compiled the approaches that can be helpful to set the text area value.
How to Implement Auto Scroll
While testing different web pages on a website, you may need to overview various added functionalities in one go.
Moreover, this technique is often utilized to access and highlight the searched queries.
In such cases, implementing auto-scroll is very helpful in carrying out the mentioned operations smartly.
This blog will explain the methods to implement auto scroll.
How to Implement Auto Scroll?
To implement auto scroll, the following methods can be applied:
“window.scrollTo()” Method
“window.scrollBy()” Method
Using “jQuery”
The following approaches will demonstrate the stated concept one by one!
Method 1: Implement Auto Scroll Using window.scrollTo() Method
The “scrollTo()” method scrolls the Document Object Model(DOM) according to the specified coordinate values.
This method can be implemented to auto scroll any HTML element according to the given coordinate values.
Syntax
window.scrollTo(x, y)
In the given syntax, x and y refer to the “X” and “Y” coordinates, respectively.
Let’s check out the below-given example to understand the stated concept.
Example
In this example, we will create a button with an “onclick” event invoking the function autoScroll():
<button onclick= "autoScroll()">Click Me</button>
Now, include a heading in the “<h2>” tag:
<h2>The following images will be auto scrolled</h2>
After that, we will add two images with their paths and set their dimensions using the height and width properties:
<img src= "image.JPG" height= "855" width= "355"><img src= "sample.JPG" height= "855" width= "355">
Lastly, define a function named “autoScroll()”.
In its function definition, apply the “window.scrollTo()” method and set the coordinates according to your requirements.
In our case, we have set “0” as the X coordinates and “200” as the Y coordinates:
function autoScroll(){
window.scrollTo(0, 200);}
The corresponding output will be:
![]() In the above output, it can be observed that the scroll bar is scrolled to a certain location according to the set values in the scrollTo() method.
In the above output, it can be observed that the scroll bar is scrolled to a certain location according to the set values in the scrollTo() method.
Method 2: Implement Auto Scroll Using window.scrollBy() Method
The “scrollBy()” method scrolls the document according to the given number of pixels in the argument.
More specifically, we will utilize this method to auto scroll the DOM to the bottom upon the button click.
Syntax
window.scrollBy(x, y)
In the above syntax, “x” and “y” refers to the horizontal and vertical pixel values utilized for scrolling.
Example
Firstly, create a button with an “onclick” event redirecting to the function “autoScroll()”:
<button onclick= "autoScroll()">Click Me</button>
Next, include the following heading as discussed in the previous method:
<h2>The following images will be auto scrolled</h2>
Similarly, use the “src” attribute to add the images path and set their dimensions:
<img src= "image.JPG" height= "655" width= "425"><img src= "sample.JPG" height= "655" width= "425"><img src= "template.JPG" height= "655" width= "425">
Now, we will include two paragraphs in the “<p>” tag:
<p>The specified images represent the different case-scenarios</p><p>Template literals use the backtick (`) characters and are mainly used for string interpolation.
This technique can be utilized to display the specified string value against the corresponding template literal utilized for it.
It will be placed in the original function definition along with the value of the callback function.</p>
Finally, define the function named “autoScroll()”.
Here, apply the “window.scrollBy()” method and set the number of pixels such that it auto scrolls to the required location of the DOM:
function autoScroll(){
window.scrollBy(0, 500);}
In our case, auto scroll will scroll down towards the bottom of the page:
![]() In the above output, it can be seen that the DOM is auto scrolled till the bottom upon the button click.
In the above output, it can be seen that the DOM is auto scrolled till the bottom upon the button click.
Method 3: Implement Auto Scroll Using jQuery
This technique can be implemented to auto scroll the specified image by including the “jQuery” library and its methods, such as scrollTop() and height().
More specifically, we will use the scrollTop() method to set the vertical scrollbar position for the selected elements.
Syntax
$(selector).scrollTop()
Here, the “selector” indicates the “document” in the below discussed example.
The following example illustrates the stated concept.
Example
First, specify the source of the “jQuery” library in the script tag:
<script src= "https://ajax.googleapis.com/ajax/libs/jquery/3.3.1/jquery.min.js">
Next, apply the “$( document ).ready()” method which will function once the page Document Object Model (DOM) is ready for the JavaScript code to execute and the “scrollTop()” method will return the vertical scrollbar position in the DOM.
$(document).ready(function(){
$(document).scrollTop($(document).height());});
Lastly, we will add two headings in the “<h1>” tag and an image using the “src” attribute:
<h1>This is LinuxHint Website</h1><h1>This image will be auto scrolled</h1><img src= "sample.JPG" height= "855" width= "355">
Output
![]() We have discussed various methods to implement the auto scroll using JavaScript.
We have discussed various methods to implement the auto scroll using JavaScript.
Conclusion
To implement auto scroll, utilize the “window.scrollTop()” method to scroll the DOM according to the given coordinates values, the “window.scrollBy()” method to scroll the document with respect to the given number of pixels in the argument, or the jQuery “scrollTop()” method for setting the vertical scrollbar position of the selected element.
This manual discussed the methods for implementing auto scroll.
The outerHTML Property
Sometimes developers need to replace an element’s source code with HTML-formatted text or access the source code of an element at runtime.
For this purpose, utilize the outerHTML property that is similar to Element.innerHTML.
The main difference between these two properties is that innerHTML access an element’s plain text content without HTML tags, while the outerHTML property should be used if you need HTML tags.
This study will explain the outerHTML property.
What is the outerHTML Property?
The “outerHTML” is the JavaScript property of the DOM interface that provides the element’s HTML component.
Along with the text, it also comprises the element’s complete HTML structure, including its opening and closing tags.
Moreover, by using the outerHTML property, you can access or modify the element’s HTML structure.
How to Use the outerHTML Property?
Follow the given syntax for getting the HTML content using outerHTML property:
element.outerHTML
The following syntax is used for setting the HTML content using outerHTML property:
element.outerHTML = htmlString;
Example 1: Get HTML Structure Using outerHTML Property
In the following example we will get the element’s content using outerHTML property.
Here, we will first create a “div” element using HTML <div> tag and assign an id “div” that contains multiple elements, including a heading, label, and button.
There is an onclick event attached with the button, that will invoke the defined function named “getContentbyOuterHTML()” to show the complete structure of the HTML element:
<div id="div"><h3>Welcome to the <span style="color: red">LinuxHint</span>.</h3><label>It is the best <span style="color: green">Website</span> to learn and polish your <span style="color: green">skills</span>!</label><br><br><button onclick="getContentbyOuterHTML()">Click Here!</button></div>
Next, define the “getContentbyOuterHTML()” function that will trigger on the “onclick” event.
It will show the content of the div’s element, including all tags.
In the function, first we will pass the “div” id of the container to the “getElementById()” method as an argument, then, show the element’s content in the alert() method by calling outerHTML property:
function getContentbyOuterHTML(){
var getCont = document.getElementById("div");
alert("Outer HTML : \n” + getCont.outerHTML);
}
The output shows the complete structure of the element <div> including its child elements:
![]()
Example 2: Set and Get HTML Structure Using outerHTML Property
In this example, we will set some content on the DOM using JavaScript outerHTML property and then get the complete structure of the specified element.
Here, we will create two buttons, one is “Set!” that will trigger the “setOuterHTML()” function on a “onclick” event and sets some content on the DOM, and the second button is “Get” that will get the complete structure of the <div> element by triggering the “getContentbyOuterHTML()” function:
<div id="div"><h3>Set and Get the content as OuterHTML:</h3><p id="set"></p><br><button onclick="setOuterHTML()">Set!</button><button onclick="getContentbyOuterHTML()">Get</button></div>
In JavaScript file, define two functions, the “setOuterHTML()” and the “getContentbyOuterHTML()”.
In setOuterHTML() function, set the content with <p> tag using the set outerHTML property syntax as a child element of the element <div>:
function setOuterHTML(){
var setCont = document.getElementById("set");
setCont.outerHTML = "<p>It is the best Website to learn and polish your skills!<p>";}
Then, in getContentbyOuterHTML() function, get the complete structure of the <div> element using the get outerHTML property syntax:
function getContentbyOuterHTML(){
var getCont = document.getElementById ("div");
alert(getCont.outerHTML);}
Output
![]() We have covered all the essential information about outerHTML JavaScript property.
We have covered all the essential information about outerHTML JavaScript property.
Conclusion
The “outerHTML” is the JavaScript property of the DOM interface that provides the complete HTML structure of the element, including its opening and closing tags.
It is similar to the innerHTML property, but the difference between them is that innerHTML access an element’s plain text content without HTML tags, while the outerHTML property gets content with HTML tags.
In this study, we explained the outerHTML property.
Start JavaScript Coding | Beginner Guide
JavaScript is an effective client-side programming language used for web application development in almost every field.
It is one of the most evolving languages that is expanding its functionalities with time.
Most of the web pages or websites you visit will use JavaScript to some extent to enhance user interactivity and experience.
Moreover, there is a huge demand for JS in the IT industry; therefore, learning JavaScript is beneficial for you to get a good job and excel in your career.
This manual will discuss basic JavaScript coding.
Basic Functionalities
JavaScript supports the following major functionalities:
Variables
Functions
Conditional Statements
Arrays
Objects
Let’s check out each of them one by one!
JavaScript Variables
JavaScript variables are declared to store some integer or a string value in it.
You can create variables using “let”, “var”, and “const”.
Example 1: Creating Variables Using let Keyword
“let” keyword is utilized for creating a block-scoped variable whose value cannot be redeclared or overwritten once it is assigned.
For instance, in the following example, an error will be encountered upon overwriting the same variable with a different value:
let a=2
console.log(a)
let a=3
console.log(a)
Output
![]()
Example 2: Creating Variables Using var Keyword
In the case of using the “var” keyword, a variable can be re-assigned a value.
As a result, the previous value gets updated.
Now, executing the same program will update the value of the “a” variable to “3”:
var a=2
console.log(a)
var a=3
console.log(a)
Output
![]() Hence, no error is shown in this particular case.
Hence, no error is shown in this particular case.
Example 3: Creating Variables Using const Keyword
The constant (much-like) variables defined with “const” cannot be redeclared or re-assigned.
In the following example, the redeclaration of the variable “a” will result in an error:
const a=2
console.log(a)const a=3
console.log(a)
Output
![]()
JavaScript Functions
JavaScript functions are defined using the “function” keyword with the specified function name including the open and closing brackets.
Its function definition comprises the required functionality that you want to perform when it gets invoked.
In the following example, we will define a function named “test()” and log the following message on the console:
function test(){
console.log("This is a function")}
Output
![]()
JavaScript Conditional Statements
Developers mostly utilized “if-else” statements to apply a particular condition based on the requirement.
It can be implemented as demonstrated in the following example.
Example
In the given example, assign the specified value to the following variable:
let a= 10
Next, apply the “if-else” condition in such a way that if the first condition is satisfied, the “if” block will execute:
if (a>5){
console.log("Condition Satisfied")}
Otherwise, the “else” block will execute:
else{
console.log("Condition Not Satisfied")}
Output
![]()
JavaScript Arrays
JavaScript Arrays are enclosed in the square brackets “[ ]”.
Their elements can contain integers, numbers, and strings.
These are used to store some bulk data.
Example
First, declare an array named “array” with the following integer and string values:
array= [1, "Harry"]
Now, access the array value corresponding to the specified index:
console.log("The accessed value is:", array[1])
Output
![]()
JavaScript Objects
JavaScript Objects are created to associate some attributes or properties with their respective values.
These are created using “new Object()”:
const createObject = new Object();
createObject.firstName = "Harry";
createObject.lastName = "Smith";
console.log(createObject)
Output
![]() You can also create objects by utilizing literals in the following way:
const createObject= {firstName: "Harry",
lastname: "Smith"}
console.log(createObject)
Output
You can also create objects by utilizing literals in the following way:
const createObject= {firstName: "Harry",
lastname: "Smith"}
console.log(createObject)
Output
![]() We have discussed the core concepts of JavaScript coding.
We have discussed the core concepts of JavaScript coding.
Conclusion
To start JavaScript coding as a beginner, go through the discussed concepts of implementing different types of variables, including the local and global scope functionalities, declaring the functions, applying the condition to apply a particular condition, declaring arrays to store some data and creating the objects to refer to some attributes and their values.
This blog is a basic guide for beginners to start JavaScript coding.
JavaScript Declare Multiple Variables
In JavaScript, reusable data is stored in containers called variables.
A variable is used for storing manipulated data, so its name must be unique.
There are multiple ways to declare variables, but the most common and understandable is to declare variables in separate lines because you can use any type of variable, such as var, let, or const, which is easily understandable.
This tutorial will define various methods for declaring variables.
How to Declare Multiple Variables?
For declaring multiple variables, there are different ways as follows:
Variable declaration in separate line
Variable declaration in a block
Variable declaration in one line
Variable declaration in array notation
Let’s discuss all the mentioned ways one by one.
Method 1: Declare Variables in Separate Line
The most popular method to define and initialize JavaScript multiple variables is to write each variable in a separate line, such as:
var num;
let a;const str;
In this situation, you can declare variables with different data types like in the above example, three variables “num”, “a”, and “str” are declared as three different data types “var”, “let”, and “const”.
Let’s see an example to initialize and declare variables at the same time:
var num = 15;
let a = '11';const str = "Hello";
Then, print the assigned values to the variables:
console.log("Variable 'a' contains "+ a);
console.log("Variable 'str' contains "+ str);
console.log("Variable 'num' contains "+ num);
The corresponding output will be:
![]()
Method 2: Declare Variables in One Line
The next way is to declare comma-separated variables in the same line:
var name, rollNo, age;
It is the most simple and easiest way, but the limitation is that all variables should belong to the same data type.
No other data type or related variable can be added to the same line.
Now, we will declare multiple variables “name”, rollNo” and “age” and initialize them with “john”, “11”, and “19” values in one line:
var name = "john", rollNo = 11 , age = 19;
Print any one of the variables using the “console.log()” method:
console.log(rollNo);
Output
![]()
Method 3: Declare Variables in Block
To overcome the readability issue of the above method, declare and initialize the variables in the block form separated by comma such as:
var name = "john",
rollNo = 11,
age = 19;
Print any of the variable by passing it in the “console.log()” method:
console.log(name);
Output
![]()
Method 4: Declare Variables in Array Notation
Variable declaration can also be done using the Destructuring assignment syntax or in array notation:
var [name, pinNo, age];
It is a JavaScript expression that separates values from arrays or objects into various variables.
In the given example, we will define and initialize three variables in array notation format:
var [name, pinNo, age] = ["John" , 110, 26];
Print the value of variable “name” using the “console.log()” method:
console.log(name);
Output
![]() We have compiled all the solutions for declaring multiple variables.
We have compiled all the solutions for declaring multiple variables.
Conclusion
To declare multiple variables, you can use the different ways including, variable declaration in a separate line, in block, in one line or declare in array notation.
The declaration of multiple variables in a single line is easy but it is advised to declare each variable separately to maintain the readability of the code.
In this tutorial, we have defined the different ways of declaring multiple variables.
JavaScript Scrollable Div
Scrolling is a very vital feature which can be observed in almost every website’s DOM.
Similarly, the scrollable div is very helpful in providing the user an ease to overview the relevant content instantly as well as reading it thoroughly.
In the other case-scenario, it also assists in saving the end-user’s time and helps in automation processes as well.
This article will demonstrate the concept of scrollable div using JavaScript.
How to Create a JavaScript Scrollable Div?
To create a div scrollable, the following approaches can be utilized:
“overflow” property.
“overflowX“ and “overflowY” properties.
The following approaches will demonstrate the stated concept one by one!
Method 1: Create a JavaScript Scrollable Div Using the overflow Property
The “overflow” property handles content that goes outside the element box.
This property can be utilized to assign the specific property such that the accessed element is scrolled.
The below-given example illustrates the discussed concept.
Example
Firstly, include a heading in the “<h3>” tag:
<h3>This is a Scrollable Div</h3>
Next, include a “div” element along with the assigned “id”.
Within the div, include the specified image to be scrolled with the adjusted dimensions in the “<img>” tag:
<div id= "scroll"><img src= "template.JPG" height= "655" width= "855"></img></div>
Now, access the assigned id “scroll” to the div in order to scroll the included image by assigning the “overflow” property to auto which will generate the scrolling through the specified element horizontally as well as vertically:
document.getElementById('scroll').style.overflow = 'auto';
Lastly, adjust the “div” dimensions considering the plotting of the specified image in order to make it scrollable:
#scroll{height:500px;width: 700px;}
The corresponding output will be:
![]()
Method 2: Create a JavaScript Scrollable Div Using the overflow and overflowY Properties.
The “overflowX” property is applied to specify the content’s behavior when it overflows an element along the horizontal edges(left and right).
On the other hand, the “overflowY” property specifies the content’s behavior vertically(along the top and bottom edges).
These methods can be implemented to scroll the accessed element by adjusting the properties in accordance with the given requirements.
Example
Firstly, assign an “id” to the div element and include the specified heading as discussed in the previous method.
Also, contain the following paragraph in it in order to make it(div) scrollable:
<div id= "scroll"><h3>Div</h3><p>JavaScript is one of the top scripting languages mainly used for applying various features in making a website or a web page attractive and user-friendly.
This particular language also integrates HTML for performing various added functionalities as well.</p></div>
Next, fetch the div id using the “document.getElementById()” method.
Here, adjust the overflowX and overflowY properties.
The assigned properties will result in scrolling the div vertically only:
document.getElementById('scroll').style.overflowX= 'none';
document.getElementById('scroll').style.overflowY= 'auto';
Finally, style the scrollable div and adjust its dimensions as illustrated in the previous method:
<style>
div{background: lightcyan;}
#scroll{height:100px;width: 300px;}
</style>
Output
![]() This write-up concluded the approaches that can be utilized for making a div scrollable.
This write-up concluded the approaches that can be utilized for making a div scrollable.
Conclusion
To make a div scrollable, apply the “overflow” property to be assigned in such a way that the included image within the div is scrolled or the “overflowX“ and “overflowY” properties can be utilized by being assigned in such a way that the accessed “div” is scrolled vertically only.
These properties can be implemented to perform the given requirement of making a div scrollable.
JavaScript Time Formats
In JavaScript, applying the time formats is very useful for observing the variation in the GMT(GreenWich Mean Time) or Universal Time Coordinated(UTC) and calculating the time difference.
In addition to that, when you need to access the exact time to manipulate it according to your requirements.
In such cases, utilizing various time formats is very helpful.
This write-up will guide you about applying time formats.
How to Apply JavaScript Time Formats?
JavaScript time formats can be implemented using:
“getHours()” and “getUTCHours()” Methods
“getTimezoneOffset()” Method
“getTime()” Method
“setHours()” Method
“getSeconds()” Method
We will now go through each of the mentioned methods one by one!
Method 1: Apply JavaScript Time Format Using getHours() and getUTCHours() Methods
The “getHours()” method returns the hour from 0 to 23 of the current date, and the “getUTCHours()” method output the current hour according to UTC.
These methods can be implemented to return the current hour and the corresponding UTC hour, respectively.
Example
In this example, we will create a date object with the new Date() constructor to display the current date and time:
let timeFormat = new Date();
Now, invoke the getHours() method to get the current hour considering the current date and time:
console.log("The current Hour is:", timeFormat.getHours());
Also, apply the getUTCHours() method to get the Universal Coordinated Time hour as well:
console.log("The current UTC hour is:", timeFormat.getUTCHours());
Output
![]()
Method 2: Apply JavaScript Time Format Using getTimezoneOffset() Method
The “getTimezoneOffset()” method computes the difference between UTC time and local time in minutes.
This method can be applied to find out the difference between the mentioned time for further processing..
The following example demonstrates the above concept.
Example
First, create a date object as discussed in the previous method.
After that, apply the getTimezoneOffset() method to return the difference between the UTC and local time zone in minutes:
timeFormat= (new Date().getTimezoneOffset());
Finally, log the time difference in minutes:
console.log("The difference between UTC and the local time zone is:", timeFormat)
Output
![]() It can be seen from the output that there is a negative time difference of -240 minutes between the UTC and local time zone.
It can be seen from the output that there is a negative time difference of -240 minutes between the UTC and local time zone.
Method 3: Apply JavaScript time Format Using getTime() Method
The “getTime()” method computes the number of milliseconds since January 1, 1970 and return it.
This method can be implemented to return the milliseconds from the mentioned date till the current time.
Go through the below-given example.
Example
Firstly, repeat the previous method for creating a new date object.
Now, apply the “getTime()” method to return the milliseconds count since January 1, 1970 till the current time:
timeFormat= (new Date().getTime());
Lastly, log the milliseconds count on the console:
console.log("The number of milliseconds passed from the January 1st of 1970 UTC+0 are:", timeFormat )
Output
![]()
Method 4: Apply JavaScript Time Format Using setHours() Method
The “setHours()” method sets the hour of a date.
This method can be utilized for specifying the custom time in the method’s argument.
Syntax
Date.setHours(hours, minutes, seconds)
In the given syntax, the first argument refers to the “hour”, the second argument indicates “minutes”, and the third argument refers to the “seconds”.
Example
Firstly, create a new date object as follows:
let timeFormat = new Date();
Next, set the custom time using the setHours() method by placing the hours, minutes and seconds in its argument respectively and display it:
timeFormat.setHours(1, 10, 15);
console.log("The current time wrt the set hour is:", timeFormat);
Output
![]()
Method 5: Apply JavaScript Time Format Using getSeconds() Method
The “getSeconds()” method returns the seconds ranging from 0 to 59.
This method can be implemented to display the accurate time with seconds.
Example
In this demonstration, apply the getSeconds() method on the created date object:
let timeFormat = new Date();
timeFormat.getSeconds()
Now, log the precise time with seconds on the console:
console.log("The current date and time is:", timeFormat);
Output
![]() We have compiled all the possible JavaScript time formats in this blog.
We have compiled all the possible JavaScript time formats in this blog.
Conclusion
To apply time formats, utilize the “getHours()” and “getUTCHours()” methods to get the current and UTC hour respectively, the “getTimezoneOffset()” method to compute the time difference between the local time zone and UTC, the “getTime()” method to return the milliseconds from the January 1st, 1970 till the current time, the “setHours()” method” to specify the custom time or the “getSeconds()” method to get the accurate time with seconds.
This blog demonstrated the methods to apply the time formats.
selectedIndex Property
While developing a website, there can be a situation where you need to get the index of the selected option from the added drop-down menu.
Do you have no idea how to do that? No worries! To handle such a situation, JavaScript offers an attribute called “selectedIndex” that is used to get the index of the selected option from the drop-down list.
This tutorial will explain the selectedIndex Property and its usage.
What is selectedIndex Property?
The “selectedIndex” is the JavaScript property utilized for setting or returning the selected option’s index in the added drop-down list.
It outputs a number that represents the index of the option selected in the HTML drop-down menu.
More specifically, the index of the drop-down list starts at zero, and it returns -1 if no option is chosen.
Syntax
Follow the below-given syntax to use the selectedIndex property:
selectObject.selectedIndex
Here, “selectObject” is the option that is selected from the drop-down menu, and the selectedIndex property will fetch its index.
Example 1: Get the Index of Selected Option Using selectedIndex Property With addEventListener() Method
First, we will create a drop-down list using the “<select>” tag and specify its option using the “<option>” tags.
Then, add a label which will display the index of the selected option:
<h4>Select the Option and Get the Index of the Selected Option</h4><select id="select"><option>C</option><option>C++</option><option>HTML</option><option>CSS</option><option>Python</option><option>Java</option><option>JavaScript</option></select><br><br><label id="index" ></label>
In a JavaScript file, we will first get the drop-down list, and the label element by passing their respective ids “select” and “index” in the document.getElementById() method.
Then, invoke the “addEventListener()” method and pass the “change” event and the function as arguments.
This will work in such a way that when an option of the drop-down menu is selected, its index will be displayed as the content of the added label:
const selectOption = document.getElementById('select');const optionIndex = document.getElementById('index');
selectOption.addEventListener('change', () => {const index = selectOption.selectedIndex;
optionIndex.textContent = `The index of the selected option is: ${index}`;});
It can be seen that the index against the selected option is successfully displayed:
![]()
Example 2: Get the Index of Selected Option Using selectedIndex Property with onclick Event
Here, we will create two buttons, one for the deselect the options and the other for displaying index that will trigger the “deselect()”, and the “getIndexofSelectedOption()” functions, respectively:
<button type="button" onclick="getIndexofSelectedOption()">Show index</button><button type="button" onclick="deselect()">Deselect</button>
In the JavaScript file, firstly, define the “getIndexofSelectedOption()” function which will print the index against selected option by fetching it drop-down list element using its document.getElementById() method and then accessing the selected option’s index using the “selectedIndex” property:
function getIndexofSelectedOption(){
var selectOption = document.getElementById('select').selectedIndex;
var optionIndex = document.getElementById("index");
optionIndex.textContent = `The index of the selected option is: ${selectOption}`;}
In the deselect() function, we will set the value “-1” of the drop-down menu.
As a result, the option get deselected:
function deselect(){
document.getElementById("select").selectedIndex = "-1";}
Clicking on the “Show index” button will display the index of the selected option.
In contrast, the “Deselect” button will deselect the selected option:
![]() We have covered all the details related to the JavaScript selectedIndex property.
We have covered all the details related to the JavaScript selectedIndex property.
Conclusion
The “selectedIndex” property is used to determine the selected option’s index in an HTML drop-down list created using the <select> tag with <option> tag.
It gives a number as an output that represents the index of the option selected in the drop-down menu.
More specifically, the index of the drop-down list starts at zero, and it returns -1 if no option is chosen.
In this tutorial, we have discussed the JavaScript selectedIndex property.
How to Use Inline if Statement
One of the key principles of programming is conditional statements.
It can be either True or False.
Developers can use them to build conditional logic and perform other parameter checks.
The conditional statement (if-else) is a block statement that will reserve several lines.
You can use an Inline if statement to reduce lines of code and perform the same action.
This tutorial will illustrate the use of inline if statements.
How to Use Inline if Statement?
In JavaScript, a ternary operator is the most typical and recommended use for an inline if statement.
It is used as a replacement for an if-else statement.
It contains three operands, “a condition”, “a true statement”, and “a false statement”.
A question mark (?) follows the condition, and a true statement is followed by a colon (:).
Syntax
The syntax of an inline if statement is given below:
condition ? "expression1" : "expression2"
Here:
The “condition” is a statement that can be either true or false.
The “expression1” is the value that will be returned if the given condition is true.
While “expression2” is the value that will be returned if the condition is not true.
Example
In this example, we will use an inline if statement using the ternary operator.
To do so, first, we will create a variable “marks” by assigning the value “86”:
var marks = 86;
Then, use a ternary operator to check the condition if marks are greater than or equal to “70” return “Grade A” as output else return “Grade B” and store the result in variable “grades”:
var grades = marks >= 70 ? "Grade A" : "Grade B";
Lastly, print the result on the console utilizing the “console.log()” method:
console.log(grades);
The output shows “Grade A”, which means the condition is true:
![]() How to use multiple conditions in an inline if statement? Follow the given section.
How to use multiple conditions in an inline if statement? Follow the given section.
How to Use an Inline if Statement With Multiple Conditions?
You can also apply multiple conditions with an inline if statement.
To do this, follow the below syntax for using the ternary operator.
Syntax
condition1 ? true_expression1 : condition2 ? true_expression2: else_expression
Here, “condition1” is the first ‘if’ statement that will be checked, whether it is true or false.
The “true-expression1” is the value that will be returned if condition1 is true.
“condition2” is the else if statement which will be checked whether the second condition is true or false.
The “true-expression2” is the value that will be returned if condition2 is true.
While “else_expression” is the value that will be returned if none of the following conditions are met.
Example
Here, we will check multiple conditions with an inline if statement.
First, we will create variable “marks” assigning a value “56”:
var marks = 56;
Now, we will add a condition for marks greater than 90; if that condition is true, the “Grade A+” will be printed on the console, if marks are greater than or equal to 70 but less than 90, the output will be “Grade A”, otherwise, the output will be “Grade F”:
var grades = marks >= 90 ? "Grade A+" : marks >= 70 ? "Grade A" : "Grade F";
Finally, print the grades on the console:
console.log(grades);
The output displays “Grade F”, which means both conditions are false:
![]()
How to Use Inline if Statement As a Nested if Statement?
You can also use an inline if statement as a nested if statement such as:
if
………if
………………
elseif
………………elseelse
To do so, follow the below syntax using the ternary operator.
Syntax
condition1? true_expression1: condition2? true_expression2: else_expression2
Here, “condition1” is the first if statement that will be checked, whether it is true or false.
The “true-expression1” is the value that will be printed if condition1 is true.
“condition2” is the second if statement, which is nested if, that will be checked whether the given condition is true or false
The “true-expression2” is the value that will be returned if condition2 is true.
In contrast, “else_expression” is the value that will return if the second condition is false.
Example
First, create a variable “marks” by assigning the value “65”:
var marks = 65;
Then, use nested if conditions with the help of an inline if statement.
In the first ‘if’ statement, we will add a condition for marks greater than 90; if the condition is true, print “Grade A+”.
In the second ‘if’ condition, we will use the logical operator “&” to check if the marks are between 70 and 89 means less than 90, then the output will be “Grade A”.
In the third ‘if’ statement, we will check if the marks are less than 70 and greater than or equal to 50, the “Grade B” will be printed on the console.
If both second and third ‘if’ statements are false, then “Grade F” will be printed on the console:
var grades = marks > 90? "Grade A+": marks < 90 && marks >=70? "Grade A": marks < 70 && marks >=50? "Grade B": "Grade F"
Finally, print the resultant grades on the console using the “console.log()” method:
console.log(grades);
Output
![]() We have compiled all the essential information related to the inline if statement.
We have compiled all the essential information related to the inline if statement.
Conclusion
To use an Inline if Statement, you can use a “ternary operator” that is an alternative to an if…else statement.
It requires three operands, “a condition”, which is followed by a question mark (?), “a true statement”, followed by a colon (:), and “a false statement”.
It performs the same as if-else statements but with fewer lines of code.
In this tutorial, we have illustrated the use of inline if statements with examples.
How to Callback Function With Parameters
While programming, a callback function with parameters can assist in avoiding problems and errors.
In addition to that, it offers the ease of calling a particular function after another.
In another case, it is beneficial in such a way that as long as the previous operation is not completed, one can wait to proceed to the next operation.
This article will illustrate the methods to apply callback functions having parameters.
How to Callback Function With Parameters?
To callback function with parameters, the following methods can be applied:
“User-defined” value
“Template Literals”
Now, we will demonstrate the stated concept one by one!
Method 1: Applying Callback Function With Parameters on the User-defined Value
This method can be applied to pass the callback function as an argument to the main function involving the user-defined value while being invoked.
Check the following example for understanding the stated concept.
Example
Firstly, define a function named “example()” with two arguments: “item” and “cb”, where the item is the value entered by the user, and the second argument refers to the callback function.
In its function definition, ask the user to enter a string value using a prompt.
Then, the user-defined value will be passed to the callback function as a string argument:
function example(item, cb){
var string = prompt("Enter the content: ") + item;
cb(string); }
Now, declare the callback function named “callBack()” with the specified argument “fact” utilized to display the entered value in via alert dialogue box:
function callBack(fact){
alert(fact);}
Finally, access the main function example() along with the callback function being passed as a parameter to it with the specified string value:
example("Loaded!", callBack);
The resultant output will be:
![]() From the above output, it is evident that both of the string values, the original and the callback function’s argument value are merged and successfully displayed in the alert box.
From the above output, it is evident that both of the string values, the original and the callback function’s argument value are merged and successfully displayed in the alert box.
Method 2: Applying Callback Function With Parameters Using Template Literals
“Template literals” are represented as the backtick (`) characters and are mainly used for string interpolation.
This technique can be utilized to display the specified string value against the corresponding template literal.
These literals should be placed in the original function definition along with the value of the callback function.
Example
In the following example, define a function named “example()” with the specified arguments.
Here, the particular argument “string” is similarly referring to the string value with the help of the template literal, and “cb” represents the callback function:
function example(string, cb){
console.log(`${string}`);
cb(string);}
After that, declare the callback function named “callBack()”.
In its definition, we will print out the following message:
function callBack(){
console.log('LinuxHint!'); }
Lastly, invoke the “example()” function and pass the string value and the callBack function as arguments:
example('Website Loading...', callBack);
It can be observed that upon passing the call back function as a parameter, its corresponding string value is merged with the main function’s value:
![]() We have compiled the methods to utilize the callback function with parameters.
We have compiled the methods to utilize the callback function with parameters.
Conclusion
In JavaScript, you can apply a callback function with parameters upon the value entered by the user or utilize the template literals technique.
The first approach can be utilized to perform the callback function on the user-defined value, whereas the second approach assists in working with hard coded values as its parameters.
This manual demonstrated the method to use the callback function having parameters.
How to Append Elements in an Array
In JavaScript, the process of adding additional elements to the beginning or end of an already created array is known as the “append elements to an array“.
You can add a single element, a set of elements, or even a whole array to another array.
More specifically, JavaScript allows you to traverse or manipulate arrays using a variety of methods.
This article will elaborate the procedure to add elements in an array.
How to Append Elements in an Array?
To append elements to an array, JavaScript supports several methods:
push() method
concat() method
unshift() method
splice() method
Let’s look more in-depth at these methods.
Method 1: Add Elements in an Array Using push() Method
The simplest approach for adding elements to the end of an array is the “push()” method.
It gives a new array as an output with a new length after adding elements.
Syntax
Follow the given syntax to use the push() method for adding elements in array:
array.push(element1, element2, ....
, elementN);
Here, the “element1, element2…” are going to be pushed in the “array” utilizing the “push()” method.
Example 1: Append One or More Elements in the Same Array
First, we will create an array named “employee” that stores the employee’ names:
var employee = ['Stephen', 'Mari', 'John', ];
Then, add two more elements as the name of employees “Rhonda” and “Susan” in the array:
employee.push('Rhonda', 'Susan');
Print the array with the appended elements on the console:
console.log(employee);
The output shows that the elements are successfully appended at the end of the array, and the length is updated to “5”:
![]() Example 2: Append an Array into Another Array
Here, we will create two arrays “animals” and “petAnimals”:
var animals = ['Zebra', 'Lion', 'Tiger',];var petAnimals = ['Cat', 'Rabbit'];
Now, push the “petAnimals” array elements into the other array using the push() method with spread operator:
animals.push(...petAnimals);
Then, print the array “animals” using “console.log()” method:
console.log(animals);
The added spread operator copies all of the elements of the “petAnimals” array and then these elements are appended to the “animals” array by utilizing the push() method:
Example 2: Append an Array into Another Array
Here, we will create two arrays “animals” and “petAnimals”:
var animals = ['Zebra', 'Lion', 'Tiger',];var petAnimals = ['Cat', 'Rabbit'];
Now, push the “petAnimals” array elements into the other array using the push() method with spread operator:
animals.push(...petAnimals);
Then, print the array “animals” using “console.log()” method:
console.log(animals);
The added spread operator copies all of the elements of the “petAnimals” array and then these elements are appended to the “animals” array by utilizing the push() method:
![]() Let’s see another method for appending one array to another.
Let’s see another method for appending one array to another.
Method 2: Add Elements in an Array Using concat() Method
The “concat()” method is used to append the elements of one array to another, or we can say it joins two or more arrays.
It merges two arrays by appending elements of an array into another and returns the single array.
Syntax
Use the below-given syntax to use concat() method:
array.concat(array1, array2,..., arrayN);
Example
We will use the already created array and invoke the concat() method for concatenating the petAnimals array elements with “animals” array and then saving the resultant elements in the new array:
var array = animals.concat(petAnimals)
Lastly, print the new array elements using the “console.log()” method:
console.log(array);
It can be seen that the elements of the array “petAnimals” is successfully appended to the array “animals”:
![]() Want to add elements at the beginning of the array? Follow the next section!
Want to add elements at the beginning of the array? Follow the next section!
Method 3: Add Elements in an Array Using unshift() Method
There is another JavaScript method called “unshift()” that can add or append elements at the start or beginning of an array.
Syntax
Follow the given syntax for adding elements at the beginning of an array utilizing the “unshift()” method:
array.unshift(element1, element2, ....
, elementN);
Example
Here, we will create an array named “birds” with two elements: “Parrot” and “Pigeon”:
var birds = ['Parrot', 'Pigeon',];
Then, call the “unshift()” method by passing an element “Cocktail” that needs to be appended in the created array:
birds.unshift('Cocktail');
Finally, print the updated array on the console:
console.log(birds);
Output
![]() Let’s move to another method for adding the element in the middle of an array.
Let’s move to another method for adding the element in the middle of an array.
Method 4: Add Elements in an Array Using splice() Method
If you want to replace array elements or add elements in an array at any specified index, use the JavaScript predefined method “splice()”.
Moreover, we will use it to append elements in the middle of an array.
Syntax
Follow the given syntax to utilize the splice() method for appending elements in an array:
array.splice(startIndex, deleteCount, element1, ....., elementN)
Here, the “startIndex” is the location in the array where a new element should be placed, “deleteCount” indicates how many elements should be eliminated, and the “element1, ….., elementN” are the elements that need to be appended.
Example
Now, we will append elements in the same “birds” array by passing arguments the start index “1” where the new elements need to be appended, “0” indicates that no element should be deleted, and then “Cocktail” and “Sparrow” are the required elements:
birds.splice(1, 0, 'Cocktail', 'Sparrow');
Print the array “birds” on the console using the “console.log()” method:
console.log(birds);
Output signifies that the elements are successfully appended at the middle of the array:
![]() We have gathered all the best methods for appending elements in an array.
We have gathered all the best methods for appending elements in an array.
Conclusion
To append elements to an array, you can utilize the JavaScript built-in methods, including the “push()” method, “concat()” method, “unshift()” method, or “splice()” method.
The push() method can insert elements at the end of an array, while the unshift() method appends elements at the start of an array, the splice() method inserts a new element in the middle of the array, and the concat() method merges two or more arrays.
In this article, we elaborated on the procedure to add elements arrays with proper examples.
JavaScript Declare Empty Array
Declaring empty arrays assists in almost every programming language in many aspects.
For instance, appending some particular data in the empty array for sorting.
Moreover, to organize data in different sections.
Also, to cater the unused, outdated or junk data.
In such cases, this approach is very helpful in containing and managing the data appropriately.
This article will contemplate on the approaches that can be utilized to declare an empty array as well as to empty a filled array.
How to Declare an Empty Array Using JavaScript?
To declare an empty array, the following approaches can be implemented:
create a literal with brackets.
“New Array” constructor.
“splice()” method and “length” property.
The stated approaches will be explained one by one!
Example 1: Declare an Empty Array by Creating a Literal With Brackets
In the following example, declare an empty array named “emptyArray” using the square brackets with no any value contained and display it:
let emptyArray= []
console.log(emptyArray)
Output
![]() In the above output, “length : 0” indicates that the array is empty.
Example 2: Declare an Empty Array by Applying the New Array Constructor
Here, declare an empty array by applying the “new” keyword to the “Array()” constructor.
No parameters in it indicate that the array is empty:
let emptyArray = new Array();
console.log(emptyArray)
Output
In the above output, “length : 0” indicates that the array is empty.
Example 2: Declare an Empty Array by Applying the New Array Constructor
Here, declare an empty array by applying the “new” keyword to the “Array()” constructor.
No parameters in it indicate that the array is empty:
let emptyArray = new Array();
console.log(emptyArray)
Output
![]() Example 3: Declare an Empty Array Using the splice Method and the length Property
These two approaches can be utilized to transform a non-empty array to empty.
Both of the approaches will be applied to yield the same result on two different arrays.
First, declare two non-empty arrays as follows:
let emptyArray1= [1]
let emptyArray2= ['Alice', 'Harry']
Next, apply the “splice()” method to make the specified array empty.
The “0” in its parameter indicate that the array element at 1st index will be spliced and as a result, the array will become empty:
emptyArray1.splice(0)
console.log(emptyArray1)
Similarly, here apply the “length” property and assign it to “0” to transform the specified array’s length to 0 thereby leaving no element in it and display it:
emptyArray2.length = 0
console.log(emptyArray2)
Output
Example 3: Declare an Empty Array Using the splice Method and the length Property
These two approaches can be utilized to transform a non-empty array to empty.
Both of the approaches will be applied to yield the same result on two different arrays.
First, declare two non-empty arrays as follows:
let emptyArray1= [1]
let emptyArray2= ['Alice', 'Harry']
Next, apply the “splice()” method to make the specified array empty.
The “0” in its parameter indicate that the array element at 1st index will be spliced and as a result, the array will become empty:
emptyArray1.splice(0)
console.log(emptyArray1)
Similarly, here apply the “length” property and assign it to “0” to transform the specified array’s length to 0 thereby leaving no element in it and display it:
emptyArray2.length = 0
console.log(emptyArray2)
Output
![]() This write-up demonstrated the concept of declaring empty arrays.
This write-up demonstrated the concept of declaring empty arrays.
Conclusion
Creating a literal with brackets, the “New Array” constructor or the “splice()” method and “length” property approach can be utilized to declare an empty array.
Creating a literal with brackets is the most effective and easy approach, the new Array constructor technique creates an array without even assigning it.
The splice() method and length property approaches both set a non-empty array to empty in separate ways.
This article guided to declare an empty array.
Is JavaScript a programming language?
JavaScript is an interactive and user-friendly programming language.
It is almost used by every developer today for enhancing a web page or a website.
It is easy to learn and involves the user’s interaction for performing various functionalities and making an overall web page attractive and accessible document design.
This tutorial will give you an overview of JavaScript as a programming language.
Is JavaScript a Programming Language?
Yes, JavaScript is a scripting programming language.
It is an object-oriented programming language used to make web pages and apps more dynamic, presentable, and attractive for users.
JavaScript offers added functionalities that basic languages like HTML and CSS lack, such as refreshing a Twitter feed, a particular website, etc.
Basic Functionalities
JavaScript supports the following major functionalities:
Variables
Functions
Conditional Statements
Arrays
Objects
Let’s check out each of them one by one!
JavaScript Variables
JavaScript variables are declared to store some integer or a string value in it.
You can create variables using “let”, “var”, and “const”.
Example 1: Creating Variables Using let Keyword
“let” keyword is utilized for creating a block-scoped variable whose value cannot be redeclared or overwritten once it is assigned.
For instance, in the following example, an error will be encountered upon overwriting the same variable with a different value:
let x=7
console.log(x)
let x=4
console.log(x)
Output
![]() Example 2: Creating Variables Using var Keyword
In the case of using “var” keyword, a variable can be re-assigned a value.
As a result, the previous value gets updated.
Now, executing the same program will update the value of the “x” variable to “7”:
var x=5
console.log(x)var x=7
console.log(x)
Output
Example 2: Creating Variables Using var Keyword
In the case of using “var” keyword, a variable can be re-assigned a value.
As a result, the previous value gets updated.
Now, executing the same program will update the value of the “x” variable to “7”:
var x=5
console.log(x)var x=7
console.log(x)
Output
![]() Hence, no error is shown in this particular case.
Example 3: Creating Variables Using const Keyword
The constant (much-like) variables defined with “const” cannot be redeclared or re-assigned.
In the following example, the redeclaration of the variable “a” will result in an error:
let x=10
console.log(x)
let x=30
console.log(x)
Output
Hence, no error is shown in this particular case.
Example 3: Creating Variables Using const Keyword
The constant (much-like) variables defined with “const” cannot be redeclared or re-assigned.
In the following example, the redeclaration of the variable “a” will result in an error:
let x=10
console.log(x)
let x=30
console.log(x)
Output
![]()
JavaScript Functions
JavaScript functions are defined using the “function” keyword with the specified function name including the open and closing brackets.
Its function definition comprises the required functionality that you want to perform when it gets invoked.
In the following example, we will define a function named “show()” and log the following message on the console:
function show(){
console.log("Welcome to linuxhint")}
show()
Output
![]()
JavaScript Conditional Statements
Developer mostly utilized “if-else” statements to apply a particular condition based on the requirement.
It can be implemented as demonstrated in the following example.
Example
In the given example, assign the specified value to the following variable:
let x= 7
Next, apply the “if-else” condition in such a way that if the first condition is satisfied, the “if” block will execute:
if (x>5){
console.log("x is greater than five")}
Otherwise, the “else” block will execute:
else{
console.log("x is less than five")}
Output
![]()
JavaScript Arrays
JavaScript Arrays are enclosed in the square brackets “[ ]”.
Their elements can contain integers, numbers, and strings.
These are used to store some bulk data.
Example
First, declare an array named “array” with the following integer and string values:
array= [1, "Linda"]
Now, access the array value corresponding to the specified index:
console.log("Employee name is", array[1])
Output
![]()
JavaScript Objects
JavaScript Objects are created to associate some attributes or properties with their respective values.
These are created using “new Object()”:
const obj = new Object();
obj.firstName = "John";
obj.lastName = "Peter";
console.log(obj);
Output
![]() You can also create objects by utilizing literals in the following way:
const obj= {firstName: "John",
lastname: "Peter"}
console.log(obj)
Output
You can also create objects by utilizing literals in the following way:
const obj= {firstName: "John",
lastname: "Peter"}
console.log(obj)
Output
![]()
Important Concepts
These are some of the important concepts:
Hoisting
Callbacks
Async and Await
Object Oriented JavaScript
Closures and Arrays
Functions and Arrow Functions
Expression and Statement
Modules and Namespaces
setTimeout and setInterval
Document Object Model(DOM)
Prompt and alert
Advantages of Using JavaScript
Here, we have enlisted the fantastic advantages of using JavaScript:
Easy to learn
Can be linked with HTML, CSS for added functionalities
User-friendly
Simple to Implement
Higher Speed
JavaScript Libraries
Check out the list of the mostly utilized JavaScript libraries:
jQuery(for animation and event handling)
D3.js(Data Manipulations)
Underscore.js(manipulate objects and arrays)
Anime.js(adding animations)
Chart.js(adding charts and graphs)
Frameworks of JavaScript
The top JavaScript frameworks are:
“Vue”: Used for developing reactive web user interfaces
“React”: User for building user-interfaces
“Angular”: is structural framework for dynamic web apps
Applications of JavaScript
We have enlisted the top application of JavaScript below:
Displaying Animations
Making drop-down menus,
Locating the cursor’s position
Solving Mathematical queries
Changing button colors upon the mouse hover.
Linking button with various functionalities
Game Development
Build web and mobile apps
We have provided the basic information related to JavaScript language.
Conclusion
JavaScript is a scripting programming language utilized for embedding additional functionalities in user interfaces.
It has many applications for making a web page attractive.
This easy-to-learn language can be integrated with other languages like HTML and CSS for different purposes.
This manual explained the function of JavaScript as a programming language.
Input Only Numbers
There are often some requirement-based websites that want the user to meet certain criteria to access the website.
For instance, in the case of restricting a user to input a particular data type while filling a particular form.
In such cases, entering only numbers becomes very helpful in fulfilling the requirements and ensuring data accuracy.
This article will demonstrate the methods to input only numbers.
How to Input Only Numbers?
You can input only numbers by opting for the following approaches:
“ASCII” Character Set
“jQuery”
The mentioned concepts will be demonstrated one by one!
Method 1: Input Only Numbers Using ASCII Character Set
This procedure can be utilized to apply a condition upon the ASCII representation of numbers on the input field.
Example
In the following example, include the “ID” that needs to be entered in the input field.
Also, specify the input field as a “text” and invoke the function inputNumber() while passing the event as an argument when “onkeypress” event gets triggered:
<center><b>ID:</b><input type="text" size="50%" onkeypress="return inputNumber(event)"/></center>
Next, define a function named “inputNumber()” that accepts “num” as an argument.
In the function definition, apply the condition upon the numbers represented in ASCII in such a way that if the ASCII code is greater than “31” and less than “48” or “57”, it signifies that a non-number character is entered in the input field.
In such case, an alert will be generated asking the user to input only numbers:
function inputNumber(num){
var ASCIICode = (num.which) ? num.which : num.keyCode
if (ASCIICode > 31 && (ASCIICode 57)){
alert("Enter numbers only")
}}
It can be seen that when a character is typed in the input field an alert box popped up with the following information:
![]() The following table explains the discussed concept of ASCII representation for numbers as per the requirement:
The following table explains the discussed concept of ASCII representation for numbers as per the requirement:
| ASCII Representation | Digits |
|---|
| 48 | 0 |
| 49 | 1 |
| 50 | 2 |
| 51 | 3 |
| 52 | 4 |
| 53 | 5 |
| 54 | 6 |
| 55 | 7 |
| 56 | 8 |
| 57 | 9 |
The only limitation to the above-given method is that it still accepts the non-number input from the user after displaying the warning.
To resolve this issue, check out the next method!
Method 2: Input Only Numbers Using jQuery
This approach can be implemented by including the “jQuery” library and applying it to the input field with the help of a regular expression to detect the non-numeric values and replace them with an empty string.
Look at the following example to understand the stated concept.
Example
First, include the following jQuery library to apply its functionalities:
<script src="https://ajax.googleapis.com/ajax/libs/jquery/3.4.1/jquery.min.js"></script>
Next, add a heading using the “<h3>” tag and input field using the “<input>” tag within the center tag to align them in the center.
Here, we will confine the length of the input field to “4” using the “maxlength” attribute since it is a 4-digit pin:
<center>
<h3>Enter 4-digit Pin:</h3>
<input type= "text" size= "50%" name= "numonly" maxlength= "4"></center>
Now, apply the “jQuery” function on the input field with the “/[^0-9]/g” regular expression.
This regular expression check if the types value is in not a character “^” then replace it with an empty character:
$(function() {
$("input[name='numonly']").on('input', function(e) {
$(this).val($(this).val().replace(/[^0-9]/g, ''));
});});
In this example, we have restricted the input field to only accept 4 digit numeric character from the user:
![]() We have implemented the methods upon the input field to input only numbers.
We have implemented the methods upon the input field to input only numbers.
Conclusion
To input only numbers, we have implemented the “ASCII” character set approach and the “jQuery” technique.
The ASCII character set approach can be utilized to apply a condition to the input field that checks the ASCII character of the entered character.
Whereas, the jQuery technique is used along with the regular expression to apply a check upon the created input field.
This article demonstrated the methods to input only numbers.
How to Get Width of Element
In the phase of testing a web page or the website while designing, getting the dimensions of the included elements in the Document Object Model(DOM) is of great aid to adjust various added functionalities and formatting them accordingly.
This approach also then results in making a website stand out by making it readable and an overall accessible document design.
This article will demonstrate the methods to consider for computing the width of an element.
How to Get the Width of an Element?
The width of an element can be computed by utilizing the following approaches:
“offsetWidth” property.
“clientWidth“ property.
“getBoundingClientRect()” method.
These approaches will now be discussed in detail one by one!
Method 1: Get Width of Element Using the offsetWidth Property
This property can be applied to access an element against the fetched “id” and compute its outer width.
Overview the following example for demonstration.
Example
Firstly, include an “<h3>” tag in order to include the computed width of an element:
<h3 id= "head"></h3>
Next, contain the specified image in the “div” element associated with an “id”:
<div id= "img"><img src= "template2.PNG"></div>
After that, access the contained image and apply the “offsetWidth” property to calculate the width of the image:
var getElement = document.getElementById('img').offsetWidth;
After the computation, access the heading section specified before and display the image’s width using the “innerText” property:
var get= document.getElementById("head")
get.innerText= "The width of the element is: " + getElement;
get.innerText= "The width of the element is: " + width;
Output
![]() Method 2: Get Width of Element Using the clientWidth
Property
This property can also be implemented similar to the previous approach.
The main difference is that it computes the inner width of the specified element.
Example
First, revive the above discussed methods for including a heading:
<h2>Get Width of HTML Element using JavaScript</h2>
In this particular example, include the specified heading contained in the “div” element specified by “id”.
This particular heading will be computed upon for “width”:
<div id="myElement"><h3 style="background-color: khaki;">This is a Heading Element</h3></div>
This particular tag refer to the computed width to be displayed on DOM:
<<strong>h4</strong> id= "status"></<strong>h4</strong>><<strong>br</strong>>
Now, create a button with an attached “onclick” event invoking the function getWidth():
<button type="button" onclick="getWidth()">Click Me</button>
Lastly, define a function named “getWidth()”.
Here, fetch the heading to be computed upon for width.
In the next step, apply the “clientWidth” property to perform the stated operation and similarly, the “innerText” property will display the width of the heading:
function getWidth(){
var getElement = document.getElementById('myElement');
var get= document.getElementById("status")
var width = getElement.clientWidth;
get.innerText= "The Width of the element is " + width + "px";}
Output
Method 2: Get Width of Element Using the clientWidth
Property
This property can also be implemented similar to the previous approach.
The main difference is that it computes the inner width of the specified element.
Example
First, revive the above discussed methods for including a heading:
<h2>Get Width of HTML Element using JavaScript</h2>
In this particular example, include the specified heading contained in the “div” element specified by “id”.
This particular heading will be computed upon for “width”:
<div id="myElement"><h3 style="background-color: khaki;">This is a Heading Element</h3></div>
This particular tag refer to the computed width to be displayed on DOM:
<<strong>h4</strong> id= "status"></<strong>h4</strong>><<strong>br</strong>>
Now, create a button with an attached “onclick” event invoking the function getWidth():
<button type="button" onclick="getWidth()">Click Me</button>
Lastly, define a function named “getWidth()”.
Here, fetch the heading to be computed upon for width.
In the next step, apply the “clientWidth” property to perform the stated operation and similarly, the “innerText” property will display the width of the heading:
function getWidth(){
var getElement = document.getElementById('myElement');
var get= document.getElementById("status")
var width = getElement.clientWidth;
get.innerText= "The Width of the element is " + width + "px";}
Output
![]() Method 3: Get Width of Element Using the getBoundingClientRect() Method
This method returns the size of an element.
This method can be integrated with the “width” property to measure the width of the input field.
Look at the following example.
Example
First, contain an input “text” field with the specified placeholder value and the attached event “onmouseover”:
<div id="field"><input type= "text" placeholder= "Width?" onmouseover= "getWidth()"></div>
Now, define a function named “getWidth()” and access the specified input field.
This input field will be computed for the size and width using the “getBoundingClientRect()” method and the width property respectively.
Finally, display the calculated width:
function getWidth(){
var getElement = document.getElementById('field');
var position = getElement.getBoundingClientRect();
var width = position.width;
alert(width);}
Output
Method 3: Get Width of Element Using the getBoundingClientRect() Method
This method returns the size of an element.
This method can be integrated with the “width” property to measure the width of the input field.
Look at the following example.
Example
First, contain an input “text” field with the specified placeholder value and the attached event “onmouseover”:
<div id="field"><input type= "text" placeholder= "Width?" onmouseover= "getWidth()"></div>
Now, define a function named “getWidth()” and access the specified input field.
This input field will be computed for the size and width using the “getBoundingClientRect()” method and the width property respectively.
Finally, display the calculated width:
function getWidth(){
var getElement = document.getElementById('field');
var position = getElement.getBoundingClientRect();
var width = position.width;
alert(width);}
Output
![]() This write-up explained the methods to compute the element’s width.
This write-up explained the methods to compute the element’s width.
Conclusion
The “offsetWidth” property, the “clientWidth“ property or the “getBoundingClientRect()” method can be opted for getting the width of an element.
The “offsetWidth” property can be used to return the element’s outer width, the “clientWidth“ property can be utilized to compute the inner width of the specified element or the “getBoundingClientRect()” can be chosen for computing the size of the specified element and extracting the width from it.
This write-up demonstrated the methods to compute the width of an element.
How to Get Week Number of the Year?
Computing the week number of the year is very helpful to indicate the weeks that have been passed already in the current year.
This functionality is also useful for analyzing the number of days or months passed or remaining in the current year.
Also, this approach assists in checking for a leap year, planning projects, functions etc.
This leads in assisting the user of the appropriate preparations beforehand.
This write-up will demonstrate how to compute the week number of the year.
How to Compute the Week Number of the Year?
The first step for computation of the year’s week number involves a “date” object which can be created using the “new Date()” constructor.
In its parameters, include the year, month and day respectively.
The current year will be fetched using the “getFullYear()” method.
The month is specified as “0” indicating the first month and “1” is the day:
var year = new Date(currentDate.getFullYear(), 0, 1);
This particular step will compute the number of days till the current date and round it off to the nearest down integer value i.e(5.6 = 5):
var days = Math.floor((currentDate - year) / (24 * 60 * 60 * 1000));
Similarly, the below-given code will result in calculating the current week of the year and round it off to the nearest top integer value i.e(5.6 = 6) and display it:
var week = Math.ceil(( currentDate.getDay() + 1 + days) / 7);
console.log("Week Number of the current date (" + currentDate + ") is : " + week);
The above calculation can be applied on the following approaches to get the week number of the year:
“Current Date”
“User-Input Date”
The following examples will illustrate the stated concept.
Example 1: Get Week Number of the Year Using the Current Date
This example calculates the week number of the year considering the current date.
In the following step, a “date” object will be created as discussed in the computation procedure:
currentDate = new Date();
Now, similarly include the year, month and day in the created object’s parameter respectively:
var year = new Date(currentDate.getFullYear(), 0, 1);
This particular step will likewise compute the number of days till the current date and round it off to the nearest down integer value:
var days = Math.floor((currentDate - year) / (24 * 60 * 60 * 1000));
Similarly, the below-given code will result in calculating the current week of the year, round it and display it:
var week = Math.ceil(( currentDate.getDay() + 1 + days) / 7);
console.log("Week Number of the current date (" + currentDate + ") is : " + week);
The corresponding output is:
![]() Example 2: Get Week Number of the Year Using the User-Input Date
This example provides the user an option to opt for the date from the given calendar and displays the corresponding week against it.
Firstly, include the following heading and date in the “<h2>” and “<b>” tags respectively.
Next, specify the input type as “date” with the assigned id.
Also, include a “button” and attach an “onclick” event to it invoking a function named “weekYear()”.
In the next step, specify the “<h3>” tag with the assigned id.
This specific tag is allocated to contain the computed week number upon the user-entered date:
<h2 align= "Center"> Calculate Week Number using User Input Date<br></h2><center><b align="Center"> Enter date</b><input type= "date" id= "date"><br> <br><button onclick="weekYear()">Calculate Week Number</button><h3 id= "result" align= "center"></h3></center>
Now, define a function named “weekYear()”.
In its definition, access the assigned input type and retrieve its value.
After that, similarly create a new date object and contain the value of date as its parameter.
In the further steps, similarly repeat the procedure discussed in the computation procedure for pointing to the start of the current year, computing the number of days and weeks till the current date.
Finally, the last step will display the week number of the year at its allocated heading tag using the “innerText” property:
function weekYear() {
var get = document.getElementById("date").value;
var currentDate = new Date(get);
var year = new Date(currentDate.getFullYear(), 0, 1);
var days = Math.floor((currentDate - year) / (24 * 60 * 60 * 1000));
var week = Math.ceil(( currentDate.getDay() + 1 + days) / 7);return document.getElementById("result").innerHTML = "Week number of the specified date is: " + week;}
Output
Example 2: Get Week Number of the Year Using the User-Input Date
This example provides the user an option to opt for the date from the given calendar and displays the corresponding week against it.
Firstly, include the following heading and date in the “<h2>” and “<b>” tags respectively.
Next, specify the input type as “date” with the assigned id.
Also, include a “button” and attach an “onclick” event to it invoking a function named “weekYear()”.
In the next step, specify the “<h3>” tag with the assigned id.
This specific tag is allocated to contain the computed week number upon the user-entered date:
<h2 align= "Center"> Calculate Week Number using User Input Date<br></h2><center><b align="Center"> Enter date</b><input type= "date" id= "date"><br> <br><button onclick="weekYear()">Calculate Week Number</button><h3 id= "result" align= "center"></h3></center>
Now, define a function named “weekYear()”.
In its definition, access the assigned input type and retrieve its value.
After that, similarly create a new date object and contain the value of date as its parameter.
In the further steps, similarly repeat the procedure discussed in the computation procedure for pointing to the start of the current year, computing the number of days and weeks till the current date.
Finally, the last step will display the week number of the year at its allocated heading tag using the “innerText” property:
function weekYear() {
var get = document.getElementById("date").value;
var currentDate = new Date(get);
var year = new Date(currentDate.getFullYear(), 0, 1);
var days = Math.floor((currentDate - year) / (24 * 60 * 60 * 1000));
var week = Math.ceil(( currentDate.getDay() + 1 + days) / 7);return document.getElementById("result").innerHTML = "Week number of the specified date is: " + week;}
Output
![]() This article demonstrated the concept of getting the week number of the year.
This article demonstrated the concept of getting the week number of the year.
Conclusion
The pre-built method of the JavaScript’s Date object can be applied on the “current date” or the “user-input date” to fulfill the given requirement.
The former example computes the week number with respect to the year’s current date.
On the other hand, the latter demonstration results in calculating the week number from the user-input date from the provided calendar.
This write-up explains how to get the week number of the year with the help of examples.
How to Get href
“href” stands for a hypertext link.
While developing a website, the URL of the page to which the link points is specified using the HTML anchor “<a>” tag.
In certain scenarios, the developers need to determine the value of the href, which is the page’s URL.
To do so, JavaScript has some built-in methods that can assist you.
This manual will discuss the ways to get the href value of the JavaScript anchor tag.
How to Get href?
To determine the href value, use the following JavaScript predefined methods:
getAttribute() method
href attribute
Let’s examine these approaches individually!
Method 1: Get href Using getAttribute() Method
The “getAttribute()” method of the Element interface gives the value of a particular attribute of the defined element.
The return value is null or the empty string if the desired attribute is missing.
Syntax
Follow the given syntax for getting the href using getAttribute() method:
element.getAttribute(attributeName)
Here, “attributeName” is the name of the attribute whose value we want to get.
Example: Get href Using querySelector() Method With getAttribute() Method
We will first, create an anchor tag, button and a label for printing URL that will get the href value using JavaScript “getAttribute()” method:
<h3>Get the href</h3><a href="https://linuxhint.com/increase-checkbox-size-css/" id="link">Link</a> <br><br><button id="submit" onclick="getUrl()">Click Here!</button><br><br><label id="getUrl"></label>
Next, define the “getUrl()” function file, where we will first, get the anchor tag using “querySelector()” method and then call the getAttribute() method by passing href as an argument.
It will find out the first anchor tag and retrieve its URL and store it in the “href” variable.
Finally, prints the value as the text of the added label:
function getUrl(){
var href = document.querySelector('a').getAttribute('href');
var url = document.getElementById('getUrl');
url.textContent = `The URL is ${href}`;}
The output displays the value of href on a button click:
![]() Let’s move to the next method for getting href.
Method 2: Get href Using href Attribute
The other method for getting href value is the “href” attribute.
The href is the property of the “HTMLAnchorElement” that updates the href and gives a string with the complete URL.
Syntax
Use the following syntax for getting the href value with the help of the “href” attribute:
anchorElement.href
Example: Get href Using getElementById() Method With href Attribute
We will consider the same link in the anchor tag used in the previous example.
Then, in the “getUrl()” function, first access the anchor tag by passing the “link” id of the anchor tag in the “getElementbyId()” method and call the “href” attribute with it.
Next, again get the added label using the same procedure and set the value of the fetched href as its content:
function getUrl(){
const value1 = document.getElementById("link").href;
const url = document.getElementById('getUrl');
url.textContent = `The URL is ${value1}`;}
Output
Let’s move to the next method for getting href.
Method 2: Get href Using href Attribute
The other method for getting href value is the “href” attribute.
The href is the property of the “HTMLAnchorElement” that updates the href and gives a string with the complete URL.
Syntax
Use the following syntax for getting the href value with the help of the “href” attribute:
anchorElement.href
Example: Get href Using getElementById() Method With href Attribute
We will consider the same link in the anchor tag used in the previous example.
Then, in the “getUrl()” function, first access the anchor tag by passing the “link” id of the anchor tag in the “getElementbyId()” method and call the “href” attribute with it.
Next, again get the added label using the same procedure and set the value of the fetched href as its content:
function getUrl(){
const value1 = document.getElementById("link").href;
const url = document.getElementById('getUrl');
url.textContent = `The URL is ${value1}`;}
Output
![]() We have provided the simplest solution for getting the href value.
We have provided the simplest solution for getting the href value.
Conclusion
To get the href, you can utilize the JavaScript predefined methods, such as getAttribute() method and href attribute.
The only thing that separates the getAttribute() method from the href attribute is that it returns the value of the anchor element while the href gives the whole path to which the anchor element points.
In this manual, we have discussed the ways to get the href value of the JavaScript anchor tag.
classList JavaScript | Explained
A JavaScript DOM feature named “classList” can be used to style an element’s CSS classes.
It is a read-only JavaScript property that is used to represent the information included in an element’s class property.
More specifically, the names of the CSS classes are returned by the called classList.
This write-up will illustrate the classList JavaScript property and its uses.
What is classList?
The “classList” is the JavaScript DOM read-only attribute representing the data in an element’s class property.
It gives the names of the CSS classes as output.
Despite being read-only, the classList can still be used to change the classes.
Moreover, you can modify the CSS classes given to an HTML element using the classList object.
Syntax
Follow the given syntax to use the classList attribute:
element.classList;
Here, the “element” is the HTML element.
Example
In this example, we will create a button by assigning a class named “button” and attach the onclick() event to it that will output the names of the assigned class to the button when triggered:
<h4>Click to show the assigned class to the button</h4><button id="btn" class="button" onclick="buttonClick()">Click Here</button>
Now, we will set the border radius of the button as “2cm” in the CSS file:
.button {
border-radius: 2cm;}
We will link the style sheet with the HTML file using the “<link>” tag:
<link rel="stylesheet" href="./stylesheet.css">
In JavaScript file, define a function “buttonClick()” in such a way that when it is invoked, firstly, the document.getElementById() method access button using its id and then display the assigned class to the button in an alert() method:
function buttonClick(){
var click = document.getElementById("btn");
alert(click.classList);}
Output
![]() Let’s check out the methods of the classList JavaScript property.
Let’s check out the methods of the classList JavaScript property.
What are the Methods of the classList Property?
There are some methods of the classList Property are as follows:
add()
remove()
toggle()
contains()
item()
replace()
The below-given table comprises the description of the mentioned methods:
| Methods |
Description |
| add() |
You can add one or more classes to an element with the add() method. |
| remove() |
To eliminate classes from the element’s list of classes, use the remove() method. |
| toggle() |
Toggling the particular class names of an element is done using the toggle() method.
The specified class is added with one click, and the class is removed with another click. |
| contains() |
To check whether the given class exists in the element or not, utilize the contain() method. |
| item() |
It is used to show the names of the classes that are present at the specific index. |
| replace() |
An existing class can be replaced with a new class using the replace() method. |
Now, we will discuss some commonly used methods of the classList.
Example 1: How to Use Add() Method of classlist Property?
We will add new classes in the button by clicking on the new “Add class to the button”:
<button onclick="addClass()">Add class to the button</button>
Then, create two classes “btnColor” and “boldText” that will add the buttons background color and bold the text of the button:
.btnColor{
background-color: blueviolet;}
.boldText {
font-weight: bold;}
In JavaScript file, define a function named “addClass()” that will call the “add()” method of the classList with the name of class as an argument added in the button’s class:
function addClass(){
var newClass = document.getElementById("btn").classList;
newClass.add("btnColor");
newClass.add("boldText");}
The output indicates that the new classes are added in the button “Click Here” when “Add class to the button” is clicked.
Then, click on the “Click Here” button to display the list of classes:
![]()
Example 2: How to Use Remove() Method of classlist Property?
We will now remove a class from the list.
To do so, we will create a new button “Remove class from the button” and attach an onclick() event with it:
<button onclick="removeClass()">Remove class from the button</button>
We will define a function “removeClass()” file to remove the class “btnColor” from the list of the classes:
function removeClass(){
var newClass = document.getElementById("btn").classList;
newClass.remove("btnColor");}
As you can see in the output, the “Click Here” button displayed one class named “button” and then when the “Add class to the button” is clicked, two new classes “boldText” and “btnColor” are added to the list, and the background color of the button is also changed.
Lastly, clicking on the “Remove class from the button” will remove the “btnColor” class from the list:
![]()
Example 3: How to Use Toggle() Method of classlist Property?
Now, we will use the toggle() method for toggling the list of classes on one click and will remove on another click:
<button onclick="toggleClass()">Toggle button</button>
In JavaScript file, define a function “toggleClass()” that will first add the button’s color on one click and then removes it on the other click:
function toggleClass(){
var newClass = document.getElementById("btn").classList;
newClass.toggle("btnColor");}
The corresponding output is as follows:
![]() All of the fundamental guidelines for the classList JavaScript property have been covered.
All of the fundamental guidelines for the classList JavaScript property have been covered.
Conclusion
The “classList” is the read-only attribute of JavaScript that gives the names of the CSS classes assigned to the HTML element.
It permits to change the CSS classes with the help of its predefined methods, including add(), remove(), toggle() and so on.
In this write-up, we have illustrated the classList JavaScript property and its methods with detailed examples.
Word Count Using JavaScript
Sometimes, as a JavaScript developer, you must restrict user input into the text box by the character limit or the word limit.
In such situations, the counter can help in keeping track of the words or characters when the user enters them.
More specifically, the word counter can be utilized to count the words using different approaches.
This write-up will explain the method for counting the words.
How to Count Word Using JavaScript?
As we know, the words in a sentence are separated by a space.
This states that the space can be utilized as a separator to count the words in a sentence or string.
To count the words in a text area, use the JavaScript predefined methods and properties, including “split()”, “filter()”, and “trim()” methods with regex or without regex.
Example 1: Count Word Using split() and filter() Methods
Firstly, initialize a string surrounded by inverted comma and store it in a variable named “string”:
var string = 'LinuxHint is the best Website for learning skills';
Then, print the string using “console.log()” method:
console.log(string);
Get the count of words by calling the defined function named “getCount()”:
console.log('Total Words in String: '+ getCount(string));
In “getCount()” function, invoke the split() and filter() methods that will split the string based on the spaces, counts the words, and returns the total count:
function getCount(str) {
return str.split(' ').filter(function(num) {
return num != ''
}).length;}
The output displayed the word count of the initialized string as “8” words:
![]() Example 2: Count Word Using trim() and split() Methods
In this example, we will use another approach to perform the same operation.
To do so, consider the same string and call “trim()” with the “split()” method, use the regex for space as “/\s+/”, and lastly invoke the “length” property:
function getCount(str) {
return str.trim().split(/\s+/).length;}
Output
Example 2: Count Word Using trim() and split() Methods
In this example, we will use another approach to perform the same operation.
To do so, consider the same string and call “trim()” with the “split()” method, use the regex for space as “/\s+/”, and lastly invoke the “length” property:
function getCount(str) {
return str.trim().split(/\s+/).length;}
Output
![]() Example 3: Count Words Entered by User in Text Box
In this example, we will count the words in a sentence by entering text in a text box.
To do so, create a textbox using the HTML <textarea> tag with id “txtarea” and attach an “onclick()” event to it which invokes the JavaScript user-defined function “wordCount()” to count every word except the spaces:
<textarea id="txtarea" oninput="wordCount()" rows="8" cols="45" placeholder="Enter text ....."></textarea>
Then, create two labels; one for description and the other to display the word count:
<label>Total Word Count:</label><label id="showCount"></label>
In the wordCount() function, first get the id of the text box using the “getElementById()” method, set count equals to 0, and call the split() method by passing space as an argument.
Then, iterate the text in the text area using the “for” loop and check if the text does not contain any space, then increment 1 in the count:
function wordCount() {
var text = document.getElementById("txtarea").value;
var count = 0;
var split = text.split(' ');
for (var i = 0; i < split.length; i++) {
if (split[i] != "") {
count ++;
}
}
document.getElementById("showCount").innerHTML = count;}
The output signifies that the word counter works simultaneously when the user enter any text:
Example 3: Count Words Entered by User in Text Box
In this example, we will count the words in a sentence by entering text in a text box.
To do so, create a textbox using the HTML <textarea> tag with id “txtarea” and attach an “onclick()” event to it which invokes the JavaScript user-defined function “wordCount()” to count every word except the spaces:
<textarea id="txtarea" oninput="wordCount()" rows="8" cols="45" placeholder="Enter text ....."></textarea>
Then, create two labels; one for description and the other to display the word count:
<label>Total Word Count:</label><label id="showCount"></label>
In the wordCount() function, first get the id of the text box using the “getElementById()” method, set count equals to 0, and call the split() method by passing space as an argument.
Then, iterate the text in the text area using the “for” loop and check if the text does not contain any space, then increment 1 in the count:
function wordCount() {
var text = document.getElementById("txtarea").value;
var count = 0;
var split = text.split(' ');
for (var i = 0; i < split.length; i++) {
if (split[i] != "") {
count ++;
}
}
document.getElementById("showCount").innerHTML = count;}
The output signifies that the word counter works simultaneously when the user enter any text:
![]() We have compiled all the simplest solutions to count the words.
We have compiled all the simplest solutions to count the words.
Conclusion
To count the words in a text area, you can utilize the JavaScript predefined methods and properties, including the “split()” method, “filter()” method, and “trim()” method with regex or without regex and “length” property.
The word count is mainly used in the forms while entering information in a specific limit.
In this write-up, we have explained different methods for counting words.
Window btoa() Method | Explained
In real-life problems, you often want to transform your data via encoding so that it can be safely utilized by a different type of system.
Moreover, encoding assists in keeping the data secure as the files become unreadable.
In addition to that, it can compress the size of audio and video files.
In such cases, the “window.btoa()” method does wonder in encoding the data to ensure data privacy.
This manual will guide you about the usage of the Window btoa() method.
What is Window btoa() Method?
The JavaScript “window.btoa()” method encodes a string in base-64.
This method uses the “A-Z“, “a-z“, “0-9“, “+“, “/” and “=” characters for encoding the specified string placed in its argument.
Syntax
window.btoa(string)
In the above syntax, “string” refers to the specified string that needs to be encoded.
Let’s check the following examples to understand the stated concept.
Example 1: Encode the Initialized String
In this example, we will simply encode the initialized string value by applying the window.btoa() method.
To do so, firstly, initialize the following string value:
let text = "Encode the String";
Next, apply the “window.btoa()” method taking the specified string as its argument:
let encoded = window.btoa(text);
Finally, print the encoded value:
console.log(encoded);
The resultant encoded output will be:
![]() If you want to take the string value as an input from the user and encode it, utilize the following example.
Example 2: Encode the User-Defined String
In the following example, we will encode the string value entered by the user via the prompt dialogue box.
The below-given code will ask the user to input the string value:
input= prompt("Enter the String Value:")
Now, encode the user-defined string value using the “window.btoa()” method:
let encoded = window.btoa(input);
Finally, display the encoded string value via alert dialogue box:
alert(encoded)
Output
If you want to take the string value as an input from the user and encode it, utilize the following example.
Example 2: Encode the User-Defined String
In the following example, we will encode the string value entered by the user via the prompt dialogue box.
The below-given code will ask the user to input the string value:
input= prompt("Enter the String Value:")
Now, encode the user-defined string value using the “window.btoa()” method:
let encoded = window.btoa(input);
Finally, display the encoded string value via alert dialogue box:
alert(encoded)
Output
![]() Example 3: Encode Heading Text
In this particular example, we will encode the string value of the heading by accessing its specified “id” using a button.
First, specify the following heading in the “<h3>” tag with the specified id:
<h3 id= "lh">LinuxHint</h3>
Next, follow the given steps to encode the heading:
Define a function named “encodeString()”.
In its function definition, access the specified id using the “getElementById()” method.
Now, invoke the “btoa()” method to encode the text added in the heading.
Finally, apply the “innerText” property to display the encoded string value on the Document Object Model(DOM):
function encodeString(){
let get= document.getElementById("lh")
let encoded = window.btoa(get);
get.innerText= encoded}
Output
Example 3: Encode Heading Text
In this particular example, we will encode the string value of the heading by accessing its specified “id” using a button.
First, specify the following heading in the “<h3>” tag with the specified id:
<h3 id= "lh">LinuxHint</h3>
Next, follow the given steps to encode the heading:
Define a function named “encodeString()”.
In its function definition, access the specified id using the “getElementById()” method.
Now, invoke the “btoa()” method to encode the text added in the heading.
Finally, apply the “innerText” property to display the encoded string value on the Document Object Model(DOM):
function encodeString(){
let get= document.getElementById("lh")
let encoded = window.btoa(get);
get.innerText= encoded}
Output
![]() We have discussed all the possible examples for the usage of the window.btao() method.
We have discussed all the possible examples for the usage of the window.btao() method.
Conclusion
You can use the “window.btoa()” method to encode the string, whether it is initialized, user-defined via prompt, or any text element, such as a heading.
For initialized and the user-defined string, the window.btoa() method is invoked while passing the required string as an argument.
In the last scenario, it is required to access the element with the help of its id and then encode it.
This write-up demonstrated the examples of using the window.btoa() method.
What is ? | Explained
At the end of any statement or phrase, a question mark (?) is used to indicate a direct question.
However, have you ever encountered a situation question mark code and wondered what it meant? A question mark can perform different functions based on its use.
You can use it wherever it is required once you know what it is.
This post will demonstrate the question mark “?”.
What is “?”?
The question mark “?” might have three different meanings.
It is used as:
Ternary Operator
Null Coalescing Operator
Optional Chaining Operator
“?” as a Ternary Operator
In every programming language, conditional statements are typically represented by “if-else” statements.
However, even for the simplest conditions, these statements require multiple lines of code.
In such a scenario, utilize the Question Mark (?) conditional statements as the “ternary Operator”.
The word “ternary” denotes a relationship between three elements, the condition, the truth block, and the false block.
The condition and the truth block are separated by a question mark (?), and the colon (:) separates the truth and the false block.
This operator returns a boolean value depending upon the evaluation of the condition.
How to Use “?” as a Ternary Operator?
The “?” can be used as a ternary operator as follows:
condition ? true : false
Here, “condition” is an expression that needs to be evaluated and produces a boolean value, where “true” is the value that will be applied if the condition is true, and “false” is the value that will be used if the condition is false.
Example
First, we will create a variable “marks” and assign a value “78”:
var marks = 78;
Then, check whether the marks is greater than 60 or not using the ternary operator.
If yes, then print “Pass”; else, “Fail”:
var result = (marks > 60) ? "Pass" : "Fail";
Finally, print the result on the console using the “console.log()” method:
console.log(result);
The corresponding output is:
![]() Let’s discuss the other use of the Question mark (?).
Let’s discuss the other use of the Question mark (?).
“?” as a Null Coalescing Operator
The OR || operator is useful.
Still, in some cases, developers only want the first operand to be evaluated when it is null or undefined.
As a result, the null coalescing operator has been added to ES11.
It is denoted with a double question mark (??), and it belongs to the same class of logical operators as the logical OR and AND operators.
This operator gives the operand on the right-hand side as output if the operand on the left is “null” or “undefined”.
The null coalescing operator makes conditional tests and debugging code much easier.
How to Use “?” as a Null Coalescing Operator?
To use a question mark (?) as a null coalescing operator, follow the below-given syntax:
statement1 ?? statement2
Here, “statement1” and “statement2” are the two conditions that will be checked in such a way that if the statement1 is null or undefined, the only possible outcome is statement2, while if it is not null or undefined then, the result will be statement1.
Example
We will first create a variable “num” and assigned a value “14” to it:
var num = 14;
Then, use the null coalescing operator with expressions “undefined” and “num”:
var check = undefined ?? num;
Lastly, print the result on the console:
console.log(check);
The output gives the value of right-hand side operand as “undefined” is present on the left side of the null coalescing operator:
![]() Similarly, when the keyword “null” is added in the place of “undefined“, it gives the same result, but If the other representations of the null value, such as an empty string ” “ or “0” are on the left-hand side, the null coalescing operator will not consider it as null and gives the value of left-hand side operand.
Here, we will use “0” and the null coalescing operator with variable “num”:
var check = 0 ?? num;
The output gives “0”, the left-hand-sided value:
Similarly, when the keyword “null” is added in the place of “undefined“, it gives the same result, but If the other representations of the null value, such as an empty string ” “ or “0” are on the left-hand side, the null coalescing operator will not consider it as null and gives the value of left-hand side operand.
Here, we will use “0” and the null coalescing operator with variable “num”:
var check = 0 ?? num;
The output gives “0”, the left-hand-sided value:
![]() The question mark is also used for one more purpose, let’s see it!
The question mark is also used for one more purpose, let’s see it!
“?” as an Optional Chaining Operator
The “Optional Chaining Operator” is used as a question mark (?) with a dot(.) and is denoted as (?.).
This operator can be used to access an object’s property or invoke a function.
Instead of throwing an error, the object returns undefined if it is undefined or null.
Using this operator is a secure and efficient access check for nested object attributes.
How to Use “?” as an Optional Chaining Operator?
For the chaining operator, you can use the given syntax:
Object.val?.prop
Here, the optional chaining operator “?” is used to access the value of the specified object property.
Example 1: Accessing Non-existing Properties of an Empty Object
Here, first, we will create an empty object named “user1”:
var user1 = {};
Then, access its non-existing properties with the dot(.) operator, it will throw an error:
console.log(user1.info.name);
Output
![]() While, when the optional chaining operator is added to access its undefined properties, it will not throw an error:
console.log(user1.info?.name);
The output gives undefined rather than error:
While, when the optional chaining operator is added to access its undefined properties, it will not throw an error:
console.log(user1.info?.name);
The output gives undefined rather than error:
![]() Let’s see one more example related to this functionality.
Example 2: Accessing Non-existing Properties of a Non-empty Object
Here, we will define the properties of the object and then try to access the nested object attribute that does exist in the object:
var user1 = {
info: {
age: "20"
}};
Use the optional chaining operator for accessing nested object’s attribute:
console.log(user1.info?.name);
As a result, “undefined” will be displayed on the console:
Let’s see one more example related to this functionality.
Example 2: Accessing Non-existing Properties of a Non-empty Object
Here, we will define the properties of the object and then try to access the nested object attribute that does exist in the object:
var user1 = {
info: {
age: "20"
}};
Use the optional chaining operator for accessing nested object’s attribute:
console.log(user1.info?.name);
As a result, “undefined” will be displayed on the console:
![]() We have compiled all the uses of the question mark “?”.
We have compiled all the uses of the question mark “?”.
Conclusion
The question mark (?) has three different meanings as it can be used as “Ternary Operator”,denoted as (?), “Null Coalescing Operator” as (??), and “Optional Chaining Operator” representing as (?.).
Using a question mark (?) code makes your code readable and easily debug while handling mistakes.
In this post, we have demonstrated what the question mark “?” is and its uses with detailed examples.
JavaScript Wait for Page to Load
The web pages or sites you visit often let the user wait to display an important message or a warning before accessing a particular component.
For instance, when asking a user to buy the membership or login before accessing the site’s content or for the appropriate traffic management in the case of educational websites.
In such cases, you can let the user wait for a page until it gets loaded.
This blog will discuss the methodologies that can be used to set the page load time.
How to Wait for a Page to Load?
You can wait for a page to load by using the following approaches:
window onload event with “setTimeout()” method
window onload event with “setInterval()” method
“addEventListener()” method
The mentioned concepts will be demonstrated one by one!
Method 1: Wait for Page to Load Using window.onload Event With setTimeout() Method
The “window.onload” event occurs when the window has been loaded, and the “setTimeout()” method invokes a function after the specified set time.
More specifically, these approaches can be combined to load the window after the specified wait time.
Syntax
setTimeout(function, milliseconds)
In the given syntax, function refers to the accessed function “waitLoad()”, and milliseconds indicates the “set time” in milliseconds.
The below-given example demonstrates the stated concept.
Example
Firstly, utilize the “window.onload” event along with the “setTimeout()” method to load the window after the set time in milliseconds.
The specified wait time will be applied to the waitLoad() function:
window.onload= setTimeout(waitLoad, 3000)
Now, define the function named “waitLoad()” in the <script> tag.
This particular function will be accessed upon the window load and notify the user with the following messages via alert and on the Document Object Model(DOM), respectively:
function waitLoad(){
alert("Loaded!")
document.write("This page is loaded now!")};
It can be observed that the page is loaded after the specified 3 seconds waiting time:
![]() If you want to load the page after a specified waiting time repeatedly, utilize the following method.
If you want to load the page after a specified waiting time repeatedly, utilize the following method.
Method 2: Wait for Page to Load Using window.onload Event With setInterval() Method
The “window.onload” event, as discussed above, is triggered when the window has been loaded.
The “setInterval()” method accesses a specified function repeatedly at the specified time intervals computed in milliseconds.
Syntax
setInterval(function, milliseconds)
Here, the “function” refers to the function that needs to be executed and “milliseconds” is its set time interval.
Example
In the following example, we will set the time interval as the argument in the defined function.
Print a specific message via an alert on the DOM after every 3 seconds when the page gets loaded repeatedly:
window.onload = setInterval(function(){
alert("Loaded!")
document.write("This page is loaded now!")}, 3000);
Output
![]() In the extracted output, it is evident that the page is loaded repeatedly after the specified waiting time.
In the extracted output, it is evident that the page is loaded repeatedly after the specified waiting time.
Method 3: Wait for Page to Load Using addEventListener() Method
The “addEventListener()” method applies an event handler to the document.
This method can be implemented to attach a particular event and load the page upon clicking anywhere in the DOM.
Syntax
document.addEventListener(event, function)
In the given syntax, “event” refers to the event that will be triggered, and “function” points to the function which performs some functionality on the triggered event.
Example
First, we will attach an event “click” to the document using the addEventListener() method.
Upon triggering the specified event, the function named “waitLoad()” will be executed:
document.addEventListener("click", waitLoad)
Define the function “waitLoad()” in which display the following message on the DOM upon the triggered event:
function waitLoad(){
document.write("The Page is Loaded now!"); }
In this particular output, the page is loaded upon clicking the cursor anywhere on the DOM:
![]() We have compiled different methods to wait for the page to load.
We have compiled different methods to wait for the page to load.
Conclusion
To wait to load a page, utilize the window.onload event with the “setTimeout()” method, with “setInterval()” method or the “addEventListener()” method.
The window.onload event with the setTimeout() method is used to load the page after the specified time while with setInterval() method, the page loads repeatedly after the particular time interval.
The addEventListener() method can be utilized in order to attach an event and load the page as soon as the event is triggered on the DOM.
This article illustrated the methods to wait for a page to load.
JavaScript this | Explained
One of the most challenging and frequently used concepts is the “this” keyword.
JavaScript uses the “this” keyword differently than other languages.
However, it is essential for creating more advanced JavaScript code.
As a beginner, it could be somehow difficult for you to understand the use of the mentioned keyword, but no worries!
This post will explain the “this” keyword and its usage.
What is “this”?
“this” is the keyword that refers to an object that executes the existing block of code.
It represents an object that is invoking the current function.
It is used in multiple scenarios in different ways, such as:
In method
In event handling
In functions
Let’s check out each of the mentioned uses one by one!
How to Use “this” Methods?
“this” is used methods as an implicit binding.
When the function is called with the help of an object and a dot, it is considered implicit binding, and “this” points out the object during the function call.
Example
First, we will create an object with some properties and a method and then use the “this” keyword to get the values of the object’s properties:
var personInfo = {
name: "John",
age : 20,
info: function() {
console.log("Hy! I am " + this.name + " and I am " + this.age + " years old");
}}
Next, call the “info()” method along with object name:
personInfo.info();
It can be seen that the specified property values of the current object are successfully displayed:
![]() If you want to use “this” in event handling, follow the below section.
If you want to use “this” in event handling, follow the below section.
How to Use “this” Event Handling?
In this example, check out the use of the “this” keyword in event handling.
For this, consider an example in which we will hide our button with a single click.
To do so, create a button and attach an “onclick()” event with it to access the style.display property with the “this” keyword that will hide the button when clicked:
<h3>Click to Hide the Button</h3><button onclick="this.style.display='none'">Click Here!</button>
Output
![]() If you are confused about the use of the “this” keyword in user-defined functions, follow the given section.
If you are confused about the use of the “this” keyword in user-defined functions, follow the given section.
How to Use “this” Functions?
While using “this” in functions, there are three types of bindings, including:
Default binding
Implicit binding
Explicit binding
Let’s understand them individually!
Example 1: Use of this keyword in Default Binding
In default binding, the “this” keyword acts as a global object.
It is mostly used in standalone functions.
Let’s understand the stated concept with an example.
First, we will create a variable “x” and assign it the value “15”:
var x = 15;
Then, define a function named “functionDB()” and its function definition, create a variable with the same name “x” and assign it a value “5”, then, print its value using the “console.log()” method with “this” keyword:
var functionDB = function() {
var x = 5;
console.log(this.x);}
Lastly, call the “functionDB()” function:
functionDB();
Due to the use of the “this” keyword, the output displays the value of “x” as “15” because it acts as a global object and the process is called “Dynamic Binding”:
![]() Example 2: Use of this keyword in Implicit Binding
When the function is called by an object or a dot symbol, “this” keyword acts as an implicit binding.
It points out the object during the function call.
In this example, we will define a function “info()” and use the “this” keyword in the function definition:
function info(){
console.log("Hy! I am " + this.name + " and I am " + this.age + " years old")}
Then, create an object named “personInfo” with defined properties:
var personInfo = {
name: "John",
age : 20,
info: info}
Now, call the function along object:
personInfo.info();
Output
Example 2: Use of this keyword in Implicit Binding
When the function is called by an object or a dot symbol, “this” keyword acts as an implicit binding.
It points out the object during the function call.
In this example, we will define a function “info()” and use the “this” keyword in the function definition:
function info(){
console.log("Hy! I am " + this.name + " and I am " + this.age + " years old")}
Then, create an object named “personInfo” with defined properties:
var personInfo = {
name: "John",
age : 20,
info: info}
Now, call the function along object:
personInfo.info();
Output
![]() Example 3: Use of this keyword in Explicit Binding
Explicit binding is also called “hard binding” because the function is forcefully called to utilize a particular object for “this” binding, without putting a property function reference on the object.
For this purpose, call(), apply() and bind() methods can be used.
We will now utilize the same function named “info()” defined in the previous example.
Then, create an object named “personInfo” with the following values:
var personInfo = {
name: "John",
age : 20}
For invoking the function named “info()”, we will use the “call()” method and pass the created object it to as an argument:
info.call(personInfo);
As the info() is not part of the object, we still have explicitly accessed it:
Example 3: Use of this keyword in Explicit Binding
Explicit binding is also called “hard binding” because the function is forcefully called to utilize a particular object for “this” binding, without putting a property function reference on the object.
For this purpose, call(), apply() and bind() methods can be used.
We will now utilize the same function named “info()” defined in the previous example.
Then, create an object named “personInfo” with the following values:
var personInfo = {
name: "John",
age : 20}
For invoking the function named “info()”, we will use the “call()” method and pass the created object it to as an argument:
info.call(personInfo);
As the info() is not part of the object, we still have explicitly accessed it:
![]() For calling a function explicitly, you can also use the apply() and bind() methods.
The apply() method is identical to the call() method, while the bind() method creates a new function with the same body and scope that behaves in the same way as the original function.
The bind() method can be utilized to return a function that you can use later.
For calling info() with the apply() method, use the following statement:
info.apply(personInfo);
It gives the same output as the call() method gives:
For calling a function explicitly, you can also use the apply() and bind() methods.
The apply() method is identical to the call() method, while the bind() method creates a new function with the same body and scope that behaves in the same way as the original function.
The bind() method can be utilized to return a function that you can use later.
For calling info() with the apply() method, use the following statement:
info.apply(personInfo);
It gives the same output as the call() method gives:
![]() For calling “info()” with the “bind()” method, utilize the given statement:
info.bind(personInfo);
Output
For calling “info()” with the “bind()” method, utilize the given statement:
info.bind(personInfo);
Output
![]() We have compiled all the essential information related to the “this” keyword.
We have compiled all the essential information related to the “this” keyword.
Conclusion
“this” is the keyword that refers to an object that executes the existing block of code.
It represents the object that is invoking the current function.
It is used in multiple scenarios in different ways, including methods, event handling, and functions.
In this post, we have explained the “this” keyword.
JavaScript Template Literals (Template Strings)
A new element added in ES6 is the template literal.
It is a new type for creating strings that adds several important new features, such as the ability to create multi-line strings and include an expression in a string.
As a developer, all of these features can enhance your abilities for manipulating strings and allowing you to create dynamic strings.
This post will illustrate template literals and how to use them.
What are JavaScript Template Literals (Template Strings)?
“Template Literals” are commonly known as “Template Strings”.
They are surrounded by the backtick (“) character, as compared to quotes in strings.
Its placeholders are denoted by the dollar sign “$”, and curly braces {} like “${expression}” is acceptable in template literals.
If you want to use an expression, you may put it in the “${expression}” box inside the backticks.
A template literal is an improved version of a standard JavaScript string.
Substitutions make a significant distinction between a template literal and an ordinary string.
You can integrate variables and expressions into a string using substitutes.
These variables and expressions will have their values automatically replaced by the JavaScript engine.
Syntax
Use the below syntax for declaring a single string using template literals:
`string text`
For multiple lines, follow the given syntax:
`string text line 1
string text line
If you want to add expression inside the backticks, the following syntax is used:
`string text ${expression} string text`
Check out the following examples to develop a better understanding of the stated concept.
Example 1: Declare a Single Line String Using JavaScript Template Literals
Usually, to create a string, it is required to use a single or double quotes, but in template literals, you can create a string as follows:
console.log(`LinuxHint`);
The output shows that it works the same just like the simple creating sting with the help of single or double quotes:
![]() Example 2: Declare Multi-line String Using JavaScript Template Literals
Normally, for printing multiple lines, we use the concatenation operator (+) and to add a new line, (\n) can be utilized, that can often make the code complex:
console.log("Welcome to the LinuxHint.\n" + "The best website for learning skills.");
While for using template literals, you can start a new line by pressing enter from the keyboard in the backticks block:
console.log(`Welcome to the LinuxHint.
The best website for learning skills.`);
Output
Example 2: Declare Multi-line String Using JavaScript Template Literals
Normally, for printing multiple lines, we use the concatenation operator (+) and to add a new line, (\n) can be utilized, that can often make the code complex:
console.log("Welcome to the LinuxHint.\n" + "The best website for learning skills.");
While for using template literals, you can start a new line by pressing enter from the keyboard in the backticks block:
console.log(`Welcome to the LinuxHint.
The best website for learning skills.`);
Output
![]() Example 3: String with Expression Substitutions
Here, first we will create two variables “x” and “y”, with the values “20” and “15”, respectively:
var x = 20;
var y = 15;
Then, create a variable “sum” for adding the “x” and “y”:
var sum = x + y;
If you want to add two numbers and display the sum of these numbers on console, normally, it is required to concatenate the strings and variables in regular string format which often creates a mess to use single or double quotes repeatedly with the strings and join them with each other and with the variables using (+):
console.log("Sum of x " + x + " and " + y + " is " + sum);
While, using the template literals, you only have to specify the strings with variables as an expression inside the “${}” in backtick block:
console.log(`Sum of x ${x} and y ${y} is ${sum}`);
Output
Example 3: String with Expression Substitutions
Here, first we will create two variables “x” and “y”, with the values “20” and “15”, respectively:
var x = 20;
var y = 15;
Then, create a variable “sum” for adding the “x” and “y”:
var sum = x + y;
If you want to add two numbers and display the sum of these numbers on console, normally, it is required to concatenate the strings and variables in regular string format which often creates a mess to use single or double quotes repeatedly with the strings and join them with each other and with the variables using (+):
console.log("Sum of x " + x + " and " + y + " is " + sum);
While, using the template literals, you only have to specify the strings with variables as an expression inside the “${}” in backtick block:
console.log(`Sum of x ${x} and y ${y} is ${sum}`);
Output
![]() We have gathered all the essential information related to the template literals.
We have gathered all the essential information related to the template literals.
Conclusion
“Template Literals”, also known as “Template Strings”, is an improved version of a standard JavaScript string surrounded by the backtick (“) character, as compared to quotes in strings.
It permits the creation of single-line and multi-line strings without the use of the concatenation operator and includes an expression in a string.
This post has discussed template literals with explained examples.
JavaScript Switch String
In the programming field, the switch string technique enhances code optimization, which results in faster execution.
In the other case, it also allows you to summarize a multiple-choice code block that would otherwise be lengthy if used with the if/else loop.
In addition to that, this approach is much easier to debug.
Also, it tests the equality of the specified string against the several values specified in the test cases, which is very helpful.
This blog will discuss the methodologies for applying switch strings.
How to Apply Switch String?
The switch string can be implemented by utilizing the “switch-case” statements with the following approaches:
Specified “string” value
“User-defined” value
“Type Conversion” technique
The mentioned concepts will be demonstrated one by one!
Method 1: JavaScript Switch String on Specified String Value
In this method, specify a string value and apply different checks on it using the switch cases.
Syntax
switch(expression){
case x:
case y:}
In the above syntax, the “expression” refers to the value that will be checked upon various cases, such as “x” and “y”.
Example
Firstly, we will specify the following string value:
let testValue= "This is LinuxHint"
Next, apply the “switch-case” statements that hold the variable in which the string value is stored.
Within the switch statement, there are two cases, such as “Website” and “This is LinuxHint”.
In this particular scenario, the second case will be triggered, which matches the string value against the argument:
switch(testValue){
case 'Website':
console.log("This is a Website")
case 'This is LinuxHint':
console.log("This is LinuxHint Website")}
The resultant output will be:
![]()
Method 2: JavaScript Switch String on User-defined Value
This technique can be applied by asking the user to input a string value, match it with the specified cases, and then print the corresponding message on the console window.
Go through the following example.
Example
In the following example, we will ask the user to input a string value via prompt dialogue box:
let testValue= prompt("Enter the String Value:")
Now, apply the “switch-case” statements as discussed in the previous method.
If the user-defined value matches the specified cases, the corresponding message will be logged against the particular matched case:
switch(testValue){
case 'Google':
alert("This is a website")
case 'LinuxHint':
alert("This is an accessed website")}
Output
![]()
Method 3: JavaScript Switch String Using the Type Conversion Technique
This technique can be implemented to convert the specified integer value into the string using the “String()” method.
Syntax
String(value)
In the given syntax, “value” indicates the integer value that will convert into a string.
Example
First, specify the following integer value:
var testValue = 3;
Then, invoke the “String()” method as the arguments of the “switch” statement to convert the specified integer value into the string.
Now, the integer value will be treated as a string value, and the “case ‘3’” will be invoked.
In the other case, if the particular case is assigned an integer value, such as 3 like the other cases, the default case will trigger, and the corresponding message “Error” will print:
switch(String(testValue)){
case 1:
console.log("It's an integer");
case 2:
console.log("It's an integer");
case '3':
console.log("It's a digit, converted to string");
break;
default:
console.log("Error");}
Output
![]() In the above output, it can be observed that the corresponding message against the case “3” is logged.
In the above output, it can be observed that the corresponding message against the case “3” is logged.
Conclusion
To implement the switch string, apply it to the specified “string value” by placing it in the argument of the “switch” statement and checking for the matched cases.
As a second approach, get the user-defined value and perform the same operation on it.
Lastly, utilize the “Type Conversion” technique to convert the specified integer value into the string and invoke the corresponding case.
This blog demonstrated the methods to apply switch strings.
JavaScript not equal Comparison Operator | Explained
In programming languages, comparison operators are utilized for comparing two values.
Depending on the condition, these operators return a boolean value true/ false.
The “not equal” is also a comparison operator that determines whether the two operand values are equal or not.
It returns true if the two operand values are not equal.
This tutorial will demonstrate the not equal comparison operator.
JavaScript not-equal Comparison Operator
The “not equal” comparison operator is also known as the “inequality” operator.
It is denoted as (!=) which is the combination of two characters, an exclamation sign also called not (!) with an equal sign (=).
It is used to verify if the two compared values are equal or not; if the values are equal, it returns “false” as an output, and else gives “true”.
Syntax
Use the following syntax for the not-equal operator:
a != b
Here, “a” and “b” are two operands that will be checked to determine whether they are equal or not.
Example 1: Compare Two Strings Using not equal Comparison Operator
Here, we will see whether the two strings “hello” and “Hello” are equal or not using the not equal (!=) operator:
console.log('hello' != 'Hello');
The output displays “true” which signifies that both strings are not equal:
![]() Example 2: Compare Character With Number Using not equal Comparison Operator
Now, we will compare and check if the character “1” and the number “1” are equal or not:
console.log('1' != 1);
The output displayed “false” as both values are equal:
Example 2: Compare Character With Number Using not equal Comparison Operator
Now, we will compare and check if the character “1” and the number “1” are equal or not:
console.log('1' != 1);
The output displayed “false” as both values are equal:
![]() Example 3: Compare Number With Boolean Using not equal Comparison Operator
In this example, we will determine whether the “true” boolean value is equivalent to the “1”:
console.log(1 != true);
It returns “false” as output which indicates “1” represents the “true” boolean value:
Example 3: Compare Number With Boolean Using not equal Comparison Operator
In this example, we will determine whether the “true” boolean value is equivalent to the “1”:
console.log(1 != true);
It returns “false” as output which indicates “1” represents the “true” boolean value:
![]() Example 4: Compare Number With null Using not equal Comparison Operator
Here, we will compare if “0” is equal to the “null”:
console.log(0 != null);
The above-given statement output “true”, which means the specified values are not equal:
Example 4: Compare Number With null Using not equal Comparison Operator
Here, we will compare if “0” is equal to the “null”:
console.log(0 != null);
The above-given statement output “true”, which means the specified values are not equal:
![]() We have gathered all the details on the JavaScript not equal comparison operator.
We have gathered all the details on the JavaScript not equal comparison operator.
Conclusion
The comparison operator “not equal” is frequently referred to as the “inequality” operator.
It is represented by the symbol (!=).
When two values are compared, this operator determines if they are equal or not; in the case of equal, it outputs “false”; otherwise, it outputs “true”.
In this tutorial, we have demonstrated the not equal comparison operator.
JavaScript Date() Constructor
The date object is used to manipulate date and time.
Working with the date and time is often performed through the JavaScript Date() object.
It has several methods and a constructor that simply allows us to work with date and time.
On a web page, a timer can be set using the JavaScript date object.
This manual will elaborate on the Date() constructors.
What is JavaScript Date() Constructor?
For creating Date objects, utilize the “new” operator.
There are four different Date() constructors available for creating date objects:
Date()
Date(dateString)
Date(milliseconds)
Date(year, month, day, hours, minutes, seconds, milliseconds)
Let’s check out each of the mentioned methods one by one!
How to Use Date() Constructor?
By calling the “new Date()” constructor, a new date object is created with today’s date and time:
var date = new Date();
Now, print the current date and time on the console by passing the variable “date” to the “console.log()” method:
console.log(date);
The following date value will be displayed on the console:
![]()
How to Use Date(dateString) Constructor?
In order to construct a new date object with a provided date string, use the “new Date(dateString)” constructor.
To do so, first, we will create a new date object by passing date as a string in the Date(dateString) constructor:
var date = new Date("October 8, 2022 15:11:05");
Then, print it on the console:
console.log(date);
The corresponding output will look like this:
![]()
How to Use Date(milliseconds) Constructor?
With the help of the “new Date(milliseconds)” constructor, a new date object is created by utilizing Universal Time (UTC) by adding the milliseconds.
When the new Date(milliseconds) constructor is invoked, a new date object is created with ZERO milliseconds added to the zero time:
var date = new Date(0);
Print the date returned by the “new Date(milliseconds)” constructor using the console.log() method:
console.log(date);
Output
![]() Similarly, when we have passed “500000000000” milliseconds to the constructor, the date will be displayed with respect to it:
var date = new Date(500000000000);
The given output shows the time after 15 years:
Similarly, when we have passed “500000000000” milliseconds to the constructor, the date will be displayed with respect to it:
var date = new Date(500000000000);
The given output shows the time after 15 years:
![]()
How to Use Date(year, month, day, hours, minutes, seconds, milliseconds) Constructor?
This constructor accepts a minimum of two arguments and a maximum of seven to get the time in the specified format.
However, in the case of one parameter, the Date() constructor will accept it as milliseconds.
For instance, we will pass all the parameters to the Date() constructor, including year, month, day, hours, minutes, seconds, and milliseconds as 2022, 5, 11, 15, 14, 15, and 7, respectively:
var date = new Date(2022, 5, 11, 12, 14, 15, 7);
Finally, print the date object value on the console using the “console.log()” method:
console.log(date);
Output
![]() We have gathered all the essential instructions related to the JavaScript Date() constructor.
We have gathered all the essential instructions related to the JavaScript Date() constructor.
Conclusion
To construct a date object, you can utilize one of four variants of the Date() constructor, including Date(), Date(dateString), Date(milliseconds), and Date(year, month, day, hours, minutes, seconds, milliseconds).
Moreover, to create a Date object, use the “new” operator.
This manual has elaborated on the Date() constructor.
How to Left Trim and Right Trim String
Like other programming languages,, strings are an important form of variable, and the developers frequently need to edit or modify strings to fulfill their requirements, such as removing extra white spaces from a string, including “tab”, “space”, “line terminating characters” from either beginning or the end or on both sides of the string.
This article will explain the method of trimming the string from the right or the left side.
How to Left Trim and Right Trim String?
For left or right string trimming, JavaScript offers some built-in methods, including:
trim() method
trimLeft() method
trimRight() method
Let’s check out each of them one by one!
How to Use trim() Method?
The “trim()” method does not modify the original string, it only removes the whitespace characters from both sides, the starting, and end of a string.
Syntax
Follow the given syntax for using the trim() method to trim the strings:
string.trim();
The trim() method calls along the string that will be trimmed and returns a new string by eliminating extra white spaces from the specified string.
Example
First, we will create a “string” that contains extra white spaces at the start and the end of the string:
var string = " Welcome to the LinuxHint ";
Then, call the trim() method and store the resultant string in the variable “answer”:
var answer = string.trim();
Lastly, print the resultant string on the console using the “console.log()” method:
console.log(answer);
Now, we use the “length” property that returns the length of the string before and after the trimming:
console.log("Length of the Actual String is " + string.length);
console.log("Length of the Resultant String is " + answer.length);
As you can see in the output, the length of the actual string is “33” which contains spaces, and the resultant string’s length is “24”.
This states that the white spaces from the start and the end of the string are successfully trimmed:
![]() If you want to remove the whitespaces only from the start of the string, follow the below section.
If you want to remove the whitespaces only from the start of the string, follow the below section.
How to Use trimLeft() Method?
The “trimLeft()” eliminates the leading white spaces in a string.
It works similarly to the “trimStart()” method.
Both methods act as the same because the trimStart() is the alias of the trimLeft() method.
Syntax
Use the following syntax for trimming the string from the left or the start of the string:
string.trimLeft();
Example
We will first create a string with three whitespaces at the beginning of the string and the same at the end of the string:
var string = " Welcome to the LinuxHint ";
Now, call the trimLeft() method to trim the spaces from the left side or start of the string:
var answer = string.trimLeft();
Finally, print the string on the console:
console.log(answer);
Check the length of the string before and after the trimming using the “length” property of the string:
console.log("Length of the Actual String is " + string.length);
console.log("Length of the Resultant String is " + answer.length);
The output shows that the “trimLeft()” method successfully trimmed the white spaces present at the beginning of the string:
![]() You can also utilize the “trimStart()” method instead of the trimLeft() method for the same purpose:
var answer = string.trimStart();
It outputs the same result as the trimLeft() method:
You can also utilize the “trimStart()” method instead of the trimLeft() method for the same purpose:
var answer = string.trimStart();
It outputs the same result as the trimLeft() method:
![]() Want to know the method to specifically remove extra spaces from the right side of the string? Follow the given-provided method.
Want to know the method to specifically remove extra spaces from the right side of the string? Follow the given-provided method.
How to Use trimRight() Method?
To trim the string from the right side of the string, use the JavaScript predefined “trimRight()” which is also known as the “trimEnd()” method.
It is primarily utilized for removing spaces from the end of the string or from the string’s right side.
Syntax
The syntax for the trimRight() method is as follows:
string.trimRight();
Example
We will now utilize the same string and eliminate spaces from the right side of it by calling the “trimRight()” method:
var answer = string.trimRight();
It can be seen from the output that extra whitespaces from the end of the string are removed:
![]() Now, use the “trimEnd()” method instead of the trimRight() method for the same scenario:
var answer = string.trimEnd();
Output
Now, use the “trimEnd()” method instead of the trimRight() method for the same scenario:
var answer = string.trimEnd();
Output
![]() We have covered all the essential instructions related to the left and right trimming process of the string.
We have covered all the essential instructions related to the left and right trimming process of the string.
Conclusion
To the left and right trim string, use the JavaScript predefined methods including the “trim()” method, “trimLeft()” or “trimStart()” method, and the “trimRight()” or “trimEnd()” method.
The trim() method trims the strings from the both left and the right of the string, the trimLeft() or the trimStart() method trims the string from the start, while the trimRight() or the trimEnd() method trims the string from the end.
In this article, we have explained the procedure to trim the string from the right or the left side with detailed examples.
How to Auto Refresh Web Page Every 5 Seconds Using JavaScript
In JavaScript, there are situations when we need to ensure that the entered content on a particular site is accurate and up to date.
For instance, it is required to display the most recent content on a web page while filling out a lengthy form and observing the new changes or when you want to test a website.
In such cases, auto-refreshing a web page every 5 seconds using JavaScript is very helpful in coping with these types of situations.
This article will discuss the methods to auto refresh a web page every 5 seconds using JavaScript.
How to Auto Refresh Web Page Every 5 Seconds Using JavaScript?
To auto refresh a web page every 5 seconds using JavaScript, the following approaches can be utilized:
“setInterval()” and “document.querySelector()” methods
“refresh()” method
“setTimeout()” method
Go through the discussed methods one by one!
Method 1: Auto Refresh Web Page Every 5 Seconds Using setInterval() and document.querySelector() Methods
The “setInterval()” method accesses a function at specified time interval and the “document.querySelector()” method gets the first element matching a CSS selector.
These methods can be used in combination to access the specific heading tag and set the time interval to a required functionality with the help of a timer.
Syntax
setInterval(function, milliseconds, par1, par2)
In the above syntax, “function” refers to the function that needs to be accessed, “milliseconds” is the specific time interval to execute, and “par1” and “par2” are the additional parameters.
document.querySelector(CSS selectors)
Here, “CSS selectors” represent one or more than one CSS selectors.
Check out the following example.
Example
First, specify a title and a heading in the <title> and <h2> tags, respectively:
<title>Page Refresh every 5 Seconds</title><h2 style="text-align: left">Auto Refresh the Page</h2>
Now, set a timer value as “1”:
let timer= 1;
After that, apply the “setInterval()” method with a “1000ms” value.
This will increment the timer every second.
Also, access the specified heading to display it on the “Document Object Model(DOM)” upon the end of the set timer value.
Finally, iterate the value of timer with the increment of “1” using “++” post-increment operator and apply a condition in such a way that if the value exceeds 5, the “location.reload()” method will result in the reloading of the window:
setInterval(() => {
document.querySelector('h2').innerText= timer;
timer++;
if(timer >5)
location.reload(); }, 1000);
It can be seen that our web page gets auto refresh every five seconds:
![]()
Method 2: Auto Refresh Web Page Every 5 Seconds Using onload Event
The “onload” event is triggered when an object has been loaded.
This technique can be implemented to refresh the page with the help of a user-defined function when the web page is loaded.
Syntax
object.onload = refreshPage(){myScript};
In the given syntax, “function” refers to the function that needs to be invoked when the object is loaded.
Look at the following example.
Example
Firstly, include a title and heading as discussed in the previous method:
<title>Page Refresh every 5 Seconds</title><h2>Auto Refresh the Page</h2>
Now, apply the “onload” event and invoke the function “refreshPage()” and pass “5000” as argument which indicates five seconds time interval:
<body onload= "JavaScript:refreshPage(5000);"></body>
Lastly, define a function named “refreshpage()” with “t” as an argument which is referring to the set time for auto refreshing the web page.
The “location.reload()” method will reload the page after the specified time:
function refreshPage(t){
setTimeout("location.reload(true);", t);}
Output
![]()
Method 3: Auto Refresh Web Page Every 5 Seconds Using setTimeout() method
The “setTimeout()” method invokes a function after a specified set time.
This method can be applied to reload a web page after a specific set timeout.
Syntax
setTimeout(function, milliseconds, par1, par2)
In the given syntax, “function” refers to the function to be accessed, “milliseconds” is the specific time interval to execute, and “par1”, “par2” are the additional parameters.
Example
In the script tag of the HTML page, apply the “setTimeout()” method in such a way when 5 seconds get passed, the location.reload() method reloads the web page:
<script>
setTimeout("location.reload(true);", 5000);</script>
Output
![]() We have discussed all the convenient methods to auto refresh a web page every 5 seconds using JavaScript.
We have discussed all the convenient methods to auto refresh a web page every 5 seconds using JavaScript.
Conclusion
To auto refresh a web page every 5 seconds using JavaScript, utilize the “setInterval()” and “document.querySelector()” methods for adjusting the timer value, the “refresh()” method for refreshing a web page, or the “setTimeout()” method for setting a specific timeout refresh limit of a web page.
This article demonstrated the methods to auto refresh a web page every 5 seconds using JavaScript.
Math.min JavaScript | Explained
In JavaScript, while dealing with mathematical computations, the “Math.min()” method becomes very useful in solving complex problems or extracting some particular value, especially handling floating-point numbers in which it is difficult to compare the two numbers based on the decimal values.
In such cases, the Math.min() method is of great aid in saving time.
This blog will discuss the use of the JavaScript Math.min() method with the help of examples.
What is JavaScript Math.min() Method?
The “Math.min()” method is used to return the lowest-valued number passed in the method and returns “NaN” if any of its arguments is not a number.
How to Use JavaScript Math.min() Method?
In order to use the JavaScript Math.min() method, follow the below-given syntax:
Math.min(value1, value2, ...)
In the given syntax, “value1” and “value2” refer to the values to be compared to fetch the minimum value.
The following examples will demonstrate the discussed method clearly.
Example 1: Get the Minimum Value From Arguments
In the following example, we will apply the “Math.min()” method and place “2” and “4” as the values that need to be compared:
var minValue= Math.min(2, 4);
Finally, the minimum value in the provided values will be displayed on the console using the “console.log()” method:
console.log("The minimum value is:", minValue)
Output
![]()
Example 2: Get the Minimum Value From an Array Using spread(…) Operator
Spread operator “…” can also be utilized with the Math.min() method to spread out the array elements and then extract the minimum value.
Syntax
let array = [...value]
In the given syntax, “value” refers to an array value.
Now, we will first declare an array with the following numeric values:
var minValue= [2,3,4,5]
Apply the “spread(…)” operator denoted by three dots which is used to copy all or some part of the existing array/object into another array/object.
This operator will access the values of the “minValue” array and extract the minimum value using the “Math.min()” method and log it on the console:
console.log("The minimum value in the given array is:", Math.min(...minValue))
Output
![]() We have discussed different scenarios to implement the Math.min() method.
We have discussed different scenarios to implement the Math.min() method.
Conclusion
The JavaScript “Math.min()” method can be used to extract the minimum number out of the specified value.
It can also be utilized with the “spread(…)” operator to access the array values, spread them, and return the minimum number.
This write-up demonstrated the different methods to utilize the JavaScript Math.min() method.
JavaScript KeyCodes
The Unicode of all keys of the keyboard, including numeric, alphabets, special characters, and so on called “KeyCodes”.
As we know, JavaScript is a client-side scripting language, it is frequently required to know the keycode associated with a character while processing text or characters entered into a form element on a web page.
This tutorial will illustrate the use of keycodes with detailed examples.
So, let’s start!
How to Use JavaScript KeyCodes?
When a keyboard key is pressed or released, three different client-side events, keydown, keypress, keyup may take place in every browser.
When a keyboard key is pressed, the keydown event is triggered, and immediately after that, the keypress event is executed.
When the key is released, the keyup event is triggered.
These events can be utilized to get the KeyCode of a key depending upon the requirements.
Check out the provided examples to clear your concept.
Example 1: Check When a Key is Pressed Up or Pressed Down
In this example, a message will be displayed on the console when the key is pressed down and then pressed up by pressing and releasing the key on your keyboard.
To do so, first, we will create a heading and two input fields with the ids, “txt1” and “txt2”:
<h3>JavaScript KeyCodes</h3><input type="text" placeholder="Enter key" id="txt1"><input type="text" placeholder="Enter key" id="txt2">
In JavaScript file, we will fetch the first input field using the “getElementById()” method by passing id “txt1” as an argument and then call the “addEventListener()” method where the “event.preventDefault()” method will be called that will check which type of event is triggered:
document.getElementById("txt1").addEventListener("keydown", function(event) {
event.preventDefault();
console.log(`${event.type}`);});
Similarly, we will do same for the second input field with id “txt2”:
document.getElementById("txt2").addEventListener("keyup", function(event) {
event.preventDefault();
console.log(`${event.type}`);});
As a result, the output will show “keydown” message on the console when the key is pressed down, while the cursor control is in the first input field, and when a key will be pressed in the second input field, no new message appears on the console until the key is released and the “keyup” event is triggered:
![]() Want to fetch the KeyCode when a key is pressed? Look at the following example!
Want to fetch the KeyCode when a key is pressed? Look at the following example!
Example 2: Get the Unicode on KeyPress Using “event.which” Attribute
In this example, we will try to get the Unicode of keys by pressing them randomly.
To do so, we will create two labels one is for printing statements, and the other one will print the Unicodes on a keyPress:
<h3>JavaScript KeyCodes</h3><label>Press any key to get the code of that key:</label><label id="unicode"></label>
In the JavaScript file, access the “onkeydown” property of the “document” object which invokes the function “checkCodeofpressedKey” while pressing the key down.
We will call the “event.which” attribute used for the keyboard key input as it normalizes the “event.keyCode” and “event.charCode” values.
The function will return the code of the key that will be pressed:
document.onkeydown = checkCodeofpressedKey;
functioncheckCodeofpressedKey(e) {
var keycode;if (window.event){
keycode = window.event.keyCode;
}
elseif (e){
keycode = e.which;
}
document.getElementById("unicode").innerHTML = keycode;}
Output
![]() We have covered all the essential information related to keycodes.
We have covered all the essential information related to keycodes.
Conclusion
The Unicode of all keys of the keyboard, including numeric, alphabets, and special characters, is called “KeyCodes”.
JavaScript is frequently required to know the keycode associated with a character while processing text or characters entered into a form element on a web page.
In this tutorial, we illustrated the use of keyCodes with detailed examples.
How to Make First Letter Lowercase
While programming, we come across situations where it is required to include multiple string values to be edited or in the case of differentiating the actual name from the surname.
In such cases, JavaScript provides a very convenient functionality to make the first letter lowercase which handles such types of preprocessing cases.
This manual will guide you to lowercase the first letter.
How to Make First Letter Lowercase?
To make the first letter lowercase, you can use:
“toLowerCase()” and “slice()” methods
“Logical AND” operator and “toLowerCase()” method
“Regular Expression” and “replace()” method
We will now go through each of the approaches one by one!
Method 1: Make First Letter Lowercase Using toLowerCase() and slice() Methods
The “toLowerCase()” method converts the given string to lowercase letters, and the “slice()” method returns selected elements as a new array.
These methods can be utilized to access the index of a particular character, convert it into lowercase and merge it into the string.
Syntax
string.slice(start, end)
In the given syntax, “start” and “end” refers to the start and end indexes of the given string.
The following example explains the stated concept.
Example
In the following example, store a particular string value in a variable named “string” and display it:
const string= "FIRST LETTER LOWERCASE"
console.log("The default string value is:", string)
Now, apply the “charAt()” method in order to refer to the specific index “0” representing the first element, the toLowerCase() method to transform the character at the specified index to lowercase and the slice() method to place the character at the start of the string by referring to its index “1”:
const string1= string.charAt(0).toLowerCase() + string.slice(1)
Finally, display the updated string value with the first letter as lowercase on the console:
console.log("The updated string value is:", string1)
The output of the above implementation will be as follows:
![]()
Method 2: Make First Letter Lowercase Using Logical AND Operator and toLowerCase() method
The “Logical AND” Operator (&&) returns true if both the values are true and false otherwise and the This operator can be used in combination with toLowerCase() to perform the AND operation between both the original string value and the value holding the first-string character as lower case and return the result.
Example
First, declare a function named “firstLower()” containing “lower” as an argument referring to the string value to be checked upon on the function call.
In its definition, apply the “&&” operator, which will access the original string value along with the updated string value.
Here, the toLowerCase() and slice() methods will convert the first-string character into the lower case and merge it into the given string value respectively as discussed in the previous method:
function firstLower(lower){return lower && lower[0].toLowerCase() + lower.slice(1) || lower;}
Finally, invoke the defined “firstLower()” function and pass the required value in it:
console.log(firstLower('JAVASCRIPT'));
Output
![]()
Method 3: Make First Letter Lowercase Using Regular Expression and replace() method
A “regular expression” is a sequence of characters that form a search pattern and the “replace()” method searches for a specific value in the given string and replaces it.
These methods can be implemented to do a global search for the first-string character and transform it into the lowercase.
Syntax
/pattern/modifiers;
Here, “pattern” is a regular expression and “modifiers” refer to a modifier.
string.replace(searchValue, newValue)
Here, “searchValue” will be replaced with the “newValue” in the given string.
The below example explains the stated concept.
Example
Firstly, define a function named “firstLower()” with “string” as an argument referring to the string value that needs to be checked.
Then, specify a regular expression for searching the first-string character globally using the “/g” flag and converting it into lowercase using the toLowerCase() method.
function firstLower(string){return string.replace(/(?:^|\s)\S/g, function(a){return a.toLowerCase(); });};
Finally, invoke the function by placing the required as an argument to it:
console.log(firstLower("CASE"))
Output
![]() We have discussed different creative methods to make the first letter lowercase.
We have discussed different creative methods to make the first letter lowercase.
Conclusion
To make the first letter lowercase, utilize the “toLowerCase()” and “slice()” methods for transforming the first string character into lower case and merging in the original string, the “Logical AND” Operator and the “toLowerCase()” method to “AND” the original string value and the value holding the first character as the lower case with the help of a function or the “Regular Expression” and “replace()” method to do a global search for the first character in a string and transforming it into lower case.
This write-up demonstrated the methods to lowercase the first letter.
What is select Method
Sometimes, the developers need to add a feature to select the whole text with a single mouse click or button click.
To perform this task, JavaScript provides a simple method called the “select()” method.
It simply selects the text where it will be called.
This write-up will define the select() method to select a text.
What is select() Method?
The “select()” method selects all the text in a text area using the <textarea> tag in HTML or in an input field using <input> tag.
It is called the “HTMLInputElement.select()” method.
You can use this method with the “this” keyword in the HTML element to get the currently selected element.
Then, fetch it using the “getElementById()” method in the JavaScript file or <script> tag.
How to Use select() Method?
For using the select() method, follow the provided syntax:
select();
The select() method takes no parameter and returns nothing but only selects the text in the text field or in the text area.
Check out the given examples to understand the select() method.
Example 1: Select Text Using “this” With select() Method
In this example, we will select a text in a text field without using any JavaScript file or a <script> tag.
Firstly, we will create a heading “Select the text on click” using an HTML <h4> tag:
<h4>Select the text on click</select></h4>
Then, add an input text field where we will set a value “LinuxHint” and attach an “onclick()” event that calls the “select()” method with “this” keyword:
<input onClick="this.select();" type="text" value="LinuxHint">
When the mouse clicks on the text field, it will select the whole text that exists within it:
![]()
Example 2: Select Text using getElementById() Method
Here, we will enter a text in a text field and then select the whole text by clicking on the button.
For this purpose, we will create an input field with “selectedText” id and a placeholder:
<input type="text" id="selectedText" placeholder="Enter text">
Then, create a button and attach an “onclick()” event with it, which calls the JavaScript user-defined function called “selectedTextFunc()”:
<button type="button" onclick="selectedTextFunc()">Enter</button>
In the script tag, we will create a JavaScript function that fetches the id of the text field and then calls the “select()” method.
When the button is clicked, the below function will trigger:
<script>
function selectedTextFunc(){
document.getElementById("selectedText").select();}</script>
Output
![]() We have covered all the essential information related to the JavaScript select() method.
We have covered all the essential information related to the JavaScript select() method.
Conclusion
The “select()” method is the predefined method that is used for selecting the text in the text field or the text area.
You can use it by getting the id of the field or text area by utilizing the “getElementById()” method in a user-defined method that will further call in the HTML, or you can use it directly in HTML with the “this” keyword.
In this write-up, we have discussed the select() method with detailed examples.
What is window.open()
In HTML, the anchor tag is used to redirect users from one page to another page.
This type of tag is only limited to opening a link on the current page or in a new tab; both ways are not suitable if you want to ensure the user remains engaged with your content.
In solution, you have to interact with JavaScript in which the new links or pages can be opened in popups or in new browser windows.
This write-up will provide guidance about the window.open() method.
What is window.open()?
In JavaScript, “window.open()” method is utilized to open up a new browser window with or without any content.
This method provides control over the browser window to adjust the window height, width, and position.
How to Use window.open()?
To use the window.open() method, utilize the following syntax:
window.open(url, target, windowFeatures)
Here, “url” represents the URL address of the page that needs to be opened.
If not specified, by default a blank tab or window will be opened.
Target: This assigns the window’s name in which the context is loaded.
Moreover, you can also declare the following targets/options to have more control over your window:
_blank: This is the default option in which the URL is loaded in a new tab or window.
_parent: URL will be opened in the current working window.
_ self: This will replace the current page with the specified URL.
_top: This will open the URL in any loaded window
windowFeatures: This will assist you in customizing a window according to your need.
It is an optional argument.
The following values are supported:
height=pixels: This demonstrates the height of the window.
The unit can only be assigned in pixels (px).
width= pixels: This option will set the width of the window.
left= pixels: Adjust the window from the left side.
top= pixels: Specify the top position of the window
resizable= yes|no: This will allow the window to be resizable respectively.
menubar= yes|no: Control the behavior of whether the menu bar will be displayed or not.
scrollbars= yes|no: Display or hide the scrollbars on some specific browsers, such as Firefox, IE, and Opera.
status= yes|no: Decide whether the status bar will be shown or not.
titlebar= yes|no: Set this option to yes if you want to show the title bar; otherwise, no.
Let’s apply some values in the below example to understand how window.open() method works.
Example 1
In our example, we will utilize “<p>” and a “<button>” tag.
<p> tag contains some text describing the button’s purpose.
Next, in the <button> tag, we will set the “onclick” event and assign it a function named “xyzFunction()”.
Place both tags within the <body> tag of the HTML file:
<p>Clicking below button will open a new Window with defined dimensions</p><button onclick="xyzFunction()">Click Me</button>
Inside the “xyzFunction()” of our JavaScript file, we will specify the “newWindow” as a variable.
By keeping the syntax in mind, we will use the “window.open()” method along with the URL as “https://linuxhint.com” and set the height as “250” and width “400” (pixels).
Use the empty “” to leave the target value empty:
function xyzFunction() {
var newWindow = window.open("https://linuxhint.com", "", "height=250, width=400");}
As a result, when the added button is clicked, a new window will be opened according to the specified url:
![]() Let’s take another example to see how the target value plays its part in the window.open() method.
Let’s take another example to see how the target value plays its part in the window.open() method.
Example 2
In this example, we will first discuss the purpose of the button with the help of some text:
<p>Clicking below button will open the link in parent frame <br> with defined dimensions</p>
Let’s utilize the target value as “_parent” along with the same URL and windowFeatures used in the previous example.
However, specifying the _parent argument will open the link in the current frame:
function xyzFunction() {
var newWindow = window.open("https://linuxhint.com", "_parent", "height=250, width=400");}
Output
![]() We have covered in detail what is window.open().
We have covered in detail what is window.open().
Conclusion
“window.open()” is a JavaScript predefined method that is utilized to open the new browser window with or without any content.
It provides various options to control the browser’s window, such as height, width, and position.
In this manual, we have explained in detail what window.open() is and how to use it.
What is ||
JavaScript mostly uses operators for performing tasks, such as arithmetic operators for arithmetic operations, logical operators used for performing logical operations, equality operators, and so on.
More specifically, logical operators are the words or symbols used to join two or more expressions.
The AND, OR, and NOT are the commonly used logical operators.
This article will discuss what || is and how to use it.
What is ||?
The “||” is the symbol of the “OR” operator.
It is a logical operator that performs logical operations.
The evaluation of the || operator starts from the left and goes to the right, and returns “true” if the first operand is true.
As a result, it stops the evaluation process.
Syntax
The OR statement’s syntax is as follows:
a || b
Here, “a” and “b” are operands, and “||” represents the OR operator.
You can also utilize the OR operator for the comparison of more than two operands to one another:
a || b || x || y
The OR operator will return true as an output if any of the conditions are evaluated as true.
Truth Table of || Operator
The truth table for the || operator is shown below:
| a |
b |
a||b |
| true |
true |
true |
| true |
false |
true |
| false |
true |
true |
| false |
false |
false |
As the truth table depicts, the OR operator will return “true” if one of the variable values is “true”.
In the alternative situation, it returns “false” if both values are false.
Let’s take a look at some examples to understand how the JavaScript OR “||” statement works in the console and in HTML with a JavaScript file.
Example 1: Use OR “||” Operator on Console
In this example, we will create two variables, “a” and “b”, and assign them the following values:
var a = true;
var b = false;
Here, we will use the OR “||” operator to see the result of two expressions “a” and “b”:
console.log(a || b);
Output
![]() Similarly, here, we will specify the OR “||” operator to see the result of “b || b”:
console.log(b || b);
The output signifies that if both values “false”, the OR operator will return “false”:
Similarly, here, we will specify the OR “||” operator to see the result of “b || b”:
console.log(b || b);
The output signifies that if both values “false”, the OR operator will return “false”:
![]() Let’s check out the method to use OR statements files with HTML.
Let’s check out the method to use OR statements files with HTML.
Example 2: Use OR “||” Operator Within a JavaScript File
In this example, we will first create two input fields that takes values of “a” and “b”, a button and a label that will show the resultant boolean value:
<input type="text" placeholder="Enter Value a" id="valueA"><input type="text" placeholder="Enter Value b" id="valueB"><button onclick="Func()">Enter</button><label id="p1"></label>
In the JavaScript file, first, we will define a function named “func()” that first gets the values of the input text with the help of assigned id’s with the help of the “document.getElementById()” method.
Then, we will find out whether the value of “a” is greater than the value of “b” OR if both values are equal.
If any of the condition will be evaluated true, it returns “true”:
functionfunc(){
inputValA = document.getElementById('valueA');
inputValB = document.getElementById('valueB');
document.getElementById("p1").innerHTML = (inputValA.value > inputValB.value) || (inputValA.value == inputValB.value);}
Output
![]()
Example 3: Use OR “||” Operator in if-else Conditional Statements
Here, we will use the OR “||” operator in conditional statements by checking the same condition as in previous examples.
Here, an alert box will be generated to display the resultant boolean value:
functionfunc(){
inputValA = document.getElementById('valueA');
inputValB = document.getElementById('valueB');if (inputValA.value > inputValB.value || inputValA.value == inputValB.value ){
alert ("true");
}else
alert ("false");}
Output
![]() We have covered all the essential information related to the OR “||” logical operator.
We have covered all the essential information related to the OR “||” logical operator.
Conclusion
The “||” is the symbol of the “OR” logical operator.
It is used for performing logical operations.
This operator is most frequently used if-else statements.
It returns true as output if any of the statements are found to be true; else, it gives false.
In this article, we have defined the || symbol with a detailed explanation and examples.
What is charAt()?
While creating an account on most websites, you may have noticed that the first character of your name is shown in your profile or somewhere else.
This is not magic.
Actually, the web applications have used the JavaScript code that only picks up the first character of your name and places it on the right spot.
In JavaScript, the “charAt()” method assists in performing such actions as extracting the first character.
Moreover, this method is not limited to only fetching the starting character; it can be used to extract any character based on its position or index.
In this guide, we will demonstrate what is charAt().
What is charAt()?
In JavaScript, the “charAt()” method can be utilized to return a character from a certain index.
As in a string, characters are indexed from left to right, and the first character is always on the 0th index, and the last character is on the total string length – 1 index.
The below image illustrates how the characters are indexed in a string:
![]()
How to Use charAt()?
In order to use charAt(), follow the below-given syntax:
string.charAt(index)
Here, the charAt() method will be invoked for the specified string, where the index represents the position of a character present in a string.
The value of the index is 0 by default.
So, let’s understand how to use the charAt() method with the help of an example.
Example 1: Fetch Single Character Using charAt() Method
In our example, we will initialize a string as “str” and assign some text to it:
var str = "LinuxHint";
Then, declare a variable “print” and use the charAt() method with the string as “str.charAt(0)”; where 0 is the index of the string str:
var print = str.charAt(0);
Now, print the output using the console.log() method:
console.log(print);
It can be seen that we have successfully fetched the first character of the given string using the charAt()” method
![]() Want to return two characters from the same string using charAt() method? Let’s move ahead to the next example.
Want to return two characters from the same string using charAt() method? Let’s move ahead to the next example.
Example 2: Fetch Multiple Characters Using charAt() Method
To return the two characters from the same string, we will use the charAt() method twice and concatenate the resultant values with the help of the “+” operator.
As in the second charAt() method, we will set the index as “5” to get the “sixth” character from our string along with the first character:
var print = str.charAt(0) + str.charAt(5);
Output
![]() We have described in detail what the charAt() method is and how it can be used.
We have described in detail what the charAt() method is and how it can be used.
Conclusion
In JavaScript, the “charAt()” method is used to return a character from a certain index.
If no index is mentioned within the charAt() method, it will consider it as 0 and return the first character.
To return the two characters from the same string, you can utilize the two charAt() and concatenate the values with the help of the + operator.
In this manual, we have learned what is charAt() with examples.
What is assert
Assertion checking is the main idea behind assert functions, which often throws an error if the given argument in the function is not true.
Assertions are typically removed from production code and only utilized in testing or debugging builds.
The JavaScript itself lacks a standard assert.
Therefore, it is possible that you may be utilizing a library that offers one, such as Node.js or the Console API.
This post will explain the assertion.
What is assert?
An assert function typically throws an error if the provided expression is not true., for assertion checking, you can use Console API as it provides a “console.assert()” method.
If the assertion is false, the console.assert() method prints the specified message; otherwise, “undefined” is displayed on the console if the condition is true.
How to Use assert?
The provided syntax can be used for invoking the console.assert() method:
console.assert(assertion, msg);
It takes two parameters, “assertion” which is the expression that is evaluated whether it is true or false, and “msg” is the error message that will print if the condition is false.
Example 1
We will create two variables, “a” and “b”, and assign values “20” and “23”, respectively:
var a = 20;
var b = 23;
Then, call the console.assert() method, which will check whether the difference between variables “a” and “b” is “3”:
console.assert(a - b == 3, "It returns 'false'");
The output displays an error message which indicates that the difference between variables “a” and “b” is not “3”, which means the condition is false:
![]() In the other case, we will check the assertion that the sum of the variables “a” and “b” is “43”.
As a result, the console.assert() method will do nothing; just print out “undefined” on the console:
console.assert(a + b == 43, "It returns 'false'");
Output
In the other case, we will check the assertion that the sum of the variables “a” and “b” is “43”.
As a result, the console.assert() method will do nothing; just print out “undefined” on the console:
console.assert(a + b == 43, "It returns 'false'");
Output
![]()
Example 2
Instead of printing a message, you can also print anything like an array, list of objects, and so on, Now, we will use the same variables created in the above example, and define an array of programming languages, that will print if the assertion condition is false:
var arr = ["JavaScript", "Python", "Java"];
Here, we will call the “console.assert()” method by passing an assertion and an array instead of error message as an argument:
console.assert(a - b == 3, arr);
The output displayed the lament of the created array because the assertion condition is false:
![]() We have covered all the details about the assertion.
We have covered all the details about the assertion.
Conclusion
The assert function throws an error if the specified passed argument is not true.
There is no standard assert.
However, you can use the “console.assert()” method of the Console API.
It is utilized for testing and debugging operations.
In this post, we explained the assertion and console.assert() method.
What Does e Mean
“e”, also known as an event, is a part of an extensive concept of JavaScript known as event handling.
More specifically, an event object is passed to each event handling function.
The function’s e parameter is an optional input event handler parameter corresponding to a JavaScript Event object that provides details about the recently occurred action or event.
This article will explain what “e” is and how to use it.
What Does e Mean?
“e” is a short variable reference to an event object provided to the event handlers.
The event object generally offers certain useful methods and properties that the event handlers can utilize.
For instance, we will use the “which” property of the event handler to determine which event is triggered.
Syntax
To use “e” functions, use the following syntax:
function myFunc(e) {
........}
Here, “e” is passed as an argument in the defined function.
Example: Determine Which Key has been Pressed
Firstly, we will create a heading in the HTML file that informs the user to press the key from your keyboard.
Then, add two labels; one displays the description, and the other shows the code of the pressed key:
<h3>Press any key from your keyboard:</h3><label>The code of the key is:</label><label id="code"></label>
In a JavaScript file, access the user-defined function “checkpressedKeyCode” on the “onkeydown” property of the “document” object:
document.onkeydown = checkpressedKeyCode;
Now, define the function named “checkpressedKeyCode()” and pass the event object’s variable “e” as an argument.
Then, call the “event.which” attribute to display the key code of the pressed key:
function checkpressedKeyCode(e) {
var code;if (window.e){
code = window.e.keyCode;}else if (e){
code = e.which;}
document.getElementById("code").innerHTML = code;}
It can be seen that the Unicode of the pressed keys are displayed successfully:
![]() We have covered all the information related to e.
We have covered all the information related to e.
Conclusion
“e” is a short variable reference to an event object that will be provided to event handlers.
An event object is passed to each event-handling function.
The function’s “e” parameter is an optional input event.
In general, the event object provides certain useful methods and attributes that the event handlers can utilize.
This article explained the “e” with an example.
isNumber JavaScript
There can be a scenario to find the entries that have been inserted into the wrong fields.
For instance, in the case of applying a check upon the “date” field while filling out a particular form.
Moreover, it is also beneficial in the case of configuring the encoded or decoded items.
In such scenarios, the “isNumber()” method is very helpful in distinguishing between the numbers and strings.
This write-up will explain the usage of the isNumber() method with the help of different examples.
What is “isNumber()”?
The “_.isNumber()” is a JavaScript predefined method used to check whether the specified argument is a number or not based on the boolean values “true” or “false”.
This function returns the boolean value “true” in the case of an integer or a floating-point value; otherwise returns a “false”.
Syntax
_.isNumber(object)
In the given syntax, the “object” holds the element that needs to be checked for a number.
Example 1: Using _.isNumber() Method to Check Numeric Type
In this example, the _.isNumber() function can be applied to return a corresponding boolean value against each of the provided values in its argument.
To do so, firstly, apply the function upon the string value “Number”:
console.log(_.isNumber('Number'));
Next, print the corresponding output against the following integer value:
console.log(_.isNumber(10));
Lastly, check the specified function on the float value and return the corresponding boolean value:
console.log(_.isNumber(10.2));
![]() In the above output, it can be observed that the boolean value “false” is returned against the provided string value and the boolean value “true” is returned against both the integer and float values.
Example 2: Applying _.isNumber() to Check the Array Elements
In the following example, we will apply the isNumber() method on the declared array to check if the accessed array element is a number or a string.
First, we will declare an array that contains the integer and string values respectively:
array= [1, 2, "number"]
Next, access the array elements with the specified indexes.
Both of the accessed elements will output different boolean values based on their data types:
console.log(_.isNumber(array[1]))
console.log(_.isNumber(array[2]))
The output displayed “true” against the first index value that is “2” and “false” for the 2nd index that is a string:
In the above output, it can be observed that the boolean value “false” is returned against the provided string value and the boolean value “true” is returned against both the integer and float values.
Example 2: Applying _.isNumber() to Check the Array Elements
In the following example, we will apply the isNumber() method on the declared array to check if the accessed array element is a number or a string.
First, we will declare an array that contains the integer and string values respectively:
array= [1, 2, "number"]
Next, access the array elements with the specified indexes.
Both of the accessed elements will output different boolean values based on their data types:
console.log(_.isNumber(array[1]))
console.log(_.isNumber(array[2]))
The output displayed “true” against the first index value that is “2” and “false” for the 2nd index that is a string:
![]() We have implemented various examples for implementing the “isNumber()” method.
We have implemented various examples for implementing the “isNumber()” method.
Conclusion
“isNumber()” is a built-in JavaScript method used to verify the strings, whether it is a number or not.
This method takes an argument and checks whether it is a number or not and returns the boolean value “true” or false” accordingly.
It is very helpful to distinguish between numbers and strings.
This blog illustrated the use of the isNumber() method.
How to Swap Array Elements
In the process of maintaining the bulk of data, swapping is a very important feature for appropriately managing incorrect or outdated data.
For instance, when you need to update some particular record for an update.
In such a scenario, swapping array elements is a very useful feature for updating all the records at once, which also saves time.
This article will demonstrate the methods to swap the elements in an array using JavaScript.
How to Swap Array Elements?
To swap the elements in an array using JavaScript, the following techniques can be applied:
“Indexing” Technique
“Destructor” Assignment
“splice()” Method
The mentioned approaches will be discussed one by one!
Method 1: Swap Array Elements Using Indexing Technique
The “Indexing” technique can be applied to equalize the array elements based on their indexes and store them in a variable in such a way that they are swapped.
Look at the below-given example.
Example
In this example, we will declare an array of some integer values and display them on the console:
let arrayElements = [2, 4, 20, 40];
console.log("The original array elements are:", arrayElements);
After that, access the array’s first element by referring to its index “0” and store it in a variable named “store”:
const store = arrayElements[0];
In the next step, equalize the array’s first element with the second element as demonstrated below:
arrayElements[0] = arrayElements[1];
Now, equalize the array’s second element to the variable “store” in which the array’s first element was stored.
This will result in the swapping of both the first and second element present in an array:
arrayElements[1] = store;
Similarly, repeat the above-discussed steps for the third and fourth array element to swap them as well:
const store1 = arrayElements[2];
arrayElements[2] = arrayElements[3];
arrayElements[3] = store1;
Finally, print the swapped array elements on the console:
console.log("The swapped array elements are:", arrayElements);
The resultant output will be:
![]() In the above output, it can be observed that the two former and the two latter array elements are swapped with each other.
In the above output, it can be observed that the two former and the two latter array elements are swapped with each other.
Method 2: Swap Array Elements Using Destructor Assignment
The “Destructor Assignment” swaps the arrays more easily and requires only a single line of code.
In this scenario, you only need to assign the arrays in square brackets and set the right side in a reversed sequence of array elements.
Example
First, we will declare two arrays with the following elements:
var x = [1, 3, 5];
var y = [2, 4, 6];
Next, apply the destructor assignment, which will access the arrays having a contrast in their sequence and display them:
[x,y] = [y,x]
console.log("The swapped array elements are:")
Finally, observe if the array elements of one array are swapped with the other array or not:
console.log("First Array:", x)
console.log("Second Array:", y)
Output
![]() In this particular output, it is evident that the array elements of both the arrays are swapped.
In this particular output, it is evident that the array elements of both the arrays are swapped.
Method 3: Swap Array Elements Using splice() Method
The “splice()” method adds or removes array elements by specifying them in its argument and changes the original array as well.
This method can be implemented to divide the array elements into parts, then merge and append them in a new array.
Check out the following example for the demonstration.
Example
Firstly, we will declare an array with the following integer values and display them on the console:
let arrayElements = [12, -2, 55, 68];
console.log("The original array elements are:", arrayElements);
Then, create an empty array for appending the swapped array elements:
array=[]
After that, apply the “splice()” method to splice the array elements reversely and concatenate them:
var splice= arrayElements.splice(2, 4) + ',' + arrayElements.splice(0, 2)
Now, apply the “push()” method to append the swapped array elements into the empty array named “array”:
array.push(splice)
Finally, print the added spliced values resulting in the swapped array elements:
console.log("The swapped array elements are:", array)
Output
![]() We have discussed different creative methods to swap array elements.
We have discussed different creative methods to swap array elements.
Conclusion
To swap array elements, apply the “indexing” technique to equalize the array elements and store them in a variable, the “destructor assignment” to access the arrays with a contrast in their elements sequence, or the “splice()” method to divide the array elements and push them into a new array in a reversed manner.
This write-up illustrated the methods to swap array elements.
How to Swap Images
While creating an attractive web page or a website, there can be a requirement to swap the images in order to link them or create an effect.
For instance, displaying a cropped or dotted version of an image and the original image simultaneously illustrates the photo editing effect.
In such a scenario, swapping images does wonders in increasing the overall responsiveness of a web page or a site.
This article will check out the methodologies for swapping images.
How to Swap Images?
To swap images, the following methods can be utilized:
“match()” method with an “onclick” event
“includes()” method with “onmouseover” event
Side by side swapping using the “src” attribute
The following approaches will demonstrate the concept one by one!
Method 1: Swap Images Using match() Method With onclick Event
The “match()” method matches a string against a regular expression, and the “onclick” event redirects to the accessed function upon the button click.
These methods can be implemented in combination to match the image source and swap it with a different image by specifying its path.
Syntax
string.match(match)
In the given syntax, “match” refers to the value that needs to be searched and matched.
Let’s look at the following example.
Example
In the below-given example, we will add the following heading using the “<h2>” tag:
<h2>Swap the Images</h2>
Now, create a button with an onclick event redirecting to the function named “swapImages()”:
<input type = "button" onclick = "swapImages()" value = "Swap Image"><br>
After that, specify the source of the default image along with its id and adjusted height respectively:
<img src = "imageupd1.PNG" id = "getImage" height = "255">
Now, define the function named “swapImages()”.
It will, firstly, access the specified image using the “document.getElementById()” method.
Then, apply the “src” attribute along with the “match()” method to apply a check on the default image in its argument.
If the specified source matches the default image, the “src” attribute will change its value to a different image.
This will result in the swapping of both images:
function swapImages(){
var get = document.getElementById('getImage');
if (get.src.match("imageupd1.PNG")){
get.src = "imageupd2.PNG";
}
else{
get.src = "imageupd1.PNG";
}}
The corresponding output will be as follows:
![]()
Method 2: Swap Images Using includes() Method With onmouseover Event
The “includes()” method checks if a string contains a specified string in its argument and the “onmouseover” event occurs when the cursor is moved onto the specified element.
More specifically, these techniques can be implemented to check the image source and swap the specified images on hovering.
Example
Here, we will first include the following heading element:
<h2>Swap the Images</h2>
Next, specify the image source and adjust its dimensions.
Also, include an event named “onmouseover” which will access the function named swapImages() with the specified id:
<img src = "imageupd1.PNG" onmouseover= "swapImages()" id= "getImage" height = "255" width = "355">
After that, define the function named “swapImage()”.
Now, repeat the previously discussed steps to access the default image.
In the next step, apply the “includes()” method to check if the “src” attribute includes the default image in its argument.
If so, the particular attribute will be assigned a new image path to swap on the mouse hover.
In the other case, the same image will be retrieved in “else” condition:
function swapImages(){
var get = document.getElementById('getImage');
if (get.src.includes("imageupd1.PNG")){
get.src = "imageupd2.PNG";}
else{
get.src = "imageupd1.PNG";
}}
Output
![]()
Method 3: Side by Side Image Swapping Using src Attribute
In this particular method, the two specified images will be swapped side by side by accessing the images and equalizing them using the “src” attribute.
Example
First, we will include the desired images with their specified paths and dimensions:
<img src = "imageupd1.PNG" id = "img1" height = "255" width = "355" /><img src = "imageupd2.PNG" id = "img2" height = "255" width = "355" />
Next, create a button with an “onclick” event invoking the function named swapImages() when clicked:
<br /><input type = "button" value = "Swap the Images" onclick = "swapImages()" />
Now, we will declare a function named “swapImages()” which will firstly access images by their ids using the “document.getElementById()” method.
Then, the “src” attribute will link the accessed images in such a way that the src of the first image equals the second, and thus images get swapped when the added button is clicked:
function swapImages(){
let get1 = document.getElementById("img1");
let get2 = document.getElementById("img2");
let fetch = get1.src;
get1.src = get2.src;
get2.src = fetch;}
Output
![]() We have discussed various methods to swap images.
We have discussed various methods to swap images.
Conclusion
To swap images, utilize the “match()” method with an “onclick” event to match the default image and swap it with a different image upon the button click, the “includes()” method with an “onmouseover” event to swap the default image with the specified image upon the mouse hover or equalize the “src” attribute of both the images to swap the images side by side.
This write-up demonstrated the methods to swap images.
How to Remove Second Last Character From String
While programming, we come across situations involving the use of complex string arrays comprising some punctuation or grammar mistakes.
For instance, when you test a web page or a website and face some issues in the DOM section particularly.
In such cases, removing the second last character from a string can save your time and effort.
This manual will guide you to remove the second last character from the string.
How to Remove Second Last Character From String?
To remove second last character from a string, use:
“slice()” and “addEventListener()” methods
“substring()” method
We will now go through each of the two approaches one by one!
Method 1: Remove Second Last Character From String Using slice() and addEventListener() Methods
The “addEventListener()” method attaches an event handler to a document, while the “slice()” method returns selected elements as a new array.
These methods can be used in combination to add a click event and slice the given string when the button is clicked.
Syntax
string.slice(start, end)
In the given syntax, “start”, and “end” refers to the start and end indexes of the given string, respectively.
document.addEventListener(click, function)
In the above syntax, “click” refers to the specified event, and “function” is the function on which the event is to be applied.
The following example explains the stated concept clearly.
Example
Firstly, create a button and a heading that will be displayed on the Document Object Model(DOM) as follows:
<button>Click Me</button><h2>Output</h2>
Now, access the created button and heading using the “document.querySelector()” method:
let button= document.querySelector("button");
let output= document.querySelector("h2");
After that, specify a string value named “Character” and log it on the console:
let string= "Character";
console.log("The given string value is:", string)
Finally, add a “click” event to the created button.
Also, apply the “slice()” method along with the “length” property in such a way that the second last character is extracted out.
In the below demonstration, the slice() method will first refer to the whole string with the last two values subtracted, and then the second slice() method will only extract the last string character.
Both of the fetched substrings will be fetched and concatenated using the “+” operator and displayed as the innerHTML of the heading refers as the “output”:
button.addEventListener("click", () => {
let secondLast = string.slice(0, string.length - 2) + string.slice(string.length - 1);
output.innerText = secondLast;});
Output
![]()
Method 2: Remove Second Last Character From String Using substring() Method
The “substring()” method extracts characters from start to end without any change in the original string.
This method can be implemented to locate the second last character from the given string by separating the last two characters and merging the last character in the string only.
Syntax
string.substring(start, end)
In this particular syntax, “start” and “end” refer to the start and end indexes, respectively, similar to the slice method.
Example
First of all, we will store a string value named “JavaScript” and log it on the console:
const string= 'JavaScript';
console.log("The given string value is:", string)
Now, apply the “substring()” method by referring to the string indexes in such a way that the second last string character is located and omitted using the same approach which is discussed in the previous method:
const secondLast= string.substring(0, string.length - 2) + string.substring(string.length - 1);
Finally, display the resultant string value on the console:
console.log("The resultant string after removing second last character is: ", secondLast);
Output
![]() We have discussed all the easiest methods to remove the second last character from string.
We have discussed all the easiest methods to remove the second last character from string.
Conclusion
To remove the second last character from a string, use the “slice()” and “addEventListener()” methods for adding a click event and extracting the second last character upon the button click or the “substring()” method for separating the last two characters and merging the last character in the string only.
This blog explained the method to remove the second last character from a string.
How to Disable or Enable Buttons Using JavaScript and jQuery
Have you ever noticed how frequently, the submit button wouldn’t work until all the relevant fields have been filled in on a web form? This logic is implemented by determining the button’s status (enabled or disabled) depending on whether the input field is filled or not and then performing the required operation.
If you are not sure how to perform that? No worries!
This manual will explain the method of enabling and disabling buttons with the help of JavaScript and jQuery.
How to Disable or Enable Buttons Using JavaScript and jQuery?
One of the most practical things each web application includes in its buttons is the enabling and disabling functionalities.
You can use the “disabled” attribute for enabling or disabling the buttons in jQuery and JavaScript.
Example 1: Disable or Enable Buttons Using JavaScript
In HTML file, we will first, create three buttons, the button where actions will perform, one is for disabling and the other one is for enabling the button:
<button id="button">Button</button><button onclick="disableButton()">Click to Disable</button><button onclick="enableButton()">Click to Enable</button>
We will define function “disableButton()” for disabling the button by setting the value of the disabled attribute to “true”:
function disableButton() {
document.getElementById("button").disabled = true;}
For enabling button, set the disabled property value to “false”:
function enableButton() {
document.getElementById("button").disabled = false;}
The corresponding output is as follows:
![]() Example 2: Disable or Enable Buttons Using jQuery
In this example, we will use jQuery to disable and enable the button.
To do so, first, create two buttons in an HTML file.
One of them is used to disable and enable the other button:
<button id="button">Button</button><button id="toggle">Click Here to Disable and for Enable double click on it</button>
For using jQuery, specify it the “src” attribute in <head> tag:
<script src="https://ajax.googleapis.com/ajax/libs/jquery/1.10.2/jquery.min.js"></script>
In the <script> tag, disable the button on a single click by triggering the “click” event in the button with id “toggle” and set the value of the “disabled” attribute of the first button to “true”.
Similarly, on the “dblclick” event, set the value of the disabled attribute to “false” to enable the “Button” on double click:
$(document).ready(function () {
$('#toggle').on('click', function () {
$('#button').prop('disabled', true);
});
$('#toggle').on('dblclick', function () {
$('#button').prop('disabled', false);
});});
The output signifies that we successfully disable and enable the button using jQuery:
Example 2: Disable or Enable Buttons Using jQuery
In this example, we will use jQuery to disable and enable the button.
To do so, first, create two buttons in an HTML file.
One of them is used to disable and enable the other button:
<button id="button">Button</button><button id="toggle">Click Here to Disable and for Enable double click on it</button>
For using jQuery, specify it the “src” attribute in <head> tag:
<script src="https://ajax.googleapis.com/ajax/libs/jquery/1.10.2/jquery.min.js"></script>
In the <script> tag, disable the button on a single click by triggering the “click” event in the button with id “toggle” and set the value of the “disabled” attribute of the first button to “true”.
Similarly, on the “dblclick” event, set the value of the disabled attribute to “false” to enable the “Button” on double click:
$(document).ready(function () {
$('#toggle').on('click', function () {
$('#button').prop('disabled', true);
});
$('#toggle').on('dblclick', function () {
$('#button').prop('disabled', false);
});});
The output signifies that we successfully disable and enable the button using jQuery:
![]() Example 3: Enable the Disabled Button Using JavaScript
Now, we will enable the disabled button after entering some text in the text field using JavaScript.
For this, create an input field and a submit button with ids “text” and “submit”.
The submit button is disabled by default utilizing the disabled attribute:
<input type="text" id="Text" placeholder="Enter Text"/><input type="submit" id="submit" disabled="disabled" />
In the JavaScript file, we will first get the ids of the input field and button and then call the function “stateHandle” in “addEventListener” method, where we will set the value of the disabled attribute to “false” if the text field is empty, which indicates the disable button; else, we will set it as “true”, if the input field is filled with any text and the submit button will be enabled:
let input = document.querySelector("#Text");
let button = document.querySelector("#submit");
input.addEventListener("change", stateHandle);function stateHandle() {
if (document.querySelector("#Text").value !="") {
button.disabled = false;
}
else {
button.disabled = true;
}}
Output
Example 3: Enable the Disabled Button Using JavaScript
Now, we will enable the disabled button after entering some text in the text field using JavaScript.
For this, create an input field and a submit button with ids “text” and “submit”.
The submit button is disabled by default utilizing the disabled attribute:
<input type="text" id="Text" placeholder="Enter Text"/><input type="submit" id="submit" disabled="disabled" />
In the JavaScript file, we will first get the ids of the input field and button and then call the function “stateHandle” in “addEventListener” method, where we will set the value of the disabled attribute to “false” if the text field is empty, which indicates the disable button; else, we will set it as “true”, if the input field is filled with any text and the submit button will be enabled:
let input = document.querySelector("#Text");
let button = document.querySelector("#submit");
input.addEventListener("change", stateHandle);function stateHandle() {
if (document.querySelector("#Text").value !="") {
button.disabled = false;
}
else {
button.disabled = true;
}}
Output
![]() Example 4: Enable the Disabled Button Buttons Using jQuery
In this example, we will use jQuery to enable the disabled submit button.
To do so, first set the value of the disabled attribute to “false” for disabling the button while the input field is empty.
Then, if the field is filled with any text, set the value of disabled attribute to “true”, which enables the submit button:
$(document).ready(function () {
$('#Text').on('input change', function () {
if ($(this).val() != '') {
$('#submit').prop('disabled', false);
}
else {
$('#submit').prop('disabled', true);
}
});});
The corresponding output is shown below:
Example 4: Enable the Disabled Button Buttons Using jQuery
In this example, we will use jQuery to enable the disabled submit button.
To do so, first set the value of the disabled attribute to “false” for disabling the button while the input field is empty.
Then, if the field is filled with any text, set the value of disabled attribute to “true”, which enables the submit button:
$(document).ready(function () {
$('#Text').on('input change', function () {
if ($(this).val() != '') {
$('#submit').prop('disabled', false);
}
else {
$('#submit').prop('disabled', true);
}
});});
The corresponding output is shown below:
![]() We have covered all the aspects of the enabling and disabling button using JavaScript and jQuery.
We have covered all the aspects of the enabling and disabling button using JavaScript and jQuery.
Conclusion
For enabling and disabling the button and jQuery, you can use the “disabled” property.
To do so, set the value of the disabled attribute “true” or “false” to disable or enable the button, respectively.
In this manual, we have explained the method of enabling and disabling buttons with the help of JavaScript and jQuery.
How to Check if Checkbox is Checked Using JavaScript
The checkbox is an HTML input type that acts as a selection box.
It is utilized for selecting or deselecting a certain option.
Checkboxes are frequently utilized to let visitors engage with web pages and often POST data to a backend by checking the box that applies to a certain condition.
This manual will demonstrate the technique to verify if the checkbox is checked or not.
How to Check if Checkbox is Checked Using JavaScript?
To determine if the checkbox is checked, use the “checked” property.
As we know, each element contains a few characteristics that allow Javascript to control it in certain ways and the checkbox’s checked property is one of these.
The checked property gives the boolean value true or false when a checkbox is selected.
Example 1: Using onclick() Event For Checking if Checkbox is Checked
We will first create a checkbox attaching the “onclick()” event that will invoke the user-defined “boxChecked()” function to check whether the checkbox is checked or not:
<h4>Check the box for accepting terms and conditions:</h4><br><input type="checkbox" id="Checkbox" onclick="boxChecked()"> I Accept all the terms and conditions.</input>
In the JavaScript file, we will define a function named “boxChecked()”, which will first fetch the checkbox’s id using the “getElementById()” method and then apply the checked property in such a way that the checked returned value is set to “true” if it is marked as checked.
Then, an alert will be shown with the message “The checkbox is CHECKED! Thanks for accepting:”:
function boxChecked() {
var checkBox = document.getElementById("Checkbox");
if (checkBox.checked == true){
alert("The checkbox is CHECKED! Thanks for accepting:");
} }
The corresponding output is shown below:
![]() Example 2: Using addEventListener() Method For Checking if Checkbox is Checked
Here, we will create a checkbox without an onclick() event.
Then, we will add a paragraph, and its display is set as “none” until the checkbox is unchecked.
In the other case, when the checkbox is marked as checked, its added text will be displayed in green color:
<input type="checkbox" id="Checkbox"> I Accept all the terms and conditions.<p id="text" style="color: green; display: none;">CHECKED!</p>
You can also verify whether the checkbox is checked or not without using the onclick() event.
Here, we will use another method called “addEventListener()” with the “querySelector()” method using the checkbox’s checked property.
This will work in such a way that the querySelector() method will first select the first element matched with the added id, and then the addEventListener() method will associate the “click” event with it:
var text = document.getElementById("text");
document.querySelector('#Checkbox').addEventListener('click', (event) =>{
if(event.target.checked){
text.style.display = "block";
}})
It can be seen that, when the checkbox is marked, the added content is displayed in green color:
Example 2: Using addEventListener() Method For Checking if Checkbox is Checked
Here, we will create a checkbox without an onclick() event.
Then, we will add a paragraph, and its display is set as “none” until the checkbox is unchecked.
In the other case, when the checkbox is marked as checked, its added text will be displayed in green color:
<input type="checkbox" id="Checkbox"> I Accept all the terms and conditions.<p id="text" style="color: green; display: none;">CHECKED!</p>
You can also verify whether the checkbox is checked or not without using the onclick() event.
Here, we will use another method called “addEventListener()” with the “querySelector()” method using the checkbox’s checked property.
This will work in such a way that the querySelector() method will first select the first element matched with the added id, and then the addEventListener() method will associate the “click” event with it:
var text = document.getElementById("text");
document.querySelector('#Checkbox').addEventListener('click', (event) =>{
if(event.target.checked){
text.style.display = "block";
}})
It can be seen that, when the checkbox is marked, the added content is displayed in green color:
![]() Everything you need to know about how to determine if a checkbox is marked or not has been provided to you.
Everything you need to know about how to determine if a checkbox is marked or not has been provided to you.
Conclusion
To determine if the checkbox is checked, utilize the checkbox’s “checked” property.
The checked property outputs a boolean value true if it is checked; else, it gives false.
For the verification, you can use two different procedures; one is the onclick() event, and the other is addEventListener() method.
In this manual, we have described the procedure to verify whether the checkbox is checked or not using JavaScript.
How to Create a Simple Click Counter Using JavaScript
Counter is one of the main components for using dashboards in an online application or website.
It can be applied in various contexts, such as games(to boost the points or score value) and several time-saving hacks.
Moreover, using it on the website creates a simple vote counter for counting the number of items in the packages or votes.
This tutorial will demonstrate the procedure for creating a simple counter with a click.
How to Create a Simple Click Counter Using JavaScript?
A click counter counts each click and displays it on the screen.
It increments the counter value by using the JavaScript “onclick” event and “count”, which will be incremented on every click.
Example 1: Creating Simple Counter
In this example, we will create a simple counter containing a button with the “onclick” event attached to it.
It works in such a way that when the button is clicked, it will invoke the user-defined function named “counterFunc()”:
<h3>Counter:</h3><label id="count"></label><br><br><button onclick="counterFunc()">Click</button>
Set the initial value of the “count” equals to 0:
count = 0;
The “counterFunc()” function will increment the count by one and print using the “innerHTML” property:
function counterFunc(){
count++;
document.getElementById("count").innerHTML = count;}
The corresponding output is given as follows:
![]() Example 2: Count and Reset
Here, we will add one more functionality in the above counter that is a “Reset” button.
We will attach “onclick” event with the button to invoke the JavaScript defined function “resetFunc()”:
<button onclick="resetFunc()">Reset</button>
In “resetFunc()”, set the count value to 0.
When the “Reset” button is clicked, the counter turns to 0 as the reset value:
function resetFunc(){
count=0;
document.getElementById("count").innerHTML = count; }
The output signifies that we can easily reset the counter and start the counting again:
Example 2: Count and Reset
Here, we will add one more functionality in the above counter that is a “Reset” button.
We will attach “onclick” event with the button to invoke the JavaScript defined function “resetFunc()”:
<button onclick="resetFunc()">Reset</button>
In “resetFunc()”, set the count value to 0.
When the “Reset” button is clicked, the counter turns to 0 as the reset value:
function resetFunc(){
count=0;
document.getElementById("count").innerHTML = count; }
The output signifies that we can easily reset the counter and start the counting again:
![]() Example 3: After Refreshing Start From the Same Count
In websites, there are some situations where we need to start the count from the same existing count even after refreshing the page.
For this purpose, we will use the “localStorage” of the browser in our JavaScript defined function which will be called on the click on button where “onclick” event attached:
function counterFunc(){
if (typeof(Storage) !== "undefined") {
if (localStorage.count) {
localStorage.count = Number(localStorage.count)+1;
} else {
localStorage.count = 1;
}
document.getElementById("count").innerHTML = localStorage.count;
}else {
document.getElementById("count").innerHTML = "Sorry, the browser you used does not support web storage.";
}}
It can be seen that the output starts the count from the same, even after refreshing the page.
This happens because of the “localStorage” property.
This property enables the JavaScript apps and sites to save the key-value pair in the web browser without any expiration date:
Example 3: After Refreshing Start From the Same Count
In websites, there are some situations where we need to start the count from the same existing count even after refreshing the page.
For this purpose, we will use the “localStorage” of the browser in our JavaScript defined function which will be called on the click on button where “onclick” event attached:
function counterFunc(){
if (typeof(Storage) !== "undefined") {
if (localStorage.count) {
localStorage.count = Number(localStorage.count)+1;
} else {
localStorage.count = 1;
}
document.getElementById("count").innerHTML = localStorage.count;
}else {
document.getElementById("count").innerHTML = "Sorry, the browser you used does not support web storage.";
}}
It can be seen that the output starts the count from the same, even after refreshing the page.
This happens because of the “localStorage” property.
This property enables the JavaScript apps and sites to save the key-value pair in the web browser without any expiration date:
![]() We have compiled all the necessary instructions related to creating a simple click counter using JavaScript.
We have compiled all the necessary instructions related to creating a simple click counter using JavaScript.
Conclusion
To create a simple click counter using JavaScript, you can use the JavaScript “onclick” event and a variable count whose value will be incremented on every click.
You can also create a reset button on the counter to reset the count.
Moreover, utilizing the “localStorage” property can assist in saving the counter value even after refreshing the page.
This tutorial demonstrated the procedure for creating a counter on a click.
JavaScript URL Encode | Explained
A URL is a website’s address, and the process of transforming a string to a certain URL format is known as URL encoding.
It improves the security and reliability of URLs.
The character “%” encodes each character that has to be converted into a URL, along with a two-character hex value corresponding to its UTF-8 representation.
The browser automatically changed any spaces to a “+” or “%20” symbol.
This article will elaborate on the procedure for encoding the URL.
JavaScript URL Encode
The URL is automatically encoded by browsers, which means that before sending the request, some special characters are converted to other reserved characters.
For encoding URLs, use the below-given methods:
encodeURI() method
encodeURIComponent() method
Let’s examine each of the mentioned techniques individually.
Method 1: Encode URL Using encodeURI() JavaScript Method
The “encodeURI()” method is utilized for encoding or encrypting the URL by passing the string as an argument.
It encodes the special character excluding (A-Z a-z 0-9, / ? : @ & = + $ #) characters and returns a new string as an output that indicates the string is encoded as URI(Uniform Resource Identifier).
It is the standard approach to encoding URLs.
Syntax
To apply the encodeURI() method, use the syntax listed below:
encodeURI(string);
Here, “string” is the url that will be encoded.
Example
Firstly, we will create a variable named “url” and assign a URL string to it that will be used for encryption:
var url = "https://linuxhint.com/append Values to Object/";
Then, invoke the encodeURI() method by passing the url string as an argument to it:
var encodedURL = encodeURI(url);
Finally, print the encoded url on the console using the “console.log()”:
console.log(encodedURL);
The output indicates that the string is encoded in the actual format of the URL and all the spaces are encoded as with character “%20”:
![]() The only limitation of this approach is that it does not encrypt the characters “A-Z,a-z, 0-9,!@#$&*()=:/,;?+”, and in that scenario, choose the next approach!
The only limitation of this approach is that it does not encrypt the characters “A-Z,a-z, 0-9,!@#$&*()=:/,;?+”, and in that scenario, choose the next approach!
Method 2: Encode URL Using encodeURIComponent() Method
Another method used for encrypting or encoding a URL is the “encodeURIComponent()” method.
It works the same as the encodeURI() method.
However, the difference is that encodeURIComponent() encrypts every single URL parameter value including domain name with “A-Z a-z 0-9 – _.! ~ * ‘ ()” characters, while the encodeURI() method encrypts the whole URL.
More specifically, you can utilize this method when it is required to encrypt characters that the encodeURI() method won’t be able to.
Syntax
Use the below-mentioned syntax for the encodeURIComponent() method:
encodeURIComponent(string);
Here, “string” is the url that will be encoded.
Example
Here, we will use the same url string created in the above example and call the “encodeURIComponent()” method by passing that url string as an argument:
var encodedURL = encodeURIComponent(url);
Then, print the encoded url on the console:
console.log(encodedURL);
It can be seen in the output that the domain name is also encrypted:
![]() We have compiled all the approaches for the encrypting URL.
We have compiled all the approaches for the encrypting URL.
Conclusion
The URL is encoded using the encodeURI() or encodeURIComponent() method.
The encodeURI() method performs the best because encodeURIComponent() encrypts both the domain name and the complete URL, which may not be required in some cases.
This article elaborated on the procedure for encoding the URL.
How to Strip HTML Tags From String
While programming, we often want to write complex codes where it is very likely to add an “html” tag in a string value in case of headings or paragraphs mistakenly.
For instance, the end tag of an HTML or body element should be stripped if the HTML or body element is not followed by a comment.
Do not know how to strip the HTML tags from a particular string? No worries!
This manual will discuss the methods to Strip the HTML Tags from a specific String.
How to Strip HTML Tags From a String?
To strip HTML tags using JavaScript, the following approaches can be utilized:
“replaceAll()” method
“Text Content” property
“DOMParser” interface
“string-strip-HTML” package
Go through the mentioned methods one by one!
Method 1: Strip HTML Tags From String Using replaceAll() Method
The “replaceAll()” method returns a new string when all of the matched patterns get replaced by the specified replacement.
This method can be implemented to replace all the HTML tags in a string with the empty string.
Syntax
replaceAll(pattern, replacement)
In the given syntax, “pattern” refers to the string or an object, and “replacement” can be a function or a string.
The below example explains the concept clearly.
Example
In the following example, include a string value including HTML tags placed in the “<h1>” tag and display the unstripped string value:
string value:let unStripped= "<h1 class= 'header_tag'>Strip <i>Tags</i></h1>";
console.log("Unstripped html tags:", unStripped)
Now, apply the “replaceAll()” method to replace the HTML tags with empty string specified as ” “.
The “gi” here will search for all occurrences of the regular expression in the provided string, and the “regex operator” will start searching for values starting from “/” and ending at “/” respectively:
let replace= unStripped.replaceAll(/<\/?[^>]+(>|$)/gi, "");
Finally, display the corresponding string value without any HTML tags:
console.log("Stripped html tags:", replace);
The corresponding output will be as follows:
![]()
Method 2: Strip the HTML Tags From a String Using Text Content Property
The “textContent” property sets the text content of the specified element.
This method can be utilized to return the text elements from the given HTML string.
Example
First, store an unstripped string value and display it as discussed in the previous method.
let unStripped= "<h1 class= 'header_tag'>HTML <i>Elements</i></h1>";
console.log("Unstripped html tags:", unStripped)
Next, create an element named “div” using the “document.createElement()” method and assign the created element a string value including the HTML tags:
let div= document.createElement("div");
div.innerHTML= unStripped;
Now, apply the textContent property to include text within the “<script>” element.
If the string contains <script> elements, this method with textContent will return its content and strip the HTML tags using ” ” into an empty string and logging it on the console:
let text= div.textContent || div.innerText || "";
console.log("Stripped html tags:",text);
Output
![]()
Method 3: Strip the HTML Tags From a String Using DOMParser Interface
The “DOMParser” interface gives the functionality to parse HTML source code from the specified string value into a DOM.
This technique can be implemented by parsing an HTML code in such a way that when a string containing HTML code is passed to it as an argument, the HTML tags can be stripped with the DOMParser and its “parseFromString()” method.
Syntax
DOMParser.parseFromString(unStripped)
Here, “parseFromString()” method removes the HTML tags from the string “unStripped”.
Example
Firstly, create a function named “stripTags()” with “html” as its argument.
Next, apply the parseFromString() method to remove the html tags from the specified variable named “unStripped” referring to the contained unstripped string value and return its text content using the “textContent” property:
function stripTags(html){
const parseHTML= new DOMParser().parseFromString(unStripped, 'text/html');
return parseHTML.body.textContent || '';}
Now, create a string value to be stripped and display the unstripped and stripped values on the console and compare them:
let unStripped= "<h1 class='header_tag'>Java and <i>JavaScript</i></h1>";
console.log("Unstripped html tags:", unStripped)
console.log("Stripped html tags:", stripTags(unStripped));
Output
![]()
Method 4: Strip HTML Tags From a String Using string-strip-HTML Package
The “string-strip-html” package is applied to strip HTML from a particular string and provides a “stringStripHtml()” method that carries an HTML as an input.
This method can be implemented in such a way that if the particular string includes the “<script>” element, string-strip-html() will remove it along with its content.
Example
In the first step, include a string-strip-html package in the “<script>” tag:
<script src= "https://cdn.jsdelivr.net/npm/string-strip-html/dist/string-strip-html.umd.js"></script>
Now, include a string value and refer it to the string value containing the “<script>” element.
This will result in removing the html tags from the provided string value:
const {stripHtml}= stringStripHtml;
let htmlWithScriptElement= '<script>alert("Html Tags");<\/script>';
let unStripped= `<h1 class= 'header_tag'>Html <i>Tags</i> ${htmlWithScriptElement}</h1>`;
Finally, log the unstripped and stripped values and compare the resultant string values in both the scenarios:
console.log("Unstripped html tags:", unStripped)
console.log("Stripped html tags:", stripHtml(unStripped).result);
Output
![]() We have discussed all the easiest methods to strip html tags from string.
We have discussed all the easiest methods to strip html tags from string.
Conclusion
To strip html tags from the string, apply the “replaceAll()” method for replacing all the html tags with an empty string, the “Text Content” property to return the text elements from the specific HTML string, the “DOMParser” interface to parse the html tags from the string or the “string-strip-HTML” package for including a package and passing an HTML string to the in-built method.
This manual guided about the methods to strip html tags from string.
How to Sort an Array
While working in the computer science field, there can be a scenario where it is required to implement lookup tables to hold multiple values having the same data type.
For instance, when you deal with complex arrays having numeric or alphabetical data, arrange them in an automated manner.
In such cases, sorting an array becomes very convenient in organizing data in an ordered form and fetching them instantly and efficiently.
This article will discuss the methods to sort a JavaScript array.
How to Sort an Array?
To sort an array, the following approaches can be utilized:
“onclick” event and “sort()” method.
“reverse()” method
“arrow” function
Go through the discussed methods one by one!
Method 1: Sort an Array Using onclick Event and sort() Method
The “onclick” event occurs when the user clicks on an element, whereas the “sort()” method sorts an array alphabetically or in an ascending manner.
These methods can be applied to sort an array of strings when the added button is clicked.
Syntax
object.onclick= sortArray(){myScript};
In the above syntax, “sortArray()” refers to the function that will be invoked when the onclick event is triggered.
Example
In the following example, we will add a sentence in a paragraph inside the “<p>” tag and assign it the specified id:
<p>Click the button to sort an array.</p><p id= "myId"></p>
Now, create a button with an “onclick” event redirecting to the sortArray() function:
<button onclick= "sortArray()">Click Me</button>
After that, define a function named “sortArray()”.
Here, create an unsorted array of countries and display it.
Finally, apply the “sort()” method to display the sorted array:
function sortArray(){
var unsorted= ["India", "Pakistan", "Bangladesh", "China"];
console.log("The unsorted array is:", unsorted);
console.log("The unsorted array is:", unsorted.sort()); }
The output of the above implementation will result as follows:
![]()
Method 2: Sort an Array Using reverse() Method
The “reverse()” method reverses the elements in an array.
This method can be utilized to sort a numeric array in descending order.
Example
Firstly, create an unsorted array as follows:
var unsorted= [42, 21, 10, 5];
Next, display the corresponding values of the unsorted array:
console.log("The unsorted array is:", unsorted);
Now, sort the specified array and log it on the console using the reverse() method:
console.log("The sorted array is:", unsorted.reverse());
It can be seen that the added values are sorted in descending order:
![]()
Method 3: Sort an Array Using arrow Function
The “arrow” function is a type of function which works only if the function contains only one statement.
This function can be implemented to sort the unsorted array by allocating the required sorting pattern in the arrow function.
Check out the following example for understanding the stated concept.
Example
In the following example, declare an unsorted array and display it as discussed in the previous method:
var unsorted= [42, 21, 10, 5];
console.log("The unsorted array is:", unsorted);
Now, include an arrow function and specify the sorting order in it as “(a – b)”.
This indicates that the first value “a” should be smaller than the second value “b”:
const compare = (a, b) => (a - b);
Finally, display the sorted array by referring to the arrow function and display it:
unsorted.sort(compare);
console.log("The sorted array is:", unsorted);
Output
We have compiled the easiest method to sort an array.
Conclusion
To sort an array, utilize the “onclick” event and the “sort()” method for sorting an alphabetical array with the help of a function, the “reverse()” method for reversing an array based on descending values or the “arrow” function technique to specify the sorting order in the arrow function and sort it.
This write-up demonstrated the methods to sort an array.
JavaScript Basic Tutorial
In comparison to other languages such as C, C++, Java, and Python, JavaScript is very simple and easy to learn.
No setup, such as an IDE or virtual machine(VM) is required to install or configure.
All you need is a web browser and a plain text editor.
Moreover, JavaScript has a bright future with developing technologies such as Node.js and MongoDB.
This manual will explain the basics of the JavaScript language.
What is JavaScript?
JavaScript is a scripting and object-oriented programming language utilized in a wide range of applications, including the development of web-based games and other interactive media.
The web browser’s JavaScript code must be translated by the JavaScript Translator, which is built within the browser.
It is intended to bring interactivity and dynamic effects to web pages by modifying the content sent from a web server, which cannot be possible with just HTML and CSS.
JavaScript is a crucial component of every website’s framework, along with HTML and CSS.
HTML is used to create the fundamental framework of the website, CSS is used for styling, and JavaScript makes the website interactive and allows you to add animation or other advanced functionalities.
Basics of JavaScript
JavaScript is a user-friendly and adaptable language.
Digging deep into JavaScript as an expert will permit you to design various things, including games, animated 2D and 3D visuals, in-depth database-driven apps, and much more.
To learn JavaScript, first, you should have a basic knowledge of HTML coding, the concepts of object-oriented programming, and an idea for creating online applications.
JavaScript supports all the programming features, including:
Data types
Functions
Conditional statements
Loops
Objects, and so on.
Here, in this manual, we will define the basics of JavaScript, including its features, advantages, and how JavaScript performs its functionalities separately on the console or when linked with an HTML file.
JavaScript Features
Following are some of the fantastic features of JavaScript:
It is a simple, interpret-able language.
JavaScript is supported by all widely used web browsers, including Opera, Firefox, Chrome, and so on.
It gives consumers effective control over web browsers.
Being an object-oriented programming language, JavaScript handles inheritance with the help of prototypes instead of classes.
A number of operating systems support JavaScript, including macOS and Windows
Let’s try some examples to use the basics of JavaScript, such as how to integrate it with an HTML file and how to use it on a console.
Example 1: Run Your First JavaScript Code on Console
Here, we will execute a JavaScript code on the console, which will print a message using the print statement that is “console.log()”:
console.log("Hy! this is my first JavaScript code");
The corresponding output is as follows:
![]()
Example 2: Link JavaScript File with HTML
There are two ways to integrate JavaScript code with an HTML file.
You can add JavaScript code in an HTML file using <script> tag.
Syntax
<script>
......</script>
Add the JavaScript external file in HTML using the “src” attribute of the <script> tag.
Syntax
<script src="./JSfile.js"></script>
For instance, first, we will create two headings in HTML file using “<h1>” and “<h4>” tags:
<h1>Welcome to the Programming World:</h1><h4>Select the language you want to learn:</h4>
Then, create a “form” that contains a checkbox, a button and an input field that shows the text of the selected checkbox after clicking on the submit button.
The “onclick()” event is attached with “submit” button that invoked the JavaScript function named “myFunctiontoSelectLang()” when triggered:
<form>
<input type="checkbox" name="Java" value="Java">Java<br>
<input type="checkbox" name="JavaScript" value="JavaScript">JavaScript<br>
<input type="checkbox" name="HTML" value="HTML">HTML<br>
<input type="checkbox" name="Python" value="Python">Python<br><br>
<input type="button" onclick="myFunctiontoSelectLang()" value="Submit"><br><br>
<input type="text" id="selected language" size="50">
</form>
In JavaScript file, we will define the “myFunctiontoSelectLang()” function where we will program for fetching the value of the marked checkbox and set it in an input field after clicking on the the submit button:
function myFunctiontoSelectLang() {var language = document.forms[0];var text = "";var i;for (i = 0; i < language.length; i++) {if (language[i].checked) {
text = text + language[i].value + " ";}}
document.getElementById("selected language").value = "I am interested to learn " + text;}
Output
![]()
JavaScript Advantages
Some of the fantastic advantages of the JavaScript language are as follows:
User-friendly
Simple to understand
Link-able to HTML and CSS for additional functionality
Simple and easy to use
High Speed
We have compiled all the basic information related to JavaScript.
Conclusion
JavaScript is a scripting language used for creating dynamic websites.
It is also considered a programming language because it provides object-oriented principles.
It is user-friendly, simple, faster, and easy to learn.
JavaScript is used with HTML to improve the user experience, providing the best functionalities.
In this manual, we have defined the basics of the JavaScript programming language with its features and advantages.
JavaScript getElementById
To access DOM (Document Object Model is a programming API) element, you can apply various techniques.
One of the most helpful and popular methods is to utilize the JavaScript getElementById() method.
All the browsers support JavaScript getElementById() including Firefox, Internet Explorer, Chrome, and so on.
This article will discuss the getElementById() method.
What is getElementById()?
To fetch an object of an HTML element with the help of its “id”, use the “document.getElementById()” method.It is the fastest and most efficient technique to access a DOM element.
It is mostly used to manipulate or obtain information from an element in your document.
Note: An element’s id should be unique within an HTML document.
If there are many elements with the same id in the HTML document, the method gives the first element it detects.
It outputs null if it cannot locate an element in the DOM with the specified ID.
How to Use getElementById()?
Follow the below syntax for using the getElementById() method:
document.getElementById(id);
It accepts an “id” of the element on which you need to perform some operation.
This added id should be unique in a document and case-sensitive.
Example 1: Change the Color of the Text
In this example, clicking a button will cause the color of the heading to change.
To do so, we will create heading using <h4> tag and set “welcome” as its id that will help to get this element:
<h4 id="welcome">Welcome to LinuxHint</h4>
Then, create a button where onclick() event is attached which will invoke the JavaScript user-defined function called “changeColor()”, trigger when the button is clicked:
<button type="button" onclick="changeColor()">Click here</button>
In the JavaScript file, define a function named “changeColor()” that will first get the added heading using the “getElementById()” method and then call the style attribute to set the color equals to “magenta”:
function changeColor() {
document.getElementById("welcome").style.color = "magenta";}
It can be seen from the output when the button is clicked, the color of the added heading is changed:
![]()
Example 2: Change Text
Here, we will change the entire text of the heading on the button click.
First, we will create a heading using <h3> tag by setting id as “chngTxt”:
<h3 id="chngTxt">Welcome to the LinuxHint</h3>
Then, attach an onclick() event with the button that will call the “changeText()” function to change the added text:
<button type="button" onclick="changeText()">Click here</button>
Define the “changeText()” function in such a way that it will fetch the heading heading using the document.getElementbyid() method and change its text when the button is clicked:
function changeText() {var demo = document.getElementById("chngTxt").innerHTML = "The best Website for Learning Skills";}
As you can see in the output, when we click on the button the text is changed:
![]() We have covered all the details about the getElementById() method.
We have covered all the details about the getElementById() method.
Conclusion
The getElementById() is the JavaScript method used to fetch the HTML DOM element.
It is the most efficient technique to access a DOM element.
It searches the element with the help of the id assigned to it.
If the specified ID is not located in the DOM, it will return null.
This manual discussed the JavaScript method getElementById() with detailed examples.
JavaScript for of | Explained
In JavaScript, the “for…of” statement is beneficial to fetch the string or the array items separately in the case of working with some specific string or array element.
For instance, when you need to perform some computation on all the elements of an array or display them simultaneously.
It can also be used to iterate along the map or argument objects.
This blog is all about the usage of JavaScript for…of statement.
So, let’s start!
What is JavaScript for…of Statement?
“for…of” the statement loops through the values of an iterable object which can be an array, string, set, Map, or argument.
It is also used to access all the items simultaneously by referring to a created variable.
How to Use JavaScript for…of Statement?
To use the JavaScript for…of Statement, utilize the provided syntax:
for (variable of iterable){}
In the given syntax, “variable” refers to the items in the specified “iterable”, which can be a string or an array.
Note that the mentioned variable can be declared with const, let, or var.
The following examples will explain the applications of the discussed statement in different case scenarios.
Example 1: Iterating Over an Array
In the following example, we will create an array with the following values:
let array= [10, 20, 30];
Now, apply the “for…of” statements to iterate along the specified array.
The “item” will refer to the array of items.
Also, in each iteration, the “2” will be incremented in the array values:
for (let item of array){
item= item + 2;
console.log("The Array items are:", item);}
The output of the above implementation will be as follows:
![]()
![]()
Example 2: Iterating Over a String Value
In this example, we will declare a string value named “forof”:
let string= 'forof';
Now, iterate along the string characters by applying the “for…of” statement and access the string characters via a variable named “character” and logging them separately on the console:
for (let character of string){
console.log("The String items are:", character);}
Output
![]()
![]()
Example 3: Iterating Over Map Objects
First, create a new Map object using the “new Map()” method:
let mapId= new Map();
Next, utilize the “set()” method to set the values for the specified key:
mapId.set('name', 'harry');
mapId.set('id', 'none');
Now, apply the “for…of” statement in order to iterate along the map items contained in “mapId” and display them:
for (let map of mapId){
console.log("The Array items are:", map);}
Output
![]()
![]()
Example 4: Iterating Over Set Objects
Firstly, create a new set using the “new Set()” method with the following values:
let sets = new Set([10, 20]);
Next, apply the “for…of” statement to access the set values one by one and log them on the console:
for (let set of sets){
console.log("The Set items are:",set); }
Output
![]()
![]()
Example 5: Iterating Over Arguments Objects
Firstly, define a function named “forOf()”.
Here, “arguments” is an object applied inside the function which contains the specified value of the arguments passed to the particular function:
function forOf() {
for (const value of arguments) {
console.log("The Argument items are:", value);
}}
Finally, invoke the “forOf()” function by passing the values into it as arguments:
forOf(10, 20);
Output
![]()
![]() We have provided different implementations of the “for…of” statement.
We have provided different implementations of the “for…of” statement.
Conclusion
The “for…of” statement is utilized to iterate over an array by adding the array items and displaying them.
You can apply the statement to iterate over an array, string, map object, set object, and arguments.
This article demonstrated the applications of the for…of statement by applying various examples.
JavaScript toLocaleString | Explained
The “toLocaleString()” method is beneficial when we need to know the date or time of any country.
Also, you can check the timezone of any country and its difference with respect to another country in terms of time, date, day, and UTC.
Additionally, this method can also assist in computing the UTC/GMT with the help of the computed time difference.
This blog will discuss the implementation of the JavaScript toLocaleString method.
So, let’s start!
What is JavaScript toLocaleString() Method?
The “toLocaleString()” method gives a number as a string using the local language format.
This method uses the “Date” object to initialize the date to the specific time zone.
How to Use JavaScript toLocaleString() Method?
To use the toLocaleString() method, follow the provided syntax:
date.toLocaleString(locales, options)
In the above syntax, “date” represents the variable holding the Date object, “locales” are the various time zones, and “options” refer to the object with formatting options.
Let’s check out the following example for understanding clearly.
Example 1: Displaying Current Date and Time of Current Timezone
In the following example, create a date object with the help of the new “Date()” constructor:
var date= new Date();
Now, apply the toLocaleString() method to the date object to display the current date and time:
let currdateTime= date.toLocaleString();
console.log(currdateTime);
The output of the above demonstration will be as follows:
![]()
![]() To get the date and time of a specific time zone, implement the following example.
To get the date and time of a specific time zone, implement the following example.
Example 2: Getting Date and Time of a Specific Timezone
First, create a Date object and store the values such that (Year:2022, Month:8, Day:23, Hour:8, 0 Minutes, and 0 Seconds), respectively, and display them.
Here, “UTC” represents the Coordinated Universal Time according to which the world regulates clocks and time:
var date= new Date(Date.UTC(2022, 8, 23, 8, 0, 0));
console.log("The date and time in UK is:", date);
Finally, display the set date value with respect to the “US” timezone using the toLocaleString() method:
console.log("The date and time in US is:", date.toLocaleString('en-US'));
Output
![]()
Example 3: Displaying Specified Date and Time by Setting their Attribute Values
Now, assign some values for the date attributes(year, month, day) and a weekday as well to be displayed along with the date:
var format= {
weekday: 'long',
year: 'numeric',
month: 'long',
day: 'numeric',};
Lastly, log the current date along with the weekday in “US” time zone as follows:
console.log("The date and time in US is:", date.toLocaleString('en-US', format));
Output
![]() This write-up has explained the different techniques to implement the toLocaleString() method.
This write-up has explained the different techniques to implement the toLocaleString() method.
Conclusion
The “toLocaleString()” method can be applied to display the current date and time with the help of the created constructor.
Moreover, it can be used to initialize a particular date and time and convert it to the specified time zone or display the specified date and time by setting their attribute values along with the weekday.
This blog explained the techniques to utilize the toLocaleString() method in multiple ways.
JavaScript: String charCodeAt() Method
In JavaScript, there are several predefined methods for performing different tasks.
More specifically, the JavaScript method charCodeAt() is utilized to figure out the Unicode value of a character at the specified index of a string.
The charCodeAt() method belongs to the String object.
This study will discuss the JavaScript charCodeAt() method.
What is String charCodeAt() Method?
The “charCodeAt()” string method returns a Unicode value for a character at a given point in a string.
As you know, the charCodeAt() is a String object method.
That’s why it needs to be called using a particular instance of the String type.
It takes “index” as a parameter and returns an integer value called Unicode against that index.
If no parameter is passed, it considers the 0th index.
How to Use String charCodeAt() Method?
Use the following syntax to use the charCodeAt() method:
charCodeAt(index);
Here, the index ranges from 0 to n-1, where n is the string’s length.
If the specified index number is negative, higher, or equal to the string’s length, it returns NaN.
Example 1
We will first create a string “LinuxHint” stored in a variable named “string” :
var string = "LinuxHint";
Then, call the charCodeAt() method by passing the index “5” as a parameter to get the Unicode of the character “H” in a string:
console.log(string.charCodeAt(5));
The output displayed “72” as the Unicode of the character “H”:
![]()
Example 2
In this example, we will display the character with its Unicode by using two JavaScript methods called “charAt()” and “charCodeAt()” by passing index as an argument:
console.log(`The code of the character ${string.charAt(5)} is ${string.charCodeAt(5)}`);
Output
![]()
Example 3
Here, we will pass the index that exceeds the length of the string.
As the string created above is of length “8”, we will pass the index “11”:
console.log(string.charCodeAt(11));
The output “NaN” signifies that the index passed is not exist in the string:
![]() We have covered all the details related to the charCodeAt() method of JavaScript.
We have covered all the details related to the charCodeAt() method of JavaScript.
Conclusion
The “charCodeAt()” method is a JavaScript predefined method of the String Object that is used for identifying the Unicode of the character in a string at a specified position.
It returns an integer value at the specified index, and if the index is greater than or equal to “n”, which is the length of the string, and less than “0”, it outputs NaN.
In this study, we have discussed the JavaScript charCodeAt() method with a detailed explanation.
5 Sources to Learn JavaScript for Free
You can make your website more interactive by using JavaScript with HTML and CSS.
It is not always the simplest programming language to learn.
However, if you want to design online applications or become a developer, understanding JavaScript will benefit you even if you are a programming expert.
Moreover, it allows you to learn new programming languages easily.
This tutorial will describe the five best sources to learn JavaScript for Free.
What is JavaScript?
“JavaScript” is a scripting language used for many different purposes, such as creating “websites”, “web applications”, “video games”, and more.
It is used to add dynamic website features that cannot be embedded with only HTML and CSS.
It is probably faster than other languages since it is lightweight and interpret-able.
Let’s see the free sources for learning JavaScript!
5 Sources to Learn JavaScript for FREE
There are a lot of websites, books, online groups, and much more for learning any language, including JavaScript.
This section will talk about the best free online websites/sources for learning JavaScript from the beginner to the advanced level.
There are a number of online paid and free websites.
Following are the best five free online sources for learning JavaScript language:
JavaScript for Cats
Codecademy
MDN JavaScript
FreeCodeCamp
Coursera
JavaScript for Cats
Beginners can learn JavaScript for free with the help of the JavaScript for cats course.
It will help you become familiar with the fundamentals of the JavaScript language, including variables, functions, libraries, data structures, and other concepts.
The course states that the instructions are so simple that even your pet can begin coding instantly.
![]()
Codecademy
Codecademy is the best free source to learn JavaScript.
It will help you learn JavaScript from level zero.
You will gain knowledge of data types, loops, functions, and data structures.
There are also online courses available for Python, SQL, HTML, and CSS.
![]()
MDN JavaScript
The best and most efficient source for learning JavaScript is MDN JavaScript.
Its tutorials are fantastic as the course is written and updated by qualified developers, and they provide high-quality data.
It split its tutorials into four parts:
Complete beginners level tutorial
JavaScript Guide tutorial
Tutorials for Intermediate
Advanced level tutorials
![]()
FreeCodeCamp
The FreeCodeCamp is another best free source for learning JavaScript.
It enables you to build practical projects, learn to code for free, and find employment as a developer.
To master the fundamentals of JavaScript, this source contains a large variety of interactive tutorials and tasks.
FreeCodeCamp also provides video tutorials on their Youtube channel that helps more effectively to build understanding:
![]()
Coursera
Coursera is one more fantastic website used for online learning, with multiple free JavaScript tutorials and courses.
It was created by Stanford professors.
Coursera is a combination of free and paid online courses, and it is appropriate for all skill levels, including beginners, juniors, and even senior developers.
You can watch a variety of Coursera courses for free if certification is not your goal:
![]() We have covered the best FREE sources for learning JavaScript.
We have covered the best FREE sources for learning JavaScript.
Conclusion
The best 5 FREE sources for learning JavaScript language include “JavaScript for Cats”, “Codecademy”, “MDN JavaScript”, “FreeCodeCamp”, and “Coursera”.
You can achieve a relatively advanced level of knowledge by utilizing these sources.
All of these sources are the best, but MDN JavaScript is an outstanding source for learning purposes.
In this tutorial, we described the five best FREE sources for learning JavaScript, providing the links that mean your desired free source is just a click away.
Convert Array to Object
While programming, you may need to enter multiple records, especially in the case of complex entries.
For instance, when you want to access an item instantly or in the case of inserting and removing an element.
In such cases, converting an array to an object is of great aid as they are comparatively much faster than the arrays and save a lot of time.
This blog will guide you related to transforming the specified array into an object.
How to Convert/Transform an Array to Object?
To convert/transform an array to object, the following approaches can be utilized:
“Object.fromEntries()” method.
“Spread(…)” operator
“Object.assign()” method
“reduce()” method
Go through the mentioned methods one by one!
Method 1: Convert/Transform Array to Object Using Object.fromEntries() Method
The “Object.fromEntries()” method accepts a key-value pair as an argument and returns a new object.
This method can be implemented to convert a two-dimensional array of integers and strings into objects.
Syntax
Object.fromEntries(arrtoObject)
In the given syntax, “arrtoObject” refers to the array which needs to be converted into an object.
Look at the below example for demonstration.
Example
In the following example, we will create a two-dimensional array named “arrtoObject” with the following key-value pairs:
const arrtoObject= [[1, 'LinuxHint'],[2, 'JavaScript'],];
Now, apply the “Object.fromEntries()” method to convert the given array into object and display it:
const toObject= Object.fromEntries(arrtoObject);
console.log(toObject);
The corresponding output will be as follows:
![]()
Method 2: Convert/Transform an Array to Object Using Spread(…) Operator
The “Spread” operator (…) copies all or part of an existing array or object into another array or object.
This method can be applied to target the array values and copy them into objects.
Syntax
[...arrtoObject];
In the above syntax, the spread operator “…” will target all the array values stored in the particular “arrtoObject” variable.
The following example explains the stated concept.
Example
First, initialize an array with the specified string values:
const arrtoObject= ['These', 'are', 'objects'];
Now, apply the spread operator upon the declared array values using “…”.
This will result in converting the array values into objects and log it on the console:
const toObject= {...arrtoObject};
console.log("The converted array to object is:", toObject);
Output
![]()
Method 3: Convert/Transform an Array to Object Using Object.assign() Method
The “Object.assign()” method is implemented to place the values from one or more than one source object to a target object.
This method can be utilized to convert the given string values in an array into target object values.
Syntax
Object.assign(target, ...sources)
Here, “target” refers to the target object, and “sources” are the properties that need to be applied.
Example
Firstly, store the following string values in an array named “arrtoObject”:
const arrtoObject= ['JavaScript', 'Objects'];
Next, apply the “Object.assign()” method to convert the given array passed in its parameter into the target object and display it on the console using the “console.log()” method:
const toObject= Object.assign({}, arrtoObject);
console.log("The converted array to object is:", toObject)
Output
![]()
Method 4: Convert/Transform Array to Object Using reduce() Method
The “reduce()” method implements a reducer function for array elements.
This method can be applied to iterate along the specified array by passing its values to the object.
Look at the following example for demonstration.
Example
First, declare an array named “arrtoObject” with the following values:
const arrtoObject= ['Array', 'Object']
Next, apply the reduce() method with the help of a function to iterate along the created array.
Here, “index” refers to the value’s index, and “key” is the corresponding value.
Finally, log the target object values on the console:
console.log("The converted array to object is:", arrtoObject.reduce(function(target, key, index){
target[index] = key;return target;}, {}))
Output
![]() We have discussed various techniques to convert a given array into an object.
We have discussed various techniques to convert a given array into an object.
Conclusion
In JavaScript, you can utilize the “Object.fromEntries()” method to convert the two-dimensional array into an object, the “Spread(…)” operator method to target the given array values and copy them into objects, the “Object.assign()” method to convert the array into the target object in its parameter or the “reduce()” method to iterate along a particular array by passing it an object.
This blog explained the methods for converting the specified array to an object.
How Can You Place CSS?
“Cascading Style Sheet(CSS)” is essential for applying styling to the overall document design and making a web page attractive and user-friendly.
More specifically, placing CSS is very helpful in performing the complex functionalities, along with making the overall website or web page attractive and accessible.
This write-up will discuss examples of linking CSS with JavaScript.
How Can You Place CSS?
CSS can be placed by getting the HTML head element, creating a new link element, and setting its attributes for accessing the particular CSS file.
Check out the provided example to understand the stated concepts.
Example 1: Creating a Link and Appending it to the Heading Using CSS
In the following example, get the HTML head element using the “document.getElementsByTagName()” method which will include an element into the DOM (Document Object Model) dynamically:
var htmlHead= document.getElementsByTagName('HEAD')[0];
Now, create a new link element using the “document.createElement()” method:
var linkCss= document.createElement('link');
After that, set the attributes for the created link element for relating the current document with the linked document(CSS) by specifying the file type and the file name as follows:
linkCss.rel= 'stylesheet';
linkCss.type= 'text/css';
linkCss.href= 'linkcss.css';
The “appendChild()” method will append the link element which is specified as its argument to the HTML head:
htmlHead.appendChild(link);
In the below step, access the created element named “link” using the class attribute:
<h2 class= "link">Place CSS</h2>
Finally, apply the CSS styling on the added heading.
CSS Code
.link{color: blue;font-size: 24px;text-align: center;}
Output
![]() In the above output, it can be observed that the CSS styling is applied on the specified heading by accessing the created link.
In the above output, it can be observed that the CSS styling is applied on the specified heading by accessing the created link.
Example 2: Creating a Link and Appending it to div Using CSS
In the following example, repeat the above-discussed steps for getting the HTML head element, creating a new link element, assigning the attributes for the created link element, and appending the link element to the HTML head:
var linkCss = document.createElement('link');
linkCss.rel= 'stylesheet';
linkCss.type= 'text/css';
linkCss.href= 'linkcss2.css'; document.getElementsByTagName('HEAD')[0].appendChild(linkCss);
Next, include a “div” in HTML and access the created link with the following value to be displayed on the DOM:
<div class= "link">Place CSS</div>
Lastly, implement the CSS styling on the specified div by referring to the created element “.link”.
The styling includes the adjusting font-size, font-weight, color, background-color, padding, and text-align:
CSS Code
.link{font-size: 24px;font-weight: bold;color: white;background-color: green;padding: 10px;text-align: center;}
Output
![]() We have explained the procedure for placing CSS.
We have explained the procedure for placing CSS.
Conclusion
CSS can be placed by getting the HTML head, creating a new element, and setting the attributes for it, which results in linking the particular CSS file and appending it to the HTML head in order to be applied to the heading or div.
This blog demonstrated the concept of placing CSS with the help of examples.
How to Append String at the End
While programming, there can be situations where it is required to join multiple string values in a single array.
For instance, appending an array of the names and surnames, making an array or a code more readable, or for an accessible document design.
In such cases, appending a string at the end becomes very helpful and saves time.
This article will discuss the methods to append strings at the end.
How to Append String at the End?
To append a string at the end, the following approaches can be utilized:
“join()” Method
“+” Operator
“+=” Operator
“concat()” Method
Go through the mentioned methods one by one!
Method 1: Append String at the End Using join() Method
The “join()” method returns an array as a string by concatenating the items.
This method can be applied to append the strings by placing them in an array and joining them.
Syntax
array.join(separator)
Here, “separator” refers to the separator that needs to be used.
Check out the following example.
Example
In the following example, we will declare two variables named “string1” and “string2” with the specified string values:
let string1= "Python"
let string2= "JavaScript"
Now, place both the strings in the following array with ” ” in between them which will to add a space in between both strings:
array= [string1, " ", string2]
Lastly, append the strings by applying join() method on the array:
alert(array.join(''))
Output
![]() In the above output, the string named “JavaScript” is appended with a space.
To avoid using space and append it, omit the ” ” between the strings in all the demonstrated methods.
In the above output, the string named “JavaScript” is appended with a space.
To avoid using space and append it, omit the ” ” between the strings in all the demonstrated methods.
Method 2: Append String at the End Using + Operator
The “+” Operator can be applied to add two or more two items.
This operator can be utilized to append the string at the end of another string value.
Example
First, declare two strings and store the required values in them:
let string1= "Join"
let string2= "String"
Now, create a variable named “append” and add both strings with a space in between them:
var append= string1 + " " + string2
Finally, display the resultant string value on the console:
console.log("The resultant string after appending is:", append)
Output
![]()
Method 3: Append String at the End Using += Operator
The “+=” operator can be utilized to increment an item iteratively with respect to the specified value used with it.
This technique can be used to create a single variable and apply the specific operator to append the values applied with it sequentially at the end.
The following example explains the discussed concept.
Example
Firstly, create a variable named “string1” and store the specified string value in it:
let string1= "Linux"
Now, use the operator “+=” on the variable containing the string to append the blank space represented by ” ” and the string value “Hint”, one by one:
string1+= " "
string1+= "Hint"
Finally, log the appended string value on the console:
console.log("The resultant string after appending is:", string1)
Output
![]()
Method 4: Append String at the End Using concat() Method
The “concat()” method concatenates two or more arrays or string values.
This method can be applied to concatenate two string values by appending a string at the end of a string value.
Syntax
array1.concat(string2)
In the given syntax, “string2” represents the string value that needs to be concatenated.
The following example explains the stated concept.
Example
Initialize the two variables with the following string values as discussed in the previous methods:
let string1= "Programming"
let string2= "Concepts"
Now, concatenate the string value “Concepts” with the other string using the concat() method and display it on the console:
console.log("The resultant string after appending is:", string1.concat(" ", string2))
Output
![]() We have discussed all the easiest methods to append strings at the end.
We have discussed all the easiest methods to append strings at the end.
Conclusion
To append a string at the end, utilize the “join()” method for placing the string values in a string and joining them, the “+” operator method to add both the string values, “+=” operator to iterate along the values and append them or the “concat()” method for concatenating the specific string value to the end of the other value.
This blog explained the methods to append strings at the end.
How to Close Tab/Window Created Using JavaScript.
While surfing the internet, you often come across situations where you want to close a particular tab/window after a specific time interval or after the task is accomplished.
Every opened tab or window consumes working memory or RAM, which can eventually lead to serious performance issues and slow down other functionalities.
In such cases, JavaScript offers the great functionality of closing the created tab/window automatically.
This article will discuss the methods to close tabs and windows.
How to Close Tab/Window Created Using JavaScript?
To close tab/window created using JavaScript, the following approaches can be utilized:
“window.open()” and “setTimeout()” methods
“window.open()” method and “onclick” event
Go through the mentioned methods one by one!
Method 1: Close Tab Created Using window.open() and setTimeout() Methods
The “window.open()” method opens a new browser window, or a new tab, based on the added values and the “setTimeout()” method accesses a function after a specified set time.
These methods can be used in combination to open a particular tab based on the URL and close it by setting a timeout value.
Syntax
window.open(URL, name, specs, replace)
In the given syntax, “URL” is the page’s URL, “name” is the target attribute, “specs” refer to a comma-separated list of items, and “replace” indicates whether the URL creates a new entry or replaces it.
setTimeout(function, milliseconds, par1, par2)
In the given syntax, “function” refers to the function that needs to be invoked, “milliseconds” is the specific time interval to execute, and “par1”, “par2” are the additional parameters.
Look at the following example for a better understanding.
Example
First, add the specified heading in the “<h2>” tag and create a button with an onclick event which will invoke the “openTab()” method when clicked:
<h2>Close the Tab</h2><button onclick= "openTab()">Click Here</button>
Now, define a function named “openTab()”.
In its definition, call the “window.open()” method to open a new tab with respect to the specified URL.
Lastly, apply the “setTimeout()” method on the function named “closeTab()” to close the tab using the “close()” method.
This will result in closing the particular tab after five seconds:
function openTab(){
var closeWindow= window.open("https://www.google.com");
setTimeout (function closeTab(){
closeWindow.close();},5000);}
The output of the above implementation will result as follows:
![]() If you want to close a created window instead, utilize the following method:
If you want to close a created window instead, utilize the following method:
Method 2: Close Window Created Using window.open() Method and onclick Event
The “window.open() method opens a new browser window, or a new tab, based on the set parameter values as discussed in the previous method, whereas an “onclick” event occurs when the user clicks on an element.
These methods can be used in combination to allocate separate functions for opening and closing the new window and set the dimensions of the created window in parameters.
Syntax
object.onclick= closeWindow(){myScript};
In the above syntax, “closeWindow()” refers to the accessed function.
The following example illustrates the stated concept.
Example
Firstly, include a heading and create two different buttons for opening and closing the window respectively with an onclick event referring to the specified functions:
<h2>Close Window using JavaScript</h2><button onclick= "openWindow()">Click Here to Open a New Window</button><button onclick= "closeWindow()">Click Here to Close a New Window</button>
Next, define a function named “openWindow()”.
In its definition, specify the URL which will be opened in the new window and specify the parameters “width” and “height” values to set the dimensions of the new window:
var open;
function openWindow(){
open= window.open("https://www.google.com", "_blank", "width= 786, height= 786");}
Last, define the closeWindow()” function and apply the “close()” method referring to the variable named “open”, which opens the window in the previous function.
This will result in closing the opened window when the button is clicked:
function closeWindow(){
open.close();}
Output
![]() We have discussed the simplest methods for closing the tab and window created using JavaScript.
We have discussed the simplest methods for closing the tab and window created using JavaScript.
Conclusion
To close a tab/window created using JavaScript, utilize the “window.open()” and “setTimeout()” methods for closing a created tab after a specified time or the window.open() method with parameters and “onclick” event involving separate buttons for each of the functionality and setting the dimensions of the created window in parameters.
This write-up explained the methods to close a tab/window created using JavaScript.
How to Check if String Contains Numbers and Letters
While surfing through the internet, we often come across situations where we need to cover any division of topics that are too large to hold a variety of records, including numbers.
For instance, when you need to create a secure username and password.
In such cases, checking if a string contains numbers and letters can assist you in filtering out the data based on the added condition.
This blog will explain the methods to check if the string contains numbers and letters.
How to Check/Verify if a Particular String Contains Numbers and Letters?
To check if a string contains numbers and letters, the following methods can be utilized:
“Regular Expression” and “addEventListener()” Method
“Regular Expression” and “match()” Method
“Regular Expression” and “test()” Method
Let’s check out each of the methods one by one!
Method 1: Check if String Contains Numbers and Letters Using Regular Expression and addEventListener() Method
A “regular expression” is a sequence of characters that forms a search pattern, and the “addEventListener()” method merges an event handler to a document.
These methods can be implemented to apply a regular expression to the provided value and perform the required check on it.
Syntax
/pattern/modifiers;
Here, “pattern” is a regular expression and “modifiers” refer to a modifier.
document.addEventListener(event, function)
In the above syntax, “event” refers to the specified event, and “function” is the function that will be invoked when the specified event is triggered.
Example
In the following example, we will create a button and include a heading in the <button> and <h2> tags, respectively:
<button>Click Me</button><h2>Result</h2>
Now, access the created button and heading using the “document.querySelector()” method and store them in the specified variables:
let button= document.querySelector("button");
let outputMsg= document.querySelector("h2");
After that, store an alphanumeric value in a variable named “check” which will be used to check the specific condition:
let check= "JavaScript40";
Next, apply the regular expression in which “[a-zA-Z]” matches any character from lowercase “a” through uppercase “Z” and “[0-9]” refers to the numbers from 0 to 9:
let regExp= /^(?=.*[a-zA-Z])(?=.*[0-9])/;
Finally, attach an event named “click” to the created button.
Here, apply the specific regular expression on the particular value to be checked using the “test()” method.
In case the condition is evaluated as true, the message “Numbers and Letters contained!” will be displayed on the Document Object Model(DOM):
button.addEventListener("click", () => {
let isMatch= regExp.test(check)
let result= isMatch ? "Numbers and Letters contained!" : "Please type Numbers and Letters!";
outputMsg.innerText= result;});
The above implementation will result the following output:
![]()
Method 2: Check if String Contains Numbers and Letters Using Regex Operator and match() Method
The “match()” method matches a string with respect to the added string or regular expression.
More specifically, we will use these methods to include an input field, apply a check on the entered values and return the corresponding result via an alert.
Syntax
string.match(regex)
In the given syntax, “regex” refers to the regular expression that needs to be matched with the provided string value.
The following example explains the stated concept.
Example
First, include an input text field with the specified id for entering the values.
Also, create a button with an “onclick” event which will invoke the “numLett()” when triggered:
<body>
Type Numbers and Letters <input type= "text" id= "MyInput"></p><button onclick= "numLett()">Click Me</button></body>
Next, define a function named “numLett()”.
In its definition, fetch the input type specified before by applying the “document.getElementById()” method.
After that, apply a regular expression as discussed in the previous method and match the string value with the expression using the “match()” method.
In this case, if the values get matched with the added regex, the specified message will be displayed with the help of an alert box:
functionnumLett(){
var check= document.getElementById("MyInput");
var regex= /^(?=.*[a-zA-Z])(?=.*[0-9])/;if (check.value.match(regex)){
alert("Numbers and Letters contained!"); }else {
alert('Please type Numbers and Letters!');}}
Output
![]()
Method 3: Check if String Contains Numbers and Letters Using Regular Expression and test() Method
The JavaScript “test()” method tests for a match in the given string.
This method can be applied to test multiple assigned values based on the regular expression.
Syntax
RegExpObject.test(str)
Here, “string” refers to the particular string that needs to be tested.
Example
Firstly, assign different types of values to three constants, including the combination of numbers, letters, and special characters:
const check1= 'javascript40';const check2= 'numbers and letters';const check3= 'with symbols !@#$%^&';
Now, define a function named “numLett()” and pass “str” in its argument that refers to the assigned value that needs to be checked.
Lastly, test the values based on the regular expression by invoking the numLett() function:
function numLett(str){return /^[A-Za-z0-9]*$/.test(str);}
console.log("The condition is:", numLett(check1));
console.log("The condition is:", numLett(check2));
console.log("The condition is:", numLett(check3));
In the following output, the boolean value “true” indicates that the particular string “check1” contains both the numbers and letters:
![]() We have provided the simplest methods to check if a string contains numbers and letters.
We have provided the simplest methods to check if a string contains numbers and letters.
Conclusion
To check/verify if a string contains numbers and letters in JS, utilize the RegExp and the“addEventListener()” method to apply a regular expression and a click event to perform the check upon the button click, the “match()” method to include an input field, apply a check on the entered values and return the corresponding alert or the “test()” method to test multiple values based on the regular expression.
This manual explained the methods for checking if the numbers and letters are contained in a string.
How to Get Unix Timestamp
The Unix timestamp is the time in seconds between a stated period and the Unix Epoch., the timestamp is specified in milliseconds.
Want to get a Unix Timestamp? JavaScript predefined methods can rescue you!
This article will demonstrate the method for getting the Unix timestamp.
How to Get Unix Timestamp?
For getting Unix Timestamp, use the below-given JavaScript methods:
getTime() method
Date.now() method
Let’s discuss these methods one by one!
Method 1: Get Unix Timestamp Using getTime() Method
There are numerous functions available for working with dates and times in the JavaScript Date object.
One of them is the “getTime()” method.
It provides the milliseconds since January 1, 1970 (Unix Epoch).
The getTime() method always represents time using the UTC format.
Syntax
Follow the below-provided syntax for getting Unix timestamp with the help of getTime() method:
Date.getTime();
The above-mentioned method does not take any argument.
Let’s check out an example for getting Unix Timestamp using the getTime() method.
Example
Firstly, we will create a variable “tDate” that stores the date as a string:
var tDate = '2022-09-22';
Then, create an instance of the Date object by passing the date string stored in “tDate”:
var date = new Date(tDate);
Call the getTime() method and divide it by “1000” to get the time in seconds because the Unix timestamp represents the number of seconds between a particular date and the Unix Epoch while the JavaScript getTime() method gives result in milliseconds:
var unixTimeStamp = Math.floor(date.getTime() / 1000);
Finally, print the timestamp using the “console.log()” method:
console.log(unixTimeStamp);
Output
![]() Let’s move on to the next method!
Let’s move on to the next method!
Method 2: Get Unix Timestamp Using Date.now() Method
The “now()” method of the Date Object also helps to get the Unix timestamp.
It offers the most recent millisecond UTC timestamp.
It is the static method; that’s why it must be called with Date Object.
It almost supports all browsers except IE8 and previous versions.
Syntax
Use the given syntax for now() method of the Date Object:
Date.now();
The “Date.now()” method takes no argument and gives the current time in milliseconds.
Example
Now, we will invoke the “Date.now()” method by dividing it by 1000 to get the Unix timestamp in seconds:
Math.floor(Date.now() / 1000);
It can be seen that the Unix timestamp is displayed in seconds:
![]() We have provided the simplest methods for getting the Unix timestamp.
We have provided the simplest methods for getting the Unix timestamp.
Conclusion
For getting a Unix timestamp, you can use the JavaScript predefined methods of the Date Object, including the getTime() method or Date.now() method.
It is preferable to use Date.now() rather than getTime() because it does not create a new instance of the Date object.
This article demonstrates the methods for getting Unix Timestamp.
How to Get Mouse Coordinates
While surfing through the web pages, there is a possibility that you want to locate a malfunctioning cursor or it is required to fetch the overall document’s coordinates for clarity when designing a website., or you may need to create various sections on a web page and align them.
In such cases, getting mouse coordinates can assist you.
This article will discuss the methods to Get mouse Coordinates.
How to Get Mouse Coordinates?
To get mouse coordinates, the “clientX” and “clientY” properties can be used with:
“onclick” event
“pageX” and “pageY” properties with “addEventListener()” method
“onmousemove” event and “getElementbyId()” method
We will now go through each of the listed methodologies one by one!
Method 1: Get Mouse Coordinates Using onclick Event
The “clientX” and “clientY” properties are used to return the horizontal and vertical coordinates of the mouse pointer, respectively.
Whereas an “onclick” event is triggered when the user clicks on an element.
These methods can be implemented to access the horizontal and vertical mouse coordinates by locating the pointer’s latest position with the help of a specified button.
Syntax
object.onclick= mouseCoordinates(){myScript};
In the above syntax, “mouseCoordinates()” refers to the function that will be invoked when a button is clicked.
Example
Firstly, create a button with an onclick event redirecting to the mouseCoordinates() function when it is triggered:
<button onclick= "mouseCoordinates(event)">Click me to get the Mouse Coordinates</button>
Next, define a function named “mouseCoordinates()” which takes the event as an argument.
When the specified events get triggered, the “clientX” and “clientY” properties return the mouse’s updated X and Y coordinate values:
function mouseCoordinates(event){
document.write("Coordinate(X) = " + event.clientX + "<br>Coordinate(Y) = " + event.clientY);}
The above implementation results in the following output:
![]() In case of getting the mouse coordinates of the whole DOM upon scrolling, utilize the below method.
In case of getting the mouse coordinates of the whole DOM upon scrolling, utilize the below method.
Method 2: Get Mouse Coordinates Using pageX and pageY Properties With addEventListener() Method
The “pageX” and “pageY” properties return the horizontal and vertical coordinates, respectively by referring to the “Document Object Model(DOM)” upon the mouse hover and the “addEventListener()” method that attaches an event handler to a document.
These methods can be applied to get the coordinate values of the visible screen and the whole DOM upon scrolling.
Syntax
document.addEventListener(mousemove, mouseCoordinates)
In the above syntax, “click” refers to the specified event, and “mouseCoordinates” is the function on which the event needs to be applied.
Example
Firstly, adjust the height of the overall DOM in the web page in order to get the coordinate value “pageY” upon scrolling it:
<div style= "height: 1000px;"></div>
Next, define a function named “mouseCoordinates()” that accepts the variable “event” as an argument as discussed in the previous method.
This particular variable will be utilized to access the value of pageX, pageY, clientX, and clientY properties for getting the coordinate values of the full web page and the visible screen upon scrolling:
function mouseCoordinates(event){
console.log("pageX: ", event.pageX,"pageY: ", event.pageY,"clientX: ", event.clientX,"clientY:", event.clientY)}
Finally, add an event named “mousemove” and the “mouseCoordinates” as the function that will be invoked to get the coordinates while the pointer is moving:
window.addEventListener('mousemove', mouseCoordinates);
Output
![]() In the above output, it can be observed that while scrolling down, the value of “pageY” increases with the increase in the “y-axis” of the DOM.
In the above output, it can be observed that while scrolling down, the value of “pageY” increases with the increase in the “y-axis” of the DOM.
Method 3: Get Mouse Coordinates Using onmousemove Event and getElementbById() Method
The “onmousemove” event is triggered when the pointer is moving on a specific element, and the “getElementById()” method fetches an element with a specified id.
These methods can be applied to display the fluctuating coordinate values upon the mouse hover on DOM.
Syntax
document.getElementById(elementID)
Here, “elementID” refers to the specified id of the added element.
Example
Firstly, assign an id named “output” to paragraph.
Then, apply the “onmouse” event to the overall document and assign it the function mouseCoordinates() that will be invoked accordingly:
<p id= 'output'></p>
document.onmousemove= mouseCoordinates;
In the next step, fetch the created paragraph element by specifying its id in the document.getElementById() method:
var output= document.getElementById('output');
Here, define a function named “mouseCoordinates()” taking the event as an argument as discussed in the previous methods.
In its function definition, utilize the “clientX” and “clientY” properties with the event to get the “X” and “Y” mouse coordinates upon moving the cursor.
Finally, display the corresponding coordinates on the DOM with respect to the cursor’s position as the innerHTML of the fetched paragraph named as “output”:
function mouseCoordinates(event){
var xPos= event.clientX;
var yPos= event.clientY;
output.innerHTML= "Coordinate (X) : " + xPos + " " + "pixels <br>Coordinate (Y) : " + yPos + " " + "pixels";}
Output
![]() This write-up has compiled the methods to get mouse coordinates.
This write-up has compiled the methods to get mouse coordinates.
Conclusion
To get mouse coordinates, apply the “clientX” and “clientY” properties with the onclick event to get the latest mouse coordinates upon the button click, the “pageX” and “pageY” properties and “addEventListener()” method to get the coordinates of both the overall DOM and the current screen or with an “onmousemove” event and “getElementbyId()” method to display the changing coordinates upon hovering the mouse.
This blog demonstrated the methods to get mouse coordinates.
How to Get Image Dimensions
We often encounter situations where we want to adjust the size of the images for the proper structure and adjustment of the overall Document Object Model (DOM) while testing a web page or a website.
For instance, in the case of adjusting the space to be reserved for a particular image, it gets loaded.
In such cases, you can utilize the different JavaScript methods for getting image dimensions.
This article will discuss the methods to Get Image Dimensions.
How to Get Image Dimensions?
To get image dimensions, the following approaches can be utilized:
“width” and “height” properties
“document.querySelector()” method and “onclick” event
“addEventListener()” method
Go through the discussed methods one by one!
Method 1: Get Image Dimensions Using width and height Properties
The “height” and “width” properties set the height and width of the specified element.
These properties can be utilized along with a keyword referring to the current object to get the image’s dimensions.
Syntax
object.style.width
In the given syntax, the width of the specified object will be fetched.
object.style.height
Here, the height of the added object will be fetched.
Example
First, create an instance HTMLImageElement instance using the image() constructor and access the image to be accessed for dimensions by specifying its path:
var dimensions= new Image();
dimensions.src= 'template.jpg';
Next, apply an onload event such that when the window loads, the “width” and the “height” properties along with the object access the height and width of the specific image and display it via alert:
dimensions.onload= function(){
alert(this.width + 'x' + this.height);}
The corresponding output will be as follows:
![]()
Method 2: Get Image Dimensions Using document.querySelector() Method and onclick Event
The “document.querySelector()” method gets the first element matching a CSS selector and the “onclick” event occurs when the user clicks on an element.
These methods can be used in combination to access the image path and fetch its dimension on the button click.
Syntax
document.querySelector(CSS selectors)
Here, “CSS selectors” represents one or more than one CSS selectors.
object.onclick= imgSize(){myScript};
In the above syntax, “imgSize()” refers to the function that will be invoked when an “onclick” event gets triggered.
Example
In the following example, we will create a button and attach an onclick event to it which will invoke the imgSize() function when triggered:
<button type= "button" onclick= "imgSize();">Get Image Dimensions</button>
Now, specify the path of the image in the “<img>” tag:
<img src= 'template.jpg' id= "dim">
After that, define a function named “imgSize()”.
In its definition, access the image and fetch its width and height using the width and height properties, respectively, as discussed in the previous method, and display it in the alert box:
function imgSize(){
var dimensions= document.querySelector("#dim");
var width= dimensions.width;
var height= dimensions.height;
alert("Original , " + "Original923" data-lazy-src="https://linuxhint.com/wp-content/uploads/2022/10/word-image-237501-2.gif">
Method 3: Get Image Dimensions Using addEventListener() Method
The “addEventListener()” method attaches an event handler to a document.
This method can be implemented to access the created button and image and apply a click event for getting the image dimensions upon the button click.
Syntax
document.addEventListener(click, function)
In the above syntax, “click” refers to the specified event, and “function” is the function that will be invoked, respectively.
Example
First, create a button and specify the image path with a particular height and width values:
<button>Get Image Dimensions</button><span id= "size"></span><hr><img src= 'template.jpg' > style= "height:300px; width:300px;"
Now, access the created button and the specific image using the “document.querySelector()” method.
Then, add the event “click” to the button and apply the naturalWidth and naturalHeight properties in order to log out the original width and height of an image:
let btn= document.querySelector('button');
let dimensions= document.querySelector('#size');
let img= document.querySelector('img');
btn.addEventListener('click', () =>{
dimensions.innerText= `Height: ${img.naturalHeight} Width: ${img.naturalWidth}`;});
Output
![]() We have explained the simplest methods to get image dimensions.
We have explained the simplest methods to get image dimensions.
Conclusion
To get image dimensions, utilize the “width” and “height” properties to create an object and access the width and height of the specific image, respectively, the “document.querySelector()” method and “onclick” event to access the image path and get its dimension on the button click or the “addEventlistener()” method to access the created button and image and apply a click event for getting the corresponding image dimensions.
This blog explained the methods to get image dimensions.
How to Remove All Non-Alphanumeric Characters
In JavaScript, the non-alphanumeric character in a string makes it difficult to read and understand.
However, JavaScript offers different options to manipulate strings.
More specifically, the removal of characters from a string variable is one such modification that can help you remove all non-alphanumeric characters.
This article will illustrate the procedures for removing all non-alphanumeric characters.
How to Remove All Non-Alphanumeric Characters?
For removing all non-alphanumeric characters, utilize the “replace()” method.
In the replace() method, two arguments are passed; one is the searched string that will be replaced, and the other is the replacement value.
For instance, we will pass an empty string as the second parameter, which is the replacement of the searched string, and the regex for non-alphanumeric characters as the first argument to eliminate non-alphanumeric characters, including spaces.
Syntax
Use the following syntax to use the replace() method for the elimination of non-alphanumeric characters from a string:
replace("searchedValue", "replacement")
Here, the non-alphanumeric characters in a string are the “searchedValue” that will be searched in the string and removed as a replacement with an empty string that will work as the replacer or “replacement”.
Let’s go to the examples to learn more about the replace() method.
Example 1: Using replace() Method with Regular Expression
We will first create a variable named “str” that contains a string with non-alphanumeric characters:
var str = "Li!nu%x#hint* is$ th^e bes`t web’si!te";
Then, create a pattern stored in a variable called “regexPattern”:
var regexPattern = /[^A-Za-z0-9]/g;
Pass the pattern and an empty string to the replace() method:
var ans = str.replace(regexPattern, "");
Lastly, display the result on the console using the “console.log()” method:
console.log(ans);
As you can see, the replace() method successfully removed all non-alphanumeric characters from a string:
![]()
Example 2: Using replace() Method with Metacharacter(\W)
Here, we will eliminate all non-alphanumeric characters that are also called the special characters from a string using Metacharacter(\W) that is also a form of the regex.
It will match all non-alphanumeric characters, including spaces in a string.
Here, we will use the same string created in the previous example and invoke the replace() method by passing Metacharacter(\W) as the first parameter with an empty string that will place by removing all the non-alphanumeric characters from a string:
var ans = str.replace(/\W/g, "");
Finally, print the result with the help of the “console.log()” method:
console.log(ans);
It can be seen that non-alphanumeric characters from a string:
![]() We have provided the simplest and easy method for removing all non-alphanumeric characters from a string.
We have provided the simplest and easy method for removing all non-alphanumeric characters from a string.
Conclusion
To eliminate all the non-alphanumeric characters from a string, you can use the JavaScript replace() method.
This method will search the string according to the pattern and replace them with an empty string.
For eliminating non-alphanumeric characters from a string, either a regular expression or a Metacharacter(\W) can be used.
This article illustrated the methods for removing all non-alphanumeric characters.
How to Remove Digits After Decimal
While developing a web application, programmers frequently need to manipulate the data stored in the database and transform floating-point and double-precision numbers into integer numbers.
Are you stuck in a similar situation? If yes, then no need to worry! JavaScript predefined methods can assist you.
This blog will demonstrate the methods for removing digits after the decimal points.
How to Remove Digits After Decimal?
To eliminate or remove digits after decimal, you can use:
parseInt() method
Math.trunc() method
Math.round() method
Math.floor() method
Math.ceil() method
Let’s check how these methods perform!!
Method 1: Remove Digits After Decimal Using parseInt() Method
Using the JavaScript predefined “parseInt()” method, the specified number is parsed to the nearest whole number.
Syntax
Use the below syntax for the parseInt() method:
parseInt(number);
Here, “number” is passed to the parseInt() method that will parse it and remove the digits from the decimal point.
Check out the following example!
Example
In this example, we will pass the number “17.90” to the “parseInt()” method for eliminating the digits after the decimal point:
console.log(parseInt(17.90));
Here, the output shows that the parseInt() method successfully removed the digits “90” from the number “17.90”:
![]() Let’s move to the second method!
Let’s move to the second method!
Method 2: Remove Digits After Decimal Using Math.trunc() Method
The most common method for removing decimal places is “Math.trunc()”.
It accepts the input in the form of positive, negative, or floating-point numbers and outputs the integer part after removing the digits after the decimal point.
Syntax
Follow the given syntax for removing digits after decimal using the trunc() method:
Math.trunc(number);
Example
In this example, we will pass the number “128.45” to the “Math.trunc()” method:
console.log(Math.trunc(128.45));
The digits “45” are now removed from the specified number:
![]() Let’s see another method.
Let’s see another method.
Method 3: Remove Digits After Decimal Using Math.round() Method
The “Math.round()“ method rounds off the decimal value to the nearest integer.
Syntax
The round() method can be used with the syntax shown below:
Math.round(number);
Example
Here, we will pass the number “65.72” to the round() method to remove the decimal part of the number, which is “72”:
Math.round(65.72);
“66” is returned as output because of the digit “7” after the decimal point, the Math.round() method incremented or round off the given number:
![]()
Method 4: Remove Digits After Decimal Using Math.floor() Method
The “Math.floor()” method always rounds down the number to the nearest integer nearest zero.
Syntax
Follow the below-provided syntax to use the Math.floor() method for eliminating digits after the decimal point:
Math.floor(number);
Example
We will pass the number “2.96” as a parameter in the Math.floor() method to eliminate the decimal part of it:
Math.floor(2.96);
Output
![]()
Method 5: Remove Digits After Decimal Using Math.ceil() Method
The “Math.ceil()” method of the Math class returns the next largest integer of the input float number.
It works the opposite of the Math.floor() method.
Syntax
Follow the below-given syntax to use the Math.ceil() method:
Math.ceil(number);
Example
Here, we will pass the number “14.7” to the Math.ceil() method:
Math.ceil(14.7);
It can be seen from the output that the number “14.7” is rounded to “15”:
![]() We have compiled all the methods for eliminating digits after the decimal points.
We have compiled all the methods for eliminating digits after the decimal points.
Conclusion
For removing digits after decimal point, you can use the JavaScript built-in methods including parseInt(), Math.trunc(), Math.round(), Math.floor(), or Math.ceil().
All of these methods efficiently remove the digits after the decimal point.
The Math.trunc() method is the most commonly used method for this purpose.
In this blog, we have demonstrated the methods for eliminating or removing digits after the decimal points with detailed examples.
How to Remove Specific Special Characters from a String
In JavaScript, to make the string easy to read and understand, you need to eliminate any special characters from it.
More specifically, the special characters include punctuation marks or symbols, which make the text less understandable and readable if added in string or text.
This study will define the procedure for removing a specific special character from a JavaScript string.
How to Remove Specific Special Characters from a String?
For removing a specific special character from a JavaScript string, utilize the JavaScript “replace()” method.
It is a predefined method of the String type object.
This method accepts two parameters, the search value, and the replacement value, and gives a string as output with a specific replacement after searching the string for a specific value or a regex pattern.
Syntax
Follow the below-mentioned syntax to use the replace() method for removing a specific special character from a string:
replace("searchedValue", "replacement")
Here, the special character will be represented as “searchedValue” that will be searched in a string and replaced with the “replacement” value which will be an empty string.
Let’s examine several examples to understand the replace() method better.
Example 1: Replace Specific character (#) from a JavaScript String
In this example, we will remove the specific character hash “#” from a string.
To do so, first, we will create a variable named “string” that contains the following value:
var string = "Welcome To Linux#Hint";
Now, call the replace() method and passing “#” and an empty string as parameters.
The replace() method will work in such a way that it will search for the hash character in a string and replace it with an empty string:
var res = string.replace('#', "");
Finally, print the resultant string with the help of the “console.log()” method:
console.log(res);
It can be seen that the hash character is successfully removed from the specified string:
![]() For replacing any specific character, you only have to specify it in the replace() method as a parameter as shown in above example, while to remove all the special characters from a string, check out the next example.
Example 2: Replace All Special Characters
For removing all special characters from a string, use the regex pattern.
First, create a variable named “string1” that contains a string with special characters:
var string1 = "Welcome* T^o L!inux#Hint";
Then, invoke the “replace()” method by passing a regex pattern that checks the string whether any special character is present in the string or not.
If yes, it removes them and places an empty string as a replacer:
var result = string1.replace(/[^a-zA-Z ]/g, "");
Lastly, display the updated string value on the console:
console.log(result);
As you can see, all of the specific special characters are now removed:
For replacing any specific character, you only have to specify it in the replace() method as a parameter as shown in above example, while to remove all the special characters from a string, check out the next example.
Example 2: Replace All Special Characters
For removing all special characters from a string, use the regex pattern.
First, create a variable named “string1” that contains a string with special characters:
var string1 = "Welcome* T^o L!inux#Hint";
Then, invoke the “replace()” method by passing a regex pattern that checks the string whether any special character is present in the string or not.
If yes, it removes them and places an empty string as a replacer:
var result = string1.replace(/[^a-zA-Z ]/g, "");
Lastly, display the updated string value on the console:
console.log(result);
As you can see, all of the specific special characters are now removed:
![]() We have gathered the simplest method for removing a specific special character in a string.
We have gathered the simplest method for removing a specific special character in a string.
Conclusion
For removing a specific special character from a string, utilize the “replace()” method.
Based on the provided pattern in replace() method, the method searches the string on it and replaces them with the defined replacer.
You can modify or construct the pattern as per your need.
In this study, we have discussed the procedure for removing a specific special character from a JavaScript string.
How to Trigger Click Event
While programming, we often encounter situations where we want to invoke any function upon the button click.
For instance, in the case of automation testing, you need to test some added functionality of a web page or a site.
In such scenarios, the technique of triggering click events becomes very handy and efficient for countering the stated challenges.
This write-up will guide you about the procedure to trigger click events.
How to Trigger Click Event?
To trigger click event, apply the following techniques:
“click()” method
“addEventListener()” and “dispatchEvent()” methods
Now, we will demonstrate the use of the above-mentioned methods one by one!
Method 1: Trigger Click Event Using click() Method
The “click()” method is used to perform a click on the specified element.
This method can be implemented by creating a button, getting its id, and triggering the click event when the button is clicked using a user-defined function.
Go through the following example for demonstration.
Example
In the following example, a button will be added with having “Click Me” as its id and its associated onclick event, which will access the “clickEvent()” function:
<button type= "button" id= "btn" onclick= "clickEvent()">Click Me</button>
In JavaScript code, access the created button by specifying its id in the document.getElementById() method.
After that, the “click()” method will be invoked to perform the further operation:
const get= document.getElementById('btn');get.click();
Finally, define the function named “clickEvent()” in such a way that it will print out the following message on the console when the button is clicked using the “click()” method:
function clickEvent() {
console.log("Click Event triggered")}
The output of the above implementation will result as follow:
![]() In the above output, it is observed that the button “Click Me” is clicked in an automated way using the “click()” method.
Meanwhile, the clickEvent() function is accessed, and the specified message is logged on the console.
In the above output, it is observed that the button “Click Me” is clicked in an automated way using the “click()” method.
Meanwhile, the clickEvent() function is accessed, and the specified message is logged on the console.
Method 2: Trigger Click Event Using “addEventListener()” and “dispatchEvent()” Methods
The “addEventListener()” method attaches an event handler to a DOM object and the “dispatchEvent()” method dispatches the specified event to the object.
These methods can be used in combination to create a new Event object and execute the click event with the help of the specified function.
Syntax
document.addEventListener(event, function)
In the above syntax, “event” refers to the specified event, and “function” is the function on which the event is to be applied.
dispatchEvent(event)
Here, “event” refers to the selected event object that needs to be dispatched.
Overview the following example.
Example
The first step is to include a button with an id, an onclick event and a value as discussed in the previous method:
<button type= "button" id= "btn" onclick= "clickEvent()">Click Me</button>
Then, fetch the button and add the event “click” using the “addEventListener()” method and specify “e” in its argument which refers to the event(click) object.
Then, the “dispatchEvent()” method will dispatch the click event to an object named “Event” as demonstrated:
const get = document.getElementById('btn');get.addEventListener('click', e => {});get.dispatchEvent(new Event('click'));
Lastly, define the same clickEvent() function as stated in the previous method to display the corresponding message when the “click” event is triggered:
function clickEvent() {
console.log("Click Event triggered")}
Output
![]() We have compiled different methods to trigger click events.
We have compiled different methods to trigger click events.
Conclusion
To trigger click events, the “click()” method can be applied to fetch the button and invoke the added function accordingly.
Also, the “addEventListener()” and “dispatchEvent()” methods can be utilized to include a specified event and dispatch it to a newly created object.
This article demonstrated the methods to trigger click events.
How to Trim All Items in Array
In JavaScript, you often encounter a bulk amount of data that needs proper formatting, which cannot be handled separately.
For instance, when you want to append some new data in an array and delete the old data or some part of data in the case of an update.
In such cases, trimming items in an array can help you in saving a lot of effort and time.
This blog will explain the methods to trim all items in an array.
How to Trim/Omit All Items in an Array?
To Trim All Items in Array, you can utilize:
“trim()” method
“splice()” method
We will now go through each of the mentioned approaches one by one!
Method 1: Trim All Items in Array Using trim() Method
The “trim()” method removes the whitespace from both ends of the provided value without any change in the original string.
You can apply this method to remove the whitespaces from the start and end of the given array items.
Syntax
string.trim()
Here, “string” refers to the string value from which the whitespaces will be removed.
Let’s go through the following example for demonstration
Example
Firstly, we will declare an array named “array” and store the integer and character values in it and display it on the console using the “console.log()” method:
const array = [' a ', ' b ', ' 1 ', ' 2 '];
console.log("The Original Array is:", array)
Next, we will map the defined array to the “trim()” method.
This will remove blank spaces from both ends of the array values:
const trimArray = array.map(element => {
return element.trim();});
Finally, we will log the updated array values on the console:
console.log("The trimmed Array is:", trimArray);
The output of the above implementation will result as follows:
![]() Want to trim all array elements? Check out the following section!
Want to trim all array elements? Check out the following section!
Method 2: Trim All Items in Array Using splice() Method
The “splice()” method updated the elements of the array by replacing existing elements with updated ones.
We will apply this method to trim all items in an array so that no item is left in an array.
Syntax
array.splice(index, howmany, item1,..item n)
Here, “index” refers to the item’s index, “howmany” refers to the number of items, and “item1” refers to the item.
Look at the below example.
Example
In the example below, we will declare a variable named “trimArray” and initialize it with the integer and character values:
var trimArray = [' a ', ' b ', ' 1 ', ' 2 '];
console.log("The Original Array is:", trimArray)
Now, we will apply the “splice()” method with “0” as an argument.
This will result in trimming all items such that no integer or character is left behind in an array:
trimArray.splice(0)
Finally, we will display the resultant array:
console.log("The trimmed Array is:", trimArray);
Output
![]() We have compiled the easiest method to trim spaces from the start and end of an array element and trim all array elements as once.
We have compiled the easiest method to trim spaces from the start and end of an array element and trim all array elements as once.
Conclusion
To trim all items in an array, you can use the “trim()” method by mapping the array items to be trimmed to the specified method and the “splice()” method to trim the array items based on the argument value of the method.
This manual provided the easiest methods to trim all array items.
How to Trim Character From End of String
There can be a possibility where there is a need to correct a string value that is added mistakenly.
In such a situation, it is required to update the current data.
For instance, while trimming a sentence into words, there might be words that have blank spaces at the end of the word.
In such cases, the technique of trimming characters becomes very helpful in removing unnecessary characters and ensuring overall proper formatting.
This article will illustrate the methods to trim characters from the end of a string.
How to Trim Character From End of the String?
To trim characters from the end of the string, the following methods can be applied:
“substring()” Method.
“slice()” Method.
Check out the above-mentioned methods one by one!
Method 1: Trim a Character From the String’s End Using substring() Method
The “substring()” method extracts characters from the start till the end without any change in the original string value.
This technique can be applied to trim the last string character by removing the last element using the “length” property.
Syntax
string.substring(start, end)
Here, “start” refers to the start index, and “end” refers to the end index of the given string.
The following example will demonstrate the explained concept.
Example
Firstly, a variable named “trimLast” is created having the following value:
var trimLast= "Trim Character from Endd";
Now, the “substring()” method will be applied to trim the last character.
This will be done by specifying the index of the first string character as “0”.
For the last index, the “length” property will be utilized, and “1” will be subtracted from it to trim the last string character:
trimLast= trimLast.substring(0, trimLast.length - 1);
Finally, the updated string value will be displayed on the console:
console.log("The String after trimming character from End is:", trimLast)
It can be seen that the last “d” is trimmed from the given string:
![]()
Method 2: Trim Character From End of String Using slice() Method
The “slice()” method slices up the selected items and gives a new array of the particular items.
This method can be utilized to trim the last string character by referring to the index of the last character and slicing it.
Syntax
array.slice(start, end)
In the above syntax, “start” is the start index, and “end” refers to the last index.
The following example explains the above concept.
Example
We will consider the already created string.
Now, the “slice()” method will be applied with “0” referring to the first string character and “-1” as the last string character.
This method will work in such a way that the “-1” index will slice the last string character, and a new string value will be returned:
trimLast= trimLast.slice(0, -1);
Lastly, the updated string value after trimming will be logged on the console:
console.log("The String after trimming character from End is:", trimLast)
Output
![]() We have compiled different approaches for trimming characters from the end of String.
We have compiled different approaches for trimming characters from the end of String.
Conclusion
To trim characters from the end of the string, the “substring()” method can be applied along with the “length” property to refer to the string’s total length and subtract the last character value from it or the “slice()” method to refer to the index position of the last string character and slice it accordingly.
This blog explained the methods to remove characters from the string’s end.
How to Validate Email Address
The process of verifying the entered values by the users is known as validation.
It improves user experience and is significant to web applications.
Validation is used to verify a user’s identity by checking the user’s email, password, mobile number, and a variety of other information.
This technique is most utilized while creating forms for websites.
In this post, we will talk about some common methods for validating email addresses.
How to Validate Email Address?
When verifying an HTML form, validating the email is a critical step., you can validate the email address:
Using regex
Without regex
Let’s examine how these approaches will validate the email.
Method 1: Validate Email Address Using Regex
To validate an email, you can use a regex pattern/regular expression with JavaScript “match()” method.
The value of the specified email in an input field is compared to a regular expression or regex pattern using the match() method.
Syntax
Follow the below syntax for validating an email using the match() method:
inputText.value.match(regexPattern);
Here, the “regexPattern” is the regular expression that will match the text field’s value.
Now, check out the following example.
Example
In this example, we will create a HTML form that contains an input value and a button that will check whether the entered email is valid or not by calling the user-defined JavaScript function named as “mailValidation()”:
<form name="form" action="#">
<input type="text" id="txt" placeholder="Enter your email">
<button type="submit" onclick="mailValidation()">Submit</button></form>
In the JavaScript file, we will define the “mailValidation()” method that takes the value of the input field as a parameter.
After that, define a regex pattern for email that follows A-Za-z alphabets, characters, 0-9 digits, with @ and (.).
Then, call the match() method with the input text value by passing the regex pattern.
If the value of the input text matches the regex, an alert will show with the message “Valid email address!”; else, the alert shows a specified message:
function mailValidation(inputText) {
regexPattern = /^[a-zA-Z0-9.!#$%&'*+/=?^_`{|}~-]+@[a-zA-Z0-9-]+(?:\.[a-zA-Z0-9-]+)*$/;
inputTextVal = document.getElementById("txt");
if(inputTextVal.value.match(regexPattern))
{
alert("Valid email address!");
return true;
}
else
{
alert("You have entered an invalid email address!");
return false;
}
}
It can be seen that our defined methodology is working perfectly for verifying email address:
![]() Let’s see another method to validate email without using regex.
Let’s see another method to validate email without using regex.
Method 2: Validate Email Address Without Using Regex
For validating email without regex, you can use the “includes()” method.
It gives a boolean value as an output.
It accepts characters as an argument and returns “true” if they exist in the input, else it outputs “false”.
Syntax
Follow the below-provided syntax to use the includes() method:
string.includes(characters);
Here, “characters” are the (@) sign and (.) which will be checked in the entered email.
Example
In this example, we will make changes in the above-created JavaScript function named “mailValidation()”.
Here, we will use the includes() method in function to check the input value whether it contains (@) sign and (.) or not:
function mailValidation(inputText) {
inputTextVal = document.getElementById("txt");
if(inputTextVal.value.includes("@", "."))
{
alert("Valid email address!");
return true;
}
else
{
alert("You have entered an invalid email address!");
return false;
}}
Output
![]() We have compiled the simplest methods to validate email addresses using JavaScript.
We have compiled the simplest methods to validate email addresses using JavaScript.
Conclusion
To validate an email address, you can use the “match()” method for validating with regex or the “includes()” method for validating the email without using regex.
The match() method matches the entered email address with the particular regex while the includes() method checks the “@” and the “.” in the email whether both are included in the entered email or not.
This post discussed the methods for validating email addresses with detailed examples.
JavaScript => | Explained
In JavaScript, the “=>” is the called “arrow function”.
novel functionality that was included in ES6.
In some languages, such as Python, the arrow function is called “lambda functions”.
You can write JavaScript functions more precisely due to the arrow function.
It improves the readability and structure of the code.
A developer can use arrow functions to achieve the same result as a regular function, with fewer lines of code and about 50% less typing.
This tutorial will define the working of the arrow function (=>).
JavaScript Arrow “=>” Function
The anonymous function known as the “arrow function” lacks a name and is not connected to an identifier.
These functions are defined without the function keyword, and the return statement is optional for such functions without arguments.
A function’s input is placed on the left, whereas the right side of the function represents the output.
The arrow function enables you to more clearly define a function to increase the readability of the code.
Syntax
Follow the below given syntax for writing function with the help of the arrow function (=>):
() => statement/expression;
OR
var functionName = (arg1, arg2, ...) => {statements};
You can use var, let, or const as a data type.
However, you can utilize the var keyword for defining the arrow function.
Example 1
Here, we will create an arrow function that will print the message “Welcome To LinuxHint” on the console:
var printMsg = () => console.log('Welcome To LinuxHint');
Then, call the arrow function that is stored in a variable “printMsg”:
printMsg();
Output
![]() Example 2
In this example, we will perform the same task with both a regular function and the arrow function.
To do so, we will create a regular JavaScript function to multiply two numbers specified as arguments:
var product = function(a, b) {
return a * b;};
Then, call the function by passing two values “5” and “8” arguments:
product(5,8);
The output displayed “40” which is the product of the given arguments:
Example 2
In this example, we will perform the same task with both a regular function and the arrow function.
To do so, we will create a regular JavaScript function to multiply two numbers specified as arguments:
var product = function(a, b) {
return a * b;};
Then, call the function by passing two values “5” and “8” arguments:
product(5,8);
The output displayed “40” which is the product of the given arguments:
![]() Now, we will perform the same operation with the help of the arrow function only in one line of code:
var product = (a, b) => { return a * b };
Then, call the arrow function that is stored in a variable “product” by passing two arguments:
product(5,8);
Here, you can see in the output, you will get the same result in just two lines of code:
Now, we will perform the same operation with the help of the arrow function only in one line of code:
var product = (a, b) => { return a * b };
Then, call the arrow function that is stored in a variable “product” by passing two arguments:
product(5,8);
Here, you can see in the output, you will get the same result in just two lines of code:
![]()
Difference Between Regular Function and Arrow Function
There are some differences between arrow functions and regular JavaScript functions, yet both functions are similar in some ways:
Regular functions are constructible and callable, while the arrow functions can only be called, but cannot be constructed.
Regular functions can be called with the new keyword because they can be constructed, while the new keyword cannot be used to invoke the arrow functions.
Duplicate named parameters are allowed for regular functions but not for arrow functions.
Pros and Cons of Arrow Functions
| Pros | Cons |
|---|
| It reduces the lines of code, which improve code readability. | It is more difficult to debug because you cannot identify the function name or the particular line number where an error occurred. |
| Writing the arrow => offers greater flexibility than writing the function keyword. | It must not be utilized as a regular method or constructor. |
We have covered all the basic information about the arrow function (=>).
Conclusion
In JavaScript, the “=>” is the called “arrow function” that allows writing functions more precisely to improve the readability of the code.
It gives the same result as the JavaScript regular functions with fewer lines of code.
In this tutorial, we have discussed the working of arrow function (=>) with their pros and cons and the difference between regular function and arrow function.
JavaScript Enum | Explained
Enums, also known as enumerated types, are unique data types that describe variables as a collection of pre-determined constants.
Although enum types are not directly present, you can build enum-like types in your program.
To contain the enumerated type, you can define an object and assign keys to each enum value.
This write-up will demonstrate the enums with their syntax and types.
JavaScript Enum
A collection of constants is represented as an enum., Enums can be implemented simply by creating an object that contains the enum type and assigning a key to each enum value.
These items are separated by commas.
Syntax
The syntax for enum is as follows:
const EnumType = {
<enumConstant1> : <value1>,
<enumConstant2> : <value2>,
...
<enumConstantN> : <valueN>}
Here, the “enumConstant” are the keys and the “value” are the values assigned to the enums.
Types of Enum
There are three types of enum:
Numeric enum
String enum
Heterogeneous enum
Let’s discuss these types in detail!
Numeric Enum
Numeric enums are number-based enums, which means that string values are stored as numbers.
The values in numeric enums are automatically incremented.
Syntax
Use the below syntax for creating the numeric enum:
const enumName ={
M: 0,
N: 1}
Here, we have saved the alphabets in enums with assigned numeric values.
Example
In this example, we will create an enum that will be created by defining an object, and then we will assign the values to the enums in the form of the key-value pair.
Enum values will start with zero and will be incremented by one for each member:
const fruits ={
Mango: 0,
Apple: 1,
Apricot: 2,
Orange: 3,
Peach: 4}
Now, we will check the enum value against the numeric value 1, by creating a constant and assign it the same value:
const fruit = 1;
Lastly, utilize the strict equality operator “===” to compare the value of the constant with the fruits.Apple enum value:
console.log(fruit === fruits.Apple);
The given program will output “true”, which means that the enum value of Apple is equal to the value of constant fruit:
![]()
String Enum
The only difference between string and numeric enums is that string values are used to initialize the enum values rather than numeric values.
When debugging a program, it is simpler to understand text values than numeric numbers.
Another advantage of using string enums is that they provide better readability.
Syntax
Follow the below-mentioned syntax for string enum:
const enumName ={
Y: "YELLOW",
P: "PEACH"}
Here, we have created an enum type for alphabets with assigned string literals.
Example
Now, we will use the same enum created in the above example but with different values.
These enum values are initialized with string literals.
Numeric enum values are automatically incremented, whereas string enum values must be explicitly set.
This is the main difference between numeric and string enums:
const fruits ={
Mango: "YELLOW",
Apple: "RED",
Apricot: "LIGHTYELLOW",
Orange: "ORANGE",
Peach: "PEACH"}
Get the value of enum key “Mango” and display on the console:
console.log(fruits.Mango);
The output returns “YELLOW” as the value of the required enum:
![]()
Heterogeneous Enum
Enums that contain both string and numeric elements are known as heterogeneous enums.
Syntax
Use the following syntax for creating heterogeneous enum:
const enumName ={
M: "YELLOW",
P: 4}
Example
Here, we will create a heterogeneous enum that contains both numeric values and string literals:
const fruits ={
Mango: "YELLOW",
Apple: 1,
Apricot: 2,
Orange: "ORANGE",
Peach: 4}
Lastly, print out the required enum values on the console:
console.log(fruits.Mango, fruits.Apple);
![]() We have covered all the essential information about JavaScript enums.
We have covered all the essential information about JavaScript enums.
Conclusion
Enum types are not directly supported by Javascript; however, create enum-like types.
For this purpose, define an object and assign a value to each enum key to contain the enumerated type.
Using JavaScript, you can create different types of enums: numeric enum, string enum, and heterogeneous enum.
In this write-up, we have demonstrated the enums with their syntax and types.
JavaScript forEach()
While working with arrays, you may need to iterate the array to get output while performing some operations on them.
To do so, JavaScript provides some methods, including the “forEach()” method that will execute the specified function one time for every element inside an array.
This article will illustrate the functionality of the JavaScript forEach() method.
What is JavaScript forEach() Method?
The “forEach()” method iterates through an array’s elements while calling a function.
It utilizes a function differently than the traditional “for loop”.
This method’s return value is always undefined.
Depending on the functionality of the argument function, this method may or may not modify the passed array.
Syntax
Follow the given -mentioned syntax to use forEach loop:
forEach(callback(element, index, arr));
Here, the “callback()” is the function that will be invoked for each element of the array stored in this parameter, “element” is the value of an array that will be processed, “index” is the index of the element that will be processed, and “arr” is the array that is passed to the method.
The “arr” and the “index” are the optional arguments, while the “element” is mandatory.
Example 1
In this example, first, we will create an array of odd numbers:
var oddNumbers = [1, 3, 5, 9, 11];
Now, we will print the elements of the array on the console:
oddNumbers.forEach(function(number) {
console.log(number);});
Output
![]() Now, let’s see how to use the forEach() method with an HTML file.
Example 2
Here, in HTML file, we will create a button that invoke the “findSquare()” method when its onclick event is triggered:
<button type="submit" onclick="findSquare()">Click to see the square of odd numbers:</button>
Next, define a function named “findSquare()” that contains an array of odd numbers and an empty array.
In its function definition, call the Foreach() method that will square every element of array and then push it in the empty “square” array:
function findSquare() {
var oddNumbers = [1, 3, 5, 9, 11];
var square = [];
oddNumbers.forEach(function (number) {
square.push(number * number);
});
Lastly, print out the new values using the “document.write()” method:
document.write("Square of Odd numbers '1,3,5,7,9,11' is: ");
document.write(square);
When the button is clicked, all of the values of the square array are displayed:
Now, let’s see how to use the forEach() method with an HTML file.
Example 2
Here, in HTML file, we will create a button that invoke the “findSquare()” method when its onclick event is triggered:
<button type="submit" onclick="findSquare()">Click to see the square of odd numbers:</button>
Next, define a function named “findSquare()” that contains an array of odd numbers and an empty array.
In its function definition, call the Foreach() method that will square every element of array and then push it in the empty “square” array:
function findSquare() {
var oddNumbers = [1, 3, 5, 9, 11];
var square = [];
oddNumbers.forEach(function (number) {
square.push(number * number);
});
Lastly, print out the new values using the “document.write()” method:
document.write("Square of Odd numbers '1,3,5,7,9,11' is: ");
document.write(square);
When the button is clicked, all of the values of the square array are displayed:
![]() We have covered all the essential information related to the JavaScript forEach() method.
We have covered all the essential information related to the JavaScript forEach() method.
Conclusion
The “forEach()” method calls a function while iterating through the items of an array.
It differs somewhat from the traditional “for loop”.
This method is utilized to iterate through sets, maps, and arrays.
In this article, we illustrated the JavaScript forEach() method with detailed examples, including console-based and the linked JavaScript file with HTML.
JavaScript OR | Explained
In every computing language, such as C, Java, and so on, operators are used to perform arithmetic and logical operations.
Similarly, JavaScript also uses these operators for performing specific tasks.
The “OR” specifically is one of the logical operators.
If any or both of the operands’ values are true, it outputs the boolean value “true”; otherwise, it gives the value “false”.
This article will show the use of OR statement.
JavaScript OR Operator
The logical operator “OR” is employed in conditional statements such as if-else.
Two vertical lines, “||”, are used to denote this operator., the OR operator works as follows:
It returns true if any of the conditions is satisfied.
If both of the conditions are untrue, it returns false.
It outputs true if both conditions are evaluated as true.
The OR operator will not determine if the second condition is true or false if the first condition is evaluated as “true”.
If the first condition is “false”, then consider the second one.
Syntax
The OR statement’s syntax is as follows:
x || y
Here, “x” and “y” are operands.
The OR operator can also be used to compare two or more variables to one another:
x || y || z || w
If any of the conditions are satisfied, it will return “true” as output.
Truth Table of OR Operator
Let’s examine the truth table for OR operator:
| x | y | x||y |
|---|
| true | true | true |
| true | false | true |
| false | true | true |
| false | false | false |
As the truth table depicts, the OR operator will output “true” if one of the variable values is “true”.
In the alternative situation, it gives “false” if both values are false.
Let’s see the provided examples to learn JavaScript to test the working of the JavaScript OR methods.
Example 1
This example is console based in which we will first create two variables, “a” and “b”, by assigning them values “23” and “20”, respectively:
var a = 23;var b = 20;
Then, use the logical operator OR “||” in if statement that will check the conditions a>b OR b<a.
If any of the conditions is true, then it will add both values and display the resultant value on the console:
if(a>b || b<a) {
var s = a+b;
console.log("The sum is " +s);}
The output shows “43” which is the sum of “23” and “20”:
![]() Let’s see how to use OR operator with HTML.
Example 2
Here, in HTML file, we will create an input field and a button that will invoke the function created file called “valueFunc()”:
<input type="text" placeholder="Enter Value b/w 50 and 100" id="text"><button onclick="valueFunc()">Enter</button>
In the JavaScript file, we will define a function called “valueFunc()” which will check the entered input text’s value in such a way that if its value is greater than 50 or equal to 100, an alert box will be generated:
function valueFunc(){
inputVal = document.getElementById('text');
if (inputVal.value > 50 || inputVal.value == 100 ){
alert ("You entered Valid input value");
}else
alert ("Enter value between 50 and 100");}
Output
Let’s see how to use OR operator with HTML.
Example 2
Here, in HTML file, we will create an input field and a button that will invoke the function created file called “valueFunc()”:
<input type="text" placeholder="Enter Value b/w 50 and 100" id="text"><button onclick="valueFunc()">Enter</button>
In the JavaScript file, we will define a function called “valueFunc()” which will check the entered input text’s value in such a way that if its value is greater than 50 or equal to 100, an alert box will be generated:
function valueFunc(){
inputVal = document.getElementById('text');
if (inputVal.value > 50 || inputVal.value == 100 ){
alert ("You entered Valid input value");
}else
alert ("Enter value between 50 and 100");}
Output
![]() We have covered all the necessary information for using the JavaScript OR statement.
We have covered all the necessary information for using the JavaScript OR statement.
Conclusion
The logical operator OR is frequently used conditional statements such as if-else.
If any of the statements are verified as true, the result is true; else, it gives false.
The condition is analyzed by the OR operator from the left.
When the first condition is satisfied, the other conditions are not checked.
In this article, we showed the use of OR statement.
What Does JavaScript colon (:) Do?
The colon “:” is a punctuation mark made up of two identical dots that are vertically aligned.
The majority of JavaScript’s syntax is derived from Java, C, and C++., a colon can be used in different ways, such as checking the case in the switch statement, setting labels, and object properties by creating object literals.
This write-up will demonstrate the working of the colon “:”.
What Does JavaScript Colon (:) Do?
In JavaScript, the colon “:” has a variety of uses.
Let’s see the working of the colon “:” in many situations such as:
in switch statement
in ternary operation
for object literal
for setting labels
Method 1: Use Colon “:” in Switch Statement
Here, we will see the working of the Colon “:” in the switch statement for checking the added cases.
Example
Firstly, we will create a variable named “age” and assigns the value “18”:
let age = 18;
Then, use Colon “:” in the switch statement that will check the age based on different cases:
switch (age) {
case 15:
console.log("He is 15 years old");
break;
case 20:
console.log("He is 20 years old");
break;
default:
console.log("His age is 18 Years");}
Output
![]()
Method 2: Use Colon “:” in Ternary Operation
Let’s see the working of the Colon “:” in the ternary operator.
Example
We will first create two variables, “a” and “b”, by assigning values “12” and “8”, respectively:
var a = 12;var b = 8;
Then, check which variable is greater using the ternary operator:
var res = a > b ? "a is greater than b" : "b is greater than a";
Finally, print the result using “console.log()” method:
console.log(res);
The output shows the variable a is greater than b:
![]()
Method 3: Use Colon “:” for Object Literal
For creating an object, you can also use the colon “:” in a program.
It works in such a way that you have to place the object property name before the colon and its value after that.
Example
Create an object “car” with properties “color” and “model”:
var car = {
color: "Black",
model: 2019}
Then, we will get the color of the car object and display on the console:
console.log("Color of the car is " + car.color);
Output
![]()
Method 4: Use Colon “:” for Setting Labels
You can also utilize colon for setting labels which are explained in the following example.
Example
Firstly, we will create three variables “a”, “b” and “res”:
var a = 5;var b = 52;var res = 0;
Then, set a label where we will use a colon:
sum:
Then, define a loop using which we will add the numbers until “a” is less than “b”:
while(a<b>=b){
break sum;
}}
Lastly, we will print the sum using the “console.log()” method:
console.log("Sum is " + res);
Output
![]() We have covered all the basic information about colon “:”.
We have covered all the basic information about colon “:”.
Conclusion
The colon “:” is a punctuation mark used in different ways, such as checking the case in the switch statement, setting labels, or setting object properties by creating object literals.
Its use depends on your requirements.
In this write-up, we have demonstrated the working of the colon “:” with examples.
What Does JavaScript semicolon (;) Do?
A semicolon (;) is a symbol used for punctuation that represents a pause that is longer than a comma.
The semicolon symbol is very important in programming.
It is also used to indicate the end of instruction in various programming languages such as C, C++, Java, JavaScript, and Python.
This study will explain the working of the semicolon (;).
What Does JavaScript ; Do?
In JavaScript, the “semicolon” (;) is used to terminate a statement, and it is an optional but essential part of JavaScript language.
It informs the compiler that a statement has ended so that the execution control can move to the next statement.
In JavaScript, there are some situations where the semicolon is mandatory to use.
In the other case, the added statement will also work because JavaScript has an automatic semicolon feature that exists as an invisible semicolon at the end of the statement to inform the compiler about the termination of the statement.
Let’s execute a simple program without a semicolon at the end of the statement and check if it gets executed or not.
Example: Executing Program Without ;
We will create a variable that stores a string “LinuxHint”:
var string = "LinuxHint"
Then, print the string on the console using the “console.log()” method without adding the semicolon (;) at the statement’s end:
console.log(string)
The output depicts that the JavaScript has successfully executed the added statements of the program:
![]()
When Parser Adds an Automatic “;”?
The following are situations when the JavaScript parser will add a semicolon automatically while parsing the source code:
When the new line begins with the new statement.
Next line after closing the current block.
After the return, break, throw, and continue statements.
At the source file’s end where it gets complete.
All of the above-given statements can be terminated with or without a semicolon.
Now, let’s test some of the mentioned cases.
Example
Here, we will define a function named “add()” in which we will add two numbers, “a” and “b”, and place semicolons at the end of the return statement and at the end of the block or function definition:
var add = function(a, b) {
return a + b;};
Then, call the add() function without using semicolon at the end of the line and check whether the function will execute or not:
add(5,8)
It can be observed that the specified function is successfully invoked without using the semicolon:
![]() Now, check what happens when you do not hardcode the semicolon at the end of the block, after the return statement, and at the end of the source file:
var add = function(a, b) {
return a + b}
add(5,8)
Here, the output indicates that if we do not use semicolons at the end of the function, return statement and the end of the source file, the program will still work:
Now, check what happens when you do not hardcode the semicolon at the end of the block, after the return statement, and at the end of the source file:
var add = function(a, b) {
return a + b}
add(5,8)
Here, the output indicates that if we do not use semicolons at the end of the function, return statement and the end of the source file, the program will still work:
![]()
When Parser Does Not Add an Automatic “;”?
Let’s see the situations where the semicolons are mandatory to add:
two statements must be separated by a semicolon if placed on the same line.
In a “for” loop’s first two statements, but not the third (increment/decrement) statement.
Example
First, we will create an array of odd numbers without placing a semicolon at the end of the statement:
var oddNumbers = [1, 3, 5, 9, 11]
Print the array on the console using the “for” loop, where have added a semicolon after the first two statements as it is mandatory else it will show an error and the code will not be executed:
for(i = 0; i < oddNumbers; i++){
console.log(oddNumbers[i])}
Output
![]() Although semicolons are optional, while it’s a good practice to use it.
Although semicolons are optional, while it’s a good practice to use it.
Conclusion
In JavaScript, the “semicolon” (;) is used to terminate a statement, and it is an optional but essential part of JavaScript language., there are some situations where the semicolon is mandatory to use, as discussed; otherwise, if you do not specify a semicolon at the end of the statement, it also works due to its automatic semicolon feature.
In this study, we have explained the working of the semicolon (;).
How to Change Text Color
JavaScript is a dynamic language that provides various programming options to perform multiple tasks.
For instance, changing an element’s color is one of the most frequent tasks while developing a website.
To do so, first, get the reference to the HTML element you want to change the color, then assign it the color value style color attribute.
This study will illustrate the methods for changing the color of the text.
How to Change Text Color?
For changing the text color, use the below-mentioned predefined JavaScript methods:
style.color property with getElementById() method
style.color property with querySelector() method
Let’s explain these methods individually.
Method 1: Change Text Color Using style.color property with getElementById() Method
To change the color of the text, you can use the “getElementById()” method with the “style.color” property.
In such a scenario, the text element can be accessed using the getElementById() method and then apply the color attribute with the help of HTML style.color property.
Syntax
Use the given syntax for changing text color by using color property with the help of the getElementById() method:
document.getElementById("id").style.color = "color";
The “id” is the element’s id specified to access the text element and then change its color using the style.color property.
Head toward the below example to understand the stated concept!
Example
First, we will create a heading using <h4> tag and assign an id “id” that is used to access the h4 element, then, create a button that invokes a function named “changeColor()” defined in a JavaScript(JS) file when the onclick event of the added button gets triggered:
<h4 id="id">Welcome to LinuxHint</h4><button type="button" onclick="changeColor()">Click to See The Magic</button>
In JS file, define a function named “changeColor()” and get the heading by passing its id to the getElementById() method and then change its color:
function changeColor() {
document.getElementById("id").style.color = "red";}
Lastly, specify the source of the JavaScript file using the src tag in the HTML file:
<script src="./JSfile.js"></script>
It can be seen from the output that when the added button is clicked, the text element changed its color to “red”:
![]() Let’s check out the other method!
Let’s check out the other method!
Method 2: Change Text Color Using style.color property with querySelector() Method
You can also change the color of the text using the “querySelector()” method with style.color property.
It accesses the element with both id or the assigned class while the getElementById() method just fetches the element with its assigned id.
Syntax
Use the following syntax to change the text color using color property with the help of querySelector() method:
document.querySelector("id/className").style.color = "color";
Example
Here, we will use the <p> tag to add a paragraph with class named “color”, that will help to access the <p> element and a button that will call the JavaScript “changeColor()” method when its onclick event will be triggered:
<p class="color">Welcome to LinuxHint</p><button onclick="changeColor()">Click to See The Magic</button>
In the definition of the “changeColor()” method, we will invoke the “querySelector()” method by passing class name with dot(.) that indicates the element is accessed based on its class name, and then apply color property on it:
function changeColor() {
document.querySelector(".color").style.color = "Magenta";}
However, to use an id in an HTML element and access it using querySelector() method, add the “#” sign with id name:
document.querySelector("#color").style.color = "Magenta";
Output
![]() We have gathered the simplest approach to change the text color.
We have gathered the simplest approach to change the text color.
Conclusion
For changing text color, you can use the style.color property with the help of getElementById() method or querySelector() method.
The getElementById() method is used to access the HTML element based on its assigned id, while the querySelector() method accesses the element based on the assigned id or the class by specifying (#) or (.) signs, respectively.
This study illustrated the simple procedure for changing the text color.
How to Assign Value to Textbox Using JavaScript
Sometimes, you may need to set a textbox value based on any event.
You can do this by adding an input textbox element in the HTML file and setting its attribute value based on the requirement.
JavaScript has predefined methods that can be useful for the stated purpose.
This post will define the procedure for assigning value to the textbox using JavaScript.
How to Assign Value to Textbox Using JavaScript?
For assigning value to the textbox, use the following methods:
Using setAttribute() method
Using Text Value property
Let’s look at the working of these methods separately!
Method 1: Assign Value to Textbox Using setAttribute() Method
The “setAttribute()” method is used to assign a value to the textbox.
It is utilized to add or set an attribute to a certain element and give it a value.
This method takes two parameters as an argument, and both are mandatory.
Syntax
Follow the below-mentioned syntax for setAttribute() method:
setAttribute(attributeName, attributeValue);
Here, “attributeValue” is the value of the attribute whose name is specified.
Example
We will first create a heading and an input field with the default “Text” placeholder value.
Next, add a button that will invoke the “myFunction()” method when it is clicked:
<h5>Click the button to see the default value of the text field.</h5><input type="text" id="myText" placeholder="Text"><button onclick="myFunction()">Click</button>
In JS file, define a function named “myFunction()” and access the textbox using “getElementbyId()” method and then set the value with the help of “setAttribute()” method:
function myFunction() {
document.getElementById("myText").setAttribute('value', 'LinuxHint');}
It can be seen from the output that when the button is clicked, the value of the textbox is set as “LinuxHint”:
![]() Let’s see the next procedure for assigning value to the textbox.
Let’s see the next procedure for assigning value to the textbox.
Method 2: Assign Value to Textbox Using Text Value Property
There is another approach for assigning value to the textbox, which is the “value” property of the text.
In this approach, you only have to assign the value to the textbox using the value property.
Syntax
Use the following syntax for assigning value to a textbox using the value property of the text element:
value = "Text";
Example
Here, we will assign the value to the already created textbox in the previous example.
To do so, access the textbox in the myFunction() and then, assign the required value to the textbox using the “value” property:
function myFunction() {
document.getElementById("myText").value = "LinuxHint";}
As you can see the output successfully, assign the value to the textbox:
![]() We have gathered the simplest approaches for assigning value to the textbox using JavaScript.
We have gathered the simplest approaches for assigning value to the textbox using JavaScript.
Conclusion
For assigning value to the textbox using JavaScript, you can use the JavaScript predefined method called setAttribute() method or the value property of the text element.
Both of these approaches work efficiently for assigning value to the textbox.
You can select one of them as per your requirement.
In this post, we have discussed the approaches for assigning the value to the textbox using JavaScript with detailed examples.
How to Add Option to Select Tag From Input Text Using JavaScript
While developing a website, there can be a requirement to add new options to the select element dynamically, which becomes challenging for beginners.
In such a situation, you can utilize different JavaScript methods for the purpose of adding options to the select tag from the added input text.
Don’t know how?
This tutorial will define the procedure to add an option from an input text to a select tag using JavaScript.
How to Add Option to Select Tag From Input Text Using JavaScript?
To add an option from an input text to a select tag using JavaScript, you can use different methods, such as:
add() method with Option Constructor
createElement() method with appendChild() method
Let’s explore each method one by one!
Method 1: Add Option to Select Tag From Input Text Using add() Method with Option Constructor
For adding an option from the input text in a select tag, use the “add()” method with “Option” Constructor.
The add() method is used to add the elements to the options of the “HTMLSelectElement” also known as <select> tag.
It takes two parameters as arguments.
Syntax
Follow the provided syntax to use the add() method for adding an option in a select tag:
add(option, existingOption);
Here, the “option” represents the new option that is going to be added in place of the “existingOption”.
Example
We will create an input field, a drop-down menu using <select> tag and a button that will add new options in a select element, invoking the “insertOption()” function when it is clicked:
<input type="text" id="txt" placeholder="Enter text to add option"><select id="options"><option value="c">C</option></select><br><br><button id="add btn" onclick="insertOption()">Add Option</button>
In the JS file, define a function named “insertOption()” and then access the button, textbox, and the select element with their assigned id’s using the “querySelector()” method.
Then, create an instance of the option using the Option constructor, and call the add() method by passing the existing option and the new option that needs to be added at the end of the list:
functioninsertOption(){const addBtn = document.querySelector('#addbtn');const listbox = document.querySelector('#options');const dropdown = document.querySelector('#txt');const option = new Option(dropdown.value, dropdown.value);
listbox.add(option, undefined);
dropdown.value = '';
dropdown.focus();}
The output shows that the new option from the text field is added at the end of the drop-down menu:
![]() Note: You can use this method to add the option at the beginning of the select tag by adding the value of the existing option as a second parameter instead of undefined.
It will add the new option before the existing one.
Let’s move to the other method!
Note: You can use this method to add the option at the beginning of the select tag by adding the value of the existing option as a second parameter instead of undefined.
It will add the new option before the existing one.
Let’s move to the other method!
Method 2: Add Option to Select Tag From Input Text Using createElement() With appendChild() Method
There is another approach using which you can create a new element using the “createElement()” method with the “appendChild()” method.
By using this methodology, we will add the options at the beginning of the select tag.
Syntax
Use the following syntax for adding option in select tag from the input text using appendChild() method:
appendChild(newOptionValue);
Example
Here, we will create a dropdown list by adding two options “C” and “C++”, an input field and a button that will call the user-defined JavaScript function named “insertOption()” when its onclick event is triggered:
<input type="text" id="txt" placeholder="Enter text to add option"><select id="dropdown"><option>C</option><option>C++</option></select><br><br><button onclick="insertOption();">Add Option</button>
In a function named “insertOption()”, first access the select element and the text field using their assigned id’s and then, call the createElement() and createTextNode() methods for creating an option instance and fetch the text value as an option.
After that, call the appendChild() method and pass the text value as an option then, add this option at the beginning of select list using “insertBefore()” method with select element:
functioninsertOption(){
var select = document.getElementById("dropdown"),
textValue = document.getElementById("txt").value,
newOption = document.createElement("Option"),
newOptionValue = document.createTextNode(textValue);
newOption.appendChild(newOptionValue);
select.insertBefore(newOption, select.firstChild);}
As you can see that the output shows that the new option from the text field is added at the start of the drop-down menu:
![]() We have compiled all the possible solutions for adding options from an input text to the select tag.
We have compiled all the possible solutions for adding options from an input text to the select tag.
Conclusion
To add an option from an input text to a select tag using JavaScript, you can use the JavaScript built-in methods, including add() method or appendChild() method.
You can add options in a select tag at the beginning of the list as well as the end of the list.
In this tutorial, we have defined the procedure to add an option from an input text to a select tag using JavaScript with detailed examples.
How to Add Row to HTML Table Using JavaScript
Sometimes, while developing a website, there can be a requirement to create or remove rows and cells or add data in a table dynamically using JavaScript.
JavaScript is a dynamic language that helps in dynamically controlling, gaining access to, and modifying HTML components on the client side.
More specifically, it can be utilized to add a row to an HTML table.
This manual will use JavaScript to explain the procedure for adding a row to a table.
How to Add Row to HTML Table Using JavaScript?
For adding a row in a table, use the following procedures:
insertRow() method
Create a new element
Let’s check each procedure individually.
Method 1: Add Row to HTML Table Using insertRow() Method
The “insertRow()” method is utilized to add a new row at the beginning of the table.
It creates a new <tr> element and inserts it into the table.
It takes an index as a parameter that defines the location of the table where a row will be added.
If “0” or no index will be passed in a method, this method adds the row at the start of the table.
If you intend to add the row at the last/end of the table, then pass index “-1” as an argument.
Syntax
Use the following syntax for adding rows in a table with the help of the insertRow() method:
table.insertRow(index);
Here, “index” indicates the position where you want to add a new row, such as at the end of the table or at the start.
Example 1: Adding a Row at the Top/Start of the Table
Here, we will create a table and a button in an HTML file using the HTML <table> and <button> tags.
The table contains three rows and three columns or cells:
<table id="table"><tr><td>Cell of Row 1</td><td>Cell of Row 1</td><td>Cell of Row 1</td></tr><tr><td>Cell of Row 2</td><td>Cell of Row 2</td><td>Cell of Row 2</td></tr><tr><td>Cell of Row 3</td><td>Cell of Row 3</td><td>Cell of Row 3</td></tr></table><br>
Then, create a button which will invoke the “addRow()” button when clicked:
<button type="button" onclick="addRow()">Click to add row at the top of Table</button>
For styling the table, we will set the border of each cell and the table as given below:
table, td {
border: 1px solid black;}
Now, we will add rows in the table at the top/start of the table using JavaScript.
To do so, define a function named “addRow()” that will be called on the button’s onclick() event.
Then, fetch the created table using the “getElementById()” method.
After that, call the “insertRow()” method by passing the “0” index as a parameter that indicates the row will be added at the start of the table.
Then, invoke the “insertCell()” method by passing indexes that show how many cells will be added to the row.
Finally, add the text data or text in cells using “innerHTML” property:
functionaddRow() {
var tableRow = document.getElementById("table");
var row = tableRow.insertRow(0);
var cell1 = row.insertCell(0);
var cell2 = row.insertCell(1);
var cell3 = row.insertCell(2);
cell1.innerHTML = "Cell of New Row";
cell2.innerHTML = "Cell of New Row";
cell3.innerHTML = "Cell of New Row";}
As you can see in the output, the new row is added at the top of the existing table by clicking on the button:
![]()
Example 2: Adding a Row at the End of the Table
If you want to insert a row at the last/end of the table, pass the “-1” index to the “insertRow()” method.
It will add the row at last when the button is clicked:
functionaddRow() {
var tableRow = document.getElementById("table");
var row = tableRow.insertRow(-1);
var cell1 = row.insertCell(0);
var cell2 = row.insertCell(1);
var cell3 = row.insertCell(2);
cell1.innerHTML = "Cell of New Row";
cell2.innerHTML = "Cell of New Row";
cell3.innerHTML = "Cell of New Row";}
Output
![]() Let’s move to the other method!
Let’s move to the other method!
Method 2: Add Row to HTML Table by Creating New Element
There is another method for adding a row in a table that is creating new elements using JavaScript methods, including the “createElement()” method and the “appendChild()” method.
The createElement() creates the <tr> and <td> elements and the appendChild() method appends the cells and rows in a table.
Syntax
Follow the provided syntax to create a new element for adding a row in a table using JavaScript:
document.createElement("tr");
Here, the “tr” is the table row.
Example
We will now use the same previously created table in HTML with a CSS file, but in the JavaScript file, we will use the “createElement()” method.
Then, add the data or text in the cells using the “innerHTML” property.
Lastly, invoke the “appendChild()” method that will add the cells in a row and then the row in a table:
functionaddRow() {
var tableRow = document.getElementById("table");
var row = document.createElement("tr");
var cell1 = document.createElement("td");
var cell2 = document.createElement("td");
var cell3 = document.createElement("td");
cell1.innerHTML = "Cell of New Row";
cell2.innerHTML = "Cell of New Row";
cell3.innerHTML = "Cell of New Row";
row.appendChild(cell1);
row.appendChild(cell2);
row.appendChild(cell3);
tableRow.appendChild(row);}
The output shows that the new row is successfully added at the end of the table:
![]() We have compiled all the methods for adding a row in a table using JavaScript.
We have compiled all the methods for adding a row in a table using JavaScript.
Conclusion
For adding a row in a table, use the two approaches: insertRow() method or create a new element using JavaScript predefined methods, including the appendChild() method and the createElement() method.
You can add a row at the start of the end of the table using the insertRow() method by passing indexes.
This manual explained the procedures for adding a new row in a table by clicking on a button using JavaScript.
How to Check if a Number is a Perfect Square
In JavaScript, we often encounter mathematical problems, including square roots.
In such cases, perfect squares play a very important role as they can ease our calculations to a great extent.
Also, as the square root of the perfect square is always a natural number, it makes our life easier in mathematics.
Moreover, it saves us a lot of time dealing with complex calculations.
This write-up will guide you about checking if the entered number is a perfect square.
How to Check/Verify if the Provided Number is a Perfect Square?
To verify if a provided number is a perfect square, you can utilize:
“Math.sqrt()” method
“Math.floor()” and “Math.ceil()” methods
The mentioned approaches will now be discussed one by one!
Method 1: Check if the Provided Number is a Perfect Square Using Math.sqrt() Method
The “Math.sqrt()” method results in the square root of a number.
By utilizing it, you can also check the condition for the perfect square of the specific number with the help of the “if-else” loop.
Syntax
Math.sqrt(x)
Here, the Math.sqrt() method will output the square root of the “x” variable.
Let’s go through the following example for demonstration.
Example
First, we will prompt the user to input the number and store it in a variable named “perfectSquare”:
var perfectSquare= prompt("Enter a number:")
Now, we will get the square root of the provided number using the “Math.sqrt()” method:
z= Math.sqrt(perfectSquare)
After that, we will check the condition that if the provided number equals the product of the square root of itself, it will satisfy the perfect square condition:
if(perfectSquare == z*z){
alert("The Number is a perfect square")}else{
alert("The Number is not a perfect square")}
Save the provided code and enter any number for verification:
![]() The given output indicates that the entered number which is “9” is a perfect square:
The given output indicates that the entered number which is “9” is a perfect square:
![]()
Method 2: Check if a Number is a Perfect Square Using “Math.floor()” and “Math.ceil()” Methods
“Math.floor()” method rounds down the specified number to an integer such as 4.7 will be rounded to 4, whereas the “Math.ceil()” method returns the rounded number up to an integer such as 4.7 will be rounded to 5.
Both of these methods can be used at the same time to verify if the provided number is a perfect square or not.
Syntax
Math.floor(x), Math.ceil(x)
Here, “x” refers to an integer.
Look at the following example for a better understanding of the concept:
Example
Now, we will include the “Math.sqrt()” method in both of the above methods to handle the resultant square root value.
Then, verify the provided number as a perfect square using the “Math.ceil()” and “Math.floor()” methods.
This combination will work in such a way that if the provided number is an imperfect square, the values of both methods will vary, and the “else” block will be executed.
In the other case, the provided number will be a perfect square:
if(Math.ceil(Math.sqrt(perfectSquare)) == Math.floor(Math.sqrt(perfectSquare))){
alert("The Number is a perfect square")}else{
alert('The Number is not a perfect square')}
The output of the above implementation will result as follows:
![]() We have compiled all the simplest methods for checking if a number is a Perfect Square.
You can utilize any of the above methods according to your understanding.
We have compiled all the simplest methods for checking if a number is a Perfect Square.
You can utilize any of the above methods according to your understanding.
Conclusion
To check if the entered number is a perfect square, use the “Math.sqrt()” method and add an if-else statement to check the perfect square condition.
Also, the “Math.floor()” and “Math.ceil()” methods can be used in combination for applying the condition on the rounded number resulting from a square root.
This write-up explained to verify if the provided number is a perfect square.
How to Check and Uncheck All Checkboxes Using JavaScript
There can be a situation where all the checkboxes need to be checked or unchecked in the case of any questionnaire or quiz.
For instance, it is required to make multiple selections from a specific items list or make no selection at all, or when you have to select or clear the selected options in a form in one go.
In such cases, checking and unchecking all checkboxes using JavaScript becomes very handy and timesaving.
This article will demonstrate the methods for checking and unchecking all checkboxes using JavaScript.
How to Check and Uncheck All Checkboxes using JavaScript?
To check and uncheck all checkboxes, you can apply:
“document.getElementsByName” method with Checkboxes
“document.getElementsByName” method with Buttons
The mentioned approaches will now be discussed one by one!
Method 1: Check and Uncheck All Checkboxes Using “document.getElementsByName()” Method With “Checkboxes”
The “document.getElementsByName()” method returns the elements with the specified name in its arguments.
This method will be applied to fetch the value of each checkbox with the help of the passed name.
Let’s go through the following example for demonstration.
Example
First, the input type will be specified as “checkbox” and a specific name and value will be assigned against each checkbox:
<input type= "checkbox" name= "lang" value= "Python">Python<br/><input type= "checkbox" name= "lang" value= "Java">Java<br/><input type= "checkbox" name= "lang" value= "JavaScript">JavaScript<br/>
Now, include an additional checkbox with the value “Check All” and attach an “onclick()” event with this checkbox which will work in such a way when the checkbox will be clicked, the “checkUnchecked()” method will be invoked with the object “this” as an argument:
<input type= "checkbox" onclick= 'checkUncheck(this)'/>Check All<br/>
After that, define a function named “checkUncheck()” in the JavaScript file, with a variable named “checkBox” as an argument.
Now, access the checkbox values using the “document.getElementsByName()” method and place the value of the “name” attribute as its argument.
Lastly, apply a “for” loop to iterate along all the checkbox values and utilize the “checked” property to mark them all as checked:
function checkUncheck(checkBox) {
get = document.getElementsByName('lang');for(var i=0; i<get.length; i++) {
get[i].checked = checkBox.checked;}}
As you can see, when the “Check All” checkbox is marked, all of the other checkboxes are also marked as checked:
![]()
Method 2: Check and Uncheck All Checkboxes Using “document.getElementsByName()” Method With “Buttons”
The “document.getElementsByName()” method, as discussed in the previous method, fetches the elements with the specified name in its arguments.
It can be utilized to check or uncheck all of the added checkboxes on a web page.
Look at the following example for demonstration.
Example
Now, we will include two buttons for both the “Checks All” and “Uncheck All” functionalities.
Then, attach an “onclick” event with both button which will access the specified functions separately:
<input type= "button" onclick= 'check()' value= "Checks All"/><input type= "button" onclick= 'unCheck()' value= "Unchecks All"/>
Next, define a function named “check()” and apply the “document.getElementsByName” method with the specified value of the “name” attribute.
Then, iterate the “for” loop along all the checkbox values discussed in the previous method.
Moreover, when the associated button is clicked, the “checked” property will mark all of the checkboxes and set the checked state as “true”:
function check(){
var get= document.getElementsByName('check');for(var i= 0; i<get.length; i++){
get[i].checked= true;}}
Next, define a function named “unCheck()”, and add the reverse functionality in it to mark the checked box property as “false”:
function unCheck(){
var get= document.getElementsByName('check');for(var i= 0; i<get.length; i++){
get[i].checked= false;}}
It can see in the output that the added buttons are working perfectly:
![]() We have provided the easiest methods to check and uncheck all checkboxes using JavaScript.
We have provided the easiest methods to check and uncheck all checkboxes using JavaScript.
Conclusion
For checking and unchecking all the checkboxes using JavaScript, use the “document.getElementsByName()” method with “Checkboxes” to add a checkbox and access the function, which will result in getting the checkboxes checked or apply the same method with “Buttons” to include two buttons separately for checking and unchecking all the specified values.
This write-up explained the methods for checking and unchecking all the checkboxes using JavaScript.
How to Remove Space From Start and End of String
You may usually come across some programs where it is required to insert the string data in bulk within an array.
Hence, you need not update each string value separately.
For instance, you have to deal with the name and surname values involving blank spaces.
In such cases, removing spaces from the start and end of the string becomes very useful for proper formatting and accessible design of the array and overall program.
This write-up will guide you to omit space from the string’s start and end.
How to Remove/Omit Space From the Start and End of String?
To remove space from the string’s start and end, you can use:
“trim()” method
“replace()” method
Let’s discuss the mentioned approaches one by one!
Method 1: Remove the Spaces From the String’s Start and End Using trim() Method
The “trim()” method removes the specified character from both sides of a string without any change in the original string.
You can apply this method to remove the blank spaces in the provided string value from its start and end.
Syntax
string.trim()
Here, “string” refers to the string value from which the whitespaces will be removed.
Example
In the example below, we will declare a variable named “removeSpace” and store a string value that has many whitespaces at the start and end:
var removeSpace= " Remove Spaces from Start and End! ";
Apply the “trim()” method on the string value.
This will result in the removal of blank spaces from the start and end positions of the string value:
var resultString= removeSpace.trim();
Finally, we will display the resultant string value without spaces on the console:
console.log(resultString)
As you can see, we have successfully removed spaces from the specified string:
![]()
Method 2: Remove Space From Start and End of String Using replace() Method
The “replace()” method searches for a string value without any change in the original string value.
We will utilize this method to search for the spaces using a regular alternative-based expression that searches and matches with two alternative patterns.
Syntax
string.replace(searchValue, newValue)
Here, “searchValue” is the value that needs to be searched and replaced with “newValue()”.
Overview the following example.
Example
Now, we will apply the “replace()” method string with a regular expression “/^\s+|\s+$/gm”.
The given two alternative regex patterns will search for the spaces at the string’s start and end.
If found, it will be replaced by an empty string:
var resultString= removeSpace.replace(/^\s+|\s+$/gm,'');
Finally, we will log the updated string value without the spaces on the console:
console.log(resultString)
Output
![]() We have compiled all the simplest methods to remove space from the start and end of the string.
We have compiled all the simplest methods to remove space from the start and end of the string.
Conclusion
To remove space from the start and end of a String, you can apply the “trim()” method directly on the initialized string or the “replace()” method along with a regular expression as its argument in order to search for the blank spaces and replace them with an empty string.
This article guided about removing space from the string’s start and end.
How to Get URL Parameter Value
There can be a situation programs where there is a need to access some data or a part of a URL to utilize it according to your own requirements.
For instance, it is required to locate data referring to the corresponding attribute.
In such cases, the technique of getting URL parameter values saves a lot of time and effort.
This article will discuss the methods to get the URL parameter value.
How to Get URL Parameter Value?
To get URL parameter value, the following approaches can be utilized:
“split()” method with “for” loop
URLSearchParams” Object
Go through the discussed methods one by one!
Method 1: Get URL Parameter Value Using “split()” Method With “for” Loop
The “split()” method splits a given string into an array of substrings without any change in the original string.
This method can be applied to a given URL in two parts, and a for loop can be used to control the iteration with the help of the length property to get all the parameter values.
Syntax
string.split(separator, limit)
Here, “separator” refers to the string that needs to be split and “limit” is a number that represents the split limits.
Check out the following example for understanding the stated concept.
Example
In the below example, we will create a button and attach an onclick event with it which will access the “getParameters()” function:
<button onclick= "getParameters()"> Get URL parameters value </button>
Now, we will define the getParameters() function.
In its definition, a URL of an example domain is added that will be accessed and stored in a variable named “getUrl”.
Next, the specified URL will be split into two parts using “?” as a separator and “1” as the limit, and “&” will then separate each parameter string and store it in the “params” array.
After that, “for” loop will be applied in such a way that each of the parameter and its value will be displayed on the console:
function getParameters() {
let getUrl= "https://example.com/?product=shirts&color=white&user=anonymous&size=s";
let getParameters= getUrl.split('?')[1];
letparams= getParameters.split('&');for(let i= 0; i <params.length; i++) {
letvalue= params[i].split('==');
console.log(value[0], value[1]);
}
}
The output of the above implementation will result as follows:
![]() That was all about accessing all parameter values at once.
However, if you want to get a value of a specific parameter, move to the next section!
That was all about accessing all parameter values at once.
However, if you want to get a value of a specific parameter, move to the next section!
Method 2: Get URL Parameter Value With URLSearchParams Object
The “URLSearchParams” can also be utilized to get the specified URL using an object and fetch a particular value against the corresponding attribute.
Go through the following example for further demonstration.
Example
First, include a button with an “onclick” event which will access the specified function as discussed in the previous method:
<input type= "button" value= "Get URL parameter value" onclick= "urlParameter()">
Next, a function named urlParameter() will be defined.
Here a new object named “URLSearchParams” is created, which will access the specified url referring to the example domain.
Finally, display all of the values corresponding to the specified attribute.
In our case,
function urlParameter(){
let getUrl= new URLSearchParams("https://example.com/?product=shirts&color=white&user=anonymous&size=s")
console.log(getUrl.get('user'));}
Output
![]() In the above output, it can be observed that the “anonymous” value is fetched for the “user” parameter.
We have illustrated different methods for getting URL parameter values.
In the above output, it can be observed that the “anonymous” value is fetched for the “user” parameter.
We have illustrated different methods for getting URL parameter values.
Conclusion
To get URL parameter value, utilize the “split()” method with the “for” loop to split the specified URL, separate each parameter value and display them by adding the required condition against their corresponding attributes.
Also, the “URLSearchParams” object method can be used to create a new object and extract the value of a specific attribute.
This write-up has demonstrated the methods to get URL parameter values.
How to Remove First and Last Element in Array
In JavaScript, you may often encounter complex codes based on arrays.
These types of code include various functionalities which need not apply on every other array repeatedly.
For instance, when you want to delete some unnecessary data from the array or create a new array based on the existing array elements.
In such cases, removing the array’s first and last element can help you out.
This article will provide the procedure to remove the first and last array’s element.
How to Remove/Omit First and Last Array Elements?
To remove/omit the first and last elements in the given array, you can use:
“shift()” and “pop()” methods
“slice()” method
We will now go through each of the mentioned methods one by one!
Method 1: Remove/Omit First and Last Array Elements Using shift() and pop() Methods
In JavaScript, the “shift()” method is used to omit the first array element.
Whereas the “pop()” method omits the last array element.
These methods can be used in combination to remove the first and last array elements.
Syntax
array.shift(), array.pop()
Here, “array” refers to a defined array on which the shift() and pop() methods will be applied to remove the first and last array elements, respectively.
Look at the stated example for the demonstration.
Example
In the following example, initialize an array named “remArr” with integer and string value in it:
var remArr= [1, 2,'a']
Now, we will apply the “shift()” method to remove the first element “1” from an array and display it on the console using the “console.log()” method:
remArr.shift()
console.log("Array after removal of first element is:", remArr)
After that, we will use the “pop()” method to remove the last element “a” from an array and display it:
remArr.pop()
console.log("Array after removal of last element is:", remArr)
Lastly, print out the update array on the console:
console.log("The New Array becomes:", remArr)
Output
![]()
Method 2: Remove First and Last Array Elements Using slice() Method
In JavaScript, the “slice()” method slices up the array elements and returns them as a new array.
You can apply this method to slice the first and last array elements by accessing their indexes and removing them from an array.
Syntax
array.slice(start, end)
Here, “start” and “end” refer to the first and last index of the array.
The following example explains the stated concept:
Example
Now, we will apply the “slice()” method to the “remArr” string and refer to the start and end indexes “1” and “-1”, respectively.
This will result in removing the elements at first and last indexes from the given array:
var remArr= [1,2, 'a]
var firstLast= remArr.slice(1, -1)
Lastly, we will display the resultant array on the console:
console.log("The New Array after removing First and Last Element becomes:", firstLast)
Output
![]() We have provided all the simplest methods to remove the first and the last element in the array.
We have provided all the simplest methods to remove the first and the last element in the array.
Conclusion
For removing the first and the last array elements, you can use the “shift()” and “pop()” methods for removing the first and last elements in an array respectively and the “slice()” method to specify the index of the element in its argument, which needs to be removed.
Both methods change the length of the original array.
This write-up explained the methods to remove the first and last array elements.
How to Get Last Element in Array
There might be a case while programming where you want to delete or update data from a collection.
For instance, you need to append some particular data into another array and find some incorrect data at the last index of the existing array.
In such cases, getting the array’s last element can help you out.
This blog will explain the methods to fetch an array’s last element using JavaScript.
How to Get/Fetch Last Element in Array?
To fetch the array’s last element, the following methods can be applied:
“length” property
“Index Positioning” technique
The above approaches will now be discussed one by one!
Method 1: Get Last Element in Array Using length Property
The “length” property specifies the length of an array or a string.
This property can be utilized to get the array’s last element by specifying the length of an array and subtracting “1” from it to access the last array element.
Syntax
String.length
In the above syntax, “length” represents the length of the specified string.
The following example will clarify the stated concept.
Example
In this example, an array named “array” will be defined with the specified elements:
var array= ['Audi', 'Benz', '1']
Now, subtracting “1” from the total array length will fetch the last array element and store in a variable named “lastElement”:
var lastElement= array[array.length - 1];
Lastly, the updated array will be displayed on the console using the “console.log()” method:
console.log("The last element of an array is:", lastElement)
The given output signifies that we have successfully fetched the last element of the array, which is “1”:
![]()
Method 2: Get Last Element in Array Using Index Positioning Technique
“Index Positioning” technique is applied in the case of accessing some particular array value or performing operations between two array elements.
This technique can also be utilized to access the last array element by positioning its specified index in an array.
Syntax
Array[index]
Here, “index” refers to the array index starting from “0” as the first position up to so on.
Example
Firstly, an array of the string and integer values will be defined:
var array= ['Audi', 'Benz', '1']
Next, the index of the last array element will be accessed and stored in a variable named “lastElement”:
var lastElement= array[2]
Lastly, the resultant array will be logged on the console:
console.log("The last element of an array is:", lastElement)
Output
![]() We have compiled the easiest methods for getting the array’s last element.
We have compiled the easiest methods for getting the array’s last element.
Conclusion
To get the last element in an array, apply the “length” property, which will refer to the array’s length, and subtract “1” from it to access the last array element or apply the “index positioning” technique to fetch the particular index of the last array element and display it on the console.
This write-up demonstrated the methods to get the array’s last element.
How to Find Square of a Number
In JavaScript, there are scenarios where math problems are involved, which include multiple calculations, complex equations, and taking measurements.
For instance, while dealing with finance, normal distributions, measuring lengths and distances, quadratic formula (falling objects height), the radius of circles, and standard deviation in a JavaScript program.
In such cases, finding the square of numbers can save your time and effort.
This blog will guide you to compute the square of the given number.
How to Find Square of a Number?
To find square of the given number, you can use:
“Math.pow()” Method
“Exponentiation Operator (**)”
“Custom” function
We will now go through each of the mentioned methods one by one!
Method 1: Find Square of a Number Using Math.pow() Method
The “Math.pow()” method returns the value of “x” to the power of “y” like (x^y).
It returns a “NaN” value in the case of a negative base and a non-integer base.
Applying this method will assign a particular value as an exponent value and raise the base power accordingly.
Syntax
Math.pow(base, exponent)
Here, “pow()” refers to the power method, “base” refers to the value to be raised, and “exponent” will be raised according to the base value.
The following example explains the discussed concept.
Example
First, assign a specific value “5” to the variable named “squareNumber”:
var squareNumber= 5
Now, the “Math.pow()” method will raise the value of the assigned number to “2” as its power:
squareNumber= Math.pow(squareNumber,2)
Finally, display the resultant squared value:
console.log("The square of the given number is:", squareNumber)
The resultant output in this method will be as follows:
![]()
Method 2: Find Square of a Number Using Exponentiation Operator(**)
The “Exponentiation operator (**)” changes the value of the first variable with respect to the assigned second value, which will act as the power of the first variable.
However, it also returns a “NaN” value under the same circumstances discussed in the previous method.
This operator can be utilized by adding (**) in between both the operand values, where the first value will act as a base and the operand value after the exponentiation operator (**) will be raised accordingly.
Syntax
x ** y
Here, “x” refers to the value of a variable, and “y” is the power value that will raise the value of x.
Go through the following example for demonstration
Example
First, assign a value “5” to the variable named “square”:
var square= 5
Next, apply the exponentiation operator “**” and specify “2” as the required power of the square variable:
squareNumber= square**2
Finally, display the squared number:
console.log("The square of the given number is:", squareNumber)
Output
![]()
Method 3: Find Square of a Number Using Custom Function
In JavaScript, a custom function can be utilized to get the required functionality.
This technique can be used to create a function for finding the square of a number.
Overview the following example.
Example
Firstly, define a function named “squareNumber()” that accepts “square” as an argument and returns a value after multiplying the passed value with itself using the multiplication operator “*”:
function squareNumber(square){return square*square}
Next, invoke the squareNumber() custom function and pass “5” as an argument:
console.log("The square of the given number is:", squareNumber(5))
Output
![]() We have provided the easiest methods for finding the square of a number.
We have provided the easiest methods for finding the square of a number.
Conclusion
To compute the square of a given number, the “Math.pow()” method is applied to assign a specific power to a particular value, and the Exponentiation operator “**” can be utilized to raise the power of the value(before the operator) with respect to the value(after the operator) or a custom function can be defined for the same purpose.
This article provided a guideline for finding the square of a given number.
How to Create Table From an Array of Objects
On a webpage, unaligned data can decrease the readability and create problems for viewers.
To tackle such situations, you can utilize the tables to sort data in a better way.
Tables provide a great format to align data and improve readability and visibility.
As tables can be created using HyperText Markup language (HTML), which can be linked with JavaScript.
This post will explain the procedure to form a table with an array of objects.
How to Create Table From an Array of Objects?
To create a table from an array of objects, we will use the following methods:
HTML Table string
map() method
Let’s explore each method one by one!
Method 1: Create Table From an Array of Objects Using HTML Table String
In JavaScript, the purpose of a “string” is to store text, numbers, or special symbols.
Strings are defined by closing a character or group of characters in double or single quotes.
More specifically, they are also utilized for creating tables.
Let’s take an example to get a clear concept about creating a table from an array of objects using the Table string.
Example
In our example, we will utilize a “<div>” tag with an id “container” and place it within the <body> tag of our HTML file:
<div id="container"></div>
Let’s declare an “array” and assign some values to it:
var array = ["Mark", "Sparrow", "Fish", "Orange"];
Initialize a variable “Table” to store the HTML table string:
var Table = "<table><tr>";
Specify the two cells per row by setting the value “2” of the “cells” variable:
var cells = 2;
Next, use the “array.for Each()” method to pass each array element from the function.
Then, set the “{value}” with an identifier “$” within the “<TD>” tag.
Next, declare a variable “a” to add to increment the index “i”, and specify an “if” condition in such a way that if the remainder of cells values and the created variable is equal to zero and the value “a” is not equal array’s length, then break into the next line or row of the table:
array.for Each((value, i) => {
Table += `<TD>${value}</TD>`;
var a = i + 1;if (a%cells==0&&a!=array.length) {
Table += "</tr><tr>"; }});
Assign the table closing tags to the variable “Table” using the “+=” operator.
Then, link the content of the Table to the created container using its container.
For that, utilize the “belittlement()” method and pass the id to it and place the inner HTML to set the values within the variable Table:
Table += "</tr></table>";
document.belittlement("container").inner HTML = Table;
In our CSS file, we will apply some properties to the table and its data cells.
To do so, we will set the “border” property with the value “1px solid” to set the border around the table and its cells and the “padding” property with the value “3px” to generate the defined space around the element content, according to the defined border:
table,TD {
border: 1px solid;
padding: 3px;}
Save the given code, open your HTML file and view your table of an array’s objects:
![]() Let’s explore one more method for creating a table from an array of objects.
Let’s explore one more method for creating a table from an array of objects.
Method 2: Create Table From an Array of Objects Using map() method
The “map()” method applies a specific function to each element of the array, and in return, it provides a new array.
However, this method does not make any replacements in the original array.
You can also utilize the map() method to form a table with an array of objects.
Example
Let’s create an array using the “let” keyword.
Assign some values to the object properties or keys:
let array = [
{"Name": "Mark","Age": "Twenty (20)"},
{"Name": "Che mi","Age": "Thirty (30)"}]
Access the already created container by using belittlement() method and utilize “insertAdjacentHTML()” method to add the table tags:
document.belittlement('container').insertAdjacentHTML('afterend',
`<table><tr><th>
Use the “Object.keys()” method to access the keys of the defined object and then use the “join()” method to place them as headings within the “<th>” tag:
${Object.keys(array[0]).join('<th>')}
After adding the table head closing tag and table row and data opening tag, we will use the “map()” method to call the “Object.values()” method function for each value of the object keys, then utilize the “join()” method to place them within a row and move to next one:
</th><tr><TD>${array.map(e=>Object.values(e)
.join('<TD>')).join('<tr><TD>')}</table>`)
As you can see, we have successfully created table from the defined array of objects:
![]() We have covered the efficient ways to create a table from an array of objects.
We have covered the efficient ways to create a table from an array of objects.
Conclusion
In JavaScript, for the formation of a table from an array of objects, the HTML “table” string or “map()” method can be utilized.
To do so, specify a div tag with an id.
Then, declare the array of objects in both methods, store table tags within variables, or directly return them to a connected HTML element with data.
This post has discussed the method for creating a table from an Array of objects using JavaScript.
Different Ways to Get Value from Radio Button
In JavaScript, we usually come across web pages where it is required to get the radio button value to verify if the entered data is correct or not.
For instance, you need to submit a form and notify the user if the data entered is relevant.
In such cases, getting value from the radio button is a very helpful feature for saving the end-user time and ensuring data security.
Different Ways to Get Value from Radio Button
To get value from the radio button, the following methods can be utilized:
“getElementById()” and “getElementsByName()” methods
“find()” method
“checked” property
We will now go through each of the listed methodologies one by one!
Method 1: Get Value from Radio Button Using getElementById() and getElementsByName() Methods
The “getElementById()” method fetches an element with a specified id and the “getElementsByName()” method accesses the elements with the name specified in its argument.
These methods can be used to get both the attributes’ button id and the name value for accessing them and displaying their values.
Syntax
document.getElementById(elementID)
Here, “elementID” is referring to the specified id of the added element.
document.getElementsByName(name)
In the above syntax, “name” is the element’s name value.
The following example will explain the stated concept clearly.
Example
In the following example, we will include a heading in the “<h>” tag with a line break as follows:
<h>Select any one:</h><br>
Now, assign the input type as “radio” the radio button, and specify its id, name, and value:
<input type= "radio" id= "email" name= "contact" value= "email">
Also, include a “label” for the input type with a value named “Email”:
<label for= "email">Email</label>
Similarly, repeat the discussed steps for the “Phone No.” field:
<input type= "radio" id= "contact" name= "contact" value= "Contact Number"><label for="contact">Phone No.</label><br>
After that, include a button named “Submit” for getting the value upon clicking:
<button id= "submit">Submit</button>
Now, fetch the created button using the “document.getElementById()” method in the JavaScript file.
Also, apply an “onclick” event to access a function.
In the function defined below, access both the input types using the “document.getElementsByName()” method as the “name” attribute in both the input types is the same.
Finally, apply a “for” loop and get the value of the selected radio button using the “checked” property and display it in the alert box:
document.getElementById('submit').onclick= function(){
var value= document.getElementsByName('contact');for (var radio of value){if (radio.checked) {
alert(radio.value);
}
}}
The output of the above program will result as follows:
![]()
Method 2: Get Value from Radio Button Using the find() Method
The “find()” method accesses the value of the first element.
This method can be implemented to get the value of the checked radio button by finding the specific attributes with the help of the added name.
Syntax
Array.from(value).find(radio => radio.checked)
Here, “from()” method will access the specified element, “find()” method will match it with the value of the checked radio button, and the resultant value will be returned.
Look at the following example.
Example
For HTML, we will use the same code given in the previous method.
In our JavaScript file, we will fetch the button id using the “document.getElementById()” method with an “onclick” event accessing the function, which will firstly get both the input types having the same name attribute “contact” using the “document.getElementsByName()” method.
Lastly, apply the “from()” method to access the value stored in the variable named “value”, and the “find()” method will get the checked state of the input.
Finally, the “value” property will return the value of the specific radio button marked as checked:
document.getElementById('submit').onclick= function() {
var value= document.getElementsByName("contact");
var selectValue= Array.from(value).find(radio => radio.checked);
alert(selectValue.value);}
Output
![]()
Method 3: Get Value from Radio Button Using the checked() property
The “checked” property returns the checked state of the specified input type.
This method can be applied to check the checked condition for each of the radio buttons and return the corresponding value.
Syntax
checkboxObject.checked
In the given syntax, “checkboxObject” refers to the specified object to be checked.
Example
First, add a “label” using “<label for>” tag for specifying a particular category followed by a line break in “<br>” tag:
<label for="gender">Select any one: </label><br>
Next, repeat the above discussed procedures for specifying two input types as “radio” and assign the given values followed by a line break shown below:
<input type= "radio" id= "gender" name= "gender" value= "Male" checked= "Male">Male</input><input type= "radio" id= "genderFem" name= "gender" value= "female" checked= "Female">Female</input><br>
Also, include an input type named “submit” to get the radio button value upon clicking.
An “onclick” event will also be added to access the specified function upon clicking submit:
<input type="submit" value="submit" onclick="submitData()">
After that, declare a function named “submitData()” and get the elements of the specified ids and store them in the variables named “get” and “get1”.
Finally, apply a condition that if the radio button referring to the “Male” or “Female” gender is accessed, the “checked” property will check it, and the “value” property will fetch the corresponding value against each of the checked radio button:
functionsubmitData(){
get= document.getElementById("gender")
get1= document.getElementById("genderFem")if (get.checked == true){
alert(document.getElementById("gender").value);
}
elseif (get1.checked == true){
alert(document.getElementById("genderFem").value);
}
Output
![]() We have compiled different ways to get value from a radio button.
We have compiled different ways to get value from a radio button.
Conclusion
To get value from the radio button, apply the “getElementById()” and “getElementsByName()” methods for accessing both the attributes at the same time and displaying their corresponding values, or “find()” method for getting the radio buttons checked by finding the specified attributes based on their set names or the “checked” property method to apply a condition for each of the attributes and get their value.
This blog is guided related to the procedure of getting value from the radio button.
Disable a Button Based on Condition
In JavaScript, we often come across web pages or forms having certain requirements for filling a form.
For instance, it is required to fill a certain input field with a specific number of characters.
In such cases, the functionality of disabling a button based on condition is very useful to ensure the correctness and regulations of the data of a specific element data.
This blog will guide about disabling a button conditionally.
How to Disable a Button Based on Condition?
To disable a button based on condition, the following approaches can be utilized:
“disabled” property with “length” property
“includes()” and “document.getElementById()” methods
Go through the discussed methods one by one!
Method 1: Disable a Button Based on Condition Using “disabled” and “length” Properties
The “disabled” property indicates whether the control is disabled, and if so, it does not accept clicks, and the “length” property specifies the length of a string.
These properties will be utilized to disable a button on the condition.
For instance, a specific length of characters is entered in the input field.
Overview the following example to understand the stated concept.
Example
Firstly, include an input type named “text” and a placeholder value.
Then, add a button a heading within the created div:
<div><input type="text" placeholder="Enter Your Name"><button>Show</button><h1>Disable Button</h1></div>
Move to JavaScript file, and fetch the specified elements using the “document.querySelector()” method:
let button= document.querySelector('button');
let input= document.querySelector('input');
let output= document.querySelector('h1');
After that, include an event listener named “click” and attach it to the specified button, which will fill out the input field value when the button is clicked:
button.addEventListener('click', () =>{
output.innerText= input.value;});
Similarly, an event named “keyup” will be attached to the input field, which will trigger the given function in such a way that if the length of the input field value becomes greater than “5”, the button will get disabled:
input.addEventListener('keyup', () =>{if(input.value.length >5) {
button.disabled= true
}else {
button.disabled= false;
}});
Output
![]()
Method 2: Disable a Button Based on a Particular Condition Using “includes()” and document.getElementById() Methods
The “getElementById()” method accesses an element with a specified value in its argument, and the “includes()” method returns true if a particular string contains a specified string value.
These methods can be applied to fetch the input id and place a condition on a specified character in the input field.
Syntax
document.getElementById(elementID)
Here, “elementID” refers to the specific id of an HTML element.
includes(searchvalue)
In the above syntax, “searchvalue” refers to the value that needs to be searched.
The following example demonstrates the stated concept.
Example
First, include an input type named “text” and an “onkeyup” event accessing the function named “disableButton(this)” where “this” in its argument refers to an object:
<input type= "text" id= "disable" onkeyup= "disableButton(this)" />
Similarly, include an input type named “submit” with a disabled value as follow:
<input type= "submit" id= "Submit" disabled value= "Submit" />
Now, declare a function named “disableButton(txt)” where “txt” is referring to the object.
Fetch the input type element using the document.getElementById() method.
Finally, apply a condition for disabling the button by specifying a particular character “!” using the “includes()” method.
This will function in such a way that if the specified character is detected in the input field, the button will get disabled:
functiondisableButton(txt) {
var bt = document.getElementById('Submit'); if (disable.value.includes('!')){
bt.disabled= true
} else { bt.disabled= false; }}
Output
![]() We have offered the simplest methods for disabling a button.
We have offered the simplest methods for disabling a button.
Conclusion
To disable a button based on condition, utilize the “disabled” property with the “length” property, which will apply the functionality based on the length of input characters, or the “includes()” method with “document.getElementById()” method for accessing the input field and applying a condition on the specified character in the input field.
This manual provided the procedure to disable a button based on the added condition.
How to Replace All Special Characters in a String
Special characters are characters that are neither alphabetical nor numerical.
Nearly all unreadable characters, including symbols, accent marks, and punctuation marks, fall into the category of special characters.
From the string, you should remove all special characters so that it can be read fluently and clearly.
This post will illustrate the approach for replacing special characters within a string.
How to Replace All Special Characters in a String?
From the string, replace all the special characters through the “replace()” method.
It simply replaces the string with any other specified value.
replace() is a predefined method of the String type object.
It accepts two parameters, “searchValue” and “replaceValue”, and outputs a string with a specific replacement after searching the string for a specific value or a regex pattern.
Syntax
Follow the below-provided syntax to use the replace() method:
replace("searchValue", "replaceValue")
In our case, we will remove the special characters from a string with an empty string, so, the special characters in a string are the “searchValue” that will be searched in a string, and an empty string will act as the replacer or “replaceValue”.
Let’s see the examples, to understand the working of the replace() method.
Example 1: Replacing All String’s Special Characters Without Spaces
In this example, we will remove all special characters except space from a string using the JavaScript replace() method.
For this purpose, first, we will create a string named “str” that contains special characters and spaces between words:
var str = "Welcome' To L!inux#Hint$";
Then, call the “replace()” method by passing a regex as a search value that checks the string whether any special character exists in the string or not.
If yes, then it places an empty string as a replacement of character:
var res = str.replace(/[^a-zA-Z ]/g, "");
Finally, print the resultant string with the help of the “console.log()” method:
console.log(res);
As you can see in the output, all the special characters from the string are removed except spaces:
![]() There are some situations where you want to remove special characters including spaces from a string, if you want to do this, follow the given example.
There are some situations where you want to remove special characters including spaces from a string, if you want to do this, follow the given example.
Example 2: Replacing All String’s Special Characters With Spaces
Here, we will remove all the String’s special characters with spaces.
To do so, first, we will create a string that contains special characters with spaces:
var str = "Welcome' To L!inux@#Hint$";
Now, call the replace() method by passing regex and the empty string, as a search and replacer value.
A string’s special characters and spaces will be searched for using the regex, and they will be replaced with an empty string:
var res = str.replace(/([^\w]+|\s+)/g, '');
Lastly, print the resultant string on the console:
console.log(res);
The output shows that all the special characters including spaces are removed from the string:
![]() We have provided the simplest and effective procedure for removing the special characters from the string.
We have provided the simplest and effective procedure for removing the special characters from the string.
Conclusion
For replacing special characters from a string, use the “replace()” method.
It searches the string for the special characters based on the provided pattern and replaces them with the specified replacer.
You can update or create the pattern based on the requirements.
This post illustrated the method for removing special characters from a string with a detailed explanation.
How to Replace All Colon
A colon (:) is used as a punctuation mark to build a connection between two sentences.
Sometimes you need to replace all colons from the string with any specific character or remove all the colons from the text or string.
JavaScript provides some predefined methods for performing this task efficiently.
This blog will demonstrate the procedure for replacing all colons from a string.
How to Replace All Colon?
For replacing all colons from a string, use the below-mentioned JavaScript predefined methods:
replace() method
replaceAll() method
Let’s implement each of them individually!
Method 1: Replace All Colon Using replace() Method
The “replace()” method is used to simply replace the value with the defined string, character, or any symbol.
It is the predefined method of the String type object.
It accepts two parameters and gives a string with the newly replaced values.
The replace() method replaces only the first occurrence, while you can use the regex pattern to replace all the instances of any character or a string.
In our case, we want to remove all the colons from a string, so, we will use the replace() method with the regular expression or a regex pattern.
Syntax
The syntax for using the replace() method is as follows:
string.replace("searchValue", "replaceValue");
Here, the “searchValue” is the value that needs to be searched and replaced with the “replaceValue”.
Example
In this example, first, we will create a variable named “cString” that stores a string having colons in it:
var cString = "LinuxHint: provides the best tutorials:";
Then, call the replace() method by passing a regex pattern to search colon in the entire string and replaces it with an empty string, which is given as the second parameter:
var ans = cString.replace(/:/g,'');
Here, “g” indicates the global flag that searches all occurrences in the provided string.
Lastly, print the resultant string using the “console.log()” method:
console.log(ans);
As you can see in the output, all the colons are successfully removed from a string:
![]() Let’s move to the next method.
Let’s move to the next method.
Method 2: Replace All Colon Using replaceAll() Method
For replacing all colons from a string, you can also use the “replaceAll()” method.
It works the same as the replace() method, but the difference is that the replace() method replaces the first occurrence while the replaceAll() method replaces all the occurrences in a string without using a regex pattern or a regular expression.
Syntax
For using the replaceAll() method, follow the given syntax:
string.replaceAll("searchValue", "replaceValue");
Here, the “searchValue” is the value that needs to be searched and replaced with the “replaceValue”.
Example
We will now use the same string and call the “replaceAll()” method without specifying any regex pattern for removing all the occurrences.
So, we will only enter a colon (:) that will be searched and replaced with an empty string:
var ans = cString.replaceAll(':','');
Print the string after removing all colons:
console.log(ans);
The output shows that all the colons are removed from a string:
![]() We have compiled the simplest methods for replacing all colons from a string.
We have compiled the simplest methods for replacing all colons from a string.
Conclusion
For replacing all colons from a string, you can use the replace() method or the replaceAll() method.
For instance, the replace() and the replaceAll() methods search the string for the colons and replace them with an empty string.
In the replace() method, you need to add a regex for removing all the occurrences of the colons in a string, while in the replaceAll() method, only add the colon as a search value.
In this blog, we have demonstrated the procedure for replacing all colons from a string with proper examples.
How to Replace a Character with New Line
While testing a web page or a site, there may exist unwanted characters or formatting errors, such as spelling mistakes or ambiguity in the text, which need to be handled.
In such cases, replacing a character with a new line plays a major role in making things clear and increasing the readability of the added text.
This manual will guide you about replacing a character with a new line.
How to Replace a Character with New Line?
To replace a character with a new line, you can use:
“replace()” method
“replaceAll()” method
We will now go through each of the two approaches one by one!
Method 1: Replace a Character with New Line Using “replace()” Method
The “replace()” method searches for a specific value in the given string and replaces it.
This method can be applied to replace a specific character with a new line.
Syntax
string.replace(searchValue, newValue)
Here, “searchValue” will be replaced with the “newValue” in the given string.
Example 1: Replace “!” with New Line
First, include a heading in the “<h>” tag and a button and specify its id:
<h>Replace the Character</h><button id= "button">Replace the Character</button>
Apply the “document.querySelector()” method and access the button using its “id” and heading respectively:
let accessBtn= document.querySelector("button");
let head= document.querySelector("h");
Next, initialize a variable named “str” with a value and set it as the inner text of “head”:
let str= "Character Replaced with a new line! It was great!";
head.innerText= str;
After that, apply an event “click” and utilize the replace() method to replace the specific character “!” with a new line specified as “\n”.
Lastly, display the corresponding string value after replacing the character:
accessBtn.addEventListener("click", () => {
let result= str.replace("!","\n");
head.innerText = result;});
When the added button is clicked, “!” will be replaced with the new line which can be seen below:
![]()
Example 2: Using regex for Replacing “!” with New Line
In this example, we will utilize the “/!/g” regex for replacing all of the matches “!” with the new line in the provided string.
This regex will be then passed to replace() method as an argument along with the “\n” new line character:
accessBtn.addEventListener("click", () => {
let regExp= /!/g;
let result= str.replace(regExp, "\n");
head.innerText = result;});
The corresponding output in this case will be:
![]()
Method 2: Replace a Character with New Line Using “replaceAll()” Method
Do you not want to use regex? No worries! The “replaceAll()” method gets you covered.
This method can be used for removing all the specified characters, which will yield the same output as the previous example.
accessBtn.addEventListener("click", () => {
let result= str.replaceAll("!","\n");
head.innerText = result;});
Output
![]() We have discussed different creative methods to replace a character with a new line.
We have discussed different creative methods to replace a character with a new line.
Conclusion
To replace a character with a new line, the “replace()” method can be utilized to replace a particular character, regex pattern with replace method to search for a specified character and replace it.
Moreover, the “replaceAll()” can also be used to replace all the specific characters present in the added string.
This write-up discussed the procedure to replace a character with a new line.
How to Remove Extra Space Between Words
Spaces are used to connect words in a sentence that are separated from other words.
It makes the entire sentence meaningful, readable, and easily understandable.
Sometimes, there may be some extra spaces added in the text that may disturb the formatting.
You must eliminate the additional spaces between the sentences in this situation.
This guide will illustrate the procedure to eliminate extra spaces between words.
How to Remove Extra Space Between Words?
For removing extra spaces between words, there are some JavaScript predefined methods listed below:
replace() method
split() method
trim() method
Let’s examine the working of each method separately.
Method 1: Remove Extra Space Between Words Using replace() Method
The “replace()” is a predefined method of the String type object used to replace the value in a string with the defined string, character, or any symbol.
It returns a new string as output with the replaced values after searching the string for a specific value or a regex pattern.
Syntax
Follow the below-provided syntax for using the replace() method:
string.replace("searchValue", "replaceValue")
The replace() method accepts two parameters, one is the “searchValue” that will be searched and replaced, and the other is the “replaceValue” used as a replacer.
Example
In this example, first, we will create a variable named “string” that stores a string with extra spaces:
var string = "Welcome to LinuxHint";
Then, create a regex pattern and store it in a variable called “regexPattern”:
var regexPattern = /\s+/g;
Here, “\s” is used for the spaces, “+” sign indicates all the spaces in a string, and “g” is the global flag which is added to search the full string and identify spaces.
Now, invoke the “replace()” method by passing the regex pattern as a searchValue and the space as a replaceValue:
var ans = string.replace(regexPattern, " ");
Here, the pattern will search the spaces between words and replace them with a single space.
Finally, print the resultant string on the console using the “console.log()” method:
console.log(ans);
As you can see that the output gives a string with a single space between words:
![]() If you want to remove all spaces between words, use the below method.
If you want to remove all spaces between words, use the below method.
Method 2: Remove Extra Space Between Words Using split() Method
For removing extra spaces between words, utilize the “split()” JavaScript method with the “join()” method.
The split() method divides the string into an array of substrings, while the join() method concatenates the substrings and outputs a new string.
The split() method takes a parameter that needs to be replaced, and the join() method accepts the replacer as its argument.
This method finds the spaces in the string and replaces all the spaces with the empty string.
Syntax
Follow the below-given syntax for using the split() method:
string.split(" ").join("")
Here, the split() method splits the string based on the space and joins them with an empty string.
Example
We will now use the same string that is already created in the above example and call the “split()” method with the “join()” method:
var ans = string.split(" ").join("")
Lastly, print the resultant string on the console using the “console.log()” method:
console.log(ans);
The output shows that all the spaces between the string are successfully removed:
![]() If you want to remove the spaces that occur at the beginning of the string, you have to follow the given section.
If you want to remove the spaces that occur at the beginning of the string, you have to follow the given section.
Method 3: Remove Extra Space Between Words Using trim() Method
The “trim()” method is another JavaScript method that is used to remove spaces.
It can remove the spaces at the starting and ending positions of the string and gives a new trimmed string.
It not only removes white spaces but also removes tabs and line breaks from a string.
This method does not accept any parameter as an argument.
Syntax
Follow the below-mentioned syntax for removing extra spaces between words:
string.trim();
Example
Here, we will create a string leading extra spaces and store it in a variable named “string”:
var string = " Welcome to LinuxHint";
Then, call the “trim()” method that will remove the spaces from the start of the string:
var ans = string.trim();
Print the resultant string on the console:
console.log(ans);
The spaces from the beginning of the string are successfully removed:
![]() We have compiled all the procedures for eliminating extra spaces between words.
We have compiled all the procedures for eliminating extra spaces between words.
Conclusion
For removing extra spaces, you can use the predefined JavaScript methods, including replace() method, split() method, or trim() method.
The trim() method removes the spaces at the start of the string, while the replace() method removes extra spaces between words.
The split() method removes all the spaces between words.
This guide illustrated the procedure for eliminating extra spaces between words with detailed explanations.
How to Remove All Quotation Marks from String
The quotation marks include a single quote (‘) and a double quote (“).
The double quotation mark is used in sentences to quote or prominent some text, while a single quote is utilized to indicate a quotation inside the other quote.
Sometimes, we must remove all the quotation marks from the string in cases such as parsing text.
This blog will demonstrate the way to eliminate all quotation marks from a string.
How to Remove All Quotation Marks from String?
For removing all quotation marks from a string, use the JavaScript replace() methods.
It is the predefined method of the String type object.
It accepts two parameters, “searchValue” and “replaceValue” and gives a string with a specific replacement after searching the string against a specific value or a regex pattern.
In our case, we will remove all the quotation marks from a string with an empty string, so, the quotation marks, including single quotes and double quotes in a string, will be considered as the searchValue, and an empty string will act as the replacer or replaceValue.
Syntax
Follow the below-provided syntax to use the replace() method:
replace("searchValue", "replaceValue")
Here, “searchValue” refers to the value that will be searched in a string and replaced with the “replaceValue”.
Example 1
In this example, first, we will create a string that contains single and double quotation marks stored in a variable named “str”:
var str = `Welcome' to the "LinuxHint"`;
Then, call the replace() method by passing a regex pattern as a searchValue that searches the single and double quotation marks from a string replace them with an empty string:
console.log(str.replace(/"|'/g, ''));
Here, the regex pattern contains a single quote (‘) and double quote (“) with OR (|) operator that indicates that it will search for the single quote or double quote in a string, and “g” is the global flag which signifies that all of the occurrences or the single and double quotes in a string will be considered.
As you can see in the output, all the quotation marks, including single and double quotes from the string are removed successfully:
![]() Let’s see another example.
Let’s see another example.
Example 2
Here, we will consider the same string but apply another regex pattern to remove all the quotation marks from a string:
console.log(str.replace(/['"]/g, ''));
Here, [‘ “] is a character class that matches single and double quotation marks, and “g” is the global flag which indicates that the pattern will apply on the whole string.
Output
![]() We have provided the simplest and most efficient way to remove all the quotation marks from a string.
We have provided the simplest and most efficient way to remove all the quotation marks from a string.
Conclusion
For removing all quotation marks, you can use the JavaScript replace() method.
It searches the string for the quotation marks based on the provided pattern and replaces them with empty strings.
You can add or create the pattern based on your program requirements.
In this blog, we have demonstrated the way to remove all quotation marks from a string with detailed examples.
How to Hide Button
While developing a website, there can be a situation where it is required to click a button only once.
For instance, you are submitting a form or entering any sensitive information restricted for modifications or revisions.
In such scenarios, hiding buttons using JavaScript becomes very handy to ensure the privacy of the information.
This blog will explain the methods to hide buttons.
How to Hide Button?
To hide a button, the following methods can be utilized:
“style.visibility” property
“style.display” property
The mentioned approaches will now be discussed one by one!
Method 1: Hide Button Using “style.visibility” Property
The “style.visibility” property sets the visibility of an element.
This property can be utilized to hide the visibility of the predefined button by referring to its “id”.
Syntax
Object.style.visibility = 'hidden'
Here, the visibility of the specified “Object” is set as “hidden”.
Check out the following demonstration for a better understanding.
Example
First, create a button using the input tag, assign it a value named “Click_Me”, and include an onclick which will trigger the “hideButton()” function when the added button is clicked:
<input type= button value= Click_Me id= btn onclick= "hideButton()">
In the JavaScript file, define the hideButton() function in such a way that it invokes the “document.getElementsById()” to access the created button and set its visibility as “hidden”:
function hideButton(){
document.getElementById('btn').style.visibility= 'hidden';}
The output of the above program is shown as follows:
![]()
Method 2: Hide Button Using “style.display” Property
The “style.display” property sets the specified element’s display type.
This technique can be implemented to hide the created button by fetching its specified id and setting “none” as its display type.
Syntax
Object.style.display='none'
Here, the display property of the “Object” is set as “none”.
Go through the following example for demonstration.
Example
We will utilize the same HTML code in this example.
However, in the JavaScript file, we will define the “hideButton()” function which will be invoked when the button is clicked.
In its definition, the “document.getElementById()” method will fetch the button using its “btn” id and the value of its “style.display” property will be set as “none” in order to hide it:
function hideButton(){
document.getElementById('btn').style.display= 'none';}
Output
![]() We have offered the simplest methods to hide buttons.
We have offered the simplest methods to hide buttons.
Conclusion
To hide a button, you can utilize the “style.visibility” and “style.display” properties.
To do so, firstly, you have to fetch the button by specifying its id in the document.getElementbyId() method and then set the value of the style.visibility property as hidden, or none for the style.display property.
This manual discussed the method related to hiding buttons.
How to Check if Variable is Regex
The term “Regex”, also known as “Regular Expression”, refers to a string of characters that creates a search pattern.
It could be only one letter, a simple, or a complex pattern.
A regex is used to match character combinations in strings.
You can use the added search pattern to specify the search criteria to extract some information from a text.
The variables can be used to store these patterns.
This manual will provide the procedure to verify if the JavaScript variable is regex.
How to Check if Variable is Regex?
To verify if a variable is a regex, use the JavaScript “instanceof” operator.
It is utilized to determine whether the object is a specific type of instance.
As it compares the instance with the type, the operator is also known as a type of Comparison operator.
If an object is an instance of a particular class, the instanceof operator gives true or false as a boolean value, depending on the situation.
Moreover, it can be utilized to identify an object’s type at run time.
Syntax
Follow the below-provided syntax to use the “instanceof” operator:
regexPattern instanceof RegExp
Here, “regexPattern” is a variable that stores a regular expression or a regex, the “RegExp” is a JavaScript object that contains its own properties and methods, and the instanceof operator will check if regexPattern contains a regex or not.
Example 1: Check if Variable has a Regex Pattern
In this example, we will check whether the variable has a regex pattern.
To do so, we will first create a variable named “pattern” that stores the following regex pattern or regular expression:
var pattern = /^([a-z0-9]{5,})$/;
Then, we will check whether the “pattern” variable stores any regex with the help of “instanceof” operator with a ternary (?) operator, which acts like a conditional operator and stores it in a variable called “result”:
var result = pattern instanceof RegExp ? "Yes" : "No";
Finally, print the result on the console using the “console.log()” method:
console.log(result);
As you can see that the output shows “Yes”, which indicates that the string stored in a variable “pattern” is a regex:
![]() If you want to see how a variable follows a regex pattern, follow the next example.
If you want to see how a variable follows a regex pattern, follow the next example.
Example 2: Check if Variable Follows a Regex Pattern
In this example, we will check how the variable follows a regex pattern.
For this purpose, we will first create a regex pattern stored in a variable named “pattern”:
var pattern = /^([a-z0-9]{5,})$/;
Then, for verification, call the “test()” method by passing any value.
If it matches the pattern, the method will return “true”; else, “false”:
console.log(pattern.test(12345));
The output displayed “true”, which means the value follows the pattern:
![]() We have provided the simplest approach for determining if a variable is a regex.
We have provided the simplest approach for determining if a variable is a regex.
Conclusion
To check if a variable is a regex, use the “instanceof” operator.
It is used to check the object against a specified type.
This operator outputs a boolean value based on whether or not the object is a reference of a particular class.
This manual provided the procedure for verifying whether the variable is regex or not with properly defined examples.
How to Check if String Contains Only Numbers and Special Characters
A string is created with multiple characters, some of which can be special characters, numbers, or letters., you can check whether a string contains only numbers and special characters, or it contains letters also.
To do so, utilize the JavaScript built-in methods with regular expressions that can validate the strings based on specific patterns.
This tutorial will describe the methods to determine whether the string contains only numbers and special characters.
How to Check if String Contains Only Numbers and Special Characters?
To ensure that the string only contains special characters and numbers, use the below-listed methods:
test() method
match() method
Let’s see how these methods will work!
Method 1: Check if String Contains Only Numbers and Special Characters Using test() Method
If a string contains any number or special characters, it can be checked using a regular expression, also known as a regex pattern, passed in the “test()”.
If a single special character and a number are found in a string, it returns “true” or “false”.
Also, note that the test() method is a case-sensitive method.
Syntax
Follow the below-mentioned syntax for using the test() method:
regexPattern.test(string);
Here, the “regexPattern” is a regular expression for special characters and numbers that will be checked in a string with the help of the test() method.
Example
In this example, we will first create a variable named “str” that stores a string containing numbers and special characters:
var str = "71#8*6%0!72(8)-5%";
Now, create a regex pattern for searching numbers and special characters in a string and store it in a variable “pattern”:
var pattern = /^[`!@#$%^&*()_+\-=\[\]{};':"\\|,.<>\/?~\d]*$/g;
Here, the pattern contains all the special characters and for numbers, where “\d” indicates all digits 0 to 9.
Then, call the test() method by passing a string as an argument and store its returned result in the variable “res”:
var res = pattern.test(str);
Finally, we will print the resultant value on the console:
console.log(res);
As you can see, the output returns “true” which means the string contains numbers and special characters:
![]() Let’s see another method!
Let’s see another method!
Method 2: Check if String Contains Only Numbers and Special Characters Using match() Method
Use the “match()” method to see if the string only contains special characters and numbers.
It compares a string to a regular expression or regex pattern.
If a match occurs, it returns an array of all matched occurrences; else, it returns null.
The ternary operator or conditional statement is also used with the match() method that returns a boolean value, depending on the evaluated condition.
Syntax
To use the match() method, follow the given provided syntax:
string.match(regexPattern);
Here, the “regexPattern” is the regular expression for special characters and numbers that will be matched in a string.
Example
Here, we will use the same string and pattern created in the above example.
Then, invoke the match() method by passing the regex pattern as an argument, which matches the string against it and outputs “true” if the match is found; else, it returns “false” using the ternary operator:
var res = str.match(pattern) ? "true" : "false";
Finally, print the resultant value on the console using the “console.log()” method:
console.log(res);
Output
![]() We have provided the best ways for checking whether the string contains only numbers and special characters.
We have provided the best ways for checking whether the string contains only numbers and special characters.
Conclusion
For verifying if the string contains only numbers and special characters, use the JavaScript built-in provided methods such as the test() or the match() method.
Both methods compare the string to the pattern; the test() method returns a boolean value, true or false, while match() returns an array of matched occurrences.
In this tutorial, we described the methods for verifying whether the string contains only numbers and special characters with the help of detailed examples.
How to Check if String Contains Backslash
The escape characters, including a backslash (\), tab (t), single quote (‘), and double quote (“), all are represented in a string with the help of the backslash symbol (\).
Sometimes you need to make sure the string doesn’t contain a backslash.
In such a scenario, you must use two backslashes at once as a backslash in a string or a regular expression.
This study will provide the procedure for determining if a backslash exists in a string.
How to Check if String Contains Backslash?
For determining whether the string has a backslash, use the below-provided JavaScript methods:
includes() method
match() method
Let’s use both of them one by one!
Method 1: Check if String Contains Backslash Using includes() Method
The JavaScript “includes()” method is used to check whether a character or a string is included in the string or if it exists in the string or not.
You can use it to check for a backslash in a string.
For this purpose, backslashes are accepted as arguments by the includes() method, and if they are found in the string, it returns “true”; else, “false”.
Syntax
The syntax for the includes() method is as follows:
string.includes(searchString);
Here, “searchString” is the substring or a character that will be searched in a string.
Example
Here, in the example, we will first create a string with the backslash:
var str = "\\ is a Backslash";
Here, two backslashes in a string refer to the single backslash because the escape characters are used in a string with the help of backslash, such as single or double quotes in a string (\‘, \“); similarly, we use the backslash as (\\).
Then, call the includes() method by passing a backslash as an argument and the resultant value is stored in a variable named “res”:
var res = str.includes('\');
Print the value of the “res” variable with the help of “console.log()” method:
console.log(res);
The output indicates that the backslash exists in the string:
![]() Let’s move toward the second method!
Let’s move toward the second method!
Method 2: Check if String Contains Backslash Using match() Method
The “match()” method also verifies whether the string contains a backslash or not.
It compares a string to a regex pattern or regular expression.
An array of matched occurrences is returned if a match was found; otherwise, null is set as the return case.
The match() method can also utilize the ternary operator, also known as a conditional statement.
Syntax
Use the given syntax for match() method:
string.match(regexPattern);
Here, the match() method will match the specified “regexPattern” with the characters of the “string”.
Example
We will now use the same string and call the match() method by passing a regex pattern “/\\/” for backslash that checks whether the backslash is present in the string or not.
Also, utilize the ternary operator with the match() method instead of a conditional statement:
var res = str.match(/\\/) ? "yes" : "No";
Lastly, print the resultant value on the console using the “console.log()” method:
console.log(res);
The output gives “yes” which means the string contains backslash:
![]() We have assembled the simplest methods for determining if the string contains backslash in a string.
We have assembled the simplest methods for determining if the string contains backslash in a string.
Conclusion
To check whether the string has a backslash, you can use the JavaScript methods, such as the includes() method or the match() method.
The includes() method searches the backslash as a substring in a given string and returns a boolean value, whereas the match() method compares the string to the pattern, and it returns an array of matches.
In this study, we have provided the procedure to check if the specified string contains a backslash.
How to Add and Remove readonly Attribute
In JavaScript, there are web pages that require you to input sensitive data, which should not be modified once entered or while submitting a form.
For instance, setting the file permissions to be readable or not.
In such cases, adding and removing readonly attributes is very effective in file handling and ensuring the overall security requirements.
This write-up will discuss the method to add and remove a readonly attribute.
How to Add and Remove readonly Attribute?
To add and remove a readonly attribute, apply the “setAttribute()” and “removeAttribute()” methods.
The “setAttribute()” method assigns a value to an attribute, and the “removeAttribute()” method removes an attribute from the specified element.
These methods can be associated with a “click” event to set the specified value as “readonly” and restrict its removal.
Syntax
element.setAttribute(name, value)
In the above syntax, “name” refers to the attribute name, and “value” is the new value to be assigned.
element.removeAttribute(name)
Here, “name” refers to the name of the particular attribute.
Go through the following example for demonstration.
Example
Firstly, include two buttons with “addAttribute” and “removeAttribute” ids.
These buttons will be utilized for adding and removing the readonly attribute, respectively.
Also, include an input id as “text” for entering the text data:
<button id= "addAttribute">Add Attribute</button><button id= "removeAttribute">Remove Attribute</button><input id= "text">
In the JavaScript file, use the “document.querySelector()” to fetch the added HTML elements with the help of their specified ids:
var addButton= document.querySelector('#addAttribute');
var removeButton= document.querySelector('#removeAttribute');
var get= document.querySelector('input');
After that, apply the “addEventListener()” method to attach the click event handler with the setAttribute() method.
It will work in such a way that when the “Add Attribute” button is clicked, the value of the input field will be set as “readonly”:
addButton.addEventListener('click', () => {
get.setAttribute('readonly', true);});
Similarly, repeat the same procedure for removing the set attribute by including the event click separately and applying the removeAttribute() method:
removeButton.addEventListener('click', () => {
get.removeAttribute('readonly');});
For testing purpose, firstly, we will input a value in the input field and click on the Add Attribute button.
As a result, the attribute of the added value will be set as readonly.
Then, click on the Remove Attribute button.
You may notice that the value will still be there(not removed).
This is how the given program will work:
![]() We have provided the simplest methods for adding and removing readonly attributes.
We have provided the simplest methods for adding and removing readonly attributes.
Conclusion
To add and remove readonly attributes, the “setAttribute()” and “removeAttribute()” methods can be utilized for adding and removing the readonly attribute respectively by fetching the corresponding button id, including an event handler and an input type with each of the implemented methods.
This blog explained the methods to add and remove readonly attributes.
How to Add Active Class
While developing a website, sometimes your code becomes so lengthy and complex that you cannot add or remove CSS ids or classes individually.
To tackle such situations, you can use JavaScript to add active classes for styling or to fulfill other purposes.
JavaScript provides different methods to resolve the stated complex issue instantly.
This manual will explain the procedure of adding an active class.
How to Add Active Class?
To add an active class, we will use the following methods:
document.getElementById()
document.querySelector()
Let’s head over to the first method!
Method 1: Use document.getElementById() With classList.add() Method to Add Active Class
In JavaScript, the “document.getElementById()” method is used to access a certain element by its id.
However, it only selects the elements based on their ids, not classes.
You can use it with the “classList.add()” method for adding an active class.
Let’s explore this method by taking an example.
Example
In our HTML file, we will take the “<p>” tag with some text, specify its id as “txt”, and add an “onclick” event which will trigger the “activate()” function.
Note that, add the <p> tag within <body> tag:
<p id="txt" onclick="activate()"> Tap Here </p>
In the JavaScript file, define the activate() function in such a way that it firstly accesses the paragraph element using its id in the document.getElementbyId() method.
Then, add a CSS class to its class list for styling purposes:
function activate() {
var a = document.getElementById("txt");
a.classList.add("newclass");}
In the CSS file, place a dot before “newclass” and assign the “background-color” property a value “orange”:
.newclass {
background-color: orange;}
As a result, when you will click on the paragraph element, the added background property will be applied to it:
![]() Let’s have a look at the following method in which we will use the document.querySelector() to add an active class.
Let’s have a look at the following method in which we will use the document.querySelector() to add an active class.
Method 2: Use document.querySelector() With classList.add() Method to Add Active Class
In JavaScript, the “document.querySelector()” method is utilized to get the first element from the code.
You can specify classes and ids both within the querySelector() method.
It can be used with the “classList.add()” method for adding an active class.
Example
We will now only use the “document.querySelector()” with id “#txt” to select the paragraph element.
Again, the classList.add() method will be used to add the active “newclass”:
function activate() {
var a = document.querySelector("#txt");
a.classList.add("newclass");}
Output
![]() We have learned two simplest methods to add active class
We have learned two simplest methods to add active class
Conclusion
To add active class, we can utilize the “getElementById()” or “querySelector()” with the classList.add() method.
Both mentioned methods get elements by their id first, then using classList.add() method, the new class name assigned to the element that can be used for styling purposes.
This post has described the procedure related to adding an active class.
How to Replace First Character of String
Sometimes, changing a word in real-time seems difficult, such as changing cat to bat at the same position by only replacing the first character.
However, if you are using JavaScript, it might be easy to perform such operations as it provides predefined methods.
This manual will explain the procedure for replacing a string’s first character.
How to Replace First Character of String?
For the replacement of the first character, utilize the provided methods:
replace() method
substring() method
slice() method
Let’s explore the first method!
Method 1: Replace First Character of String Using replace() Method
The “replace()” method is used to find or search for a value from a selected string and replace it with the provided value.
You can also utilize the replace() method to replace only a string’s first character.
Syntax
Follow the below syntax for using the replace() method:
string.replace(searchValue, newValue)
Here, the replace() will look for the “searchValue” and replace it with the “newValue” in the given string.
Example
Within this example, Let’s create a string having the “Glue” value:
var a = 'Glue';
Let’s initialize a character and set its value to “a[0]”.
As a result, the first character of the created “a” variable will be stored in “char”:
var char = a[0];
Now, print the original first character on the console:
console.log(a)
Then, invoke the “replace()” method with the created variable, pass char as the character that needs to be replaced with “B”:
const replaced = a.replace(char, 'B');
Print the resultant String using the console.log() method:
console.log(replaced);
![]() In the given output, we can see that the first character of the string is replaced successfully.
In the given output, we can see that the first character of the string is replaced successfully.
Method 2: Replace First Character of String Using substring() Method
The “substring()” method is utilized to retrieve the characters from the starting to ending index.
However, you can use this method to extract only the first letter from the string and then add the new character along with the string.
Syntax
Follow the provided syntax to utilize the substring() method:
string.substring(initial, final)
Here, the substring() method will return a substring that contains the character between the “initial” and “final” indexes.
Example
The substring() method will remove the first character of the already created string, which is stored in a, and the “b” will be added in its place:
const replaced = 'b' + a.substring(1);
Output
![]() Let’s move ahead and explore the slice() method to replace the first character of the string.
Let’s move ahead and explore the slice() method to replace the first character of the string.
Method 3: Replace First Character of String Using slice() Method
The “slice()” method is mainly used to manipulate arrays.
It extracts the required element without making changes to the array.
However, you can utilize this method to replace the first character of a string and store it in another string.
Syntax
string.slice(initial, final)
Here, the slice() method will accept “initial” as the starting index and “final” as the last index-1.
Example
We will now set “b” as the first character of the string “a” with the help of the “slice()” method.
To do so, we will pass “1” as the final index, which will slice down the
const replaced = 'b' + a.slice(1);
Output
![]() We have described three methods for replacing the first character of a string.
We have described three methods for replacing the first character of a string.
Conclusion
To replace the first character of the string, the “replace()”, “substring()”, or “slice()” method can be utilized.
The substring() and slice() methods will retrieve the string’s first character; then, you can replace it with the new character.
However, in comparison, the replace() method is efficient for the replacement of specific characters respectively.
In this manual, you have learned how to replace the first character of a string using JavaScript.
How to Get and Set Input Text Value
On most web pages, it is required to get the input text value from the users in order to enter correct data and ensure data security.
For instance, you need to get, set or store some specific data to use it for further processing.
In such cases, getting and setting input text value becomes very helpful for protecting data privacy.
This write-up will demonstrate the methods to get and set input text values.
How to Get and Set Input Text Value?
To get and set input text value, utilize:
“getElementById()” method
“getElementByClassName()” method
“querySelector()” method
Go through each of the mentioned methods one by one!
Method 1: Get and Set Input Text Value Using document.getElementById() Method
The “getElementById()” method accesses an element with the specified Id.
This method can be applied to access the ids of the input fields and buttons for getting and setting the text value.
Syntax
document.getElementById(elementID)
Here, “elementID” refers to the specified Id of an element.
The below example explains the discussed concept.
ExampleFirstly, include two input type fields and separate buttons for getting and setting the input text values with the “onclick” events which will access the specified functions:
<input type= "text" id= "getText" name= "getText" onclick= "this.value = '' "/><button onclick= "getText()">Get Value</button><button onclick= "getAndSetText()">Set Value</button><input type= "text" id= "setText" name= "setText" onclick= "this.value = '' "/>
Then, get the value of the input field with the help of the document.getElementById() method:
document.getElementById('getText').value= "Input Here";
Now, declare a function named “getAndSetText()”.
Here, fetch the input field with the “getText” id and pass the input value to the next input field having “setText” id:
function getAndSetText(){
var setText= document.getElementById('getText').value;
document.getElementById('setText').value= setText;}
Similarly, define a function named “getText()”.
After that, get the input field with “getText” id and pass the particular value to the alert box for getting the input text value:
function getText(){
var getText = document.getElementById('getText').value;
alert(getText);}
Output
![]()
Method 2: Get and Set Input Text Value Using document.getElementByClassName() Method
The “getElementByClassName()” method accesses an element with the help of the specified class name.
This method, similarly, can be applied to access the class of the input field and buttons for entering and setting the text value.
Syntax
document.getElementsByClassName(classname)
In the above syntax, the “classname” represents the class name of elements.
ExampleSimilar to the previous example, we will first access the first input field with the “getText” class name.
Then, define a function named “getAndSetText()” and get the specified input field based on its class name and set the value in the next input field:
document.getElementByClassName('getText').value= "Input Here"; function getAndSetText()
{
var setText= document.getElementByClassName('getText').value;
document.getElementById('setText').value= setText;
}
Likewise, define a function named “getText()”, add the class name of the first input field and pass the particular value to the alert box to display the fetched value:
function getText() {
var getText = document.getElementByClassName('getText').value;
alert(getText);}
This implementation will yield the following output:
![]()
Method 3: Get and Set Input Text Value Using “document.querySelector()” Method
The “document.querySelector()” fetches the first element that matches the specified selector, and the addEventListener() method can add an event handler to the selected element.
These methods can be applied to get the id of the input field and buttons and apply an event handler to them.
Syntax
document.querySelector(CSS selectors)
Here, “CSS selectors” refer to one or more CSS selectors.
Look at the following example.
ExampleFirstly, include input types with their placeholder values and buttons for getting and setting the input text values:
<input type= "text" id= "input-get" placeholder= "Get Value"><button id="get">GET</button><input type= "text" id= "input-set" placeholder= "Set Value"><button id="set">SET</button>
Next, fetch the added input fields and buttons using the “document.querySelector()” method:
let buttonGet= document.querySelector('#get');
let buttonSet= document.querySelector('#set');
let getInput= document.querySelector('#input-get');
let setInput= document.querySelector('#input-set');
let result= document.querySelector('#result');
Then, include an event handler named “click” for both buttons to get and set the values, respectively:
buttonGet.addEventListener('click', () =>{
result.innerText= getInput.value;});
buttonSet.addEventListener('click', () =>{
getInput.value= setInput.value;});
Output
![]() We have discussed the simplest methods for getting and setting input text value.
We have discussed the simplest methods for getting and setting input text value.
Conclusion
To get and set input text value, utilize the “document.getElementById()” method or the
“document.getElementByClassName()” method for accessing the specified input field and buttons based on their ids or class name and then set their values.
Moreover, the “document.querySelector()” can also be utilized for getting and setting input text values.
This blog explained the methods to get and set input text values.
How to Detect Tab Key
We often come across websites or web pages that comprise the case-sensitive element.
Moreover, some web pages do not allow you to input the data as long as the specific key, such as caps lock, is pressed, especially in the case of passwords.
In such cases, detecting the tab key becomes very helpful for alerting the user of the entered data beforehand.
This write-up will guide you to detect the tab key.
How to Detect Tab Key?
To detect the tab key, apply the following techniques:
“querySelector()” Method
“getElementbyId()” Method
The mentioned approaches will be demonstrated one by one!
Method 1: Detect Tab Key Using document.querySelector() Method
The “document.querySelector()” method accesses the first element matching a CSS selector, and then the addEventListener() method adds an event handler to the accessed element.
These methods can be applied to access the input type and detect whether the tab key is pressed or not when its value is entered.
Syntax
element.addEventListener(event, function, useCapture)
In the given syntax, “event” refers to the event name, “function” is the specific function to execute when the event occurs, and “useCapture” is the optional argument.
document.querySelector(CSS selectors)
In the above syntax, “CSS selectors” refer to one or more CSS selectors that can be specified in the document.querySelector() method.
Go through the following example for a better understanding of the stated concept.
ExampleFirstly, specify the input type as “text” with an initial placeholder value and a heading in the “<h>” tag:
<input type= "text" placeholder= "Enter Text"><h2>Result</h2>
Next, apply the “document.querySelector()” method for accessing the specified input and the heading respectively and store them in the variables named “input” and “result”:
let input= document.querySelector("input");
let result= document.querySelector("h2");
Now, add the “keydown” event with the input field using the addEventListener() method.
This event will notify the user whenever the “tab” key is pressed in the input field by applying the following condition with the help of the “innerText” property:
input.addEventListener("keydown", (e) => {
if (e.key === "Tab"){
result.innerText= "Tab Key Pressed";
} else {
result.innerText= "Tab Key Not Pressed";
}
In this case, when the user will press tab key, the added will notify about the performed action:
![]()
Method 2: Detect Tab Key Using the document.getElementbyId() Method
The “document.getElementById()” method can be utilized to access a particular HTML element based on its id.
This method can be implemented to get the input field and add an event to alert the user whenever the particular key is pressed, such as the tab key.
Syntax
document.getElementById(elementID)
In the given syntax, “elementID” refers to the id of a specified element.
Let’s overview the following example.
ExampleIn the below example, include an input type and a placeholder value as discussed in the previous method:
<input type= "text" id= "tab" placeholder= "Enter Text">
Now, fetch the input field id using the “document.getElementById()” method.
let input= document.getElementById(“tab”);
Finally, add an event named “keydown” in the addEventListener() method, which will alert the user whenever the “Tab” key is pressed:
input.addEventListener("keydown", (e) => {
if(e.key === "Tab"){
alert("Tab Key Pressed");
} });
Output
![]() We have discussed all the simplest methods to detect the tab key.
We have discussed all the simplest methods to detect the tab key.
Conclusion
To detect tab key, utilize the “addEventListener()” with the “document.querySelector()” method for getting the input type and applying an event for detecting the specified key or the “getElementbyId()” method for fetching the input field based on its id and notifying the user whenever the added condition is satisfied.
This blog guided about detecting tab key.
How to Divide Two Numbers
Division is a common arithmetic operation in every programming language., a division operator (/) is utilized for dividing numbers.
For dividing two numbers, you can use the division operator or a JavaScript predefined method that considers every number as an integer.
This tutorial will illustrate the methods for dividing two numbers.
How to Divide Two Numbers?
For dividing two numbers, use the below-mentioned methods:
Division (/) operator
parseInt() method
Let’s see the working of both of them!
Method 1: Divide Two Numbers Using Division (/) Operator
For dividing two numbers, use the division operator that is denoted as (/).
You can divide two operands; the operand that is divided is referred to as the “dividend”, while the operand that divides is known as the “divisor”.
The resultant value after division is called the “quotient”.
SyntaxFollow the given-provided syntax for division:
dividend/divisor;
Here, the “/” operator will divide the dividend with the divisor.
Example 1: Integer Dividend with Integer DivisorIn this example, we will divide the two numbers “a” and “b” by assigning integer values:
const a = 12;const b = 2;
Then, call the console.log() method by passing “a” as a dividend while “b” is a divisor:
console.log(a/b);
The output gives “6” by dividing “12/2”:
![]() Example 2: Integer Dividend with Float DivisorWe will now divide the integer value with the float value where the value of the variable “a” is “111” and “b” is “1.6”:
const a = 111;const b = 1.6;
Print the value after dividing them using the “console.log()” method:
console.log(a/b);
Output
Example 2: Integer Dividend with Float DivisorWe will now divide the integer value with the float value where the value of the variable “a” is “111” and “b” is “1.6”:
const a = 111;const b = 1.6;
Print the value after dividing them using the “console.log()” method:
console.log(a/b);
Output
![]() Example 3: Float Dividend with Integer DivisorIn this example, we will divide the floating point value “124.72” with the integer “3” using the division operator:
const a = 124.72;const b = 3;
console.log(a/b);
Output
Example 3: Float Dividend with Integer DivisorIn this example, we will divide the floating point value “124.72” with the integer “3” using the division operator:
const a = 124.72;const b = 3;
console.log(a/b);
Output
![]() Example 4: Float Dividend with Float DivisorNow, the variables that contain float values “14.72” and “2.2” respectively:
const a = 14.72;const b = 2.2;
We will divide both variables using the “/” division operator:
console.log(a/b);
The output indicates that if we divide two floating point numbers, it will give result in a floating point number:
Example 4: Float Dividend with Float DivisorNow, the variables that contain float values “14.72” and “2.2” respectively:
const a = 14.72;const b = 2.2;
We will divide both variables using the “/” division operator:
console.log(a/b);
The output indicates that if we divide two floating point numbers, it will give result in a floating point number:
![]() Let’s move toward the second approach!
Let’s move toward the second approach!
Method 2: Divide Two Numbers Using parseInt() Method
The “parseInt()” is a JavaScript predefined method that takes a value in a string format and returns it in integer format.
For example, if you can pass a floating point number “10.87” as a value, it will return “10”.
For dividing two numbers using parseInt(), the method first returns the number as an integer format and then applies division to it with the help of the division operator.
SyntaxUse the given syntax for dividing two numbers using parseInt() method:
parseInt(a)/parseInt(b);
Here, the “parseInt()” method takes values in integer or decimal format and returns it in integer format and then divides them using the division operator.
Example 1: Integer Dividend with Integer DivisorIn this example, we will divide the two numbers “a” and “b” by assigning integer values “41” and “2”:
const a = 41;const b = 2;
Then, call the parseInt() method with division operator and stores its result in a newly created variable “res”:
const res = parseInt(a)/parseInt(b);
Here, parseInt() takes an integer value, so it returns the same values.
When we divide them, it returns either an integer value or a decimal number based on the number.
Then, print the value of “res” with the help of the “console.log()” method:
console.log(res);
The output gives “20.5”, which is the decimal number because the dividend is an odd integer number and the dividend is an even integer number:
![]() Example 2: Integer Dividend with Float DivisorHere, we will divide the integer value with the float value, where the value of the variable “a” is “40” and “b” is “2.8”:
const a = 40;const b = 2.8;
Then, call the parseInt() method with the division operator and store its result in a newly created variable “res”.
This method first converts the decimal number to an integer and then divides them:
const res = parseInt(a)/parseInt(b);
Lastly, we will print the resultant value that is stored in a variable “res”:
console.log(res);
Output
Example 2: Integer Dividend with Float DivisorHere, we will divide the integer value with the float value, where the value of the variable “a” is “40” and “b” is “2.8”:
const a = 40;const b = 2.8;
Then, call the parseInt() method with the division operator and store its result in a newly created variable “res”.
This method first converts the decimal number to an integer and then divides them:
const res = parseInt(a)/parseInt(b);
Lastly, we will print the resultant value that is stored in a variable “res”:
console.log(res);
Output
![]() Example 3: Float Dividend with Integer DivisorIn this example, our divisor comprises floating point number and dividend is an integer:
const a = 40.567;const b = 2;
Here the parseInt() method will first convert the decimal number to an integer and then divides them:
const res = parseInt(a)/parseInt(b);
Finally, print the resultant value that is stored in a variable “res”:
console.log(res);
Output
Example 3: Float Dividend with Integer DivisorIn this example, our divisor comprises floating point number and dividend is an integer:
const a = 40.567;const b = 2;
Here the parseInt() method will first convert the decimal number to an integer and then divides them:
const res = parseInt(a)/parseInt(b);
Finally, print the resultant value that is stored in a variable “res”:
console.log(res);
Output
![]() Example 4: Float Dividend with Float DivisorNow, our variables contain float values “40.567” and “2.5” respectively:
const a = 40.567;const b = 2.5;
Call the parseInt() method with the division operator and store the resultant value in a variable “res”.
The parseInt() method will first convert the decimal number to an integer and then divides them:
const res = parseInt(a)/parseInt(b);
Then, print the resultant value that is stored in a variable “res”:
console.log(res);
Output
Example 4: Float Dividend with Float DivisorNow, our variables contain float values “40.567” and “2.5” respectively:
const a = 40.567;const b = 2.5;
Call the parseInt() method with the division operator and store the resultant value in a variable “res”.
The parseInt() method will first convert the decimal number to an integer and then divides them:
const res = parseInt(a)/parseInt(b);
Then, print the resultant value that is stored in a variable “res”:
console.log(res);
Output
![]() We have compiled all the methods for dividing two numbers.
We have compiled all the methods for dividing two numbers.
Conclusion
For the division of two numbers, you can use the Division (/) operator or parseInt() method.
The parseInt() method returns any number in an integer format and divides them using the division (/) operator.
The quotient will be an integer if the dividend and the divisor are even numbers; if one is odd and the other is even, it will return a decimal number.
This tutorial illustrated the methods for dividing two numbers with detailed examples.
How to Create Custom Alert Box
In JavaScript, we often want to create web pages having customized alert boxes to make a web page more attractive.
Moreover, some additional functionalities can also be added in the alert box for the purpose of customization.
In such cases, creating a custom alert box makes your development life easier and enhances the appearance of the website.
This blog will illustrate the methods for creating custom alert boxes.
How to Design a Custom Alert Box?
For creating a custom alert box, you can utilize:
“SweetAlert” Library
“JQuery” Library
We will now go through each of the two approaches one by one!
Method 1: Create a Custom Alert Box Using SweetAlert Library
SweetAlert is a JavaScript library used to customize alerts in web applications and websites with the help of a button.
You can utilize its “Swal.fire()” method to create an alert box and customize it using CSS.
It can be done by specifying the “Content Delivery Network” (CDN) link of the SweetAlert library in the “<script>” tag for accessing it.
Example
In the example below, we will load the “JQuery” file and “CDN” file in our script tags as follow:
<script src= "https://ajax.googleapis.com/ajax/libs/jquery/3.6.0/jquery.min.js"></script><script src= "https://cdn.jsdelivr.net/npm/sweetalert2@11.4.8/dist/sweetalert2.all.min.js"></script>
Now, we will apply CSS on the button.
Its styling include the “padding” which will set the overall area of button to 15px, and “text-align” will align the text to center:
<style type= "text/css">
button {
padding: 15px;
text-align: center;
}
</style>
Then, create a “button” named Enable Custom Alert Box which will trigger the alert box and assign “showAlert” as its id which will be accessed by the JavaScript function:
<main>
<button id= "showAlert">Enable Custom Alert Box</button></main>
Lastly, access the specified button id and apply the “click()” method on it.
As a result, when the button is clicked, the “Swal.fire()” method will return the corresponding text in an alert box:
<script>
$("#showAlert").click(function(){
Swal.fire(
'This is a customized alert box.',
)
});</script>
The output of the above implementation will result as follows:
![]()
Method 2: Create Custom Alert Box Using JQuery Library
JQuery is a JavaScript library that makes event handling much simpler to implement with an easy-to-use API.
You can utilize it to get the id and class of the alert box and apply different methods to them for creating a customized alert box.
The below example explains the stated concept.
Example
Firstly, we will load the JavaScript library “JQuery” in our program:
<script src= "https://ajax.googleapis.com/ajax/libs/jquery/3.2.1/jquery.min.js"></script>
Now, initialize the “div id”, “div class” and “button class” in the HTML file:
<div id= "confirm">
<div class="message">This is a customized alert box.</div>
<button class="ok">OK</button></div>
In the below step, we will include a button named “Enable Custom Alert Box”.
It will function in such a way that when the button will be clicked, the “onclick” event will trigger the “showAlert()” method:
<input type= "button" value= "Enable Custom Alert Box" onclick= "showAlert();"/>
After that, we will define the function showAlert() which accepts two arguments.
In its body, we will access the div id, fetch the div class message, and button class.
The “text()” method will return the text content of the message, and the “unbind()” method will remove the event handlers from the message.
When its button is clicked, the alert box will hide.
Lastly, the “click()” method will be applied for handling message on the alert box:
<script>
function showAlert(msg, ok) {
var confirmBox= $("#confirm");
confirmBox.find(".message").text(msg);
confirmBox.find(".ok").unbind().click(function() {
confirmBox.hide();
});
confirmBox.find(".ok").click(ok):
confirmBox.show();
}
</script>
Style the custom alert box for making it attractive:
<style>
#confirm {
display: none;
border: 1px solid;
position: fixed;
width: 250px;
left: 50%;
margin-left: -100px;
padding: 25px;
text-align: center;
}
</style>
Output
![]() We have discussed different creative methods to create Custom Alert Box.
You can apply any of the methods according to your requirement.
We have discussed different creative methods to create Custom Alert Box.
You can apply any of the methods according to your requirement.
Conclusion
To create a custom alert box, you can use the “SweetAlert library, which includes a “CDN” file to enable the “Swal.fire()” method, and “JQuery” library, which will load the JQuery library in the project, fetch various attributes of the alert box and apply different functionalities on the alert box.
This article explained the methods for creating custom alert boxes using JavaScript.
How to Create Button
Developers mostly want their web pages to be attractive and make them interactive.
For this purpose, buttons are added to the web page.
For instance, when there is a need to send or receive data, including click events for added functionalities for the user while registering or signing in to an account.
In such cases, buttons allow the end-user to perform various functionalities smartly.
This blog will explain the methods to create buttons.
How to Create Button?
To create button, the following methods can be utilized:
“createElement()” and “appendChild()” methods
“Type” attribute of “input” tag
The following approaches will demonstrate the concept one by one!
Method 1: Create Button Using “createElement()” and “appendChild()” Methods
The “createElement()” method creates an element, and the “appendChild()” method appends an element to the last child of an element.
These methods will be applied for creating a button and appending it to the Document Object Model(DOM) that needs to be utilized, respectively.
Syntax
document.createElement(type)
element.appendChild(node)
In the above syntax, “type” refers to the type of element that will be created using the createElement() method, and “node” is the node that will be appended with the help of the appendChild() method.
The following example will explain the stated concept.
Example
Firstly, a “button” will be created using the document.createElement() method and stored in a variable named “createButton”:
const createButton= document.createElement('button')
Next, the “innerText” property will refer to the created button and set the text value of the specified button as follows:
createButton.innerText= 'Click_Me'
Lastly, the “appendChild()” method will append the created button to DOM by referring to the variable in which it is stored as an argument:
document.body.appendChild(createButton);
The output of the above implementation will result as follows:
![]()
Method 2: Create Button Using “Type” Attribute of “input” Tag
The “type” attribute represents the type of input element to display.
It can be used to create a button by specifying “button” as the value of the type attribute of the input tag.
Syntax
<input type="button">
Here, “button” indicates the type of the input field.
Check out the below-given example.
Example
Firstly, we will use an input tag, specify its type as “button”, and value as “Click_Me”.
As a result, a button will be created.
Furthermore, it will trigger the “createButton()” function when clicked:
<input type=button value=Click_Me onclick="createButton()">
In the JavaScript file, we will define the “createButton()” function which will generate an alert box when the added button will be clicked:
function createButton(){
alert("This is a button")}
Output
![]() The discussed techniques to create a button can be utilized suitably according to the requirements.
The discussed techniques to create a button can be utilized suitably according to the requirements.
Conclusion
To create a button, “createElement()” and “appendChild()” methods can be applied for creating a button and appending it to be utilized in the DOM.
Another technique that can be used to create a button is defining an input type and adding the associated functionality.
This article demonstrated the methods to create a button.
How to Format Phone Number
It is necessary to keep data secure and aligned, especially when it comes to phone numbers.
Websites that collect users’ phone numbers often face format problems.
Users fill their data in a very uncertain way without keeping the standards in view.
It makes data processing difficult for website developers.
To avoid such situations, JavaScript can be used to format the phone numbers according to a specific standard.
This blog will discuss the procedure related to formatting a phone number.
How to Format Phone Number?
In JavaScript, to format a phone number, we will use the following methods:
RegEx
substr() method
Let’s dig into the first method!
Methods 1: Using RegEx to Format Phone Number
“RegEx” is shorthand for regular expression.
It is the container of characters that introduces a search pattern with respect to a string and then replaces or removes the existing values of a string with new values respectively.
Let’s move ahead and take an example to understand how using the RegEx method can format a phone number.
Example
In this example, we will create a variable “p” and assign it a random unformatted number:
var p = '+1.234-567.1234';
Then, invoke the replace() method, where \D is for digits from [0-9], + is to detect the repetition of digits and g is for the global match.
Then, again call the replace() method with a special sequence of characters such as, (\d{1}) to set one digit, (\d{3}) to set three digits, and (\d{4}) to set four digits.
To know more about these operations, check out our other dedicated article.
Moreover, $1 will be the first group and the + will be aligned right before it, ($2) will be the second group which is enclosed within brackets, $3-$4 will be the third and fourth group with a hyphen sign (-):
p = p.replace(/\D+/g, '').replace(/(\d{1})(\d{3})(\d{3})(\d{4})/, '+$1 ($2) $3-$4');
Now, print the results using the below line:
console.log(p);
![]() As you can see, we have successfully formatted the phone number.
As you can see, we have successfully formatted the phone number.
Methods 2: Using substr() to Format Number
The “substr()” method extracts the substring from a specific index till the mentioned ending index.
This method can assist in making substrings of numbers with proper format and sequence of characters.
As a result, a formatted number will be generated.
Syntax
string.substr(start, end)
Here, the “substr()” method will retrieve the substring from the specified “start” index till the “end” index of the given string.
Example 1
Let’s divide the program into three parts.
In the first part, we will consider the value “p.substr(0, 3)”, as 0 is the starting point, and 3 is the length; in the second part, the value “p.substr(3, 3)” indicates that the digits will start from 4th position and their length will be 3.
The last part has value “p.substr(6, 4)” where the digit positions is starting from 7 and its total length is 4:
p = p.substr(0, 3)+ '-' + p.substr(3, 3)+ '-' + p.substr(6, 4);
Output
![]() Now, let’s take another example to figure out how we can insert the country code along with our number using the same method.
Now, let’s take another example to figure out how we can insert the country code along with our number using the same method.
Example 2
In this example, we will take the string “str” and make the “+1” to store in it:
var str = '+1';
Now, we will define 1 as the starting point in the first value of “p.substr(1, 3)”.
The rest code will remain the same:
p = p.substr(1, 3)+ '-' + p.substr(3, 3)+ '-' + p.substr(6, 4);
Print out the newly initialized str string with string p:
console.log(str, p);
Output
![]() We have learned the procedure to format phone number through two different methods.
We have learned the procedure to format phone number through two different methods.
Conclusion
To format the phone number, the “RegEx” or “substr()” method can be utilized.
By defining the regular expression, you need to create a pattern, and then with the help of the replace() method, the phone number can be formatted.
In the substr() method, three parts can be created, and each part has a defined starting point and length.
This article has covered the method to format phone numbers.
How to Compare Two Strings
[There are some situations where the developers need to compare two strings.
Most programmers frequently make the mistake of attempting to compare their strings using the == operator.
The == operator has some restrictions in this situation as the variable types cannot be validated using it.
So, you may need to look for other methods to handle the situation.
This article will demonstrate the procedure for comparing strings.
How to Compare Two Strings?
For comparing two JavaScript strings, use the following listed methods:
strict equality operator “===”
localeCompare() method
RegEx with test() method
includes() method
Let’s examine the working of each method separately.
Method 1: Compare Two Strings Using strict equality Operator
The strict equality operator (===) can be utilized to validate whether the strings are equal or not.
If the strings are different, it returns false as an output; else, it gives true.
As it is a case-sensitive method, while comparing strings, it also compares the case of the letters, which means that lowercase and uppercase letters are considered different.
Syntax
Use the below syntax for comparing two strings using the strict equality operator:
str1===str2;
Here, the “===” operator will compare the value and the datatype of str1 and str2.
Example
In this example, we will compare the two strings one is in upper case, and the other is in lowercase.
To do so, first, we will create two variables named “str1” and “str2” that stores strings “LinuxHint” and “linuxhint”:
var str1 = "LinuxHint";var str2 = "linuxhint";
Then, call the “console.log()” method for printing the result that tells whether the strings are equal or not using the “===” operator:
console.log(str1 === str2);
The output shows “false” which indicates that the strings are not equal because the equality operator performs case-sensitive comparison:
![]() If you want to perform a case-insensitive comparison between strings, you have to follow the below-given methods.
If you want to perform a case-insensitive comparison between strings, you have to follow the below-given methods.
Method 2: Compare Two Strings Using localeCompare() Method
“localeCompare()” is a JavaScript predefined method used for comparing two strings.
It performs a case-insensitive string comparison and utilizes the current locale to compare two strings.
Syntax
Follow the below-mentioned syntax for comparing two strings using the localeCompare() method:
str1.localeCompare(str2);
Here, “str2” is the string that will be compared with “str1”:
Example
We will now use the same strings that are already created in the previous example and then compare them using the “localeCompare()” method with the help of the conditional operator:
if(str1.localeCompare(str2)){
console.log("str1 is equals to str2");}else{
console.log("str1 is not equals to str2");}
As you can see that the output indicates the strings are equal because the method compares the case-insensitive comparison:
![]() Let’s move to the next method!
Let’s move to the next method!
Method 3: Compare Two Strings Using RegExp With test() Method
There is another method for comparing two strings that also performs case-insensitive comparison called “RegExp” with the help of the “test()” method.
It checks the equality of strings based on the defined regex.
The test() method will accept a string as an argument for comparison.
Syntax
Follow the given syntax for the test() method using RegEx with test() method:
regPattern.test(str2);
Here, “str2” is the string that will be compared with “regPattern”:
Example
Now, we will create an instance of RegExp by passing a string “str1” and a regex “gi” that indicates the case-insensitive comparison and stores it in a variable “regPattern”:
var regPattern = new RegExp(str1, "gi");
After that, we will call the “test()” method by passing the string “str2” as an argument.
var ans = regPattern.test(str2);
Then, use the conditional statement to verify whether the strings are equal or not:
if(ans) {
console.log("str1 is equals to str2");} else {
console.log("str1 is not equals to str2");}
Output
![]() If you want to compare a string with another string as a substring, you must follow the below section.
If you want to compare a string with another string as a substring, you must follow the below section.
Method 4: Compare Two Strings Using includes() Method
To determine whether the string is a substring of the other string, JavaScript provides a predefined method called the “includes()” method.
It takes a string as an argument and gives a boolean value “true” if it exists in the string; else, it returns “false”.
Syntax
Follow the below-provided method for using the includes() method:
str1.includes(str2);
Here, “str2” is the string that checks whether it is included or a part of the “str1”:
Example
Here, first, we will create two strings, “str1” and “str2” and check whether the second string is a substring of first or not:
var str1 = "LinuxHint";var str2 = "in";
For this, call the “includes()” method by passing the “str2” as an argument:
console.log(str1.includes(str2));
The output gives “true” which indicates that the “str2” is the part of the “str1”:
![]() We have compiled all the methods for comparing two JavaScript strings.
We have compiled all the methods for comparing two JavaScript strings.
Conclusion
For comparing two JavaScript strings, you can use the localeCompare() method, strict equality operator, RegEx with test() method, or includes() method.
The strict equality operator performs a case-sensitive comparison while the test() method and the localeCompare() method perform the case-insensitive comparison.
Lastly, the includes() method checks the string as a substring in another string.
In this article, we demonstrated the methods for comparing two strings with proper examples.
How to Get Last Character of String
A string comprises several characters, some of which may be special characters, numbers, or letters.
As a result, a string’s last character can either be a letter, a number, or a special character, so if you want to know about the last character of a string, use the JavaScript predefined methods.
This article will provide multiple ways to get the string’s last character.
How to Get Last Character of String?
To get the string’s last character, use the following methods:
charAt() method
at() method
substr() method
slice() method
Bracket notation
Let’s discuss the working of all of these methods one by one!
Method 1: Get Last Character of String Using charAt() Method
For getting the string’s last character, use the “charAt()” method.
It takes the index of the last character as a parameter and returns the character as an output at that index.
The “string.length – 1” is passed as an argument because the index of the string starts at 0, and the last index is the string.length – 1.
SyntaxFollow the below-given syntax for using the charAt() method:
string.charAt(string.length - 1);
Here, the “string.length – 1” refers to the last index of the string.
ExampleIn this example, firstly, we will create a variable named “str” that stores a string “LinuxHint”:
var str = "LinuxHint";
Then, call the charAt() method by passing the last index of the string and store the returned character in variable “getLastCh”:
var getLastCh = str.charAt(str.length - 1);
Finally, print the last character of a string returned by a “charAt()” method using “console.log()” method:
console.log(getLastCh);
The output displayed “t” as the last character of the “LinuxHint” string:
![]() Let’s move to the second method.
Let’s move to the second method.
Method 2: Get Last Character of String Using at() Method
JavaScript predefined “at()” method is also used to get the string’s last character.
It takes “-1” as an argument which is the position of the last character of a string, and it returns the character at that position.
SyntaxUse the given syntax for at() method:
string.at(-1);
Here, “-1” indicates the last index of the string.
ExampleWe will use the same string “str” created in the above example and then call the “at()” method by passing the index of the last character:
var getLastCh = str.at(-1);
Finally, print the last character on the console:
console.log(getLastCh);
As you can see, we have successfully fetched the last character “t” of a string “LinuxHint”:
![]() Let’s see another method for getting the last character of a string.
Let’s see another method for getting the last character of a string.
Method 3: Get Last Character of String Using substr() Method
To get the string’s last character, use the JavaScript predefined “substr()” method.
It takes the index of the last character as a parameter and gives the character at that index as a substring.
SyntaxFollow the below-provided syntax for the substr() method:
string.substr(string.length - 1);
The “string.length – 1” is the last index of the string.
ExampleHere, we will use the same string created in the previous example and call the “substr()” method:
var getLastCh = str.substr(str.length - 1);
Print the resultant value using the “console.log()” method:
console.log(getLastCh);
Output
![]() Let’s see one more method to do the same task.
Let’s see one more method to do the same task.
Method 4: Get Last Character of String Using slice() Method
You can also use the “slice()” method for getting the string’s last character.
It gives the extracted part in a new string without altering the existing string.
The slice() method accepts a string as input and returns a substring; if you start the slicing at -1, the last character in the string will be returned.
SyntaxFor the slice() method, use the given syntax:
string.slice(-1);
Here, “-1” indicates the last index of the string.
ExampleIn this example, we will use the previously created string and invoke the “slice()” method to get the last character from a string:
var getLastCh = str.slice(-1);
Finally, print the last character of the string using “console.log()” method:
console.log(getLastCh);
The output returns the last index “t” of the string “LinuxHint”:
![]() Let’s move to the next method.
Let’s move to the next method.
Method 5: Get Last Character of String Using Bracket Notation
The bracket notation “[ ]” is another method for getting the string’s last character.
In order to get the string’s last character, you can utilize the “str.length – 1”.
SyntaxFollow the below-mentioned syntax for using bracket notation:
string[string.length - 1];
ExampleNow, we will use the “bracket notation” to get the string’s last character:
var getLastCh = str[str.length - 1];
Lastly, print the returned last character of the string on the console:
console.log(getLastCh);
Output
![]() We have gathered all the methods for getting the last character from a string.
We have gathered all the methods for getting the last character from a string.
Conclusion
To get the last character from a string, you can use the JavaScript built-in methods, such as the charAt() method, at() method, substr() method, slice() method, or Bracket notation.
However, the at() and the charAt() methods are the common methods utilized to get the last character.
This article provided multiple ways to get the last character from a string with detailed examples.
How to Remove Last Comma from String
A comma is a separator utilized between the items of a list, phrases, and so on.
Sometimes, while writing in the flow, we add the comma at the end of the list at the last of the string.
It can be challenging for a developer to remove the last comma from a set of strings manually.
For this purpose, JavaScript provides some predefined methods that can be utilized to tackle the situation.
This write-up will demonstrate the methods for eliminating the last comma from a given string.
How to Remove Last Comma from String?
For removing the last comma from a string, use the below-given JavaScript methods:
slice() method
replace() method
substring() method
Let’s explore these methods one by one.
Method 1: Remove Last Comma from String Using slice() Method
The “slice()” method is used for removing any character from a string.
It extracts the part of the string based on the starting and the ending index and gives it as a new string.
More specifically, we will use it for removing the last comma from a string.
SyntaxFollow the below-mentioned syntax to use the slice() method:
String..slice(startIndex, endIndex);
Here, “startIndex” and the “endIndex” are the indexes that specify which portion of the string needs to be extracted.
ExampleIn this example, we will first create a variable named “color” that stores a list of colors separated by commas:
var color = "red,blue,green,orange,";
Invoke the slice() method by passing the start index as “0” and the end index as “-1” that helps to get the string before the last character that is the comma:
var answer = color.slice(0, -1);
Calling the given slice() method will extract the substring starting from the 0 index and extract it before the last character of a string.
Then, print the resultant string on the console using the “console.log()” method:
console.log(answer);
The output shows the last comma from a list of colors is successfully removed:
![]() Let’s head toward the second method!
Let’s head toward the second method!
Method 2: Remove Last Comma from String Using replace() Method
The “replace()” method is used to simply replace the value in a string with the defined string, character, or any symbol.
It is the predefined method of the String type object.
It accepts two parameters and outputs a string with the newly replaced values.
SyntaxFollow the below-given syntax to use the replace() method:
String.replace(searchValue, replaceValue);
Here, the “searchValue” is the value that needs to be searched and replaced with the “replaceValue”.
ExampleWe will now use the already created string stored in the variable “color” and call the replace() method by passing the searchValue as a comma in the form of a regex pattern.
The extracted commas will be replaced with empty strings:
var answer = color.replace(/,*$/, '');
Here, in the regex pattern, the “*” sign indicates any number of this (comma), and the “$” sign matches it till the end of the string.
Lastly, print the resultant string stored in a variable “answer” on the console using the “console.log()” method:
console.log(answer);
As you can see in the output, the last comma from a string is removed by utilizing the replace() method:
![]() Let’s use another method for removing the last comma from a string.
Let’s use another method for removing the last comma from a string.
Method 3: Remove Last Comma from String Using substring() Method
There is another JavaScript method that helps to remove commas from the end of a string called the “substring()” method.
Just like the slice() method, it also takes two parameters and returns a new string as output by extracting the specified portion of the string as a substring based on the start and last index.
SyntaxFollow the below-provided syntax to use the substring() method:
String.substring(startIndex, endIndex);
Here, “startIndex” and the “endIndex” are the indexes that specify which portion of the string should be extracted from the string.
Note that the start index is included, while the end index is excluded from a resultant string.
ExampleIn this example, we will use the previously created string called “color” and invoke the “substring()” method by passing the start index “0”, and the last index will be a number less than the overall length:
var answer = color.substring(0, color.length-1);
On the console, we will print the resultant string:
console.log(answer);
Output
![]() We have provided all the methods for eliminating the last comma from a string.
We have provided all the methods for eliminating the last comma from a string.
Conclusion
For removing the last comma from a string, you can use the slice() method, replace() method, or substring() method.
The slice() and the substring() methods extract the strings except for the last comma, while the replace() method only replaces the last comma in a string with an empty string.
This write-up demonstrated the methods for eliminating the last comma from a given string with detailed examples.
How to Cut a String After a Specific Character
Trimming a string involves the removal of characters or words of the string from the start or the end position.
You can filter the strings by removing particular characters or a part of the string as a substring to get the specific portion.
This makes it easier for your JavaScript program to correctly handle user input or data retrieved from a website.
This manual will describe the procedure to trim the string after a specified character.
How to Cut a String After a Specific Character?
To trim a string after a specified character is a little challenging for developers.
However, JavaScript provides some built-in methods that are listed below:
substring() method
slice() method
split() method
Let’s look at how each method works.
Method 1: Cut a String After a Specific Character Using substring() Method
The “substring()” is a predefined JavaScript method belonging to the String type object.
It displays a substring of a string as an output.
This method takes two parameters, the starting, and the ending index, and returns a new string as output by extracting the specified portion of the string as a substring.
Moreover, the start index is included, while the end index is excluded from the resultant string.
SyntaxFollow the below-given syntax for using the substring() method:
string.substring(0, string.indexOf(character));
Here, “0” is the start index of the string, and the “string.indexOf(character)” is the end index of the extracted string, which refers to the index of the specified character which will not be included in the resultant string.
Example: Cutting a String After a SpaceIn this example, we will cut the string when the first space is detected in the string.
To do so, first, we will create a variable called “string” with the following value in it:
var string = 'Learn Programming Skills';
Then, call the substring() method by passing the start and the end index of the string.
For this purpose, invoke the indexOf() method accepts a space as an argument:
var ans = string.substring(0, string.indexOf(' '));
Lastly, print the resultant string stored in a variable “ans” on the console using the “console.log()” method:
console.log(ans);
As you can see that the output cut the remaining string after getting the first space:
![]() Let’s head towards the other method!
Let’s head towards the other method!
Method 2: Cut a String After a Specific Character Using slice() Method
For trimming a string after a particular character, use the JavaScript “slice()” method.
It takes the start and the last index as parameters and outputs a new string by extracting the portion of the string based on specified indexes.
As the last index, we will use the indexOf() method by passing the character that will return the index of the specified character.
SyntaxFollow the below-provided syntax for the slice() method:
string.slice(0, string.indexOf(character));
Example: Cutting a String After “@” CharacterWe will create a string that is stored in a variable named “string”, which will be trimmed based on the “@” character:
var string = 'Learn Programming @Skills';
Invoke the slice() method by passing a character “@” as an argument:
var ans = string.slice(0, string.indexOf('@'));
Then, print the resultant string on the console using the “console.log()” method:
console.log(ans);
The output shows that the string is successfully cut after the specified character “@”:
![]() Let’s try another method for cutting a string after a specific character.
Let’s try another method for cutting a string after a specific character.
Method 3: Cut a String After a Specific Character Using split() Method
There is another JavaScript method for cutting a string after a specific character called the “split()” method.
It gives the string after splitting it into an array of substrings.
This method splits the string into two parts, one before the character and the other after the character.
SyntaxFollow the below-mentioned syntax to use the split() method:
string.split(separator, limit);
Here, “separator” and the “limit” are the two parameters passed as arguments to the split() method.
The second parameter is optional, while the first parameter is utilized to split the string.
Moreover, the limit specifies how many splits there can be.
ExampleNow, call the split() method by passing a separator “@”, which is utilized to split the string.
We have specified the index 0 to get the substring before the specified character:
var ans = string.split('@')[0];
Finally, print the resultant string stored in a variable “ans” on the console using the “console.log()” method:
console.log(ans);
The output shows that the string is successfully trimmed:
![]() We have gathered all the JavaScript methods for cutting the string after a particular character.
We have gathered all the JavaScript methods for cutting the string after a particular character.
Conclusion
To cut a string after a specific character, you can use the substring() method, slice() method, or split() method.
The slice() and the substring() methods work the same as they extract the string by cutting other parts based on the specific character.
In this manual, we have described the procedure to cut the string after a particular character with proper examples.
How to Convert Timestamp to Date Format
In JavaScript, there are situations where there is a need to convert the random or incorrect date and time value which is independent of any time zone or calendar.
For instance, when it is required to get the value of each attribute in the date format.
In such cases, JavaScript can help you to encode the unformatted timestamp value in the proper date and time format.
This manual will guide you related to converting Timestamp into date format.
How to Convert Timestamp Value in Date Format?
To convert timestamp value in date format, the following methods can be applied:
“New Date()” Constructor
“getHours()”, “getMinutes()” and “toDateString()” Methods
“Date” Class Methods
Go through the discussed methods one by one!
Method 1: Convert Timestamp into Date Format Using “New Date()” Constructor
The “new Date()” constructor creates a new object named “date” with the current date and time.
This method can be applied to create a Date object referring to the declared timestamp value and displaying the converted date format.
The below example will demonstrate the stated concept.
Example
First, declare a variable named “timeStamp” and store a specific value in it:
var timeStamp= 1807110465663
Next, apply the “Date()” constructor to create a new date object and use the timeStamp value as its argument:
var dateFormat = new Date(timeStamp);
Finally, log the converted date format value on the console:
console.log(dateFormat)
The output of the above implementation will result as follows:
![]()
Method 2: Convert Timestamp to Date Format Using “getHours()”, “getMinutes()” and “toDateString()” Methods
Firstly, assign a particular timestamp value and store it in a variable named timeStamp:
var timeStamp= 1107110465663
Next, apply the “Date()” constructor to create a new date object with the timeStamp value as its argument as discussed in the previous method:
const date= new Date(timeStamp);
After that, apply the “getHours()” and “getMinutes()” methods to get the hours and minutes with respect to the assigned timeStamp value.
Also, apply the “toDateString()” method to get the corresponding date as well:
dateFormat = date.getHours() + ":" + date.getMinutes() + ", "+ date.toDateString();
Finally, display the resultant date format on the console:
console.log(dateFormat);
Output
![]()
Method 3: Convert Timestamp to Date Format Using Date Class Methods
The “Date” class provides various methods to represent the declared timestamp into the date format.
This method can be implemented to create a new date object and display the corresponding date format by applying the methods for fetching each of its attributes separately.
Look at the following example.
Example
Repeat the steps discussed in the above methods for initializing a timestamp value and creating a new date object as follows:
var timeStamp= 1107110465663
var dateFormat= new Date(timeStamp);
Now, apply the “getDate()” method for getting the day of the month, “getMonth()” for getting the month, “getFullYear()” for getting the value of the full year.
Also, apply the “getHours()”, “getMinutes()”, and “getSeconds()” for getting the corresponding time against the provided time stamp.
Lastly, add all the attributes to get the date format sequentially:
console.log("Date: "+ dateFormat.getDate()+
"/"+(dateFormat.getMonth()+1)+
"/"+dateFormat.getFullYear()+
" "+dateFormat.getHours()+
":"+dateFormat.getMinutes()+
":"+dateFormat.getSeconds());
Output
![]() We have compiled different methods to convert timestamp to date format.
We have compiled different methods to convert timestamp to date format.
Conclusion
To convert timestamp to date format, apply the “New Date()” Constructor method to create a new date object and display the current date and time.
Also, apply the “getHours()”, “getMinutes()”, and “toDateString()” methods to compile the time and date and display them.
Moreover, the “Date Class” methods can also be utilized for the same purpose.
This article guided related to converting timestamp to date format.
How to Check if Current URL Contains String
Checking if a current URL contains the required string does wonders in accessing all the related websites according to your needs in one go resulting in the saving of a lot of time and hassle.
In addition, this technique becomes very helpful in testing the various web pages of your website.
This article will discuss the methods to check if the current URL contains a string.
How to Check/Identify if Current URL Contains String?
To check if the current URL contains a string, you can utilize:
“test()” method.
“toString().includes()” method.
“indexOf()” method.
We will now go through each of the mentioned approaches one by one!
Method 1: Check if Current URL Contains String Using test() Method
The “test()” method checks for a match in the string and returns “true” if found.
We will apply this method to test if the current URL contains a string or not.
Syntax
test(string)
Here, “string” refers to the string that needs to be searched.
Overview the following example for the demonstration.
Example
Firstly, we will specify the string as “URL” and test the presence of it in the current URL page by applying the “window.location.href” property.
If the added condition is satisfied, an alert box will pop-up with the specified message:
if (/URL/.test(window.location.href)) {
alert("The URL contains the string 'URL'");}
The resultant output will be:
![]()
Method 2: Check if Current URL Contains String Using toString().includes() Method
The “toString()” method returns a string referring to the object and the “includes()” method returns true if the specified value is present in the string.
Both of these methods can be utilized in combination to verify if the current URL contains the added string or not.
Syntax
string.includes(value)
Here, the includes() method will search for the given “value” in the “string”.
Look at the below example for demonstration.
Example
In the below example, we will apply the “window.location” object, which has all the information regarding the current document location.
Then, we will use the “toString()” method with the particular object to verify if the specified string is present in the current URL.
Finally, generate an alert box upon the satisfied condition:
if (window.location.toString().includes("STRING")) {
alert("The URL contains the string 'STRING'");}
Output
![]()
Method 3: Check if Current URL Contains String Using indexOf() Method
The “indexOf()” method returns the position of the first value in a string and returns -1 if the value is not found.
We will apply this technique to check if there is a string value in the current URL by accessing its index.
Syntax
string.indexOf(value)
Here, indexOf() method will search for the “value” in the specified string.
The below example will demonstrate the above concept.
Example
First, we will apply the “window.location.href” property to access the current page’s URL.
After that, we will access the string’s index by applying the “indexOf()” method.
Finally, the alert box will display the following message if the specified string is found in the current URL:
if (window.location.href.indexOf("URL") > -1) {
alert("The URL contains the string 'URL'");}
In the other case if the string value is not found, the alert box will display the following message:
else {
alert("The URL do not contain the string 'URL'");}
Output
![]() We have provided simplest methods to check if the current URL contains a string.
We have provided simplest methods to check if the current URL contains a string.
Conclusion
To check if the current URL contains a string, you can apply the “test()” method along with the “window.location.href” property for matching the particular string value with the URL or the “toString().includes()”, or the “indexOf()” method to return the index of the first value in the specified string.
This write-up explained the methods to check if the current URL contains a string.
How to Check if a String Contains a Dot
A dot is used at the end of the sentence, which is called a full stop.
Finding if a string has a dot can be a little challenging for a beginner developer, especially when it is required to check the ending of a sentence.
However, JavaScript provides built-in methods that can help you perform this task easily.
This study will provide you with the procedure to check whether the string contains a dot or not.
How to Check if a String Contains a Dot?
To determine if a string contains a dot, use the following JavaScript predefined methods:
includes() method
match() method
Let’s examine each of the aforementioned methods one by one.
Method 1: Check if a String Contains a Dot Using includes() Method
To evaluate if a substring is present in a string, use the “includes()” method.
It accepts a substring as an argument, and if it is present in the string, the method will output the boolean value “true”, else it gives “false”.
More specifically, we will utilize this method to check if the selected string contains a dot or not.
Syntax
Follow the below-mentioned syntax for includes() method:
string.includes(character);
Here, the “includes()” method will check if the “string” contains the specified “character” or not.
Example
Firstly, we will create a string named “str” having the following value:
var str = "LinuxHint";
Next, we will check whether the dot (.) exists in the string or not by invoking the “includes()” method with the ternary operator which acts like a conditional statement and stores the result in a newly created variable called “ans”:
var ans = str.includes('.') ? "true" : "false";
Finally, print the resultant value using the “console.log()” method:
console.log(ans);
As you can see that the output gives “false” because no dot exists in the string:
![]() Let’s head toward the second method!
Let’s head toward the second method!
Method 2: Check if a String Contains a Dot Using match() Method
To determine if a string contains a dot or not, there is another method called the “match()” method.
A string is matched to a regular expression or a regex pattern using the match() method.
If a match occurs, it gives an array of the matched occurrences; else, it gives null.
You can also use the match() method with the ternary operator or conditional statement.
Syntax
Use the given syntax for match() method:
string.match(regexPattern);
Here, the match() method will match the “regexPattern” with the characters of the specified “string”.
Example
We will now create a variable named “str” that stores a string containing a dot(.):
var str = "LinuxHint.";
Then, call the match() method by passing a regex pattern “/\./g”.
As a result, if a dot exists, it will print “true”; else, “false”.
Here, we will use a ternary (?) operator with the match() method that is just like conditional statements:
var ans = str.match(/\./g) ? "true" : "false";
Print the resultant value on the console using the “console.log()” method:
console.log(ans);
The output shows “true” which indicates that the string contains a dot(.):
![]() We have provided the simplest methods for determining whether the string contains a dot.
We have provided the simplest methods for determining whether the string contains a dot.
Conclusion
To determine if a string contains a dot, you can use the JavaScript predefined methods, such as the includes() or the match() method.
The includes() method searches the string or character as a substring in a given string, while the match() method matches the string against the specified pattern.
In this study, we provided the procedures to check whether the string contains dots or not with detailed examples.
How to Clear Input Fields
There can be a situation where it is required to clear the entered value of an input field or the whole form.
For instance, you need to change the category or encounter a specific requirement to change all of the entered data.
In such cases, clearing input fields using JavaScript becomes very effective and useful.
This article will discuss the methods to clear the input fields.
How to Clear Input Fields?
To clear input fields, the following approaches can be utilized:
“onfocus” event and “target” property
“onclick” event and “document.getElementById()” method
“reset()” method
Go through the discussed methods one by one!
Method 1: Clear Input Fields Using onfocus Event and target Property
The “onfocus” event is triggered when a specific element gets focus, and the “target” property returns the element that triggered the event.
More specifically, these techniques can be applied to clear the specified target value in the input field.
The following example explains the discussed concept clearly.
Example
In the following example, we will assign an input type as “text” with the specified value and and attach as onfocus event to it which will trigger the clearInput() function:
<input type= "text" value= "clear input" onfocus= "clearInput(this)">
Now, define the function named “clearInput()” with the “target” property as its argument in order to return the element that triggered the event.
After that, a specific condition will be applied that if the input field hold a particular value, such as “clear input”, the input field will be cleared:
function clearInput(target){
if (target.value== 'clear input'){
target.value= "";
}
}
Now, when the user will input “clear input” value in the input field and it gets focus, the entered value will get clear:
![]()
Method 2: Clear Input Fields Using onclick Event and document.getElementById() Method
In JavaScript, the “document.getElementById()” method is utilized for accessing an element based on its id and “onclick” is used to attach an event to an HTML element.
More specifically, this combination can be used in such a way when the added button is clicked, the input field element will be accessed, and the entered value will be cleared.
Example
Firstly, assign an input type with an id named as “name”:
<input type= "text" id= "name">
Then, create a button with a value named “clear” and add an “onclick” event which will access the clearInput() function when triggered:
<input type= "button" value= "clear" onclick= "clearInput()">
Now, define a function named “clearInput()”.
Here, the document.getElementbyId() will access the input field using its id.
Then, an “if” condition will be applied so that as long as the input field is not empty, the value of the input field will be set as empty:
function clearInput(){
var getValue= document.getElementById("name");
if (getValue.value !="") {
getValue.value = "";
}
}
In this scenario, clicking the added button will clear the input field value:
![]() Want to reset all input field values at once? Check out the next method.
Want to reset all input field values at once? Check out the next method.
Method 3: Clear Input Fields Using reset() Method
The “reset()” method clears all the values of the form elements.
This method can be implemented to clear the input field holding text with a click of a button.
Syntax
formObject.reset()
Here, “formObject” is the element that will be reset.
Have a look at the given example.
Example
First, create a form and assign it an id as demonstrated below.
Next, ask the user to enter an “ID” in the input field.
Then, include a button with an “onclick” event accessing a function as discussed in the previous method:
<form id= "Form">
ID: <input type= "text"><br><br><input type= "button" onclick= "clearInput()" value= "Clear form"></form>
Finally, declare a function named “clearInput()”, fetch the form using the document.getElementById() method and reset the input field upon the button click:
function clearInput() {
document.getElementById("Form").reset();}
Output
![]() We have demonstrated the techniques to clear input fields.
We have demonstrated the techniques to clear input fields.
Conclusion
To clear input fields, utilize the “onfocus” event and “target” property to apply the functionality based on the presence of a particular value, or the “onclick()” event and “document.getElementById()” method for getting the id of the input field and clearing the field as long as there is some value in it or the “reset()” method to reset the values of all input field at once.
This write-up has explained the methods to clear the specified input fields.
How to Check if Variable Exists and is True
There can be a situation where JavaScript programs involve a huge amount of data stored in the variables which need to be handled simultaneously or when the programmer needs to handle a specific variable without locating it in the complex code.
In such cases, checking if the variable exists and is true becomes very handy and can save your precious time.
This article will discuss the methods to check if a variable exists and is true.
How to Check if Variable Exists and is True?
To check if a variable exists and is true, the following approaches can be utilized:
“try/catch” statements
“prompt()” method
Go through the discussed methods one by one!
Method 1: Check if Variable Exists and is True Using try/catch Statements
The “try/catch” statements define a code block to run and handle the corresponding errors.
This method can be used to access the declared variable in the “try” block and apply a specific condition if it is true.
The following example explains the stated concept.
Example
In the below example, the button named “Check” will be included as an input type to verify the existence of a variable and if it is true.
HTML Code
<input type="button"><h1>Does the Variable exist and is True?</h1><div>
<button>Check</button></div>
Now, the button and the heading will be accessed using the “document.querySelector()” method and stored in the variables named btnAccess and head respectively:
let btnAccess= document.querySelector("button");
let head= document.querySelector("h1");
Next, assign the variable a boolean value named “true”:
JS Code
let testVar= true;
After that, an event listener named “click” will be defined which functions in such a way that when the button is clicked, the try/catch statements will execute.
The “try” block will try to access the defined variable “testVar”.
The catch block, on the other hand, will handle the corresponding “Reference error” in the case of failure of the try block’s execution:
btnAccess.addEventListener("click", () => {
let declared= true;
try {
testVar
} catch (e) {
if (e.name == "ReferenceError") {
declared= false;
}
}
Finally, a condition will be applied for checking if the variable exists and is true and it will be stored in the variable named “result”.
If both the conditions are evaluated as true, the message “The variable exists and is true” will be displayed:
let result = declared && testVar === true ? "The variable exists and is true" :
"The variable does not exists and is not true.";
head.innerText = result;});
The output of the above implementation will result as follows:
![]()
Method 2: Check if Variable Exists and is True Using prompt() Method
The “prompt()” method asks the user for input using a dialog box.
This method can be utilized to input any variable and then display the corresponding output if the variable exists and is true based on the defined functions for each of the conditions.
Go through the following demonstration.
Example
Firstly, declare a variable named testVar and assign it a boolean “true” value and an additional variable named declared as follows:
var testVar= truevar declared;
Next, ask the user for the input variable using the “prompt()” method:
input= prompt("Enter the variable to test:");
Finally, test the if condition for the specified variable in such a way that if the the entered value equals “true”, isTrue() method will be invoked, and for the other case, isFalse() method will be called which displays the added message:
if (input=="testVar"){
declared==true
isTrue();}else{
declared==false
isFalse();}function isTrue(){
console.log("The variable exists and is true")}function isFalse(){
console.log("The variable does not exists and is not true.")}
Output
![]() We have compiled different methods for checking if a variable exists and is true.
We have compiled different methods for checking if a variable exists and is true.
Conclusion
To check if a variable exists and is true in Java script, the “try/catch” statements method can be applied to access the assigned variable, handle the exception, and specify the particular condition for the variable to meet.
Also, the “prompt()” method can be implemented to ask the user to input a value and check if it is true or not.
This write-up demonstrated the techniques to check if the variable exists and is true
How to Check if String Contains Text (Case Insensitive)
In JavaScript, there comes a situation where you need to deal with the string data whose format is not understandable.
In such a scenario, you can fetch the case-insensitive string values and format them accordingly.
In addition to that, this approach also helps in creating a case-sensitive based form for the users to input the sections with block or capital letters only.
This blog will explain the methods to check if a string contains text.
How to Check if String Contains Text Which is Case Insensitive?
To check if a string contains text, the following methods can be utilized:
“includes()” Method with “List”.
“match()” and “toUpperCase()” Methods.
We will now go through each of the listed methodologies one by one!
Method 1: Check if String Contains Text (Case Insensitive) Using includes() Method with List
The “includes()” method determines whether the provided string includes the given characters or not.
This specific method can be utilized with the help of a list containing “case insensitive” characters.
You can utilize this method in such a way that if the provided string matches any of the list’s values, the string will be logged as Case Insensitive on the console.
In the other case, you can add another message for the indication.
Syntax
string.includes(searchValue)
Here, “searchValue” refers to the value that will be searched in the specified “string”.
Look at the following example for demonstration.
Example
In this example, a list will be declared with the case insensitive characters:
list= ["Ana", "aNa", "anA"]
Next, we will create a “string” which we want to match with the list value:
string= "Ana"
Now, the “if/else” condition will be applied with the “includes()” method to check if the list contains the specified case insensitive string.
If so, the particular string will be logged as “Case Insensitive” on the console.
In the other case, it will be referred to as “Case Sensitive”:
if (list.includes(string)){
console.log('The provided string is : Case Insensitive')}else{
console.log('The provided string is : Case Sensitive')}
The output of the above implementation will result as follows:
![]()
Method 2: Check if String Contains Text (Case Insensitive) Using match() and toUpperCase() Methods
The “match()” method matches the specified value with the string that is utilized to access this method.
It can be used in combination with “toUpperCase()” methods to check if a string holds a case insensitive value.
Syntax
string.match(string.toUpperCase())
Here, the “toUpperCase()” method will first convert the “string” into Uppercase and match it with the original string.
Example
Firstly, create a string with the following value:
string= "Ana"
Next, apply a “for” loop to iterate along the string characters.
Then, invoke the “match()” method to match each character of the provided string with the Upper-Case version of the same string using the “toUpperCase()” method.
In case if the value gets matched, the added message will be displayed on the console window:
for (i= 0;i<=3;i++){if (string[i].match(string[i].toUpperCase())){
console.log('The provided string is : Case InSensitive')}}
Output
![]() We have compiled the easiest method for checking if a string contains a case sensitive string.
We have compiled the easiest method for checking if a string contains a case sensitive string.
Conclusion
To check if a string contains the insensitive text, define a list with the case insensitive characters of the provided string and verify its case using the “includes()” method.
Also, the “match()” with the “toUpperCase()” method can be applied to iterate along the string characters and match them with the uppercase version of the same string.
This blog guided you about the procedure to check if a string contains case insensitive text.
How to Check if String Does Not Contain Letters
A string contains letters, special characters, symbols, and numbers.
Sometimes, you only need letters in a string or only numbers.
Here, the question arises, how do you identify the string containing any letters or numbers or both? To do so, JavaScript provides some built-in methods.
This manual will demonstrate the multiple ways to determine whether the string contains letters or not.
How to Check if String Does Not Contain Letters?
For verifying, if the string does not contain letters, you can use the JavaScript built-in methods:
test() method
match() method
Let’s discuss each method individually.
Method 1: Check if String Does Not Contain Letters Using test() Method
The regular expression or a regex pattern is utilized to determine whether a string contains letters.
The “test()” method can be used with it.
It searches the string based on the pattern.
According to the outcome of the pattern search, it returns a boolean value true if the pattern is found; else, it outputs false.
Note that the test() is a case-sensitive method.
Syntax
Follow the given syntax to use the test() method:
regexPattern.test(string);
Here, “regexPattern” is a regular expression that will be checked in the given “string” using the test() method.
Example
In this example, first, we will create a regex pattern “/[a-zA-Z]/”, stored in a variable “pattern”:
var pattern = /[a-zA-Z]/;
Here, the regex pattern is used to search whether any letter between a to z or A to Z exists in the string or not.
Then, create a string that is stored in a variable “string”:
var string = "17Y84Q67";
Invoke the test() method with the regex pattern by passing a string as an argument and store the result in a newly created variable “ans”:
var ans = pattern.test(string);
Finally, print the resultant value on the console using the “console.log()” method:
console.log(ans);
As you can see, the output displayed “true”, which means the letters exist in the string:
![]() Let’s proceed with the second method!
Let’s proceed with the second method!
Method 2: Check if String Does Not Contain Letters Using match() Method
The “match()” method is also used to determine whether a string contains letters or not.
A string is compared to a regular expression or regex pattern using the match() method.
It returns an array of the matched occurrences if a match is found; otherwise, it outputs null.
The match() method can also utilize a ternary operator or conditional statement.
Syntax
Follow the below-mentioned syntax for using the match() method:
string.match(regexPattern);
Here, the “regexPattern” is the regular expression that will be matched in the given string.
Example
We will first create a string stored in a variable:
var string = "178467";
Then, use the ternary operator with match() method, which is similar to the conditional statement.
We will call the match() method by passing the regular expression or regex pattern for verifying whether the letters exist in a string or not:
var ans = string.match(/[a-zA-Z]/) ? "true" : "false";
Lastly, print the resultant value on the console:
console.log(ans);
The output shows “false” which indicates that the string does not contain letters:
![]() We have compiled the simplest methods for verifying whether the string contains letters or not.
We have compiled the simplest methods for verifying whether the string contains letters or not.
Conclusion
To determine if the string contains letters or not, use the JavaScript methods, such as the test() or the match() method.
Both of these methods match the string against the pattern; the test() method returns a boolean value, true or false, while the match() method returns an array of matches or null, depending upon the evaluation.
In this manual, we have demonstrated multiple ways to determine whether the string contains letters or not.
How to Change Button Color on Click
In JavaScript, we often want to create customized web pages involving various functionalities for an attractive design.
For instance, in the case of notifying the user of any successful operation, warning or error notifications.
In such scenarios, changing the button color on click is a significant feature to gain the user’s attention and notify them of the specific alerts beforehand.
This article will discuss the methods to change the color of a button on click.
How to Change the Color of the Button on Click?
To change the color of the button color upon the click, the “style.backgroundColor” property can be used with:
“onclick” event
“indexing”
“querySelector() method
We will now go through each of the listed methodologies one by one!
Method 1: Change Button Color Upon Click Using “onclick” Event
The style.backgroundColor property adjusts the background color of the specified element using color coding.
It is applied to set the color with respect to the Red, Green, and Blue (RGB) values.
More specifically, you can utilize the “onclick” in such a way that when a button is clicked, the added color code will be applied as its background.
The following example explains the stated concept clearly.
Example
Firstly, create a button with the “button” id.
Then, add “onclick” event which will trigger the “buttonColor()” function when the added button is clicked:
![]() Next, declare a function named “buttonColor()”.
In its definition, access the button using the document.geElementById() button and apply the style.backgroundColor property to set the button’s color.
You can assign any RGB color code as its background:
Next, declare a function named “buttonColor()”.
In its definition, access the button using the document.geElementById() button and apply the style.backgroundColor property to set the button’s color.
You can assign any RGB color code as its background:
![]() The above implementation will show the following output:
The above implementation will show the following output:
![]() Want to set more than one background color on a button? If yes, follow the next section!
Want to set more than one background color on a button? If yes, follow the next section!
Method 2: Change Button Color on a Click Using Indexing
“Indexing” is a technique applied to iterate along an array or list items by specifying their indexes.
It can be applied to define a set of colors and change the button color with respect to the added elements.
More specifically, you can attach an addEventListener() method in such a way when a button is clicked; its background color will be changed according to the added color.
Look at the following example for demonstration.
Example
Firstly, we will create a button with the “Click Here” value:
![]() Next, the button will be accessed by specifying its id in the document.getElementById() method:
Next, the button will be accessed by specifying its id in the document.getElementById() method:
![]() Now, the variables index0 and index1 will be declared with the values “0” and “1” respectively:
Now, the variables index0 and index1 will be declared with the values “0” and “1” respectively:
![]() After that, an array of two colors will be defined and stored in a variable named “colors”:
After that, an array of two colors will be defined and stored in a variable named “colors”:
![]() Finally, a “click” event will be attached to the created button by invoking the “addEventListener()” method.
This will work in such a way that when the button is clicked, the buttonColor() method will be invoked, which will change the background color according to the index of the added colors in the array:
Finally, a “click” event will be attached to the created button by invoking the “addEventListener()” method.
This will work in such a way that when the button is clicked, the buttonColor() method will be invoked, which will change the background color according to the index of the added colors in the array:
![]() As you can see in the given output, when the button is clicked, its background color is first set to “green” then “blue”:
As you can see in the given output, when the button is clicked, its background color is first set to “green” then “blue”:
![]()
Method 3: Change Button Color Upon Clicking Using “document.querySelector()” Method
The “document.querySelector()” method fetches the first element matching a CSS selector and the “addEventListener()” method includes and applies a specific event to an element.
These methods can be utilized to access the button id, add the click event handler, and set the button’s background color.
Look at the following example for demonstration.
Example
In the following example, include a button with the specified value as discussed in the previous methods:
![]() Now, apply the document.querySelector() method to access the button having “success” id:
Now, apply the document.querySelector() method to access the button having “success” id:
![]() Lastly, apply the addEventListener() to add an event handler named “click” to the button and set its color to “Light Green” using the style.backgroundColor property:
Lastly, apply the addEventListener() to add an event handler named “click” to the button and set its color to “Light Green” using the style.backgroundColor property:
![]() Output
Output
![]() We have provided the easiest methods for changing button color on click.
We have provided the easiest methods for changing button color on click.
Conclusion
To change the button color, you can utilize the style.backgroundColor property with the color code, which is the RGB value.
To do so, invoke the document.getElementById() method for accessing the created button and then perform further operations.
The document.querySelector() is also used for the same purpose.
Moreover, the indexing technique can also be utilized for applying multiple background colors.
This manual guided about changing the button’s color on click.
How to Change Background Image
In JavaScript, there are web pages that need an attractive layout, such as dark backgrounds that usually work better for interfaces.
Similarly, white backgrounds let the readers focus on content, and so the news portals or blogs use a comparatively light background with dark text.
In such cases, JavaScript becomes very handy in formatting and improving document design.
This article will discuss the methods to change the background image.
How to Change Background Image?
To change the background image, the following approaches can be utilized:
“backgroundImage” property on “DOM”.
“getElementById()” method and “backgroundImage” property on “paragraph”.
Go through the discussed methods one by one!
Method 1: Change Background Image Using backgroundImage property on DOM.
The “backgroundImage” property adjusts the background image of the specified element.
This technique can be applied by applying the backgroundImage property and specifying the background image by locating its path as an argument.
Syntax
![]() In the above syntax, “URL” refers to the path of the image.
Look at the following example for demonstration.
Example
In this example, a button will be included with the specified value and an “onclick” event redirecting to a
function named backgroundImage():
In the above syntax, “URL” refers to the path of the image.
Look at the following example for demonstration.
Example
In this example, a button will be included with the specified value and an “onclick” event redirecting to a
function named backgroundImage():
![]() Now, a function “backgroundImage()” will be declared and the “document.body.style.backgroundImage” property will access the background image using the specified image path in its argument:
Now, a function “backgroundImage()” will be declared and the “document.body.style.backgroundImage” property will access the background image using the specified image path in its argument:
![]() The output of the above implementation will result as follows:
The output of the above implementation will result as follows:
![]()
Method 2: Change Background Image Using getElementById() method and backgroundImage property on paragraph
The “getElementById()” method returns an element with a specified value and the “backgroundImage” property, as stated above, returns the background image of the particular element specified in its argument.
This method can be applied to map the specified color on the background of the particular paragraph.
Syntax
![]() Here, “elementID” refers to the id of an element.
Go through the following example for a better understanding of the stated concept.
Example
First, include a paragraph in the <p> tag and assign it a specific id:
Here, “elementID” refers to the id of an element.
Go through the following example for a better understanding of the stated concept.
Example
First, include a paragraph in the <p> tag and assign it a specific id:
![]() Next, create a button with an onclick event accessing the function backgroundImage() as discussed in the previous method:
Next, create a button with an onclick event accessing the function backgroundImage() as discussed in the previous method:
![]() Lastly, declare the function named “backgroundImage()” similarly.
Here, access the defined Id using the “getElementById()” method and apply the specified background image on it.
This will result in the implementation of the color on the paragraph’s background:
Lastly, declare the function named “backgroundImage()” similarly.
Here, access the defined Id using the “getElementById()” method and apply the specified background image on it.
This will result in the implementation of the color on the paragraph’s background:
![]() Output
Output
![]() We have compiled the easiest method for changing background image
We have compiled the easiest method for changing background image
Conclusion
To change background image, apply the “backgroundImage” property on “DOM” for applying the specified background image on the whole web page using a function or by getting the particular id using “getElementById()” method and applying “backgroundImage” property on the specified “paragraph”.
This blog illustrates the methods to change background images.
How to Change an Element Background Color
Using JavaScript, you may need to highlight some data or an element in your web page.
Also, it enhances the element’s visibility using different colors and makes the overall web page more attractive.
In such cases, adding and changing the background color of an element is very effective in catching the reader’s attention and improving the website design.
This write-up will guide you to change the element’s background.
How to Change an Element Background Color?
To change the background color of an element, apply the following techniques:
backgroundColor property with color
backgroundColor property with color code
The mentioned approaches will be demonstrated one by one!
Method 1: Change an Element Background Color Using backgroundColor Property With Color
The “backgroundColor” property sets the background color of the specified element.
This property can be implemented on any of the added HTM elements by accessing its id and assigning it a background color.
Syntax
![]() Here, the “object” refers to the element upon which the background color will be applied.
The following example explains the stated concept.
Example
In the example below, the heading tag <h> will be assigned an id named “id” and the “Background Color!” value:
Here, the “object” refers to the element upon which the background color will be applied.
The following example explains the stated concept.
Example
In the example below, the heading tag <h> will be assigned an id named “id” and the “Background Color!” value:
![]() Next, in the JavaScript file, the “document.getElementById()” method will access the “id” of the heading element.
After that, the backgroundColor property will assign the color value “Lightgreen” against the id, which refers to the specified heading value in the previous step:
Next, in the JavaScript file, the “document.getElementById()” method will access the “id” of the heading element.
After that, the backgroundColor property will assign the color value “Lightgreen” against the id, which refers to the specified heading value in the previous step:
![]() The output of the above implementation will result as follows:
The output of the above implementation will result as follows:
![]() In the output, it is observed that the background color is only applied to the selected heading element.
In the output, it is observed that the background color is only applied to the selected heading element.
Method 2: Change an Element Background Color Using backgroundColor Property With Color Code
As discussed earlier, the “backgroundColor” property sets the background color of the specified element.
This property can also be implemented upon the specified element using the RGB color code.
Look at the following example for demonstration:
Example
Firstly, we will add a paragraph using the <p> tag and assign it an id named “id” and a value as shown below:
![]() Next, the “getElementById()” method will similarly access the paragraph element with the specified id and assign the background color using the backgroundColor property.
Here, “#090” indicates the “RGB” code of medium dark shade of green color:
Next, the “getElementById()” method will similarly access the paragraph element with the specified id and assign the background color using the backgroundColor property.
Here, “#090” indicates the “RGB” code of medium dark shade of green color:
![]() Output
Output
![]() In the above implementation, the green color is a result of “RGB->090”, in which 9 refers to the intensity of the green color.
In the above implementation, the green color is a result of “RGB->090”, in which 9 refers to the intensity of the green color.
Conclusion
To change the background color of an element, the “backgroundColor” property with the color method can be utilized to access the specific id and assign a particular background color.
It is used with the “RGB” code to apply a specific shade of color to the selected HTML element.
This article guided related to the method of changing the element’s background color.
How to Check if String Contains Question Mark
At the last of any sentence or phrase, a question mark (?) is a punctuation mark utilized for representing a direct question.
Sometimes, you need to verify whether there is any question mark in a text document or a paragraph.
For instance, to validate the questions present in the text.
JavaScript gives some built-in methods that help to do this task efficiently.
This tutorial will demonstrate the procedure for verifying the question mark in a string.
How to Check if String Contains Question Mark?
To check if a given string has a question mark, use the following methods.
includes() method
match() method
Let’s use both of them one by one!
Method 1: Check if String Contains Question Mark Using includes() Method
To verify whether a question mark is present in a string, use the “includes()” method.
It accepts a question mark as an argument and returns “true” if the question mark exists in the string, else it outputs “false”.
Syntax
Follow the below-mentioned method to use the includes() method:
string.includes(character);
Here, “character” can be a question mark (?) which will be checked in the specified string.
Example
In this example, we will create a string stored in a variable named “string”:
var string = "How to code a JavaScript program?";
Then, invoke the includes() method by passing a question mark as an argument and store the returned result in the variable “ans”:
var ans = string.includes('?');
Finally, print the resultant value using the “console.log()” method:
console.log(ans);
The output displayed “true” which indicates that the string contains a question mark(?):
![]() Let’s head toward the second method!
Let’s head toward the second method!
Method 2: Check if String Contains Question Mark Using match() Method
Another method called the “match()” method checks whether a string contains a question mark or not.
The match() method compares a string to a regular expression or a regex pattern.
If a match occurs, an array of matches is returned; else the null is returned.
The ternary operator or conditional statement can also be used with the match() method.
Syntax
Follow the given syntax for verifying the string contains a question mark using the match() method:
string.match(regexPattern);
Here, the “regexPattern” is the regular expression that will search for the question mark in the string.
Example
We will now use the same string created in the above example and use the ternary operator with the match() method by passing the regular expression to search for the question mark:
var ans = string.match(/\?/g) ? "true" : "false";
Print the result on the console:
console.log(ans);
As you can see, the output gives “true” which means the question mark (?) exist in the string:
![]() We have gathered the simplest JavaScript methods for determining whether the string contains a question mark.
We have gathered the simplest JavaScript methods for determining whether the string contains a question mark.
Conclusion
To verify whether the string contains a question mark, you can use JavaScript predefined methods, such as the includes() method or match() method.
The includes() method searches for the question mark as a substring, whereas the match() method compares the string based on the given pattern.
This tutorial demonstrated the procedure for verifying the question mark in a string with a detailed explanation.
How to Retrieve Selected Value from JavaScript Dropdown
In JavaScript, we often come across user-friendly web pages which include a questionnaire or a form to get the value of single or multiple selected options.
Moreover, while dealing with a quiz-based web page, we want to notify the user regarding the status against the provided answer with a value(Correct, Wrong).
In such cases, retrieving the selected values from the Dropdown is very helpful in providing clarity and saving time on the user’s end.
This article will guide you to retrieve selected values from a Dropdown list.
How to Get/Retrieve Selected Value from Dropdown?
To retrieve Selected Value from Dropdown, you can use:
“value” property.
“selectedIndex” property.
We will now go through each of the mentioned approaches one by one!
Method 1: Get/Retrieve Selected Value from Dropdown Using value Property
The “value” property returns the value attribute of a text field.
We will utilize this method to get the selected option from a dropdown list and display its value:
Syntax
selectElement.value
Here, the “value” property will return the particular value selected from the dropdown list.
Let’s go through the following example for a better understanding of the concept:
Example
In this example, we will specify the id named “select” and insert the option values to be selected in the dropdown list.
These option values will be placed within the “<option>” tags.
Now, we will include a button with an “onclick” event.
This will work in such a way that when the button with value “Check option” be pressed, the function “selectValue()” will be triggered:
<p> Select the gender from the given dropdown list:
<select id= "select">
<option value= "Male">Male</option>
<option value= "Female">Female</option>
</select></p> <p> The value of the Gender selected is:
<span class= "output"></span></p><button onclick= "selectValue()"> Check option </button>
Next, we will declare a function named “selectValue()”.
Here, we will use the “document.querySelector()” method to access the id of the created drop-down menu.
After that, we will get the value of the selected gender from the dropdown list using the “value” property.
Lastly, the “textContent” property will return the text content of the selected value and display it:
<script type= "text/javascript">
function selectValue() {
select= document.querySelector('#select');
output= select.value;
document.querySelector('.output').textContent= output;
}</script>
The output of the above implementation will result as follows:
![]()
Method 2: Retrieve Selected Value from Dropdown Using “selectedIndex” Property
The “option” property returns a collection of all <option> elements and the “selectedIndex” property returns the index of the selected option from the “option” property in a drop-down list.
We will use both together to select a specified option and display the corresponding option’s value by accessing its index.
Syntax
select.options[select.selectedIndex].value
The above-given syntax will assist in fetching the value of the selected dropdown menu option using its index.
Look at the following example for demonstration:
Example
We will now utilize the same HTML code given in the previous example and make some changes in the JavaScript code.
To do so, we will define the function “selectValue()” and access the assigned id of the dropdown menu named “select” with the help of the document.querySelector() method.
After that, we will use the “options” property in combination with other properties, including “selectedIndex” to retrieve the value of the selected option.
Lastly, the “textContent” property will be used in this method to return the text content of the selected value and display the corresponding value:
<script type= "text/javascript">
function selectValue() {
select= document.querySelector('#select');
output= select.options[select.selectedIndex].value;
document.querySelector('.output').textContent= output;
}</script>
Output
![]() We have provided the easiest methods to retrieve a selected value from Dropdown.
We have provided the easiest methods to retrieve a selected value from Dropdown.
Conclusion
To get/retrieve selected value from Dropdown, apply the “value” property for getting the selected item’s value from the dropdown list and the “option” property along with the “selectedIndex” property to get the set of options and get the value of the selected option by accessing the particular option’s index.
This write-up has explained the methods to get/retrieve selected values from dropdown.
How to Replace Space with Underscore
JavaScript is a scripting language that is utilized for developing attractive and interactive web pages for websites.
However, sometimes, developers need to replace some characters or extra spaces from the text with specified letters.
For the corresponding purpose, we have some predefined methods which are utilized.
This tutorial will illustrate the procedure of replacing spaces with underscores.
How to Replace Space with Underscore?
For replacing spaces in a string with an underscore, there are some predefined methods of JavaScript that are listed below.
replace() method
replaceAll() method
split() method
Let’s look at the working of each method.
Method 1: Replace Space with Underscore Using replace() Method
The “replace()” method will simply replace the value in a string with the defined string It accepts two parameters, one is the value that will be replaced, and the other is the value used as a replacer.
In our case, we will remove the space in a string with an underscore, so, the space is the replaced value that will be searched in a string, and the underscore will act as the replacer.
Note: This method only works for replacing a single value.
Syntax
Follow the given syntax to use the replace() method:
replace("replaceValue","replacer");
Example
Here, we will create a variable “str” assigned with a string “Linux Hint” that contains space in between both words:
var str = "Linux Hint";
Now, we will call the replace() method by passing the value that needs to be replaced and a replacer as the space “ ” and the underscore “_”, respectively:
console.log(str.replace(" " , "_"));
As you can see, we have successfully replaced space with the underscore in the specified string:
![]() If you want to replace all the spaces in a string, you can follow the next given section.
If you want to replace all the spaces in a string, you can follow the next given section.
Method 2: Replace Space with Underscore Using replaceAll() Method
The “replaceAll()” method is also a predefined method of JavaScript.
This method also takes two parameters, one is the value that will be replaced, and the other is the value that is used as a replacer.
It is specifically used in cases when it is required to replace all of the specified values at once.
This method replaced all the string’s entire spaces.
Syntax
Follow the given syntax to use the replaceAll() method:
replaceAll("replaceValue","replacer");
Example
Here, we will create a variable “str” assigned with a string “Welcome to Linux Hint” that contains multiple spaces going to be replaced with underscores:
var str = "Welcome to Linux Hint";
Now, we will call the replaceAll() method by passing space “ ” and the underscore “_” as arguments:
console.log(str.replace(" " , "_"));
The output shows we have successfully replaced all spaces with the underscores in the given string:
![]() Let’s move to the other method for replacing space with an underscore.
Let’s move to the other method for replacing space with an underscore.
Method 3: Replace Space with Underscore Using split() Method
The string is divided into an array of substrings with the help of the “split()” method.
For replacing any character or space from a string with a specified character, you can use the “join()” method.
The split() method takes a parameter that needs to be replaced, and the join() method accepts the replacer as its argument.
This method finds the spaces in the string and replaces all the spaces with the specified character.
Syntax
The given syntax is used for replacing space with an underscore:
split(“ ”).join(“_”)
Example 1: Replace Single Space with Underscore
For replacing space with an underscore, we will utilize the already created string.
To do so, we will call the split() method with join() method by passing space and underscore as parameters, respectively:
console.log(str.split(“ ”).join(“_”));
While executing the above code, you can see the string replaced with an underscore:
![]() Example 2: Replace Multiple Spaces with Underscores
Here, we will remove all the entire spaces from a string with the help of split() method.
First, we will create a string “Welcome to Linux Hint” with multiple spaces:
var str = "Welcome to Linux Hint";
Now, we will call the split() method with the join() method and print the resultant string using “console.log()” method:
console.log(str.split(“ ”).join(“_”));
Example 2: Replace Multiple Spaces with Underscores
Here, we will remove all the entire spaces from a string with the help of split() method.
First, we will create a string “Welcome to Linux Hint” with multiple spaces:
var str = "Welcome to Linux Hint";
Now, we will call the split() method with the join() method and print the resultant string using “console.log()” method:
console.log(str.split(“ ”).join(“_”));
![]() We have provided simplest methods to replace space with an underscore.
We have provided simplest methods to replace space with an underscore.
Conclusion
For replacing space with an underscore, you can use the predefined methods of JavaScript, including replace() method, replaceAll() method, and the split() method.
The split() method is utilized with the join() method.
The replace() method is used to replace a single space in a string; if you want to replace all the spaces in a string, utilize the replaceAll() method or the split() method.
In this tutorial, we have illustrated the procedure to replace the spaces with underscore with detailed examples.
How to Replace Space with New Line
A space is utilized to separate words in a sentence.
The addition of space makes the entire sentence meaningful.
But to make the content more readable, a new line is used.
To move content to the next line, use the new line character (\n).
This post will illustrate the methods for replacing space with a new line.
How to Replace Space with New Line?
For replacing space with the new line, you can use the given mentioned methods:
replace()
replaceAll()
Let’s look at the working of each method.
Method 1: Replace Space with New Line Using replace() Method
The “replace()” method replaces the value in a string with the specified string or a character.
It is the predefined method of the String type object.
It returns a new string as output with the replaced values after searching the string for a specific value or a regex pattern.
In our case, we will use a new line to remove the space in a string.
Syntax
Follow the below-given syntax to use the replace() method:
replace("searchValue", "replaceValue")
The given method takes two parameters; one is the “searchValue” that will be searched in a string and needs to be replaced, and the other is the “replaceValue” that is used as a replacer.
For instance, the space is the replaced value that will be searched in a String, and the new line is its replacer.
Example 1: Replacing Single Space with New Line
In this example, we will first create a string type variable to store a string with spaces:
var str = "Welcome to LinuxHint"
Then, call the replace() method by passing the space (“ ”) as the replaced value going to be searched in the String and the new line “\n” is passed as the replacer:
console.log(str.replace(" ", "\n"));
Output shows that the replace() method only replaces the first occurrence of space with the new line while the string contains two spaces:
![]() If you want to replace all the occurrences of the spaces with a new line in a string, follow the next given section.
Example 2: Replacing Multiple Spaces with New Line
Here, we will consider the same string as in the previous example and replace all the spaces with the new line using the regex pattern “/ /g” in the replace() method:
console.log(str.replace(/ /g, "\n"));
In the regex pattern, we have added the “g” (global) flag, for matching all the occurrences of the spaces in a string.
As you can see, the output indicates that all the spaces are successfully replaced with a new line.
Every word after the space starts from a new Line:
If you want to replace all the occurrences of the spaces with a new line in a string, follow the next given section.
Example 2: Replacing Multiple Spaces with New Line
Here, we will consider the same string as in the previous example and replace all the spaces with the new line using the regex pattern “/ /g” in the replace() method:
console.log(str.replace(/ /g, "\n"));
In the regex pattern, we have added the “g” (global) flag, for matching all the occurrences of the spaces in a string.
As you can see, the output indicates that all the spaces are successfully replaced with a new line.
Every word after the space starts from a new Line:
![]() If you want to perform the same operation without using the regex, then use the below-discussed method.
If you want to perform the same operation without using the regex, then use the below-discussed method.
Method 2: Replace Space with New Line Using replaceAll() Method
There is another method for replacing something from a string called the “replaceAll()” method.
In the replaceAll() method, you do not need to add a regex for replacing all the instances of a specific character in a string.
This method also accepts two parameters one is the searched value, and the other is its related replacer.
Syntax
Follow the given syntax to use the replaceAll() method:
replaceAll("searchValue", "replaceValue")
Example
In this example, we will use the same string created in the previous example and then replace all the spaces with the new line without using any regex pattern:
console.log(str.replaceAll(" ", "\n"));
As you can see that all words after the spaces are now moved to the new line:
![]() We have compiled all the methods for replacing space with a new line.
We have compiled all the methods for replacing space with a new line.
Conclusion
For replacing spaces with a new line in a string, you can use the predefined Javascript methods, including replace() method and the replaceAll() method.
The first approach only replaced the first occurrence, whereas the regex pattern is used for replacing all the occurrences.
In comparison, the replaceAll() method replaces all the occurrences from the string.
In this post, we illustrated the methods for replacing spaces with a new line with detailed examples.
How to Replace All Single Quotes with Double Quotes
Text is typically stored and modified using JavaScript strings.
Characters enclosed in quotation marks can be represented by strings.
Strings can be written in one of three ways: inside single quotes, double quotes, or backticks.
The use of single or double quotes generally makes no difference because they both represent strings at the end of the sentence.
Single quotes only have one drawback, they cannot be used within JSON files, which makes copying and pasting between JavaScript and JSON files difficult.
JSON, however, only allows the use of double quotes.
This tutorial will demonstrate the methods for replacing single quotation marks with double quotes.
How to Replace All Single Quotes with Double Quotes?
For replacing single quotes with double quotes in a string, you can use the following JavaScript methods:
replace() method
replaceAll() method
Check out each of the mentioned methods one by one.
Method 1: Replace All Single Quotes with Double Quotes Using replace() Method
You can use the “replace()” method to replace the single quotations with double ones in a string.
It is the predefined method of the String type object.
It returns a new string as output with the replaced values after searching the string for a specific value or a regex pattern.
Syntax
Follow the given syntax to use the replace() method:
replace("searchValue", "replaceValue")
Here, the string value that will be replaced is “searchValue”, and the value that will be added in place of it is “replaceValue”.
Example 1: Replace First Occurrence of Single Quotes with Double Quotes
First, we will create a variable that stores a string name “strng”:
var strng = "Welcome to 'LinuxHint'."
Now, we will call the replace() method by passing a single quote and a double quote as arguments.
We will use backticks to represent the search value and the replaced value rather than single or double quotes due to differentiation:
console.log(strng.replace(`'`, `"`));
Output shows that the replace() method only replaced the first occurrence of a single quote to a double quote from the string:
![]() Need to replace all the occurrences of the single quotes using replace() method from a string? Follow the given section.
Example 2: Replace All Occurrences of Single Quotes with Double Quotes
Here, we will consider the same string named “strng” and replace all the single quotes from the string with double quotes, using regex “/’ /g”.
For matching all the occurrences of a single quote in the string, we will use the “g” (global) flag in our regex:
console.log(strng.replace(/'/g, `"`));
As you can see, the output indicates that all the occurrences of a single quote are successfully replaced with double quotes:
Need to replace all the occurrences of the single quotes using replace() method from a string? Follow the given section.
Example 2: Replace All Occurrences of Single Quotes with Double Quotes
Here, we will consider the same string named “strng” and replace all the single quotes from the string with double quotes, using regex “/’ /g”.
For matching all the occurrences of a single quote in the string, we will use the “g” (global) flag in our regex:
console.log(strng.replace(/'/g, `"`));
As you can see, the output indicates that all the occurrences of a single quote are successfully replaced with double quotes:
![]() Let’s see another method for replacing all the occurrences of the single quote with double quotes.
Let’s see another method for replacing all the occurrences of the single quote with double quotes.
Method 2: Replace All Single Quotes with Double Quotes Using replaceAll() Method
In the “replaceAll()” method, you do not need to add a regex for replacing all the occurrences from a string.
It accepts two parameters; one is the value going to be searched, and the other is the replaced value.
Syntax
Use the following syntax for the replaceAll() method:
replaceAll("searchValue", "replaceValue")
Example
In this example, we will create a string with multiple words that are surrounded by single quotes:
var strng = "Welcome to 'LinuxHint', it is the best 'Website' for Learning."
Now, we will call the replaceAll() method by passing the single quote (‘) as the searched value and the double quote (“) as a replaced value:
console.log(strng.replaceAll(`'`, `"`));
The output indicates that the replaceAll() method successfully replaced all the occurrences of the single quotes with the double quotes from the string:
![]() We gathered all the methods for replacing single quotes with double quotes in a string.
We gathered all the methods for replacing single quotes with double quotes in a string.
Conclusion
For replacing single quotes with double quotes in a string, you can use the JavaScript method, including replace() method and the replaceAll() method.
Only the first occurrence is replaced by the replace() method; to replace all instances, use the regex in it.
In contrast, the replaceAll() method replaced all the instances of the single quotations with double quotes.
In this tutorial, we have demonstrated the methods for replacing single quotes with double quotes with detailed explanations.
How to Remove a Word from a String
Characters written inside quotes can be represented with the help of the Strings.
Strings are commonly used to store and manipulate text.
JavaScript allows us to manipulate strings easily and change the value of the variables in a string.
The elimination of words from a string variable is one such operation.
This study will guide you through the methods for deleting a word from a string.
How to Remove a Word from a String?
For removing a word from a string, you can use the given predefined JavaScript methods:
substr() method
replace() method
Let’s check out each of the mentioned methods individually.
Method 1: Remove a Word from a String Using substr() Method
The “substring()” method assists in removing a word from a string.
It extracts the needed part of the string by passing the start and the end index of the substring.
As a result, a substring between the start and the last index will be returned.
Syntax
Follow the below-given syntax for using the substring() method:
str.substr(startIndex, endIndex)
Example
In this example, first, we will create a variable that stores the following string:
var str = "Welcome to the LinuxHint."
Next, we will call the substr() method by passing the starting index as “0” and the ending index as “10”.
It will extract the string from 0 to 10 indexes as a substring:
console.log(str.substr(0, 10));
Output
![]() The above method just gets the specific part of the string.
However, in case of deleting a particular word from a string, follow the next section!
The above method just gets the specific part of the string.
However, in case of deleting a particular word from a string, follow the next section!
Method 2: Remove a Word from a String Using replace() Method
You can use the “replace()” method for removing a word from a string.
It is the most frequently simplest method.
It accepts two parameters and gives a string with a specific replacement.
You can also utilize this method to remove a single occurrence of any specific word in a string.
Syntax
Follow the below-given syntax for using the replace() method:
replace("searchValue", "replaceValue")
Here, the “searchValue” is the value in a string that will be replaced, and the “replaceValue” is used as a replacement.
Let’s move to the example to learn more about the given method.
Example 1: Removing the First Occurrence of a Word from a String
First, we will create a variable named “str” that stores a string:
var str = "Welcome to the LinuxHint."
Now, we will remove the word “the” from the string by invoking the replace() method:
console.log(str.replace("the", ""));
As you can see, the specified word is removed from the string:
![]() Now, if you want to remove a word that occurs multiple times in the same string, what would you do? For this purpose, follow the next example.
Example 2: Removing All Occurrences of a Word from a String
In this example, we will remove the word with multiple occurrences in the string using replace() method with regex; as the regex checks the full string and replaces all the occurrences with the specified replacement value.
Here, we will create a variable that holds a string of words that appear more than once:
var str = "The programmers can write code that is computer-understandable while Good programmers write code that is understandable by humans."
Now, we will replace all the “write” word with the empty string:
console.log(str.replace(/write/g, ""));
Here, the output shows that all the occurrences of the word “write” is successfully removed from the string:
Now, if you want to remove a word that occurs multiple times in the same string, what would you do? For this purpose, follow the next example.
Example 2: Removing All Occurrences of a Word from a String
In this example, we will remove the word with multiple occurrences in the string using replace() method with regex; as the regex checks the full string and replaces all the occurrences with the specified replacement value.
Here, we will create a variable that holds a string of words that appear more than once:
var str = "The programmers can write code that is computer-understandable while Good programmers write code that is understandable by humans."
Now, we will replace all the “write” word with the empty string:
console.log(str.replace(/write/g, ""));
Here, the output shows that all the occurrences of the word “write” is successfully removed from the string:
![]() We offered the methods related to removing words from the string.
We offered the methods related to removing words from the string.
Conclusion
For removing a word from a string, you can use the predefined JavaScript methods, including the substring() method and the replace() method.
The substring() method extracts a specific part of the selected string, whereas the replace() method is used for removing a single word from the string, and also you can use it to remove all the occurrences of the same word in the string by using regex.
In this study, we guided how to remove words from a string with proper examples.
How to Get Unique Values from Array
Array is used for storing data, and it is one of the most widely utilized data structures.
JavaScript permits you to store data using arrays.
However, sometimes, it is required to remove redundant items from arrays., different methods are available for getting unique values from an array.
This manual will discuss the methods for getting unique values from an array.
How to Get Unique Values from Array?
For getting unique values from an array, there are different methods listed below:
for loop
Set() constructor
filter() method
Let’s understand the working of these methods.
Method 1: Get Unique Values from Array Using for Loop
For getting unique values, the easiest and most commonly used method is the “for” loop.
It will iterate the complete array, extract the unique elements, and remove the duplicate elements if occurred.
Example
First, we will create an array of even numbers named “evenArray” that contains some duplicated even numbers., we will use “var” for creating any variable or an array with a global scope:
var evenArray = [2,6,8,12,18,4,2,18];
Now, we will create an empty array named “arrayOut” that will be used to store unique values from an array:
var arrayOut = [];
A variable count initialized with “0” will be used in the for loop for iteration:
var count = 0;
We will initialize the “start” variable with “false” that will be set as “true” during iteration if the element of an array is equal to the variable in arrayOut.
It is also utilized to verify the duplicate values:
var start = false;
Now, we will iterate the array until its length and push the elements in an empty created array by verifying every element.
If the element of an array is equivalent to the array “arrayOut”, it will not get selected:
for (i = 0; i < evenArray.length; i++) {
for (j = 0; j < arrayOut.length; j++) {
if ( evenArray[i] == arrayOut[j] ) {
start = true;
}
}
count++;if (count == 1 && start == false) {
arrayOut.push(evenArray[i]);
}
start = false;
count = 0;}
Finally, we will print the array with unique values using the “console.log()” method:
console.log(arrayOut);
The output will display the unique values from the array:
![]() Let’s move to the next method for getting a unique value from an array.
Let’s move to the next method for getting a unique value from an array.
Method 2: Get Unique Values from Array Using Set() Constructor
The JavaScript “Set()” constructor represents a set that is the collection of unique values.
It gives the new array with unique values as output after accepting an array as an argument.
It is the simplest method for extracting an array’s unique values.
Syntax
Follow the below syntax to use the Set() method:
new Set(array);
Example
We will take the same array used in the above example and pass it into a Set() constructor that returns the array of unique elements:
console.log(new Set(evenNumbers));
You can see that the existing array was of size “9” while the size of the resultant array is “6”, that indicates the duplicated values are successfully removed:
![]() Let’s see another method to get a unique value from an array.
Let’s see another method to get a unique value from an array.
Method 3: Get Unique Values from Array Using Array.filter() Method
There is another method to get unique values from an array that is “Array.filter()”.
This method creates a new array by filtering out or removing the duplicate values from the existing array.
Syntax
The following syntax is used for the filter() method:
array.filter((currentValue, index, array))
Here, the “currentValue” stores the value of the element that is currently being processed in an array, “index” is the index of that element, and “array” is the array that will call the “filter()” method.
Example
In this example, we will use the already created array and then filter the values of the array using the filter() method.
The Array.filter() method will filter the values and only add the unique values to the new array:
var newArray = evenNumbers.filter((value, index, self) => self.indexOf(value) === index);
Lastly, we will print the array elements using the “console.log()” method:
console.log(newArray);
The output indicates that the duplicated values are removed:
![]() We offered all the methods related to get unique values from an array.
We offered all the methods related to get unique values from an array.
Conclusion
For getting unique values from an array, you can use the “for” loop, the “Set()” constructor, and the “Array.filter()” method.
The for loop is the most commonly used method to get unique elements by iterating the array.
The Set() constructor and the filter() method is the predefined methods that can fetch unique values from an array.
In this manual, we discussed the methods for getting unique values from an array.
How to Get Decimal Part of Number
In JavaScript, you have to handle numbers and strings for different purposes, and it may be needed to divide the number into its integer and decimal components.
For instance, the number 11.5 would be divided into two numbers, 11 and 0.5.
The digit after the decimal point (.) is a decimal part of the number, such as 5 being the decimal part of the number 11.5.
This blog will provide the methods to get the decimal part of a number.
How to Get Decimal Part of Number?
You can use some predefined methods of JavaScript to get the decimal part of a number.
These methods are mentioned below:
indexOf() method
split() method
Let’s see the working of both of them one by one!
Method 1: Get Decimal Part of Number Using indexOf() Method
The “indexOf()” method can be utilized to get the decimal part from a number.
In this approach, firstly, you have to convert the number to a string and get the index of the decimal point (.) with the help of the “indexOf()” method.
Then, extract the part after the decimal point as a substring utilizing the “substring()” method.
Syntax
Follow the below-given syntax for getting the decimal part from number using indexOf() method:
toString().indexOf(decimalPoint)
Example
In this example, first we will create a variable that stores a decimal number “15.115”:
var number = 15.115;
Here, we will first convert the number to the string, then get the index of the decimal point, and store it in a new variable:
var getDecimalVal = number.toString().indexOf(".");
After getting the index of the decimal point, we will again convert the number to the string and get the part of the number after the decimal point using the substring() method and lastly store it in a new variable named “decimalPart”:
var decimalPart = number.toString().substring(getDecimalVal+1);
Finally, we will print the decimal part of the number that is stored as a value of the variable “decimalPart” on the console:
console.log(decimalPart);
As you can see, the output displayed the decimal part of the number:
![]() Let’s head toward the second method!
Let’s head toward the second method!
Method 2: Get Decimal Part of Number Using split() Method
The “split()” method is another way to determine a decimal part of a number.
It is the most frequently and simply used method for getting the part of a number.
It splits the string into an array of substrings and gives the new array as output.
Syntax
Use the following method for the “split()” method:
string.split(separator, limit)
It takes two parameters, the separator and the limit.
The second parameter is optional, while the first parameter, “separator”, is used to split the string.
The “limit” specifies how many splits there can be.
Note that the Items that exceed the split limit won’t be displayed in the array.
The split items are returned in the new array.
Example
Here, we will use the same number created in the previous example.
Then, we will first convert the number into the string using the “toString()” method and split the number by passing the decimal point (.) as a separator.
Then, convert the array element at index 1 for fetching the decimal part of the number:
var getDecimal = number.toString().split(".")[1];
Finally, print the decimal part of the number on the console:
console.log(getDecimal);
Output
![]() We have gathered all the methods for getting the decimal part of a number.
We have gathered all the methods for getting the decimal part of a number.
Conclusion
For getting the number’s decimal part, you can use the “split()” method and the “indexOf()” method.
In the indexOf() method, you will first convert your number to a string and get the index of the decimal point (.) and get the part after the decimal point as a substring using the substring() method.
In the split() method, first split the string based on the separator and get the number after the separator.
In this blog post, we have provided the methods for getting the decimal part of a number with detailed examples.
How to Get Checkbox Value
In JavaScript, getting a checkbox value brings ease for the user when confirming the selected options.
Moreover, in the case of submitting an important form, getting a checkbox value assists in entering accurate information.
In addition, selecting multiple options for an answer in a quiz or a questionnaire and getting the value of the checkbox helps in finding the correct solution.
This write-up will guide you to get/fetch checkbox values.
How to Get/Fetch Checkbox Value?
For getting the checkbox value, you can use:
“document.querySelectorAll()” method
“document.getElementById” method
We will now go through each of the methods one by one!
Method 1: Get Checkbox Value Using document.querySelectorAll() Method
The “document.querySelectorAll()” method returns all the elements matching a CSS selector.
You can also utilize this method to select the specified checkbox values.
Syntax
document.querySelectorAll(CSS selectors)
Here, “CSS selectors” refer to the checkboxes name defined in the HTML file.
Go through the following example for demonstration:
Example
In the first step, we will assign a “label for” attribute that specifies a label for an input HTML element of a form.
After that, we will add the input type “checkbox” for using the checkbox as an input.
Now, we will assign “name”, “value”, and “id” for each checkbox.
Lastly, we will also include a button for getting the checkbox value.
This processes will be repeated for each of the three checkboxes:
<p>Select your favorite language</p>
<label for= "s1"> <input type= "checkbox" name= "language" value= "Python" id="s1">Python</label>
<label for= "s2"><input type= "checkbox" name= "language" value= "Java" id="s2">Java</label>
<label for= "s3"><input type= "checkbox" name= "language" value= "JavaScript" id="s3">JavaScript</label>
<p>
<button id= "button">Get Selected subject</button>
</p>
In the next step, we will fetch the button “id” using “document.querySelector()” method and add the “click” event to the button.
Next, include the “document.querySelectorAll()” method within the click event to select the values of the specified checkboxes.
Finally, apply the “push()” method for displaying the value of each selected checkbox using the “document.write()” method:
<script>
const button= document.querySelector('#button');
button.addEventListener('click', (event) => {
let checkboxes= document.querySelectorAll('input[name="language"]:checked');
let output= [];
checkboxes.forEach((checkbox) => {
output.push(checkbox.value);
});
document.write("You have selected ", output);
});
</script>
The output of the above implementation will result in:
![]()
Method 2: Get Checkbox Value Using document.getElementById() Method
The “document.getElementById()” method returns an element with a specified value or id.
It can also be used to fetch the checkbox “id” and return the value of each selected checkbox.
Syntax
document.getElementById(elementID)
Here, the “elementID” refers to the id value of an element whose selected value is going to be fetched.
Let’s go through the following example for demonstration.
Example
Firstly, we will specify the input type to “checkbox” and assign the “id”, “class”, and “value” to each checkbox as discussed in the previous method.
We will contain these functionalities in a tag named table data “<td>”.
Similarly, we will include a button with an “onclick” event which will access the function “getCheckboxValue()”:
<h2>Select your favorite language</h2><td> Python: <input type= "checkbox" id= "s1" class= "lg" value= "Python"> </td><td> Java: <input type= "checkbox" id= "s2" class="lg" value= "Java"> </td> <td> JavaScript: <input type= "checkbox" id= "s3" class= "lg" value= "JavaScript"> </td> <button onclick= "getCheckboxValue()">Submit</button> <br><h4 id= "result"></h4>
Now, we will declare a function named “getCheckboxValue()” to fetch the id of each checkbox using the “document.getElementById()” method.
Next, we will create a variable “result”, in which the resultant value of the selected checkbox will be stored.
Lastly, we will add different conditions for each checkbox using “if/else” statements.
These statements will work in such a way that if a specific checkbox is selected or marked as checked, the document.getElementById() method will access its id, and the corresponding value against that particular id will be displayed.
Finally, display the content of the store checkbox value:
<script>function getCheckboxValue() {
var lang1= document.getElementById("s1");
var lang2= document.getElementById("s2");
var lang3= document.getElementById("s3");
var result= " ";
if (lang1.checked == true){
var lg1= document.getElementById("s1").value;
result= lg1 + " ";
}
else if (lang2.checked == true){
var lg2= document.getElementById("s2").value;
result= result + lg2 + " ";
}
else if (lang3.checked == true){
document.write(result);
var lg3= document.getElementById("s3").value;
result= result + lg3 ;
}
else {
return document.getElementById("result").innerHTML= "Select any one";
}
return document.getElementById("result").innerHTML= "You have selected " + result + " language";}</script>
The output of the above implementation will result in:
![]() We have provided all the simplest methods to get checkbox values.
We have provided all the simplest methods to get checkbox values.
Conclusion
To get the checkbox value, you can use the “document.querySelectorAll()” method to select the specified checkboxes or the “document.getElementById” method to get the “id” against each of the selected checkboxes and display its corresponding value.
This write-up has explained the methods to get checkbox values.
Fibonacci Numbers With JavaScript
“JavaScript is now ECMAScript.
The development of JavaScript is continued as ECMAScript.
The reserved word “javascript” is still used, just for backward compatibility.”
Meaning of Fibonacci Numbers
Fibonacci numbers are a particular sequence of positive integers, beginning from 0.
Whole numbers are positive integers.
So, a Fibonacci number is a particular sequence of whole numbers or natural numbers, beginning from 0.
In this sequence, the first two numbers are 0 and 1, in that order.
The rest of the numbers are developed from there by adding the previous two numbers.
The first twelve Fibonacci numbers are obtained as follows:
0
1
1 + 0 = 1
1 + 1 = 2
2 + 1 = 3
3 + 2 = 5
5 + 3 = 8
8 + 5 = 13
13 + 8 = 21
21 + 13 = 34
34 + 21 = 55
55 + 34 = 89
In other words, the first twelve Fibonacci numbers are:
0, 1, 1, 2, 3, 5, 8, 13, 21, 34, 55, 89
Of course, the thirteenth number would be: 144 = 55 + 89.
Fibonacci numbers may be imagined to be in an array, like so:
An array has indexes.
In the following table, the second row shows the corresponding zero-based indexes for the Fibonacci numbers in an array:
| 0 | 1 | 1 | 2 | 3 | 5 | 8 | 13 | 21 | 34 | 55 | 89 |
| 0 | 1 | 2 | 3 | 4 | 5 | 6 | 7 | 8 | 9 | 10 | 11 |
With zero-based indexes, if there are twelve elements, then the last index is 11.
Fibonacci numbers can be produced in O(n) time or in O(1) time.
In these time complexity expressions, n means n main operations, and 1 means 1 main operation.
With O(n), n Fibonacci numbers are produced, beginning from 0.
With O(1), one Fibonacci number is produced from the corresponding index.
That is why O(1) takes just one main operation instead of n main operations.
The aim of this article is to explain how to produce Fibonacci numbers, either way, using JavaScript, which is actually ECMAScript today.
Coding Environment
The node.js environment will not be used as the reader might have anticipated.
Instead, the browser will be used for interpretation of the code and displaying the results.
The script (code) should be written in a text editor file, which should be saved with the extension “.html.” The script should have as minimum code:
<!DOCTYPE HTML>
<html>
<head>
<title>Fibonacci Numbers with JavaScript</title>
</head>
<body >
<script type='text/ecmascript'>
</script>
</body>
</html>
This is an approximate minimum code a web page needs.
All coding for this article goes in-between the tags, <script type=’text/ecmascript’> and </script>.
To run the code written (added), just double-click the icon of the filename, and the browser of the computer will open it.
Definition of a Fibonacci Number
There is a mathematical definition for a Fibonacci number.
It is defined as follows:
![]() Where Fn is a Fibonacci number corresponding to a zero-based index, n.
The first two numbers: 0 and 1, are pre-declared, in that order.
The last line of this function shows how the rest of the numbers originate from the first two numbers in their order.
This definition is also one of the formulas for the Fibonacci number.
Where Fn is a Fibonacci number corresponding to a zero-based index, n.
The first two numbers: 0 and 1, are pre-declared, in that order.
The last line of this function shows how the rest of the numbers originate from the first two numbers in their order.
This definition is also one of the formulas for the Fibonacci number.
Producing Fibonacci Numbers in O(n) Time
If n is 1, then only 0 would be displayed as a Fibonacci number.
If n is 2, then 0 and 1 would be displayed as Fibonacci numbers, in that order.
If n is 3, then 0, 1, and 1 would be displayed as Fibonacci numbers in that order.
If n is 4, then 0, 1, 1, and 2 would be displayed as Fibonacci numbers, in that order.
If n is 5, then 0, 1, 1, 2, and 3 would be displayed as Fibonacci numbers, in that order.
If n is 6, then 0, 1, 1, 2, 3, and 5 would be displayed as Fibonacci numbers, in that order – and so on.
The ECMAscript function to generate the first n Fibonacci integers (numbers) is:
<script type='text/ecmascript'>
function fibonacci(A) {
n = A.length;
if (n > 0)
A[0] = 0;
if (n > 1)
A[1] = 1;
for (i=2; i<n; i++) { //n=0 and n=2 have been considered
currNo = A[i - 1] + A[i - 2];
A[i] = currNo;
}
}
The closing script tag has not been shown.
The function receives an array.
The first two Fibonacci numbers are assigned at their position.
The for-loop iterates from the zero-based index, 2 to just below n.
The most important statement in the for-loop is:
currNo = A[i – 1] + A[i – 2];
This adds the immediate previous two numbers in the array to have the current number.
By the time the fibonacci() function finishes executing, all the elements of the array are the first n Fibonacci numbers.
A suitable code to call the fibonacci() function and display the Fibonacci numbers is:
N = 12;
arr = new Array(N);
fibonacci(arr);
for (i=0; i<N; i++)
document.write(arr[i] + ' ');
document.write("<br>");
</script>
This code shows the closing script tag.
The code is typed below the above code.
The output displayed on the web page is:
0 1 1 2 3 5 8 13 21 34 55 89
as expected.
Producing One Fibonacci Number in O(1) Time
O(1) is constant time.
It refers to one main operation.
Another mathematical formula to produce a Fibonacci number is:
![]() Note that on the right-hand side of the equation, it is not the square root of 5 that is raised to the power n; it is the expression in parentheses that is raised to the power n.
There are two such expressions.
If n is 0, Fibn would be 0.
If n is 1, Fibn would be 1.
If n is 2, Fibn would be 1.
If n is 3, Fibn would be 2.
If n is 4, Fibn would be 3 – and so on.
The reader can verify this formula mathematically by substituting different values for n and evaluating.
n is a zero-based index in this formula.
The result is the corresponding Fibonacci number.
The ECMAScript (JavaScript) code for this formula is:
<script type='text/ecmascript'>
function fibNo(n) {
FibN = (Math.pow((1+Math.sqrt(5))/2, n) - Math.pow((1-Math.sqrt(5))/2, n)) / Math.sqrt(5);
return FibN;
}
The closing script tag has not been shown.
Note how the power (pow) and square root (sqrt) predefined functions have been used.
In ECMAScript (JavaScript), the Math module does not have to be imported.
The function fibNo() implements the formula directly.
A suitable call and display for the fibNo() function on the web page are:
N = 11;
ret = fibNo(N);
document.write(ret);
</script>
The code shows the closing script tag.
The output is:
89.00000000000003
It is possible to remove the unnecessary decimal digits from the answer.
However, that is a discussion for some other time.
If more than one Fibonacci number is required, then the code has to call the formula once for each zero based corresponding n index.
Note that on the right-hand side of the equation, it is not the square root of 5 that is raised to the power n; it is the expression in parentheses that is raised to the power n.
There are two such expressions.
If n is 0, Fibn would be 0.
If n is 1, Fibn would be 1.
If n is 2, Fibn would be 1.
If n is 3, Fibn would be 2.
If n is 4, Fibn would be 3 – and so on.
The reader can verify this formula mathematically by substituting different values for n and evaluating.
n is a zero-based index in this formula.
The result is the corresponding Fibonacci number.
The ECMAScript (JavaScript) code for this formula is:
<script type='text/ecmascript'>
function fibNo(n) {
FibN = (Math.pow((1+Math.sqrt(5))/2, n) - Math.pow((1-Math.sqrt(5))/2, n)) / Math.sqrt(5);
return FibN;
}
The closing script tag has not been shown.
Note how the power (pow) and square root (sqrt) predefined functions have been used.
In ECMAScript (JavaScript), the Math module does not have to be imported.
The function fibNo() implements the formula directly.
A suitable call and display for the fibNo() function on the web page are:
N = 11;
ret = fibNo(N);
document.write(ret);
</script>
The code shows the closing script tag.
The output is:
89.00000000000003
It is possible to remove the unnecessary decimal digits from the answer.
However, that is a discussion for some other time.
If more than one Fibonacci number is required, then the code has to call the formula once for each zero based corresponding n index.
Conclusion
Fibonacci numbers are a particular sequence of positive integers, beginning from 0.
Whole numbers are positive integers.
So, a Fibonacci number is a particular sequence of whole numbers or natural numbers, beginning from 0.
In this sequence, the first two numbers are 0 and 1, in that order.
These first two numbers are just defined as such.
The rest of the numbers are developed from there by adding the immediate previous two numbers.
After producing the first two Fibonacci numbers, in order to produce the rest of the Fibonacci numbers, to end up with a total of n numbers, a for-loop has to be used with the statement:
currNo = A[i – 1] + A[i – 2];
This adds the immediate last two Fibonacci numbers to have the current Fibonacci number.
When given a zero-based index, to have the corresponding Fibonacci number, use the formula:
![]()
How to Trim a String to a Particular Length
Strings are commonly used to store and manipulate text.
You might need to restrict the number of characters in a string value while working with text.
Trimming a string to a specific length can be challenging for developers.
But it’s not as complicated as it looks.
This manual will explain the procedure on how to cut a string to a specific length.
How to Trim a String to a Particular Length?
For trimming a string to a specific length, JavaScript provides some methods given below:
slice() method
substring() method
Let’s look at how these methods work.
Method 1: Trim a String to a Particular Length Using slice() Method
To cut the string according to the given length, you can utilize the “slice()” method.
It gives only the part of the string as an output until the given limit.
It accepts two parameters, the start index and the end index of the slice of a string, as arguments.
The second argument is optional; if you will not mention the end index, it considers it as the last index of the string.
Syntax
Follow the below-given syntax to use the slice() method:
slice(startIndex, endIndex)
Example
In the following example, first, we will create a variable named “strng” and assign it the following string value:
var strng = "Welcome to LinuxHint."
Now, we will trim the string to the 7th index of the string by passing the start index “0” and the end index “7” that will split the string from start to 7th index as a slice of the string:
console.log(strng.slice(0,7));
As you can see the output gives “Welcome” as a slice of the string that starts from 0 index:
![]() Let’s head towards the second method!
Let’s head towards the second method!
Method 2: Trim a String to a Particular Length Using substring() Method
There is another method called “substring()” used to trim a string to a particular length.
It also accepts two parameters, the start and the end index of the substring, and returns a part of the string between the specified indexes.
Syntax
You can use the given syntax to trim a string using the substring() method:
substring(starIndext, endIndex)
Example
Here, we will use the previously created string that is stored in the variable “strng” and call the “substring()” method by passing the start index as “11” and the end index as “20”:
console.log(strng.substring(11,20));
The given output indicates that the string is successfully trimmed based on the particular length:
![]() We have provided the easiest methods related to trimming a string to a particular length.
We have provided the easiest methods related to trimming a string to a particular length.
Conclusion
To trim a string to a particular length, you can use the JavaScript predefined methods, including the slice() method and substring() method.
Both methods act the same; you can select anyone which is most suitable for you.
This manual explains the procedure for trimming a string to a specific length with detailed examples.
How to Use Exponents
In JavaScript, we often come across solving Math problems, including complex equations, taking measurements, and calculating multi-dimensional quantities.
For instance, instead of writing out “x” multiplied by itself two times, we can simply write “x^2”, which makes calculation easier.
In such cases, using exponents becomes very handy.
Moreover, utilizing exponents also allows us to abbreviate something that would otherwise be time-consuming to think about.
This article will discuss the methods to use exponents.
How to Use/Apply Exponents?
To utilize Exponents, you can use:
“Math.pow()” Method
“Exponentiation Operator (**)”
We will now go through each of the mentioned approaches one by one!
Method 1: Use Exponents Using Math.pow() Method
The Math.pow() method returns the value of “a” to the power of “b” like (a^b).
It returns a “Nan” value in the case of a negative base and a non-integer base.
You can also utilize this method to return the specified power of the provided number.
Syntax
Math.pow(base, exponent)
Here, “pow” refers to the power method, “base” refers to the number whose value is to raise, and “exponent” is the required value.
Go through the following example for a better understanding of the stated concept.
Example
First, we will observe two different cases.
First, we will display the base “7” with exponent value “2” which will work as “7^2=49”:
console.log(Math.pow(7, 2));
Now, we will verify the “NaN” condition by placing a negative base value, and a non-integer exponent value as follows:
console.log(Math.pow(-7, 0.5));
The output of the above implementation is given below:
![]()
Method 2: Use Exponents Using Exponentiation Operator(**)
The Exponentiation operator (**) changes the value of the first variable with respect to the assigned second value which will act as power of the first variable.
However, it also returns a “NaN” under the same circumstances discussed in the previous method.
To utilize this operator, you can add (**) in between both operand values where the first value will act as a “base”, and the operand value after the exponentiation operator (**) will be raised according to the added base.
Syntax
x ** y
Here, “x” refers to the value or a variable, and “y” is the power value that needs to be applied at x.
Example
Firstly, we will declare a variable named “base” and store the value “2” in it:
let base= 2
Next, we will raise the assigned value of the base variable to the power “3” using the exponentiation operator “**”.
Here, in place of the base variable, you can also add any integer value directly:
console.log(base ** 3)
The corresponding output, in this case, will be:
![]() We have provided the simplest methods to use exponents.
We have provided the simplest methods to use exponents.
Conclusion
To use Exponents, you can utilize the “Math.pow()” method for assigning an exponent power to a base value and “Exponentiation Operator(**)” for raising the base value(on the left) to the provided exponent value(on the right) separated by (**).
This write-up has explained the methods to use exponents.
How to Remove Leading Zeros from a String
When a string contains extra leading zeros, it can be very irritating.
Moreover, sometimes, it becomes important to remove them so that the string can be processed further.
The removal of leading zeros from a string can be a little challenging task for beginners, but no worries!
This write-up will demonstrate the methods to eliminate leading zeros from a string.
How to Remove Leading Zeros from a String?
For removing leading zeros from a string, utilize the methods listed below:
parseInt() method
parseFloat() method
replace() method
Number constructor
Multiply string by 1
Let’s examine the working of each method separately.
Method 1: Remove Leading Zeros from a String Using parseInt() Method
The “parseInt()” method is used for removing the leading zeros from a String containing integer values.
It accepts a string as an argument and gives it as output after removing the leading zeros.
Syntax
Follow the given syntax to use the parseInt() method:
parseInt(strng);
Have a look at the following example to know more about the given method.
Example
First, we will create a string that contains numbers starting with zeros:
var strng = "0010100";
Then, we will call the parseInt() method to remove the leading zeros by passing the string to the method and store it in a variable named “numb”:
var numb = parseInt(strng);
Finally, print the returned value on the console:
console.log(numb);
The given output indicates that the leading zeros are successfully removed from the string:
![]() If you want to remove the leading zeros from a floating point number in a string, see the next given section.
If you want to remove the leading zeros from a floating point number in a string, see the next given section.
Method 2: Remove Leading Zeros from a String Using parseFloat() Method
For removing leading zeros from a string that contains a floating point number, use the “parseFloat()” method.
It also accepts a string as an argument.
Syntax
Follow the below syntax to use the parseFloat() method:
parseFloat(strng);
Example
Here, we will create a string containing the decimal number leading to zeros:
var strng = "001.250";
Then, call the parseFloat() method by passing the string in it as an argument and stores the resultant value in variable “numb”:
var numb = parseFloat(strng);
Finally, we will print the resultant value on the console using “console.log()” method:
console.log(numb);
As you can see that the given output shows that the zeroes leading from the string are successfully removed:
![]() Let’s head towards the next method!
Let’s head towards the next method!
Method 3: Remove Leading Zeros from a String Using replace() Method
You can use the “replace()” method to eliminate leading zeros from a string.
This method uses the pattern or regex that helps to replace something based on that regex.
Syntax
The following described method is used for the replace() method:
strng.replace(regex, replacer);
Here, “regex” is the pattern that helps to replace something with “replacer”.
Example
In this example, first we will create a string named “strng” and assign it a value having leading zeros:
var strng = "001500";
Then, we will call the replace() method by passing two parameters; the regex, which is used to remove leading zeros from a string and the empty string that acts as a replacer:
var numb = strng.replace(/^0+/, '');
Finally, we will print the resultant value using the “console.log()” method:
console.log(numb);
Output
![]() Let’s move ahead to understand some other methods for removing leading zeros from the string.
Let’s move ahead to understand some other methods for removing leading zeros from the string.
Method 4: Remove Leading Zeros from a String Using Number Constructor
The Number() constructor takes a string as an argument and returns the number by truncating zero from the start of the string.
Syntax
Use the following syntax to utilize the Number constructor:
Number(strng);
Example
We will create a new string named “strng” and assign value “000100”:
var strng = "000100";
Then, pass the string to the Number constructor which will remove the starting zeros from the string:
var numb = Number(strng);
Print the resultant value that is stored in the variable “numb”:
console.log(numb);
As you can see in the output, the starting zeros are removed from the string:
![]() Let’s see another approach for removing zeros from a string.
Let’s see another approach for removing zeros from a string.
Method 5: Remove Leading Zeros from a String by Multiplying it with 1
You can remove zeros placed before the number by multiplying the string with “1”.
When the string multiplies with one, it removes the starting zeros and returns the actual number.
Syntax
Follow the given syntax for deleting the leading zeros from a string:
strng * 1;
Example
We will create a string “strng” with value “001020”:
var strng = "001020";
Then, multiply the string with one and store it in a variable “numb”:
var numb = strng * 1;
Print the resultant value using “console.log()” method:
console.log(numb);
Output
![]() We have gathered different methods for removing leading zeros from the string.
We have gathered different methods for removing leading zeros from the string.
Conclusion
For removing leading zeros from a string, you can use parseInt() method, parseFloat() method, replace() method, Number() constructor, or multiply the string by 1.
The parseInt() method returns the int value by removing leading zeros, while the parseFloat() method gives the floating-point number by truncating the leading zeros.
The replace() method uses regex to remove zeros.
In this write-up, we have demonstrated various methods for removing leading zeros from a string.
JavaScript Equivalent to printf or String.Format
Applying the JavaScript Equivalent to printf/String.Format is very helpful as almost every program needs to display or log some value on the console.
It also assists you in developing an understanding of the code by displaying the corresponding integer or string values utilized in it.
In addition, you can also utilize the JavaScript equivalent of printf or String.Format for printing out warnings or errors on the console window.
This article will demonstrate the methods to apply the JavaScript Equivalent to printf or String.Format.
JavaScript Equivalent to printf/String.Format
To apply the JavaScript Equivalent to printf/String.Format, you can use:
“console.log()” Method
“document.write()” Method
“String.format()” Method
We will now go through each of the above approaches one by one!
Method 1: JavaScript Equivalent to printf/String.Format Using “console.log()” Method
In JavaScript, the “console.log” method is used to print the value of some integer or string.
You can also utilize this method for printing the integer and string values as an equivalent to printf.
Syntax
console.log(message)
Here, the passed “message” parameter will be logged on the console using the console.log() method.
This argument can be anything, such as some integer or a string value.
Look at the below-given example.
Example
First, we will store an integer value and a string value in the given two variables named “val1” and “val2”, respectively:
var val1= 2var val2= "JavaScript Equivalent to Printf or String.Format"
Now, we will display the initialized values of “val1” and “val2” on the console using the “console.log()” method:
console.log(val1)
console.log(val2)
We will get the following output after the above implementation:
![]()
Method 2: JavaScript Equivalent to printf or String.Format Using “document.write()” Method
In JavaScript, “document.write()” method is also used to display the integer and string values on the DOM (Document Object Model).
More specifically, this method prints the integer or string values on the DOM and not on the console.
Syntax
document.write(exp1, exp2)
Here, “exp1” and “exp2” refer to some integer or string value.
Go through the following example for demonstration.
Example
Now, we will display the values of the already created variables using the “document.write()” method:
document.write(val1,"\n")
document.write(val2)
After the implementation, we will get the following output:
![]()
Method 3: JavaScript Equivalent to printf or String.Format Using String.format() Method
The “String.format()” method is used to change or customize the output format.
We will apply this functionality to modify the entered string value.
This will be achieved by placing the index values at the string positions where we want to place the specified string value.
Then, we will place the string values which are to be updated in the arguments of the format() method.
Overview the following example for demonstration.
Example
First, we will create a custom prototype function.
The format function will take the particular string and fetch the number added inside the “{}” brackets and replace the number contained in it with the string argument placed at that specified index.
After that, “/{(\d+)}/g” will search for non-digit characters(strings) and place them at the specified index after verifying the added condition:
String.prototype.format = function () {
var val1 = arguments;
return this.replace(/{(\d+)}/g, function (get, number) {
return typeof val1[number] != "undefined" ? val1[number] : get;
});
};
Now, we will specify the indexes “{0}, {1}” where string values need to be replaced.
These new string values will be placed initially in the “format()” method as arguments.
Moreover, the added index refers to the string where the specified string will be replaced:
console.log("{0} is the First Argument, whereas {1} is the second argument".format("Java", "JavaScript"));
The corresponding output will be:
![]() We have provided the simplest methods to apply JavaScript Equivalent to printf or String.Format.
You can use either of the approaches according to your requirements.
We have provided the simplest methods to apply JavaScript Equivalent to printf or String.Format.
You can use either of the approaches according to your requirements.
Conclusion
To apply JavaScript Equivalent to printf or String.Format, you can utilize the “console.log()” method for logging the integer and string values on the console or “document.write()” method for displaying the corresponding values on the DOM and “String.format()” method for updating the string value at the place of the specified index.
This article guided you about JavaScript Equivalent to printf or String.Format.
How to Disable Links
In JavaScript, you may encounter a situation where it is required to disable a specific link in case of an update in the website content or when there is heavy traffic on a specific site to be accessed or maintaining a website or web page.
In such scenarios, disabling links can be helpful for the developers and users as it saves a lot of time on both ends.
This article will guide you about Disabling Links.
How to Disable Links?
To Disable Links, you can apply:
Setting “href” attribute
“addEventListener()” method
We will now go through each of the mentioned approaches one by one!
Method 1: Disable Links by Setting href attribute
“href” is an attribute of the anchor tag used to identify sections within a document.
It can be used to return an “undefined” value by placing a null value “void(0)” in the “URL” to disable the link.
Syntax
<a href= "URL:void(0)">
Here, “URL” refers to the website resource for opening a web page and adding “void(0)” will disable it.
Look at the below-given example.
Example
In this example, we will place the href in the “<body>” tag.
Now, we will return an undefined value by setting href to “https://www.youtube.com:void(0)”:
<body>
<a href= "https://www.youtube.com:void(0):void(0)" id= "home">Youtube</a><br> </body>
The output of the above implementation will result in:
![]()
Method 2: Disable Links Using “addEventListener” method
In JavaScript, the “addEventListener()” method attaches an event handler to a document.
We can utilize this method to add an event “click” and then disable the provided link by “preventDefault()” at a specific condition which will prevent the triggering of the added event.
Syntax
addEventListener(event, function)
Here, the parameter “event” refers to the event type, and the parameter “function” is the function we want to access whenever the event occurs.
Look at the following example for a better understanding of the concept:
Example
Firstly, we will place the webpage link in the anchor tag of the “href” attribute.
Here, “id=home” will open the homepage of youtube and the “blank” target will open the specified webpage in the new tab:
<a href='https://www.youtube.com/' id='home' target='blank'>Youtube</a>
Next, we will access the href attribute value by passing it as a parameter to the “document.getElementById()” method.
Now, we will include a “click” event and the function we want to access whenever the event occurs.
Finally, a condition is applied in such a way that if the specified web page triggers as the click event, the event is disabled by the “preventDefault()” method:
<script>
var link = document.getElementById('home');
document.addEventListener('click', function (e) {
if (e.target.id === link.id) {
e.preventDefault();
}
});</script>
The corresponding output in this case will be:
![]() We have provided all the simplest methods to Disable Links.
You can use any of the explained methods according to your requirements.
We have provided all the simplest methods to Disable Links.
You can use any of the explained methods according to your requirements.
Conclusion
To disable links, you can apply the “href” attribute method for returning an undefined value by placing the null value “void(0)” in the “URL” placeholder or utilize the “addEventListener()” method for adding a click event at the specified URL in the href attribute and then disabling it on a specific condition.
This write-up explained the methods to disable links.
How to Alert Yes No With the confirm() Function
Developers often need to get input from the users to decide further course of action.
This input can be of many types, simplest of which is a yes or no answer.
JavaScript provides us with inbuilt functionality which can be used to get simple yes/no answers from users.
These simple, straight forward answers are often needed when the user is performing a sensitive task like deleting their profile.
An example of such input would be the prompt by Facebook when you try to leave the webpage after writing an incomplete post.
This simple user input reduces the chance of mistakes and makes sure that the user has clear intentions of performing the task.
Confirm() method
JavaScript offers the inbuilt confirm method to prompt the user with a message and get a Yes or No answer in response.
The dialog box offers users with two options: Ok and Cancel.
If the user presses Ok then the confirm() method returns true else it returns false.
The syntax of confirm() method is really straightforward.
Just invoke the window object and call the confirm() method:
window.confirm(text);
As the window object has global scope, its methods can be called without reference to the window object.
confirm(text);
The confirm() method takes a single optional argument which is the text that would be displayed on the dialog box.
As stated above the confirm() method also returns a true or false value.
Using the confirm() method
You can simply call the confirm() method with an optional string to prompt the user for a Yes or No answer:
confirm("Do you want to proceed?");
![]() You should store the value returned by the confirm() method inside a variable so it can be used later
let user_input = confirm("Do you want to proceed?");
It is important to note that the confirm() method is synchronous which means that all other JavaScript processes will be stopped and the user won’t be able to access any other parts of the webpage until they have provided an input.
This can sometimes cause problems as developers do not want to restrict user’s access to web pages.
The confirm() method also has another disadvantage that its dialog box’s position, style and options cannot be customised.
You should store the value returned by the confirm() method inside a variable so it can be used later
let user_input = confirm("Do you want to proceed?");
It is important to note that the confirm() method is synchronous which means that all other JavaScript processes will be stopped and the user won’t be able to access any other parts of the webpage until they have provided an input.
This can sometimes cause problems as developers do not want to restrict user’s access to web pages.
The confirm() method also has another disadvantage that its dialog box’s position, style and options cannot be customised.
Conclusion
In this write-up we took an insight into the JavaScript confirm() method.
The confirm() method is a convenient way of getting simple straight forward answers from users and can often come in handy.
However, it has a few drawbacks because of which it should not be overused.
How to Add Object to Array
As JavaScript arrays automatically resize as you add items to them, you do not have to worry about them being full.
Indexing can be used to easily access any item present within an array.
JavaScript offers several built-in methods which are ideal for adding items to arrays.
In this detailed how-to guide, we will go through the methods which can be used to add objects to arrays.
How to Add Object to Array
The simplest way an object or any other type of element can be added to a JavaScript array is indexing.
You can just assign the object to an index of the array and if there is an item already present there then it will be replaced by the new object:
let obj = {"Name": "John Doe", "id": 3};
let arr = [{"Name": "Richard Roe", "id": 1}, {"Name": "John Smith", "id": 2}];
arr[2] = obj;
console.log(arr);
![]() This method is quite easy but it’s hard to know the indices and size of the arrays so we have to look for some other methods which can be used to add objects to arrays.
The most well-known, convenient and easy to use methods are push(), unshift() and splice().
Their functionalities are slightly different but any of these methods can be used.
Let’s take a look at how these are different:
This method is quite easy but it’s hard to know the indices and size of the arrays so we have to look for some other methods which can be used to add objects to arrays.
The most well-known, convenient and easy to use methods are push(), unshift() and splice().
Their functionalities are slightly different but any of these methods can be used.
Let’s take a look at how these are different:
array.push() Method
The array.push() method takes elements as parameters and adds them to the end of the array and returns the new size of the array:
let obj = {"Name": "John Doe", "id": 3};
let arr = [{"Name": "Richard Roe", "id": 1}, {"Name": "John Smith", "id": 2}];
arr.push(obj);
console.log(arr);
![]()
array.unshift() Method
The array.unshift() function is the opposite of the push method as it adds elements to the beginning of the array.
Similar to the push method it can take one or more elements as parameters and add them to an array:
let obj = {"Name": "Richard Roe", "id": 1};
let arr = [{"Name": "John Smith", "id": 2}, {"Name": "John Doe", "id": 3}];
arr.unshift(obj);
console.log(arr);
![]()
array.splice() Method
The array.splice() method is a bit different as it can be used to both delete and insert elements from a given index.
It takes three arguments, the index, no of elements to delete and the new element which is to be added:
let obj = {"Name": "John Doe", "id": 3};
let arr = [{"Name": "Richard Roe", "id": 1}, {"Name": "John Smith", "id": 2}];
arr.splice(2, 0, obj)
console.log(arr);
![]() We have given 0 as the 2nd parameter as we don’t want to delete any elements from the existing array.
We have given 0 as the 2nd parameter as we don’t want to delete any elements from the existing array.
Additional Useful Methods
JavaScript also offers a lot of other useful methods for manipulating arrays, objects and objects present within arrays.
The array.apply() and the array.concat() are two of such functions which might be helpful in our case.
The array.apply() method can be used to combine the contents of arrays.
So, if you have two different arrays which contain objects and you want to add the objects of one array to another, you do not have to do it manually one by one.
You can just use the apply() method.
Moreover, if you need a new array to be formed from the contents of the existing array then you can use the concat() function.
Conclusion
The push, unshift and splice methods can be used to add objects to JavaScript arrays.
The push method adds objects to the end, the unshift method adds objects to the start and the splice method adds them at a given index of the array.
All of these methods have been extensively explained in the guide above.
Difference Between window.location.href and window.location.replace | Explained
Both of these attributes belong to the Browser’s Window object.
To be precise, they belong to an inner object known as the location object, and its only job is to know the document’s current location.
Changing these location objects’ values typically means changing the document.
Because this object defines the URL, and any change in the URL means changing the document for another.
Now, the href property and the replace() function do the exact same job but in a different manner.
Let’s break the confusion.
Both of these properties are used to go to a new document or a new webpage.
However, the “href” property does so by adding a new entry inside the history element, and the “replace” property does by replacing the topmost entry in the history element with the newer URL.
The window.location.href Property
First of all, set up a new homepage with the following line inside it:
<center><p>This is the first page</p><button onclick="buttonClicked">Go to Second Page</button></center>
In this above code snippet, a button has been created that will be used to go to the second page by using the function buttonClicked() inside the script file.
Running this HTML document gives the following page on the browser:
![]() After that, in the script file or in the <script> tag, use the following lines of code:
<script>
function buttonClicked() {
window.location.href = "secondPage.html";}</script>
This script is going to relocate the browser to the “secondPage.html”.
However, secondPage.html doesn’t exist yet.
So, create the secondPage.html with the following lines inside it:
<html lang="en"><head><meta charset="UTF-8" /><meta http-equiv="X-UA-Compatible" content="IE=edge" /><meta name="viewport" content="width=device-width, initial-scale=1" /><title>secondPage</title></head><body><center><p>This is the second page</p></center></body></html>
Note: This secondPage.html must be created in the same directory as the home.html or the first page.
After that running the main html file and clicking the button will yield the following results:
After that, in the script file or in the <script> tag, use the following lines of code:
<script>
function buttonClicked() {
window.location.href = "secondPage.html";}</script>
This script is going to relocate the browser to the “secondPage.html”.
However, secondPage.html doesn’t exist yet.
So, create the secondPage.html with the following lines inside it:
<html lang="en"><head><meta charset="UTF-8" /><meta http-equiv="X-UA-Compatible" content="IE=edge" /><meta name="viewport" content="width=device-width, initial-scale=1" /><title>secondPage</title></head><body><center><p>This is the second page</p></center></body></html>
Note: This secondPage.html must be created in the same directory as the home.html or the first page.
After that running the main html file and clicking the button will yield the following results:
![]() It is clear from the output that pressing the button will redirect the browser to the second page, and then pressing the back button on the browser’s window will take the browser back to the home page.
This is the working of the window.location.href property.
It is clear from the output that pressing the button will redirect the browser to the second page, and then pressing the back button on the browser’s window will take the browser back to the home page.
This is the working of the window.location.href property.
The window.location.replace()
Just like in the href property example, start by creating a new HTML file named home.html and add in the following lines inside it:
<center><p>This is the first page</p><button onclick="buttonClicked()">Go to Second Page Using Replace</button></center>
After that, add in the following lines in the script tag or in the script file:
<script>
function buttonClicked() {
window.location.replace("secondPage.html");}</script>
In the code snippet, notice that unlike the href property, the replace is actually a function that takes the new location inside its arguments.
After that, create the secondPage.html add in the following lines inside it:
<html lang="en"><head><meta charset="UTF-8" /><meta http-equiv="X-UA-Compatible" content="IE=edge" /><meta name="viewport" content="width=device-width, initial-scale=1" /><title>secondPage</title></head><body><center><p>This is the second page</p><p>But the browser cannot go back</p><p>Because it has used the replace Property</p></center></body></html>
After that, running this home.html will show the following behavior of the browser:
![]() It is clear from the gif above that the replace function replaces the topmost entry in the history of the browser, therefore the browser’s back button is grayed out.
It is clear from the gif above that the replace function replaces the topmost entry in the history of the browser, therefore the browser’s back button is grayed out.
Conclusion
The href property and the replace() function are both part of the window location object.
The primary object of both of these is to move the browser to a new webpage which is defined by the URL.
The href property adds an element in the history of the browser.
Whereas, the replace() function replaces the topmost entry with the new location, causing the browsers to not be able to go back to the previous page.
How to Implement an onload Event in iframe
The onload event is used to run scripts and call JavaScript functions after the contents of a webpage have been loaded.
It can be used to get the information about the user’s browser so that the compatible version of the web page can be loaded.
onload events are also sometimes used to deal with cookies.
It is most commonly used with the <body> tag but can also be used with other tags as well such as the img, link, script, style, frame and iframe tag.
This guide is all about the use of onload event with the iframe tag.
Before moving onto the use of onload event first we should make ourselves familiar with the iframe tag.
The iframe tag can be used to create embedded web pages which are displayed inside a bordered rectangular region on the host webpage.
iframe tag can take different attributes such as the src attribute to specify the URL of the webpage and the height and width attributes for the size of the embedded webpage:
<!DOCTYPE html><html><body><center><h1>Implementing onload Event in iframe</h1><iframe src="https://linuxhint.com/" ></iframe></center></body></html>
![]() Now that we have made ourselves familiar with the iframe tag we will take a look at how we can implement an onload event on it.
Now that we have made ourselves familiar with the iframe tag we will take a look at how we can implement an onload event on it.
Implementing an onload Event in iframe
There are several different methods which can be used to implement the onload event.
The easiest way is through the onload attribute which can be used directly with the iframe tag.
onload Attribute
<!DOCTYPE html>
<html>
<body>
<center>
<h1>Implementing onload Event in iframe</h1>
<iframe src="https://linuxhint.com/" onload="displayMessage()"></iframe>
</center>
</body>
<script>
function displayMessage() {
alert("Page Loaded Successfully!");}
</script>
</html>
![]()
addEventListener() Method
The second method is by adding an event listener to the iframe tag:
<!DOCTYPE html><html><body><center><h1>Implementing onload Event in iframe</h1><iframe id="linuxHint" src="https://linuxhint.com/" onload="displayMessage()"></iframe></center></body><script>
var page = document.getElementById("linuxHint");
page.addEventListener("load", displayMessage)
function displayMessage() {
alert("Page Loaded Successfully!");}</script></html>
![]()
JavaScript onload Event
The third and the last method is by using the onload event directly on the iframe object:
<!DOCTYPE html><html><body><center><h1>Implementing onload Event in iframe</h1><iframe id="linuxHint" src="https://linuxhint.com/" onload="displayMessage()"></iframe></center></body><script>
var page = document.getElementById("linuxHint");
page.onload = function () {
alert("Page Loaded Successfully!");}</script></html>
![]()
Conclusion
This guide has listed three different methods of implementing the onload event in the iframe tag methods.
The onload events can be used to run scripts after the contents of the webpage have been loaded.
How to Hide Elements Using Class Name
JavaScript provides a variety of functions that can help us to enhance our websites.
A common feature we see on different websites is to hide elements present on the website just by clicking on a button.
We can do this task in multiple ways using different JavaScript functions.
In this article, the use of getElementByClassName() has been explored to hide the elements of a web page.
Following are the points that have been covered in this article along with the example codes:
Introduction to getElementByClassName() method of Javascript
Properties of JavaScript used to hide elements
Hiding single element of a webpage by using getElementByClassName() method
Hiding multiple elements associated to a specific class
Hiding all the child nodes of an element associated to a specific class
Hiding only specific child nodes of an element associated to a specific class
getElementsByClassName()
One of the important and basic functions of JavaScript that deals with the elements present on a web page is getElementsByClassName().
This function provides an HTML stream of elements associated with a specified class name.
Syntax
The syntax of this method is provided below:
![]() In the above code statement, the syntax of getElementByClassName() method has been shown.
Here, the method getElementsByClassName() returns an element present on index 0, associated with the class Birds in the declared variable stream.
As the basic purpose and syntax of getElementsByClassName() has been explained above.
Now let us try to hide webpage elements by using this function.
In the above code statement, the syntax of getElementByClassName() method has been shown.
Here, the method getElementsByClassName() returns an element present on index 0, associated with the class Birds in the declared variable stream.
As the basic purpose and syntax of getElementsByClassName() has been explained above.
Now let us try to hide webpage elements by using this function.
What are the properties of JavaScript that are used to hide elements?
Before jumping toward the task, let us see the two styling properties through which the elements can be hidden on a webpage.
These two properties are described below:
visibility = ‘hidden’: This property is used to only hide the elements and it does not remove the space linked to that element
display = ‘none’: This property is used to hide the elements and it also removes the space linked to that element
We will use both the properties in different scenarios so that it will be easy to find out the workings and practical differences of these two properties.
How to hide a single element of a webpage using getElementByClassName() method?
The snippet given below depicts the creation of a webpage with a heading, a bit of text, a list of birds, and a list of animals along with a button to click.
HTML
<h1>Hide Birds From The List</h1><p> Click on button to hide the element by class name</p><div class="outer"><div class="bird"> Sparrow </div><div class="bird"> Pigeon </div><div class="animal"> Lion </div><div class="animal"> Deer </div><div class="bird"> Parrot </div><div class="bird"> Owl </div><div class="animal"> Wolf </div><div class="animal"> Horse </div></div><input type='button' id='btn' value='Click to hide' onclick='hideElement()'>
Following image depicts the above code with a bit of description.
![]() Save the code and run the file; a similar web page will appear on your browser screen as shown below.
Save the code and run the file; a similar web page will appear on your browser screen as shown below.
![]() Let’s write a script to hide a single element from this web page.
The scenario is that on clicking the given button, only the first bird’s name should be hidden from the screen, and the rest of the bird and animal names should remain on the screen.JS
functionhideElement(){const stream = document.getElementsByClassName('bird')[0];
stream.style.visibility = 'hidden';
}
A snippet with the brief description of the above code is provided below.
Let’s write a script to hide a single element from this web page.
The scenario is that on clicking the given button, only the first bird’s name should be hidden from the screen, and the rest of the bird and animal names should remain on the screen.JS
functionhideElement(){const stream = document.getElementsByClassName('bird')[0];
stream.style.visibility = 'hidden';
}
A snippet with the brief description of the above code is provided below.
![]() Save the file and run it.
The browser will display the following web page.
In the below given image, it can be seen that when the Click to hide button is pressed the sparrow which is the object of the class bird present at index [0] becomes hidden but the space linked to this object is still there:
Save the file and run it.
The browser will display the following web page.
In the below given image, it can be seen that when the Click to hide button is pressed the sparrow which is the object of the class bird present at index [0] becomes hidden but the space linked to this object is still there:
![]()
How to hide multiple elements of a webpage using getElementByClassName() method?
To hide multiple elements that are associated with the class bird, only the JavaScript needs to be updated; the rest of the HTML code for the web page will remain the same.
Update the script code with the code given below:
functionhideElement(){const allBirds = document.getElementsByClassName('bird');for (const stream of allBirds) {
stream.style.display = 'none';
}
};
A snippet with the brief description of the above code is provided below:
![]() In the above code, it can be seen that instead of using the visibility property for hiding the elements, the display property has been used for the aforementioned purpose.
Save this code script and run it:
In the above code, it can be seen that instead of using the visibility property for hiding the elements, the display property has been used for the aforementioned purpose.
Save this code script and run it:
![]() In the above code, the click on the Click to hide button will hide all the birds’ names along with their linked spaces.
In the above code, the click on the Click to hide button will hide all the birds’ names along with their linked spaces.
How to hide childNodes of an element of a webpage associated with a class using getElementByClassName() method?
To hide the childNodes of an element of a webpage, firstly make changes in the HTML code and create some childNodes:
<h1>Hide Birds From The List</h1><p>Click on button to hide the element by class name</p><div class="outer"><div class="bird"><p> Sparrow </p><p> Pigeon </p><p> Owl </p></div><div class="animal"><p> Lion </p><p> Deer </p><p> Wolf </p></div></div><input type='button' id='btn' value='Click to hide' onclick='hideElement()'>
![]() After updating the HTML code, make changes in the script as well.
The property that is used to hide all the childNodes of a class is visibility property with the value hidden.
functionhideElement(){const stream = document.getElementsByClassName('bird')[0];
stream.style.visibility = 'hidden';
}
On saving and executing the file with the above alterations.
Following web page will appear on the screen.
On clicking the button, the childNodes of the class bird will become hidden from the screen but the space linked with those childNodes will remain on the screen as shown below because visibility property has been used instead of the display property.
After updating the HTML code, make changes in the script as well.
The property that is used to hide all the childNodes of a class is visibility property with the value hidden.
functionhideElement(){const stream = document.getElementsByClassName('bird')[0];
stream.style.visibility = 'hidden';
}
On saving and executing the file with the above alterations.
Following web page will appear on the screen.
On clicking the button, the childNodes of the class bird will become hidden from the screen but the space linked with those childNodes will remain on the screen as shown below because visibility property has been used instead of the display property.
![]()
How to hide specific childNodes of an element of a webpage associated with a class using getElementByClassName() method?
To hide the specific childNodes having specific elements inside a class, let us first make changes in the HTML code and create different childNodes in the class bird with different elements:
<div class="bird"><h4> Crow </h4><p> Sparrow </p><h3> Pigeon </h3><h1> Eagle </h1><p> Owl </p></div>
![]() After the alteration in the HTML code, also update the script with the following script code:
functionhideElement() {const stream = document.getElementsByClassName('bird');for (let n in stream[0].childNodes) {if (stream[0].childNodes[n].nodeName === 'H1'|| stream[0].childNodes[n].nodeName=== 'H4')
stream[0].childNodes[n].style.display = 'none';
}}
Below snapshot provides a brief description of the above script code.
After the alteration in the HTML code, also update the script with the following script code:
functionhideElement() {const stream = document.getElementsByClassName('bird');for (let n in stream[0].childNodes) {if (stream[0].childNodes[n].nodeName === 'H1'|| stream[0].childNodes[n].nodeName=== 'H4')
stream[0].childNodes[n].style.display = 'none';
}}
Below snapshot provides a brief description of the above script code.
![]() On executing the above code, a similar web page will appear on screen.
When the click button is pressed all the childNodes of class bird will be hidden along with their occupied space:
On executing the above code, a similar web page will appear on screen.
When the click button is pressed all the childNodes of class bird will be hidden along with their occupied space:
![]()
Conclusion
To hide the elements in a JavaScript, two styling properties can be used which are visibility and display.
The getElementsByClassName() method is used to fetch the element code.
The article provides various ways through which the getElementsByClassName() is used to hide a single element, multiple elements, childNodes of a class and specific childNodes of a class.
How to Get Type of a Variable
JavaScript is a well-known dynamically typed language that can change the date type during runtime.
However, it is important to find the type of a variable because users can not specify the type of a variable at declaration time.
The typeof operator is employed to get the variable type.
This article aims to provide a brief explanation of how to get the type of a variable with the help of suitable examples.
How to Get Type of a Variable?
JavaScript provides a typeof operator that has enumerable features to evaluate the type of variable.
It returns the data type by passing operands to it.
The syntax of the typeof operator is simple and is described below:
Syntax:
typeof operand
In this syntax, the operand represents the expression or variable to find the data type.
Note: JavaScript offers the following data types for variables to contain:
| Data Types |
Description |
| Number |
Integer or Floating number. |
| Boolean |
True or False values. |
| Undefined |
Data type whose value is not initialized. |
| String |
Specifies the textual data. |
| Object |
Key-value pairs of collection of data. |
| Function |
Assign function as a variable. |
Let us practice the use of the typeof operator to check the datatype of the various variables.
Example 1: Getting the Boolean, Number and String Types
An example illustrates the working of typeof operators with different data types (Boolean, Number, and String).
The code is utilized for getting the types of different variables.
Code
console.log("Example to check the type of variable");
var1 = false;
console.log(typeof(var1));
let var2 =45418761;
console.log(typeof(var2));
var3 = "Welcome to JavaScript World";
console.log(typeof(var3));
The code is described in listed order:
Firstly, “var1” stores the Boolean value “false” and the “typeof” operator is used to evaluate the type of “var1”.
The“var2” and “var3” store the numbers “45418761” and string “Welcome to JavaScript World”.
The data types of “var2” and “var3” variables are retrieved using the “typeof” operator.
![]() Output
Output
![]() The output returns the data type of “var1”, “va2,” and “var3” variables as boolean, number, and string respectively.
The output returns the data type of “var1”, “va2,” and “var3” variables as boolean, number, and string respectively.
Example 2: Getting the Function and Object Types
Another example is considered to compute the data types of two variables via typeof operators.
The code is provided here.
Code
console.log("Example to check the type of variable");
let var1 = function() { return 2*2 } ;
console.log(typeof(var1));
var2 = [23,242,63];
console.log(typeof(var2));
In the above code:
Firstly, a function is called that returns the “2*2” and stores it in the “var1” variable.
The typeof operator computes the type of “var1” variable and displays the output.
Similarly, “var2” stores an array “[23, 242, 63]” and prints the type of “var2” by passing through the “typeof” operator.
![]() Output
Output
![]() The output shows that the “function” and “object” types of “var1” and “var2” variables are displayed in the console window.
The output shows that the “function” and “object” types of “var1” and “var2” variables are displayed in the console window.
Conclusion
In JavaScript, the typeof operator can be utilized to get the data types of variables.
Users can pass variables as arguments and return types such as boolean, number, string, function, object, etc.
This article utilizes the typeof operator to extract the data type of the variable along with different examples.
This operator is useful for developers to check the data types during the runtime.
Here, you have learned to get the variable types.
How to Find Index of Object Array
Sometimes when working with objects containing arrays, you will need to know the index of an object.
You can employ different JavaScript methods to uniquely identify objects from their properties and then access their indices.
This guide will give an extensive and comprehensive explanation of how different methods can be used to achieve this goal.
Find Index of Object with Map and indexOf() Method
The map method is used to apply a function on each item of the array, transform it and then return it inside an array.
We can use this method to get specific properties of objects which we can then use to identify objects.
When we identify the object that we want to know the index of we can just call the indexOf() method:
let employees = [{firstName:"John", lastName:"Doe", age:38}, {firstName:"John", lastName:"Smith", age:45}];
let ind = employees.map(item => item.age).indexOf(45);
console.log(ind);
![]() In the above code, we first defined an array which contains two objects.
The objects contain data of different employees.
We then used the map function to just get the ages of employees in a separate array.
Lastly, we used the indexOf() method to get the index of the object whose age property is 45 and printed it to the console.
We could have used the map function to get the value of any property and get the index of the object based on that property.
JavaScript ES6 introduced a new method called findIndex().
This method is a lot more elegant, but sadly it doesn’t work on old browsers.
In the above code, we first defined an array which contains two objects.
The objects contain data of different employees.
We then used the map function to just get the ages of employees in a separate array.
Lastly, we used the indexOf() method to get the index of the object whose age property is 45 and printed it to the console.
We could have used the map function to get the value of any property and get the index of the object based on that property.
JavaScript ES6 introduced a new method called findIndex().
This method is a lot more elegant, but sadly it doesn’t work on old browsers.
Find Index of Object With findIndex() Method
The findIndex() method takes a function containing a test as an argument and applies it to each element of the array without making any changes to the original array.
It then returns the position of the array element or -1 if no element passes the test.
With the use of the findIndex() method we do not have any need of the map() function:
let employees = [{firstName:"John", lastName:"Doe", age:38}, {firstName:"John", lastName:"Smith", age:45}];
let ind = employees.findIndex(item => { return item.age == 45});
console.log(ind);
![]() The findIndex() method can also take the index of the current element and the array of current element as optional arguments.
We have used arrow functions in both of the above examples to make the code more readable but the default function syntax can also be used as the argument to these functions:
let employees = [{firstName:"John", lastName:"Doe", age:38}, {firstName:"John", lastName:"Smith", age:45}];
let ind = employees.findIndex(function(item) { return item.age == 45});
console.log(ind);
The findIndex() method can also take the index of the current element and the array of current element as optional arguments.
We have used arrow functions in both of the above examples to make the code more readable but the default function syntax can also be used as the argument to these functions:
let employees = [{firstName:"John", lastName:"Doe", age:38}, {firstName:"John", lastName:"Smith", age:45}];
let ind = employees.findIndex(function(item) { return item.age == 45});
console.log(ind);
Conclusion
This comprehensive tutorial gives two different methods of finding the indices of Objects based on the values of their properties.
The findIndex() method applies the conditional function to each element of the array itself and then returns the index of the element which passes the condition.
But when we are using the indexOf() method, we also have to use the map() method to get the property values.
How to Decode HTML Entities Using JavaScript
HTML stores its reserved characters as character entities.
Character entities are simple text strings that start with an & and end with a ;.
HTML entities are necessary because if you’re trying to write HTML’s special characters like < or > as simple text then HTML should be able to somehow store them so that they are not interpreted as HTML code.
HTML entities are necessary for proper viewing of rendering of text on webpages.
Entities can also be used when trying to write characters which are generally not found on standard keyboards.
Decoding HTML Entities
HTML entities can be decoded by using several different methods involving vanilla JavaScript or JavaScript libraries.
This guide will only go through vanilla JavaScript methods for decoding HTML entities as they are easy and straightforward.
Decoding HTML Entities with the <textarea> DOM Element
The first method is by using the textarea element.
As the name suggests, the textarea element is used to create a simple text area where each character is interpreted as simple plain text.:
function decode(str) {
let txt = document.createElement("textarea");
txt.innerHTML = str;return txt.value;}
In the above code we first created the textarea element using the document.createElement() method.
Then we wrote the string containing HTML entities inside the textarea using innerHTML property.
This way the string will be converted to simple text and entities will be converted to characters.
Lastly, we returned the string stored inside the txt variable which is the textarea.
Now if we call the decode function with an HTML entity as parameter it will return it as simple text:
let encodedStr = "<p>";
let decodedStr = decode(encodedStr);
console.log(decodedStr);
![]()
Decoding HTML Entities with the DOMParser.parseFromString() method
The second method is by using the DOMParser.parseFromString() method.
The DOMParser.parseFromString() method takes a string containing HTML and returns it as an HTML element:
function decode(str) {
let txt = new DOMParser().parseFromString(str, "text/html");return txt.documentElement.textContent;}
In the above code we first passed the string as an argument to the DOMParser.parseFromString() method and got it back as an HTML element by specifying the second argument as “text/html”.
We then returned the text content of the newly created HTML element.
Now calling the decode() function:
let encodedStr = "<p>";
let decodedStr = decode(encodedStr);
console.log(decodedStr);
![]()
Conclusion
HTML Entities are necessary for proper viewing of text on webpages.
Some websites contain code snippets as simple text.
Without Entities it would be difficult to differentiate between what is a HTML code for the webpage and what is just plain text.
How to Convert JavaScript Object to JSON
Converting JavaScript Object to JSON is useful for having a mode of communication so that each programming language can cope up with every character accurately.
Moreover, this type of conversion enables the data to be transferred between various programming languages in a format to build understanding.
On the other hand, we cannot use a JavaScript object directly in PHP or C++; because each language has a different representation of an object.
This write-up will guide you about converting JavaScript Object to JSON.
How to Convert JavaScript Object to JSON?
JavaScript object can be converted into JSON using two simple methods:
“JSON.stringify()” method
“Object.keys()” method
We will now go through each of the mentioned approaches one by one!
Method 1: Convert JavaScript Object to JSON Using JSON.stringify() Method
The “stringify()” method is utilized to convert a JavaScript value to a “JSON” by accepting the value that needs to be converted into JSON as an “argument”.
To convert the JavaScript Objects to JSON format using the “stringify()” method, you have to follow the below-given syntax.
Syntax
JSON.stringify(value)
Here, “value” represents the JavaScript object that will be converted into JSON.
Look at the below-given example.
Example
Firstly, we will create a null array to contain the objects and their corresponding values in it.
Now, we will create two properties, “name” and “id”, and assign them the following values:
var obj= {};
obj.name="Harry"
obj.id= 1
Then, we will perform the required functionality of converting JavaScript Object to JSON using the “stringify()” method.
This will be done by specifying “obj” as an argument and displaying the resultant JSON value:
var json = JSON.stringify(obj);
console.log(json);
Execution of the above code will result in:
![]()
Method 2: Convert JavaScript Object to JSON Using Object.keys() Method
“Object.keys()” is a JavaScript method that accepts the key of an object and returns its corresponding value.
You can apply this method to convert the created objects to JSON and store them in an array.
Moreover, we will also add “{}” for accumulating the values in an array.
For converting the JavaScript Object to JSON using the Object.keys() method, you have to use the following syntax:
Syntax
Object.keys(obj)
Here, “obj” refers to the keys for which the Object.keys() method will fetch the values.
Here is an example for the demonstration.
Example
We will apply the “Object.keys()” method on the already created object and place “obj” in an argument that will access the values of its keys.
Moreover, we have also added “{” to accumulate the values in an array form:
var keys= Object.keys(obj);
var json= "{";
In the next step, we will use a for loop for iterating along the declared objects in an array.
Here, keys[i] refers to the objects “name” and “id”, and obj[keys[i] refers to the values placed in the corresponding objects.
The “json” variable is added to it as this statement will be executed two times such that in the first iteration, it will fetch the value of the “name” key, and in the next iteration, it performs the same operation for “id”.
The resultant value will be concatenated with the created object using the “+” operator.
Also, we will convert the objects and their values into string values using “$”:
for (let i= 0; i < keys.length; i++) {
json= json + `"${keys[i]}":"${obj[keys[i]]}",`;}
Finally, we will add an ending “}” bracket and add it to the array which will result in the proper accumulation of the object and their corresponding values in an array.
Then, we will display the converted JSON string values on the console:
json= json + "}";
console.log(json);
The resultant output in this case will be:
![]() We have compiled all the convenient methods related to converting JavaScript Object to JSON.
You can use any of the above methods according to your requirements.
We have compiled all the convenient methods related to converting JavaScript Object to JSON.
You can use any of the above methods according to your requirements.
Conclusion
To Convert JavaScript Object to JSON, you can apply the “JSON.stringify()” method by placing the variable name in arguments for referring to the objects and their values.
Moreover, you can also utilize the “object.keys()” method for the specified conversion and returning array of keys and their corresponding values.
This article guided about converting JavaScript Object to JSON.
How to Check if All Array Elements Pass a Test
In JavaScript, arrays are the set of a-like elements combined to perform different tasks.
These tasks can be performed with a combination of different user-defined and built-in functions.
Now we have a simple question: Have you ever thought that is there any function that checks if all the elements in an array pass the given test or not? If not, then let us tell you that JavaScript provides every() method to check if all array elements pass a test or not.
In this write-up, we will demonstrate JavaScript functionality to check if all array elements pass a test.
How to Check if All Array Elements Pass a Test?
In JavaScript, every() method checks whether all the elements present in an array satisfy the given function’s condition or not and returns Boolean values as an output.
If all the elements satisfy the test, then it returns true, and if even one element does not satisfy the condition, it returns false.
Here is the syntax to use every() method.
Syntax:
array_name.every(function)
In the syntax, “array_name” represents the array who’s each element will be iterated over the function defined in the “every()” method.
Example 1: When One or More Array Elements Fail the Test
Let’s practice every() method when one or more array elements do not satisfy the function’s criteria of the every() method.
Code:
var sal=[30,150,42,81,20,21,35,23]
tc = x => (x / 3 > 20)
console.log(sal.every(tc))
In this code, we have created an array of numbers.
Then, we create a test condition using the arrow function.
The test condition divides every array element by 3 and checks if the result after dividing must be greater than 20.
Output:
![]() The output has returned false, which states that at least one array element could not pass the test condition.
The output has returned false, which states that at least one array element could not pass the test condition.
Example 2: When All Array Elements Pass the Test
Now, let us see what happens when all the array elements pass the test.
Code:
var sal=[30,150,42,81,20,21,35,23]
tc = x => (x / 2 > 5)
console.log(sal.every(tc))
In this code, we create an array of numbers.
Then, we create a test condition using the arrow function.
The test condition divides every array element by 2 and checks if the result after dividing must be greater than 5.
Output:
![]() The output has returned true which states that all the array elements pass the test condition.
Hence, it is concluded that to pass a test for all elements, the condition of every() method must return true.
The output has returned true which states that all the array elements pass the test condition.
Hence, it is concluded that to pass a test for all elements, the condition of every() method must return true.
Conclusion
In JavaScript, we use every() method to check if all the array elements pass a test.
The every() method returns a true value if every element passes a test, otherwise it returns a false value.
This post has provided a detailed demonstration of every() method to check if all array elements pass a test.
Additionally, we have also provided examples in both cases: if all array elements passed the test or any of them failed.
How to Send POST Request Using XMLHttpRequest
The XMLHttpRequest is an API in the form of objects which is used to send or receive data from servers.
The send() method of XMLHttpRequest makes a request to the server.
The request is asynchronous by default but can be synchronous as well.
If the request is synchronous then the method returns only when the response arrives otherwise response is delivered using events.
HMLHttpRequest is part of AJAX which are web development techniques which can be used to develop asynchronous web apps.
On asynchronous web pages we can send and receive data from servers and update web pages without reloading the web pages.
The request sent by XMLHttpRequest can either be a GET or POST request.
We can GET in most cases but POST is more secure and should be used whenever we have large amounts of data or unknown user input.
Sending a POST request using XMLHttpRequest
To send a request through XMLHttpRequest we first need to make a new XMLHttpRequest object:
const request = new XMLHttpRequest();
To send a request we need to use the open() and send() methods.
The open() method takes three parameters which are the method (GET/POST), URL (file location on server) and a Boolean value for asynchronous or synchronous nature of the request:
request.open("POST", "File_Path", true);
For a synchronous request:
request.open("POST", "File_Path", false);
With asynchronous requests JavaScript does not wait for the request to complete and can run other scripts while the request is being completed.
It is not recommended to use synchronous requests as the web app can come to a complete halt if the server is busy.
Before sending the data by the send() method we can also use the setRequestHeader() to send the data like an HTML form with a header name and a header value:
request.setRequestHeader(header, value);
Now we can send data with an optional parameter which specifies the body of the request:
request.send(body);
The onreadystatechange property can be used on the XMLHttpRequest object to execute a function once a response has been received from the server:
request.onreadystatechange => {if (this.readyState == XMLHttpRequest.DONE && this.status == 200) {//Code to be Executed once request is finished}};
All in all, a simple asynchronous POST request using XMLHttpRequest will look something like this:
const request = new XMLHttpRequest();
request.open("POST", "File_Path", true);
request.setRequestHeader(header, value);
request.onreadystatechange => {if (this.readyState == XMLHttpRequest.DONE && this.status == 200) {//Code to be Executed once request is finished}};
request.send(body);
Conclusion
AJAX’s XMLHttpRequest can be used to send and receive data from the server and update the web page according to it.
This technique is pure gold for developers as they can do all this without having to reload the page.
How to Replace All Instances of a String
The string contains a sequence of characters that represent any information.
JavaScript uses a variety of features to manipulate the string by adding, removing, and replacing instances.
The replacement of the string instances is carried out to remove a specific part of the string to serve a specific purpose.
In this blog, we have demonstrated various methods of replacing all instances of a string.
The outcomes of this blog are listed below:
Method 1: Using replaceAll() Method for Replacing All Instances of a String
Method 2: Using replace() Method for Replacing All Instances of a String
Method 1: Using replaceAll() Method for Replacing All Instances of a String
The replaceAll() method extracts the pattern of passing instances and replaces all the matching instances in the existing string.
The method is useful for developers to minimize the time and effort of replacing instances in complex tasks.
The syntax of the replaceAll() method is provided below:
Syntax
replaceAll("matching_instance", "replaced_instance")
The parameters are as follows:
matching_instance: Specifies the instance that the user wants to replace.
replaced_instance: Refers to the instance being replaced with the matched one (matching_instance).
Example
The following example code shows how to make use of the replaceAll() method.
Code
console.log("Example to Replace Instances of a String");const list_name = "John, Harry, Brown, John, Adam";
console.log(list_name.replaceAll("John", "Marry"));
The description of the above code is as follows:
Firstly, the string “John, Harry, Brown, John, Adam” is stored in the “list_name” variable.
After that, all instances that match “John” are replaced with “Marry” by utilizing the replaceAll() method.
Finally, the console.log() method helps us present the replaced string in the console window.
![]() Output
Output
![]() The output validates that all the instances which matched with the “John” are replaced with the “Marry” in the console window.
The output validates that all the instances which matched with the “John” are replaced with the “Marry” in the console window.
Method 2: Using replace() Method for Replacing All Instances of a String
The replace() method is employed for replacing the first occurrence of the matched string only.
However, the replace() method can be integrated with the regular expression for the replacement of all the instances in an existing string.
The method searches for the specified pattern, which is passed via regex.
After that, it returns the new string after the replacement of all instances present in the existing string.
The work of the replace() method is described in the following syntax:
Syntax
replace("matching_instance", "replaced_instance")
The parameters are described below:
matching_instance: Refers to the instance to be replaced.
The matching string must be defined as the global regular expression.
replaced_instance: Represents the instance that will be replaced with the first instance of the
Example
Let us practice the replace() method.
An example code is provided below:
Code
console.log("Example to Replace Instances of a String");const user_str = "Cricket is famous sport because Cricket is easy to play!";
let str1 = /Cricket/g;
let str2 = "Hockey";
let new_str = user_str.replace(str1,str2);
console.log(new_str);
The description of the code is as follows:
Firstly, a user-defined string is written and stored in the “user_str” variable.
Furthermore, a regular expression “/Cricket/g”(a global regular expression that will trace all the instances of the word “Cricket”) is utilized to replace the specified instance and store it in the “str1” variable.
The “str2” stores the string that the user wants to replace in the existing string.
After that, the replace() method is employed by passing “str1” and “str2” as arguments.
Finally, the console.log() method displays the updated string in the console window.
![]() Output
Output
![]() The output shows that all the instances of “Cricket” are replaced with “Hockey”.
The output shows that all the instances of “Cricket” are replaced with “Hockey”.
Conclusion
In JavaScript, the replaceAll() and replace() methods can be used to replace all the instances of a string.
The replaceAll() method matches the string and performs replacement by the provided sequence of characters.
On the other hand, the replace() method utilizes the global regular expression to match all the instances of the string and then replace them with the specified string.
In this post, various JavaScript methods are demonstrated for replacing all instances of a string.
How to Remove Last Character From String
A string is a combination of characters that transform information to the user.
JavaScript provides various functionalities to add, remove, and replace characters from the existing string.
In some situations, users require the string by excluding the last character, such as “%”, “$”, or any alphabet.
In this post, we have demonstrated various methods for removing the last character from an existing string.
Using slice() Method to Remove Last Character
Using substring() Method to Remove Last Character
Using replace() Method to Remove Last Character
Method 1: Using slice() Method to Remove Last Character
The slice() method is utilized to remove the last character from the existing string.
The method accepts two parameters, “0” and “-1”.
The 0 shows the starting index and the -1 specifies the subtraction of the last character by the total length of the string.
The syntax of the slice() method is written below:
Syntax
slice(0,-1)
In this syntax, 0 specifies the first index and -1 represents the last index.
Code
console.log("Example to Remove Last Character From String")
var txt = 'JavaScript';
var str = txt.slice(0, -1);
console.log(str);
In this code, the first txt string stores the “JavaScript”.
After that, the slice() method is considered to remove the last character by passing the argument “-1”.
In the end, the console.log() method is utilized to display the message in the console window.
![]() Output
Output
![]() The output shows that “JavaScrip” is returned after removing the last character from “JavaScript”.
The output shows that “JavaScrip” is returned after removing the last character from “JavaScript”.
Method 2: Using substring() Method to Remove Last Character
The length property is employed with the substring() method for removing the last character.
Firstly, the length of the string is extracted, and then subtracts the last index from the original string.
The syntax of the method is provided below:
Syntax
substring(0, str.length - 1)
In this syntax, 0 represents the first index, and str.length -1 returns the total length of the string by excluding the last index.
Code
console.log("Example to Remove Last Character From String")
var message = 'Hello';
var str = message.substring(0, message.length - 1);
console.log(str);
The above code explains in such a way that the message stores the string “Hello”.
After that, the substring() method is employed to remove the last character from the existing string.
In this method, the message.length is utilized to extract the length of the string and subtracts the last character from the existing string.
![]() Output
Output
![]() The output returns “Hell” after removing the “o” from the “Hello” string
The output returns “Hell” after removing the “o” from the “Hello” string
Method 3: Using replace() Method to Remove Last Character
Another example is adapted with the replace() method that exchanges the last character with the empty string by passing arguments.
The syntax of the replace method is provided below:
Syntax
replace('charcter-to-be-matched', '')
In the above syntax, the first argument is used to match the characters, and the second argument refers to the empty string, which will be used to replace the first argument’s character.
Let’s apply the replace() method to remove the last character from a string via the following example code.
Code
console.log("Example to Remove Last Character From String")
var text = 'Linuxhint';
var new_text = text.replace('t', '');
console.log(new_text);
In this code, text stores the string “Linuxhint”.
After that, the replace() method is utilized to replace the last character “t” with an empty string ” and display the result on the console.
![]() Output
Output
![]() The output shows that “Linuxhint” is replaced with “Linuxhin” by removing the last character.
The output shows that “Linuxhint” is replaced with “Linuxhin” by removing the last character.
Conclusion
In JavaScript, slice(), substring() and replace() methods are used to remove the last character from the string.
The slice() method is utilized to remove the last character by passing the argument “-1”.
Furthermore, the substring() method extracts the specific part of the string by ignoring the last character of the original string.
The replace() method is employed to replace the last character with “” empty string and return the updated string.
You have experienced various methods for removing the last character from the exciting string.
How to map, reduce and filter a Set element using JavaScript?
If you’re someone like me who has started their programming journey by first learning a low-level language like C and then later moving onto higher-level languages like JavaScript, then you must have been awestruck by the level of ease these higher-level languages provide.
You can always find an inbuilt method to perform complex tasks in just one line.
The map, reduce and filter are three such methods which can be used to transform data stored inside arrays without writing any complex loops.
These methods iterate over whole arrays, perform some computation and then return a new transformed array.
Let’s take a closer look at these methods:
Map()
We’ll start off with the map() method which can be used to apply a function to each element of the array.
It takes a function as an argument which will be applied to the elements of the array:
let num = [0, 1, 2, 3, 4, 5];
let numSquare = num.map(element => element * element);
console.log(numSquare);
![]() If we had done the same thing using loops then the code would have looked something like this:
let num = [0, 1, 2, 3, 4, 5];for(let i = 0; i <6; i++) {
num[i] *= num[i];}
console.log(num);
If we had done the same thing using loops then the code would have looked something like this:
let num = [0, 1, 2, 3, 4, 5];for(let i = 0; i <6; i++) {
num[i] *= num[i];}
console.log(num);
![]()
Reduce()
The reduce() method can be used to reduce all of the values present inside the array into a single value.
Following code applies reduce method on an array to get the sum of the whole array:
functionsumArray(result, element){return result + element;}
let num = [0, 1, 2, 3, 4, 5];
let sum = num.reduce(sumArray);
console.log(sum);
![]() This can also be done with loops in the following way:
let num = [0, 1, 2, 3, 4, 5];
let sum = 0;for(let i = 0; i <6; i++) {
sum+=num[i];}
console.log(sum);
This can also be done with loops in the following way:
let num = [0, 1, 2, 3, 4, 5];
let sum = 0;for(let i = 0; i <6; i++) {
sum+=num[i];}
console.log(sum);
![]()
Filter()
The filter() method can be used to apply a certain condition on the elements of an array and then get only those elements which pass that condition.
Similar to the previous two methods, filter() also takes an argument function.
This function is used to apply the condition on each element and then add it to an array if it passes the condition.
This array will be returned by the filter method:
Consider the following code which checks whether the array contains any multiples of 5:
let num = [1, 2, 3, 4, 5, 6, 7, 8, 9, 10];
let multiples = num.filter(element => element % 5 == 0);
console.log(multiples);
![]() As with the previous two methods, filter() can also be replaced with loops but with loops the code won’t be as easy to read.
As with the previous two methods, filter() can also be replaced with loops but with loops the code won’t be as easy to read.
Conclusion
This in-depth guide has explained the use of map(), reduce and filter methods.
These functions save a ton of time and make code elegant and easier to read.
The developers can use these methods to transform the data in their arrays without writing complex loops.
JavaScript Promise.race() Method
Promise.race() method is a built-in method of JavaScript which takes an iterable of promises as an argument and returns the first promise which is resolved or rejected.
The Promise.race() method will either return the fulfilment value or the reason for rejection.
Iterables are objects which can be looped through such as Arrays, Strings and Maps.
What are Promises anyway?
Asynchronous code can be dealt with promises.
They take a function known as the executor as a parameter.
When a promise is created, the executor automatically runs asynchronously and returns a value in case it is fulfilled else it returns the reason for rejection:
let example_promise = newPromise((resolve, reject) => {
resolve("Promise has been resolved");});
example_promise.then( r =>console.log(r));
![]() Asynchronous nature of promises:
let example_promise = newPromise((resolve, reject) => {
resolve("Promise has been resolved");});
example_promise.then( r =>console.log(r));
console.log("1,2,3...");
Asynchronous nature of promises:
let example_promise = newPromise((resolve, reject) => {
resolve("Promise has been resolved");});
example_promise.then( r =>console.log(r));
console.log("1,2,3...");
![]()
How to use Promise.race() Method?
Pass an iterable of promises to the Promise.race() method and get its return value in variable:
let prom1 = newPromise((resolve, reject) => {
setTimeout(() => resolve("Promise has been resolved"), 500);});
let prom2 = newPromise((resolve, reject) => {
setTimeout(() => reject("Promise could not be resolved"), 250);});
let temp = Promise.race([prom1, prom2]);
temp.catch(reason =>console.log(reason));
![]() In this example we had two promises.
The first promise was resolved after 500ms and the second promise was rejected just after 250 seconds.
As the second promise was the first one to be either resolved or rejected it was returned by the Promise.race() method.
If the argument passed to the Promise.race() method is an empty iterable then the method will return a forever pending promise:
let temp = Promise.race([]);
console.log(temp);
In this example we had two promises.
The first promise was resolved after 500ms and the second promise was rejected just after 250 seconds.
As the second promise was the first one to be either resolved or rejected it was returned by the Promise.race() method.
If the argument passed to the Promise.race() method is an empty iterable then the method will return a forever pending promise:
let temp = Promise.race([]);
console.log(temp);
![]() If the argument iterable has any non-promise values or promises which have already been fulfilled or rejected then the method will settle for the first value in the array:
let p1 = newPromise((resolve, reject) => {
resolve("P1 has been resolved");});
let p2 = newPromise((resolve, reject) => {
resolve("P2 has been resolved");});
let temp = Promise.race([p1,p2]);
temp.then(value =>console.log(value));
If the argument iterable has any non-promise values or promises which have already been fulfilled or rejected then the method will settle for the first value in the array:
let p1 = newPromise((resolve, reject) => {
resolve("P1 has been resolved");});
let p2 = newPromise((resolve, reject) => {
resolve("P2 has been resolved");});
let temp = Promise.race([p1,p2]);
temp.then(value =>console.log(value));
![]() Promise.race() method check for both resolved and rejected promises.
This method also has another alternative which is the Promise.any() method which can be used to just check for the fulfilled promises.
Promise.race() method check for both resolved and rejected promises.
This method also has another alternative which is the Promise.any() method which can be used to just check for the fulfilled promises.
Conclusion
Promise.race() method is used to get the first promise that is either fulfilled or rejected from an iterable of promises.
The promise which is fulfilled or rejected the earliest is the return value of Promise.race().
The write-up provided in-depth insight into the Promise.race() method.
JavaScript | Optional chaining
Optional chaining is a fairly new feature to JavaScript introduced by ECMA international.
It is used to check the properties of deep nested objects without having to worry about the property not existing.
It provides a safe way to check for those values without running into errors.
The optional chaining operator returns an undefined value instead of an error, when the reference does not exist.
This feature is not something that you’ll definitely need in your code but can often prove to be very useful.
Optional chaining will work best when you’re not really sure about what the data might actually look like e.g., when working with APIs.
The optional changing operator will continue down the path until it reaches a property value or runs into an error:
let employee = {
firstName:"John",
lastName:"Doe",
Age:34};
console.log(employee.address?.zip);
![]() If we had tried to access the same property value without using the optional chaining operator then we would have received an error:
let employee = {
firstName:"John",
lastName:"Doe",
Age:34};
console.log(employee.address.zip);
If we had tried to access the same property value without using the optional chaining operator then we would have received an error:
let employee = {
firstName:"John",
lastName:"Doe",
Age:34};
console.log(employee.address.zip);
![]()
Optional Chaining on Method Calls
Optional chaining also works on method calls.
You can use optional chaining when you’re not sure whether a method exists within an object.
An example use case is data fetched from an API which may or may not contain certain features depending on the user’s device:
let employee = {
firstName:"John",
lastName:"Doe",
Age:34};
console.log(employee.method?.());
![]() Without optional chaining:
let employee = {
firstName:"John",
lastName:"Doe",
Age:34};
console.log(employee.method());
Without optional chaining:
let employee = {
firstName:"John",
lastName:"Doe",
Age:34};
console.log(employee.method());
![]() The optional chaining operator can also be used multiple times within a single statement to avoid errors.
The optional chaining operator can also be used multiple times within a single statement to avoid errors.
Combining optional chaining with the Nullish coalescing operator
Optional chaining can also be paired with the ?? operator to provide a default value in case the property or the method does not exist:
let employee = {
firstName:"John",
lastName:"Doe",
Age:34};
console.log(employee.method?.() ?? "Function Does Not Exist");
![]() The default value can also be some function call.
The default value can also be some function call.
Optional chaining overuse
Optional chaining was introduced to increase the readability and elegance of code.
It should be used carefully as it can result in silencing of errors.
Overuse of the optional chaining operator may cause problems in your code.
Conclusion
Optional chaining is a recently added feature of JavaScript which can be used to access properties and methods within deep nested JavaScript objects without having to worry about putting in manual checks for existence of those methods and properties.
How to Check if String is Number with Comma
A comma is added to lengthy sentences to increase the readability.
Similarly, a comma is utilized to make a number value easier to read.
For every three decimal places to the left of the decimal point, a comma is utilized.
It is applied to numbers with four or more digits.
JavaScript provides some predefined methods to check if the string is a number with a comma or not.
This study will explain the procedure of checking if a string is a number with a comma.
How to Check if String is Number with Comma?
For verifying the string contains a number with a comma, you can use:
match() method
test() method
Let’s go through the working of these methods.
Method 1: Check if String is Number with Comma Using match() Method
For verifying string is a number having a comma, the predefined method of the JavaScript “match()” can be used.
It takes a pattern as a parameter that matches the string against the pattern and returns a boolean value “true” or “false”.
In our case, we will use this method with a ternary operator (?) that results in the “Yes” or “No” format instead of true and false.
Syntax
Follow the provided syntax to use the match() method:
var.match(pattern)
Here, the passed “pattern” will be matched to the “var” variable with the help of the “match()” method.
Example
In this example, we will create a string of numbers having commas and then verify it using the match() method whether the string has a number with a comma or not:
var Val = "1,56,700";
Now, we will set the pattern, using a regular expression:
var pattern = /^[0-9,]*$/g;
Then, call the match() method with variable “Val” to check if the string Val contains a number with a comma, and output “Yes” or “No”, depending upon the evaluation:
Val.match(pattern) ? "Yes" : "No";
The output shows that the string contains numbers with commas when matched with the pattern:
![]() Let’s have a look at the next method for verifying a string is a number with a comma.
Let’s have a look at the next method for verifying a string is a number with a comma.
Method 2: Check if String is Number with Comma Using test() Method
“test()” is another method that can be utilized for verifying the string is a number with a comma.
It also matches the string based on the pattern and gives the boolean value “true” or “false”; however, it takes a string as an argument.
Syntax
Follow the below-given syntax for verifying string is a number with a comma using the “test()” method:
test(Val);
Example
Here, we will create a string named “Val” that contains numbers with a comma:
var Val = "18,520";
Then, we will set the pattern using the following regular expression:
var pattern = /^[0-9,]*$/g;
Lastly, we will call the test() method by the defined string as an argument:
pattern.test(Val);
The output displayed “true”, which means the string contains numbers with a comma:
![]() We have provided the solution for verifying if the string is a number with a comma.
We have provided the solution for verifying if the string is a number with a comma.
Conclusion
For verifying the string is a number with a comma, use JavaScript predefined methods, including the match() method and test() method.
Both methods utilize the regular expression as a pattern and return the boolean value true if the string matches the particular pattern.
In this study, we have explained the methods for verifying the string is a number with a comma.
How to Check if String Already Exists in Array
JavaScript arrays are utilized for storing values in a single variable.
You can add a list of multiple items in an array.
However, there exists a possibility that duplicate strings are present in an array.
To ensure that an array only contains unique strings, you must check it to see if a string is already present or not.
This approach also improves the searching method in an array.
This article will describe the method to determine whether a string is present in an existing JavaScript array.
How to Check if String Already Exists in Array?
To verify whether the string is already present in the array or not, you can use the different JavaScript methods, including:
indexOf() method
includes() method
for loop
Let’s understand the working of these methods individually.
Method 1: Check if String Already Exists in Array Using indexOf() Method
To check if the string is present in an array or not, you can use the “indexOf()” method.
It gives the index of the element if it is present in the array, else it returns -1.
So, for verification, you can add the “if” condition where, if the index of an element is not equal to -1, it already exists in the array.
Syntax
Follow the below-mentioned syntax to check if the string exists in an array using the indexOf() method:
array.indexOf('element')!==-1;
Here, the indexOf() method will check if the “element” already exists in the “array” or not.
Example
Here, we will create an array of flowers that contain the following elements:
var flowers = ['Rose', 'Lily', 'Jasmin', 'Tulip'];
Now, we will check the index of an element of the array called “Rose”.
If the index of it is equal to -1, it means the specified element does not exist in the array; in the other case, it means it is present in the array:
flowers.indexOf('Rose')!==-1;
The output gives true, which indicates that the “Rose” is present in the array:
![]() Let’s move to the next method!
Let’s move to the next method!
Method 2: Check if String Already Exists in Array Using includes() Method
You can also use the “includes()” method to check if the string already exists in an array or not.
For validation purposes, it is the best method.
It verifies whether a value is present in an array or not.
If an element is present, it returns true; else, it returns false.
Syntax
Use the given syntax of the includes() method to verify whether the “element” string is present in the array or not:
array.includes('element');
Example
Here, we will use the includes() method to determine whether the string “rose” is already present in an array or not, using the includes() method:
flowers.includes('rose');
As the includes() method is a case-sensitive method, so, the output will be given as “false”:
![]() Let’s check another method for verifying if the string is present in an array.
Let’s check another method for verifying if the string is present in an array.
Method 3: Check if String Already Exists in Array Using for Loop
In order to determine whether a string is already present in an array or not, you can use the “for” loop method.
It is the most common method of major programming languages.
Example
Now, we will store the string “Lily” in a variable “matchString”:
var matchString = 'Lily';
Then, we will set a flag “exist” as false, whose value is going to be updated as “true” if the searched element is present in an array:
var exist = false;
Now, we will iterate the entire array till its length and check every element to match the value of “matchString”.
If it matches, the flag’s value will be updated to “true” which indicates that the element is already present in an array:
for (var i = 0; i<=flowers.length; i++) {
if (flowers[i] === matchString) {
exist = true;
break;
}}
The output displayed “true” which means the searched string exist in an array:
![]() We have compiled all best solutions to check if the string is already present in a JavaScript array.
We have compiled all best solutions to check if the string is already present in a JavaScript array.
Conclusion
To verify whether the string is already present in the array, you can use the different JavaScript methods, including the indexOf() method, the includes() method, and for loop.
The includes() method is the most popular method for this purpose.
It outputs true if the string already exists in an array; else returns false while the indexOf() method gives an index if the element exists; else, it outputs the -1.
In this article, we described the methods for verifying whether the string is present in an array or not with examples.
How to Check if a Variable is Null or Empty
In JavaScript, or any other language, when you create a variable, you assign it some values.
However, in the other case, it acts like an undefined variable.
If a variable holds an empty string, it means the variable is “empty” due to its zero length.
In order to indicate the absence of any object value, you can also give a variable the value “null“.
This blog will discuss the methods for determining whether a variable is null or empty.
How to Check if a Variable is Null or Empty?
For verifying whether the variable is null or empty, you can use the following methods:
length property
strict equality (===) with OR (||) operator
Let’s go through the working of these methods individually.
Method 1: Check if a Variable is Null or Empty Using length Property
To verify whether a variable is null or empty, you can use the “length” property, which is the fundamental property of JavaScript.
It is possible to perform self-reflection functions that interact with other functions by using the length property
Syntax
Follow the below-given syntax for the length property:
(val.length==0)
Here, we will check if the length of the variable “val” is zero or not.
Example
In this example, we will create an empty string stored in a variable “val”:
var val = "";
Then, we will use the length property in a conditional statement to check if the length of the variable is 0, representing that it is an empty string:
if(val.length==0){
console.log("variable ‘val’ is empty");}
Execute the above code and see the output:
![]() Let’s move to the next method!
Let’s move to the next method!
Method 2: Check if a Variable is Null or Empty Using strict equality (===) and OR (||) Operator
Another method to verify the variable is null or empty is using the strict equality “===” operator with OR “||” operator.
The strict equality operator checks the two operands of different types and returns a boolean value true if they are the same.
Syntax
You can use the following syntax for checking the variable is null or empty:
if(val===null || val==="")
Example
Here, we will create a variable “val” and assigned a “null” value to it:
var val = null;
Then, we will use the OR operator with strict equality operator in the “if” conditional statement to verify whether the variable is null or empty:
if(val===null || val===""){
console.log("variable is null");}
The output indicates that the variable “val” is null:
![]() We have presented all the methods to check if a variable is null or empty.
We have presented all the methods to check if a variable is null or empty.
Conclusion
For verifying whether the variable is null or empty, you can use the length property of the JavaScript or the strict equality (===) operator with the OR (||) operator.
The length property is mainly used for the empty variables because the empty variables contain 0 lengths while null shows the absence of object value.
In this blog, we have discussed the methods for checking the variable, whether it is null or empty or not.
How to Check if a String is Palindrome
A phrase, number, word, or group of words that can be read the same from backward and forward is known as a palindrome.
In palindromes, if you reverse the number or word, it gives the same output.
For example, “12821” and the word “noon”.
It will be the same if you write or read these examples from the opposite side.
This manual will describe the procedure for checking if the string is a palindrome.
How to Check if a String is a Palindrome?
To verify if a string is a palindrome, you can use the below-listed methods:
Predefined methods
User-defined methods
Let’s understand the working of these methods one by one.
Method 1: Check if a String is a Palindrome Using Predefined Methods
JavaScript provides some predefined methods such as the “split()” method, “reverse()” method, and the “join()” method that you can use for verifying if the string is a palindrome or not.
The string is split into individual array characters using the split() method.
The reverse() method reverses the array position.
Finally, the array’s elements are all combined into a string utilizing the join() method.
Syntax
Follow the given syntax for using predefined methods to verify the string is a palindrome or not:
str.split("").reverse().join("")
Example
In this example, we will create an arrow function to verify the string is a palindrome.
To do so, we will call the split() method to split the array into individual characters, then call the reverse() method to reverse the position of the array, and then finally combine all the elements by calling the join() method.
If the resultant string is equivalent to the original string, it will return “true” means the passed string is palindrome, else it will return “false”:
var isPalindrome = (str) => {
return str === str.split("").reverse().join("");};
Then, we will call the “isPalindrome()” function by passing the string “radar” to verify that the string is palindrome or not:
console.log("The string 'radar' is Palindrome? : " + isPalindrome("radar"));
As you can see, the output returned true, which means the string “radar” is a palindrome:
![]() Let’s head toward the second procedure!
Let’s head toward the second procedure!
Method 2: Check if a String is a Palindrome Using User-defined Methods
Another procedure to check whether a string is a palindrome or not is to create a user-defined method.
In a user-defined method, you can specify your logic with the help of conditional and iterative statements.
Example
First, we will create a function named “palindrome()” that checks whether the string is palindrome or not.
For this purpose, we will first iterate the string in forward and backward directions, then determine whether the character in the forward direction is equal to the character in the backward direction.
If yes then it gives “true”, else “false”:
function palindrome(str){
var l = str.length -1;
for(var i = 0;i < l/2;i++){
var x = str[i] ;
var y = str[l-i];
if(x == y){
return true;
}
}
return false;
}
Now, we will create another function named “isPalindrome()” that will call the “palindrome()” function by passing the string as an argument.
If the function returns true, it will print the message “The string is a palindrome”; else, print “The string is not a palindrome”:
function isPalindrome(str){
var result = palindrome(str);
if(result == true){
console.log("The string is palindrome");}
else
{
console.log("The string is not a palindrome");
}
}
Lastly, we will call the “isPalindrome()” and pass the string “radar” to check if it is a palindrome or not:
isPalindrome("radar");
The output indicates that the string “radar” is a palindrome:
![]() We have provided the procedure to check if a string is a palindrome or not.
We have provided the procedure to check if a string is a palindrome or not.
Conclusion
To check whether the string is a palindrome or not, you can use the predefined methods of JavaScript and the user-defined method.
In the predefined procedure, split(), reverse(), and join() methods are used that return true if the string is a palindrome, else it returns false.
In a user-defined procedure, you can add your own logic with the help of conditional and iterative statements.
In this manual, we described the methods to verify if a string is a palindrome with proper examples.
How to Check if a String is Hex
Hex value is also known as Hexadecimal value.
It is a specific number system that uses 16 alphanumeric symbols, ranging from 0 to 9, including the letters A to F.
In this number system, each value corresponds to the digits 0, 1, 2, 3, 5, 6, 7, 8, 9, A, B, C, D, E, and F.
Hex codes are frequently used in computing applications to compress binary codes.
This manual will describe the procedure to check whether the string is Hex or not.
How to Check if a String is Hex?
For checking whether the string is Hex or not, you can use the predefined JavaScript “match()” method.
This method matches the string with the defined regex pattern.
It accepts the regex pattern or regular expression as a parameter to match the string with a pattern.
If a match is found, it will be returned as an array.
Syntax
Follow the given syntax for the match() method:
String.match(regex)
Here, the match() method will match the “String” value with the defined “regex”.
Example 1: match() Method With Conditional Statement
In this example, we will check whether the string is Hex or not by utilizing the conditional statements.
First, we will create a variable named “input” that contains a string “A46b7F8”:
var input = "A46b7F8";
Then, we will create a regular expression or a regex pattern that is stored in a variable “regex”:
var regex = /[0-9A-Fa-f]{6}/g;
The “g” flag here denotes that every possible match in a string should be checked against the regular expression.
Now, we will check the string against the pattern in a conditional statement.
If the input string matches the regex pattern, it will print the message “String is hex” statement on the console, else it will print “String is not hex”:
if (input.match(regex) ){
console.log ("String is hex");}else{
console.log("String is not hex");}
Output shows that the string has a Hex value:
![]() Example 2: match() Method With Ternary Operator
In this example, we will use the same regex and the input string that is created in the previous example.
However, the match() method will be utilized with the ternary operator.
The ternary operator acts just like a conditional statement as it is a short form of the conditional statement.
It is an ideal approach in terms of code optimization.
The ternary operator requires three parameters, a comparison parameter, a result parameter for true comparisons, and a result parameter for false comparisons.
Here, the resultant value or message will be stored in a variable named “val”:
var val = input.match(regex) ? "String is hex" : "String is not hex";
Finally, print the resultant message that is stored in a variable “val” using the “console.log()” method:
console.log(val);
Output indicates that the input string is hex as it matches the specified pattern:
Example 2: match() Method With Ternary Operator
In this example, we will use the same regex and the input string that is created in the previous example.
However, the match() method will be utilized with the ternary operator.
The ternary operator acts just like a conditional statement as it is a short form of the conditional statement.
It is an ideal approach in terms of code optimization.
The ternary operator requires three parameters, a comparison parameter, a result parameter for true comparisons, and a result parameter for false comparisons.
Here, the resultant value or message will be stored in a variable named “val”:
var val = input.match(regex) ? "String is hex" : "String is not hex";
Finally, print the resultant message that is stored in a variable “val” using the “console.log()” method:
console.log(val);
Output indicates that the input string is hex as it matches the specified pattern:
![]() We have provided the easiest solutions for checking if the string is hex or not.
We have provided the easiest solutions for checking if the string is hex or not.
Conclusion
For verifying whether the string is hex or not, you can use the predefined JavaScript “match()” method.
This method matches the string against the defined regex pattern.
You can apply this method in two different ways with the if condition and ternary operator.
Both work the same; however, the ternary operator is best in terms of code optimization.
This manual discussed the procedure to check whether the string is Hex or not with properly detailed examples.
How to Append Value to an Array JavaScript
In JavaScript, there are multiple methods to add an element to an array.
You can add a single element, multiple elements, or even an entire array to another.
JavaScript also permits you to traverse or modify the arrays using different methods.
The Array.prototype object is the source of all properties and methods.
This article will explain the procedures to append value to an array.
How to Append Value to an Array?
For appending a value to an array, you can use the predefined methods of the JavaScript that are given below:
push() method
unshift() method
splice() method
Let’s understand these methods thoroughly.
Method 1: Append Value to an Array Using push() Method
For appending a value to an array, the “push()” is the most commonly used method.
It simply pushes the element into the array, or we can say that it appends elements at the end of the array.
Syntax
Follow the given syntax:
Array.push("element");
Here, the “element” is going to be pushed in the “Array” with the help of the “push()” method.
Example
First, we will create an array named “flowers”:
let flowers = ["Rose", "Lily", "Jasmine"];
We will print the elements of the created array on the console using the “console.log()” method:
console.log(flowers);
Then, we will add an element “Tulip” in the array “flowers” using the push() method:
flowers.push("Tulip");
Finally, we will print the updated array “flowers” after adding an element in it:
console.log(flowers);
As you can see in the output that the element “Tulip” is successfully added to our array:
![]() If you want to add an element at the start of the array, check out the next section.
If you want to add an element at the start of the array, check out the next section.
Method 2: Append Value to an Array Using unshift() Method
You can also use the “unshift()” method for appending a value to an array.
It appends the value at the start of an array.
Syntax
Use the given syntax for appending a value at the start position of an array using unshift() method:
Array.unshift("element");
Example
We will consider the same array that was created in the previous example named “flowers”.
Now, we will add the element “Tulip” at the start of the array by utilizing the “unshift()” method:
flowers.unshift("Tulip");
Finally, we will print the array “flowers” on the console:
console.log(flowers);
The output indicates that the element “Tulip” is successfully added at the start of the array:
![]() Let’s see the next method to add the element in the middle of the array.
Let’s see the next method to add the element in the middle of the array.
Method 3: Append Value to an Array Using splice() Method
Another method is used to append an element in an array called the “splice()” method.
It adds the element in the array’s middle where you want.
It takes three parameters as an argument.
Syntax
Follow the below-provided syntax for the splice() method:
Arrays.splice(index, deleteCount, "element");
Here, the “index” is the position where a new element should be added, “deleteCount” tells how many elements should be removed, and the “element” is a value that will be added in the array.
Example
Now, we will add the element “Tulip” at the 1st index of an array.
In the following code, “1” is the index of an array where the element will be placed, and the “0” indicates that no elements need to be removed from an array:
flowers.splice(1, 0, "Tulip");
Print the appended array on the console:
console.log(flowers);
You can see in the output that the element “Tulip” is successfully placed at the 1st index of an array:
![]() We gathered all the methods to append a value to an array.
We gathered all the methods to append a value to an array.
Conclusion
For appending a value to an array, you can use the predefined methods of JavaScript, including the push() method, unshift() method, and splice() method.
The unshift() method can be used to insert a new element at the beginning of an array, the push() method can be used to insert a new element at the end, and the splice() method can be used to insert a new element in the middle of the array.
This article explained the procedures to append values to an array.
How to Append One Array to Another Array
Objects that resemble lists and have methods for traversal and modification are called arrays.
A list of data is stored in an array., there are several ways to append an element to an array exist.
You can append a single element, multiple elements, or even an entire array to another array.
This tutorial will illustrate the procedure to append one array to another.
How to Append One Array to Another Array?
To append one array to another, Javascript allows some predefined methods listed below:
concat() method
push() method
spread operator
Let’s examine the working of each method separately.
Method 1: Append One Array to Another Array Using concat() Method
For appending one array to another, you can use the “concat()” method.
It combines the two arrays and returns a new array.
Syntax
You can use the below-given syntax for the concat() method:
array1.concat(array2)
Here, the concat() method will append elements of “array2” to “array1”.
Example
First, we will create two arrays named “array1” and “array2”:
var array1 = [1,11,22,33];var array2 = [111,222];
Now, we will append the elements of array2 to the array1 by using concat() method and store it in a “newArray”:
var newArray = array1.concat(array2);
Lastly, we will print the “newArray” using the “console.log()” method:
console.log(newArray);
The output indicates that we have successfully appended the two arrays:
![]() Let’s move to the next method to append arrays.
Let’s move to the next method to append arrays.
Method 2: Append One Array to Another Array Using push() Method
You can also use the “push()” method, which is another predefined method of JavaScript used for appending two arrays.
It is possible to combine it with the “apply()” method.
There is no need to create a new array for storing appended arrays as the push() method adds the elements to the existing array.
Syntax
Follow the below-given syntax utilizing both apply() and push() methods to append “array2” in “array1”:
array1.push.apply(array1, array2);
Example
In this example, we will use the previously created arrays named “array1” and “array2” and append both arrays using the “push()” method:
array1.push.apply(array1, array2);
Finally, we will print the array1 elements using the “console.log()” method:
console.log(array1);
The output shows that array2 is successfully appended with array1:
![]() Let’s have a look at another method for appending an array to the other array.
Let’s have a look at another method for appending an array to the other array.
Method 3: Append One Array to Another Array Using Spread Operator
You can use one more method of JavaScript called the “Spread” operator.
This operator is denoted as “[…]”.
It creates a third array by combining the components of the first two arrays.
Syntax
For the spread operator, use the below syntax:
[...array1, ...array2];
Example
We will consider the above-created arrays “array1” and “array2” and join them using spread operator:
var newArray = [...array1, ...array2];
Then, print the array “newArray” that stores the resultant array after joining the elements of both arrays:
console.log(newArray);
You can see in the output, the elements of both arrays are now appended:
![]() We gathered simplest methods for appending one array to another.
Note: These methods are efficient for combining small arrays.
If you want to append large arrays, you must create a user-defined method.
We gathered simplest methods for appending one array to another.
Note: These methods are efficient for combining small arrays.
If you want to append large arrays, you must create a user-defined method.
Conclusion
For appending one array to another, you can use the predefined methods of JavaScript, including the concat() method, the push() method, and the spread operator.
All of these predefined methods are efficient for small arrays.
If you want to combine or append a large array, you can create a user-defined method for efficient results.
This tutorial illustrated the procedure for appending one array to another with proper examples.
How to Add Options to Select With JavaScript
In JavaScript, we usually encounter a challenge where we have to include a complex list in which we want to add or edit an option in the case of updates or changes in criteria.
Moreover, having many options and a lack of handling of the categories can cause issues in manual scenarios.
In these scenarios, the provided JavaScript methods of adding new options can rescue you.
This write-up will guide about adding options to select with JavaScript.
How to Add/Insert Options to Select With JavaScript?
We can add options to select with JavaScript using three simple methods:
“document.createElement()” method
“JQuery” Library
“Option()” Constructor
We will now go through each of the mentioned approaches one by one!
Method 1: Add Options to Select With JavaScript Using document.createElement() Method
The “document.createElement()” method creates an element node.
You can also utilize this method to create an additional option in the existing options list.
This functionality will be achieved by including a button that will add the specified option to the list when clicked.
For adding options to select with JavaScript using document.createElement() method, you have to follow the below-given syntax.
Syntax
document.createElement(type)
Here, “type” refers to the type of element which needs to be created.
Look at the following example for understanding of the stated concept.
Example
In the example below, we will assign a specific id, “addoptions” and the size “3”, which refers to the container size in which three options are placed.
Now, we will assign the values of the options named “Python” and “Java”.
After that, add a button with an “onclick” event.
It will work in such a way that when the button is pressed, the function “addOptions()” will be triggered:
<select id= "addoptions" size= "3">
<option value= "Python">Python</option>
<option value= "Java">Java</option>
</select><button type= "button" onclick= "addOptions()">Add New Option</button>
In the next step, we will define the function “addOptions()” and access the specified id of select using the “document.getElementById()” method.
After that, we will create an “option” element for adding a new value in the options list.
Lastly, we will assign a value “JavaScript” to the specific option and add it to the options list using the “add()” method:
<script>function addOptions() {
var x= document.getElementById("addoptions");
var option= document.createElement("option");
option.value= "JavaScript";
option.text= "JavaScript";
x.add(option);}</script>
The output of the above implementation will result as follows:
![]()
Method 2: Add Options to Select With JavaScript Using JQuery
“JQuery” is an essential JavaScript library which makes JavaScript programming simpler.
You can utilize its “append()” method to add an option and assign a specific value to that particular option.
Let’s go through the following example for demonstration.
Example
In the same HTML file, we will now include a jQuery library within the HTML “<script>” tag:
<script src= "https://code.jquery.com/jquery-3.1.0.js"></script>
Next, we will apply the functionalities for adding an option in the options list in a function named “addOptions()”.
Here, we will access the id of select using “#addoptions”, add a new option using “append()” method with the help of the “val()” and “text()” methods:
<script>function addOptions() {
$('#addoptions').append($('').val('JavaScript').text('JavaScript'));}</script>
The resultant output will be:
![]()
Method 3: Add Options to Select With JavaScript Using Option() Constructor
The “Option()” constructor creates a new “HTMLOptionElement”.
It can be utilized for adding a new slot for an additional option named “JavaScript”.
For adding options to select with JavaScript using the Option() Constructor method, you have to follow the below-given syntax.
Syntax
new Option(text, value)
Here, “text” represents the element’s content, and “value” refers to the value of HTMLOptionElement
Example
We will now utilize the “addOptions()” function for getting the select id with the help of the “document.getElementById()” method.
Then, call the “Option()” constructor and place the option value “JavaScript” in it.
After that, the “appendChild()” method will append the specified option value to the end of the list:
<script>function addOptions() {
var x= document.getElementById("addoptions");
var option= new Option("JavaScript");
x.appendChild(option);}</script>
Output
![]() We have provided simplest methods for adding options to select with JavaScript.
We have provided simplest methods for adding options to select with JavaScript.
Conclusion
To add options to select with JavaScript, you can use the “document.createElement()” method for creating an option element and including the specified option value in it or the “JQuery” library or the “Option()” constructor method for adding a new slot for an additional option and appending its value in the options list.
This article guided you about adding options to select with JavaScript.
Go to URL With onclick
In JavaScript programming, there comes a situation where you want to access other websites by a provided link, or it is required to link your content or video with reference to another website.
This approach can be utilized for a better understanding of the stated concept.
Moreover, linking different web pages within a website saves the user’s time and enhances readability.
This blog will guide you about going to URL onclick.
Go to URL using “onclick” Event
To go to URL using onclick event, you can use:
The “window.open()” method.
The “window.location” object method.
We will now go through each of the mentioned methods one by one!
Method 1: Go to URL With onclick Using window.open() Method
In JavaScript, the “window.open()” method is used for opening a new browser window.
You can also utilize this method to go to a specified URL using the button “onclick” event.
Syntax
window.open(url, windowName, specs);
Here, “url” refers to the website link, “windowName” is the name of the window, and “specs” refers to the comma-separated list of items.
Look at the below-given example.
Example
In the example below, we will add a button and specify its “onclick” event in such a way that when the button is clicked, the onclick event will access the function “openGoogleByMethod()”:
<body> <button type= "button" id= "btn" onclick= "openGoogleByMethod()">Open Google</button></body>
Now, we will define a function “openGoogleByMethod()” and use the “window.open()” method and pass the “URL” of the “Google” site in it as an argument.
This will result in opening the specified site in a new tab:
<script>
function openGoogleByMethod(){
window.open("https://www.google.com")
}</script>
The output of the above implementation will result in:
![]()
Method 2: Go to URL With onclick Using window.location() Method
The “window.location()” method can be used to fetch the current page (“URL”) and then redirect the browser to a new page address.
You can also utilize this method to access the specified URL using the “location” object.
Let’s go through the following example for better understanding:
Example
In our JavaScript, we will apply the “window.location()” method, where the “location” object will contain the information on the current location, which is “Google” in this case.
The “window.location.href” property will then return the URL of the page specified in the window.location:
<script>
function openGoogleByMethod(){
window.location("https://www.google.com");
window.location.href = "https://www.google.com";}</script>
Execution of the above-given code will result in the following output:
![]() We have provided all the simplest methods to go to the URL by applying onclick.
We have provided all the simplest methods to go to the URL by applying onclick.
Conclusion
In JavaScript, to go to URL with onclick, you can use the “window.open()” method to open the window with the specified “URL” or apply the “window.location” object method to specify the location of the specified URL and the “window.location.href” property to return the URL of the specified page.
This article has explained the methods to go to the URL using onclick.
What is External JavaScript?
External JavaScript is simply writing the JavaScript part of the HTML webpage in a separate file and then linking that file using the “src” attribute of the <script> tag.
Thus, the word “external” as the JavaScript is placed inside a file that is not part of the original HTML document.
Alternatively, when the JavaScript part of a web page is written inside the same HTML document, inside the script tag, it is known as the Internal JavaScript.
To display the working of an external JavaScript, simply create a “.js” file and type the following lines inside that file:
function showAlert() {
alert("This Alert Is Written In External JavaScript");}
For this example, the JavaScript file name is “script.js”.
Now, create a new HTML document, and in that HTML file, use a script tag to define the type of the script that is going to be used and then the link to the script file as:
<head> <script type="text/JavaScript" src="script.js"></script></head>
This script tag for the external JavaScript can be placed in both the <head> tag and in the <body> tag, both have their own pros and cons.
After this, in the body tag, add the following lines:
<body><center>
<button onclick="showAlert()">Click for Alert</button></center></body>
Fire up the HTML document and observe the following output:
![]() Now press the button for the alert using the function written in the external JavaScript:
Now press the button for the alert using the function written in the external JavaScript:
![]() It is clear from the screenshot above that the external JavaScript works perfectly fine.
It is clear from the screenshot above that the external JavaScript works perfectly fine.
Why use External JavaScript?
There are multiple reasons why one should use external JavaScript such as:
External JavaScript provides the facility to be used by multiple HTML documents, thus creating the reusability within multiple files
External JavaScript is often cached in the browser’s memory, thus speeding up the processes of revisiting an HTML document
Usage of external JavaScript can organize the code in a much better way than a regular Internal JavaScript
External JavaScript provides the concept of exports and import which the programmer can use to optimize the HTML document by limiting it to only load some aspects from the JavaScript code instead of the complete JavaScript file.
External JavaScript is far superior to internal JavaScript, especially when working with large-scale applications.
The Drawbacks of External JavaScript
There is only one major drawback of using external JavaScript: the browser has to make an additional request to the server for the JavaScript file.
Other than this, there aren’t many significant drawbacks to external JavaScript.
Wrap up
Whenever the JavaScript part of a website or a web application is placed in a different file than the HTML and then linked inside the HTML document, it is known as External JavaScript.
To use external JavaScript, create a file with the “.js” extension.
After that, create a script tag in the HTML document and pass the path to that JavaScript file in the “src” attribute of the <script> tag.
Operator Precedence
The word precedence means to give something priority as compared to other ones based on order, rank, and importance.
Similarly, operator precedence refers to the order of arithmetic operators that are prioritized.
In the guide, operator precedence is demonstrated with practical implementation.
The following learning outcomes are expected:
How Operator Precedence Works?
Operator Precedence in Grouping Expressions
Operator Precedence in Complex Mathematical Expressions
Operator Precedence in Similar Category of Operators
How Operator Precedence Works?
The operator precedence works in such a way that it evaluates the higher precedence operator first.
After that, the evaluation of lower precedence is performed.
Most of the time, you would have observed multiple additions (+), subtraction (-), and expression grouping ( ) in a mathematical expression.
These expressions are evaluated based on the precedence of the operators being used.
Table of Operator Precedence
JavaScript comprises operator precedence in ascending order including, First, Second, Third etc.
The following table presents the “Precedence Order”, “Operators”, “Description”, and “Associativity”.
Let’s look at the table and describes the above-stated terms:
In the table, the columns details are as follows:
Precedence Order: Prioritizes the operators to execute in order as “First”, “Second”, “Third”, “Fourth”, “Fifth”, “Sixth”.
The “First” specifies the highest priority for execution as compared to “Second”, “Third”, and so on.
Operators: Shows the operators being used.
Description: The expression grouping specifies brackets () to give highest priority, increment performs addition to operands, decrement subtracts the operands, etc.
Associativity: Associativity means the execution of operator of same precedence.
The “Left to Right” specifies the execution of specified operator from left side to right side.
While the “Right to Left” works same working as “Left to Right” but in opposite direction.
| Precedence Order |
Operators |
Description |
Associativity |
| First |
() |
Expression Grouping |
Left to Right |
| First |
++ |
Increment |
Right to Left |
| First |
– |
Decrement |
Right to Left |
| First |
! |
Not Operator |
Right to Left |
| Second |
* |
Multiplication |
Left to Right |
| Second |
/ |
Division |
Left to Right |
| Second |
** |
Exponential |
Right to Left |
| Second |
% |
Modulus |
Left to Right |
| Third |
+ |
Addition |
Left to Right |
| Third |
– |
Subtraction |
Left to Right |
| Third |
+ |
Concatenation |
Left to Right |
| Forth |
< |
Less than |
Left to Right |
| Forth |
<= |
Less than or Equal |
Left to Right |
| Forth |
> |
Greater than |
Left to Right |
| Forth |
>= |
Greater than or Equal |
Left to Right |
| Fifth |
== |
Equal |
Left to Right
|
| Fifth |
!= |
Not Equal |
Left to Right
|
| Sixth |
&& |
AND |
Left to Right
|
| Sixth |
|| |
OR |
Left to Right
|
| Seventh |
= |
Assignment |
Right to Left |
Example 1: Operator Precedence in Grouping Expressions
An example is adapted that briefly explains the expression grouping in operator precedence.
var a = 10 * (5 + 5) / 2
The above code computes the operation of expression grouping first, which is present in the parentheses.
After that, the result of this operator precedence is multiplied by 10 by following the associativity rule.
In the end, the outcome is extracted to divide the previous result by 2.
Example 2: Operator Precedence in Complex Mathematical Expressions
In this section, a mathematical expression is adapted and explains the sequence of execution of different operator precedence.
var e = 10*(4+18)/15(18-10)*23
In this code:
Firstly, the parentheses operator precedence is executed (4+18) and (18-10).
After that, the output of 4 + 18 = 22 is multiplied by 10 and returns the value of 220.
Furthermore, the output return from (18 – 10) is 8.
It was multiplied by 15 and returned the value of 120.
Finally, the 220 value is divided by 120 and returns the 83 value, which is multiplied by 23 and extracts the final output of 42.09.
Example 3: Operator Precedence in Similar Category of Operators
If both the operator precedence has the same category, like addition and subtraction then the associativity comes into practice and the calculation will be done from left to right:
var g = 2 - 2 + 4
For this instance, JavaScript computes the arithmetic operations from left to right.
Therefore, the execution is performed first 2 – 2; after that, the output is added with the number 4.
So, the result is 0 + 4 = 4.
That’s it! You have learned the working and usage of various operators.
Conclusion
In JavaScript, the operator precedence determines the priority of the operators in any operation.
It computes and prioritizes the highest precedence compared with the other operators.
It is very useful for resolving problems in complex mathematical expressions and computer programming.
In this post, the usage of operator precedence is explained.
Furthermore, a comprehensive table and different examples of operator precedence are explained by utilizing JavaScript.
Introduction to Redux
You have come here to learn about Redux; it seems like you are learning about front-end development, or you eagerly want yourself to excel.
This article will cover the following points, so make sure you stay with us until the end to learn about Redux.
What is Redux?
What are the advantages of using Redux?
Where can we use Redux?
What are the building components of Redux?
How to get started with the Redux?
So let us dive into the introduction of Redux first.
What is Redux?
Re means concerning, and dux means leader.
So as the name suggests, Redux is one of the limelight and hottest libraries leading the world in the current time concerning the front-end domain.
It belongs to the set of JavaScript libraries.
The specialty of the redux is that it is a predictable state container that helps to manage the application’s state.
Now, as we know the basic concept of Redux, let us see the benefits that come with the use of Redux.
What are the advantages of using Redux?
Some of the benefits that Redux provides in our applications are as follows:
Using Redux in applications enhances the state prediction factor that provides an ease to developers
Redux provides high-level maintainability to the applications.
The maintenance elements that come with the redux make the application easy to test and debug
Employing Redux helps to optimize the performance of large applications.
Redux also proved to be one of the most valuable and practical libraries for server-side rendering
So, we know what Redux is and why we should use it.
Now the question arises of where we can use Redux.
Where can we use Redux?
Redux offers a unique mechanism to integrate it with several frameworks or platforms, especially with React and React-Native, but not limited.
It can also be indulged in Angular, Angular Js, and Mithril.
If you have reached here, we assume you have gone through the above-mentioned basic introduction of Redux.
Hold on; there is still much more left about Redux that you should know for a better introduction.
Now let us learn about the components of Redux, what they are, and how they work together.
What are the building components of Redux?
Redux is a container that holds the following components in it”:
![]() The above figure depicts how a Redux works in an application.
It takes the event or action from the user interface and passes it on to the reducer.
The reducer takes the current state, applies this event or action, and passes a new state as an output.
This output state then gets saved into the store of the application.
Now we are done with introducing the Redux, its benefits, and its internal components.
Don’t you think we should try a simple coding exercise for it?
The above figure depicts how a Redux works in an application.
It takes the event or action from the user interface and passes it on to the reducer.
The reducer takes the current state, applies this event or action, and passes a new state as an output.
This output state then gets saved into the store of the application.
Now we are done with introducing the Redux, its benefits, and its internal components.
Don’t you think we should try a simple coding exercise for it?
Conclusion
Redux is utilized to optimize the performance of large applications.
This article demonstrates the introduction of Redux, advantages, usage and building components of Redux.
It is useful to make the application easy to test and debug.
Hence, you have experienced the knowledge of Redux which contains the libraries of JavaScript.
How to Zoom-in and Zoom-out Image Using JavaScript?
JavaScript can be used to manipulate an HTML element’s style property to create a zoom-in and zoom-out effect.
To do this, simply access the width attribute using the style property and increase it or decrease it according to the requirement.
To access this style property of an HTML element, a reference to the HTML element must be created and stored inside a variable of JavaScript.
Let’s go over the step-by-step procedure for achieving the task at hand.
Step 1: Setting up the HTML Document
Start by creating a new HTML document with the following lines inside it:
<center><img id="pic" src="pic.png" /><button onclick="zoomIn()">Zoom-In</button><button onclick="zoomOut()">Zoom-Out</button></center>
In the above lines:
First a new image element is being created with the local url for a picture that will be displayed on the HTML document.
The image element has the id set to “pic” so that JavaScript can reference it.
After that, create a new button, “Zoom-In”, with the onclick property that will search for the function zoomIn() in the script file or in the script tag.
After that, create a new button, “Zoom-Out”, which has been created with the onclick property that will search for the function zoomOut() in the script file or in the script tag.
Running the HTML document at this point will yield the following output on the browser:
![]() Step 2: Adding Functionality Using JavaScript
In the second step, either create a script tag in the same HTML document or create a new JavaScript file and link it to the HTML document.
No matter the case, the first thing is to create the function for the zoom-in button with the following lines of code:
function zoomIn() {
var pic = document.getElementById("pic");
var width = pic.clientWidth;
pic.style.width = width + 100 + "px";}
In the above code snippet:
Function zoomIn() has been created which will be called every time the Zoom-In button is clicked.
Inside the function, the first step is to get the reference of the image element by using its ID and store it inside the variable “pic”.
After that, get the current width of the image element by using the clientWidth attribute.
And then access the style property and the width attribute within the style property and increase its value by adding some pixels in the current width of the image.
This will mimic a zoom-in effect on the image every time the zoom-in button is clicked.
After that, create the function for the Zoom-Out button using the following lines:
function zoomOut() {
var pic = document.getElementById("pic");
var width = pic.clientWidth;
pic.style.width = width - 100 + "px";}
In the above code snippet:
Function zoomOut() has been created which will be called every time the Zoom-Out button is clicked.
Inside the function, the first step is to get the reference of the image element by using its ID and store it inside the variable “pic”.
After that, get the current width of the image element by using the clientWidth attribute and store it inside the “width” variable.
And then access the style property and the width attribute within the style property and decrease its value by removing some pixels from the current width of the image element.
This will mimic a zoom-out effect on the image every time the zoom-out button is pressed.
Step 3: Testing the Functionality
The last step to run the HTML document and observe the working of the HTML document to be as:
Step 2: Adding Functionality Using JavaScript
In the second step, either create a script tag in the same HTML document or create a new JavaScript file and link it to the HTML document.
No matter the case, the first thing is to create the function for the zoom-in button with the following lines of code:
function zoomIn() {
var pic = document.getElementById("pic");
var width = pic.clientWidth;
pic.style.width = width + 100 + "px";}
In the above code snippet:
Function zoomIn() has been created which will be called every time the Zoom-In button is clicked.
Inside the function, the first step is to get the reference of the image element by using its ID and store it inside the variable “pic”.
After that, get the current width of the image element by using the clientWidth attribute.
And then access the style property and the width attribute within the style property and increase its value by adding some pixels in the current width of the image.
This will mimic a zoom-in effect on the image every time the zoom-in button is clicked.
After that, create the function for the Zoom-Out button using the following lines:
function zoomOut() {
var pic = document.getElementById("pic");
var width = pic.clientWidth;
pic.style.width = width - 100 + "px";}
In the above code snippet:
Function zoomOut() has been created which will be called every time the Zoom-Out button is clicked.
Inside the function, the first step is to get the reference of the image element by using its ID and store it inside the variable “pic”.
After that, get the current width of the image element by using the clientWidth attribute and store it inside the “width” variable.
And then access the style property and the width attribute within the style property and decrease its value by removing some pixels from the current width of the image element.
This will mimic a zoom-out effect on the image every time the zoom-out button is pressed.
Step 3: Testing the Functionality
The last step to run the HTML document and observe the working of the HTML document to be as:
![]() As it is clear from the gif above that the zoom-in and the zoom-out button are working perfectly as intended.
As it is clear from the gif above that the zoom-in and the zoom-out button are working perfectly as intended.
Wrap up
It is quite easy to mimic a zoom-in and a zoom-out effect on an image element with the help of JavaScript.
After the HTML document is all set-up, go into the JavaScript file and access the width property of the image.
And then change the value of that width property according to the button that has been pressed by the user.
How to Trigger a File Download When Clicking an HTML Button or JavaScript?
JavaScript is a scripting-based language and integrates with HTML for interactive web interfaces.
It facilitates various features, such as a drop menu, pop-up alert messages, and trigger files for downloads.
In this post, you will learn about triggering a download file by clicking an HTML button as well as JavaScript code.
Additionally, this post serves the following outcomes:
How to Trigger a File Download When Clicking an HTML Button
How to Trigger a File Download Using JavaScript
Method 1: How to Trigger a File Download by Clicking an HTML Button?
This method is adapted to trigger a file download by pressing the HTML button.
The following syntax will serve the purpose of downloading a file by clicking an HTML button:
Syntax
<input type="button" value="Download"> <button></button>
You need to utilize the <input> tag to create an HTML button and set its value to “Download”.
The value is a user-defined attribute and can be set as per the user’s wish.
Example
In this example, an HTML button is used to trigger a download file.
The code is as follows:
Code
<p>
Trigger a file download using the HTML button</p><button type="submit" onclick="window.open('computer.jpg')">Download</button>
The script executes in the test.html file.
The description is listed below:
Firstly, <p> is used to display a message with a paragraph tag.
After that, the tag <button> is employed to display a button in a Web browser.
In the end, the onclick keyword is utilized to pop up a new window when a user clicks on a button.
![]() Output
Output
![]() After clicking the button “Download”, the user can download “computer.jpg”.
Method 2: How to Trigger a File Download Using JavaScript?Another method is adapted to download a file by utilizing JavaScript.
The download() method is utilized to download a file by pressing the button.
The code for this objective is given below.
Code
<html><body><center><h2>How to trigger a download file when
clicking an HTML button or JavaScript?</h2><textarea id="text">
Welcome to JavaScript World</textarea><br/><input type="button" id="specialBtn"value="Download" /></center><script>function download(f, t) {
var e = document.createElement('a');
e.setAttribute('href','data:text/plain;charset=utf-8, '
+ encodeURIComponent(t));
e.setAttribute('download', f);
document.body.appendChild(e);
e.click();
document.body.removeChild(e);}
document.getElementById("specialBtn")
.addEventListener("click", function() {
var t = document.getElementById("text").value;
var f = "JavaScript.txt";
download(f, t);}, false);</script></body></html>
The description of the code is listed here:
Firstly, a message is displayed by utilizing the <h2>tags.
After that, <textarea> is utilized to allocate a text area for input from the user.
Furthermore, a button is used to download the file by pressing it.
The addeventListener() is utilized to trigger an event and download a JavaScript.txt file.
Output:
After clicking the button “Download”, the user can download “computer.jpg”.
Method 2: How to Trigger a File Download Using JavaScript?Another method is adapted to download a file by utilizing JavaScript.
The download() method is utilized to download a file by pressing the button.
The code for this objective is given below.
Code
<html><body><center><h2>How to trigger a download file when
clicking an HTML button or JavaScript?</h2><textarea id="text">
Welcome to JavaScript World</textarea><br/><input type="button" id="specialBtn"value="Download" /></center><script>function download(f, t) {
var e = document.createElement('a');
e.setAttribute('href','data:text/plain;charset=utf-8, '
+ encodeURIComponent(t));
e.setAttribute('download', f);
document.body.appendChild(e);
e.click();
document.body.removeChild(e);}
document.getElementById("specialBtn")
.addEventListener("click", function() {
var t = document.getElementById("text").value;
var f = "JavaScript.txt";
download(f, t);}, false);</script></body></html>
The description of the code is listed here:
Firstly, a message is displayed by utilizing the <h2>tags.
After that, <textarea> is utilized to allocate a text area for input from the user.
Furthermore, a button is used to download the file by pressing it.
The addeventListener() is utilized to trigger an event and download a JavaScript.txt file.
Output:
![]() The output returns a text area with a “Download” button.
After pressing the button, it triggers a JavaScript.txt file for downloading.
The output returns a text area with a “Download” button.
After pressing the button, it triggers a JavaScript.txt file for downloading.
Conclusion
Two methods are adapted to trigger a file download by utilizing the HTML button and JavaScript.
In the first method, the HTML button is associated with its onclick event to download the file by specifying the location of the file.
In the second method, JavaScript code is utilized to take input from the user and download the file.
Moreover, practical implementation is also given for downloading files by utilizing the HTML button and JavaScript.
How to Splice String
String Splicing is a technique used in the case of complex string arrays where we need to fetch a specific string value and update or change it.
Moreover, it also gives us more flexibility to work on string data, as indexing only assists in a single character extraction.
In the other case, with splicing, a sequence of characters or substring can be accessed and updated from the start to the end indexes.
Additionally, developers also utilize the mentioned techniques to break the strings for security reasons, such as checking if the string contains any incorrect characters or some sort of malicious code.
This write-up will guide you about Splicing String.
How to Splice String?
To Splice String, you can use:
“split()” method
“spread(…)” operator
We will now go through each of the methods one by one!
Method 1: Splice String Using split() Method
In JavaScript, the “split()” method is used to split a specific string into an array of strings.
This method accepts a pattern as an argument and divides the string into an ordered list of substrings utilized for searching patterns, then adds them up in an array and returns it.
Syntax
string.split(separator, limit)
Here, “separator” refers to spaces, commas, and “limit” is an integer value that limits the number of splits.
Look at the below-given example.
Example
First, we will declare a function named “spliceString()” having arguments “str”, “index”, “count”, and “add”.
Now, we will add functionality to split the string into spaces by placing empty double quotes as a separator.
Then, we will splice the string with respect to the function arguments and then join the split string values into a string value with “join()” method:
function spliceString(str, index, count, add) {
var array= str.split("");
array.splice(index, count, add);return array.join("");}
Finally, we will call the function with a string value.
Here, “7” refers to the string’s index value, that is “C”; in this case, “9” refers to “count”, as the length of the characters at that specific index, and “string” refers to “add” which is the new value which will replace the “Character”:
console.log(spliceString('Splice Character', 7, 9, "string"));
The corresponding output will be:
![]()
Method 2: Splice String Using spread(…) Operator Method
In JavaScript, the “spread(…)” operator helps in quickly copying part of an existing array or the whole array into another array.
It gets an iterable as an argument and spreads it into individual elements.
Syntax
To use the “spread() operator” method for splicing the String, you have to follow the below-given syntax:
var a = [...value];
Here, “…” is the spread operator which will spread the given “value” in the “a” variable.
Example
Firstly, we will store a string value in a variable named “str”:
var str= "Splice Character";
Now, we will apply the “spread(…)” operator and convert the defined string value stored in the created” into an array:
var array[...
str];
Next, we will replace the current value with the new value “string” by splicing it with “7” and “9” which are allocated as arguments.
Here, “7” refers to the index of the string value to be replaced, and “9” is the length of the string value “Character”, which will now be replaced by “string” value.
array.splice(7, 9,'string');
Join an array of strings into a single string using “join()” method, and then we will display the updated string value:
array= array.join('');
console.log(array);
Execution of the above-given code will result in the following output:
![]() We have provided all the simplest methods to Splice a String.
You can utilize either of any methods according to your requirements.
We have provided all the simplest methods to Splice a String.
You can utilize either of any methods according to your requirements.
Conclusion
To Splice String, you can use the “split()” method for splitting the string into an array of strings and updating the current string value by placing different arguments which will access the current string value and replace it with the updated one.
The “spread(…)” operator can also be utilized for converting a string value into an array and splicing it to update the current string value and then joining the array of substrings into a string.
This write-up explained the methods to Splice String.
How to Download a File Using JavaScript/jQuery?
JavaScript or jQuery can easily be used to cause a file download upon pressing a button or pressing a <a> tag link.
To do this, simply use the “location.href” property of the “window” object and set it equal to the path of the file on the server, which will be downloaded on the client’s machine.
To understand this better, follow the examples given below.
Example 1: Using Vanilla JS and <button> tag
For this example, the script part would be written in normal JavaScript, and a button press would cause the client’s machine to download the intended file.
Step 1: Set up the HTML Document
Start by creating a new HTML document named “home”, and then add the following lines inside that HTML document:
<center><p>Click the button below to download the file!</p><button onclick="downloadFile()">Download File</button></center>
Adding the above lines within the <body> tag of the HTML element would result in the following outcome inside the browser:
![]() From the lines that have been added into the HTML document, it can be easily noticed that the “onclick” property of the button has been set to the function “downloadFile()”.
Let’s create that function in the next step
From the lines that have been added into the HTML document, it can be easily noticed that the “onclick” property of the button has been set to the function “downloadFile()”.
Let’s create that function in the next step
Step 2: JavaScript Part
Either within the script tag or in the linked JavaScript file, add the following lines of code to add the functionality to the button:
<script>
function downloadFile() {
window.location.href = "Demo.docx";}</script>
Here, the window.location.href property has been set to the path of the file that is to be downloaded by the client’s machine.
Since only the name of the file has been used as the path to the file, this means that the file is placed inside the same folder as the HTML document:
![]() Anyhow, this would cause the browser to download the file.
Anyhow, this would cause the browser to download the file.
Step 3: Testing
At the end, fire up the HTML document and click on the button and observe that the browser will instantly start downloading the file like:
![]() As it is clear from the gif above that the whole webpage is working perfectly as intended.
As it is clear from the gif above that the whole webpage is working perfectly as intended.
Example 2: Using jQuery and <a> tag
For this example, the script part would be written in jQuery, and a <a> tag link would cause the browser to start the download of the intended file.
Step 1: Set up the HTML Document
Just like the first example, create a new HTML document named “home” and then add in the following lines inside that HTML document:
<center><p>Click the button below to download the file!</p><a id="download" href="#">Click Here!</a></center>
Now, in this example, an <a> tag with the id “download” is being used instead of a button.
Running this HTML document will yield the following results on the webpage:
![]() Next up is to add some jQuery to download the file every time the link is clicked.
Next up is to add some jQuery to download the file every time the link is clicked.
Step 2: jQuery Code
In the script tag or in the script file, add the following lines:
$(document).ready(function () {
$("#download").click(function (e) {
e.preventDefault();
window.location.href = "Demo.docx";});});
In the above lines:
A function is being called once the document is fully ready
Within that function, a constant check has been applied on the element with the id “download” which is actually the <a> tag and the check is of a “click” event
After that, simply access the location.href attribute to the file path.
Step 3: Testing
Fire up the HTML document and click the link and observe the result response to be like this:
![]() The clickable link is causing the client’s machine to download the intended file using jQuery
The clickable link is causing the client’s machine to download the intended file using jQuery
Wrap up
To use JavaScript or jQuery to cause the client’s machine to download a specific file, simply access the href attribute of the window object’s location property and set it equal to the complete path of the file on the server.
By using this way, it is easy to create a button that will cause the file to be downloaded.
And also, a clickable link to cause the file to download.
Anyhow, the procedure has been explained thoroughly in the above examples.
How to Create Counters
In JavaScript, counters are primarily utilized for displaying the values starting from “0” and ending at a specific number.
These are also used by many websites for making a web page more attractive.
Moreover, counters also become useful in the case of counting over a specified time interval for using dashboards in the application.
How to Use Counters?
To create counters, you can use:
“for” loop
“Math.random()” method
We will now go through each of the mentioned approaches one by one!
Method 1: Create Counters Using for loop
In JavaScript, the “for” loop can be used to implement the counters.
This method can be implemented by taking a counter “stop” limit from the user as an integer and performing the iteration from zero to that number.
Here is an example for the demonstration.
Example
First, we will ask the user to enter the counter’s stop limit via pop-up:
a= prompt('Where do you want your counter to stop?')
Next, we will apply a “for” loop for iterating a loop till it reaches the counter’s stop limit entered by the user.
Then, display all the corresponding timer values:
for(let count =0; count<=a; count+=1){
console.log(count);}
Input Value
![]() Output
Output
![]()
Method 2: Create Counters Using Math.random() Method
This method is applied to generate a random value in each iteration using the “Math.random()” and convert the resultant floating-point number into an integer with the help of the “Math.floor()” method.
Syntax
Math.floor(Math.random() * (number));
Here, “number” represents the counter stop limit.
Look at the below-given example.
Example
First, we will define a function “value()” where we will initialize the “count” to “0”.
Then, assign the random values to the “randomNo” variable via “Math.random()”.
As a result, a decimal number will be returned between 0 and 1 and convert the resultant floating-point values into integers using the “Math.floor()” method.
Next, we will include a condition in the while condition, which will execute until the generated does not equal “5”.
In each iteration, a new random number will be generated, and the value of the counter will be updated:
functionvalue(){
let count = 0;
let randomNo = Math.floor(Math.random());
while(randomNo != 5){
randomNo = Math.floor(Math.random() * (10));
count += 1;
}
returncount;}
Finally, we will display the random value generated by calling the function “value()”:
console.log("Counter value is", value());
Output
![]() Now, upon executing the same code, we will get another random value:
Now, upon executing the same code, we will get another random value:
![]() We have provided the easiest methods for creating and using counters.
We have provided the easiest methods for creating and using counters.
Conclusion
You can create counters by applying the “for” loop for iterating the counters till their assigned stop limit or the “Math.random()” method for randomly displaying the counter’s value.
This article guided about creating counters using the specified methods with the help of the examples.
How to check if an array includes an object?
In most higher-level programming languages, arrays come with built-in methods which can be used to access and manipulate data present inside arrays.
JavaScript also has such methods which will be the topic of this article.
Specifically, the methods which can be used to check if an object with a particular property/value is present inside an array.
JavaScript offers many methods whose functionality can be used to check for objects inside arrays.
We’ll look at most of them in great detail:
arr.some() Method
The some() method takes a function as an argument which checks if any element of the array contains a specific property value.
If that property value is found then the method returns true:
let employees = [{firstName:"John", lastName:"Doe", age:39}, {firstName:"Adam", lastName:"Smith", age:40}];
let found = employees.some(obj => {if (obj.age == 40) {
returntrue;
}
returnfalse;});
console.log(found);
![]() Else it returns false:
let employees = [{firstName:"John", lastName:"Doe", age:39}, {firstName:"Adam", lastName:"Smith", age:40}];
let found = employees.some(obj => {if (obj.age == 55) {
returntrue;
}
returnfalse;});
console.log(found);
Else it returns false:
let employees = [{firstName:"John", lastName:"Doe", age:39}, {firstName:"Adam", lastName:"Smith", age:40}];
let found = employees.some(obj => {if (obj.age == 55) {
returntrue;
}
returnfalse;});
console.log(found);
![]()
arr.includes() Method
The includes method takes an object as an argument and returns true if it is present inside an array:
let emp1 = {firstName:"John", lastName:"Doe", age:39};
let emp2 = {firstName:"Adam", lastName:"Smith", age:40};
let employees = [emp1, emp2];
let found = employees.includes(emp1);
console.log(found);
![]() It is important to note that the argument object and the object inside the array should be the same.
Different objects with same values will return false:
let employees = [{firstName:"John", lastName:"Doe", age:39}, {firstName:"Adam", lastName:"Smith", age:40}];
let found = employees.includes({firstName:"Adam", lastName:"Smith", age:40});
console.log(found);
It is important to note that the argument object and the object inside the array should be the same.
Different objects with same values will return false:
let employees = [{firstName:"John", lastName:"Doe", age:39}, {firstName:"Adam", lastName:"Smith", age:40}];
let found = employees.includes({firstName:"Adam", lastName:"Smith", age:40});
console.log(found);
![]()
arr.find() Method
The find() method is similar to the some() as it checks for specific property values but if found, it returns the object instead of true value:
let employees = [{firstName:"John", lastName:"Doe", age:39}, {firstName:"Adam", lastName:"Smith", age:40}];
let found = employees.find(obj => {if (obj.age == 40) {
returntrue;
}
returnfalse;});
console.log(found);
![]() If the object is not present then the find() method returns undefined:
let employees = [{firstName:"John", lastName:"Doe", age:39}, {firstName:"Adam", lastName:"Smith", age:40}];
let found = employees.find(obj => {if (obj.age == 28) {
returntrue;
}
returnfalse;});
console.log(found);
If the object is not present then the find() method returns undefined:
let employees = [{firstName:"John", lastName:"Doe", age:39}, {firstName:"Adam", lastName:"Smith", age:40}];
let found = employees.find(obj => {if (obj.age == 28) {
returntrue;
}
returnfalse;});
console.log(found);
![]()
arr.filter() Method
The filter() method can be applied on an array to get a list of all the objects that pass certain conditions:
let employees = [{firstName:"John", lastName:"Doe", age:39}, {firstName:"Adam", lastName:"Smith", age:40}];
let found = employees.filter(obj => {if (obj.age == 40) {
returntrue;
}
returnfalse;});
console.log(found);
![]()
arr.findIndex() Method
The findIndex() method will check for specific property value and return the index of the found object:
let employees = [{firstName:"John", lastName:"Doe", age:39}, {firstName:"Adam", lastName:"Smith", age:40}];
let found = employees.findIndex(obj => {if (obj.age == 40) {
returntrue;
}
returnfalse;});
console.log(found);
![]() If the object is not found then it returns -1:
let employees = [{firstName:"John", lastName:"Doe", age:39}, {firstName:"Adam", lastName:"Smith", age:40}];
let found = employees.findIndex(obj => {if (obj.age == 99) {
returntrue;
}
returnfalse;});
console.log(found);
If the object is not found then it returns -1:
let employees = [{firstName:"John", lastName:"Doe", age:39}, {firstName:"Adam", lastName:"Smith", age:40}];
let found = employees.findIndex(obj => {if (obj.age == 99) {
returntrue;
}
returnfalse;});
console.log(found);
![]()
Conclusion
In this write-up we went over several ways of checking if an array contains an object.
All of these methods have a few differences in how they work.
These differences were mentioned and comprehensively discussed in the post above.
How to Remove Element by Id using JavaScript
There are several functionalities that JavaScript supplies to a website in order to make it interactive.
One of the most basic features that JavaScript provides is to remove a node or an element from a web page.
This article will follow the below given steps of removing an element from a web page.
getElementsById method
remove() method
removing child nodes or elements
What is getElementsById Method?
getElementsById, as the name suggests, is a JavaScript method that is used to retrieve a specific Id of an element and return it to a variable.
This returned element value can be utilized in performing various tasks.
Syntax
![]() Next, we’ll take a look at the built-in remove() method to find out how it can be used to remove elements by Id.
Next, we’ll take a look at the built-in remove() method to find out how it can be used to remove elements by Id.
The remove() Method
The remove() method helps in removing an element or a node.
It does not take any parameters or returns any value.
As we have seen the purpose of both the getElementsByID method and the remove method.
Now, we’ll take a look at a simple code snippet that will delete an HTML element from a web page:
HTML
<html><body><h2> Remove the text </h2><h1 id="mySelect"> This text will be removed when you click the button </h1><button onclick="myRemoveFunction()">Remove selected fruit</button></body></html>
In the above code snippet, a simple text is provided in <h1> and <h2> HTML element tag along with a button.
Once the button is clicked the text inside the <h1> tag will be removed from the webpage.
Save and run the code, the output of the above snippet is similar to that shown below.
![]() Now, a JavaScript code should be added behind the button so that when the button gets clicked, the desired results can be achieved.
JS
<script>
function myRemoveFunction() {
var textRemove = document.getElementById("mySelect");
textRemove.remove();}</script>
In the above script, it can be seen that a user-defined myRemoveFunction function has been created in which firstly the Id of the element is retrieved by the getElementById method and is stored in the variable textRemove.
After returning the element by Id to the variable textRemove, the built-in function of remove has been used which will remove the HTML element the moment the button is clicked.
On executing the above code, a similar output can be seen on the browser as presented below.
Now, a JavaScript code should be added behind the button so that when the button gets clicked, the desired results can be achieved.
JS
<script>
function myRemoveFunction() {
var textRemove = document.getElementById("mySelect");
textRemove.remove();}</script>
In the above script, it can be seen that a user-defined myRemoveFunction function has been created in which firstly the Id of the element is retrieved by the getElementById method and is stored in the variable textRemove.
After returning the element by Id to the variable textRemove, the built-in function of remove has been used which will remove the HTML element the moment the button is clicked.
On executing the above code, a similar output can be seen on the browser as presented below.
![]() In the above snapshot of the output, it can be seen that, when the button is clicked, the text that was present in the <h1> Element tag has been removed from the web page.
In the above snapshot of the output, it can be seen that, when the button is clicked, the text that was present in the <h1> Element tag has been removed from the web page.
Conclusion
JavaScript provides different methods for better web page functionality.
The getElementById is one of the common and useful methods that returns an element’s Id value.
The element whose Id is saved to a variable can be removed by using the built-in remove function of JavaScript.
How to Get the Timezone
In JavaScript, getting the Timezone is very useful for fetching the GMT(GreenWich Mean Time) or Universal Time Coordinated (UTC).
Moreover, we can view the Timezone of any country around the globe and observe the change in time, date, day, and UTC of that country.
In addition to that, TimeZone also assists in calculating the UTC/GMT by observing the time difference.
This manual will offer the method related to getting Timezone.
How to Get the Timezone?
For getting the Timezone, you can utilize:
“Date()” object constructor
“Intl.DateTimeFormat()” method
We will now go through each of the mentioned approaches one by one!
Method 1: Get the Timezone Using Date() Object Method
In JavaScript, Date Object creates a new date object to display the current date/ time.
We will utilize the Date object constructor to create a new date object, store it in a variable, and then display the TimeZone.
Syntax
In JavaScript, follow the given syntax for creating a date object:
new Date()
Go through the following example for better understanding.
Example
In this method, we will create a new Date object named “timeZone” using the “Date()” object constructor.
Then, we will display the current TimeZone on the console:
var timeZone = new Date();
console.log(timeZone);
Execution of given code will show the following output:
![]()
Method 2: Get the Timezone Using Intl.DateTimeFormat() Method
In JavaScript, the mentioned method can be used to enable time formatting and access the time zone.
We have also used the “resolvedOptions()” method along with “Intl.DateTimeFormat()”.
The “resolvedOptions()” method returns a new object with properties that reflect the locale and date and time formatting options calculated during initialization of this “Intl”.
Syntax
In JavaScript, to use the “Intl.DateTimeFormat()” method for getting the time zone, you have to follow the below-given syntax:
Intl.DateTimeFormat().resolvedOptions().timeZone
Look at the below-given example for demonstration.
Example
First, we will enable the time formatting using the “Intl.DateTimeFormat()” method.
Moreover, we will apply the “resolvedOptions()” method along with Intl.DateTimeFormat() in order to reflect the locale and date/time formatting options computed during Intl object initialization.
Then, we will display the current time zone on the console.
var timeZone = Intl.DateTimeFormat().resolvedOptions().timeZone;
console.log(timeZone);
The corresponding output will be:
![]() We have provided the simplest methods for getting the Timezone.
You can use any of the approaches according to your requirements.
We have provided the simplest methods for getting the Timezone.
You can use any of the approaches according to your requirements.
Conclusion
To get the timezone, you can use the Date() object constructor for creating a new date object and displaying the timezone or utilize the “Intl.DateTimeFormat()” method for enabling the time formatting and reflecting the date and time formatting options calculated during the initialization of “Intl”.
This write-up explained the methods for getting the Timezone.
How to get started with the Redux?
To get started with the basics of Redux coding practice, let us create a simple React application with Redux.
We use Visual Studio code to create the application and for the coding.
Create a separate folder in your desired location and open the terminal window.
![]() After successfully executing the command mentioned above, you will see different folders on the sidebar of our visual studio screen.
After successfully executing the command mentioned above, you will see different folders on the sidebar of our visual studio screen.
![]() Here you can see a folder named src; delete all the files present inside this src folder.
In addition, please make a new file and name it indexes with the extension of js altogether index.js.
After creating this new file, open the terminal and write the following command.
Here you can see a folder named src; delete all the files present inside this src folder.
In addition, please make a new file and name it indexes with the extension of js altogether index.js.
After creating this new file, open the terminal and write the following command.
![]() As you can see in the above snippet, the Node Package Manager (npm) will install the Redux toolkit in our react application project by using the installation command.
Now we have created our react application and are also done with installing the Redux toolkit.
It is time to set our Redux components in this react application project.
As you can see in the above snippet, the Node Package Manager (npm) will install the Redux toolkit in our react application project by using the installation command.
Now we have created our react application and are also done with installing the Redux toolkit.
It is time to set our Redux components in this react application project.
![]() So, first of all, let us set up the store of our Redux.
So, for doing so, we will have to import the
configureStore function from Redux.
Usually, we use the createStore built-in function to create the store, but configureStore is an improved way to create the store, so we will create our store using the configureStore function.
The syntax is
import { configureStore } from 'redux';
Now we will set the second most component of Redux i-e, reducer.
As we know, it takes the current state and performs an action or event on it, so now we will define the function of the reducer.
Store function needs to be updated each time the reducer acts on a state.
On every action the reducer performs, we know the current state will change into an updated state.
To update the store’s state values, we need to use the subscribe function of the store.
So, first of all, let us set up the store of our Redux.
So, for doing so, we will have to import the
configureStore function from Redux.
Usually, we use the createStore built-in function to create the store, but configureStore is an improved way to create the store, so we will create our store using the configureStore function.
The syntax is
import { configureStore } from 'redux';
Now we will set the second most component of Redux i-e, reducer.
As we know, it takes the current state and performs an action or event on it, so now we will define the function of the reducer.
Store function needs to be updated each time the reducer acts on a state.
On every action the reducer performs, we know the current state will change into an updated state.
To update the store’s state values, we need to use the subscribe function of the store.
![]() The above code snippet tells how we can set our store and reducer for the Redux along with the description.
If you run the above code using the command npm start, you will see the reducer message displayed on your console screen.
The above code snippet tells how we can set our store and reducer for the Redux along with the description.
If you run the above code using the command npm start, you will see the reducer message displayed on your console screen.
![]() Now, as we have executed our store and reducer, let us check whether the store is getting updated each time the reducer performs an event or action in its current state.
So, for this, we need to dispatch an action.
Each action may or may not have a different type, but the action must have a type.
It is just like that we want to perform something with a meaningful purpose.
The type of action may be INCREMENT_NUMBER, DECREMENT_NUMBER, ADD_USER, DELETE_RECORDS, etc.
Now, as we have executed our store and reducer, let us check whether the store is getting updated each time the reducer performs an event or action in its current state.
So, for this, we need to dispatch an action.
Each action may or may not have a different type, but the action must have a type.
It is just like that we want to perform something with a meaningful purpose.
The type of action may be INCREMENT_NUMBER, DECREMENT_NUMBER, ADD_USER, DELETE_RECORDS, etc.
![]() We have updated our code with the dispatching of our actions from the store to the reducer.
The reducer will perform these actions on the current state and will return the updated state.
Later on, the subscribe function will help the store to update the status values in the store for future use.
We have updated our code with the dispatching of our actions from the store to the reducer.
The reducer will perform these actions on the current state and will return the updated state.
Later on, the subscribe function will help the store to update the status values in the store for future use.
![]() You can see in the above snippet that the reducer performed the action of Increment number to state=0 and returned the state=1, the store updated this response of the reducer.
On dispatching the other action with an increment in number, the reducer again increased in the state and made it state=2.
When performed by the reducer in the results, the last dispatched action of decreasing number updates the state from state=2 to state=1.
You can see in the above snippet that the reducer performed the action of Increment number to state=0 and returned the state=1, the store updated this response of the reducer.
On dispatching the other action with an increment in number, the reducer again increased in the state and made it state=2.
When performed by the reducer in the results, the last dispatched action of decreasing number updates the state from state=2 to state=1.
Conclusion
In this article, create a simple React application to start with the Redux.
The Visual Studio code is utilized to create the application.
This article demonstrates a simple code that exercises Redux.
The Node Package Manager (npm) installs the Redux toolkit in our react application project by using the installation command.
Hence, you can practice it and do other experiments for your own learning.
How to Exit a JavaScript Function
In JavaScript, exiting a JavaScript function is considered helpful when we need a quick way to exit in the middle of the function or when a particular condition is satisfied.
Moreover, it also assists in specific scenarios where you want to use some of the function’s functionality in our program and not the whole function.
This write-up will guide you to exit a JavaScript Function.
How to Exit a JavaScript Function?
To exit a JavaScript Function, you can use:
“return” Statement
“try catch throw” Statement
“break” Statement
We will now go through each of the mentioned approaches one by one!
Method 1: Exit a JavaScript Function Using return Statement Method
The “return” statement returns a specific value of a function.
We applied the return statement to output a particular value against a specified condition and exit the function.
Look at the below-stated example.
Example
Firstly, we will define a function “exitFunc()” and pass two arguments “a” and “b” in it.
Then, we will return a specific value against each condition:
functionexitFunc(a, b) {if (a>5) {return(0);
}else
{return("true")
}}
In the next step, we will call the function with the specified arguments.
As a result, the corresponding condition in the above code will be executed, and the specific value in either of the cases will be returned, and the function will exit:
console.log(exitFunc(3,2));
Here, in the output, the corresponding value “true” is returned against the “3” value in “a” and the function exits:
![]()
Method 2: Exit a JavaScript Function Using “try catch throw” Statement Method
The “try catch throw” statements work in such a way that if an error occurs in the try block, the throw statement throws the exception to the catch block which then handles that exception.
In this method, a condition is defined in the “try” block and the function exits by throwing an exception “exit” to the catch block.
The catch block then exits the function by displaying the message on the console.
Moreover, we have also used “else” condition to check if the function exited properly.
In the other case, it will display the “Function not exited” message.
Example
First, we will place a condition in the try block.
If the condition is true, an exception will be thrown to the “catch” block with “e” referring to “exit” and the function will exit by displaying the specified message:
exitFunc = (name) => {try {if (name === "JavaScript") throw"exit";else {
console.log("Function not exited")
}
} catch (e) {
console.log("The Function is exited")
} };
Lastly, the function will be called with the specified arguments.
As a result, an exception will be thrown and the function will exit:
exitFunc("JavaScript")
Output
![]()
Method 3: Exit a JavaScript Function Using break Statement Method
The “break” statement jumps out of a code block and terminates the current loop.
Here is an example for the demonstration.
Example
In this method, we displayed two statements on the console and applied the “break” statement in between them.
As a result, the statement placed after the break statement will not be executed as the function because the function will exit before it.
To do so, first, we will define an arrow function named “exitFunc()” and place a “break” statement between the operation of printing two statements:
exitFunc = () => {
exitFunc: {
console.log("Function is exited");break exitFunc;
console.log("Function not exited");
}};
Next, we will call the “exitFunc()” function and the corresponding functionalities of the function will be executed:
exitFunc()
In the output, we can see that the second added statement after the break is not executed as the function exited before it:
![]() We have provided the simplest methods to exit a JavaScript Function.
We have provided the simplest methods to exit a JavaScript Function.
Conclusion
To exit a JavaScript Function, you can use the “return” statement to return a value against a specified condition, the “try throw catch” statements to handle the conditions and exceptions and the “break” statement to terminate the loop and jump out from the function.
This article guided the methods related to exiting a JavaScript function.
How to Use mailto
In JavaScript, “mailto” is primarily used to give access to a specified email address.
This feature is very helpful in the cases of mailing resumes against job applications or contacting for help or guidance., you can perform the function of redirecting an email address instead of a web page using some properties.
This write-up will guide you regarding the use of mailto.
How to Use mailto?
To utilize mailto, you can use:
“location.href” property
Using “anchor” tag with “href” attribute
Let’s go through each of the above-mentioned methods one by one!
Method 1: Use mailto Using window.location.href Property
In JavaScript, the “window.location.href” property refers to the current page’s URL.
However, you can also utilize it to redirect to specified mail.
In such a scenario, create a user-defined function that sets the window.location.href property and associate it with the “onload” event of the HTML file.
As a result, the added property will redirect to the specified email.
Have an overview of the below example to understand the stated concept.
Example
First of all, we will define a function “mailTo()” in which we will apply the added “mailto” functionality.
In the body of the created user-defined function, utilize the “window.location.href” property and assign the desire email address to it:
function mailTo(){
window.location.href = "mailto:mail@example.org";}
Lastly, call the “mailTo()” method to perform the required functionality:
mailTo()
Execution of the above-given program will open up the default mail app on your system and open the compose mail window with the specified email address:
![]() In the other case, you will be asked to create an account first:
In the other case, you will be asked to create an account first:
![]()
Method 2: Use mailto Using “anchor” Tag with “href” Attribute
In this method, we will apply the “mailto” functionality with the help of an anchor tag and set its value using the “href” attribute.
Go through the following example to clearly understand the above concept.
Example
In the first method, we will create an anchor tag and store it in the “mail” variable:
let mail = document.createElement("a");
In the next step, we will refer to an email address by setting the “href” value.
Moreover, the “click()” method will simulate a mouse click on the added element:
mail.href = "mailto:xyz@mail.com.";
mail.click();
Output
![]() We have discussed the simplest methods for using mailto.
We have discussed the simplest methods for using mailto.
Conclusion
To use “mailto”, you can use the “window.location.href” property which includes the use of a user-defined function and “onload” event.
Another method for applying “mailto” is creating an “anchor” tag and setting its “href” attribute value.
Both methods can utilize the mailto functionality for redirecting to the specified mail.
This article guided about the procedure for using mailto.
How to Make a Div Clickable Using JavaScript
The <div> element is the most important and commonly used tag in web development.
It defines a section or division in an HTML document.
Moreover, users can modify the different styling properties on the <div> tags such as background color, font size, textcolor, and any of the functionality that can be applied by clicking on the div.
One can add a specific functionality upon clicking the div.
In this post, we will demonstrate several methods to make a div clickable using JavaScript.
How to Make a Div Clickable
Example 1: Using addEventListener() Method to Make a Div Clickable
Example 2: Using <div> Tag to Make a URL Clickable
How to Make a Div Clickable?
JavaScript provides addEventListener() method to make a clickable text within <div> tag.
Moreover, a simple function can also be associated with the onclick functionality of the div tag to make a div clickable.
The clickable operation can be applied by accessing the id or class attribute.
Users can place any content inside a <div> tag to display in the browser.
Let’s try both methods to make a div clickable.
Example 1: Using addEventListener() Method to Make a Div Clickable
The addEventListener() method is applied through the <div> tag for making a div clickable.
The method is triggered by an association with a particular event.
By considering it, a code is followed with <div> tags to make a clickable text.
Code
<html><body><center><h2>Example to clickable</h2><div id="cl">Press the clickable div</div></center><script>
document.getElementById('cl').addEventListener('click', cl_Div);
function cl_Div() {
document.getElementById('cl').innerHTML = "Welcome to JavaScript";} </script></body></html>
The code is illustrated below:
Firstly, a <div> area is specified in which contains a message “Press the clickable div” having a unique id of “cl”.
After that, the getElementById() method is utilized to extract the HTML <div> element by its “cl” value.
Furthermore, the addEventListener() method is employed to add an event handler by passing “click” and “cl_Div” arguments.
In the end, a cl_Div() method is called that returns a message “Welcome to JavaScript” by employing the innerHTML property.
![]() Output
Output
![]() The output returns the browser in which the user clicks on the div and the div tag is changed to “Welcome to JavaScript”.
The output returns the browser in which the user clicks on the div and the div tag is changed to “Welcome to JavaScript”.
Example 2: Using <div> Tag to Make a URL Clickable in a Div
The <div> tag is famous for redirecting to other links or webpages.
This tag has an “href” attribute that accepts the URL of a specific webpage.
Let us practice using it via the following example code:
Code
<center><h2>Example to Make a Div Clickable</h2><div class="clickable">"https://linuxhint.com/" </div></center><script>
$(".clickable").click(function() {
window.location = $(this).find("a").attr("href");return false;});</script>
The above code is explained line by line:
First, a <div> area is specified and assigned a class value of “clickable”.
After that, a <div> tag is applied by passing the link “https://linuxhint.com”.
By pressing the link, it refers to the div having the class “clickable”.
After that, the window.location() method gets the “URL” of the specified webpage through the attr() method.
![]() Output
Output
![]() The output shows that when a user presses the link “Click link”, a new window pops up in the browser.
The output shows that when a user presses the link “Click link”, a new window pops up in the browser.
Conclusion
In JavaScript, a built-in addEventListener() method or a user-defined function can be used to make a div clickable.
The addEventListener() method takes two arguments, the first argument must be ‘click’ and the second argument must point towards the div (utilizing its class name or id).
In a user-defined function, the function is attached to the onclick event of the div to make the div clickable.
This blog has demonstrated all the possible methods to make a div clickable using JavaScript.
How to Iterate Through a Map
JavaScript offers a variety of functionalities to perform iterations over an array.
One of them, the map() method iterates on each element of the specified array and returns an updated array with the same length.
The “for of” loop alongside the entries() method iterates through the map object that traverses each element of the array.
These methods return an array through the key-value pairs.
Moreover, these methods do not operate on an empty array.
This post explains various methods to iterate through a map.
The following content expresses the overview of this post:
How to Iterate Through a Map
Using “for of” Loop to iterate through Map
Using callback Method to iterate through Map
How to Iterate Through a Map?
In JavaScript, a map object is a combination of a key and a value pair.
This object is created through the Map() constructor.
The map() method iterates through the object in a specified array.
To iterate over the object, the map() method integrates with the entries() method and returns an array through the key-value pairs.
This section demonstrates many ways to iterate through a map.
Method 1: Using “for of” Loop to Iterate Through Map
To perform iteration, the “for of” loop is executed once for each key-value pair of map objects.
First, have a look at the syntax of the “for of” loop to iterate over a map.
Syntax
for (const x of map.entries()) {}
In this syntax, “x” stands for the key-value pair, and “map” refers to the object.
Code
console.log("Example to iterate through a map")
var mag_obj = new Map();
mag_obj.set("Cricket", "sport");
mag_obj.set("Apple", "food");for (var [key, value] of mag_obj.entries()) {
console.log(key + " is " + value);}
The above code is explained here:
Firstly, an object “mag_obj” is created through the Map() constructor with a new keyword.
After that, the set() method is utilized to store two values, “Cricket” and “sport” in the “mag_obj”.
Similarly, “Apple” and “food” are set through the set() method.
After that, the “for of” loop is implemented with an entries() method that iterates over all the elements and returns the new array by placing “is” between the above values.
Finally, the console.log() method presents the output through the key-value pair in the console window.
![]() Output
Output
![]() The output shows that “Cricket is sport” and “Apple is food” are concatenated through the key-value pairs.
The output shows that “Cricket is sport” and “Apple is food” are concatenated through the key-value pairs.
Method 2: Using Callback Method to Iterate Through Map
The “map()” method is employed as a callback function on each element of the array.
The syntax of the map() method being used as a callback function is provided below:
Syntax
arr.map((element) => { operation })
In this syntax, the map() method iterates over each element and then performs a specific operation on it.
Code
console.log("Example to iterate through a map")const num = [3, 6, 7, 2, 5]const new_num = num.map(Item => {
return Item * 2})
console.log(new_num)
The description of the code is provided here:
An array num is created having five elements “3, 6, 7, 2, and 5”.
After that, the map() method is utilized to iterate over each element of the array through the num object.
The method returns the new array by multiplying each element by 2.
In the end, the console.log() method is employed to present the new array in the console window.
![]() Output
Output
![]() The output shows that “[3, 6, 7, 2, 5]” is converted to “[6, 12, 14, 4, 10]” by multiplying each element with “2” in JavaScript.
The output shows that “[3, 6, 7, 2, 5]” is converted to “[6, 12, 14, 4, 10]” by multiplying each element with “2” in JavaScript.
Conclusion
JavaScript provides the map() method that integrates with the “for of” loop and entries() methods to perform iteration through map objects.
The for loop iterates the array of elements through object keys.
The entries() method traverses a map object by extracting keys and then performing iteration through values.
Here, you have learned many ways to iterate through a map object.
How to Initialize JavaScript Date to a Particular Time Zone
In JavaScript, initializing the date to a particular time zone is useful when you need to view the date or time of any particular country.
Moreover, it also assists in the case of observing the time difference among the countries.
This article will provide some easy methods for initializing the JavaScript date to a particular time zone.
Different Ways of Initializing JavaScript Date to a Particular Time Zone
In JavaScript, you can use the following methods for initializing JavaScript date to a particular time zone:
The “toLocaleString()” method
The “Intl.DateTimeFormat()” method
Have a look at each of the mentioned approaches one by one!
Method 1: Using “toLocaleString()” Method to Initialize JavaScript Date to a Particular Time Zone
This method involves the use of the “Date” object with the “toLocaleString()” method to initialize the date to the specified time zone.
Syntax
date.toLocaleString(locales, options)
Here, the date represents the Date object which will be used to call the “toLocaleString()” method by passing the “locales” and “options” argument, which will contain the time zone information.
Let’s overview the following example for a clear understanding.
Example
First, we will create a new Date object and store the following values (Year as “2022”, Month as “8”, Day as “23”, Hour as “8”, “0” Minutes, and “0” Seconds) respectively.
Then, we will display the set date value using the “console.log()” method:
var date = new Date(Date.UTC(2022, 8, 23, 8, 0, 0));
console.log("Date in Dubai is :", date)
Next, we will initialize the date to “UK” time zone using “toLocaleString” method and pass “en-GB” as English Great Britain locales, and “Europe/London” as time zone:
console.log("Date in UK is : ", date.toLocaleString('en-GB', { timeZone: 'Europe/London' }));
As a result, we will get the following output:
![]()
Method 2: Using “Intl.DateTimeFormat()” Method to Initialize JavaScript Date to a Particular Time Zone
In JavaScript, the “Intl” class offers a “DateTimeFormat()” method that is used to format the date-time strings.
This method performs the conversion to the specified time zone “UK“.
Let’s overview the following example for understanding the above concept clearly.
Example
Firstly, we will create a Date class object and set the values as in the previous example like (Year, Month, Day, Hours, Minutes, and Seconds) respectively and display the current date with the time zone information:
var date = new Date(Date.UTC(2022, 8, 23, 8, 0, 0));
console.log('Date in China is : ', date);
Next, we will create a new Intl object named “currentTZ”, and use the DateTimeFormat() method to initialize it to the particular time zone.
Lastly, display the date with the timezone information on the console:
var currentTZ= new Intl.DateTimeFormat('en-GB', {timeZone: 'Europe/London'});
var ukDate = currentTZ.format(date);
console.log('Date in UK is : ', ukDate);
The output of the above-given program will be displayed as follows:
![]() We have provided the simplest methods for initializing JavaScript date to a particular time zone.
We have provided the simplest methods for initializing JavaScript date to a particular time zone.
Conclusion
To initialize JavaScript Date to a Particular Time Zone, you can use the “toLocaleString()” method for direct initialization or the “Intl.DateTimeFormat()” method, which utilizes an “Intl” class object and “DateTimeFormat()” method collectively for the mentioned purpose.
However, both methods work efficiently.
This article assisted regarding the procedure of initializing the JavaScript date to a particular time zone.
How to Rotate an Image with JavaScript
Image rotation is primarily used in image-based algorithms.
This feature is also used to set the alignment of an image, apply captcha recognition techniques, and in case of solving image-based riddles., you can perform this functionality with the help of user-defined functions or using some property.
This write-up will guide you about rotating an image with JavaScript.
How to Rotate an Image with JavaScript?
In JavaScript, image rotation is carried out using:
document.querySelector() method
document.getElementById method
transform-origin property.
We will now check out each of the mentioned approaches one by one!
Method 1: Rotate an Image with JavaScript Using document.querySelector() Method
In JavaScript, the “document.querySelector()” method retrieves the first element that matches a CSS selector.
In our scenario, we will utilize the method to rotate a selected image according to the specified degrees.
For the specified purpose, we will set the value of the “style.transform image’s property.
Have a look at the below-given example to understand the stated concept.
Example
First of all, we will assign the selected image an id “img” and specify its source “src” in the body of the HTML file:
<img id="img" src="E:\JOB TECHNICAL ARTICLES\image.PNG" />
Next, we will add a button to rotate the image in such a way that when it is clicked it will call the “IMAGEROTATION()” function defined in the JavaScript file:
<button onClick="IMAGEROTATION()">Rotate Image</button><script src="IMAGE ROTATION.js">
In our JavaScript file, we will declare a variable named “rotate” and initialize it with “0”.
This will allow us to rotate the image with respect to the “0” reference angle:
var rotate=0
Now, we will define a function named “IMAGEROTATION()” and set the rotation angle as “180” degrees.
The added “if” condition will check the rotation angle; if it is reached 360 degrees, the rotation angle will return to its initial angle as “0”.
Lastly, we will use the “document.querySelector()” method to get the image with the “img” id and rotate it accordingly:
functionIMAGEROTATION() {
rotate += 180;
if (rotate === 360) {
rotate = 0;
}
document.querySelector("#img").style.transform = `rotate(${rotate}deg)`;
}
Save the added code and open the HTML on the browser.
As a result, your selected image will be displayed; click on the “Rotate Image” button to rotate the image at “180” degrees:
![]() Output
Output
![]()
Method 2: Rotate an Image with JavaScript Using document.getElementById() Method
In this method, we will rotate the selected image by accessing it from the HTML file using its “id” and rotate it with a specified angle set in the JavaScript file.
Example
In the example, we will display two images side by side on our web page.
The first one will be in the original format, whereas the second image will be rotated.
To do so, we will set the overall “margin” to accumulate both images properly.
Then, we will specify the original image source “src” and set its width:
<div style="margin: 50px"><img src="E:\JOB TECHNICAL ARTICLES\image.PNG" />
For the second image, we will assign an id “rotate” to it.
Then, add its source and assign the same width to the image in order to visualize it in a better way.
Lastly, specify the source of JavaScript file in the created container:
<img id="rotate"
src="E:\JOB TECHNICAL ARTICLES\image.PNG" /><script src="IMAGE ROTATION2.js"></script>
In the JavaScript file, we will access the second image that needs to be rotated using its “rotate” id and rotate it “180” degrees.
This can be achieved by setting the value of the “style.transform” property of the accessed image element:
const rotated = document.getElementById('rotate');
rotated.style.transform = 'rotate(180deg)';
The output of the above code will be displayed as follows:
![]()
Method 3: Rotate an Image with JavaScript Using transform-origin Property
This method includes the use of the “transform-origin” property, which is useful for setting the exact orientation of the rotated image such as top-left, bottom-right.
Look at the provided example for understanding the use of the transform-origin property for rotating an image.
Example
Firstly, access the image element using the document.getElementById() method and pass “rotate” as an id of the required element:
const rotated = document.getElementById('rotate');
Then, rotate the image by “180” degrees and adjust its orientation as “bottom-right” using the transformOrigin property:
rotate.style.transform = 'rotate(180deg)';
rotate.style.transformOrigin = 'bottom right';
The provided code will show the following output:
![]() We have provided the easiest methods for rotating an image using JavaScript.
We have provided the easiest methods for rotating an image using JavaScript.
Conclusion
To rotate an image, you can use the “document.querySelector()” method, in case of manual rotation, “document.getElementById()” method for accessing the “id” of the image to be rotated, and “transform-origin” property method for specifying the exact orientation of the image.
This article guided about the procedure of rotating an image using JavaScript.
How to Use Map Index
In JavaScript, the map index is considered useful in locating the exact position of an array value, especially in the case of complex arrays.
Moreover, it also assists in the process of adding, updating or deleting an array value at a specific index.
In addition to that, it is applied without any change in the original array.
This blog will demonstrate the method of using map index.
How to Use Map Index?
In JavaScript, you can use a map index by applying the “map()” method for printing the index of each element in an array.
The map() method works for each element in an array with no change in the original array.
It can be utilized for mapping the array values along with their indexes.
Now, go through the following example.
Example 1: Using “map()” Method to Print Index of All Array Elements
Firstly, we will define a “mapIndex” array and store five string values in it as follows:
let mapIndex = ['David','Harry','Robert','John','Gerard']
Next, we will map the array values and their indexes as “x” and “y” respectively.
The first argument in the “map()” method will always act as the value in an array and the second as an index.
Finally, we will display the array values and their indexes in the form of strings “$” using the “console.log()” method:
mapIndex.map((x,y) => console.log(`The index of ${x} is ${y}`));
As you can see, we have successfully accessed the index of the stored array values:
![]()
Example 2: Using “map()” Method to Access a Specific Index of an Array Element
This example will demonstrate the procedure of accessing a specific index of any array element using the “map()” method.
For the specified purpose, we will utilize the same array created in the previous example.
Next, we will map the values in the same way as mentioned earlier.
The only difference is that we will display a specific index “0” of each array element:
mapIndex.map((x,y) => console.log(`The index of ${x[0]} is ${y}`))
The resultant output, in this case, will be this:
![]() We have provided the simplest method for using map index.
We have provided the simplest method for using map index.
Conclusion
To use map index, you can apply the “map()” method for displaying the specified values of each element against their indexes in an array.
The map() method will take the value and index as arguments respectively and print out them accordingly after mapping.
This blog guided you about the procedure of using Map Index.
How to Update Object
In JavaScript, updating object values becomes very useful when it is required to change the values at some regular interval.
Moreover, it is also helpful in case of storing the values temporarily in an array or changing multiple values at the same time, taking any specific object as reference.
This post will discuss the process of updating objects in a JavaScript array.
How to Update Object Array?
In JavaScript, object can be updated by the following methods:
“findIndex()” method
“for” loop
“map()” method
We will now check out each of the mentioned approaches one by one!
Method 1: Updating Object in a JavaScript Array Using “findIndex()” Method
In JavaScript, the “findIndex()” method is used to find the index of elements whose value matches the specified condition in arguments.
Let’s have an overview of the below example for better understanding.
Example
Firstly, we will declare an array of objects as shown below:
const Array_obj = [{id: 0, name: "David"},{id: 1, name: "John"},];
Next, we will apply the “findIndex()” method to execute for each array element.
In its argument, specify the object value that needs to be updated.
In this case, we will update the value where the “id” of the object is “0”:
upd_obj = Array_obj.findIndex((obj => obj.id == 0));
In the next step, we will display the current value before the update.
Then, we will update the “name” property value against the set “id” in order to update its value:
console.log("Before Object Updation: ", Array_obj[upd_obj]);
Array_obj[upd_obj].name = "Harry";
Finally, we will display the updated object value by using “upd_obj” as an argument of “Array_obj” in which the array was defined:
console.log("After Object Updation: ", Array_obj[upd_obj]);
Output
![]()
Method 2: Updating Object in a JavaScript Array Using “for” Loop
In this method, we will use the “for” loop for iterating through the array objects and update the object values accordingly.
Here is an example for the demonstration.
Example
Firstly, we will define an array of objects having “id” and “name” properties with the following values:
const Array_obj = [{id: 0, name: 'David'},{id: 1, name: 'John'},];
Next, we will apply the “for” loop for iterating through each object in the “Array_obj” array and update the value with respect to the specified “id”:
for (const i of Array_obj) {if (i.id == 1) {
i.name = 'Harry';}}
Finally, we will display the updated object value on the console screen:
console.log('The Updated Array is:', Array_obj);
The corresponding output will be:
![]()
Method 3: Updating Object in a JavaScript Array Using “map()” Method
In this method, the value of an object is updated by using the “map()” method.
This method works for each element in an array.
Moreover, it maps the updated value to the object.
Example
Firstly, we will create an “Array_obj” array containing objects with values in them:
const Array_obj = [{id: 0, name: 'David'},{id: 1, name: 'John'},];
In the next step, we will map the new value to the “name” object by giving “id” as reference.
Moreover, we will locate the position of the object to be updated via “if” condition:
const upd_obj = Array_obj.map(obj => {if (obj.id == 1) {return {obj, name: 'Harry'};}return obj;}
Lastly, display the updated object value stored in the “upd_obj” variable.
console.log(upd_obj);
Output
![]() We have provided the simplest methods related to updating the objects Array.
We have provided the simplest methods related to updating the objects Array.
Conclusion
To update an object in a JavaScript array, you can use “findIndex()” method for executing each array element and updating the object values accordingly, the “for” loop method for iterating through an array and updating the specified value, and “map()” method for mapping the updated value to an object.
This article guided about the procedure of updating an object in a JavaScript array.
How to Track Mouse Position
Tracking a mouse position is an interesting task that tracks the coordinates of the pointer.
It extracts the x and y coordinates of the whole webpage or specified area defined by the user.
JavaScript provides “clientX” and “clientY” properties to track the mouse pointer in the current window.
These properties find out where the user’s mouse lies in the x and y coordinates of the browser window.
In this post, we will demonstrate the way for tracking a mouse position.
How to Track Mouse Position?
In JavaScript, two properties, “clientX” and “clientY”, are utilized for tracking a mouse position in the visible area of the browser.
Both properties are executed in a specified area provided by the user.
The syntax of the “clientX” and “clientY” properties is provided below:
Syntax of clientX
event.clientX
The “clientX” returns the horizontal axis of the mouse pointer.
Syntax of clientY
event.clientX
Similarly, the “clientY” property returns the vertical axis with the movement of the mouse pointer.
Example
The example explains the usage of tracking mouse position.
HTML Code
<h2>Example to Track Mouse Position</h2><style>#div1 { height: 200px; width:100%;
border: 1px solid #444;
}</style><div id="div1" onmousemove="getCursorPosition(event)"></div><div>X Mouse position: <span id="c_p_x"></span>.</div><div>Y Mouse position: <span id="c_p_y"></span>.</div><script src="test.js"></script>
The explanation of the code is as follows:
Firstly, the div tag is created and a “div1” id is assigned to it.
Different properties, including height, width, border, and position, are applied within <style> tag.
After that, the getCursorPosition() method is utilized by passing an “event”.
After that, the “X Mouse position” and “Y Mouse position” are extracted with the cursor movement.
In the end, the source path of the JavaScript file is assigned “test.js” within <script> tag.
The code for the “test.js” file is provided below:
JavaScript Code
function getCursorPosition(event) {
document.getElementById("c_p_x").textContent = event.clientX;
document.getElementById("c_p_y").textContent = event.clientY;}
In this code:
Firstly, the getCursorPosition() method is called and an argument is passed named “event”.
After that, the document.getElementById is utilized to extract the HTML elements whose ids are “c_p_x” and “c_p_y”.
The event.clientX returns the horizontal coordinate based on the client area and the “event.clientY” is employed by returning the vertical coordinate in the browser.
Output
![]() The output shows that “X Mouse position” and “Y Mouse position” are tracked by changing the mouse position in the browser.
The output shows that “X Mouse position” and “Y Mouse position” are tracked by changing the mouse position in the browser.
Conclusion
In JavaScript, the “clientX” and “clientY” properties track the mouse position.
These properties can be combined with a user-defined function to get the coordinates of the mouse position.
This post has demonstrated the method to track mouse position using the “clientX” and “clientY” properties.
The example practiced here shows that the x-coordinate and y-coordinate are dynamically updated whenever a mouse moves.
How to Toggle a Button
Toggling is a concept to change any property of an element alternatively or navigate to a specific operation.
JavaScript can toggle between multiple properties such as background color, button, text, and font size.
This toggling effect can be associated with a button that is easier for the clients to execute.
This post has demonstrated the way to toggle a button with the following learning outcomes:
How to Toggle a Button?
Example 1: Modifying Text Messages by Toggling a Button
Example 2: Toggling ON/OFF Button
How to Toggle a Button?
A conditional statement is a basic requirement for toggling a button.
To achieve this, you need to get the element and then some custom function is applied to apply some specific operation on that element.
The function is associated with the onclick event of the button.
So that, whenever the button is clicked, that function will be executed.
Let’s practice some examples to toggle a button.
Example 1: Modifying Text Messages by Toggling a Button
An example is considered to modify a message by toggling a button.
The example comprises HTML and JavaScript code, which are explained below:
HTML code
<html><h2>Example to toggle a button</h2><div id="js">Press Button to see magic</div><button onclick="btntog()"> Button</button></html><script src="test.js"></script>
In HTML code, the description is as follows:
A <div> tag is created with an “id=js”.
After that, a button is created associated with a “btntog()” method.
By pressing “Button”, the method “btntog()” is triggered.
In the end, the JavaScript file “test.js” is passed as src within <script> tags.
The code for the JavaScript file “test.js” is provided here:
JavaScript code
functionbtntog(){
var t = document.getElementById("js");if(t.innerHTML=="Welcome to Linuxhint"){
t.innerHTML="JavaScript World";}else{
t.innerHTML="Welcome to Linuxhint";}}
In this code:
getElementById is utilized to extract the HTML element “js” and the value is stored in a variable “t”.
After that, the innerHTML property is employed in the if condition to check the text “Welcome to Linuxhint”.
If the condition is true, the content “Welcome to Linuxhint” is replaced with “JavaScript World“.
If the condition is false, the text “Welcome to Linuxhint” is assigned as HTML content to the div tag.
Output
![]() The output shows that toggling a button returns two messages as “Welcome to Linuxhint” and “JavaScript World” alternatively.
The output shows that toggling a button returns two messages as “Welcome to Linuxhint” and “JavaScript World” alternatively.
Example 2: Toggling ON/OFF Button
An example is followed to change the inline text of the button.
In this example, the “ON/OFF” text will alternatively change the value by pressing the button.
The HTML and JavaScript codes are provided here:
HTML code
<html><h2>Example to toggle a button</h2><input type="button" id="myBtn" value="OFF"
onclick="tgl();"><script src="test.js"></script></html>
The above code is described as:
A clickable button having an id of “myBtn” is created and its value is set to “OFF”.
By pressing the button, the tgl() method will be triggered.
In the end, “test.js” is attached to the source path within <script> tag.
JavaScript code
functiontgl(){
var t = document.getElementById("myBtn");if(t.value=="ON"){
t.value="OFF";}
elseif(t.value=="OFF"){
t.value="ON";}}
In this code:
A tgl() method is utilized to toggle a button.
In this method, you extract the HTML element by employing the getElementById property, and then the if else-if statement is added to it.
If the “value==ON”, toggle the value to “OFF”.
If the value is OFF, then the value will be toggled to “ON”.
Output
![]() The output shows that the button has been toggled from OFF to ON.
That is all! You have learned to toggle a button.
The output shows that the button has been toggled from OFF to ON.
That is all! You have learned to toggle a button.
Conclusion
In JavaScript, a button can be used to toggle between various states of its own values, or any function can be associated with the toggle operation.
The onclick() event of the button is associated with the function.
This article explains an overview of toggling a button along with two practical examples.
The first example extracts the text by the innerHTML property and modifies it through a toggle button.
In the second example, the value of the button itself is changed using a custom function.
How to Stop setInterval Call
In JavaScript, invoking/calling a function is essential for the execution of a piece of code repeatedly.
JavaScript provides a setInterval() method that sets the specific time delay between each call of a repeatedly called function.
Moreover, it is useful to stop the calling methods.
For this purpose, the clearInterval() method is introduced to stop the set interval call.
This post demonstrates the method to stop setInterval calls.
How to Stop setInterval Call
Example 1: Stop setInterval Call of Clock Time Using clearInterval() Method
Example 2: Stop setInterval Call of Message Using clearInterval() Method
How to Stop setInterval Call?
JavaScript is capable of executing a specific piece of code after a time delay.
Whenever a function or code chunk is being executed repeatedly, you may wish to execute each chunk after a specific time period.
Sometimes, a situation happens to stop the message or timer.
The clearInterval() function is utilized to stop the setInterval call by accepting the same time interval.
The syntax is provided here:
Syntax
clearInterval(interval_id);
The interval_id specifies the time interval that is returned from the setInterval() method.
Example 1: Using clearInterval() Method to Stop setInterval Call of Clock Time
An example is considered to stop the setInterval call of time by employing the clearInterval() method.
The example comprises HTML and JavaScript codes, which are explained below:
HTML Code
<html><body><h2>An example to stop setinterval call</h2><p id="demo"></p><button onclick="myStopFunction()">Stop time</button></body></html><script src="test.js"></script>
The description of the HTML code is provided below:
A button “Stop time” is created which is associated with a method “myStopFunction()”.
The method is triggered when the user presses the “Stop time” button.
In the end, the “test.js” file is passed as the source within the “<script>” tag.
Let us take the JavaScript code (the file is named as “test.js” on our system):
JavaScript Code
var myVar = setInterval(myTim, 1000);
functionmyTim() {
var d = newDate();
var t = d.toLocaleTimeString();
document.getElementById("demo").innerHTML = t;}
functionmyStopFunction() {
clearInterval(myVar);}
In this code:
The “setInterval()” method sets the specific time interval by passing “myTim” and “1000” milliseconds as parameters.
In this “myTim()” method, variable “d” stores the current date, and variable “t” extracts the current time by calling the “toLocaleTimeString()” method.
In the end, the “myStopFunction()” is employed to stop the setInterval call by the “clearInterval()” method.
![]() Output
Output
![]() The output shows that the set interval is stopped by pressing the button “Stop time” in the browser window.
The output shows that the set interval is stopped by pressing the button “Stop time” in the browser window.
Example 2: Using clearInterval() Method to Stop setInterval Call in a for loop
An example is considered to display a simple message using the setInterval call.
The clearInterval() function is used to clear the interval of 1000 ms (1-seconds).
For instance, the code is provided below.
Code
var i=0;
var int = setInterval(function(){
console.log("JavaScript World");
i++;if(i>=5) {
clearInterval(int);
}
} , 1000);
In this code:
The setInterval() method passed a callback function and 1000 as arguments.
Inside the function(), the message “JavaScript World” is displayed five times.
When the limit exceeds the number, the clearInterval() will stop the setInterval call.
The clear interval() breaks the interval set by passing an int value.
In the end, the setInterval() method is stopped through the clearInterval() method.
![]() Output
Output
![]() The output returns the message “JavaScript World” and stops the setInterval call after 5 seconds.
The output returns the message “JavaScript World” and stops the setInterval call after 5 seconds.
Conclusion
The clearInterval() method is utilized to stop the setInterval call.
The method is useful to clear the time that is set by setInterval.
This post demonstrates the work and usage of the clearInterval() method to stop the setInterval call.
It is important when the user has already set a specific time for any specific function.
In this post, one example displays a simple message by utilizing the callback function and interval.
The second example shows the digital clock time that stops using the clearInterval() method.
How to Sort Array of Objects Alphabetically
In JavaScript, sorting an array refers to a concept that exchanges the positions of elements based on user criteria.
It is useful to sort alphabets, numeric in a predefined list or array.
By considering the importance, this post demonstrates various methods to sort an array of objects alphabetically.
The learning outcomes of this post are:
How to Sort Array of Objects Alphabetically
Using sort() Method to Sort Array of Objects Alphabetically
Using localeCompare() Method to Sort Array of Objects Alphabetically
How to Sort Array of Objects Alphabetically?
JavaScript provides various methods to perform sort operations on numerical as well as textual strings.
For instance, the sort() method is adapted to sort an array of objects and retrieve them in alphabetical order.
It is possible through the index values of alphabets.
Each alphabet has a unique index value.
Based on these values, any string is retrieved in ascending or descending order.
Furthermore, the localeCompare() method is employed to compare the two strings.
It compares the string and sorts the objects via alphabetical order.
Both methods do not change the existing string.
Method 1: Using sort() Method to Sort Array of Objects Alphabetically
JavaScript provides the sort() method to sort an array of objects and retrieve them in alphabetical order.
It returns the numeric value that indicates the sorting order of the passed strings.
The following syntax of the sort() method is practiced to sort the array of objects alphabetically:
sort(function compareFn(x, y)
The parameters of syntax are as follows:
compareFn() method determines the order of elements.
x refers to the first element for comparison.
y indicates the second element for comparison.
The working procedure of the sort() method is discussed here:
Returns “-1” if the first string is less than the second string by ordering criteria.
Returns the “1” if the first string is greater than the second one.
Return “0” if both strings are equal.
Example
An example is considered here to demonstrate the sort() method.
The following code is written here:
console.log("Sort Array of Objects Alphabetically");const player_names = [
{ name: 'Henry' },
{ name: 'Alex' },
{ name: 'Morgan' },
{ name: 'Bale' },];
let sort_names = player_names.sort();
console.log(sort_names);
The description of the code is explained here:
Firstly, an array of objects is created named “player_names”.
After that, name properties are assigned with different values, such as “Henry“, “Alex“, “Morgan“, and “Bale“.
The sort() is utilized through the “player_names” object to perform sorting in alphabetical order.
Finally, the console.log() method is employed to display the console window.
![]() Output
Output
![]() The output shows that “Alex”, “Bale”, “Henry”, and “Morgan” are displayed in an alphabetical order.
The output shows that “Alex”, “Bale”, “Henry”, and “Morgan” are displayed in an alphabetical order.
Method 2: Using localeCompare() Method to Sort Array of Objects Alphabetically
JavaScript provides a localeCompare() method to compare the two strings.
It is the method of the string class that returns a numerical value that indicates which string comes first as compared to other strings.
Firstly, it compares strings by passing them as an argument.
After that, sort the objects based on their alphabetical order.
For instance, the syntax is as follows:
Syntax
string.localeCompare(cmpString)
In this syntax, cmpString indicates the string to compare and returns -1, 0, and 1 based on comparing strings.
Example
An example is adapted to explain the localeCompare() method.
The code explains the working of the localeCompare() method:
Code
console.log("Sort Array of Objects Alphabetically");const Std_arr = [
{ name: 'John' },
{ name: 'Adam' },
{ name: 'Peter' },];const sortedList = Std_arr.sort((a, b) =>
a.name.localeCompare(b.name));
console.log(sortedList);
The description of the code is provided as below:
An array is created as “Std_arr” containing different objects having different properties.
After that, the sort() method is utilized to callback a function.
The function iterates over all the objects in the “Std_arr” array by utilizing the localeCompare() method on the name properties of the Std_arr.
Lastly, the console.log() method is applied to print the sorted array.
![]() Output
Output
![]() The output returns the sorted array of objects as “Adam”, “John”, and “Peter” in the console window.
The output returns the sorted array of objects as “Adam”, “John”, and “Peter” in the console window.
Conclusion
In JavaScript, the sort() and localeCompare() methods are utilized to sort an array of objects in alphabetical order.
The sort() method retrieves the array in sorted order by passing strings.
On the other hand, the localeCompare() method performs a comparison between two strings and returns an integer value that indicates which string comes first as compared to other strings.
Both these methods change the positions of elements in the existing array and return an array in alphabetical order.
How to Read File Line by Line
Reading a file through a browser is an essential task for any website that interacts with its users.
The file can be accessed without storing it on the internet.
JavaScript provides a built-in method, FileReader() which can be used to read a file.
Moreover, various NPM modules can also be used to read a file.
This post demonstrates various methods for reading a file line by line via JavaScript.
The content of this post is as follows:
How to Read a File Line by Line
Using FileReader() Method for Reading a File Line by Line
Using readline Module for Reading a File Line by Line
How to Read File Line by Line?
JavaScript is famous for providing a variety of methods, and properties to facilitate the user.
The built-in FileReader() method can read the file content of each line.
For instance, the “readline” module is also utilized to access the file and read it line by line.
Moreover, users can read the file through websites or local machines.
Example 1: Using FileReader() Method for Reading a File Line by Line
Here, HTML and JavaScript code is practiced showing the usage of the FileReader() method for reading a file line by line using the functionalities of JavaScript.
HTML Code
<h1>Example to Read Local text file </h1><input type="file" name="readfile" id="readfile" /><script src="test.js"></script>
In this code, a file selection field is provided by giving the name “readfile” in the <input> tag.
After that, a JavaScript file is integrated by providing the source as “test.js”.
JavaScript Code
let file = document.getElementById("readfile");
file.addEventListener("change", function () {
var reader = new FileReader();
reader.onload = function (progressEvent) {
console.log(this.result);
};
reader.readAsText(this.files[0]);});
The description of the code is provided here:
Firstly, getElementById is employed to extract the file “id” by passing the value “readfile”.
After that, addEventListener is utilized to trigger the file by passing the “change” value.
Furthermore, the “FileReader()” method is employed for reading the content of a file.
Finally, the content of the file is returned through “this.result”.
In the end, “reader.readAsText()” is utilized for reading the file.
Output
![]() The output shows that the “JavaScript.txt” file is selected as a text file from the browser.
After selecting the file, line-by-line text “Welcome to JavaScript” and “Welcome to Linuxhint” are read and displayed in the console window.
The output shows that the “JavaScript.txt” file is selected as a text file from the browser.
After selecting the file, line-by-line text “Welcome to JavaScript” and “Welcome to Linuxhint” are read and displayed in the console window.
Example 2: Using “readline” Module for Reading a File Line by Line
Another method is adapted for reading a file by employing the readline module.
In this method, a path is required to access the file name.
For instance, the code is provided here.
Code
console.log("Example to read line by line text");const f = require('fs');const readline = require('readline');
var user_file = './JavaScript.txt';
var r = readline.createInterface({
input : f.createReadStream(user_file)});
r.on('line', function (text) {
console.log(text);});
In this code:
Firstly, the require(“readline”) is employed to read a data stream from a file.
After that, the filename “./JavaScript.txt” is assigned to the “user_file” variable.
A readline.createInterface provides an interface for the readline module to read the content of a file.
Furthermore, a callback “function” is utilized by passing the value “text”.
Finally, the “console.log()” method is employed to present the content in the console window.
![]() Output
Output
![]() The output shows that “Welcome to JavaScript” and “Welcome to Linuxhint” are read from the “JavaScript.txt” file.
The output shows that “Welcome to JavaScript” and “Welcome to Linuxhint” are read from the “JavaScript.txt” file.
Conclusion
In JavaScript, a built-in method FileReader() alongside the readline module can be used to read a file line by line.
The FileReader() method reads the content of files stored on the local system.
Moreover, the readline module performs the reading of the content.
Both these methods require the source of the file.
In contrast, you can retrieve the file through the website.
Two practical examples are provided to extract the content that is found in the text file.
Hence, you have learned a method of reading the content of a file.
How to Pass JavaScript Function as Parameter
Similar to other variables or values, JavaScript functions are the data that can be passed to another function.
This states that a function can be passed as an argument or parameter to another method., such action permits the utilization of the accepted function parameter to carry out further operations.
Moreover, it also reduces the overall complexity of code and gives a clear understanding.
This manual will teach the procedure for passing a function as a parameter or argument.
How to Pass a JavaScript Function as Argument/Parameter?
For the purpose of passing a function as a parameter, JavaScript offers a “referenceFunc()” that will refer to the specific function that needs to be passed as a parameter.
Here we have an example for the demonstration.
Example
First, we will declare a function “parent()” and pass “referenceFunc” as a parameter:
function parent(referenceFunc) {
referenceFunc();}
Next, we will declare the second function named “child()” which needs to be passed as a parameter in the parent() function.
Moreover, we will display a message in the body of the function to verify if the function is successfully passed as an argument or not:
function child() {
console.log('JavaScript function passed as a Parameter');}
Finally, we will pass the child() function as an argument to the parent() function:
parent(child);
When the above-given program will be executed and the parent() function will try to access child() function, the compiler will refer child() function as “referenceFunc()” and execute the code add in its body as follows:
![]() We have demonstrated the simplest method for passing a function as a parameter or argument.
We have demonstrated the simplest method for passing a function as a parameter or argument.
Conclusion
To pass a function as a parameter, you can place a reference to the required function as an argument.
In such a scenario, when a function tries to access another function that is passed as an argument at the function call, the added reference parameter will refer to it, and the specified operation will be performed.
This write-up discussed the method for passing any function as an argument or parameter.
Java ArrayDeque – addFirst(), addLast()
ArrayDeque – addFirst()
java.util.ArrayDeque.addFirst() adds an element to the first of an ArrayDeque collection object.
It is important to pass a parameter to this method.
If we continuously use this method to add elements, then each element is inserted at the first position in the ArrayDeque.
Syntax
arraydeque_object.addFirst(element)
Where arraydeque_object represents the ArrayDeque collection.
Parameter
It takes an element with respect to the ArrayDeque collection object type.
Note
If we insert an incorrect data type element, the error is returned.
If we insert a null value, a NullPointerException is thrown.
Example 1
Here, we will create an ArrayDeque collection with 5 Integers and add an element at First.
import java.util.*;import java.util.ArrayDeque;public class Main{
public static void main(String[] args) {
// Create ArrayDeque named a_deque_object with Integer type
Dequea_deque_object = new ArrayDeque();
// Insert 5 values into a_deque_object.
a_deque_object.add(12);
a_deque_object.add(22);
a_deque_object.add(02);
a_deque_object.add(52);
a_deque_object.add(62);System.out.println("Actual Data present in a_deque_object: "+ a_deque_object);
//Add 100 to it at the first position
a_deque_object.addFirst(100);System.out.println("Final Data present in a_deque_object: "+ a_deque_object);
}}
Output:
![]() So we can see 100 is inserted at first of a_deque_object.
Explanation
Line 9:
Create an ArrayDeque named a_dequeobject with an Integer type.
So we can see 100 is inserted at first of a_deque_object.
Explanation
Line 9:
Create an ArrayDeque named a_dequeobject with an Integer type.
![]() Line 12-18:
Add elements into it and return the data.
Line 12-18:
Add elements into it and return the data.
![]() Line 21:
Now add 100 at the first position.
Line 21:
Now add 100 at the first position.
![]() Finally, you can display the final data present in a_deque_object.
Finally, you can display the final data present in a_deque_object.
Example 2
Here, we will create an ArrayDeque collection with 5 Strings and insert some elements at the first position continuously.
import java.util.*;import java.util.ArrayDeque;public class Main{
public static void main(String[] args) {
// Create ArrayDeque named a_deque_object with String type
Dequea_deque_object = new ArrayDeque();
// Insert 5 elements into a_deque_object.
a_deque_object.add("Potassium");
a_deque_object.add("Hydrogen");
a_deque_object.add("Helium");
a_deque_object.add("Oxygen");
a_deque_object.add("Magnesium");System.out.println("Actual Data present in a_deque_object: "+a_deque_object);
//Add "HCL" to a_deque_object at the first position
a_deque_object.addFirst("HCL");System.out.println("Data present in a_deque_object after adding HCL: "+ a_deque_object);
//Add "H2SO4" to a_deque_objectat the first position
a_deque_object.addFirst("H2SO4");System.out.println("Data present in a_deque_object after adding H2SO4: "+ a_deque_object);
//Add "H2O" to a_deque_object at the first position
a_deque_object.addFirst("H2O");System.out.println("Data present in a_deque_object after adding H2O: "+ a_deque_object);
//Add null to a_deque_object at the first position
a_deque_object.addFirst(null);System.out.println("Data present in a_deque_object after adding null: "+ a_deque_object);
}}
Output:
![]() So we inserted three elements one by one at first.
Explanation
Line 9:
Create an ArrayDeque named a_dequeobject with string type.
So we inserted three elements one by one at first.
Explanation
Line 9:
Create an ArrayDeque named a_dequeobject with string type.
![]() Line 12-18:
Add elements into it and return the data.
Line 12-18:
Add elements into it and return the data.
![]() Line 21,22:
Now add “HCL” at the first position and return a_deque_object.
Line 21,22:
Now add “HCL” at the first position and return a_deque_object.
![]() Line 25,26:
Now add “H2SO4” at the first position and return a_deque_object.
Line 25,26:
Now add “H2SO4” at the first position and return a_deque_object.
![]() Line 29,30:
Now add “H2O” at the first position and return a_deque_object.
Line 29,30:
Now add “H2O” at the first position and return a_deque_object.
![]() Line 33,34:
Now add null at the first position.
You can see the exception raised.
Line 33,34:
Now add null at the first position.
You can see the exception raised.
![]()
ArrayDeque – addLast()
java.util.ArrayDeque.addLast() adds an element at the last of an ArrayDeque collection object.
It is important to pass a parameter to this method.
If we continuously use this method to add elements, then each element is inserted at the last position in the ArrayDeque.
We can say that addLast() is quite similar to the add() method.
Syntax
arraydeque_object.addLast(element)
Where arraydeque_object represents the ArrayDeque collection.
Parameter
It takes an element with respect to the ArrayDeque collection object type.
Note
If we insert an incorrect data type element, the error is returned.
If we insert a null value, a NullPointerException is thrown.
Example 1
Here, we will create an ArrayDeque collection with 5 Integers and add an element at Last.
import java.util.*;import java.util.ArrayDeque;public class Main{
public static void main(String[] args) {
// Create ArrayDeque named a_deque_object with Integer type
Dequea_deque_object = new ArrayDeque();
// Insert 5 values into a_deque_object.
a_deque_object.add(12);
a_deque_object.add(22);
a_deque_object.add(02);
a_deque_object.add(52);
a_deque_object.add(62);System.out.println("Actual Data present in a_deque_object: "+ a_deque_object);
//Add 100 to it at the last position
a_deque_object.addLast(100);System.out.println("Final Data present in a_deque_object: "+ a_deque_object);
}}
Output:
![]() So we can see 100 is inserted at the last of a_deque_object.
Explanation
Line 9:
Create an ArrayDeque named a_dequeobject with an Integer type.
So we can see 100 is inserted at the last of a_deque_object.
Explanation
Line 9:
Create an ArrayDeque named a_dequeobject with an Integer type.
![]() Line 12-18:
Add elements into it and return the data.
Line 12-18:
Add elements into it and return the data.
![]() Line 21:
Now add 100 at the last position.
Line 21:
Now add 100 at the last position.
![]() Finally, you can display the final data present in a_deque_object.
Finally, you can display the final data present in a_deque_object.
Example 2
Here, we will create an ArrayDeque collection with 5 Strings and insert some elements at the last position continuously.
import java.util.*;import java.util.ArrayDeque;public class Main{
public static void main(String[] args) {
// Create ArrayDeque named a_deque_object with String type
Dequea_deque_object = new ArrayDeque();
// Insert 5 elements into a_deque_object.
a_deque_object.add("Potassium");
a_deque_object.add("Hydrogen");
a_deque_object.add("Helium");
a_deque_object.add("Oxygen");
a_deque_object.add("Magnesium");System.out.println("Actual Data present in a_deque_object: "+ a_deque_object);
//Add "HCL" to a_deque_object at the last position
a_deque_object.addLast("HCL");System.out.println("Data present in a_deque_object after adding HCL: "+ a_deque_object);
//Add "H2SO4" to a_deque_object at the last position
a_deque_object.addLast("H2SO4");System.out.println("Data present in a_deque_object after adding H2SO4: "+ a_deque_object);
//Add "H2O" to a_deque_object at the last position
a_deque_object.addLast("H2O");System.out.println("Data present in a_deque_object after adding H2O: "+ a_deque_object);
//Add null to a_deque_object at the last position
a_deque_object.addLast(null);System.out.println("Data present in a_deque_object after adding null: "+ a_deque_object);
}}
Output:
![]() So we inserted three elements one by one at last.
Explanation
Line 9:
Create an ArrayDeque named a_dequeobject with string type.
So we inserted three elements one by one at last.
Explanation
Line 9:
Create an ArrayDeque named a_dequeobject with string type.
![]() Line 12-18:
Add elements into it and return the data.
Line 12-18:
Add elements into it and return the data.
![]() Line 21,22:
Now add “HCL” at the last position and return a_deque_object.
Line 21,22:
Now add “HCL” at the last position and return a_deque_object.
![]() Line 25,26:
Now add “H2SO4” at the last position and return a_deque_object.
Line 25,26:
Now add “H2SO4” at the last position and return a_deque_object.
![]() Line 29,30:
Now add “H2O” at the last position and return a_deque_object.
Line 29,30:
Now add “H2O” at the last position and return a_deque_object.
![]() Line 33,34:
Now add null at the last position.
You can see the exception raised.
Line 33,34:
Now add null at the last position.
You can see the exception raised.
![]()
Conclusion
We saw how to add elements at the first position of the ArrayDeque collection object using the addFirst() method and at the last position of the ArrayDeque collection, the object using the addLast() method.
If we provide null as a parameter to both methods, NullPointerException is raised.
We found that the addLast() method is similar to the add() method in its functionality.
Maximum Call Stack Size Exceeded Error | Explained
Recursive functions are functions that call a method within another method.
However, infinite recursion causes a stack size error.
The stack size error occurs due to the pending of many requests.
This problem arises when calling the function itself.
By considering it, this article explains that the maximum call stack size exceeds the error.
Moreover, the solution is also provided to resolve the error.
The article serves us as follows:
Maximum Call Stack Size Exceeded Error
Using if Condition to resolve the maximum call stack size exceeded error
Using for loop to resolve the maximum call stack size exceeded error.
Maximum Call Stack Size Exceeded Error
The stack size exceeded error occurs when the user calls the recursive function.
This type of error occurs due to repeatedly invoking a method.
The fun_user() is utilized as a recursive call inside the function fun_user() to generate an error in the console window.
Code
console.log("Maximum call stack size exceeded");
fun_user();function fun_user(){
fun_user();}
In this code, the “maximum call stack size exceeded error” is generated by calling a method “fun_user()” inside the function.
![]() The code displays the error as “RangeError: Maximum call stack size exceeded.”
There are many ways to resolve this error, such as for loop and conditional statements, which can be used to limit the function call.
The code displays the error as “RangeError: Maximum call stack size exceeded.”
There are many ways to resolve this error, such as for loop and conditional statements, which can be used to limit the function call.
Solution 1: Using if Condition to resolve the maximum call stack size exceeded error
To resolve the error, the if condition is applied to restrict the stack size.
For instance, the code is given below.
Code
var i=1;
fun_user(i);function fun_user(i){if (i <= 10){
console.log('Welcome to JavaScript');i=i+1;
fun_user(i);}}
The description of the code is as follows:
Firstly, a variable “i” is initialized with the value 1.
After that, fun_user() method is employed by passing the variable “i”.
In this function, if condition is applied that restricts the iteration to 10.
Finally, the message “Welcome to JavaScript” is displayed using the “console.log()” method.
![]() Output
Output
![]()
Solution 2: Using for Loop to Resolve the Maximum Call Stack Size Exceeded Error
To resolve the error, a for loop is utilized to limit the iterations.
For instance, the code is given below.
Code
let output = 0;for (let i = 5; i > 0; i--){
output += add(1, 1);}function add(a, b) {return a + b;}
console.log(output);
In this code:
The variable “output” is initialized with a value of 0.
After that, a for loop is utilized to perform five iterations.
In this loop, the add() method is called by passing the value 1.
The method add() returns the addition of two variables a and b.
In the end, thelog() method is employed to display the output in the console window.
![]() Output
Output
![]() The output returns “10” by resolving the error of the maximum call stack size.
The output returns “10” by resolving the error of the maximum call stack size.
Conclusion
The infinite calling of recursive functions occurs as the “maximum call stack size exceeded error”.
This article explains the reasons for causing this type of error.
Afterward, two solutions, including “for loop” and “conditional statements” are utilized to resolve the error.
Hence, the calling functions are restricted by employing these solutions.
How to Wait for Promises to Get Resolved
Promises are widely used features in the JavaScript programming language.
Promises have a key role to wait until the execution of specific tasks is completed.
It allows the user to execute the next task after completing a task.
This post demonstrates the promise to wait by utilizing the resolve() method.
It is useful for callback functions that execute a piece of code based on user needs.
Moreover, it can manage the flow control of asynchronous events, where parallel events are called.
Why Promises Are Required?
JavaScript can perform one task at a given time in a sequential way.
However, executing the code in parallel causes some issues.
For example, if a user sets 5 seconds for the setTimeOut() method, the JavaScript will execute the next part of the code before completing the previous task.
Therefore, promises are required to wait until the current task is executed.
Working of Promises
A promise is a JavaScript-based object that returns a value after completing or in-completing an asynchronous task.
The completed task refers to the resolve function call, while the incomplete task indicates the reject function call.
The syntax is provided here by considering the promise with the resolve function call.
Syntax
Promise.resolve(value);
The syntax returns a promise “object” that resolves the passing value.
Different States of Promise
Promise is created by utilizing the constructor.
A promise is an object that contains three forms, “fulfilled”, “rejected”, and “pending” and are described below:
fulfilled: refers to the promise being resolved.
rejected: indicates that the promise has been rejected.
pending: specify the initial state before the promise is rejected or resolved.
Note: The promise is mostly used for asynchronous operations.
But users can reject or resolve the operation by synchronizing.
Let us practice different examples are considered to wait for the promise with different time periods.
Example 1: Waiting for 3 Seconds
An example is followed by utilizing the promise to wait for 3000 milliseconds.
Code
console.log('Example to wait for promises to get resolved');
const p1 = new Promise((resolve, reject) => {
setTimeout(() => {
console.log('First promise resolved');}, 3000);});
In this code:
Firstly, the “Promise” constructor is called by a new keyword.
After that, callback a setTimeout() method by passing a string “First promise resolved” and “3000” milliseconds.
Hence, the passing string waits 3 seconds to resolve the promise.
![]() Output
Output
![]() The output shows that a message “First promise resolved” is displayed after 3 seconds.
The output shows that a message “First promise resolved” is displayed after 3 seconds.
Example 2: Using the “async” and “await” Keywords to Wait for a Promise
Another example is considered by utilizing the async and await keywords to wait for promises.
The code is provided below.
Code
console.log('Promises to get resolved');
async function info() {
const promise = new Promise(resolve =>
resolve('Welcome to JavaScript'));
const txt = await promise;
console.log(txt);return txt; }
info()
![]() In this code:
Firstly, function info() is employed with the “async” keyword that returns the promise.
After that, the “Promise” constructor is called with a new keyword and a callback to the “resolve()” method.
A message “Welcome to JavaScript” is passed as an argument to resolve the method.
The “async” keyword is permitted with the “await” keyword.
The await keyword is utilized to wait for promises and store them in the “txt” variable.
In the end, the info() method is called to return the “txt” variable.
Output
In this code:
Firstly, function info() is employed with the “async” keyword that returns the promise.
After that, the “Promise” constructor is called with a new keyword and a callback to the “resolve()” method.
A message “Welcome to JavaScript” is passed as an argument to resolve the method.
The “async” keyword is permitted with the “await” keyword.
The await keyword is utilized to wait for promises and store them in the “txt” variable.
In the end, the info() method is called to return the “txt” variable.
Output
![]() The output returns a message “Welcome to JavaScript” by employing the resolve method of promise.
The output returns a message “Welcome to JavaScript” by employing the resolve method of promise.
Example 3: Wait for 2 Seconds Using “async” and “await” Keywords
The following code is carried to wait for promises to get resolved using the async and await keywords.
console.log('Promises to get resolved');
async function wait_tim() {let p2 = await promise;
console.log(p2);}let promise = new Promise(resolve => {
setTimeout(() => resolve('JavaScript'), 2000);});
wait_tim();
The explanation of the code is as follows:
Firstly, the wait_tim() method is defined with the “async” keyword that returns the promise.
Furthermore, the await keyword is employed to wait for a promise and store it in the “txt” variable.
After that, the “Promise” constructor is called with a new keyword that calls back a resolve method.
In this method, the setTimeout() method is utilized by passing a string “JavaScript” and “2000” milliseconds.
In the end, the “wait_tim()” method is called to wait “2 seconds” to resolve the promise.
![]() Output
Output
![]() The output shows that a message “JavaScript” waits for 2 seconds before printing on the console.
The output shows that a message “JavaScript” waits for 2 seconds before printing on the console.
Conclusion
JavaScript provides a Promise.resolve() method to wait for promises and returns a promise object which is resolved by providing a given value.
This article explains the workings of a promise object along with syntax.
The method is useful for controlling the flow of asynchronous events, where parallel events are called.
Moreover, numerous examples are provided to wait for the promise by employing the setTimeout() method.
How to Wait for a Function to Finish
JavaScript is asynchronous in nature and does not wait for the execution of code.
Therefore, it is a challenging task to wait for a piece of code before executing another piece.
In this way, users prioritize the specified functions that execute first, while others are in the waiting queue.
This post demonstrates the various possibilities for waiting for a function to finish.
The content of this post is as follows:
How to Wait for a Function to Finish
Using a Callback Function With setTimeout() to Wait for a Function to Finish
Using await Keyword and setTimeout() to Wait for a Function to Finish
How to Wait for a Function to Finish?
By default, the execution of JavaScript code is asynchronous.
It represents that JavaScript does not wait for a function to complete before starting on the other parts of the code.
A callback function is employed to execute the code in such a way that the user waits for a function to finish before the execution of the next piece of code.
The async/await keywords are used in the asynchronous environment to wait for a function to perform further execution.
The objective of these keywords is to suspend the operation in an async function by giving commands from the promise object to execute or not.
Method 1: Using a Callback Function With setTimeout() to Wait for a Function to Finish
A callback function is adapted with the setTimeout() method to wait for a function before proceeding with the further execution.
Let us practice via the following example code:
Code
console.log("An example to use setTimeout");function first() {
console.log("1st Call");}function second() {
console.log("2nd Call");}function third() {
console.log("3rd Call");}
setTimeout(function () {
first();}, 3000);
second();
third();
The description of the code is as follows:
The “first()”, “second()” and “third()” methods are utilized to display some information by employing the “log()” method.
Now, the “setTimeout()” method is employed by calling a function “first()” and “3000” milliseconds
After that, the “second()” and “third()” methods are called to execute the pieces of code present in these methods.
![]() Output
Output
![]() The output returns the executable code in such a way that the “second()” and “third()” methods are executed after the complete execution of the “first()” method.
The output returns the executable code in such a way that the “second()” and “third()” methods are executed after the complete execution of the “first()” method.
Method 2: Using await Keyword and setTimeout() to Wait for a Function to Finish
Another method is practiced by utilizing the await keyword and setTimeout() method to wait for a function to finish.
The method works with a promise object to fulfill the operation.
The example code is provided below:
Code
console.log("An example to use async/await keyword");
async function Fun(){
console.log("Welcome to JavaScript");
await Async();
console.log("Welcome to Linuxhint");}function Async(){return new Promise((res)=>{
setTimeout(()=>{
res();} , 3000);});}
Fun();
The description of the code is given below:
A function “Fun()” is utilized with the “async” keyword.
In this function, the “Async()” method is employed with the “await” keyword to wait for a function.
In the “Async()” method, a callback method “res()” is used with the “setTimeout()” method by passing “3000 milliseconds (3 seconds)”.
![]() Output
Output
![]() It is observed in the output that the message “Welcome to JavaScript” is displayed first and then a wait of 3 seconds is encountered.
After that, the further execution continues, containing the message “Welcome to Linuxhint”.
It is observed in the output that the message “Welcome to JavaScript” is displayed first and then a wait of 3 seconds is encountered.
After that, the further execution continues, containing the message “Welcome to Linuxhint”.
Conclusion
JavaScript provides a setTimeout() method which can work with the callback function and the await keyword to wait for a function to finish.
The objective of employing these methods is to execute a piece of code after waiting for a specific time.
The await keyword is utilized with a promise object that rejects or resolves the request.
Remember, both methods are integrated with the setTimeout() method.
This post has demonstrated the possible methods for waiting for a function to complete.
How to Use Not in Operator
The “Not” operator is famous for reversing the logical state of any value.
Moreover, it is helpful to validate a specified property in a large list of object properties.
It evaluates whether a certain property already exists in the object or not and returns a Boolean output (true or false values).
This post focuses on practicing the Not in operator.
How to Use Not in Operator?
In JavaScript, the Not (!) operator is employed to contradict any expression.
It is applied with the “in” operator to check the existence of the properties in the object.
Additionally, you would have experienced the “Not in” operator, which is utilized to validate the existence of a property and insert it into the object if it is not present.
Both methods return Boolean output (true or false values) based on the passing property name.
Let us experience the usage of the Not in operator with the help of suitable examples.
Example 1: Using the Not (!) in Operator
An example is considered to contradict the statement by employing the “Not in” operator.
The operator evaluates the presence of a property in the existing object by returning a Boolean output.
For instance, the code is as follows.
Code
console.log("Example to use the Not in Operator");
const teacher_info = {
name: 'Peter',
age:25,
subject: "English",};if (!('contact' in teacher_info)){
teacher_info.contact = "332214353";}
console.log(teacher_info);
The above code is described below:
Firstly, a “teacher_info” object is initialized with “name”, “age” and “subject” properties.
These properties have “Peter”, “25” and “English” values.
After that, the “! in” operator is utilized to evaluate the presence of the “contact” property in the “teacher_info” object.
If the “contact” property is not in the “teacher_info” object, then assign a value of “332214353” to the “contact” property.
Finally, the log() method is employed to display the “teacher_info” object in the console window.
![]() Output
Output
![]() Earlier, the “contact” property was not present in the object.
After applying the “Not in” operator, the if condition is true and therefore the “contact” property is added to the object as shown in the output.
Earlier, the “contact” property was not present in the object.
After applying the “Not in” operator, the if condition is true and therefore the “contact” property is added to the object as shown in the output.
Example 2: Using the Not (!) in Operator
The Not operator is integrated with the “in” operator to evaluate the existence of a property in the object.
The following code aims to validate whether the new property is present or not in the existing object properties.
Code
console.log("Example to use the Not Operator");
const teacher_info = {
name: 'Peter',
age:25,
subject: 'English',};if (!('country' in teacher_info)){
teacher_info.country = "USA";}
console.log(teacher_info);
The code is explained in a list:
An object named “teacher_info” is created with different properties.
These properties include name, age, and subject, having “Peter”, “25” and “English” values.
After that, “Not in” operator is utilized to check the “country” property in the “teacher_info” object.
If the “country” property is not present in the “teacher_info” object, then assign the “USA” value.
In the end, the log() method is adapted to present the “teacher_info” object in the console window.
![]() Output
Output
![]() The expected outcome returns the property with the value “country: ‘USA'”, which is not present in the “teacher_info” object.
It is possible through “Not in” in JavaScript.
The expected outcome returns the property with the value “country: ‘USA'”, which is not present in the “teacher_info” object.
It is possible through “Not in” in JavaScript.
Conclusion
In JavaScript, the “Not in” operator is utilized to validate the existence of a specific property by passing an argument.
It is useful to check if the new property exists or not in the existing object properties.
The method can be applied with the “Not” operator to evaluate the specified property in the current properties of the object.
This post enlightens a brief explanation of the “Not in” operator along with two practical examples.
How to use Nested Objects
JavaScript can store data through key-value pairs.
The key-value pairs are associated with the JavaScript objects.
Objects contain properties that can be stored in nested objects.
These nested objects are created within other objects and accessed through dot or bracket notation.
Here, we will demonstrate the way to use nested objects.
The outcomes of this post are as follows:
How to Create Nested Objects
How to Use Nested Objects
How to Create Nested Objects?
An object is the most essential part of any programming language to assign or modify properties in any program.
Nested objects have their own importance that is present inside objects.
These objects contain the properties of objects.
The following example code explains how a nested object is created:
Code
console.log("An example to create nested objects")
const data = {
id: 009,
email: 'abc@linuxhint.com',
contactInfo: {
name: 'Harry',
address: {
city: 'Berlin',
country: 'Germany'}}}
console.log(data)
The description of the code is as follows:
An object “data” is created that contains multiple properties, including “id”, “email”, “contactInfo”, “name”, “address”, “city” and “country”.
The nested objects such as “contactInfo” and “address” can be retrieved through the dot operator.
In the end, thelog() method is used to present all the object properties of “data”.
![]() Output
Output
![]() It is observed that nested objects “id”, “email” and “contactInfo” are displayed in the console window.
It is observed that nested objects “id”, “email” and “contactInfo” are displayed in the console window.
How to Use Nested Objects?
The nested objects are utilized to store the object’s properties with another object.
The dot and square bracket notations are employed to access the properties of objects.
Mostly, the object properties are retrieved to use in any piece of code.
The properties of the objects and nested objects are retrieved using one of the following syntaxes:
> object.property> object['property']
In the first syntax, the dot operator is used, while the second way is to access the property using bracket notation.
Let us practice the use of nested objects via the following example.
Example
In this method, first nested objects are created, and after that, a specific nested object’s property is accessed via dot notation.
The following example code addresses the issue:
Code
const teacher = {
name: "Brown",
address: {
area: {
street: "oxford university road",},
city: "London",
country: "England"},}
console.log(teacher.address.area);
The code is described as:
Firstly, a “teacher” object is initialized in which the “address” as a nested object is utilized.
The “address” object contains the properties “area”, “city”, and “country” which can be accessed through dot as well as square bracket notation.
In the end, the log() method is employed by passing the “teacher.address.area” as an argument.
![]() Output
Output
![]() The output shows that the “street” object is accessed as a nested object and displays the value “oxford university road” in the console window.
The output shows that the “street” object is accessed as a nested object and displays the value “oxford university road” in the console window.
Conclusion
Nested objects are utilized to store the properties of an object in another object.
These objects can be accessed through dot as well as bracket notation.
These nested objects are useful for storing the different properties and specifying the value based on user needs.
This post has provided a way to create as well as use nested objects.
How to use JavaScript Append Array to Another
An array is a combination of similar types of elements.
Similarly, combinations of arrays provide meaningful information to the users.
JavaScript provides a way to append two or more arrays.
It is useful to add one or multiple elements in an existing array.
For instance, the push() method is employed to add elements to the array.
Moreover, the concat() method is adapted to concatenate the two arrays.
This post demonstrates various methods to append an array to another.
The following learning outcomes are expected:
Using the push() Method
Using the concat() Method
Method 1: Append Array Using the push() Method
JavaScript provides a push() method integrated with the for loop to append elements of one array into another array.
It extends the existing array by the addition of new elements.
The syntax of the push() method is:
Syntax
array.push(element1, element2, ..., elementsn)
In this syntax, “element1”, “element2”, …. “elementsn” will be appended into an array.
Code
console.log("An example to append array");
var first_level = [100, 200, 300];
var second_level = [400, 500];for (var i of second_level) {
first_level.push(i);}
console.log(first_level);
In this code:
An array is initialized with the name “first_level” and has elements “100”, 200, 300” in it.
After that, another “second_level” array is created containing two elements “400” and “500”.
A “for loop” is used to iterate over the elements of “second_level” array and push them one by one to the “first_level” array.
Finally, thelog() method is employed to present the complete array in the console window.
![]() Output
Output
![]() It is observed in the output console that all the elements of “second_array” are appended to the “first_array”.
It is observed in the output console that all the elements of “second_array” are appended to the “first_array”.
Method 2: Append Array Using the concat() Method
JavaScript provides a concat() method to append an array to another array.
The concat() method can append multiple arrays to another.
Let us look at the syntax of the concat() method:
Syntax
array1.concat(array2, array3, ..., arrayN)
The syntax shows that array2, array3 up to arrayN are concatenated to array1.
Code
console.log("An example to append array");
array1 = ['cricket', 'football'];
array2 = ['hockey', 'basketball'];
array3 = ['volleyball', 'snooker'];
sports = array1.concat(array2, array3);
console.log(sports);
The description of the code is provided here:
The “array1”,”array2” and “array3” are initialized with two elements each.
After that, the “concat()” method is employed to append two arrays, “array2” and “array3” into “array1”.
The concatenated array is stored in a new array named “sports”.
In the end, thelog() method is employed to display the appended array “sports”.
![]() Output
Output
![]() The output returns the appended array “sports” by utilizing the “concat()” method.
That is all! You are now able to use JavaScript to append one or multiple arrays.
The output returns the appended array “sports” by utilizing the “concat()” method.
That is all! You are now able to use JavaScript to append one or multiple arrays.
Conclusion
JavaScript provides the push() and concat() methods to append two or more arrays into one.
The push() method is adapted with a for loop to append all the elements of arrays.
While the concat() method is employed to append multiple arrays into one.
These methods are useful for developers to visualize data from multiple arrays in one place.
This article has guided you on various methods of JavaScript to append arrays to another.
How to Use Image onload Event
In JavaScript, the Image “onload” event occurs when the image is loaded successfully on a web page.
This feature can be utilized when we need to load images on our web pages to make them attractive.
Image onload event is also used in the development of websites that display the products’ images, logos, and banners.
This article will highlight the image onload event using JavaScript.
How to Use Image onload JavaScript Event?
You can utilize the following methods for performing image onload event operation:
querySelector()
User-defined function
We will now go through each of the mentioned approaches one by one!
Method 1: Use Image onload Event with document.querySelector()
The “document.querySelector()” method is primarily used to return the first element that matches with a particular selector within the document.
For instance, it can be utilized to define an event for accessing an image from the HTML file.
The below-given example will use the document.querySelector() method to define an image on load event.
Example
First, we will add the image source “src” in the HTML file:
<img src="E:\JOB TECHNICAL ARTICLES\image.PNG">
Now, move to the JavaScript file and call the “addEventListener()” method with the window object.
This method will be used to add an event listener to load the desired image with the help of the “document.querySelector()” method.
After that, add a pop-up alert with the stated message:
window.addEventListener("load", event => {
var img = document.querySelector('img');
alert("Image is Loaded Successfully");});
Lastly, specify the source of the JavaScript file in the head or body tag:
<script src="image onload 2.js"></script>
Opening the given HTML file will show the following output:
![]() After loading the selected image, the following alert box will also pop up with a message:
After loading the selected image, the following alert box will also pop up with a message:
![]()
Method 2: Use Image onload Event with User-defined Function
A user-defined function can also be utilized for the image on loading process, which is accessed in “HTML” file via “onload”.
This function will return the image status in an alert box.
Check out the following example to understand the stated concept.
Example
First, we will define an “Imageonload()” function and show the status of the image to be loaded via alert box:
function Imageonload() {
alert("Image is loaded successfully");}
Next, we will add the path of the image that needs to be downloaded and call the defined “Imageonload()” function as “onload” event.
Moreover, we will also specify the source of the JavaScript file in the HTML file:
lt;img src="E:\JOB TECHNICAL ARTICLES\image.PNG" onload="Imageonload()" ><script src="image onload 2.js"></script>
Output
![]() We have provided different methods to use the image onload event.
We have provided different methods to use the image onload event.
Conclusion
To use the image onload event, you can use the document.querySelector() method or user-defined function.
In the first approach, the addEventListener() method is called with the window object used to add an event listener to the document.querySelector() method.
For the second approach, a user-defined object can be created, which is accessed in the HTML file via onload event.
This write-up discussed the method to use an onload JavaScript event.
Validation of File Size While Uploading Using JavaScript / jQuery
Data validation is an essential part of any web application as it helps ensure that the data being uploaded fits certain requirements imposed by the developers.
Data can be validated on both server and client side but client-side validation often saves users’ time and proves nicer, smoother user experience.
Client-side data validation can be done easily and consumes much less time.
In this how-to-do guide we will go through the process of creating a form using HTML, JavaScript/jQuery which validates the file of the size as it is being uploaded.
The benefit of this validation is that we can restrict users to upload only a certain size of files and make sure that they strictly follow our requirements.
If the file is of the wrong size, we can prompt a message to the user without uploading the file to the server which saves precious time.
Create Webpage
First, we’ll create a simple HTML webpage:
<!DOCTYPE html><html> <head>
<title>
Validation of file size while uploading using JavaScript / jQuery
</title> </head> <body style="padding-top: 10px; text-align:center;">
<p>Upload a file</p>
<input id="file" type="file" style="padding-left: 95px;"/>
<br><br>
<button onclick="sizeValidation()">Upload</button>
</body> </html>
![]() Understanding the Code:
In the body of the webpage, we have simply used a <p>, <input>, <br> and a <button> tag.
The <input> tag is used so the user can choose a file and then upload it using the button displayed by using the <button> tag.
The <button> tag calls the sizeValidation() function on click event which then determines the size of the file and prints an appropriate alert depending on the size of the file.
Understanding the Code:
In the body of the webpage, we have simply used a <p>, <input>, <br> and a <button> tag.
The <input> tag is used so the user can choose a file and then upload it using the button displayed by using the <button> tag.
The <button> tag calls the sizeValidation() function on click event which then determines the size of the file and prints an appropriate alert depending on the size of the file.
Define JavaScript sizeValidation() Function
Now let’s write the JavaScript code which defines the sizeValidation() function.
<script>
function sizeValidation() {
var input = document.getElementById('file');
var file = input.files;
if(file.length==0){
alert("No File Chosen");
return false;
}
var fileSize = Math.round((file[0].size / 1024));
if (fileSize <= 5*1024) {
alert("Uploaded");
} else {
alert(
"Error! File too large");
}
}
</script>
Understanding the Code:
Inside the body of the sizeValidation() function we first get the <input id=”file” /> tag and then use the var file = inputElement.files; line so we can get access to the file being uploaded.
Then we check if a file has been uploaded, if not, we will prompt an error message and get out of the function by returning false.
![]() We then use some mathematics to determine the size of the file.
If the file is of appropriate size i.e., 5MB (in this case), it is uploaded.
We then use some mathematics to determine the size of the file.
If the file is of appropriate size i.e., 5MB (in this case), it is uploaded.
![]() Otherwise, a pop-up containing an error message is displayed.
Otherwise, a pop-up containing an error message is displayed.
![]()
Conclusion
Even though client-side validation is a lot more efficient, it is still not a substitute for server-side validation and can be circumvented in most cases.
It is always a best practice to implement both server and client-side validation so that you can ensure both efficiency and accuracy of your application.
Password Matching Using JavaScript
Confirm password fields are necessary to include when making online forms which ask users to set a password.
The password field hides the user’s input by default making it necessary to have some kind of mechanism which allows users to confirm that they have written the right password without making any typos.
The confirm password field prompts the user to recheck their password if they mistype any characters and the password and confirm password fields do not match.
In this post our goal is to make an HTML form which matches the user’s input in the Password and Confirm Password fields to confirm whether the user has typed the right password or has made any typos.
Step 1: HTML Form
The first step is to make an HTML form which takes the user’s input:
<center>
<h2>Linux Hint</h2>
<form>
<p> Enter Password </p>
<input type = "password" id="pass"> <br><br>
<p> Confirm Password </p>
<input type = "password" id = "confirmpass"> <br><br>
<button type = "submit" onclick="passwordConfirmation()">Log in</button>
</form> </center>
![]() We have created a simple HTML form which has two input fields of type password and a Login button which calls the passwordConfirmation() function when it is clicked.
We have created a simple HTML form which has two input fields of type password and a Login button which calls the passwordConfirmation() function when it is clicked.
Step 2: JavaScript Form Validation
Now we will write JavaScript code inside the passwordConfirmation() function which validates the password:
function passwordConfirmation() {
var password = document.getElementById("pass").value;
var confirmPassword = document.getElementById("confirmpass").value;
if (password == "") {
alert("Error: The password field is Empty.");
} else if (password == confirmPassword) {
alert("Logged In");
} else {
alert("Please make sure your passwords match.")
}}
Inside the passwordConfirmation() function we first get the values of password and confirm password fields and store them inside variables.
We then use conditional statements to check for different cases.
Case 1: Password field is empty
The first conditional checks whether the password field is empty.
We prompt the user to type in the password if the field is empty:
![]() Case 2: Passwords match
In case the passwords match the user successfully logs in:
Case 2: Passwords match
In case the passwords match the user successfully logs in:
![]() Case 3: Passwords do not match
If the passwords do not match, we ask the user to retype the passwords and make sure they match:
Case 3: Passwords do not match
If the passwords do not match, we ask the user to retype the passwords and make sure they match:
![]() The JavaScript and HTML code together looks something like this:
<!DOCTYPE html><html>
<body>
<center>
<h2>Linux Hint</h2>
<form>
<p> Enter Password </p>
<input type = "password" id="pass"> <br><br>
<p> Confirm Password </p>
<input type = "password" id = "confirmpass"> <br><br>
<button type = "submit" onclick="passwordConfirmation()">Log in</button>
</form>
</center>
</body>
<script>
function passwordConfirmation() {
var password = document.getElementById("pass").value;
var confirmPassword = document.getElementById("confirmpass").value;
if (password == "") {
alert("Error: The password field is Empty.");
} else if (password == confirmPassword) {
alert("Logged In");
} else {
alert("Please make sure your passwords match.")
}
}
</script></html>
The JavaScript and HTML code together looks something like this:
<!DOCTYPE html><html>
<body>
<center>
<h2>Linux Hint</h2>
<form>
<p> Enter Password </p>
<input type = "password" id="pass"> <br><br>
<p> Confirm Password </p>
<input type = "password" id = "confirmpass"> <br><br>
<button type = "submit" onclick="passwordConfirmation()">Log in</button>
</form>
</center>
</body>
<script>
function passwordConfirmation() {
var password = document.getElementById("pass").value;
var confirmPassword = document.getElementById("confirmpass").value;
if (password == "") {
alert("Error: The password field is Empty.");
} else if (password == confirmPassword) {
alert("Logged In");
} else {
alert("Please make sure your passwords match.")
}
}
</script></html>
Conclusion
Humans can often make mistakes but that shouldn’t bar them from logging into their accounts.
Even the slightest mistake in entering a password can restrict a user’s access to their account.
So, it is always a good idea to double check a user’s password to confirm they have entered the right one.
Implementation of Stack
Stacks are linear data structures which follow the principle of LIFO.
LIFO stands for last in first out meaning that the most recently added item is the first one to be removed.
This data structure is named stack as an analogy to real world stacks e.g., a stack of cookies in a cookie jar or a stack of books on a bookshelf.
In stack insertion and extraction can only be done on one end i.e., the top of the stack.
For example, if we want to eat a cookie, we will get the top one first and then the 2nd and so forth.
This post will be all about the implementation of stack.
As we are working with JavaScript we won’t be worried about the size of the stack as the size of the JavaScript objects can grow dynamically.
Implementation of Stack
We will use a JavaScript class to implement the stack data structure.
The stack class will contain an array in its constructor which will be used to store elements in the stack.
The class will also define different methods which will be used to manipulate the data stored inside the stack.
The most basic methods of the array are the insert() and extract() methods which are used to add and remove elements from the top of the stack.
The stack class also defines other methods such as peek(), isEmpty(), clear(), print() and size() as well:
class stack {
constructor() {
this.elements = [];
}
//Places an item on top of the stack
insert(element) {
this.elements.push(element);
}
//Removes an item from the top of the stack
extract() {
this.elements.pop();
}
//Returns the top most element of the stack
peek() {
return this.elements[this.elements.length - 1];
}
//Checks if stack is empty
isEmpty() {
return this.elements.length == 0;
}
//Prints the whole stack
print() {
for (let i = 0; i < this.elements.length; i++) {
console.log(this.elements[i]);
}
}
//Returns the size of the stack
size() {
return this.elements.length;
}
//clears the stack
clear() {
this.elements = [];
}}
Pushing and Popping elements from the stack
The most basic operation of the stack is to insert and extract elements from the top of the stack.
The stack class provides two methods for these operations:
![]() The first line of the above-mentioned code declares a new stack named s.
Then the insert() method is used to insert four elements to the stack, two of which are then removed by the extract() method.
How to get the top element from the stack
The stack class defines the peek() method to get the top element from the stack:
The first line of the above-mentioned code declares a new stack named s.
Then the insert() method is used to insert four elements to the stack, two of which are then removed by the extract() method.
How to get the top element from the stack
The stack class defines the peek() method to get the top element from the stack:
![]() How to check if the stack is empty?
The class also defines a method which can be used to check if the stack is empty:
How to check if the stack is empty?
The class also defines a method which can be used to check if the stack is empty:
![]() How to print the whole stack?
The print() method can be called to print the whole stack
How to print the whole stack?
The print() method can be called to print the whole stack
![]() How to check the size of the stack?
The size() method uses the .length property to get the size of the stack:
How to check the size of the stack?
The size() method uses the .length property to get the size of the stack:
![]() How to clear the whole stack?
Simply invoke the clear() method to remove every element of the stack:
How to clear the whole stack?
Simply invoke the clear() method to remove every element of the stack:
![]()
Conclusion
Stacks are useful data structures with many real-world applications such as browser history, undo button in text editors and call logs.
All of these applications follow the LIFO principle e.g., the back button in the browser takes back to the last visited page and the first entry of the call log is always the latest call.
The implementation of stack is really easy as it has the inbuilt push and pop methods for arrays.
This article demonstrates the process of implementation of stack.
How to Wait for X Seconds
Modern programming languages support the sleep() method to wait for the execution of a program.
JavaScript is unable to use this method due to its asynchronous nature.
However, JavaScript achieves this task using the setTimeout() method.
The method has the facility to wait for x seconds during the code execution to serve the specific purpose of the programmer.
The article demonstrates the way to wait for X seconds during code execution with the following learning outcomes:
How to Wait for X Seconds Using setTimeout() Method
Example 1: Wait for 5 Seconds
Example 2: Wait for 3 Seconds
How to Wait for X Seconds Using setTimeout() Method?
The setTimeout() method executes the piece of code when the time expires.
The method takes input time in milliseconds and delays the execution defined by the user.
The setTimeout() method takes two parameters as arguments.
The first argument refers to the callback function, which executes when the time expires.
While the other arguments represent the number of milliseconds that delay the execution.
Note: 1000 milliseconds refer to 1 second.
Syntax
window.setTimeout(funct, millisec);
The “funct” represents the callback function, and “millisec” represents the number of milliseconds.
Example 1: Wait for 5 Seconds
An example is considered for waiting 5 seconds by utilizing the setTimeout() method.
The code is provided below:
Code
console.log("An example to wait 5 seconds");
console.log("JavaScript");
setTimeout(() => {console.log("World"); }, 5000);
In this code, the built-in method setTimeout() is employed to wait for 5000 milliseconds (5 seconds).
After that, display the message “World” in the console window.
![]() Output
It is observed in the output window that “JavaScript” is printed first.
After waiting 5 seconds, the second message “World” is presented in the console.
Output
It is observed in the output window that “JavaScript” is printed first.
After waiting 5 seconds, the second message “World” is presented in the console.
Example 2: Wait for 3 Seconds
As JavaScript is asynchronous in nature, it can execute parallel functions.
For this purpose, an example is considered to wait for 3 seconds in an asynchronous way.
For this purpose, the code is given here.
Code
console.log("An example to wait 3 seconds");wait();
async function wait() {
console.log("Welcome to JavaScript");
await sleep(3000);
console.log("Welcome to Linuxhint");
}
function sleep(ms) {
return new Promise(val => setTimeout(val, ms));
}
The description of the code is given below:
The “wait” method is employed in an asynchronous way.
In this method, “3000” milliseconds are passed to the sleep() method for delaying 3 seconds.
In the sleep() method, the “Promise” object is employed to execute the operation in an asynchronous way.
In the end, the setTimeout() method is employed by passing the milliseconds “ms”.
![]() Output
The output shows the executable code and displays “Welcome to JavaScript.” After waiting for 3 seconds, the message “Welcome to Linuxhint” is displayed in the console window.
Output
The output shows the executable code and displays “Welcome to JavaScript.” After waiting for 3 seconds, the message “Welcome to Linuxhint” is displayed in the console window.
Conclusion
JavaScript provides a built-in method setTimeout() to wait X seconds based on user needs.
The term “X” here refers to the number of seconds.
The setTimeout() does not break the flow control of the program but delays its execution.
The time is provided in milliseconds by the user.
This post has demonstrated the usage of serTimeout() method to wait for specific seconds.
How to Get ID of Clicked Button Using JavaScript/jQuery?
Sometimes a developer has to know the ID of the button which the user has clicked to decide further course of action on a webpage.
As you will see in this write-up, this can be done through both vanilla JavaScript and jQuery.
So, let’s begin:
First, we will create a simple HTML webpage which has two buttons at the centre of the page:
<!DOCTYPE html><html>
<body>
<center>
<div style="margin-top: 50px;">
<h2>Click one of the following buttons</h2>
<button id="button_one" style="width: 100px; height:40px; margin-right: 10px;">1</button>
<button id="button_two" style="width: 100px; height:40px;">2</button>
</div>
</center>
</body></html>
![]()
How to Get the ID of the Clicked Button Using JavaScript?
We can get the ID of the clicked button using JavaScript in several different methods.
In our first method, we will get the nodelist of all the button tags and store them inside a variable.
Then we will iterate over the nodelist to get the ID of the button which has been clicked:
<script>
var buttons = document.getElementsByTagName("button");
for (let index = 0; index < buttons.length; index++) {
buttons[index].onclick = function () {
alert(this.id);
}
}
</script>
We can also set-up each button with onclick event individually:
<!DOCTYPE html><html>
<body>
<center>
<div style="margin-top: 50px;">
<h2>Click one of the following buttons</h2>
<button id="button_one" style="width: 100px; height:40px; margin-right: 10px;" onclick="alertId(this.id)">1</button>
<button id="button_two" style="width: 100px; height:40px;" onclick="alertId(this.id)">2</button>
</div>
</center>
</body>
<script>
function alertId(id) {
alert(id)
}
</script></html>
![]()
How to Get the ID of the Clicked Button Using jQuery?
jQuery also has several different methods which can be used to get the ID of a clicked button.
We’ll start with the click() method that is applied on a selector and takes a function name as an optional argument:
<!DOCTYPE html><html>
<body>
<center>
<div style="margin-top: 50px;">
<h2>Click one of the following buttons</h2>
<button id="button_one" style="width: 100px; height:40px; margin-right: 10px;" onclick="alertId(this.id)">1</button>
<button id="button_two" style="width: 100px; height:40px;" onclick="alertId(this.id)">2</button>
</div>
</center>
</body>
<script>
$("button").click(alertId($(this).attr("id")));
function alertId(id) {
alert(id)
}
</script></html>
![]() We can also use the on() method to attach event handlers to elements.
The on() method takes at least one event as an argument along with some other optional arguments:
<!DOCTYPE html><html>
<body>
<center>
<div style="margin-top: 50px;">
<h2>Click one of the following buttons</h2>
<button id="button_one" style="width: 100px; height:40px; margin-right: 10px;" onclick="alertId(this.id)">1</button>
<button id="button_two" style="width: 100px; height:40px;" onclick="alertId(this.id)">2</button>
</div>
</center>
</body>
<script>
$("button").on('click', alertId($(this).attr("id")));
function alertId(id) {
alert(id)
}
</script></html>
We can also use the on() method to attach event handlers to elements.
The on() method takes at least one event as an argument along with some other optional arguments:
<!DOCTYPE html><html>
<body>
<center>
<div style="margin-top: 50px;">
<h2>Click one of the following buttons</h2>
<button id="button_one" style="width: 100px; height:40px; margin-right: 10px;" onclick="alertId(this.id)">1</button>
<button id="button_two" style="width: 100px; height:40px;" onclick="alertId(this.id)">2</button>
</div>
</center>
</body>
<script>
$("button").on('click', alertId($(this).attr("id")));
function alertId(id) {
alert(id)
}
</script></html>
Conclusion
The ID of a clicked button can be accessed through both plain JavaScript and jQuery.
We discussed four such methods and gave in-depth detail and relevant examples in this write-up.
Top 10 Most Popular JavaScript Frameworks for Web Development
Choosing the right framework for your web-based project can mean the difference between a well-made and an ordinary project.
After learning the basics of web development every beginner runs into the question of which JavaScript framework is best for them.
As there is no official JavaScript framework, a lot of developers have made their own.
The plethora of frameworks makes the choice of choosing the right framework is even harder for beginners.
This post has been written to specify the advantages and disadvantages of different frameworks so that the process of choosing the right framework becomes easier.
But before learning about different frameworks we should first know what even is a framework:
What are JavaScript Frameworks?
Frameworks reduce redundancy and increase reusability of code by providing pre-written code which can be used to render objects on applications.
Of Course, these objects can be rendered by using plain HTML, CSS and JavaScript but the frameworks provide already written code for common tasks which can greatly reduce the time and effort put in by the developer.
Top 10 Most Popular JavaScript Frameworks for Web Development
1.
Node.js
Node.js is a framework which allows developers to run code written in runtime environments outside of web browsers.
This makes it ideal to be used for back-end, server-side development.
Node.js is beginner friendly and allows JavaScript code to be run on the server-side irrespective of the technology being used on the front-end.
As many web developers are already familiar with JavaScript, back-end development becomes easier for them with the help of Node.js.
Node.js can be used to build apps which can handle simultaneous requests and is known for its non-blocking I/O model.
Node.js is suitable for building highly-scalable, real-time applications which are data intensive and have microservices.
It is being used by international companies like PayPal, Netflix and Walmart.
2.
Vue.js
Vue.js is one of the fastest, lightweight, open-source frameworks of JavaScript which has made its name in the dev community in a very short amount of time.
It is used to build faster, creative UIs using shadow DOM.
Vue.js is easy to learn for beginner web developers who already have basic knowledge of HTML and JavaScript.
It is even being used by big companies like stackoverflow.
Vue.js is ideal for interactive elements, graphics and animations.
Some of its features include CLI for faster development of plugins and instant prototyping, dual integration mode, templates and two-way data binding.
3.
Angular
Angular is another feature rich TypeScript based JavaScript framework which is open source and is mainly used to build Single Page Applications.
Developed and operated by Google, this framework is being used by many Google app developers.
Google itself uses Angular for many of its sites like YouTube and Gmail.
Google’s support makes this framework extra reliable.
Angular offers two-way data binding and is best suited for video-streaming, real-time data and e-commerce apps.
Angular supports a component-based structure which is very similar to React.
4.
Backbone.js
In this framework all back-end functions flow through an API resulting in simplicity of complex UI design and avoidance of spaghetti code as complex functionalities can be implemented using a lot less code.
It is adaptable, easy to integrate and is best for developing SPA (single-page applications).
Backbone.js uses the MVC design paradigm and gives developers the option to select the tools which work best for them.
5.
ReactJs
ReactJs is technically not a framework, rather it is a library of JavaScript but it’s strong ecosystem and flexibility allows developers to build entire frameworks around it.
Originally created by Facebook to manage Facebook Ads, ReactJs was later made available to the public and quickly rose in popularity.
ReactJs is most suited to be used in large scale applications which are rich in features.
Overall ReactJs is easy to learn and maintain, SEO friendly, fast rendering library which provides reusable coding structures which make it easier to build dynamic web applications.
6.
Ember.js
Ember.js is another well thought out JavaScript framework for front-end web development.
It is the best choice for modern, scalable, large web apps but can also be used for smaller projects.
It has many features built into it like a CLI, a great collection of add-ons and tons of other features and libraries.
Its plethora of features also come with a disadvantage which is the size of the framework.
In addition to being harder to learn, it is also really heavy and can be too big for smaller projects.
Ember.js has a strong community and well written documentation which makes it ideal for long term projects.
7.
Svelte JS
Svelte JS is another efficient front-end web framework which is used to build static lean web applications.
The most unique thing about Svelte JS is that it compiles code into smaller standalone framework-less JavaScript modules unlike other frameworks which make use of virtual DOM.
It has a very small community and does not have many dev tools, but it is still one of the best when it comes to creating reusable, efficient code for simple web apps.
8.
Express
Express.js is built on top of Node.js and is a back-end JavaScript framework.
It is known for its minimalistic design and great performance.
Despite its minimalistic approach it has many quality features such as middleware packages, plugins integration in server-side code and easier management of routing available.
With Express.js you can even create APIs to integrate with other applications.
9.
Meteor
Originally named skybreak, this framework was later renamed to Meteor.
This framework is an isomorphic model which means that it can render on both back and front end seamlessly without any hiccups.
In addition to being used in the back and front end it can also be used in database management as it easily integrates with MongoDB.
It provides full stack solutions and other important features such as reactive templates and minification of JavaScript on the production server.
Meteor is easy to learn, has an active/strong community and is one of the fastest ways to build cross-platform JavaScript apps.
Meteor has its own CLI and web server debugging tool along with built-in security measures.
10.
Polymer
Just like React.js, polymer is another JavaScript library which has an extensive area of application due to its flexibility and powerful features.
Built by Google this library is used to create web apps with minimal complexity.
While Angular is Google’s full-scale framework, polymer is just a library for designing web elements.
Polymer supports both one-way and two-way data binding along with offering other useful features such as allowing developers to make their own customizable, reusable elements.
Conclusion
JavaScript frameworks save a ton of time and allow developers to show extreme productivity.
The choice of the right framework can often be challenging.
One must keep in mind project requirements, complexity, compatibility and learning curve when choosing a framework for their project.
Each framework is unique and has been optimised for certain use cases.
So, it is imperative for a developer to choose the right framework.
JavaScript string.slice() Method
Strings are an essential data type and are present in almost all major programming languages.
They have a key role in storage and manipulation of data.
JavaScript strings come with several built methods which can be used to manage and manipulate them.
The slice() method is one of such methods.
slice() method
The slice() method is used to get a substring from a string by passing the starting and the ending index of the required substring without actually modifying the original string.
Syntax of the slice() method
str.slice(startingPosition,endingPosition)
The slice() method is applied on a string with the help of the dot operator.
It requires the name of the string along with the two parameters which are the starting and the ending position of the substring within the original string.
It is interesting to note that the second argument i.e., the endingPosition of the substring is totally optional.
Method 1: Using slice() Method by Passing Both Arguments
In the first method, we will use the slice() method by passing both the starting and the ending index.
var originalString = 'JavaScript string.slice() Method - LinuxHint';
var subString = originalString.slice(35,40);
console.log(subString);
console.log(originalString);
![]() We first created a variable called originalString to store a string.
We then created another variable and used the slice() method to assign it a value.
We passed 35 as the starting index and 40 as the ending index of the subString.
We then used the console.log() method to show the value of the subString on the console.
Lastly, we logged the value of the originalString to the console to show that the original string has remained unchanged.
We first created a variable called originalString to store a string.
We then created another variable and used the slice() method to assign it a value.
We passed 35 as the starting index and 40 as the ending index of the subString.
We then used the console.log() method to show the value of the subString on the console.
Lastly, we logged the value of the originalString to the console to show that the original string has remained unchanged.
Method 2: Using slice() Method by Passing a Single Argument
The slice method can also work with only one argument.
If a single argument is passed to the slice() method then it takes it as the starting index and the ending index is the end of the string by default:
var originalString = 'JavaScript string.slice() Method - LinuxHint';
var subString = originalString.slice(35);
console.log(subString);
![]()
Method 3: Using slice() Method by Passing a Negative Value as an Argument
If we pass a negative value to the slice method as an argument then it starts the indexing from the end of the string:
var originalString = 'JavaScript string.slice() Method - LinuxHint';
var subString = originalString.slice(-9);
console.log(subString);
![]() We can also pass two negative arguments:
var originalString = 'JavaScript string.slice() Method - LinuxHint';
var subString = originalString.slice(-9, -4);
console.log(subString);
We can also pass two negative arguments:
var originalString = 'JavaScript string.slice() Method - LinuxHint';
var subString = originalString.slice(-9, -4);
console.log(subString);
![]() Incorrect Arguments:
The slice() method returns an empty string in case the starting index being passed is greater than the ending index of the string:
var originalString = 'JavaScript string.slice() Method - LinuxHint';
var subString = originalString.slice(35, 30);
console.log(subString);
The slice() method also returns an empty string in case the starting index being passed is greater than the length of the original string:
Incorrect Arguments:
The slice() method returns an empty string in case the starting index being passed is greater than the ending index of the string:
var originalString = 'JavaScript string.slice() Method - LinuxHint';
var subString = originalString.slice(35, 30);
console.log(subString);
The slice() method also returns an empty string in case the starting index being passed is greater than the length of the original string:
![]()
Conclusion
The inbuilt str.slice() method is used to get a substring from a string by passing an initial position/index and an optional ending position/index.
In this article we have tried every possible use of the slice() method with appropriate examples to see how it behaves with different arguments.
Window confirm() Method
The window object is how JavaScript interacts and communicates with the browser.
JavaScript uses the browser object model which is used to interact with the different components of the browser i.e., navigation, the width, the height of the browser window.
The window object comes with several built-in properties and methods which are useful for JavaScript developers as these can be used to manipulate the browser window.
One of these methods is the confirm() method which we will explain today in this write-up.
The window confirm() method is used to prompt a user with a message and get their response.
The confirm() method opens a pop-up on top of the browser window, displays a text message and two buttons, the OK and the Cancel button which are used to get the response of the user.
The confirm() method blocks the user from accessing the website until they have provided a response.
This feature can come in handy in some cases but developers are recommended not to overuse the confirm() method and instead use its alternatives like the alert() method.
confirm() method Syntax
The confirm() method is called with the reference of the window object and takes a string literal as an argument.
This string is the message that is displayed on the pop-up:
window.confirm(text);
But as the window object represents the global scope, its methods can be called without any reference.
Thus, the below given syntax is equally valid:
confirm(message);
How to Use the Window confirm() Method?
Simply invoke the confirm() method and pass it a string containing the message that you want to display to the screen.
I’ll be using the browser console to demonstrate the working of the confirm() method:
confirm("Press Okay to Confirm");
![]() The confirm() method actually returns a Boolean value which can be stored in a variable to determine the further course of action.
In case the user clicks on the OK button then the confirm() method returns true else it returns false.
var op = confirm("Press Okay to Confirm");if(op == true){
console.log("OK pressed");}else{
console.log("Cancel pressed");}
Understanding the Code
We first use the confirm() method to show the user a message through a pop-up on the screen:
The confirm() method actually returns a Boolean value which can be stored in a variable to determine the further course of action.
In case the user clicks on the OK button then the confirm() method returns true else it returns false.
var op = confirm("Press Okay to Confirm");if(op == true){
console.log("OK pressed");}else{
console.log("Cancel pressed");}
Understanding the Code
We first use the confirm() method to show the user a message through a pop-up on the screen:
![]() The user now only has two options either to click the OK or the Cancel button as the confirm() method blocks user’s access to the webpage.
If the user presses OK, the confirm() method will return true.
Upon pressing the Cancel button, the method will return false.
We are storing these return values in our op variable.
We then use this variable in our conditional statements to print whether the user has pressed OK or Cancel button:
The user now only has two options either to click the OK or the Cancel button as the confirm() method blocks user’s access to the webpage.
If the user presses OK, the confirm() method will return true.
Upon pressing the Cancel button, the method will return false.
We are storing these return values in our op variable.
We then use this variable in our conditional statements to print whether the user has pressed OK or Cancel button:
![]()
![]()
Conclusion
This beginner’s guide has an elaborate and easy explanation of how the confirm() method is used to display pop-ups.
confirm() is one of many built-in JavaScript methods which belong to the global window object which can be used to communicate with the browser window.
The confirm() method has many real-world applications like its most frequent use is confirmation dialogs which appear when a user tries to leave or refresh a web page without saving their progress e.g., trying to leave an unfinished email on Gmail.
Insertion of Variable into String Using JavaScript
While programming, you may encounter a situation where it is required to concatenate the values of variables in a string, retrieve their values directly, or reuse the values to display them in different formats.
In such a scenario, utilize the special character “$” that has a predefined meaning, or go for the basic formatting guide.
This article will guide you about the insertion of variables into strings using JavaScript.
How to Insert a Variable into String Using JavaScript?
In JavaScript, you can utilize the following methods for variable insertion into a string:
Using a special character “$” with variables.
Basic Formatting method.
We will now check out each of the mentioned approaches one by one!
Method 1: Inserting Variable into String Using “$” Special Character
The first method includes the use of the special character “$”.
This special character is followed by the variables that are required for insertion.
Moreover, the resultant string can be displayed on the console for validation.
Look at the following example to understand the stated concept.
Example
Firstly, we will create two variables named “var1” and “var2”:
let var1 = 3; let var2 = 2;
Next, we will insert the created variables into a string by adding the “$” special character and specifying the variable name within the curly braces “{ }”.
We will also calculate their sum within the curly braces.
As a result, the string will contain the updated value after performing the addition:
console.log(`Sum of ${var1} and ${var2} is ${var1 + var2}`);
The output of the above-given program will be displayed as follows:
![]() JavaScript also offers a basic formatting method which you can also use for insertion of selected variables into a string.
JavaScript also offers a basic formatting method which you can also use for insertion of selected variables into a string.
Method 2: Inserting Variable into String Using Basic Formatting Method
In this type of method, the variable values are retrieved via the old C language method “%d” placeholder, which represents an integer value.
Using this basic formatting method, you can easily insert the specified variable value into a string.
Example
In this method, firstly, we will define two variables as follows:
var a1 = 15;
var b1 = 3;
In the next step, we will insert the variable values into a string by placing a “%d” placeholder followed by the variables that need to be inserted.
At the same time, we will also perform division operation on them:
console.log('Dividing %d by %d results %d.', a1, b1, (a1/b1));
The output will result in the following string:
![]() We have offered the easiest methods for inserting variables into a string using JavaScript.
We have offered the easiest methods for inserting variables into a string using JavaScript.
Conclusion
To insert variables into a string, you can use the special character “$” followed by the variable name and basic formatting method with a “%d” placeholder.
Moreover, the basic operations can be performed on the integer values, and the resultant string will comprise that value as well.
This article guided about the procedure of inserting variables into a string using JavaScript.
How to Validate a Date
JavaScript is famous for providing a variety of built-in features to ease developers’ needs.
The validation of dates has its own importance because people follow different time zones throughout the entire world.
For instance, Date.parse() and regular expressions are employed to validate the date.
Both methods have the importance of checking the date format in the form validation.
Moreover, users can validate the date by manually defining the format, such as “mm/dd/yy”.
This post demonstrates multiple ways to validate a date.
How to Validate a Date?
The Date.parse() method is employed to parse the date string.
The method inputs the date as an argument and returns the milliseconds.
Moreover, you can use regular expressions to validate a date as well.
The expression checks that the user entered the date by following the “mm/dd/yy” format.
Let’s practice Date.parse() and regex to validate a date.
Example 1: Validate a Date Using Date.parse()
An example is considered to validate the date by employing the Date.parse() method.
The method follows the “mm/dd/yy” format.
Moreover, users can also follow the ISO date format “yy-mm-dd”.
The example code is discussed below:
Code
console.log("An example to validate the date");let isValidDate = Date.parse('05/11/22');if (isNaN(isValidDate)) {
console.log("Not a valid date format.");}else{
console.log("Valid date format.");}
The explanation of the code is given below:
The parse() method is adapted by passing the date in “mm/dd/yy” format, such as “05/11/22” and returns a string in date format.
After that, the isNaN() method is applied with the if-else statement that computes whether the passing string “isValidDate” is a number or not.
If the isNaN() method returns a true value, then display a message “Not a valid date format”.
Otherwise, display “Valid date format” by utilizing the console.log() method.
![]() Output
The isNaN() method returns a false value, passing the string “isValidDate” as a number.
Hence, it executes else-block statements by displaying the message “Valid date format” in the console window.
Output
The isNaN() method returns a false value, passing the string “isValidDate” as a number.
Hence, it executes else-block statements by displaying the message “Valid date format” in the console window.
Example 2: Validate a Date Using Regular Expressions
The regular expression is adapted to match the pattern “mm/dd/yy” as a date format.
It evaluates the passing date and returns a Boolean output (true or false).
The example code is provided below:
Code
console.log("Another example to validate the date");
var d_reg = /^(0[1-9]|1[0-2])\/(0[1-9]|1\d|2\d|3[01])\/(0[1-9]|1[1-9]|2[1-9])$/;
var user_date = "12/01/22"if (d_reg.test(user_date)) {
console.log("Date follows mm/dd/yy format");}else{
console.log("Invalid date format");}
The description of the code is given below:
A regular expression “/^(0[1-9]|1[0-2])\/(0[1-9]|1\d|2\d|3[01])\/(0[1-9]|1[1-9]|2[1-9])$/” is applied to validate the “mm/dd/yy” date format, which is stored in the “d_reg” variable.
A date of “12/01/22” is assigned to the “user_date”
After that, a condition is applied with “d_reg.test” to verify the date by passing it as an argument.
In the end, the console.log() method is employed to display the output.
![]() Output
The output shows that the date “12/01/22” follows the “mm/dd/yy” format using the regex expression.
Output
The output shows that the date “12/01/22” follows the “mm/dd/yy” format using the regex expression.
Conclusion
In JavaScript, Date.parse() and regular expressions can be used to validate a date.
The Date.parse() method returns the number of milliseconds based on the passing date.
Similarly, the regular expression is considered to validate the date following the “mm/dd/yy” format.
This post has demonstrated the possible methods to validate a date with the help of examples.
How to Get Class Name
JavaScript supports classes that encapsulate methods to manipulate data.
Therefore, it is important to get/access the class name in a programming task.
Getting the name of the class is possible through a name property of constructor.
Moreover, the isPrototypeof() method and instanceof operators are employed to get the class name.
These methods are useful for debugging messages.
In this guide, you will learn how to get the class name in JavaScript.
The content of this blog is as follows:
Method 1: Get the Class Name Using Name Property
Method 2: Get the Class Name Using isPrototypeof() Method
Method 3: Get the Class Name Using instanceof Property
Method 1: Get the Class Name Using Name Property
The name property integrates with the object constructor that returns the class name.
Therefore, a method is adapted with the name property for getting the class name.
It is useful in complex programming tasks to repeatedly utilize the name of a class.
The code explains the working of the name property to get the class name:
Code
console.log("An example to get the class name");
class Teacher {}let obj = new Teacher();
console.log(Teacher.name);
console.log(obj.constructor.name);
In this code:
First, a class called “Teacher” is created through an empty body.
After that, the “obj.constructor” is employed to get the class name with the “name” property.
The console.log()method displays the class name by accessing the constructor function.
![]() Output
Output
![]() It is observed that the “name” property is utilized to access the class name “Teacher”.
It is observed that the “name” property is utilized to access the class name “Teacher”.
Method 2: Get the Class Name Using isPrototypeOf() Method
The isPrototypeOf() method finds out if the existence of an object is a part of another object’s prototype chain.
It takes input and returns a Boolean output (true or false) based on the user input.
The following example is provided here to get the class name with the isPrototypeOf() method.
Code
console.log("An example to get the class name");
class Animal {}let obj = new Animal();
console.log(Animal.prototype.isPrototypeOf(obj));
The description of the code is given below:
Firstly, a class “Animal” is created, and after that an “obj” object is initialized with a new keyword.
Furthermore, the “isPrototypeOf()” method is employed to check the existence of an object by passing “obj”.
![]() Output
Output
![]() The output returns a “true” value that validates the access to the class “Animal” in JavaScript.
The output returns a “true” value that validates the access to the class “Animal” in JavaScript.
Method 3: Get the Class Name Using instanceof Property
The instanceof property provides a facility to get the class name.
Generally, it evaluates the type of object during run time.
To find the class name, you can write the class name after the instanceof operator.
It returns a Boolean output (true or false value) that validates either you got the class name or not.
The following example code makes use of the instanceof operator:
Code
console.log("An example to get the class name");
class Vehicle {}let veh = new Vehicle();
console.log(veh instanceof Vehicle);
In this code, the class name “Vehicle” is accessed through the instanceof operator.
After that, the console.log() method is utilized to display the return value.
![]() Output
Output
![]() The output displays the “true” value in the console window, which validates the accessibility of the class.
The output displays the “true” value in the console window, which validates the accessibility of the class.
Conclusion
JavaScript provides the name property, isPrototypeOf() method, and instanceof operators to get the class name.
These methods evaluate the existence of objects and return a Boolean output (true or false values) that validates whether you got the class name or not.
These methods are useful for debugging messages.
All the latest browsers support these methods.
In this blog, you have learned to retrieve the class name with different examples.
How to Subtract Dates
JavaScript provides a Date object to perform manipulations with a date, day, time, year, etc.
Using this object, users can extract dates and modify them by addition or subtraction based on their needs.
This post demonstrates various methods for subtracting dates in JavaScript.
For finding the difference between dates, the getDate() methods are adapted.
Moreover, Math.abs() is also used to subtract two dates.
The content of the post is as follows:
How to Subtract Dates
Using getDate() Method
Using Math.abs() Method
How to Subtract Dates?
The Date object has various features to extract and manipulate the current dates.
For instance, the getDate() method is utilized to retrieve the day number on behalf of the Date object.
Moreover, the Math.abs() method is adapted to calculate the difference between two dates in absolute values.
Method 1: Subtract Dates Using getDate() Method
The Date object is used with the getDate() method to subtract dates.
For instance, an example is considered for subtracting dates by employing the getDate() method.
The method returns milliseconds.
The example code is provided below:
Code
console.log("Example to Subtract two dates")
var d1 = new Date("March 16, 2022");
var d2 = new Date("April 6, 2022");
var sub = d2.getTime()-d1.getTime();
console.log(sub);
The description of the code is provided in a listed way:
Firstly, the “d1” variable is utilized to store the date “March 16, 2022”.
After that, the “d2” variable stores the second date as “April 6, 2022”.
Furthermore, the “getTime()” method is adapted to calculate the difference between these dates.
These methods extract the difference in milliseconds and store it in “sub” variables.
In the end, the log() method is utilized to display the difference between these dates in millisecond format.
![]() Output
Output
![]() The result of two subtraction is printed on the console.
The result of two subtraction is printed on the console.
Method 2: Subtract Dates Using Math.abs() Method
The Math object provides various features to manipulate the data using addition or subtraction.
Therefore, an example is considered to be subtracting the two dates by employing the abs() method.
The code is written below by considering the method:
Code
console.log("First date")
var first_date = new Date("03/8/2022");
var sec_date = new Date("02/10/2022");
console.log(first_date)
console.log("Second date")
console.log(sec_date)
var dif= Math.abs(sec_date-first_date);
d = dif/(1000 * 3600 * 24)
console.log("Subtracting days")
console.log(d);
The explanation of the code is given here:
Two variables, “first_date” and “sec_date” are utilized to store two “03/8/2022” and “02/10/2022” dates.
After that, abs() method is used to store the absolute value of the subtracted dates in a “diff” variable.
Furthermore, the value in the “diff” variable is divided by “1000*3600*24” to convert the absolute values into days and store them in the “d” variable.
In the end, the log() method is employed to display the subtracted days.
![]() Output
Output
![]() The output returns “26” after subtracting the dates from “Mar 08 2022” to “Feb 10 2022”.
The output returns “26” after subtracting the dates from “Mar 08 2022” to “Feb 10 2022”.
Conclusion
The getDate() and Math.abs() methods are used for getting the difference between the two dates.
The difference could be in days, hours, or whatever the user wishes for.
The Date object is used with the getDate() method to subtract dates.
Here, we have demonstrated multiple methods to get the difference between two dates.
For better understanding, we have provided a set of examples that show the demonstration of each method.
How to Square a Number
A squared number is the same as a number multiplied by itself.
JavaScript provides built-in methods as well as manual multiplication to square a number.
The Math.pow() method and exponentiation operators give the facility for squaring a number.
Moreover, users can extract the squared number by multiplying it by itself.
In this guide, you will learn numerous methods of squaring a number.
The content of this article serves as below:
Using Math.pow() Method
Using Exponentiation Operator
Multiplying Number by Itself
Method 1: Using the Math.pow() Method to Square a Number
JavaScript has built-in functions to compute the square of a number.
For instance, the math object facilitates the pow() method to square a number.
The method accepts two parameters; the first one contains the number and the second one represents the number of times to be multiplied.
The syntax is provided below.
Syntax
Math.pow(a, b))
In this syntax, “a” represents the exponent and “b” represents the base.
As we intend to use this method to get the square of a number, the value of the second argument “b” will be “2”:
Code
console.log("An example of Math.pow() method")
console.log(Math.pow(3, 2));
In this code, two values, “3” and “2,” are passed as arguments.
The first value “3” represents the (base) number and the second value “2” (exponent) denotes the number of times 3 will be multiplied by itself:
![]() Output
Output
![]() It is observed that the final output returns a “9”, which is the square of “3”.
It is observed that the final output returns a “9”, which is the square of “3”.
Method 2: Using Exponentiation Operator for Squaring a Number
Another efficient method of squaring a number is possible through the exponentiation operator.
It is represented as (**) two asterisks.
The work of this method is similar to the pow() method.
The syntax for using the exponentiation operator is provided here:
Syntax
a ** b
The first number, “a” represents the value whose square is to be calculated.
And the number “b” shows the number of times the number “a” is multiplied through itself.
Code
console.log("An example of exponential operator")
console.log(3 ** 2);
In this code, an exponentiation operator is employed to get the squared number.
![]() Output
Output
![]() The output shows “9” in the console window, which is the square of “3”.
The output shows “9” in the console window, which is the square of “3”.
Method 3: Multiplying Number by Itself to Square a Number
The simplest and most common method for getting the squared number is by multiplying the number with itself.
In this way, the output returns the square of the input number.
By considering, the code is written here.
Code
<td >console.log("An example of multiplying number by itself");let num = 3;let sqNum = num * num;
console.log(sqNum);
In this code, the “num” variable is initialized with 3.
After that, the number is multiplied by itself and stored in the “sqNum” variable.
Finally, the console.log() method is utilized to display the squared number on the console:
![]() Output
Output
![]() The execution of the above code returns the output “9” which is the square of the number “3”.
The execution of the above code returns the output “9” which is the square of the number “3”.
Conclusion
In JavaScript, Math.pow(), exponentiation operator, and multiplying a number by itself provide a squared number.
The Math.pow() method and the exponentiation operator take two arguments as input.
The first one is a base while the second one is an exponent.
The base represents the number whose square is to be calculated, and the value of the exponent must be “2” to get the square.
On the other hand, the user multiplies a number with itself to get a squared number.
In this article, you have learned to square a number using three different methods alongside examples.
How to Append Values to Object
An object is the most important entity in the programming language due to its immutable property.
With this property, developers can manipulate different tasks through objects.
Appending different values to an existing object is conducted to make run-time changes to the objects.
JavaScript offers a variety of built-in methods to append values to objects.
In this post, we will demonstrate all the possible methods alongside examples to append values to objects.
This post serves the following learning outcomes:
Using Object.assign() Method to Append Values to Object
Using push() Method to Append Values to Object
Using spread (…) operator to Append Values to Object
Method 1: Using Object.assign() Method to Append Values to Object
The Object.assign() method is a famous one for appending values to objects.
It takes two arguments.
The first represents the target object, and the second argument takes the key/value pairs.
The syntax of Object.assign() method is provided below:
Syntax
Object.assign(target, source);
The parameters are described here:
target: specifies the object to whom the values will be appended.
source: refers to the value being appended.
Let’s understand the working of this method via the following example code:
Code
console.log("An example to use assign() method");
let user_obj = {1: { name: "Adam" },2: { name: "Harry" },};
let obj = Object.assign(user_obj, { 3: { name: "Jasam" } });
console.log(obj);
In this code:
Firstly, “Adam” and “Harry” are assigned as values to the “name” property.
The Object.assign() method is utilized to append a “Jasam” value to the “user_obj” object.
Finally, the console.log() method is employed to present all the values in the console window.
![]() Output
Output
![]() It is observed from the output that the new value is successfully added to the object.
It is observed from the output that the new value is successfully added to the object.
Method 2: Using push() Method to Append Values to an Array Object
The push() method can be used to add or insert one or multiple values to an array.
This method returns a new array after appending values.
Let us see if it works via the following syntax:
Syntax
arr.push(value1, value2, ..., valueN)
In this syntax, “value1”, “value2” and “valueN” are the values to be appended to the “arr” variable.
Code
console.log("An example to use assign() method");const sports = ['cricket', 'hockey', 'football'];const counter = sports.push('basketball');
console.log(counter);
console.log(sports);
The description of the code is provided here:
An array named “sports” is created which comprises three elements i.e., “cricket”, “hockey” and “football”.
After that, the value “basketball” is appended to using the sports.push() method.
In the end, the console.log() method displays the array in the console window.
![]() Output
Output
![]() The output shows that the “basketball” value is appended to the sports object by utilizing the push() method.
The output shows that the “basketball” value is appended to the sports object by utilizing the push() method.
Method 3: Using Spread (…) Operator to Append Values to Object
The spread (…) operator is employed to append values to objects.
It is useful to merge objects into one place.
The syntax of the spread operator is provided below:
Syntax
{...obj, key: 'value' }
In this syntax, “value” is assigned to the key in the object obj.
The example code of the spread operator to append values to an object is provided below:
Code
console.log("An example to use spread operator");
let obj1 = {name: 'Harry'};
obj2 = {...obj1, color: 'white'};
console.log(obj2);
In this code:
An “obj1” is utilized to store the element name by assigning the value “Harry”.
After that, the “white” value appends to “obj1”.
In the end, the console.log() method displays the appended values in the console window.
![]() Output
Output
![]() The output shows the new object “obj2” which contains the value from the object “obj1” as well as the appended value “white”.
The output shows the new object “obj2” which contains the value from the object “obj1” as well as the appended value “white”.
Conclusion
JavaScript provides two methods, i.e., Object.assign() and push() to append values to an object.
The Object.assign() method appending values to objects by key/value pairs.
The push() method adds one or multiple values into an array.
However, the spread (…) operator can also be used to append values to an object.
This post has demonstrated all the possibilities for appending values to an object.
How to Check if a Variable is String
In JavaScript, a string is a representation of a sequence of characters that can be written in single or double quotes.
The JavaScript variable holds numbers as well as strings to perform any operation in different scenarios.
Therefore, it is an important task for checking the variable type to identify the correct data type before performing any operation., the typeof and instanceof operators are used to evaluate if the variable is a string or not.
This article explains various methods to check that a variable is a string.
The learning outcomes of this blog are listed below:
Using typeof Operator to Check the Variable is String
Using instanceof Operator to Check the Variable is String
How to Check if a Variable is a String?
JavaScript has the ability for checking the type of a variable by returning a Boolean output.
The typeof and instanceof operators are utilized to compute whether the type of variable is a string or not.
The typeof operator retrieves the variable datatype through which the variable can be checked whether it is a string or not.
The instanceof operator evaluates the type of the variable at runtime.
Let us practice the detailed working of the typeof operator:
Method 1: Using typeof Operator to Check if the Variable is a String
A method is an adapted typeof operator that determines the data type of passing operands.
After that, this operator evaluates whether the variable is a string or not.
For instance, the syntax is given below.
Syntax
typeof var;
In this syntax, the variable “var” is evaluated to get its data type and examine if it is a string or not.
Code
console.log("Example to check variable is string");
var var1 = 'Welcome to JavaScript World';
console.log(typeof var1);
The description of the code is provided below:
A variable “var1” is employed to store the string “Welcome to JavaScript World”.
The typeof operator is utilized to check if “var1” is a string or not
The type of variable “var1” is displayed in the console window.
![]() Output
Output
![]() The output returns “string” in the console window, which validates that the variable is a string.
The output returns “string” in the console window, which validates that the variable is a string.
Method 2: Using instanceof Operator to Check if Variable is a String
The instanceof operator is employed to determine the type of instance.
An example is considered to evaluate the variable is a string or not.
For instance, the syntax and code are provided below.
Syntax
var instanceof String;
In this syntax, the instanceof operator is utilized for checking the variable is an instance of the String data type or not.
Code
console.log("Example to check variable is string");
var str =newString("Welcome to JavaScript World");if (str instanceofString)
{
console.log(' Passing variable is string');}else
{
console.log('Passing variable is not string');}
The description of the code is as follows:
A variable “str” is used to store the string “Welcome to JavaScript World”.
After that, a condition is applied to check if the variable “str” is a string or not by employing the instanceof operator.
If the condition statement is true, display the message “Passing variable is string”.
Otherwise, the statement “Passing variable is not string” is printed.
![]() Output
Output
![]() The if-block of the code is executed, which states that the condition is true and hence the “passed” variable is a string.
The if-block of the code is executed, which states that the condition is true and hence the “passed” variable is a string.
Conclusion
In JavaScript, the typeof and instanceof operators can be used variable is a string.
The typeof operator returns the variable datatype, whereas the instanceof operator checks whether the specific variable belongs to the data type string or not.
These operators return true or false.
Here, both methods are elaborated with the help of suitable examples for checking the variable is a string.
How to Check if a Value is Object
An object is the most important entity in any programming language for controlling the flow of a program.
It contains the key-value pairs.
If a situation happens to check if a value is an object or not.
It is the right place to evaluate the type of object.
This post demonstrates the various methods to check that the value is an object.
Therefore, this post serves the following learning outcomes:
Using typeof Operator to Check the Value is Object
Using Object.getprototypeOf() Method to Check the Value is Object
Using instanceof Operator to Check the Value is Object
How to Check if a Value is an Object?
JavaScript provides typeof and instanceof operators to check if a value is an object or not.
These operators compute the value of a data type.
One can place a check that if the value is an object type, it should return true, else false.
Moreover, the Object.getprototypeOf() method is also utilized to evaluate whether the value is an object or not.
Let’s practice these methods one by one:
Method 1: Using typeof Operator to Check the Value is Object
The typeof operator is adapted to tell us the type of object.
It returns a true value by checking if the value is an object; otherwise, it returns false.
The syntax of the typeof operator is as follows:
Syntax
typeof variable;
In the above syntax, the variable is passed to the typeof operator, and the method will return its type.
Code
console.log("Check a Value is Object"); const teacher = {
name: 'Harry',
age: 45};
console.log(typeof teacher === 'object')
The explanation of the code is given below:
A “teacher” object is created, containing the properties “name” and “age”.
The assigned values to these properties are “Harry” and “45”.
In the end, the typeof operator is employed with the strict equality operator to check the equality of the type with the object.
![]() Output
Output
![]() The output displays “true,” which states that the “teacher” is an object.
The output displays “true,” which states that the “teacher” is an object.
Method 2: Using Object.getprototypeOf to Check the Value is Object
Another method is considered to evaluate the object type by utilizing the Object.getPrototypeOf() method.
The method returns a prototype (existing in-built functionality) of the specified object.
Let us look at the syntax of the Object.getprototypeOf() method:
Syntax
Object.getPrototypeOf(obj)
In this syntax, obj specifies the prototype to be returned.
Code
console.log("Check a Value is Object"); const teacher = {
name: 'Harry',
age: 45};const new_obj = Object.create(teacher);
console.log(Object.getPrototypeOf(new_obj) === teacher);
The description of the code is provided here:
A teacher object is created by passing the “name” and “age” properties.
After that, an object named “new_obj” is created by utilizing the Object.create() method
Furthermore, the Object.getPrototypeOf() method is employed to check whether the value is an object or not by the strict assignment operator.
The console.log() method is employed to display the true or false output in the console window.
![]() Output
Output
![]() In the output, the true value validates that the passing value is an object.
In the output, the true value validates that the passing value is an object.
Method 3: Using instanceof Operator to Check the Value is Object
The instanceof operator can also be utilized to evaluate the value is an object or not.
It evaluates the type of an object during runtime and checks if a particular object is an instance of the class.
It returns a Boolean output, such as a true value that shows the value is an object, otherwise, it returns false.
The syntax is provided below:
Syntax
value instanceof Object
In this syntax, the instanceof evaluates the type of object and returns a Boolean value.
Code
console.log("Check a Value is Object"); const sports = {
name: 'Cricket',};
functionfun_obj(val) {return val instanceofObject; }
console.log(fun_obj(sports));
In this code:
An object “sports” is initialized by passing the “name” with the value “Cricket”.
A function fun_obj() is utilized by passing “val” as an argument.
The instanceof operator evaluates the type of an object and returns a Boolean (true or false) output.
In the end, the console.log() method is employed to return the true or false value in the console window.
![]() Output
Output
![]() The output returns that the teacher is initialized as an object.
It returns a “true” value in the console window, which validates that the value is an object.
The output returns that the teacher is initialized as an object.
It returns a “true” value in the console window, which validates that the value is an object.
Conclusion
JavaScript provides typeof, Object.getPrototypeOf() method, and instanceof operators to check whether the value is an object or not.
The typeof operator computes the value of a data type.
The Object.getPrototypeOf() method returns a prototype of the specified object.
The instanceOf operator computes the type of an object during runtime and checks if a particular object is an instance or not.
These methods evaluate the type of object and return the output in true or false.
This article demonstrates checking if a value is an object or not with different examples.
How to Check if a Value is an Object?
How to Change the Background Color
HTML, CSS, and JavaScript are essential parts of building an interactive website.
Most of the developers utilized inline CSS formatting to implement styles within HTML element tags.
One of them, a style attribute, has its own importance in changing the background color of HTML elements.
It is implemented on various elements such as headings, paragraphs, tables, or whole pages.
This style attribute can also be utilized via JavaScript as well.
This article demonstrates how to change the background color.
How to Change the Background Color?
The property “backgroundColor” is employed to return the color of the specified element.
Users can access the HTML element and then apply this property to change the background color.
The syntax is given here by assigning the background color.
Syntax
object.style.backgroundColor = "color"
In this syntax, “color” represents the value of the color to be assigned to the “backgroundColor” property of an HTML object.
Note: Users can specify “color” as the name of the color, RGB values, or hex color codes.
Example 1: Change the Background Color of Specified Area
An example is adapted to change the background color of a specified area.
The following example code refers to changing the background color of the div having “id=txt”:
Code
<html><body><center><h2> An example to change background color </h2><div id="txt"> Welcome to JavaScript</div><button onClick="col()">Button</button><script type='text/javascript'>
function col() {
var uCol = document.getElementById("txt");
uCol.style.backgroundColor='yellow';}</script></body></center></html>
In this code:
A specific area is allocated by <div> tags and a message “Welcome to JavaScript” is written in it.
A “Button” is attached with the “col()” method that is triggered by pressing it.
In the “col()” method, document.getElementById extracts the value of the div element having “id=txt” and its value is stored in a variable named “uCol“.
Finally, the “style.backgroundColor” property is employed to change the background color by assigning “yellow”.
![]() Output
Output
![]() The output shows that by pressing the button, the background color of the message is changed.
The output shows that by pressing the button, the background color of the message is changed.
Example 2: Change the Background Color of the Whole Page
Another example is changing the complete background color of a webpage to blue by utilizing the hex code #0000FF.
The following code refers to the above stated scenario:
Code
<html><body><h1>Welcome to Linuxhint</h1><button type="button" onclick="myFun()">Change background color</button><script>
function myFun() {
document.body.style.backgroundColor = "#0000FF";}</script></body></html>
The code is demonstrated as:
A button “Change background color” is employed, which is associated with a “myFun()” method.
In “myFun()”, the style property “backgroundColor” is set to “ #0000FF” as a hex code.
The “myFun()” method is triggered on the “onclick” by pressing the button.
![]() Output
Output
![]() The output shows that the background color is changed from white to blue by pressing the button in the browser window.
The output shows that the background color is changed from white to blue by pressing the button in the browser window.
Conclusion
In JavaScript, the style.backgroundColor property is utilized for changing the background color.
The color value can be in RGB, hex code, or its name.
In this article, two examples are provided to change the background color by name and hex code of a specific area as well as the whole page.
The backgroundColor property is useful for changing the background color of headings, tables, or any specified elements.
How to calculate the Sum of Array of Objects
While programming, you may encounter a situation where it is required to perform various operations among the array objects.
For instance, in the case of keeping the data related to the same object with some modification in values, such as computing the sum of properties in an array object.
This post will discuss the process of finding and using the sum of an array’s objects using JavaScript.
How to Add/Sum Array Objects?
In JavaScript, you can utilize the following methods to calculate the sum of an array of objects:
For loop
reduce() array Method
We will now go through each of the above-mentioned methods one by one.
Method 1: Using for Loop to Find the Sum of Array of Objects
This method involves the use of the “for” loop where the array of objects is added by specifying the property on which the addition needs to be done.
Let’s check out the below-given example for a better understanding.
Example
Firstly, we will define an array of objects as follows:
var array = [
{name: 'x', id: 1},
{name: 'y', id: 2},
{name: 'z', id: 3},];
Next, we will create a variable named “add” initialized with the “0” value to avoid null value.
This variable will be utilized in the for loop to store the required sum:
var add = 0;
Then, add a for loop and control its execution using the “i” iterator and the “array.length” property.
Within the for loop, the sum of the values of the “id” property will be stored in the “add” variable, and after each iteration, its value gets updated:
for (var i = 0; i< array.length; i++){
add += array[i].id}
Lastly, we will print the updated added values of the array of objects on the console.
console.log( "Sum of the array values is: ", add);
The output of the above program will display “6” as the sum of the “id” property values:
![]() Move ahead to learn the second method for finding the sum of an array of objects.
Move ahead to learn the second method for finding the sum of an array of objects.
Method 2: Using reduce() Method to Find the Sum of Array of Objects
For the purpose of finding the sum of the array of objects, the “reduce()” method is also utilized.
This method merges the value of the previous and current objects, which will be reduced to a single value.
Example
Firstly, we will declare an array and assign different values to the same properties of both objects:
var array = [{"id": 1,"roll" : 10
}, {"id": 2,"roll" : 15
}];
Next, we will compute the sum of objects in an array for the “id”, “roll” properties and reduce them to a single resultant value:
var add = array.reduce(function(previousValue, currentValue) {return {
id: previousValue.id + currentValue.id,
roll: previousValue.roll + currentValue.roll,
}
});
Finally, display the resultant value of both the objects on the console screen:
console.log("The value of id becomes", add);
The resultant sum of the “id” is “3” and for “roll”, it is “25”:
![]() We have provided the methods related to the sum of an array of objects.
We have provided the methods related to the sum of an array of objects.
Conclusion
To calculate the sum of an array of objects, the “for” loop and “reduce()” methods of the array class can be utilized.
These mentioned methods assist in calculating the sum of the values of the specified object properties.
Moreover, you can also perform various other operations for handling the object.
This article guided about the procedure of using the sum of an array of objects.
How to Create a Map Function for Objects
An object is the building block to make interaction with functions and properties.
It is beneficial for adding specific values to an object’s attributes.
It comes true with the map() function, which is the built-in functionality of JavaScript.
It iterates over the object attributes with the key-value pairs.
This article demonstrates the creation of map functions for objects.
The content is as follows.
How to Create a Map Function for Objects
Create a Map Function and Display the Attributes
Creating a Map Function and Assign Values via map.set()
Object.entries() Method
How to Create a Map Function for Objects?
JavaScript provides a map() method for objects that works with a key-value pair.
It is valuable for performing various operations on objects by utilizing key values.
It works similarly to an array.map() method by iterating over elements of an object.
By considering the map function for objects, the syntax is written as follows.
Syntax
map(function(element, index)
In this syntax, the function iterates over the element through the index value.
Note: The map() method does not create a new object but modifies the existing object through the index values.
Example 1: Create a Map Function and Display the Attributes
An example is adapted to create a map function and assign different values to attributes.
The map() method iterates all the attributes of the object.
Finally, display all the attributes along with their values in the console window.
The following code is practiced as follows:
Code
console.log("Create a Map Function for Objects");
let Stud_Obj = {"Math_Marks": 80,"English_Marks": 77,"Physics_Marks": 90};Object.keys(Stud_Obj).map(function(key, value) {});
console.log(Stud_Obj);
In this code:
An object is created with the name “Stud_Obj” and has different attributes, including “Math_Marks”, “English_Marks” and “Physics_Marks”.
These attributes contain different “80, 77, and 90” values assigned by the colon.
After that, Object.keys are utilized to return the attributes of an object “Stud_Obj”.
The map() function calls for all attributes present in the object through key-value pairs.
In the end, the console.log() method is employed to display the object “Stud_Obj” in the console window.
![]() Output
Output
![]() The output returns all the attributes “Math_Marks”, “English_Marks” and “Physics_Marks” with their assigned values in the console window.
The output returns all the attributes “Math_Marks”, “English_Marks” and “Physics_Marks” with their assigned values in the console window.
Example 2: Create a Map Function and Assign Values
An example is used to create a new map object by utilizing the new keyword.
After that, the map.set() methods are utilized to assign attributes in the JavaScript code.
Code
console.log("Create a Map Function for Objects");
let map = new Map();
map.set("Harry_id", 04);
map.set("Peter_id", 08);
map.set("John_id", 07);
let obj_ids = Array.from(map).reduce((obj_ids, [key, value]) => (Object.assign(obj_ids, { [key]: value })), {});
console.log(obj_ids);
The explanation of the code is as follows:
A map object is created with a new keyword that iterates over the attributes of the object.
After that, the map.set() method is utilized by assigning the attributes “Harry_id”, “Peter_id” and “John_id”.
These attributes have unique values including “04”, “08”, and “07” respectively.
Furthermore, the Array.from() method returns the array from the map object.
After that, the reduce() method calls back the obj_ids and extracts all the attributes with values.
The Object.assign() method sets the specific value to each attribute through keys.
Finally, the console.log() method presents all the attributes of the object by passing “obj_ids”.
![]() Output
Output
![]()
Example 3: Object.entries() Method
JavaScript provides the Object.entries() method and returns all the attributes of the object based on key-value pairs.
By considering the Object.entries() method, the code is written as follows.
Code
console.log("Create a Map Function for Objects");const sports_obj = {
first: 'Cricket',
second: 'Football',
third: 'Hockey',
}const m = newMap(Object.entries(sports_obj));
console.log(m);
The description of the code is as follows:
Firstly, an object “sports_obj” is created containing different attributes “first”, “second” and “third”.
These attributes have different values as “Cricket”, “Football” and “Hockey”.
After that, the Object.entries() method accepts an object “sports_obj” and returns all the attributes and stores them in the variable “m”.
Finally, the console.log() method is employed to present the list of attributes of objects in the console window.
![]() Output
Output
![]() The output shows the number of attributes as “3” and displays all attributes with values in the console window.
The output shows the number of attributes as “3” and displays all attributes with values in the console window.
Conclusion
JavaScript provides a map() method for creating a map function to interact with the properties of objects.
It iterates over all the attributes of objects by utilizing key values.
In addition, the map.set() methods are utilized to assign the attributes of objects.
Moreover, the Object.entries() method returns all the attributes of the object after creating a map function.
This article demonstrates the creation of a map function for objects and displays all the attributes of objects in the console window.
How to Convert String to Title Case
In JavaScript, conversion of String to Title Case is very helpful when we need to sort an array of the strings in a presentable order.
This operation makes the readability better and gives a clear understanding.
Moreover, in the case of dealing with complex arrays, you can convert all the strings to the title case at the same time.
This write-up will guide you about converting string to title case.
How to Convert String to Title Case?
To convert string to title case, you can use:
replace() method
for loop
map() method
We will now go through each of the mentioned approaches one by one!
Method 1: Convert String to Title Case Using replace() Method
In JavaScript, the “replace()” method replaces the current string value with the updated one.
This method can be used in combination with “toUpperCase()” for converting a string to the title case.
Look at the below-given example.
Example
First, we will declare a string having the following value:
string= "converting string to title case"
Next, we will define a “titleCase()” function and split the string value in an array of string values using the “split” method.
This operation will be set as the return case of the defined function.
After that, we will call the “replace()” method and set the case of the first character as uppercase by accessing the “0” index of each split string and then joining the array to a single string as given below:
functiontitleCase() {
returnstring.split(' ').map(function(title) {
returntitle.replace(title[0], title[0].toUpperCase());
}).join(' ');}
Finally, we will display the updated string value on the console:
console.log("The conversion becomes: \n", titleCase())
The output of the above code will be displayed as follows:
![]()
Method 2: Convert String to Title Case Using “for” Loop
This method includes the use of the “for” loop for converting string to title Case.
This is done by referring to the string characters using the combination of the charAt(), toUpperCase(), and slice() methods.
Here is an example for the demonstration.
Example
Firstly, we will create a string as follows:
string= "converting string to title case"
Then, we will declare a “titleCase()” function and split the string into an array of strings.
Next, we will utilize a “for” loop for accessing the split string values.
Then, we will access the first character of each string and capitalize it using the “toUpperCase()” method.
Moreover, the string characters will be combined with the remaining string.
Lastly, the resultant string will be returned after joining them:
functiontitleCase(){
string = string.split();for (vari = 0; i<string.length; i++) {
string[i] = string[i].charAt(0).toUpperCase() + string[i].slice(1);
}
returnstring.join(' ');}
Next, we will display the converted string on the console:
console.log("The conversion becomes: \n", titleCase());
Output
![]()
Method 3: Convert String to Title Case Using “map()” Method
This method includes the use of the “map()” method, which works for each element in an array.
We will use this method by mapping a “function” with “title” as an argument.
This passed argument will behave as a variable in which the string value is stored.
Example
Firstly, we will define a “titleCase()” function and perform the same operations as in the above examples.
The map() method will be utilized, and the “title” argument will be treated as the “string” variable.
In this way, various methods will be applied to the passed string.
Next, we will use the combination of the charAt(), toUpperCase(), and the Slice() methods for the conversion, as we did previously.
functiontitleCase() {
returnstring.split(' ').map(function(title) {return (title.charAt(0).toUpperCase() + title.slice(1));
}).join(' ');}
In the final step, we will be displaying the converted title case string value:
console.log("The conversion becomes: \n", titleCase())
The resultant output will be following:
![]() We have provided the simplest methods for converting string to title case.
We have provided the simplest methods for converting string to title case.
Conclusion
To convert string to title case, you can use the “replace()” method for replacing the current value with the updated value, the “for” loop method for accessing the string characters, and the “map()” method in which the title case conversion methods will be applied to the string argument.
This article guided about the string to title case conversion.
How to Convert RGB to HEX
Photo editing programs mostly represent colors in the RGB (Red Green Blue) model, ranging from 0 to 255.
In case you want to utilize any specific color as an HTML element’s background, it is required to get the hexadecimal representation of the selected RGB value.
Many online RGB to HEX color converters can perform this functionality using JavaScript.
This blog will demonstrate the method of converting RGB to HEX.
How to Convert RGB to HEX?
In JavaScript, you can utilize the “toString()” method for converting RGB to HEX.
The toString() method takes the base “16” as a parameter for converting the specified RGB value into hexadecimal and returns its string representation.
Go through the following example for a better understanding of the above concept.
Example: Using “toString()” Method to Convert RGB to HEX
Firstly, we will define a function named “valueToHex()” and pass “c” as an argument to it.
Then, convert it using the “toString()” method and pass “16” as the required base of the string.
This function will return the converted RGB to Hex value stored in “hex” variable:
function valueToHex(c) {
var hex = c.toString(16);
return hex}
Next, we will define a “rgbToHex()” function taking “r”, “g”, “b” values as arguments.
For converting each value, call the “valueToHex()” method:
function rgbToHex(r, g, b) {
return(valueToHex(r) + valueToHex(g) + valueToHex(b));}
Finally, call the “rgbToHex()” function and place the RGB values in order to get the desired converted hexadecimal values:
console.log("The converted hexadecimal values are:")
console.log(rgbToHex(12, 51, 255));
In our case, we have passed “12”, “51”, and “255” as RGB which is converted to “c33ff” HEX value:
![]() We have provided the simplest method for converting “RGB” to “HEX”.
We have provided the simplest method for converting “RGB” to “HEX”.
Conclusion
To convert RGB to HEX, you can use the “toString()” method in a user-defined RGB to HEX conversion function.
This function will take each RGB value one by one and call the toString() method to convert it to HEX by specifying the base as “16”.
After doing so, it returns the converted RGB to the HEX value.
This blog guided you about the procedure to convert RGB to HEX.
How to Convert JSON Object to JavaScript Array
JSON is the standard format for the representation of data based on key-value pairs.
The JavaScript array is an easier way to read and understand any information as compared to JSON objects due to its organized manner.
For this purpose, JavaScript provides an “entries()” method from the “Object” class to convert the JSON object to a JavaScript array.
Moreover, a “for-in loop” is integrated with an empty string to perform the conversion of a JSON object to an array.
This article demonstrates the converting JSON object to a JavaScript array.
The content is as follows:
Using entries() Method to Convert JSON Object to JavaScript Array
Using for-in Loop to Convert JSON Object to JavaScript Array
Method 1: Using entries() Method to Convert JSON Object to JavaScript Array
JavaScript provides the entries() method for converting the JSON object into an array.
The method utilizes the Object class to perform the conversion.
To use it, the syntax of the entries() method is provided below:
Syntax
Object.entries(JSON_obj)
In this syntax, “JSON_obj” specifies a JSON object that is to be converted into a JavaScript array.
Code
console.log("An example to convert the JSON obj to array");const teacher = {name: "Harry", age: 30, subject: "English"};
console.log(Object.entries(teacher));
The description of the code is as follows:
Firstly, a JSON object “teacher” is created which comprises elements like “name”, “age”, and “subject”.
The “entries()” method is utilized to perform conversion from JSON objects to JavaScript arrays.
In this method, the JSON object “teacher” is passed as an argument to get the JavaScript array.
Finally, the console.log() method is adapted to display the array in the browser.
![]() Output
Output
![]() The output returns that the JSON object “teacher” is converted to an array.
The output returns that the JSON object “teacher” is converted to an array.
Method 2: Using a “for-in” Loop to Convert JSON Object to JavaScript Array
Another method is considered through a for-in loop to convert the JSON object to a JavaScript array.
The for-in loop iterates over the JSON object.
Each iteration returns a key value that is helpful in converting the object to an array.
For instance, the code is given below:
Code
console.log("An example to convert JSON obj to array")
var json_obj = {"John":10,"Harry":17};
var array = [];for(var i in json_obj)
array.push([i, json_obj[i]]);
console.log(json_obj);
console.log(array);
The description of the code is as follows:
Firstly, a JSON object “json_obj” is initialized with two elements “John” and “Harry”.
Furthermore, an empty “array” is initialized that stores the elements of the JSON object.
After that, a “for in loop” is employed that executes the number of elements in the “json_obj”.
In this loop, the array.push() method is utilized to insert the elements from “json_obj” into the array.
![]() Output
Output
![]() The output shows that the JSON object “json_obj” is converted to a JavaScript “array” by utilizing the “for-in loop”.
The output shows that the JSON object “json_obj” is converted to a JavaScript “array” by utilizing the “for-in loop”.
Conclusion
JavaScript provides “entries()” and “for-in loop” to convert the JSON object to a JavaScript array.
The entries() method is employed to perform the conversion from a JSON object to an array using the object class.
Moreover, a for-in loop works on an empty array to store the elements of the JSON object in the array.
In this post, both methods are explained with the help of examples to convert JSON objects into an array.
How to Convert Number to Binary Format
Computers understand binary number systems (0 and 1) and utilize it to manipulate and store all of the data, including words, images, numbers, music, and videos., conversion of a number to binary format is helpful as this format is used for coding and programming in computers.
This article will help you in performing the conversion of a number to binary format.
How to Convert a Number to Binary Format
In JavaScript, you can use the following methods for converting a number to binary format:
toString() method
User-defined function
We will now have an overview of each of the mentioned approaches step by step!
Method 1: Using toString() Method to Convert a Number to Binary Format
The JavaScript “toString()” method is used for converting a number into a string.
This method returns a string that refers to a primitive value of an object.
More specifically, it also assists in converting a number to binary format.
Syntax
number.toString(2);
Here, the toString() method will convert “number” to binary format, as base “2” is passed as an argument.
Have an overview of the following example to understand the explained concept.
Example
First, we will take a decimal number from the user as input.
Then, we will apply the “toString()” method for converting it to binary format:
const a = parseInt(prompt('Enter a decimal number: '));
let binary = a.toString(2);
Next, we will display the resultant value in binary format via pop-up:
alert('Binary number is:' + ' ' + binary);
Execute the given code, input any decimal number in the input field, and click on “OK” button:
![]() As a result, the corresponding binary format will be displayed on the screen:
As a result, the corresponding binary format will be displayed on the screen:
![]() Want to perform the same operation using a user-defined function? Look at the following section.
Want to perform the same operation using a user-defined function? Look at the following section.
Method 2: Using User-defined Function to Convert a Number to Binary Format
In this section, we will implement a function that returns the input number set as a binary number.
This user-defined function will check whether the number is greater than zero and then performs the added functionality.
Here we have an example for the demonstration.
Example
Firstly, define a function named “decimal_to_binary()”, which accepts the number “a” as an argument.
Next, we will add a “while” loop that will execute until the passed number is greater than 0.
If so, it will be divided by “2”, and the remainder will be added to “binary”.
Then, update the value of the passed argument using the “Math.floor()” method and return the binary format:
functiondecimal_to_binary(a){
var binary = '';
while (a>0)
{
binary = (a%2) + binary;
a = Math.floor(a/2);
}
returnbinary;
}
Finally, call the function and pass the numbers that need to be converted into binary format:
console.log(decimal_to_binary(2));
console.log(decimal_to_binary(7));
The resultant output will be shown as follows:
![]() We have offered the easiest methods step-by-step for converting a number to binary format using JavaScript.
We have offered the easiest methods step-by-step for converting a number to binary format using JavaScript.
Conclusion
In JavaScript, to convert a number to binary format, you can apply the “toString()” built-in method or create a “user-defined” function.
In the first approach, two is passed as an argument representing the base of the required binary format.
However, the user-defined function takes a decimal number and converts it into the corresponding binary number.
This article discussed the methods to convert a number to binary format using JavaScript.
How to Clear Canvas
The canvas element is a container to draw graphical representations in the browser.
It is created by utilizing the <canvas> tag.
Moreover, it is useful to clear all the elements of the canvas to reuse it.
JavaScript is a feature rich programming language that provides extensive functionalities to address a specific purpose.
In this guide, we will demonstrate the method to clear the canvas using JavaScript.
This post serves the following outcomes:
How to Use the clearRect() Method to Clear Canvas?
Clear Specific Portion of Canvas
Clear Complete Portion of Canvas
How to Use the clearRect() Method to Clear Canvas?
In JavaScript, the clearRect() method is used to clear the whole or specific portion of the canvas.
Alongside this method, you need to retrieve the canvas element via its class or the id.
First, let’s have a look at the syntax of the clearRect() method:
Syntax
clearRect(x, y, width, height);
The parameters of the clearRect() method are as follows:
x: specifies the x-coordinate of the top left corner of the rectangle.
y: specifies the y-coordinate of the top left corner of the rectangle.
width: represents the width of the rectangle to clear (pixels).
height: represents the height of the rectangle to clear (pixels).
Example 1: Clear Specific Portion of Canvas
An example is considered by employing the clearRect() method to remove specific elements in the browser window.
The following code is separated and explained as HTML and JavaScript parts.
HTML Code
<html><body><h2>Example to Specific Portion Clear Canvas</h2><canvas id="can" ></canvas><script src="test.js"></script></body></html>
The explanation of code is as follows:
A canvas element is created with “id=can” having width=”500″ and height=”350″.
A JavaScript file is attached by passing the name of the file “test.js” to the src attribute.
JavaScript Code
var c = document.getElementById("can");
var ctx = c.getContext("2d");
ctx.fillStyle = "black";
ctx.fillRect(0, 0, 500, 350);
ctx.clearRect(250, 100, 100, 100);
In this code:
Firstly, the getElementById() method extracts the canvas element.
After that, the getContext() method is utilized to extract the drawing context to display in canvas.
Furthermore, the fillReact() method draws a filled rectangle by passing width and height arguments.
In the end, clearReact() removes the pixels in the specified rectangle.
Output
![]() The output shows that a specific portion which is present in the center of canvas is cleared in the browser window.
The output shows that a specific portion which is present in the center of canvas is cleared in the browser window.
Example 2: Clear Complete Canvas
A method is considered to clear all the canvas elements by pressing the button.
Initially, a graphic representation is placed on the canvas.
After that, the clearRect() method is employed to clear the complete portion of the canvas.
By considering the clearRect() method, the piece of code is divided into HTML and JavaScript files.
HTML Code
<h2>Press the button to clear the canvas rectangle</h2><canvas id="myCan" ></canvas><div><input type="button" id="clear" value="Clear Button"></div><script src="test.js"></script>
In this code:
A canvas element is created by assigning “width” of “300” and “height” of “180” dimensions.
After that, a button is attached whose value is “Clear Button”.
In the end, the JavaScript code file “test.js” is linked with the HTML file within <script> tags.
JavaScript Code
var canvas = document.getElementById('myCan');
var context = canvas.getContext('2d');
context.beginPath();
context.rect(18, 50, 200, 100);
context.fillStyle = "black";
context.fill();
context.lineWidth = "20";
context.stroke();
document.getElementById('clear').addEventListener('click', function () {
context.clearRect(0, 0, canvas.width, canvas.height);}, false);
The code explanation is written here:
The getElementById(‘myCan’) is utilized to extract the canvas element by passing an argument.
After that, the “2d” is passed for drawing an image on a two-dimensional surface by using the getContext() method.
Furthermore, the context.react() creates a rectangle by specifying the heights and widths.
The fillStyle property is utilized to specify the color.
After that, the fill() method is employed to fill the color in a rectangle.
In the end, the context.clearReact() method is used to clear the canvas by passing width and height.
Output
![]() The output returns a black colored canvas that is cleared by pressing the “Clear Button” in the window.
The output returns a black colored canvas that is cleared by pressing the “Clear Button” in the window.
Conclusion
In JavaScript, clearRect() provides a feature to clear the canvas elements by specifying the height and width.
This post has explained the working and usage of the clearRect() method to clear canvas.
For a better understanding, two examples are considered to remove the specific as well as clear all portions of the canvas.
The method is beneficial for redrawing, plotting, and animations on the canvas.
How to Crop an Image Using HTML Canvas
The HTML canvas element is famous for performing manipulations with images.
It can perform various features related to images, like cropping, resizing, zooming in, zooming out, and so on.
Cropping an image is essential to remove the unnecessary parts of an image.
For instance, JavaScript provides built-in functionality by the drawImage() method to crop an image and display it in a canvas element.
This article demonstrates the practical implementation of cropping an image using HTML canvas.
How to Crop an Image Using HTML Canvas?
The canvas is a blank area in which the user can perform any task regarding the image.
JavaScript provides the drawImage() method for cropping an image.
The method is utilized to scale an image into canvas elements.
This method works the same as rectangular by specifying the size and location of the image.
The syntax of the drawImage() method is provided below:
Syntax
drawImage(img, src_x, sy, sWid, sHei, dx, dy, dWid, dHei);
The parameters are explained as below:
Parameters Description
| img | Specifies the image (via the <img> tag) to be cropped and displayed in the browser. |
| src_x | Specifies the start of cropping of the source image from the x-axis. |
| src_y | Denotes the start of the cropping of the source image from the y-axis. |
| sWid | Identifies the width of the image. |
| sHei | Represents the height of the image. |
| dx | Specifies the started point from the x-axis for drawing. |
| dy | Specifies the started point from the y-axis for drawing. |
| dWid | Represents the width of the image to be displayed. |
| dHei | Represents the height of the image to be displayed. |
Let us practice the drawImage() method to crop an image using HTML canvas.
Example
An example is considered to crop an image by employing the HTML canvas.
The example consists of HTML and JavaScript code sections.
These sections are discussed as follows.
HTML Code
<html><body><img id="flower" src="https://cdn.pixabay.com/photo/2022/08/15/12/47/moth-7387787__340.jpg"><canvas id="can_id" ></canvas></body></html><script src="test.js"></script>
The description of the code is as follows:
An <img> tag is utilized by specifying dimensions containing width and height.
A URL of a web image is assigned to src.
After that, the HTML canvas element is utilized to display the cropped image in the browser.
In the end, the JavaScript file test.js is linked within <script> tags.
JavaScript Code
window.onload = function() {
var img = document.getElementById("flower");
var canvas = document.getElementById("can_id");
var context = canvas.getContext("2d");
context.drawImage(img, 10, 10);};
In this code:
Firstly, the “window.onload” event is employed to check whether the webpage is ready to display.
Furthermore, the getElementById property is utilized to extract the image and canvas id by “flower” and “can_id”.
After that, the getContext() method is used to show the drawing on canvas as a “2d” surface.
Finally, the drawImage() method is employed for drawing a new image.
Moreover, x and y coordinates are passed as “10” and “10” for placement of the image on the canvas.
Output
![]() The output shows that the full image is resized by applying the drawImage() method in the browser window.
The output shows that the full image is resized by applying the drawImage() method in the browser window.
Conclusion
In JavaScript, the drawImage() method is utilized with three arguments to crop an image by utilizing the HTML canvas element.
The method accepts a variety of arguments, but only the image-reference, height, and width are utilized to crop an image.
The getElementById also plays a key role in retrieving the image element.
This article demonstrates various methods to crop an image using HTML canvas.
How to Create Array of Specific Length
An array is an ordered collection of elements.
Usually, an array is created with an arbitrary length.
Sometimes, developers are required to initialize an array of a specific length in a large-scale program.
Mostly, the length property of arrays is utilized to serve the above-stated purposes.
However, JavaScript offers several methods to create an array of a specific length.
In this post, we will provide insight into the methods used to create an array of a specific length.
The learning outcomes are summarized as:
Creating an Array of Specific Length
Create Array of Specific Length with Array() Constructor
Create Array of Specific Length with apply() Method
Method 1: Creating an Array of Specific Length
This method is general and the most used to initialize an array where the developer only initializes the number of elements as per his desire.
The following code refers to creating an array of a specific length:
Code
console.log("Create an array of specific length");const lang = ["JavaScript", "Java", "C++", "Python"];
console.log(lang);
The explanation of the code is as follows:
Firstly, an array “lang” is created with four elements: “JavaScript”, “Java”, “C++”, and “Python”.
The elements are assigned in the array to represent the length of the specified array.
In the end, the console.log() method is adapted to present the elements in the existing array.
![]() Output
Output
![]() The output shows the length of the array as “4”, which validates elements existing in the array.
Moreover, it presents elements such as “JavaScript”, “Java”, “C++”, “Python”.
The output shows the length of the array as “4”, which validates elements existing in the array.
Moreover, it presents elements such as “JavaScript”, “Java”, “C++”, “Python”.
Method 2: Creating Array of Specified Length Using Array() Constructor
A constructor Array() is utilized to create an array that is possible through the keyword “new”.
A user can pass different elements that define the specific length of an array.
By considering the Array() constructor, different elements are passed in the following code:
Code
console.log("Create an array of specific length");
var arr = new Array('Linuxhint', 'JavaScript');
console.log(arr)
The code is as follows:
Firstly, an Array() constructor is utilized with a new keyword to create an array.
In this array, two elements, ‘Linuxhint’ and ‘JavaScript’ are stored in the variable “arr”.
Finally, the console.log() method is employed to display the elements of the array in the console window.
![]() Output
Output
![]() The output shows that “Linuxhint” and “JavaScript” are displayed alongside the length of the array as well.
The output shows that “Linuxhint” and “JavaScript” are displayed alongside the length of the array as well.
Method 3: Create Array of Specific Length Using apply() Method
An apply() method is considered that calls the specified arguments.
Users can pass parameters to this method via an array.
The method takes two parameters: the first one refers to this parameter, and the second one refers to the array.
The syntax of the apply() method is as follows:
Syntax
apply(thisArg, arr)
In this syntax, thisArg refers to a callback function, and arr represents the array for applying the function.
Code
console.log("Create an array of specific length");
var emp_arr = Array.apply('empty', {
length: 3 } );
console.log(emp_arr.length);
emp_arr = ["John", "Peter", "Harry"];
console.log(emp_arr);
The description of the code is as follows:
Firstly, an “emp_arr” variable is created with a specified length and has a value of 3.
After that, the “length” property is utilized that returns the array length.
In the end, the console.log() method displays all elements in the console window.
![]() Output
Output
![]() The output shows that “John,” “Peter,” and “Harry” are displayed in the console window.
The output shows that “John,” “Peter,” and “Harry” are displayed in the console window.
Conclusion
JavaScript provides the length property, the Array() constructor, and the apply() method to create an array of a specific length.
The “length” property sets and returns the number of elements in the predefined or existing array.
The Array() constructor initializes an empty array with a new keyword.
Moreover, the apply() method is considered, which uses the specified arguments for creating a specific array of lengths.
This article illustrated several methods for creating an array of a specific length.
How to Resize Image Using HTML Canvas
In JavaScript, image resizing plays an important role in making the web page more interactive.
By resizing, the images can be placed at any desired place on a webpage.
For this purpose, the HTML <canvas> element provides a feature of resizing images with the integration of JavaScript code.
This element is applicable for drawing graphics, including animation, plotting graphs, and many more.
Moreover, users can specify the dimensions of the resized image.
The article demonstrates how to resize an image using the HTML canvas via JavaScript.
How to Resize an Image Using HTML Canvas?
The HTML <canvas> element is utilized to draw graphics in different aspects.
It is useful for animation, plotting graphs, and combining photos.
Moreover, users can resize the image by providing specific dimensions.
It does not change the original image but creates a new cropped or resized image.
For this purpose, the drawImage() method is utilized to scale the image in canvas elements.
The practical implementation of resizing the image is divided into two separate files, i.e., HTML and JavaScript.
HTML Code
<html><body>
<img id="fire" src="https://cdn.pixabay.com/photo/2020/02/26/08/59/fireworks-4881190__340.jpg" alt="fire">
<canvas id="can" >
</canvas></body></html><script src="test.js"></script>
The description of the code is provided here:
First, an image URL is provided by specifying width and height with <img> tags.
After that, HTML <canvas> is adjusted by resizing the width and height of the image.
In the end, a JavaScript “test.js” is linked by providing the source.
JavaScript Code
window.onload = function() {
var img = document.getElementById("fire");
var canvas = document.getElementById("can");
var context = canvas.getContext("2d");
context.drawImage(img, 10, 10);};
In this JavaScript code:
Firstly, the “window.onload” event is utilized for checking if the webpage is ready to display.
After that, getElementById property is employed to extract the image and canvas ids by “fire” and “can”.
After that, the getContext() method is used to show the drawing on canvas by passing a “2d” surface.
In the end, the drawImage() method is utilized to draw a new image.
Moreover, x and y coordinates are specified as “10” and “10” for placing the image on the canvas.
Output
![]() The output shows that the full image is resized by applying the drawImage() method in the HTML <canvas>.
The right portion of the above display represents the resized portion of the image.
The output shows that the full image is resized by applying the drawImage() method in the HTML <canvas>.
The right portion of the above display represents the resized portion of the image.
Conclusion
JavaScript provides a drawImage() method to resize the image by employing the HTML <canvas>.
The method takes input as the heights and widths of the existing image.
After that, a resizing factor is applied to draw a new image based on the provided heights and widths.
Moreover, users can specify the web images for resizing via JavaScript.
In this post, users have learned to resize the image based on HTML <canvas>.
It has various applications in online shopping stores, gaming sites, etc.
How to Remove Substring From String
JavaScript provides various built-in features to manipulate strings.
The replace() method is the commonly utilized method to replace or remove substrings.
The replace() method is used to match the substring and then remove the matched part.
The regular expressions can also be used in the replace() method to make a perfect match of the substring.
In this post, we have provided numerous methods for removing a substring from an existing string.
How to Remove Substring?
JavaScript provides a replace() method to remove substrings from strings.
Moreover, users can replace a substring in an existing string as well.
The method takes input as a substring to remove the string.
For this purpose, the syntax is given below:
Syntax
str.replace(rem_substring, newSubstring);
The parameters are described as follows.
rem_substring: specifies the substring to be removed.
newSubstring: refers to the new string that replaces the existing one.
Example 1: Using the replace() Method to Remove the Substring
A built-in replace() method is utilized to remove the substring with an empty string.
The method accepts the first argument as the substring for removal.
While the second argument replaces the substring provided in the first argument.
The following example utilizes the replace() method:
Code
console.log("An example to remove substring");
let str = 'What is JavaScript World';
let newStr = str.replace('JavaScript','');
console.log(newStr);
The description of the code is given below.
First, the string “What is JavaScript World” is stored in the “str” variable.
After that, the replace() method is employed to remove the “JavaScript” substring and replace it with the empty string “” (empty).
In the end, the console.log() method is utilized to display the updated string in the console window.
![]() Output
Output
![]() The output shows that the “JavaScript” string has been removed from the existing string “What is JavaScript World”.
The output shows that the “JavaScript” string has been removed from the existing string “What is JavaScript World”.
Example 2: Using Regular Expression to Remove Substring
A regular expression is adapted with the replace() method for removing a substring from an existing string.
In this method, two arguments are passed as input.
The first argument represents the regular expression “/remove_string/g” that the user wants to remove.
The second argument refers to the empty string which performs replacement with the original string.
The following code is employed to remove the substring.
Code
console.log("Another example to remove substring");
let str = 'Welcome to JavaScript World';
let newStr = str.replace(/JavaScript/g, '');
console.log(newStr);
In this code:
A str variable is utilized to store the string “Welcome to JavaScript World”.
After that, the regular expression “/JavaScript/g” is used to remove the substring “JavaScript” from the existing string.
Finally, newStr is utilized to display the new string by removing the substring.
![]() Output
Output
![]() The output validates that the “JavaScript” substring has been removed from the existing string “Welcome to JavaScript World” in the console window.
The output validates that the “JavaScript” substring has been removed from the existing string “Welcome to JavaScript World” in the console window.
Conclusion
In JavaScript, the replace() method is utilized to remove the substring with an existing string.
The replace() method accepts two arguments.
The first one represents the substring to be matched, and the second argument will be an empty string.
This empty string will be replaced with the matching substring to remove it from the string.
The matching string can be carried out using regular expressions as well.
Here, you have learned the removal of a substring from an existing string in JavaScript.
How to Select Onchange
JavaScript offers a variety of built-in features to minimize the time and effort of developers.
JavaScript interacts with the HTML elements to make an interactive look for websites.
It is possible through an onchange event that is triggered when the user changes the selected option via <select> element.
This post explains the selection of onchange events along with a practical example.
The content that demonstrates this post is as follows.
How to Select Onchange?
The onchange event occurs when the element value is modified.
It is specifically used in checkboxes for form validation.
For instance, a drop-down list is utilized, having different options.
The onchange event is called whenever the user selects any option.
All modern browsers are compatible with this event.
An example is provided to select a value using the onchange event.
It is divided into HTML and JavaScript files.
This example code is provided below:
HTML Code
<h2>An Example to Select the onchange Value </h2>
Select Level of Education:<select id="education" onchange="GetSelectedTextValue(this)">
<option value="School">School</option>
<option value="College">College</option>
<option value="University">University</option></select><script src="test.js"></script>
The description of the code is listed here:
First, a dropdown list is created by assigning the id “education” within <select> tags
In this list, different options are provided as “School”, “College” and “University” on behalf of the onchange event.
The onchange event is called if one of the previously mentioned options is selected.
Lastly, the <script> tag is used to attach the JavaScript file “js”.
The “test.js” file contains the following code:
JavaScript Code
function GetSelectedTextValue(education) {
var sleTex = education.options[education.selectedIndex].innerHTML;
var selVal = education.value;
alert("Selected Text: " + sleTex + " Value: " + selVal);}
The description of the code is given below:
The GetSelectedTextValue() method is used by passing the “education” as an argument.
A “sleTex” variable is employed to extract the value of education from the HTML
After that, “selVal” variable is used to retrieve the value of education.
In the end, an alert box is generated that extracts the text as well as value by “sleTex” and “selVal”.
Output
![]() The output shows the dropdown list of “School”, “College” and “University” options.
The onchange event is called if the specific option is selected.
Finally, it displays the value of the selected text in the pop-up window.
The output shows the dropdown list of “School”, “College” and “University” options.
The onchange event is called if the specific option is selected.
Finally, it displays the value of the selected text in the pop-up window.
Conclusion
JavaScript has a built-in event onchange that occurs when the value of an element is selected by the user.
For this purpose, a dropdown list is generated to select a value on behalf of the onchange event.
It is useful to provide a cross-check facility when selecting an option.
In this post, you have experienced how to select text as well as value by utilizing onchange events.
How to Use JavaScript Window Onload Function Call
In JavaScript, you would have observed that either some message or some operation is performed on the onload event of the window.
For this purpose, the window.onload event is employed to call a function.
During the page load, the user can display any kind of message or information by triggering this event in the browser.
In this guide, you will learn how to use the JavaScript window.onload event.
This post serves the following learning outcomes:
Display a Message on the Window Onload Event
Display the Sum of Two Numbers on the Window Onload Event
Display a Message on the Window Onload Event
An approach is considered to display a simple message by utilizing the window onload function call.
JavaScript provides a window.onload event that is triggered during the loading of the webpage.
Moreover, users can change the event to trigger a function based on a particular event.
The syntax of the window.onload event is provided below:
Syntax
window.onload = fun()
In this syntax, the function “fun()” is called using the window.onload.
Code
<html><script>
function fun() {
alert(" Welcome to JavaScript World");
}
window.onload=fun();</script><h1> Example of the window.onload </h1></html>
The description of the code is given below:
A function “fun()” is utilized to generate an alert message “Welcome to JavaScript World”.
After that, the onload event is employed to call the function “fun()”.
![]() Output
Output
![]() The output shows a message “Welcome to JavaScript World” in the alert box by employing the window.onload function.
The output shows a message “Welcome to JavaScript World” in the alert box by employing the window.onload function.
Display the Sum of Two Numbers on the Window Onload Event
Another method is considered to add two numbers by calling the function using the window.onload event.
The following code refers to adding two numbers on the onload event of the window:
Code
<html>
<h2> Methods to call a JavaScript function on page load.
</h2>
<script type="text/javascript">
window.onload = simpFunction( 5, 10 );
function simpFunction( number1, number2 ) {
alert(" The sum of " + ( number1 ) + " and " + ( number2 ) + " is "
+ ( number1 + number2 ) );
}
</script>
</html>
The description of the code is as follows:
The “window.onload” event occurs to call the function.
A “simpFunction” method is used by passing two arguments “number1” and “number2”.
In this function, an alert message is generated which will add two numbers, “5” and “10”.
![]() Output
Output
![]() The output shows that an alert box is loaded which shows the sum of “5” and “10”.
That’s it! You have learned to apply window.onload events.
The output shows that an alert box is loaded which shows the sum of “5” and “10”.
That’s it! You have learned to apply window.onload events.
Conclusion
JavaScript provides a window.onload event to call a function on the load event of the window.
The function may point towards an alert message, a warning message, or to address any programming query.
We have provided two different approaches to using the window.onload event.
The first approach prints an alert message on the load event of the window, whereas the second example makes use of the window.onload event to address a mathematical problem.
How to Check Whether a Radio Button is Selected With JavaScript
Radio buttons, an essential part of HTML forms, allow users to select one of the multiple options.
They can be created by simply using the <input> tag of type “radio”.
Radio buttons are used in a group of two or more buttons with a common name.
This makes it easier to fetch them into a single object and check their status.
The status of a radio button can be checked by using two different methods which will be discussed in this write-up.
The first step of both these methods is the same which is to create a form containing radio buttons:
Setting up an HTML Form
We’ll just create a simple HTML form with a few radio buttons:
<h4>Choose Your Favourite Colour</h4><form>
<input type="radio" id="Red" name="colour" value="Red" />
<label for="Red">Red</label>
<input type="radio" id="Green" name="colour" value="Green" />
<label for="Green">Green</label>
<input type="radio" id="Blue" name="colour" value="Blue" />
<label for="Blue">Blue</label>
<br><br>
<button id="submit" onclick="checkValue()">Submit</button></form>
![]() In the above code we first used a simple <h4> tag to give a heading so the user can easily understand the purpose of our form which is to choose a favourite colour.
We then used the <form> tag to create a form, inside which we have used <input> tags to create three radio buttons which give different options to the users.
We have also used the <label> tags to label our radio buttons.
We then used a couple of <br> tags to give ourselves a few line breaks so the whole form looks nice and evenly spaced.
The form was ended with a <button> tag which can be used to submit our form.
The <button> calls the checkValue() function when it is clicked.
Now we will write the JavaScript code to define the checkValue() function to check which radio button has been selected:
In the above code we first used a simple <h4> tag to give a heading so the user can easily understand the purpose of our form which is to choose a favourite colour.
We then used the <form> tag to create a form, inside which we have used <input> tags to create three radio buttons which give different options to the users.
We have also used the <label> tags to label our radio buttons.
We then used a couple of <br> tags to give ourselves a few line breaks so the whole form looks nice and evenly spaced.
The form was ended with a <button> tag which can be used to submit our form.
The <button> calls the checkValue() function when it is clicked.
Now we will write the JavaScript code to define the checkValue() function to check which radio button has been selected:
Method 1: Using the getElementsByName()
We can use the .checked() property to check whether a radio button has been selected or not:
function checkValue() {
var radios = document.getElementsByName("colour");
for (const radio of radios) {
if (radio.checked) {
alert(radio.value + " is your favourite colour");
break;
}
}}
Inside the checkValue() function we have first declared a variable named radios which receives a nodelist of all the radio buttons with the name colour.
We then iterate over the nodelist and check the status of each radio button.
If a radio button has been selected we use the alert() method to display which colour has been selected.
![]() The code for the entire webpage:
<!DOCTYPE html><html>
<body>
<h4>Choose Your Favourite Colour</h4>
<form>
<input type="radio" id="Red" name="colour" value="Red" />
<label for="Red">Red</label>
<input type="radio" id="Green" name="colour" value="Green" />
<label for="Green">Green</label>
<input type="radio" id="Blue" name="colour" value="Blue" />
<label for="Blue">Blue</label>
<br><br>
<button id="submit" onclick="checkValue()">Submit</button>
</form>
</body>
<script>
function checkValue() {
var radios = document.getElementsByName("colour");
for (const radio of radios) {
if (radio.checked) {
alert(radio.value + " is your favourite colour");
break;
}
}
}
</script></html>
If we want to check for an individual radio button, we can give it a unique id and then use the getElementsById() method to store it in a variable.
We can then use the checked() property to check if the button has been picked.
The code for the entire webpage:
<!DOCTYPE html><html>
<body>
<h4>Choose Your Favourite Colour</h4>
<form>
<input type="radio" id="Red" name="colour" value="Red" />
<label for="Red">Red</label>
<input type="radio" id="Green" name="colour" value="Green" />
<label for="Green">Green</label>
<input type="radio" id="Blue" name="colour" value="Blue" />
<label for="Blue">Blue</label>
<br><br>
<button id="submit" onclick="checkValue()">Submit</button>
</form>
</body>
<script>
function checkValue() {
var radios = document.getElementsByName("colour");
for (const radio of radios) {
if (radio.checked) {
alert(radio.value + " is your favourite colour");
break;
}
}
}
</script></html>
If we want to check for an individual radio button, we can give it a unique id and then use the getElementsById() method to store it in a variable.
We can then use the checked() property to check if the button has been picked.
Method 2: Using the querySelectorAll() Method
The querySelectorAll() method takes a CSS selector as an argument and returns a nodelist of all the elements that match the given selector:
function checkValue() {
var radios = document.querySelectorAll('input[name="colour"]');
for (const radio of radios) {
if (radio.checked) {
alert(radio.value + " is your favourite colour");
break;
}
}}
The definition of the checkValue() function is almost the same in both the methods.
The difference is of the method which gets the nodelist of radio buttons.
Method 2 uses the querySelectorAll() method to get the nodelist.
<!DOCTYPE html><html>
<body>
<h4>Choose Your Favourite Colour</h4>
<form>
<input type="radio" id="Red" name="colour" value="Red" />
<label for="Red">Red</label>
<input type="radio" id="Green" name="colour" value="Green" />
<label for="Green">Green</label>
<input type="radio" id="Blue" name="colour" value="Blue" />
<label for="Blue">Blue</label>
<br><br>
<button id="submit" onclick="checkValue()">Submit</button>
</form>
</body>
<script>
function checkValue() {
var radios = document.querySelectorAll('input[name="colour"]');
for (const radio of radios) {
if (radio.checked) {
alert(radio.value + " is your favourite colour");
break;
}
}
}
</script></html>
Conclusion
Radio buttons are used to get the user’s preference from a list of options.
Groups of radio buttons can be formed by giving the same value to their name attributes.
Only one radio button can be selected at a time.
This post was about how we can use JavaScript to check whether a radio button is selected.
How to Check for an Empty String
While dealing with strings, it is recommended to look for an empty string in the data.
You can include/exclude the empty strings to perform operations on a specific piece of code.
JavaScript provides several methods that assist in checking for empty strings.
This article demonstrates various JavaScript methods to check for an empty string.
The content of the post is as follows:
Using the Strict Equality Operator to Check an Empty String
Using Property length to Check an Empty String
Using Boolean Function to Check an Empty String
Method 1: Using the Strict Equality Operator to Check an Empty String
JavaScript supports a strict equality operator (===) to compute the strict equality of the data.
It can also be employed for checking an empty string.
It returns a true value when the string is an empty, otherwise a false value.
The example code is provided below:
Code
let empStr = "";if (empStr === ""){
console.log("String is empty");}else{
console.log("String is not empty");}
In this code, a variable “empStr” is initialized with an empty string.
After that, an if condition is placed with the strict equality operator to evaluate an empty string.
If the statement is true, then a chunk of the if block is executed; otherwise, the else part is run.
![]() Output
The display returns an output “String is empty” in the console window, which states that the string is empty.
Output
The display returns an output “String is empty” in the console window, which states that the string is empty.
Method 2: Using the length Property to Check an Empty String
Another method is used for checking an empty string by employing the property of length.
This property calculates the number of characters in a string and returns the total length of the existing string.
For instance, the code is provided below:
Code
let empStr = "";if (empStr.length == 0){
console.log("String is empty");}else{
console.log("String is not empty");}
The length property is utilized in the code for checking an empty string.
If the number of characters in a string is equal to zero, the message “String is empty” will be displayed on the console window.
![]() Output
The output returns “String is empty” which validates that the number of characters in the existing string is zero.
Output
The output returns “String is empty” which validates that the number of characters in the existing string is zero.
Method 3: Using the Boolean Function to Check an Empty String
The Boolean function is considered to contradict the statement.
The Boolean function checks for the characters in the string.
If the character number is 0, then it returns a true value, else false value.
The following code refers to using the Boolean function to check for an empty string:
Code
let empStr = "";let str = "Welcome to Javascript";
console.log(Boolean(empStr))
console.log(Boolean(str))
The description of the code is illustrated here:
An empty string is stored in an “empStr” variable and a “str” variable contains a non-empty string.
The Boolean function is employed to check the number of characters in both strings.
![]() Output
The output returns a “false” value for an empty string in the console window, which validates that the number of existing characters in the string is zero.
Output
The output returns a “false” value for an empty string in the console window, which validates that the number of existing characters in the string is zero.
Conclusion
The strict equality operator, length property, and Boolean function can be used to check an empty string in JavaScript.
These methods evaluate the number of characters in a string and return true or false based on the input string.
These methods have various applications, such as form validation in the educational, industrial, and government sectors.
In this article, you have learned various JavaScript functionalities to check for an empty string.
How to Add Attribute to DOM Element
The DOM is the structure of an HTML document starting from its root element <html> till the end of the document.
Any element, such as “p”, “div“, or “table“, is referred to as the DOM element.
The DOM elements allow the user to modify the content of the webpage.
An attribute specifies the collection of objects.
Moreover, JavaScript provides setAttribute() methods for adding or modifying the attributes of DOM elements.
In this post, we have demonstrated all the possible methods to add attributes to the DOM elements.
How to Add Attribute to DOM Element
Add Attribute to DOM Element
Add Multiple Attributes to DOM Element
How to Add Attribute to DOM Element?
The setAttribute() method is employed to add an attribute value to an existing element.
If the attribute is already added, setAttribute() updates the value.
It takes two inputs, one is the name, and the second specifies the value.
By loading the webpage, the attribute property is applied to the DOM elements.
The syntax of the setAttribute() method is provided below:
Syntax
setAttribute(name, value)
The parameters are described as follows:
name: Refers to the attribute name.
value: Specifies the value of the attribute.
Example 1: Add an Attribute to DOM Element
An example is considered by the addition of an attribute to the DOM element.
The setAttribute() method is utilized for adding value to the attribute.
The example code is written below:
Code
<html><body><h2> Example to add attribute to DOM element.
</h2><p> Click the button to disable it </p><button onclick = "btn_fn()" id = "btn"> Click Button </button></body><script>function btn_fn() {
document.getElementById("btn").setAttribute("disabled", "");}</script></html>
The description of the code is provided below:
A button named “Click Button” is attached and has a unique id “btn”.
After that, this button is associated with the “btn_fn()” method.
In this method, “getElementById” is utilized to extract the “btn” id.
Finally, the “setAttribute()” method is employed to disable the button by passing an empty It disables the button by pressing it.
![]() Output
Output
![]() It is observed that after pressing the “Click button”, the disabled value is passed by the “setAttribute()” method.
It is observed that after pressing the “Click button”, the disabled value is passed by the “setAttribute()” method.
Example 2: Add Multiple Attributes to DOM Element
An example is considered to add multiple attributes to the DOM element by utilizing the setAttribute() method.
The setAttribute() method extracts the DOM elements by getElementById. After that, assign the property through the setAttribute() method.
These attributes include a button, link, and styling property.
For instance, the code is as follows.
Code
<html><body style = "text-align: center;"><h2> Example of adding an attribute using setAttribute() method.
</h2><a id = "link"> Google.com </a><br> <br><button onclick = "fun()"> Add attribute </button></body><script>function fun() {
document.getElementById("link").setAttribute("href", "https://www.Google.com/");
document.getElementById("link").setAttribute("style", "background-color: red;");}</script></html>
The description of the code is provided in the following order:
Firstly, an anchor “<a>” tag is employed by passing the id “link”.
In this link, “com” is passed as text for display in the browser.
A button “Add attribute” is attached that is associated with the “fun()” method.
The “func()” will be triggered by the button with the onclick value.
The “setAttribute()” method is utilized to fetch “link” using “getElementById” and an “href” attribute is set whose value is “https://www.google.com/”.
Similarly, a “style” attribute is set whose value is “background-color: red” for changing the text background color.
![]() Output
Output
![]() Firstly, the text is not clickable.
After pressing the button “Add attribute”, a link is added to the text “Google.com” which is clickable now and opens the webpage associated with the link.
Firstly, the text is not clickable.
After pressing the button “Add attribute”, a link is added to the text “Google.com” which is clickable now and opens the webpage associated with the link.
Conclusion
The setAttribute() method is employed for adding an attribute to the elements.
The same method updates the value of the attribute if the DOM element already contains the attribute.
This post has demonstrated the methods for adding attributes to the DOM elements.
The setAttribtue() method takes a name and a value as arguments.
Moreover, users can set multiple attributes to DOM elements by utilizing JavaScript.
This article demonstrates two examples by adding as well as modifying the attribute value of the DOM element.
How to Add Days to Current Date
JavaScript provides a Date object to perform various manipulations using date/time.
While dealing with date/time functionalities, a developer may be required to add a few days to the current date to find a specific date that occurs after adding the days.
In this post, we will demonstrate various methods for adding days to the current date.
This post serves the following outcomes:
Using setDate() Method to Add Days to Current Date
Using Date.now() Method to Add Days to Current Date
Using Custom Function to Add Days to Current Date
Method 1: Using setDate() Method to Add Days to Current Date
An example is adapted for adding specified days by employing the setDate() and getDate() methods.
Firstly, the getDate() method retrieves the current date based on the local time, and then the setDate() method sets the month’s day by passing an argument of a particular date.
The following code is written here by utilizing the setDate() and getDate() methods.
Code
console.log("Add 2 Days to Current Date")
const d = new Date();
d.setDate(d.getDate() + 2);
console.log(d)
The description of the code is as follows:
First, an object “d” is created with the Date() constructor by the new keyword.
After that, the getDate() method is utilized that returns the current date based on the local time.
The setDate() method returns the month’s day by adding two days to the existing date.
Finally, the log() method is employed to display the updated date in the console window.
![]() Output
Output
![]() The output returns the updated date “Sat Aug 27, 2022, 09:45:00 GMT+0500 (Pakistan Standard Time)” by adding two days to the current date.
The output returns the updated date “Sat Aug 27, 2022, 09:45:00 GMT+0500 (Pakistan Standard Time)” by adding two days to the current date.
Method 2: Using Date.now() Method to Add Days to Current Date
The Date.now() method is important to extract the number of milliseconds.
These milliseconds are added to the current date to return the updated date.
For instance, the code is as follows:
Code
console.log("Add 1 Day to Current Date")
const d = new Date(Date.now() + (3600 * 1000 * 24))
console.log(d)
The description of the code is as follows:
Firstly, the Date() constructor is called with a new keyword.
In this constructor, the now() method is employed with “3600 * 1000 * 24”(number of milliseconds in one day) to add one day to the current date.
The now() method returns the milliseconds.
Lastly, the updated date is printed on the console.
![]() Output
Output
![]() The output returns “Fri Aug 26, 2022, 09:48:31 GMT+0500 (Pakistan Standard Time)” by adding 1 day to the current date.
The output returns “Fri Aug 26, 2022, 09:48:31 GMT+0500 (Pakistan Standard Time)” by adding 1 day to the current date.
Method 3: Using Custom Function to Add Days to Current Date
A custom function is adapted for adding days.
Using this function, users can specify a random date and add certain days to it.
For instance, the code is as follows:
Code
console.log("Add 5 Day to Current Date")function custom_fn(date, days){
var d = new Date(date);
d.setDate(d.getDate() + days);return d;}
var user_date = new Date(2022 , 03 , 20);
console.log(custom_fn(user_date, 5));
In this code:
A custom function “custom_fn” is created in which two arguments are passed, named as date, days.
In this method, a variable d stores the current date by calling the constructor Date().
After that, the setDate() method specifies the number of days that are added after extracting the current date via the getDate() method.
In the end, a manual date “2022, 03, 20” is passed to the Date() constructor and stored in the user_date variable.
Finally, the log() method is adapted to display the updated date after the addition of 5 days.
![]() Output
Output
![]() The output shows that a custom function is utilized for adding 5 days to the manual assignment date.
The output shows that a custom function is utilized for adding 5 days to the manual assignment date.
Conclusion
In JavaScript, the setDate(), getDate() and Date.now() methods are employed for adding days in the current date.
The setDate() method sets the month’s day by passing a specified date.
Furthermore, the getDate() method returns the current date based on the local time and region.
The Date.now() method returns the number of milliseconds, and these milliseconds are converted into days to get the updated date.
Moreover, a custom function is adapted for adding days by passing a specified date from the user.
This post has discussed various methods for adding days to the current date.
How to Add Commas to Number
In computing, the format of a number is a key player in representing large numbers.
Consequently, this process enhances the readability of the users.
JavaScript offers a variety of methods to deal with number formatting.
For instance, the toLocaleString() and Intl.NumberFormat() methods can be used to add commas.
Moreover, the regular expressions can also be utilized to add commas at a specific place in a number.
This post provides a detailed demonstration of all the possible methods to add commas to numbers.
Method 1: toLocaleString() Method to Add Commas to a Number
The toLocaleString() is employed to localize the number with a specific country’s formatting.
By default, it follows the USA format to display a number.
It converts the “passed” number to a string separated by commas.
The work of the toLocaleString() method can be described by the following syntax:
Code
console.log("Example to add comma to number");
const num = 456563453;
const out = num.toLocaleString();
console.log(out);
In this code:
A variable “num” is utilized to store the number “456563453”.
After that, the toLocaleString() method is employed to add a comma to the number and store it in the “out” variable.
In the end, the “log()” method is used to display a number in the console window.
![]() Output
Output
![]() The output shows that the input number is separated by commas.
The output shows that the input number is separated by commas.
Method 2: Using Regex to Add Commas to a Number
Another method is implemented with a regular expression that splits the string into thousands of segments.
The regex expressions “/\B(?=(\d{3})+(?!\d))/g” searches the digit multiple of three and places a comma to digit.
For instance, the code is provided here.
Code
console.log("Example to add comma to number");let n1 = fun(234234.555);let n2 = fun(-89834874);function fun(num) {return num.toString().replace(/\B(?=(\d{3})+(?!\d))/g, ',');}
console.log(n1);
console.log(n2);
The description of the code is as follows:
A custom function “fun()” is called by passing the numbers “234234.555” and “-89834874”.
In this fun() method, a regex “/\B(?=(\d{3})+(?!\d))/g” is used to match the group of three digits.
After that, it returns a number by placing a comma by utilizing the second argument “,” of the replace() method.
Hence, the “num.toString()” extracts the number and replaces it after applying a comma.
Lastly, the updated variables are printed on the console.
![]() Output
Output
![]() The output shows that “234234.555” and “-89834874” are converted to “234,234.555” and “-89,834,874” respectively.
The output shows that “234234.555” and “-89834874” are converted to “234,234.555” and “-89,834,874” respectively.
Method 3: Using Intl.NumberFormat() Method to Add Commas to a Number
The “Intl.NumberFormat” method transforms a number by specifying the number and region, such as ‘en-IN’ specifies the number “6,34,434”, and ‘en-GB’ refers to “454,234”.
The code is as follows by considering the ‘en-US’ above-mentioned method.
Syntax
new Intl.NumberFormat(locales, options)
The parameters are described as follows:
locals: specifies the language and region.
options: refers to the setting of how the number is formatted into a string (optional).
Code
console.log("Example to add comma to number");
const num = 57484;
const numFor = Intl.NumberFormat('en-US');
const new_for = numFor.format(num);
console.log(new_for)
The description of the code is explained here:
Firstly, a “num” variable is utilized to store the number “57484”.
After that, the “Intl.NumberFormat()” is employed by accepting the language and region as “en-US”.
This method formats a number according to the “en-US”
After that, the “format()” method returns a formatted string based on the argument “num”.
In the end, the “console.log()” method is employed to display the number via the “new_for” variable.
![]() Output
Output
![]() The output shows that “57484” is converted to “57,484” after adding commas.
The output shows that “57484” is converted to “57,484” after adding commas.
Conclusion
JavaScript provides toLocaleString(), regex, and Intl.NumberFormat() methods to add commas to numbers.
The toLocaleString() localizes the number by specifying a country’s format for placing commas.
The regex searches for the digit multiple of three and places a comma after the digit.
The “Intl.NumberFormat” method returns a number by placing a comma following the “en-US” format.
Hence, you have learned to add commas to numbers with the help of numerous examples.
How to Sort Array of Object by Property
Sorting is the concept of arranging items in a specific manner., sorting an array has significant importance in arranging elements in ascending as well as descending order.
For instance, the array.sort() method is utilized to sort an array based on object properties.
The article demonstrates how to sort an array by object property.
The content served in this guide is as follows.
How to Sort Array by Object Property
Example 1: Sort Array by Alphabetical Order Using the Name Property
Example 2: Sort Array by Numerical Order Using the Age Property
How to Sort Array by Object Property?
The array.sort() method facilitates sorting the array elements by using the callback function.
The callback function iterates over all the elements based on object properties in the array.
The objective of this method is to compute all the elements by fulfilling user-defined conditions.
By default, the array.sort() method returns an ascending sequence of the elements in the existing array.
Syntax
array.sort()
Note: The method is employed to sort the numerical as well as alphabetical elements.
Example 1: Sort Array by Alphabetical Order Using the Name Property
An example is used to perform sorting of the array values through the property.
Code
console.log("An example of sort array");
const teachers = [
{ name: "John", age: 30 },
{ name: "Peter", age: 27 },
{ name: "Bob", age: 38 }];
teachers.sort((x, y) => x.name.localeCompare(y.name));
console.log(teachers);
The explanation of the code is listed below:
An array “teachers” is created in which name and age properties are stored.
A method “localeCompare” is adapted to compare the name
The sort() method is used to call a “localeCompare()” method to compare the first alphabet of the name
This method performs iteration through all the elements in the current array.
Finally, the console.log() method is utilized to display the values of the name property in alphabetical order.
![]() Output
The output returns the sorted array in alphabetical order, such as Bob, John, and Peter.
Output
The output returns the sorted array in alphabetical order, such as Bob, John, and Peter.
Example 2: Sort Array by Numerical Order Using the Age Property
Another example is followed to perform sorting the array via the object properties.
Code
console.log("An example of sort array");
var objAr = [
{ name: "John", age: 30 },
{ name: "Peter", age: 27 },
{ name: "Bob", age: 38 }];output=objAr.sort(cmpAge);function cmpAge(a, b){
return a.age - b.age;}
console.log(output);
In this code:
An array objAr is created in which name and age properties are stored.
After that, a method called cmpAge is used to compare the age
Furthermore, the sort() method is utilized for calling the cmpAge() method to compare the age
The method evaluates all the values of the age property in the array.
In the end, the console.log() method is employed to display the age property in ascending order.
![]() Output
The output shows the sorted array by using the age property.
Output
The output shows the sorted array by using the age property.
Conclusion
In JavaScript, the built-in method array.sort() is employed to sort an array by accessing its properties.
The method utilizes the callback function to perform iterations through all the elements in the existing array.
Two examples are demonstrated to sort the array by alphabetical as well as numerical order.
Therefore, you have to understand how to sort an array by the properties of objects.
Moreover, all the famous browsers support the array.sort() method of JavaScript.
How to Convert a Float Number to Int
The conversion of data types from one to another is referred to as the key operation programming.
JavaScript has various built-in methods to convert a data type to another data type.
For instance,the Math object supports various methods, including Math.ceil(), Math.floor(), Math.round(), and Math.trunc() to convert the float number to an integer.
These methods are used to convert a float number to an integer.
In this guide, we have used various math object methods and other JavaScript methods to convert float numbers to integers.
Here is the content of this guide:
Method 1: Math.ceil()
Method 2: Math.round()
Method 3: Math.trunc()
Method 4: Parselnt()
Method 5: Bitwise Or Operation
Method 6: Math.floor()
Method 1: Math.ceil()
JavaScript provides a ceil() method by utilizing the Math object.
The method returns the next higher integer number from the floating point.
Syntax
Math.ceil(val)
The parameter val represents the floating value of any number.
Example
x=Math.ceil(25.1);
y=Math.ceil(-25.1);
console.log(x);
console.log(y);
In the above code, “25.1” and “-25.1” are the two floating point numbers that are passed to the Math.ceil() method.
Output
![]() The output shows that “25.1” is converted to “26” (as the nearest higher integer value of “25.1”) and “-25.1” to “-25” (nearest higher integer value of “-25.1”).
The output shows that “25.1” is converted to “26” (as the nearest higher integer value of “25.1”) and “-25.1” to “-25” (nearest higher integer value of “-25.1”).
Method 2: Math.round()
The method round() is employed to round the fractional number to the closest number.
The syntax of the Math.round() method is as follows:
Syntax
Math.round(val)
The parameter val denotes the floating number to convert into an integer.
Example
x=Math.round(25.13);
y=Math.round(13.523);
console.log(x);
console.log(y);
In the above code, Math.round() methods are utilized by passing two float numbers, “25.13” and “13.523”.
Output
![]() It is observed that “25.13” is converted to “25” (as the value after the fractional point is less than 5).
Similarly, the value “13.523” is converted to “14” (because the value after the fractional point is greater than 5).
It is observed that “25.13” is converted to “25” (as the value after the fractional point is less than 5).
Similarly, the value “13.523” is converted to “14” (because the value after the fractional point is greater than 5).
Method 3: Math.trunc()
The trunc() method removes the fractional part of the passed number and returns the whole number only.
The syntax of the Math.trunc() method is given below:
Syntax
Math.trunc(val)
The parameter val represents the floating value of any number.
Example
x=Math.trunc(15.1);
y=Math.trunc(-175.1);
console.log(x);
console.log(y);
In this code, Math.trunc() methods are employed by passing two float numbers, “15.1” and “-175.1”.
Output
![]() The output removes the fractional part of the floating number (.1) and returns the integer “15” and “-175” in the console window.
The output removes the fractional part of the floating number (.1) and returns the integer “15” and “-175” in the console window.
Method 4: Math.parselnt()
The parseInt() method provides a simple solution to convert the float number to an integer.
It retrieves the integer number from the fractional number and returns the output as an integer number.
Syntax
Math.parseInt(val)
The val parameter means the floating number to convert into an integer.
Example
x=parseInt("24.5");
y=parseInt("-24.5");
console.log(x);
console.log(y);
The parseInt() method is utilized by taking input “24.5” and “-24.5” and displaying the output using the console.log() method.
Output
![]() The output shows that “24.5” is converted to “24” (by removing floating numbers).
Similarly, “-24.5” to “-24” (by removing floating numbers) in the console window.
The output shows that “24.5” is converted to “24” (by removing floating numbers).
Similarly, “-24.5” to “-24” (by removing floating numbers) in the console window.
Method 5: Bitwise Or Operation
The Bitwise Or operation allows the conversion of the float number to an integer by removing the decimal part of the current number.
The syntax of the Bitwise Or operator is as follows:
Syntax
let output = num | 0;
The num represents the float number.
Example
console.log(23.5 | 0);
console.log(-25.5 | 0);
In this code, “23.5” and “-25.5” are passed as floating numbers to be converted into integers.
Output
![]() The output shows “23.5” to “23” and “-25.5” to “-25” by removing the fractional number in the console window.
The output shows “23.5” to “23” and “-25.5” to “-25” by removing the fractional number in the console window.
Method 6: Math.floor()
The method provides a rounding-off facility to the downside for the passing floating number.
The syntax is given below.
Syntax
Math.floor(val)
The parameter val describes the floating number to convert into an integer.
Example
An example is considered using the floor() method by passing different values.
x=Math.floor(25.1);
y=Math.floor(-25.1);
console.log(x);
console.log(y);
The Math.floor() method is employed by passing floating numbers “25.1” and “-25.1” to convert into integers.
Output
![]() The output shows that the Math.floor() method has converted (by removing the fractional part) the “25.1” to “25” and “-25.1” to “-26”.
The output shows that the Math.floor() method has converted (by removing the fractional part) the “25.1” to “25” and “-25.1” to “-26”.
Method 7: toFixed()
Another method is adapted to convert the floating number to an integer using toFixed().
In this case, the number is rounded off to the closest integer value.
The syntax is provided below:
Syntax
.toFixed(dig);
In the above syntax, the dig specifies the number of digits for the decimal part.
Example
console.log( (6546.1453).toFixed(0));
In this code, the toFixed() method is utilized to convert the floating number “6546.1453” to integers.
Output
![]() The output returns the integer number “6546” (the closest integer number) from “6546.1453” in the console window.
The output returns the integer number “6546” (the closest integer number) from “6546.1453” in the console window.
Conclusion
In JavaScript, Math.ceil(), Math.floor(), Math.round(), Math.trunc() methods are employed to convert the float number to integer.
All these methods take a floating point as an input and return an integer number.
Moreover, parseInt(), bitwise Or operation, and toFixed() methods are utilized to remove the decimal numbers of floating numbers.
In this article, you have learned how to convert a float number to an integer using numerous JavaScript methods.
How to Change Image Source JavaScript
JavaScript can integrate with HTML to fulfill the demands of users.
By integration, users can employ a feature to change the image source.
For instance, the src property is utilized to specify the image source.
The sources may include a local file system as well as the image URL.
This guide serves to change the image source file by utilizing the src property.
All the latest browsers support the src property for locating the source image.
This post serves the following learning outcomes:
How to Change the Image Source
Example 1: Change Image Source of Local File Image
Example 2: Change Image Source of Web Based Image
How to Change the Image Source
JavaScript is essential for dynamically changing the display of the image.
For instance, the img HTML element provides the src property to modify the source of the image.
The source of the image may be a local system or any URL image.
The syntax to apply the src property using JavaScript is provided below:
Syntax
document.getElementById("myImageId").src="newSource.png";
Parameter
The description of the parameters is as follows:
myImageId: specifies the image id.
src: refers to the source of the image.
Example 1: Change Image Source of the Local Image
An example is adapted to change the source of an image through the local file.
The example comprises HTML and JavaScript code files.
HTML Code
<html><body><center>
<h2>Example to Change the Image Source</h2><img id="imgid" src="computer.jpg" id="image" /><br> </br><button onclick="changeScr()">Change Image Button</button></center></body></html><script src="test.js"> </script>
In this code, the src attribute is utilized to fetch the image “computer.jpg“.
After that, a “Change Image Button” is added to the HTML file that triggers the changeScr() method.
The changeScr() method is written in a JavaScript file.
JavaScript Code
function changeScr() {
document.getElementById("imgid").src="books.jpg";}
In this code, the changeSrc() method fetches the element using its id “imgid” and sets the value of the “src” attribute of that element.
Output
![]() The output shows that after pressing the “Change Image Button” the source file of the image is changed, and the new image is displayed.
The output shows that after pressing the “Change Image Button” the source file of the image is changed, and the new image is displayed.
Example 2: Change Image Source of a Web-Based Image
Another example is employed for changing the image source through the URL.
The complete code is divided into HTML and JavaScript files.
HTML Code
<html><body><center>
<h2>Example to Change Web Image Source</h2><img id="imgid" src="https://cdn.pixabay.com/photo/2020/02/26/08/59/fireworks-4881190__340.jpg" id="image" /><br> </br><button onclick="changeScr()">Change Image </button></center></body></html><script src="test.js"> </script>
The description of the code is as below:
Firstly, the width and height of the image are assigned to the image within <img> tags.
After that, the URL of an image is provided by the src property to display the image in the browser window.
JavaScript Code
function changeScr() {
document.getElementById("imgid").src="https://cdn.pixabay.com/photo/2022/07/28/23/42/rainbow-7350780__340.jpg";
}
In this code, the changeScr() method is used to trigger an event when the user clicks on the button to change the source of the image.
Output
![]() The output illustrates that when a user clicks on the “Change Image”, the new image is replaced with the existing one.
The output illustrates that when a user clicks on the “Change Image”, the new image is replaced with the existing one.
Conclusion
JavaScript provides a src attribute to change the image source by specifying the path of the file.
For instance, the getElementId() method is utilized to extract the HTML element through id, and then the src property will change the source image.
After extraction, the new source image file is assigned.
Here, you have learned to change the image source.
For this, we have demonstrated a set of examples in various scenarios.
How to Download a File Using JavaScript
JavaScript comprises a bundle of built-in features, methods, and properties to fulfill the user’s as well as the developer’s demands.
File downloading is a useful task in any browser to trigger a file and download it.
JavaScript allows you to download any file from the internet.
This post demonstrates various examples of downloading a file using JavaScript.
How to Download a File
Example 1: Downloading a File From the Internet
Example 2: Creating and Downloading a Text File
How to Download a File?
JavaScript provides an href attribute for downloading a file.
The attribute is supported by HTML 5.
Using this attribute, users can employ the link as well as the button for downloading files according to their needs.
Two examples are explained in detail to download text as well as image files.
Example 1: Downloading a File From Internet
An example is adapted to download a JPG file by using a hyperlink.
The piece of code is divided into two files named HTML and JavaScript.
HTML Code
<center> <<strong>h2</strong>> An example to download JPG file</<strong>h2</strong>>
<p> Please click the link below </p><a href="https://rb.gy/dlzhey" download>Download Link</a></center>
In this piece of code,
Firstly, all the script is written within <center> tags for center alignment.
After that, an anchor <a> tag is utilized to provide a link named “Download Link.”Finally, an image file named “remotar-jobs.jpg” is downloaded by pressing the “Download Link”
JavaScript Code
// Create a linkconst download = (p, f) => {
const anchor = document.createElement('a');
anchor.href = p;
anchor.download = f;
document.body.appendChild(anchor);
anchor.click();
document.body.removeChild(anchor);};
The description of the JavaScript code is written below:
The download attribute is utilized by passing two arguments, p and
After that, an anchor object is created that is associated with the HTML file by passing the “a’’
The argument p specifies the location of the file that is associated with the href
Furthermore, the other argument f refers to the name of the downloaded file.
In addition, the appendChild property is utilized to trigger the anchor
Finally, the removeChild property is used to remove the event that is created by the click().
Output
![]() The output returns a message with a “Download Link”.
After pressing a link, an image file in JPG format is downloaded.
The output returns a message with a “Download Link”.
After pressing a link, an image file in JPG format is downloaded.
Example 2: Creating and Downloading a Text File
Another example is considered for downloading a text file.
In this example, a button is attached to download a text file.
Here, the example demonstrates that the user can input text into a text box, and the text will be downloaded into a text file.
The name of the downloaded file is “JavaScript.txt”.
The complete code is written in an HTML file.
HTML Code
<center> <h2> An example to download text file</h2><p> Please click the link below </p><textarea id="val" rows="4">Welcome to JavaScript</textarea><br/><input type="button" id="dwn-btn" value="Download Button"/> </center>
The code description is discussed below:
An area of text is specified using the <textarea> tags in which the user can modify data for downloading.
A “Download Button” is attached to download a file.
JavaScript
document.getElementById("dwn-btn").addEventListener("click", function(){
var t = document.getElementById("val").value;
var fn = "JavaScript.txt";
dwn(fn, t);
}, false);
function dwn(fn, t) {
var element = document.createElement('a');
element.setAttribute('href', 'data:text/plain;charset=utf-8,' + encodeURIComponent(t));
element.setAttribute('download', fn);
element.style.display = 'none';
document.body.appendChild(element);
element.click();
document.body.removeChild(element);}
The code is explained as:
A property addEventListener is employed to trigger a function() by passing the click value of the button.
A method dwn is used to download a file by passing fn and t
The setAttribute is utilized to set the href and download attributes.
The appendChild property is employed to append elements.
After that, the click() method is applied to the element.
Lastly,the removeChild() method removes the child elements.
Output
![]() The output displays a text area in which the message “Welcome to JavaScript” is written.
After pressing the “Download Button”, the text file named “JavaScript.txt” is downloaded, containing the message in it.
The output displays a text area in which the message “Welcome to JavaScript” is written.
After pressing the “Download Button”, the text file named “JavaScript.txt” is downloaded, containing the message in it.
Conclusion
The href attribute is used to download a file by triggering an event.
Based on the href attribute, two examples are practically implemented for downloading image and text files.
In the first example, a hyperlink is attached to download an image file, while in the second example, a button is employed for downloading a text file.
In this guide, you have learned JavaScript’s attributes for downloading a file.
How to Check if String is a Number
A string is an essential part of displaying any information to the user., various methods are provided to perform operations on strings.
Sometimes numeric values have also been seen as a string.
In such a case, it is preferred to check if the variable/value is a number or string.
To do so, JavaScript offers a variety of methods.
In this guide, you will study how to evaluate if the string is a number by various methods.
The content of this guide is listed below:
How to Check if String is a Number
Using the “+” Operator to Check if String is a Number
Using if-else Condition to Check if String is a Number
Using “regex” to Check if a String is a Number
How to Check if String is a Number?
In JavaScript, a built-in method isNaN() evaluates the string in such a way that if the passed string is a number.
This built-in function of JavaScript returns a true or false output based on the passing string.
Furthermore, the “+” operator is employed to check the string by converting the string into a number.
It returns a NaN value to represent that the string is not a number.
Finally, the regex expression is employed to compute the number as a string.
Method 1: Using the “+” Operator to Check if String is a Number
This method refers to using the “+” operator to check if a string is a number.
The following code makes use of the “+” operator to check if the string is a number.
Code
console.log("An Example to Check if String Is a Number");
console.log(+'45423')
console.log(+'JavaScript')
The code utilizes the plus operator by passing the “45423” number and string as a “JavaScript”.
![]() Output
Output
![]() The outcome returns 45423 and NaN on the console.
It shows that the plus operator evaluates the string by returning a NaN value.
The outcome returns 45423 and NaN on the console.
It shows that the plus operator evaluates the string by returning a NaN value.
Method 2: Using if-else Condition to Check if String is a Number
In JavaScript, the isNaN() method evaluates the string by checking a number or not.
It returns the true value by passing a string as an input that shows the string is not a number.
The method is adapted with if-else conditions to check the string.
For instance, the code is as follows:
Code
<html><body> <center><h2>Example to Check if a String</h2>
<script type="text/javascript">
var s1 = "JavaScript"
if(isNaN(s1)){
document.write(s1 + " is not a number <br/>");
}else{
document.write(s1 + " is a number <br/>"); }
var n1 = 500;
if(isNaN(n1)){
document.write(n1 + " is not a number <br/>");
}else{
document.write(n1 + " is a number <br/>"); }
</script></center></body></html>\
In this code, the description is as follows:
A variable “s1” is employed to store the string “JavaScript”.
After that, a condition is applied in the if statement using the isNaN() method for computing if the string is a number.
The same process is followed by passing the number “500” via n1.
Finally, thewrite() method is utilized to display the computed outcome in the browser.
![]() Output
Output
![]() The output shows that “JavaScript is not a number” and “500 is a number”.
The output shows that “JavaScript is not a number” and “500 is a number”.
Method 3: Using “Regex” to Check if a String is Number
Another method is considered for evaluating the string using a regex expression.
Code
console.log("An Example to Check if String Is a Number");function isNum(v) {
return /\d/.test(v);}
console.log(isNum('JavaScript'));
console.log(isNum('734239'));
The isNum() method is adapted with the regex expression to check whether the string is a number.
![]() Output
Output
![]() The output shows that the string “JavaScript” returns false.
It represents the passing string as an illegal number.
The output shows that the string “JavaScript” returns false.
It represents the passing string as an illegal number.
Conclusion
The built-in method “isNaN()” is the most commonly used to check if the string is a number or not.
In this article, plus operators, regex expressions, and if-else statements are used with the isNaN() method to evaluate the string by converting it into a number.
It returns a true value if the input value is not transformed into a number.
By performing various examples, you have learned how to check if the string is a number or not.
How to Get Input Value
JavaScript offers a variety of functionalities to create interactive interfaces.
One can retrieve the value of any element using JavaScript methods.
The input value can be printed somewhere on the web page or it can be obtained as an alert message.
All this is possible with the help of JavaScript.
Here, we will describe the JavaScript support to get the input value from any element.
The following learning outcomes are expected:
How to Get Input Value
Get the Input Value Using the getElementbyId() Method
Get the Input Value Using the getElementsbyClassName() Method
Get Input Value Using querySelector() Method
How to Get Input Value
JavaScript provides two properties to get the input values by employing the getElementById, getElementsByClassName, and querySelector methods.
These methods extract the string as well as the numerical value to display the user information.
All the famous browsers support both of these properties.
The value property returns the information of the user.
Moreover, the property is useful for assigning any specific value for display in the browser window.
The syntax of these methods is stated below.
Syntax of getElementById
document.getElementById("textId").value = "text_message";
Syntax of getElementsByClassName
document.getElementsByClassName("clName").value ;
Syntax of querySelector
document.querySelector("id1").value
The description of the above parameters is as below:
textId: denotes the id of an element.
text_message: represents the message to be displayed.
clName: specify the name of the class.
Id1: represents the id or class of an HTML element.
Example 1: Get the Input Value Using the getElementbyId() Method
Another example is considered for getting the input value.
HTML
<!DOCTYPE html><html><body><center><h2> An example to get the value of the text field</h2>
Favorite Message: <input type="text" id="mtxt" value="Welcome to JavaScript"><p>Press button to display the text value.</p><button onclick="Display_fn()">Display Button</button><p id="demo"></p></center></body></html><script src="test.js"> </script>
The HTML code gets the input value “Welcome to JavaScript” by pressing the “Display Button”.
The button is attached with the Display_fn() method.
JavaScript
function Display_fn() {
var a = document.getElementById("mtxt").value;
document.getElementById("demo").innerHTML = a;}
A method Display_fn() is employed to retrieve the value of text in the HTML file by getElementById.
![]()
Example 2: Get the Input Value Using the getElementsbyClassName() Method
An example is considered to get the numeric value from the input field.
HTML file
<!DOCTYPE html><html><body><center>
<h2> An example to get the numeric value of field</h2>
<input type="text" placeholder="Type " id="inp_id1" class="inpCls">
<br> </br>
<button type="button" onclick="getInpVal();">Get Numeric Value</button></center></body></html><script src="test.js"> </script>
In this code, the description is as below:
The class inpCls is used to input the numeric number.
After that, a button is attached that is associated with the getInpVal() method.
In the end, a JavaScript file test.js is linked by assigning the source src variable.
JavaScript
function getInpVal() {
let inpVal = document.getElementsByClassName("inpCls")[0].value;
alert(inpVal);}
In the JavaScript file:
A method getInpVal() is used to extract the value from the HTML file.
The extraction is performed by getElementByClassName(“inpCls”)[0].value.
In the end, an alert message is generated by passing the inpVal variable.
Output
![]() The output shows that the user first inputs any number.
After that, an alert box is generated by pressing the “Get Numerical Value” button.
The output shows that the user first inputs any number.
After that, an alert box is generated by pressing the “Get Numerical Value” button.
Example 3: Get Input Value Using querySelector() Method
Another example is considered to get the value using the querySelector() method.
Code
<html><body>
<h2>Get value using Query Selector <br></h2>
<input type="text" id="id1" > <br><button type="button" onclick="getValueInput()">
Display Button
</button>
<p id="val"></p>
<script>
const getValueInput = () =>{
let val1 = document.querySelector("#id1").value;
document.querySelector("#val").innerHTML = `Message: ${val1}`;
}
</script></body></html>
In this code, the description is as follows:
Firstly, a text box and a button are attached with <input> and <button> tags respectively.
The button is associated with the getValueInput() method.
In this method, querySelector() is employed to extract the value of the text box and display it using val1.
![]() Output
Output
![]() The output shows the message “JavaScript” by pressing the button in the browser.
The output shows the message “JavaScript” by pressing the button in the browser.
Conclusion
The getElementById, getElementsByClassName, and querySelector() methods are utilized to get the input value.
The first two methods retrieve the elements using the id and class name.
While the third method can get the elements using an id as well as a class name.
Here, you have learned to use all three of these methods to get input values.
How to Use Array of JSON Objects
JavaScript Object Notation (JSON) is the well-known format for data storage as well as exchange between clients and servers.
JavaScript provides an environment to perform manipulation with arrays through JSON objects.
In this way, users can modify and display the information that is stored in the array.
In this tutorial, you will learn how to use the array for different purposes by a JSON object.
This guide serves the following content:
How to Use Array of JSON Objects
Example 1: Creating an Array of JSON Objects
Example 2: Accessing the Array of JSON Objects
Example 3: Add or Delete the Array of JSON Objects
How to Use Array of JSON Objects?
The JSON object is basically a JavaScript-based object.
These objects can be used to access the properties of an array.
After accessing, users can add, delete, or modify the properties in the existing array.
Moreover, the stringify() method is employed for converting the JSON string to an array of JSON objects.
In this way, the push() and pop() methods are utilized to perform manipulation on the array.
Example 1: Creating an Array of JSON Objects
An example is considered for creating an array of JSON objects by employing JavaScript.
For instance, the code is provided below.
Code
const teacher = {
"Name": "Harry","Subject": "English",
"age": "35"
};
console.log(teacher);
In this code, an array “teacher” is created by defining properties such as “Name”, “Subject”, and “age”.
After that, different values like “Harry”, “English”, and “35” are assigned to the above properties.
In the end, display the array “teacher” by employing the console.log() method.
Output
![]() The output shows the “teacher” array of JSON objects in the console window.
The output shows the “teacher” array of JSON objects in the console window.
Example 2: Accessing the Array of JSON Objects
An example is considered to access the properties of array elements.
Code
console.log("An Example to Use Array by JSON Object");const teacher = {
"Name": "Harry","Subject": "English",
"age": "35"};const objArr = teacher => {
const arr = [];
const keys = Object.keys(teacher);
for(let x = 0; x < keys.length; x++){
arr.push(teacher[keys[x]]);
};
return arr;};
console.log(objArr(teacher));
The description of the code:
An array “teacher” is initialized by defining “Name”, “Subject”, and “age” properties.
These properties are assigned different values, such as “Harry”, “English”, and “35”.
After that, a JSON object “objArr” is utilized to access the properties of elements and return a new array.
Inside the “objArr”, a for loop is used that inserts the property values by employing the push() method.
The loop is executed until all the property values are entered into the “arr” array.
In the end, the objArr(teacher) is utilized to display the property values.
![]() Output
Output
![]() The output shows different values, “Harry”, “English”, and “35” by assigning properties.
The output shows different values, “Harry”, “English”, and “35” by assigning properties.
Example 3: Add or Delete the Array of JSON Objects
An example is adapted to add and delete the array of elements using a JSON object.
Code
console.log("An Example to Use Array by JSON Object ");var arrObj = [ {"fruit":"Apple"}, {"fruit":"Banana"} ];
console.log(JSON.stringify(arrObj));
arrObj.push({"fruit":"Orange"});
console.log(JSON.stringify(arrObj));
arrObj.pop();
console.log(JSON.stringify(arrObj));
The description of the code is as follows:
An array of JSON objects “arrObj” is initialized with two fruit properties.
After that, the JSON.stringify() method is used to convert the JavaScript value to JSON strings.
The arrObj.push() method inserts an element by passing the value of “fruit”: “Orange” into the array.
After that, the arrObj.pop() method removes the recently entered element from the array.
In the end, display the array of JSON objects “arrObj” by employing the console.log() method.
![]() Output
Output
![]() The output shows the above code execution by adding and removing the array elements “fruit”: “Orange” through the JSON objects.
The output shows the above code execution by adding and removing the array elements “fruit”: “Orange” through the JSON objects.
Conclusion
In this article, JSON objects are utilized to access and modify the elements of an array in JavaScript.
For this, an overview with two practical examples is provided.
In the first example, JSON objects accessed the properties of the array and displayed them on the console.
In the second example, a built-in method, stringify(), is employed for adding and deleting properties in the array.
Based on this article, users can add, delete, or modify the properties of an array using JSON objects.
How to Remove Item From Array by Value
An array is a combination of elements that are stored in a single variable.
JavaScript provides various methods to add, remove, and modify items from an array.
Each item has a unique index to identify its location in the array.
In this guide, you will remove items from the array by passing them values using JavaScript’s filter() and splice() methods.
By considering these built-in methods, the content of this guide is as follows.
Remove Item From Array Using splice() Method
Remove Item From Array Using filter() Method
Method 1: Remove Item From Array by Value Using splice() Method
In JavaScript, a built-in method array.splice() is employed to remove the item from the array.
The method returns the new array by removing the item value, which is passed through the index.
The purpose of using this method is to overwrite the array by adding or removing the items from the array.
Let’s discuss the syntax.
Syntax
array.splice(ind, num, items)
The parameters are described as follows:
ind: specify the index number to remove the item.
num: represents the number to be removed.
items: refer to the addition of items in the array.
Code
const arr = [{num: 5}, {num: 10}, {num: 15}];const idxObj = arr.findIndex(object => {
return object.num === 10;});
arr.splice(idxObj, 1);
console.log(arr);
The code narrates the removal of an item whose num value is 10.
In this code, the arr.splice() method is utilized to remove an item by passing the idxObj index from the arr array.
Finally, the new array is displayed using the console.log() method.
Output
![]() The output returns the new array, whose length is 2.
In this new array, the item whose value is equal to 10 is removed through the arr.splice() method.
The output returns the new array, whose length is 2.
In this new array, the item whose value is equal to 10 is removed through the arr.splice() method.
Method 2: Remove Item From Array Using filter() Method
The filter() method is employed to filter an array based on the specified criteria.
In this method, users can specify the value for the removal of items in the array.
The filter() method iterates over the existing elements in the array.
Moreover,
Syntax
array.filter(function(curVal, idx, arr), thisValue)
The description of parameters is as below.
function: represents the callback function.
curVal: specifies the current element value.
idx: refers to the current element index.
arr: represents the array.
Example
An example is used to remove an item from the array by passing the value.
Code
const arr = [
{ name: 'Harry', show: 'Cricket' },
{ name: 'John', show: 'Football' },
{ name: 'Marry', show: 'Hockey' },
{ name: 'Bob', show: 'Running' },
];
console.log(arr);
rem = arr.filter(arr => arr.name != 'Harry');
console.log(rem);
The code is explained below:
Firstly, an array arr is created by storing different items such as names and show.
After that, the filter() method is utilized by passing the condition arr.name!=’Harry’.
Finally, the console.log() method is employed to display the new array.
![]() Output
Output
![]() The output of the code returns the new array by removing a specific item whose value is equal to “Harry”.
The output of the code returns the new array by removing a specific item whose value is equal to “Harry”.
Conclusion
Two built-in methods array.splice() and array.filter() methods are utilized to remove items from an array.
In the array.splice() method, the index value of an item is passed for the removal of a specified item in the array.
The array.filter() method is employed to filter the existing array by applying conditions.
Both these methods are useful for dealing with many items to save time and effort for developers as well as users.
In this article, you have learned how to remove items from an array by passing values in JavaScript.
How to Round a Number to 2 Decimal Places
Rounding a number is an essential part of programming languages to estimate a number and utilize it according to user needs.
JavaScript provides two built-in methods: Number.toFixed() and Math.round() to round a number by the placement of 2 decimals.
These methods are useful for rounding the nearest integer numbers.
All recent browsers support both of these methods for rounding off the number in JavaScript.
In this post, we demonstrate various methods for rounding a number by the placement of 2 decimals.
Number.toFixed() method
Math.round() method
How to Round a Number to 2 Decimal Places Using Number.toFixed() Method?
The toFixed() method is the best practice for rounding a number by the placement of 2 decimals.
It takes a specific input number that represents how many numbers to place the decimals.
The syntax for employing this method is given below.
Syntax
num.toFixed(dec_dig);
The syntax is described as
num: specifies the rounded number.
dec_dig: represents the decimal digits for placement of decimals
Example
An example is used to enlighten the toFixed() method.
Code
console.log("Example of Round off number");
let number = 8.5424499578;
let round_number = number.toFixed(2);
console.log(round_number);
The code is explained below:
A number variable is utilized to store the 8.542449957 number for round-off.
Furthermore, the number.toFixed() method is called by passing 2 as an argument for placing the decimal.
Finally, the console.log() method is employed to display a round number for placing 2 decimals in the console window.
![]() Output
Output
![]() The toFixed() method is utilized to round a number to 2 decimal places, from 8.5424499578 to 8.54.
The toFixed() method is utilized to round a number to 2 decimal places, from 8.5424499578 to 8.54.
How to Round a Number to 2 Decimal Places Using Math.round() Method?
Another method known as Math.round() is adapted for rounding a number by the placement of 2 decimals.
The method rounds the nearest integer value by multiplying and dividing the number by 100.
Let’s refer to the syntax.
Syntax
Math.round(num)
This method accepts a number (as a parameter) that will be rounded off.
Example
An example is given of employing the Math.round() method.
Code
console.log("Another Example of Round off number");
let number = 4.5841682;
let round_number = Math.round(number * 100) / 100;
console.log(round_number);
In this code,
Firstly, a number variable holds a value of 4.5841682.
After that, the built-in method of JavaScript Math.round() is utilized to round the number.
In this method, the number is multiplied and divided by 100 to round a number by placing 2 decimal numbers.
In the end, the console.log() method is employed to display the rounding number in the console window.
![]() Output
Output
![]() The output shows that the number 4.5841682 has been rounded off to 4.58 by placing the 2 decimal numbers.
It is possible through the built-in Math.round() method of JavaScript.
The output shows that the number 4.5841682 has been rounded off to 4.58 by placing the 2 decimal numbers.
It is possible through the built-in Math.round() method of JavaScript.
Bonus: How to Create a Manual Function to Round a Number?
Both the Math.round() and toFixed() methods are limited to the specific number that the user passes them.
For instance, users can create a custom function for rounding a number to 2 decimals.
Code
// An example of custom functionfunction user_definedMet(num){
return +(Math.round(num + "e+2") + "e-2");}
console.log(user_definedMet(10.89909095));
![]() In this code, the method user_definedMet is adapted as a custom function to round a number by passing a num variable.
In this method, the Math.round() method is employed for rounding the number up or down based on the exponent e.
Finally, the console.log() method is utilized to display the output of a custom function by passing a 10.89909095 number.
Output
In this code, the method user_definedMet is adapted as a custom function to round a number by passing a num variable.
In this method, the Math.round() method is employed for rounding the number up or down based on the exponent e.
Finally, the console.log() method is utilized to display the output of a custom function by passing a 10.89909095 number.
Output
![]() The outcome of the above code execution rounds off from 10.89909095 to 10.9.
The outcome of the above code execution rounds off from 10.89909095 to 10.9.
Conclusion
The toFixed() and Math.round() methods round the number by placing the 2 decimal numbers.
However, both these methods are limited to returning the input number after the placement of a decimal.
To overcome the issue, you can create a custom function for rounding up or down the given number.
This post has demonstrated various methods of JavaScript for rounding a number by the placement of 2 decimals.
Where to put JavaScript in an HTML Document?
JavaScript can be added at two different places inside an HTML document.
It can either be placed inside the <head> section or in the <body> section.
The tag in which you place the JavaScript affects the output of your webpage.
JavaScript in the <head> tag
Whenever an HTML page is opened, the <head> is the first content tag that is loaded, which means that all of the data inside this <head> is loaded before the <body> tag.
If JavaScript is added to the head tag, it will not wait for the complete loading of the webpage and will be loaded into the browser’s memory.
To demonstrate this, create a basic HTML page that will prompt the user as soon as it’s loaded into the browser’s memory.
Take the following HTML file:
<html lang="en">
<head>
<meta charset="UTF-8" />
<meta http-equiv="X-UA-Compatible" content="IE=edge" />
<meta name="viewport" content="width=device-width, initial-scale=1" />
<title>Document</title>
<script>
alert("Done loading Script from the <head> tag");
</script>
</head>
<body>
<img src="https://images.alphacoders.com/107/1072732.jpg" />
</body></html>
As you can see, the script is added in the <head> tag.
However, in the body tag, an 8k image is being loaded on the webpage, which will take a few moments to load.
Load the HTML page and the output:
![]() From this output, it is clear that putting the script in the <head> causes it to load even before the DOM is ready.
From this output, it is clear that putting the script in the <head> causes it to load even before the DOM is ready.
JavaScript in the <body> tag
As mentioned above, one can place the JavaScript within the <body> tag.
This will allow the DOM to load fully and then load the JavaScript according to its position in the <body> tag.
To demonstrate this, we are going to create a button on the HTML page with the following lines and in the functionality to that button with the following lines:
<html lang="en">
<head>
<meta charset="UTF-8" />
<meta http-equiv="X-UA-Compatible" content="IE=edge" />
<meta name="viewport" content="width=device-width, initial-scale=1" />
<title>Document</title>
</head>
<body>
<center>
<button id="myButton">Click to Alert!</button>
</center>
<script>
button = document.getElementById("myButton");
button.addEventListener("click", myFunction);
function myFunction() {
alert("This Script was inside the <body tag>");
}</script>
</body></html>
In the above code snippet, an event listener is added on the button which alerts the user upon button press all with script inside the <tag>.
Execute this HTML file and observe the following output:
![]() It is clear from the above output that the script is working fine in the <body> tag
It is clear from the above output that the script is working fine in the <body> tag
JavaScript in <body> tag or <head> tag
To answer this question, take the last example and simply move the script tag for alerting the user upon button press inside the <head> tag like:
<html lang="en">
<head>
<meta charset="UTF-8" />
<meta http-equiv="X-UA-Compatible" content="IE=edge" />
<meta name="viewport" content="width=device-width, initial-scale=1" />
<title>Document</title>
<script>
button = document.getElementById("myButton");
button.addEventListener("click", myFunction);
function myFunction() {
alert("This Script was inside the <body tag>");
}
</script>
</head>
<body>
<center>
<button id="myButton">Click to Alert!</button>
</center>
</body></html>
Upon execution on this program, the difference is not visible as the output looks like the following:
![]() However, opening the browser’s console shows the difference, because in the console there is this error:
However, opening the browser’s console shows the difference, because in the console there is this error:
![]() This error is caused by JavaScript trying to get the reference of an element from the body tag, which has not been yet initialized by DOM because the JavaScript in the head tag was executed even before the DOM was fully loaded.
So, in conclusion, placing the script in the head tag or the body tag comes down to the working of the webpage.
This error is caused by JavaScript trying to get the reference of an element from the body tag, which has not been yet initialized by DOM because the JavaScript in the head tag was executed even before the DOM was fully loaded.
So, in conclusion, placing the script in the head tag or the body tag comes down to the working of the webpage.
Wrap-up
JavaScript can be placed in two different places inside an HTML document file in the <head> tag or in <body> tag.
Placing the JavaScript in the head tag causes the browser to load the script before the DOM is fully ready.
Whereas including the JavaScript inside the <body> loads the script after the DOM is ready.
Because of this, there is no optimal place for including JavaScript in your HTML document, and it depends upon the task that one wants to perform.
What is the Difference Between Array.slice() and Array.splice()?
The Array slice() method and the Array splice() method are both built-in JavaScript and are used to get a subarray out of an array.
However, they are both quite different in their work.
This article will differentiate them from each other by simply going over them one by one.
The Array slice() Method
The array slice() method (as mentioned above) is used to extract or make a sub-array from a parent array.
This means that its return value is an array itself.
To understand the Array slice() method, look at the syntax given below:
subArray = arrayVar.slice(start?: number, end?:number);
In this syntax:
subArray is the second array in which the returned array from the slice() method is stored
arrayVar is the main array from which the sub-array is being extracted
start defined the starting point (index) from where to select the elements to copy, it should be a number value
end is the ending point (index) of the selection, it should be a number value
Return Value
It returns an array
Working
The way the splice() method works is that the arguments passed inside it define the selection of elements to copy into the second array.
Remember, the word used here is “copy” because the original array is not modified.
Example of the array.slice() method
To demonstrate the working of the array slice(), start by creating an array with the following line:
arrayVar = [1, 2, 3, 4, 5, 6, 7, 8, 9];
After that, simply create a new variable which is going to store the return value from the slice() method and then set that variable equal to arrayVar.slice() with the following line:
returnedArray = arrayVar.slice(2, 6);
This above line selects the elements from index 2 to index 5 because the endpoint index passed in the argument of the slice() method is not included in the selection.
After that, display the returnedArray on the terminal:
console.log(returnedArray);
Upon executing the program, the following result is displayed on the terminal:
![]() To verify that this splice() method doesn’t affect the original array, simply print the original array onto the terminal as well:
console.log("The array after slice() method", returnedArray);
console.log("The original array is as", arrayVar);
Execute the program again to get the following output on the terminal:
To verify that this splice() method doesn’t affect the original array, simply print the original array onto the terminal as well:
console.log("The array after slice() method", returnedArray);
console.log("The original array is as", arrayVar);
Execute the program again to get the following output on the terminal:
![]() It is clear from the output mentioned above that the original array was not affected with the slice() method.
It is clear from the output mentioned above that the original array was not affected with the slice() method.
The Array splice() Method
The array.splice() method (as mentioned above) is used to create or extract a sub-array from an array.
However, the slice() method removes the selected elements from the original array and passes them onto the second array.
To understand the Array splice() method, look at the syntax given below:
returnedArray = arrayVar.splice(start?:number, count?:number)
In this syntax:
returnedArray is used to store the return value of the splice() method
arrayVar is the array from which the second array is being created
start is the starting point (index value) of the selection, it should be a number
count is the number of elements to select from the starting point, it should be a number
Return Value
It returns an array
Working
The working of the splice() method is quite simple, it uses the values passed inside its arguments to make a selection from the original array.
After that, it removes those elements from the original array and returns them as return value.
This means that the splice() method does affect the original array
Example of the splice() method
To demonstrate the working of the splice() method, start by creating a new array with the following line:
arrayVar = [1, 2, 3, 4, 5, 6, 7, 8, 9];
After that, create a variable to store the returned value from the splice() method and set it equal to the arrayVar.splice() method like:
returnedArray = arrayVar.splice(2, 5);
In the above line, the selection starts from index 2 and counts 5 elements after that starting index.
After that, simply pass the “returnedArray” variable to the console log to print the result on the terminal like:
console.log(returnedArray);
Executing the program will create the following result on the terminal:
![]() It is clear from the output that the subarray has 5 elements subtracted from the original array.
To demonstrate the effect of the splice() method on the original array, print out the original array as well using the console log function:
console.log("The array after slice() method", returnedArray);
console.log("The original array is as", arrayVar);
Executing the code will provide the following output on the terminal:
It is clear from the output that the subarray has 5 elements subtracted from the original array.
To demonstrate the effect of the splice() method on the original array, print out the original array as well using the console log function:
console.log("The array after slice() method", returnedArray);
console.log("The original array is as", arrayVar);
Executing the code will provide the following output on the terminal:
![]() It is clear from the output that the selected elements were removed from the original array and moved to the second array which is returnedArray variable.
So it is easy to conclude that the splice() method does alter the original array.
It is clear from the output that the selected elements were removed from the original array and moved to the second array which is returnedArray variable.
So it is easy to conclude that the splice() method does alter the original array.
Wrap up
The array slice() method and the array splice() method are used to create sub-arrays from a parent array.
The only difference between the two is how they perform their task.
The slice() method creates a subarray by copying the selected elements from the parent array into the child array.
While the splice() method creates a subarray by removing the selected elements from the parent array and putting them in the child array.
Object.create()
One of the common methods to create an object is the Object.create() method.
For this purpose, the method utilizes an already existing object as a prototype.
This method returns the new object having the specific properties of the prototype object.
In JavaScript, everything can be an object, e.g., Booleans, Numbers, Strings, etc.
The developers tend to use the Object.create() method in the inheritance.
This post provides a deep insight into the working and usage of the Object.create() method.
How to Use the Object.create() Method?
In JavaScript, the Object.create() method is a built-in method that is utilized to create a new object.
For this purpose, it returns an object having the specific and existing prototype object and properties.
The syntax of Object.create() method is provided below:
Syntax
Object.create(prototype_object, propertiesObject)
The Object.create() method takes two arguments which are enlisted here:
prototype_object: Specifies the prototype of the existing object for creating a new object
propertiesObject(Optional): Represents the properties to be added to the new object.
Let’s head over to the following examples to practice the Object.create() method.
Example 1: Creating a New Object Using the Object.create() Method
An example is given below for utilizing the built-in Object.create() method of JavaScript.
Code
// Example of Object.create() method
const human = {}
const man = Object.create(human, {
color: {
value: 'Brown-Asian'
}});
console.log(man.color)
In the code:
A new object, “man” is created by passing the prototype of a human, which is an already existing object.
The property “color” is declared for the newly created object.
In the end, display the newly created object property of man.color using the console.log() method.
![]() Output
The output shows that the color property of the man object is displayed on the console.
Output
The output shows that the color property of the man object is displayed on the console.
Example 2: Utilizing the Existing Properties of the Object.create() Method
Here, we are using an example to express the property of an existing object into a newly created object.
The example code is provided below:
Code
// Example of Object.create() method
const school = {
Std_Information: function ()
{
console.log(`Student name is ${this.name}`);
console.log(`Is he Student? ${this.isStudent}`);
}
};
const me = Object.create(school);
me.name = "Minhal"; // "name" is a property set on "me".
me.isStudent = true; // inherited properties can be overwritten
me.Std_Information();
In the code:
A new object me is created that utilizes the properties of the school object.
The properties that are associated with the school object are name and isStudent, which return “Minhal” and “true” values.
![]() Output
The display shows the properties of a new object me that is already present in the existing object school.
In this way, the Object.create() method retrieves the specified prototype of the object in JavaScript.
Output
The display shows the properties of a new object me that is already present in the existing object school.
In this way, the Object.create() method retrieves the specified prototype of the object in JavaScript.
Conclusion
JavaScript extracts the properties of existing objects by creating new objects with the Object.create() method.
Using this method, users can retrieve the specified prototype of objects and properties.
This post specifies the overview of the Object.create() method.
Moreover, two examples are provided to understand the concept of this method in JavaScript.
JavaScript Get Date Methods
The JavaScript Get Date methods allow you to retrieve the minute, hour, day, month, or a year from a specific time period.
These methods are utilized to perform a micro as well as macro analysis from a specific date/month/year to a specific date/month/year.
The application of Get-Date methods can be observed on various well-known websites, including stock exchanges and trading websites.
In this post, we will learn the working and usage of the various Get Date methods.
Method 1: getFullYear()
The getFullYear() method returns the output of the year in an absolute number.
The method relies on the local time.
Here, we will describe the syntax and an example of the getFullyear() method.
Syntax
Date.getFullYear()
Example
In this example, the getFullyear() method is used to retrieve the absolute value of the year.
const User_date = new Date('December 25, 1995 23:15:30');
const year = User_date.getFullYear();
console.log(year);
In the above code, a predefined value of the data is stored in the variable and then the getFullyear() method is applied to that variable.
![]() The output shows that only the year number is printed on the console.
The output shows that only the year number is printed on the console.
Method 2: getMonth()
The getMonth() method is used to return an integer value present between 0 and 11.
The 0 shows the first month (January), and the 11 represents the last month (December).
Syntax
Date.getMonth()
Using the getMonth() method, an example is given of how to utilize the getMonth() method.
Example
The below code lines utilize the getMonth() method to get the month from the date.
const User_date = new Date('July 25');
const month = User_date.getMonth();
console.log(month);
In the above code, a variable stores the date and then the getMonth() method is applied to this variable
![]() It is observed that only the month number is returned.
It is observed that only the month number is returned.
Method 3: getDate()
The getDate() method is utilized to extract the date of the month.
It returns the integer values between 1 and 31 that show the first and last dates of the month.
The syntax of the getDate() method is as follows:
Syntax
Date.getDate()
Where the Date represents the date or a variable (containing date) on which the getDate() method will be applied.
Example
The code makes utilize of the getDate() method to get the date:
const User_date = new Date('July 25');
const date= User_date.getDate();
console.log(date);
A random date is stored in a variable, and then the getDate() method is applied to the Date variable.
![]() From the output, it is observed that the date (25) is retrieved and printed on the console.
From the output, it is observed that the date (25) is retrieved and printed on the console.
Method 4: getDay()
The getDay() method extracts the day of the week.
It returns a value from 0 to 6.
The number 0 is used for Sunday and 6 for Saturday.
The syntax of the getDay() method is as follows:
Syntax
Date.getDay()
Example
An example is followed by utilizing the getDay() method.
const User_date = new Date('July 25 2020');
const day= User_date.getDay();
console.log(day);
The statement in the third line of code stores the day of the week using the day variable.
The last statement is written in the code to present the information of the day using the.
getDay() method.
Output
![]() The output returns the 6 that represents the Saturday of the week.
The output returns the 6 that represents the Saturday of the week.
Method 5: getHours()
The getHours() method basically gives the hour information.
It retrieves the hour value from the date provided.
The method extracts values from 0 to 23.
The syntax of the getHours() method is as follows:
Syntax
Date.getHours()
The get.Hours() method is applied on the Date (it may be a variable containing the date or directly a date can be provided).
Example
Let’s exercise the usage of the getHours() method in the following lines:
let User_date = new Date('July 25 2020, 08:04:20');let Hours= User_date.getHours();
console.log(Hours);
In the above code, the getHours() method is utilized to give information between 0 and 23.
Output
![]() The display shows the value of 8, which represents the 8th hour.
The display shows the value of 8, which represents the 8th hour.
Method 6: getMinutes()
The getMinutes() method is used to retrieve information for minutes within an hour.
It extracts integer values from 0 to 59.
The syntax for utilizing this method is below.
Syntax
getMinutes()
In JavaScript, extract the minutes information using the getMinutes() method.
Example
The following code refers to the use of the getMinutes() method.
let User_date = new Date('July 25 2020, 08:04:20');let Minutes= User_date.getMinutes();
console.log(Minutes);
Using the getMinutes() method, retrieve the minutes information of an hour.
Output
![]() The output returns a value of 4, which indicates that the current time is in the 4th minute of the hour.
The output returns a value of 4, which indicates that the current time is in the 4th minute of the hour.
Conclusion
JavaScript supports Get Date methods to retrieve information about the date, time, month, year, etc.
The getDate(), getMonth(), getYear(), getHours()and getMinutes() methods are discussed in this post.
All these methods aim to return the date/time in a specific format.
For better understanding, we have provided the syntax and examples of each method.
JavaScript Date toString() Method
In JavaScript, the date object has the ability to work with various formats, including milliseconds, seconds, minutes, hours, days, weeks, months, and years.
The date.toString() method is employed to represent the date as a string value.
In JavaScript, every object has a toString() method to represent the information in a text or string format.
Likewise, the date object is used with the toString() method when a user is required to present the date in a string format.
Modern browsers such as Opera, Firefox, Chrome, Firefox, etc.
support the date.toString() method.
In this post, we will give a concise overview of the toString() method and its usage.
How to Use the Date toString() Method?
The syntax of the date.toString() method is mentioned below:
Syntax
date.toString()
The Date toString() method will not take any input but returns the string value.
Let’s experience how it works using a few examples.
Example 1: Get the Current Date/Time as a String Value
The current date and time can be obtained as a string value.
A simple code that serves the purpose is provided below:
Code
<html><body>
<p> Example 1: Using the Date toString() method</p> <p> Press button to display the date and time as a string.</p><button onclick="myFunction()">Press it</button><p id="test"></p><script>function myFunction() {
var date = new Date();
var string = date.toString();
document.getElementById("test").innerHTML = string;}</script></body></html>
The description of the above code is provided here:
A function named myFunction() is created that will be called on the onclick event of the button.
In the myFunction(), an object of the Date() is created.
The Date() method contains the current date/time.
After that, the toString() method is applied on the object named date and the result is stored in a string variable.
In the end, the string is assigned to the HTML element (whose id=test) for display in the browser.
![]() Output
The outcome of the above code is presented here.
Upon pressing the button, the current date, day, and time is displayed on the browser.
Output
The outcome of the above code is presented here.
Upon pressing the button, the current date, day, and time is displayed on the browser.
Example 2: To Convert the User Defined Date to String
Another example is given here by employing the toString() method.
This method converts the information into the string format.
In this way, the code is as follows.
<html><body><script>// Example 2: Using the Date toString() method
var date=new Date(2021, 3, 23, 22, 21, 30);
document.writeln(date.toString());</script></body></html>
In this example, numerical values are passed to the built-in Date() method.
These values are saved in the date object.
After that, the toString() method is utilized to transform the numerical information into the string format.
In the end, using the document.writeln() method is utilized to display the string format in the browser.
Note: While using the date.toString() method, the 0 refers to the January and 11 represents the December month.
In our case, we have used 3 (as the month value) which refers to the April month.
![]() Output
In the output, the value presented in the date object is converted into string and is printed on the browser.
Output
In the output, the value presented in the date object is converted into string and is printed on the browser.
Conclusion
In JavaScript, the date.toString() method is utilized to display the date and time in a string format.
The Date toString() method is applied on the date object.
The date.toString() method does not accept any arguments and just converts the provided date/time to a string.
This post briefly demonstrates the purpose and working of the date.toString() method.
For better understandability, different examples are also provided.
JavaScript Date parse() Method
JavaScript Date.parse() method converts a date formatted string into returns the difference from the date within that string with 1st of January 1970 in milliseconds.
This parse() method is used with the help of a dot operator with the Date object.
To better understand this Date parse() method look at the syntax below.
When the Date.parse() is called, it is known as a Direct call to the parse() method.
However, whenever an object of the Date is created using the new keyword and the Date() constructor, it is known as an implicit call to the parse() method
Syntax of Date.parse()
Date.parse(DateInString)
The following are the syntax details:
Date: The Date object of JavaScript
DateInString: The representation of Date in string format
Return Value: Difference of date with Jan 1st,1970 in milliseconds, or NaN if the string is invalid.
Additional Note: The parse() method was a feature of the ES1 release of JavaScript
Example 1: Date parse() Method With a Valid String
To demonstrate the working of the date parse() method, first create a string representing a specific date like
string = "20 July 2000"
After that, simply create a new variable and set it equal to date parse() method and pass in the string in the argument of the parse() method like
milli = Date.parse(string);
Afterwards, print the value from this “milli” variable using the console log function like:
console.log(milli);
Execute this code, and the output will be:
![]() The output on the terminal is the number of milliseconds elapsed from 1970 to the date given in the string variable.
The output on the terminal is the number of milliseconds elapsed from 1970 to the date given in the string variable.
Example 2: Passing an Invalid String in the Date parse() Method
To demonstrate the return value of the Date parse() method with an invalid string, create a string with the following line:
string = "32 Feb 2005";
The above line is representing a date which is the 32nd of February 2002 which is invalid.
Now we are going to pass this string into the Date parse() method and display the result on the terminal using the console log function:
console.log(Date.parse(string));
After executing, the following result is displayed on the terminal:
![]() The result on the terminal is a NaN, which means that it is “Not a Number”.
The result on the terminal is a NaN, which means that it is “Not a Number”.
Example 3: Calculating the Time Elapsed in Years From the Date parse() Method
To calculate the time elapsed since 1970 to the Date passed inside the parse() method can easily be calculated with the help of simple mathematical calculations.
Write the following calculations for calculating years from milliseconds:
minutes = 1000 * 60;
hours = minutes * 60;
days = hours * 24;
years = days * 365;
Now, create a date string with the following line:
date_string = "25 Dec 2005";
Pass this string into the Date parse() method and store the outcome in a new variable:
milliseconds = Date.parse(date_string);
To convert the time elapsed, simply divide this millisecond variable by years and print the result onto the terminal using the console log function:
console.log(milliseconds/years);
Executing the program produces the following result:
![]() This result is the number of years passed since 1st January 1970 till 25th Dec 2005.
This result is the number of years passed since 1st January 1970 till 25th Dec 2005.
Wrap-up
The Date parse() method is used to take a date_string and convert that string into the difference between the value represented by that string and 1st January 1970.
This difference is represented in the form of milliseconds.
The working method here is the parse() method (introduced in the ES1 release), which is used with the help of a dot operator with the Date object.
Form Validation Using HTML and JavaScript
Users can easily manage form validation with the help of JavaScript and regular expressions.
Forms are crucial for properly working any website, and managing invalid input in the form fields is the programmer’s job.
This article is going to show you how to create a form and how to put different validation checks on different form fields with the help of JavaScript.
Step 1: Setting up the HTML Document
Create a new HTML document and type in the following lines inside it to create a form:
<center><h1>This is an example of form validation</h1><form name="validityForm" onsubmit="return formSubmit()" method="post"><br /><p>Type in your First Name:</p><br /><input type="text" name="name" id="nameField" /><br /><p>Type in your Email Address</p><input type="text" name="email" id="emailField" /><br /><p>Type in your Contact no#</p><input type="text" name="tele" id="teleField" /><br /><br /><button type="submit">Submit!</button></form></center>
In the above lines:
A <form> tag is used to create a form with the name set to validityForm and the method is set to “post”.
Also, the onsubmit property is set to “return formSubmit()” which executes this method upon submission and only submits the form if that method returns true.
After that, simply use <p> tags to prompt the user and <input> to take the input from the user.
Remember that every input tag has a unique name.
At the end of the form, create a button with the type set to “submit”.
If the HTML document is loaded in a web browser, it will show the following:
![]() The webpage asks for the user’s first name, email address, and contact number.
The webpage asks for the user’s first name, email address, and contact number.
Step 2: Setting up the JavaScript File
In JavaScript, start by creating the function formSubmit() with the following lines:
function formSubmit() {// All the next lines will be included within the body of this function}
After that, create three variables and store the values from the three fields inside them using the following lines:
var firstName = document.forms.validityForm.name.value;
var conactNumber = document.forms.validityForm.email.value;
var emailAdr = document.forms.validityForm.tele.value;
In the above lines, the “document” object was used to get the “forms” attribute, which was further used with the name of the form validityForm to access the input tags with their names inside it.
After that, define the regular expressions for checking the validity of each field with the following lines:
var emailRegex = /^\w+([\.-]?\w+)*@\w+([\.-]?\w+)*(\.\w{2,3})+$/g;
var teleRegex = /^\d{10}$/;
var nameRegex = /\d+$/g;
In the above lines:
emailRegex checks for a valid email address with @ including and even allows a dot “.” and a hyphen
teleRegex checks for only numeric characters with maximum length of input set to 10
nameRegex checks for any special characters or numbers inside the name field
After that, compare the three regular expressions with their respective text field values with the help of if statements, and if any field is invalid then simply return and alert the user, for all this use the following lines:
if (firstName == "" || nameRegex.test(firstName)) {
window.alert("Invalid First Name");
returnfalse;
}if (emailAdr == "" || !emailRegex.test(emailAdr)) {
window.alert("Please enter a valid e-mail address.");
returnfalse;
}if (conactNumber == "" || !teleRegex.test(conactNumber)) {
alert("Invalid Phone Number");
returnfalse;
}
After this, prompt the user for that the inputs were valid and return the value as true:
alert("Form Submitted with Correct Information");return true;
The complete JavaScript code is as:
functionformSubmit() {
var firstName = document.forms.validityForm.name.value;
var conactNumber = document.forms.validityForm.email.value;
var emailAdr = document.forms.validityForm.tele.value;
var emailRegex = /^\w+([\.-]?\w+)*@\w+([\.-]?\w+)*(\.\w{2,3})+$/g;
var teleRegex = /^\d{10}$/;
var nameRegex = /\d+$/g;if (firstName == "" || nameRegex.test(firstName)) {
window.alert("Invalid First Name");
returnfalse;
}if (emailAdr == "" || !emailRegex.test(emailAdr)) {
window.alert("Please enter a valid e-mail address.");
returnfalse;
}if (conactNumber == "" || !teleRegex.test(conactNumber)) {
alert("Invalid Phone Number");
returnfalse;
}
alert("Form Submitted with Correct Information");
returntrue;}
Step 3: Testing the Validation of the Form
Execute the working of the form validation by executing the HTML document and typing in data to the inputs fields.
Provide an invalid name with special characters or numbers inside it
![]() The webpage prompted the user that the name was invalid.
Try again with the correct name and incorrect email address:
The webpage prompted the user that the name was invalid.
Try again with the correct name and incorrect email address:
![]() The user was alerted that the email address is not valid.
After that, try with a valid name and valid email address but with an invalid contact number like:
The user was alerted that the email address is not valid.
After that, try with a valid name and valid email address but with an invalid contact number like:
![]() The webpage prompted the user that the contact number is not valid.
After that, for the final test, provide all the correct information like:
The webpage prompted the user that the contact number is not valid.
After that, for the final test, provide all the correct information like:
![]() With all correct information provided, the form validation is successful and the web application can move forward.
With all correct information provided, the form validation is successful and the web application can move forward.
Conclusion
Form Validation can be implemented on an HTML form with JavaScript, regular expressions, and a little bit of logic building.
Regular expressions can define the correct accepted input for a field.
After that, the regular expression can be matched against its respective input field’s value using the test() method.
This goes for other types of input fields as well, may it be for Address, Postal Code, or Country name.
Fibonacci Series Program
There are many different types of series in mathematics.
They are all applied for their own uses.
Some examples of series are arithmetic and geometric series.
Similar to those, there’s a series named the Fibonacci series.
This series consists of a sequence of numbers that is a sum of its two previous numbers in the series.
An example of this would be if the third and fourth numbers of a Fibonacci series are 2 and 4.
Then the fifth number will be 6 and the sixth number 10.
In this article, knowledge will be provided on how anyone can implement this concept into JavaScript code.
Creating Fibonacci Series
Like many other programs, this one also utilizes a few different variables and a for loop.
To break down the code into a simple program, it has been divided into 2 sections.
Check out the different sections below.
Section 1: Declaring Variables
The first section is the simplest one.
In this section, some variables are declared.
Let’s explain the work behind these variables.
The num variable is the maximum limit of the Fibonacci series.
The firstNum will initially hold the first value of the series.
Then inside the program, it holds the first number that has to be added to the second number which is the secondNum variable.
Take a look at the code below:
//section 1
var num=4, firstNum = 0, secondNum = 1;
var next;
Section 2: Using Loop to print values
This is the main section where the Fibonacci Series is made and displayed.
It starts with a for loop between the range of 0 and num.
The first step in this section is to display the firstNum value which in this case is zero initially.
Then the variable sum is temporarily assigned the value of the firstNum added into the secondNum.
The next step is to move the firstNum forward in the series.
This is accomplished by assigning the value of secondNum to firstNum.
Afterward, secondNum is given the sum value which moves secondNum forward in the series.
//section 2for ( var i = 0; i < num; i++){
document.write("<br>" + firstNum);
sum = firstNum + secondNum;
firstNum = secondNum;
secondNum = sum;}
The loop is then repeated with new values of firstNum and secondNum and this way the entire series is printed this way.
Below is an example of how this code will run with the value of num being 8:
![]() This is the easiest way to implement the Fibonacci Series.
If someone desires they can take user input instead of hard coding the maximum number in the series.
This is the easiest way to implement the Fibonacci Series.
If someone desires they can take user input instead of hard coding the maximum number in the series.
Conclusion
You can get the Fibonacci series using JavaScript by using for loop to implement 3 crucial variables.
The firstNum variable holds the first value and secondNum holds the second value.
The sum variable calculates its sum and moves the series forward by assigning the sum value to secondNum.
In this article, every variable is explained in depth and how they all work together to display the Fibonacci Series.
Different Ways of Writing Functions
In JavaScript, it is crucial to learn about functions, and the most important reason is that functions provide the users with the capability to implement modularity.
Modularity is the ability to divide a big problem or hurdle into smaller, manageable chunks.
Functions generally consist of two parts, one is where a function is written or created, and the other is one is the “function call” to perform the task written inside it., a user can create a function in three different ways, which are:
Function declarations
Function Expressions
Arrow Functions (also called Fat-arrow functions).
Method 1: Functions Declarations
Function Declarations are the most standard and widely used way of creating functions.
A function declaration contains four different parts in this sequence:
The keyword function
The identifier or the function’s name
The functions’ parameters enclosed in parenthesis
The function’s body is enclosed with curly brackets.
To create a function for adding two different values and returning the sum of the two values, take the following lines:
function getSum(num1, num2) {return num1 + num2;}
As you can see, the function declaration started with the keyword function followed up by the name of the function “getSum”.
After the name, parameters are declared, and then the function’s body.
The user can call this function with:
console.log(getSum(5, 10));
This will produce the following output on the terminal:
![]() The result of 5 + 10 was printed on the terminal as 15.
The result of 5 + 10 was printed on the terminal as 15.
Method 2: Function Expressions
Function expressions are quite like function declarations, but the major difference comes in the sequence of its parts.
The sequence of the parts of a function expression is as follows:
Function identifier or name
Assignment operator “=”
They keyword function
Parameters (inside parenthesis)
Body of the function {inside curly brackets}
Unlike the function declaration, function expressions start with the identifier of the function which is then set equal to (using the assignment operator) the keyword function and so on.
To create the same getSum function (as in method 1), use the following lines of code:
getSum = function (num1, num2) {return num1 + num2;};
Call a function created through a function expression is the same as a function created with function declaration:
console.log(getSum(30, 5));
This will produce the following result on the terminal:
![]() The result, 35 was printed on the terminal
The result, 35 was printed on the terminal
Method 3: Arrow Functions / Fat Arrow Function
Arrow functions are the newest way of creating a function as released in the ECMAv6 version of JavaScript.
Arrow functions use a special keyword (more like a key symbol) that is created by two special characters, “=>”, which looks like an arrow, hence the name arrow function.
But since it uses a “=” character instead of “-” to create an arrow-like shape, it got popular with the name Fat Arrow function.
The way of creating a function includes the following sequence of parts:
The Identifier of the function
The assignment operator “=”
Parameters (in parenthesis)
Fat arrow “=>”
Body of the function {in curly brackets}
To create the function getSum(just like in the previous methods) use the following lines of code:
getSum = (num1, num2) => {return num1 + num2;};
Calling the function created with a fat arrow is exactly the same as functions created with other methods:
console.log(getSum(150, 270));
This will give the following result on the terminal:
![]() The value of 150 + 270 was printed on the terminal as “420”
The value of 150 + 270 was printed on the terminal as “420”
Wrap up
In the ES6 version of JavaScript, the user can create a function three different ways.
These creation methods are function declarations, function expressions, and fat arrow functions.
The function declarations and function expressions can also work in other versions of JavaScript.
However, the Fat arrow functions or Arrow functions are specific to ES6 versions of JavaScript.
This article has displayed all three of these methods with examples.
Difference Between GET and POST Request in Vanilla JavaScript
JavaScript is a famous scripting language that requires requests to the server side.
The language has various methods, including GET, POST, DELETE, PUT, COPY, PATCH, and HEAD, to create HyperText Transfer Protocol (HTTP) requests.
These requests are employed to make the interaction between the server and clients.
Based on these HTTP requests, users can send or receive data/information from the server.
In this article, the key difference between GET and POST requests is discussed under the umbrella of HTTP requests.
Both these requests are utilized to transform information between websites and servers.
The vanilla term is used as simple JavaScript without using additional frameworks and libraries.
The content of this article is mainly focused on the key difference between the GET and POST request methods in Vanilla JavaScript.
GET request method in Vanilla JavaScript
POST request method in Vanilla JavaScript
Comparison of GET and POST request methods
GET Request in Vanilla JavaScript
The GET request is a method that can be utilized to request the data from the specific URI in the Vanilla JavaScript.
It is used only to retrieve the data.
Mostly, this request is used for images or word documents that are less secure.
Pros of GET request method
The request can be visible in the browser.
It is useful to require data information.
It provides a facility to store the result of the HTML form.
Cons of GET request method
The request is restricted to retrieving the data only.
The URL length is limited.
Not suitable for sending sensitive data/information.
POST Request in Vanilla JavaScript
The POST request method is worked under the HTTP request.
It is utilized to check that the data is taken on the server.
The length of the data is not restricted.
The POST request method is mainly used to send sensitive and confidential information such as usernames and passwords.
Pros of POST request method
It allows the user to send the data to the server.
Using the request, users can send data in ASCII as well as binary format.
Mostly, it is used to send sensitive data, such as passwords.
Cons of POST request method
It required a time to upload the file.
The request is not supported by firewall procedures.
Comparison of GET and POST request methods
The comparison of the POST and GET request methods is demonstrated here.
| GET request method | POST request method |
| It supports the string data types. | It supports various data types, including string, binary, and numeric. |
| The parameters are stored in the history. | Not provide the facility to save parameters in history. |
| It is more effective to take less time. | It required a long time to upload the file. |
| This request provides a facility to store the results in bookmarks. | Not store the results in bookmarks. |
| Using GET requests, values are visible in the URL. | Values are not visible in the URL. |
| The length of the values is limited in the GET requests. | No restriction of values in POST request. |
Conclusion
The GET and POST request methods are utilized to exchange the data/information between the server and web page under HTTP requests.
The GET request method is employed to send data such as images or documents.
While the POST request method is specifically used to send sensitive and secure information to the server.
This article differentiates the key difference between the GET and POST request methods in Vanilla JavaScript with pros and cons.
Difference Between forEach() and map() Loop
JavaScript has a bundle of built-in methods to perform different mathematical operations on the array elements.
The map() and forEach() are two methods that iterate over the elements of the existing array.
The map() method applies a function on each element of the array and returns a new array whereas the forEach() method also uses the same function, but it changes the elements of the current array.
This post describes the map() and foEach() methods in detail to differentiate these methods.
How Does forEach() Method Work?
The forEach() method is employed to perform some operation on the array elements.
It allows you to execute a callback method.
The forEach() method return type is undefined as it totally depends on the functionality of the call back function.
It is a newer way to write less code that iterates over an array.
The syntax of the forEach() method is provided below:
Syntax
array.forEach(function(element, index, array), thisVal)
The description of the syntax is as follows:
function(element, index, array): is a required function to iterate over array elements.
element: Specifies the existing array element.
index: Represents the index of the existing element.
array: Specifies the name of the array to which the element belongs to.
thisVal: represents this value of the function.
Example
The following example code is adapted to discuss the usage of the forEach() method.
Code
<html><h2>An example of using the forEach() </h2><body><div id='id1'></div><script>
var a = [10,11,12,13,14,15];
a.forEach(function(e){
var i = document.createElement('div');
i.innerText = e;
document.getElementById('id1').appendChild(i);});</script></body></html>
The description of the code is as follows:
A <div> tag is created which will be used to display the array.
After that, an array a is initialized with six elements from 10 to 15.
Furthermore, the forEach() method is utilized to iterate over the array elements .
The innertext property will retrieve all the content of ‘div’ element.
The appendchild property is used to append the child elements to the element having id “id1”.
![]() Output
Output
![]() It is observed that the elements of the array are printed on the browser’s window.
It is observed that the elements of the array are printed on the browser’s window.
How Does map() Method Work?
The map() method returns transformed elements in a new array by applying the callback function to each element of the array.
The method is immutable and can change/alternate the data.
It is faster compared with the forEach() method.
It provides chainable features; users can associate sort(), filter(), and reduce() methods after applying map() to arrays.
Moreover, it returns the same size as the existing array.
The syntax is given below.
Syntax
array.map(function(element, index, array), thisVal)
The description of the parameters is as follows:
function(element, index, array): denotes the function to be applied on each array element.
element: specify the current element of the array
index: represent the index of the current element
array: specify the name of the array for the callback method
thisVal: shows the current value of the function.
Code
console.log('An example of using the map()')const num = [10, 9, 8, 7, 6]
console.log(num.map(ele =>
ele * ele))
The description of the code is listed here.
Firstly, a message is displayed using the “console.log()” method.
After that, an array is employed with the name num in which five elements are defined.
Finally, the map() method is used to return a new array where all its elements are the multiples of theirselves.
![]() Output
Output
![]() The outcome of the code shows that the map() method returns the square values 10, 9, 8, 7, and 6 to 100, 81, 64, 49, and 36.
The outcome of the code shows that the map() method returns the square values 10, 9, 8, 7, and 6 to 100, 81, 64, 49, and 36.
Conclusion
The map() and forEach() methods use the function to perform iteration over the array elements.
Resultantly, map() methods create an array whereas the return type of the forEach(0 method is undefined.
In this post, a detailed explanation of the map() and forEach() method is described to differentiate these two iterating methods.
Both methods are used to iterate over the array elements However, their way of working differs which can be understood from the above written content.
Difference Between forEach and for Loop
Loops are utilized to execute a set of instructions multiple times.
It is useful to reduce the effort of creating the code many times.
The for loop is a basic repeating structure that iterates a/multiple statement(s).
It refers to the number of times for executing the statements by checking the condition.
While forEach loop iterates through elements of the array.This post provides a detailed working and usage of for and forEach loops.
The purpose is to provide a comprehensive difference between both loops.
Difference Between for and forEach Loop?
The forEach method is mainly utilized to execute the code based on the elements of the array, maps, or sets.
It has the property of accessing both the index and value of each element.
It takes time to execute the code due to the method call.
While the for loop is the most basic and versatile loop in JavaScript.
It represents the number of times to execute the condition.
The following table represents the working of the for loop and forEach loop.
| for loop | forEach loop |
| Generic type of loop and can be used in a variety of scenarios. | Mostly applied on arrays, maps, and sets. |
| Useful for quickly iterating the collection of items. | Useful for iterating the subset of items. |
| The syntax is easier and quicker. | The format of syntax is a little complex. |
| Does not provide a facility for modification during iteration. | User modifies the items as per requirements. |
| The user can utilize the break statement to break. | It cannot provide a facility to break the statement because of the callback method. |
Syntax of the forEach Loop
array.forEach(function(CurrVal, Index, Array) {// execute the piece of code});
The parameters which are used in the above syntax are listed below:
function(CurrVal, Index, Array): The function to be run on each element.
CurrVal: Current value of the array.
Index: Current index of the element.
Array: The array of current elements.
Syntax of the For Loop
for (initializer; condition; counter){// execute the piece of code}
In the for loop, three conditions are specified:
initializer: initializes the variable with a value.
condition: specifies the condition to execute the code.
counter: specify the flow control of a loop using arithmetic operations.
How Does forEach Loop Work?
An example is given below by utilizing the forEach method in JavaScript.
Code
// An example is given to use the forEach method
let array = [1, 2, 3, 4, 5, 6, 7, 8]; //specify an array of numbers//operation for the square of each number
let rtnValue = array.forEach(val =>
console.log(`${val} x ${val} = ${val * val}`));
The description of the JavaScript code is provided below:
An array variable is initialized.
The forEach method is utilized to access the elements of the array.
Inside the forEach loop, each array value is being squared (multiplying the array element by itself).
Finally, the output is displayed on the console.
![]() Output
Output
![]() The output shows the square of all eight elements of the array in the console.
The output shows the square of all eight elements of the array in the console.
How Does for Loop Work?
An example is provided that demonstrates the concept of the for loop in JavaScript.
Code
// An example is given to use the for loop
var array = [1,2,3,4];
console.log('Using for loop');for (var i = 0; i < array.length; i++){
console.log(array[i]);}
The description of the code is listed below:
An array is defined that contains four elements.
After that, the for loop is executed on the array elements to print them.
Secondly, a condition is placed that executes the code provided by the array.length.
Lastly, the i++ increment operator is utilized to increase the value of the i variable by one.
![]() Output
Output
![]() The output shows that the for loop executes the statements four times (as the number of elements is four in the array).
The output shows that the for loop executes the statements four times (as the number of elements is four in the array).
Conclusion
Primarily, both are the loop types used to iterate over the number of collections.
The forEach method is utilized to execute the code for every element found in the array.
On the other hand, the for loop is simple to use and repeats the piece of code specified by the user.
The for loop consumes less execution time and is helpful in solving complex problems.
You have learned the important points between both for and forEach loop utilizing the JavaScript.
For better understanding, we have provided examples of each loop type as well.
Cross-Browser Window Resize Event Using JavaScript/jQuery
JavaScript supports various features for resizing the cross-browser window.
For this purpose, jQuery also has built-in methods to accomplish the resizing window task.
jQuery is a well-structured and fully featured library of JavaScript which can execute the JS code effectively.
In this post, two methods are adapted to resize the window based on JavaScript and jQuery.
In the first method, the addEventListener() method is employed to extract the width as well as height of the resize browser window.
In the second method, the window.resize() method computes the number of times the browser is resized.
The browser window can be maximized or minimized depending on the user’s needs.
This post serves the following learning outcomes:
Method 1: Resize the Window Using JavaScript
Method 2: Resize the Window Using jQuery
Method 1: Resize the Window Using JavaScript
In JavaScript, the addEventListener method is utilized by passing the “resize” value.
It returns the page height and page width of the window by maximizing or minimizing the window.
The event is triggered when the browser changes the size of the window.
Moreover, the user can specify an element or selector for invoking the window resize event.
All the latest browsers (Opera, Chrome, Edge, Safari, etc.) support this method.
The syntax of the addEventListener() method (w.r.t to the resize functionality of the window) is provided below:
Syntax
window.addEventListener('resize', function)
The above-written syntax can be described as
The addEventlistener method is bound with the ‘resize’ property of the window.
Moreover, the function will be called if the resize of the window is detected.
Example
The following example code shows the usage of JavaScript’s addEventListener() method.
Code
<html><head><style>
div {
background-color: lightpink;
width: 40%;} span { font-size: 20px;}</style><h2> Example of Resizing the Window </h2><div><span>Page Width = <span class="width"></span></span><span>Page Height = <span class="height"></span></span></div><script>
display();
window.addEventListener('resize', display);
function display() {
document.querySelector('.height').innerText = document.documentElement.clientHeight;
document.querySelector('.width').innerText =
document.documentElement.clientWidth;}</script> </head></body></html>
The description of the above code is described here:
A section is specified with <div> tag in which different styling properties such as background color, and width are mentioned.
After that, the Page Width and Page Height of the current window is displayed using the span class, which is used to represent inline content.
The window.addEventListener() method is triggered by passing the resize value as an argument.
Furthermore, a display() method is called within <script> tags.
The width and height of the window are dynamically updated by passing values .height and .width.
These values are associated with the HTML elements.
![]() Output
Output
![]() The output is explained here:
A message is displayed first with heading tags.
Initially, the Page Width and the Page Height of the existing window are set to 567 and 304 pixels, respectively.
The values of Page Width and Page Height are updated according to the dimension of the current window.
The output is explained here:
A message is displayed first with heading tags.
Initially, the Page Width and the Page Height of the existing window are set to 567 and 304 pixels, respectively.
The values of Page Width and Page Height are updated according to the dimension of the current window.
Method 2: Resize the Window Using jQuery
The window.resize() method of jQuery is employed to extract the width and height of the browser.
It returns the values that show how many times the window has been resized by maximizing or minimizing it.
The syntax of the resize() method is provided below:
Syntax
$(window).resize();
The window element represents that the resize method is being applied to the window.
You can pass any function as an argument to the resize() method.
By doing so, the function is executed on the resizing of the window.
Example
Let’s understand the concept using the following example.
Code
<html><body><h2>Example of resizing browser window.</h2><p>Resize the Window about <span>0</span> times.</p></body><script src="https://ajax.googleapis.com/ajax/libs/jquery/3.4.1/jquery.min.js"></script><script>var i = 1;
$(document).ready(function() {
$(window).resize(function() {
$("span").text(i += 1);});});</script></html>
In this code:
First, import the jQuery within the <script> tags.
After that, a variable i is initialized with the value 1.
After that, the document.ready() method is utilized to check if the document is ready for resizing.
In this method, window.resize() method is executed that extracts the content of the browser window using $(“span”).text property.
![]() Output
Output
![]() The output shows the execution of the above code.
It displays a value that dynamically updates with the size of the window screen.
It represents the number of times the window resizes.
The output shows the execution of the above code.
It displays a value that dynamically updates with the size of the window screen.
It represents the number of times the window resizes.
Conclusion
The addEventListener() method of JavaScript reports the height and width of resizing windows dynamically.
While the window.resize() method of jQuery returns the number of times the window is being maximized or minimized.
You have learned two different methods to detect the cross-browser window resize event using jQuery and JavaScript.
Creating Objects (4 Different Ways)
JavaScript is a programming language that is designed to facilitate interaction between objects.
In this scripting language, an object is basically a variable that can store many values.
For example, cars in a showroom, students in school, and cash in bank accounts.
There are different ways of creating objects using JavaScript, such as object literals, constructor methods, classes, and new keywords.
However, the object literal is the most common way of creating objects using JavaScript.
In this article, we have explained two methods for creating objects.
Using Object Literal to Create Object
Using Constructor Method to Create Object
Using the Class to Create Object
Using the new Keyword to Create Object
Method 1: Create an Object Using the Object Literals
It is the simplest way for creating an object by initializing the object.
Users can create and define an object in a single line.
A key-value pair phenomenon is carried out to assign the values separated by a colon.
The assignment of values is written in curly braces:
Syntax
The syntax for creating an object with an object initializer is given below:
var object= {propertyName:propertyValue}
The property name refers to the name of the property, and the propertyValue represents the value of that property.
Example
In this example, all the values are assigned to the properties of the object with a key value.
Code
// An example of creating an object using Object literals
var teacher = {firstName:"Harry",
lastName:"Billi",
age:35,
subject:"Math"};
console.log(teacher.firstName);
In the code:
The object teacher is defined, and different properties are created for this object.
Afterward, different values are assigned to these properties.
In the end, the specific property teacher.firstName is displayed using the console.log() method in JavaScript.
![]() Output
Output
![]() The output returns the specific property of an object by creating the object literal method.
Note: JavaScript 1.1 and earlier do not support object literals for initializing objects.
The output returns the specific property of an object by creating the object literal method.
Note: JavaScript 1.1 and earlier do not support object literals for initializing objects.
Method 2: Creating an Object Using the Constructor Method
Another alternative way that can be utilized to create an object is the constructor method.
The method creates an object instance of the class.
In this method, first define an object type by utilizing the constructor method:
Syntax
function Constructor(property) {this.property = property;}
let newObject= new Constructor('objectValue');
Parameter:
The parameters are described as follows.
Constructor: a method that initializes an object of the class.
newObject: represents the newly created object
property: indicates the existing object property
objectValue: specifies the value that is assigned to the object.
Example
An example is provided for creating an object with the constructor method.
For this purpose, the code is as follows:
Code
// An example of creating an object using Constructor
function Class(name, subject) {this.name = name;this.subject = subject;}
let teacher1 = new Class('John', 'Math');
let teacher2 = new Class('Harry', 'Physics')
console.log(teacher1.name);
console.log(teacher2.name);
In this code:
A constructor is called by passing the property name and subject.
After that, two objects are created with the names of teacher1 and teacher2.
The different values are assigned to them by calling the constructor.
![]() Output
Output
![]() The output returns the names John and Harry that are associated with the properties of teacher1 and teacher2.
The output returns the names John and Harry that are associated with the properties of teacher1 and teacher2.
Method 3: Creating an Object Using the Class
The new version of JavaScript ES6 supported the concept of class.
Creating the object by utilizing the class is quite like the above constructor method.
However, the methods are replaced with the classes by providing the functionalities in the ES6 version.
The syntax to create this method is provided below:
Syntax
Class className{
constructor(property) {this.property = property;}}
let newObject= new className('objectValue');
In the above syntax:
The className specifies the name of the class.
After that, the property is passed to the constructor.
In the end, the objectValue is assigned to the newObject variable.
Example
An example of creating an object is demonstrated by utilizing the class.
Code
// An example of creating an object using Classesclass Teacher {
constructor(name, subject, haircolor) {this.name = name;this.subject = subject;this.haircolor = haircolor;}}
let teacher1 = new Teacher('Ali', 'Physics', 'black');
let teacher2 = new Teacher('John', 'Math', 'brown');
console.log(teacher1.name);
console.log(teacher2.subject);
In this code:
The class Teacher is defined in three properties: name, subject and haircolor.
Furthermore, two objects are created: teacher1 and teacher2.
Afterwards, different values are assigned to teacher1 and teacher2 objects.
Finally, present the information with the console.log() method.
![]() Output
Output
![]() The output shows the execution of the above code in such a way that object teacher1 returns the name property Ali.
In the same way, the subject property of object teacher2 is returned by utilizing the dot operator in JavaScript.
The output shows the execution of the above code in such a way that object teacher1 returns the name property Ali.
In the same way, the subject property of object teacher2 is returned by utilizing the dot operator in JavaScript.
Method 4: Creating an Object Using the new Keyword
This method refers to creating an object using the new keyword.
The dot operator is utilized to create the properties of new objects.
After that, values are assigned to them.
It is also a commonly used method to create objects.
To better understand the new keyword, an example is provided here.
Example
The example is demonstrated by creating an object teacher in JavaScript.
Code
// An example of creating an object using new keyword
var teacher = new Object();
teacher.firstName = "Ali";
teacher.lastName = "Ahmed";
teacher.subject = "Math";
teacher.age = 35;
teacher.hairColor = "brown";
console.log(teacher.firstName);
console.log(teacher.age);
console.log(teacher.subject);
In this code, the description is as follows:
An object teacher is created with a new keyword.
After that, firstName, lastName, subject, age, and hairColor properties are defined with the dot operator.
Different values are assigned to these properties.
In the end, the object properties are displayed using the console.log() method.
![]() Output
Output
![]() The output displays the execution of the code by utilizing the new keyword.
First, the teacher.Name returned the name of teacher Ali. Similarly, teacher.age and teacher.subject is utilized to display the age and subject of the teacher in JavaScript.
The output displays the execution of the code by utilizing the new keyword.
First, the teacher.Name returned the name of teacher Ali. Similarly, teacher.age and teacher.subject is utilized to display the age and subject of the teacher in JavaScript.
Conclusion
The four different ways are demonstrated for creating objects, including object literals, constructor methods, classes, and the new keyword.
Firstly, the object literal is used for creating an object by the name-value pairs.
The constructor method is employed to initialize an object and assign values based on its existing properties.
Furthermore, classes are adapted to create objects and display their properties by assigning values to them.
In the end, the keyword new is utilized to create a single object at a time and present it in the console window.
Arrow functions | Explained
The arrow functions were included with the release of ECMAv6 back in 2015.
The arrow function is a way of creating a function with the main goal of reducing the number of letters required to create a function.
Arrow functions are named “arrow” because they use a keyword made up of two special characters, the “=” and the “>” which forms a shape that looks like an arrowhead “=>”.
Creating a function with Arrow Function
Creating a function with the Arrow function method includes the following steps:
First, time in the name of the function or the identifier of the function
After that, set the name of the function equal to the parameters required by the function enclosed in parenthesis
After that use the arrow symbol “=>” to denote the keyword function
After the arrow symbol, simply include the body of the function enclosed within {curly brackets}.
So an arrow function looks like this:
funcName = (para1,para2,para3..) => {//Body of the function}
Function Declaration & Function Expression vs Arrow Functions
Normally, a function declaration to create a function that adds two numbers passed inside its arguments looks like this:
function getSum(num1, num2) {return num1 + num2;}
And a function expression to create the same function would look like this:
getSum = function (num1, num2) {return num1 + num2;};
There are a few common things in both of these methods for creating a function:
The name or the identifier of the function
The keyword function
Parameters inside parenthesis
Body of the function inside curly brackets
Assignment operator in the case of function expression
Now, if the same function was to be created with the Arrow functions it would have the following sequence:
The name or identifier
Assignment operator
Parameters with parenthesis
Arrow head
Body of the function
So the same getSum() function created with Arrow function will look like this:
getSum = (num1, num2) => {return num1 + num2;};
It is pretty visible at first glance that the Arrow function uses way less letters or characters to create a function then both function declaration and function expression.
And the main reason for that is that instead of using the keyword function, an arrow symbol is used.
Function Call for Functions Created With Arrow Function
The function doesn’t now change whether the function was created using the function declaration, function expression, or even with the Arrow function.
For a function named as getSum (as created above) with two parameters is always going to be:
result = getSum(num1Val, num2Val);
The Fat Arrow
The arrowhead symbol of the arrow function is often referred to as the “fat arrow” because instead of using a hyphen “-” for creating the arrowhead an equal “=” which makes the arrow head look far, hence the name Fat Arrow.
Wrap up
An array function is a way to create functions, which was released in the ESMAv6 version of JavaScript.
This method of creating a function replaced the keyword function from function creation and used an arrow symbol “=>”, hence the name arrow function.
The arrow function doesn’t change the way a function is called to perform the task written inside it.
This article has explained arrow functions or fat arrow functions in detail, along with a brief comparison with other forms of method creation.
Array reduce() Method | Explained
The Array reduce() method is used to iterate through all the items of an array and apply a reducer() function on each element individually.
This reducer() function is a callback function.
At the end of all the callback function execution, a final resultant value is returned.
Since it returns only one value, it is known as a reducer that reduces the entirety of an array into a single value.
This callback function can be created within the parameters of the reduce function and can even be created somewhere else explicitly.
The reducer() method is given three arguments automatically.
The first is the totalValue, currentElem, currentElemIndex.
To understand the Array reduce() method, let’s talk about its proper syntax:
Syntax of the Array reduce() Method
The syntax of the Array reduce() method can be explained as:
arrayVar.reduce(function(total/initialValue,currentElem,currentElemIndex),initialValue);
In this syntax:
arrayVar is the name of the array variable on which the reduce() method is applied
Function is the callback function which is known as the reducer method
initialValue is the initial value that can be passed to the callback function to set its total parameter (optional)
Inside the callback function:
total/initialValue is used to store the return value of the previous execution of the reducer function or it can even be used to store an initial value
currentElem is used to store the value of the the array element on which the reducer function is being executed
currentElemIndex is used to store the index of the array element on which the reducer function is being executed
Return value:
The resultant or accumulated value calculated by executing the callback function on all the items of the array
To better understand the working of the reduce() method, take a look at the examples below:
Example 1: Add Values of an Array Using reduce() Method
Start by creating a new array with the following line of code:
numbersArray = [56,12,87,44,99,67];
After that, apply the reduce() method on the “numbersArray” and create a function inside its argument and also store the result value from the reduce() method in a new variable with the following lines of code:
result = numbersArray.reduce(function (total, currentElem) {return total + currentElem;});
After that, to display the final reduced value on the terminal, simply pass the variable “result” in the console log function like:
console.log(result);
The complete code snippet is as:
numbersArray = [56, 12, 87, 44, 99, 67];
result = numbersArray.reduce(function (total, currentElem) {return total + currentElem;});
console.log(result);
Execute the program and the following result will be displayed on the terminal:
![]() The final value was printed on the terminal.
The final value was printed on the terminal.
Example 2: Subtracting all the Values of an Array From 1000 With Explicit Function
Start by creating a function named as subtractAll() with the following lines of code:
function subtractAll(initialValue, currentElem) {return initialValue - currentElem;}
In the above lines, the reducer function was created with two parameters and a value was returned.
After that, create an array with numbers stored inside it with the following lines of code:
theArray = [78, 12, 87, 44, 53, 69];
After that, apply the reduce() method on the “theArray” and provide an initialValue as 1000 and also store the returned value into a variable with the following lines:
var result = theArray.reduce(subtractAll, 1000);
After that, pass the result variable in the console log function to print the final value onto the terminal like:
console.log(result);
The complete code snippet is as:
function subtractAll(initialValue, currentElem) {return initialValue - currentElem;}
theArray = [78, 12, 87, 44, 53, 69];
var result = theArray.reduce(subtractAll, 1000);
console.log(result);
Executing the program will give the following output on the terminal:
![]() All the values from the array were subtracted from 1000, and the final value has been printed on the terminal.
All the values from the array were subtracted from 1000, and the final value has been printed on the terminal.
Wrap up
The Array reduce() method is used to implement a callback function on every array element and compute a single final value.
Since the callback function is used to compute a single final value, the callback function is also known as the reducer method.
This article has explained the Array reduce() with the help of examples.
Array and Array of Objects | A Comparison
Arrays and Objects are the two most used variable data types of JavaScript when it comes to representing real-world objects in the world of programming.
Arrays and Objects are special because they fall under the umbrella of the non-primitive data type.
Both of these are not bound by restrictions on their size or the types of values that they can store inside them.
This allows them to store other arrays and other objects inside them.
This article will explain Arrays of JavaScript and Arrays of Objects.
Arrays
Arrays belong to the non-primitive data type, and as mentioned above, they are not restricted by a size constraint.
This also gives them one more property, which is that they work on references, references to the memory location in which the value of their first variable is stored.
To create an array, simply create a variable and set it equal to square bracket “[ ]” and within these square brackets, type the values to store in the array, with every value separated by a comma “,”.
An example of this would be:
arrayVariable = [1, 2, 3, "Porsche", "BMW", true, undefined];
So, arrayVariable is the name of the array in which different types of values are being stored.
Now to iterate through the elements with the help of a for loop is used and to print out the values of the array “arrayVariable” one by one, use the following lines:
for (i = 0; i < arrayVariable.length; i++) {
console.log(arrayVariable[i]);}
In the above lines, it is easy to notice that to access a value inside an array “square brackets [ ]” and then the index value of the elements are passed.
The first element is placed at the 0th index, and the second element is placed at the 1st index, and so on.
Executing this code prints out the following on the terminal:
![]() As you can see, every element was printed on the terminal
As you can see, every element was printed on the terminal
Array of Objects
As mentioned before, arrays and objects are those data types that can store values of other arrays and objects.
An array of objects is exactly what it sounds like, and it is an array in which every element is an object.
To demonstrate this, take the following lines of code to create two different objects:
var personObj = {
name: "John Doe",
age: 18,
isEmployed: true,};
var carObj = {
carMake: "Porsche",
price: 345000,
model: 2016,};
Ater that, create a new array and set it equal to personObj and carObj with square brackets like:
arrayVariable = [personObj, carObj];
Now, to iterate through this array and to print out its element on the terminal use the following lines of code:
for (i = 0; i < arrayVariable.length; i++) {
console.log(arrayVariable[i]);}
After this, the terminal will show the following:
![]() Both of the elements of the array of objects was printed on the terminal.
To access a specific value, let the car made of the object carObj use the following line of code:
console.log(arrayVariable[1].carMake);
This will give the following output on the terminal:
Both of the elements of the array of objects was printed on the terminal.
To access a specific value, let the car made of the object carObj use the following line of code:
console.log(arrayVariable[1].carMake);
This will give the following output on the terminal:
![]()
Conclusion
JavaScript includes Array as datatypes as well as objects, now these two are able to store elements of each other.
This means that creating an Array of objects is possible, as well as creating objects of arrays.
In this article, a general overview of arrays and an array of objects was given with their working.
How to Design Digital Clock Using JavaScript?
JavaScript provides a variety of methods to build state of the art web-based components to enhance the interactiveness of the website.
Digital clock is the key element of any website that would show the current time on the specific part of the webpage.
In today’s guide, we will demonstrate the way to create a digital clock using JavaScript.
How to Design a Digital Clock Using JavaScript?
You would have observed digital clocks on most of the websites.
Have you ever thought, how they are created? It is JavaScript which enables you to put live digital clocks on the webpages.
Let’s see how you can create it.
Before getting into details, you must know the working of few built methods that will be used in this example.
The Date() method is the key component of creating a digital clock, as it contains the date, time, year, etc information.
Moreover, the following methods will also be used:
getSeconds(): to obtain the seconds.
getMinutes(): to retrieve the minutes.
getHours(): to get the hour.
Example
The following example code represents the creation of a digital clock using JavaScript.
Code
<!DOCTYPE html><html><body onload="startTime()"><h1>Welcome to the Digital Clock using JavaScript</h1><div id="txt"></div><script>
functionstartTime() {const date = newDate();
let secs = date.getSeconds(); // Store seconds in secs variable
let mints = date.getMinutes(); // Minutes are stored in mints variable
let hrs = date.getHours(); // variable hrs stores the number of hours
secs = Time(secs);
mints = Time(mints);
document.getElementById('txt').innerHTML = hrs + ":" + mints + ":" + secs;
setTimeout(startTime, 500);}
functionTime(i) {if (i <10) {i = "0" + i}; // add zero in front of numbers < 10return i;}</script></body></html>
The description of the code is as follows:
The startTime() method is defined in which you extract the current date by utilizing the Date() method.
Furthermore, the object of the Date() method is used with getSeconds(), getHours(), and getMinutes() methods to extract the seconds, hours, and minutes.
Afterwards, the Time() method is utilized to place zero on the left side of the number if the number is less than zero.
![]() Output
Output
![]() The output represents that a simple digital clock is displayed on the webpage which shows the current time.
The output represents that a simple digital clock is displayed on the webpage which shows the current time.
Conclusion
A digital clock can be created by using the Date() method and applying the object of the Date() method on the getSeconds(), getMinutes(), and getHours() methods.
In this article, user learned to design a digital clock.
The getSeconds(), getMinutes(), and getHours() methods are used to extract the seconds, minutes, and hours from the Date method.
How to Create a Simple Graph
Graphs are better than textual data to show some sort of survey or to categorize raw data.
Users can create graphs with the help of different SVG elements grouped to showcase data.
In HTML <svg> is used to display an SVG element and a <g> tag is used to group multiple SVG elements together.
However, using JavaScript to compute elements that we have to categorize in the graph and then display them in a linear graph chart is quite complex.
This article will take an array of elements which are going to car makes and their quantity found in a survey.
After that, it will calculate their percentages from the total cars in the survey and then display them on the graph with their percentages written on the linear graph.
Step 1: Setting up the HTML Document
The HTML doesn’t require much stuff to be done inside it.
We simply need to create an empty <div> that will be modified by JavaScript code, and JavaScript will also plot the graph inside this div.
Therefore, use the following lines:
<center><b>This is a Linear Graph Showcasing Percentages of Car Makes From a Survey<b><div id="graphDiv"></div></center>
At this point, the HTML document will only show the following result:
![]() The div is not visible, because currently it doesn’t contain any other elements or text.
The div is not visible, because currently it doesn’t contain any other elements or text.
Step 2: Setting up the JavaScript Code
Start by creating an element array.
This array is going to contain the Name of the car make and the number of cars.
For this, simply use the following lines:
let elementArray = [];
elementArray[0] = ["Mercedes", 8];
elementArray[1] = ["Audi", 13];
elementArray[2] = ["BMW", 11];
elementArray[3] = ["Porsche", 25];
After that, we are going to create a function that is going to plot the graph on the HTML document.
This function will be named “plotGraph”, and it will take the three parameters as:
function plotGraph(array, graphWidth, div) {// The next lines will be included in this body}
As you can see, this function takes the element from which is going to pick in the raw data, it takes in the width of the graph on the HTML webpage and the div in which it has to plot the graph.
In this function, the very first thing is to create the following variables:
let totalCars = 0;
let calpercentage = 0;
let calwidth = 0;
The thing is:
total cars will be used to store the number of cars
calPercentage will be used to calculate the percentage of each car make
calwidth will be used to determine the size of the bar (according to the percentage) of the graph to be placed inside the width passed in the parameters
To calculate the total number of cars use the following lines of code:
for (i = 0; i < array.length; i++) {
totalCars += parseInt(array[i][1]);}
After that, create a variable named as output, this variable will be used to create a table on the HTML webpage.
Therefore, it will contain HTML code inside it:
let output = '<table border="0" cellspacing="0" cellpadding="8">';
Currently, this output variable only contains the query for the start of the table.
Later on, more queries inside will be appended to it, which will represent the complete table with a graph inside it.
After that simply use the following lines of code:
for (i = 0; i < array.length; i++) {
calpercentage = Math.round((array[i][1] * 100) / totalCars);
calwidth = Math.round(graphWidth * (calpercentage / 100));
output += `<tr><td>${array[i][0]}</td><td><svg ><g class="bar"><rect ></rect></g></svg> ${calpercentage}%</td></tr>`;}
In the above code snippet:
This for loop is going to iterate through the elements array one by one
Percentages of every car make is being calculated
And then the size of the percentage bar is being calculated
Lastly, the output is being appended with the HTML query to compute the next bar of the graph
<svg> tag creates an SVG element on the HTML webpage
<g> groups SVG elements together under a given name
After this, simply come out of the for loop, and append the ending tag of the table inside the output variable
output += "</table>";
Now at this point, the output variable contains the complete HTML query to plot the linear graph from the raw data that was provided.
All that is left to do is to access the div and set it equal to our output variable and also display the total number of cars:
div.innerHTML = `${output}<br>Total Cars: <b>${totalCars}</b>`;
And with that the function plotGrapgh is complete.
To plot the graph, simply call the plotGraph function and pass in the arguments as:
plotGraph(elementArray, 500, document.getElementById("graphDiv"));
The complete JavaScript code is as:
let elementArray = [];
elementArray[0] = ["Mercedes", 8];
elementArray[1] = ["Audi", 13];
elementArray[2] = ["BMW", 11];
elementArray[3] = ["Porsche", 25];
function plotGraph(array, graphWidth, div) {
let totalCars = 0;
let calpercentage = 0;
let calwidth = 0;for (i = 0; i < array.length; i++) {
totalCars += parseInt(array[i][1]);}
let output = '<table border="0" cellspacing="0" cellpadding="8">';for (i = 0; i < array.length; i++) {
calpercentage = Math.round((array[i][1] * 100) / totalCars);
calwidth = Math.round(graphWidth * (calpercentage / 100));
output += `<tr><td>${array[i][0]}</td><td><svg ><g class="bar"><rect ></rect></g></svg> ${calpercentage}%</td></tr>`;}
output += "</table>";
div.innerHTML = `${output}<br>Total Cars: <b>${totalCars}</b>`;}
plotGraph(elementArray, 500, document.getElementById("graphDiv"));
Running the HTML document on a web-browser now shows the following output:
![]() And the linear graph has been plotted inside the div showcasing the percentages of different car makes from a survey.
And the linear graph has been plotted inside the div showcasing the percentages of different car makes from a survey.
Conclusion
It is possible to create a graph on an HTML document with the help of JavaScript.
For this, the user needs to utilize the <svg> tag to create SVG elements and the <g> to group multiple SVG elements together under a specific name.
However, it is not easy to build a graph on an HTML webpage as it can be very daunting for a new beginner.
In this article, a linear graph was built with JavaScript, and each step was thoroughly explained.
How to Create a Dropdown List Using JavaScript?
HTML and CSS are used to create stunning web pages, but when JavaScript is used in combination, the result is absolutely phenomenal.
One really cool thing about a webpage is its drop-down lists.
Now, there are many frameworks available on the internet that allow the user to use pre-built drop-down lists but knowing the fundamentals are important.
This article will demonstrate how to create a basic drop-down list with the help of HTML, CSS, and JavaScript.
Step 1: Set up the HTML Document
Start by creating an HTML document and putting the following lines inside the HTML file:
<center><div id="ddSection"><button onclick="ButtonClicked()" id="button">Choose Car Make</button><center><div id="carMakes"><a href="#"> Porsche </a><a href="#"> Mercedes </a><a href="#"> BMW </a><a href="#"> Audi </a><a href="#"> Bugatti </a></div></center></div></center>
Let’s explain what is going on over here:
A parent <div> is created with the id = “ddSection”, Later this div will be used to align its child elements in-line with it
A button is created which calls the ButtonClicked() method upon click.
This button will be used to show the drop-down list.
After that, another div is created with the id “carMakes”, which is going to store a bunch of options inside it.
This div will work like a container for the <a> tags placed inside it.
Running the HTML document gives the following output to the browser:
![]() As it is visible in the output, the items of the drop-down list are not in the correct spot.
They should be:
Hidden until the button is clicked
Vertically inline with the button since it is a “Drop-down” list
So, let’s fix that in the next step
As it is visible in the output, the items of the drop-down list are not in the correct spot.
They should be:
Hidden until the button is clicked
Vertically inline with the button since it is a “Drop-down” list
So, let’s fix that in the next step
Step 2: Fixing the Drop-down List’s Items with CSS
To start, set the parent div’s (whose id is ddSection) display property to “inline-block”, also set its position to “relative”:
#ddSection {position: relative;display: inline-block;}
After that, add some styling to the button:
#button {padding: 10px 30px;font-size: 15px;}
Style the container for the list items and set its display property to “none” so that it is hidden in the start:
#carMakes {display: none;min-width: 185px;}
And finally, style the list items, and set their display property to “none”, so they are also hidden in the start:
#carMakes a {display: block;background-color: rgb(181, 196, 196);padding: 20px;color: black;text-decoration: none;}
The complete CSS code for this demonstration:
#ddSection {position: relative;display: inline-block;}
#button {padding: 10px 30px;font-size: 15px;}#carMakes {display: none;min-width: 185px;}#carMakes a {display: block;background-color: rgb(181, 196, 196);padding: 20px;color: black;text-decoration: none;}
Running the HTML now will create the following output on the browser:
![]() The list items are now hidden, all there is left to do is to toggle their display property upon button press.
Let’s do that in the next step.
The list items are now hidden, all there is left to do is to toggle their display property upon button press.
Let’s do that in the next step.
Step 3: Toggling Display Property With JavaScript
In the JavaScript file, start by creating the function ButtonClicked(), which will be executed upon the press of the button:
function ButtonClicked() {// Upcoming lines of code belong here}
In this function, get the reference of the div with id “carMakes” which is the container for the list items like:
var container = document.getElementById("carMakes");
After this, use the container variable to show and hide the drop down list with the help of if-else statement and the display property of the careMakes div:
if (container.style.display === "none") {
container.style.display = "block";
} else {
container.style.display = "none";
}
The complete JavaScript code for this demonstration is as:
function ButtonClicked() {
var container = document.getElementById("carMakes");if (container.style.display === "none") {
container.style.display = "block";
} else {
container.style.display = "none";
}}
After this, simply run the HTML file on a browser and click on the button to show and hide the drop-down list:
![]() And the drop-down list is working perfectly fine.
And the drop-down list is working perfectly fine.
Conclusion
Drop-down list can be created with a combination of HTML, CSS, and JavaScript.
Drop-down lists add to the aesthetics of the web page.
To create a drop-down list, create the required elements in the HTML file.
In the CSS file, style the elements and hide them using their display property.
In the JavaScript file, toggle the display property upon button click.
In this article, the creation of a drop-down list was explained step by step.
How to convert milliseconds to date
One of the many built in features that JavaScript provides is the ability to be able to convert milliseconds into date or vice versa.
JavaScript uses the Date() function to perform these tasks.
Before we proceed, it is important to note that the values of date and millisecond that the Date() constructor will give us are in reference to a standard starting date “January 1, 1970, 00:00:00 UTC”.
In this article let us take a look at how you can utilise this function to perform the conversions.
Converting Milliseconds to Date
To Convert milliseconds to date you simply need to use “var” or “const” to declare a variable which has the value of the milliseconds stored in it.
var checkTime = 1658736641414;
You can declare a specific integer for the milliseconds or you can use the current millisecond amount.
For the current millisecond, use the function getTime() which is used to return the number of milliseconds from the standard date “January 1, 1970, 00:00:00 UTC” till the current date as shown below:
var checkTime = new Date().getTime();
Once the millisecond integer is stored into a variable, use the “Date()” constructor to convert the milliseconds into date and then store it into the new variable “checkDate”.
var checkDate = new Date(checkTime);
console.log(checkDate.toString());
The complete code snippet along with the output is given below for reference:
![]() As shown in this snippet, you will get an output of the date corresponding to the milliseconds that you input into the variable.
As shown in this snippet, you will get an output of the date corresponding to the milliseconds that you input into the variable.
Conversion from Date to various String Formats?
Once you have your date in a variable, you can use various string methods to display the date in any format that you prefer.
Some common formats are shown below:
toLocaleString()
The following method will return the string in the locale format that your system is using:
checkDate.toLocaleString();
![]()
toDateString()
The use of this method will return the string with only the Date and not the time:
checkDate.toDateString();
![]()
toTimeString()
The following method will display only the time out of the Date conversion:
checkDate.toTimeString();
![]()
Conclusion
To convert milliseconds to date, provide the milliseconds stored in a variable to the Date() constructor and it will perform the conversion.
Later, store the result in any variable to use it later.
This article represents the step by step guide on how to perform conversions from milliseconds to a date.
Moreover, it is demonstrated how to convert the date into different formats using various methods provided by JavaScript.
How to Convert JSON Data to a HTML Table Using JavaScript/jQuery?
JSON is a file format that is mostly used to transfer the data/information between servers and web applications.
JavaScript and jQuery refer to the implementation of the JavaScript programming language.
jQuery is a feature-rich JavaScript library that executes the code in less time as compared to full JavaScript code.
jQuery interacts with the HTML DOM to manipulate the HTML elements.
This article provides a procedural guide to converting JSON data to an HTML table using JavaScript/jQuery.
How does JSON Data convert to an HTML Table?
Firstly, of all, a document form is created with <form> tag, in which an HTML table is created with <table> tag.
After that, a JavaScript library is imported to employ the built-in features of jQuery.
Finally, the JSON data is converted to the formatted table in the HTML document using JavaScript/jQuery.
To practice this functionality, we have provided a detailed example here.
Example
For a better understanding, the example code is divided into four chunks.
These chunks are referred to as a particular section.
Let’s dig into them:
Section 1: Create a table and insert the JavaScript/jQuery
<html><head><h2> An example to convert json data to html table using jquery</h2><form id="form1" ><div><table id="htmltable" border="1" cellpadding="3" style="border-collapse: collapse;"></table></div></form></body></html><script type="text/javascript" src="http://code.jquery.com/jquery-3.6.0.js"></script><script type="text/javascript">
In the code:
A table is created with <table> tag and various styles are added to it.
Finally, jQuery is imported in this section of code by <script> tag to acquire the built-in functionality of JavaScript and jQuery.
![]()
Section 2: Inserting elements in the List
$(function () {
varmyList = [{ "Name": "Awais", "Education": "BSCS", "Location": "Karachi"},
{ "Name": "John", "Education": "DPT", "Location": "Islamabad" },
{ "Name": "Ali", "Education": "B.Sc.", "Location": "Lahore" }]
htmltable(myList);})
The description of this piece of code is provided below:
The function is utilized to fetch the JSON object into the HTML table by passing myList as an argument to the htmltable method.
A list “myList” is added to store the JSON data.
In this list, Name, Education, and Location are added as headers.
Moreover, the values of these table headers are also assigned.
![]()
Section 3: Inserting key values for append data in HTML table
functionaddcols(list) {
var col = [];
varhTr = $('<tr />');for (vari = 0; i<list.length; i++) {
var rows = list[i];for (var k in rows) {if ($.inArray(k, col) == -1) {
col.push(k);
hTr.append($('<th />').html(k));}}}
$("#htmltable").append(hTr);return col;}
The description of the above code is provided below:
The addcols() method is used by passing the list of JSON data.
After that, a for loop is employed to store the length of the list in the rows variable.
Another for loop is implemented that executes till the number of elements in the rows is reached.
In this loop, the append property is used to insert the key values into the HTML table.
![]()
Section 4: Convert the JSON data into an HTML table
function htmltable(list) {
var cols = addcols(list);for (var i = 0; i < list.length; i++) {
var row = $('<tr/>');for (var colIndex = 0; colIndex < cols.length; colIndex++) {
var cv = list[i][cols[colIndex]];if (cv == null) { cv = ""; }
row.append($('<td/>').html(cv));}
$("#htmltable").append(row);}}</script></head><body>
The description of this piece of code is given below.
The htmltable() method is used to insert the value of the table by checking the index value.
The first for loop is utilized to move in the horizontal sequence of the table.
The second for loop is used as a nested loop to move the control vertically.
After that, the cv variable is employed to store the column value.
Furthermore, if the value of cv is empty in JSON data, then an empty cell is allocated to it.
Otherwise, it converts data to an HTML table using the append property.
![]() Output
Output
![]() The output returns the execution of all the above sections of code in an HTML table.
The Name, Education, and Location are represented in the header.
Moreover, different values for these headers are presented in the table.
The output returns the execution of all the above sections of code in an HTML table.
The Name, Education, and Location are represented in the header.
Moreover, different values for these headers are presented in the table.
Conclusion
The JSON data is converted into an HTML table by employing JavaScript/jQuery.
jQuery has features of the JavaScript library that can be embedded in any JavaScript file.
In this post, you have learned to convert the JSON data to an HTML table using JavaScript/jQuery.
The JSON data is structured in such a way that the keys in JSON data are converted into the headers of the table, and the values in the JSON data are converted into entries in a table.
How to Convert Image Into Base64 String Using JavaScript?
An image is a combination of pixels that represents the binary data.
Base64 is an encryption scheme that encrypts a binary data type to an ASCII string type.
Base64 takes any amount of data and represents it in binary format.
The article demonstrates how to convert the image into a base64 string by the utilization of JavaScript.
The outcome of the string is useful for transferring the data with minimum resources.
Moreover, the encrypted string is secure from any malicious threat.
The content to convert the image into base64 is listed below.
How to Convert Image Into a Base64 String Using JavaScript?
The representation of strings is an important task that converts the image into ASCII format.
The string is a combination of alphabets, characters, and numbers.
It is useful to convert the image into a base64 string using the local file system.
The converter automatically detects the type of content for uploading the image.
Moreover, the user can select a specific image format to convert the image into a base64 string format.
It consumes very little memory due to compression, which is helpful for transferring data.
Moreover, users can utilize conversion by accessing the image source through the URL.
Important: Most developers do not follow random images from the internet by accessing through URL and converting to base64 string due to security concerns.
Example
An example is adapted to convert an image into a base64 string by employing JavaScript.
Code
<html><h2>Example of converting image to string</h2><body><input type="file" onchange="enc(this)" /><script>
function enc(element) {
let reader = new FileReader();
let f = element.files[0];
reader.onloadend = function() {
document.write('String Output: ', reader.result); }
reader.readAsDataURL(f); }</script></body></html>
The explanation of this code is as follows:
Firstly, a user-defined method enc() is created by passing an argument element.
After that, an object of the FileReader() function is employed.
The reader.onloadend() event triggers a function that will return the result property of the reader object.
And the data/file is presented as a URL.
![]() Output
Output
![]() Upon clicking the “Choose File” button, the user needs to choose the image file.
Once the image file is selected, you will see the corresponding string on the screen.
Upon clicking the “Choose File” button, the user needs to choose the image file.
Once the image file is selected, you will see the corresponding string on the screen.
Conclusion
The image is converted into a base64 string using a built-in function FileReader().
This method extracts the contents of a file from the local file system.
After that, a base64 encryption scheme is applied that converts the binary data into ASCII format.
In this post, you learned the conversion of the image into base64 utilizing JavaScript.
The objective of using this conversion is to transfer secure data in a string format.\
How to convert a float number to a whole number?
Many programming languages all over the globe utilize various data types to be able to differentiate between the variety of data stored inside variables.
Even when it comes to numbers, there are many types.
Some common examples are int, float, and double.
This is not the case when dealing with JavaScript., there are no different types of numbers.
They are all stored the same.
Whether it’s “5”, “5.3”, or even “0.00032”.
But sometimes, these decimal numbers need to get rounded to whole numbers, for the sake of making calculations easier.
In this article, knowledge will be provided on how these floating type numbers can be converted into whole numbers using JavaScript.
How a float number is converted into a whole number?
JavaScript provides a wide variety of methods through which anyone can convert a floating point number into a whole number.
This section will shed some light on some of the most commonly used methods.
Method 1: Using parseInt()
The most commonly used method is the “parseInt()” function.
This function takes in a variable or value and converts it to int type.
The syntax for it is as follows:
parseInt(x);
Check out the example for “parseInt()” below:
![]()
Method 2: Using toFixed()
The “toFixed()” method is very similar to the “parseInt()” method except it only accepts number values and will round off your number to the nearest decimal number that you specify.
So for the whole number, we pass the default index which is 0 in the function.
The syntax is given below:
x.toFixed();
Here x is the float number that should be converted and the function does not take any integer as an argument which means it will use the default.
The sample snippet is shown below:
![]() The next output shows rounding off to the next whole number:
The next output shows rounding off to the next whole number:
![]()
Method 3: Using Math.floor()
The Math library is extremely useful when it comes to performing tasks like this.
The Math.floor() function will take the decimal value and round it to the lowest whole number.
The syntax of is shown down below:
Math.floor(x);
An example for this function is given below:
![]()
Method 4: Using Math.ceil()
This function will perform the opposite task to the Math.floor() function.
This will round the decimal number to the highest possible whole number.
Check out the syntax for this function:
Math.ceil(x);
Sample for the Math.ceil() function is presented below:
![]()
Method 5: Using Math.round()
Unlike the two Math functions used above, Math.round() makes use of the decimal number and rounds to the nearest whole number.
Meaning that if the decimal number is greater than or equal to 5, it will get rounded to the next number otherwise, it is rounded to the lower number.
The syntax for Math.round() is shown below:
Math.round(x);
For further understanding take a look at these two snippets:
![]() The example above clearly shows how the Math.round() differs from the other Math functions since it rounds up the decimal into a whole number.
The example above clearly shows how the Math.round() differs from the other Math functions since it rounds up the decimal into a whole number.
Conclusion
Any decimal number can be converted into a whole number using functions like parseInt(), toFixed(), Math.floor(), Math.ceil(), and Math.round().
This article has provided all the various ways in which any decimal number can be changed to a whole number using JavaScript.
How to Close Window Using JavaScript Which is Opened by the User With a URL?
JavaScript provides a variety of methods to perform any operation on a web page effectively.
The window.open() method is used to open a tab in the browser.
Moreover, the window.close() method can be employed to close the window utilizing JavaScript.
That window is already opened by the user in the URL.
This post demonstrates the working and usage of the window.close() method to close the window with JavaScript that is already opened by a URL.
How to Use the window.close() Method?
In JavaScript, the window.close() method is utilized for closing the window that has already been opened by the window.open() method.
The working of the window.close() method is described using the following syntax:
Syntax
window.close()
The window.close() method does not take any parameter, it just closes the existing open tab in the browser.
Note: Some of the browsers do not support the window.close() method if the window.open() method is not employed first to open any webpage.
For a better understanding, the following lines of code are implemented to close windows with the built-in methods of JavaScript.
Code
<html><head><center><h2 style="color:red"> An example of Window close() method </h2><body><b> Press the button to open Linuxhint site </b><br><button onclick="windowOpen()"> Open Linuxhint </button><br><br><b> Press the button to close Linuxhint site </b><br><button onclick="windowClose()"> Close Linuxhint </button></body> </center><script>
var newWindow;
function windowOpen() {
newWindow = window.open("https://linuxhint.com/declare-variables-different-ways-javascript/","_blank", "width=400, height=250"); }
function windowClose() {
newWindow.close(); }</script> </head> </html>
In the above code:
two buttons Open Linuxhint and Close Linuxhint are created.
These buttons are associated with the windowOpen() and windowClose() methods to open and close the window tab.
URL is provided in the code to access a webpage.
![]() Output
Output
![]() The output shows the execution of the window.close() method.
The link is opened using the “Open Linuxhint” button.
When the “Close Linuxhint” button is pressed, the window is closed.
The output shows the execution of the window.close() method.
The link is opened using the “Open Linuxhint” button.
When the “Close Linuxhint” button is pressed, the window is closed.
Conclusion
The window.close() method can be used to close a window by utilizing JavaScript that is already opened by a URL.
Most of the time, the window.close() method works with the window.open() method.
For a better understanding, we have provided a detailed working and usage of the window.close() method alongside.
In the provided example, the window is opened first, and then it is closed using the window.close() method.
How to check if a string is a palindrome or not
Tackling strings in programming presents us with many different opportunities where multiple different actions can be done on the string.
Such as finding out its length, searching for a keyword amongst the string, and even checking to see if that string is a palindrome or not.
A palindrome is a string that will remain the same if the string gets inverted.
For example, if we take the string “rotator” and invert it, it will return us the exact same string.
In this article, it will be shown how someone can implement the concept of palindrome within the code of JavaScript by creating a check for it.
How to verify a palindrome using JavaScript?
There are two major methods through which anyone can verify whether a particular string is a palindrome or not using JavaScript.
This section elaborates on the functionality of the methods that are given below.
By Dividing the String
The first method that exists involves dividing the given string into two halves.
Let’s dive deeper to gain a better understanding of this algorithm.
The code is given below:
functioncheckPalindrome(){//section 1
var palString = "dumb";
var len = palString.length; //section 2 for (let i = 0; i < len / 2; i++) { //section 3 if (palString[i] !== palString[len - 1 - i]) {
alert( 'It is not a palindrome');return
}
}
alert( 'It is a palindrome'); }
console.log(checkPalindrome());
To make it easier for you to understand, the code is divided into 3 sections.
Let's try to gain an understanding of them one by one.
Section 1: Getting String Length
In the first section a variable is declared in which the value of the string is stored.
You can take a user input or hard code the word yourself.
Using the length keyword, the length of the string is calculated and stored in the variable len.
Section 2: Dividing the String
The string is divided into two halves using the condition in the for loop.
This means that the loop will run for only the first half.
Section 3: Compare both halves
Using an if statement, the first half run by the for loop is checked against the second half.
If the letters in the string do not match, the function terminates after telling us that it is not a palindrome.
Otherwise, if the loop runs all the way through, this means that the string is a palindrome.
Below is a snippet of how the process works:
![]()
Using Built-in Functions
The second technique is much easier to execute compared to the first.
It requires the use of some built-in JavaScript functions.
Below is the implementation of how these functions work:
functioncheckPalindrome () {
var string = "notpal";
var arrayString = string.split (''); // const reverseArray = arrayString.reverse(); const reverseString = reverseArray.join(''); if (string == reverseString) {
alert('This String is a Palindrome');
} else {
alert ('This String is NOT a Palindrome' );
} }
console.log(checkPalindrome());
This code makes use of the split() function which will convert the String into an array by splitting each character.
Once an array, it will simply be reversed using the reverse() function as shown above.
We will change the reversed string back into an array.
To achieve this the join() function is going to be used.
Once both the string and the reverse string are obtained, they are compared and if they turn out to be equal then the string is a palindrome.
An example of this is shown below:
![]() In this example, it is very clear that the string “notpal” is not a palindrome and the program shows the output.
In this example, it is very clear that the string “notpal” is not a palindrome and the program shows the output.
Conclusion
There are two ways in which palindrome can be checked.
The first way involves dividing the string into two halves and comparing one half with the other.
The second way involves the use of some in-built functions which convert the string into an array and reverse it so that the reversed string can be compared with the original string.
How to check if a number is prime or not
One of the many basic mathematical functions that you can perform using JavaScript is a function that helps you determine whether an integer is prime or not.
A prime number can be described as a number that we can only divide fully, by the number 1 and itself.
For example, the integer 7 is only capable of dividing by the number 1 and also the number 7.
In this post, you will learn how to implement this concept into JavaScript code.
How to find whether an integer is prime or not?
The simplest way to check if a number is prime or not involves the use of multiple if/else statements as well as a “for loop”.
Let us take a look at the code that will solve this problem:
This code takes a number, performs functions on it, checks whether it is prime or not, and then displays the result.
The code has been divided into 3 sections so that you can understand it with more ease.
Section 1
This section contains variable declaration:
// Section 1const sampleInt = 7;
var primeBool = true;
var i;
First, we stored the number(to be checked whether it is a prime number or not) into a variable “sampleInt” and declared two other variables(“primeBool” and “i”) for further use.
Section 2
This section checks whether it is prime or not:
// Section 2if (sampleInt >1) {for (i = 2; i < sampleInt; i++) {if (sampleInt % i == 0) {
primeBool = false;break;
}
}}
This is the core section.
Here it starts off with a simple if statement to make sure that your integer is greater than one.
Afterward, a for loop is used which starts off with an initial value of 2 and increments all the way to n-1(“n” in this case being the integer).
Another if statement is used to check if the integer is divisible by any number between the range of 2 and n-1.
If it is, the “primeBool” will be assigned the value false.
Section 3
This section displays the result:
// Section 3if (primeBool) {
console.log(`${sampleInt} is a prime number`);} else {
console.log(`${sampleInt} is a not prime number`);}
Once it is checked, whether the provided number is a prime number or not, this section will use if/else statements to print out the respective statement.
As the provided integer is 7, the “prime” value will stay true and this section will print out the following:
7 is a prime number.
This display will give us the answer to the question of whether the entered integer is a prime number or not.
A sample snippet of the code is shown below:
![]() Through these 3 simple stages, the result has been found for the question of whether a certain integer is prime or not?
Through these 3 simple stages, the result has been found for the question of whether a certain integer is prime or not?
Conclusion
To verify whether a number is prime or not, a “for loop” is used to iterate between 2 and n-1, and then our integer is divided by each of those iterated values.
If the division is successful (the modulus is 0), it shows that the integer is not prime, otherwise, it is prime.
The various sections in this article elaborated in detail on how everything was implemented.
How to Check Empty/Undefined/Null String?
JavaScript has the ability to check the empty/undefined/null string on the client side for authentication.
It is useful to enhance the processing of data before forwarding it to the server.
The main objective is to authenticate the values that are input by the users, whether they are empty or filled.
An empty string represents a string of zero length, while a null string shows that it does not contain any value.
Moreover, the undefined term refers to a variable that does not have a value.
In this article, three methods are demonstrated to check empty/undefined/null strings.
These methods validate the empty or filled string.
The outcomes of this post are described here:
Using the Strict Equality (===) Operator for Empty/Undefined/Null String
Using the Length Property for Empty/Undefined/Null String
Conversion Variable to Boolean to Check the Empty/Undefined/Null String
Method 1: Using the “===” Operator for Empty/Undefined/Null String
In this method, the strict equality operator is used to check the undefined, empty, or null string.
The operator returns the true output if the user inputs the string data type; otherwise, the operator returns the false output.
Code
// Example of Using "===" operator to check the empty string
console.log("" === "")// check the empty value
console.log("__" ==="") // check the operator value
In the code, the “===” operator is utilized to check the empty string.
Note: undefined and null strings are not validated using the “===” operator in JavaScript.
![]() After the execution of the code, the output is given below.
Output
After the execution of the code, the output is given below.
Output
![]() The outcome of the code returns values after validating/checking the strings that are filled or empty.
In this way, the first line returns the true value that validates the empty string code.
The outcome of the code returns values after validating/checking the strings that are filled or empty.
In this way, the first line returns the true value that validates the empty string code.
Method 2: Using the length Property for Empty/Undefined/Null Strings
Another method is adapted using the length property of JavaScript.
To exercise the length property, the following lines of code are used:
Code
// Example of Using length property to check the empty string
let string1 = "Welcome to JavaScript World"; // check the string
let string2 = ""; // check the empty string
console.log(string1.length === 0)
console.log(string2.length === 0)
In the code, string1, string2 are used to store different data types.
In the end, the property of length is utilized to compute whether the string is empty or not and return the output.
![]() Note: The length property is not compatible with undefined and null strings.
Output
Note: The length property is not compatible with undefined and null strings.
Output
![]() The above display indicates that the second value in the output is true, which validates that the string is empty.
While other values return false, which shows the strings are filled.
The above display indicates that the second value in the output is true, which validates that the string is empty.
While other values return false, which shows the strings are filled.
Method 3: Converting String to Boolean to Check the Empty/Undefined/Null String
In the third method, empty/undefined/null strings are checked by converting the variable into a Boolean value.
The code is given below with descriptions.
Code
// Example of Using Boolean method to check the empty string
let string1 = "Welcome to JavaScript World"; // check the string
let string2 = ""; // check the empty string
console.log(Boolean(string1))
console.log(Boolean(string2))
The code contains two variables named string1 and string2.
The variable string1 stores the filled string “Welcome to JavaScript”, while variable string2 contains the empty “” string value.
After storing string values in these variables, a Boolean method to check whether the string is empty or not.
![]() Note: The method does not compute the null and undefined strings.
Output
Note: The method does not compute the null and undefined strings.
Output
![]() The same result can be seen in the output with the Boolean method that validates that the first string is filled, and the other is empty.
The same result can be seen in the output with the Boolean method that validates that the first string is filled, and the other is empty.
Conclusion
JavaScript can check the empty/undefined/null string with the strict equality “===” operator, length property, and Boolean method.
The “===” operator validates the string value, the length property computes the length of the string, and the boolean method is utilized by passing the string values.
Using these methods, users can implement different problems such as form validation, client-side calculations, handling dates and times, etc.
How to check if a date is valid or not using JavaScript
Whenever data is entered into a variable, it gets assigned its corresponding data type.
For instance, if you enter 5, the data type would be int.
But if you enter “5”, it will be stored as a string.
This sort of check on the type of data exists only for the common data types.
But what about some uncommon ones such as dates? The system does not automatically detect whether an entered date is valid or invalid.
In this article, let us look at how a date variable can be verified for whether it is valid.
How can it be verified if a date is valid or not?
In JavaScript, the Date() function is used to create and assign a date variable.
A few different functions exist which may be utilized for checking purposes.
There are two meaningful assessments that should be made.
If both of those two prove to be true, the date is valid.
Some light is shed on what these two checks are down below.
The “instanceof” keyword
This keyword is used to verify whether a certain variable is created from a predefined constructor or not.
The keyword returns a boolean value of true if the specified variable is indeed constructed from the specified constructor.
Let’s take an example down below:
![]() In this scenario, since x is an object created using the Date() constructor, the instanceof keyword returns true.
In this scenario, since x is an object created using the Date() constructor, the instanceof keyword returns true.
The “isNaN” keyword
This keyword stands for “is not a number”.
It is used to verify whether a variable in use is a number.
In the case that the variable turns out not to be a number(isNaN returns true) then it converts it into a number.
If a date is converted to a number, it converts to milliseconds.
So if isNaN turns out to be false, the variable is a date.
Check out the example below for clarification:
![]() Since the variable being converted is a Date(), it returns the milliseconds.
This indicates that the isNaN will return false.
Now let’s combine our two concepts into a function together to prove that a number is a valid date.
The code is given down below:
function validDate() {
var x = new Date();return x instanceof Date && !isNaN(x);}
console.log(validDate());
In this function a variable is declared.
In the next step, the condition is checking if the instanceof is true and isNaN is false.
If these two situations occur, the function returns true showing that the variable is a valid date.
Check out the examples down below:
Since the variable being converted is a Date(), it returns the milliseconds.
This indicates that the isNaN will return false.
Now let’s combine our two concepts into a function together to prove that a number is a valid date.
The code is given down below:
function validDate() {
var x = new Date();return x instanceof Date && !isNaN(x);}
console.log(validDate());
In this function a variable is declared.
In the next step, the condition is checking if the instanceof is true and isNaN is false.
If these two situations occur, the function returns true showing that the variable is a valid date.
Check out the examples down below:
![]() This example shows a valid date variable being verified.
This example shows a valid date variable being verified.
![]() In this example, an invalid date exists, and hence the false shows that it is not a valid date.
In this example, an invalid date exists, and hence the false shows that it is not a valid date.
Conclusion
The article elaborates on how a function uses the instanceof and the isNaN function to check the validity of a Date.
If instanceof is true and isNaN is false then the date is valid, otherwise, it is invalid.
The article explains both these keywords in great detail as well as how they are combined in the main function.
How to Change Style Attribute of an Element Dynamically Using JavaScript?
The Document Object Model (DOM) provides a feature to control the styles dynamically in web development.
For instance, it integrates with JavaScript to provide accessibility for modifying the properties of elements.
It is useful to change the color, background, and text size in different real-world applications.
In this article, you will change the style attributes of an element by utilizing JavaScript.
How to Change the Style Attribute of an Element Dynamically.
It is easy to modify the style attribute of an element by employing JavaScript.
The workings of this conversion are as follows.
Firstly, getElementById is utilized to access the elements of document objects.
After that, a button is created that occurs if the client pressed it.
Therefore, the property of a specific element is accessed, and the user dynamically changes the style attribute of an element.
Syntax
element.style.propertyName="propertyValue";
Parameters
The description of the parameters is as follows:
propertyName: specifies the name of property such as color, font-size, etc.
propertyValue: represents the value to assign to the property of an element, e,g, “red”.
Example
An example is adapted to change the text color by accessing the style attribute of an element.
The code is given below by considering the dynamic change of style attributes.
Code
<html><body><h2>An example to change the dynamic properties</h2><form action="" name="orderForm"><input type="BUTTON" value="Press Button" onClick="pressBtn()" /></form><script language=javascript type="text/javascript">
function pressBtn()
{
var myElement = document.getElementById("introtext");
myElement.style.color="red";
}
</script><p id="introtext">Welcome to JavaScript World"</p>
</body>
</html>
The description of the code is explained in a logical order.
A button is created by passing the value “Press Button”.
A “pressBtn()” method is attached to this button that is triggered when it is called.
After that, the above method “pressBtn()” is written within <script> tags.
In this method, myElement variable is utilized to save the element attributes.
Finally, the style attributes of this element are dynamically changed when the pressBtn() method is called.
![]() Output
Output
![]() After pressing the button “Press Button”, the pressBtn() method is triggered, which changes the style attribute of this specific element dynamically.
After pressing the button “Press Button”, the pressBtn() method is triggered, which changes the style attribute of this specific element dynamically.
![]() Finally, the black text color of “Welcome to JavaScript” is changed to red in the browser by utilizing the JavaScript pressBtn() method.
Finally, the black text color of “Welcome to JavaScript” is changed to red in the browser by utilizing the JavaScript pressBtn() method.
Conclusion:
First, the element is accessed using the getElementById, and then the document.style.property is employed to change the style attribute of the element.
Lastly, a button is associated with it, and when this button has pressed, the style of the element changes.
This article demonstrates the possible method to convert the style attribute.
How to call JavaScript function in HTML using onClick() method?
Programming is all about efficiency.
Repetition within a code has always been frowned upon by developers all across the globe.
To fulfill this purpose, something called functions exists in programming.
So what exactly is a function? Functions can be seen as a piece of code that the developer creates within their program.
This function that has been created once can be utilized multiple times by just using the name of that function.
In web development, functions are created inside JavaScript but can be used within the HTML code.
In this article, some light will be shed on how a function that exists, can be accessed by the HTML section.
Calling any JS Function within HTML code
When tackling functions, two distinct scenarios will stand out.
This section will show you how you can call any JavaScript function in either of those two cases.
JavaScript inside the HTML File
When the JavaScript function exists within the same file as the HTML code, it is fairly simple to access it and call it within HTML.
Let us see the sample code below:
<html><head><script type = "text/javascript">
function sampleFunction() {
alert("This function is working!");}</script></head><body><h1>Click this button to Call the JavaScript function inside HTML</h1><input type = "button" onclick = "sampleFunction()" value = "Press me!"></body></html>
Within the JavaScript section of this code, a function is formed that has the name “sampleFunction”.
The function is supposed to execute an alert when called.
Within the main body of the HTML code, a button is created.
Buttons have an “onclick” feature that allows them to call functions from the JS code.
We will utilize the name “sampleFunction” which will be used to call it in the “onclick” feature.
Check out the example below:
![]() The output is as follows:
The output is as follows:
![]()
JavaScript Inside an External File
In most cases, JavaScript functions are not present within the same file as the HTML code.
In cases like this, the two files need to be linked together so that the HTML code can call functions from JavaScript.
This code down below represents JavaScript file:
function sampleFunction() {
document.write("Function has been called!");}
In the JavaScript file, the function has been created.
This function can now be called in an HTML file as many times as the developer desires.
The code below shows the HTML file:
<html><head><script type = "text/javascript" src = "jsFile.js"></script></head><body><h1>Click this button to Call the JavaScript function inside HTML</h1><input type = "button" onclick = "sampleFunction()" value = "Press me!"></body></html>
Here we have linked the JavaScript file that is named “jsFile.js” with the HTML file using the “src” keyword within the script tags.
Doing this will allow the “onclick” function below to access the function from the JS file.
Conclusion
There are two ways to reach a JavaScript function within HTML.
The first is to use the “onclick” feature of a button to call the function which is already present inside the HTML file.
The second one is linking the external JavaScript file with the HTML file using the “src” keyword.
In this article, you have learned the two different scenarios in which you will need to access a function from JavaScript inside HTML.
How Does Inline JavaScript Work With HTML ?
The inline JavaScript represents the piece of code written between the <script> tags in the .html file.
Moreover, JavaScript has the capability of calling and pushing data to the server.
Therefore, it provides DOM manipulation by utilizing different built-in functions.
For this purpose, inline JavaScript is useful to reduce the complexity by using a number of JavaScript files in a program.
It is best practice for demonstration purposes so that developers do not need to switch between JavaScript files.
In this post, users will understand how inline JavaScript works with HTML.
The outcomes of this post are:
How Inline JavaScript Works in HTML?
How to Add Inline JavaScript with HTML?
How Inline JavaScript Works in HTML?
The browser interprets the code as JavaScript by writing between <script> tags.
Otherwise, it is treated as plain text.
The <script> tag can specify an external script file by the utilization of the src attribute.
The advantage of using inline JavaScript in HTML files is to reduce the round trip of the web browser to the server.
Furthermore, an additional call to a JavaScript file is avoided by using the JavaScript code in the HTML file.
The following syntax refers to using the Inline JavaScript with HTML:
Syntax
<script>//JavaScript_code</script>
The pair of <script> tags and the JavaScript code inside the tags is the primary identification factor of inline JavaScript.
How to Add Inline JavaScript with HTML?
Until now, you have learned the basic information about inline JavaScript.
Here, we will practically demonstrate how an inline JavaScript can be added.
Let’s head over to the examples:
Example 1: Display a message With <script> in HTML file
An example is adapted to display a message within <script> tags in the HTML document.
Code
<!DOCTYPE html ><html><head><h2> Example of using JavaScript code in HTML file</h2><script>
document.write("Welcome to JavaScript World");</script></head><body></body></html>
In this example, the document.write() method is utilized to present the message “Welcome to JavaScript”.
![]() Output
Output
![]() The outcome of the code displays the message “Welcome to JavaScript World” in the browser window.
The outcome of the code displays the message “Welcome to JavaScript World” in the browser window.
Example 2: Using an alert box to present a message
An example is explained here in which a method is used to display a message in an alert box.
Code
<html><h2> Another example of using JavaScript code in HTML file</h2><body><form><a href="#" onclick="disp()">Please Press it to Pop Up a Window</a></form><script>
function disp() {
alert("Welcome to JavaScript World"); }</script></body></html>
The description of the code is listed below:
The code starts with the <html> tag followed by a few HTML elements.
After that, a disp() method is defined to pop up an alert box within the <script> tag.
In the alert box, a message “Welcome to JavaScript World” is displayed.
Output
![]() The outcome returns a link that is stated as “Please Press it to Pop Up a Window” in the browser.
The outcome returns a link that is stated as “Please Press it to Pop Up a Window” in the browser.
![]() After pressing the link, a new pop-up is generated that displays the message “Welcome to JavaScript”.
Here you go! You have learned the concept of inline JavaScript and its application as well.
After pressing the link, a new pop-up is generated that displays the message “Welcome to JavaScript”.
Here you go! You have learned the concept of inline JavaScript and its application as well.
Conclusion
Inline JavaScript is added in an HTML document with the help of <script> tag.
Inline JavaScript reduces the requests that are created by the web page.
This article gives a detail about the working of inline JavaScript with HTML.
The inline JavaScript is easy to integrate with lesser complexity problems.
However, in case of large/complex JavaScript, it is recommended to consider external JavaScript as the inline JavaScript will affect the readability/reusability of overall code.
How to Redirect to a Relative URL?
Redirecting a user to different web pages based on their actions is essential to learn.
However, new beginners often confuse redirecting to a URL and redirecting to a relative URL.
However, the redirecting process is not different at all, but the meaning of the terms is quite different.
Redirecting to a normal URL means sending the user to a URL no matter what that URL is or where it is placed.
Directing to a relative URL means redirecting the user to a webpage placed in the same directory as the parent page or home page.
Relative URLs can also be used to redirect to files placed in other directories, but the Relative URL would contain only the path and no other information like the domain.
This article will explain two different methods to redirect users to relative URLs but before that, quickly set up two different web pages by using the steps below:
Setting up the two HTML Documents
Create a new HTML document named home and put the following lines inside it:
<center><b>This is the First Page!</b><button onclick="buttonClicked()">Click Me!</button></center>
This will display the following webpage on the browser:
![]() After that, create another HTML document in the same directory (this is important to make it a relative URL) and name it as secondPage.html.
After that, type the following lines in the secondPage.html:
<center><b>This is the second page</b><br /><br /><b>I'm in the same Directory as home.html</b>
</center>
Running the secondPage.html in the web browser gives the following outcome:
After that, create another HTML document in the same directory (this is important to make it a relative URL) and name it as secondPage.html.
After that, type the following lines in the secondPage.html:
<center><b>This is the second page</b><br /><br /><b>I'm in the same Directory as home.html</b>
</center>
Running the secondPage.html in the web browser gives the following outcome:
![]() Setting up the web pages is done.
Let’s move to the two different methods for relative URL redirecting.
Setting up the web pages is done.
Let’s move to the two different methods for relative URL redirecting.
Method 1: Using the Window Object to Redirect to a Relative URL
In the script file attached to the home.html webpage, create the following function:
function buttonClicked() {// Next lines come inside this body}
Inside this function, use the window object to access its location property, and from that access the href and equal to the path of the secondPage.html.
Since it is a relative URL (both the web pages are in the same directory), simply set the href to the name of the second webpage, which is secondPage.html.
The function will look like this:
function buttonClicked() {
window.location.href = "secondPage.html";}
Run the home.html on a web browser and then observe the following functionality:
![]() From the output, it is clear that pressing the button redirects the user to the secondPage.html using its relative URL
From the output, it is clear that pressing the button redirects the user to the secondPage.html using its relative URL
Method 2: Using the Document Object to Redirect to a Relative URL
Start by again creating the function created in method 1 with the following lines:
function buttonClicked() {// Next lines come inside this body}
In this function, instead of the window object, this time around using the document object to access the location object.
And then, from the location object, access the href property and set it equal to the relative path of the secondPage.html.
Since the secondPage is in the same directory, the relative path would only be the name of the second webpage, which is the “secondPage.html”
function buttonClicked() {
document.location.href = "secondPage.html";}
Run the home.html on a web browser and then observe the following functionality:
![]() It is clear that the user was redirected to the second by using the Relative of the second page with the help of JavaScript.
It is clear that the user was redirected to the second by using the Relative of the second page with the help of JavaScript.
Wrap up
The user can be redirected to another webpage with the help of a relative URL by using either the document.location.href property or the window.location.href property and setting their value equal to the relative URL of the second webpage.
In this article, both of these methods were demonstrated with the help of a step-by-step example.
How to Remove an HTML Element Using JavaScript?
JavaScript is a scripting language, and one of the main purposes it was developed was to manipulate the nodes of an HTML document.
Manipulating the nodes essentially means manipulating the elements of an HTML document.
Thus, removing an element is also a part of manipulating that element.
The most atomic way of removing an element from the HTML webpage is to use the remove() on that element.
To apply any method to an HTML element, the user must create a reference to that element inside the JavaScript code.
This article will demonstrate how to remove an element from an HTML document with the help of an example.
The remove() method
The remove method (as mentioned above) is used to remove an element on which it is applied from the HTML document.
The syntax of the remove method is as follows:
elemRef.remove()
In this syntax, the elemRef is the reference of the HTML element inside the JavaScript code.
This function takes in no parameter, nor does it return anything.
Let’s take a look at some examples
Example1 : Removing a an Element Using its Class
Start by creating a new HTML file and place the following lines inside that file:
<center><p class="removeMe">I have the class "removeMe", so remove me!</p><br /><br /><b>By LinuxHint</b></center>
In these lines, a simple tag is created with the class set to “removeMe”.
Running this HTML document displays the following output on the terminal:
The output shows the <p> tag on the screen.
The <b> is just a placeholder so that the webpage isn’t empty when the element is removed.
After that, simply add a button that will remove the element upon button press and set its onclick value to buttonClicked():
<br /><button onclick="buttonClicked()">Remove</button>
This gives us the following webpage:
![]() The button is added to the webpage, now in the <script> tag add in the following lines:
function buttonClicked() {
elem = document.getElementsByClassName("removeMe");
elem.remove();}
In the above lines:
The function buttonClicked() is created, which will be executed upon pressing the remove button
Inside the function, a reference to the element to be removed is created by using its className
After that, the remove() method is called on the element to remove it from the HTML document
Execute the code now to get the following results:
The button is added to the webpage, now in the <script> tag add in the following lines:
function buttonClicked() {
elem = document.getElementsByClassName("removeMe");
elem.remove();}
In the above lines:
The function buttonClicked() is created, which will be executed upon pressing the remove button
Inside the function, a reference to the element to be removed is created by using its className
After that, the remove() method is called on the element to remove it from the HTML document
Execute the code now to get the following results:
![]() As soon as the button is pressed, the element with the className = “removeMe” is removed from the HTML document.
As soon as the button is pressed, the element with the className = “removeMe” is removed from the HTML document.
Example 2: Removing an Element Using its ID
Create an HTML document, and just like in example 1, create a p tag and a button, but this time around, give the <p> tag an ID instead of class:
<center><p id="removeMe">This Time, I have the ID as "removeMe", so remove me!</p><br /><br /><b>By LinuxHint</b><br /><button onclick="buttonClicked()">Remove</button></center>
This will give the following output on the browser:
![]() After that, in script file add in the following lines:
function buttonClicked() {
elem = document.getElementsByID("removeMe");
elem.remove();}
In the above lines:
The function buttonClicked() is created, which will be executed upon pressing the remove button
Inside the function, a reference to the element to be removed is created by using its ID = “removeMe”
After that, the remove() method is called on the element to remove it from the HTML document
Running the HTML element and pressing the button creates the following result:
After that, in script file add in the following lines:
function buttonClicked() {
elem = document.getElementsByID("removeMe");
elem.remove();}
In the above lines:
The function buttonClicked() is created, which will be executed upon pressing the remove button
Inside the function, a reference to the element to be removed is created by using its ID = “removeMe”
After that, the remove() method is called on the element to remove it from the HTML document
Running the HTML element and pressing the button creates the following result:
![]() The element with the id as “removeMe” was removed from the HTML document
The element with the id as “removeMe” was removed from the HTML document
Conclusion
The remove() method can be applied on an element to remove it from the DOM of the HTML document.
However, to apply this method to an element, a reference to the element must first be made.
And then, the remove() method is used on that reference of that element using the dot operator.
This article has explained the working of the remove() method with examples.
How to print to Console?
Category: JavaScriptJavaScript comprises different built-in methods to print a generic/specific message(s) to the console window.
A console is a window used to show or print the output of the program after executing the code.
It is very useful for testing/debugging purposes for developers as well as users.
For this purpose, JavaScript has various methods, such as console.log(), console.warn(), console.error() and console.info().
The objective of these methods is to print a message to the console.
Each method has a unique functionality based on the user’s needs.
This post demonstrates the working and usage of all the methods that are used to print on console.
How to Print to Console?
A console window is a specific area that checks the code for execution.
The console.log(), console.warn(), console.error(), and console.info() are utilized to print messages to console.
The messages can be strings, numerical numbers, properties of an object, or elements of arrays.
All the latest browsers support these console methods that can be accessed through the developer tools section or by pressing key F12.
Method 1: Using console.log() Method to Print to Console
The console.log() method is utilized to print any variable which is defined in it.
It can be used for descriptive text.
The method returns the value that the user passed as a parameter.
Developers employ this method for debugging purposes.
The console.log() is the widely used method to print output.
The output may be calculated results or messages.
The syntax of the console.log() method is provided below:
Syntax
console.log(message);
The message parameter specifies the information to be displayed using the console.log() method.
For better understanding, the following example code is used to practice the console.log() method.
Code
// An example to use console.log() method');
var a = 'Welcome to JavaScript';
console.log(a);
A variable “a” is initialized, and then it is printed on the console using the console.log() method.
Output
![]() The output shows that the value of variable “a” is printed on the console.
The output shows that the value of variable “a” is printed on the console.
Method 2: Using console.error() Method to Print to Console
The console.error() method is the most common method for displaying the error message in the console window.
The syntax of the console.error() message is provided below:
Syntax
console.error(message);
This method also accepts only parameters which will be displayed as an error message on the console.
Let’s practice the console.error() via the following example code:
Code
// An example to use console.error() method');
var a = 'Display error message';
console.error(a);
A variable is initialized, and that variable is passed to the console.error() method as an argument.
Output
![]() After executing a code in the browser console, a highlighted text is displayed as shown in the output’s image.
After executing a code in the browser console, a highlighted text is displayed as shown in the output’s image.
Method 3: Using console.warn() to Print to Console
A built-in console.warn() method of JavaScript is followed to print a warning message to the console window.
The syntax of the console.warn() method is provided here:
Syntax
console.warn(message);
This method also accepts one parameter, which will be displayed as a warning on the console.
The following example refers to the usage of the console.warn() method.
Code
// An example to use console.warn() method');
var a = 'Display warning message';
console.warn(a);
In this code, the console.warn() method is utilized to print a warning message to the users.
Output
![]() The highlighted text in yellow is used to present the warning message to the user by using the console.warn() method.
The highlighted text in yellow is used to present the warning message to the user by using the console.warn() method.
Method 4: Using console.info() to Print to Console
Another method console.info() is adapted to print the general information to the user.
To use this method, the syntax is written below:
Syntax
console.error(message);
Example
An example is used to send a specific or user-defined message to the console window.
Code
// An example to use console.info() method');
var a = 'Display information message';
console.info(a);
The console.info() is employed to print a general message/information to the user through the console.
Output
![]() The outcome of the code returns a generic message “Display information” to the console window.
The outcome of the code returns a generic message “Display information” to the console window.
Conclusion
The console.log(), console.warn(), console.error() and console.info() methods are utilized to print to the console.
The console.log() method is the most adapted method to display strings, arrays, and object properties to the console.
The console.warn() and console.error() messages are employed to display the user with warning and error messages.
In the end, the console.info() method is used for printing general/specific information to the console window in JavaScript.
Here, you have learned the working and usage of all the above-mentioned methods with suitable examples.
How to Print | Explained with Examples
Like any other computing language, JavaScript provides a variety of ways to print output.
As a JavaScript learner, you have come across the console.log() method for printing the output.
However, the inner.HTML property, window.alert() method, and document.write() methods can also be used for printing purposes.
In our today’s guide, we will provide a deep insight into all the possible approaches to print.
Let’s dig into these methods one by one.
Method 1: console.log() Method
The console.log() method is the most used way to print.
It can be used to print the strings, objects, or any other output on the console.
The JavaScript code will work on the console; therefore, the console.log() method cannot be used to run any HTML or CSS integration with the JS.
The syntax of this method is described below:
Syntax
console.log(message);
The following example is carried out to print a message based on the console.log() method.
Code
console.log("An example to use console.log()")
console.log("Welcome to JavaScript");
In this code, the console.log() method is employed to print a message in the console window.
Output
![]() The output shows that two statements that were used with the console.log() method are printed on the console.
The output shows that two statements that were used with the console.log() method are printed on the console.
Method 2: document.write() Method
The document.write() is another approach used to print output in a browser using JavaScript.
For instance, the method is utilized to add content to the HTML page.
The developer community utilizes this method for testing or debugging purposes.
The syntax of the document.write() method is described below:
Syntax
document.write(message);
The message parameter passed to this method will be printed on the console.
For better understanding of this method, let’s have a look at the following example code:
Code
<html><body><h2>An example of using document.write() </h2><script>
document.write("Welcome to JavaScript");</script></body></html>
In the above code, the document.write() method is used inside the <script> tags.
Output
![]() The output shows that the “Welcome to JavaScript” text is printed on the browser.
The output shows that the “Welcome to JavaScript” text is printed on the browser.
Method 3: inner.HTML Property
The inner.HTML property is famous for printing a message in an HTML document.
In the method, the unique identification of the element is passed to get the HTML element in the document.
Syntax
document.getElementById("p").innerHTML = "message";
The description of the parameters is given below:
getElementById: identify the unique id of the HTML element.
message: represents the specific information to be printed.
The example code for the innerHTML property is provided below.
Code
<html><body><h2>An example to use innerHTML </h2><p id="p"></p><script>
document.getElementById("p").innerHTML = "Welcome to JavaScript";</script></body></html>
The description of the code is as follows.
A general message is displayed by using the heading <h2> tags.
After that, a unique identification “p” is assigned to the paragraph element.
Furthermore, the string “Welcome to JavaScript” is assigned using the innerHTML property.
Output
![]() The output displays the message “Welcome to JavaScript” by employing the innerHTML property.
The output displays the message “Welcome to JavaScript” by employing the innerHTML property.
Method 4: window.alert() Method
Another approach to printing a message is possible through the window.alert() method.
It is useful for form validation and confirmation of any user action in the browser.
The syntax of the window.alert() method is as follows:
Syntax
window.alert("message");
The message argument will be displayed as an alert message.
Example
An example is utilized to pop up the window by the window.alert() method.
Code
<html><body><h2>An example to use window.alert()</h2><script>
window.alert("Welcome to JavaScript");</script></body></html>
In this code:
A message is displayed using the heading <h2> tag.
After that, the alert() method is employed within the <script> tags.
Finally, the string “Welcome to JavaScript” is passed to the alert() method.
Output
![]() The output of the above code execution represents a pop-up window.
In this window, the passing string “Welcome to JavaScript” is printed as an alert to the user.
The output of the above code execution represents a pop-up window.
In this window, the passing string “Welcome to JavaScript” is printed as an alert to the user.
Bonus Tip: Other Console Methods to Print
Apart from the consol.log method, there are several other methods that are assisted by the console object of the JavaScript.
They are used for several purposes and print on the console.
The following table contains all those methods alongside their descriptions and the syntaxes:
| Method | Syntax | Description |
| clear() | console.clear() | This method clears the console. |
| error() | console.error() | Prints an error message. |
| info() | console.info() | Prints informational messages. |
| warn() | console.warn() | Displays a warning on the console. |
| assert() | console.assert() | Error message if and only if the assertion is false. |
That’s it from this guide.
You have learned to print via various possible methods.
Conclusion
It is concluded that four different approaches named document.write(), innerHTML, window.alert, and console.log() can be employed to print information.
The information may include strings, object properties, calculated output, etc.
The console supports additional methods, including console.warn(), console.info(), console.error().
We have also demonstrated the purpose and the syntax of these methods.
How to Print a Page?
JavaScript has the ability to integrate the HTML elements to provide a wide range of features.
Printing a web page is an important feature of JavaScript.
JavaScript serves a lot of methods to serve various purposes.
Similarly, to print a webpage, the window.print() method is used to print the webpage using JavaScript.
This post provides a deep insight on how to print a page.
How to Print a Page?
In JavaScript, the window.print() method is utilized for printing the current web-page.
The window object is utilized to call the print() method.
The print() method is employed to provide the printing functionality.
It sends the complete content of the web page to the user’s printer.
The syntax of the window.print() method is provided below:
Syntax
window.print()
The window.print() method neither accepts parameters nor returns anything.
Example
Another example is followed by a user-defined method for printing a page.
By considering the user defined method, the code is as follows.
Code
<html><body><h2>Example using user defined method </h2><button onclick="user_defined_method()">Please Press Button</button><p> Welcome to JavaScript</p><script>
function user_defined_method()
{
window.print();
}
</script></body></html>
The description of the code is as follows:
An HTML button is created which will call the user_define_method() on its oclick event.
Inside the <script> tag, the function user_defined_method() is created which contains the window.print() method inside it.
![]() Output
Output
![]() It is observed from the output, that if a user presses button “Please Press Button” the print dialgoue is opened which will enable you to print the web-page.
It is observed from the output, that if a user presses button “Please Press Button” the print dialgoue is opened which will enable you to print the web-page.
Conclusion
The window.print() method is used to print a page.
Whenever the window.print() method is applied the print dialgoue box will appear which will enable you to print the web-page.
This post provides a detailed guide to print a page.
To achieve this, we have provided a detailed explanation of the window.print() method with the help of suitable examples.
How to Make Incremental and Decremental Counter Using HTML, CSS and JavaScript?
JavaScript has various built in-methods that are associated with HTML and CSS to build the front-end websites.
On most websites, an incremental or decremental counter is observed, which is either incrementing or decrementing the value to serve a specific purpose.
For this purpose, arithmetic operations like addition and subtraction are employed according to the user’s needs.
This guide provides a step-by-step procedure to create an incremental and decremental counter using HTML, CSS, and JavaScript.
How to Make an Incremental and Decremental Counter?
The meaning of increment in programming is to add a certain number to the existing number, whereas decrement means subtracting a number from the existing number.
The incremental and decremental counter has its own importance in e-commerce sites.
Example
In this example code, we are creating an incremental as well as decremental counter project by utilizing HTML, CSS, and JavaScript.
HTML Code
<center><h2>An example of Increment and Decrement counter</h2><input id=demoInput type=number min=1 max=100><button onclick="increment()">+</button><button onclick="decrement()">-</button></center>
In the above HTML, two buttons are created.
One button has the increment() function on its onclick event, and the second button has the decrement() function on its onclick event.
CSS Code
<style>
button {
width: 30px;
height: 30px;
font-size: 25px;
background-color: burlywood;
color: honeydew;}
h2 {
color: black;
margin: 0 50px;
font-size: 30px;}
</style>
The styling properties are implemented on the counter button as well as headings.
These properties include width, height, font size, background color, color, etc.
JavaScript Code
function increment() {
document.getElementById('demoInput').stepUp();}
function decrement() {
document.getElementById('demoInput').stepDown(); }
In this file, two methods increment() and decrement() are utilized within a <script> tag.
The increment() method is used to increase the value by one.
Similarly, the decrement() method is employed to decrement the value by one.
By default, the stepUp() and stepDown() methods increase and decrease the value by 1.
However, you can set the interval by passing the required value in the stepUp() and stepDown() methods.
For instance, stepUp(2) will increment the value by 2.
Complete Code
<html lang="en"><head><style>
button {
width: 30px;
height: 30px;
font-size: 25px;
background-color: burlywood;
color: honeydew;}
h2 {
color: black;
margin: 0 50px;
font-size: 30px;}</style></head><body><h2>An example of Increment and Decrement counter</h2></div><input id=demoInput type=number min=1 max=100><button onclick="increment()">+</button><button onclick="decrement()">-</button><script>
function increment() {
document.getElementById('demoInput').stepUp();}
function decrement() {
document.getElementById('demoInput').stepDown(); }</script></body></html>
The above code is executed in the .html file.
Output
![]() The output returns an input field with two buttons.
Initially, the text box does not contain any numbers.
When the “+” button is pressed, the value starts increasing, while the “-” button decreases the value.
The output returns an input field with two buttons.
Initially, the text box does not contain any numbers.
When the “+” button is pressed, the value starts increasing, while the “-” button decreases the value.
Conclusion
The incremental and decremental counters are employed for increasing or decreasing the value by a specific number.
This incremental/decremental phenomenon is mostly used on shopping carts of online sites.
Here, you have learned to design incremental and decremental counters with the help of HTML, CSS, and JavaScript.
Usually, the increment or decrement value of the counter is set to “1”.
However, you can set the interval value as per your requirements.
How to Make the Browser go Back to Previous Page Using JavaScript?
Making a browser go back to the previous page with the help of JavaScript is quite easy.
To do this, simply access the window Object of the browser’s window and its history property.
After that, simply use the back() method on the history to move the browser to the previous entry inside its history list.
Additional Note: Referring to the previous page with a <a> reference tag is not a good solution.
Most new beginners often try to use the <a> reference tag to move to the previous page, and in the browser’s history, it registers itself as a move forward.
So that is not an optimal solution because the browser is not going back.
Rather, it is actually going forward.
The method in Spotlight
The following method is used to move the browser back:
window.history.back()
This method takes neither takes any parameters nor does it return anything.
It simply moves the browser one step back in its history.
Let’s go over an example to demonstrate its working
Step 1: Set up home.html
Create an HTML document with the name home, and this is the first page that will be used to move to a second page.
To create this home HTML document, use the following lines:
<center><b>This is the First Page!</b><a href="secondPage.html">Click to Visit the Second Page</a></center>
In this HTML document, an <a> tag is used to move the browser “forward” on the second page.
At this point, the browser shows the following output:
![]() The webpage shows the link to move to the second page, but currently, that second page is missing, so create that in the next step.
The webpage shows the link to move to the second page, but currently, that second page is missing, so create that in the next step.
Step 2: Set up secondPage.html
Create another HTML document and name it secondPage.html.
In this file, add in the following lines:
<center><b>This is the second page</b><br /><b>Click the Button below to "back" to the previous page</b><br /><br /><br /><button onclick="backButton()">Take me Back!</button></center>
In this HTML document, we have created a button with an onclick property set to backButton().
This will create the following webpage on the browser:
![]() The button’s functionality to take the browser back upon button press is still missing.
For this, add the following script tag inside the secondPage.html:
<script>
function backButton() {
window.history.back();}</script>
In this script tag, the function backButton() is created which will be called on the button press.
In this function, the back() method has been applied to the property “history” using the browser’s window object.
After this, load the home.html in a browser and observe the functionality as follows:
The button’s functionality to take the browser back upon button press is still missing.
For this, add the following script tag inside the secondPage.html:
<script>
function backButton() {
window.history.back();}</script>
In this script tag, the function backButton() is created which will be called on the button press.
In this function, the back() method has been applied to the property “history” using the browser’s window object.
After this, load the home.html in a browser and observe the functionality as follows:
![]() There are a few things to notice:
At first, both the forward and the back button of the browser were disabled because of no history
Clicking the link takes the user to the second page
When on the second page, the back button gets activated
Clicking the button on the second page takes the user back on the home page.
However, the back button is disabled on the home page, and the forward button is now enabled
This means that the browser was not redirected to the homepage.
Rather, it was moved back from the history
There are a few things to notice:
At first, both the forward and the back button of the browser were disabled because of no history
Clicking the link takes the user to the second page
When on the second page, the back button gets activated
Clicking the button on the second page takes the user back on the home page.
However, the back button is disabled on the home page, and the forward button is now enabled
This means that the browser was not redirected to the homepage.
Rather, it was moved back from the history
Wrap up
In the JavaScript part of the web page document, simply use the window.history.back() to make the browsers go back to the previous page it had visited.
The “window” is the browser’s window object, the “history” is a property of the window object, and back() is the method that is being applied to the history to move the browser back.
This article used a step-by-step example to demonstrate the working of the window.history.back() method.
How to Implement a filter() for Objects?
JavaScript is a scripting language that executes the script by providing functionality to the users.
It executes on the client side and has built-in functions including alert(), console.log() and filter() methods.
In JavaScript, users face difficulty in utilizing the filter() method on objects because the filter() method cannot iterate over the keys and values in an object.
Keeping in view the importance of the filtering phenomenon, we have provided a detailed guide to understanding how to filter objects.
How Does filter() Work for Objects?
The basic working of the filter() method is that the elements/objects are passed to a condition.
After fulfilling the conditions, the method returns an array of filtered data.
Users can specify the conditions in the filter() method according to their needs.
Example 1
An example is demonstrated to practically implement a filter() method for objects.
Code
let student = [
let student = [
{ name: 'Ali', subject: 'English' },
{ name: 'John', subject: 'Physics' },
{ name: 'Marry', subject: 'Math' },
{ name: 'Dany', subject: 'English' },
{ name: 'Kohli', subject: 'English' },]
TopStudent = student.filter(student => student.subject == 'English');
console.log(TopStudent);
The description of the above code is as follows:
First, an array of objects is created which contains the name and subject of the students.
After that, a filter is applied to check the condition “student.subject==‘English’”
It evaluates students that are studying English subjects and stores them in the TopStudent variable.
Finally, the TopStudent variable is displayed using the console.log() method.
![]() Output
Output
![]() The outcome of the filter() method represents that those students named Ali, Dany, and Kohli study the English subject.
The outcome of the filter() method represents that those students named Ali, Dany, and Kohli study the English subject.
Example 2
An example is given to filter the even numbers in an array containing values 1 to 6.
Code
const numbers = [1, 2, 3, 4, 5, 6];
let callback = a => a % 2 === 0;const e = numbers.filter(callback);
e;
In this code:
An array number is created having 1 to 6 values in it.
After that, a filter() method is implemented by passing the callback variable.
Furthermore, the callback variable stores values divided by 2 and stored in it.
Output
![]() The output shows the above code execution by filtering the values, which are divided by the number 2.
The output shows the above code execution by filtering the values, which are divided by the number 2.
Conclusion
In JavaScript, the filter() method returns a new array of selected elements/objects that meet the specific condition.
It is difficult to directly apply the filter() method to the keys and values of the objects.
This post guides you to filter objects by their keys and values.
To do so, a practical implementation of the object with the filter() method is also provided.
How to Hide div Element by Default and Show it on Click Using JavaScript and Bootstrap?
Hiding elements of an HTML webpage and showing them upon a certain button press is quite simple with the help of CSS, Bootstrap, and JavaScript.
There are multiple approaches to this problem.
However, none of them can be considered optimal or the “best” solution.
This article will take the approach of setting the div’s display property to none at the start and changing it with the help of JavaScript.
Step 1: Setup the HTML Document
The first step is to start by creating an HTML document, and inside that HTML file, simply include a div and a button with the following lines:
<center><div id="hideDiv">This is the div</div><button onclick="buttonClicked()">Click to Show</button></center>
In the above lines:
A <div> is being created with a specific id that is “hideDiv”
A button is created with the <button> tag, with an onclick property set equal to buttonClicked() function from the script file
At this point, the HTML document creates the following webpage on the browser:
![]() A div with text and a button are being displayed onto the webpage.
A div with text and a button are being displayed onto the webpage.
Step 2: Setup the CSS File or the <style> tag
Create either a CSS file and link it with the HTML document or use a <style> tag.
The div is not yet prominent enough.
Therefore, adding some styling to it would be great:
#hideDiv {background-color: yellowgreen;height: 150px;width: 150px;}
In the above lines:
The div is reference by using its ID as “hideDiv”
A height and a width is specified for the div
A background color has been given to the div
At this point, the HTML document looks like this:
![]() However, to hide the div at the start, add one more line to the CSS file which is:
display: none;
The whole CSS part would become:
#hideDiv {display: none;background-color: yellowgreen;height: 150px;width: 150px;}
Now, the HTML looks like this:
However, to hide the div at the start, add one more line to the CSS file which is:
display: none;
The whole CSS part would become:
#hideDiv {display: none;background-color: yellowgreen;height: 150px;width: 150px;}
Now, the HTML looks like this:
![]() The div is not being displayed on the HTML webpage at the start.
The div is not being displayed on the HTML webpage at the start.
Step 3: Setup the JavaScript File or the <script> Tag
Now, to add functionality to the button press, simply add the following JavaScript lines to the HTML document by either using a <script> tag or a linked JavaScript file:
function buttonClicked() {
$("#hideDiv").show();}
In these lines:
A function buttonClicked() is created which would be called upon the click of the button due the the onclick() property defined inside the <button> tag
The div is referenced by its ID that is “hideDiv”
The show() method is called on the div which enables its display property
At this point, the HTML webpage works like following:
![]() The div is displayed on button press and the problem has been fully tackled.
The div is displayed on button press and the problem has been fully tackled.
Wrap up
A div can easily be hidden at the start of a webpage with the help of the display property of the HTML element, and it can easily be displayed again upon button press with JavaScript.
This article has displayed the step-by-step procedure to achieve the task at hand.
However, as mentioned at the start of this article, there are multiple approaches to this problem, and none of them can be regarded as the best solution.
How to get the first and last item in an array using JavaScript
Data is what makes up the vast majority of the web so it is only fitting that this data is managed correctly.
To manage considerable amounts of data, various data structures are used.
Arrays are one of the many different classes of data storing technique that can store large but specified amounts of data.
Each element in the array is recognized by its index number which is assigned based on the position of the item in the array.
For example, if an element is placed at the 6th position in the array, its index number will be 6-1 hence 5.
In this article, some light will be shed on how you can retrieve the initial and final item of an array.
How are items retrieved in an array?
To learn about this concept, it is important to first learn how the index is used to retrieve any item from the array that is desired.
The syntax provided down below is an illustration it can be achieved:
const element = sampleArray[6];
In the code above, the 7th element(since the index starts from 0) of the “sampleArray” is being retrieved and stored into a variable named “element”.
The first item
Applying what we learned in the section above we can get the first item of an array with ease.
Follow the example below:
const first = sampleArray[0];
Here we simply apply what we learned above.
The array always starts with the 0th index, which means that its first element is always on the index 0.
The algorithm is being implemented in the following snippet:
![]()
The last item
The retrieval of the last element requires a couple more steps compared to the first.
This is because the developer is not always aware of what the maximum size of the array will be.
Due to this a standard method will be applied that works for any size of the array.
Below you are given an illustration for this:
const size = sampleArray.length;const last = sampleArray[size];
console.log(size);
console.log(last);
In this code an additional function is being used.
The “sampleArray.length” function is being utilized where “sampleArray” is the name of your array.
This operation is used to compute the full number of elements inside an array, then stores it into a variable.
Once we have the length, we subtract it by one and use it as the index of the final item.
The sample snippet is shown below:
![]() Using these methods the first and last item of any array can be retrieved.
Using these methods the first and last item of any array can be retrieved.
Conclusion
The first item of an array can be retrieved using the 0th index of the array whereas the final item requires the use of the “sampleArray.length” function(which returns the total length of an arrow).
Through this article, we have seen how the first and last item from an array of any size can be retrieved.
How to Get Selected Value in Dropdown List Using JavaScript?
A dropdown list provides a list of elements that are linked with a particular function.
By clicking on each element, the JavaScript code executes at the backend and performs a specific task regarding that element.
The dropdown list property is very commonly used in e-commerce, educational, and stock market websites.
If you are exploring JavaScript to enhance your programming skills, then this is the best place for you to understand the basic concepts of JavaScript.
In today’s guide, you will learn to extract the value which is selected in a dropdown list by utilizing JavaScript.
In this article, users will be able to get the value which is selected in the dropdown view by utilizing JavaScript.
How to Get Selected Value in a Dropdown List?
JavaScript can be used to retrieve values that are selected from the dropdown list and then display the value in the browser.
This section provides a built-in function to get the value which is selected by the dropdown list.
Example
An example is demonstrated to get the values from a dropdown list.
Code
<!DOCTYPE html><html><head><title>Please select the element and see value</title><h2>An example to get selected value in dropdown list using JavaScript </h2><style>* {font: 18px Arial;}</style></head><body>
<p>Please select the element and see value </p>
<select id="sel" name="Sports">
<option value="">-- Please Select --</option>
<option value="Cricket">Cricket</option>
<option value="Football" selected>Football</option>
<option value="Hockey">Hockey</option>
</select>
<input type="button" value="Please Click it" onclick=" selectVal(sel)"></body><script>
let selectVal = (ele) => {
alert('Return the value of the selected option: ' + ele.value);}</script></html>
The code is described as:
First, a message is displayed to select the element from the dropdown list.
After that, the option keyword is utilized for dropdown lists such as Cricket, Football, and Hockey.
After clicking on each element, the piece of code is executed and pops up the values associated with the element.
![]() Output
Output
![]() The display represents a dropdown list by executing the above code.
At the backend, different elements are attached to a list, and each is assigned a value.
By clicking an element, the specific value is displayed in the pop-up window.
The display represents a dropdown list by executing the above code.
At the backend, different elements are attached to a list, and each is assigned a value.
By clicking an element, the specific value is displayed in the pop-up window.
Conclusion
A dropdown list is utilized to get the selected value by clicking the options in JavaScript.
For this purpose, <select> and <option> tags are employed for selection and giving options to the users, respectively.
By clicking the option, the user extracts the associated value in the pop-up window of the web browser.
Mostly, these dropdown lists are used on e-commerce sites.
Here, you have learned to get the value which is selected in dropdown lists using JavaScript.
How to get all unique values and remove repeating values in a JavaScript array
Gathering massive quantities of data requires the need of extensive amounts of storage as well.
While collecting data, there are many occasions when people run into recurring values.
These values can occupy a deceptively large amount of storage in the system.
Hence it is important to have a system that can filter out the data, remove all the recurring values, and keep all the unique values.
In this article, a similar problem will be tackled regarding the removal of recurring values from a JavaScript array.
How to remove recurring values from within an array?
There are numerous diverse methods in which a JavaScript array can be cleared of duplicates.
In this section, we will shed some light on the many generally used methods to achieve this.
Using a function “indexOf()”
The “indexOf” is a function that makes use of two parameters and returns an integer.
We will utilize the string as parameter number 1 that needs to be searched.
Parameter number 2 is the substring that will be searched for inside parameter number 1.
If the substring is found, the index number of where it was found is returned.
Let’s have a look at how this concept is applied:
var array = ["repeat", "new1", "repeat1", "new2", "repeat", "repeat1"];
var newArray = [];for(i=0; i < array.length; i++){if(newArray.indexOf(array[i]) === -1) {
newArray.push(array[i]);
}}
console.log(newArray);
In the code above, two arrays are declared.
One contains all the data(array), and the other is an empty array(newArray).
The array is looped through using a “for loop”.
The “indexOf” function is used with the empty array as the first parameter and the data as the second parameter.
This way the function will take a value from the data and try to find it among the(initially empty) array.
If the value is not found, the data will be put into the empty array using the “push” keyword.
This will happen for each of the data values inside the array.
Once the loop terminates, the “newArray” will contain all the unique values of the original array.
A sample is shown below:
![]()
Using Sets
Making use of sets is the easiest method to obtain the unique values from an array.
A set is similar to an array except it only includes special different values.
To get these unique values, the array needs to be converted into a set and then back into an array.
Refer to the code shown below:
var array = ["repeat", "new1", "repeat1", "new2", "repeat", "repeat1"];
var uniqueArray = [...new Set(array)];
console.log(uniqueArray);
In the code above, an array is declared with various recurring values.
The “new Set” function is used to remove duplicates and create a set using the array.
This set is then stored into a variable “uniqueArray”.
Since this variable is declared inside the “[ ]” brackets, it is converted back into an array.
The execution of this code is shown below:
![]() Using these methods, any JavaScript array can be sorted to clear duplicate values from it and leave behind an array with only the unique values.
Using these methods, any JavaScript array can be sorted to clear duplicate values from it and leave behind an array with only the unique values.
Conclusion
An array can be cleaned of recurring values using two common methods.
In method 1 we will change the array and make it a Set and afterward change it back into an array.
The other is to utilize the indexOf function.
This function will assist in comparing these 2 strings.
This article has demonstrated and explained the working of both these methods in detail.
How to Force Input Field to Enter Numbers Only Using JavaScript?
Restricting the user to only numeric input values is extremely important, especially when taking data on a form.
There are numerous examples where restricting the user to avoid any wrong input is important such as taking the user’s telephone number or maybe asking the user about his age.
In HTML, the input tag can be set to only take numeric inputs by setting its type property to the number or to tel. However, doing it through JavaScript is going to be a little tricky.
Step 1: The HTML Document
Create an HTML file, and in that file, set up an input field and some text telling the user to input data into the text field with the help of the following lines:
<center><b>Enter Numbers here</b><br /><input type="text" onkeypress="return checkNumber(event)" /></center>
In these lines:
Input tag’s onkeypress property has been set to the return value of the checkNumber() method
The onkeypress property is executed on a specific event happening, and this event happens to be a key press, so pass the event inside the checkNumber() method as well.
Running the HTML web page now will provide the following result on the browser:
![]() Currently, all types of characters can be written inside this text field:
Currently, all types of characters can be written inside this text field:
![]() But this will change in the next section.
But this will change in the next section.
Step 2: Set up JavaScript code
In the JavaScript file or in the <script> tag, start by creating the function named as checkNumber():
function checkNumber(event) {// The upcoming lines come inside here}
Inside this function, the first thing is to get the ASCII code of the key press by using the “event” variable:
var aCode = event.which ? event.which : event.keyCode;
After that, if the ASCII code is not of number, then return false to the input field otherwise, return true:
if (aCode > 31 && (aCode < 48 || aCode > 57)) return false;return true;
The complete code snippet will be as:
function checkNumber(event) {
var aCode = event.which ? event.which : event.keyCode;if (aCode > 31 && (aCode < 48 || aCode > 57)) return false;return true;}
With that you are done with setting up the JavaScript portion.
Step 3: Testing the Input Field
After you are done with steps 1 and step 2, simply execute the HTML document and try putting values inside the input field and observe its behavior:
![]() It is now only allowing numbers to be written inside it and ignores other character
It is now only allowing numbers to be written inside it and ignores other character
Conclusion
To restrict the user to only enter numeric characters inside an input using JavaScript.
Then, in that case, call a function on every key pressed inside that input field, and within this function, compare the ASCII code of the key pressed against the ASCII codes of numeric values.
Based on this comparison, allow the keys to be entered inside the input field.
JavaScript | removeEventListener() Method With Examples
JavaScript offers a number of built-in methods to execute some basic operations e.g.
form validation, event handling, website management, etc.
The removeEventListener() method is utilized to remove an event that has already been added.
To understand the removeEventListener() method, first the user must have an idea of the addEventListener() method.
In the addEventListener() method, an event is attached with this method to perform the operations.
On the other hand, the removeEventListener() method is utilized to remove an event.
This guide provides a deep insight into the removeEventListener() method.
How to Use the removeEventListener() Method?
If a user wants to disable a button after one click, they can use the removeEventListener() method.
The syntax of the removeEventListener() method is as follows:
Syntax
element.removeEventListener(event, function, capture)
The parameters that are used in the above syntax are listed here:
event: identifies the event to be removed.
function: represents the remove function.
capture: specifies true and false according to the outcome; the default value is false.
Example 1
An example is adapted in which the removeEventListener() method is utilized to remove an event that has been added by the addEventListener() method.
In this example, two arguments are required.
One argument specifies the name of the event, while the other is a function that is associated with the event listener.
Code
<html><body style = "text-align:center;"><center><p> Welcome to JavaScript World</p><p>An example to use the removeEventListener() method </p><button onclick="removeHandler()" id="myBtn">Try Magic Button to fix it</button><p id="Id"></p><script>if (document.addEventListener) {
document.addEventListener("mousemove", magicFunction);} elseif (document.attachEvent) {
document.attachEvent("onmousemove", magicFunction);}
functionmagicFunction() {
document.getElementById("Id").innerHTML = Math.random();}
functionremoveHandler() {if (document.removeEventListener) {
document.removeEventListener("mousemove", magicFunction);
} elseif (document.detachEvent) {
document.detachEvent("onmousemove", magicFunction);
}}</script></body></html>
The description of the above code is enlisted here:
First, the addEventListener() method is used to attach a mousemove event named magicFunction.
The addEventListener is triggered if the movement of the mouse is detected.
Otherwise, it attaches an attachEvent event to generate continuous random numbers.
After that, the magicFunction() method is utilized to generate the random numbers with the Math.random() method.
In the end, a custom removeHandler() method is used in which removeEventListener() is called to remove the event that generates the random number.
Otherwise, a detach event is triggered to pause the number.
![]() Output
Output
![]() The output returns a display in the chrome window using the removeEventListener() method.
In this display, random numbers are continuously generated that are associated with mouse movement.
A button is attached here named “Try Magic Button to fix it”.
It is used to fix the randomly generated number.
The output returns a display in the chrome window using the removeEventListener() method.
In this display, random numbers are continuously generated that are associated with mouse movement.
A button is attached here named “Try Magic Button to fix it”.
It is used to fix the randomly generated number.
Example 2
Another example is followed here by utilizing the removeEventListener() method.
The code is as follows:
Code
<body style = "text-align:center;"><center><p> Welcome to JavaScript World</p><p>Another example to use the removeEventListener() method </p><button id="click">Magic Button</button></center><script>
let btn = document.getElementById('click');const clicked = (e) => {
alert('User pressed the Magic Button');
btn.disabled=true; // Disable the button
btn.removeEventListener('click', clicked)
}
btn.addEventListener('click', clicked)</script></body>
In the code, the removeEventListener() method is utilized with a button.
The id of the button is passed to the removeEventListener() method, which will remove the event when the button is pressed.
![]() Output
Before clicking the button:
Output
Before clicking the button:
![]() After clicking the button:
After clicking the button:
![]() After clicking the Magic Button, an event is called that generates a pop-up window in the web browser.
After clicking the Magic Button, an event is called that generates a pop-up window in the web browser.
Conclusion
The removeEventListener() method is utilized to remove the already added event.
To practice this method, you must add an event using the addEventListener() method.
After that, the removeEventListener() method can be called to remove that event.
Here, you have learned the working and usage of the removeEventListener() method with the help of basic as well as advanced examples.
JavaScript Date toISOString() Method
The Date toISOString() method is a part of the primitive Date object of JavaScript.
The main purpose of the toISOString() method is to convert the value of a Date variable into a string.
The returning string from this toISOString() method is formatted according to the ISO standard (ISO stands for International Organization for Standardization).
The toISOString() method was included with the ECMAv5 release.
Syntax of Date toISOString() Method
The syntax of the Date toISOString() method is defined as:
stringVar = dateVar.toISOString();
In this syntax:
stringVar is the variable in which the program will store the return value from the toISOString()
dateVar is a Date variable, whose value toISOString() method will convert into string
Additional Notes: The format of the standard, ISO-8601 (in which the string is returned), is “YYYY-MM-DDTHH:mm:ss.sssZ”.
The “Z” at the end specifies that the timezone offset is zero.
Example 1: Using a Date Variable Created by an Empty new Date() Constructor
To demonstrate the working of the toISOString() method, simply create a new date variable with the help of the new Date() constructor from the Date object:
dateVar = new Date();
Afterwards, apply the toISOString() method on the date variable with the help of a dot operator and then store the return value in a new variable:
stringVar = dateVar.toISOString();
Pass the stringVar into the console log function:
console.log(stringVar);
The full code snippet will be as:
dateVar = new Date();
stringVar = dateVar.toISOString();
console.log(stringVar);
Upon executing the code mentioned above, the terminal will display the following output:
![]() From the output, it is noticeable that the value of the date variable has been printed in the ISO stand mentioned above.
From the output, it is noticeable that the value of the date variable has been printed in the ISO stand mentioned above.
Example 2: Using a Date Variable With Custom Date in the Constructor
This time around, start by creating a dateString with the following line:
dateString = "15 Feb 2005";
After that, create a new Date variable and pass the dateString in the new Date() constructor with the following line:
dateVar = new Date(dateString);
Afterwards, apply the toISOString() method on the date variable with the help of a dot operator and then store the return value in a new variable:
stringVar = dateVar.toISOString();
Lastly, pass the variable stringVar into the console log function to display the result on the terminal:
console.log(stringVar);
The complete code snippet of this example will be as:
dateString = "15 Feb 2005";
dateVar = new Date(dateString);
stringVar = dateVar.toISOString();
console.log(stringVar);
Running this code snippet will produce the following result on the terminal:
![]() The output in the terminal shows the date “15th of February, 2005” in the ISO format.
The output in the terminal shows the date “15th of February, 2005” in the ISO format.
Wrap up
The Date toISOString() method is used to format the value of a Date variable into a specific ISO format.
ISO format is a string representation of a Date value set by the International Organization for Standardization.
This toISOString() method returns a string value to the caller.
This method was released with the release of the ECMAv5 JavaScript.
JavaScript | RegExp test() Method
The RegExp test() method is used to match a pattern detonated by the RegExp with a string and return true or false depending upon whether the match is found or not.
The test() method is a method of the RegExp Object in the JavaScript programming language.
This article will explain the RegExp test() method along with examples, but first, let’s start with the syntax:
Syntax of the test() Method
result = regExpVar.test(matchString)
In this syntax:
result is the variable in which the return value of the test() method will be stored
regExpVar is the variable that contains the regular expression to match
matchString is the string that will be matched against the regular expressions
Return Value
The return value of this method is of the Data Type boolean, returns true if the match is found else false.
Example 1: Trying the Find the Character “h” Inside a String
Start by creating a string variable and give it some string value with the following line:
stringVar = "Hello World, This is LinuxHint";
The next step is to actually create the pattern to be matched against this string, use the following line to create the pattern:
pattern = /h/i;
This pattern is to find out the existence of the character “h” without case-sensitivity.
After that, apply the test method on the pattern, and in the argument of the test method, simply pass the stringVar and store the return value in a new variable as:
result = pattern.test(stringVar);
At the end, simply print the result variable on the terminal using the console log function:
console.log(result);
The complete snippet for this example is as:
stringVar = "Hello World, This is LinuxHint";
pattern = /h/i;
result = pattern.test(stringVar);
console.log(result);
Executing this code will print the following result on the terminal:
![]() The output shows that the character “h” was present inside the stringVar.
The output shows that the character “h” was present inside the stringVar.
Example 2: test() Method With Case Sensitive Pattern
For this example, create a pattern that will search for the character “h” with case sensitivity with the help of the following line of code:
pattern2 = /h/;
After that, create a string variable just like in example 1:
stringVar2 = "Hello World, This is Also LinuxHint";
After that, apply the test() method on the pattern with string value passed inside it:
result = pattern.test(stringVar2);
At the end, pass the result variable in the console log function to print the return value from the test() method on the terminal:
console.log(result);
The complete code snippet for this example would be:
stringVar2 = "Hello World, This is Also LinuxHint";
pattern2 = /h/;
result = pattern.test(stringVar2);
console.log(result);
Executing this code will print the following result on the terminal:
![]() The letter “h” in the small case was not found in the string.
Therefore, the result value is false
The letter “h” in the small case was not found in the string.
Therefore, the result value is false
Wrap up
The RegExp test() is used to match the pattern defined inside the RegExp object against a string and returns a true boolean value if the match is found.
Otherwise, a false boolean value is returned.
The test() method is applied to a regExp variable with the help of the dot operator.
This article has explained the test() method with the help of examples
JavaScript | Program to Write Data in a Text File
Writing data to a file can be exceptionally useful for storing your data for longer.
You don’t have to worry about losing your data after exiting your program.
Every language has had some kind of support for storing data into files with the help of some packages, and JavaScript is no exception.
JavaScript has a package named “File System”, which lets the user work with files.
In this package, there is a function named “writeFile”, whose sole purpose is to write data to a file specified within its path.
The writeFile() Method From “fs” Package
As mentioned above, the writeFile method is a part of the “fs” package, and to use this function, you need to include the “fs” package in your JavaScript application.
To better understand the working of this writeFile(), take a look at its syntax below:
writeFile(pathOfFile, dataToWrite, callbackFunction);
In this syntax:
pathofFile: Specifies the exact path to the file in which data is to be written
dataToWrite: The data that is to be written
callbackFunction: The callback function to be executed in the case of an error while writing data to the file
Example: Writing Text Into a File Using writeFile() method
The first step to use the writeFile() function for writing data is to include the File System package in our program with the help of the following line:
const fs = require("fs");
The require keyword tells the compiler that you need to link the following package with this application.
After that, simply use the variable “fs” with a dot operator to access the methods included in the file system package.
After that, define the data that to write in a variable like:
const stringToWrite = "HELLO I AM WRITTEN TO THE FILE";
After that, simply use the writeFile() method using the following lines:
fs.writeFile("./test.txt", stringToWrite, (err) => {if (err) {
console.error(err);return;
}
In this above code snippet:
The first argument specifies the location of the file, which in this case is placed in the folder as my program
Second argument takes in the variable stringToWrite, which contains the data
The third argument is a callback function with a variable err, that will be displayed onto the
terminal when an error occurs.
The complete code snippet will be as:
const fs = require("fs");const stringToWrite = "HELLO I AM WRITTEN TO THE FILE";
fs.writeFile("./test.txt", stringToWrite, (err) => {if (err) {
console.error(err);return;
}});
console.log("Data has been Written");
As for the test.txt file:
![]() It is clear from the screenshot that currently, the file is empty.
Upon executing the above code, the following prompt is displayed on the terminal:
It is clear from the screenshot that currently, the file is empty.
Upon executing the above code, the following prompt is displayed on the terminal:
![]() And inside the “test.txt” file, it shows:
And inside the “test.txt” file, it shows:
![]() From the above screenshot, it is clear that the data was written to the file test.txt
From the above screenshot, it is clear that the data was written to the file test.txt
Conclusion
JavaScript includes a package named as “File System”, which is used to work with files.
This package contains a method named as writeFile(), which is used to write data to a file specified in its argument.
To use this method, the first thing is to include the package “fs” into the program by using a required keyword.
This article has explained the process of writing data to a file through writeFile() with the help of an example.
JavaScript | Object Properties
JavaScript is a programming language, and objects are the key component of any object-oriented programming language.
The objects comprise keys and values that point towards the characteristics of an object.
It represents the characteristics of an object, such as the height of a man, the color of a ball, the name of a student, etc.
This article gives a demonstrated overview of the working and usage of the object properties in JavaScript.
This article serves the following outcomes:
What are the Object Properties?
Different Examples to Use the Object Properties
What are the Object Properties?
In JavaScript, properties point out the set of values that are associated with the object.
JavaScript has the ability to add, delete, and modify an object’s properties with different methods.
In simple words, property represents the characteristics of an object.
Users can access the property by utilizing the dot operator.
For better understanding by the user, the syntax of object properties is given here.
Syntax
The simple syntax to access the property of the object is given below:
objName.propName
or
objName[propName]
or
objName="propName"
The description of the parameters is listed below:
objName: Denotes the name of the object.
propName: Represents the name of the property.
Example 1: Display the Different Properties of an Object
An example is demonstrated to assign the object properties and display the names of properties.
// An example of object properties
let teacher = {};
teacher.name = 'John';
teacher.id = '052-39';
teacher.age = 25;
teacher.color = 'black';for (let property in teacher) {
console.log(property);}
In the code:
An empty object named “teacher” is declared.
Values are assigned to the object using the dot operator.
Lastly, for loop and the console.log method are utilized to print the names of properties.
Output
![]() The display shows the name, id, age, and color properties of the teacher object.
The display shows the name, id, age, and color properties of the teacher object.
Example 2: Modify the Properties of an Object
Another example is provided to perform modification of the properties of an object.
// Another example is used to modify the propertyconst teacher = {
name: 'Harry',
age: 30,
subject: 'English',
performance: 'Grade B',
}
console.log(teacher)// Modify the property of an object
deleteteacher.performance
teacher.performance = 'Grade D'
teacher.subject = 'Math'
console.log(teacher)
In this example, the description is as follows:
First, assign a specific value to different properties of an object.
After that, the delete keyword is utilized to delete the value of the teacher.performance property.
In the end, display all the properties and values of the teacher object after modification of the values.
Output
![]() The output shows the old properties as well as the modified set of properties.
The output shows the old properties as well as the modified set of properties.
Example 3: Delete Object Properties
Like modifying, JavaScript allows you to delete a property of an object.
To do so, a delete operator is employed.
var web = {
name: 'LinuxHint',
type: “Tech”}
console.log(delete web.type);
In the above code, an object named “web” is created that has two key values.
Using the delete operator, the type property of the “web” object is deleted.
![]() The output has returned true, which states that the type property has been deleted.
The output has returned true, which states that the type property has been deleted.
Conclusion
In JavaScript, object properties are said to be the set of values that are associated with the object.
Arrays, objects, dates, and functions are always objects.
However, Booleans, Strings, or Numbers can also be objects.
You have learned a brief overview of the object properties, and a set of examples is also provided that demonstrate how to play with object properties.
JavaScript | Converting milliseconds to date.
The millisecond is the common unit that specifies a time period of less than a second.
It is important to measure the time to write or read from the hard disk.
The date object is used to hold information about the year, month, day, date, etc.
Users manually input the value of milliseconds.
The milliseconds are transformed into dates by utilizing the JavaScript built-in methods.
Most developers prefer the date in a string format.
Users can extract the desired format of the date by passing the milliseconds value to the date object.
In this guide, we have demonstrated JavaScript’s functionality to convert milliseconds to date.
How to Convert Milliseconds to Date?
In JavaScript, The date.toString() method is adapted to convert milliseconds into the date.
Users can manually input the value of milliseconds and extract the date information in string format.
Two examples are provided below.
Example 1: Using a Function to Convert Milliseconds to Date
An example is explained by performing the conversion of milliseconds to date style using the built-in functions of JavaScript.
Code
// An example is used to extract the date// convert milliseconds to date value
functionconMili(mSecVal){return (newDate(mSecVal)).toDateString();}//get the milliseconds value
console.log(conMili(16475046402));
In this code:
A method called conMili() is created that has one argument.
This function is utilized to convert the value of milliseconds into the date string format.
This function will return the milliseconds that were converted into the date.
In the end, the console.log() method is utilized to display the string.
![]() Output
Output
![]() The output shows that the milliseconds are converted into the respective date and are displayed on the console.
The output shows that the milliseconds are converted into the respective date and are displayed on the console.
Example 2: Convert Pre-Defined Milliseconds to Change Them to Date
Another example is utilized to convert milliseconds into the date, day, month, year, and time.
For this instance, the code is provided below.
Code
<html><h2>Another example of converting milliseconds to date </h2><button onClick="id3()">Please Press it</button><p id="id1"style="font-size: 15px;"></p><p id="id2"; font-size: 15px;"></p>
<script>
var milsec = 1578857991011;
functionid3() {
var date = newDate(milsec);
down.innerHTML = date.toString();}
var up = document.getElementById('id1');
var down = document.getElementById('id2');
up.innerHTML = "Milliseconds = " + milsec;
</script></body></html>
The description of the code is listed below:
An HTML button ”Please Press it” is utilized and the function id3() is set on its onclick event.
After that, a variable “milsec” is used to store the value of milliseconds.
Finally, a function “id3()” is utilized for converting the milliseconds into the date.
Output
![]() When the button “Please Press it” is pressed, the provided milliseconds will be converted into the date.
When the button “Please Press it” is pressed, the provided milliseconds will be converted into the date.
Conclusion
In JavaScript, the milliseconds can be converted to the date using the date.toString() method.
This article has demonstrated various examples that make use of the JavaScript function for converting milliseconds into a date.
If a random millisecond value is used, then the respective date will be printed on the console.
You have learned to convert milliseconds to the date via different methods.
Conclusion
JavaScript | Const
In JavaScript, the const keyword has unique importance as compared to the let and var keywords.
The const keyword is mainly used to define variables that can not be reassigned and redeclared.
The objective of utilizing the const keyword is that the value remains constant in the whole program, such as const pi = 3.14.
All modern web browsers support the const keyword.
In this article, the working, importance, and usage of the const keyword is explained in detail.
This post serves the following learning outcomes:
How Does the const Work?
How to use const
How Does the Const Keyword Work?
In JavaScript, the const keyword is utilized to define the new variable.
Before using the const keyword, a user must be aware of the following aspects of the const keyword:
Once a variable is initialized using the const keyword, the user can not change its value.
Users can not declare without initializing the value.
It can be declared in uppercase as well as lowercase.
However, most of the developers used the uppercase convention for declaring the variable.
Above all, the const keyword is used in such a scenario if a user is sure that the value of the variable will never change throughout the program.
Let’s have a look at the following code to better understand the difference between the const and the var keyword for declaring variables.
Code
function test () {const a =10;const b= 7;const a=17;}
function test1 () {
var x =17;
var x=9;}
The function test() tries to initialize two variables with the “const” keyword.
On the other hand, the function test1() initializes variables employing the “var” keyword.
Let’s see how JavaScript behaves in such a scenario:
![]() Before executing the code, the code editor has marked that there is a problem in the function test() as highlighted in the above image.
While the same scenario is accepted in the case of the “var” keyword.
Let’s execute the code for further clarification:
Before executing the code, the code editor has marked that there is a problem in the function test() as highlighted in the above image.
While the same scenario is accepted in the case of the “var” keyword.
Let’s execute the code for further clarification:
![]() The output shows that the editor has thrown an error and has not allowed us to execute the code.
The output shows that the editor has thrown an error and has not allowed us to execute the code.
How to Use the Const Keyword?
This section provides a practical implementation of the const keyword.
For this, various sets of examples are exercised below:
Example 1: Initializing an object using the const keyword
If the object is initialized using the const keyword, it cannot be reinitialized.
However, you can change the properties of that object.
In the following example code, the const keyword is being used to initialize an object:
Code
const teacher = { age: 25 };
teacher.age = 35;
console.log(teacher.age);
In this code, the constant value is modified by accessing the property of the teacher object using the teacher.age=35.
Output
![]() After modifying the property value, the console.log() method is used to display the newly assigned value in JavaScript.
After modifying the property value, the console.log() method is used to display the newly assigned value in JavaScript.
Example 2: Initializing an Array Using the const Keyword
An example is also provided to access the elements of the const array in JavaScript.
For this purpose, the code is given below:
Code
const colors = ['blue'];
colors.push('green');
console.log(colors);
The description of the code is listed below:
An array named colors is initialized using the const keywords.
The push() method is used to update the value of the array.
Lately, the array has been printed on the console.
Output
![]() The output returns the elements in the array by executing the above code.
In this display, the green color is pushed into the existing array by utilizing the colors.push() method.
The output returns the elements in the array by executing the above code.
In this display, the green color is pushed into the existing array by utilizing the colors.push() method.
Conclusion
In JavaScript, the const keyword is used to initialize a variable in a blocked scope, and the value of the variable cannot be changed within that scope.
The keyword is used when the user is sure that the value will never change throughout the program.
You have learned the working and usage of the const keyword.
Introduction to JavaScript
Javascript is a scripting language that was essentially made for client-side programming applications.
However, later the popularity of JavaScript led to developers of JavaScript adding more and more functionalities to JavaScript, eventually leading to JavaScript becoming a language for server-side coding.
JavaScript was created around 27 years ago (at the time of this writing) in 1995, and in just two years, it quickly became an ECMA standard for web browsers.
Now the term ECMAScript is often heard by many new programmers when they start out, and they get confused.
When JavaScript became an EMCA standard, the name versions of JavaScript started to come out named “ECMAScript,” and different versions got abbreviated down to ES1, ES2, and so on.
Testing out JavaScript
Sometimes, when starting out in programming, he doesn’t want to fully commit to one programming language.
Well, JavaScript can be tested on any modern-day web browser by simply heading inside its console and running commands there, and then one can decide to commit or not.
To do this, open up developer tools (or similar according to your browser) of your browser
![]() And then head over to the console tab:
And then head over to the console tab:
![]() Since JavaScript is an ECMA standard for web browsers, the web browsers can execute JavaScript code snippets without requiring any external environment settings.
In the console, type the following lines:
console.log("Hello, This is My First JavaScript Test Run");
Hit enter, and the console will show the following:
Since JavaScript is an ECMA standard for web browsers, the web browsers can execute JavaScript code snippets without requiring any external environment settings.
In the console, type the following lines:
console.log("Hello, This is My First JavaScript Test Run");
Hit enter, and the console will show the following:
![]() The console.log() statement is a function of JavaScript that is used to print out data onto the terminal of either your browser or your code editor.
The console.log() statement is a function of JavaScript that is used to print out data onto the terminal of either your browser or your code editor.
Running Some Basic JavaScript Commands
In the console, variables can easily be created by simply typing the name or identifier of the variable, and then the user can give them some value.
However, the better approach is to declare the type or, more precisely, the variable’s scope by using the keywords like var or let.
Use the following lines to create values and store different values inside them:
var name = "John Doe";
var age = 22;
isEmployed = true;
After this, these values are now stored in the temporary memory of the browser.
You can alert the user with the help of the alert() function to display a dialogue box on the browser’s window (Yes, on top of the browser’s tab window) with the following line:
alert("Your Name is as : " + name + " age is " + age );
Hitting Enter would display the following alert box:
![]() This was possible because JavaScript was mainly built for HTML manipulations which included working with different objects of the browser.
You can also take the input from the user using the prompt() method and store that input inside a variable like
var city = prompt("Which City Do You Live In" + name);
Hitting Enter will display the following alert box with an input field like:
This was possible because JavaScript was mainly built for HTML manipulations which included working with different objects of the browser.
You can also take the input from the user using the prompt() method and store that input inside a variable like
var city = prompt("Which City Do You Live In" + name);
Hitting Enter will display the following alert box with an input field like:
![]() So fill in the answer in the input field like:
So fill in the answer in the input field like:
![]() After that, you can again use the alert box to display the user’s city on the browser’s window with the following statement:
alert("So you are from " + city);
With this, the browser will show the following alert box:
After that, you can again use the alert box to display the user’s city on the browser’s window with the following statement:
alert("So you are from " + city);
With this, the browser will show the following alert box:
![]() Anyways this was it for the basic introduction of JavaScript
Anyways this was it for the basic introduction of JavaScript
Wrap-up
JavaScript, commonly referred to as the scripting language for websites, is a portable, cross-platform (with packages now supporting multiple platform development), interpreted computer language.
It was mainly built for web page manipulations and building.
However, it is widely used in non-browser situations and is well known for web page building.
JavaScript | array.values()
JavaScript provides a list of methods to perform specific operations on arrays.
The array.value() method is used to extract the values of an array with the help of the array iterator object.
Additionally, it is also used for printing the array of elements in the console.
This article gives a demonstrative view of the array.values() method in JavaScript.
How Does array.values() Method Work?
As discussed above, the array.values() method works on the basis of the iterator object.
The iterator object has no ability to store the values present in the array.
However, it stores only the index/address of elements of the existing array.
The method does not have the capability to change/modify the existing array.
The syntax of the array.values() method is described below:
Syntax
array.values()
The values() method does not take any parameters and returns the iterator object of that array.
Example 1
An example is provided that demonstrates the use of the array.values() method:
Code
// An example to use the array.value()
let subject = ["English", "Math", "Chemistry"];// returns an iterator object that having values of subject
let iterObj = subject.values();for (let val of iterObj) { // looping through iterator
console.log(val); // display values in subject array}
The description of the code is given below:
First, an array named “subjects” is initialized with the three values English, Math, and Chemistry.
After that, subject.values() is utilized to return the values of the array to an iterator object iterObj.
Finally, a for loop is utilized that performs iteration over the iterObj to display the values in the array.
![]() Output
Output
![]() The outcome of the code returns the values of the array, including English, Math, and Chemistry, that are stored in the existing subject array.
The outcome of the code returns the values of the array, including English, Math, and Chemistry, that are stored in the existing subject array.
Example 2
Another example is demonstrated by using the array.values() method.
Code
let sports = ["cricket", "football", "hockey"];
let iteratorObject = sports.values();
console.log(iteratorObject.next().value);
sports[1] = "badminton";
console.log(iteratorObject.next().value);
The description of the code is given below.
An array of sports is initialized with cricket, football, and hockey values.
After that, an iteratorObject is employed to store the values of the sports array.
Furthermore, the next() method is adapted to extract the value of the first element.
After that, the first value of the sports array is updated by the assignment of badminton using sports[1]= “badminton”.
Finally, display the value by employing the console.log() method.
![]() Output
Output
![]() The output returns two values, cricket and badminton, by utilizing the array.values() method.
The output returns two values, cricket and badminton, by utilizing the array.values() method.
Conclusion
The array.values() method is applied to the arrays to get the indexes of the array elements in an iterator object.
This iterator object can be used to print the array values as well.
Following this post, you have learned to apply the array.values() method in the possible scenarios.
The iterator object stores the index only (not the elements), and the values are obtained using the indexes stored in the iterator object.
For printing, you may need to apply the for loop or manually print every element.
How to Write a Cell Phone Number in an International Way Using JavaScript?
Working with cell phone numbers is something that is important, especially when fetching data from the database and showing it to the user on the web browser.
In such scenarios, the programmer must make sure that the cell phone number is formatted in a certain international format.
This article will explain how to take a cell phone number, format it in an international way, and show it back to the user.
And the international format for the cell phone number will be “E-164”, which is titled the International Public Telecommunication Numbering Format.
Step 1: Create an HTML page
Simple start by creating an HTML webpage to prompt the user and to show the formatted number with the following lines:
<body onload="start()"><center><b>Enter Number in the Prompt box</b><div id="number"></div></center></body>
In the above lines:
The onload property is set on the <body> tag which looks for the start() function in the JavaScript on the complete loading of the webpage.
A <b> tag is created to notify the user
A div with the id “number” is created to print out the formatted cell phone number
Running the HTML document will show the following web page on the browser:
![]() This web page doesn’t do anything, this will change in the next step
This web page doesn’t do anything, this will change in the next step
Step 2: JavaScript Code for Formatted Cell Phone Number in E.164
In the JavaScript file, or inside the <script> tag, create a function name as start() that is going to be executed upon the complete loading of the webpage:
function start() {// Upcoming lines belong here}
In this function, use a prompt box to get the input from the user and store it inside the variable “userNumber”:
var userNumber = prompt("Enter Your Cell Number");
After that, apply the match method() on the variable userNumber with the help of a dot operator.
We will compare the input from the user against the regEx to verify that it is a correct cell number:
var result = userNumber.match(/^(1|)?(\d{3})(\d{3})(\d{4})$/);
After that, check the result variable or more specifically the value at index 1 for the country to match with the value “1”:
var cCode = result[1] ? "+1" : "";
Once, that input is verified, simply format the string in the correct E-164 format to be put on the web page with the following:
var formattedNumber = cCode + " (" + result[2] + ") " + result[3] + "-" + result[4];
And then the last step is to access the div with the id as “number”, and then set its innerHTML value to the formattedNumber variable:
document.getElementById("number").innerHTML ="The international number is: " + formattedNumber;
The complete JavaScript code snippet is as:
function start() {
var userNumber = prompt("Enter Your Cell Number");
var result = userNumber.match(/^(1|)?(\d{3})(\d{3})(\d{4})$/);
var cCode = result[1] ? "+1" : "";
var formattedNumber =
cCode + " (" + result[2] + ") " + result[3] + "-" + result[4];
document.getElementById("number").innerHTML ="The international number is: " + formattedNumber;}
Step 3: Testing the Output
After you are done with the first two steps, run the HTML document, and when prompted, type in the correct cell phone number and observe the following output:
![]() The inserted number was converted in the E-164 number format
The inserted number was converted in the E-164 number format
Wrap-up
A cell phone number can be easily converted in an international way or according to the E-164 with the help of JavaScript.
For this, take the cell phone number from the user, match it against a regEx to verify its integrity and then format it using the string manipulation techniques.
In this article, all of these steps are explained in detail step by step.
How to Use Escape Characters to Correctly Log Quotes in a String Using JavaScript?
Most developers face the issue of syntax errors when displaying log quotes in a string using the console.log() method.
For instance, JavaScript provides three ways to write log quotes in a string using single quotes (‘ ‘), double quotes (“ ”), and backticks (` `).
These quotes must be the same at both ends of the content to display it correctly.
Moreover, the purpose of the quote is to nominate or highlight the message/information to the users.
This post provides a detailed demonstration of using the escape characters for quotes in a string by utilization of JavaScript.
How to Use Escape Characters to Quotes in a String?
The escape character is basically a backslash (\) that is utilized to display any character.
The escape character is utilized to start the escape command to perform some tasks.
The escape characters are required to display a quote in the console window.
For example, \t for horizontal tab, \v for vertical tab, and \’ represent single quotation marks.
A string is a representation of a set of characters that are wrapped into quotes., there is a constraint to printing a single or double quote at the same time.
In the console method, if a string is presented in a single quote, then the user must utilize the double quote inside of the single quote or vice versa.
Moreover, the backtick provides additional features to display single and double quotes at the same time.
Example 1: Use Escape Characters for Single Quotes
An example is adapted to use the escape characters as single quotes.
For instance, the code is written below.
Code
console.log("An example of using single log quotes")const eSingle = 'Welcome to \'JavaScript\'';
console.log(eSingle)
In this code, the eSingle variable is used to store the single quotes of a string by \’ and display it using the console.log() method.
![]() Output
Output
![]() The output displays the message “Welcome to ‘JavaScript’ ”, in which JavaScript is highlighted within single quotes.
The output displays the message “Welcome to ‘JavaScript’ ”, in which JavaScript is highlighted within single quotes.
Example 2: Use Escape Characters to Double Quotes
Another example is following the steps to use the escape characters in the double quotes.
The code is written below.
Code
console.log("An example of using double log quotes")const eDouble = 'Welcome to "JavaScript"';
console.log(eDouble)
In this code, the eDouble variable is employed to store and display the string in double quotes.
![]() Output
Output
![]() The output shows the highlighted word “JavaScript” within double quotes using escape characters.
The output shows the highlighted word “JavaScript” within double quotes using escape characters.
Example 3: Use Escape Characters for Single and Double Quotes
In this example, backticks are adapted to display quotes in a string.
It allows the user to use both double and single quotes.
It is used as the outer quote.
The code is given below.
Code
console.log("An example of using single and double log quotes")const esd = `"Welcome' to "JavaScript"`;
console.log(esd)
In this code, the esd variable is used to store the single as well as double quotes present in the string by employing backticks.
![]() Output
Output
![]() The output shows the execution of the above code to display single and double quotes in a string.
The output shows the execution of the above code to display single and double quotes in a string.
Conclusion
In JavaScript, single quotes (‘ ‘), double quotes (“ ”), and backticks(“) are employed for displaying correct log quotes in a string.
For this purpose, the backslash \ escape character is utilized before single or double quotes of strings.
In this article, you learned usage of escape characters for quotes in a string with JavaScript.
In addition, both single and double quotes can be employed for a single-line string.
For multiple lines, it is best practice to use the backticks.
How to Use Goto?
The goto statement is utilized to change the sequence of execution of any program.
Different programming languages support the goto statement.
However, JavaScript does not support the goto statement.
Now, there is no need to worry because the desired results can be achieved through the break and continue keywords.
A method is adapted to get the same results/output of goto statements.
In this post, you will learn how to use a break and continue keywords as an alternative method of goto keyword.
Let’s start:
How to Use the Goto?
The goto statement points out the location where the code execution will resume.
The break and continue keywords work together to shift control from one part of the code to another part.
Moreover, it can be utilized in the loop for passing control to other sections of code.
Most developers adopt this method to evaluate the code or check the issues/errors in code.
Note: Developers/Users can utilize the break keyword to get out of the loop after fulfilling a certain condition.
The syntax of the above keywords is as follows.
Syntax
break piece_of_code;continue piece_of_code;
Piece_of_code: specify the variable or block of code, but it cannot be a JavaScript keyword.
Example
An example is given of how to use the break and continue to switch the control from one statement to another statement of code.
The code is as follows:
Code
// An example of use break and continue
var x;
console.log("An example of use break and continue keyword");for(x=1;x<=18;x++){if (x===3 || x===4) {continue;
}
console.log(i);if(x===6){break;
}}
console.log("The execution is stopped");
The description of the above code is listed below.
Firstly, the var x is declared
Inside the for loop, the variable x is initialized, and the condition for the x is set to “x<=18”.
Lastly, the value of x is incremented by 1.
The keyword continue is utilized within a loop that moves the control to the next cycle of the loop.
The break keyword is employed to stop the execution process of the code.
![]() Output
Output
![]() The output returns the execution of the above code.
In the display, values are presented as missing 3 and 4 due to the continue keyword.
Moreover, the break keyword breaks the code after printing the value 6.
In the end, a message is displayed “The execution is stopped”.
The output returns the execution of the above code.
In the display, values are presented as missing 3 and 4 due to the continue keyword.
Moreover, the break keyword breaks the code after printing the value 6.
In the end, a message is displayed “The execution is stopped”.
Conclusion
The goto statement does not work directly.
To compensate for the purpose, break and continue keywords can be used as an alternative to the goto statement.
We have briefly explained the working and usage of the break and continue keywords in JavaScript.
Using these keywords, control is switched from one part of the code to another part of the code.
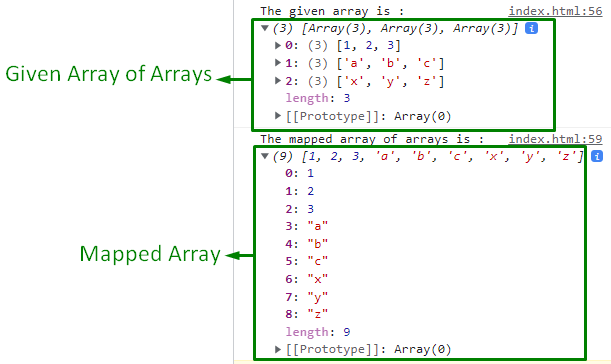 In the above output, it can be seen that the null array is mapped with the declared array of arrays.
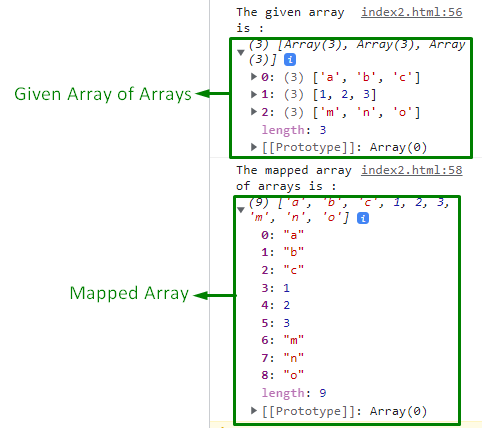 It can be seen that the provided array of arrays is mapped into a new array.
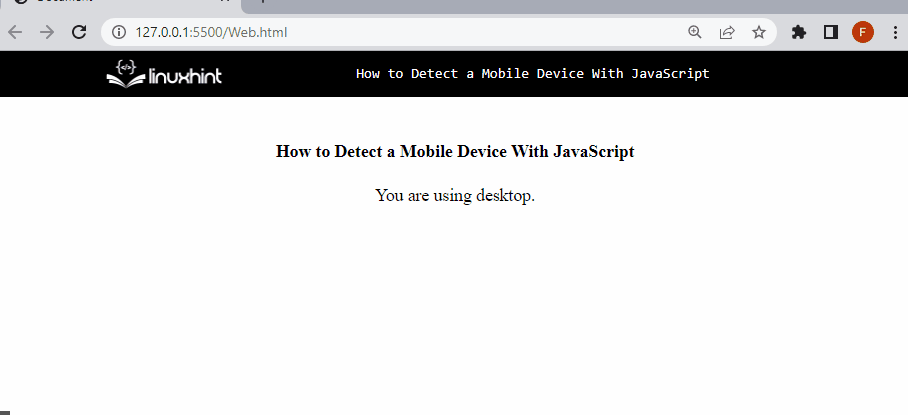 The above GIF shows when we have adjusted the document window, and the viewport is equivalent to the 768px.
As a result, an alert message “Mobile mode” has been displayed.
The above GIF shows when we have adjusted the document window, and the viewport is equivalent to the 768px.
As a result, an alert message “Mobile mode” has been displayed.


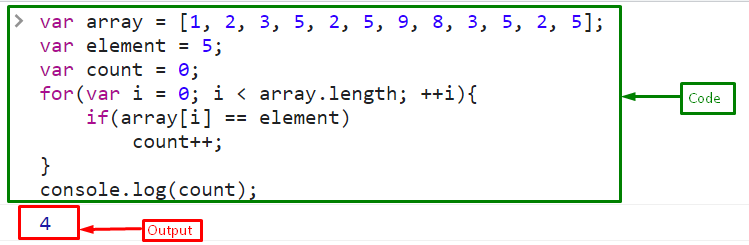 We have compiled all the instructions relevant to counting the specific element in an array.


 We have compiled all the essential instructions related to verifying if an array includes a value.
 When the split() method is used on an empty string, it produces an array containing an empty string rather than an empty array:
 If you want to retrieve an empty array when the string is empty, you can add a filter() function after the split method:
 That’s all about the conversion of a string with commas to an array.
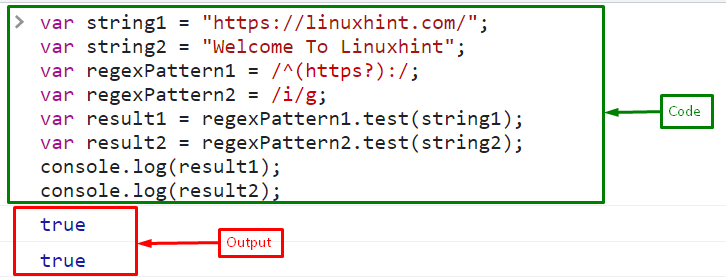

 We have provided all the essential instructions to verify whether a string matches a regex.
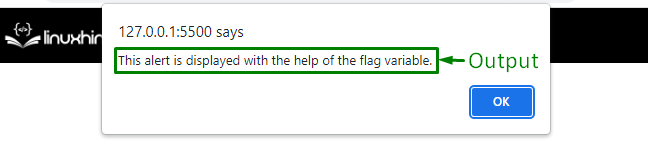 It can be observed that, upon the satisfied condition, the stated message has been displayed.
Example 2: Utilization of Flag Variable Along With the User-defined Value
In this particular example, the “for” loop will be iterated till the number specified by the user and the corresponding outcome will be displayed:
<script>
let flagVariable = 0;
let rang = prompt('Enter the number', '')
for(var i = 0; i < rang; i++) {
if(i == 2) {
flagVariable++;
}
}
if(flagVariable) {
alert("This alert is displayed with the help of flag variable");
}</script>
In the above code snippet:
Likewise, initialize the flag variable with “0”.
After that, input a number from the user that will act as an end limit for the “for” loop.
In the next step, apply a “for” loop and iterate till the user-defined limit.
It is such that if the user-defined number is less than “2”, the “if” condition remains false.
In the other case, i.e., “>2”, the initialized flag variable will be incremented, and the added message will be displayed.
Output
It can be observed that, upon the satisfied condition, the stated message has been displayed.
Example 2: Utilization of Flag Variable Along With the User-defined Value
In this particular example, the “for” loop will be iterated till the number specified by the user and the corresponding outcome will be displayed:
<script>
let flagVariable = 0;
let rang = prompt('Enter the number', '')
for(var i = 0; i < rang; i++) {
if(i == 2) {
flagVariable++;
}
}
if(flagVariable) {
alert("This alert is displayed with the help of flag variable");
}</script>
In the above code snippet:
Likewise, initialize the flag variable with “0”.
After that, input a number from the user that will act as an end limit for the “for” loop.
In the next step, apply a “for” loop and iterate till the user-defined limit.
It is such that if the user-defined number is less than “2”, the “if” condition remains false.
In the other case, i.e., “>2”, the initialized flag variable will be incremented, and the added message will be displayed.
Output
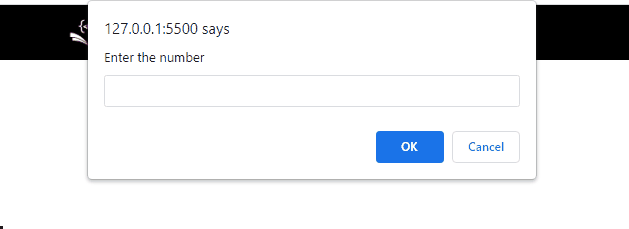 As evident, the prompt dialogue box will appear when the input number is evaluated as greater than “2”.
 In the above output, it can be observed that the outcome of both the “single tilde(~)” and “double tilde(~~)” operators is the same since the single tilde is applied twice.
Example 2: Use of Double Tilde (~~) Operator Along With the Math.floor() Method
In this particular example, the specified value will be evaluated via the “double tilde(~~)” operator and the “Math.floor()” method and their difference will be observed:
<script>
let x = 2.4;
Let y = ~~x;
z = Math.floor(x);
console.log('This is the value of y: ', y);
console.log('This is the value of z: ', z);</script>
In the above lines of code:
Firstly, specify the stated value.
In the next step, apply the “double tilde (~~)” operator and store the resultant value in the variable “y”.
Likewise, apply the “Math.floor()” method upon the initialized value and store it in a variable “z”.
Lastly, display the resultant outcome against each of the functionality.
Output
In the above output, it can be observed that the outcome of both the “single tilde(~)” and “double tilde(~~)” operators is the same since the single tilde is applied twice.
Example 2: Use of Double Tilde (~~) Operator Along With the Math.floor() Method
In this particular example, the specified value will be evaluated via the “double tilde(~~)” operator and the “Math.floor()” method and their difference will be observed:
<script>
let x = 2.4;
Let y = ~~x;
z = Math.floor(x);
console.log('This is the value of y: ', y);
console.log('This is the value of z: ', z);</script>
In the above lines of code:
Firstly, specify the stated value.
In the next step, apply the “double tilde (~~)” operator and store the resultant value in the variable “y”.
Likewise, apply the “Math.floor()” method upon the initialized value and store it in a variable “z”.
Lastly, display the resultant outcome against each of the functionality.
Output
 It can be observed that both the “double tilde operator(~~)” and the “Math.floor()” method yielded the same output.
 The Infinity is a global object that has the attribute of infinite length.
Technically, Infinity is categorized as a Window object property:
The Infinity is a global object that has the attribute of infinite length.
Technically, Infinity is categorized as a Window object property:
 Of course, infinity is not the same as other numbers; it is greater than any finite number.
Let’s see the below-given GIF, where it can be observed that when “1” exceeds the length of 308, it gives an Infinity:
Of course, infinity is not the same as other numbers; it is greater than any finite number.
Let’s see the below-given GIF, where it can be observed that when “1” exceeds the length of 308, it gives an Infinity:

 Let’s see how the Infinity works in the arithmetical operations.
 If you will divide any finite number with zero, it will also return Infinity:
const division = 1/0;
Output
If you will divide any finite number with zero, it will also return Infinity:
const division = 1/0;
Output
 Sometimes, when you use infinity with any finite number, such as divide any number with infinity, it gives a finite number “0”;
const division = 100/Infinity;
Output
Sometimes, when you use infinity with any finite number, such as divide any number with infinity, it gives a finite number “0”;
const division = 100/Infinity;
Output
 Infinity is not used as an iterable object, such as a “for-of” loop, if you try to utilize it, it will give an error “Uncaught TypeError: Infinity is not iterable”:

 We have compiled all the necessary information related to detecting the browser back button event.
 It can be observed that the user-defined binary number has been converted into a decimal number.
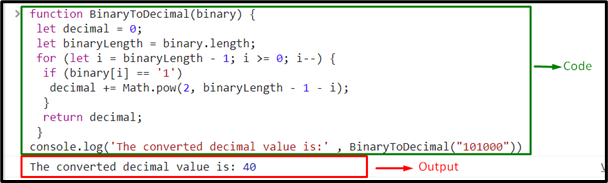 The desired conversion is achieved, as computed before.
 The output shows that the common values against the particular keys are returned.
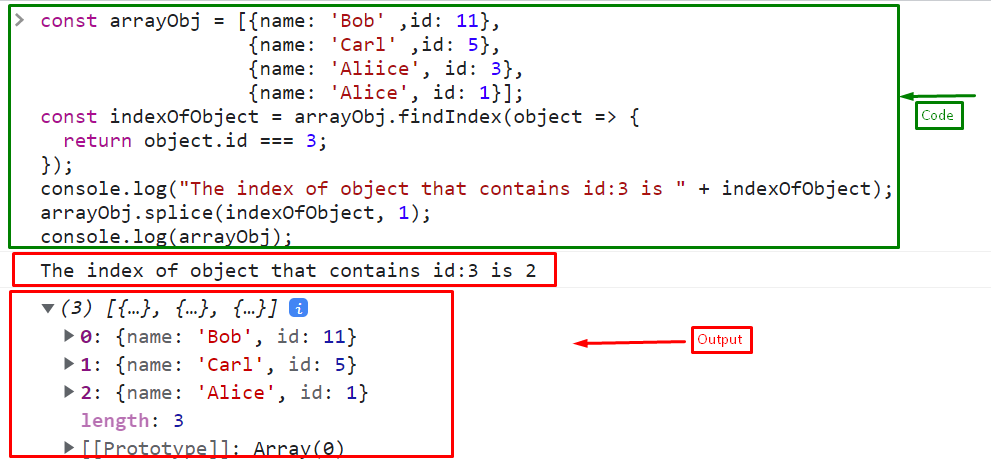
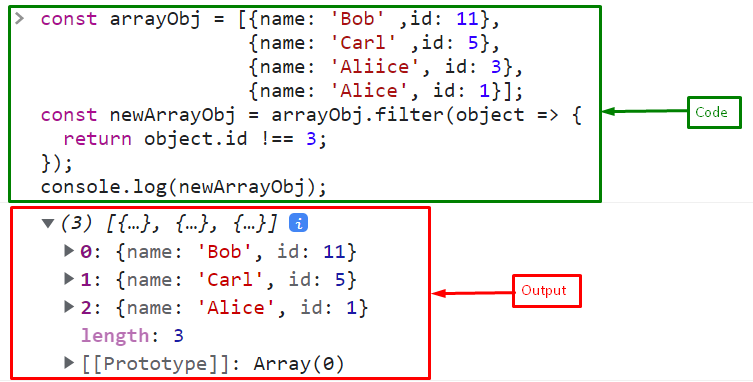 That’s all about finding and eliminating objects in an array based on the key value.

 That’s all about capturing the right-click event.
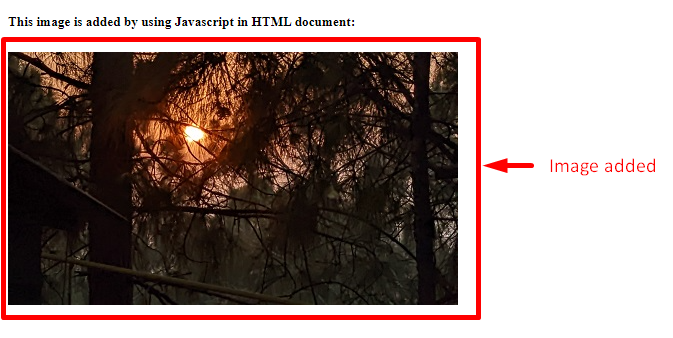
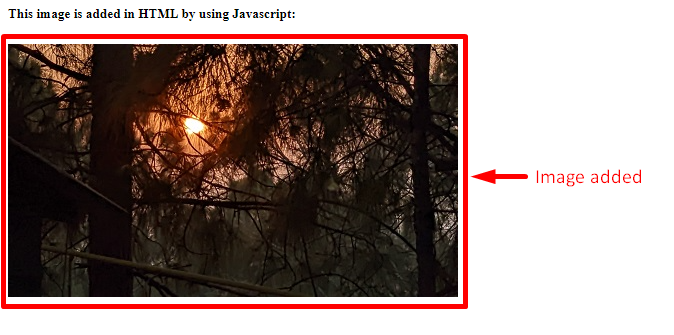 It can be seen that the image is appended to the “<img>” element in HTML via JavaScript.


 That’s all about the JavaScript Sets.
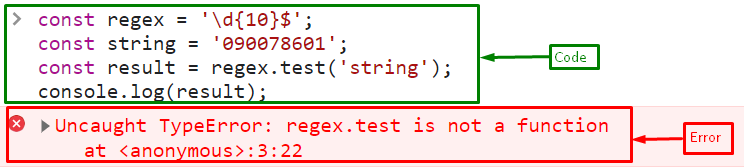
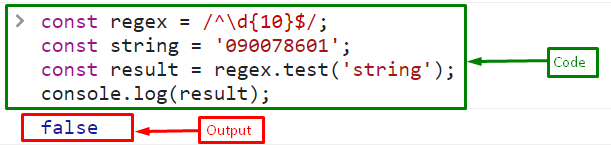 We have compiled all the essential instructions to solve the mentioned error.
 Let’s see how to fix the above-mentioned error.
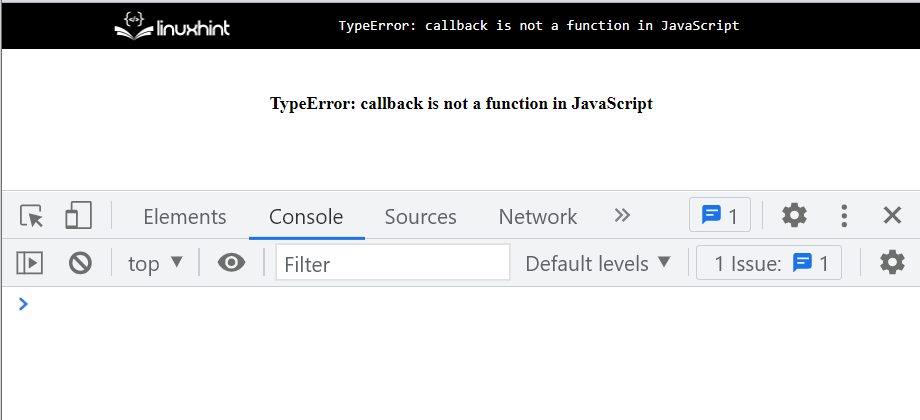 Here, we will perform an addition operation in a callback function by passing two parameters “a” and “b” and then call it by passing two arguments “5” and “8”:
function calculation(callback = (a, b) => {
var sum = a + b;
console.log("Sum is: " + sum);}) {
return callback(5, 8);}
Output
Here, we will perform an addition operation in a callback function by passing two parameters “a” and “b” and then call it by passing two arguments “5” and “8”:
function calculation(callback = (a, b) => {
var sum = a + b;
console.log("Sum is: " + sum);}) {
return callback(5, 8);}
Output
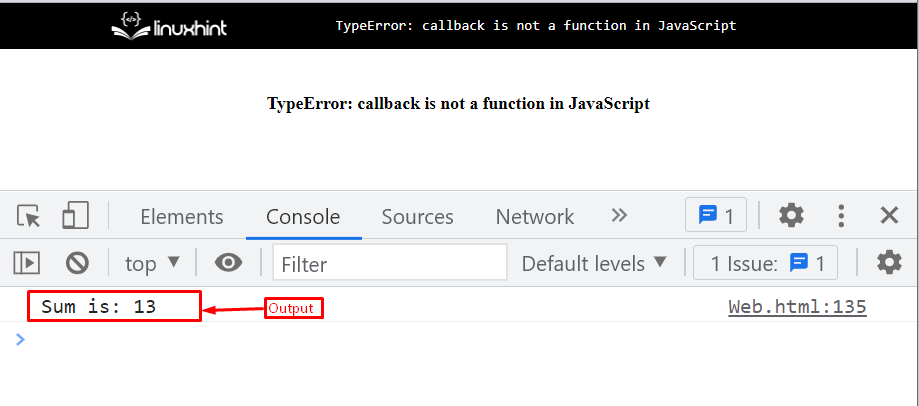 That’s how you fix the specified type error.
 The output shows that the “attr()” method doesn’t change the original state, whereas the “prop()” method displays the updated value.
 Now, in the JavaScript file, or the tag, add the given lines of code:
function print () {
var printDiv = document.getElementById("divPrint");
var printWindow = window.open('', '', 'left=0, top=0, width=800, height=500, toolbar=0, scrollbars=0, status=0');
printWindow.document.write(printDiv.innerHTML);
printWindow.document.close();
printWindow.focus();
printWindow.print();}
In the above code snippet:
First, define the “print()” method that is invoked when the “onclick” event is triggered.
Get the element (div) that you want to print by passing its assigned id to the “getElementById()” method.
Call the “window.open()” method and pass the window size according to your requirement.
Pass the reference of the div element to the “window.document.write()” method with the “innerHTML” property to write the content on the print window.
Then, close the document using the “window.close()” method.
Set focus on the print window using the “window.focus()” method.
Finally, call the “print” method of the window object to print the specified content.
Output
Now, in the JavaScript file, or the tag, add the given lines of code:
function print () {
var printDiv = document.getElementById("divPrint");
var printWindow = window.open('', '', 'left=0, top=0, width=800, height=500, toolbar=0, scrollbars=0, status=0');
printWindow.document.write(printDiv.innerHTML);
printWindow.document.close();
printWindow.focus();
printWindow.print();}
In the above code snippet:
First, define the “print()” method that is invoked when the “onclick” event is triggered.
Get the element (div) that you want to print by passing its assigned id to the “getElementById()” method.
Call the “window.open()” method and pass the window size according to your requirement.
Pass the reference of the div element to the “window.document.write()” method with the “innerHTML” property to write the content on the print window.
Then, close the document using the “window.close()” method.
Set focus on the print window using the “window.focus()” method.
Finally, call the “print” method of the window object to print the specified content.
Output
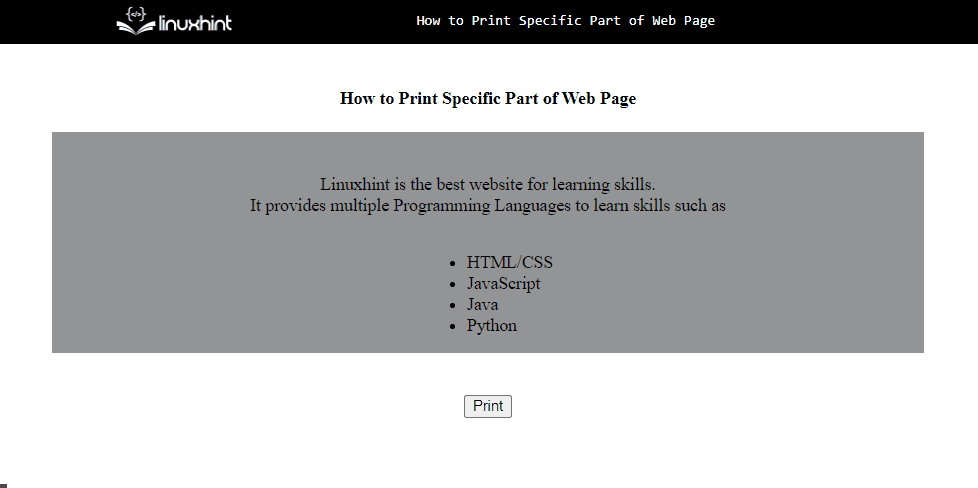 That’s all about printing the specified part of the web page.
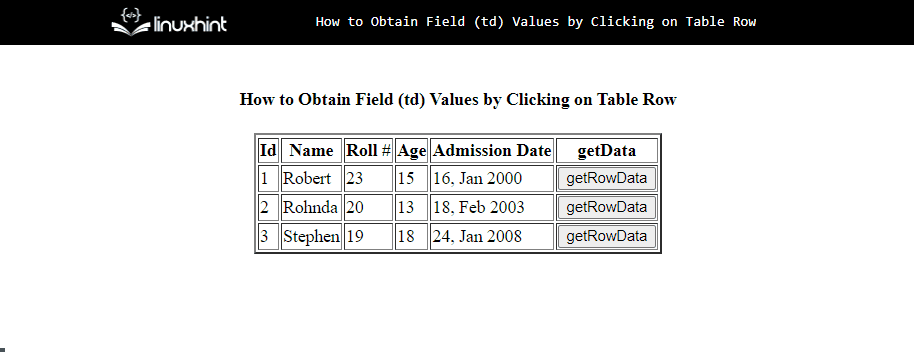 That’s all about getting the <td> values by clicking on the table row.

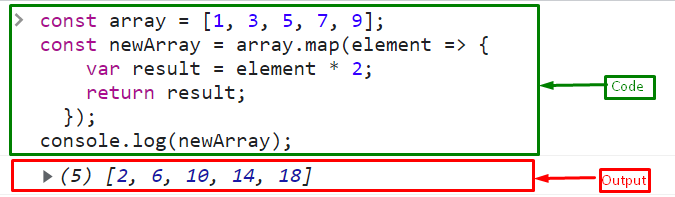 That’s all about fixing the map method returns undefined.
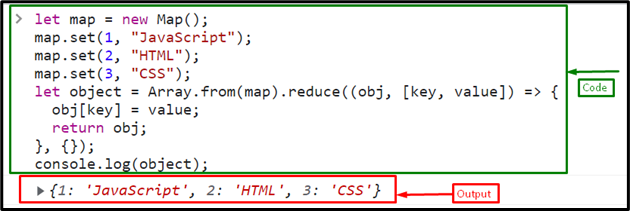
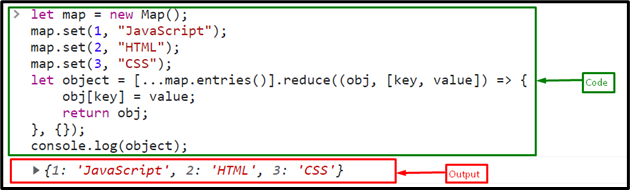 That’s all about JS Map return Objects using JavaScript.
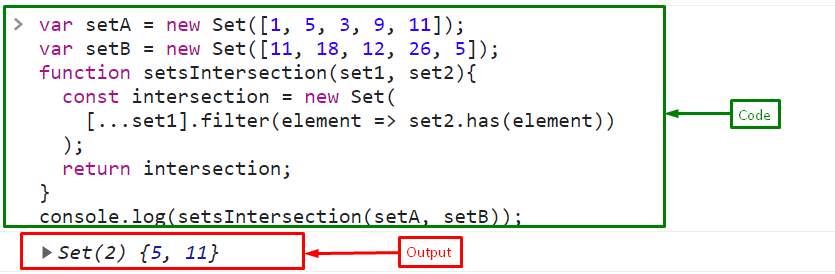
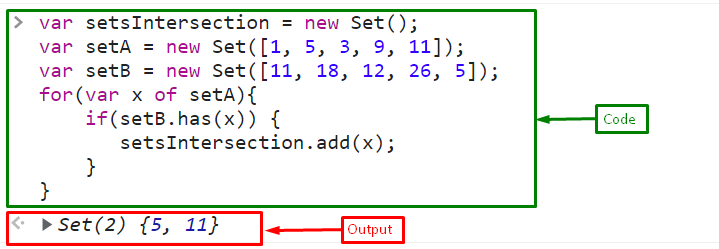 That’s all about the intersection of the JavaScript Sets intersection.
 The difference between both of the stated attributes can be analyzed with the help of the generated count.
 In the above output, it can be seen that all the sibling nodes of “<h5>” are displayed.
 The above output signifies that the corresponding sibling node has been successfully retrieved.
 You can also use the onkeyup() event to get the text of an input text box during onkeypress.
The onkeyup occurs when the user releases the key on the keyboard:
<input type="text" id="txtbox" onkeyup="getValue()">
Output
You can also use the onkeyup() event to get the text of an input text box during onkeypress.
The onkeyup occurs when the user releases the key on the keyboard:
<input type="text" id="txtbox" onkeyup="getValue()">
Output
 That’s all about getting the text of an input box during onkeypress.
 Now, in the JavaScript file, define a function “getText()” that will trigger on the click event.
Here, we will get the input value using the “getElementById()” method and show it in the “alert()” method:
function getText() {
var text = document.getElementById("txtArea").value;
alert(text);}
Define a function “setText()” that will trigger on the “Add new Text” button and set the specified text in the text area:
function setText() {
var text = document.getElementById("txtArea").value = “Linuxhint is the best Website for Learning Skills”;}
The output shows that the pre-entered value of the textarea is displayed in the alert message by clicking the “Get the Text” button.
Then, we set the new input value in the text area using the “Add new Text” button.
Lastly, the input textarea value is fetched using the “Get the Text” button:
Now, in the JavaScript file, define a function “getText()” that will trigger on the click event.
Here, we will get the input value using the “getElementById()” method and show it in the “alert()” method:
function getText() {
var text = document.getElementById("txtArea").value;
alert(text);}
Define a function “setText()” that will trigger on the “Add new Text” button and set the specified text in the text area:
function setText() {
var text = document.getElementById("txtArea").value = “Linuxhint is the best Website for Learning Skills”;}
The output shows that the pre-entered value of the textarea is displayed in the alert message by clicking the “Get the Text” button.
Then, we set the new input value in the text area using the “Add new Text” button.
Lastly, the input textarea value is fetched using the “Get the Text” button:
 That’s all about using textarea input.
 It can be observed that the div is successfully reloaded without reloading the entire page.
 Note: If you want to add leading zeros with the negative number then use the “slice()” method with the addition operator.
First, use the slice() method to cut the (-) sign from the string.
Then, add the zeros to the number.
After that, again add the (-) sign with the string using the (+) operator:
const numLeadingZeros = '-' + '00' + String(-3).slice(1);
Print the number on the console:
console.log("Number with leading zeros: " + numLeadingZeros);
The output indicates that the negative number is successfully concatenated with leading zeros:
Note: If you want to add leading zeros with the negative number then use the “slice()” method with the addition operator.
First, use the slice() method to cut the (-) sign from the string.
Then, add the zeros to the number.
After that, again add the (-) sign with the string using the (+) operator:
const numLeadingZeros = '-' + '00' + String(-3).slice(1);
Print the number on the console:
console.log("Number with leading zeros: " + numLeadingZeros);
The output indicates that the negative number is successfully concatenated with leading zeros:

 We have provided all the essential information related to getting the number with leading zeros.
 That’s all about saving the HTML web page as a PDF.

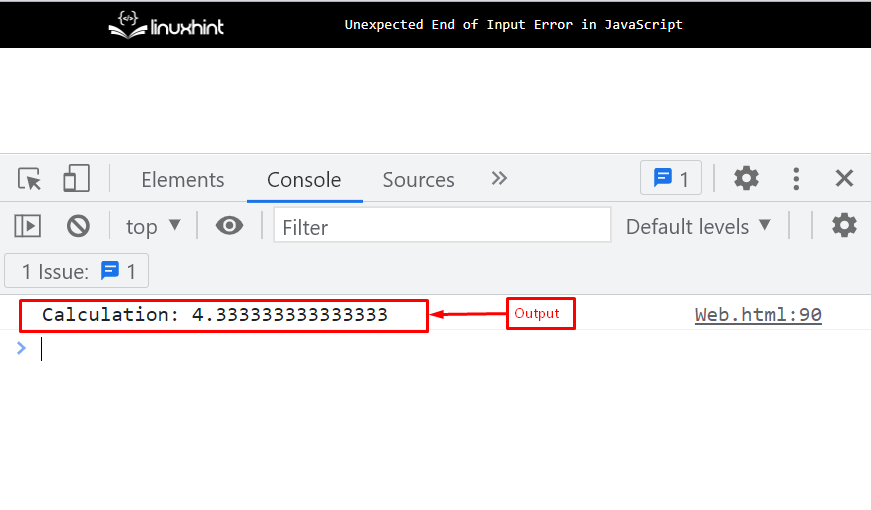

 That’s all about the unexpected end-of-input error.
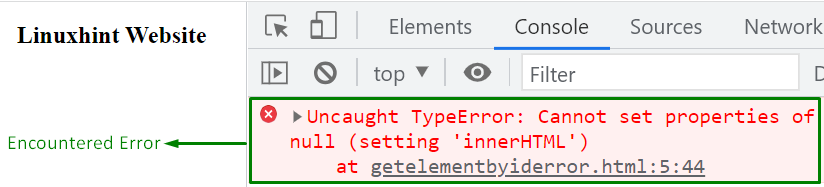 In the above output, it can be seen that the stated error is displayed due to prior access to the element.
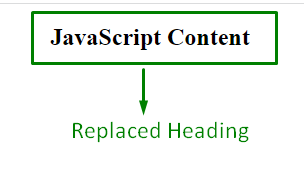 As seen, the encountered error is resolved, and the updated content via the “innerHTML” property is displayed.
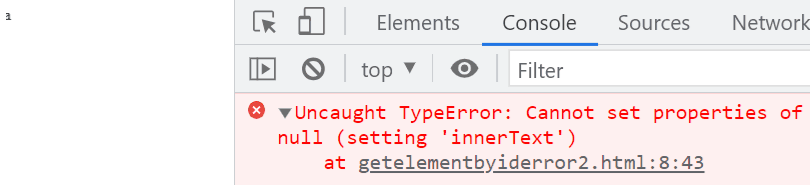 In this output, it can be verified that the applied property did not affect the element due to incorrect id format.
 In the above output, it can be visualized that the updated text content is displayed.
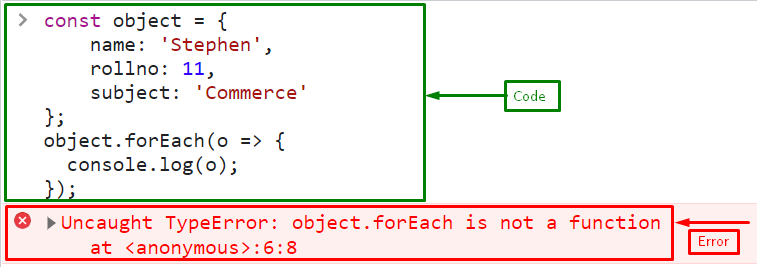
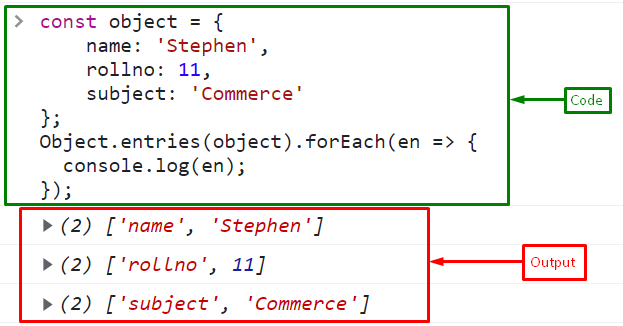 Note: forEach method is also applied for getting keys and values of an object using the Object.keys() and Object.values() method.
Now, let’s see if you don’t want to get an object’s keys, values, or entries, so what would you do? See the given example!
Note: forEach method is also applied for getting keys and values of an object using the Object.keys() and Object.values() method.
Now, let’s see if you don’t want to get an object’s keys, values, or entries, so what would you do? See the given example!
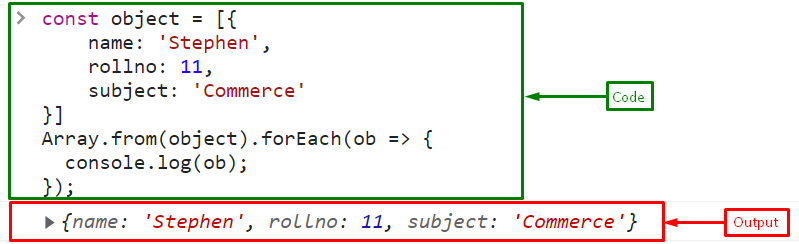 We have compiled all the best possible solutions to fix the specified error.
 In the above output, it can be seen that the JS code is working properly by placing it within the “<head>” tag.

 We have offered authentic information related to placing JavaScript in an HTML file.

 That’s all about escape and unescape functions.
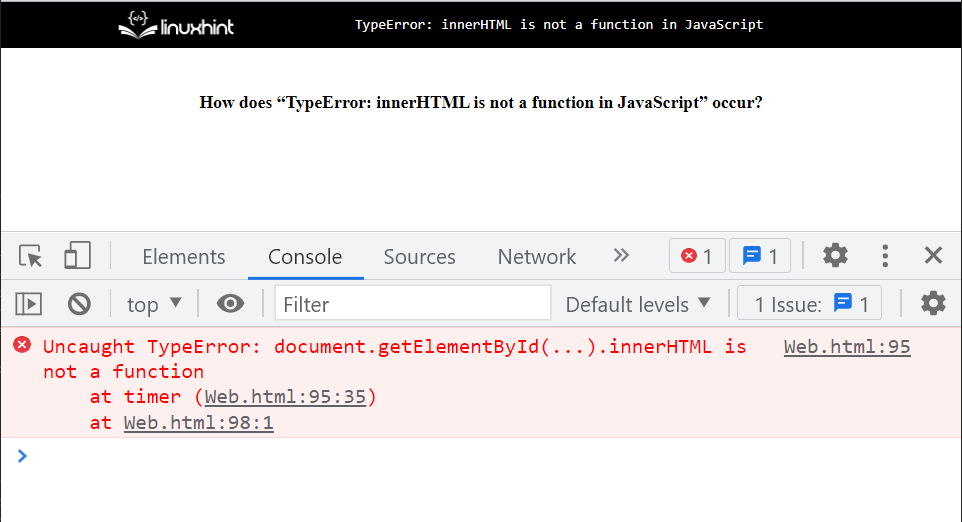 Now, let’s see in the given section how to fix this error!
 That’s all about the innerHTML is not a function error and the solution.

 In this output, it can be seen that there is no external involvement of any variable or state which might affect the function.

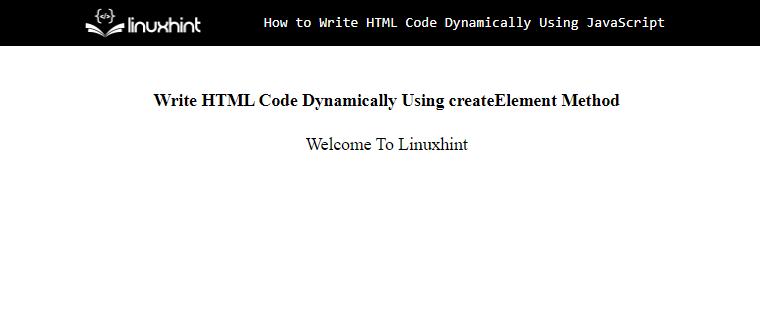
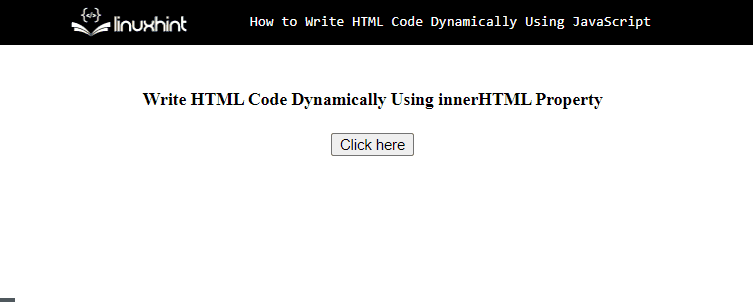 We have compiled all the essential information related to writing the HTML code dynamically using JavaScript.
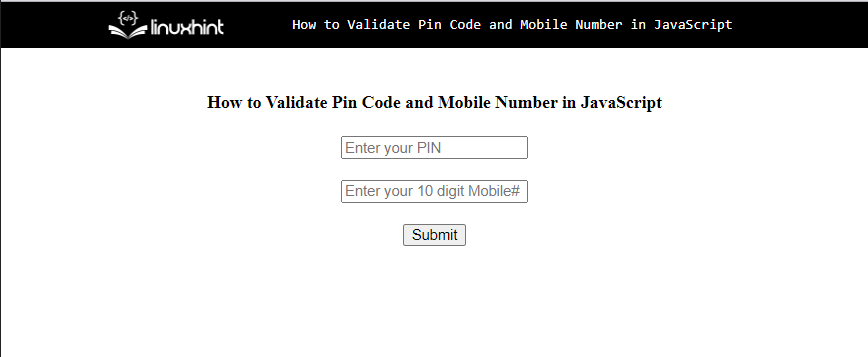 In the <script> tag or the JavaScript file, paste the following lines of code:
functionvalidation(pin, mobile) {
var pin = document.getElementById('pin').value;
var mobileNumber = document.getElementById('number').value;
pinRegexPattern = /^\d{6}$/;
mobRegexPattern = /^\d{3}\d{3}\d{4}$/;if(pin.match(pinRegexPattern) && mobileNumber.match(mobRegexPattern) )
{
alert("Pin and Mobile number is Validated!");
returntrue;
}if(pin.match(pinRegexPattern) 6){
alert("Pin must be 6 digits!");
returntrue;
}else
{
alert("You have entered an invalid Pin and mobile number!");
returnfalse;
}}
In the above snippet:
First, define a function “validation” with two parameters, “pin” and “mobile”.
Get the input values of the text fields, such as the mobile number and pin code.
Define regex patterns for both the pin code and the mobile number.
Now, in a conditional statement, check the input values of the pin code and mobile number, and call the match() method by passing the regex that will verify whether the value matches the pattern.
If it matches, the method will output true, else returns false.
You can see in the output if the pin code is less than or greater than the limit “6”, an alert pops up.
If the pin and mobile number match the given pattern, it will show the message for validation:
In the <script> tag or the JavaScript file, paste the following lines of code:
functionvalidation(pin, mobile) {
var pin = document.getElementById('pin').value;
var mobileNumber = document.getElementById('number').value;
pinRegexPattern = /^\d{6}$/;
mobRegexPattern = /^\d{3}\d{3}\d{4}$/;if(pin.match(pinRegexPattern) && mobileNumber.match(mobRegexPattern) )
{
alert("Pin and Mobile number is Validated!");
returntrue;
}if(pin.match(pinRegexPattern) 6){
alert("Pin must be 6 digits!");
returntrue;
}else
{
alert("You have entered an invalid Pin and mobile number!");
returnfalse;
}}
In the above snippet:
First, define a function “validation” with two parameters, “pin” and “mobile”.
Get the input values of the text fields, such as the mobile number and pin code.
Define regex patterns for both the pin code and the mobile number.
Now, in a conditional statement, check the input values of the pin code and mobile number, and call the match() method by passing the regex that will verify whether the value matches the pattern.
If it matches, the method will output true, else returns false.
You can see in the output if the pin code is less than or greater than the limit “6”, an alert pops up.
If the pin and mobile number match the given pattern, it will show the message for validation:
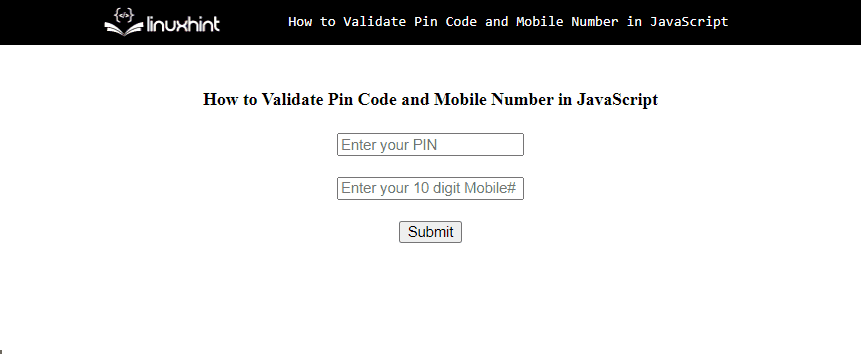 Now, we will use another pattern for validating mobile phone numbers that are the length of 13, including delimiter (+) that will denote the country code:
/^[\+][0-9]{2}[0-9]{3}[0-9]{3}[0-9]{4}$/
In the above regex pattern:
“^” marks the beginning of the string.
The boundaries of the regular expression are indicated by the forward slash character “/”.
“{}” represents the limit.
“$” indicates that the string has ended.
“[0-9]{2}...” represents the two digits next to the delimiter + in ranging from 0 to 9.
In JavaScript code, we will use the same above code by replacing only the “mobileRegexPattern”:
mobRegexPattern = /^[\+][0-9]{2}[0-9]{3}[0-9]{3}[0-9]{4}$/;
Output
Now, we will use another pattern for validating mobile phone numbers that are the length of 13, including delimiter (+) that will denote the country code:
/^[\+][0-9]{2}[0-9]{3}[0-9]{3}[0-9]{4}$/
In the above regex pattern:
“^” marks the beginning of the string.
The boundaries of the regular expression are indicated by the forward slash character “/”.
“{}” represents the limit.
“$” indicates that the string has ended.
“[0-9]{2}...” represents the two digits next to the delimiter + in ranging from 0 to 9.
In JavaScript code, we will use the same above code by replacing only the “mobileRegexPattern”:
mobRegexPattern = /^[\+][0-9]{2}[0-9]{3}[0-9]{3}[0-9]{4}$/;
Output
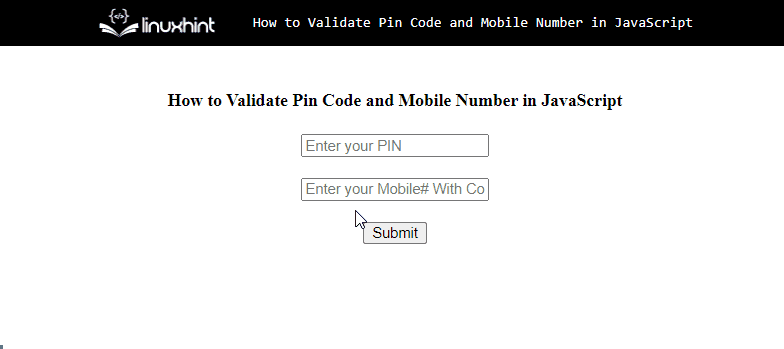 That was all about validating the pin code and mobile number.
 As seen in the above output, the included numbers in the string value are extracted and displayed.
 The above output indicates that the desired requirement is achieved.
 Let’s see the second way to export the function using the “export” keyword.
Example 2: Export Function With Export Keyword
Here, we will define the function “getInformation()” in “info.js” with an “export” keyword that will “import” in the <script> tag:
export function getInformation(name, id){
name = prompt('Enter Your Name');
id = prompt('Enter Your id');
console.log(name);
console.log(id);}
In the <script> tag, import the function from “info.js”:
<script type="module">
import {getInformation} from './info.js';
console.log(getInformation());</script>
Output
Let’s see the second way to export the function using the “export” keyword.
Example 2: Export Function With Export Keyword
Here, we will define the function “getInformation()” in “info.js” with an “export” keyword that will “import” in the <script> tag:
export function getInformation(name, id){
name = prompt('Enter Your Name');
id = prompt('Enter Your id');
console.log(name);
console.log(id);}
In the <script> tag, import the function from “info.js”:
<script type="module">
import {getInformation} from './info.js';
console.log(getInformation());</script>
Output
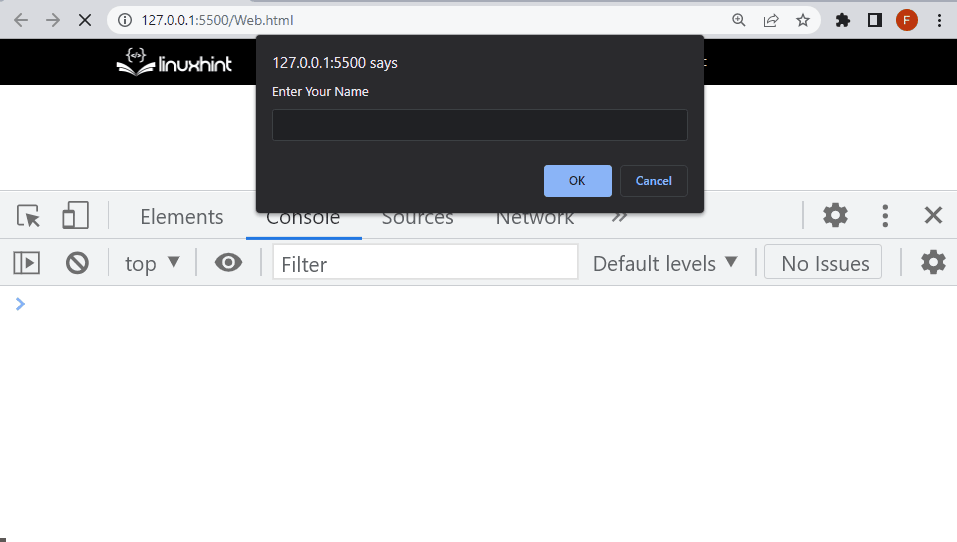 That’s all about exporting JavaScript functions from one JS file to another.
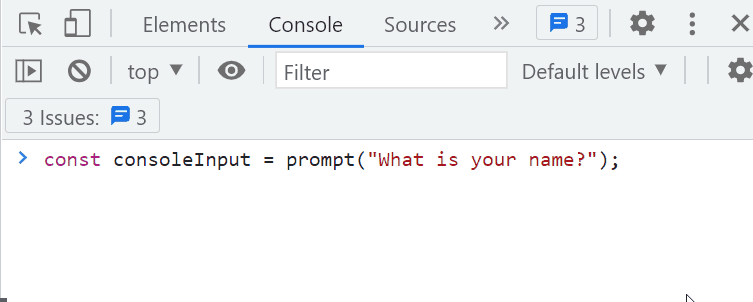 Example 2: Get User Input and Display on Console
Here, for retrieving the entered input value returned by the “prompt()” method, we will call the “alert()” method afterward:
alert(`Your name is ${consoleInput}`);
Output
Example 2: Get User Input and Display on Console
Here, for retrieving the entered input value returned by the “prompt()” method, we will call the “alert()” method afterward:
alert(`Your name is ${consoleInput}`);
Output
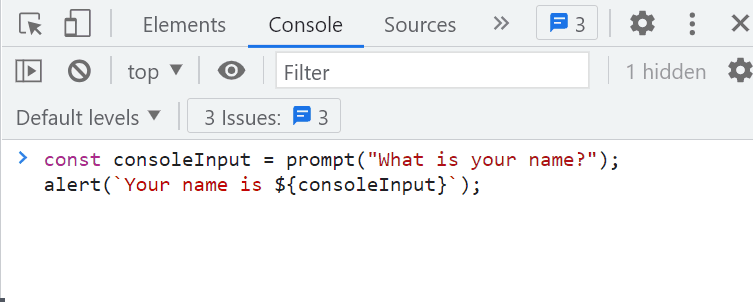 That’s all about creating user input in the JavaScript console.

 So, we will use (\n) in the multiple strings with (+) operator:
var multipleStr = 'Welcome To Linuxhint\n' +'> Welcome to JavaScript Tutorials\n' +'>> How to Create Multiple strings';
Print the multiple strings as a single string but in multiple lines (multiline string):
console.log(multipleStr);
Output
So, we will use (\n) in the multiple strings with (+) operator:
var multipleStr = 'Welcome To Linuxhint\n' +'> Welcome to JavaScript Tutorials\n' +'>> How to Create Multiple strings';
Print the multiple strings as a single string but in multiple lines (multiline string):
console.log(multipleStr);
Output
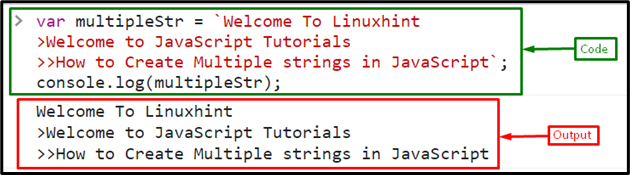 That’s all about creating multiline strings.
 In the above output, it can be visualized that the first passed argument 10 is “37.037%” of the second passed argument 27.
 In this output, it can be seen that the resultant percentage has two decimal places.
 The above output signifies that the desired functionality is achieved.
 In the above output, the difference in the output of both methods can be observed according to the explanation.
 The last two outcomes signify that the “substring()” method does not facilitate the negative indexes, and hence, the difference in both methods is clear.
 As the includes() method does not handle values other than string or array.
Hence, the stated error is displayed upon the included integer value.
As the includes() method does not handle values other than string or array.
Hence, the stated error is displayed upon the included integer value.
 In this output, it is clear that the latter expression is executed upon the unsatisfied condition.
 The above output indicates that the applied condition is true, and the stated value is contained in an array.

 This particular output signifies that the required functionality is achieved.
 In this output, it can be seen that the latter URL is fetched, thereby removing the former one.
 As seen, the function is invoked after the set time, and the assigned URL is invoked.
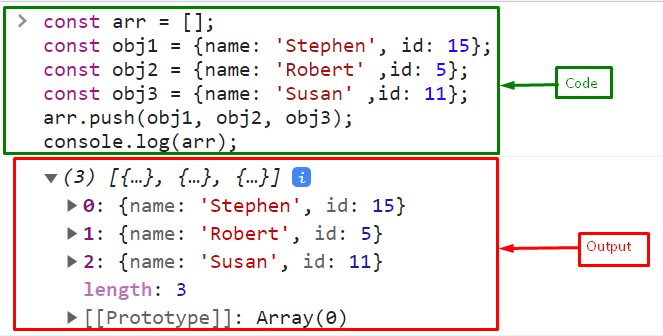
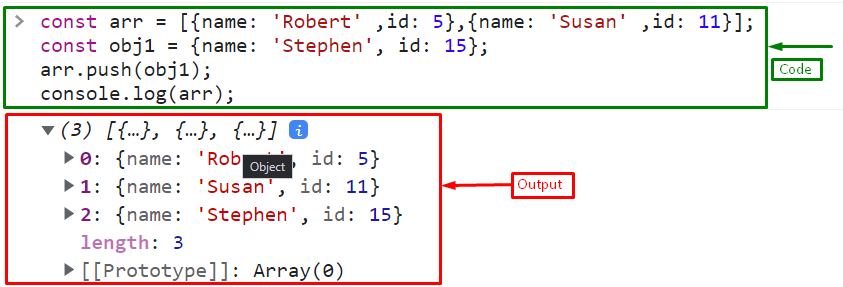
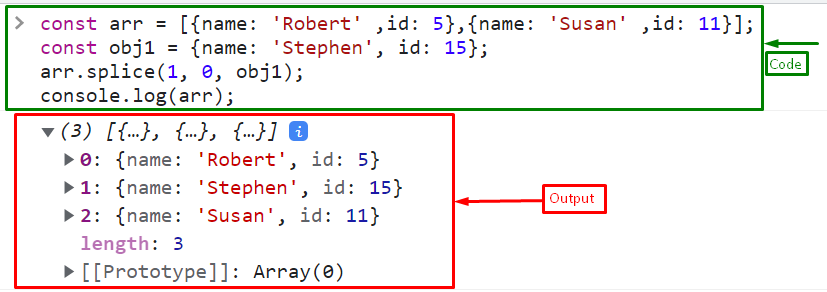
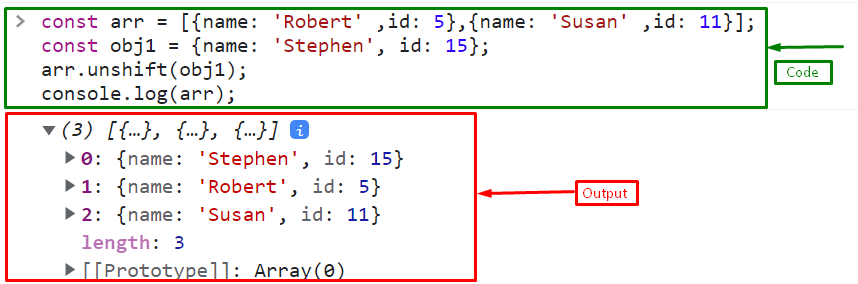 We have gathered all the best solutions to push an object to an array.
 Example 2: Get the Keys of an Object With Random Key Ordering Using an Object.keys() Method
The “Object.keys()” method also sorts the keys in ascending order.
Here, the object contains properties with random key ordering:
const object = {
15: 'JavaScript',
8: 'HTML',
23: 'CSS' };
Call the Object.keys() method by passing the object as an argument:
const result = Object.keys(object);
As you can see in the output, keys are retrieved in ascending order:
Example 2: Get the Keys of an Object With Random Key Ordering Using an Object.keys() Method
The “Object.keys()” method also sorts the keys in ascending order.
Here, the object contains properties with random key ordering:
const object = {
15: 'JavaScript',
8: 'HTML',
23: 'CSS' };
Call the Object.keys() method by passing the object as an argument:
const result = Object.keys(object);
As you can see in the output, keys are retrieved in ascending order:
 In order to obtain an object’s keys, we have gathered all the necessary data.
 In the next example, check out how to show an image on a button click.
Example 2: Display Image on Button Click With CSS Class
This example is all about how a CSS class can be used to display an image and how the image will appear when the button is clicked.
First, we will create a button in an HTML file that calls the “displayImage()” function when the button is clicked:
<button onclick="displayImage('2.jpg');">Click</button>
Let’s create a CSS class “imageFeatures” to set the image attributes such as “length”, and “width” of an image:
.imageFeatures{
width: 320;
height: 250;}
Define a function “displayImage()” with a single parameter src.
Then, add an image element using the createElement() method, and set the source of an image.
Now, add the class “imageFeatures” for setting the image attributes using the “classList.add()” method.
Finally, append the image tag in a document using the “document.body.appendChild()” method:
function displayImage(src) {
var img = document.createElement("img");
img.src = src;
img.classList.add("imageFeatures");
document.body.appendChild(img);}
As you can see, the image is displayed on the button click without any delay:
In the next example, check out how to show an image on a button click.
Example 2: Display Image on Button Click With CSS Class
This example is all about how a CSS class can be used to display an image and how the image will appear when the button is clicked.
First, we will create a button in an HTML file that calls the “displayImage()” function when the button is clicked:
<button onclick="displayImage('2.jpg');">Click</button>
Let’s create a CSS class “imageFeatures” to set the image attributes such as “length”, and “width” of an image:
.imageFeatures{
width: 320;
height: 250;}
Define a function “displayImage()” with a single parameter src.
Then, add an image element using the createElement() method, and set the source of an image.
Now, add the class “imageFeatures” for setting the image attributes using the “classList.add()” method.
Finally, append the image tag in a document using the “document.body.appendChild()” method:
function displayImage(src) {
var img = document.createElement("img");
img.src = src;
img.classList.add("imageFeatures");
document.body.appendChild(img);}
As you can see, the image is displayed on the button click without any delay:
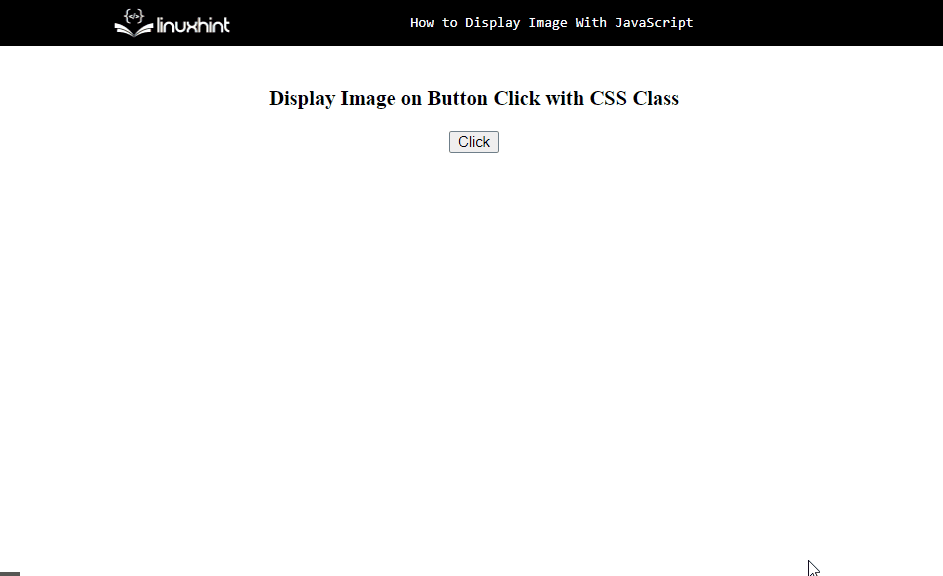 We have displayed the image with the help of JavaScript.
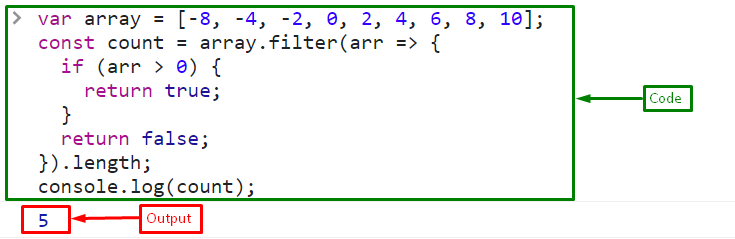
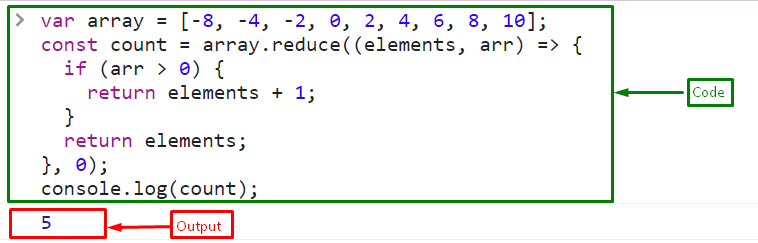 We have gathered essential instructions relevant to counting the array elements based on the specific condition.
 In the above output, it can be seen that the condition is satisfied regardless of the different times.
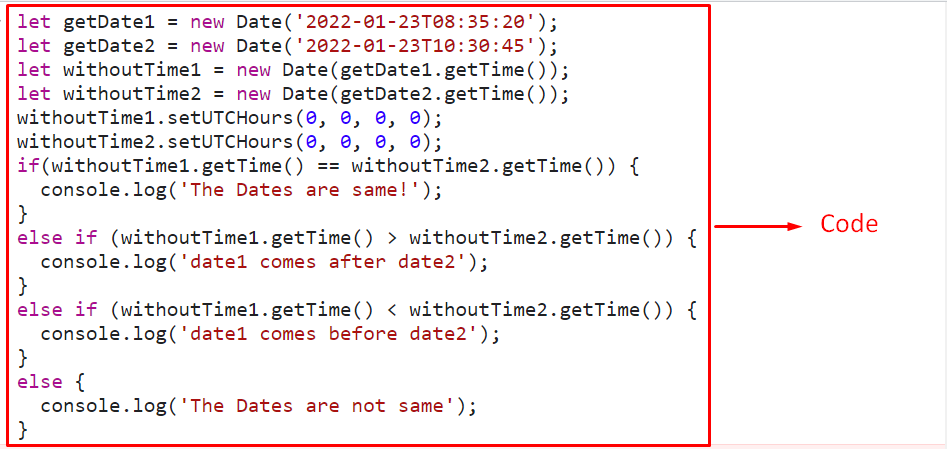 In the above output, as evident, the former date equals the latter date regardless of the set time.
 Now, in the JavaScript file or the <script> tag, use the following code:
function checkClassExists(){const classCheck = document.getElementsByClassName('flex-item1').length > 0;if (classCheck) {
alert('
Now, in the JavaScript file or the <script> tag, use the following code:
function checkClassExists(){const classCheck = document.getElementsByClassName('flex-item1').length > 0;if (classCheck) {
alert(' To verify if the specified element contains the particular class, check the next section.
 We have compiled the essential information related to verifying a particular class on the page using JavaScript.
 As observed in the above output, upon clicking the elements, the particular class is added to the elements.
 In this particular output, multiple classes are appended to each of the “<h3>” elements upon the event trigger.
 In the above output, it can be observed that the map values are set accordingly.
 Here, it can be seen that the object values are transformed into the map successfully.
 The above output signifies that the array is converted into the map.
 In the above output, it can be seen that the hours and minutes in the current date are identical to the fetched hours and minutes.
 The hours and minutes on the specified date match with the fetched time, thereby satisfying the given requirement.
 The above output signifies that the hours and minutes are displayed in “12 hours” format.
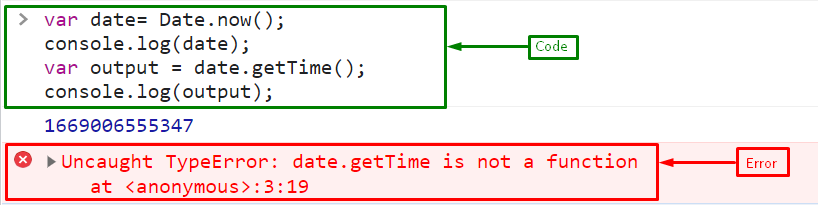
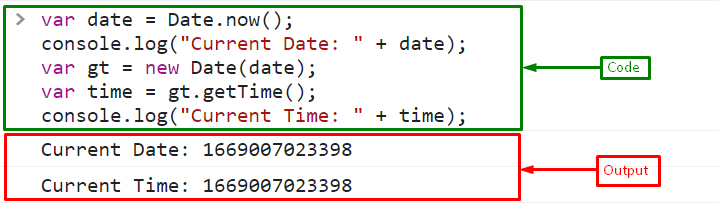 We have compiled the essential details relevant to the specified error and its solution.
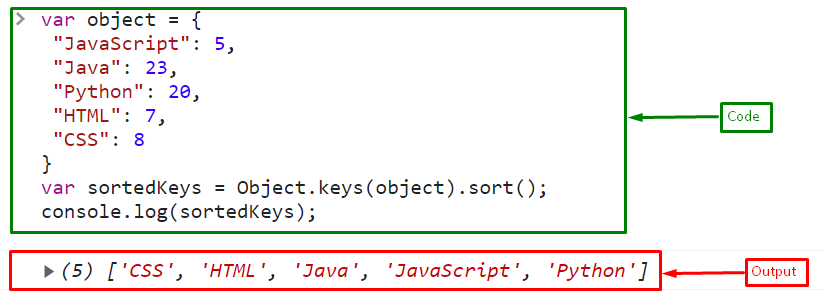 Whereas the simple Object.keys() method returns the keys of the object:
var sortedKeys =
Whereas the simple Object.keys() method returns the keys of the object:
var sortedKeys = 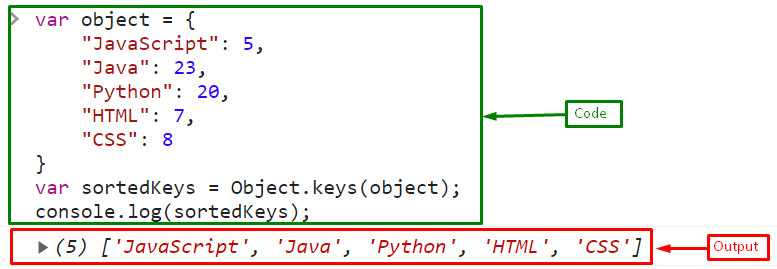 If you want to get the entries (key-value pairs) of an object in a sorted form, follow the given section.
 We have gathered all the necessary information for sorting the object keys.
 We have gathered all the necessary information relevant to sort the array of objects by Date property.
 In the output, it can be seen that the focus from the radio button is omitted upon the button click.
 In the output, the focus from the stated checkbox is removed upon the click of the button.
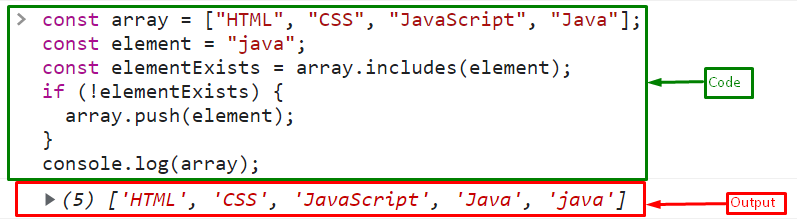 If the variable stores “Java”, the includes() method gives “true” because it already exists in the array and nothing will be pushed in the array:
const element = "Java";
Output
If the variable stores “Java”, the includes() method gives “true” because it already exists in the array and nothing will be pushed in the array:
const element = "Java";
Output
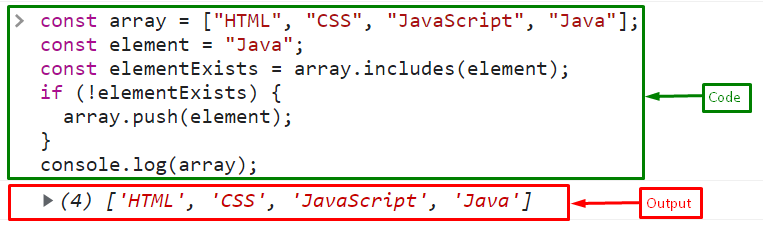
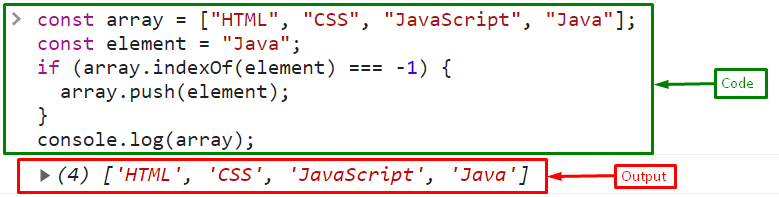 We have compiled all the essential instructions related to pushing the element if it does not exist in an array.
 In the above output, it is evident that the includes() have become case insensitive, thereby returning true.
 In the above output, the required condition is fulfilled irrespective of the case.
 As seen in the above output, the second string value is included in the first one after the conversion.
 The above output signifies that the desired requirement is achieved.
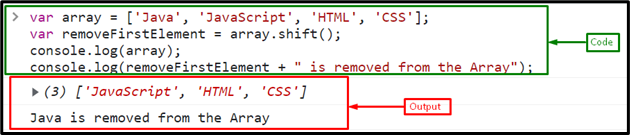
 That’s all about removing the 1st element from an array.
 In the above output, it can be seen that the index of the particular object is displayed, and it is removed later on.
 The above output indicates that the new array of filtered objects is formed.
 The above output signifies that the desired requirement is fulfilled.


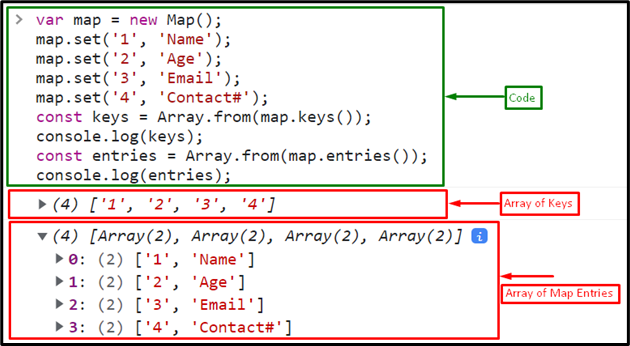
 We have compiled all the necessary information related to converting map values to an array and also map keys and entries into an array using JavaScript.
 Hence, it is proved that the specified value “7” is of data type “number”.
 The above output proves that the desired requirement is achieved.
 Example 2: Toggle the Image on Hover
In the above example, the image changes when the mouse is hovering over the image, and the same image remains.
Now, in this example, the first image will reappear when the mouse moves out of the image.
This effect is called the toggling effect.
For this purpose, we will use the “onmouseover” and “onmouseout” HTML properties:
<img id='menuImg' src="1.jpg" onmouseover="hover(this);" onmouseout="hoverOut(this)"/>
“onmouseover” calls the “hover()” function while, the “onmouseout” event calls the function “hoverOut()”:
function hoverOut(img){
img.src = "1.jpg"}
The output shows that the image is successfully changed when the mouse is over the image and it is changed when the mouse is going out of the image:
Example 2: Toggle the Image on Hover
In the above example, the image changes when the mouse is hovering over the image, and the same image remains.
Now, in this example, the first image will reappear when the mouse moves out of the image.
This effect is called the toggling effect.
For this purpose, we will use the “onmouseover” and “onmouseout” HTML properties:
<img id='menuImg' src="1.jpg" onmouseover="hover(this);" onmouseout="hoverOut(this)"/>
“onmouseover” calls the “hover()” function while, the “onmouseout” event calls the function “hoverOut()”:
function hoverOut(img){
img.src = "1.jpg"}
The output shows that the image is successfully changed when the mouse is over the image and it is changed when the mouse is going out of the image:
 That was all about the changing image on hover.

 We have provided the necessary details on the discussed issue with an appropriate solution.
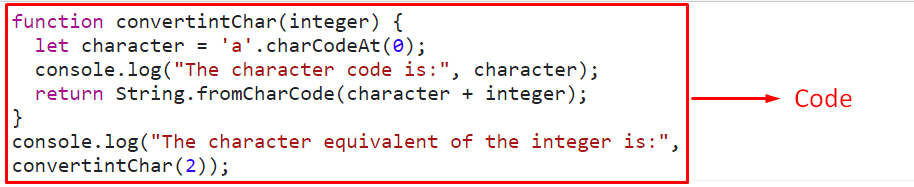 In the above output, the integer “2” is converted into its equivalent character “c”.
Note that 0,1,2 correspond to the characters “a”, “b”, “c”, and so on.
Example 2: Convert Integer to Its Character Equivalent(Uppercase) Using JavaScript
In this particular example, likewise, the passed integer will be converted into its equivalent character but in the upper case:
<script type="text/javascript">function convertintChar(integer) {
let character = 'A'.charCodeAt(0);
console.log("The character code is:", character);
return String.fromCharCode(character + integer);}
console.log("The character equivalent of the integer is:", convertintChar(0)); </script>
Perform the following steps, as given in the above code:
Define a function having the stated parameter, as we did in the previous example.
In its definition, specify the character in the upper case and associate it with the “charCodeAt()” method, as discussed before.
Then, repeat the discussed approaches as stated previously for converting the passed integer “0” into its character equivalent.
Output
In the above output, the integer “2” is converted into its equivalent character “c”.
Note that 0,1,2 correspond to the characters “a”, “b”, “c”, and so on.
Example 2: Convert Integer to Its Character Equivalent(Uppercase) Using JavaScript
In this particular example, likewise, the passed integer will be converted into its equivalent character but in the upper case:
<script type="text/javascript">function convertintChar(integer) {
let character = 'A'.charCodeAt(0);
console.log("The character code is:", character);
return String.fromCharCode(character + integer);}
console.log("The character equivalent of the integer is:", convertintChar(0)); </script>
Perform the following steps, as given in the above code:
Define a function having the stated parameter, as we did in the previous example.
In its definition, specify the character in the upper case and associate it with the “charCodeAt()” method, as discussed before.
Then, repeat the discussed approaches as stated previously for converting the passed integer “0” into its character equivalent.
Output
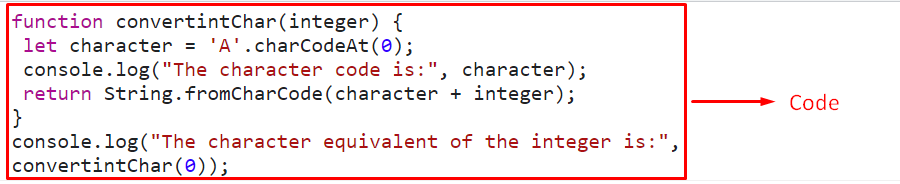 In the above output, the character code of “A” is 65, and the equivalent character of the passed integer “0” is “A”.
Example 3: Convert Character Back to Its Integer Equivalent Using JavaScript
If there is a requirement to convert the character back to its equivalent integer, follow the below-stated steps:
<script type="text/javascript">function convertcharInt(ch) {
let character = 'a'.charCodeAt(0);
console.log("The character code is:", character);
return ch.charCodeAt(0) - character;}
console.log("The integer equivalent of the character is:", convertcharInt('a')); </script>
Implement the following steps, as given in the above code:
Define a function named “convertcharInt()” having the given parameter, which corresponds to the passed character that needs to be converted into the equivalent integer.
In the function definition, similarly, return the Unicode of the associated character and display it.
Also, subtract the character code of the character “a” from the character code of the passed character to fetch the character’s equivalent integer.
Lastly, access the defined function by passing the character “a” to get its equivalent integer.
Output
In the above output, the character code of “A” is 65, and the equivalent character of the passed integer “0” is “A”.
Example 3: Convert Character Back to Its Integer Equivalent Using JavaScript
If there is a requirement to convert the character back to its equivalent integer, follow the below-stated steps:
<script type="text/javascript">function convertcharInt(ch) {
let character = 'a'.charCodeAt(0);
console.log("The character code is:", character);
return ch.charCodeAt(0) - character;}
console.log("The integer equivalent of the character is:", convertcharInt('a')); </script>
Implement the following steps, as given in the above code:
Define a function named “convertcharInt()” having the given parameter, which corresponds to the passed character that needs to be converted into the equivalent integer.
In the function definition, similarly, return the Unicode of the associated character and display it.
Also, subtract the character code of the character “a” from the character code of the passed character to fetch the character’s equivalent integer.
Lastly, access the defined function by passing the character “a” to get its equivalent integer.
Output
 The above output signifies that the desired functionality is achieved.
 In this output, it can be seen that the string’s array is converted into numbers.
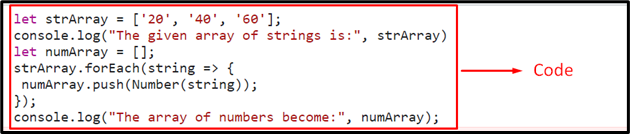 The above output indicates that the desired requirement is fulfilled.
 In this particular output, it can be seen that the allocated null array is filled with the numbers.
 As evident from the output, the created object is the instance of the class “Bike” and not the “Car”.
 The above output indicates that the desired requirement is fulfilled.
 In the above output, it can be seen that the particular class is included in the “<body>” element.
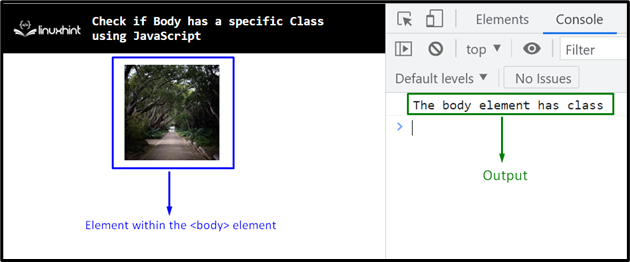 The above output indicates that the applied condition for a specific class is satisfied.
 The above output implies that the desired requirement is achieved.
 Example 2: Add 1 Day to a Specified Date
Create a Date object by passing date any date, such as “23 June 2022” as an argument, and then execute the same code block:
const date = new Date("23 June 2022");
The output gives the “24 June 2022” date by adding “1” day in the specified date:
Example 2: Add 1 Day to a Specified Date
Create a Date object by passing date any date, such as “23 June 2022” as an argument, and then execute the same code block:
const date = new Date("23 June 2022");
The output gives the “24 June 2022” date by adding “1” day in the specified date:

 We have compiled all the methods to add 1 day in a date using JavaScript.
 The above output shows only the content of the <p> tag, the <div> tag’s content is hidden because of the “display: none”:
Now, in the JavaScript file, fetch the first element where the div element will be displayed on the hover event using its “id”:
const hover = document.getElementById('hover');
Then, get a reference to the div element that will appear when hovering over the line, and store it in a variable “hiddenDiv”:
const hiddenDiv = document.getElementById('hide');
Set the “visibility” property of the “hiddenDiv” that stores a reference of the “div” element as “visible” on the “mouseover” event that will be called while hovering over the line:
hover.addEventListener('mouseover', function handleMouseOverEvent() {
hiddenDiv.style.visibility = 'visible';});
After hovering over the line, set the “visibility” property of the “hiddenDiv” as “hidden” on the “mouseout” event that will hide the div element while the cursor is away from the line:
hover.addEventListener('mouseout', function handleMouseOutEvent() {
hiddenDiv.style.visibility = 'hidden';});
The given output shows that the hidden div is successfully shown on hover using the mouseover event with visibility property:
The above output shows only the content of the <p> tag, the <div> tag’s content is hidden because of the “display: none”:
Now, in the JavaScript file, fetch the first element where the div element will be displayed on the hover event using its “id”:
const hover = document.getElementById('hover');
Then, get a reference to the div element that will appear when hovering over the line, and store it in a variable “hiddenDiv”:
const hiddenDiv = document.getElementById('hide');
Set the “visibility” property of the “hiddenDiv” that stores a reference of the “div” element as “visible” on the “mouseover” event that will be called while hovering over the line:
hover.addEventListener('mouseover', function handleMouseOverEvent() {
hiddenDiv.style.visibility = 'visible';});
After hovering over the line, set the “visibility” property of the “hiddenDiv” as “hidden” on the “mouseout” event that will hide the div element while the cursor is away from the line:
hover.addEventListener('mouseout', function handleMouseOutEvent() {
hiddenDiv.style.visibility = 'hidden';});
The given output shows that the hidden div is successfully shown on hover using the mouseover event with visibility property:
 We have compiled all the necessary information related to showing the hidden div on hover using JavaScript.

 From the above output, it can be observed that the specified numbers are rounded to the nearest “100”.

 In the above output, it is evident that the numbers are rounded up or down respectively.


 All the necessary information is compiled related to verifying the type of the variable, is it boolean or not?
 In the above output, it can be observed that the corresponding element and its id are displayed on the console.
 The above output indicates that the desired requirement is achieved.
 The fetched element in the above output verifies that the specified “id” is matched with the element’s id from any of the positions.
 As observed in the above output, the included “<img>” element hides after “5” seconds.
 In the above output, it is evident that the “table” element hides after the set time.
 The above output signifies that the added text gets hidden after five seconds.

 In the above output, it can be observed that the month “November” matches both the current date and the fetched month from the date.
Example 2: Get the Month Name From the Specified Date
In this particular example, the month name will be extracted from the “specified” date:
<script type="text/javascript">
let date = new Date(2021, 2, 25);
let getMonth = date.toLocaleString('default', {
month: 'long',});
console.log("The month is:", getMonth);</script>
Apply the below-given steps, as given in the above lines of code:
Specify the stated date with the help of the “Date()” constructor, as discussed.
Recall the discussed approach in the previous example for extracting the month from the associated variable holding the date object.
Lastly, display the corresponding month with respect to the specified date.
Output
In the above output, it can be observed that the month “November” matches both the current date and the fetched month from the date.
Example 2: Get the Month Name From the Specified Date
In this particular example, the month name will be extracted from the “specified” date:
<script type="text/javascript">
let date = new Date(2021, 2, 25);
let getMonth = date.toLocaleString('default', {
month: 'long',});
console.log("The month is:", getMonth);</script>
Apply the below-given steps, as given in the above lines of code:
Specify the stated date with the help of the “Date()” constructor, as discussed.
Recall the discussed approach in the previous example for extracting the month from the associated variable holding the date object.
Lastly, display the corresponding month with respect to the specified date.
Output

 As the months are represented from (0-11), hence “2” here indicates the month “March”.

 The above output indicates that the desired requirement has been fulfilled.

 In the above output, the month “April” refers to the specified numeric month “3” in the Date.

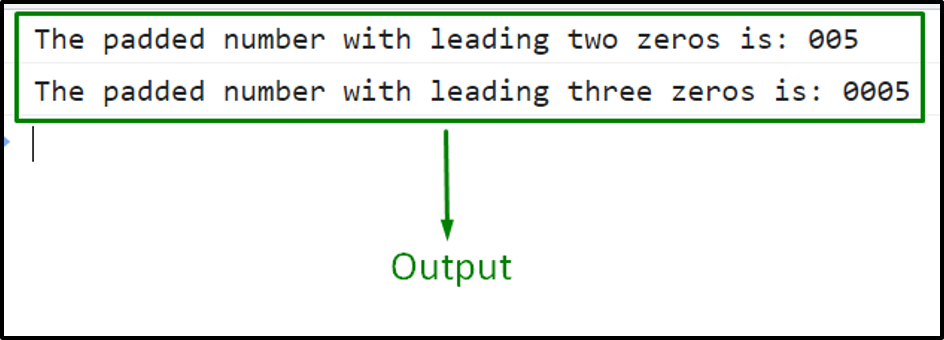 As seen, the specified number is padded with the number of leading zeros passed as parameters.
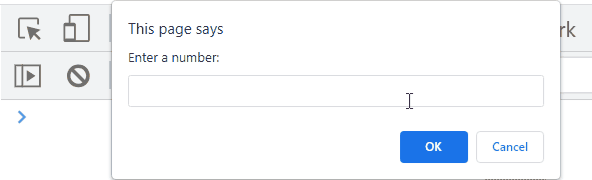 It can be observed that the resultant number is padded with the number of leading zeros entered by the user via prompt.
 Let’s see how to get the month and date in a 2-digit format.
Example 2: Format a Date Using the Concatenation of the getFullYear(), getMonth(), and getDate() Methods in YYYY-MM-DD Format
Here, we will utilize all the JavaScript getFullYear(), getMonth(), and getDate() methods and set the append 0 as a prefix if the month and date are less than 10:
var dateFormat = date.getFullYear() + "-" +((date.getMonth()+1).length != 2 ? "0" + (date.getMonth() + 1) : (date.getMonth()+1)) + "-" + (date.getDate().length != 2 ?"0" + date.getDate() : date.getDate());
Lastly, print the resultant date on the console using the “console.log()” method:
console.log(dateFormat);
Output
Let’s see how to get the month and date in a 2-digit format.
Example 2: Format a Date Using the Concatenation of the getFullYear(), getMonth(), and getDate() Methods in YYYY-MM-DD Format
Here, we will utilize all the JavaScript getFullYear(), getMonth(), and getDate() methods and set the append 0 as a prefix if the month and date are less than 10:
var dateFormat = date.getFullYear() + "-" +((date.getMonth()+1).length != 2 ? "0" + (date.getMonth() + 1) : (date.getMonth()+1)) + "-" + (date.getDate().length != 2 ?"0" + date.getDate() : date.getDate());
Lastly, print the resultant date on the console using the “console.log()” method:
console.log(dateFormat);
Output
 Let’s try another method to format the date in YYYY-MM-DD format.
 We have provided all the best possible solutions to format a Date as in YYYY-MM-DD.

 We have gathered all the necessary information related to the conversion of a Date object to another timezone.
 In the above output, it can be observed that the string value “hint” is appended to the value “Linux” at the specified index.
 In the above outcome, the “ava” string value has been appended after the first character, and the resultant string becomes “JavaScript”.
 It can be observed that we have successfully inserted a string at the specified index.
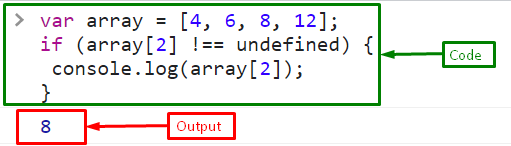
 We have compiled the different ways to determine whether the array index exists.

 We have provided the necessary information related to the stated error and the relevant solution.
 If you are not interested in using regular expressions, then follow the below section to split string with multiple separators.
 We have gathered all the best possible solutions to split the string with multiple separators.
 If you want to sort the keys of the map in descending order, follow the given section.
 We have gathered all the necessary information for sorting the map keys.
 In JavaScript code, first, create an object named “elementAttributes” and add the attributes with names and values to the object.
Here, we will add the style attribute, the name of the element, and the disable property for the button element:
const elementAttributes = {
style: 'background-color: rgb(153, 28, 49); color: white;',
name: 'LinuxButton',
disabled: '',};
Now, define a function named “setMultipleAttributesonElement” where first call the “Object.keys()” method for getting the array of the object’s keys and then utilize the “forEach()” method to iterate through the array and finally call the “setAttribute()” method to set all the defined attributes on the specified HTML element.
function setMultipleAttributesonElement(elem, elemAttributes) {
In JavaScript code, first, create an object named “elementAttributes” and add the attributes with names and values to the object.
Here, we will add the style attribute, the name of the element, and the disable property for the button element:
const elementAttributes = {
style: 'background-color: rgb(153, 28, 49); color: white;',
name: 'LinuxButton',
disabled: '',};
Now, define a function named “setMultipleAttributesonElement” where first call the “Object.keys()” method for getting the array of the object’s keys and then utilize the “forEach()” method to iterate through the array and finally call the “setAttribute()” method to set all the defined attributes on the specified HTML element.
function setMultipleAttributesonElement(elem, elemAttributes) { You can also set multiple attributes on an element without creating a separate object for the attributes.
To do this, follow the below example.
You can also set multiple attributes on an element without creating a separate object for the attributes.
To do this, follow the below example.
 We have compiled all the essential information related to setting the multiple attributes on an HTML element using JavaScript.

 In the above output, the float values within the passed range have been displayed.
 In the above output, it can be seen that the random numbers being generated fall between the specified range.
 In the above output, it can be observed that the commas in the specified string value are omitted first, and then it is parsed into a number.
 The above output indicates that the user-input string value is parsed into the number successfully.

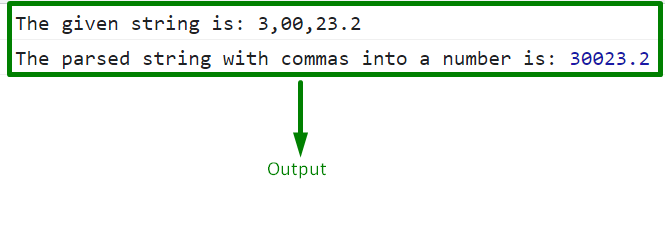 We have provided the easiest method for parsing a spring with commas to a number.
 In the above part of the example, we have seen how the “getFullYear()” method gives the year.
Let’s retrieve the year of the current year for the copyright on the web page.
To do so, first, create a “div” in the HTML file that will show as a footer on the web page.
Assign an id “copyrightYear” and set the background color using the RGB code:
<div id="copyrightYear" style="background-color:rgb(112, 109, 109)"></div>
In the JavaScript file, use the below lines of code for getting the current year with the copyright:
const copyrightFooter = `
<p>
Copyright
In the above part of the example, we have seen how the “getFullYear()” method gives the year.
Let’s retrieve the year of the current year for the copyright on the web page.
To do so, first, create a “div” in the HTML file that will show as a footer on the web page.
Assign an id “copyrightYear” and set the background color using the RGB code:
<div id="copyrightYear" style="background-color:rgb(112, 109, 109)"></div>
In the JavaScript file, use the below lines of code for getting the current year with the copyright:
const copyrightFooter = `
<p>
Copyright  We have provided the method for getting the current year for copyright using JavaScript.
 In the above output, it can be observed that the split string values are separated by the whitespaces.
 The above output signifies that the desired requirement is fulfilled.
 We have provided the easiest method related to splitting a full name into first and last names.
 In the above output, it can be observed that the visible elements on the Document Object Model are removed upon the button click.
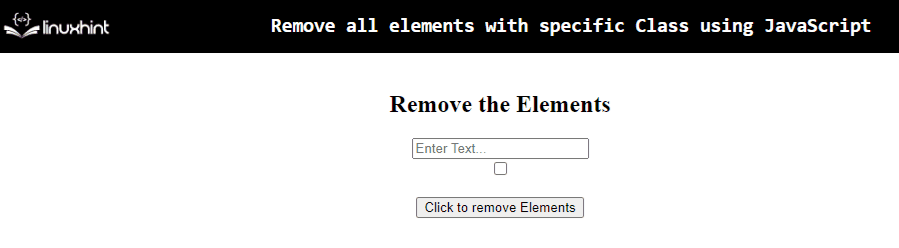 The above output signifies that the desired functionality is fulfilled.
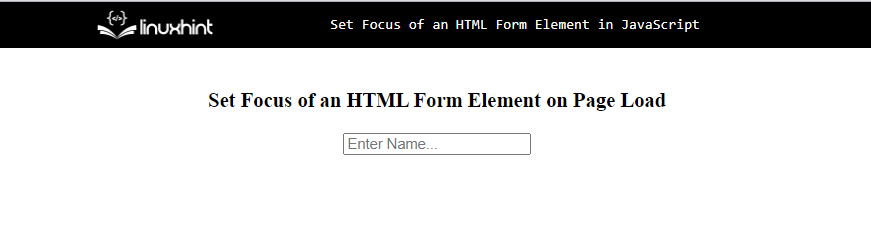 As you can see, the above output shows an input field that is not active.
So, to focus on this text box, use the below-given JavaScript code:
window.onload = function() {
document.getElementById("text").focus();}
In the above lines of code:
Define a function on the “window.onload” event.
Call the “focus()” method by fetching the HTML element “text box” using its assigned id with the help of the “getElementById()” method.
The corresponding output will be as follows:
As you can see, the above output shows an input field that is not active.
So, to focus on this text box, use the below-given JavaScript code:
window.onload = function() {
document.getElementById("text").focus();}
In the above lines of code:
Define a function on the “window.onload” event.
Call the “focus()” method by fetching the HTML element “text box” using its assigned id with the help of the “getElementById()” method.
The corresponding output will be as follows:
 The above GIF indicates that the text box is active on the page load.
Next, let’s see how to set focus on the input field while hovering on the element.
Example 2: Set Focus of an HTML Form Element on hovering the Element
To set the focus on the text box while hovering on it, use the “onmouseover” event listener:
<form>
<input type="text" id="text" placeholder="Enter Name..." onmouseover="elementFocus()"></form>
Define a function named “elementFocus()” that will trigger while the mouseover event occurs:
function elementFocus() {
document.getElementById("text").focus();}
The output shows that the textbox will be active while the mouse hovers on it:
The above GIF indicates that the text box is active on the page load.
Next, let’s see how to set focus on the input field while hovering on the element.
Example 2: Set Focus of an HTML Form Element on hovering the Element
To set the focus on the text box while hovering on it, use the “onmouseover” event listener:
<form>
<input type="text" id="text" placeholder="Enter Name..." onmouseover="elementFocus()"></form>
Define a function named “elementFocus()” that will trigger while the mouseover event occurs:
function elementFocus() {
document.getElementById("text").focus();}
The output shows that the textbox will be active while the mouse hovers on it:
 We have provided the essential information related to focusing the HTML element in an HTML form using JavaScript.
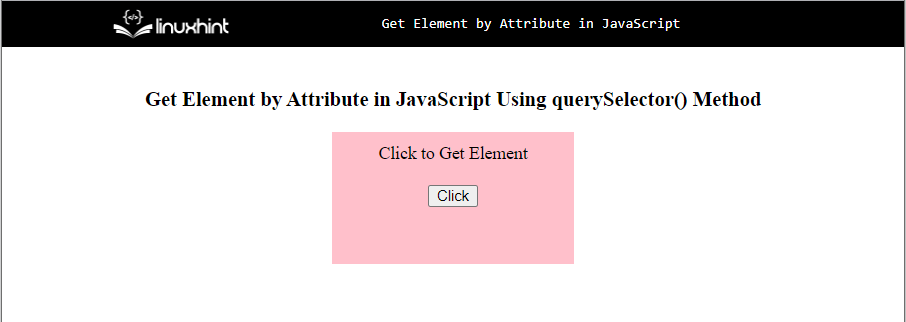 In the JavaScript file, define a function “getElement()” that will trigger while the button is clicked.
Call the “querySelector()” method and pass the attribute “id” and its value “divId” as an argument and store the resultant element in a variable “element”:
function getElement(){
var element = document.querySelector('[id="divId"]');
alert(element); }
The given output shows that the attribute “divId” belongs to an element “div”:
In the JavaScript file, define a function “getElement()” that will trigger while the button is clicked.
Call the “querySelector()” method and pass the attribute “id” and its value “divId” as an argument and store the resultant element in a variable “element”:
function getElement(){
var element = document.querySelector('[id="divId"]');
alert(element); }
The given output shows that the attribute “divId” belongs to an element “div”:
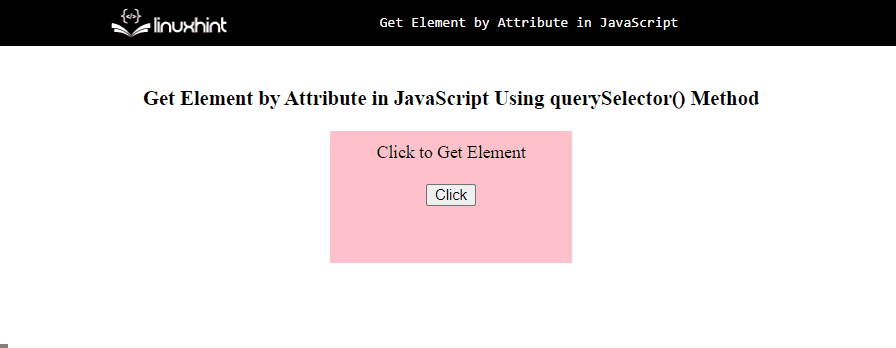 If you want to see all the elements inside the specific element, instead of calling the alert() method use the “console.log()” method that will show the element including its child elements.
function getElement(){
var element = document.querySelector('[id="divId"]');
console.log(element); }
Output
If you want to see all the elements inside the specific element, instead of calling the alert() method use the “console.log()” method that will show the element including its child elements.
function getElement(){
var element = document.querySelector('[id="divId"]');
console.log(element); }
Output
 The above GIF shows the HTML “div” element that has an attribute with the value “divId”, with its child elements in the console by clicking on the button.
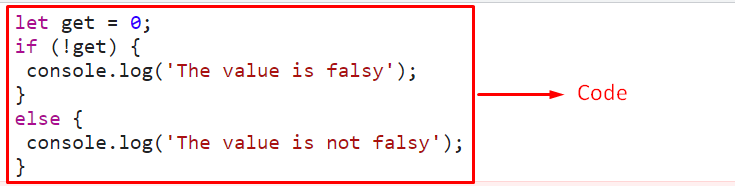 In the above output, it can be seen that the specified value is “falsy”.
Example 2: Check if the User-defined Value is Falsy
In this example, the user-defined value will be evaluated for the required condition:
<script type="text/javascript">
let a = prompt("Enter a value:");switch (a){
case 'null':
alert('The value is falsy');
break;
case 'false':
alert('The value is falsy');
break;
case '1':
alert("The value is not falsy")
break;} </script>
Perform the following steps as given in the above code snippet:
Firstly, ask the user to input a value to be checked for the stated condition.
After that, apply the “switch” statement and check for various “falsy” values entered by the user via stated cases.
Upon the matched values of the user with the “case” in the switch statement, the corresponding message within the case will be displayed via an alert.
Output
In the above output, it can be seen that the specified value is “falsy”.
Example 2: Check if the User-defined Value is Falsy
In this example, the user-defined value will be evaluated for the required condition:
<script type="text/javascript">
let a = prompt("Enter a value:");switch (a){
case 'null':
alert('The value is falsy');
break;
case 'false':
alert('The value is falsy');
break;
case '1':
alert("The value is not falsy")
break;} </script>
Perform the following steps as given in the above code snippet:
Firstly, ask the user to input a value to be checked for the stated condition.
After that, apply the “switch” statement and check for various “falsy” values entered by the user via stated cases.
Upon the matched values of the user with the “case” in the switch statement, the corresponding message within the case will be displayed via an alert.
Output

 The above output signifies that all the values in the first array are “false”, but it is not the case in the second array.
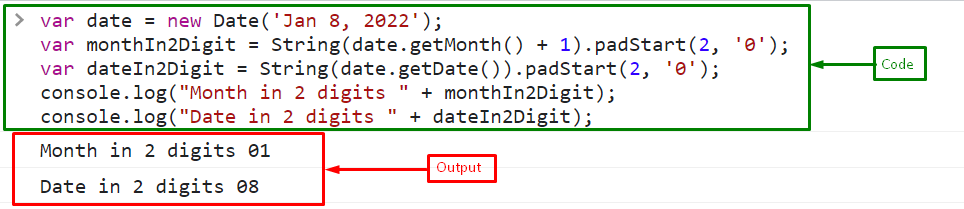
 We have compiled the necessary information related to getting the month and date in a 2-digit format.
 In the above output, it can be observed that by referring to the “id” of the parent node, the corresponding set attribute is displayed.
 From the above output, it can be seen that the parent node’s attribute “style” is fetched.
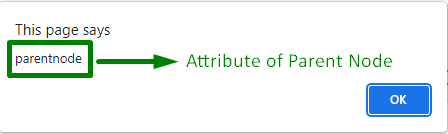 The above output signifies that the desired requirement is achieved.
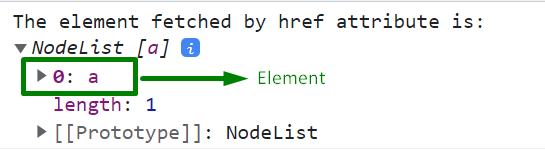 In the above output, it can be seen that the corresponding “<a>” element is retrieved with the help of the specified href attribute.
Example 2: Get an Element by Matching the href Attribute Partially
In this example, the corresponding element will be fetched by specifying the href attribute partially as well:
<a href="https://google.com">Google</a><script type="text/javascript">
let get = document.querySelectorAll('[href*="google.com"]');
console.log("The element fetched by the partial href attribute is:", get); </script>
Perform the following steps in the above code:
Firstly, likewise, include the “href” attribute and specify the stated “URL” within the “<a>” element.
In the JavaScript code, access the stated element by specifying the href attribute against it partially using the “document.querySelectorAll()” method.
Finally, display the corresponding element, i.e., “<a>” against the specified partial attribute.
Output
In the above output, it can be seen that the corresponding “<a>” element is retrieved with the help of the specified href attribute.
Example 2: Get an Element by Matching the href Attribute Partially
In this example, the corresponding element will be fetched by specifying the href attribute partially as well:
<a href="https://google.com">Google</a><script type="text/javascript">
let get = document.querySelectorAll('[href*="google.com"]');
console.log("The element fetched by the partial href attribute is:", get); </script>
Perform the following steps in the above code:
Firstly, likewise, include the “href” attribute and specify the stated “URL” within the “<a>” element.
In the JavaScript code, access the stated element by specifying the href attribute against it partially using the “document.querySelectorAll()” method.
Finally, display the corresponding element, i.e., “<a>” against the specified partial attribute.
Output
 The above output signifies that the stated element is fetched properly by partially specifying the href attribute.
 Let’s see the solution to fix this error.
 We have compiled the essential information related to the stated error and provided the relevant solution
 In the above output, it can be visualized that the stated minutes are added to the current time.
 From the above output, the time difference of “10” minutes in both statements can be observed.
 The above output signifies the time difference of “20” minutes in both statements.
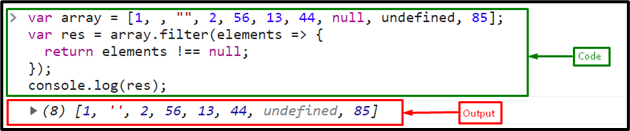 Now, remove all the null, undefined, and empty values from an array, and add these multiple conditions with the AND “&&” operator:
var res = array.filter(elements => {
return (elements != null && elements !== undefined && elements !== "");});
The given output shows that all the specified values from an array are successfully removed:
Now, remove all the null, undefined, and empty values from an array, and add these multiple conditions with the AND “&&” operator:
var res = array.filter(elements => {
return (elements != null && elements !== undefined && elements !== "");});
The given output shows that all the specified values from an array are successfully removed:

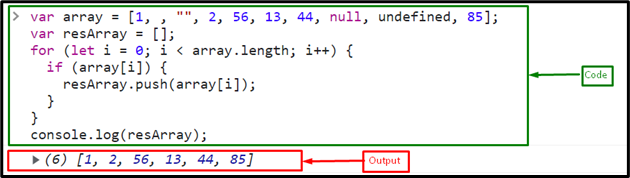
 Now, eliminate all the other undefined values from an array by specifying the following condition:
array.forEach(elements => {
if (elements != null && elements !== undefined && elements !== "") {
resArray.push(elements);
}});
Output
Now, eliminate all the other undefined values from an array by specifying the following condition:
array.forEach(elements => {
if (elements != null && elements !== undefined && elements !== "") {
resArray.push(elements);
}});
Output
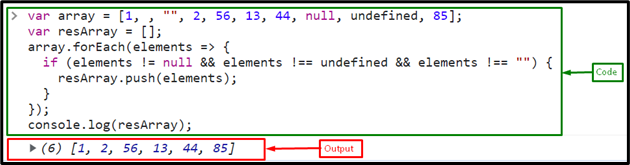 We compiled all the best methods for removing the null values from an array.
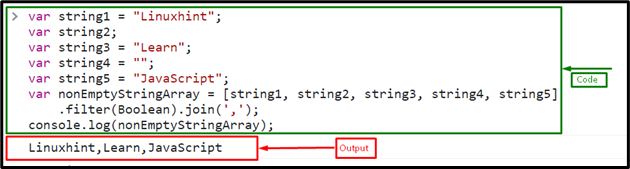 Now, let’s see what will happen when we use only the “join()” method for joining the non-empty strings.
Join all the strings by passing them in an array and call the “join()” method with a separator (“,”):
var joinNonEmptyString = [string1, string2, string3, string4, string5].join(',');
Print the result on the console:
console.log(joinNonEmptyString);
The output indicates that the “join()” method joins all the strings including empty strings.
That’s why for joining non-empty strings, we use the “filter()” method with the “join() “method:
Now, let’s see what will happen when we use only the “join()” method for joining the non-empty strings.
Join all the strings by passing them in an array and call the “join()” method with a separator (“,”):
var joinNonEmptyString = [string1, string2, string3, string4, string5].join(',');
Print the result on the console:
console.log(joinNonEmptyString);
The output indicates that the “join()” method joins all the strings including empty strings.
That’s why for joining non-empty strings, we use the “filter()” method with the “join() “method:
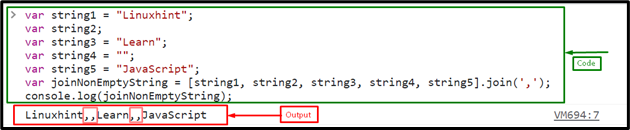 We have provided the essential instructions related to joining the non-empty strings with a separator.
 In the above output, it can be observed that the length of the map is identical to the number of set values in the map.
Example 2: Calculate the Length/Size of Map Based on Condition
This example can be implemented to compute the map’s length based on the condition applied to a specific “key” in a map.
Let’s go through the following example:
<script type="text/javascript">let mapSize = new Map();
mapSize.set('id', 1);
mapSize.set('name', 'Harry');if (mapSize.has("id")){
console.log("The length of the map is:", mapSize.size - 1)}else{
console.log("The length of the map is:", mapSize.size)}</script>
Implement the following steps in the above code snippet:
Recall the discussed steps in the previous example for creating a new map object and setting the values for the stated “keys”.
After that, apply the “has()” method to locate the specified key within the map.
Upon the satisfied condition, apply the “size” property such that “1” is subtracted from the map’s computed length.
In the other scenario, the “else” condition will execute, referring to the default length.
Output
In the above output, it can be observed that the length of the map is identical to the number of set values in the map.
Example 2: Calculate the Length/Size of Map Based on Condition
This example can be implemented to compute the map’s length based on the condition applied to a specific “key” in a map.
Let’s go through the following example:
<script type="text/javascript">let mapSize = new Map();
mapSize.set('id', 1);
mapSize.set('name', 'Harry');if (mapSize.has("id")){
console.log("The length of the map is:", mapSize.size - 1)}else{
console.log("The length of the map is:", mapSize.size)}</script>
Implement the following steps in the above code snippet:
Recall the discussed steps in the previous example for creating a new map object and setting the values for the stated “keys”.
After that, apply the “has()” method to locate the specified key within the map.
Upon the satisfied condition, apply the “size” property such that “1” is subtracted from the map’s computed length.
In the other scenario, the “else” condition will execute, referring to the default length.
Output
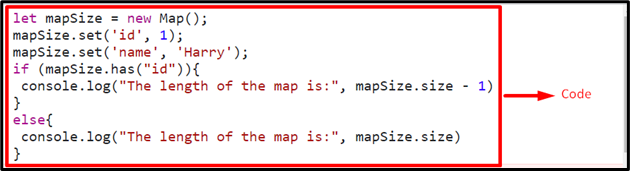 It is evident in the above output that the particular “key” is included in the map, and hence, the “if” condition is executed.

 We have compiled the essential information related to converting an ISO string to a date object.
 From the above output, it can be observed that the value of the timestamp is retrieved with respect to the specified data string.
 The above output signifies that we have successfully converted the date string to a timestamp.
 The above output signifies that the image specified in the “src” attribute clears upon the button click.
 The above output indicates that the desired functionality is achieved.
 The specified image is cleared from DOM upon the button click, thereby clearing the “src” attribute.

 From the above output, it can be observed that the last array element is fetched.

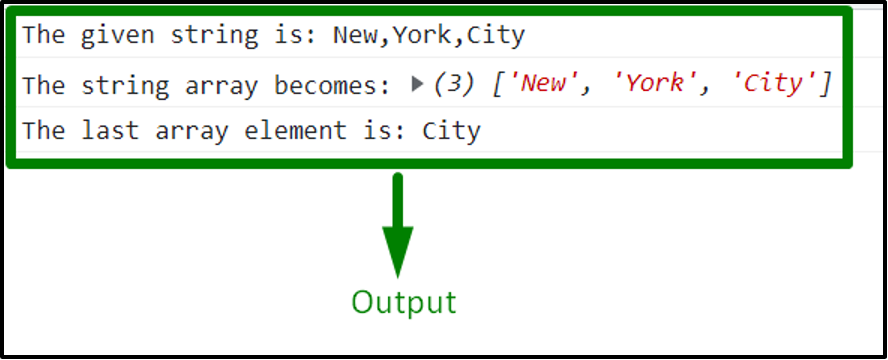 In the above output, it can be observed that the desired requirement is achieved.

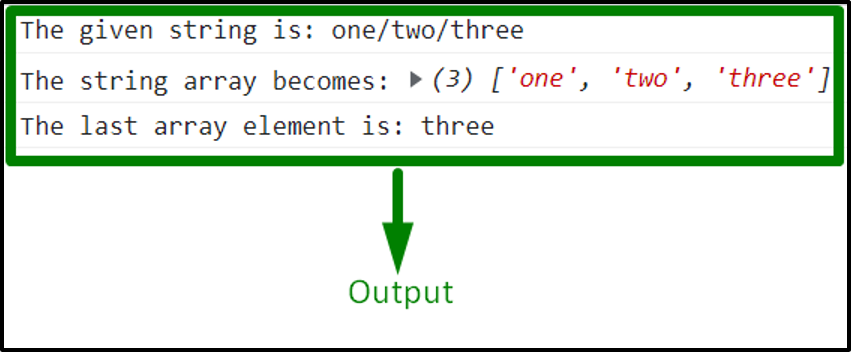 The specified string value is splitted based on the regular expression “/”.

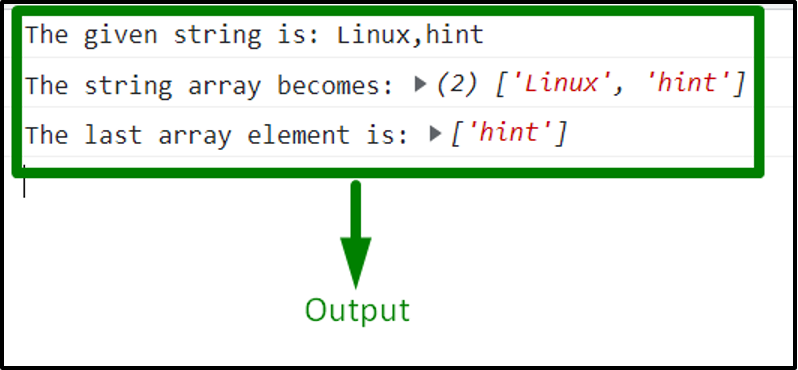 The above output indicates that the last array element is retrieved successfully.

 From the above output, it can be observed that the given string is split into an array, and the first array element is fetched.

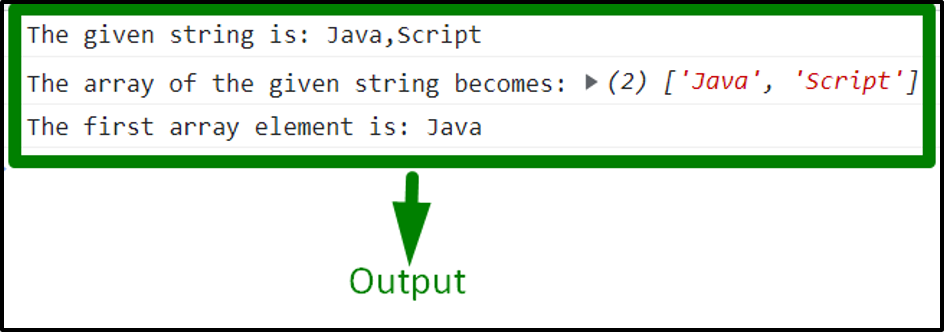

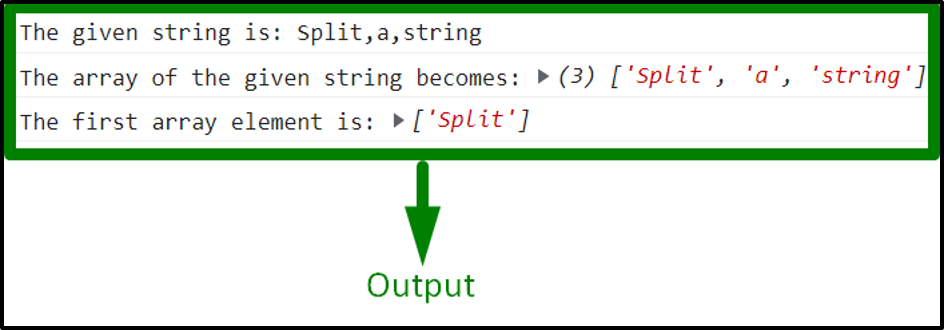 From the above output, it is evident that the first array element is retrieved.
 Now, in a JavaScript file, first, get the element using the “getElementById()” method and then fetch its text with the help of the “textContent” property and store it in a variable “text”.
Then, call the “innerHTML” property that will print the text on the specific field in a single row with spaces.
function getText(){
var text = document.getElementById("list").textContent;
document.getElementById("text").innerHTML = text;}
The corresponding output will be as follows:
Now, in a JavaScript file, first, get the element using the “getElementById()” method and then fetch its text with the help of the “textContent” property and store it in a variable “text”.
Then, call the “innerHTML” property that will print the text on the specific field in a single row with spaces.
function getText(){
var text = document.getElementById("list").textContent;
document.getElementById("text").innerHTML = text;}
The corresponding output will be as follows:
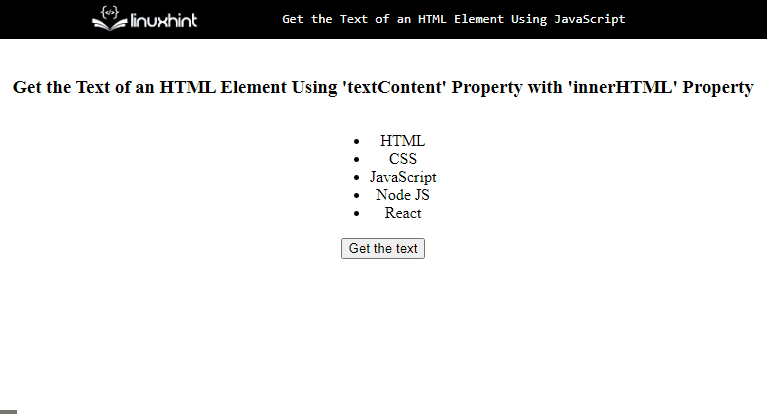 Let’s check out the second method!
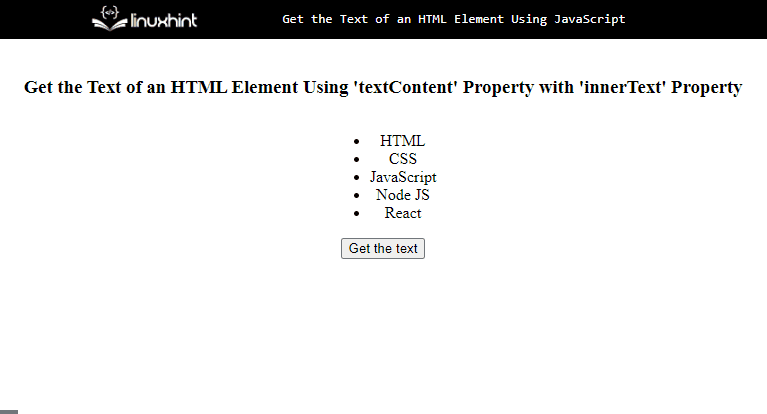 The above GIF signifies that the “innerText” property with the “textContent” property gets the text of an HTML element in the list format.
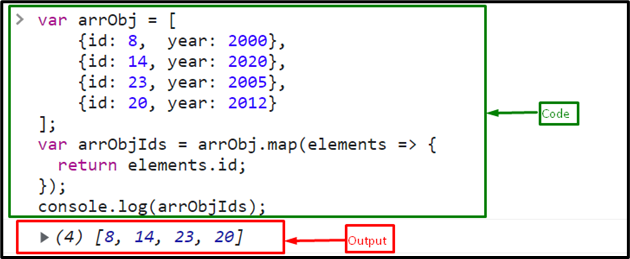 Now, find the largest id from the mapped array of ids using the “max()” method by passing an array with a spread operator in the max() method as an argument:
var maxId = Math.max(...arrObjIds);</tr></tbody></table>
Finally, print the largest id on the console:[cce_bash escaped="true" theme="blackboard" nowrap="0"]
console.log(maxId);
The output displays “23” which is the largest id in an array of objects:
Now, find the largest id from the mapped array of ids using the “max()” method by passing an array with a spread operator in the max() method as an argument:
var maxId = Math.max(...arrObjIds);</tr></tbody></table>
Finally, print the largest id on the console:[cce_bash escaped="true" theme="blackboard" nowrap="0"]
console.log(maxId);
The output displays “23” which is the largest id in an array of objects:

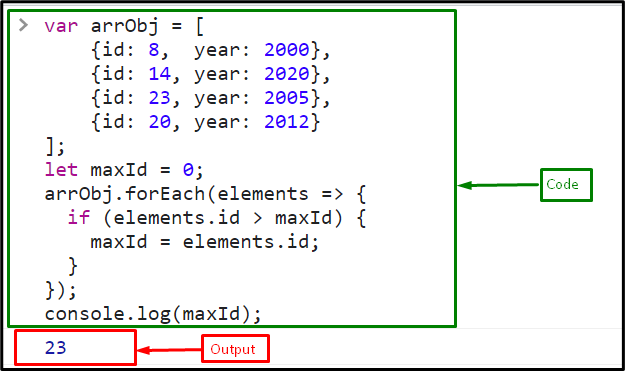
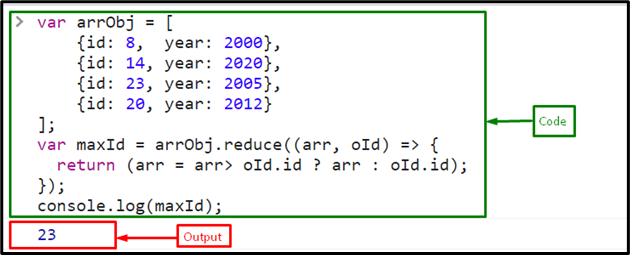 That was the essential information related to getting the max id of an array of objects.
 The above output signifies that the child elements are fetched successfully.
Let’s move on to the next approach for achieving the same functionality.
The above output signifies that the child elements are fetched successfully.
Let’s move on to the next approach for achieving the same functionality.
 In the above output, it can be observed that all the “td” child elements within the table(parent) are fetched successfully.
 Set the value of a variable to “-2”:
var num = -2;
Check whether “-2” is greater than zero or not using the NOT (!) operator:
console.log(!(num > 0));
The output displays “true”, which means the number “-2” is not greater than zero:
Set the value of a variable to “-2”:
var num = -2;
Check whether “-2” is greater than zero or not using the NOT (!) operator:
console.log(!(num > 0));
The output displays “true”, which means the number “-2” is not greater than zero:
 Example 2: Determine Whether the Number is not Greater than 0 Using less than equal to “<=” Operator
Here, in the following example, we will use the less than equal to “<=” operator to check if the number entered by the user is greater than zero or not.
First, create a button in the HTML file that will prompt the user to get the number by clicking on the button.
Then, attach an “onclick” event to the button that will trigger while on the click event occurs:
<button onclick = "negNumber()">Click to Check for a Number</button>
In the JavaScript file or the <script> tag, use the following lines of code:
function negNumber(){
let get = prompt("Enter a number:")
if(get <= 0){
alert("The number is not greater than 0")
}
else{
alert("The number is greater than 0")
}}
In the above code snippet:
Define a function named “negNumber()”.
Utilize the “prompt()” method to obtain the value from the user.
Check the condition using a conditional statement and the operator; if the entered value is less than or equal to 0, display an alert message that the number is not greater than 0.
In the else statement, show an alert message that the specified number is larger than 0.
The corresponding output will be as follows:
Example 2: Determine Whether the Number is not Greater than 0 Using less than equal to “<=” Operator
Here, in the following example, we will use the less than equal to “<=” operator to check if the number entered by the user is greater than zero or not.
First, create a button in the HTML file that will prompt the user to get the number by clicking on the button.
Then, attach an “onclick” event to the button that will trigger while on the click event occurs:
<button onclick = "negNumber()">Click to Check for a Number</button>
In the JavaScript file or the <script> tag, use the following lines of code:
function negNumber(){
let get = prompt("Enter a number:")
if(get <= 0){
alert("The number is not greater than 0")
}
else{
alert("The number is greater than 0")
}}
In the above code snippet:
Define a function named “negNumber()”.
Utilize the “prompt()” method to obtain the value from the user.
Check the condition using a conditional statement and the operator; if the entered value is less than or equal to 0, display an alert message that the number is not greater than 0.
In the else statement, show an alert message that the specified number is larger than 0.
The corresponding output will be as follows:
 We have gathered all the essential instructions related to verifying whether the number is greater than 0 or not using JavaScript.
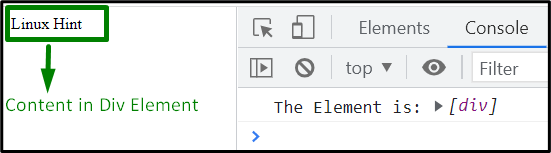 From the above output, it is evident that the element is pushed into the array upon the satisfied condition.
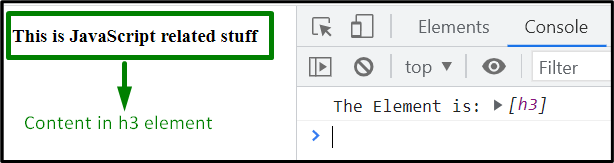 The above output indicates that the desired requirement is fulfilled.
 Example 2: Restrict the Button Click After a Single Click
To restrict the submit button click, write the below-provided code in the JavaScript file or the <script> tag:
var submitButton = document.getElementById('submit');
let buttonClicked = false;
submitButton.addEventListener('click', function handleClick() {
if (buttonClicked) {
return;
}
console.log('Submit button is clicked');
buttonClicked = true;});
In the above-given code:
First, get the submit button reference using its assigned id with the help of the “getElementById()” method.
Create a new variable called “buttonClicked” and assign its value to “false”.
In the “addEventListener()” method, define a function called “handleClick()” to manage to click events.
After the button is clicked, set the value of the “buttonClicked” property to “true”.
In this scenario, when the button is clicked for the first time, the added message will be displayed.
In the other case, nothing will happen while clicking the same button again and again:
Example 2: Restrict the Button Click After a Single Click
To restrict the submit button click, write the below-provided code in the JavaScript file or the <script> tag:
var submitButton = document.getElementById('submit');
let buttonClicked = false;
submitButton.addEventListener('click', function handleClick() {
if (buttonClicked) {
return;
}
console.log('Submit button is clicked');
buttonClicked = true;});
In the above-given code:
First, get the submit button reference using its assigned id with the help of the “getElementById()” method.
Create a new variable called “buttonClicked” and assign its value to “false”.
In the “addEventListener()” method, define a function called “handleClick()” to manage to click events.
After the button is clicked, set the value of the “buttonClicked” property to “true”.
In this scenario, when the button is clicked for the first time, the added message will be displayed.
In the other case, nothing will happen while clicking the same button again and again:
 All the necessary information related to checking if the element is already clicked or not using JavaScript is provided in this post.
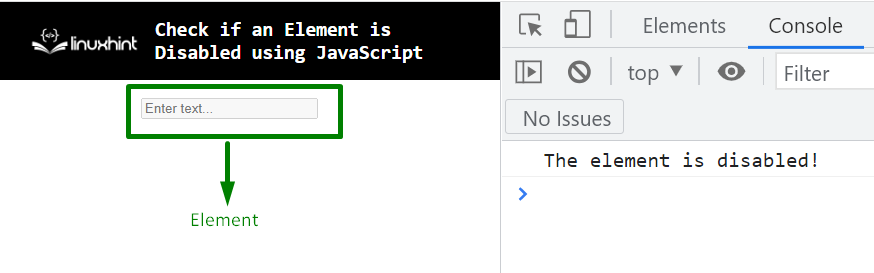 In the above output, it can be observed that the input text field element is disabled, as evident in the Document Object Model(DOM) and console, respectively.
 As seen above, the button is disabled on the DOM, and so is the corresponding message on the console.
 Upon verification, the corresponding element turned out to be disabled in the above output.
 From the above output, it is proved that all the object properties hold “null” values.
Example 2: Check If Object Properties are Null, Undefined, or False
This example will check for multiple values within the object and return the corresponding result:
<script type="text/javascript">
let object = {x: null, y: undefined, z: false};
let objProp = Object.values(object).every(value => {if (value === null || value === undefined || value === false) {
return true;}
return false;});
console.log(objProp);</script>
Perform the following steps as given in the above lines of code:
Likewise, create an object named “object” having the stated properties and assigned values.
After that, similarly, apply the “Object.values()” method such that the created object is checked for each of the specified values against a property in the stated condition with the help of the “OR(||)” operator.
In the case of a value being “null”, “undefined”, or “false”, a boolean value “true” will be returned.
In the other scenario, the value “false” will be displayed.
Output
From the above output, it is proved that all the object properties hold “null” values.
Example 2: Check If Object Properties are Null, Undefined, or False
This example will check for multiple values within the object and return the corresponding result:
<script type="text/javascript">
let object = {x: null, y: undefined, z: false};
let objProp = Object.values(object).every(value => {if (value === null || value === undefined || value === false) {
return true;}
return false;});
console.log(objProp);</script>
Perform the following steps as given in the above lines of code:
Likewise, create an object named “object” having the stated properties and assigned values.
After that, similarly, apply the “Object.values()” method such that the created object is checked for each of the specified values against a property in the stated condition with the help of the “OR(||)” operator.
In the case of a value being “null”, “undefined”, or “false”, a boolean value “true” will be returned.
In the other scenario, the value “false” will be displayed.
Output
 In the above output, it can be observed that the added conditions are evaluated as true, so, the boolean value “true” is returned.
 In the above output, it can be observed that the applied condition works properly, referring to the specified value.
Example 2: Check if the User Entered Value is Not Equal to 0
This example will illustrate the stated requirement with the help of a user-defined value:
</div><script type="text/javascript">
let get = prompt("Enter the value:")if (get == 0) {
console.log('The value is zero');} else {
console.log('The value is not zero');}</div></script>
In the above code snippet:
Firstly, input the value from the user to be checked if it equals “0” or not.
Now, repeat the steps discussed in the previous example for applying a condition upon the user-defined value with the help of the “if/else” condition and the “comparison” operator(==).
Finally, display the corresponding message referring to the redirected condition.
Output
In the above output, it can be observed that the applied condition works properly, referring to the specified value.
Example 2: Check if the User Entered Value is Not Equal to 0
This example will illustrate the stated requirement with the help of a user-defined value:
</div><script type="text/javascript">
let get = prompt("Enter the value:")if (get == 0) {
console.log('The value is zero');} else {
console.log('The value is not zero');}</div></script>
In the above code snippet:
Firstly, input the value from the user to be checked if it equals “0” or not.
Now, repeat the steps discussed in the previous example for applying a condition upon the user-defined value with the help of the “if/else” condition and the “comparison” operator(==).
Finally, display the corresponding message referring to the redirected condition.
Output
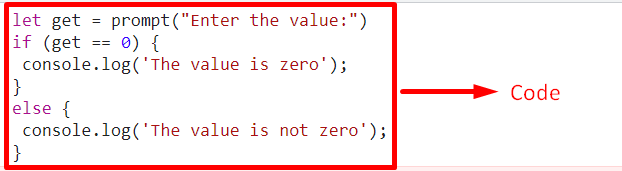 From the above output, it is evident that both of the specified conditions work properly.
 The above output signifies that the desired requirement is fulfilled.
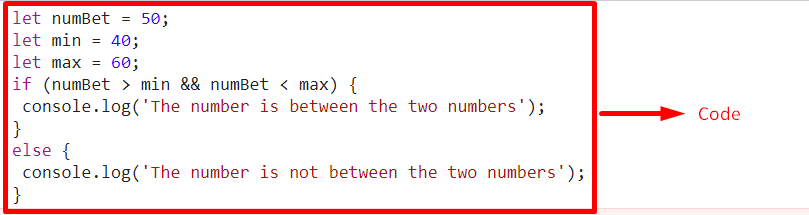 In the above output, it can be observed that the specified number is in between the two stated numbers.
 The above output signifies that the number passed as an argument is between the other two passed numbers.
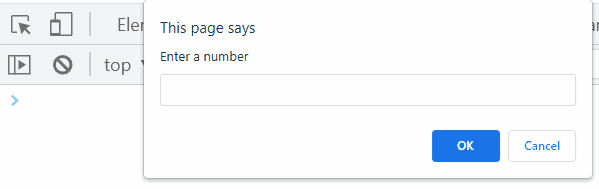 In the above output, both of the conditions work properly upon the user-defined number.
 In the JavaScript file, first, define the function “color” which will fetch the input field by specifying its id in the “getElementById()” method, and then set the background color to “pink”:
function color(){
var input = document.getElementById('txt');
input.style.backgroundColor = 'pink'; }
Output
In the JavaScript file, first, define the function “color” which will fetch the input field by specifying its id in the “getElementById()” method, and then set the background color to “pink”:
function color(){
var input = document.getElementById('txt');
input.style.backgroundColor = 'pink'; }
Output
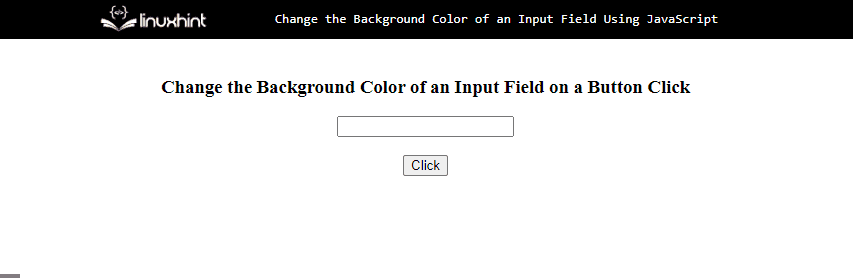 The above GIF shows the input field’s background color is changed when the button is clicked.
Bonus Tip
You can also use the “RGB” values to change the background color as follows:
input.style.backgroundColor = 'rgb(' + 233 + ',' + 185+ ',' + 193 + ')';
Output
The above GIF shows the input field’s background color is changed when the button is clicked.
Bonus Tip
You can also use the “RGB” values to change the background color as follows:
input.style.backgroundColor = 'rgb(' + 233 + ',' + 185+ ',' + 193 + ')';
Output
 We have gathered the instructions related to changing the background color of an input field using JavaScript.
 In the above output, it can be observed that the variable “multiply” is of the function type.
 From the above output, it can be observed that the stated inline function is of the “function” type.
 The above output indicates that the required functionality is achieved.
 The above output indicates that the object keys with their corresponding values are successfully traversed in print on the console in reverse order.
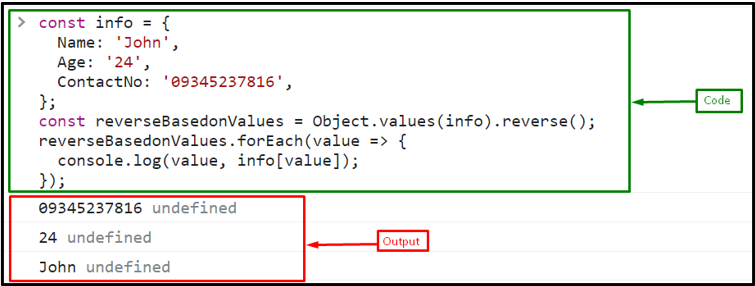 The above output shows the values of the object in reverse order.
 Let’s see the second method to get the first character of the string.

 All the relevant information is compiled to get the first letter of the string.
 The above output displays “true”, which indicates that the string ends with the specified substring.
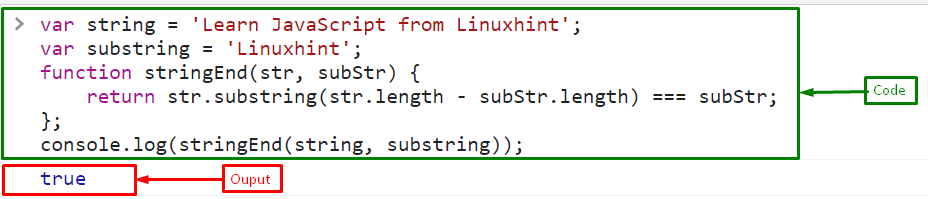 The above output displays “true” which means, the string ends with the specified substring.
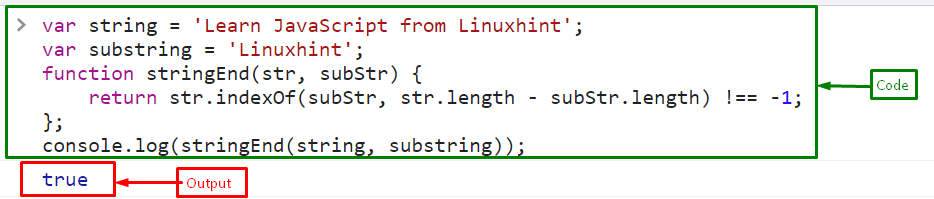 All the relevant information is gathered related to identifying whether the string ends with a substring or not.
 Now, in a JavaScript file or a “script” tag, use the below-provided code to check whether the event.target has a specific class or not:
document.addEventListener('click', function handleClick(event) {
var hasClass = event.target.classList.contains('center');
alert("This div contains 'center' class: " + hasClass);});
In the above code snippet:
First, attach an event listener on a click event that will handle every click on DOM.
Then, check whether the triggered event has the CSS class “center” or not with the help of the “classList.class()” method.
Output
Now, in a JavaScript file or a “script” tag, use the below-provided code to check whether the event.target has a specific class or not:
document.addEventListener('click', function handleClick(event) {
var hasClass = event.target.classList.contains('center');
alert("This div contains 'center' class: " + hasClass);});
In the above code snippet:
First, attach an event listener on a click event that will handle every click on DOM.
Then, check whether the triggered event has the CSS class “center” or not with the help of the “classList.class()” method.
Output
 The above GIF shows that div1 contains the “center” class as it shows “true”, while div2 and div3 display “false” in the alert box, which means they do not contain the “center” class.
 The above GIF shows that only div3 contains the “div3Style” class as it shows “true”.
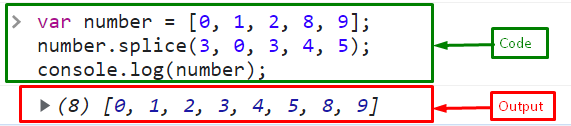 The output indicates that the elements are successfully added to an array from index 3.
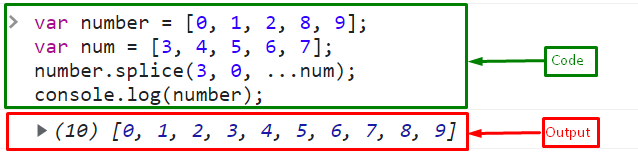 The above output shows that all elements of an array “num” are successfully added in the “number” array at the 3rd index.
 From the above output, it can be observed that the included image hides upon clicking outside it.
 From the above output, it is evident that the paragraph hides upon clicking outside it.
 The visibility of the image can be observed when clicked on it and when clicked outside.
 That was all about hiding elements when clicked outside.
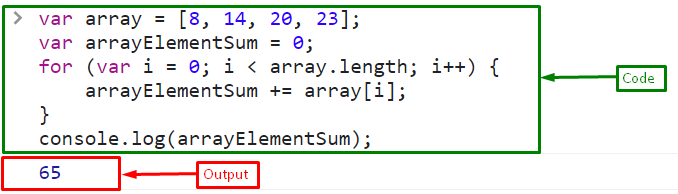 The output shows the sum of all the elements in an array as “65”.
 The output indicates that with the help of the “for-of” loop, the elements of an array that are successfully added and displayed “65” as their sum.
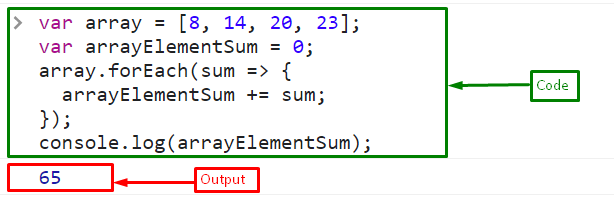
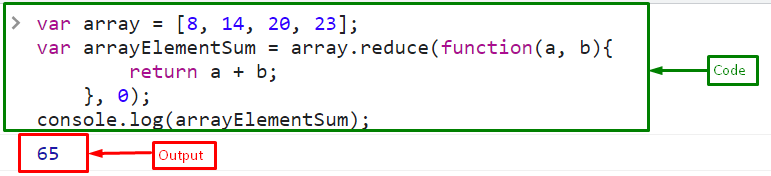 That’s all about getting the array of numbers’ sum.
 In the above output, it can be observed that the substring’s value before the specified character is retrieved.
 From the above output, it is evident that the first substring value from an array is retrieved before a specific character in the provided string.
 The above output indicates that the substring values are fetched before both specified characters.
 The above output signifies that the second last element from an array is extracted.
 The above output indicates that the desired functionality is achieved.
 The above output indicates that the array element “Java” is returned, corresponding to the second last array element.
 The given requirement is fulfilled in the above output.
 In the above output, it can be observed that the intersection of both arrays is retrieved.

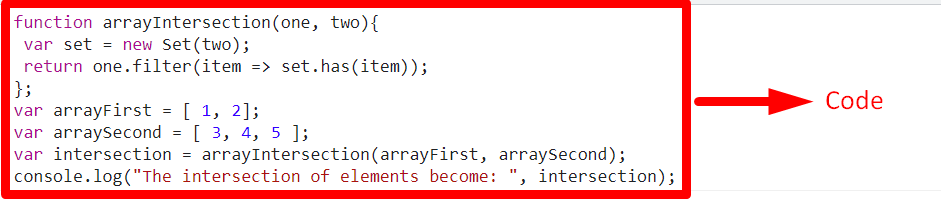 It can be observed that since no element was common in both the arrays, hence a “null” array is returned.
 From the above output, it can be seen that the index of the specified character is returned.
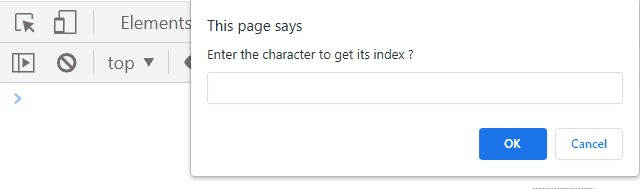 From the above output, it is evident that the index of the character “h” is retrieved.
 The above output indicates that the string comprises 9 characters.
The last index “-1”, signifies that there are no more string characters.
The above output indicates that the string comprises 9 characters.
The last index “-1”, signifies that there are no more string characters.
 In the above output, it can be observed that the resultant array is filled with “0”.
 From the above output, it is evident that the initialized array is transformed into a zero filled array.
 Here, it can be observed that the array is filled with five elements having the value ”0”.
 From the above output, the required functionality is implemented correctly.
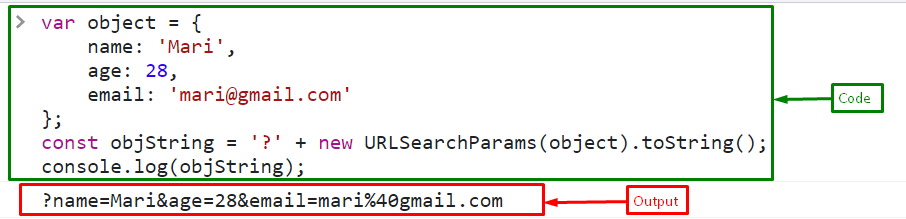 The output shows that the object is successfully converted to the string.
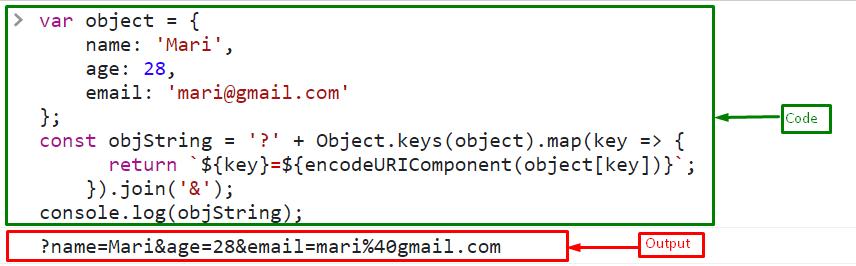 That was the essential information related to the conversion of a string from an object using JavaScript.
 The above output gives “NaN” because the string doesn’t match the Date format.
Now, pass the string in a proper format in a parse() method:
let strToDate =
The above output gives “NaN” because the string doesn’t match the Date format.
Now, pass the string in a proper format in a parse() method:
let strToDate =  The output shows a sum of the milliseconds from January 1, 1970, 00:00:00 UTC, and the date “2022-11-20”.
 The above output gives “Invalid Date” because the string doesn’t match the Date format.
Now, pass the date in a proper format in a Date constructor:
let strToDate = new
The above output gives “Invalid Date” because the string doesn’t match the Date format.
Now, pass the date in a proper format in a Date constructor:
let strToDate = new  The output displayed a new Date object.
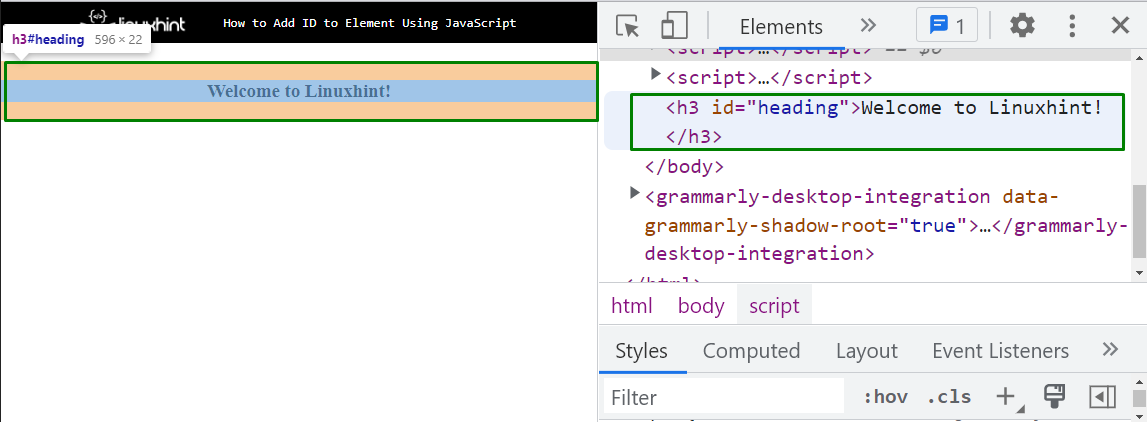 The output signifies that the heading is successfully created with its id that is set by using the “setAttribute()” method.
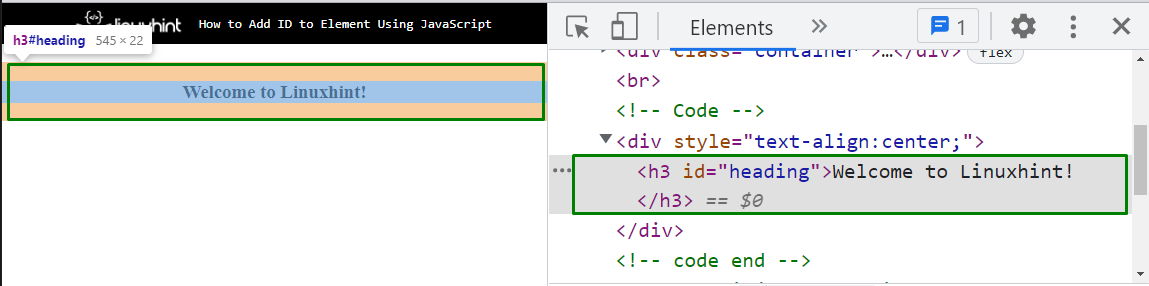 Now, in the JavaScript file, first, get the reference of the element using its assigned id with the help of the “getElementById()” method and store it in a variable “setId”:
var setId = document.getElementById("heading");
Set the new id “heading1” to the element using the “setAttribute()” method:
setId.setAttribute("id","heading1");
Output
Now, in the JavaScript file, first, get the reference of the element using its assigned id with the help of the “getElementById()” method and store it in a variable “setId”:
var setId = document.getElementById("heading");
Set the new id “heading1” to the element using the “setAttribute()” method:
setId.setAttribute("id","heading1");
Output
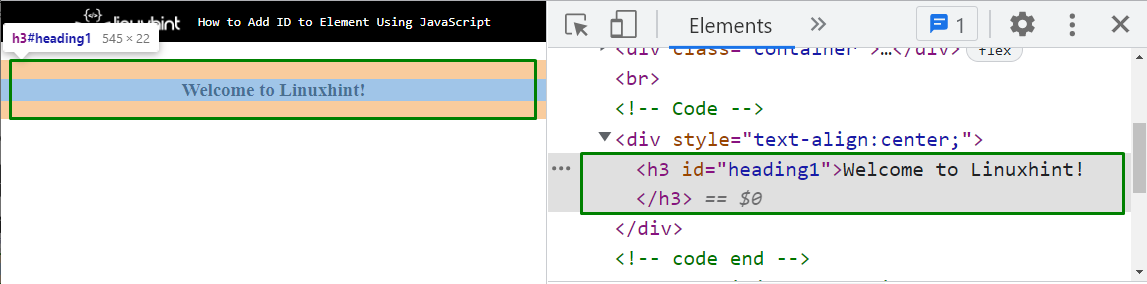 The above output indicates that the id of the HTML element heading is now “heading1” which is set by the JavaScript “setAttribute()” method.
 From the above output, it can be observed that the input field becomes disabled upon the button click.
Example 2: Set the “disabled” Attribute With the Help of a Boolean Value
In this example, the disabled attribute will be allocated a boolean value to perform the desired functionality.
The following example explains the stated concept:
<center><body><textarea id="input">Enter Text...</textarea><br><br><button onclick="setDisable()">Click to disable the Field</button></body></center><script type="text/javascript">function setDisable(){let get = document.getElementById('input');
get.setAttribute('disabled', true);}</script>
According to the above code snippet:
Allocate an input “textarea” element having the stated “id”.
Also, create a button having an “onclick” event which will invoke the function setDisable().
In the JavaScript part of the code, define a function named “setDisable()”.
In its definition, similarly, access the included text area, apply the “setAttribute()” method and assign it a boolean value “true”, respectively.
This will resultantly disable the input text area upon the button click.
Output
From the above output, it can be observed that the input field becomes disabled upon the button click.
Example 2: Set the “disabled” Attribute With the Help of a Boolean Value
In this example, the disabled attribute will be allocated a boolean value to perform the desired functionality.
The following example explains the stated concept:
<center><body><textarea id="input">Enter Text...</textarea><br><br><button onclick="setDisable()">Click to disable the Field</button></body></center><script type="text/javascript">function setDisable(){let get = document.getElementById('input');
get.setAttribute('disabled', true);}</script>
According to the above code snippet:
Allocate an input “textarea” element having the stated “id”.
Also, create a button having an “onclick” event which will invoke the function setDisable().
In the JavaScript part of the code, define a function named “setDisable()”.
In its definition, similarly, access the included text area, apply the “setAttribute()” method and assign it a boolean value “true”, respectively.
This will resultantly disable the input text area upon the button click.
Output
 The “disabled” attribute is set in a proper manner.
Example 3: Set the “disabled” Attribute to Multiple Elements
This example will result in setting the “disabled” attribute such that various elements will become disabled upon the button click at the same time.
Let’s overview the below-given example:
<center><body><input type= "text" class= "input"><input type= "text" class= "input"><input type= "checkbox" class= "input"><br><br><button onclick= "setDisable()">Click to disable the Fields</button></body></center><script type="text/javascript">function setDisable(){let get = document.getElementsByClassName("input")for (let input of get){
input.setAttribute('disabled', '');}}</script>
Go through the following steps as given in the above code snippet:
Firstly, include the input “text fields” and a “checkbox” element, respectively having the specified class.
Likewise, create a button having an “onclick” event invoking the function setDisable().
In the JavaScript part of the code, declare a function named “setDisable()”.
In its definition, access the included elements using the “getElementsByClassName()” method.
After that, apply the “for” loop.
Within the loop, apply the “setAttribute()” method such that all the included elements become disabled upon the button click.
Output
The “disabled” attribute is set in a proper manner.
Example 3: Set the “disabled” Attribute to Multiple Elements
This example will result in setting the “disabled” attribute such that various elements will become disabled upon the button click at the same time.
Let’s overview the below-given example:
<center><body><input type= "text" class= "input"><input type= "text" class= "input"><input type= "checkbox" class= "input"><br><br><button onclick= "setDisable()">Click to disable the Fields</button></body></center><script type="text/javascript">function setDisable(){let get = document.getElementsByClassName("input")for (let input of get){
input.setAttribute('disabled', '');}}</script>
Go through the following steps as given in the above code snippet:
Firstly, include the input “text fields” and a “checkbox” element, respectively having the specified class.
Likewise, create a button having an “onclick” event invoking the function setDisable().
In the JavaScript part of the code, declare a function named “setDisable()”.
In its definition, access the included elements using the “getElementsByClassName()” method.
After that, apply the “for” loop.
Within the loop, apply the “setAttribute()” method such that all the included elements become disabled upon the button click.
Output
 From the above output, it is evident that all the elements become disabled upon the button click.

 In the above output, it can be observed that the first three characters from the specified string are extracted.

 From the above output, it is evident that the required characters are extracted successfully.

 From the above output, it can be seen that the string characters are iterated one by one and displayed.

 From the above output, it can be seen that the index against the minimum value “10” is retrieved.
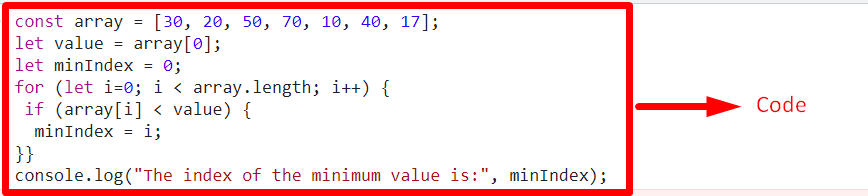
 The desired requirement is achieved in the above output.

 In the above output, it can be observed that the minimum value’s index is displayed.
 The above output displays a floating-point random number “48.04761034288709” between two numbers “83” and “23”.
If the user wants to get the random number in an integer format! Follow the below section.
The above output displays a floating-point random number “48.04761034288709” between two numbers “83” and “23”.
If the user wants to get the random number in an integer format! Follow the below section.
 The above output indicates that the “Math.floor()” method gives an integer random number between two numbers.


 We have compiled all the essential information related to removing everything after the character.
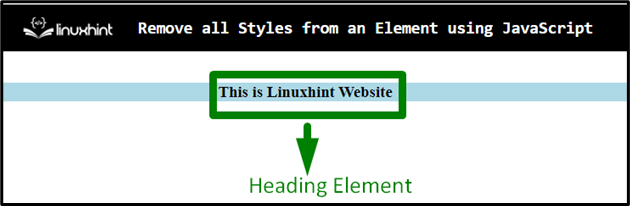 After Removing Style
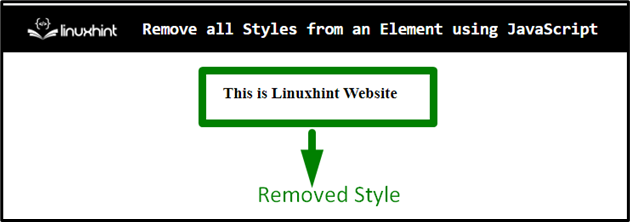 From both of the above image snippets, the difference before and after the style removal can be observed.
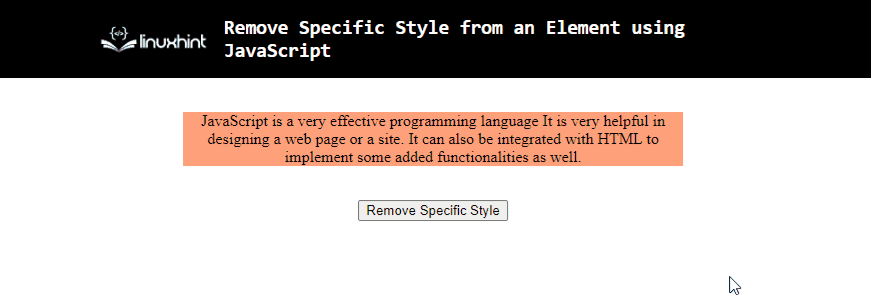 In the above output, the “width” of the paragraph is removed upon the button click.
 From the above output, it is evident that the image’s set dimensions within the “style” attribute do not affect the button click.
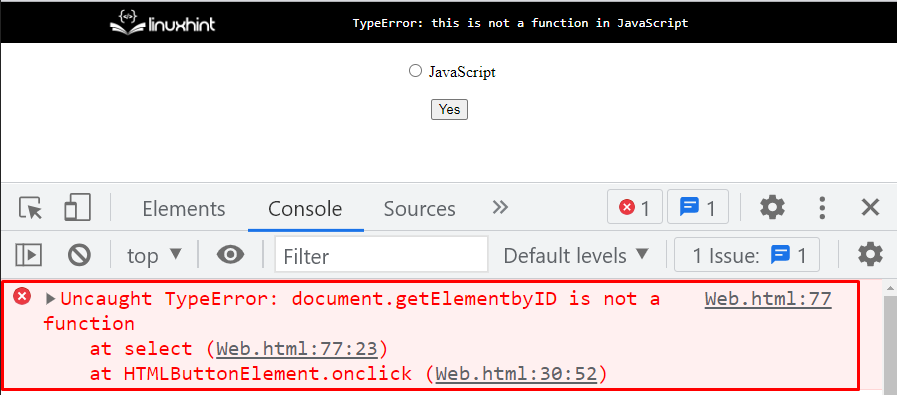 The above output shows an error “TypeError: document.getElementbyID is not a function” while clicking on the button because the method is called with a typo mistake.
It is getElementById() not getElementbyID().
The above output shows an error “TypeError: document.getElementbyID is not a function” while clicking on the button because the method is called with a typo mistake.
It is getElementById() not getElementbyID().
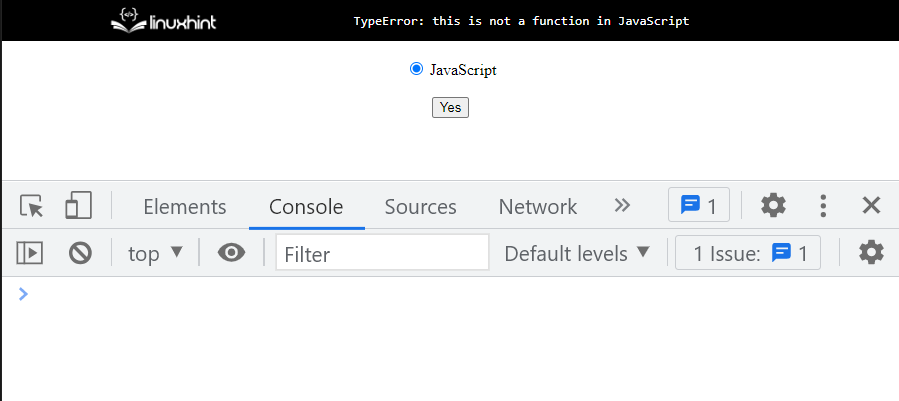 The above output snippet shows that the radio button is successfully checked by clicking on the button.
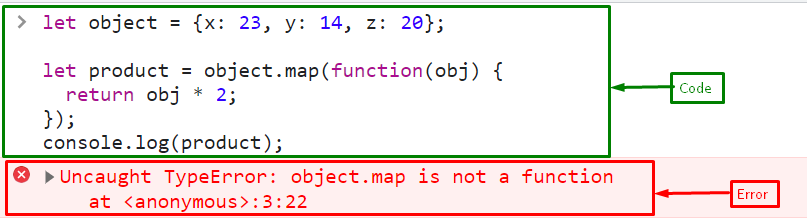 The above output shows “TypeError: object.map is not a function” because the “map()” method is not accessible by objects; it will work for the Arrays.
Let’s see “map()” method works for arrays or not.
To check it out, first, create an array of numbers:
let array = [23, 14, 20, 8, 4];
Invoke the “map()” method that will return the numbers multiplied by 2:
let product = array.map(function(n) {
return n * 2;});
Print the result on the console utilizing the “console.log()” method:
console.log(product);
The above output shows “TypeError: object.map is not a function” because the “map()” method is not accessible by objects; it will work for the Arrays.
Let’s see “map()” method works for arrays or not.
To check it out, first, create an array of numbers:
let array = [23, 14, 20, 8, 4];
Invoke the “map()” method that will return the numbers multiplied by 2:
let product = array.map(function(n) {
return n * 2;});
Print the result on the console utilizing the “console.log()” method:
console.log(product);
 The above output snippet shows the “map()” method works for the array objects.
All the essential information gathered for the JavaScript typeError: this is not a function.
The above output snippet shows the “map()” method works for the array objects.
All the essential information gathered for the JavaScript typeError: this is not a function.
 In the above output, it is evident that the background image is applied to the contained “heading” and “button” within the “div”.
 From the above output, it can be observed that the background image is added to the table upon the button click.
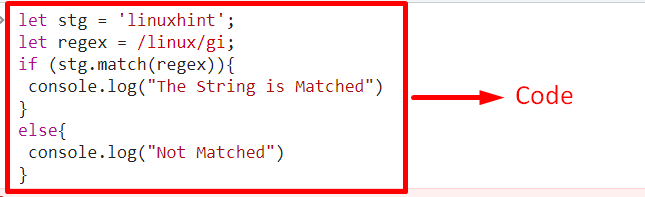 In the above output, it can be observed that the “regex” matches the specified string value.
Example 2: Using Regular Expression Pattern With match() Method on the User-Entered Value
In this example, the user-entered value will be matched with the regular expression.
Let’s heed the below-stated example:
<script type="text/javascript">
let stg = prompt("Enter the string value: ");
let regex = /linux/gi;if (stg.match(regex)){
alert("The String is Matched") }else{
alert("Not Matched")}</script>
In the above code lines:
In the first step, allow the user to enter a “string” value to be matched with the specified regular expression.
In the further steps, repeat the discussed steps for matching the entered string value and returning the corresponding message.
Output
In the above output, it can be observed that the “regex” matches the specified string value.
Example 2: Using Regular Expression Pattern With match() Method on the User-Entered Value
In this example, the user-entered value will be matched with the regular expression.
Let’s heed the below-stated example:
<script type="text/javascript">
let stg = prompt("Enter the string value: ");
let regex = /linux/gi;if (stg.match(regex)){
alert("The String is Matched") }else{
alert("Not Matched")}</script>
In the above code lines:
In the first step, allow the user to enter a “string” value to be matched with the specified regular expression.
In the further steps, repeat the discussed steps for matching the entered string value and returning the corresponding message.
Output
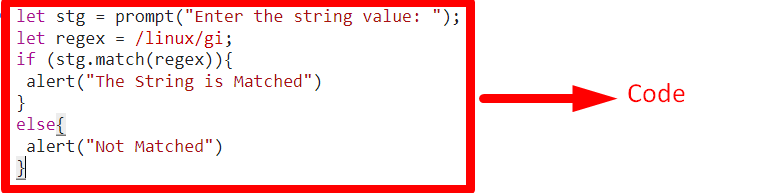 From the above output, it is evident that the entered string value matches the regular expression.
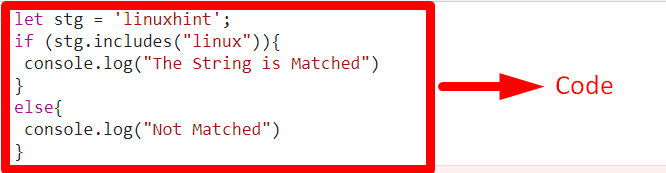 From the above output, it can be observed that the searched string value is included in the specified string value.
 Then, in the JavaScript file using the below lines of code:
function stayonPage() {if (confirm("Do you want to close the page?")){
window.close();
}}
In the above code snippet:
Define a function “stayonPage()”.
Check the condition by calling the JavaScript “confirm()” method that will show a message with the “OK” and “Cancel” option buttons.
Call the “window.close()” method in the body of the conditional statement.
If the user click on the “OK” button, it closes the tab, if they click on the “Cancel” button, it will do nothing and keep them on the same page.
Output
Then, in the JavaScript file using the below lines of code:
function stayonPage() {if (confirm("Do you want to close the page?")){
window.close();
}}
In the above code snippet:
Define a function “stayonPage()”.
Check the condition by calling the JavaScript “confirm()” method that will show a message with the “OK” and “Cancel” option buttons.
Call the “window.close()” method in the body of the conditional statement.
If the user click on the “OK” button, it closes the tab, if they click on the “Cancel” button, it will do nothing and keep them on the same page.
Output
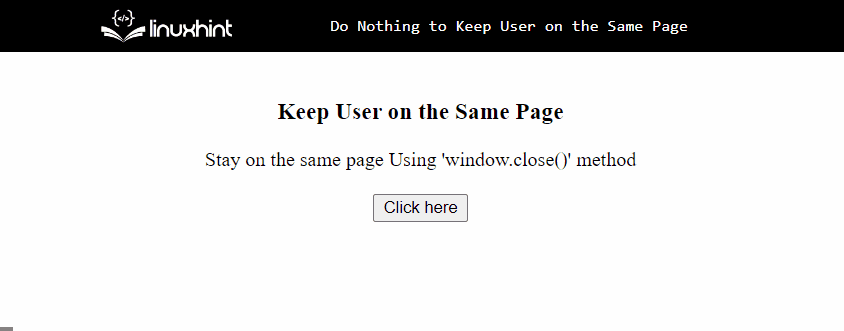 The above output shows that while clicking on the “Cancel” button, nothing happened.
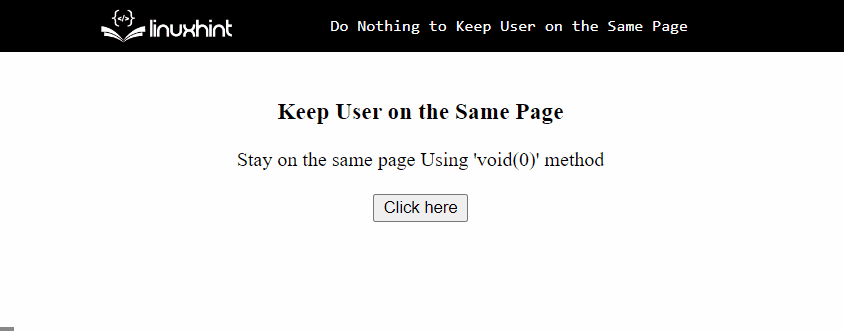
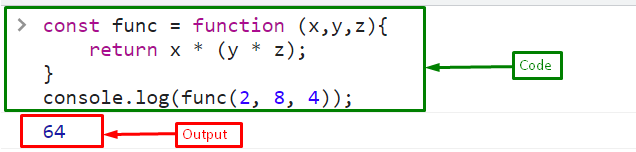 The output displays the product of numbers passed in a const function expression on the console.
As discussed above, the keyword “const” doesn’t allow “redeclared” and “reassigned”.
Here, in below code snippet, define a new function expression that will return the sum of the three numbers and store it in an already created constant variable “func”:
func = function (x,y,z){return x + (y + z);}
While calling the function with the variable name, it will display an error:
console.log(func(12, 6, 24));
Output
The output displays the product of numbers passed in a const function expression on the console.
As discussed above, the keyword “const” doesn’t allow “redeclared” and “reassigned”.
Here, in below code snippet, define a new function expression that will return the sum of the three numbers and store it in an already created constant variable “func”:
func = function (x,y,z){return x + (y + z);}
While calling the function with the variable name, it will display an error:
console.log(func(12, 6, 24));
Output
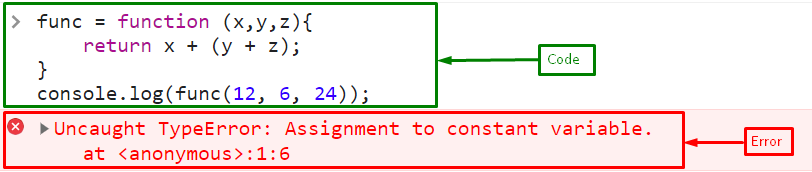 The output shows an error because of assigning a new function expression to the “func” variable.
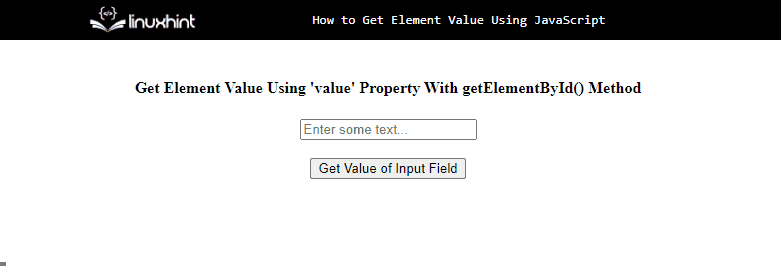 The above output indicates that the value of the element is successfully fetched using the value property with the getElementById() method.
How to get the reference of the element without any specified id? Follow the below section.
The above output indicates that the value of the element is successfully fetched using the value property with the getElementById() method.
How to get the reference of the element without any specified id? Follow the below section.
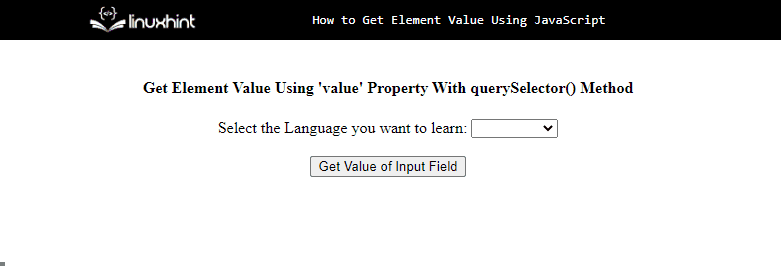
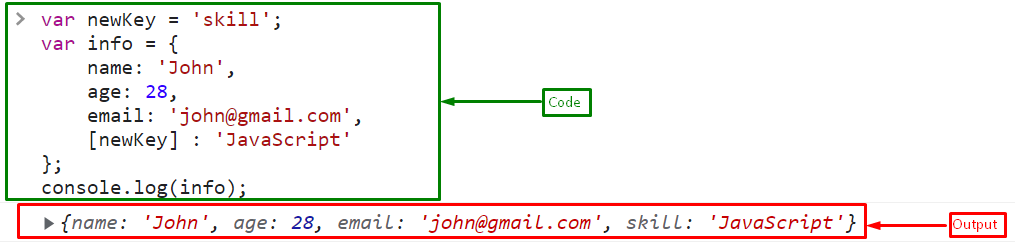 The above output shows that the dynamic key “skill” is successfully added and accessed in an object:
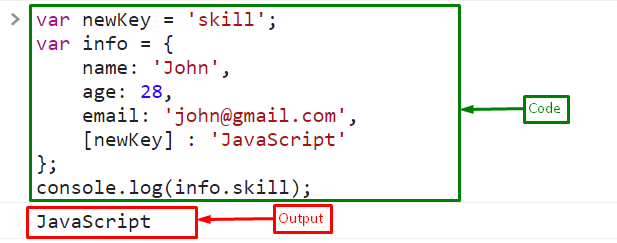 The output indicates that the object “info” successfully accesses the value of the “newKey” variable and stores it as a dynamic key.
 In the above output, it can be observed that the input field is disabled and enabled properly upon the corresponding button click.
 From the above output, it is evident that the input field becomes disabled upon pressing the “Enter” key.
 In the above output, it can be observed that the contained object is dumped on the console.
 From the above output, it is evident that the stated object is dumped successfully.
 From the above output, it can be observed that the contained properties and values of an object are dumped in the form of a table.
 In the above output, it can be observed that the object is dumped as a “string”.
 From the above output, it can be verified that the required functionality is achieved.
 From the above output, it is evident that the accurate calculation is returned with respect to the entered operator’s value.
 In the above output, it can be observed that the calculated value is returned upon clicking the corresponding operator button.
 From the above output, it can be observed that the detection of the “Tab” key is being done successfully.
 In the above output, it can be observed that upon the detection of the “Enter” key, the heading changes, thereby making the detection successful.
 From the above output, it can be observed that the desired requirement is achieved.
 In the above output, as the boolean value “false” is returned against the “inherited” properties, so the “toString” is returned false.
 In the above output, it can be observed that the parent node of both the heading and image are logged.
Example 2: Find the Parent Element of the Selected Option
This example will retrieve the parent element of all the contained options upon the button click.
Let’s follow the below-stated example step-by-step:
<body><p>Select one of the following language:</p><select class='options'><option>Python</option><option>Java</option><option>JavaScript</option></select><br><button onclick="getParent()">Click to get Parent</button><br><h3 id= "head">>/h3></body>
In the above lines of code:
Specify the “class” of the “select” element.
In the next step, include the stated options within the element in the previous step.
After that, create a “button” with an attached “onclick” event redirecting to the function getParent().
Also, specify the stated heading with an “id” to contain the message with the corresponding parent element on the Document Object Model(DOM).
<script>function getParent(){
var get = document.querySelector(".options");
var option= get.options[get.selectedIndex];
var fetch = document.getElementById("head");
fetch.innerHTML= "Parent element of the selected option is : " + option.parentNode.nodeName + " element";}</script>
Let’s continue to the JavaScript part of the code:
Declare a function named “getParent()”.
In its definition, access the “select” element using the “document.querySelector()” method.
In the next step, apply the “selectedIndex” property to return the selected option’s index in a drop-down list.
After that, access the allocated heading for displaying the parent element using the “document.getElementById()” method.
Lastly, apply the “innerHTML” property combined with the “parentNode.nodeName” to get the name of the parent element.
In the further part, style the stated elements and adjust their dimensions:
<style>
html{
height:100%;}
body{
text-align:center;}
.drop-down{
width:35%;
border:2px solid #fff;
font-weight:bold;
padding:8px;}</style>
Output
In the above output, it can be observed that the parent node of both the heading and image are logged.
Example 2: Find the Parent Element of the Selected Option
This example will retrieve the parent element of all the contained options upon the button click.
Let’s follow the below-stated example step-by-step:
<body><p>Select one of the following language:</p><select class='options'><option>Python</option><option>Java</option><option>JavaScript</option></select><br><button onclick="getParent()">Click to get Parent</button><br><h3 id= "head">>/h3></body>
In the above lines of code:
Specify the “class” of the “select” element.
In the next step, include the stated options within the element in the previous step.
After that, create a “button” with an attached “onclick” event redirecting to the function getParent().
Also, specify the stated heading with an “id” to contain the message with the corresponding parent element on the Document Object Model(DOM).
<script>function getParent(){
var get = document.querySelector(".options");
var option= get.options[get.selectedIndex];
var fetch = document.getElementById("head");
fetch.innerHTML= "Parent element of the selected option is : " + option.parentNode.nodeName + " element";}</script>
Let’s continue to the JavaScript part of the code:
Declare a function named “getParent()”.
In its definition, access the “select” element using the “document.querySelector()” method.
In the next step, apply the “selectedIndex” property to return the selected option’s index in a drop-down list.
After that, access the allocated heading for displaying the parent element using the “document.getElementById()” method.
Lastly, apply the “innerHTML” property combined with the “parentNode.nodeName” to get the name of the parent element.
In the further part, style the stated elements and adjust their dimensions:
<style>
html{
height:100%;}
body{
text-align:center;}
.drop-down{
width:35%;
border:2px solid #fff;
font-weight:bold;
padding:8px;}</style>
Output
 In the above output, it can be observed that the parent element of each of the selected options is retrieved.
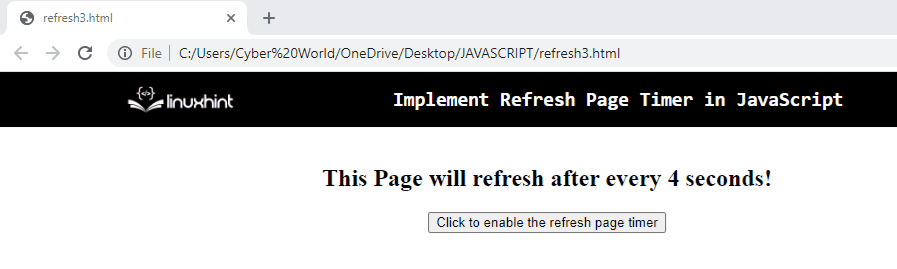 In the above output, it can be observed that the page refreshes after every 4 seconds.
 From the above output, it is evident that after the page is loaded, it refreshes after 8 seconds.
 In the above output, it can be observed that the page refreshes after 5 seconds.
 From the above output, it can be verified that the specified string is a palindrome.
Example 2: Check if a User-Entered String is Palindrome
This example will execute its functionalities upon the user-entered string value.
Let’s observe the following lines of code:
let string = prompt("Enter the string value");
let strPal = string.split("").reverse().join("");if (string === strPal) {
alert("The string is a palindrome");} else {
alert("Not a palindrome");}
In the above lines of code, perform the following steps:
Ask the user to input a string value via the “prompt” dialogue box.
After that, repeat the discussed procedure in the previous example for splitting, reversing, and joining the string value.
Lastly, display the corresponding message with respect to the entered string value.
Output
From the above output, it can be verified that the specified string is a palindrome.
Example 2: Check if a User-Entered String is Palindrome
This example will execute its functionalities upon the user-entered string value.
Let’s observe the following lines of code:
let string = prompt("Enter the string value");
let strPal = string.split("").reverse().join("");if (string === strPal) {
alert("The string is a palindrome");} else {
alert("Not a palindrome");}
In the above lines of code, perform the following steps:
Ask the user to input a string value via the “prompt” dialogue box.
After that, repeat the discussed procedure in the previous example for splitting, reversing, and joining the string value.
Lastly, display the corresponding message with respect to the entered string value.
Output
 In the above output, both scenarios of palindrome and non-palindrome string values are covered.
 From the above output, the behavior of both strings can be observed.
Example 2:
In this example, follow the below-stated code snippet:
function stringPalindrome(s) {
var lenString = s.length;
var x = 0;
var y = lenString - 1;
while (x < y) {
if (s[x] != s[y]) {
console.log("The string is not a palindrome") ;}
x += 1;
y -= 1;}
console.log("The string is a palindrome");}
stringPalindrome("dad")
stringPalindrome("harry")
In the above line of code:
Declare a function named “stringPalindrome()” having the string value to be checked for palindrome as its parameter.
In its definition, compute the string’s length.
Also, initialize the values for “x” and “y”.
The value of “y” will be assigned such that the string values are indexed properly.
After that, compare the first and last character values contained in the passed string value.
Finally, access the defined function having the passed string value as its parameter.
Output
From the above output, the behavior of both strings can be observed.
Example 2:
In this example, follow the below-stated code snippet:
function stringPalindrome(s) {
var lenString = s.length;
var x = 0;
var y = lenString - 1;
while (x < y) {
if (s[x] != s[y]) {
console.log("The string is not a palindrome") ;}
x += 1;
y -= 1;}
console.log("The string is a palindrome");}
stringPalindrome("dad")
stringPalindrome("harry")
In the above line of code:
Declare a function named “stringPalindrome()” having the string value to be checked for palindrome as its parameter.
In its definition, compute the string’s length.
Also, initialize the values for “x” and “y”.
The value of “y” will be assigned such that the string values are indexed properly.
After that, compare the first and last character values contained in the passed string value.
Finally, access the defined function having the passed string value as its parameter.
Output
 In the above output, it can be observed that both conditions are checked upon the passed string value.
 While calling the “alert()” method, the overridden alert() will be called as shown in above output:
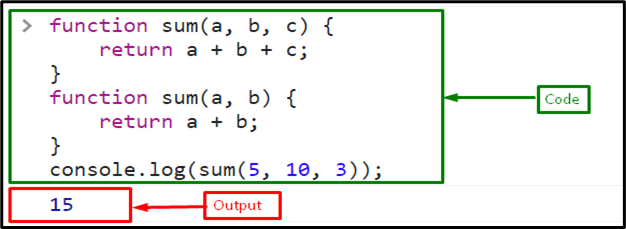 The output displays “15” because the overridden function with two parameters “sum(a, b)” is called when calling the function “sum”.
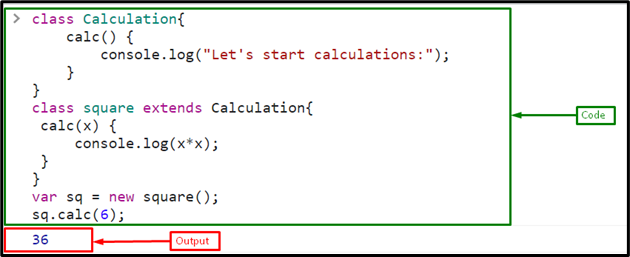 It is observable in the output that the method calc() of the parent class was overridden by the calc() method of the child class
 From the above output, it can be observed that upon the button click, the page is redirected to the “URL” thereby performing the functionality of the “anchor” element.
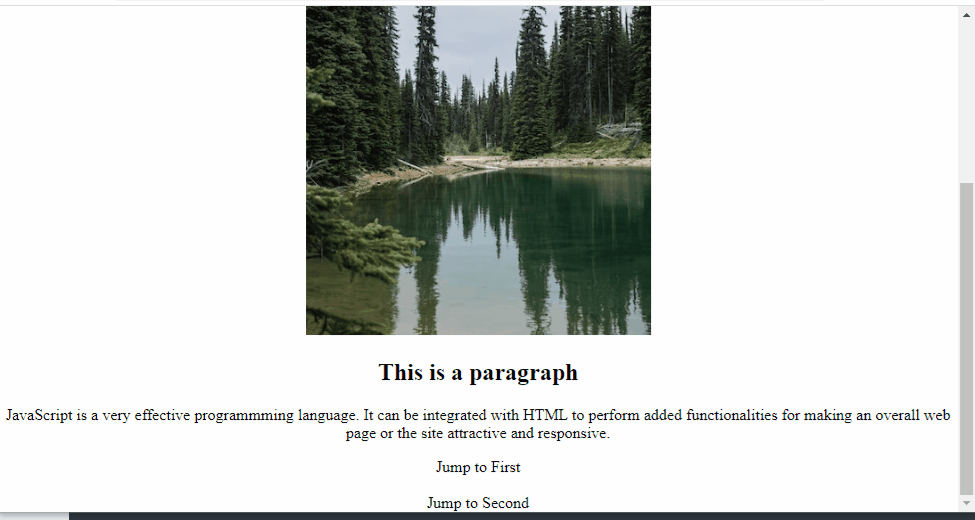 In the above output, it can be observed that upon hovering the mouse on “Jump to First”, the document is jumped to the top of the corresponding anchor.
 Output
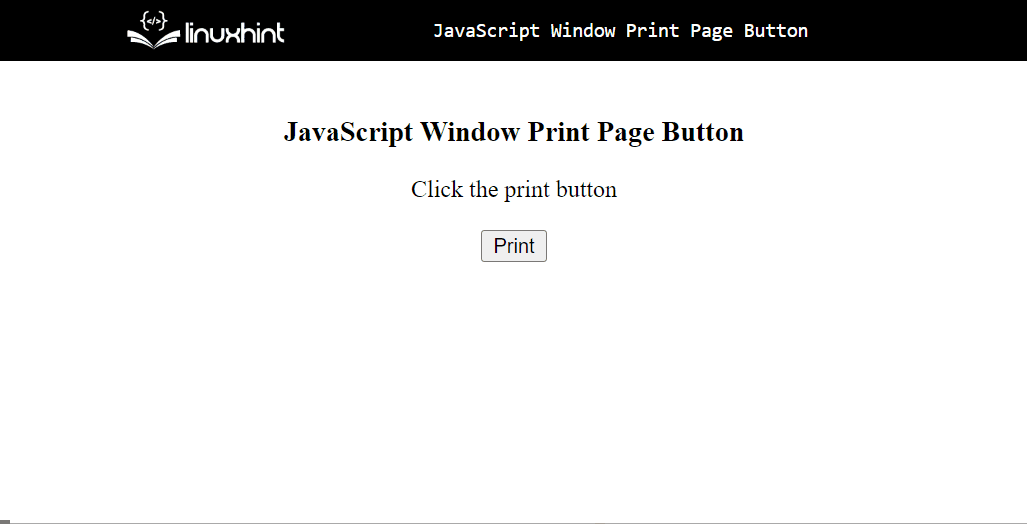 While clicking on the “Print” button, the output shows that the print dialog box appears to be printing this page.
After printing, the document looks like this:
While clicking on the “Print” button, the output shows that the print dialog box appears to be printing this page.
After printing, the document looks like this:
 The above output shows the content of the printed page, but the “window.print()” method didn’t print the navigation bar.
 This shows that the name of the variable is valid, that’s why it prints the stored value of a variable.

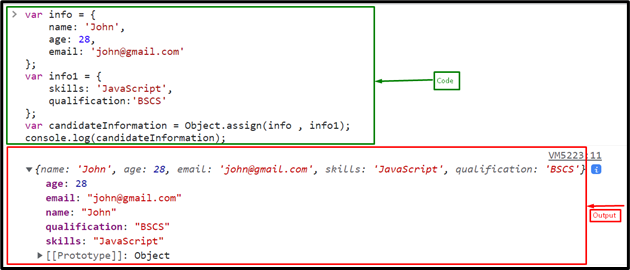
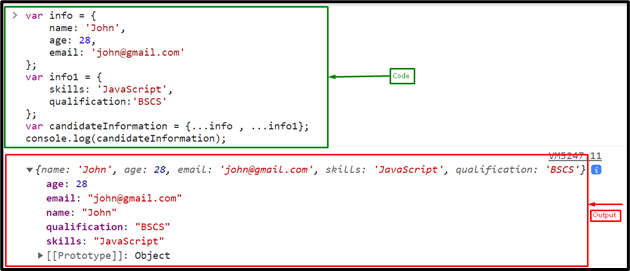
 From the above output, it can be observed that the items are incrementing in an infinite manner and so is the scrolling.
 In the above output, it is evident that the scroll is implemented infinitely upon the DOM.
 The above output indicates that the loop increments by 2 and prints an even number between 0 and 10.
Example 2:
Create an array of number 1 to 10:
var array = [1,2,3,4,5,6,7,8,9,10]
Here, iterate the loop over an array until its length, incrementing by 2:
for (var i = 0; i < array.length; i += 2) {
console.log(array[i]);}
The output displays an odd numbers between 1 and 10 from an array:
The above output indicates that the loop increments by 2 and prints an even number between 0 and 10.
Example 2:
Create an array of number 1 to 10:
var array = [1,2,3,4,5,6,7,8,9,10]
Here, iterate the loop over an array until its length, incrementing by 2:
for (var i = 0; i < array.length; i += 2) {
console.log(array[i]);}
The output displays an odd numbers between 1 and 10 from an array:
 It will show the full fledged source code of the page in a new tab as shown below:
 The second way is to “right-click” on the page and click on the “Inspect” option from a “contextMenu” or use the shortcut keys “F12”, and “Ctrl+Shift+I”.
 While clicking the “Inspect” option, it will open the below-given window with options, where the user can see the code.
 Let’s add functionality to prevent right-clicking and hotkeys on a web page from opening the “View Page Source” option.
Use the below lines of code to prevent the right-click on a web page:
document.addEventListener("contextmenu", (e) => {
e.preventDefault();}, false);
The above code snippet:
First, invoke the “addEventListener()” method by passing the reference of the “context Menu”.
Then, call the “preventDefault()” method and set it “false”, which means it stops the default right-click event/option.
The below code snippet prevents the shortcut key including “Ctrl+Shift+I”, “Ctrl+U” and ”F12”:
document.addEventListener("keydown", (e) => {
if (e.ctrlKey || e.keyCode==123) {
e.stopPropagation();
e.preventDefault();
}});
Output
Let’s add functionality to prevent right-clicking and hotkeys on a web page from opening the “View Page Source” option.
Use the below lines of code to prevent the right-click on a web page:
document.addEventListener("contextmenu", (e) => {
e.preventDefault();}, false);
The above code snippet:
First, invoke the “addEventListener()” method by passing the reference of the “context Menu”.
Then, call the “preventDefault()” method and set it “false”, which means it stops the default right-click event/option.
The below code snippet prevents the shortcut key including “Ctrl+Shift+I”, “Ctrl+U” and ”F12”:
document.addEventListener("keydown", (e) => {
if (e.ctrlKey || e.keyCode==123) {
e.stopPropagation();
e.preventDefault();
}});
Output
 The above GIF indicates that no action is taken during “right-click” or shortcut keys:
Now, let’s see how to hide the source code if the user uses the below option.
The above GIF indicates that no action is taken during “right-click” or shortcut keys:
Now, let’s see how to hide the source code if the user uses the below option.
 The snippet above shows another way to open “Developer Tools” other than right-clicking and hotkeys.
To hide the JavaScript code from this option, use the given steps:
Step 1: JavaScript Code
Create a JavaScript file for the JavaScript code relevant to the page’s functionality.
Here, we created a JavaScript file called “JSfile.js, where all the JavaScript code will be placed:
alert("The JavaScript code is not visible in View Source");
Step 2: Hide JavaScript Code
Now, hide the JavaScript file by following these lines of code in a <script> tag:
let scriptElement = document.createElement("script");
scriptElement.type = "text/javascript";
scriptElement.src = "JSfile.js";
document.body.appendChild(scriptElement);
In the above code snippet:
Create a new script element, using the “createElement()” method.
Add the JavaScript code file “JSfile.js”, in the newly created script element as a child element by calling the “appendChild()” method.
Output
The snippet above shows another way to open “Developer Tools” other than right-clicking and hotkeys.
To hide the JavaScript code from this option, use the given steps:
Step 1: JavaScript Code
Create a JavaScript file for the JavaScript code relevant to the page’s functionality.
Here, we created a JavaScript file called “JSfile.js, where all the JavaScript code will be placed:
alert("The JavaScript code is not visible in View Source");
Step 2: Hide JavaScript Code
Now, hide the JavaScript file by following these lines of code in a <script> tag:
let scriptElement = document.createElement("script");
scriptElement.type = "text/javascript";
scriptElement.src = "JSfile.js";
document.body.appendChild(scriptElement);
In the above code snippet:
Create a new script element, using the “createElement()” method.
Add the JavaScript code file “JSfile.js”, in the newly created script element as a child element by calling the “appendChild()” method.
Output
 The above GIF indicates that in the sidebar of the “Source” tab, after opening the “Developers Tool”, there is no “JS file.js”, because it is now a child element of the script element.
 Output (For Microsoft Edge Browser)
 From the above outputs, the difference of user agent in both the browser’s can be observed.
Example 2: Get User Agent Using Switch Statements
The “switch” statement is used to apply various conditions upon the actions.
This statement can be applied to apply a check upon various browsers in order to return the corresponding user agent.
Syntax
string.indexOf(search, start)
In the given syntax:
“search” refers to the string to be searched.
“start” indicates the start position.
Example
Let’s step on to the following example.
In the following example, perform the following steps:
Include the “heading” to contain the resultant message.
Create a function and apply the “switch” statement with the specified “boolean” value as its parameter.
In its definition, apply a check on the stated “browsers” by handling the exception of “-1” i.e no value found.
Also, apply the “indexOf()” method to check the contained string in its parameter in the resultant user agent.
This condition will result in configuring the corresponding browser.
After that, apply the “userAgent” property along with the “toLowerCase()” method to get the user agent of the corresponding browser and transform it to lower case.
Finally, apply the “innerText” property to display the corresponding browser name along with its user agent.
<body><h3></h3></body>
-1:
return "MS Edge";
case agent.indexOf("edg/") > -1:
return "Edge ( chromium based)";
case agent.indexOf("opr") > -1 && !!window.opr:
return "Opera";
case agent.indexOf("chrome") > -1 && !!window.chrome:
return "Chrome";
case agent.indexOf("safari") > -1:
return "Safari";
default: return "other";}})(window.navigator.userAgent.toLowerCase());
document.querySelector("h3").innerText="You are using "+ browserName +" browser";
console.log(window.navigator.userAgent.toLowerCase());</script>
Output(For Chrome Browser)
From the above outputs, the difference of user agent in both the browser’s can be observed.
Example 2: Get User Agent Using Switch Statements
The “switch” statement is used to apply various conditions upon the actions.
This statement can be applied to apply a check upon various browsers in order to return the corresponding user agent.
Syntax
string.indexOf(search, start)
In the given syntax:
“search” refers to the string to be searched.
“start” indicates the start position.
Example
Let’s step on to the following example.
In the following example, perform the following steps:
Include the “heading” to contain the resultant message.
Create a function and apply the “switch” statement with the specified “boolean” value as its parameter.
In its definition, apply a check on the stated “browsers” by handling the exception of “-1” i.e no value found.
Also, apply the “indexOf()” method to check the contained string in its parameter in the resultant user agent.
This condition will result in configuring the corresponding browser.
After that, apply the “userAgent” property along with the “toLowerCase()” method to get the user agent of the corresponding browser and transform it to lower case.
Finally, apply the “innerText” property to display the corresponding browser name along with its user agent.
<body><h3></h3></body>
-1:
return "MS Edge";
case agent.indexOf("edg/") > -1:
return "Edge ( chromium based)";
case agent.indexOf("opr") > -1 && !!window.opr:
return "Opera";
case agent.indexOf("chrome") > -1 && !!window.chrome:
return "Chrome";
case agent.indexOf("safari") > -1:
return "Safari";
default: return "other";}})(window.navigator.userAgent.toLowerCase());
document.querySelector("h3").innerText="You are using "+ browserName +" browser";
console.log(window.navigator.userAgent.toLowerCase());</script>
Output(For Chrome Browser)
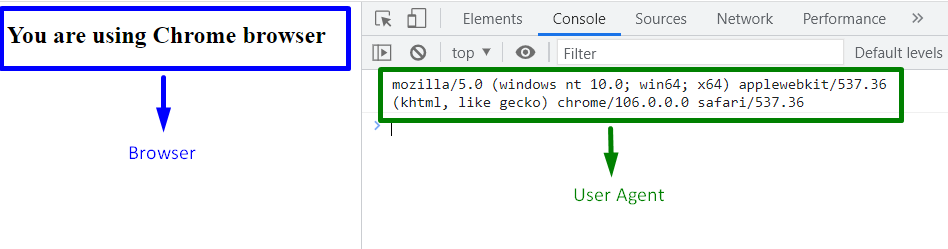 Output (For Microsoft Edge Browser)
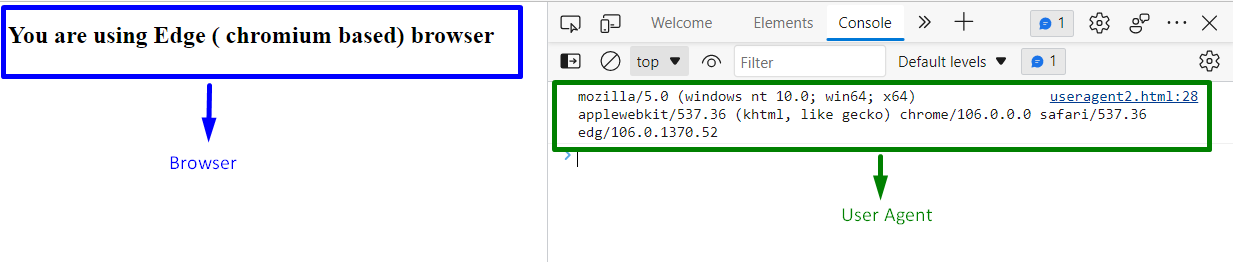 In the above outputs, it is evident that both the browsers are detected along with their user agents.
All the convenient approaches have been discussed to get user agent.
In the above outputs, it is evident that both the browsers are detected along with their user agents.
All the convenient approaches have been discussed to get user agent.
 In the above output, it can be observed that the entered value is fetched via alert dialogue box.
 From the above output, the “fetching” of each of the entered text values can be observed.
 Hence, the type’s value is logged on the console.
These were all the different ways of getting the value of the text area with the help of JavaScript.
Hence, the type’s value is logged on the console.
These were all the different ways of getting the value of the text area with the help of JavaScript.
 The above output indicates that the arrays “even” and “prime” are successfully combined with the array “odd”.
 The output indicates that the arrays have been successfully concatenated into a single array.
 The above output displays “2022” which is the current year.
But what If the user wants to get the year of the specified data in a specific format? In that case, follow the next example.
Example 2: Get Year of a Specified Date
Here, the constructor of the Date object is called by passing a custom date:
var getYear = new Date('Jan 14, 98 05:12:11');
Call the getFullYear() method with the date object, it gives the year from the specified date in a standard format:
console.log(getYear.getFullYear());
The corresponding output will look like this:
The above output displays “2022” which is the current year.
But what If the user wants to get the year of the specified data in a specific format? In that case, follow the next example.
Example 2: Get Year of a Specified Date
Here, the constructor of the Date object is called by passing a custom date:
var getYear = new Date('Jan 14, 98 05:12:11');
Call the getFullYear() method with the date object, it gives the year from the specified date in a standard format:
console.log(getYear.getFullYear());
The corresponding output will look like this:
 As the above output shows “1998” is the standard format of the year.
 After that, let’s add functionality to the filter table.
In a JavaScript script file or a tag, use the below code that will filter the table’s data based on search:
function filterTableFunc() {
var filterResult = document.getElementById("search").value.toLowerCase();
var empTable = document.getElementById("employeeData");
var tr = empTable.getElementsByTagName("tr");
for (var i = 1; i < tr.length; i++) {
tr[i].style.display = "none";
const tdArray = tr[i].getElementsByTagName("td");
for (var j = 0; j -1) {
tr[i].style.display = "";
break;
}
}
}}
In the above-given code:
First, define a function “filterTableFunc()”.
Access the search bar using its id “search” to get the entered value and convert it into a lowercase using the “toLowerCase()” method.
Get a reference to the table where the filter operation will be performed using its id “employeeData”.
Then, get the table rows using the “getElementsByTagName” method.
Iterate through the table up to its length, get the data for each table entry, and check if the stored value of the table is equal to the searched value.
If it is, then display it.
Output
After that, let’s add functionality to the filter table.
In a JavaScript script file or a tag, use the below code that will filter the table’s data based on search:
function filterTableFunc() {
var filterResult = document.getElementById("search").value.toLowerCase();
var empTable = document.getElementById("employeeData");
var tr = empTable.getElementsByTagName("tr");
for (var i = 1; i < tr.length; i++) {
tr[i].style.display = "none";
const tdArray = tr[i].getElementsByTagName("td");
for (var j = 0; j -1) {
tr[i].style.display = "";
break;
}
}
}}
In the above-given code:
First, define a function “filterTableFunc()”.
Access the search bar using its id “search” to get the entered value and convert it into a lowercase using the “toLowerCase()” method.
Get a reference to the table where the filter operation will be performed using its id “employeeData”.
Then, get the table rows using the “getElementsByTagName” method.
Iterate through the table up to its length, get the data for each table entry, and check if the stored value of the table is equal to the searched value.
If it is, then display it.
Output
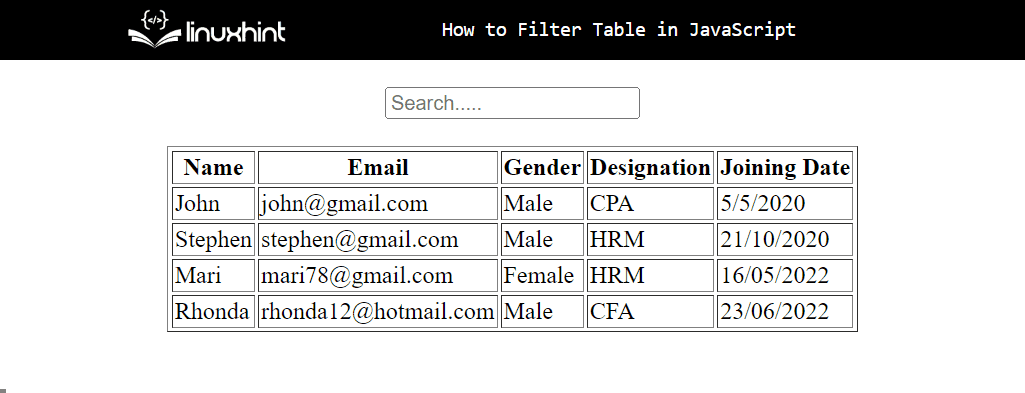 The above output indicates that the filter operation has been successfully applied to the table.
 Let’s add functionality for creating tables dynamically using JavaScript.
In the script file or tag, use the below code that will create a table dynamically:
function addTableRow() {
var name = document.getElementById("name");
var gender = document.getElementById("gender");
var designation = document.getElementById("designation");
var date = document.getElementById("date");
var table = document.getElementById("tableData");
var rowCount = table.rows.length;
var row = table.insertRow(rowCount);
row.insertCell(0).innerHTML= name.value;
row.insertCell(1).innerHTML= gender.value;
row.insertCell(2).innerHTML= designation.value;
row.insertCell(3).innerHTML= date.value;}
In the above snippet:
First, define a function “addTableRow()” that will trigger the click event of the HTML button.
Then, get the reference of all input fields one by one using their respective assigned ids using the “getelementById()” method and store them in variables.
These variables will be used to get the value of the input fields using the HTML “value” property and set them in the individual cells in the table using the “innerHTML” property.
Add rows in a table utilizing the “table.rows.length” property and then store values in it.
Output
Let’s add functionality for creating tables dynamically using JavaScript.
In the script file or tag, use the below code that will create a table dynamically:
function addTableRow() {
var name = document.getElementById("name");
var gender = document.getElementById("gender");
var designation = document.getElementById("designation");
var date = document.getElementById("date");
var table = document.getElementById("tableData");
var rowCount = table.rows.length;
var row = table.insertRow(rowCount);
row.insertCell(0).innerHTML= name.value;
row.insertCell(1).innerHTML= gender.value;
row.insertCell(2).innerHTML= designation.value;
row.insertCell(3).innerHTML= date.value;}
In the above snippet:
First, define a function “addTableRow()” that will trigger the click event of the HTML button.
Then, get the reference of all input fields one by one using their respective assigned ids using the “getelementById()” method and store them in variables.
These variables will be used to get the value of the input fields using the HTML “value” property and set them in the individual cells in the table using the “innerHTML” property.
Add rows in a table utilizing the “table.rows.length” property and then store values in it.
Output
 The above output indicates that the dynamic table is successfully created by adding data in a form using JavaScript.
 From the above output, it can be observed that the string indexes are retrieved instead.
 In the above output, it is evident that the string values are returned.
Example 2: Iterating for…in and for…of Loop Over the Object
In this particular example, iterate both loops over the created object and observe the resultant output against each of them.
In the above output, it is evident that the string values are returned.
Example 2: Iterating for…in and for…of Loop Over the Object
In this particular example, iterate both loops over the created object and observe the resultant output against each of them.
 In the above output, it can be observed that the object’s properties and the corresponding values are displayed on the console.
 From the above output, it can be observed that the accessed object is not iterable.
 In the above output, it can be observed that the backslashes are escaped in the resultant string, and a single string is split into two strings.
 From the above output, it can be observed that the contained backslashes are omitted.
Example 2: Escape Backslash Using the replaceAll() Method
This example will be applied to replace all the contained backslashes in a given string with a comma.
Follow the below-stated example.
<script type="text/javascript">let givenString = 'Java\Sc\\ript \\ Website';
console.log("The string with the backslash is: ", givenString)
updString = givenString.replaceAll("\", ',');
console.log("The string with the escaped backslash is: ", updString)
</script>
In the above lines of code, follow the stated steps:
Repeat the discussed approaches to assign a backslash contained string.
Apply the “replaceAll()” method to replace all the contained backslashes in a string with a comma.
Lastly, display the resulting string value.
Output
From the above output, it can be observed that the contained backslashes are omitted.
Example 2: Escape Backslash Using the replaceAll() Method
This example will be applied to replace all the contained backslashes in a given string with a comma.
Follow the below-stated example.
<script type="text/javascript">let givenString = 'Java\Sc\\ript \\ Website';
console.log("The string with the backslash is: ", givenString)
updString = givenString.replaceAll("\", ',');
console.log("The string with the escaped backslash is: ", updString)
</script>
In the above lines of code, follow the stated steps:
Repeat the discussed approaches to assign a backslash contained string.
Apply the “replaceAll()” method to replace all the contained backslashes in a string with a comma.
Lastly, display the resulting string value.
Output
 In the above output, it is evident that all the contained backslashes in the specified strings are replaced with a comma.
 From the above output, it can be observed that the required functionality is achieved (60 seconds = 1 minutes)
Example 2: Convert Seconds to Minutes Using User-Input Value
This example uses the same calculations for converting seconds to minutes.
The difference is that it takes the “user-input” value as seconds and computes the corresponding minutes based on that.
Let’s follow the below-given example step-by-step:
<center><h3 id = "head">The converted minutes are : </h3></center><script type="text/javascript">var get = prompt("Enter the seconds:")var head = document.getElementById("head")var computeMinutes = Math.floor(get/60);var result = get % 60;
head.innerText += computeMinutes + " minutes " + result + " seconds."</script>
In the above code-snippet:
Include the stated heading with the specified “id”.
In the JavaScript part of the code, ask the user to input the value of “seconds” via “prompt” dialogue box.
In the next step, access the included heading by its “id” using the “getElementById()” method.
Recall the discussed steps for computing the minutes and display the resultant value of “minutes” as a heading using the “innerText” property.
Output
From the above output, it can be observed that the required functionality is achieved (60 seconds = 1 minutes)
Example 2: Convert Seconds to Minutes Using User-Input Value
This example uses the same calculations for converting seconds to minutes.
The difference is that it takes the “user-input” value as seconds and computes the corresponding minutes based on that.
Let’s follow the below-given example step-by-step:
<center><h3 id = "head">The converted minutes are : </h3></center><script type="text/javascript">var get = prompt("Enter the seconds:")var head = document.getElementById("head")var computeMinutes = Math.floor(get/60);var result = get % 60;
head.innerText += computeMinutes + " minutes " + result + " seconds."</script>
In the above code-snippet:
Include the stated heading with the specified “id”.
In the JavaScript part of the code, ask the user to input the value of “seconds” via “prompt” dialogue box.
In the next step, access the included heading by its “id” using the “getElementById()” method.
Recall the discussed steps for computing the minutes and display the resultant value of “minutes” as a heading using the “innerText” property.
Output
 In the above output, it is evident that the seconds are computed precisely.
 From the above output, it can be observed that the minutes and seconds are padded accordingly and returned as a string.
These were the different ways of converting seconds into minutes.
From the above output, it can be observed that the minutes and seconds are padded accordingly and returned as a string.
These were the different ways of converting seconds into minutes.
 From the above output, it can be observed that the sum of the values of the object’s property and the pass parameters are returned.
 From the above output, it is evident that the desired sum is returned.
 In the above output, it is evident that upon calling the stated “inline” function, the sum is returned as a result.
Example: Applying call(), apply() and bind() With the Same Object and Function
In this example, apply the discussed methods on a single object with the help of a function.
Let’s follow the below-given example step-by-step:
<script type="text/javascript">
var object = { integer: 2 };function sumNum(x, y){
console.log("The sum becomes:", this.integer + x + y)}let call = sumNum.call(object, 2, 4);let apply = sumNum.apply(object, [2, 4]);let bind = sumNum.bind(object, 2, 4)let bindStore = bind();</script>
In the above lines of code, perform the following steps:
Revive the discussed steps for creating an object, declaring a function having the stated parameters.
In the further code, access the defined function with each discussed method.
It can be observed that all three methods are applied differently along with the function but yield the same output, as evident below.
Output
In the above output, it is evident that upon calling the stated “inline” function, the sum is returned as a result.
Example: Applying call(), apply() and bind() With the Same Object and Function
In this example, apply the discussed methods on a single object with the help of a function.
Let’s follow the below-given example step-by-step:
<script type="text/javascript">
var object = { integer: 2 };function sumNum(x, y){
console.log("The sum becomes:", this.integer + x + y)}let call = sumNum.call(object, 2, 4);let apply = sumNum.apply(object, [2, 4]);let bind = sumNum.bind(object, 2, 4)let bindStore = bind();</script>
In the above lines of code, perform the following steps:
Revive the discussed steps for creating an object, declaring a function having the stated parameters.
In the further code, access the defined function with each discussed method.
It can be observed that all three methods are applied differently along with the function but yield the same output, as evident below.
Output
 From the above output, it can be seen that all the methods give the same output.
 From the above output, it can be observed that the map is sorted based on alphabetic characters.
Example 2: Sort an ES6 Map By Numbers
This example will lead to sorting a map by numbers.
Let’s observe the below-given example:
<script type="text/javascript">
var sortMap = new Map();
sortMap.set("3", "Harry");
sortMap.set("1", "David");
sortMap.set("2", "Teena");
var updatedMap = new Map([...sortMap.entries()].sort());
console.log(updatedMap);</script>
In the above code snippet:
Repeat the discussed steps in the previous example for creating a new “map” object and setting the values in it using the “set()” method.
In the next step, similarly, apply the “spread” operator and the “sort()” method for sorting the map based on the set numbers.
The additional “entries()” method here results in returning the map as “key-value” pairs.
Output
From the above output, it can be observed that the map is sorted based on alphabetic characters.
Example 2: Sort an ES6 Map By Numbers
This example will lead to sorting a map by numbers.
Let’s observe the below-given example:
<script type="text/javascript">
var sortMap = new Map();
sortMap.set("3", "Harry");
sortMap.set("1", "David");
sortMap.set("2", "Teena");
var updatedMap = new Map([...sortMap.entries()].sort());
console.log(updatedMap);</script>
In the above code snippet:
Repeat the discussed steps in the previous example for creating a new “map” object and setting the values in it using the “set()” method.
In the next step, similarly, apply the “spread” operator and the “sort()” method for sorting the map based on the set numbers.
The additional “entries()” method here results in returning the map as “key-value” pairs.
Output
 In the above output, it is evident that the map is sorted based on the numbers.


 The output displays “true”, as the strict equality returns true when both operands are equal in terms of the type and value.
Example 2:
In variable “string”, store boolean value “false”:
var string = 'false';
Compare the string “false” with the string “true”:
var result = string === 'true';
Output
The output displays “true”, as the strict equality returns true when both operands are equal in terms of the type and value.
Example 2:
In variable “string”, store boolean value “false”:
var string = 'false';
Compare the string “false” with the string “true”:
var result = string === 'true';
Output
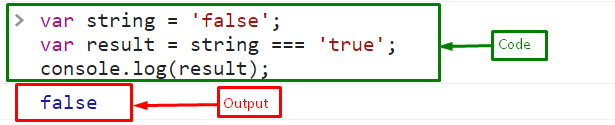 The output shows “false” because the strict equality operator returns true if the string is actually “true”.
 Output displays “true”, as in (!!) operator, first (!) converts “true” into “false”, then the second (!) again converts it into “true”.
 The output returns a boolean value “true”, as the passed string is not empty.
Example 2:
Store the boolean value “false” in a variable “string”:
var string = 'false'
Invoke the Boolean wrapper by passing the string:
Boolean(string);
The corresponding output will be:
The output returns a boolean value “true”, as the passed string is not empty.
Example 2:
Store the boolean value “false” in a variable “string”:
var string = 'false'
Invoke the Boolean wrapper by passing the string:
Boolean(string);
The corresponding output will be:

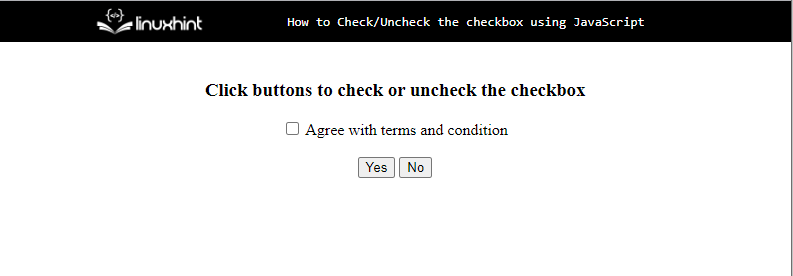 Next, define the functions to perform actions on the checkbox in the JavaScript file or the tag.
To check the checkbox, use the below lines of code:
function check() {
let input = document.getElementById('checkbox');
input.checked = true;}
In the above code:
Define a function “check()” that will trigger the button click to check the checkbox.
Inside the body of the function, get the reference of the checkbox using its id “checkbox” with the help of the “getElementById()” method and store it in a variable “input”.
Check the checkbox by setting the “checked” property “true”.
To uncheck the checkbox by clicking the “No” button, use the below-given code:
function uncheck() {
let input = document.getElementById('checkbox');
input.checked = false;}
The above code snippet:
Define a function “uncheck()” that will trigger the button click to uncheck the checkbox.
Inside the body of the function, get the reference of the checkbox using its id “checkbox” with the help of the “getElementById()” method and store it in a variable “input”.
Uncheck the checkbox by setting the “checked” property “false”.
Lastly, define a function to uncheck the checkbox by default on the page load using the “window.onload” event:
window.onload = function() {
window.addEventListener('load', check, false);}
Output
Next, define the functions to perform actions on the checkbox in the JavaScript file or the tag.
To check the checkbox, use the below lines of code:
function check() {
let input = document.getElementById('checkbox');
input.checked = true;}
In the above code:
Define a function “check()” that will trigger the button click to check the checkbox.
Inside the body of the function, get the reference of the checkbox using its id “checkbox” with the help of the “getElementById()” method and store it in a variable “input”.
Check the checkbox by setting the “checked” property “true”.
To uncheck the checkbox by clicking the “No” button, use the below-given code:
function uncheck() {
let input = document.getElementById('checkbox');
input.checked = false;}
The above code snippet:
Define a function “uncheck()” that will trigger the button click to uncheck the checkbox.
Inside the body of the function, get the reference of the checkbox using its id “checkbox” with the help of the “getElementById()” method and store it in a variable “input”.
Uncheck the checkbox by setting the “checked” property “false”.
Lastly, define a function to uncheck the checkbox by default on the page load using the “window.onload” event:
window.onload = function() {
window.addEventListener('load', check, false);}
Output
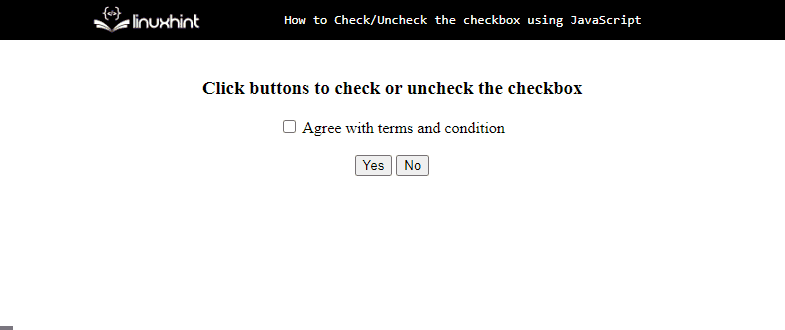 The output signifies that the checkbox is checked and unchecked successfully while clicking on the buttons.
Example 2: Check/Uncheck Multiple Checkboxes
Let’s see an example of how to check or uncheck all the checkboxes at the same time.
First, create an HTML file, and then create multiple checkboxes and a button with the id “toggle” that will toggle the checkbox to check or uncheck:
<h3>Click button to check or uncheck all the checkboxes</h3><input type="checkbox" class="checkbox"> Check or uncheck me<br><input type="checkbox" class="checkbox"> Check or uncheck me<br><input type="checkbox" class="checkbox"> Check or uncheck me<br><input type="checkbox" class="checkbox"> Check or uncheck me<br><input type="checkbox" class="checkbox"> Check or uncheck me<br><br><input type="button" id="toggle" value="Click to toggle the checkboxes">
The corresponding output will be:
The output signifies that the checkbox is checked and unchecked successfully while clicking on the buttons.
Example 2: Check/Uncheck Multiple Checkboxes
Let’s see an example of how to check or uncheck all the checkboxes at the same time.
First, create an HTML file, and then create multiple checkboxes and a button with the id “toggle” that will toggle the checkbox to check or uncheck:
<h3>Click button to check or uncheck all the checkboxes</h3><input type="checkbox" class="checkbox"> Check or uncheck me<br><input type="checkbox" class="checkbox"> Check or uncheck me<br><input type="checkbox" class="checkbox"> Check or uncheck me<br><input type="checkbox" class="checkbox"> Check or uncheck me<br><input type="checkbox" class="checkbox"> Check or uncheck me<br><br><input type="button" id="toggle" value="Click to toggle the checkboxes">
The corresponding output will be:
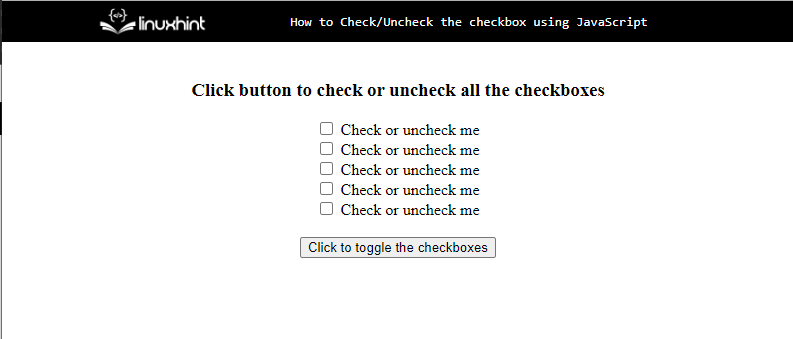 After that, in a JavaScript file or <script> tag, add the below code to check or uncheck the list of checkboxes with a single click.
First, get the reference of the button by using its id “toggle” and store it in a variable “button” and then attach an onclick event and invoke a function “checkAllBoxes” that will check the list of checkboxes and then calls the next function “uncheckAllBoxes”:
var button = document.getElementById("toggle");
button.onclick = checkAllBoxes;
To check the checkboxes, use the below-given code
function checkAllBoxes() {
var input = document.querySelectorAll('.checkbox');
for (var i = 0; i < input.length; i++) {
input[i].checked = true;
}this.onclick = uncheckAllBoxes;}
In this above code:
First, define a function “checkAllBoxes()” that will trigger on the button click to check all the checkboxes.
Inside the body of the function, get the references of all checkboxes using their assigned classes “checkbox” with the help of the “querySelectorAll()” method and store it in a variable “input”.
Iterate the checkboxes and set the “checked” property “true” to check all the checkboxes.
After checking all checkboxes, call the other function “uncheckAllBoxes” on the click event to toggle the button.
To uncheck the list of the checkbox by clicking the button, use the below lines of code:
function uncheckAllBoxes() {
var input = document.querySelectorAll('.checkbox');
for (var i = 0; i < input.length; i++) {
input[i].checked = false;
}this.onclick = checkAllBoxes; }
In this above code snippet:
Define a function “uncheckAllBoxes()” that will trigger on the button click to uncheck all the checkboxes.
Inside the body of the function, get the references of all checkboxes using their assigned classes “checkbox” with the help of the “querySelectorAll()” method and store it in a variable “input”.
Iterate the checkboxes and set the “checked” property “false” to uncheck all the checkboxes.
After that, call the other function “checkAllBoxes” on the click event to toggle the button.
Output
After that, in a JavaScript file or <script> tag, add the below code to check or uncheck the list of checkboxes with a single click.
First, get the reference of the button by using its id “toggle” and store it in a variable “button” and then attach an onclick event and invoke a function “checkAllBoxes” that will check the list of checkboxes and then calls the next function “uncheckAllBoxes”:
var button = document.getElementById("toggle");
button.onclick = checkAllBoxes;
To check the checkboxes, use the below-given code
function checkAllBoxes() {
var input = document.querySelectorAll('.checkbox');
for (var i = 0; i < input.length; i++) {
input[i].checked = true;
}this.onclick = uncheckAllBoxes;}
In this above code:
First, define a function “checkAllBoxes()” that will trigger on the button click to check all the checkboxes.
Inside the body of the function, get the references of all checkboxes using their assigned classes “checkbox” with the help of the “querySelectorAll()” method and store it in a variable “input”.
Iterate the checkboxes and set the “checked” property “true” to check all the checkboxes.
After checking all checkboxes, call the other function “uncheckAllBoxes” on the click event to toggle the button.
To uncheck the list of the checkbox by clicking the button, use the below lines of code:
function uncheckAllBoxes() {
var input = document.querySelectorAll('.checkbox');
for (var i = 0; i < input.length; i++) {
input[i].checked = false;
}this.onclick = checkAllBoxes; }
In this above code snippet:
Define a function “uncheckAllBoxes()” that will trigger on the button click to uncheck all the checkboxes.
Inside the body of the function, get the references of all checkboxes using their assigned classes “checkbox” with the help of the “querySelectorAll()” method and store it in a variable “input”.
Iterate the checkboxes and set the “checked” property “false” to uncheck all the checkboxes.
After that, call the other function “checkAllBoxes” on the click event to toggle the button.
Output
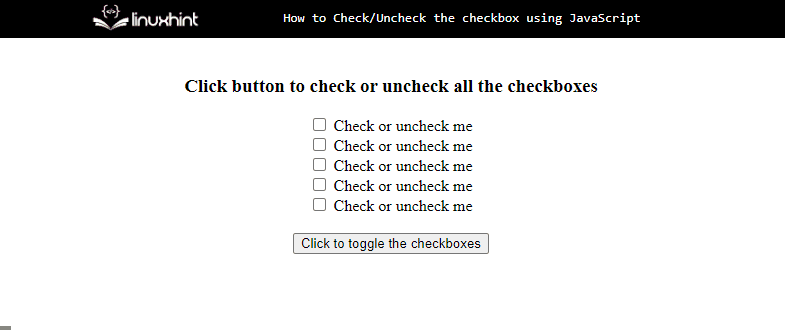 The output indicates that the list of checkboxes is successfully checked or unchecked with a single button.
 In JavaScript file, define a function, “changeTitle()” where set the new title for the page that will be changed using the “document.title” attribute:
function changeTitle() {
document.title = 'LinuxHint';}
Output
In JavaScript file, define a function, “changeTitle()” where set the new title for the page that will be changed using the “document.title” attribute:
function changeTitle() {
document.title = 'LinuxHint';}
Output
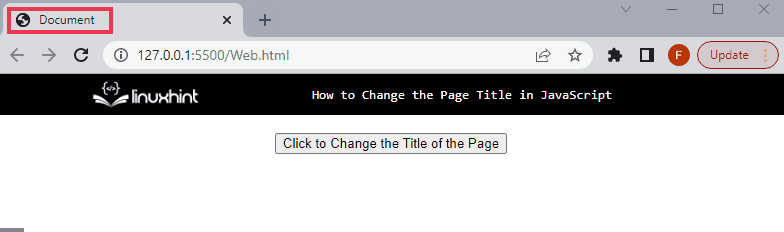 The above output shows that the page title is successfully changed on the button click.
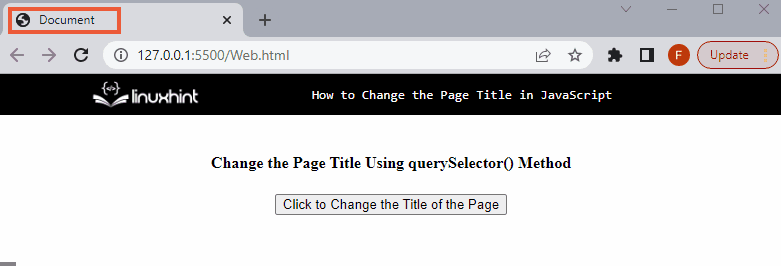 It can be observed from the output that the page’s title has been changed using JavaScript.
 In the above output, it can be observed that the pages are switched upon clicking the button.
 From the above output, it is evident that the pages are switching properly with respect to the “options” value upon the button click.
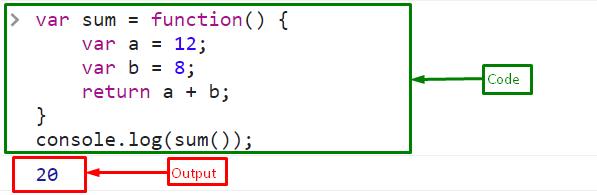 Example 2: Assign an Anonymous Function to a Variable With Parameter
Here, assign an anonymous function to the variable with two parameters “a” and “b”.
It will return the sum of two numbers that will be passed during the function call as an argument:
var sum = function(a, b) {
return a + b;}
Call the anonymous function using variable “sum” by passing number “4” as a first argument “a” and “6” as the second argument “b”:
console.log(sum(4 , 6));
The corresponding output will be:
Example 2: Assign an Anonymous Function to a Variable With Parameter
Here, assign an anonymous function to the variable with two parameters “a” and “b”.
It will return the sum of two numbers that will be passed during the function call as an argument:
var sum = function(a, b) {
return a + b;}
Call the anonymous function using variable “sum” by passing number “4” as a first argument “a” and “6” as the second argument “b”:
console.log(sum(4 , 6));
The corresponding output will be:
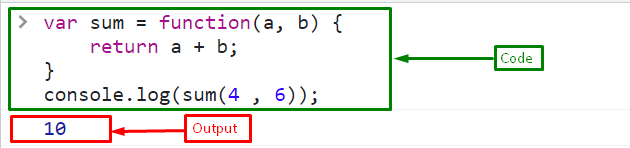
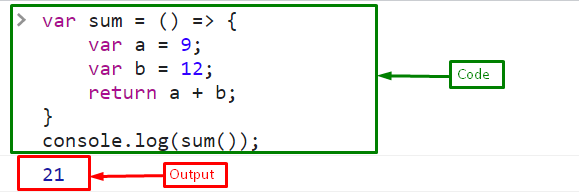 Example 2: Assign an Arrow Function to a Variable With Parameter
Create an arrow function with variables “a” and “b” that will return the sum of two numbers.
It is the same as the anonymous function with parameters but without the “function” keyword:
var sum = (a, b) => {
return a + b;}
Invoke the arrow function using the variable name “sum”:
console.log(sum(23 , 20));
Output
Example 2: Assign an Arrow Function to a Variable With Parameter
Create an arrow function with variables “a” and “b” that will return the sum of two numbers.
It is the same as the anonymous function with parameters but without the “function” keyword:
var sum = (a, b) => {
return a + b;}
Invoke the arrow function using the variable name “sum”:
console.log(sum(23 , 20));
Output
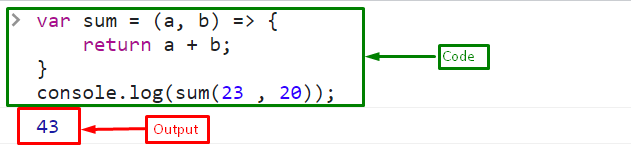
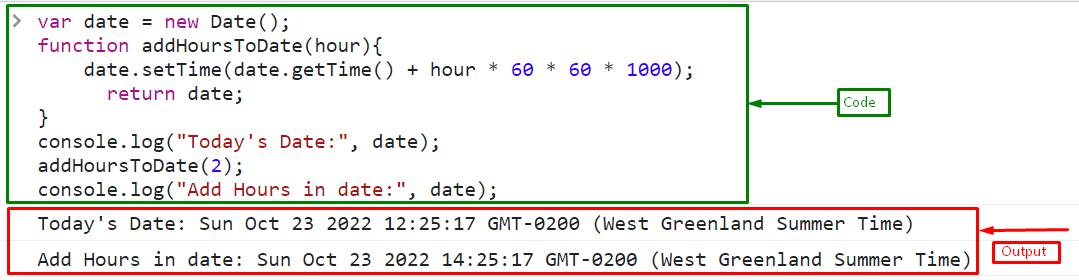
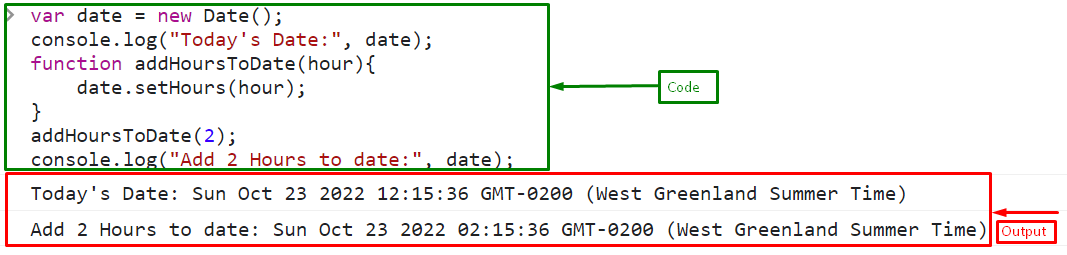
 In the above output, the value of variable “a” is first inverted to “true” then, the second (!) operator again inverts it into “false”.
Here, the below table represents the outcome of all the truthy and falsy JavaScript values using the Double Exclamation !! JavaScript:
In the above output, the value of variable “a” is first inverted to “true” then, the second (!) operator again inverts it into “false”.
Here, the below table represents the outcome of all the truthy and falsy JavaScript values using the Double Exclamation !! JavaScript:


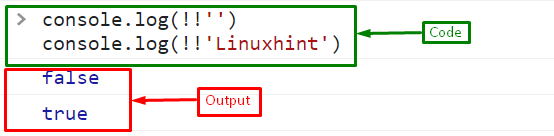 We have compiled the essential instructions related to the double exclamation (!!) sign.
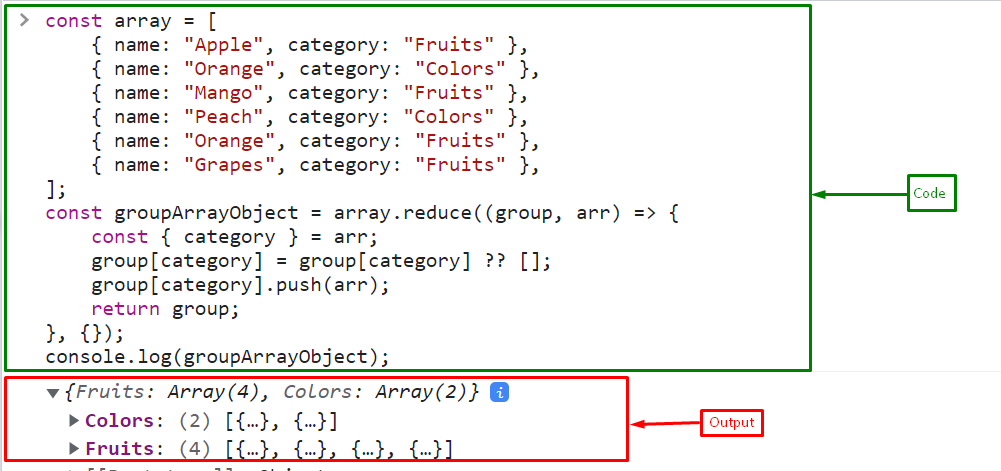 From the above output, the resultant array has two minimized arrays “Colors” and “Fruits”.
Simply click on the array head next to the minimized array’s name to expand it:
From the above output, the resultant array has two minimized arrays “Colors” and “Fruits”.
Simply click on the array head next to the minimized array’s name to expand it:
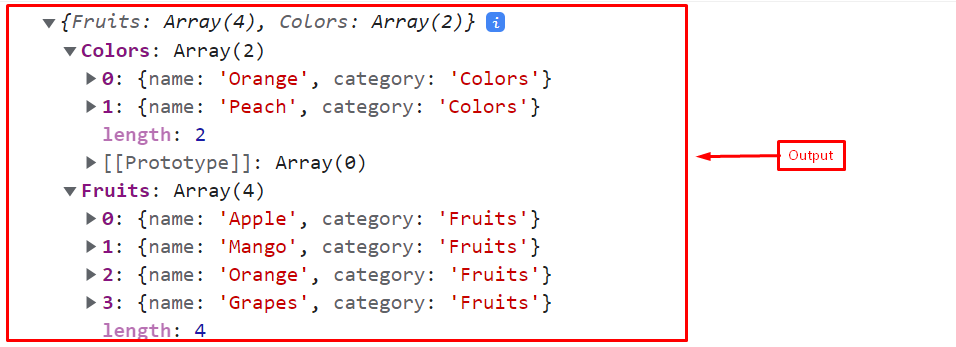 Now the output shows two objects, “Colors” and “Fruits,” that contain 2 and 4 arrays, respectively.
 It can be easily observed that the objects have now been grouped based on their “Category” key’s value.
 In the above output, it is evident that the height is computed.
 From the above output, it can be observed that the required functionality is achieved.
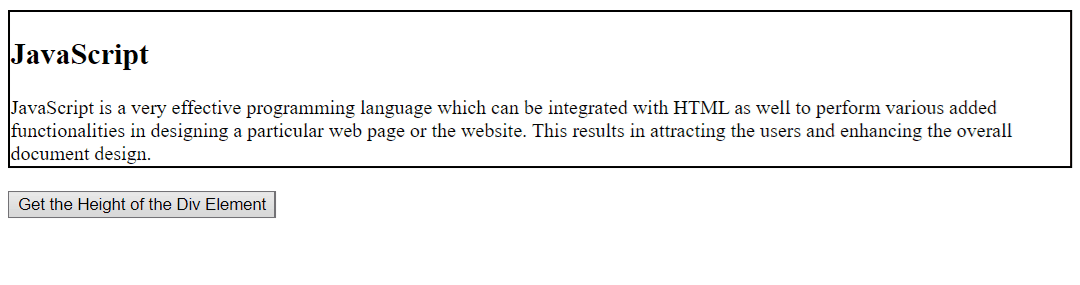 This write-up compiled the approaches to get the height of the div element.

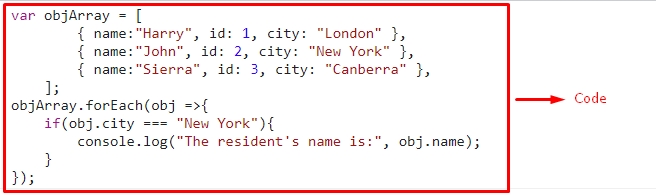
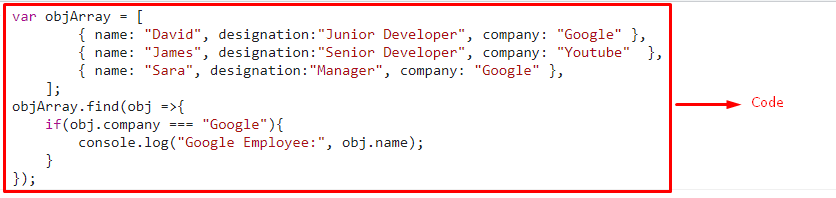
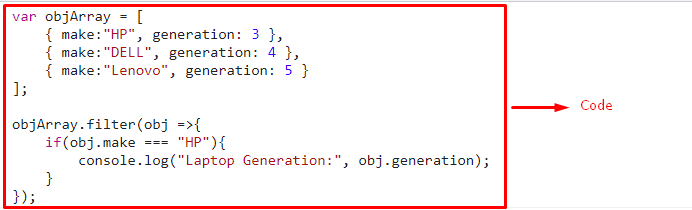
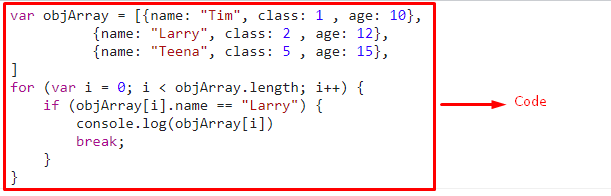 This article compiled the methods to search objects from an array.
 Let’s pass the decimal value “89.9” in the function and see the rounded value:
console.log(roundToNearest10(89.9));
The output will print “90” by rounding the decimal number “89.9” to the nearest 10:
Let’s pass the decimal value “89.9” in the function and see the rounded value:
console.log(roundToNearest10(89.9));
The output will print “90” by rounding the decimal number “89.9” to the nearest 10:
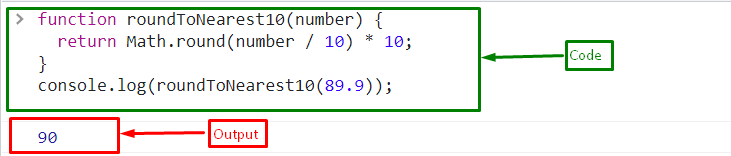
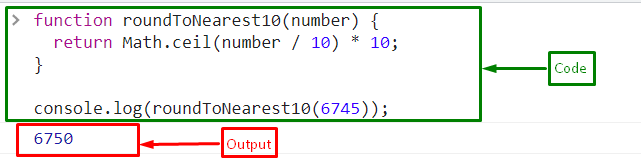 Similarly, the decimal number is also rounded to the nearest 10 using the Math.ceil() method.
Pass the number “78.02” as a parameter in the “roundToNearest10” function.
It will return “8” which is the next largest integer of the “7.802”, and then multiply the resultant number by 10 that is the approximated value to the nearest 10:
console.log(roundToNearest10(78.02));
The corresponding output will be:
Similarly, the decimal number is also rounded to the nearest 10 using the Math.ceil() method.
Pass the number “78.02” as a parameter in the “roundToNearest10” function.
It will return “8” which is the next largest integer of the “7.802”, and then multiply the resultant number by 10 that is the approximated value to the nearest 10:
console.log(roundToNearest10(78.02));
The corresponding output will be:
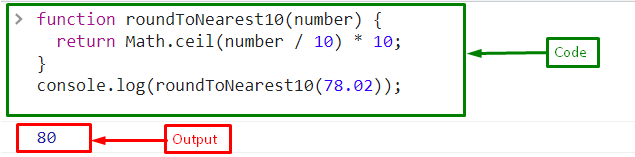
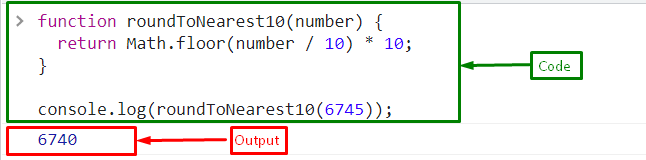 Pass the decimal number “-5.15” as a parameter in the “roundToNearest10” function.
It will return “7” which is the nearest down integer of the “7.802”, and then multiply the resultant number by 10 which is the approximated value to the nearest 10:
console.log(roundToNearest10(-5.15));
The output will be:
Pass the decimal number “-5.15” as a parameter in the “roundToNearest10” function.
It will return “7” which is the nearest down integer of the “7.802”, and then multiply the resultant number by 10 which is the approximated value to the nearest 10:
console.log(roundToNearest10(-5.15));
The output will be:
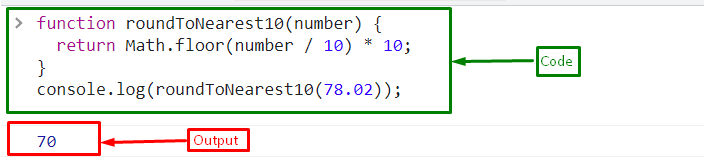
 In the above output, it can be observed that the desired requirement is fulfilled.
 In the above-given output, it is evident that the timer is paused and resumed successfully.
 Here, the timer is paused permanently.
We have compiled the approaches to pause an interval.
Here, the timer is paused permanently.
We have compiled the approaches to pause an interval.
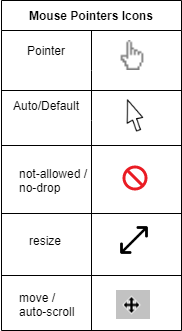 Syntax
Follow the given syntax to change the mouse pointer to use the “cursor” property:
document.style.cursor = value;
Here, the “value” is the predefined name of the cursor:
Syntax
Follow the given syntax to change the mouse pointer to use the “cursor” property:
document.style.cursor = value;
Here, the “value” is the predefined name of the cursor:
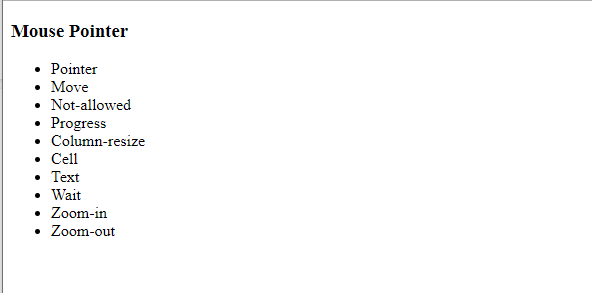 Now, in <script> tag, fetch the list items with the help of their assigned id and then change the mouse pointer using “cursor” property:
document.getElementById("pointer").style.cursor = "pointer";
document.getElementById("move").style.cursor = "move";
document.getElementById("not-allowed").style.cursor = "not-allowed";
document.getElementById("progress").style.cursor = "progress";
document.getElementById("col-resize").style.cursor = "col-resize";
document.getElementById("cell").style.cursor = "cell";
document.getElementById("text").style.cursor = "text";
document.getElementById("wait").style.cursor = "wait";
document.getElementById("zoom-in").style.cursor = "zoom-in";
document.getElementById("zoom-out").style.cursor = "zoom-out";
document.getElementById("default").style.cursor = "default";
Output
Now, in <script> tag, fetch the list items with the help of their assigned id and then change the mouse pointer using “cursor” property:
document.getElementById("pointer").style.cursor = "pointer";
document.getElementById("move").style.cursor = "move";
document.getElementById("not-allowed").style.cursor = "not-allowed";
document.getElementById("progress").style.cursor = "progress";
document.getElementById("col-resize").style.cursor = "col-resize";
document.getElementById("cell").style.cursor = "cell";
document.getElementById("text").style.cursor = "text";
document.getElementById("wait").style.cursor = "wait";
document.getElementById("zoom-in").style.cursor = "zoom-in";
document.getElementById("zoom-out").style.cursor = "zoom-out";
document.getElementById("default").style.cursor = "default";
Output


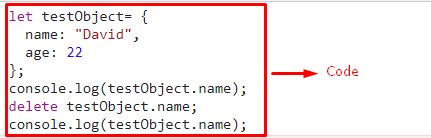 In the above output, it can be observed that the object’s property “age” is omitted.
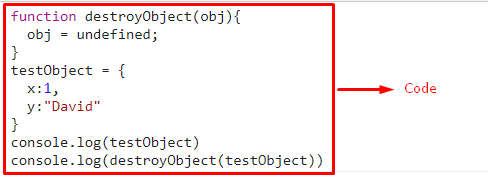 We have provided the approaches to destroy an object.

 It can be observed from the output that the count up timer is working perfectly.
 In this write-up, all the approaches to create a count-up timer are illustrated.
 It can be observed in the above output that the stated message is appended with the image upon the button click.
 In the above output, it is evident that the “success” message is appended only upon clicking the option “Yes”.
 In the output, it is evident that the resultant paragraph is appended to the “div” upon the button click.
 In the output, the button click leads to appending the resultant heading in the “div”.
This write-up demonstrated the approaches to append data to div.
In the output, the button click leads to appending the resultant heading in the “div”.
This write-up demonstrated the approaches to append data to div.
 The functionality of the incremented timer upon each click can be observed in the above output.

 In the above output, it is evident that both created buttons simulate the click.
This blog demonstrates how to apply a click simulation using JavaScript.
In the above output, it is evident that both created buttons simulate the click.
This blog demonstrates how to apply a click simulation using JavaScript.
 From the above output, it can be observed that the required functionality is “achieved”.
 In this output, it can be observed that just by declaring a variable and not initializing it, the variable will be considered “undefined”.
This write-up explained the approaches to check the condition of undefined variables.
In this output, it can be observed that just by declaring a variable and not initializing it, the variable will be considered “undefined”.
This write-up explained the approaches to check the condition of undefined variables.
 In the above output, the object’s first key name is retrieved directly.

 We have discussed the convenient approaches to get the object’s first key name.

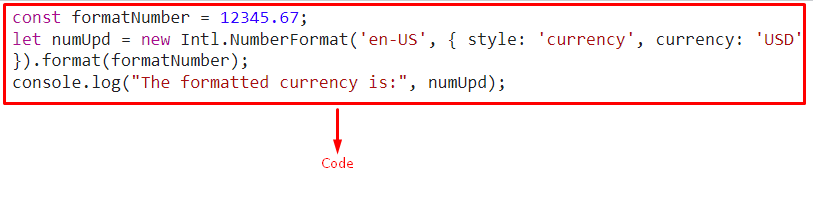 The “$” with the number indicates that the provided number is formatted in “US” currency.

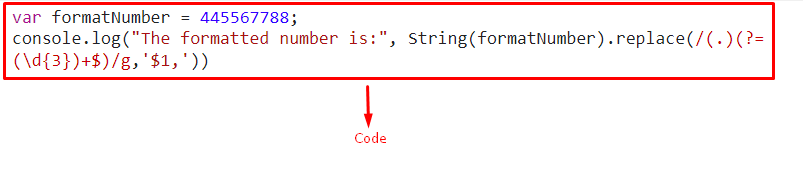 We have concluded the convenient approaches to format a number.
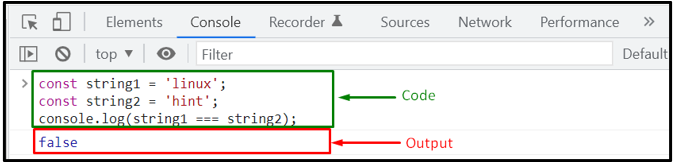 In the next statement, we will compare the “string1” value with the “linux” string:
console.log(string1 === 'linux');
Both values are equal according to their associated data type and characters case, so the strict equality operator will mark them as equal and return a “true” boolean value:
In the next statement, we will compare the “string1” value with the “linux” string:
console.log(string1 === 'linux');
Both values are equal according to their associated data type and characters case, so the strict equality operator will mark them as equal and return a “true” boolean value:
 If you want to perform “case-insensitive” comparison, convert both strings into lowercase with the help of the “toLowerCase()” method and then compare them:
const string3 = 'LINUX';
console.log(string1.toLowerCase() === string3.toLowerCase());
In this case, when the value of the “string3” is converted to lowercase, it becomes “linux,” which is equal to the “string1” value.
That’s why the execution of the above-given Equality operator will return “true”:
If you want to perform “case-insensitive” comparison, convert both strings into lowercase with the help of the “toLowerCase()” method and then compare them:
const string3 = 'LINUX';
console.log(string1.toLowerCase() === string3.toLowerCase());
In this case, when the value of the “string3” is converted to lowercase, it becomes “linux,” which is equal to the “string1” value.
That’s why the execution of the above-given Equality operator will return “true”:
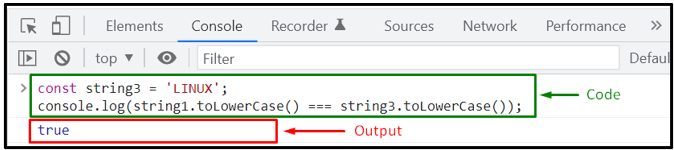
 Now, let’s check out the method of comparing strings based on their alphabetical order.
 In contrast, if “string1” comes before “string2” or is smaller than the invoked “localeCompare()” method will return “-1”:
console.log(string2.localeCompare(string1));
Output
In contrast, if “string1” comes before “string2” or is smaller than the invoked “localeCompare()” method will return “-1”:
console.log(string2.localeCompare(string1));
Output
 Lastly, the “localeCompare()” method will return the value “0” when both strings are equal:
console.log(string3.localeCompare(string2));
Output
Lastly, the “localeCompare()” method will return the value “0” when both strings are equal:
console.log(string3.localeCompare(string2));
Output
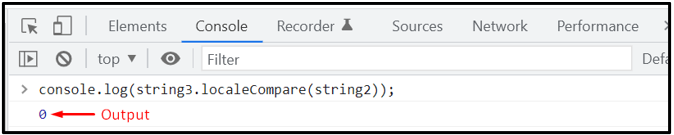 We have compiled different procedures for comparing strings.
You can choose any of them according to your requirements.
We have compiled different procedures for comparing strings.
You can choose any of them according to your requirements.
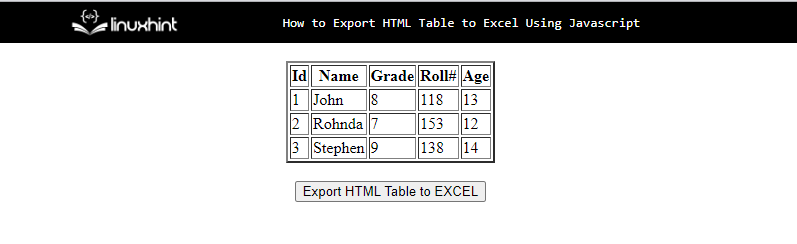 The JavaScript code for exporting the data table into a sheet is as follows:
function htmlTableToExcel(type){
var data = document.getElementById('tblToExcl');
var excelFile = XLSX.utils.table_to_book(data, {sheet: "sheet1"});
XLSX.write(excelFile, { bookType: type, bookSST: true, type: 'base64' });
XLSX.writeFile(excelFile, 'ExportedFile:HTMLTableToExcel' + type);}
The above JavaScript code follows the given steps to export the table to the excel sheet:
Define a function “htmlTableToExcel()” in a <script> tag or the JavaScript file by passing the “type” as a parameter.
Then, fetch the table using its id “tblToExcl” with the help of the “getElementById()” method.
Convert the table into a sheet by calling the “table_to_book()” method.
Write the table data into the excel sheet and set the file’s name.
After clicking the button, the sheet will be downloaded.
The JavaScript code for exporting the data table into a sheet is as follows:
function htmlTableToExcel(type){
var data = document.getElementById('tblToExcl');
var excelFile = XLSX.utils.table_to_book(data, {sheet: "sheet1"});
XLSX.write(excelFile, { bookType: type, bookSST: true, type: 'base64' });
XLSX.writeFile(excelFile, 'ExportedFile:HTMLTableToExcel' + type);}
The above JavaScript code follows the given steps to export the table to the excel sheet:
Define a function “htmlTableToExcel()” in a <script> tag or the JavaScript file by passing the “type” as a parameter.
Then, fetch the table using its id “tblToExcl” with the help of the “getElementById()” method.
Convert the table into a sheet by calling the “table_to_book()” method.
Write the table data into the excel sheet and set the file’s name.
After clicking the button, the sheet will be downloaded.
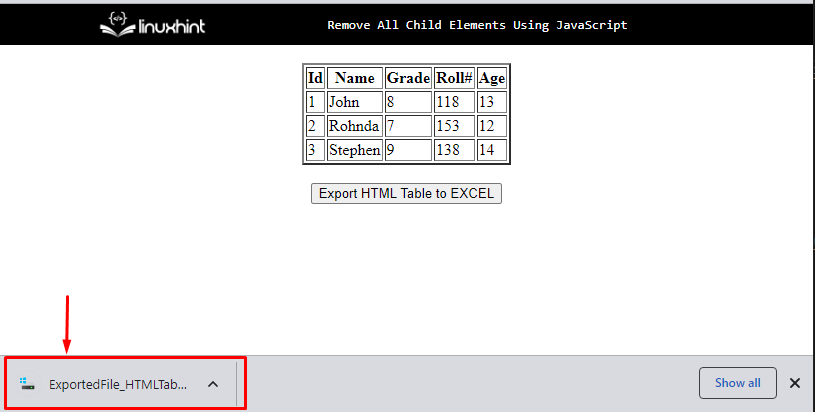 Open the downloaded file, the HTML table is now successfully exported to an excel sheet:
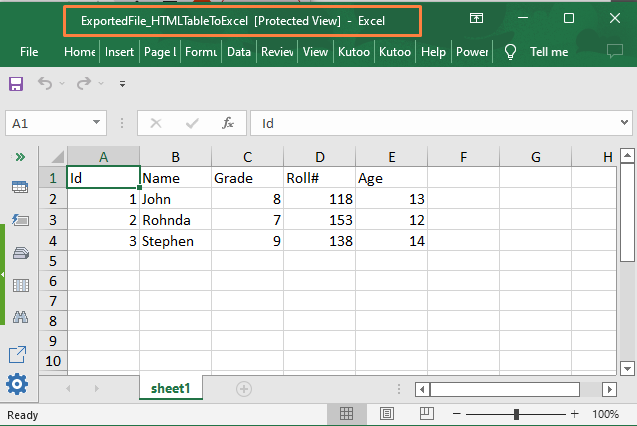 It is clear from the screenshot above that the data has been successfully exported to an excel file with the help of JavaScript.


 We have concluded the approaches that can be utilized to display datetime in 12 hour am/pm format.
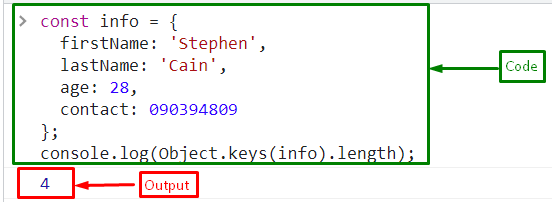 If you want only the names of keys in an object instead of count, simply call the “Object.keys()” method by passing an object as an argument:
console.log(Object.keys(info));
The output displays the names of the keys in the object in an array:
If you want only the names of keys in an object instead of count, simply call the “Object.keys()” method by passing an object as an argument:
console.log(Object.keys(info));
The output displays the names of the keys in the object in an array:
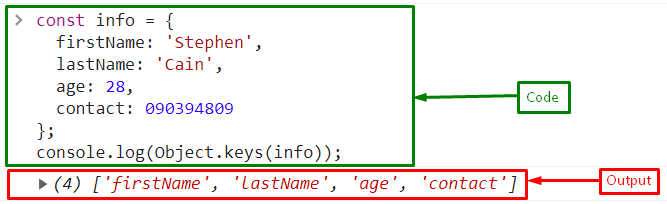
 Example 2: Count Number of Keys in an Inherited Objects
The “for” loop also counts inherited properties.
Here, we will create an object “employee” with two properties “gender”, and “joiningDate” that will inherit from the object “info”:
const employee = {
gender: 'male',
joiningDate: 'Jan,2020'};
Inherit the object “employee” with “info” using object’s property “__proto__”:
info.__proto__ = employee
Pass the object “info” to the “for_ in” loop and increment the count on each iteration.
It will also count the properties of the object “employee” because it inherits from the object “info”:
for(var key in info) {
count++;}
The output “6” indicates that this approach counts the keys of both objects’ “info” and its inherited object “employee”:
Example 2: Count Number of Keys in an Inherited Objects
The “for” loop also counts inherited properties.
Here, we will create an object “employee” with two properties “gender”, and “joiningDate” that will inherit from the object “info”:
const employee = {
gender: 'male',
joiningDate: 'Jan,2020'};
Inherit the object “employee” with “info” using object’s property “__proto__”:
info.__proto__ = employee
Pass the object “info” to the “for_ in” loop and increment the count on each iteration.
It will also count the properties of the object “employee” because it inherits from the object “info”:
for(var key in info) {
count++;}
The output “6” indicates that this approach counts the keys of both objects’ “info” and its inherited object “employee”:
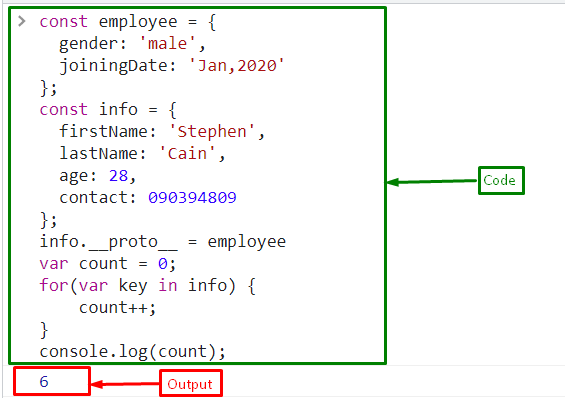 Example 3: Count Number of Keys in a Child Object
If you simply want to get the keys of the child object “employee”, use the “hasOwnProperty()” method inside the loop:
for(var key in employee) {
if (employee.hasOwnProperty(key)) {
count++;
}}
Output
Example 3: Count Number of Keys in a Child Object
If you simply want to get the keys of the child object “employee”, use the “hasOwnProperty()” method inside the loop:
for(var key in employee) {
if (employee.hasOwnProperty(key)) {
count++;
}}
Output
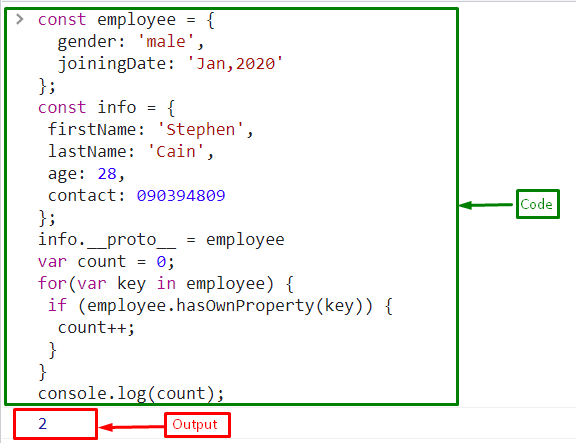
 Example 2: Converting Character Code into ASCII Code Representation Using JavaScript
In this example, convert the character to ASCII code by extracting it from a string value.
The following demonstration explains the stated concept.
let string = "Linuxhint"
console.log("The converted ASCII code is:", string.charCodeAt(2))
Firstly, initialize the string value as discussed in the previous example.
After that, apply the “charCodeAt()” method by passing the desired character’s index as its parameter.
This will result in converting the character “n” to ASCII code as specified by the index.
Output
Example 2: Converting Character Code into ASCII Code Representation Using JavaScript
In this example, convert the character to ASCII code by extracting it from a string value.
The following demonstration explains the stated concept.
let string = "Linuxhint"
console.log("The converted ASCII code is:", string.charCodeAt(2))
Firstly, initialize the string value as discussed in the previous example.
After that, apply the “charCodeAt()” method by passing the desired character’s index as its parameter.
This will result in converting the character “n” to ASCII code as specified by the index.
Output

 Example 2: Converting Character Code From String into ASCII Code Representation Using JavaScript
This specific example will result in converting the character to ASCII code by extracting it from a string value.
The below-given code-snippet explains the stated concept:
let string = "David"
console.log("The converted ASCII code is:", string.codePointAt(4))
Follow the below-stated steps:
Store the following string value in a variable named “string”
Finally, apply the “codePointAt()” method by passing the index of the character “d” in this case.
This will return the ASCII code representation of the indexed character.
Output
Example 2: Converting Character Code From String into ASCII Code Representation Using JavaScript
This specific example will result in converting the character to ASCII code by extracting it from a string value.
The below-given code-snippet explains the stated concept:
let string = "David"
console.log("The converted ASCII code is:", string.codePointAt(4))
Follow the below-stated steps:
Store the following string value in a variable named “string”
Finally, apply the “codePointAt()” method by passing the index of the character “d” in this case.
This will return the ASCII code representation of the indexed character.
Output
 We have concluded the approaches to convert character code into ASCII code representation
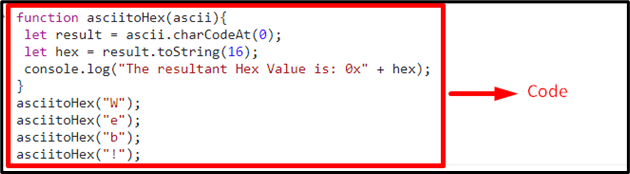
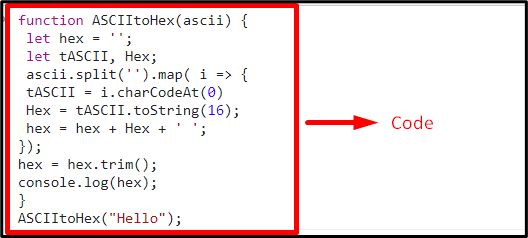 Example 2: Convert Hexadecimal Back to ASCII Representation
The following code will revert the hexadecimal conversion to the ASCII representation.
Syntax
parseInt(value, radix)
In the given syntax:
“value” refers to the value to be parsed.
“radix” refers to the number system
Let’s have a look at the following lines of code:
function hextoASCII(ascii) {
let string = '';
ascii.split(' ').map( (i) => {
merge = parseInt(i, 16);
string = string + String.fromCharCode(merge);});
console.log("The resultant ASCII Value is:", string);}
hextoASCII("48 65 6c 6f ");
Repeat the discussed steps in the previous example for declaring a function, passing a parameter, and applying the “split()” and “map()” methods.
After that, apply the “parseInt()” method which parses a value in the form of a string.
This method will parse the hexadecimal radix(16) which will perform the desired conversion.
The “fromCharCode()” method in the next step will then transform the Unicode values into characters and display them.
Lastly, access the discussed function by passing the hexadecimal values in it as parameters.
This will result in returning the corresponding ASCII representation.
Output
Example 2: Convert Hexadecimal Back to ASCII Representation
The following code will revert the hexadecimal conversion to the ASCII representation.
Syntax
parseInt(value, radix)
In the given syntax:
“value” refers to the value to be parsed.
“radix” refers to the number system
Let’s have a look at the following lines of code:
function hextoASCII(ascii) {
let string = '';
ascii.split(' ').map( (i) => {
merge = parseInt(i, 16);
string = string + String.fromCharCode(merge);});
console.log("The resultant ASCII Value is:", string);}
hextoASCII("48 65 6c 6f ");
Repeat the discussed steps in the previous example for declaring a function, passing a parameter, and applying the “split()” and “map()” methods.
After that, apply the “parseInt()” method which parses a value in the form of a string.
This method will parse the hexadecimal radix(16) which will perform the desired conversion.
The “fromCharCode()” method in the next step will then transform the Unicode values into characters and display them.
Lastly, access the discussed function by passing the hexadecimal values in it as parameters.
This will result in returning the corresponding ASCII representation.
Output
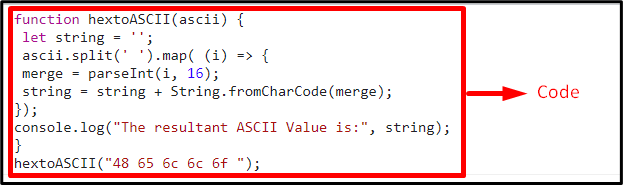
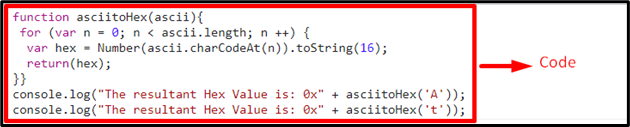 We have demonstrated the approaches to convert ASCII to hexadecimal.
 Example 2: Convert Array to String With No Commas Using join() Method With Blank Space
Go through the following lines of code:
let array = ['Linux', 'hint'];
console.log("The given array is:", array)
let join = array.join(" ");
console.log("The array converted to string without commas is:", join);
console.log(typeof join);
Follow the below-stated steps:
Firstly, revive the discussed steps in the previous example for declaring and displaying an array of string values.
Likewise, apply the “join()” method having blank space separated commas(“”).
Resultantly, the string values will be displayed having a blank space in them and their type will also be returned as discussed previously.
Output
Example 2: Convert Array to String With No Commas Using join() Method With Blank Space
Go through the following lines of code:
let array = ['Linux', 'hint'];
console.log("The given array is:", array)
let join = array.join(" ");
console.log("The array converted to string without commas is:", join);
console.log(typeof join);
Follow the below-stated steps:
Firstly, revive the discussed steps in the previous example for declaring and displaying an array of string values.
Likewise, apply the “join()” method having blank space separated commas(“”).
Resultantly, the string values will be displayed having a blank space in them and their type will also be returned as discussed previously.
Output
 From the above output, it can be observed that a blank space is placed between the two different merged “string” values, and the type of the resultant string is also returned.
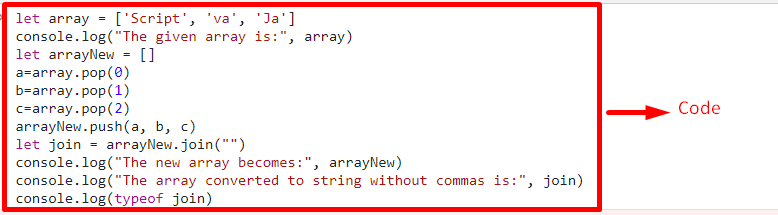
 In the above output, it is evident that the first output did not produce the desired output.
After applying the split() method, the required string value is acquired.
We have compiled the approaches to convert an array to a string with no commas.
In the above output, it is evident that the first output did not produce the desired output.
After applying the split() method, the required string value is acquired.
We have compiled the approaches to convert an array to a string with no commas.

 We have compiled the approaches to compute the dictionary’s length.
 The output indicates that the occurrence of element “6” in an array is “2”.
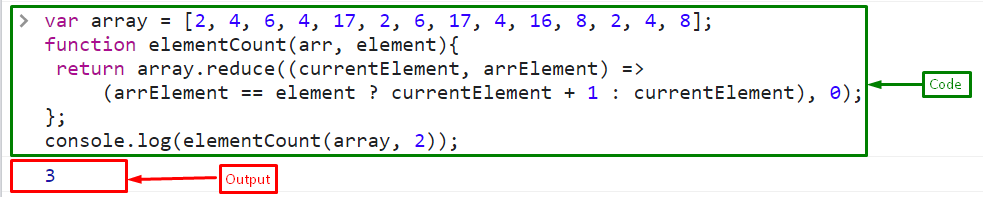 The output indicates that the occurrence of element “3” in an array is “3”:
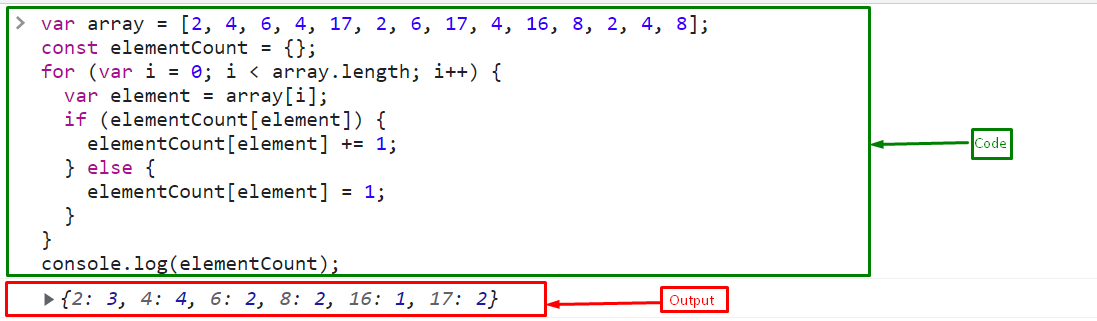 The above output shows the count of the occurrences of every element of an array.
To count the occurrence of the specific element, follow the below line of code:
console.log(elementCount[6]);
The output displays “2” which is the total count of the occurrence of element “6” in an array:
The above output shows the count of the occurrences of every element of an array.
To count the occurrence of the specific element, follow the below line of code:
console.log(elementCount[6]);
The output displays “2” which is the total count of the occurrence of element “6” in an array:
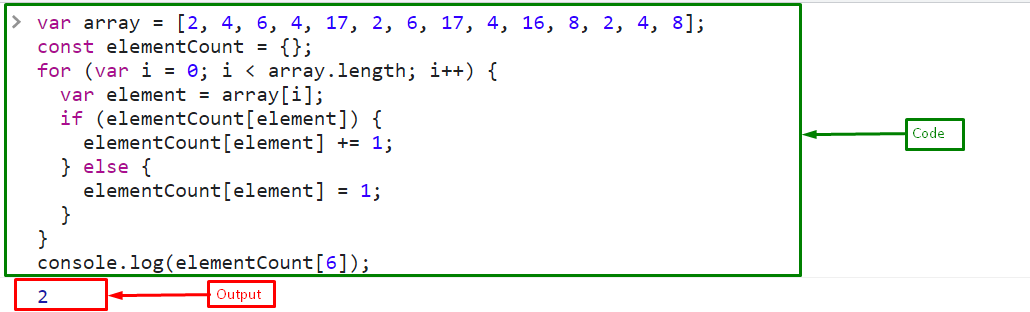
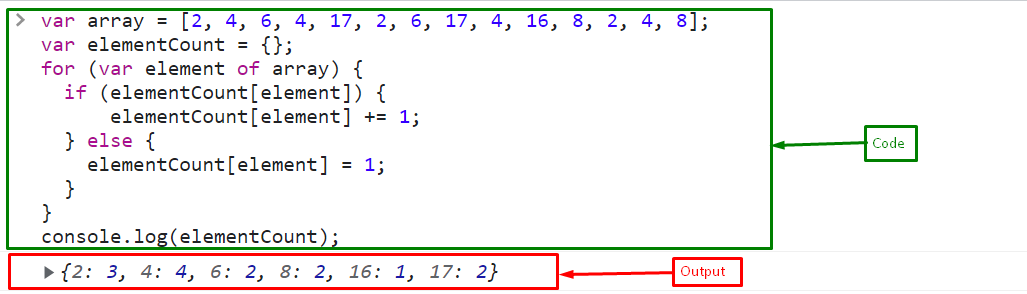 To count the occurrence of the specific element, create a variable “countElement” and store “8” in it:
var countElement = 8;
Set the count to 0:
var elementCount = 0;
Iterate through the array using the for-of loop and increment the count if the “countElement” is present:
for (arr of array) {
if (arr == countElement) {
elementCount++;
}};
Print the resultant count on the console using the “console.log()” method:
console.log(elementCount);
Output
To count the occurrence of the specific element, create a variable “countElement” and store “8” in it:
var countElement = 8;
Set the count to 0:
var elementCount = 0;
Iterate through the array using the for-of loop and increment the count if the “countElement” is present:
for (arr of array) {
if (arr == countElement) {
elementCount++;
}};
Print the resultant count on the console using the “console.log()” method:
console.log(elementCount);
Output
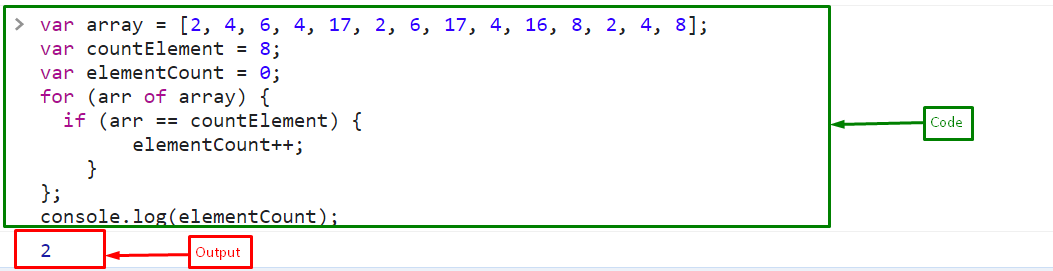 We have compiled the methods to count the element occurrences in an array.
 Example 2: Add Two Strings using Addition Assignment += Operator
Create a variable “str1” and store a string “Linux” in it:
var str1 = "Linux";
Now, add a string “hint” in a variable “str1” using addition assignment operator:
console.log(str1 += "hint");
The output indicates that the string “hint” is successfully concatenated with the string “Linux” that is stored in a variable “str1”:
Example 2: Add Two Strings using Addition Assignment += Operator
Create a variable “str1” and store a string “Linux” in it:
var str1 = "Linux";
Now, add a string “hint” in a variable “str1” using addition assignment operator:
console.log(str1 += "hint");
The output indicates that the string “hint” is successfully concatenated with the string “Linux” that is stored in a variable “str1”:
 Example 3: Add a String in a Number using Addition Assignment += Operator
Create a variable “val1” and assign a value “2”:
var val1 = 2;
Now, add a number “22” as a string in the variable “val1”.
It will concatenate with the value of val1:
console.log(val1 += '22');
Output
Example 3: Add a String in a Number using Addition Assignment += Operator
Create a variable “val1” and assign a value “2”:
var val1 = 2;
Now, add a number “22” as a string in the variable “val1”.
It will concatenate with the value of val1:
console.log(val1 += '22');
Output
 We have covered the basics of the addition assignment += operator.
 In the above output, it can be observed that the text value of “label” is changed on both the DOM and in the code as well in the “Elements” section.
 In the above output, it is evident that the desired requirement is achieved.
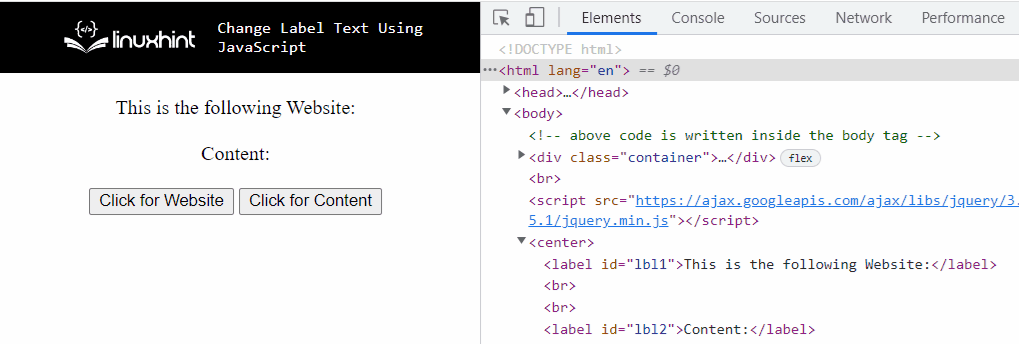 In the above output, the first transformed text value of the label on the Document Object Model (DOM) corresponds to the jQuery “text()” method and the other is a result of the “html()” method.
We have compiled the approaches to change label text using JavaScript.
In the above output, the first transformed text value of the label on the Document Object Model (DOM) corresponds to the jQuery “text()” method and the other is a result of the “html()” method.
We have compiled the approaches to change label text using JavaScript.
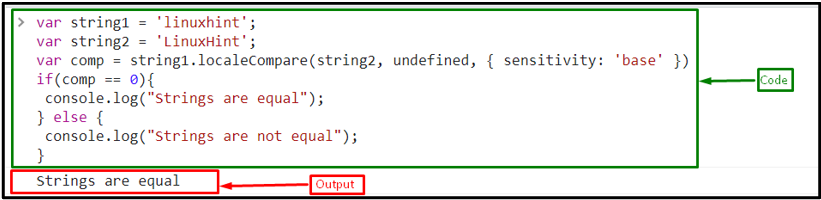
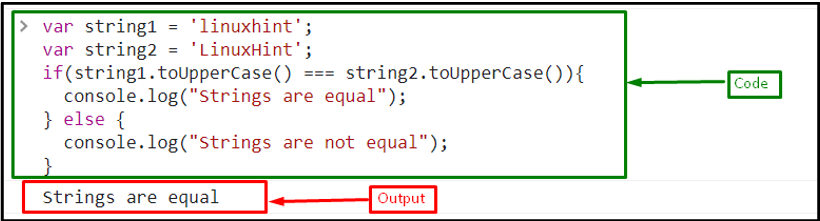 Example: Case Insensitive String Comparison Using toLowerCase() Method
Here, the strings are compared using the toLowerCase() method that will first convert the strings into lower case and then compare them using the === operator:
if(string1.toLowerCase() === string2.toLowerCase()){
console.log("Strings are equal");} else {
console.log("Strings are not equal");}
The corresponding output will be:
Example: Case Insensitive String Comparison Using toLowerCase() Method
Here, the strings are compared using the toLowerCase() method that will first convert the strings into lower case and then compare them using the === operator:
if(string1.toLowerCase() === string2.toLowerCase()){
console.log("Strings are equal");} else {
console.log("Strings are not equal");}
The corresponding output will be:

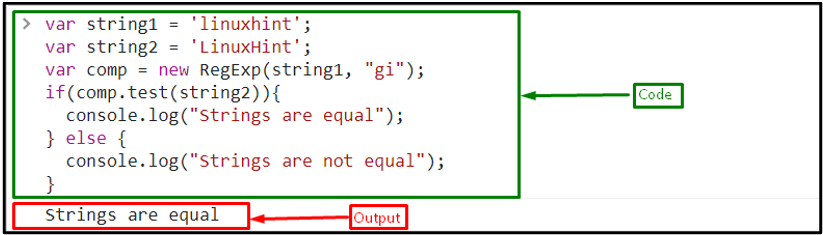
 In the above output, it can be observed that upon the accessed function, the alert dialogue box is not displayed thereby canceling the attached event.
 Here, observes the behavior upon clicking the div upon checking the checkbox.
We have compiled the approaches to cancel events.
Here, observes the behavior upon clicking the div upon checking the checkbox.
We have compiled the approaches to cancel events.
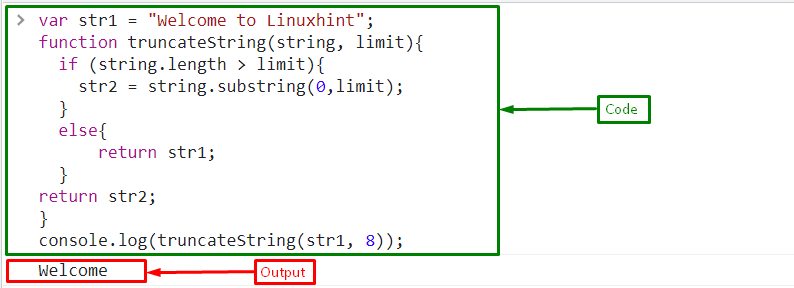
 Now, join the array into a string using the join() method and store it in a variable “truncStr”:
var truncStr = str.join('');
Print the resultant string using the “console.log()” method:
console.log(truncStr);
Output
Now, join the array into a string using the join() method and store it in a variable “truncStr”:
var truncStr = str.join('');
Print the resultant string using the “console.log()” method:
console.log(truncStr);
Output
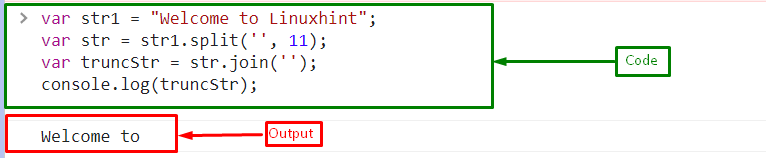
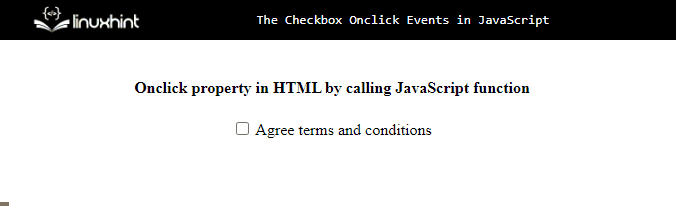 Example 2: Checkbox Onclick Event by Applying a Function on the onclick Attribute of an HTML Element
In this example, JavaScript will be used to give a value to the onclick attribute of the HTML element rather than in the HTML tag.
Create a checkbox and assign an id to it that will later be accessed:
<h4>Checkbox Onclick using JavaScript</h4><input type="checkbox" id="agree"> Agree terms and conditions
In the following step, the checkbox will be accessed using its id “agree” and an “onclick” attribute will be attached to it.
Upon the checkbox click, the defined function will be executed, and an alert message will be shown:
document.getElementById("agree").onclick = function checkClickFunc() {
alert("Checkbox is clicked");}
The corresponding output will be:
Example 2: Checkbox Onclick Event by Applying a Function on the onclick Attribute of an HTML Element
In this example, JavaScript will be used to give a value to the onclick attribute of the HTML element rather than in the HTML tag.
Create a checkbox and assign an id to it that will later be accessed:
<h4>Checkbox Onclick using JavaScript</h4><input type="checkbox" id="agree"> Agree terms and conditions
In the following step, the checkbox will be accessed using its id “agree” and an “onclick” attribute will be attached to it.
Upon the checkbox click, the defined function will be executed, and an alert message will be shown:
document.getElementById("agree").onclick = function checkClickFunc() {
alert("Checkbox is clicked");}
The corresponding output will be:
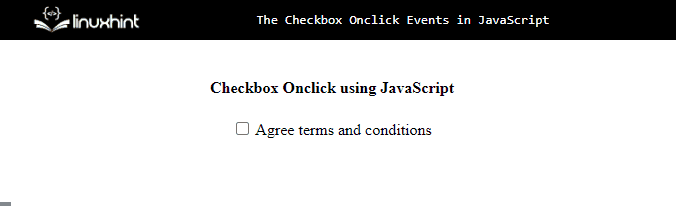 Example 3: Checkbox Onclick Event by Explicitly adding Event Listener on “click” Event
Here, the checkbox onclick event will be set using the JavaScript “addEventListener()” method:
<h4>Checkbox Onclick using JavaScript through addEventListener</h4><input type="checkbox" id="agree"> Agree terms and conditions
In the JavaScript file, use the given code:
document.getElementById("agree").addEventListener("click", checkClickFunc);function checkClickFunc() {
alert("Checkbox is clicked");}
In the above code snippet,
First, fetch the checkbox using its id and then attach an “addEventListener()” method by passing a “click” event and a function “checkClickFunc” which will be called on the checkbox click.
Define a function “checkClickFunc()”, which will be triggered while clicking the checkbox and shows an alert message:
Output
Example 3: Checkbox Onclick Event by Explicitly adding Event Listener on “click” Event
Here, the checkbox onclick event will be set using the JavaScript “addEventListener()” method:
<h4>Checkbox Onclick using JavaScript through addEventListener</h4><input type="checkbox" id="agree"> Agree terms and conditions
In the JavaScript file, use the given code:
document.getElementById("agree").addEventListener("click", checkClickFunc);function checkClickFunc() {
alert("Checkbox is clicked");}
In the above code snippet,
First, fetch the checkbox using its id and then attach an “addEventListener()” method by passing a “click” event and a function “checkClickFunc” which will be called on the checkbox click.
Define a function “checkClickFunc()”, which will be triggered while clicking the checkbox and shows an alert message:
Output
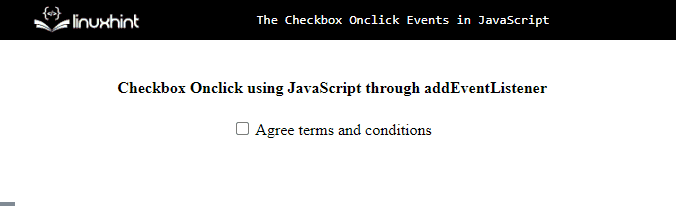
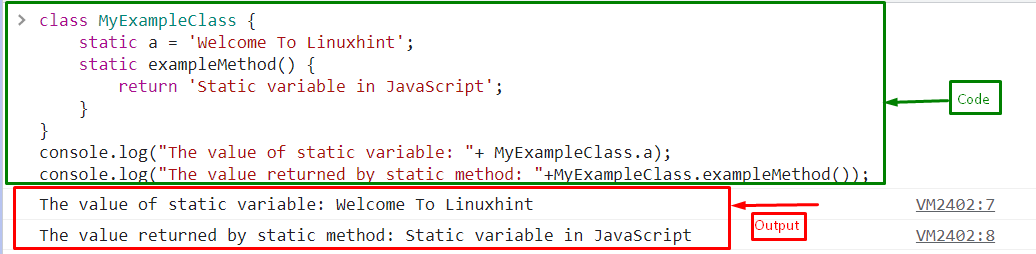 Example 2:
In the following example, call the static variable in a static method using the “this” keyword:
class MyExampleClass {
static a = 'Welcome To Linuxhint';
static exampleMethod() {
return this.a;
}}
Output
Example 2:
In the following example, call the static variable in a static method using the “this” keyword:
class MyExampleClass {
static a = 'Welcome To Linuxhint';
static exampleMethod() {
return this.a;
}}
Output
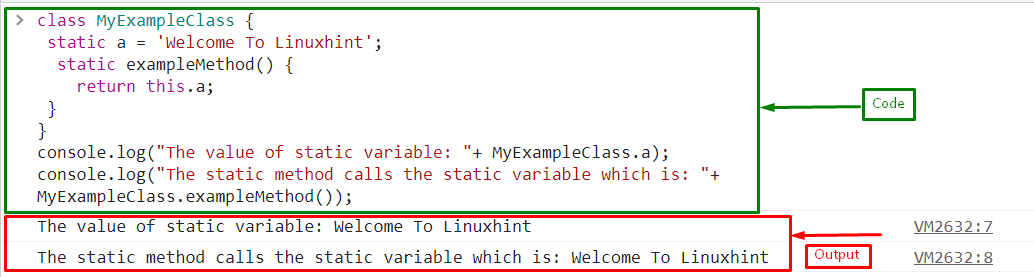
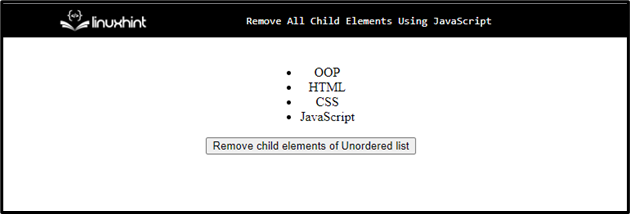 In the JavaScript file, use the following code for removing all child nodes of the element:
function removeChildElements() {
var childElements = document.querySelector("ul");
var delChild = childElements.lastChild;
while (delChild) {
childElements.removeChild(delChild);
delChild = childElements.lastChild;
}}
In the above code:
First, define a function “removeChildElements()”.
Get the HTML element “ul” using the “querySelector()” method.
Iterate the element until the last child node, then remove all of them using the “removeChild()” method.
Output
In the JavaScript file, use the following code for removing all child nodes of the element:
function removeChildElements() {
var childElements = document.querySelector("ul");
var delChild = childElements.lastChild;
while (delChild) {
childElements.removeChild(delChild);
delChild = childElements.lastChild;
}}
In the above code:
First, define a function “removeChildElements()”.
Get the HTML element “ul” using the “querySelector()” method.
Iterate the element until the last child node, then remove all of them using the “removeChild()” method.
Output
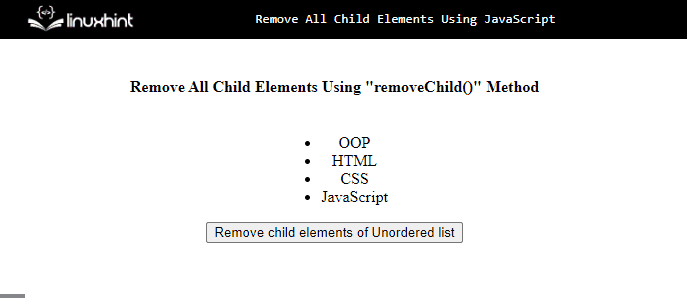 The above output indicates that all items in the list are being deleted successfully when the button is clicked.
For removing, only the first child node of the element, use the below lines of code:
function removeChildElements() {
var childElements = document.querySelector("ul");
childElements.removeChild(childElements.firstChild);}
In the above code snippet
Get the HTML element “ul” and pass the first child node to the “removeChild()” method as an argument.
Output
The above output indicates that all items in the list are being deleted successfully when the button is clicked.
For removing, only the first child node of the element, use the below lines of code:
function removeChildElements() {
var childElements = document.querySelector("ul");
childElements.removeChild(childElements.firstChild);}
In the above code snippet
Get the HTML element “ul” and pass the first child node to the “removeChild()” method as an argument.
Output
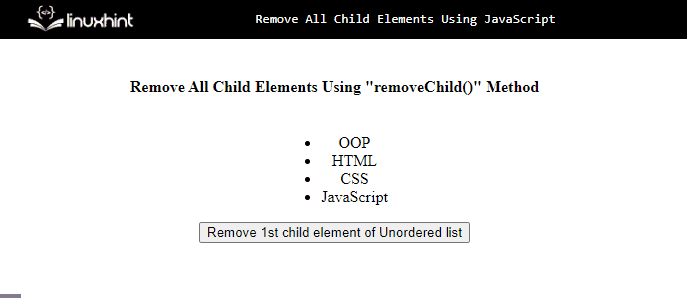 The unordered list’s first child element is the only one removed in the output seen above.
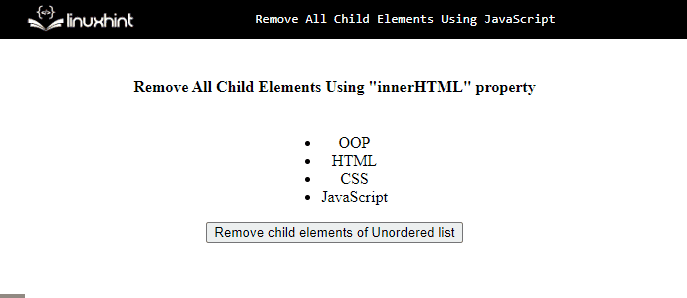 We gathered the best possible approaches for removing an element’s child nodes using JavaScript.
 In the JavaScript file, use the below lines of code:
function validatePhoneNumber(e) {
var pNumber = document.getElementById('number').value;
if (!phoneRegex(pNumber)) {
document.getElementById('error').classList.add('msg');
alert("submitted");
}
else {
document.getElementById('error').classList.remove('msg');
}
e.preventDefault();}
In this code snippet:
Define a function “validatePhoneNumber()”.
Get the value of the input field using the id “number” with the help of the “getElementById()” method and store it in a variable “pNumber”.
Call the function “phoneRegex()” by passing the input number “pNumber” as an argument, and check whether the input number is equal to the regex.
If yes! then shows an alert with the message “submitted” and adds the class “msg” using the “classList.add()” method that displays none.
If the condition is not true, show the error by calling the “classList.remove()” method, which will show an error.
After that, define a function called “phoneRegex()” where the regex pattern will be defined for the validating phone number:
function phoneRegex(input_str) {
var regPattern = /^\d{3}\d{3}\d{4}$/;
return regPattern.test(input_str);}
Lastly, call the function “validatePhoneNumber()” on the submit using the button’s id “submit” with the help of the “addEventListener()” method:
document.getElementById('form').addEventListener('submit', validatePhoneNumber);
Output
In the JavaScript file, use the below lines of code:
function validatePhoneNumber(e) {
var pNumber = document.getElementById('number').value;
if (!phoneRegex(pNumber)) {
document.getElementById('error').classList.add('msg');
alert("submitted");
}
else {
document.getElementById('error').classList.remove('msg');
}
e.preventDefault();}
In this code snippet:
Define a function “validatePhoneNumber()”.
Get the value of the input field using the id “number” with the help of the “getElementById()” method and store it in a variable “pNumber”.
Call the function “phoneRegex()” by passing the input number “pNumber” as an argument, and check whether the input number is equal to the regex.
If yes! then shows an alert with the message “submitted” and adds the class “msg” using the “classList.add()” method that displays none.
If the condition is not true, show the error by calling the “classList.remove()” method, which will show an error.
After that, define a function called “phoneRegex()” where the regex pattern will be defined for the validating phone number:
function phoneRegex(input_str) {
var regPattern = /^\d{3}\d{3}\d{4}$/;
return regPattern.test(input_str);}
Lastly, call the function “validatePhoneNumber()” on the submit using the button’s id “submit” with the help of the “addEventListener()” method:
document.getElementById('form').addEventListener('submit', validatePhoneNumber);
Output
 The above output signifies that the regex pattern for only phone numbers with 10 digits and without any special character or delimiter successfully works.
Example 2: Complex Phone Number Regex Validation
The below-given regex patterns or regular expressions allow phone numbers with 10 digits and special characters including plus sign, dash, and parenthesis.
Regex Pattern For Validating phone numbers With Delimiter dash (-)
The regex for validating phone numbers with 10 digits and a special character dash (-):
/^\d{3}[-]\d{3}[-]\d{4})$/
The pattern shows:
“^” denotes the start of the string
“/” forward slash character is used to indicate the regular expression’s boundaries
“d” stands for digits
“{}” indicates the limit
“[-]” indicates an allowed special character
“\” backslash character is the escape character
“$” denotes the end of the string
Add the above regex pattern in the “phoneRegex()” defined function:
function phoneRegex(input_str) {
var regPattern = /^\d{3}[-]\d{3}[-]\d{4})$/
return regPattern.test(input_str);}
The corresponding output will be:
The above output signifies that the regex pattern for only phone numbers with 10 digits and without any special character or delimiter successfully works.
Example 2: Complex Phone Number Regex Validation
The below-given regex patterns or regular expressions allow phone numbers with 10 digits and special characters including plus sign, dash, and parenthesis.
Regex Pattern For Validating phone numbers With Delimiter dash (-)
The regex for validating phone numbers with 10 digits and a special character dash (-):
/^\d{3}[-]\d{3}[-]\d{4})$/
The pattern shows:
“^” denotes the start of the string
“/” forward slash character is used to indicate the regular expression’s boundaries
“d” stands for digits
“{}” indicates the limit
“[-]” indicates an allowed special character
“\” backslash character is the escape character
“$” denotes the end of the string
Add the above regex pattern in the “phoneRegex()” defined function:
function phoneRegex(input_str) {
var regPattern = /^\d{3}[-]\d{3}[-]\d{4})$/
return regPattern.test(input_str);}
The corresponding output will be:
 Regex Pattern For Validating phone numbers With Delimiters Including dash (-), and Braces ()
The regex for validating phone numbers with 10 digits and special characters braces (), and dash (-):
/^\(?(\d{3})\)?[-]?(\d{3})[-]?(\d{4})$/
The pattern shows:
“^” denotes the start of the string
“/” forward slash character is used to indicate the regular expression’s boundaries
“d” stands for digits
“{}” indicates the limit
“[-]” indicates an allowed special character
“(?” also denotes as allowed in the input
“\” backslash character is the escape character
“$” denotes the end of the string
Append the above regular expression in the “phoneRegex()” defined function:
function phoneRegex(input_str) {
var regPattern = /^\(?(\d{3})\)?[-]?(\d{3})[-]?(\d{4})$/;
return regPattern.test(input_str);}
Output
Regex Pattern For Validating phone numbers With Delimiters Including dash (-), and Braces ()
The regex for validating phone numbers with 10 digits and special characters braces (), and dash (-):
/^\(?(\d{3})\)?[-]?(\d{3})[-]?(\d{4})$/
The pattern shows:
“^” denotes the start of the string
“/” forward slash character is used to indicate the regular expression’s boundaries
“d” stands for digits
“{}” indicates the limit
“[-]” indicates an allowed special character
“(?” also denotes as allowed in the input
“\” backslash character is the escape character
“$” denotes the end of the string
Append the above regular expression in the “phoneRegex()” defined function:
function phoneRegex(input_str) {
var regPattern = /^\(?(\d{3})\)?[-]?(\d{3})[-]?(\d{4})$/;
return regPattern.test(input_str);}
Output
 The above output accepts the special characters or delimiters in input, including braces and dashes with the 10 digits phone number.
It displays an error while the (+) sign is used in the input.
Regex Pattern For Validating phone numbers With All Delimiters Including dash (-), Brackets (), Dot (.), Spaces, and (+) Sign
The regex for validating phone numbers with 10 digit and special characters braces (), dash (-), dot(.), the plus (+) sign, and the space:
/^[\+]?[(]?[0-9]{3}[)]?[-\s\.]?[0-9]{3}[-\s\.]?[0-9]{4}$/
The pattern shows:
“^” denotes the start of the string
“/” forward slash character is used to indicate the regular expression’s boundaries
“d” stands for digits
“{}” indicates the limit
“[-]” indicates an allowed special character
“[(]?” also denotes as allowed in the input
“\s” denotes a space
“\.” indicates the dot
“\” backslash character is the escape character
“$” denotes the end of the string
Use the above pattern in the “phoneRegex()” defined function:
function phoneRegex(input_str) {
var regPattern = /^[\+]?[(]?[0-9]{3}[)]?[-\s\.]?[0-9]{3}[-\s\.]?[0-9]{4}$/;
return regPattern.test(input_str);}
Output
The above output accepts the special characters or delimiters in input, including braces and dashes with the 10 digits phone number.
It displays an error while the (+) sign is used in the input.
Regex Pattern For Validating phone numbers With All Delimiters Including dash (-), Brackets (), Dot (.), Spaces, and (+) Sign
The regex for validating phone numbers with 10 digit and special characters braces (), dash (-), dot(.), the plus (+) sign, and the space:
/^[\+]?[(]?[0-9]{3}[)]?[-\s\.]?[0-9]{3}[-\s\.]?[0-9]{4}$/
The pattern shows:
“^” denotes the start of the string
“/” forward slash character is used to indicate the regular expression’s boundaries
“d” stands for digits
“{}” indicates the limit
“[-]” indicates an allowed special character
“[(]?” also denotes as allowed in the input
“\s” denotes a space
“\.” indicates the dot
“\” backslash character is the escape character
“$” denotes the end of the string
Use the above pattern in the “phoneRegex()” defined function:
function phoneRegex(input_str) {
var regPattern = /^[\+]?[(]?[0-9]{3}[)]?[-\s\.]?[0-9]{3}[-\s\.]?[0-9]{4}$/;
return regPattern.test(input_str);}
Output
 We have compiled all the possible regex patterns or regular expressions for validating phone numbers.


 This article demonstrated various entities that can place a non-breaking space in an HTML string.
 We have demonstrated the approach to place a non-breaking space in a JavaScript string.
Example 2:
In this example, apply the “\u00A0” Unicode character code approach on multiple string values for placing the non-breaking spaces single or multiple times:
<center><h3>Python</h3><h3>Java</h3><h3>JavaScript</h3><button onclick = "nonBreak()">Click to apply non-breaking space</button></center>
In the above-given HTML code,
Within the “<center>” tag, specify the following headings to observe the difference before and after the applied Unicode character code.
After that, attach an “onclick” event invoking the function nonBreak()
Let’s move on to the JavaScript part of the code:
function nonBreak(){var string1 = "Py\u00A0thon";var string2 = "Ja\u00A0\u00A0va";var string3 = "Java\u00A0\u00A0\u00A0Script";
console.log("The string with 1 non-breaking space is:", string1)
console.log("The string with 2 non-breaking space is:", string2)
console.log("The string with 3 non-breaking space is:", string3)}
In the above js code:
Define the function named “nonBreak()”.
In its definition, initialize the specified string values.
The “character code” is applied in each of the string values with the change in only the number of times applied in each case.
Output
We have demonstrated the approach to place a non-breaking space in a JavaScript string.
Example 2:
In this example, apply the “\u00A0” Unicode character code approach on multiple string values for placing the non-breaking spaces single or multiple times:
<center><h3>Python</h3><h3>Java</h3><h3>JavaScript</h3><button onclick = "nonBreak()">Click to apply non-breaking space</button></center>
In the above-given HTML code,
Within the “<center>” tag, specify the following headings to observe the difference before and after the applied Unicode character code.
After that, attach an “onclick” event invoking the function nonBreak()
Let’s move on to the JavaScript part of the code:
function nonBreak(){var string1 = "Py\u00A0thon";var string2 = "Ja\u00A0\u00A0va";var string3 = "Java\u00A0\u00A0\u00A0Script";
console.log("The string with 1 non-breaking space is:", string1)
console.log("The string with 2 non-breaking space is:", string2)
console.log("The string with 3 non-breaking space is:", string3)}
In the above js code:
Define the function named “nonBreak()”.
In its definition, initialize the specified string values.
The “character code” is applied in each of the string values with the change in only the number of times applied in each case.
Output
 In the above output, the difference in the string format can be observed on the DOM and the console.
We have compiled the implementation of applying a non-breaking space in a JavaScript string.
In the above output, the difference in the string format can be observed on the DOM and the console.
We have compiled the implementation of applying a non-breaking space in a JavaScript string.
 Example 2:
In this example, the “startsWith()” method is used with the second parameter, which defines the starting point for the search:
console.log(string.startsWith('L', 34));
The startsWith() method matches characters by case.
Therefore, it returns false as “L” and “l” are not in the same case:
Example 2:
In this example, the “startsWith()” method is used with the second parameter, which defines the starting point for the search:
console.log(string.startsWith('L', 34));
The startsWith() method matches characters by case.
Therefore, it returns false as “L” and “l” are not in the same case:
 We have covered all the essential information related to the String startWith() JavaScript method.
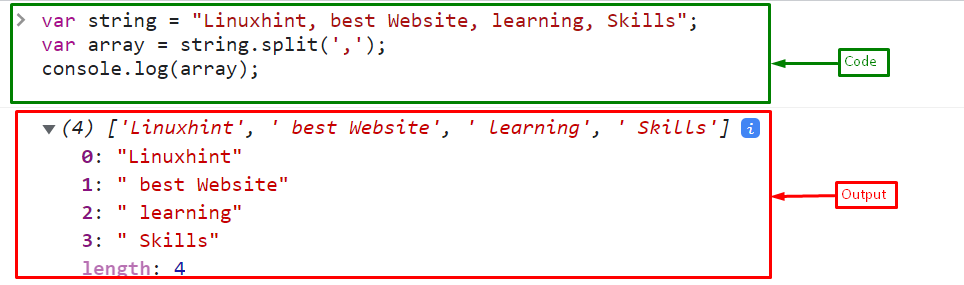 The above output shows that the string splits into an array whenever a comma is encountered.
Example 2
In the following example, get the value of the splitted string at the specified index of the array:
console.log(array[2]);
Output
The above output shows that the string splits into an array whenever a comma is encountered.
Example 2
In the following example, get the value of the splitted string at the specified index of the array:
console.log(array[2]);
Output
 This blog has provided the necessary information related to the split() method to split the string into an array by comma.
 Let’s see an example of how to create a custom right-click menu on a webpage.
Creating a Custom Right-Click Menu with JavaScript
We will create a simple webpage with HTML and CSS and then create a custom right-click menu on the webpage using JavaScript.
We will position and style our custom right-click menu using CSS properties:
<h2>JavaScript Right Click Menu</h2><h4>To get a custom context menu, click anywhere on the page</h4>
Then, write the code for the custom right-click menu in a JavaScript file.
First, hide or block the default context menu on a webpage.
Call the “preventDefault()” method that prevents the default right-click menu from appearing while triggering the “contextmenu” event.
Call the defined function named “createMenuonRightClick()” for custom right-click menu with “e.clientX” and “e.clientY” arguments that shows the mouse position:
_currentMenuVisible = null;
document.addEventListener('contextmenu', e => {
e.preventDefault();
createMenuonRightClick(e.clientX,e.clientY);});
Define a function “createMenuonRightClick()” which will be launched upon the right-click of the user on the webpage:
function createMenuonRightClick(x, y) {
closetheOpenedMenu();
const menuElement = document.createElement('div');
menuElement.classList.add('contextMenu');
const menuListElement = document.createElement('ul');
const menuArray = ['Refresh', 'Open', 'Save', 'Copy', 'Help'];
for (var element of menuArray) {
var listElement = document.createElement('li');
listElement.innerHTML = '<a href="#">' + element + '</a>';
menuListElement.appendChild(listElement);
}
menuElement.appendChild(menuListElement);
document.body.appendChild(menuElement);
_currentMenuVisible = menuElement;
menuElement.style.display = 'block';
menuElement.style.left = x + "px";
menuElement.style.top = y + "px";}
Let’s go over what’s happening in the code mentioned above:
On the right click, the first thing is to close any other right-click or context menus that are currently opened on the page.
Then we create a new “div” which will host the custom right-click menu.
Then, inside the “div”, an unordered list is added that contains an array of lists that appear as a menu on the web page.
To close the context menu, click anywhere on the web page.
This will be handled using the “click” event which will be triggered when the user clicks on the webpage after opening the right-click menu.
This event handler calls the specified function “closetheOpenedMenu()”:
document.addEventListener('click', e => {
closetheOpenedMenu();});
Now, define a function “closetheOpenedMenu()” to close the right-click menu where call the “closeContextMenu()” method which will close the menu:
function closetheOpenedMenu() {
if (_currentMenuVisible !== null) {
closeContextMenu(_currentMenuVisible);
}}
The “closeContextMenu()” method is defined below:
function closeContextMenu(menu) {
menu.style.left='0px';
menu.style.top='0px';
document.body.removeChild(menu);
_currentMenuVisible = null;}
To style a context menu or right-click menu, apply CSS to various elements to make it look good.
First, add styling to the body tag to align the text in the center and set the background color:
body{
text-align:center;
background: #b7c4f1;}
Style the menu by setting the text color, background color, border, and position to “absolute”:
.contextMenu {
position: absolute;
width: 100px; height: auto;
color: #b7c4f1;
background: #344683;
border: 1px solid #344683;
display: none;}
Style the unordered list with list items to set the padding and margin:
.contextMenu ul {
padding: 0;
margin: 0;}
.contextMenu ul li {
border-bottom: #b7c4f1 1px solid;
padding: 0;
margin: 0;}
Set the border of the last option of the menu using the “border-bottom” property that will be none;
.contextMenu ul li:last-child{
border-bottom: none;}
Style the menu with an anchor tag.
.contextMenu ul li a {
text-align: left;
display: block;
padding: 5px 10px;
color: #b7c4f1;
text-transform: capitalize;
text-decoration: none;}
Set the background color of the list items on hover:
.contextMenu ul li a:hover {
background: #2777FF;}
As you can see in the output, clicking on a web page with the right mouse button displays a custom right-click menu:
Let’s see an example of how to create a custom right-click menu on a webpage.
Creating a Custom Right-Click Menu with JavaScript
We will create a simple webpage with HTML and CSS and then create a custom right-click menu on the webpage using JavaScript.
We will position and style our custom right-click menu using CSS properties:
<h2>JavaScript Right Click Menu</h2><h4>To get a custom context menu, click anywhere on the page</h4>
Then, write the code for the custom right-click menu in a JavaScript file.
First, hide or block the default context menu on a webpage.
Call the “preventDefault()” method that prevents the default right-click menu from appearing while triggering the “contextmenu” event.
Call the defined function named “createMenuonRightClick()” for custom right-click menu with “e.clientX” and “e.clientY” arguments that shows the mouse position:
_currentMenuVisible = null;
document.addEventListener('contextmenu', e => {
e.preventDefault();
createMenuonRightClick(e.clientX,e.clientY);});
Define a function “createMenuonRightClick()” which will be launched upon the right-click of the user on the webpage:
function createMenuonRightClick(x, y) {
closetheOpenedMenu();
const menuElement = document.createElement('div');
menuElement.classList.add('contextMenu');
const menuListElement = document.createElement('ul');
const menuArray = ['Refresh', 'Open', 'Save', 'Copy', 'Help'];
for (var element of menuArray) {
var listElement = document.createElement('li');
listElement.innerHTML = '<a href="#">' + element + '</a>';
menuListElement.appendChild(listElement);
}
menuElement.appendChild(menuListElement);
document.body.appendChild(menuElement);
_currentMenuVisible = menuElement;
menuElement.style.display = 'block';
menuElement.style.left = x + "px";
menuElement.style.top = y + "px";}
Let’s go over what’s happening in the code mentioned above:
On the right click, the first thing is to close any other right-click or context menus that are currently opened on the page.
Then we create a new “div” which will host the custom right-click menu.
Then, inside the “div”, an unordered list is added that contains an array of lists that appear as a menu on the web page.
To close the context menu, click anywhere on the web page.
This will be handled using the “click” event which will be triggered when the user clicks on the webpage after opening the right-click menu.
This event handler calls the specified function “closetheOpenedMenu()”:
document.addEventListener('click', e => {
closetheOpenedMenu();});
Now, define a function “closetheOpenedMenu()” to close the right-click menu where call the “closeContextMenu()” method which will close the menu:
function closetheOpenedMenu() {
if (_currentMenuVisible !== null) {
closeContextMenu(_currentMenuVisible);
}}
The “closeContextMenu()” method is defined below:
function closeContextMenu(menu) {
menu.style.left='0px';
menu.style.top='0px';
document.body.removeChild(menu);
_currentMenuVisible = null;}
To style a context menu or right-click menu, apply CSS to various elements to make it look good.
First, add styling to the body tag to align the text in the center and set the background color:
body{
text-align:center;
background: #b7c4f1;}
Style the menu by setting the text color, background color, border, and position to “absolute”:
.contextMenu {
position: absolute;
width: 100px; height: auto;
color: #b7c4f1;
background: #344683;
border: 1px solid #344683;
display: none;}
Style the unordered list with list items to set the padding and margin:
.contextMenu ul {
padding: 0;
margin: 0;}
.contextMenu ul li {
border-bottom: #b7c4f1 1px solid;
padding: 0;
margin: 0;}
Set the border of the last option of the menu using the “border-bottom” property that will be none;
.contextMenu ul li:last-child{
border-bottom: none;}
Style the menu with an anchor tag.
.contextMenu ul li a {
text-align: left;
display: block;
padding: 5px 10px;
color: #b7c4f1;
text-transform: capitalize;
text-decoration: none;}
Set the background color of the list items on hover:
.contextMenu ul li a:hover {
background: #2777FF;}
As you can see in the output, clicking on a web page with the right mouse button displays a custom right-click menu:
 Here, the profiler is applied to check the functionalities of the “alert” dialogue box and the attached “onmouseover” event.
 In the above output, it can be observed that the JavaScript profiler displays the time consumed in operating each of the functionality separately in the above-demonstrated code.
 We have compiled the concept of applying the JavaScript profiler to various code algorithms and noted the consumed time against each of them.
 In a JavaScript file, simply write these lines of code:
function classCheck(){
const elementClass = document.querySelector('button');
if(elementClass.classList.contains('buttonStyle')){
alert("Yes! the button contains this 'buttonStyle' class");
}}
In the above code:
Define a function “classCheck()” that will be triggered on the button click.
Then, fetch the button using the “querySelector()” method and store it in a variable “elementClass”.
Call the “contains()” method by passing a specific class name like “buttonStyle” which will check whether it is part of the button or not.
If it returns “true”, an alert message will be displayed:
Output
In a JavaScript file, simply write these lines of code:
function classCheck(){
const elementClass = document.querySelector('button');
if(elementClass.classList.contains('buttonStyle')){
alert("Yes! the button contains this 'buttonStyle' class");
}}
In the above code:
Define a function “classCheck()” that will be triggered on the button click.
Then, fetch the button using the “querySelector()” method and store it in a variable “elementClass”.
Call the “contains()” method by passing a specific class name like “buttonStyle” which will check whether it is part of the button or not.
If it returns “true”, an alert message will be displayed:
Output
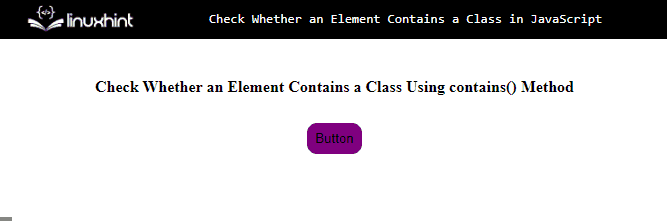 The above output indicates that when the button is clicked, it shows that it has a “buttonStyle” class.
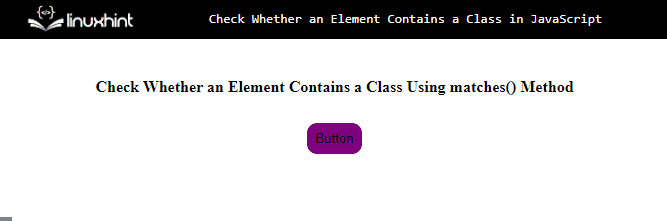
 In the above output, the [object HTMLCollection] refers to the array-like object.
Example 2: Fetching Multiple Elements Using getElementsByClassName() Method
In the following example, firstly, we will add three checkboxes using the <input> tag, assign them the same class as “lang” and add the required text as shown below:
<input type= "checkbox" class= "lang" value= "Python">Python<br/><input type= "checkbox" class= "lang" value= "JavaScript">JavaScript<br/><input type= "checkbox" class= "lang" value= "HTML">HTML<br/>
Now, include an additional checkbox with the value “Select All” and attach an “onclick()” event to it so that when the checkbox is selected, the “check()” function is called with the argument “this” like follows:
<input type= "checkbox" onclick= 'check(this)'/>Select All<br/>
Next, in the JavaScript file, define a function called “check()” with a variable named “checkBox” as an argument referring to “this” specified before.
Now, access the checkbox using the document.getElementsByClassName() method and place the value of the class attribute “lang” as its argument.
finally, use a “for” loop to iterate each value in a checkbox and use the “checked” attribute to mark each value as checked:
function check(checkBox){
get = document.getElementsByClassName('lang');
for(var i=0;i<get.length;i++) {
get[i].checked = checkBox.checked;
}}
Output
In the above output, the [object HTMLCollection] refers to the array-like object.
Example 2: Fetching Multiple Elements Using getElementsByClassName() Method
In the following example, firstly, we will add three checkboxes using the <input> tag, assign them the same class as “lang” and add the required text as shown below:
<input type= "checkbox" class= "lang" value= "Python">Python<br/><input type= "checkbox" class= "lang" value= "JavaScript">JavaScript<br/><input type= "checkbox" class= "lang" value= "HTML">HTML<br/>
Now, include an additional checkbox with the value “Select All” and attach an “onclick()” event to it so that when the checkbox is selected, the “check()” function is called with the argument “this” like follows:
<input type= "checkbox" onclick= 'check(this)'/>Select All<br/>
Next, in the JavaScript file, define a function called “check()” with a variable named “checkBox” as an argument referring to “this” specified before.
Now, access the checkbox using the document.getElementsByClassName() method and place the value of the class attribute “lang” as its argument.
finally, use a “for” loop to iterate each value in a checkbox and use the “checked” attribute to mark each value as checked:
function check(checkBox){
get = document.getElementsByClassName('lang');
for(var i=0;i<get.length;i++) {
get[i].checked = checkBox.checked;
}}
Output
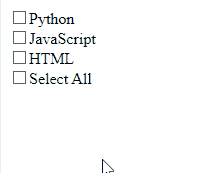 We have compiled the use of the getElementsByClassName() method using various examples.
 Alteratively, you can also apply the same functionality using “template literals”
Example 2: Use Template Literals in a JavaScript String
“Template Literals” use back-ticks (“) instead of (“”) to define a string and allows multi-line strings as well.
This technique can be implemented by dividing the specific string value into multi lines in order to add a new line.
In the below-given example, we will store a string value in a variable named “string”.
Also, divide the string value into multiple lines and log the corresponding string value on the console using template literals:
const string = `Linux Hint
This is a website`
console.log(string);
The output in this case will be as follows:
Alteratively, you can also apply the same functionality using “template literals”
Example 2: Use Template Literals in a JavaScript String
“Template Literals” use back-ticks (“) instead of (“”) to define a string and allows multi-line strings as well.
This technique can be implemented by dividing the specific string value into multi lines in order to add a new line.
In the below-given example, we will store a string value in a variable named “string”.
Also, divide the string value into multiple lines and log the corresponding string value on the console using template literals:
const string = `Linux Hint
This is a website`
console.log(string);
The output in this case will be as follows:
 We have compiled the examples to use \n and template literals for adding a new line in a JavaScript string.
 The split() method also takes the “regex pattern” as a separator instead of a specific character as an argument:
var strToken = str.split(/\W+/);
Here, in regex pattern, the forward slashes (/) indicates the start and end of a pattern, while the (\W) is the metacharacter that matches all the alphanumeric characters a-z, A-Z, 0-9 without white spaces.
While (+) indicates multiple matches.
Output
The split() method also takes the “regex pattern” as a separator instead of a specific character as an argument:
var strToken = str.split(/\W+/);
Here, in regex pattern, the forward slashes (/) indicates the start and end of a pattern, while the (\W) is the metacharacter that matches all the alphanumeric characters a-z, A-Z, 0-9 without white spaces.
While (+) indicates multiple matches.
Output
 If you want to get tokens of a specific length from a string, follow the given section.
Example 2
Now, tokenize a string of length three from a string.
To do this, use the “filter()” method with the “split()” method:
var strToken = str.split(" ").filter(function(token) {
return token.length == 3;});
Print the resultant tokens on console:
console.log(strToken);
The output indicates that only substrings of length 3 are returned from the string:
If you want to get tokens of a specific length from a string, follow the given section.
Example 2
Now, tokenize a string of length three from a string.
To do this, use the “filter()” method with the “split()” method:
var strToken = str.split(" ").filter(function(token) {
return token.length == 3;});
Print the resultant tokens on console:
console.log(strToken);
The output indicates that only substrings of length 3 are returned from the string:


 We have discussed all the convenient methods to scroll to an element using JavaScript.
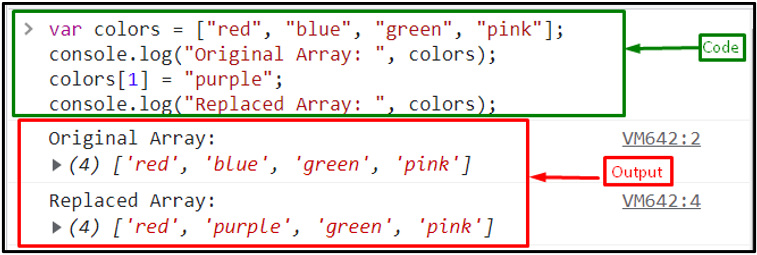 Let’s move to the second method!
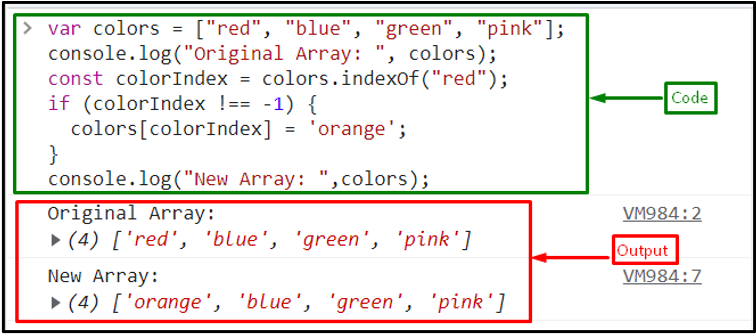 Let’s see another method for replacing objects in an array.
 If you want to replace array elements from an array at any specified index, follow the next section.
 We have gathered all the best approaches for replacing objects from JavaScript arrays.
 To remove all the commas from the string using the replace() method, pass the regex pattern “/\,/g” as a replaceValue instead of a comma (,):
console.log(str.replace(/\,/g, ''));
Here, in regular expression, the forward slashes (/) indicates the start and end of a regular expression, while the backslash (\) is used with comma (,) as an escape character, “g” is the global flag that represents to eliminate all commas from a string.
The output shows that all the commas from the string are removed:
To remove all the commas from the string using the replace() method, pass the regex pattern “/\,/g” as a replaceValue instead of a comma (,):
console.log(str.replace(/\,/g, ''));
Here, in regular expression, the forward slashes (/) indicates the start and end of a regular expression, while the backslash (\) is used with comma (,) as an escape character, “g” is the global flag that represents to eliminate all commas from a string.
The output shows that all the commas from the string are removed:


 In the above output, it can be observed that the “innerText” property changes the DOM text upon pressing the “Enter” key.
 We have compiled different methods to press Enter key programmatically.
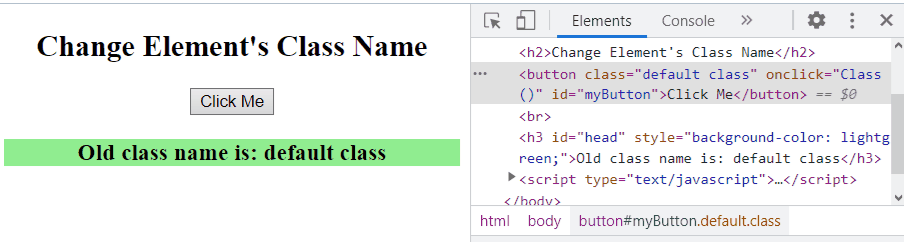 In the above-output, observe the change of the “class” on the right upon clicking the button in DOM.
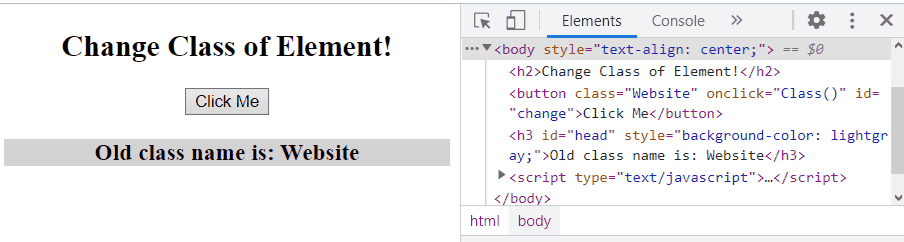 This write-up meant to clear the concept of changing the HTML element’s class using JavaScript.


 We have discussed various creative methods to pop up a div element in the center of the webpage.
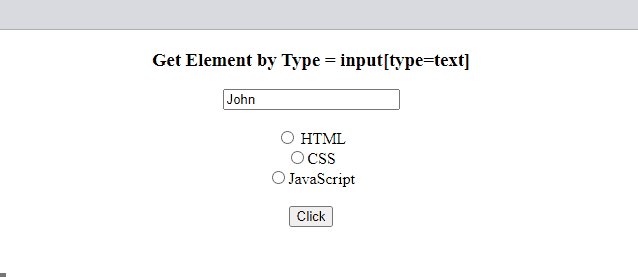 Example 2: Get all Elements by Type
Now, get all the elements of the input type by passing “input” as an argument in the “querySelectorAll()” method:
var elementTypeSelector = document.querySelectorAll('input');
Print the values of the “input” selector including “text” and “radio” on console:
console.log(elementTypeSelector[0].value, elementTypeSelector[1].value, elementTypeSelector[2].value, elementTypeSelector[3].value);
Output
Example 2: Get all Elements by Type
Now, get all the elements of the input type by passing “input” as an argument in the “querySelectorAll()” method:
var elementTypeSelector = document.querySelectorAll('input');
Print the values of the “input” selector including “text” and “radio” on console:
console.log(elementTypeSelector[0].value, elementTypeSelector[1].value, elementTypeSelector[2].value, elementTypeSelector[3].value);
Output
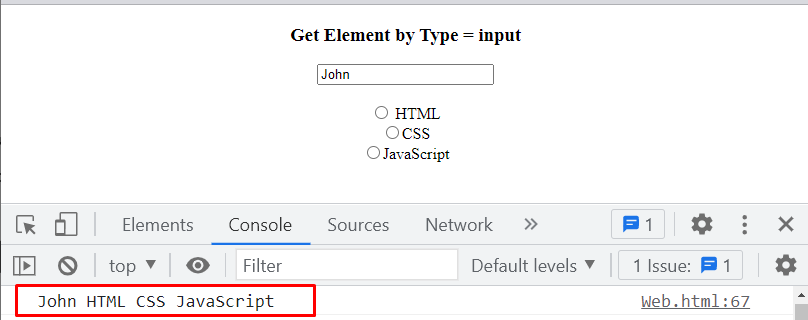
 We have provided all the solutions for getting elements by type.
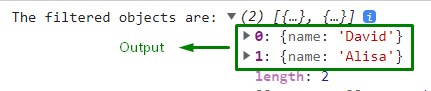 It can be seen that the specified value is filtered out from the given array of objects.

 We have discussed various methods to filter objects.
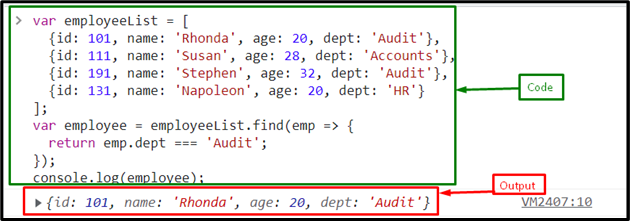 If you want to access an attribute that does not exist in the object, In that case, the filter() method will return “undefined”:
 How to filter all the objects related to a given condition? Follow the next section.
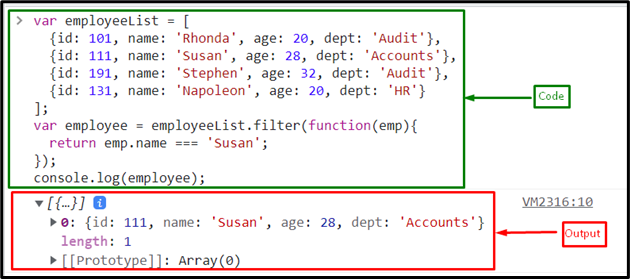 Example 2: Filter Object Arrays Based on Attributes Using filter() Method With an Arrow Function
Here, we will use the filter() method with arrow function to filter the array of object based on the attribute “dept”:
var employee = employeeList.filter(emp => {
return emp.dept === 'Audit';});
The output shows all the data that matches the dept === ‘Audit’:
Example 2: Filter Object Arrays Based on Attributes Using filter() Method With an Arrow Function
Here, we will use the filter() method with arrow function to filter the array of object based on the attribute “dept”:
var employee = employeeList.filter(emp => {
return emp.dept === 'Audit';});
The output shows all the data that matches the dept === ‘Audit’:
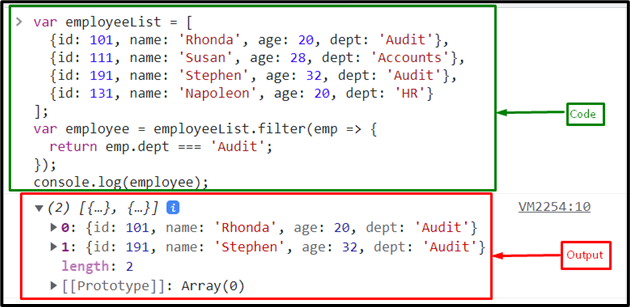 If you want to access the attribute that does not exist in the object it will returns an empty array:
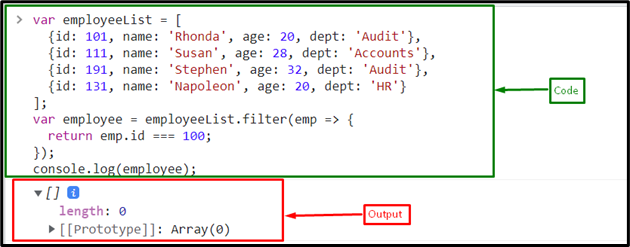 We have gathered all the methods to filter an array of objects based on the attributes.

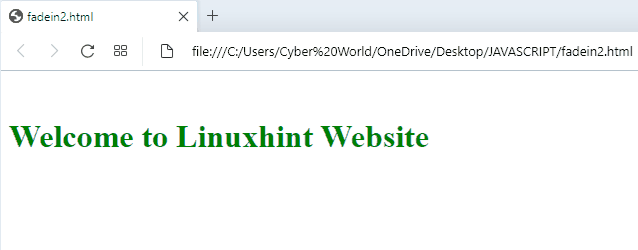 We have compiled the convenient approaches to fade-in div.
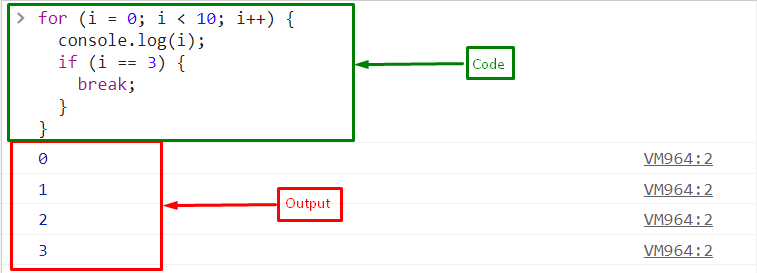 Example 2
First, we will create an object “employee” with properties “name” and “id”:
var employee = [
{ name: 'Susan', id: 1},
{ name: 'Ariely', id: 2},
{ name: 'Mari', id: 3},
{ name: 'Rhonda', id: 4},
{ name: 'Stephen', id: 5},]
With the help of the for loop, we will print the names of employees.
However, if the name is equal to the “Rhonda”, the loop will exit because of the added “break” statement:
for (const e of employee) {
console.log(e);
if (e.name === "Rhonda") {
break ;
}}
The output displays the names of employees till the added condition is satisfied:
Example 2
First, we will create an object “employee” with properties “name” and “id”:
var employee = [
{ name: 'Susan', id: 1},
{ name: 'Ariely', id: 2},
{ name: 'Mari', id: 3},
{ name: 'Rhonda', id: 4},
{ name: 'Stephen', id: 5},]
With the help of the for loop, we will print the names of employees.
However, if the name is equal to the “Rhonda”, the loop will exit because of the added “break” statement:
for (const e of employee) {
console.log(e);
if (e.name === "Rhonda") {
break ;
}}
The output displays the names of employees till the added condition is satisfied:
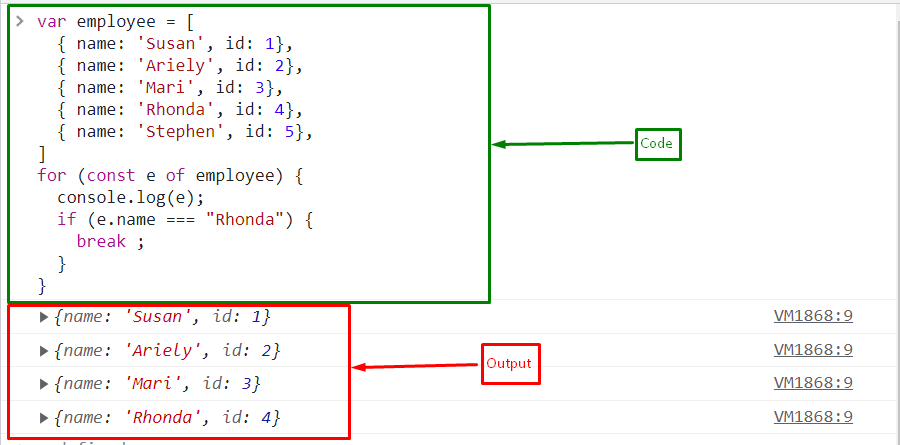 We have covered all the information related to existing for loop.
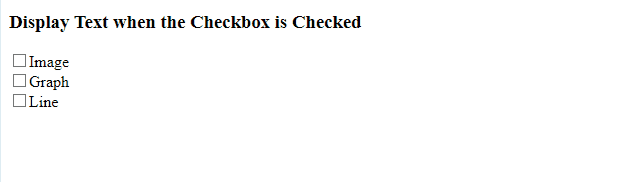 From the output, it can be clearly observed that specific text is displayed when a specific checkbox is selected.
Example 2: Display Text When Checkbox is Checked Using the checked Property with the innerText Property
This property can be applied to access the specified checkboxes and notify the user of the checked option on the Document Object Model(DOM).
Example
Firstly, similarly include the following heading and checkboxes with the specified “id” and an “onclick” event redirecting to the function checkBox():
<h3 id= "msg">Display Text when the Checkbox is Checked</h3><input type= "checkbox" id= "check1" value= "Python" onclick= "checkBox()">Python<br><input type= "checkbox" id= "check2" value= "Java" onclick= "checkBox()">Java<br><input type= "checkbox" id= "check3" value= "JavaScript" onclick= "checkBox()">JavaScript<br><br>
After that, define a function named “checkBox()”.
The following function in the below step will fetch the id of the specified checkboxes using the “document.getElementById()” method.
Also, apply a check on each of the checkboxes.
For instance, if a particular checkbox is checked, the corresponding message against each of the checkbox will be displayed on the DOM via the “innerText” property:
function checkBox(){
get1= document.getElementById("check1")
get2= document.getElementById("check2")
get3= document.getElementById("check3")
get4= document.getElementById("msg")if(get1.checked == true){
get4.innerText= "Python Language Selected"}else if(get2.checked == true){
get4.innerText= "Java Language Selected"}else if(get3.checked == true){
get4.innerText= "JavaScript Language Selected"}}
Output
From the output, it can be clearly observed that specific text is displayed when a specific checkbox is selected.
Example 2: Display Text When Checkbox is Checked Using the checked Property with the innerText Property
This property can be applied to access the specified checkboxes and notify the user of the checked option on the Document Object Model(DOM).
Example
Firstly, similarly include the following heading and checkboxes with the specified “id” and an “onclick” event redirecting to the function checkBox():
<h3 id= "msg">Display Text when the Checkbox is Checked</h3><input type= "checkbox" id= "check1" value= "Python" onclick= "checkBox()">Python<br><input type= "checkbox" id= "check2" value= "Java" onclick= "checkBox()">Java<br><input type= "checkbox" id= "check3" value= "JavaScript" onclick= "checkBox()">JavaScript<br><br>
After that, define a function named “checkBox()”.
The following function in the below step will fetch the id of the specified checkboxes using the “document.getElementById()” method.
Also, apply a check on each of the checkboxes.
For instance, if a particular checkbox is checked, the corresponding message against each of the checkbox will be displayed on the DOM via the “innerText” property:
function checkBox(){
get1= document.getElementById("check1")
get2= document.getElementById("check2")
get3= document.getElementById("check3")
get4= document.getElementById("msg")if(get1.checked == true){
get4.innerText= "Python Language Selected"}else if(get2.checked == true){
get4.innerText= "Java Language Selected"}else if(get3.checked == true){
get4.innerText= "JavaScript Language Selected"}}
Output

 Example 2: Display Text When Checkbox is Checked Using jQuery ready() and click() Methods
The “ready()” method specifies what happens when a ready event occurs and the Document Object Model is loaded.
The “click()” method, on the other hand, triggers the function to run when a click event occurs.
These methods can be implemented to click on the accessed checkbox and display the checkbox text and the corresponding value against it.
Syntax
$(document).ready(function)
In the given syntax, “function” refers to the function which is to execute after the DOM is loaded.
$(selector).click(function)
Here, likewise, the “function” points to the specific function to execute when the click event occurs.
Implementation
First, include the following jQuery library:
<script src= "https://ajax.googleapis.com/ajax/libs/jquery/3.5.1/jquery.min.js"></script>
Next, within the “<fieldset>” tag, specify the following labels and input types for each of the checkboxes:
<fieldset><legend>Programming Languages: </legend><label for= "Python">Python</label><input type= "checkbox" name= "outcome" value= "Python" /><label for= "JavaScript">JavaScript</label><input type= "checkbox" name= "outcome" value= "JavaScript" /><label for= "Java">Java</label><input type= "checkbox" name= "outcome" value= "Java" /></fieldset>
After that, create a button with the specified “class” and “id”:
<button class="demo" id="outcome" value="submit">Get Outcome</button>
Now, in the jQuery implementation, apply the “ready()” method such that when the DOM loads, the further steps become functional.
In the next step, apply the “click()” method and fetch the checkboxes by their specific names.
The “checked” property here will ensure that the checkbox is checked and return the corresponding value and text of the particular checkbox using the “val()” and “text()” methods respectively:
$(document).ready(function () {
$('#outcome').click(function () {
$('input[name="outcome"]:checked').each(function () {
let value = $(this).val();
let Text = $(`label[for="${value}"]`).text();
console.log(`The value of checkbox is ${value}`);
console.log(`The text of checkbox is ${Text}`);})});});
Output
Example 2: Display Text When Checkbox is Checked Using jQuery ready() and click() Methods
The “ready()” method specifies what happens when a ready event occurs and the Document Object Model is loaded.
The “click()” method, on the other hand, triggers the function to run when a click event occurs.
These methods can be implemented to click on the accessed checkbox and display the checkbox text and the corresponding value against it.
Syntax
$(document).ready(function)
In the given syntax, “function” refers to the function which is to execute after the DOM is loaded.
$(selector).click(function)
Here, likewise, the “function” points to the specific function to execute when the click event occurs.
Implementation
First, include the following jQuery library:
<script src= "https://ajax.googleapis.com/ajax/libs/jquery/3.5.1/jquery.min.js"></script>
Next, within the “<fieldset>” tag, specify the following labels and input types for each of the checkboxes:
<fieldset><legend>Programming Languages: </legend><label for= "Python">Python</label><input type= "checkbox" name= "outcome" value= "Python" /><label for= "JavaScript">JavaScript</label><input type= "checkbox" name= "outcome" value= "JavaScript" /><label for= "Java">Java</label><input type= "checkbox" name= "outcome" value= "Java" /></fieldset>
After that, create a button with the specified “class” and “id”:
<button class="demo" id="outcome" value="submit">Get Outcome</button>
Now, in the jQuery implementation, apply the “ready()” method such that when the DOM loads, the further steps become functional.
In the next step, apply the “click()” method and fetch the checkboxes by their specific names.
The “checked” property here will ensure that the checkbox is checked and return the corresponding value and text of the particular checkbox using the “val()” and “text()” methods respectively:
$(document).ready(function () {
$('#outcome').click(function () {
$('input[name="outcome"]:checked').each(function () {
let value = $(this).val();
let Text = $(`label[for="${value}"]`).text();
console.log(`The value of checkbox is ${value}`);
console.log(`The text of checkbox is ${Text}`);})});});
Output
 This write-up demonstrated the methods that can be utilized to display text when a checkbox is checked.
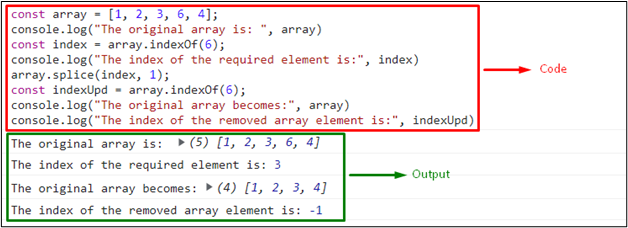 In the above output, it can be observed that the specified index is removed and displayed as “-1” in the last statement referring to the definition of the “indexOf()” method.
Method 2: Remove Index From Array Using filter() Method
The “filter()” method can be implemented along with the “indexOf()” method to create a new array with elements excluding the filtered ones.
Both elements can be utilized to filter the indexed array element and display the updated array with the removed index.
Syntax
array.filter(function(Value), thisValue)
Here, “function” refers to the function that will invoke the function for filtering purposes, “Value” is the value of the current element, and “thisValue” corresponds to the value passed to the function.
Check out the following example.
Example
First, define an array and display its original values on the console:
var array = [1, 2, 3, 4, 5];
console.log("The original array is: ", array)
Next, apply the “filter()” method upon the declared array and access the third array element by indexing it as “2” and filter it:
array = array.filter(function(item){return item !== array[2]});
Now, access the index of the removed element.
This will result in returning a garbage value “-1”:
indexUpd= array.indexOf(3)
console.log("The index of the removed array element is:", indexUpd)
Lastly, print the updated array without the filtered item:
console.log("The array without removed indexed element becomes:", array)
Output
In the above output, it can be observed that the specified index is removed and displayed as “-1” in the last statement referring to the definition of the “indexOf()” method.
Method 2: Remove Index From Array Using filter() Method
The “filter()” method can be implemented along with the “indexOf()” method to create a new array with elements excluding the filtered ones.
Both elements can be utilized to filter the indexed array element and display the updated array with the removed index.
Syntax
array.filter(function(Value), thisValue)
Here, “function” refers to the function that will invoke the function for filtering purposes, “Value” is the value of the current element, and “thisValue” corresponds to the value passed to the function.
Check out the following example.
Example
First, define an array and display its original values on the console:
var array = [1, 2, 3, 4, 5];
console.log("The original array is: ", array)
Next, apply the “filter()” method upon the declared array and access the third array element by indexing it as “2” and filter it:
array = array.filter(function(item){return item !== array[2]});
Now, access the index of the removed element.
This will result in returning a garbage value “-1”:
indexUpd= array.indexOf(3)
console.log("The index of the removed array element is:", indexUpd)
Lastly, print the updated array without the filtered item:
console.log("The array without removed indexed element becomes:", array)
Output
 Method 3: Remove Index From Array Using shift() Method
The “shift()” method removes the first array element and changes the original array.
This method can be applied by removing the first array element and accessing its removed index.
The following example will illustrate the stated concept.
Example
Firstly, declare the specified array and display it:
var array = [1, 2, 3, 4, 5];
console.log("The original array is: ", array)
Next, apply the “shift()” method to remove the first array element and access its index using the “indexOf()” method as discussed before:
array.shift();indexUpd= array.indexOf(1)
Lastly, display the index of the omitted array element, which will result in “-1” and the updated array:
console.log("The index of the removed array element is:", indexUpd)
console.log("The array without removed indexed element becomes:", array)
Output
Method 3: Remove Index From Array Using shift() Method
The “shift()” method removes the first array element and changes the original array.
This method can be applied by removing the first array element and accessing its removed index.
The following example will illustrate the stated concept.
Example
Firstly, declare the specified array and display it:
var array = [1, 2, 3, 4, 5];
console.log("The original array is: ", array)
Next, apply the “shift()” method to remove the first array element and access its index using the “indexOf()” method as discussed before:
array.shift();indexUpd= array.indexOf(1)
Lastly, display the index of the omitted array element, which will result in “-1” and the updated array:
console.log("The index of the removed array element is:", indexUpd)
console.log("The array without removed indexed element becomes:", array)
Output
 Method 4: Remove Index From Array Using pop() Method
The “pop()” method pops the last array element and updates the original array as well.
This method can be applied to pop the last array element, access its index, and update the declared array.
Example
In the first step, repeat the above-discussed steps for declaring an array:
var array = [1, 2, 3, 4, 5];
console.log("The original array is: ", array)
Here, apply the “pop()” method to pop the last array element:
array.pop();
The following code statement will access the index of the popped array element as “5”
indexUpd= array.indexOf(5)
Last, access the index of the removed array element and display the updated array:
console.log("The index of the removed array element is:", indexUpd)
console.log("The array without removed indexed element becomes:", array)
Output
Method 4: Remove Index From Array Using pop() Method
The “pop()” method pops the last array element and updates the original array as well.
This method can be applied to pop the last array element, access its index, and update the declared array.
Example
In the first step, repeat the above-discussed steps for declaring an array:
var array = [1, 2, 3, 4, 5];
console.log("The original array is: ", array)
Here, apply the “pop()” method to pop the last array element:
array.pop();
The following code statement will access the index of the popped array element as “5”
indexUpd= array.indexOf(5)
Last, access the index of the removed array element and display the updated array:
console.log("The index of the removed array element is:", indexUpd)
console.log("The array without removed indexed element becomes:", array)
Output
 This blog demonstrated the methods to remove an index from an array.
 Example 2: Applying the querySelector() Method to Compute the Dimensions of an Image
In the following example, we will create a button and attach an onclick event to it which will access the imgSize() function when triggered:
<button type= "button" onclick= "imgSize();">Get Image Dimensions</button>
Now, specify the path and id of the image respectively:
<img src= 'template.jpg' id= "dim">
After that, define a function named “imgSize()”.
Here, access the image and fetch its dimensions using the width and height properties, respectively and display them on the alert dialogue box:
function imgSize(){
var dimensions= document.querySelector("#dim");
var width= dimensions.width;
var height= dimensions.height;
alert("Original , " + "Original923" data-lazy-src="https://linuxhint.com/wp-content/uploads/2022/10/JavaScript-querySelector-Explained-2.gif">
We have provided various examples to implement the JavaScript querySelector() method.
Example 2: Applying the querySelector() Method to Compute the Dimensions of an Image
In the following example, we will create a button and attach an onclick event to it which will access the imgSize() function when triggered:
<button type= "button" onclick= "imgSize();">Get Image Dimensions</button>
Now, specify the path and id of the image respectively:
<img src= 'template.jpg' id= "dim">
After that, define a function named “imgSize()”.
Here, access the image and fetch its dimensions using the width and height properties, respectively and display them on the alert dialogue box:
function imgSize(){
var dimensions= document.querySelector("#dim");
var width= dimensions.width;
var height= dimensions.height;
alert("Original , " + "Original923" data-lazy-src="https://linuxhint.com/wp-content/uploads/2022/10/JavaScript-querySelector-Explained-2.gif">
We have provided various examples to implement the JavaScript querySelector() method.
 Example 2: Using JavaScript prompt() Method With an onclick Event
First, create a button named “Click Me” with an “onclick” event redirecting to the promptMethod() function:
<input type = "button" value = "Click Me" onclick = "promptMethod();" />
Next, define a function named “promptMethod()”.
Here, ask the user for the option to select and display it via alert dialogue box:
function promptMethod(){a= prompt(" Enter y for yes and n for no: ");
alert(a)}
Output
Example 2: Using JavaScript prompt() Method With an onclick Event
First, create a button named “Click Me” with an “onclick” event redirecting to the promptMethod() function:
<input type = "button" value = "Click Me" onclick = "promptMethod();" />
Next, define a function named “promptMethod()”.
Here, ask the user for the option to select and display it via alert dialogue box:
function promptMethod(){a= prompt(" Enter y for yes and n for no: ");
alert(a)}
Output
 Example 3: Using JavaScript prompt() Method Based on a Condition
In the following example, define a function named “promptMethod()” which will firstly ask the user to enter a value.
Here, a condition will be applied upon the division of the entered number by “2” in such a way that if the remainder is “0”, the entered number will be even; otherwise odd:
function promptMethod(){inputNumber= prompt(" Enter a number:");if (inputNumber%2 == 0){
document.write("The Entered Number is Even")}else if (inputNumber%2 != 0){
document.write("The Entered Number is Odd")}}
promptMethod();
Output
Example 3: Using JavaScript prompt() Method Based on a Condition
In the following example, define a function named “promptMethod()” which will firstly ask the user to enter a value.
Here, a condition will be applied upon the division of the entered number by “2” in such a way that if the remainder is “0”, the entered number will be even; otherwise odd:
function promptMethod(){inputNumber= prompt(" Enter a number:");if (inputNumber%2 == 0){
document.write("The Entered Number is Even")}else if (inputNumber%2 != 0){
document.write("The Entered Number is Odd")}}
promptMethod();
Output
 We have compiled the variations of using the JavaScript prompt() method.
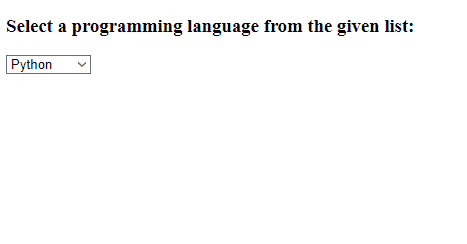 We have implemented creative methods to create dropdown using onchange.


 We have compiled various methods to scroll to id.
 The above output shows the list of fruits.
We have typed “M” in the input field, which filtered out the fruit names that contain “M” or “m”.
As a result, we have selected the desired fruit name starting with the typed letter.
Example 2: Create an Editable ComboBox Using JavaScript
Here, we will perform the same task using JavaScript.
For this, we will first create a heading and a label.
Then, add an input text field and set its id “fruit” and the list “fruit_list”:
<h3> Combobox using HTML:</h3><label>Fruit List:</label><input type="text" id="fruit" list="fruit_list">
By following the given steps, we will create a ComboBox:
First, define a “comboBox()” function in a JavaScript file that contains an array of the dropdown options stored in variable “comboValues”.
Then, create an element “datalist” using the “document.createElement()” method.
After that, set the id of the comboList to “fruit_list” that is added in the HTML <input> tag.
Apply the forEach loop to append the dropdown option list by creating an element “option” for each of the added ComboBox values.
Invoke the comboBox() function at the end.
function comboBox(){
var comboValues = ['Pomegranate', 'Apple', 'Peach', 'Apricot', 'Grapes', 'Banana', 'Pear', 'Kiwi', 'Strawberry', 'Cherry', 'Orange', 'Mango', 'PineApple', 'Melon', 'Avocado', 'Water Melon'];
var comboList = document.createElement('datalist');
comboList.id = "fruit_list";
comboValues.forEach(comboValues =>{
var option = document.createElement('option');
option.innerHTML = comboValues;
option.value = comboValues;
comboList.appendChild(option);
})
document.body.appendChild(comboList);}
comboBox();
Output
The above output shows the list of fruits.
We have typed “M” in the input field, which filtered out the fruit names that contain “M” or “m”.
As a result, we have selected the desired fruit name starting with the typed letter.
Example 2: Create an Editable ComboBox Using JavaScript
Here, we will perform the same task using JavaScript.
For this, we will first create a heading and a label.
Then, add an input text field and set its id “fruit” and the list “fruit_list”:
<h3> Combobox using HTML:</h3><label>Fruit List:</label><input type="text" id="fruit" list="fruit_list">
By following the given steps, we will create a ComboBox:
First, define a “comboBox()” function in a JavaScript file that contains an array of the dropdown options stored in variable “comboValues”.
Then, create an element “datalist” using the “document.createElement()” method.
After that, set the id of the comboList to “fruit_list” that is added in the HTML <input> tag.
Apply the forEach loop to append the dropdown option list by creating an element “option” for each of the added ComboBox values.
Invoke the comboBox() function at the end.
function comboBox(){
var comboValues = ['Pomegranate', 'Apple', 'Peach', 'Apricot', 'Grapes', 'Banana', 'Pear', 'Kiwi', 'Strawberry', 'Cherry', 'Orange', 'Mango', 'PineApple', 'Melon', 'Avocado', 'Water Melon'];
var comboList = document.createElement('datalist');
comboList.id = "fruit_list";
comboValues.forEach(comboValues =>{
var option = document.createElement('option');
option.innerHTML = comboValues;
option.value = comboValues;
comboList.appendChild(option);
})
document.body.appendChild(comboList);}
comboBox();
Output
 It can be seen that we can also edit the ComboBox value after selecting it from the available list:
 We have gathered the best solutions for creating an editable ComboBox and HTML.
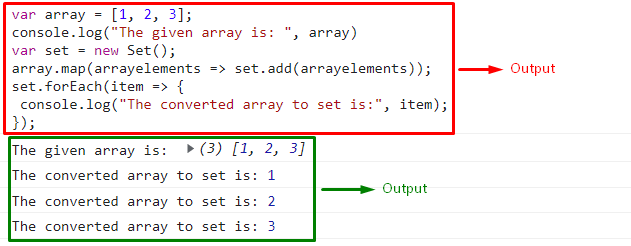
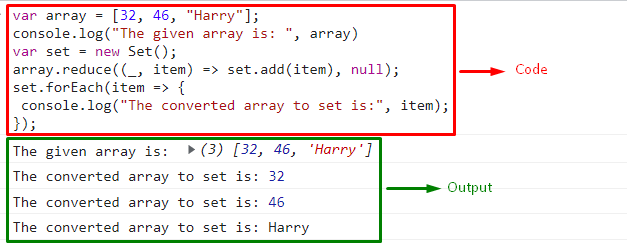
 In the above output, it is evident that the set values are displayed as an array thereby leaving no difference after the required conversion.
This blog explained different methodologies to opt for converting an array to set.
In the above output, it is evident that the set values are displayed as an array thereby leaving no difference after the required conversion.
This blog explained different methodologies to opt for converting an array to set.
 Example 2: Compare Objects With Same Properties but Different Places
In this example, first, add a property “contact” in object “information”:
var information = {
name: "Stephen",
contact: "2345667",
age: 25}
Then, compare the objects “info” and “information” using strict equality operator:
console.log(JSON.stringify(info) === JSON.stringify(information));
The output displays “false” because the placement of the object’s properties are not same:
Example 2: Compare Objects With Same Properties but Different Places
In this example, first, add a property “contact” in object “information”:
var information = {
name: "Stephen",
contact: "2345667",
age: 25}
Then, compare the objects “info” and “information” using strict equality operator:
console.log(JSON.stringify(info) === JSON.stringify(information));
The output displays “false” because the placement of the object’s properties are not same:
 Here, the question arises, why do we not use an equality operator for comparing objects instead of JSON.stringify() method? Follow the below section.
 Example 2: Using the Strict Equality Operator (===)
Now, we will compare both objects using strict equality operator:
console.log(info === information)
Output
Example 2: Using the Strict Equality Operator (===)
Now, we will compare both objects using strict equality operator:
console.log(info === information)
Output
 As you can see that the equality operators do not compare the objects so, the JavaScript allows to compare objects by converting them into strings using the “JSON.stringify()” method.
We have provided the simplest solution for comparing objects.
As you can see that the equality operators do not compare the objects so, the JavaScript allows to compare objects by converting them into strings using the “JSON.stringify()” method.
We have provided the simplest solution for comparing objects.


 In the above output, the program prints “True” because the loose equality operator converted the string value 20 to the integer value 20.
The same code using “===” will yield the undefined value as the strict equality operator first checks the type of the operands; if it is the same, then it goes for the value-based comparison:
In the above output, the program prints “True” because the loose equality operator converted the string value 20 to the integer value 20.
The same code using “===” will yield the undefined value as the strict equality operator first checks the type of the operands; if it is the same, then it goes for the value-based comparison:


 In order to apply the <ol> tag with different attributes, follow the next section.
 This blog compiled the methods to make an ordered list.
 The above output is a result of page onloading and accessed functions at the same time.

 We have explained the methods to call a JavaScript function on page load.


 We have discussed the examples to implement the inline and arrow functions.


 We have discussed all the creative methods to create a list of objects.
 Step 4: Set the breakpoints
Set a breakpoint on a line in “the code editor section” by clicking the line number column:
Step 4: Set the breakpoints
Set a breakpoint on a line in “the code editor section” by clicking the line number column:
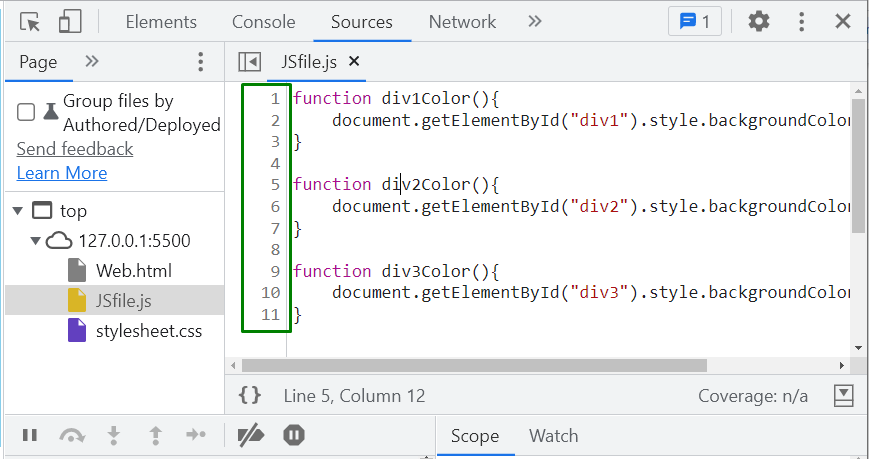 We have placed a breakpoint on line 6.
Here, the code will stop running.
Additionally, you can set multiple line-of-code breakpoints:
We have placed a breakpoint on line 6.
Here, the code will stop running.
Additionally, you can set multiple line-of-code breakpoints:
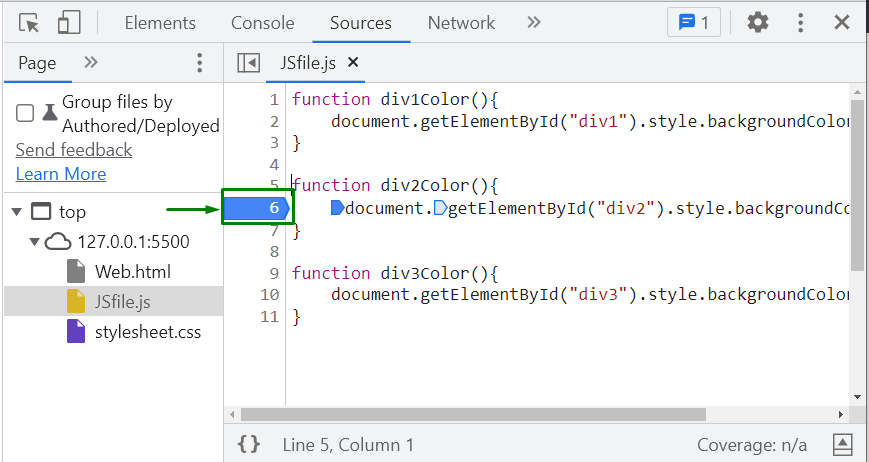 In the given example, we will just set the breakpoints and run the code to see how it works.
After setting the breakpoint, the code execution will stop so that we can inspect the values.
Output
In the given example, we will just set the breakpoints and run the code to see how it works.
After setting the breakpoint, the code execution will stop so that we can inspect the values.
Output
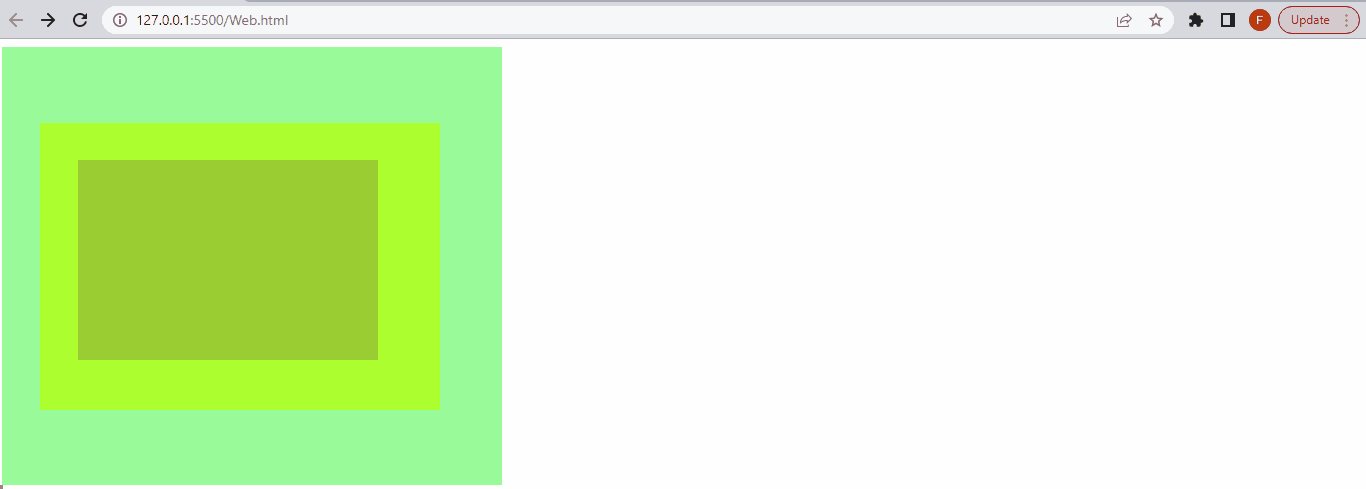 We have covered the basic instructions related to breakpoints.
 In the above output, it is evident that only the first value is true which is a result of both the operands being true.

 We have compiled the easiest methods related to the usage of &&.


 We have discussed the differences between addEventListener and onclick.
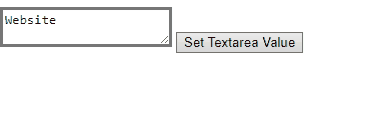 We have concluded the convenient approaches to set text area value.
 In the above output, it can be observed that the scroll bar is scrolled to a certain location according to the set values in the scrollTo() method.
 In the above output, it can be seen that the DOM is auto scrolled till the bottom upon the button click.
 We have discussed various methods to implement the auto scroll using JavaScript.

 We have covered all the essential information about outerHTML JavaScript property.

 Hence, no error is shown in this particular case.


 You can also create objects by utilizing literals in the following way:
const createObject= {firstName: "Harry",
lastname: "Smith"}
console.log(createObject)
Output
You can also create objects by utilizing literals in the following way:
const createObject= {firstName: "Harry",
lastname: "Smith"}
console.log(createObject)
Output
 We have discussed the core concepts of JavaScript coding.
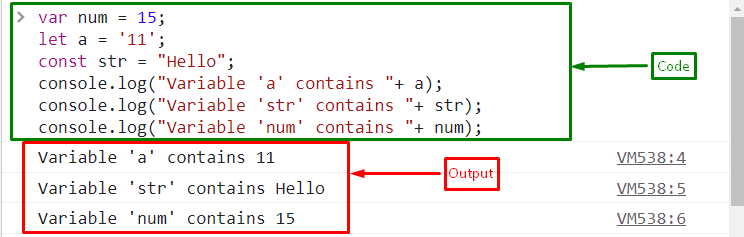


 We have compiled all the solutions for declaring multiple variables.

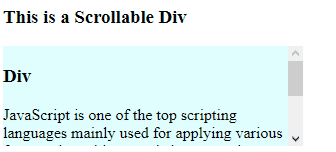 This write-up concluded the approaches that can be utilized for making a div scrollable.

 It can be seen from the output that there is a negative time difference of -240 minutes between the UTC and local time zone.


 We have compiled all the possible JavaScript time formats in this blog.

 We have covered all the details related to the JavaScript selectedIndex property.
 How to use multiple conditions in an inline if statement? Follow the given section.

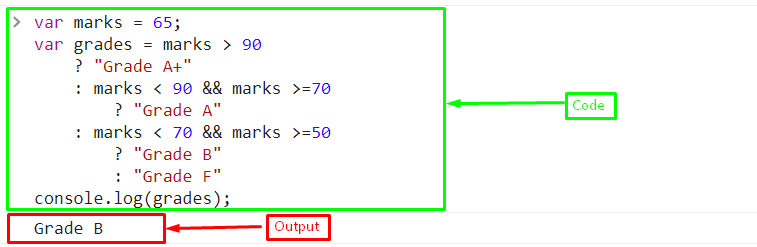 We have compiled all the essential information related to the inline if statement.
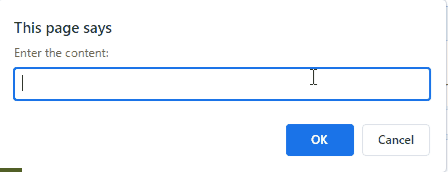 From the above output, it is evident that both of the string values, the original and the callback function’s argument value are merged and successfully displayed in the alert box.
 We have compiled the methods to utilize the callback function with parameters.
 Example 2: Append an Array into Another Array
Here, we will create two arrays “animals” and “petAnimals”:
var animals = ['Zebra', 'Lion', 'Tiger',];var petAnimals = ['Cat', 'Rabbit'];
Now, push the “petAnimals” array elements into the other array using the push() method with spread operator:
animals.push(...petAnimals);
Then, print the array “animals” using “console.log()” method:
console.log(animals);
The added spread operator copies all of the elements of the “petAnimals” array and then these elements are appended to the “animals” array by utilizing the push() method:
Example 2: Append an Array into Another Array
Here, we will create two arrays “animals” and “petAnimals”:
var animals = ['Zebra', 'Lion', 'Tiger',];var petAnimals = ['Cat', 'Rabbit'];
Now, push the “petAnimals” array elements into the other array using the push() method with spread operator:
animals.push(...petAnimals);
Then, print the array “animals” using “console.log()” method:
console.log(animals);
The added spread operator copies all of the elements of the “petAnimals” array and then these elements are appended to the “animals” array by utilizing the push() method:
 Let’s see another method for appending one array to another.
 Want to add elements at the beginning of the array? Follow the next section!
 Let’s move to another method for adding the element in the middle of an array.
 We have gathered all the best methods for appending elements in an array.
 Example 2: Creating Variables Using var Keyword
In the case of using “var” keyword, a variable can be re-assigned a value.
As a result, the previous value gets updated.
Now, executing the same program will update the value of the “x” variable to “7”:
var x=5
console.log(x)var x=7
console.log(x)
Output
Example 2: Creating Variables Using var Keyword
In the case of using “var” keyword, a variable can be re-assigned a value.
As a result, the previous value gets updated.
Now, executing the same program will update the value of the “x” variable to “7”:
var x=5
console.log(x)var x=7
console.log(x)
Output
 Hence, no error is shown in this particular case.
Example 3: Creating Variables Using const Keyword
The constant (much-like) variables defined with “const” cannot be redeclared or re-assigned.
In the following example, the redeclaration of the variable “a” will result in an error:
let x=10
console.log(x)
let x=30
console.log(x)
Output
Hence, no error is shown in this particular case.
Example 3: Creating Variables Using const Keyword
The constant (much-like) variables defined with “const” cannot be redeclared or re-assigned.
In the following example, the redeclaration of the variable “a” will result in an error:
let x=10
console.log(x)
let x=30
console.log(x)
Output


 You can also create objects by utilizing literals in the following way:
const obj= {firstName: "John",
lastname: "Peter"}
console.log(obj)
Output
You can also create objects by utilizing literals in the following way:
const obj= {firstName: "John",
lastname: "Peter"}
console.log(obj)
Output

 The following table explains the discussed concept of ASCII representation for numbers as per the requirement:
 We have implemented the methods upon the input field to input only numbers.
 Method 2: Get Width of Element Using the clientWidth
Property
This property can also be implemented similar to the previous approach.
The main difference is that it computes the inner width of the specified element.
Example
First, revive the above discussed methods for including a heading:
<h2>Get Width of HTML Element using JavaScript</h2>
In this particular example, include the specified heading contained in the “div” element specified by “id”.
This particular heading will be computed upon for “width”:
<div id="myElement"><h3 style="background-color: khaki;">This is a Heading Element</h3></div>
This particular tag refer to the computed width to be displayed on DOM:
<<strong>h4</strong> id= "status"></<strong>h4</strong>><<strong>br</strong>>
Now, create a button with an attached “onclick” event invoking the function getWidth():
<button type="button" onclick="getWidth()">Click Me</button>
Lastly, define a function named “getWidth()”.
Here, fetch the heading to be computed upon for width.
In the next step, apply the “clientWidth” property to perform the stated operation and similarly, the “innerText” property will display the width of the heading:
function getWidth(){
var getElement = document.getElementById('myElement');
var get= document.getElementById("status")
var width = getElement.clientWidth;
get.innerText= "The Width of the element is " + width + "px";}
Output
Method 2: Get Width of Element Using the clientWidth
Property
This property can also be implemented similar to the previous approach.
The main difference is that it computes the inner width of the specified element.
Example
First, revive the above discussed methods for including a heading:
<h2>Get Width of HTML Element using JavaScript</h2>
In this particular example, include the specified heading contained in the “div” element specified by “id”.
This particular heading will be computed upon for “width”:
<div id="myElement"><h3 style="background-color: khaki;">This is a Heading Element</h3></div>
This particular tag refer to the computed width to be displayed on DOM:
<<strong>h4</strong> id= "status"></<strong>h4</strong>><<strong>br</strong>>
Now, create a button with an attached “onclick” event invoking the function getWidth():
<button type="button" onclick="getWidth()">Click Me</button>
Lastly, define a function named “getWidth()”.
Here, fetch the heading to be computed upon for width.
In the next step, apply the “clientWidth” property to perform the stated operation and similarly, the “innerText” property will display the width of the heading:
function getWidth(){
var getElement = document.getElementById('myElement');
var get= document.getElementById("status")
var width = getElement.clientWidth;
get.innerText= "The Width of the element is " + width + "px";}
Output
 Method 3: Get Width of Element Using the getBoundingClientRect() Method
This method returns the size of an element.
This method can be integrated with the “width” property to measure the width of the input field.
Look at the following example.
Example
First, contain an input “text” field with the specified placeholder value and the attached event “onmouseover”:
<div id="field"><input type= "text" placeholder= "Width?" onmouseover= "getWidth()"></div>
Now, define a function named “getWidth()” and access the specified input field.
This input field will be computed for the size and width using the “getBoundingClientRect()” method and the width property respectively.
Finally, display the calculated width:
function getWidth(){
var getElement = document.getElementById('field');
var position = getElement.getBoundingClientRect();
var width = position.width;
alert(width);}
Output
Method 3: Get Width of Element Using the getBoundingClientRect() Method
This method returns the size of an element.
This method can be integrated with the “width” property to measure the width of the input field.
Look at the following example.
Example
First, contain an input “text” field with the specified placeholder value and the attached event “onmouseover”:
<div id="field"><input type= "text" placeholder= "Width?" onmouseover= "getWidth()"></div>
Now, define a function named “getWidth()” and access the specified input field.
This input field will be computed for the size and width using the “getBoundingClientRect()” method and the width property respectively.
Finally, display the calculated width:
function getWidth(){
var getElement = document.getElementById('field');
var position = getElement.getBoundingClientRect();
var width = position.width;
alert(width);}
Output
 This write-up explained the methods to compute the element’s width.
 Example 2: Get Week Number of the Year Using the User-Input Date
This example provides the user an option to opt for the date from the given calendar and displays the corresponding week against it.
Firstly, include the following heading and date in the “<h2>” and “<b>” tags respectively.
Next, specify the input type as “date” with the assigned id.
Also, include a “button” and attach an “onclick” event to it invoking a function named “weekYear()”.
In the next step, specify the “<h3>” tag with the assigned id.
This specific tag is allocated to contain the computed week number upon the user-entered date:
<h2 align= "Center"> Calculate Week Number using User Input Date<br></h2><center><b align="Center"> Enter date</b><input type= "date" id= "date"><br> <br><button onclick="weekYear()">Calculate Week Number</button><h3 id= "result" align= "center"></h3></center>
Now, define a function named “weekYear()”.
In its definition, access the assigned input type and retrieve its value.
After that, similarly create a new date object and contain the value of date as its parameter.
In the further steps, similarly repeat the procedure discussed in the computation procedure for pointing to the start of the current year, computing the number of days and weeks till the current date.
Finally, the last step will display the week number of the year at its allocated heading tag using the “innerText” property:
function weekYear() {
var get = document.getElementById("date").value;
var currentDate = new Date(get);
var year = new Date(currentDate.getFullYear(), 0, 1);
var days = Math.floor((currentDate - year) / (24 * 60 * 60 * 1000));
var week = Math.ceil(( currentDate.getDay() + 1 + days) / 7);return document.getElementById("result").innerHTML = "Week number of the specified date is: " + week;}
Output
Example 2: Get Week Number of the Year Using the User-Input Date
This example provides the user an option to opt for the date from the given calendar and displays the corresponding week against it.
Firstly, include the following heading and date in the “<h2>” and “<b>” tags respectively.
Next, specify the input type as “date” with the assigned id.
Also, include a “button” and attach an “onclick” event to it invoking a function named “weekYear()”.
In the next step, specify the “<h3>” tag with the assigned id.
This specific tag is allocated to contain the computed week number upon the user-entered date:
<h2 align= "Center"> Calculate Week Number using User Input Date<br></h2><center><b align="Center"> Enter date</b><input type= "date" id= "date"><br> <br><button onclick="weekYear()">Calculate Week Number</button><h3 id= "result" align= "center"></h3></center>
Now, define a function named “weekYear()”.
In its definition, access the assigned input type and retrieve its value.
After that, similarly create a new date object and contain the value of date as its parameter.
In the further steps, similarly repeat the procedure discussed in the computation procedure for pointing to the start of the current year, computing the number of days and weeks till the current date.
Finally, the last step will display the week number of the year at its allocated heading tag using the “innerText” property:
function weekYear() {
var get = document.getElementById("date").value;
var currentDate = new Date(get);
var year = new Date(currentDate.getFullYear(), 0, 1);
var days = Math.floor((currentDate - year) / (24 * 60 * 60 * 1000));
var week = Math.ceil(( currentDate.getDay() + 1 + days) / 7);return document.getElementById("result").innerHTML = "Week number of the specified date is: " + week;}
Output
 This article demonstrated the concept of getting the week number of the year.
 Let’s move to the next method for getting href.
Method 2: Get href Using href Attribute
The other method for getting href value is the “href” attribute.
The href is the property of the “HTMLAnchorElement” that updates the href and gives a string with the complete URL.
Syntax
Use the following syntax for getting the href value with the help of the “href” attribute:
anchorElement.href
Example: Get href Using getElementById() Method With href Attribute
We will consider the same link in the anchor tag used in the previous example.
Then, in the “getUrl()” function, first access the anchor tag by passing the “link” id of the anchor tag in the “getElementbyId()” method and call the “href” attribute with it.
Next, again get the added label using the same procedure and set the value of the fetched href as its content:
function getUrl(){
const value1 = document.getElementById("link").href;
const url = document.getElementById('getUrl');
url.textContent = `The URL is ${value1}`;}
Output
Let’s move to the next method for getting href.
Method 2: Get href Using href Attribute
The other method for getting href value is the “href” attribute.
The href is the property of the “HTMLAnchorElement” that updates the href and gives a string with the complete URL.
Syntax
Use the following syntax for getting the href value with the help of the “href” attribute:
anchorElement.href
Example: Get href Using getElementById() Method With href Attribute
We will consider the same link in the anchor tag used in the previous example.
Then, in the “getUrl()” function, first access the anchor tag by passing the “link” id of the anchor tag in the “getElementbyId()” method and call the “href” attribute with it.
Next, again get the added label using the same procedure and set the value of the fetched href as its content:
function getUrl(){
const value1 = document.getElementById("link").href;
const url = document.getElementById('getUrl');
url.textContent = `The URL is ${value1}`;}
Output
 We have provided the simplest solution for getting the href value.
 Let’s check out the methods of the classList JavaScript property.


 All of the fundamental guidelines for the classList JavaScript property have been covered.
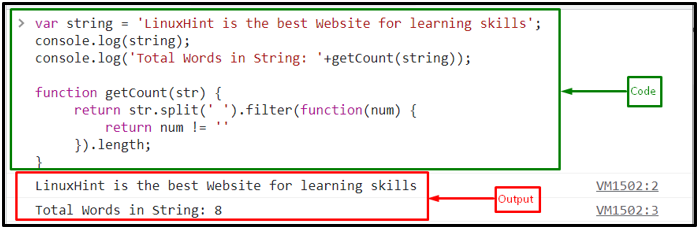 Example 2: Count Word Using trim() and split() Methods
In this example, we will use another approach to perform the same operation.
To do so, consider the same string and call “trim()” with the “split()” method, use the regex for space as “/\s+/”, and lastly invoke the “length” property:
function getCount(str) {
return str.trim().split(/\s+/).length;}
Output
Example 2: Count Word Using trim() and split() Methods
In this example, we will use another approach to perform the same operation.
To do so, consider the same string and call “trim()” with the “split()” method, use the regex for space as “/\s+/”, and lastly invoke the “length” property:
function getCount(str) {
return str.trim().split(/\s+/).length;}
Output
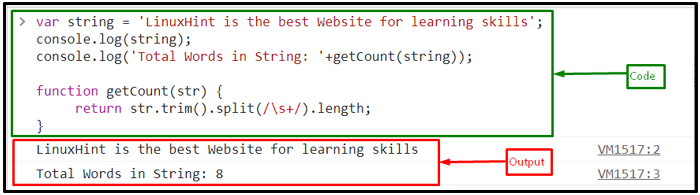 Example 3: Count Words Entered by User in Text Box
In this example, we will count the words in a sentence by entering text in a text box.
To do so, create a textbox using the HTML <textarea> tag with id “txtarea” and attach an “onclick()” event to it which invokes the JavaScript user-defined function “wordCount()” to count every word except the spaces:
<textarea id="txtarea" oninput="wordCount()" rows="8" cols="45" placeholder="Enter text ....."></textarea>
Then, create two labels; one for description and the other to display the word count:
<label>Total Word Count:</label><label id="showCount"></label>
In the wordCount() function, first get the id of the text box using the “getElementById()” method, set count equals to 0, and call the split() method by passing space as an argument.
Then, iterate the text in the text area using the “for” loop and check if the text does not contain any space, then increment 1 in the count:
function wordCount() {
var text = document.getElementById("txtarea").value;
var count = 0;
var split = text.split(' ');
for (var i = 0; i < split.length; i++) {
if (split[i] != "") {
count ++;
}
}
document.getElementById("showCount").innerHTML = count;}
The output signifies that the word counter works simultaneously when the user enter any text:
Example 3: Count Words Entered by User in Text Box
In this example, we will count the words in a sentence by entering text in a text box.
To do so, create a textbox using the HTML <textarea> tag with id “txtarea” and attach an “onclick()” event to it which invokes the JavaScript user-defined function “wordCount()” to count every word except the spaces:
<textarea id="txtarea" oninput="wordCount()" rows="8" cols="45" placeholder="Enter text ....."></textarea>
Then, create two labels; one for description and the other to display the word count:
<label>Total Word Count:</label><label id="showCount"></label>
In the wordCount() function, first get the id of the text box using the “getElementById()” method, set count equals to 0, and call the split() method by passing space as an argument.
Then, iterate the text in the text area using the “for” loop and check if the text does not contain any space, then increment 1 in the count:
function wordCount() {
var text = document.getElementById("txtarea").value;
var count = 0;
var split = text.split(' ');
for (var i = 0; i < split.length; i++) {
if (split[i] != "") {
count ++;
}
}
document.getElementById("showCount").innerHTML = count;}
The output signifies that the word counter works simultaneously when the user enter any text:
 We have compiled all the simplest solutions to count the words.
 If you want to take the string value as an input from the user and encode it, utilize the following example.
Example 2: Encode the User-Defined String
In the following example, we will encode the string value entered by the user via the prompt dialogue box.
The below-given code will ask the user to input the string value:
input= prompt("Enter the String Value:")
Now, encode the user-defined string value using the “window.btoa()” method:
let encoded = window.btoa(input);
Finally, display the encoded string value via alert dialogue box:
alert(encoded)
Output
If you want to take the string value as an input from the user and encode it, utilize the following example.
Example 2: Encode the User-Defined String
In the following example, we will encode the string value entered by the user via the prompt dialogue box.
The below-given code will ask the user to input the string value:
input= prompt("Enter the String Value:")
Now, encode the user-defined string value using the “window.btoa()” method:
let encoded = window.btoa(input);
Finally, display the encoded string value via alert dialogue box:
alert(encoded)
Output
 Example 3: Encode Heading Text
In this particular example, we will encode the string value of the heading by accessing its specified “id” using a button.
First, specify the following heading in the “<h3>” tag with the specified id:
<h3 id= "lh">LinuxHint</h3>
Next, follow the given steps to encode the heading:
Define a function named “encodeString()”.
In its function definition, access the specified id using the “getElementById()” method.
Now, invoke the “btoa()” method to encode the text added in the heading.
Finally, apply the “innerText” property to display the encoded string value on the Document Object Model(DOM):
function encodeString(){
let get= document.getElementById("lh")
let encoded = window.btoa(get);
get.innerText= encoded}
Output
Example 3: Encode Heading Text
In this particular example, we will encode the string value of the heading by accessing its specified “id” using a button.
First, specify the following heading in the “<h3>” tag with the specified id:
<h3 id= "lh">LinuxHint</h3>
Next, follow the given steps to encode the heading:
Define a function named “encodeString()”.
In its function definition, access the specified id using the “getElementById()” method.
Now, invoke the “btoa()” method to encode the text added in the heading.
Finally, apply the “innerText” property to display the encoded string value on the Document Object Model(DOM):
function encodeString(){
let get= document.getElementById("lh")
let encoded = window.btoa(get);
get.innerText= encoded}
Output
 We have discussed all the possible examples for the usage of the window.btao() method.
 Let’s discuss the other use of the Question mark (?).
 Similarly, when the keyword “null” is added in the place of “undefined“, it gives the same result, but If the other representations of the null value, such as an empty string ” “ or “0” are on the left-hand side, the null coalescing operator will not consider it as null and gives the value of left-hand side operand.
Here, we will use “0” and the null coalescing operator with variable “num”:
var check = 0 ?? num;
The output gives “0”, the left-hand-sided value:
Similarly, when the keyword “null” is added in the place of “undefined“, it gives the same result, but If the other representations of the null value, such as an empty string ” “ or “0” are on the left-hand side, the null coalescing operator will not consider it as null and gives the value of left-hand side operand.
Here, we will use “0” and the null coalescing operator with variable “num”:
var check = 0 ?? num;
The output gives “0”, the left-hand-sided value:
 The question mark is also used for one more purpose, let’s see it!
 While, when the optional chaining operator is added to access its undefined properties, it will not throw an error:
console.log(user1.info?.name);
The output gives undefined rather than error:
While, when the optional chaining operator is added to access its undefined properties, it will not throw an error:
console.log(user1.info?.name);
The output gives undefined rather than error:
 Let’s see one more example related to this functionality.
Example 2: Accessing Non-existing Properties of a Non-empty Object
Here, we will define the properties of the object and then try to access the nested object attribute that does exist in the object:
var user1 = {
info: {
age: "20"
}};
Use the optional chaining operator for accessing nested object’s attribute:
console.log(user1.info?.name);
As a result, “undefined” will be displayed on the console:
Let’s see one more example related to this functionality.
Example 2: Accessing Non-existing Properties of a Non-empty Object
Here, we will define the properties of the object and then try to access the nested object attribute that does exist in the object:
var user1 = {
info: {
age: "20"
}};
Use the optional chaining operator for accessing nested object’s attribute:
console.log(user1.info?.name);
As a result, “undefined” will be displayed on the console:
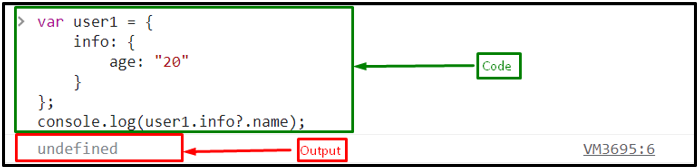 We have compiled all the uses of the question mark “?”.
 If you want to load the page after a specified waiting time repeatedly, utilize the following method.
 In the extracted output, it is evident that the page is loaded repeatedly after the specified waiting time.
 We have compiled different methods to wait for the page to load.
 If you want to use “this” in event handling, follow the below section.
 If you are confused about the use of the “this” keyword in user-defined functions, follow the given section.
 Example 2: Use of this keyword in Implicit Binding
When the function is called by an object or a dot symbol, “this” keyword acts as an implicit binding.
It points out the object during the function call.
In this example, we will define a function “info()” and use the “this” keyword in the function definition:
function info(){
console.log("Hy! I am " + this.name + " and I am " + this.age + " years old")}
Then, create an object named “personInfo” with defined properties:
var personInfo = {
name: "John",
age : 20,
info: info}
Now, call the function along object:
personInfo.info();
Output
Example 2: Use of this keyword in Implicit Binding
When the function is called by an object or a dot symbol, “this” keyword acts as an implicit binding.
It points out the object during the function call.
In this example, we will define a function “info()” and use the “this” keyword in the function definition:
function info(){
console.log("Hy! I am " + this.name + " and I am " + this.age + " years old")}
Then, create an object named “personInfo” with defined properties:
var personInfo = {
name: "John",
age : 20,
info: info}
Now, call the function along object:
personInfo.info();
Output
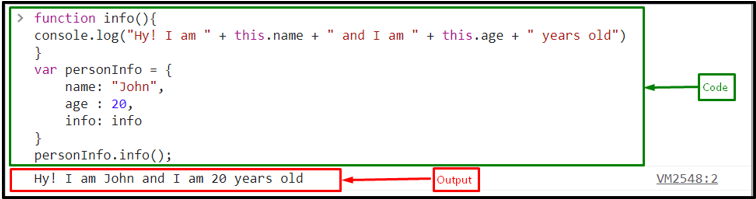 Example 3: Use of this keyword in Explicit Binding
Explicit binding is also called “hard binding” because the function is forcefully called to utilize a particular object for “this” binding, without putting a property function reference on the object.
For this purpose, call(), apply() and bind() methods can be used.
We will now utilize the same function named “info()” defined in the previous example.
Then, create an object named “personInfo” with the following values:
var personInfo = {
name: "John",
age : 20}
For invoking the function named “info()”, we will use the “call()” method and pass the created object it to as an argument:
info.call(personInfo);
As the info() is not part of the object, we still have explicitly accessed it:
Example 3: Use of this keyword in Explicit Binding
Explicit binding is also called “hard binding” because the function is forcefully called to utilize a particular object for “this” binding, without putting a property function reference on the object.
For this purpose, call(), apply() and bind() methods can be used.
We will now utilize the same function named “info()” defined in the previous example.
Then, create an object named “personInfo” with the following values:
var personInfo = {
name: "John",
age : 20}
For invoking the function named “info()”, we will use the “call()” method and pass the created object it to as an argument:
info.call(personInfo);
As the info() is not part of the object, we still have explicitly accessed it:
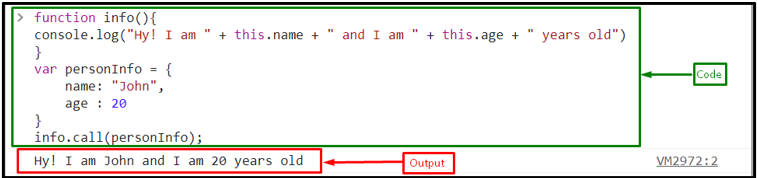 For calling a function explicitly, you can also use the apply() and bind() methods.
The apply() method is identical to the call() method, while the bind() method creates a new function with the same body and scope that behaves in the same way as the original function.
The bind() method can be utilized to return a function that you can use later.
For calling info() with the apply() method, use the following statement:
info.apply(personInfo);
It gives the same output as the call() method gives:
For calling a function explicitly, you can also use the apply() and bind() methods.
The apply() method is identical to the call() method, while the bind() method creates a new function with the same body and scope that behaves in the same way as the original function.
The bind() method can be utilized to return a function that you can use later.
For calling info() with the apply() method, use the following statement:
info.apply(personInfo);
It gives the same output as the call() method gives:
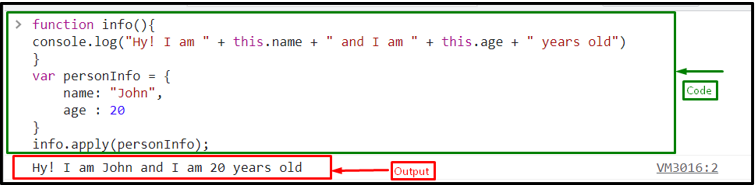 For calling “info()” with the “bind()” method, utilize the given statement:
info.bind(personInfo);
Output
For calling “info()” with the “bind()” method, utilize the given statement:
info.bind(personInfo);
Output
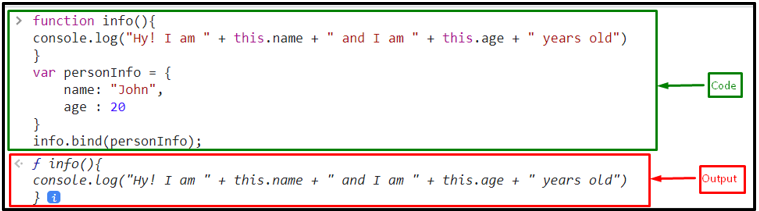 We have compiled all the essential information related to the “this” keyword.
 Example 2: Declare Multi-line String Using JavaScript Template Literals
Normally, for printing multiple lines, we use the concatenation operator (+) and to add a new line, (\n) can be utilized, that can often make the code complex:
console.log("Welcome to the LinuxHint.\n" + "The best website for learning skills.");
While for using template literals, you can start a new line by pressing enter from the keyboard in the backticks block:
console.log(`Welcome to the LinuxHint.
The best website for learning skills.`);
Output
Example 2: Declare Multi-line String Using JavaScript Template Literals
Normally, for printing multiple lines, we use the concatenation operator (+) and to add a new line, (\n) can be utilized, that can often make the code complex:
console.log("Welcome to the LinuxHint.\n" + "The best website for learning skills.");
While for using template literals, you can start a new line by pressing enter from the keyboard in the backticks block:
console.log(`Welcome to the LinuxHint.
The best website for learning skills.`);
Output
 Example 3: String with Expression Substitutions
Here, first we will create two variables “x” and “y”, with the values “20” and “15”, respectively:
var x = 20;
var y = 15;
Then, create a variable “sum” for adding the “x” and “y”:
var sum = x + y;
If you want to add two numbers and display the sum of these numbers on console, normally, it is required to concatenate the strings and variables in regular string format which often creates a mess to use single or double quotes repeatedly with the strings and join them with each other and with the variables using (+):
console.log("Sum of x " + x + " and " + y + " is " + sum);
While, using the template literals, you only have to specify the strings with variables as an expression inside the “${}” in backtick block:
console.log(`Sum of x ${x} and y ${y} is ${sum}`);
Output
Example 3: String with Expression Substitutions
Here, first we will create two variables “x” and “y”, with the values “20” and “15”, respectively:
var x = 20;
var y = 15;
Then, create a variable “sum” for adding the “x” and “y”:
var sum = x + y;
If you want to add two numbers and display the sum of these numbers on console, normally, it is required to concatenate the strings and variables in regular string format which often creates a mess to use single or double quotes repeatedly with the strings and join them with each other and with the variables using (+):
console.log("Sum of x " + x + " and " + y + " is " + sum);
While, using the template literals, you only have to specify the strings with variables as an expression inside the “${}” in backtick block:
console.log(`Sum of x ${x} and y ${y} is ${sum}`);
Output
 We have gathered all the essential information related to the template literals.
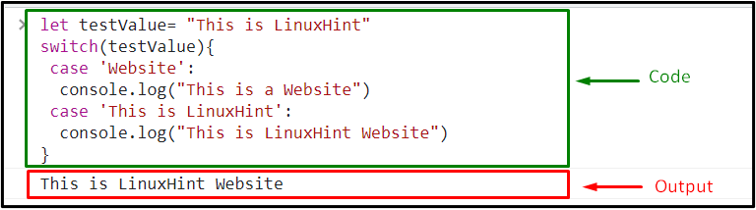
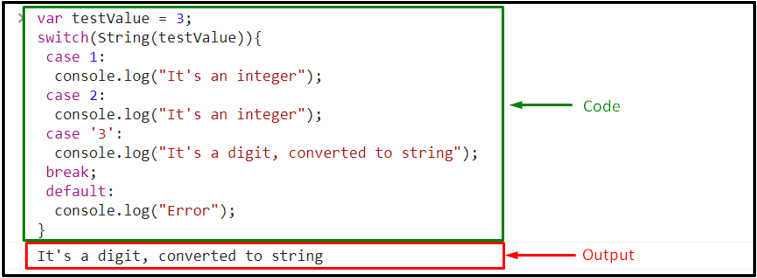 In the above output, it can be observed that the corresponding message against the case “3” is logged.
 Example 2: Compare Character With Number Using not equal Comparison Operator
Now, we will compare and check if the character “1” and the number “1” are equal or not:
console.log('1' != 1);
The output displayed “false” as both values are equal:
Example 2: Compare Character With Number Using not equal Comparison Operator
Now, we will compare and check if the character “1” and the number “1” are equal or not:
console.log('1' != 1);
The output displayed “false” as both values are equal:
 Example 3: Compare Number With Boolean Using not equal Comparison Operator
In this example, we will determine whether the “true” boolean value is equivalent to the “1”:
console.log(1 != true);
It returns “false” as output which indicates “1” represents the “true” boolean value:
Example 3: Compare Number With Boolean Using not equal Comparison Operator
In this example, we will determine whether the “true” boolean value is equivalent to the “1”:
console.log(1 != true);
It returns “false” as output which indicates “1” represents the “true” boolean value:
 Example 4: Compare Number With null Using not equal Comparison Operator
Here, we will compare if “0” is equal to the “null”:
console.log(0 != null);
The above-given statement output “true”, which means the specified values are not equal:
Example 4: Compare Number With null Using not equal Comparison Operator
Here, we will compare if “0” is equal to the “null”:
console.log(0 != null);
The above-given statement output “true”, which means the specified values are not equal:
 We have gathered all the details on the JavaScript not equal comparison operator.


 Similarly, when we have passed “500000000000” milliseconds to the constructor, the date will be displayed with respect to it:
var date = new Date(500000000000);
The given output shows the time after 15 years:
Similarly, when we have passed “500000000000” milliseconds to the constructor, the date will be displayed with respect to it:
var date = new Date(500000000000);
The given output shows the time after 15 years:

 We have gathered all the essential instructions related to the JavaScript Date() constructor.
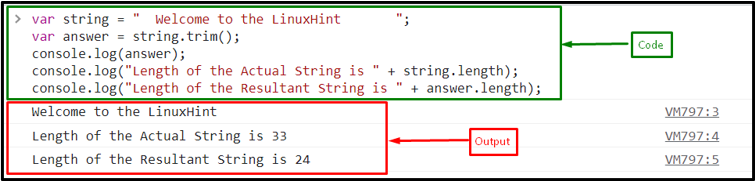 If you want to remove the whitespaces only from the start of the string, follow the below section.
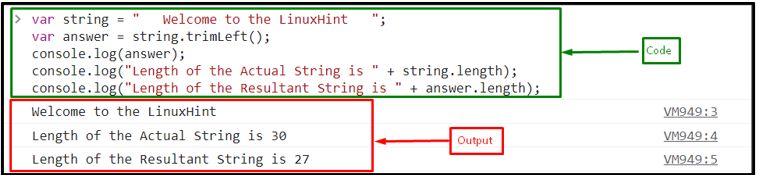 You can also utilize the “trimStart()” method instead of the trimLeft() method for the same purpose:
var answer = string.trimStart();
It outputs the same result as the trimLeft() method:
You can also utilize the “trimStart()” method instead of the trimLeft() method for the same purpose:
var answer = string.trimStart();
It outputs the same result as the trimLeft() method:
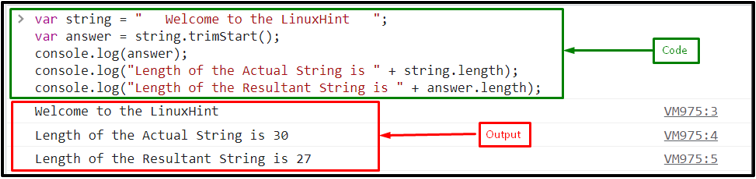 Want to know the method to specifically remove extra spaces from the right side of the string? Follow the given-provided method.
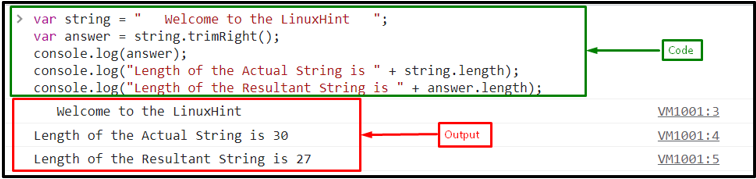 Now, use the “trimEnd()” method instead of the trimRight() method for the same scenario:
var answer = string.trimEnd();
Output
Now, use the “trimEnd()” method instead of the trimRight() method for the same scenario:
var answer = string.trimEnd();
Output
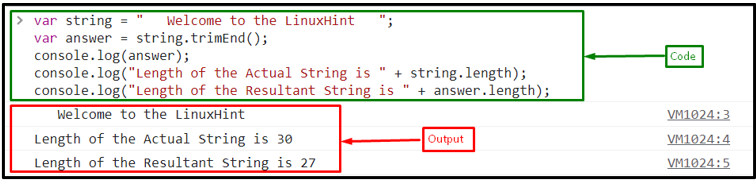 We have covered all the essential instructions related to the left and right trimming process of the string.

 We have discussed all the convenient methods to auto refresh a web page every 5 seconds using JavaScript.

 We have discussed different scenarios to implement the Math.min() method.
 Want to fetch the KeyCode when a key is pressed? Look at the following example!
 We have covered all the essential information related to keycodes.


 We have discussed different creative methods to make the first letter lowercase.
 We have covered all the essential information related to the JavaScript select() method.
 Let’s take another example to see how the target value plays its part in the window.open() method.
 We have covered in detail what is window.open().
 Similarly, here, we will specify the OR “||” operator to see the result of “b || b”:
console.log(b || b);
The output signifies that if both values “false”, the OR operator will return “false”:
Similarly, here, we will specify the OR “||” operator to see the result of “b || b”:
console.log(b || b);
The output signifies that if both values “false”, the OR operator will return “false”:
 Let’s check out the method to use OR statements files with HTML.

 We have covered all the essential information related to the OR “||” logical operator.

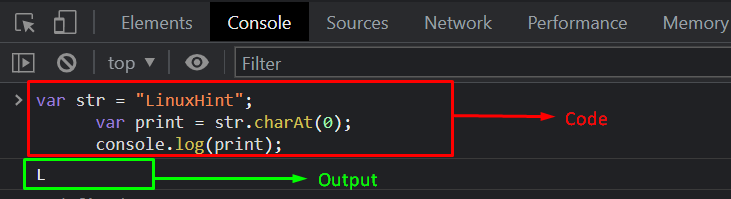 Want to return two characters from the same string using charAt() method? Let’s move ahead to the next example.
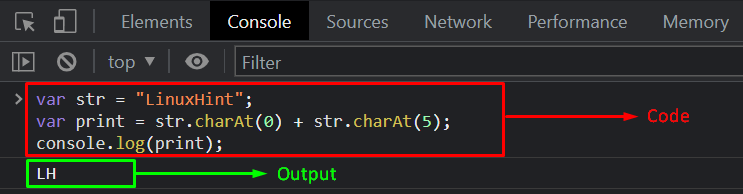 We have described in detail what the charAt() method is and how it can be used.
 In the other case, we will check the assertion that the sum of the variables “a” and “b” is “43”.
As a result, the console.assert() method will do nothing; just print out “undefined” on the console:
console.assert(a + b == 43, "It returns 'false'");
Output
In the other case, we will check the assertion that the sum of the variables “a” and “b” is “43”.
As a result, the console.assert() method will do nothing; just print out “undefined” on the console:
console.assert(a + b == 43, "It returns 'false'");
Output

 We have covered all the details about the assertion.
 We have covered all the information related to e.
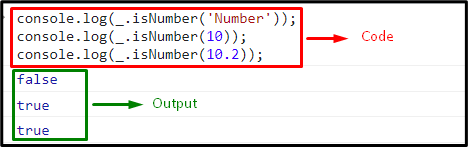 In the above output, it can be observed that the boolean value “false” is returned against the provided string value and the boolean value “true” is returned against both the integer and float values.
Example 2: Applying _.isNumber() to Check the Array Elements
In the following example, we will apply the isNumber() method on the declared array to check if the accessed array element is a number or a string.
First, we will declare an array that contains the integer and string values respectively:
array= [1, 2, "number"]
Next, access the array elements with the specified indexes.
Both of the accessed elements will output different boolean values based on their data types:
console.log(_.isNumber(array[1]))
console.log(_.isNumber(array[2]))
The output displayed “true” against the first index value that is “2” and “false” for the 2nd index that is a string:
In the above output, it can be observed that the boolean value “false” is returned against the provided string value and the boolean value “true” is returned against both the integer and float values.
Example 2: Applying _.isNumber() to Check the Array Elements
In the following example, we will apply the isNumber() method on the declared array to check if the accessed array element is a number or a string.
First, we will declare an array that contains the integer and string values respectively:
array= [1, 2, "number"]
Next, access the array elements with the specified indexes.
Both of the accessed elements will output different boolean values based on their data types:
console.log(_.isNumber(array[1]))
console.log(_.isNumber(array[2]))
The output displayed “true” against the first index value that is “2” and “false” for the 2nd index that is a string:
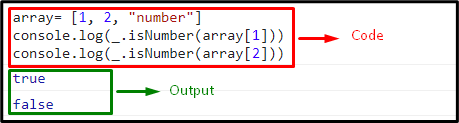 We have implemented various examples for implementing the “isNumber()” method.
 In the above output, it can be observed that the two former and the two latter array elements are swapped with each other.
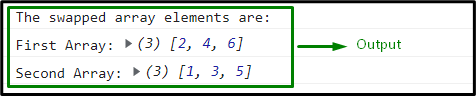 In this particular output, it is evident that the array elements of both the arrays are swapped.
 We have discussed different creative methods to swap array elements.


 We have discussed various methods to swap images.
 We have discussed all the easiest methods to remove the second last character from string.
 Example 2: Disable or Enable Buttons Using jQuery
In this example, we will use jQuery to disable and enable the button.
To do so, first, create two buttons in an HTML file.
One of them is used to disable and enable the other button:
<button id="button">Button</button><button id="toggle">Click Here to Disable and for Enable double click on it</button>
For using jQuery, specify it the “src” attribute in <head> tag:
<script src="https://ajax.googleapis.com/ajax/libs/jquery/1.10.2/jquery.min.js"></script>
In the <script> tag, disable the button on a single click by triggering the “click” event in the button with id “toggle” and set the value of the “disabled” attribute of the first button to “true”.
Similarly, on the “dblclick” event, set the value of the disabled attribute to “false” to enable the “Button” on double click:
$(document).ready(function () {
$('#toggle').on('click', function () {
$('#button').prop('disabled', true);
});
$('#toggle').on('dblclick', function () {
$('#button').prop('disabled', false);
});});
The output signifies that we successfully disable and enable the button using jQuery:
Example 2: Disable or Enable Buttons Using jQuery
In this example, we will use jQuery to disable and enable the button.
To do so, first, create two buttons in an HTML file.
One of them is used to disable and enable the other button:
<button id="button">Button</button><button id="toggle">Click Here to Disable and for Enable double click on it</button>
For using jQuery, specify it the “src” attribute in <head> tag:
<script src="https://ajax.googleapis.com/ajax/libs/jquery/1.10.2/jquery.min.js"></script>
In the <script> tag, disable the button on a single click by triggering the “click” event in the button with id “toggle” and set the value of the “disabled” attribute of the first button to “true”.
Similarly, on the “dblclick” event, set the value of the disabled attribute to “false” to enable the “Button” on double click:
$(document).ready(function () {
$('#toggle').on('click', function () {
$('#button').prop('disabled', true);
});
$('#toggle').on('dblclick', function () {
$('#button').prop('disabled', false);
});});
The output signifies that we successfully disable and enable the button using jQuery:
 Example 3: Enable the Disabled Button Using JavaScript
Now, we will enable the disabled button after entering some text in the text field using JavaScript.
For this, create an input field and a submit button with ids “text” and “submit”.
The submit button is disabled by default utilizing the disabled attribute:
<input type="text" id="Text" placeholder="Enter Text"/><input type="submit" id="submit" disabled="disabled" />
In the JavaScript file, we will first get the ids of the input field and button and then call the function “stateHandle” in “addEventListener” method, where we will set the value of the disabled attribute to “false” if the text field is empty, which indicates the disable button; else, we will set it as “true”, if the input field is filled with any text and the submit button will be enabled:
let input = document.querySelector("#Text");
let button = document.querySelector("#submit");
input.addEventListener("change", stateHandle);function stateHandle() {
if (document.querySelector("#Text").value !="") {
button.disabled = false;
}
else {
button.disabled = true;
}}
Output
Example 3: Enable the Disabled Button Using JavaScript
Now, we will enable the disabled button after entering some text in the text field using JavaScript.
For this, create an input field and a submit button with ids “text” and “submit”.
The submit button is disabled by default utilizing the disabled attribute:
<input type="text" id="Text" placeholder="Enter Text"/><input type="submit" id="submit" disabled="disabled" />
In the JavaScript file, we will first get the ids of the input field and button and then call the function “stateHandle” in “addEventListener” method, where we will set the value of the disabled attribute to “false” if the text field is empty, which indicates the disable button; else, we will set it as “true”, if the input field is filled with any text and the submit button will be enabled:
let input = document.querySelector("#Text");
let button = document.querySelector("#submit");
input.addEventListener("change", stateHandle);function stateHandle() {
if (document.querySelector("#Text").value !="") {
button.disabled = false;
}
else {
button.disabled = true;
}}
Output
 Example 4: Enable the Disabled Button Buttons Using jQuery
In this example, we will use jQuery to enable the disabled submit button.
To do so, first set the value of the disabled attribute to “false” for disabling the button while the input field is empty.
Then, if the field is filled with any text, set the value of disabled attribute to “true”, which enables the submit button:
$(document).ready(function () {
$('#Text').on('input change', function () {
if ($(this).val() != '') {
$('#submit').prop('disabled', false);
}
else {
$('#submit').prop('disabled', true);
}
});});
The corresponding output is shown below:
Example 4: Enable the Disabled Button Buttons Using jQuery
In this example, we will use jQuery to enable the disabled submit button.
To do so, first set the value of the disabled attribute to “false” for disabling the button while the input field is empty.
Then, if the field is filled with any text, set the value of disabled attribute to “true”, which enables the submit button:
$(document).ready(function () {
$('#Text').on('input change', function () {
if ($(this).val() != '') {
$('#submit').prop('disabled', false);
}
else {
$('#submit').prop('disabled', true);
}
});});
The corresponding output is shown below:
 We have covered all the aspects of the enabling and disabling button using JavaScript and jQuery.
 Example 2: Using addEventListener() Method For Checking if Checkbox is Checked
Here, we will create a checkbox without an onclick() event.
Then, we will add a paragraph, and its display is set as “none” until the checkbox is unchecked.
In the other case, when the checkbox is marked as checked, its added text will be displayed in green color:
<input type="checkbox" id="Checkbox"> I Accept all the terms and conditions.<p id="text" style="color: green; display: none;">CHECKED!</p>
You can also verify whether the checkbox is checked or not without using the onclick() event.
Here, we will use another method called “addEventListener()” with the “querySelector()” method using the checkbox’s checked property.
This will work in such a way that the querySelector() method will first select the first element matched with the added id, and then the addEventListener() method will associate the “click” event with it:
var text = document.getElementById("text");
document.querySelector('#Checkbox').addEventListener('click', (event) =>{
if(event.target.checked){
text.style.display = "block";
}})
It can be seen that, when the checkbox is marked, the added content is displayed in green color:
Example 2: Using addEventListener() Method For Checking if Checkbox is Checked
Here, we will create a checkbox without an onclick() event.
Then, we will add a paragraph, and its display is set as “none” until the checkbox is unchecked.
In the other case, when the checkbox is marked as checked, its added text will be displayed in green color:
<input type="checkbox" id="Checkbox"> I Accept all the terms and conditions.<p id="text" style="color: green; display: none;">CHECKED!</p>
You can also verify whether the checkbox is checked or not without using the onclick() event.
Here, we will use another method called “addEventListener()” with the “querySelector()” method using the checkbox’s checked property.
This will work in such a way that the querySelector() method will first select the first element matched with the added id, and then the addEventListener() method will associate the “click” event with it:
var text = document.getElementById("text");
document.querySelector('#Checkbox').addEventListener('click', (event) =>{
if(event.target.checked){
text.style.display = "block";
}})
It can be seen that, when the checkbox is marked, the added content is displayed in green color:
 Everything you need to know about how to determine if a checkbox is marked or not has been provided to you.
 Example 2: Count and Reset
Here, we will add one more functionality in the above counter that is a “Reset” button.
We will attach “onclick” event with the button to invoke the JavaScript defined function “resetFunc()”:
<button onclick="resetFunc()">Reset</button>
In “resetFunc()”, set the count value to 0.
When the “Reset” button is clicked, the counter turns to 0 as the reset value:
function resetFunc(){
count=0;
document.getElementById("count").innerHTML = count; }
The output signifies that we can easily reset the counter and start the counting again:
Example 2: Count and Reset
Here, we will add one more functionality in the above counter that is a “Reset” button.
We will attach “onclick” event with the button to invoke the JavaScript defined function “resetFunc()”:
<button onclick="resetFunc()">Reset</button>
In “resetFunc()”, set the count value to 0.
When the “Reset” button is clicked, the counter turns to 0 as the reset value:
function resetFunc(){
count=0;
document.getElementById("count").innerHTML = count; }
The output signifies that we can easily reset the counter and start the counting again:
 Example 3: After Refreshing Start From the Same Count
In websites, there are some situations where we need to start the count from the same existing count even after refreshing the page.
For this purpose, we will use the “localStorage” of the browser in our JavaScript defined function which will be called on the click on button where “onclick” event attached:
function counterFunc(){
if (typeof(Storage) !== "undefined") {
if (localStorage.count) {
localStorage.count = Number(localStorage.count)+1;
} else {
localStorage.count = 1;
}
document.getElementById("count").innerHTML = localStorage.count;
}else {
document.getElementById("count").innerHTML = "Sorry, the browser you used does not support web storage.";
}}
It can be seen that the output starts the count from the same, even after refreshing the page.
This happens because of the “localStorage” property.
This property enables the JavaScript apps and sites to save the key-value pair in the web browser without any expiration date:
Example 3: After Refreshing Start From the Same Count
In websites, there are some situations where we need to start the count from the same existing count even after refreshing the page.
For this purpose, we will use the “localStorage” of the browser in our JavaScript defined function which will be called on the click on button where “onclick” event attached:
function counterFunc(){
if (typeof(Storage) !== "undefined") {
if (localStorage.count) {
localStorage.count = Number(localStorage.count)+1;
} else {
localStorage.count = 1;
}
document.getElementById("count").innerHTML = localStorage.count;
}else {
document.getElementById("count").innerHTML = "Sorry, the browser you used does not support web storage.";
}}
It can be seen that the output starts the count from the same, even after refreshing the page.
This happens because of the “localStorage” property.
This property enables the JavaScript apps and sites to save the key-value pair in the web browser without any expiration date:
 We have compiled all the necessary instructions related to creating a simple click counter using JavaScript.
 The only limitation of this approach is that it does not encrypt the characters “A-Z,a-z, 0-9,!@#$&*()=:/,;?+”, and in that scenario, choose the next approach!
 We have compiled all the approaches for the encrypting URL.


 We have discussed all the easiest methods to strip html tags from string.


 We have covered all the details about the getElementById() method.


 We have provided different implementations of the “for…of” statement.

 To get the date and time of a specific time zone, implement the following example.

 This write-up has explained the different techniques to implement the toLocaleString() method.


 We have covered all the details related to the charCodeAt() method of JavaScript.


 We have covered the best FREE sources for learning JavaScript.


 We have discussed various techniques to convert a given array into an object.
 In the above output, it can be observed that the CSS styling is applied on the specified heading by accessing the created link.
 We have explained the procedure for placing CSS.
 In the above output, the string named “JavaScript” is appended with a space.
To avoid using space and append it, omit the ” ” between the strings in all the demonstrated methods.
In the above output, the string named “JavaScript” is appended with a space.
To avoid using space and append it, omit the ” ” between the strings in all the demonstrated methods.


 We have discussed all the easiest methods to append strings at the end.
 If you want to close a created window instead, utilize the following method:
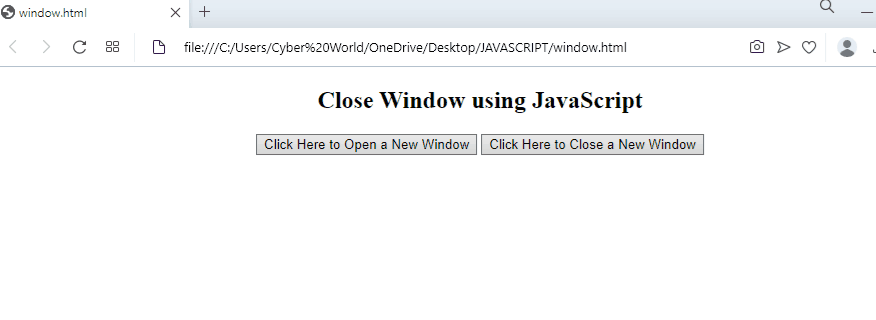 We have discussed the simplest methods for closing the tab and window created using JavaScript.

 We have provided the simplest methods to check if a string contains numbers and letters.
 Let’s move on to the next method!
 We have provided the simplest methods for getting the Unix timestamp.
 In case of getting the mouse coordinates of the whole DOM upon scrolling, utilize the below method.
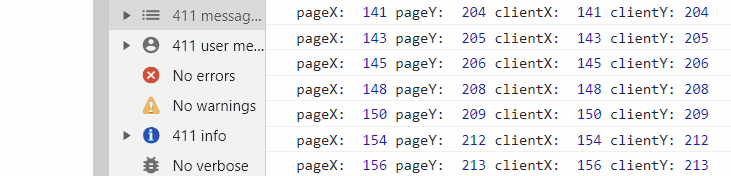 In the above output, it can be observed that while scrolling down, the value of “pageY” increases with the increase in the “y-axis” of the DOM.
 This write-up has compiled the methods to get mouse coordinates.
 We have explained the simplest methods to get image dimensions.

 We have provided the simplest and easy method for removing all non-alphanumeric characters from a string.
 Let’s move to the second method!
 Let’s see another method.


 We have compiled all the methods for eliminating digits after the decimal points.
 For replacing any specific character, you only have to specify it in the replace() method as a parameter as shown in above example, while to remove all the special characters from a string, check out the next example.
Example 2: Replace All Special Characters
For removing all special characters from a string, use the regex pattern.
First, create a variable named “string1” that contains a string with special characters:
var string1 = "Welcome* T^o L!inux#Hint";
Then, invoke the “replace()” method by passing a regex pattern that checks the string whether any special character is present in the string or not.
If yes, it removes them and places an empty string as a replacer:
var result = string1.replace(/[^a-zA-Z ]/g, "");
Lastly, display the updated string value on the console:
console.log(result);
As you can see, all of the specific special characters are now removed:
For replacing any specific character, you only have to specify it in the replace() method as a parameter as shown in above example, while to remove all the special characters from a string, check out the next example.
Example 2: Replace All Special Characters
For removing all special characters from a string, use the regex pattern.
First, create a variable named “string1” that contains a string with special characters:
var string1 = "Welcome* T^o L!inux#Hint";
Then, invoke the “replace()” method by passing a regex pattern that checks the string whether any special character is present in the string or not.
If yes, it removes them and places an empty string as a replacer:
var result = string1.replace(/[^a-zA-Z ]/g, "");
Lastly, display the updated string value on the console:
console.log(result);
As you can see, all of the specific special characters are now removed:
 We have gathered the simplest method for removing a specific special character in a string.
 In the above output, it is observed that the button “Click Me” is clicked in an automated way using the “click()” method.
Meanwhile, the clickEvent() function is accessed, and the specified message is logged on the console.
In the above output, it is observed that the button “Click Me” is clicked in an automated way using the “click()” method.
Meanwhile, the clickEvent() function is accessed, and the specified message is logged on the console.
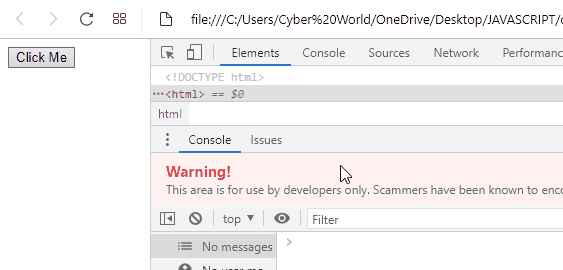 We have compiled different methods to trigger click events.
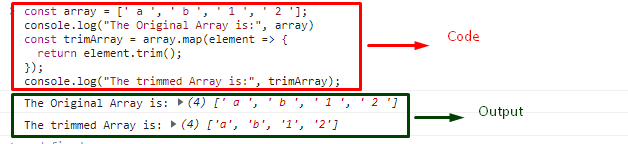 Want to trim all array elements? Check out the following section!
 We have compiled the easiest method to trim spaces from the start and end of an array element and trim all array elements as once.

 We have compiled different approaches for trimming characters from the end of String.
 Let’s see another method to validate email without using regex.
 We have compiled the simplest methods to validate email addresses using JavaScript.
 Example 2
In this example, we will perform the same task with both a regular function and the arrow function.
To do so, we will create a regular JavaScript function to multiply two numbers specified as arguments:
var product = function(a, b) {
return a * b;};
Then, call the function by passing two values “5” and “8” arguments:
product(5,8);
The output displayed “40” which is the product of the given arguments:
Example 2
In this example, we will perform the same task with both a regular function and the arrow function.
To do so, we will create a regular JavaScript function to multiply two numbers specified as arguments:
var product = function(a, b) {
return a * b;};
Then, call the function by passing two values “5” and “8” arguments:
product(5,8);
The output displayed “40” which is the product of the given arguments:
 Now, we will perform the same operation with the help of the arrow function only in one line of code:
var product = (a, b) => { return a * b };
Then, call the arrow function that is stored in a variable “product” by passing two arguments:
product(5,8);
Here, you can see in the output, you will get the same result in just two lines of code:
Now, we will perform the same operation with the help of the arrow function only in one line of code:
var product = (a, b) => { return a * b };
Then, call the arrow function that is stored in a variable “product” by passing two arguments:
product(5,8);
Here, you can see in the output, you will get the same result in just two lines of code:

 We have covered all the essential information about JavaScript enums.
 Now, let’s see how to use the forEach() method with an HTML file.
Example 2
Here, in HTML file, we will create a button that invoke the “findSquare()” method when its onclick event is triggered:
<button type="submit" onclick="findSquare()">Click to see the square of odd numbers:</button>
Next, define a function named “findSquare()” that contains an array of odd numbers and an empty array.
In its function definition, call the Foreach() method that will square every element of array and then push it in the empty “square” array:
function findSquare() {
var oddNumbers = [1, 3, 5, 9, 11];
var square = [];
oddNumbers.forEach(function (number) {
square.push(number * number);
});
Lastly, print out the new values using the “document.write()” method:
document.write("Square of Odd numbers '1,3,5,7,9,11' is: ");
document.write(square);
When the button is clicked, all of the values of the square array are displayed:
Now, let’s see how to use the forEach() method with an HTML file.
Example 2
Here, in HTML file, we will create a button that invoke the “findSquare()” method when its onclick event is triggered:
<button type="submit" onclick="findSquare()">Click to see the square of odd numbers:</button>
Next, define a function named “findSquare()” that contains an array of odd numbers and an empty array.
In its function definition, call the Foreach() method that will square every element of array and then push it in the empty “square” array:
function findSquare() {
var oddNumbers = [1, 3, 5, 9, 11];
var square = [];
oddNumbers.forEach(function (number) {
square.push(number * number);
});
Lastly, print out the new values using the “document.write()” method:
document.write("Square of Odd numbers '1,3,5,7,9,11' is: ");
document.write(square);
When the button is clicked, all of the values of the square array are displayed:
 We have covered all the essential information related to the JavaScript forEach() method.
 Let’s see how to use OR operator with HTML.
Example 2
Here, in HTML file, we will create an input field and a button that will invoke the function created file called “valueFunc()”:
<input type="text" placeholder="Enter Value b/w 50 and 100" id="text"><button onclick="valueFunc()">Enter</button>
In the JavaScript file, we will define a function called “valueFunc()” which will check the entered input text’s value in such a way that if its value is greater than 50 or equal to 100, an alert box will be generated:
function valueFunc(){
inputVal = document.getElementById('text');
if (inputVal.value > 50 || inputVal.value == 100 ){
alert ("You entered Valid input value");
}else
alert ("Enter value between 50 and 100");}
Output
Let’s see how to use OR operator with HTML.
Example 2
Here, in HTML file, we will create an input field and a button that will invoke the function created file called “valueFunc()”:
<input type="text" placeholder="Enter Value b/w 50 and 100" id="text"><button onclick="valueFunc()">Enter</button>
In the JavaScript file, we will define a function called “valueFunc()” which will check the entered input text’s value in such a way that if its value is greater than 50 or equal to 100, an alert box will be generated:
function valueFunc(){
inputVal = document.getElementById('text');
if (inputVal.value > 50 || inputVal.value == 100 ){
alert ("You entered Valid input value");
}else
alert ("Enter value between 50 and 100");}
Output
 We have covered all the necessary information for using the JavaScript OR statement.
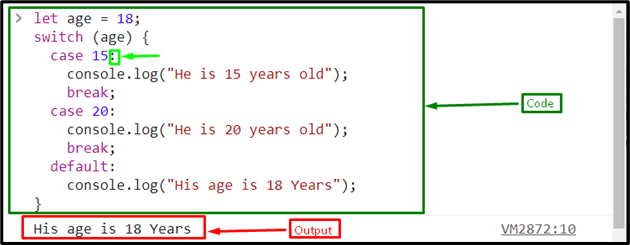

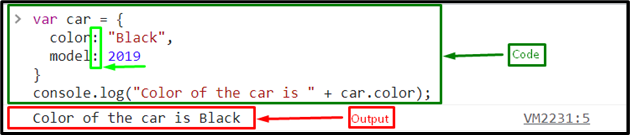
 We have covered all the basic information about colon “:”.

 Now, check what happens when you do not hardcode the semicolon at the end of the block, after the return statement, and at the end of the source file:
var add = function(a, b) {
return a + b}
add(5,8)
Here, the output indicates that if we do not use semicolons at the end of the function, return statement and the end of the source file, the program will still work:
Now, check what happens when you do not hardcode the semicolon at the end of the block, after the return statement, and at the end of the source file:
var add = function(a, b) {
return a + b}
add(5,8)
Here, the output indicates that if we do not use semicolons at the end of the function, return statement and the end of the source file, the program will still work:

 Although semicolons are optional, while it’s a good practice to use it.
 Let’s check out the other method!
 We have gathered the simplest approach to change the text color.
 Let’s see the next procedure for assigning value to the textbox.
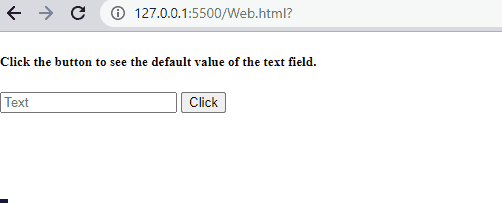 We have gathered the simplest approaches for assigning value to the textbox using JavaScript.
 Note: You can use this method to add the option at the beginning of the select tag by adding the value of the existing option as a second parameter instead of undefined.
It will add the new option before the existing one.
Let’s move to the other method!
Note: You can use this method to add the option at the beginning of the select tag by adding the value of the existing option as a second parameter instead of undefined.
It will add the new option before the existing one.
Let’s move to the other method!
 We have compiled all the possible solutions for adding options from an input text to the select tag.
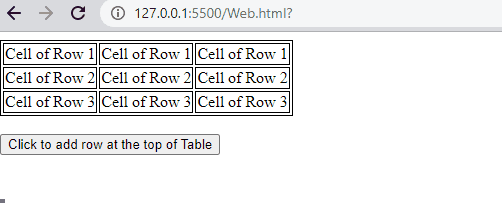
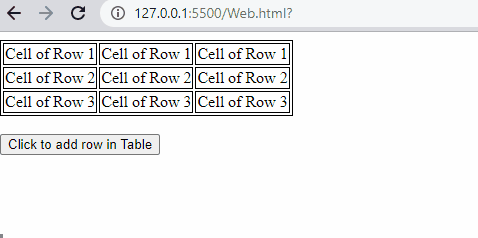 Let’s move to the other method!
 We have compiled all the methods for adding a row in a table using JavaScript.
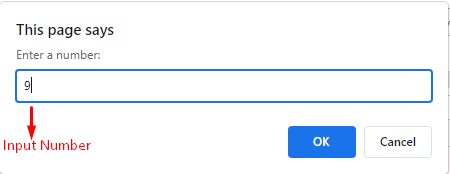 The given output indicates that the entered number which is “9” is a perfect square:
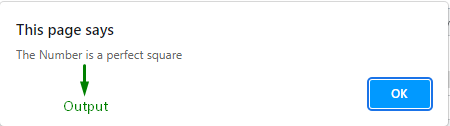
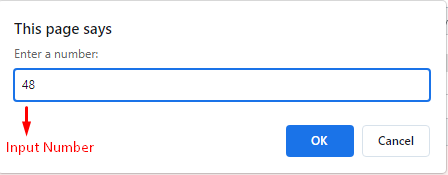 We have compiled all the simplest methods for checking if a number is a Perfect Square.
You can utilize any of the above methods according to your understanding.
We have compiled all the simplest methods for checking if a number is a Perfect Square.
You can utilize any of the above methods according to your understanding.

 We have provided the easiest methods to check and uncheck all checkboxes using JavaScript.

 We have compiled all the simplest methods to remove space from the start and end of the string.
 That was all about accessing all parameter values at once.
However, if you want to get a value of a specific parameter, move to the next section!
That was all about accessing all parameter values at once.
However, if you want to get a value of a specific parameter, move to the next section!
 In the above output, it can be observed that the “anonymous” value is fetched for the “user” parameter.
We have illustrated different methods for getting URL parameter values.
In the above output, it can be observed that the “anonymous” value is fetched for the “user” parameter.
We have illustrated different methods for getting URL parameter values.
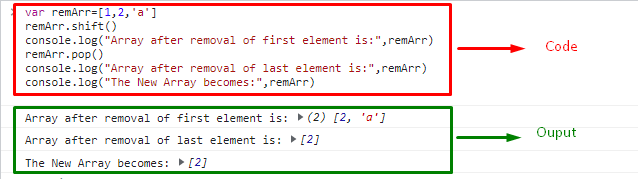
 We have provided all the simplest methods to remove the first and the last element in the array.

 We have compiled the easiest methods for getting the array’s last element.


 We have provided the easiest methods for finding the square of a number.
 Let’s explore one more method for creating a table from an array of objects.
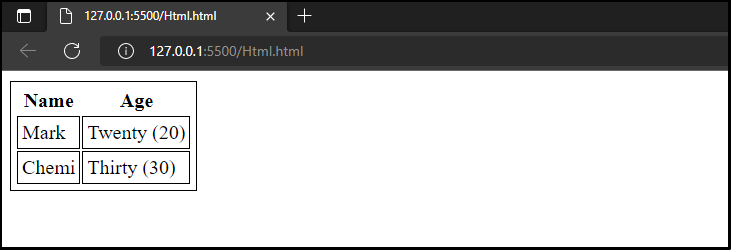 We have covered the efficient ways to create a table from an array of objects.


 We have compiled different ways to get value from a radio button.
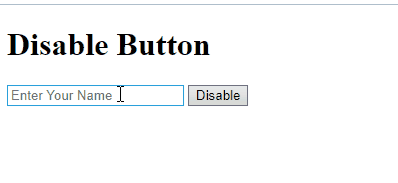
 We have offered the simplest methods for disabling a button.
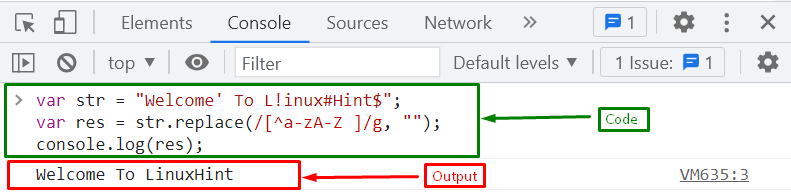 There are some situations where you want to remove special characters including spaces from a string, if you want to do this, follow the given example.
 We have provided the simplest and effective procedure for removing the special characters from the string.
 Let’s move to the next method.
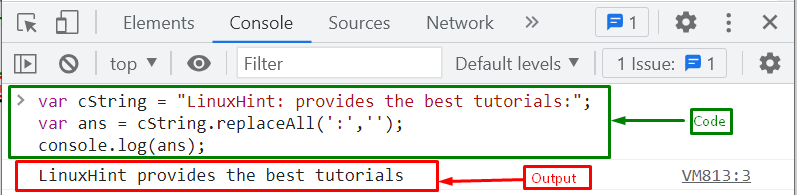 We have compiled the simplest methods for replacing all colons from a string.

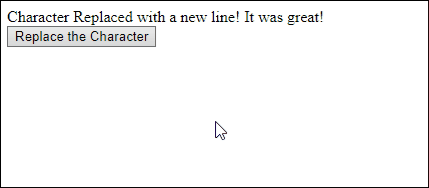
 We have discussed different creative methods to replace a character with a new line.
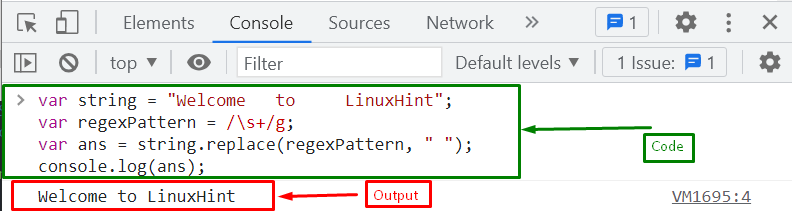 If you want to remove all spaces between words, use the below method.
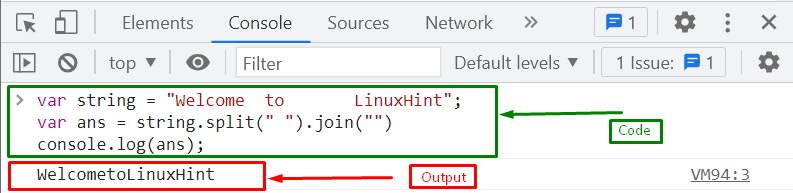 If you want to remove the spaces that occur at the beginning of the string, you have to follow the given section.
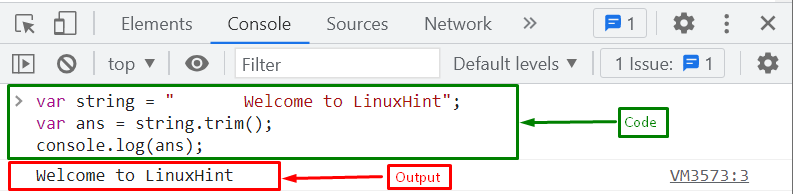 We have compiled all the procedures for eliminating extra spaces between words.
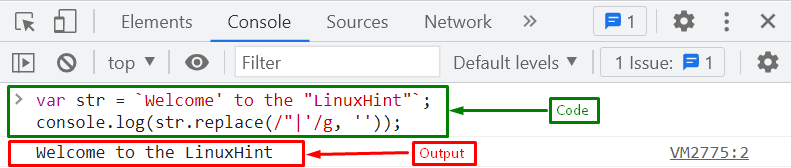 Let’s see another example.
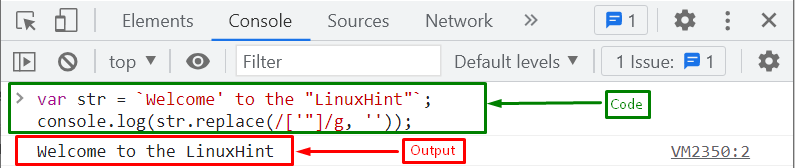 We have provided the simplest and most efficient way to remove all the quotation marks from a string.

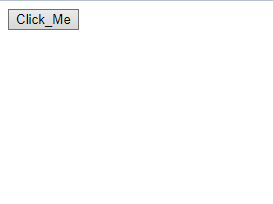 We have offered the simplest methods to hide buttons.
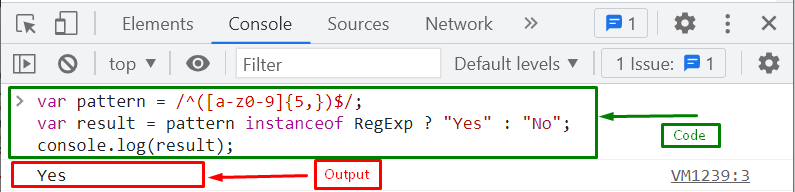 If you want to see how a variable follows a regex pattern, follow the next example.
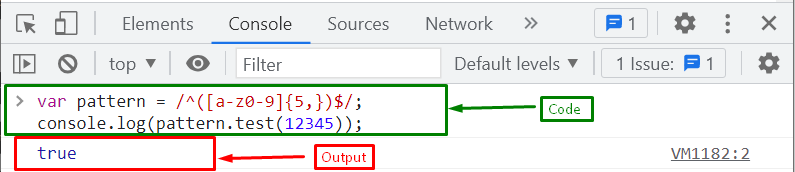 We have provided the simplest approach for determining if a variable is a regex.
 Let’s see another method!
 We have provided the best ways for checking whether the string contains only numbers and special characters.
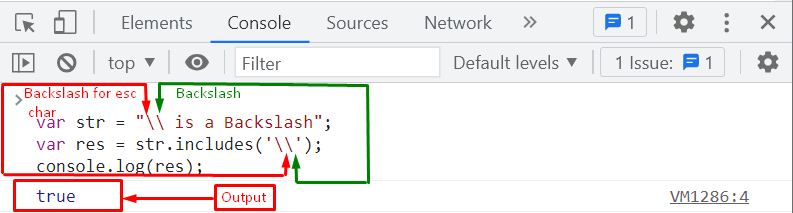 Let’s move toward the second method!
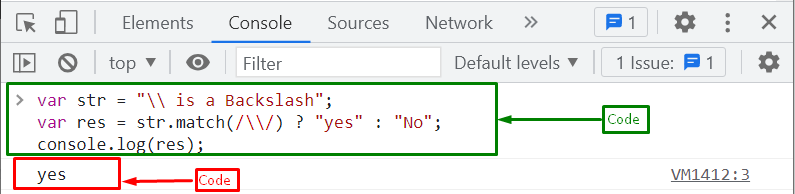 We have assembled the simplest methods for determining if the string contains backslash in a string.
 We have provided the simplest methods for adding and removing readonly attributes.
 Let’s have a look at the following method in which we will use the document.querySelector() to add an active class.
 We have learned two simplest methods to add active class
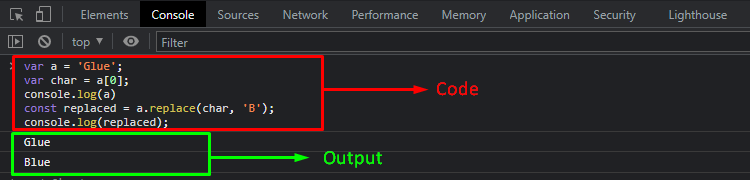 In the given output, we can see that the first character of the string is replaced successfully.
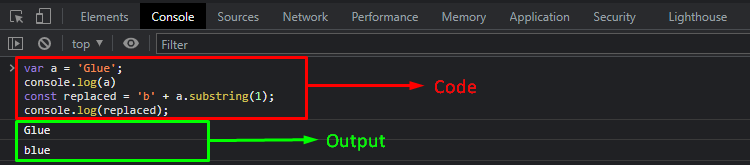 Let’s move ahead and explore the slice() method to replace the first character of the string.
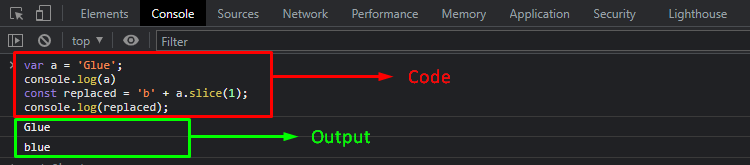 We have described three methods for replacing the first character of a string.

 We have discussed the simplest methods for getting and setting input text value.

 We have discussed all the simplest methods to detect the tab key.
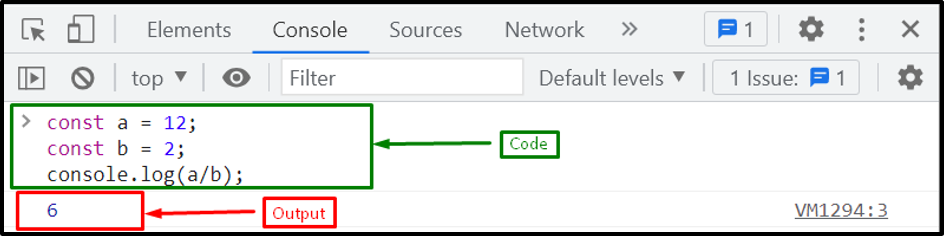 Example 2: Integer Dividend with Float DivisorWe will now divide the integer value with the float value where the value of the variable “a” is “111” and “b” is “1.6”:
const a = 111;const b = 1.6;
Print the value after dividing them using the “console.log()” method:
console.log(a/b);
Output
Example 2: Integer Dividend with Float DivisorWe will now divide the integer value with the float value where the value of the variable “a” is “111” and “b” is “1.6”:
const a = 111;const b = 1.6;
Print the value after dividing them using the “console.log()” method:
console.log(a/b);
Output
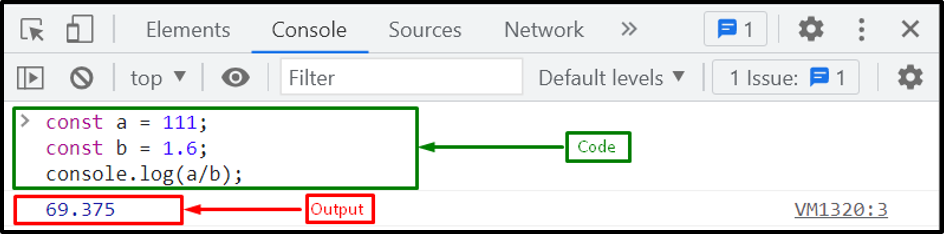 Example 3: Float Dividend with Integer DivisorIn this example, we will divide the floating point value “124.72” with the integer “3” using the division operator:
const a = 124.72;const b = 3;
console.log(a/b);
Output
Example 3: Float Dividend with Integer DivisorIn this example, we will divide the floating point value “124.72” with the integer “3” using the division operator:
const a = 124.72;const b = 3;
console.log(a/b);
Output
 Example 4: Float Dividend with Float DivisorNow, the variables that contain float values “14.72” and “2.2” respectively:
const a = 14.72;const b = 2.2;
We will divide both variables using the “/” division operator:
console.log(a/b);
The output indicates that if we divide two floating point numbers, it will give result in a floating point number:
Example 4: Float Dividend with Float DivisorNow, the variables that contain float values “14.72” and “2.2” respectively:
const a = 14.72;const b = 2.2;
We will divide both variables using the “/” division operator:
console.log(a/b);
The output indicates that if we divide two floating point numbers, it will give result in a floating point number:
 Let’s move toward the second approach!
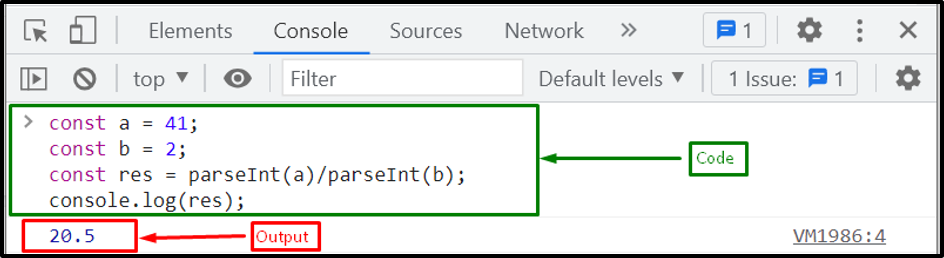 Example 2: Integer Dividend with Float DivisorHere, we will divide the integer value with the float value, where the value of the variable “a” is “40” and “b” is “2.8”:
const a = 40;const b = 2.8;
Then, call the parseInt() method with the division operator and store its result in a newly created variable “res”.
This method first converts the decimal number to an integer and then divides them:
const res = parseInt(a)/parseInt(b);
Lastly, we will print the resultant value that is stored in a variable “res”:
console.log(res);
Output
Example 2: Integer Dividend with Float DivisorHere, we will divide the integer value with the float value, where the value of the variable “a” is “40” and “b” is “2.8”:
const a = 40;const b = 2.8;
Then, call the parseInt() method with the division operator and store its result in a newly created variable “res”.
This method first converts the decimal number to an integer and then divides them:
const res = parseInt(a)/parseInt(b);
Lastly, we will print the resultant value that is stored in a variable “res”:
console.log(res);
Output
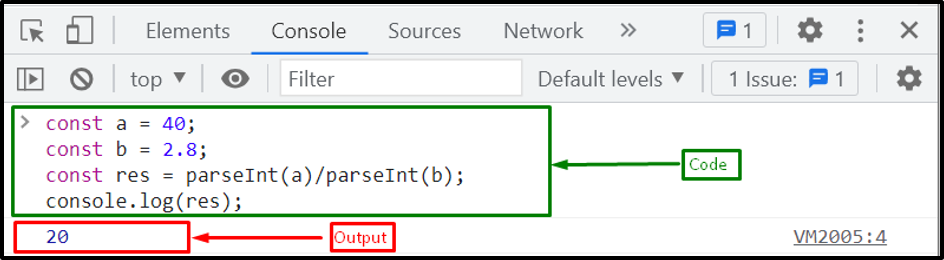 Example 3: Float Dividend with Integer DivisorIn this example, our divisor comprises floating point number and dividend is an integer:
const a = 40.567;const b = 2;
Here the parseInt() method will first convert the decimal number to an integer and then divides them:
const res = parseInt(a)/parseInt(b);
Finally, print the resultant value that is stored in a variable “res”:
console.log(res);
Output
Example 3: Float Dividend with Integer DivisorIn this example, our divisor comprises floating point number and dividend is an integer:
const a = 40.567;const b = 2;
Here the parseInt() method will first convert the decimal number to an integer and then divides them:
const res = parseInt(a)/parseInt(b);
Finally, print the resultant value that is stored in a variable “res”:
console.log(res);
Output
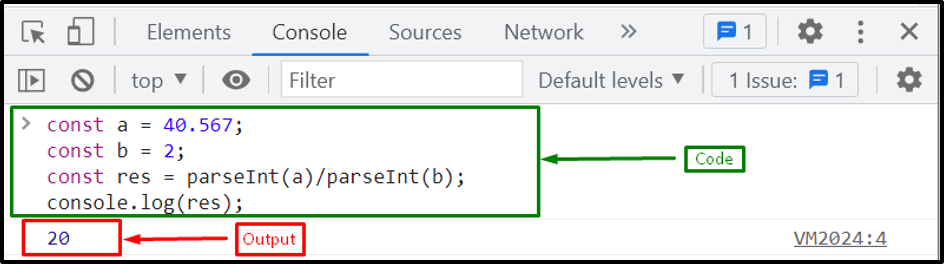 Example 4: Float Dividend with Float DivisorNow, our variables contain float values “40.567” and “2.5” respectively:
const a = 40.567;const b = 2.5;
Call the parseInt() method with the division operator and store the resultant value in a variable “res”.
The parseInt() method will first convert the decimal number to an integer and then divides them:
const res = parseInt(a)/parseInt(b);
Then, print the resultant value that is stored in a variable “res”:
console.log(res);
Output
Example 4: Float Dividend with Float DivisorNow, our variables contain float values “40.567” and “2.5” respectively:
const a = 40.567;const b = 2.5;
Call the parseInt() method with the division operator and store the resultant value in a variable “res”.
The parseInt() method will first convert the decimal number to an integer and then divides them:
const res = parseInt(a)/parseInt(b);
Then, print the resultant value that is stored in a variable “res”:
console.log(res);
Output
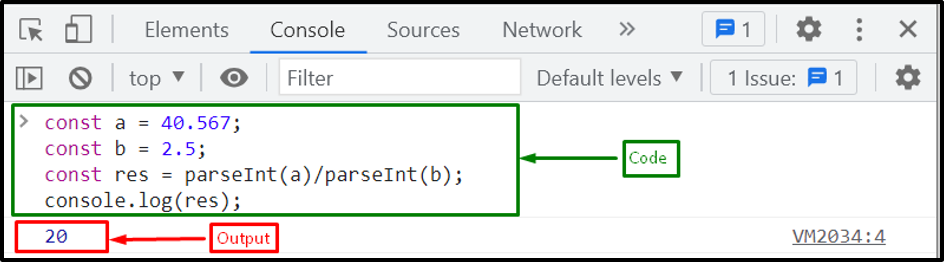 We have compiled all the methods for dividing two numbers.

 We have discussed different creative methods to create Custom Alert Box.
You can apply any of the methods according to your requirement.
We have discussed different creative methods to create Custom Alert Box.
You can apply any of the methods according to your requirement.

 The discussed techniques to create a button can be utilized suitably according to the requirements.
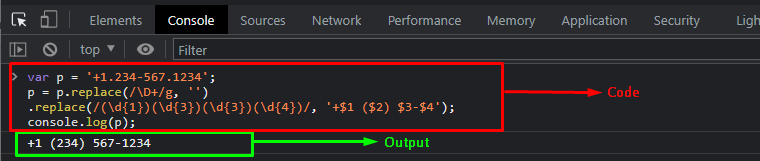 As you can see, we have successfully formatted the phone number.
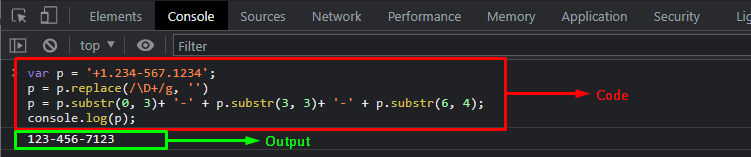 Now, let’s take another example to figure out how we can insert the country code along with our number using the same method.
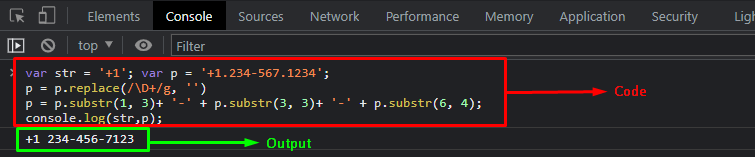 We have learned the procedure to format phone number through two different methods.
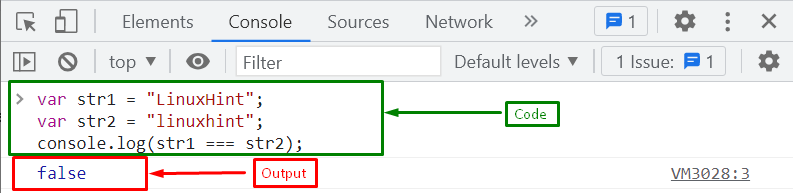 If you want to perform a case-insensitive comparison between strings, you have to follow the below-given methods.
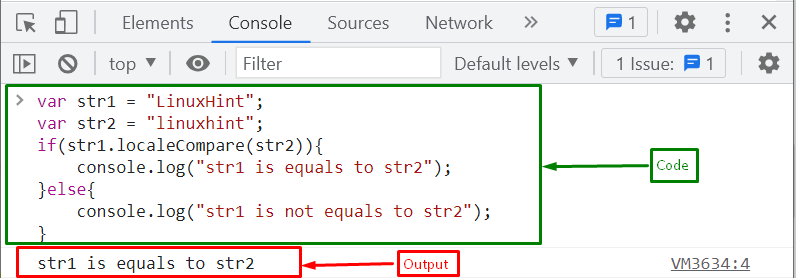 Let’s move to the next method!
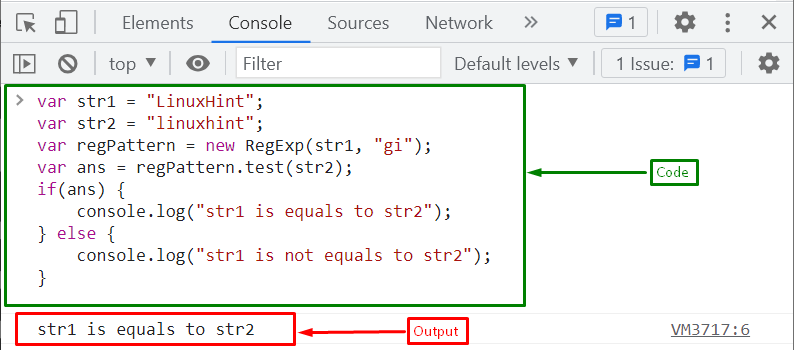 If you want to compare a string with another string as a substring, you must follow the below section.
 We have compiled all the methods for comparing two JavaScript strings.
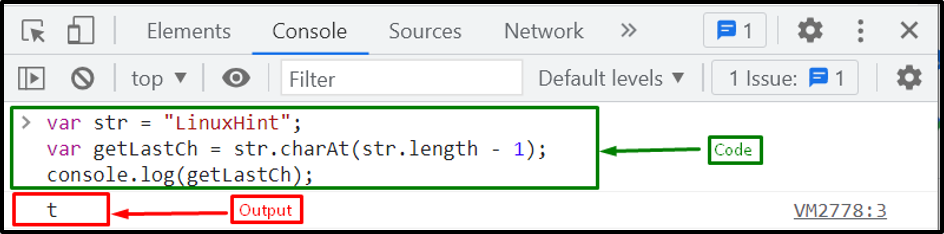 Let’s move to the second method.
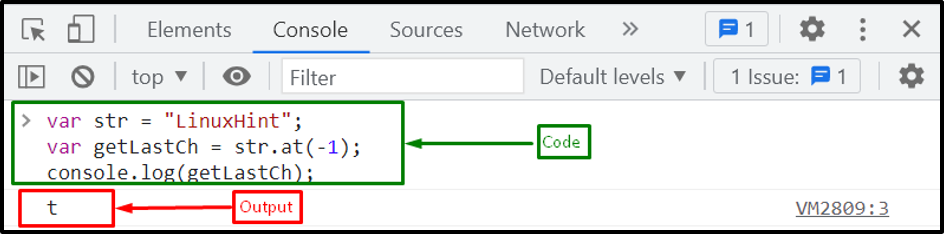 Let’s see another method for getting the last character of a string.
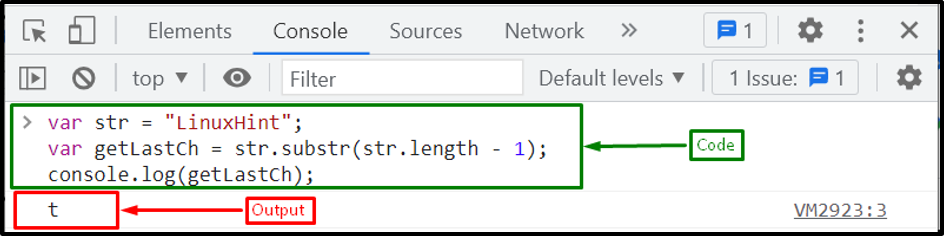 Let’s see one more method to do the same task.
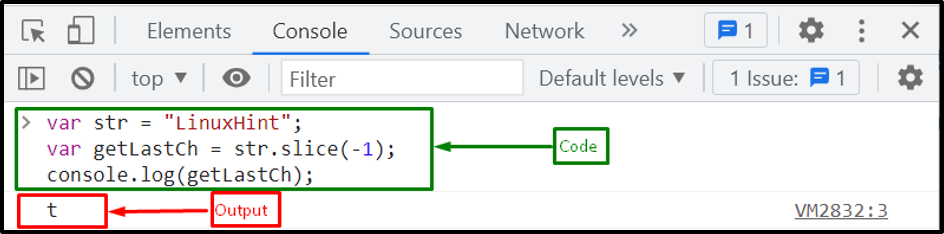 Let’s move to the next method.
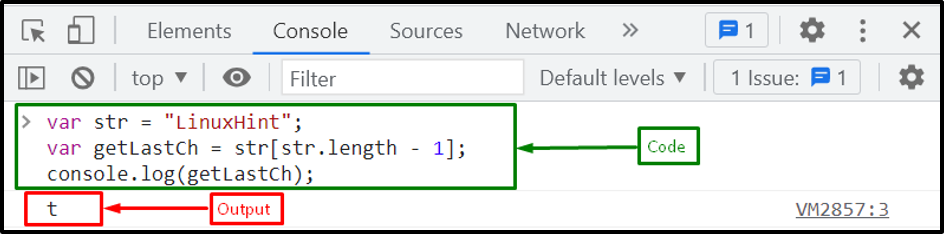 We have gathered all the methods for getting the last character from a string.
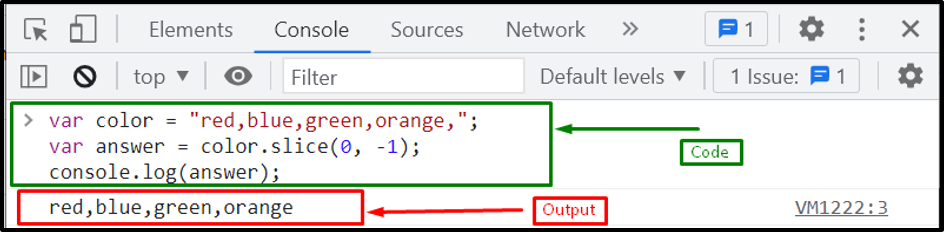 Let’s head toward the second method!
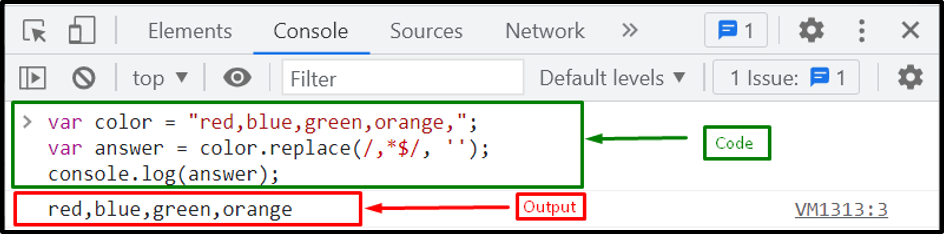 Let’s use another method for removing the last comma from a string.
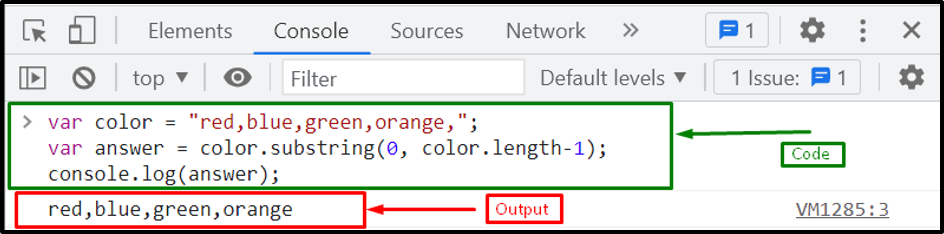 We have provided all the methods for eliminating the last comma from a string.
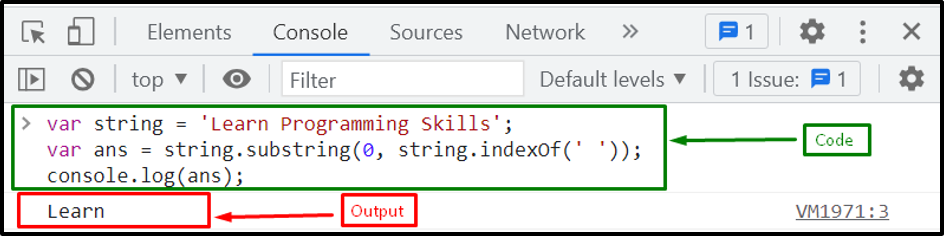 Let’s head towards the other method!
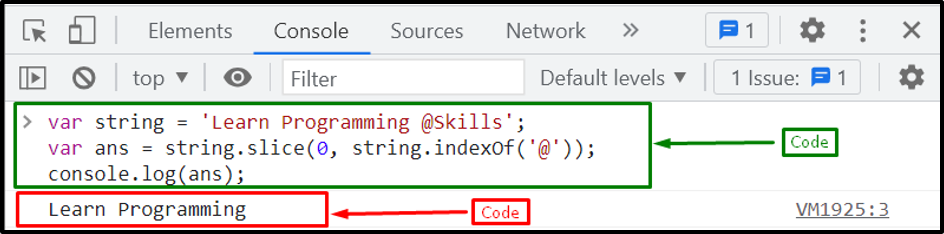 Let’s try another method for cutting a string after a specific character.
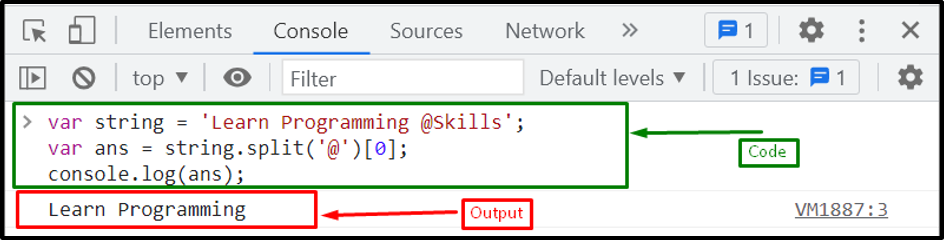 We have gathered all the JavaScript methods for cutting the string after a particular character.


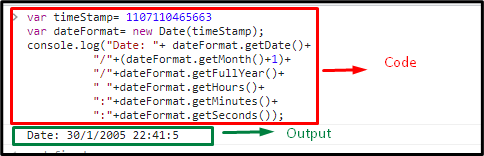 We have compiled different methods to convert timestamp to date format.
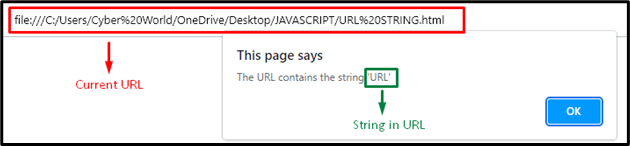

 We have provided simplest methods to check if the current URL contains a string.
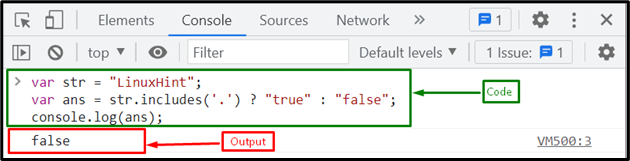 Let’s head toward the second method!
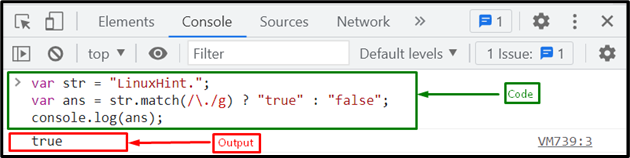 We have provided the simplest methods for determining whether the string contains a dot.
 Want to reset all input field values at once? Check out the next method.
 We have demonstrated the techniques to clear input fields.
 We have compiled different methods for checking if a variable exists and is true.
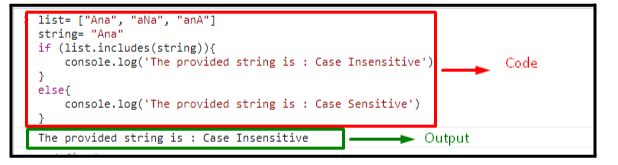
 We have compiled the easiest method for checking if a string contains a case sensitive string.
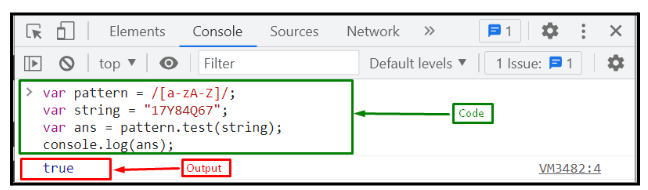 Let’s proceed with the second method!
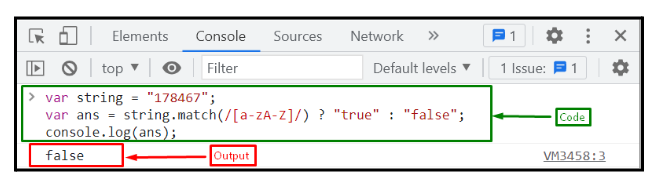 We have compiled the simplest methods for verifying whether the string contains letters or not.
 Next, declare a function named “buttonColor()”.
In its definition, access the button using the document.geElementById() button and apply the style.backgroundColor property to set the button’s color.
You can assign any RGB color code as its background:
Next, declare a function named “buttonColor()”.
In its definition, access the button using the document.geElementById() button and apply the style.backgroundColor property to set the button’s color.
You can assign any RGB color code as its background:
 The above implementation will show the following output:
 Want to set more than one background color on a button? If yes, follow the next section!
 Next, the button will be accessed by specifying its id in the document.getElementById() method:
 Now, the variables index0 and index1 will be declared with the values “0” and “1” respectively:
 After that, an array of two colors will be defined and stored in a variable named “colors”:
 Finally, a “click” event will be attached to the created button by invoking the “addEventListener()” method.
This will work in such a way that when the button is clicked, the buttonColor() method will be invoked, which will change the background color according to the index of the added colors in the array:
Finally, a “click” event will be attached to the created button by invoking the “addEventListener()” method.
This will work in such a way that when the button is clicked, the buttonColor() method will be invoked, which will change the background color according to the index of the added colors in the array:
 As you can see in the given output, when the button is clicked, its background color is first set to “green” then “blue”:

 Now, apply the document.querySelector() method to access the button having “success” id:
 Lastly, apply the addEventListener() to add an event handler named “click” to the button and set its color to “Light Green” using the style.backgroundColor property:
 Output
 We have provided the easiest methods for changing button color on click.
 In the above syntax, “URL” refers to the path of the image.
Look at the following example for demonstration.
Example
In this example, a button will be included with the specified value and an “onclick” event redirecting to a
function named backgroundImage():
In the above syntax, “URL” refers to the path of the image.
Look at the following example for demonstration.
Example
In this example, a button will be included with the specified value and an “onclick” event redirecting to a
function named backgroundImage():
 Now, a function “backgroundImage()” will be declared and the “document.body.style.backgroundImage” property will access the background image using the specified image path in its argument:
 The output of the above implementation will result as follows:
 Here, “elementID” refers to the id of an element.
Go through the following example for a better understanding of the stated concept.
Example
First, include a paragraph in the <p> tag and assign it a specific id:
Here, “elementID” refers to the id of an element.
Go through the following example for a better understanding of the stated concept.
Example
First, include a paragraph in the <p> tag and assign it a specific id:
 Next, create a button with an onclick event accessing the function backgroundImage() as discussed in the previous method:
 Lastly, declare the function named “backgroundImage()” similarly.
Here, access the defined Id using the “getElementById()” method and apply the specified background image on it.
This will result in the implementation of the color on the paragraph’s background:
Lastly, declare the function named “backgroundImage()” similarly.
Here, access the defined Id using the “getElementById()” method and apply the specified background image on it.
This will result in the implementation of the color on the paragraph’s background:
 Output
 We have compiled the easiest method for changing background image
 Here, the “object” refers to the element upon which the background color will be applied.
The following example explains the stated concept.
Example
In the example below, the heading tag <h> will be assigned an id named “id” and the “Background Color!” value:
Here, the “object” refers to the element upon which the background color will be applied.
The following example explains the stated concept.
Example
In the example below, the heading tag <h> will be assigned an id named “id” and the “Background Color!” value:
 Next, in the JavaScript file, the “document.getElementById()” method will access the “id” of the heading element.
After that, the backgroundColor property will assign the color value “Lightgreen” against the id, which refers to the specified heading value in the previous step:
Next, in the JavaScript file, the “document.getElementById()” method will access the “id” of the heading element.
After that, the backgroundColor property will assign the color value “Lightgreen” against the id, which refers to the specified heading value in the previous step:
 The output of the above implementation will result as follows:
 In the output, it is observed that the background color is only applied to the selected heading element.
 Next, the “getElementById()” method will similarly access the paragraph element with the specified id and assign the background color using the backgroundColor property.
Here, “#090” indicates the “RGB” code of medium dark shade of green color:
Next, the “getElementById()” method will similarly access the paragraph element with the specified id and assign the background color using the backgroundColor property.
Here, “#090” indicates the “RGB” code of medium dark shade of green color:
 Output
 In the above implementation, the green color is a result of “RGB->090”, in which 9 refers to the intensity of the green color.
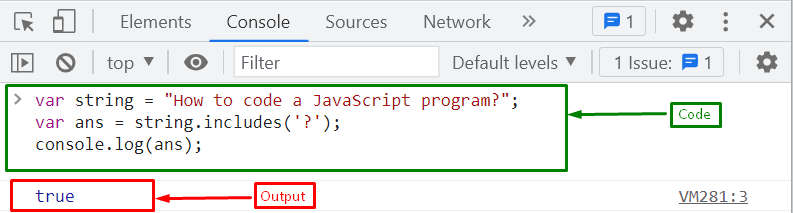 Let’s head toward the second method!
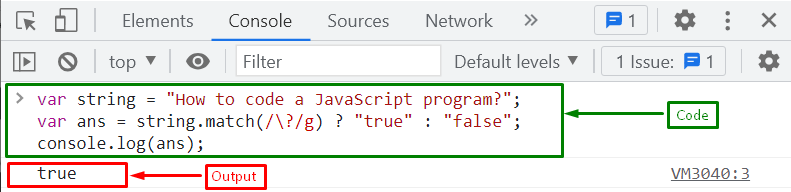 We have gathered the simplest JavaScript methods for determining whether the string contains a question mark.

 We have provided the easiest methods to retrieve a selected value from Dropdown.
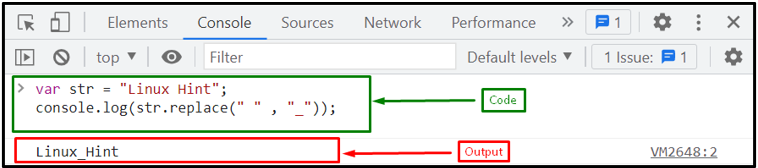 If you want to replace all the spaces in a string, you can follow the next given section.
 Let’s move to the other method for replacing space with an underscore.
 Example 2: Replace Multiple Spaces with Underscores
Here, we will remove all the entire spaces from a string with the help of split() method.
First, we will create a string “Welcome to Linux Hint” with multiple spaces:
var str = "Welcome to Linux Hint";
Now, we will call the split() method with the join() method and print the resultant string using “console.log()” method:
console.log(str.split(“ ”).join(“_”));
Example 2: Replace Multiple Spaces with Underscores
Here, we will remove all the entire spaces from a string with the help of split() method.
First, we will create a string “Welcome to Linux Hint” with multiple spaces:
var str = "Welcome to Linux Hint";
Now, we will call the split() method with the join() method and print the resultant string using “console.log()” method:
console.log(str.split(“ ”).join(“_”));
 We have provided simplest methods to replace space with an underscore.
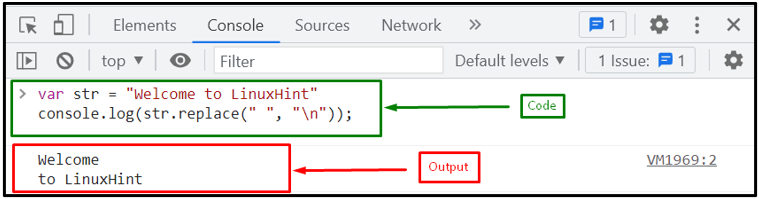 If you want to replace all the occurrences of the spaces with a new line in a string, follow the next given section.
Example 2: Replacing Multiple Spaces with New Line
Here, we will consider the same string as in the previous example and replace all the spaces with the new line using the regex pattern “/ /g” in the replace() method:
console.log(str.replace(/ /g, "\n"));
In the regex pattern, we have added the “g” (global) flag, for matching all the occurrences of the spaces in a string.
As you can see, the output indicates that all the spaces are successfully replaced with a new line.
Every word after the space starts from a new Line:
If you want to replace all the occurrences of the spaces with a new line in a string, follow the next given section.
Example 2: Replacing Multiple Spaces with New Line
Here, we will consider the same string as in the previous example and replace all the spaces with the new line using the regex pattern “/ /g” in the replace() method:
console.log(str.replace(/ /g, "\n"));
In the regex pattern, we have added the “g” (global) flag, for matching all the occurrences of the spaces in a string.
As you can see, the output indicates that all the spaces are successfully replaced with a new line.
Every word after the space starts from a new Line:
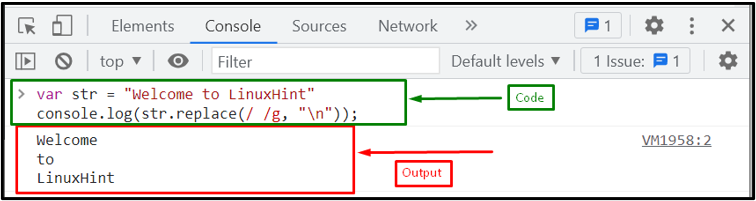 If you want to perform the same operation without using the regex, then use the below-discussed method.
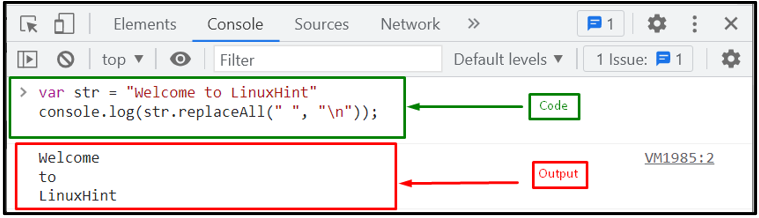 We have compiled all the methods for replacing space with a new line.
 Need to replace all the occurrences of the single quotes using replace() method from a string? Follow the given section.
Example 2: Replace All Occurrences of Single Quotes with Double Quotes
Here, we will consider the same string named “strng” and replace all the single quotes from the string with double quotes, using regex “/’ /g”.
For matching all the occurrences of a single quote in the string, we will use the “g” (global) flag in our regex:
console.log(strng.replace(/'/g, `"`));
As you can see, the output indicates that all the occurrences of a single quote are successfully replaced with double quotes:
Need to replace all the occurrences of the single quotes using replace() method from a string? Follow the given section.
Example 2: Replace All Occurrences of Single Quotes with Double Quotes
Here, we will consider the same string named “strng” and replace all the single quotes from the string with double quotes, using regex “/’ /g”.
For matching all the occurrences of a single quote in the string, we will use the “g” (global) flag in our regex:
console.log(strng.replace(/'/g, `"`));
As you can see, the output indicates that all the occurrences of a single quote are successfully replaced with double quotes:
 Let’s see another method for replacing all the occurrences of the single quote with double quotes.
 We gathered all the methods for replacing single quotes with double quotes in a string.
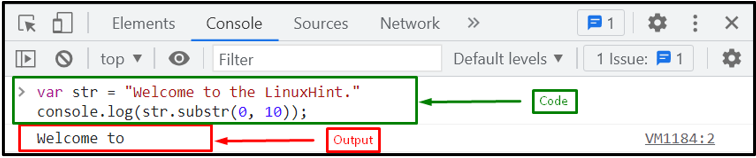 The above method just gets the specific part of the string.
However, in case of deleting a particular word from a string, follow the next section!
The above method just gets the specific part of the string.
However, in case of deleting a particular word from a string, follow the next section!
 Now, if you want to remove a word that occurs multiple times in the same string, what would you do? For this purpose, follow the next example.
Example 2: Removing All Occurrences of a Word from a String
In this example, we will remove the word with multiple occurrences in the string using replace() method with regex; as the regex checks the full string and replaces all the occurrences with the specified replacement value.
Here, we will create a variable that holds a string of words that appear more than once:
var str = "The programmers can write code that is computer-understandable while Good programmers write code that is understandable by humans."
Now, we will replace all the “write” word with the empty string:
console.log(str.replace(/write/g, ""));
Here, the output shows that all the occurrences of the word “write” is successfully removed from the string:
Now, if you want to remove a word that occurs multiple times in the same string, what would you do? For this purpose, follow the next example.
Example 2: Removing All Occurrences of a Word from a String
In this example, we will remove the word with multiple occurrences in the string using replace() method with regex; as the regex checks the full string and replaces all the occurrences with the specified replacement value.
Here, we will create a variable that holds a string of words that appear more than once:
var str = "The programmers can write code that is computer-understandable while Good programmers write code that is understandable by humans."
Now, we will replace all the “write” word with the empty string:
console.log(str.replace(/write/g, ""));
Here, the output shows that all the occurrences of the word “write” is successfully removed from the string:
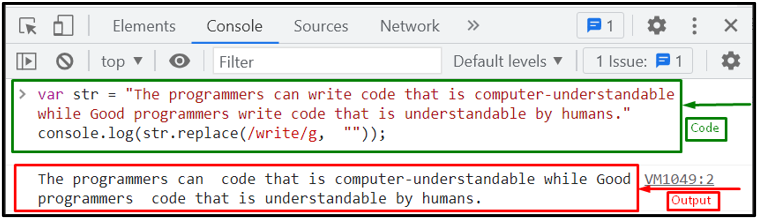 We offered the methods related to removing words from the string.
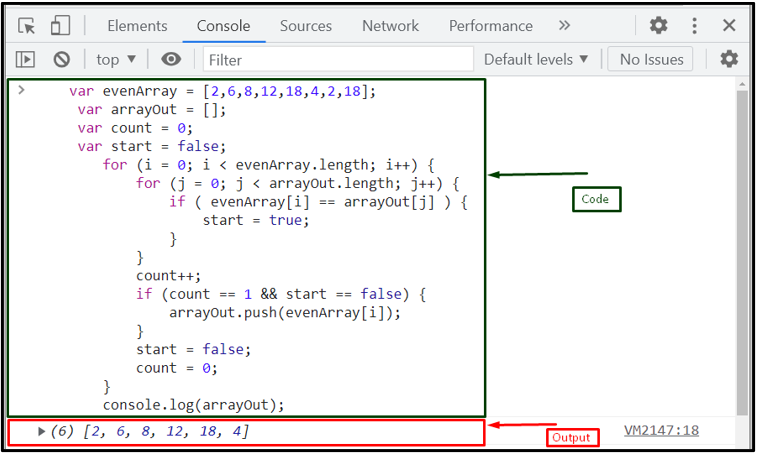 Let’s move to the next method for getting a unique value from an array.
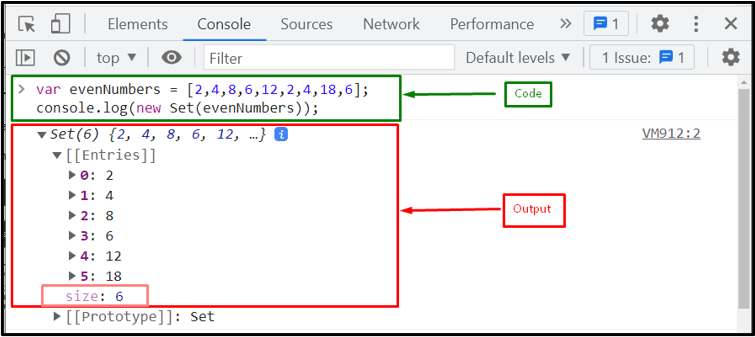 Let’s see another method to get a unique value from an array.
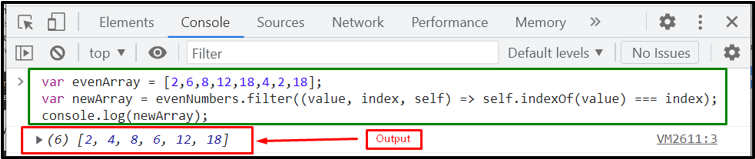 We offered all the methods related to get unique values from an array.
 Let’s head toward the second method!
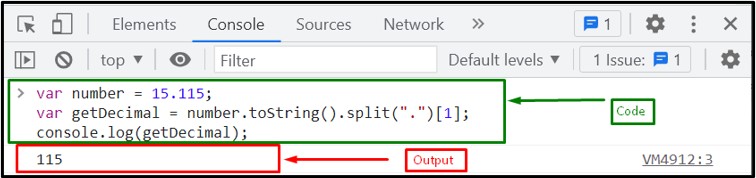 We have gathered all the methods for getting the decimal part of a number.
 We have provided all the simplest methods to get checkbox values.
 Where Fn is a Fibonacci number corresponding to a zero-based index, n.
The first two numbers: 0 and 1, are pre-declared, in that order.
The last line of this function shows how the rest of the numbers originate from the first two numbers in their order.
This definition is also one of the formulas for the Fibonacci number.
Where Fn is a Fibonacci number corresponding to a zero-based index, n.
The first two numbers: 0 and 1, are pre-declared, in that order.
The last line of this function shows how the rest of the numbers originate from the first two numbers in their order.
This definition is also one of the formulas for the Fibonacci number.
 Note that on the right-hand side of the equation, it is not the square root of 5 that is raised to the power n; it is the expression in parentheses that is raised to the power n.
There are two such expressions.
If n is 0, Fibn would be 0.
If n is 1, Fibn would be 1.
If n is 2, Fibn would be 1.
If n is 3, Fibn would be 2.
If n is 4, Fibn would be 3 – and so on.
The reader can verify this formula mathematically by substituting different values for n and evaluating.
n is a zero-based index in this formula.
The result is the corresponding Fibonacci number.
The ECMAScript (JavaScript) code for this formula is:
<script type='text/ecmascript'>
function fibNo(n) {
FibN = (Math.pow((1+Math.sqrt(5))/2, n) - Math.pow((1-Math.sqrt(5))/2, n)) / Math.sqrt(5);
return FibN;
}
The closing script tag has not been shown.
Note how the power (pow) and square root (sqrt) predefined functions have been used.
In ECMAScript (JavaScript), the Math module does not have to be imported.
The function fibNo() implements the formula directly.
A suitable call and display for the fibNo() function on the web page are:
N = 11;
ret = fibNo(N);
document.write(ret);
</script>
The code shows the closing script tag.
The output is:
89.00000000000003
It is possible to remove the unnecessary decimal digits from the answer.
However, that is a discussion for some other time.
If more than one Fibonacci number is required, then the code has to call the formula once for each zero based corresponding n index.
Note that on the right-hand side of the equation, it is not the square root of 5 that is raised to the power n; it is the expression in parentheses that is raised to the power n.
There are two such expressions.
If n is 0, Fibn would be 0.
If n is 1, Fibn would be 1.
If n is 2, Fibn would be 1.
If n is 3, Fibn would be 2.
If n is 4, Fibn would be 3 – and so on.
The reader can verify this formula mathematically by substituting different values for n and evaluating.
n is a zero-based index in this formula.
The result is the corresponding Fibonacci number.
The ECMAScript (JavaScript) code for this formula is:
<script type='text/ecmascript'>
function fibNo(n) {
FibN = (Math.pow((1+Math.sqrt(5))/2, n) - Math.pow((1-Math.sqrt(5))/2, n)) / Math.sqrt(5);
return FibN;
}
The closing script tag has not been shown.
Note how the power (pow) and square root (sqrt) predefined functions have been used.
In ECMAScript (JavaScript), the Math module does not have to be imported.
The function fibNo() implements the formula directly.
A suitable call and display for the fibNo() function on the web page are:
N = 11;
ret = fibNo(N);
document.write(ret);
</script>
The code shows the closing script tag.
The output is:
89.00000000000003
It is possible to remove the unnecessary decimal digits from the answer.
However, that is a discussion for some other time.
If more than one Fibonacci number is required, then the code has to call the formula once for each zero based corresponding n index.

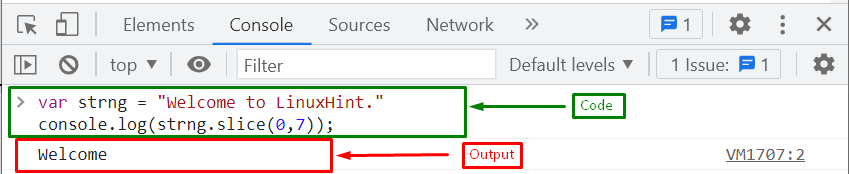 Let’s head towards the second method!
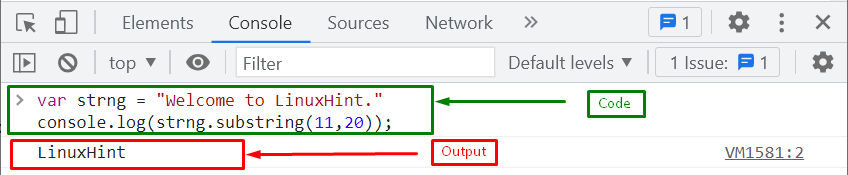 We have provided the easiest methods related to trimming a string to a particular length.

 We have provided the simplest methods to use exponents.
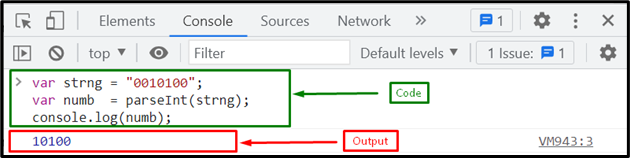 If you want to remove the leading zeros from a floating point number in a string, see the next given section.
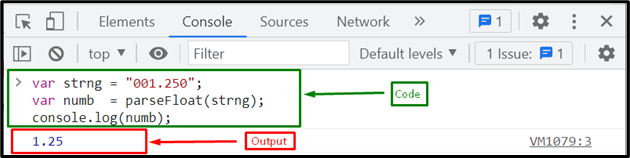 Let’s head towards the next method!
 Let’s move ahead to understand some other methods for removing leading zeros from the string.
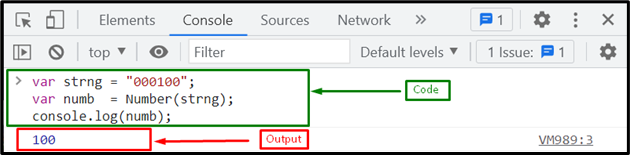 Let’s see another approach for removing zeros from a string.
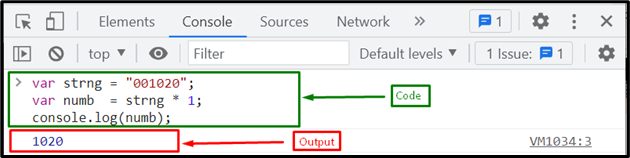 We have gathered different methods for removing leading zeros from the string.

 We have provided the simplest methods to apply JavaScript Equivalent to printf or String.Format.
You can use either of the approaches according to your requirements.
We have provided the simplest methods to apply JavaScript Equivalent to printf or String.Format.
You can use either of the approaches according to your requirements.
 We have provided all the simplest methods to Disable Links.
You can use any of the explained methods according to your requirements.
We have provided all the simplest methods to Disable Links.
You can use any of the explained methods according to your requirements.
 You should store the value returned by the confirm() method inside a variable so it can be used later
let user_input = confirm("Do you want to proceed?");
It is important to note that the confirm() method is synchronous which means that all other JavaScript processes will be stopped and the user won’t be able to access any other parts of the webpage until they have provided an input.
This can sometimes cause problems as developers do not want to restrict user’s access to web pages.
The confirm() method also has another disadvantage that its dialog box’s position, style and options cannot be customised.
You should store the value returned by the confirm() method inside a variable so it can be used later
let user_input = confirm("Do you want to proceed?");
It is important to note that the confirm() method is synchronous which means that all other JavaScript processes will be stopped and the user won’t be able to access any other parts of the webpage until they have provided an input.
This can sometimes cause problems as developers do not want to restrict user’s access to web pages.
The confirm() method also has another disadvantage that its dialog box’s position, style and options cannot be customised.
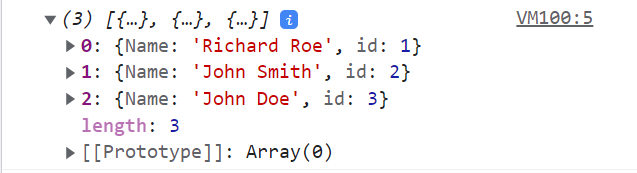 This method is quite easy but it’s hard to know the indices and size of the arrays so we have to look for some other methods which can be used to add objects to arrays.
The most well-known, convenient and easy to use methods are push(), unshift() and splice().
Their functionalities are slightly different but any of these methods can be used.
Let’s take a look at how these are different:
This method is quite easy but it’s hard to know the indices and size of the arrays so we have to look for some other methods which can be used to add objects to arrays.
The most well-known, convenient and easy to use methods are push(), unshift() and splice().
Their functionalities are slightly different but any of these methods can be used.
Let’s take a look at how these are different:
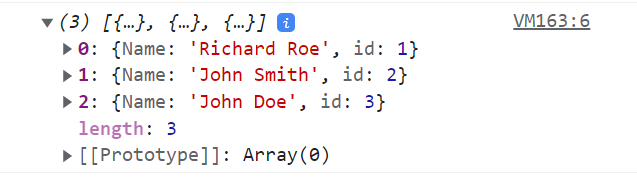
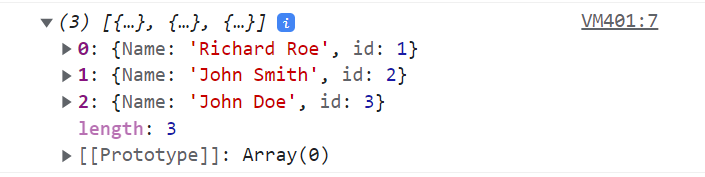
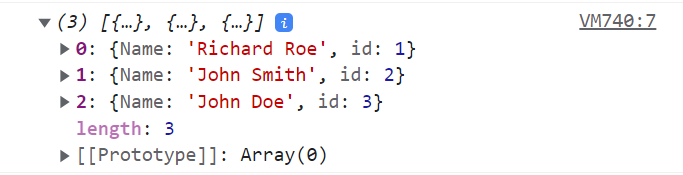 We have given 0 as the 2nd parameter as we don’t want to delete any elements from the existing array.
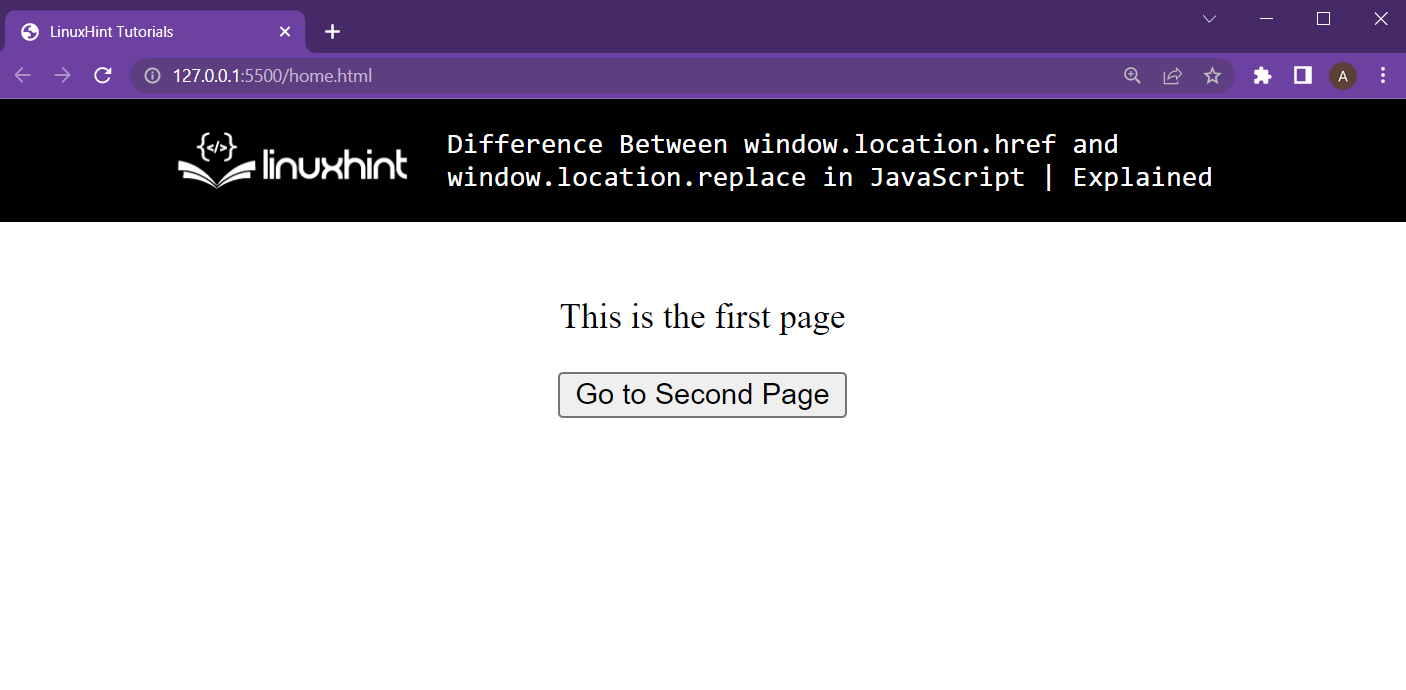 After that, in the script file or in the <script> tag, use the following lines of code:
<script>
function buttonClicked() {
window.location.href = "secondPage.html";}</script>
This script is going to relocate the browser to the “secondPage.html”.
However, secondPage.html doesn’t exist yet.
So, create the secondPage.html with the following lines inside it:
<html lang="en"><head><meta charset="UTF-8" /><meta http-equiv="X-UA-Compatible" content="IE=edge" /><meta name="viewport" content="width=device-width, initial-scale=1" /><title>secondPage</title></head><body><center><p>This is the second page</p></center></body></html>
Note: This secondPage.html must be created in the same directory as the home.html or the first page.
After that running the main html file and clicking the button will yield the following results:
After that, in the script file or in the <script> tag, use the following lines of code:
<script>
function buttonClicked() {
window.location.href = "secondPage.html";}</script>
This script is going to relocate the browser to the “secondPage.html”.
However, secondPage.html doesn’t exist yet.
So, create the secondPage.html with the following lines inside it:
<html lang="en"><head><meta charset="UTF-8" /><meta http-equiv="X-UA-Compatible" content="IE=edge" /><meta name="viewport" content="width=device-width, initial-scale=1" /><title>secondPage</title></head><body><center><p>This is the second page</p></center></body></html>
Note: This secondPage.html must be created in the same directory as the home.html or the first page.
After that running the main html file and clicking the button will yield the following results:
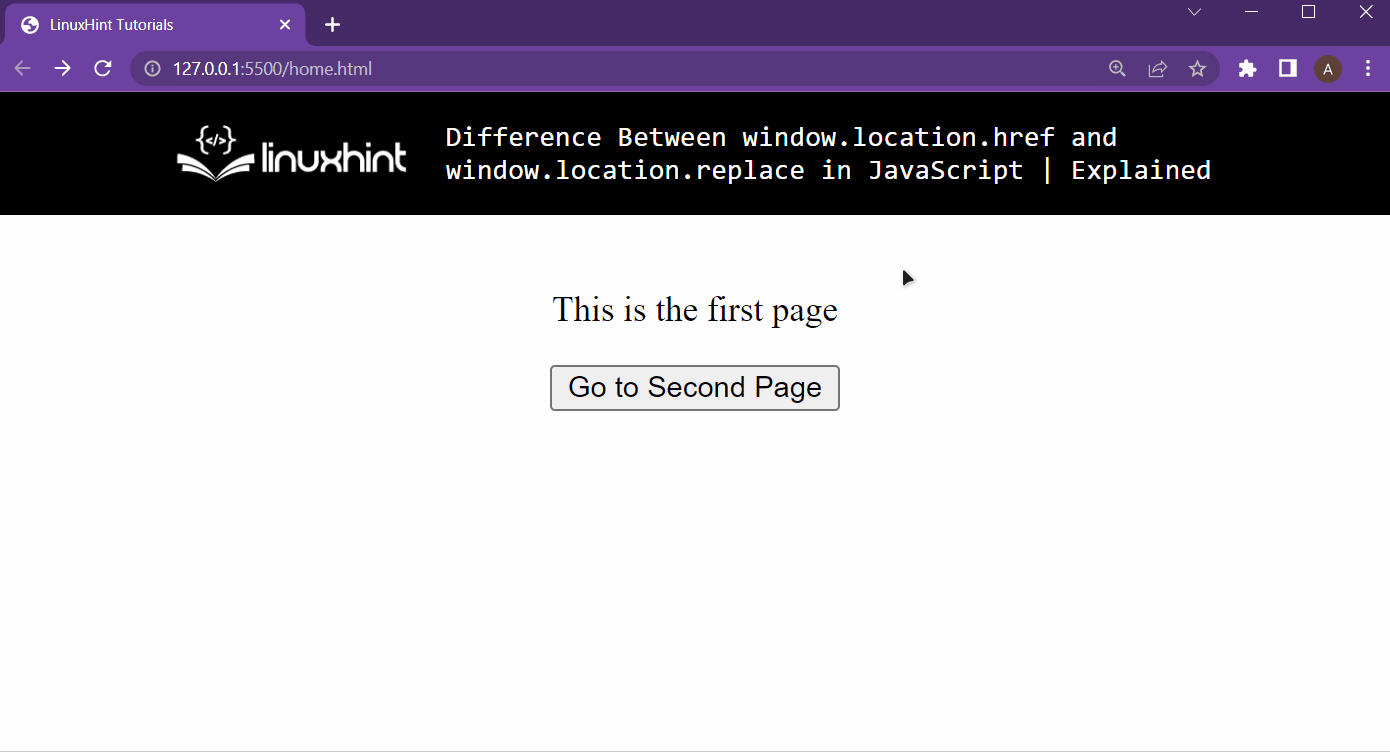 It is clear from the output that pressing the button will redirect the browser to the second page, and then pressing the back button on the browser’s window will take the browser back to the home page.
This is the working of the window.location.href property.
It is clear from the output that pressing the button will redirect the browser to the second page, and then pressing the back button on the browser’s window will take the browser back to the home page.
This is the working of the window.location.href property.
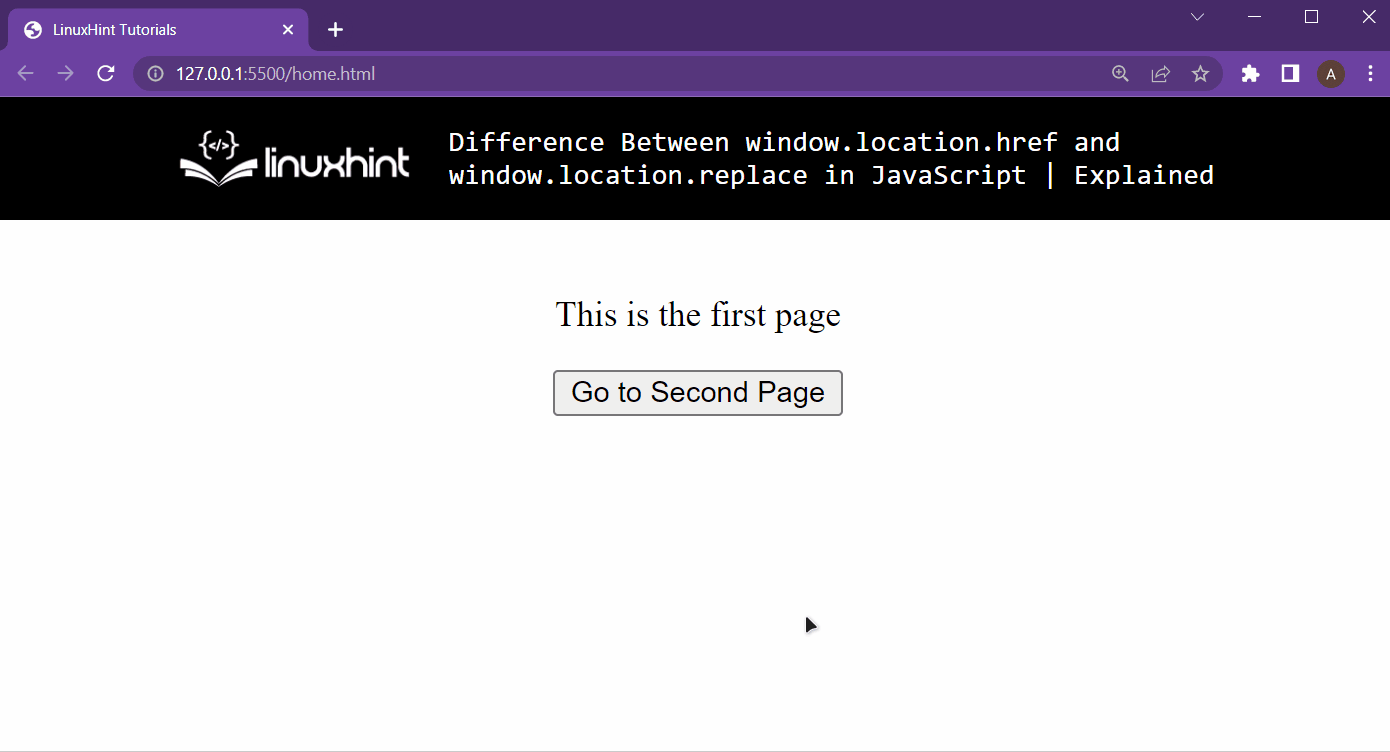 It is clear from the gif above that the replace function replaces the topmost entry in the history of the browser, therefore the browser’s back button is grayed out.
 Now that we have made ourselves familiar with the iframe tag we will take a look at how we can implement an onload event on it.


 In the above code statement, the syntax of getElementByClassName() method has been shown.
Here, the method getElementsByClassName() returns an element present on index 0, associated with the class Birds in the declared variable stream.
As the basic purpose and syntax of getElementsByClassName() has been explained above.
Now let us try to hide webpage elements by using this function.
In the above code statement, the syntax of getElementByClassName() method has been shown.
Here, the method getElementsByClassName() returns an element present on index 0, associated with the class Birds in the declared variable stream.
As the basic purpose and syntax of getElementsByClassName() has been explained above.
Now let us try to hide webpage elements by using this function.
 Save the code and run the file; a similar web page will appear on your browser screen as shown below.
 Let’s write a script to hide a single element from this web page.
The scenario is that on clicking the given button, only the first bird’s name should be hidden from the screen, and the rest of the bird and animal names should remain on the screen.JS
functionhideElement(){const stream = document.getElementsByClassName('bird')[0];
stream.style.visibility = 'hidden';
}
A snippet with the brief description of the above code is provided below.
Let’s write a script to hide a single element from this web page.
The scenario is that on clicking the given button, only the first bird’s name should be hidden from the screen, and the rest of the bird and animal names should remain on the screen.JS
functionhideElement(){const stream = document.getElementsByClassName('bird')[0];
stream.style.visibility = 'hidden';
}
A snippet with the brief description of the above code is provided below.
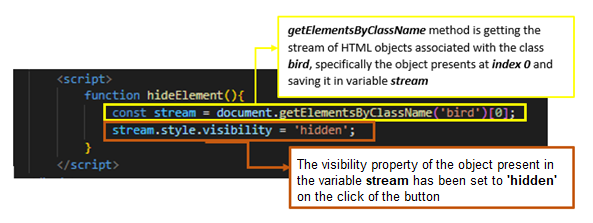 Save the file and run it.
The browser will display the following web page.
In the below given image, it can be seen that when the Click to hide button is pressed the sparrow which is the object of the class bird present at index [0] becomes hidden but the space linked to this object is still there:
Save the file and run it.
The browser will display the following web page.
In the below given image, it can be seen that when the Click to hide button is pressed the sparrow which is the object of the class bird present at index [0] becomes hidden but the space linked to this object is still there:
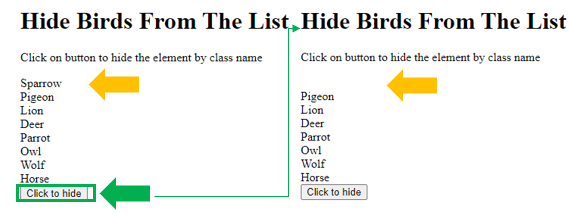
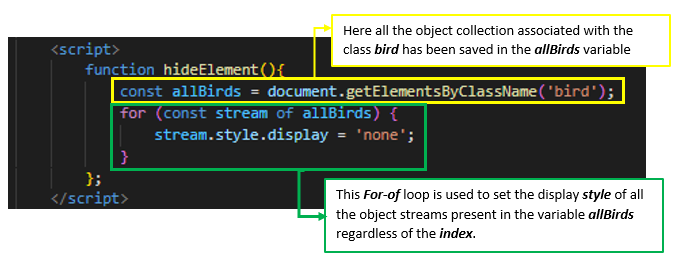 In the above code, it can be seen that instead of using the visibility property for hiding the elements, the display property has been used for the aforementioned purpose.
Save this code script and run it:
In the above code, it can be seen that instead of using the visibility property for hiding the elements, the display property has been used for the aforementioned purpose.
Save this code script and run it:
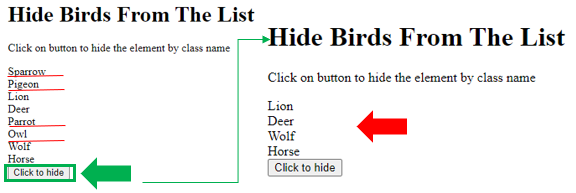 In the above code, the click on the Click to hide button will hide all the birds’ names along with their linked spaces.
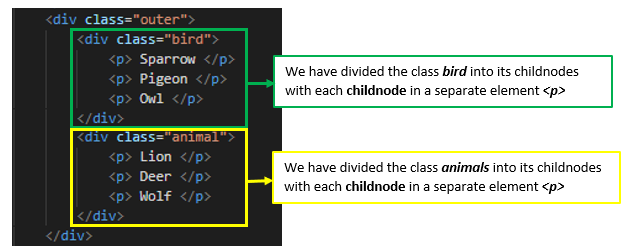 After updating the HTML code, make changes in the script as well.
The property that is used to hide all the childNodes of a class is visibility property with the value hidden.
functionhideElement(){const stream = document.getElementsByClassName('bird')[0];
stream.style.visibility = 'hidden';
}
On saving and executing the file with the above alterations.
Following web page will appear on the screen.
On clicking the button, the childNodes of the class bird will become hidden from the screen but the space linked with those childNodes will remain on the screen as shown below because visibility property has been used instead of the display property.
After updating the HTML code, make changes in the script as well.
The property that is used to hide all the childNodes of a class is visibility property with the value hidden.
functionhideElement(){const stream = document.getElementsByClassName('bird')[0];
stream.style.visibility = 'hidden';
}
On saving and executing the file with the above alterations.
Following web page will appear on the screen.
On clicking the button, the childNodes of the class bird will become hidden from the screen but the space linked with those childNodes will remain on the screen as shown below because visibility property has been used instead of the display property.
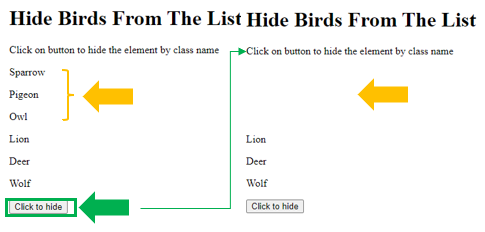
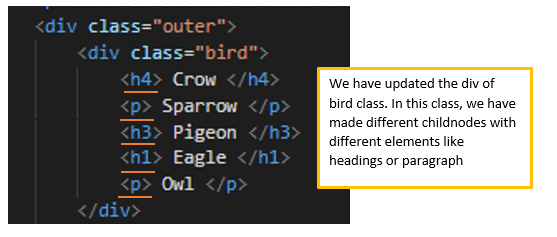 After the alteration in the HTML code, also update the script with the following script code:
functionhideElement() {const stream = document.getElementsByClassName('bird');for (let n in stream[0].childNodes) {if (stream[0].childNodes[n].nodeName === 'H1'|| stream[0].childNodes[n].nodeName=== 'H4')
stream[0].childNodes[n].style.display = 'none';
}}
Below snapshot provides a brief description of the above script code.
After the alteration in the HTML code, also update the script with the following script code:
functionhideElement() {const stream = document.getElementsByClassName('bird');for (let n in stream[0].childNodes) {if (stream[0].childNodes[n].nodeName === 'H1'|| stream[0].childNodes[n].nodeName=== 'H4')
stream[0].childNodes[n].style.display = 'none';
}}
Below snapshot provides a brief description of the above script code.
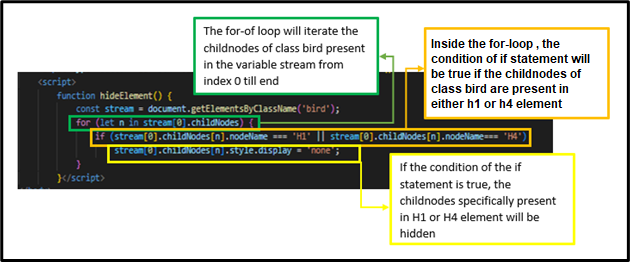 On executing the above code, a similar web page will appear on screen.
When the click button is pressed all the childNodes of class bird will be hidden along with their occupied space:
On executing the above code, a similar web page will appear on screen.
When the click button is pressed all the childNodes of class bird will be hidden along with their occupied space:
 Output
 The output returns the data type of “var1”, “va2,” and “var3” variables as boolean, number, and string respectively.
 Output
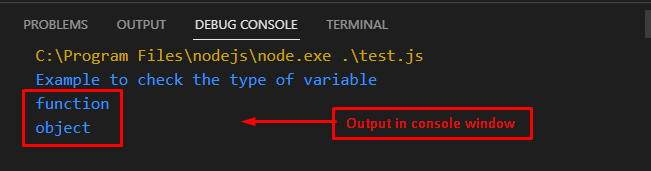 The output shows that the “function” and “object” types of “var1” and “var2” variables are displayed in the console window.
 In the above code, we first defined an array which contains two objects.
The objects contain data of different employees.
We then used the map function to just get the ages of employees in a separate array.
Lastly, we used the indexOf() method to get the index of the object whose age property is 45 and printed it to the console.
We could have used the map function to get the value of any property and get the index of the object based on that property.
JavaScript ES6 introduced a new method called findIndex().
This method is a lot more elegant, but sadly it doesn’t work on old browsers.
In the above code, we first defined an array which contains two objects.
The objects contain data of different employees.
We then used the map function to just get the ages of employees in a separate array.
Lastly, we used the indexOf() method to get the index of the object whose age property is 45 and printed it to the console.
We could have used the map function to get the value of any property and get the index of the object based on that property.
JavaScript ES6 introduced a new method called findIndex().
This method is a lot more elegant, but sadly it doesn’t work on old browsers.
 The findIndex() method can also take the index of the current element and the array of current element as optional arguments.
We have used arrow functions in both of the above examples to make the code more readable but the default function syntax can also be used as the argument to these functions:
let employees = [{firstName:"John", lastName:"Doe", age:38}, {firstName:"John", lastName:"Smith", age:45}];
let ind = employees.findIndex(function(item) { return item.age == 45});
console.log(ind);
The findIndex() method can also take the index of the current element and the array of current element as optional arguments.
We have used arrow functions in both of the above examples to make the code more readable but the default function syntax can also be used as the argument to these functions:
let employees = [{firstName:"John", lastName:"Doe", age:38}, {firstName:"John", lastName:"Smith", age:45}];
let ind = employees.findIndex(function(item) { return item.age == 45});
console.log(ind);


 We have compiled all the convenient methods related to converting JavaScript Object to JSON.
You can use any of the above methods according to your requirements.
We have compiled all the convenient methods related to converting JavaScript Object to JSON.
You can use any of the above methods according to your requirements.
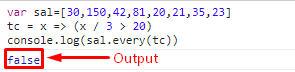 The output has returned false, which states that at least one array element could not pass the test condition.
 The output has returned true which states that all the array elements pass the test condition.
Hence, it is concluded that to pass a test for all elements, the condition of every() method must return true.
The output has returned true which states that all the array elements pass the test condition.
Hence, it is concluded that to pass a test for all elements, the condition of every() method must return true.
 Output
 The output validates that all the instances which matched with the “John” are replaced with the “Marry” in the console window.
 Output
 The output shows that all the instances of “Cricket” are replaced with “Hockey”.
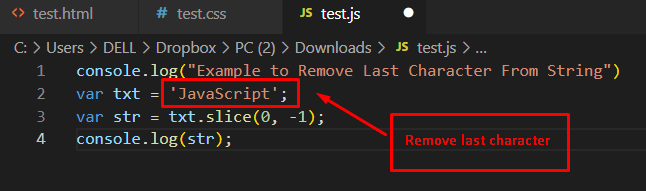 Output
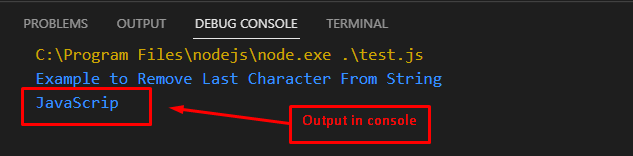 The output shows that “JavaScrip” is returned after removing the last character from “JavaScript”.
 Output
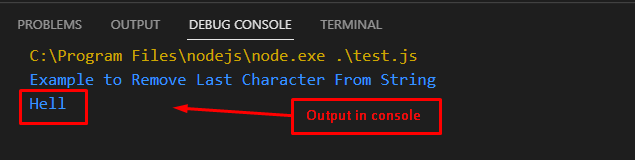 The output returns “Hell” after removing the “o” from the “Hello” string
 Output
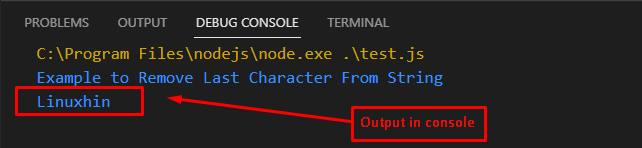 The output shows that “Linuxhint” is replaced with “Linuxhin” by removing the last character.
 If we had done the same thing using loops then the code would have looked something like this:
let num = [0, 1, 2, 3, 4, 5];for(let i = 0; i <6; i++) {
num[i] *= num[i];}
console.log(num);
If we had done the same thing using loops then the code would have looked something like this:
let num = [0, 1, 2, 3, 4, 5];for(let i = 0; i <6; i++) {
num[i] *= num[i];}
console.log(num);

 This can also be done with loops in the following way:
let num = [0, 1, 2, 3, 4, 5];
let sum = 0;for(let i = 0; i <6; i++) {
sum+=num[i];}
console.log(sum);
This can also be done with loops in the following way:
let num = [0, 1, 2, 3, 4, 5];
let sum = 0;for(let i = 0; i <6; i++) {
sum+=num[i];}
console.log(sum);

 As with the previous two methods, filter() can also be replaced with loops but with loops the code won’t be as easy to read.
 Asynchronous nature of promises:
let example_promise = newPromise((resolve, reject) => {
resolve("Promise has been resolved");});
example_promise.then( r =>console.log(r));
console.log("1,2,3...");
Asynchronous nature of promises:
let example_promise = newPromise((resolve, reject) => {
resolve("Promise has been resolved");});
example_promise.then( r =>console.log(r));
console.log("1,2,3...");

 In this example we had two promises.
The first promise was resolved after 500ms and the second promise was rejected just after 250 seconds.
As the second promise was the first one to be either resolved or rejected it was returned by the Promise.race() method.
If the argument passed to the Promise.race() method is an empty iterable then the method will return a forever pending promise:
let temp = Promise.race([]);
console.log(temp);
In this example we had two promises.
The first promise was resolved after 500ms and the second promise was rejected just after 250 seconds.
As the second promise was the first one to be either resolved or rejected it was returned by the Promise.race() method.
If the argument passed to the Promise.race() method is an empty iterable then the method will return a forever pending promise:
let temp = Promise.race([]);
console.log(temp);
 If the argument iterable has any non-promise values or promises which have already been fulfilled or rejected then the method will settle for the first value in the array:
let p1 = newPromise((resolve, reject) => {
resolve("P1 has been resolved");});
let p2 = newPromise((resolve, reject) => {
resolve("P2 has been resolved");});
let temp = Promise.race([p1,p2]);
temp.then(value =>console.log(value));
If the argument iterable has any non-promise values or promises which have already been fulfilled or rejected then the method will settle for the first value in the array:
let p1 = newPromise((resolve, reject) => {
resolve("P1 has been resolved");});
let p2 = newPromise((resolve, reject) => {
resolve("P2 has been resolved");});
let temp = Promise.race([p1,p2]);
temp.then(value =>console.log(value));
 Promise.race() method check for both resolved and rejected promises.
This method also has another alternative which is the Promise.any() method which can be used to just check for the fulfilled promises.
Promise.race() method check for both resolved and rejected promises.
This method also has another alternative which is the Promise.any() method which can be used to just check for the fulfilled promises.
 If we had tried to access the same property value without using the optional chaining operator then we would have received an error:
let employee = {
firstName:"John",
lastName:"Doe",
Age:34};
console.log(employee.address.zip);
If we had tried to access the same property value without using the optional chaining operator then we would have received an error:
let employee = {
firstName:"John",
lastName:"Doe",
Age:34};
console.log(employee.address.zip);

 Without optional chaining:
let employee = {
firstName:"John",
lastName:"Doe",
Age:34};
console.log(employee.method());
Without optional chaining:
let employee = {
firstName:"John",
lastName:"Doe",
Age:34};
console.log(employee.method());
 The optional chaining operator can also be used multiple times within a single statement to avoid errors.
 The default value can also be some function call.
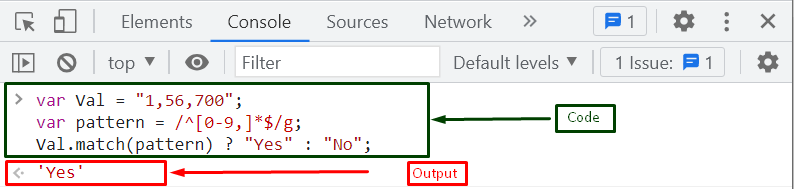 Let’s have a look at the next method for verifying a string is a number with a comma.
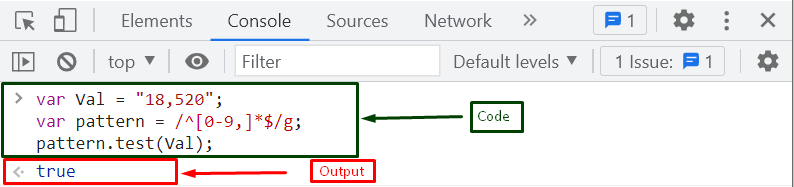 We have provided the solution for verifying if the string is a number with a comma.
 Let’s move to the next method!
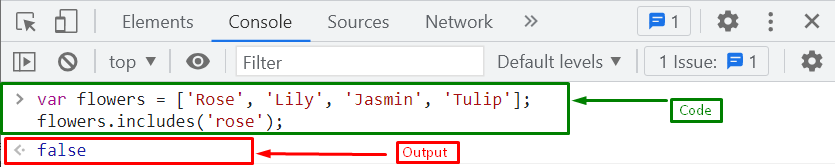 Let’s check another method for verifying if the string is present in an array.
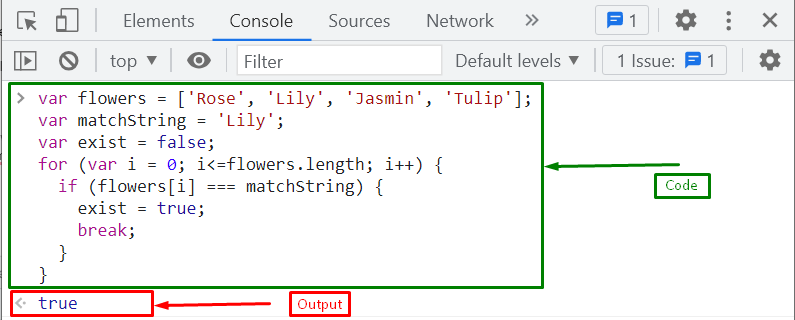 We have compiled all best solutions to check if the string is already present in a JavaScript array.
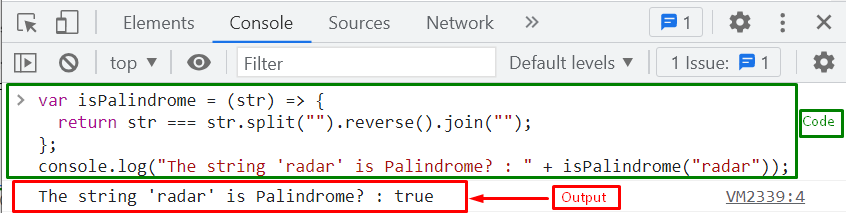 Let’s head toward the second procedure!
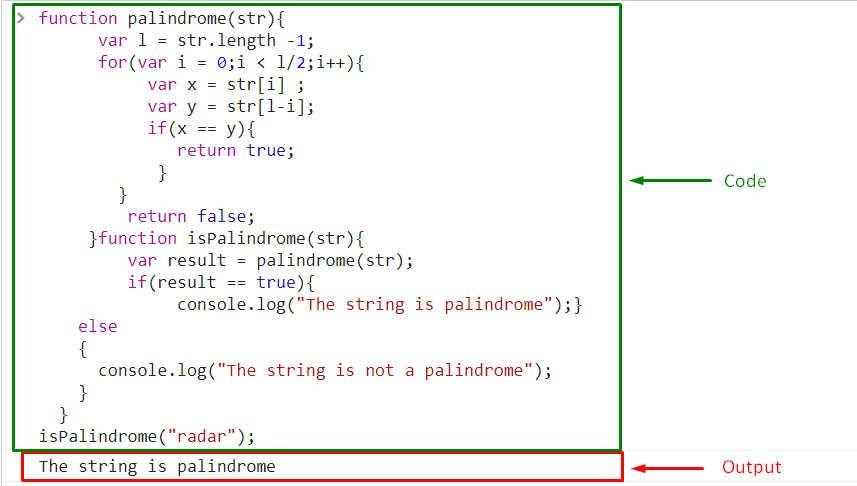 We have provided the procedure to check if a string is a palindrome or not.
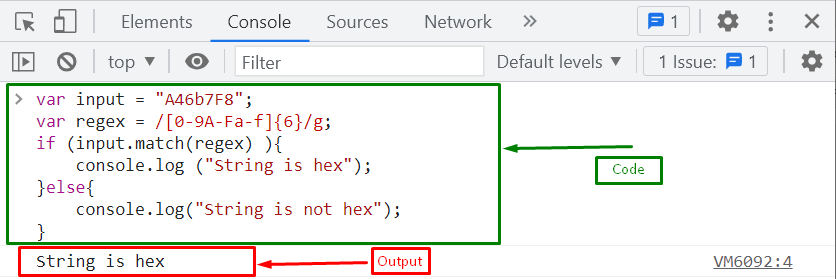 Example 2: match() Method With Ternary Operator
In this example, we will use the same regex and the input string that is created in the previous example.
However, the match() method will be utilized with the ternary operator.
The ternary operator acts just like a conditional statement as it is a short form of the conditional statement.
It is an ideal approach in terms of code optimization.
The ternary operator requires three parameters, a comparison parameter, a result parameter for true comparisons, and a result parameter for false comparisons.
Here, the resultant value or message will be stored in a variable named “val”:
var val = input.match(regex) ? "String is hex" : "String is not hex";
Finally, print the resultant message that is stored in a variable “val” using the “console.log()” method:
console.log(val);
Output indicates that the input string is hex as it matches the specified pattern:
Example 2: match() Method With Ternary Operator
In this example, we will use the same regex and the input string that is created in the previous example.
However, the match() method will be utilized with the ternary operator.
The ternary operator acts just like a conditional statement as it is a short form of the conditional statement.
It is an ideal approach in terms of code optimization.
The ternary operator requires three parameters, a comparison parameter, a result parameter for true comparisons, and a result parameter for false comparisons.
Here, the resultant value or message will be stored in a variable named “val”:
var val = input.match(regex) ? "String is hex" : "String is not hex";
Finally, print the resultant message that is stored in a variable “val” using the “console.log()” method:
console.log(val);
Output indicates that the input string is hex as it matches the specified pattern:
 We have provided the easiest solutions for checking if the string is hex or not.
 If you want to add an element at the start of the array, check out the next section.
 Let’s see the next method to add the element in the middle of the array.
 We gathered all the methods to append a value to an array.
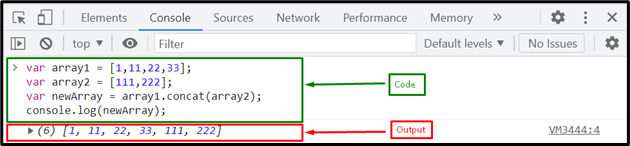 Let’s move to the next method to append arrays.
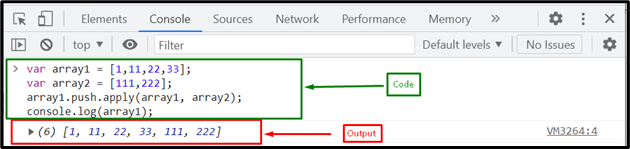 Let’s have a look at another method for appending an array to the other array.
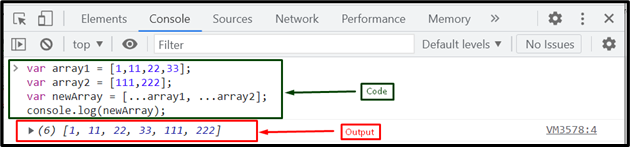 We gathered simplest methods for appending one array to another.
Note: These methods are efficient for combining small arrays.
If you want to append large arrays, you must create a user-defined method.
We gathered simplest methods for appending one array to another.
Note: These methods are efficient for combining small arrays.
If you want to append large arrays, you must create a user-defined method.


 We have provided simplest methods for adding options to select with JavaScript.
 We have provided all the simplest methods to go to the URL by applying onclick.
 Now press the button for the alert using the function written in the external JavaScript:
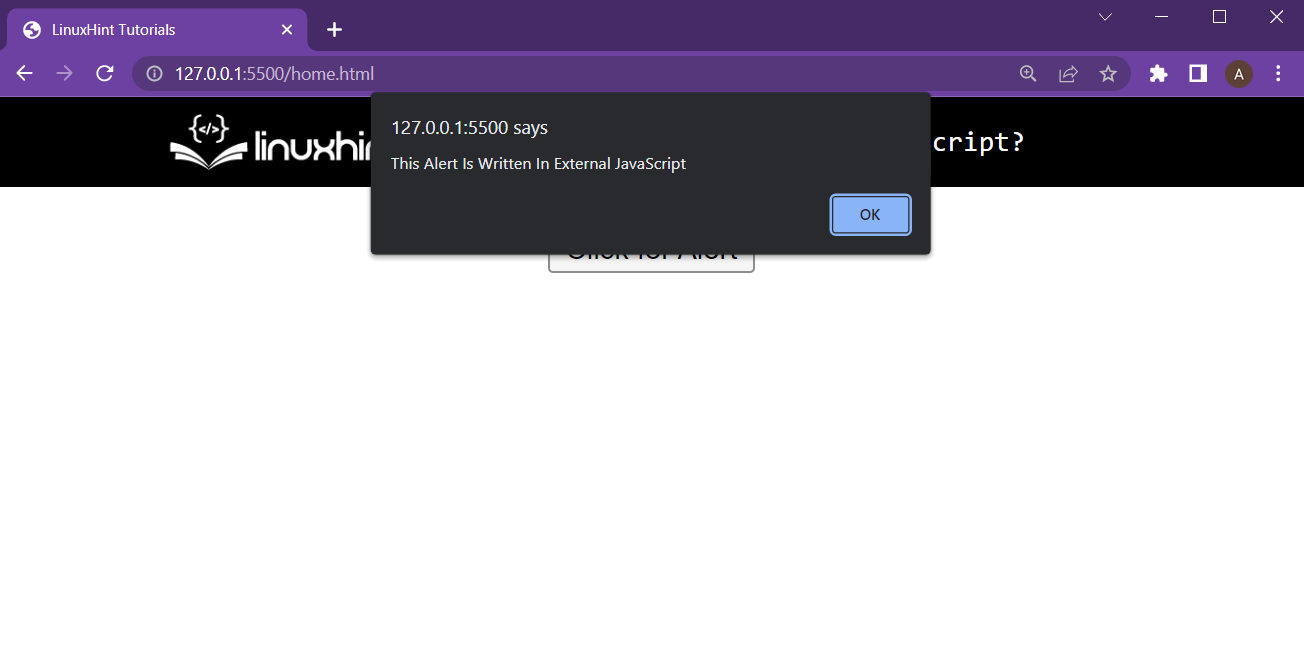 It is clear from the screenshot above that the external JavaScript works perfectly fine.
 The above figure depicts how a Redux works in an application.
It takes the event or action from the user interface and passes it on to the reducer.
The reducer takes the current state, applies this event or action, and passes a new state as an output.
This output state then gets saved into the store of the application.
Now we are done with introducing the Redux, its benefits, and its internal components.
Don’t you think we should try a simple coding exercise for it?
The above figure depicts how a Redux works in an application.
It takes the event or action from the user interface and passes it on to the reducer.
The reducer takes the current state, applies this event or action, and passes a new state as an output.
This output state then gets saved into the store of the application.
Now we are done with introducing the Redux, its benefits, and its internal components.
Don’t you think we should try a simple coding exercise for it?
 Step 2: Adding Functionality Using JavaScript
In the second step, either create a script tag in the same HTML document or create a new JavaScript file and link it to the HTML document.
No matter the case, the first thing is to create the function for the zoom-in button with the following lines of code:
function zoomIn() {
var pic = document.getElementById("pic");
var width = pic.clientWidth;
pic.style.width = width + 100 + "px";}
In the above code snippet:
Function zoomIn() has been created which will be called every time the Zoom-In button is clicked.
Inside the function, the first step is to get the reference of the image element by using its ID and store it inside the variable “pic”.
After that, get the current width of the image element by using the clientWidth attribute.
And then access the style property and the width attribute within the style property and increase its value by adding some pixels in the current width of the image.
This will mimic a zoom-in effect on the image every time the zoom-in button is clicked.
After that, create the function for the Zoom-Out button using the following lines:
function zoomOut() {
var pic = document.getElementById("pic");
var width = pic.clientWidth;
pic.style.width = width - 100 + "px";}
In the above code snippet:
Function zoomOut() has been created which will be called every time the Zoom-Out button is clicked.
Inside the function, the first step is to get the reference of the image element by using its ID and store it inside the variable “pic”.
After that, get the current width of the image element by using the clientWidth attribute and store it inside the “width” variable.
And then access the style property and the width attribute within the style property and decrease its value by removing some pixels from the current width of the image element.
This will mimic a zoom-out effect on the image every time the zoom-out button is pressed.
Step 3: Testing the Functionality
The last step to run the HTML document and observe the working of the HTML document to be as:
Step 2: Adding Functionality Using JavaScript
In the second step, either create a script tag in the same HTML document or create a new JavaScript file and link it to the HTML document.
No matter the case, the first thing is to create the function for the zoom-in button with the following lines of code:
function zoomIn() {
var pic = document.getElementById("pic");
var width = pic.clientWidth;
pic.style.width = width + 100 + "px";}
In the above code snippet:
Function zoomIn() has been created which will be called every time the Zoom-In button is clicked.
Inside the function, the first step is to get the reference of the image element by using its ID and store it inside the variable “pic”.
After that, get the current width of the image element by using the clientWidth attribute.
And then access the style property and the width attribute within the style property and increase its value by adding some pixels in the current width of the image.
This will mimic a zoom-in effect on the image every time the zoom-in button is clicked.
After that, create the function for the Zoom-Out button using the following lines:
function zoomOut() {
var pic = document.getElementById("pic");
var width = pic.clientWidth;
pic.style.width = width - 100 + "px";}
In the above code snippet:
Function zoomOut() has been created which will be called every time the Zoom-Out button is clicked.
Inside the function, the first step is to get the reference of the image element by using its ID and store it inside the variable “pic”.
After that, get the current width of the image element by using the clientWidth attribute and store it inside the “width” variable.
And then access the style property and the width attribute within the style property and decrease its value by removing some pixels from the current width of the image element.
This will mimic a zoom-out effect on the image every time the zoom-out button is pressed.
Step 3: Testing the Functionality
The last step to run the HTML document and observe the working of the HTML document to be as:
 As it is clear from the gif above that the zoom-in and the zoom-out button are working perfectly as intended.
 Output
 After clicking the button “Download”, the user can download “computer.jpg”.
Method 2: How to Trigger a File Download Using JavaScript?Another method is adapted to download a file by utilizing JavaScript.
The download() method is utilized to download a file by pressing the button.
The code for this objective is given below.
Code
<html><body><center><h2>How to trigger a download file when
clicking an HTML button or JavaScript?</h2><textarea id="text">
Welcome to JavaScript World</textarea><br/><input type="button" id="specialBtn"value="Download" /></center><script>function download(f, t) {
var e = document.createElement('a');
e.setAttribute('href','data:text/plain;charset=utf-8, '
+ encodeURIComponent(t));
e.setAttribute('download', f);
document.body.appendChild(e);
e.click();
document.body.removeChild(e);}
document.getElementById("specialBtn")
.addEventListener("click", function() {
var t = document.getElementById("text").value;
var f = "JavaScript.txt";
download(f, t);}, false);</script></body></html>
The description of the code is listed here:
Firstly, a message is displayed by utilizing the <h2>tags.
After that, <textarea> is utilized to allocate a text area for input from the user.
Furthermore, a button is used to download the file by pressing it.
The addeventListener() is utilized to trigger an event and download a JavaScript.txt file.
Output:
After clicking the button “Download”, the user can download “computer.jpg”.
Method 2: How to Trigger a File Download Using JavaScript?Another method is adapted to download a file by utilizing JavaScript.
The download() method is utilized to download a file by pressing the button.
The code for this objective is given below.
Code
<html><body><center><h2>How to trigger a download file when
clicking an HTML button or JavaScript?</h2><textarea id="text">
Welcome to JavaScript World</textarea><br/><input type="button" id="specialBtn"value="Download" /></center><script>function download(f, t) {
var e = document.createElement('a');
e.setAttribute('href','data:text/plain;charset=utf-8, '
+ encodeURIComponent(t));
e.setAttribute('download', f);
document.body.appendChild(e);
e.click();
document.body.removeChild(e);}
document.getElementById("specialBtn")
.addEventListener("click", function() {
var t = document.getElementById("text").value;
var f = "JavaScript.txt";
download(f, t);}, false);</script></body></html>
The description of the code is listed here:
Firstly, a message is displayed by utilizing the <h2>tags.
After that, <textarea> is utilized to allocate a text area for input from the user.
Furthermore, a button is used to download the file by pressing it.
The addeventListener() is utilized to trigger an event and download a JavaScript.txt file.
Output:
 The output returns a text area with a “Download” button.
After pressing the button, it triggers a JavaScript.txt file for downloading.
The output returns a text area with a “Download” button.
After pressing the button, it triggers a JavaScript.txt file for downloading.

 We have provided all the simplest methods to Splice a String.
You can utilize either of any methods according to your requirements.
We have provided all the simplest methods to Splice a String.
You can utilize either of any methods according to your requirements.
 From the lines that have been added into the HTML document, it can be easily noticed that the “onclick” property of the button has been set to the function “downloadFile()”.
Let’s create that function in the next step
From the lines that have been added into the HTML document, it can be easily noticed that the “onclick” property of the button has been set to the function “downloadFile()”.
Let’s create that function in the next step
 Anyhow, this would cause the browser to download the file.
 As it is clear from the gif above that the whole webpage is working perfectly as intended.
 Next up is to add some jQuery to download the file every time the link is clicked.
 The clickable link is causing the client’s machine to download the intended file using jQuery
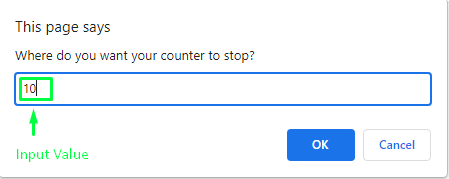 Output
 Now, upon executing the same code, we will get another random value:
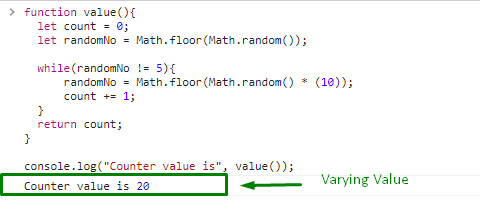 We have provided the easiest methods for creating and using counters.
 Else it returns false:
let employees = [{firstName:"John", lastName:"Doe", age:39}, {firstName:"Adam", lastName:"Smith", age:40}];
let found = employees.some(obj => {if (obj.age == 55) {
returntrue;
}
returnfalse;});
console.log(found);
Else it returns false:
let employees = [{firstName:"John", lastName:"Doe", age:39}, {firstName:"Adam", lastName:"Smith", age:40}];
let found = employees.some(obj => {if (obj.age == 55) {
returntrue;
}
returnfalse;});
console.log(found);

 It is important to note that the argument object and the object inside the array should be the same.
Different objects with same values will return false:
let employees = [{firstName:"John", lastName:"Doe", age:39}, {firstName:"Adam", lastName:"Smith", age:40}];
let found = employees.includes({firstName:"Adam", lastName:"Smith", age:40});
console.log(found);
It is important to note that the argument object and the object inside the array should be the same.
Different objects with same values will return false:
let employees = [{firstName:"John", lastName:"Doe", age:39}, {firstName:"Adam", lastName:"Smith", age:40}];
let found = employees.includes({firstName:"Adam", lastName:"Smith", age:40});
console.log(found);

 If the object is not present then the find() method returns undefined:
let employees = [{firstName:"John", lastName:"Doe", age:39}, {firstName:"Adam", lastName:"Smith", age:40}];
let found = employees.find(obj => {if (obj.age == 28) {
returntrue;
}
returnfalse;});
console.log(found);
If the object is not present then the find() method returns undefined:
let employees = [{firstName:"John", lastName:"Doe", age:39}, {firstName:"Adam", lastName:"Smith", age:40}];
let found = employees.find(obj => {if (obj.age == 28) {
returntrue;
}
returnfalse;});
console.log(found);

 If the object is not found then it returns -1:
let employees = [{firstName:"John", lastName:"Doe", age:39}, {firstName:"Adam", lastName:"Smith", age:40}];
let found = employees.findIndex(obj => {if (obj.age == 99) {
returntrue;
}
returnfalse;});
console.log(found);
If the object is not found then it returns -1:
let employees = [{firstName:"John", lastName:"Doe", age:39}, {firstName:"Adam", lastName:"Smith", age:40}];
let found = employees.findIndex(obj => {if (obj.age == 99) {
returntrue;
}
returnfalse;});
console.log(found);

 Next, we’ll take a look at the built-in remove() method to find out how it can be used to remove elements by Id.
 Now, a JavaScript code should be added behind the button so that when the button gets clicked, the desired results can be achieved.
JS
<script>
function myRemoveFunction() {
var textRemove = document.getElementById("mySelect");
textRemove.remove();}</script>
In the above script, it can be seen that a user-defined myRemoveFunction function has been created in which firstly the Id of the element is retrieved by the getElementById method and is stored in the variable textRemove.
After returning the element by Id to the variable textRemove, the built-in function of remove has been used which will remove the HTML element the moment the button is clicked.
On executing the above code, a similar output can be seen on the browser as presented below.
Now, a JavaScript code should be added behind the button so that when the button gets clicked, the desired results can be achieved.
JS
<script>
function myRemoveFunction() {
var textRemove = document.getElementById("mySelect");
textRemove.remove();}</script>
In the above script, it can be seen that a user-defined myRemoveFunction function has been created in which firstly the Id of the element is retrieved by the getElementById method and is stored in the variable textRemove.
After returning the element by Id to the variable textRemove, the built-in function of remove has been used which will remove the HTML element the moment the button is clicked.
On executing the above code, a similar output can be seen on the browser as presented below.
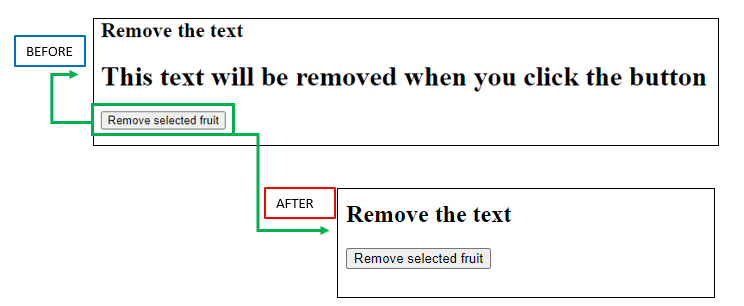 In the above snapshot of the output, it can be seen that, when the button is clicked, the text that was present in the <h1> Element tag has been removed from the web page.

 We have provided the simplest methods for getting the Timezone.
You can use any of the approaches according to your requirements.
We have provided the simplest methods for getting the Timezone.
You can use any of the approaches according to your requirements.
 After successfully executing the command mentioned above, you will see different folders on the sidebar of our visual studio screen.
 Here you can see a folder named src; delete all the files present inside this src folder.
In addition, please make a new file and name it indexes with the extension of js altogether index.js.
After creating this new file, open the terminal and write the following command.
Here you can see a folder named src; delete all the files present inside this src folder.
In addition, please make a new file and name it indexes with the extension of js altogether index.js.
After creating this new file, open the terminal and write the following command.
 As you can see in the above snippet, the Node Package Manager (npm) will install the Redux toolkit in our react application project by using the installation command.
Now we have created our react application and are also done with installing the Redux toolkit.
It is time to set our Redux components in this react application project.
As you can see in the above snippet, the Node Package Manager (npm) will install the Redux toolkit in our react application project by using the installation command.
Now we have created our react application and are also done with installing the Redux toolkit.
It is time to set our Redux components in this react application project.
 So, first of all, let us set up the store of our Redux.
So, for doing so, we will have to import the
configureStore function from Redux.
Usually, we use the createStore built-in function to create the store, but configureStore is an improved way to create the store, so we will create our store using the configureStore function.
The syntax is
import { configureStore } from 'redux';
Now we will set the second most component of Redux i-e, reducer.
As we know, it takes the current state and performs an action or event on it, so now we will define the function of the reducer.
Store function needs to be updated each time the reducer acts on a state.
On every action the reducer performs, we know the current state will change into an updated state.
To update the store’s state values, we need to use the subscribe function of the store.
So, first of all, let us set up the store of our Redux.
So, for doing so, we will have to import the
configureStore function from Redux.
Usually, we use the createStore built-in function to create the store, but configureStore is an improved way to create the store, so we will create our store using the configureStore function.
The syntax is
import { configureStore } from 'redux';
Now we will set the second most component of Redux i-e, reducer.
As we know, it takes the current state and performs an action or event on it, so now we will define the function of the reducer.
Store function needs to be updated each time the reducer acts on a state.
On every action the reducer performs, we know the current state will change into an updated state.
To update the store’s state values, we need to use the subscribe function of the store.
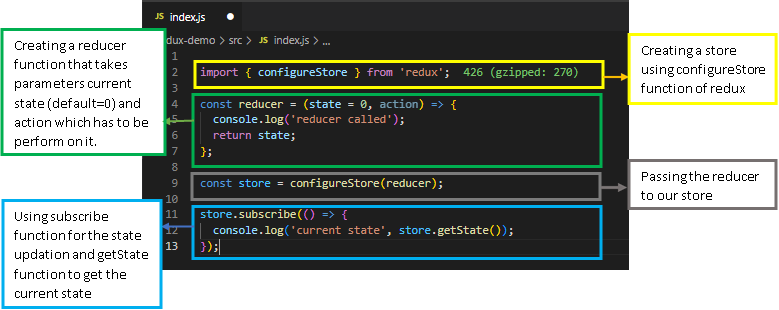 The above code snippet tells how we can set our store and reducer for the Redux along with the description.
If you run the above code using the command npm start, you will see the reducer message displayed on your console screen.
The above code snippet tells how we can set our store and reducer for the Redux along with the description.
If you run the above code using the command npm start, you will see the reducer message displayed on your console screen.
 Now, as we have executed our store and reducer, let us check whether the store is getting updated each time the reducer performs an event or action in its current state.
So, for this, we need to dispatch an action.
Each action may or may not have a different type, but the action must have a type.
It is just like that we want to perform something with a meaningful purpose.
The type of action may be INCREMENT_NUMBER, DECREMENT_NUMBER, ADD_USER, DELETE_RECORDS, etc.
Now, as we have executed our store and reducer, let us check whether the store is getting updated each time the reducer performs an event or action in its current state.
So, for this, we need to dispatch an action.
Each action may or may not have a different type, but the action must have a type.
It is just like that we want to perform something with a meaningful purpose.
The type of action may be INCREMENT_NUMBER, DECREMENT_NUMBER, ADD_USER, DELETE_RECORDS, etc.
 We have updated our code with the dispatching of our actions from the store to the reducer.
The reducer will perform these actions on the current state and will return the updated state.
Later on, the subscribe function will help the store to update the status values in the store for future use.
We have updated our code with the dispatching of our actions from the store to the reducer.
The reducer will perform these actions on the current state and will return the updated state.
Later on, the subscribe function will help the store to update the status values in the store for future use.
 You can see in the above snippet that the reducer performed the action of Increment number to state=0 and returned the state=1, the store updated this response of the reducer.
On dispatching the other action with an increment in number, the reducer again increased in the state and made it state=2.
When performed by the reducer in the results, the last dispatched action of decreasing number updates the state from state=2 to state=1.
You can see in the above snippet that the reducer performed the action of Increment number to state=0 and returned the state=1, the store updated this response of the reducer.
On dispatching the other action with an increment in number, the reducer again increased in the state and made it state=2.
When performed by the reducer in the results, the last dispatched action of decreasing number updates the state from state=2 to state=1.
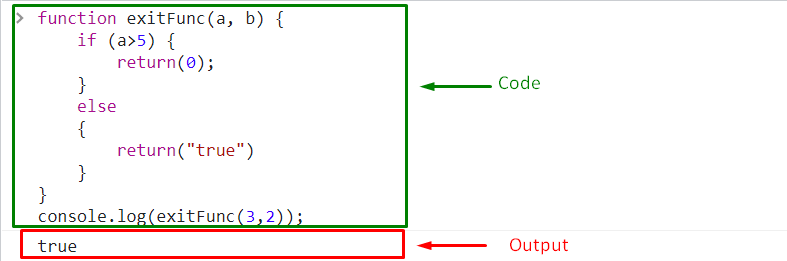
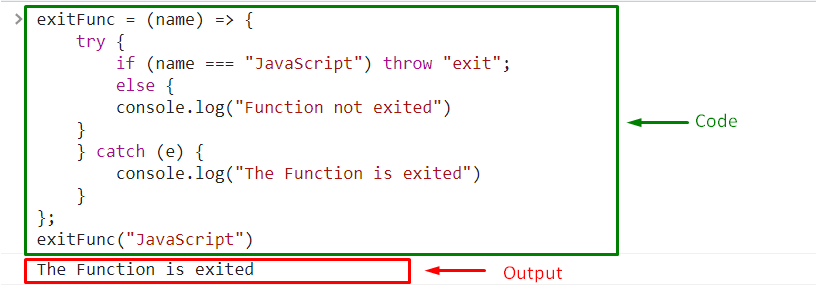
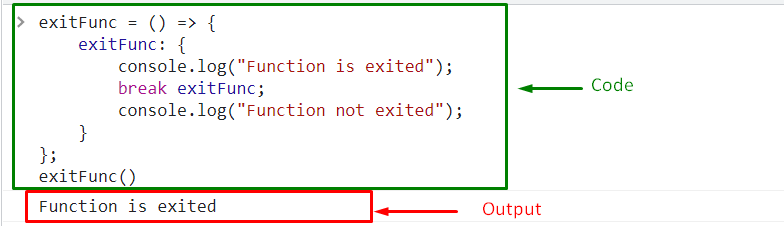 We have provided the simplest methods to exit a JavaScript Function.
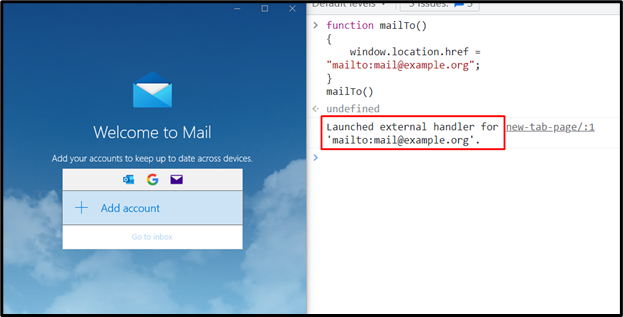 In the other case, you will be asked to create an account first:

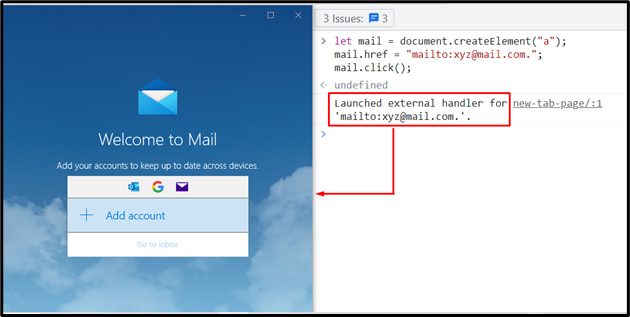 We have discussed the simplest methods for using mailto.
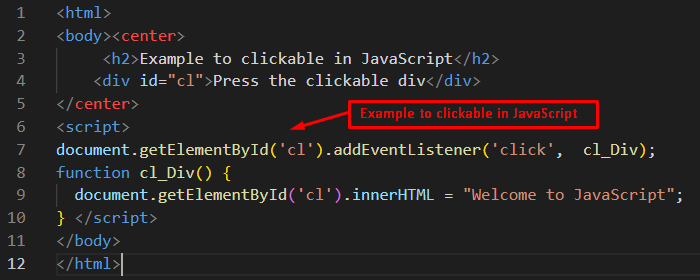 Output
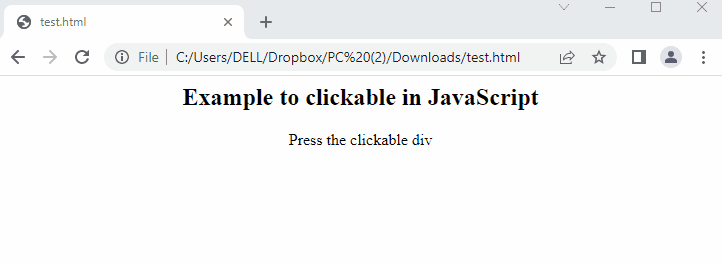 The output returns the browser in which the user clicks on the div and the div tag is changed to “Welcome to JavaScript”.
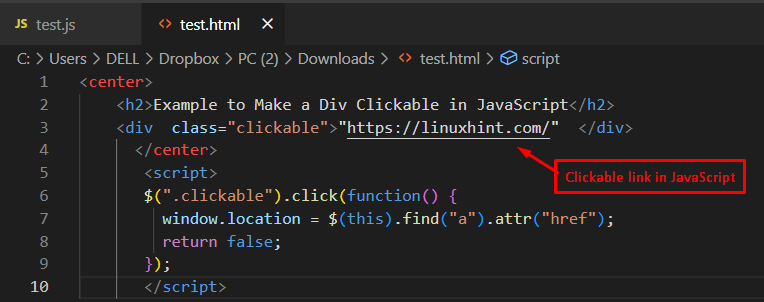 Output
 The output shows that when a user presses the link “Click link”, a new window pops up in the browser.
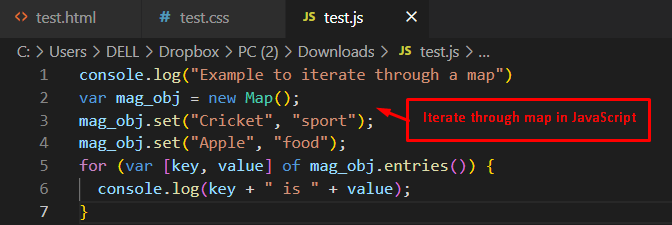 Output
 The output shows that “Cricket is sport” and “Apple is food” are concatenated through the key-value pairs.
 Output
 The output shows that “[3, 6, 7, 2, 5]” is converted to “[6, 12, 14, 4, 10]” by multiplying each element with “2” in JavaScript.
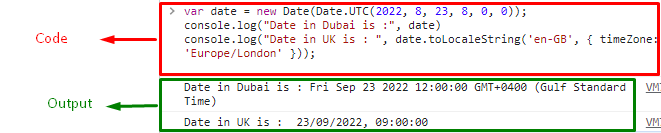
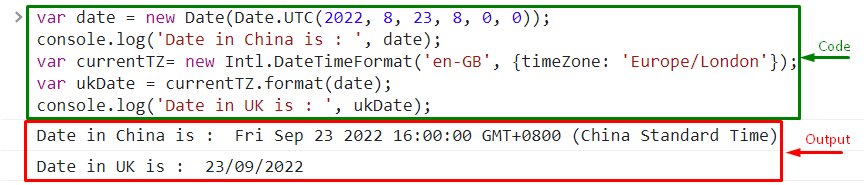 We have provided the simplest methods for initializing JavaScript date to a particular time zone.
 Output
 We have provided the easiest methods for rotating an image using JavaScript.
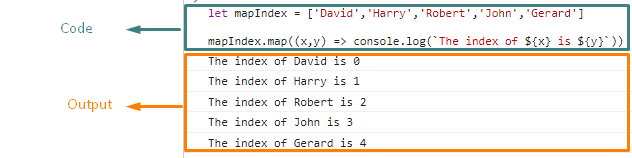
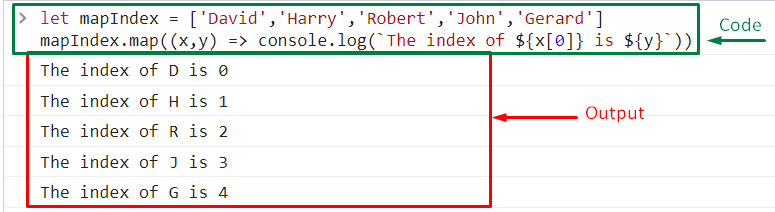 We have provided the simplest method for using map index.
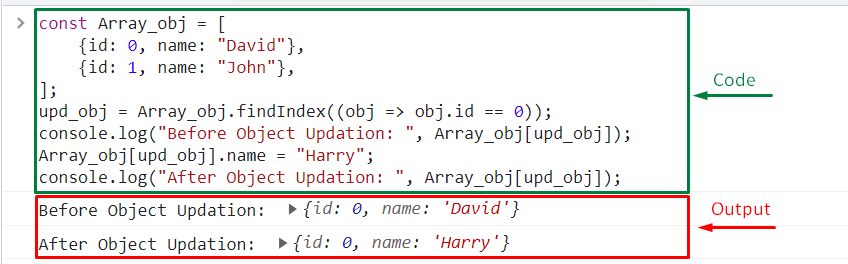

 We have provided the simplest methods related to updating the objects Array.
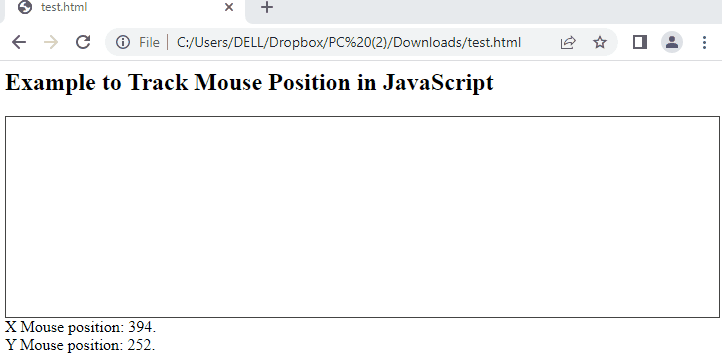 The output shows that “X Mouse position” and “Y Mouse position” are tracked by changing the mouse position in the browser.
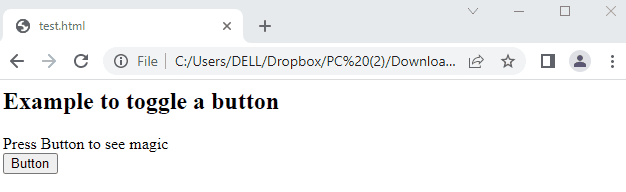 The output shows that toggling a button returns two messages as “Welcome to Linuxhint” and “JavaScript World” alternatively.
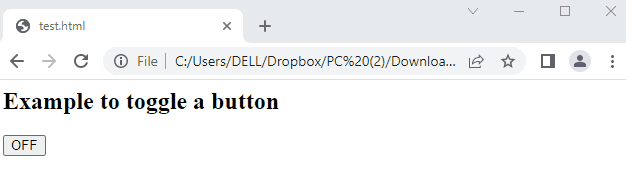 The output shows that the button has been toggled from OFF to ON.
That is all! You have learned to toggle a button.
The output shows that the button has been toggled from OFF to ON.
That is all! You have learned to toggle a button.
 Output
 The output shows that the set interval is stopped by pressing the button “Stop time” in the browser window.
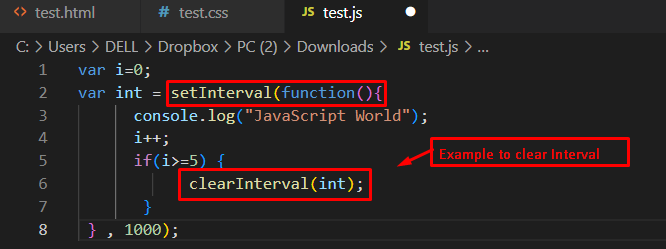 Output
 The output returns the message “JavaScript World” and stops the setInterval call after 5 seconds.
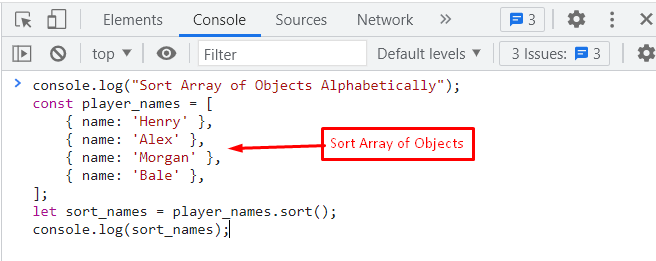 Output
 The output shows that “Alex”, “Bale”, “Henry”, and “Morgan” are displayed in an alphabetical order.
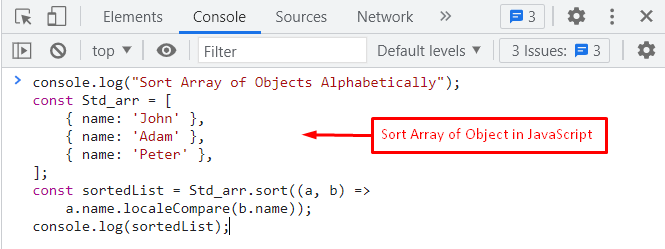 Output
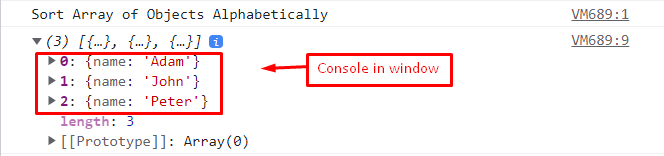 The output returns the sorted array of objects as “Adam”, “John”, and “Peter” in the console window.
 The output shows that the “JavaScript.txt” file is selected as a text file from the browser.
After selecting the file, line-by-line text “Welcome to JavaScript” and “Welcome to Linuxhint” are read and displayed in the console window.
The output shows that the “JavaScript.txt” file is selected as a text file from the browser.
After selecting the file, line-by-line text “Welcome to JavaScript” and “Welcome to Linuxhint” are read and displayed in the console window.
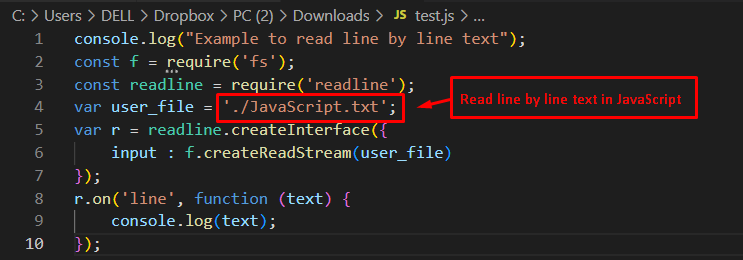 Output
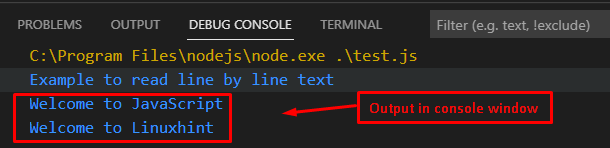 The output shows that “Welcome to JavaScript” and “Welcome to Linuxhint” are read from the “JavaScript.txt” file.
 We have demonstrated the simplest method for passing a function as a parameter or argument.
 So we can see 100 is inserted at first of a_deque_object.
Explanation
Line 9:
Create an ArrayDeque named a_dequeobject with an Integer type.
So we can see 100 is inserted at first of a_deque_object.
Explanation
Line 9:
Create an ArrayDeque named a_dequeobject with an Integer type.
 Line 12-18:
Add elements into it and return the data.
Line 12-18:
Add elements into it and return the data.
 Line 21:
Now add 100 at the first position.
Line 21:
Now add 100 at the first position.
 Finally, you can display the final data present in a_deque_object.
 So we inserted three elements one by one at first.
Explanation
Line 9:
Create an ArrayDeque named a_dequeobject with string type.
So we inserted three elements one by one at first.
Explanation
Line 9:
Create an ArrayDeque named a_dequeobject with string type.
 Line 12-18:
Add elements into it and return the data.
Line 12-18:
Add elements into it and return the data.
 Line 21,22:
Now add “HCL” at the first position and return a_deque_object.
Line 21,22:
Now add “HCL” at the first position and return a_deque_object.
 Line 25,26:
Now add “H2SO4” at the first position and return a_deque_object.
Line 25,26:
Now add “H2SO4” at the first position and return a_deque_object.
 Line 29,30:
Now add “H2O” at the first position and return a_deque_object.
Line 29,30:
Now add “H2O” at the first position and return a_deque_object.
 Line 33,34:
Now add null at the first position.
You can see the exception raised.
Line 33,34:
Now add null at the first position.
You can see the exception raised.

 So we can see 100 is inserted at the last of a_deque_object.
Explanation
Line 9:
Create an ArrayDeque named a_dequeobject with an Integer type.
So we can see 100 is inserted at the last of a_deque_object.
Explanation
Line 9:
Create an ArrayDeque named a_dequeobject with an Integer type.
 Line 12-18:
Add elements into it and return the data.
Line 12-18:
Add elements into it and return the data.
 Line 21:
Now add 100 at the last position.
Line 21:
Now add 100 at the last position.
 Finally, you can display the final data present in a_deque_object.
 So we inserted three elements one by one at last.
Explanation
Line 9:
Create an ArrayDeque named a_dequeobject with string type.
So we inserted three elements one by one at last.
Explanation
Line 9:
Create an ArrayDeque named a_dequeobject with string type.
 Line 12-18:
Add elements into it and return the data.
Line 12-18:
Add elements into it and return the data.
 Line 21,22:
Now add “HCL” at the last position and return a_deque_object.
Line 21,22:
Now add “HCL” at the last position and return a_deque_object.
 Line 25,26:
Now add “H2SO4” at the last position and return a_deque_object.
Line 25,26:
Now add “H2SO4” at the last position and return a_deque_object.
 Line 29,30:
Now add “H2O” at the last position and return a_deque_object.
Line 29,30:
Now add “H2O” at the last position and return a_deque_object.
 Line 33,34:
Now add null at the last position.
You can see the exception raised.
Line 33,34:
Now add null at the last position.
You can see the exception raised.

 The code displays the error as “RangeError: Maximum call stack size exceeded.”
There are many ways to resolve this error, such as for loop and conditional statements, which can be used to limit the function call.
The code displays the error as “RangeError: Maximum call stack size exceeded.”
There are many ways to resolve this error, such as for loop and conditional statements, which can be used to limit the function call.
 Output

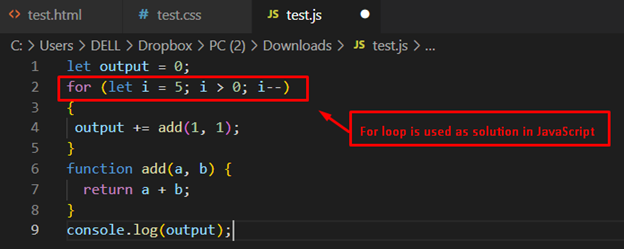 Output
 The output returns “10” by resolving the error of the maximum call stack size.
 Output
 The output shows that a message “First promise resolved” is displayed after 3 seconds.
 In this code:
Firstly, function info() is employed with the “async” keyword that returns the promise.
After that, the “Promise” constructor is called with a new keyword and a callback to the “resolve()” method.
A message “Welcome to JavaScript” is passed as an argument to resolve the method.
The “async” keyword is permitted with the “await” keyword.
The await keyword is utilized to wait for promises and store them in the “txt” variable.
In the end, the info() method is called to return the “txt” variable.
Output
In this code:
Firstly, function info() is employed with the “async” keyword that returns the promise.
After that, the “Promise” constructor is called with a new keyword and a callback to the “resolve()” method.
A message “Welcome to JavaScript” is passed as an argument to resolve the method.
The “async” keyword is permitted with the “await” keyword.
The await keyword is utilized to wait for promises and store them in the “txt” variable.
In the end, the info() method is called to return the “txt” variable.
Output
 The output returns a message “Welcome to JavaScript” by employing the resolve method of promise.
 Output
 The output shows that a message “JavaScript” waits for 2 seconds before printing on the console.
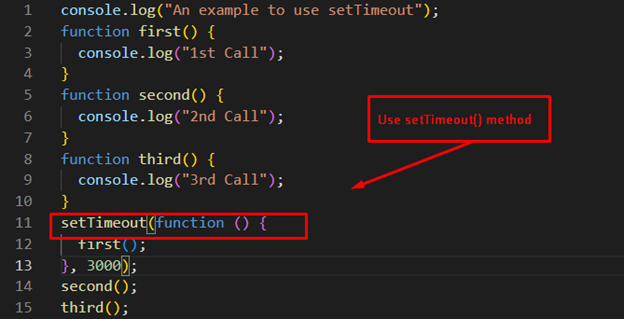 Output
 The output returns the executable code in such a way that the “second()” and “third()” methods are executed after the complete execution of the “first()” method.
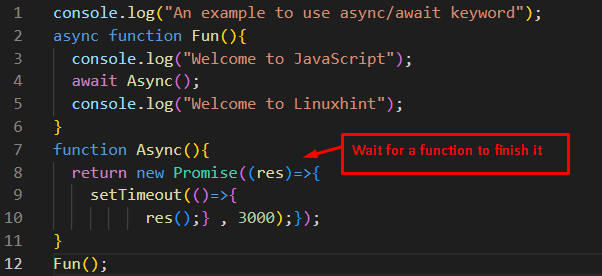 Output
 It is observed in the output that the message “Welcome to JavaScript” is displayed first and then a wait of 3 seconds is encountered.
After that, the further execution continues, containing the message “Welcome to Linuxhint”.
It is observed in the output that the message “Welcome to JavaScript” is displayed first and then a wait of 3 seconds is encountered.
After that, the further execution continues, containing the message “Welcome to Linuxhint”.
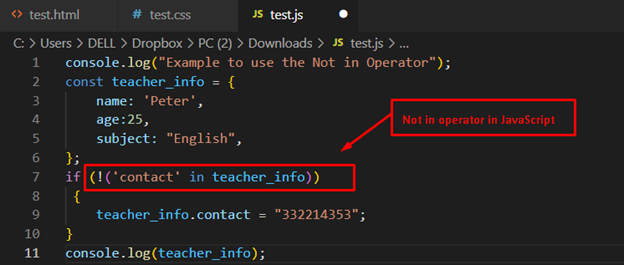 Output
 Earlier, the “contact” property was not present in the object.
After applying the “Not in” operator, the if condition is true and therefore the “contact” property is added to the object as shown in the output.
Earlier, the “contact” property was not present in the object.
After applying the “Not in” operator, the if condition is true and therefore the “contact” property is added to the object as shown in the output.
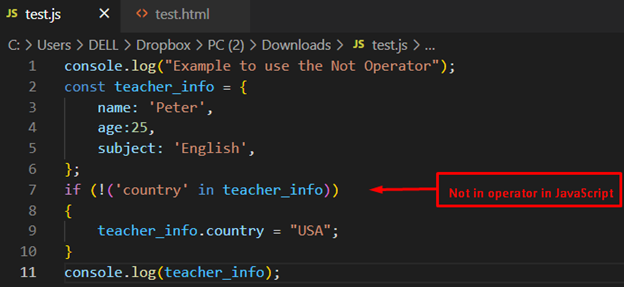 Output
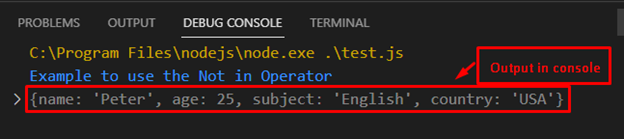 The expected outcome returns the property with the value “country: ‘USA'”, which is not present in the “teacher_info” object.
It is possible through “Not in” in JavaScript.
The expected outcome returns the property with the value “country: ‘USA'”, which is not present in the “teacher_info” object.
It is possible through “Not in” in JavaScript.
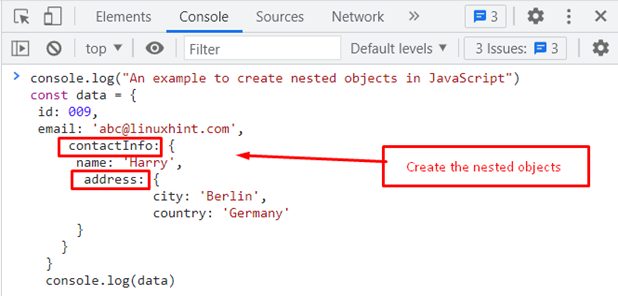 Output
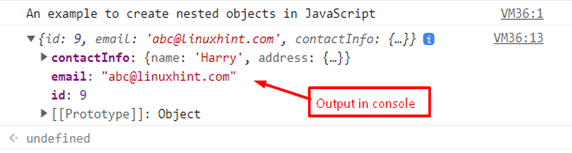 It is observed that nested objects “id”, “email” and “contactInfo” are displayed in the console window.
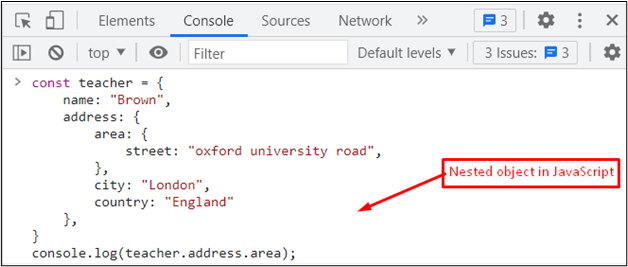 Output
 The output shows that the “street” object is accessed as a nested object and displays the value “oxford university road” in the console window.
 Output
 It is observed in the output console that all the elements of “second_array” are appended to the “first_array”.
 Output
 The output returns the appended array “sports” by utilizing the “concat()” method.
That is all! You are now able to use JavaScript to append one or multiple arrays.
The output returns the appended array “sports” by utilizing the “concat()” method.
That is all! You are now able to use JavaScript to append one or multiple arrays.
 After loading the selected image, the following alert box will also pop up with a message:
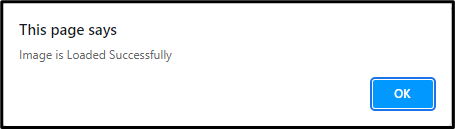
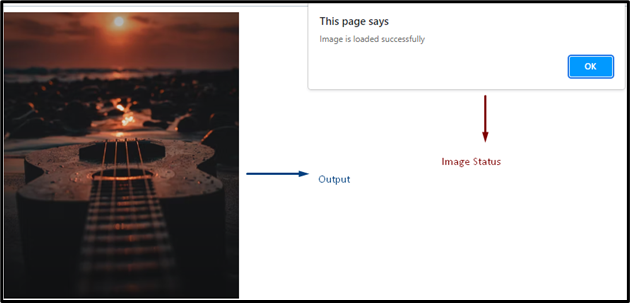 We have provided different methods to use the image onload event.
 Understanding the Code:
In the body of the webpage, we have simply used a <p>, <input>, <br> and a <button> tag.
The <input> tag is used so the user can choose a file and then upload it using the button displayed by using the <button> tag.
The <button> tag calls the sizeValidation() function on click event which then determines the size of the file and prints an appropriate alert depending on the size of the file.
Understanding the Code:
In the body of the webpage, we have simply used a <p>, <input>, <br> and a <button> tag.
The <input> tag is used so the user can choose a file and then upload it using the button displayed by using the <button> tag.
The <button> tag calls the sizeValidation() function on click event which then determines the size of the file and prints an appropriate alert depending on the size of the file.
 We then use some mathematics to determine the size of the file.
If the file is of appropriate size i.e., 5MB (in this case), it is uploaded.
We then use some mathematics to determine the size of the file.
If the file is of appropriate size i.e., 5MB (in this case), it is uploaded.
 Otherwise, a pop-up containing an error message is displayed.
 We have created a simple HTML form which has two input fields of type password and a Login button which calls the passwordConfirmation() function when it is clicked.
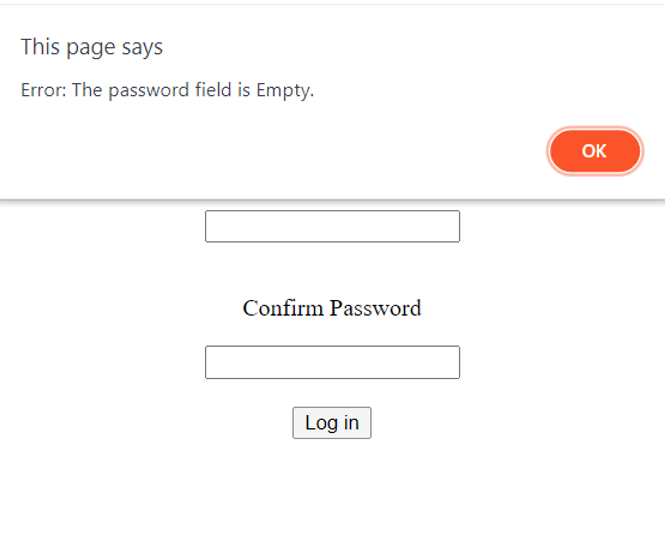 Case 2: Passwords match
In case the passwords match the user successfully logs in:
Case 2: Passwords match
In case the passwords match the user successfully logs in:
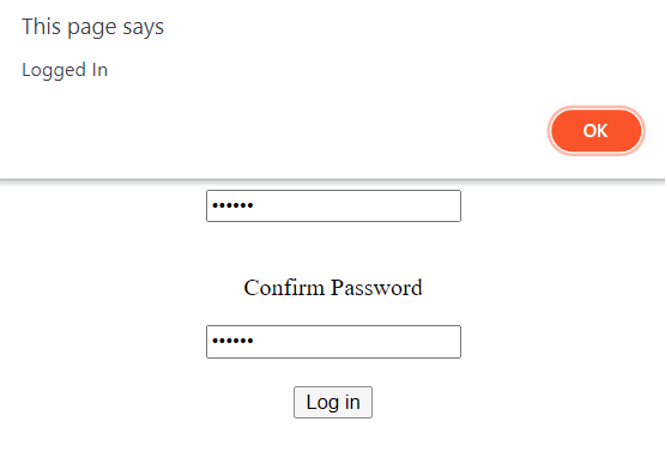 Case 3: Passwords do not match
If the passwords do not match, we ask the user to retype the passwords and make sure they match:
Case 3: Passwords do not match
If the passwords do not match, we ask the user to retype the passwords and make sure they match:
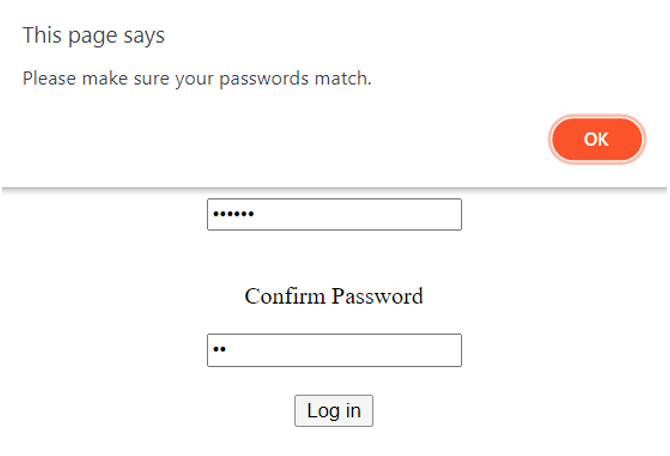 The JavaScript and HTML code together looks something like this:
<!DOCTYPE html><html>
<body>
<center>
<h2>Linux Hint</h2>
<form>
<p> Enter Password </p>
<input type = "password" id="pass"> <br><br>
<p> Confirm Password </p>
<input type = "password" id = "confirmpass"> <br><br>
<button type = "submit" onclick="passwordConfirmation()">Log in</button>
</form>
</center>
</body>
<script>
function passwordConfirmation() {
var password = document.getElementById("pass").value;
var confirmPassword = document.getElementById("confirmpass").value;
if (password == "") {
alert("Error: The password field is Empty.");
} else if (password == confirmPassword) {
alert("Logged In");
} else {
alert("Please make sure your passwords match.")
}
}
</script></html>
The JavaScript and HTML code together looks something like this:
<!DOCTYPE html><html>
<body>
<center>
<h2>Linux Hint</h2>
<form>
<p> Enter Password </p>
<input type = "password" id="pass"> <br><br>
<p> Confirm Password </p>
<input type = "password" id = "confirmpass"> <br><br>
<button type = "submit" onclick="passwordConfirmation()">Log in</button>
</form>
</center>
</body>
<script>
function passwordConfirmation() {
var password = document.getElementById("pass").value;
var confirmPassword = document.getElementById("confirmpass").value;
if (password == "") {
alert("Error: The password field is Empty.");
} else if (password == confirmPassword) {
alert("Logged In");
} else {
alert("Please make sure your passwords match.")
}
}
</script></html>
 The first line of the above-mentioned code declares a new stack named s.
Then the insert() method is used to insert four elements to the stack, two of which are then removed by the extract() method.
How to get the top element from the stack
The stack class defines the peek() method to get the top element from the stack:
The first line of the above-mentioned code declares a new stack named s.
Then the insert() method is used to insert four elements to the stack, two of which are then removed by the extract() method.
How to get the top element from the stack
The stack class defines the peek() method to get the top element from the stack:
 How to check if the stack is empty?
The class also defines a method which can be used to check if the stack is empty:
How to check if the stack is empty?
The class also defines a method which can be used to check if the stack is empty:
 How to print the whole stack?
The print() method can be called to print the whole stack
How to print the whole stack?
The print() method can be called to print the whole stack
 How to check the size of the stack?
The size() method uses the .length property to get the size of the stack:
How to check the size of the stack?
The size() method uses the .length property to get the size of the stack:
 How to clear the whole stack?
Simply invoke the clear() method to remove every element of the stack:
How to clear the whole stack?
Simply invoke the clear() method to remove every element of the stack:

 Output
It is observed in the output window that “JavaScript” is printed first.
After waiting 5 seconds, the second message “World” is presented in the console.
Output
It is observed in the output window that “JavaScript” is printed first.
After waiting 5 seconds, the second message “World” is presented in the console.
 Output
The output shows the executable code and displays “Welcome to JavaScript.” After waiting for 3 seconds, the message “Welcome to Linuxhint” is displayed in the console window.
Output
The output shows the executable code and displays “Welcome to JavaScript.” After waiting for 3 seconds, the message “Welcome to Linuxhint” is displayed in the console window.
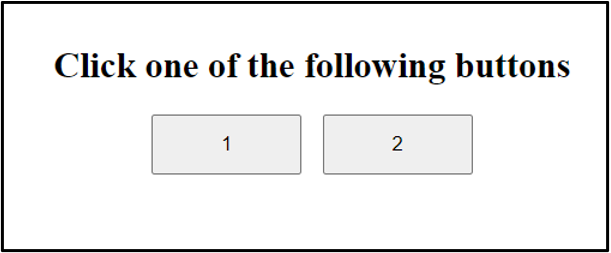
 We can also use the on() method to attach event handlers to elements.
The on() method takes at least one event as an argument along with some other optional arguments:
<!DOCTYPE html><html>
<body>
<center>
<div style="margin-top: 50px;">
<h2>Click one of the following buttons</h2>
<button id="button_one" style="width: 100px; height:40px; margin-right: 10px;" onclick="alertId(this.id)">1</button>
<button id="button_two" style="width: 100px; height:40px;" onclick="alertId(this.id)">2</button>
</div>
</center>
</body>
<script>
$("button").on('click', alertId($(this).attr("id")));
function alertId(id) {
alert(id)
}
</script></html>
We can also use the on() method to attach event handlers to elements.
The on() method takes at least one event as an argument along with some other optional arguments:
<!DOCTYPE html><html>
<body>
<center>
<div style="margin-top: 50px;">
<h2>Click one of the following buttons</h2>
<button id="button_one" style="width: 100px; height:40px; margin-right: 10px;" onclick="alertId(this.id)">1</button>
<button id="button_two" style="width: 100px; height:40px;" onclick="alertId(this.id)">2</button>
</div>
</center>
</body>
<script>
$("button").on('click', alertId($(this).attr("id")));
function alertId(id) {
alert(id)
}
</script></html>
 We first created a variable called originalString to store a string.
We then created another variable and used the slice() method to assign it a value.
We passed 35 as the starting index and 40 as the ending index of the subString.
We then used the console.log() method to show the value of the subString on the console.
Lastly, we logged the value of the originalString to the console to show that the original string has remained unchanged.
We first created a variable called originalString to store a string.
We then created another variable and used the slice() method to assign it a value.
We passed 35 as the starting index and 40 as the ending index of the subString.
We then used the console.log() method to show the value of the subString on the console.
Lastly, we logged the value of the originalString to the console to show that the original string has remained unchanged.

 We can also pass two negative arguments:
var originalString = 'JavaScript string.slice() Method - LinuxHint';
var subString = originalString.slice(-9, -4);
console.log(subString);
We can also pass two negative arguments:
var originalString = 'JavaScript string.slice() Method - LinuxHint';
var subString = originalString.slice(-9, -4);
console.log(subString);
 Incorrect Arguments:
The slice() method returns an empty string in case the starting index being passed is greater than the ending index of the string:
var originalString = 'JavaScript string.slice() Method - LinuxHint';
var subString = originalString.slice(35, 30);
console.log(subString);
The slice() method also returns an empty string in case the starting index being passed is greater than the length of the original string:
Incorrect Arguments:
The slice() method returns an empty string in case the starting index being passed is greater than the ending index of the string:
var originalString = 'JavaScript string.slice() Method - LinuxHint';
var subString = originalString.slice(35, 30);
console.log(subString);
The slice() method also returns an empty string in case the starting index being passed is greater than the length of the original string:

 The confirm() method actually returns a Boolean value which can be stored in a variable to determine the further course of action.
In case the user clicks on the OK button then the confirm() method returns true else it returns false.
var op = confirm("Press Okay to Confirm");if(op == true){
console.log("OK pressed");}else{
console.log("Cancel pressed");}
Understanding the Code
We first use the confirm() method to show the user a message through a pop-up on the screen:
The confirm() method actually returns a Boolean value which can be stored in a variable to determine the further course of action.
In case the user clicks on the OK button then the confirm() method returns true else it returns false.
var op = confirm("Press Okay to Confirm");if(op == true){
console.log("OK pressed");}else{
console.log("Cancel pressed");}
Understanding the Code
We first use the confirm() method to show the user a message through a pop-up on the screen:
 The user now only has two options either to click the OK or the Cancel button as the confirm() method blocks user’s access to the webpage.
If the user presses OK, the confirm() method will return true.
Upon pressing the Cancel button, the method will return false.
We are storing these return values in our op variable.
We then use this variable in our conditional statements to print whether the user has pressed OK or Cancel button:
The user now only has two options either to click the OK or the Cancel button as the confirm() method blocks user’s access to the webpage.
If the user presses OK, the confirm() method will return true.
Upon pressing the Cancel button, the method will return false.
We are storing these return values in our op variable.
We then use this variable in our conditional statements to print whether the user has pressed OK or Cancel button:

 JavaScript also offers a basic formatting method which you can also use for insertion of selected variables into a string.
 We have offered the easiest methods for inserting variables into a string using JavaScript.
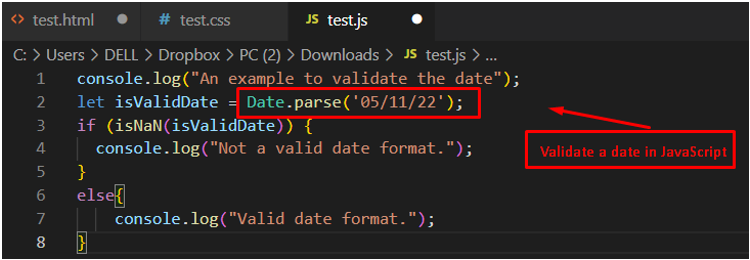 Output
The isNaN() method returns a false value, passing the string “isValidDate” as a number.
Hence, it executes else-block statements by displaying the message “Valid date format” in the console window.
Output
The isNaN() method returns a false value, passing the string “isValidDate” as a number.
Hence, it executes else-block statements by displaying the message “Valid date format” in the console window.
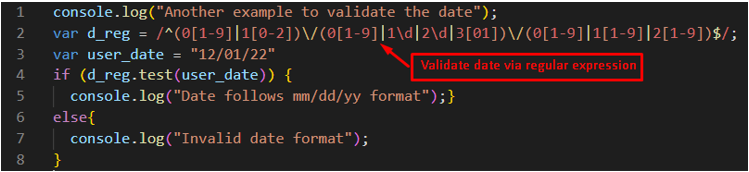 Output
The output shows that the date “12/01/22” follows the “mm/dd/yy” format using the regex expression.
Output
The output shows that the date “12/01/22” follows the “mm/dd/yy” format using the regex expression.
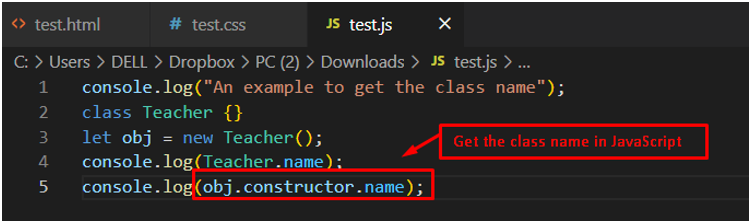 Output
 It is observed that the “name” property is utilized to access the class name “Teacher”.
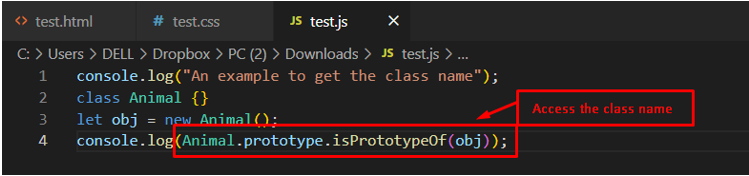 Output
 The output returns a “true” value that validates the access to the class “Animal” in JavaScript.
 Output
 The output displays the “true” value in the console window, which validates the accessibility of the class.
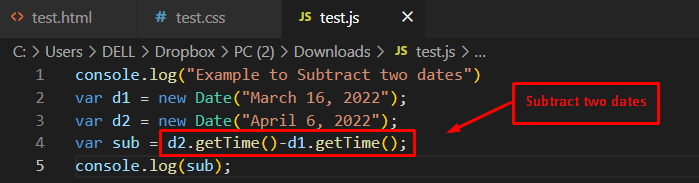 Output
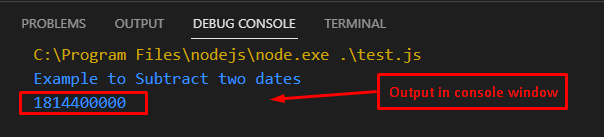 The result of two subtraction is printed on the console.
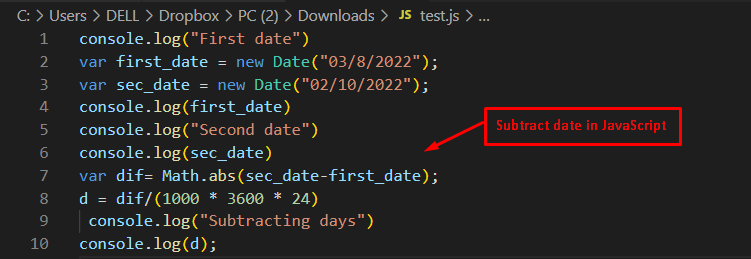 Output
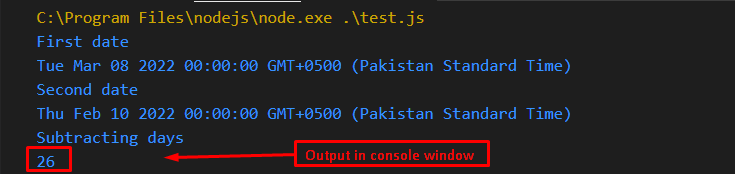 The output returns “26” after subtracting the dates from “Mar 08 2022” to “Feb 10 2022”.
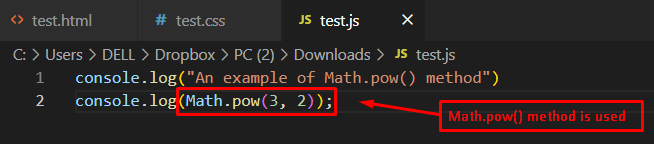 Output
 It is observed that the final output returns a “9”, which is the square of “3”.
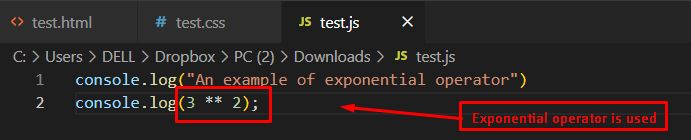 Output
 The output shows “9” in the console window, which is the square of “3”.
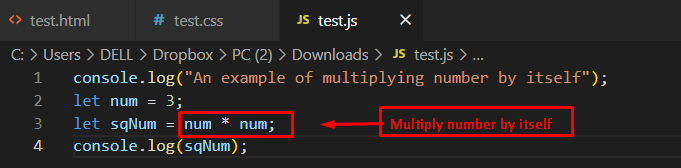 Output
 The execution of the above code returns the output “9” which is the square of the number “3”.
 Output
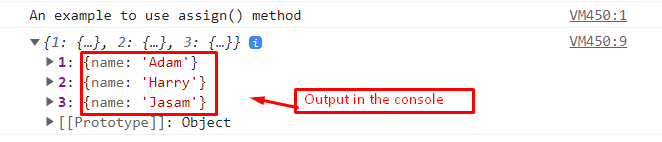 It is observed from the output that the new value is successfully added to the object.
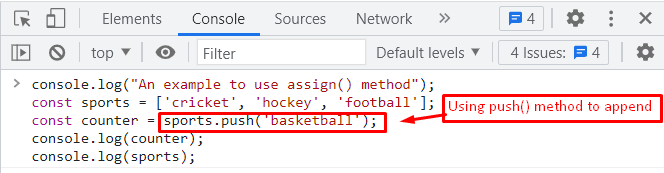 Output
 The output shows that the “basketball” value is appended to the sports object by utilizing the push() method.
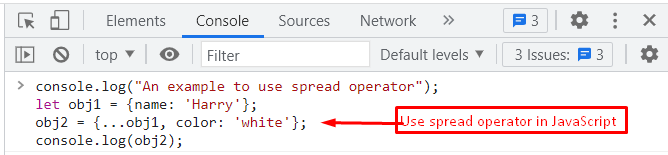 Output
 The output shows the new object “obj2” which contains the value from the object “obj1” as well as the appended value “white”.
 Output
 The output returns “string” in the console window, which validates that the variable is a string.
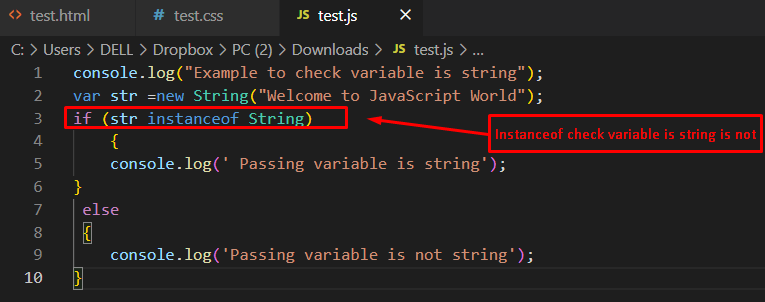 Output
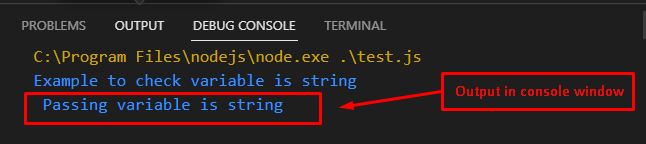 The if-block of the code is executed, which states that the condition is true and hence the “passed” variable is a string.
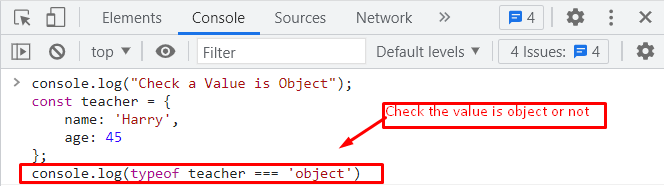 Output
 The output displays “true,” which states that the “teacher” is an object.
 Output
 In the output, the true value validates that the passing value is an object.
 Output
 The output returns that the teacher is initialized as an object.
It returns a “true” value in the console window, which validates that the value is an object.
The output returns that the teacher is initialized as an object.
It returns a “true” value in the console window, which validates that the value is an object.
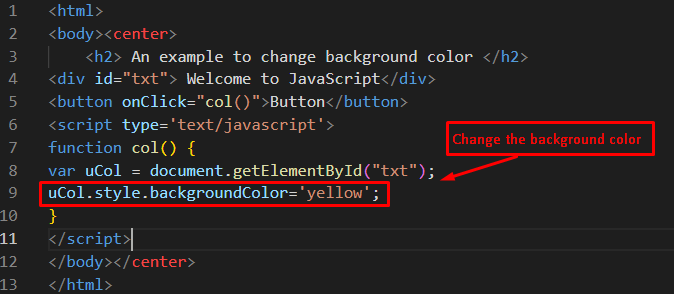 Output
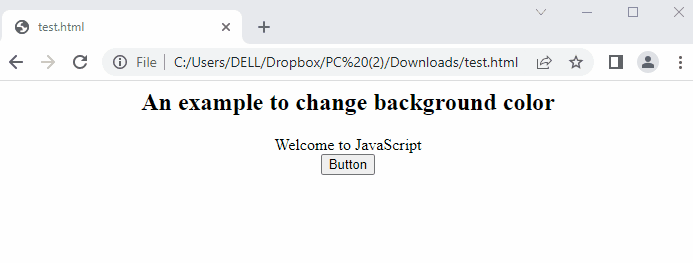 The output shows that by pressing the button, the background color of the message is changed.
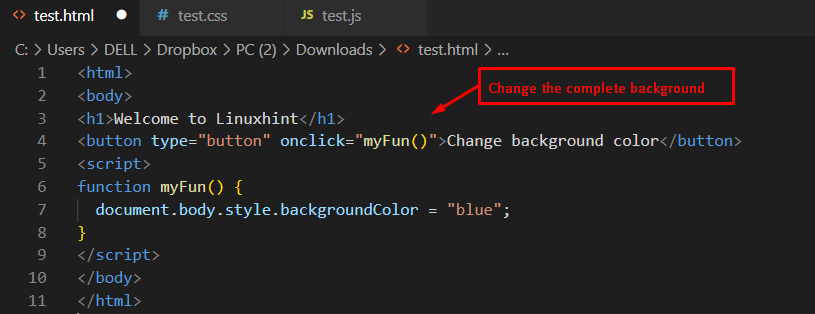 Output
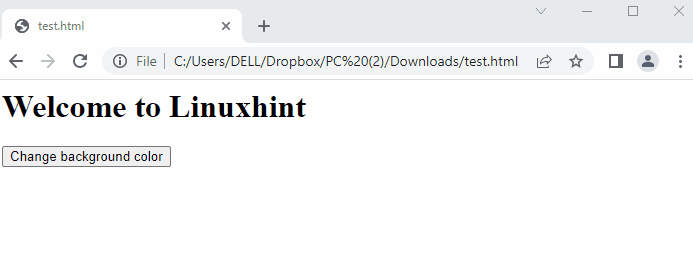 The output shows that the background color is changed from white to blue by pressing the button in the browser window.
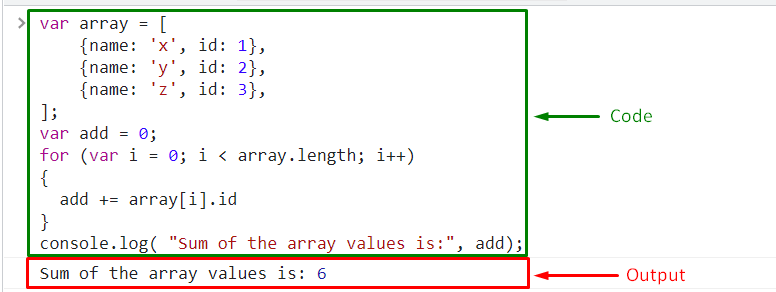 Move ahead to learn the second method for finding the sum of an array of objects.
 We have provided the methods related to the sum of an array of objects.
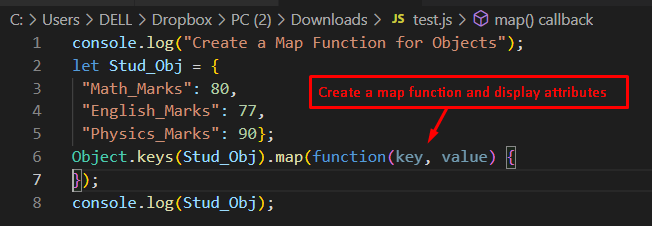 Output
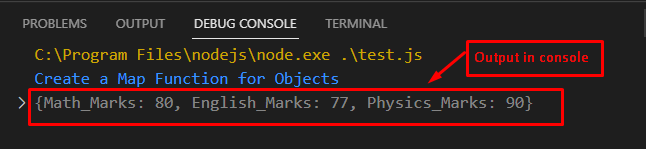 The output returns all the attributes “Math_Marks”, “English_Marks” and “Physics_Marks” with their assigned values in the console window.
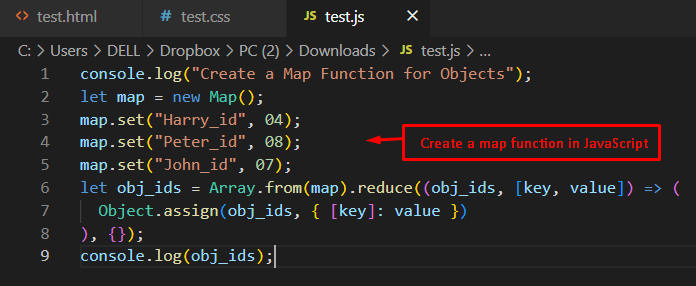 Output
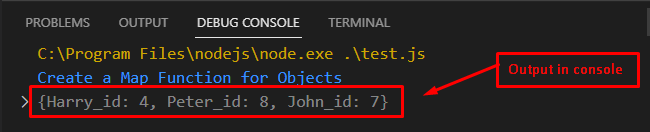
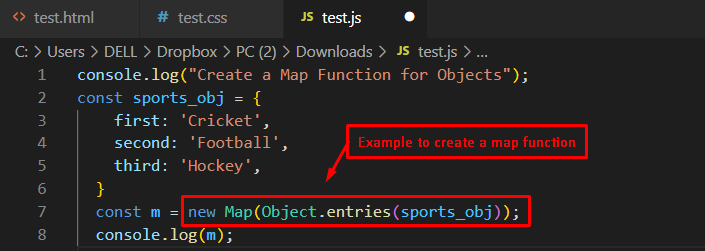 Output
 The output shows the number of attributes as “3” and displays all attributes with values in the console window.
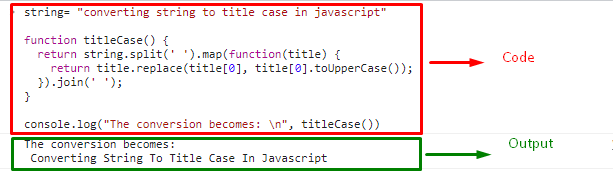
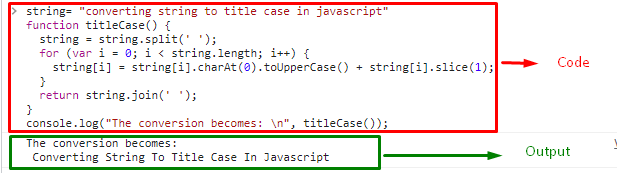
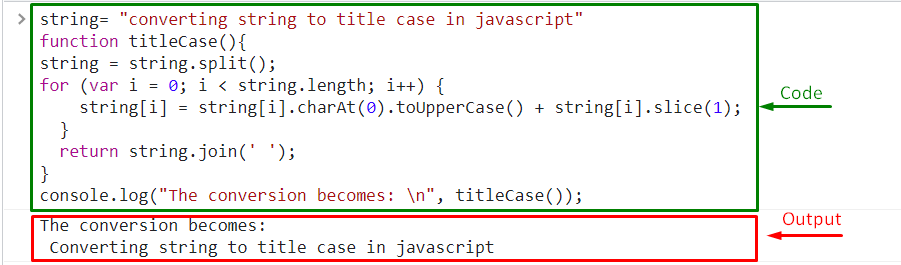 We have provided the simplest methods for converting string to title case.
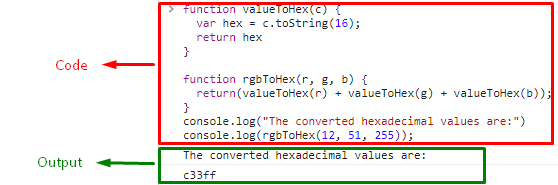 We have provided the simplest method for converting “RGB” to “HEX”.
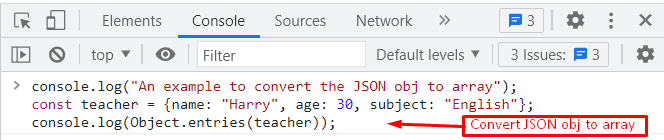 Output
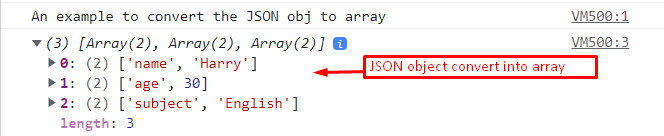 The output returns that the JSON object “teacher” is converted to an array.
 Output
 The output shows that the JSON object “json_obj” is converted to a JavaScript “array” by utilizing the “for-in loop”.
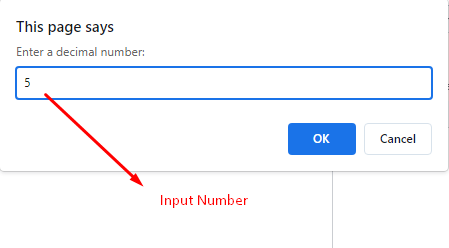 As a result, the corresponding binary format will be displayed on the screen:
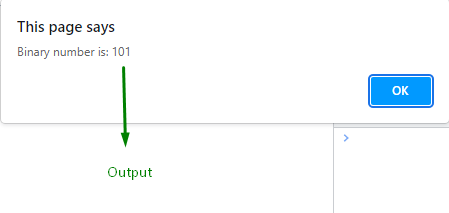 Want to perform the same operation using a user-defined function? Look at the following section.
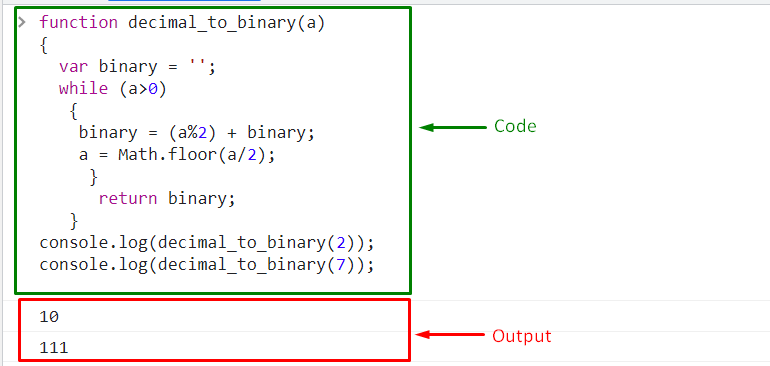 We have offered the easiest methods step-by-step for converting a number to binary format using JavaScript.
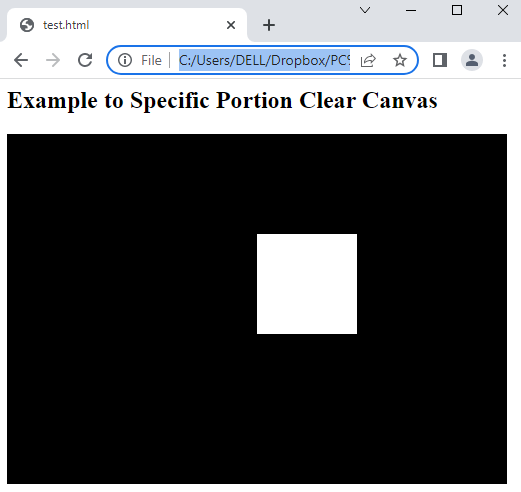 The output shows that a specific portion which is present in the center of canvas is cleared in the browser window.
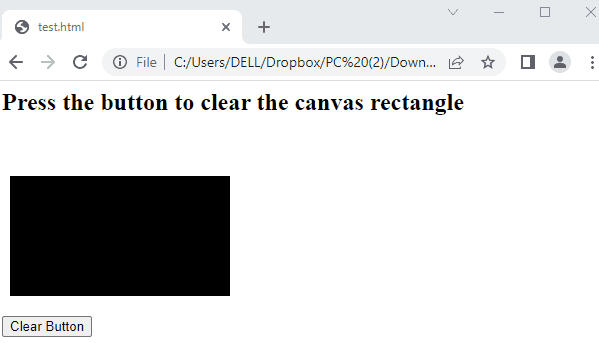 The output returns a black colored canvas that is cleared by pressing the “Clear Button” in the window.
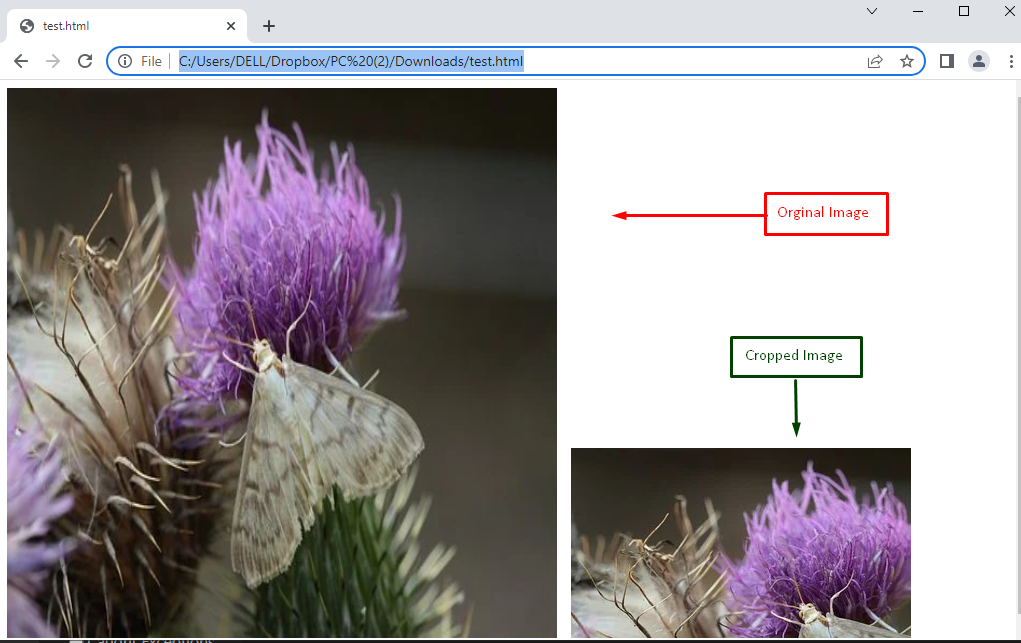 The output shows that the full image is resized by applying the drawImage() method in the browser window.
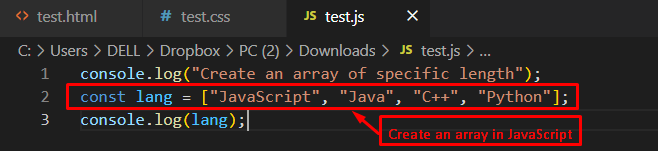 Output
 The output shows the length of the array as “4”, which validates elements existing in the array.
Moreover, it presents elements such as “JavaScript”, “Java”, “C++”, “Python”.
The output shows the length of the array as “4”, which validates elements existing in the array.
Moreover, it presents elements such as “JavaScript”, “Java”, “C++”, “Python”.
 Output
 The output shows that “Linuxhint” and “JavaScript” are displayed alongside the length of the array as well.
 Output
 The output shows that “John,” “Peter,” and “Harry” are displayed in the console window.
 The output shows that the full image is resized by applying the drawImage() method in the HTML <canvas>.
The right portion of the above display represents the resized portion of the image.
The output shows that the full image is resized by applying the drawImage() method in the HTML <canvas>.
The right portion of the above display represents the resized portion of the image.
 Output
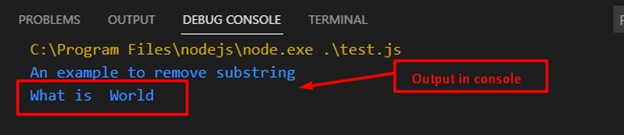 The output shows that the “JavaScript” string has been removed from the existing string “What is JavaScript World”.
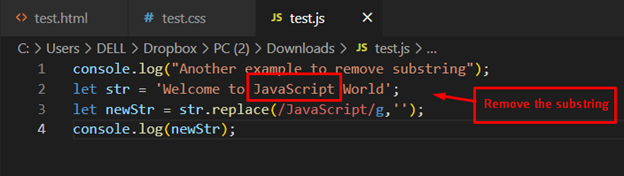 Output
 The output validates that the “JavaScript” substring has been removed from the existing string “Welcome to JavaScript World” in the console window.
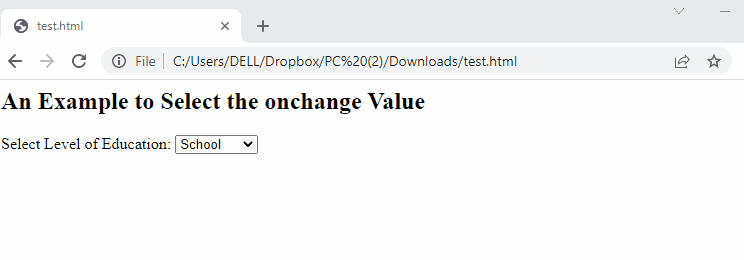 The output shows the dropdown list of “School”, “College” and “University” options.
The onchange event is called if the specific option is selected.
Finally, it displays the value of the selected text in the pop-up window.
The output shows the dropdown list of “School”, “College” and “University” options.
The onchange event is called if the specific option is selected.
Finally, it displays the value of the selected text in the pop-up window.
 Output
 The output shows a message “Welcome to JavaScript World” in the alert box by employing the window.onload function.
 Output
 The output shows that an alert box is loaded which shows the sum of “5” and “10”.
That’s it! You have learned to apply window.onload events.
The output shows that an alert box is loaded which shows the sum of “5” and “10”.
That’s it! You have learned to apply window.onload events.
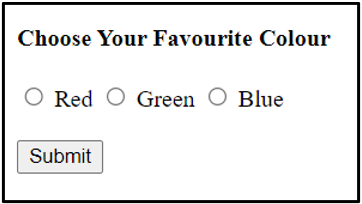 In the above code we first used a simple <h4> tag to give a heading so the user can easily understand the purpose of our form which is to choose a favourite colour.
We then used the <form> tag to create a form, inside which we have used <input> tags to create three radio buttons which give different options to the users.
We have also used the <label> tags to label our radio buttons.
We then used a couple of <br> tags to give ourselves a few line breaks so the whole form looks nice and evenly spaced.
The form was ended with a <button> tag which can be used to submit our form.
The <button> calls the checkValue() function when it is clicked.
Now we will write the JavaScript code to define the checkValue() function to check which radio button has been selected:
In the above code we first used a simple <h4> tag to give a heading so the user can easily understand the purpose of our form which is to choose a favourite colour.
We then used the <form> tag to create a form, inside which we have used <input> tags to create three radio buttons which give different options to the users.
We have also used the <label> tags to label our radio buttons.
We then used a couple of <br> tags to give ourselves a few line breaks so the whole form looks nice and evenly spaced.
The form was ended with a <button> tag which can be used to submit our form.
The <button> calls the checkValue() function when it is clicked.
Now we will write the JavaScript code to define the checkValue() function to check which radio button has been selected:
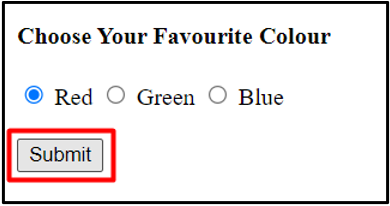 The code for the entire webpage:
<!DOCTYPE html><html>
<body>
<h4>Choose Your Favourite Colour</h4>
<form>
<input type="radio" id="Red" name="colour" value="Red" />
<label for="Red">Red</label>
<input type="radio" id="Green" name="colour" value="Green" />
<label for="Green">Green</label>
<input type="radio" id="Blue" name="colour" value="Blue" />
<label for="Blue">Blue</label>
<br><br>
<button id="submit" onclick="checkValue()">Submit</button>
</form>
</body>
<script>
function checkValue() {
var radios = document.getElementsByName("colour");
for (const radio of radios) {
if (radio.checked) {
alert(radio.value + " is your favourite colour");
break;
}
}
}
</script></html>
If we want to check for an individual radio button, we can give it a unique id and then use the getElementsById() method to store it in a variable.
We can then use the checked() property to check if the button has been picked.
The code for the entire webpage:
<!DOCTYPE html><html>
<body>
<h4>Choose Your Favourite Colour</h4>
<form>
<input type="radio" id="Red" name="colour" value="Red" />
<label for="Red">Red</label>
<input type="radio" id="Green" name="colour" value="Green" />
<label for="Green">Green</label>
<input type="radio" id="Blue" name="colour" value="Blue" />
<label for="Blue">Blue</label>
<br><br>
<button id="submit" onclick="checkValue()">Submit</button>
</form>
</body>
<script>
function checkValue() {
var radios = document.getElementsByName("colour");
for (const radio of radios) {
if (radio.checked) {
alert(radio.value + " is your favourite colour");
break;
}
}
}
</script></html>
If we want to check for an individual radio button, we can give it a unique id and then use the getElementsById() method to store it in a variable.
We can then use the checked() property to check if the button has been picked.
 Output
The display returns an output “String is empty” in the console window, which states that the string is empty.
Output
The display returns an output “String is empty” in the console window, which states that the string is empty.
 Output
The output returns “String is empty” which validates that the number of characters in the existing string is zero.
Output
The output returns “String is empty” which validates that the number of characters in the existing string is zero.
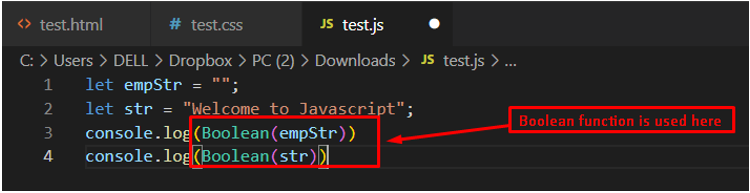 Output
The output returns a “false” value for an empty string in the console window, which validates that the number of existing characters in the string is zero.
Output
The output returns a “false” value for an empty string in the console window, which validates that the number of existing characters in the string is zero.
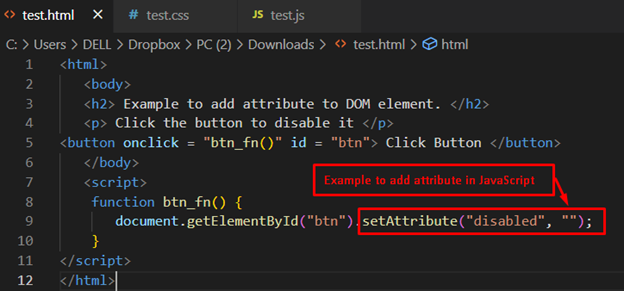 Output
 It is observed that after pressing the “Click button”, the disabled value is passed by the “setAttribute()” method.
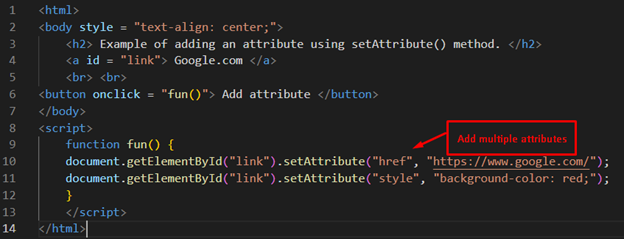 Output
 Firstly, the text is not clickable.
After pressing the button “Add attribute”, a link is added to the text “Google.com” which is clickable now and opens the webpage associated with the link.
Firstly, the text is not clickable.
After pressing the button “Add attribute”, a link is added to the text “Google.com” which is clickable now and opens the webpage associated with the link.
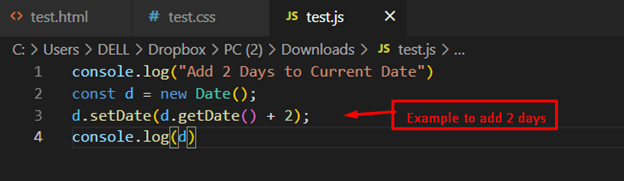 Output
 The output returns the updated date “Sat Aug 27, 2022, 09:45:00 GMT+0500 (Pakistan Standard Time)” by adding two days to the current date.
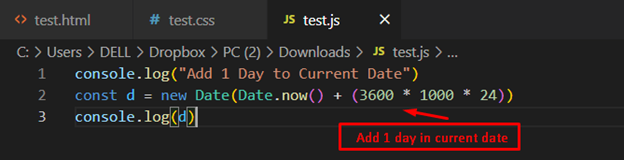 Output
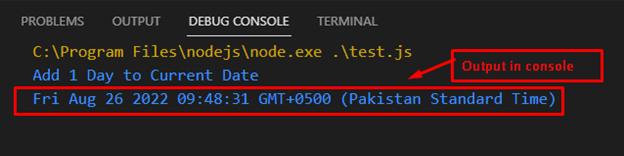 The output returns “Fri Aug 26, 2022, 09:48:31 GMT+0500 (Pakistan Standard Time)” by adding 1 day to the current date.
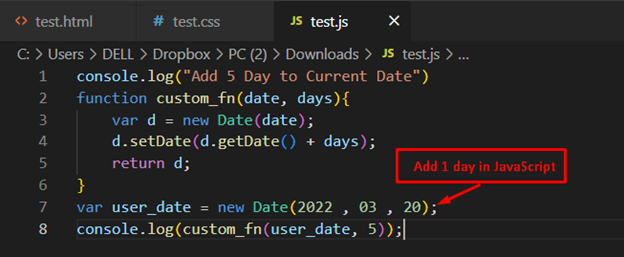 Output
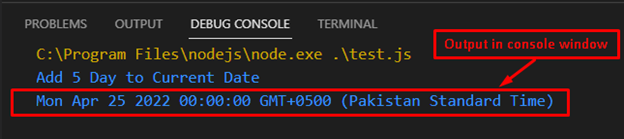 The output shows that a custom function is utilized for adding 5 days to the manual assignment date.
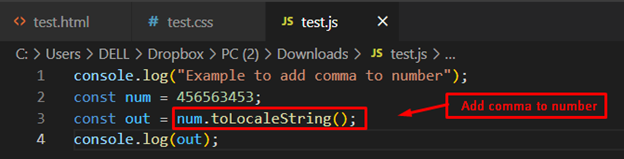 Output
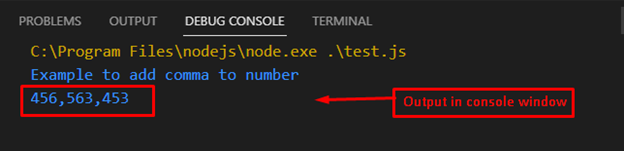 The output shows that the input number is separated by commas.
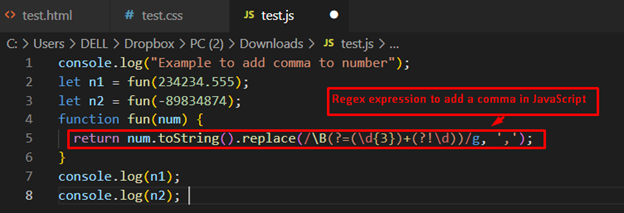 Output
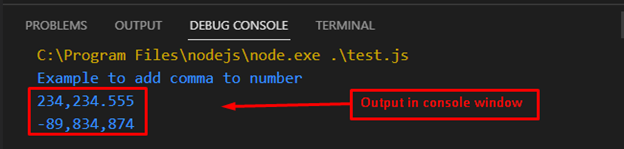 The output shows that “234234.555” and “-89834874” are converted to “234,234.555” and “-89,834,874” respectively.
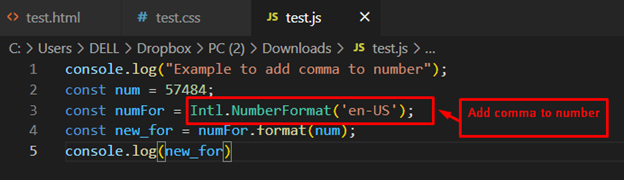 Output
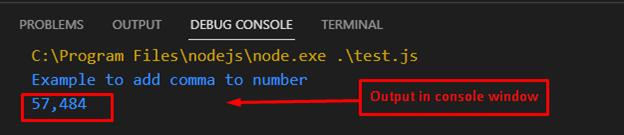 The output shows that “57484” is converted to “57,484” after adding commas.
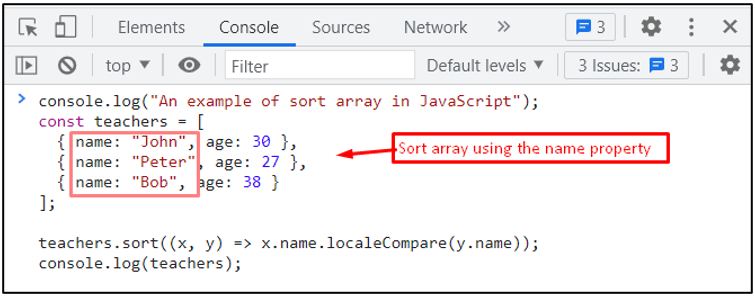 Output
The output returns the sorted array in alphabetical order, such as Bob, John, and Peter.
Output
The output returns the sorted array in alphabetical order, such as Bob, John, and Peter.
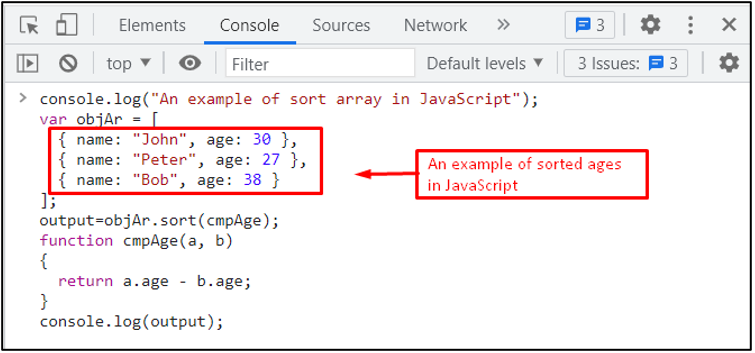 Output
The output shows the sorted array by using the age property.
Output
The output shows the sorted array by using the age property.
 The output shows that “25.1” is converted to “26” (as the nearest higher integer value of “25.1”) and “-25.1” to “-25” (nearest higher integer value of “-25.1”).
 It is observed that “25.13” is converted to “25” (as the value after the fractional point is less than 5).
Similarly, the value “13.523” is converted to “14” (because the value after the fractional point is greater than 5).
It is observed that “25.13” is converted to “25” (as the value after the fractional point is less than 5).
Similarly, the value “13.523” is converted to “14” (because the value after the fractional point is greater than 5).
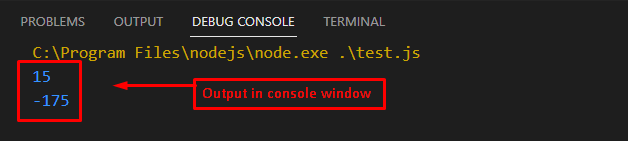 The output removes the fractional part of the floating number (.1) and returns the integer “15” and “-175” in the console window.
 The output shows that “24.5” is converted to “24” (by removing floating numbers).
Similarly, “-24.5” to “-24” (by removing floating numbers) in the console window.
The output shows that “24.5” is converted to “24” (by removing floating numbers).
Similarly, “-24.5” to “-24” (by removing floating numbers) in the console window.
 The output shows “23.5” to “23” and “-25.5” to “-25” by removing the fractional number in the console window.
 The output shows that the Math.floor() method has converted (by removing the fractional part) the “25.1” to “25” and “-25.1” to “-26”.
 The output returns the integer number “6546” (the closest integer number) from “6546.1453” in the console window.
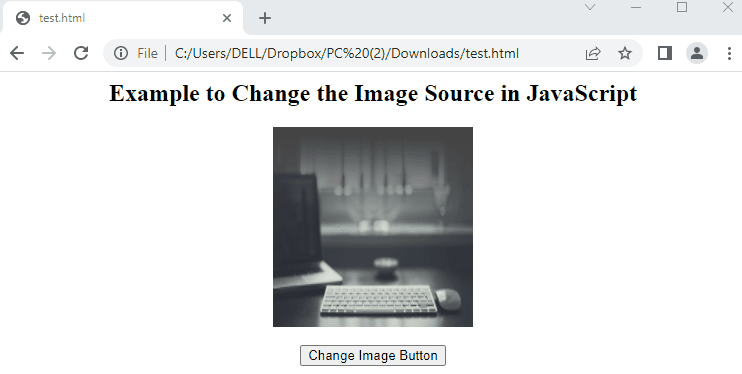 The output shows that after pressing the “Change Image Button” the source file of the image is changed, and the new image is displayed.
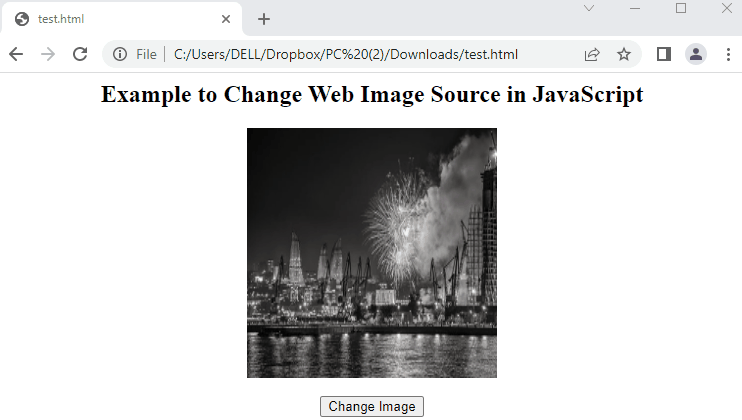 The output illustrates that when a user clicks on the “Change Image”, the new image is replaced with the existing one.
 The output returns a message with a “Download Link”.
After pressing a link, an image file in JPG format is downloaded.
The output returns a message with a “Download Link”.
After pressing a link, an image file in JPG format is downloaded.
 The output displays a text area in which the message “Welcome to JavaScript” is written.
After pressing the “Download Button”, the text file named “JavaScript.txt” is downloaded, containing the message in it.
The output displays a text area in which the message “Welcome to JavaScript” is written.
After pressing the “Download Button”, the text file named “JavaScript.txt” is downloaded, containing the message in it.
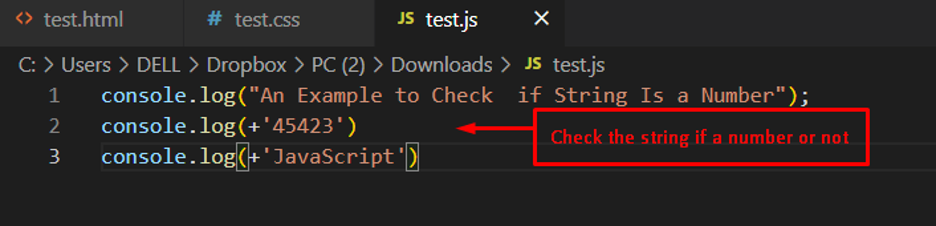 Output
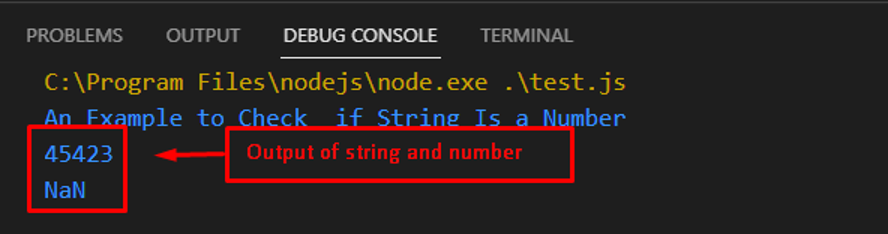 The outcome returns 45423 and NaN on the console.
It shows that the plus operator evaluates the string by returning a NaN value.
The outcome returns 45423 and NaN on the console.
It shows that the plus operator evaluates the string by returning a NaN value.
 Output
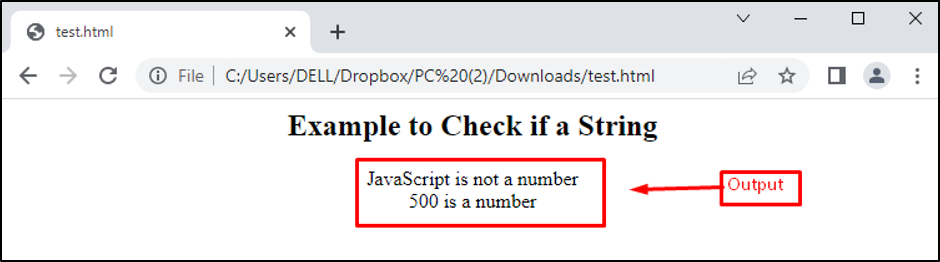 The output shows that “JavaScript is not a number” and “500 is a number”.
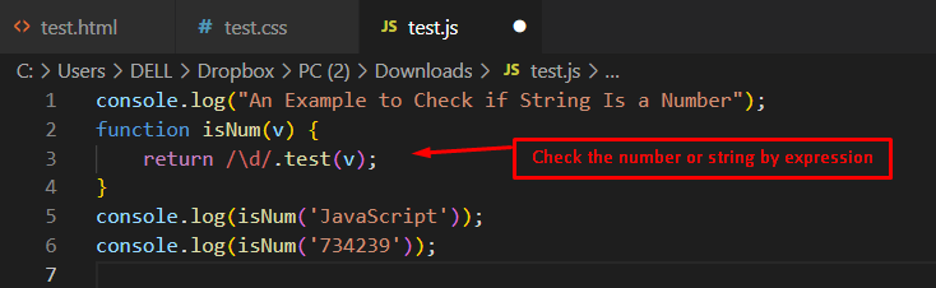 Output
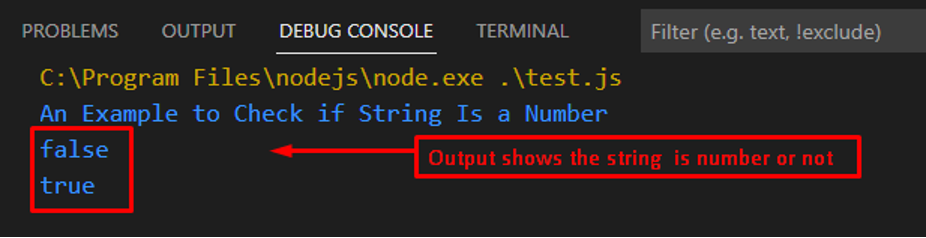 The output shows that the string “JavaScript” returns false.
It represents the passing string as an illegal number.
The output shows that the string “JavaScript” returns false.
It represents the passing string as an illegal number.
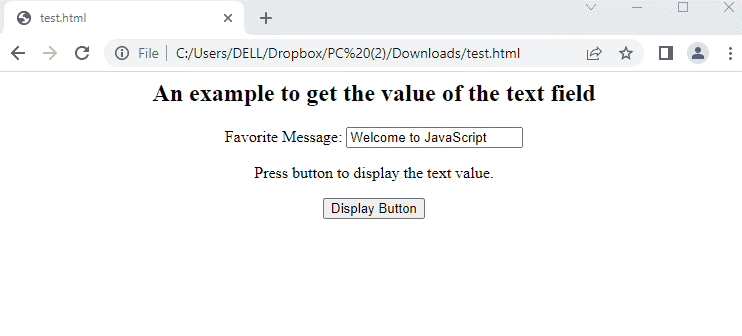
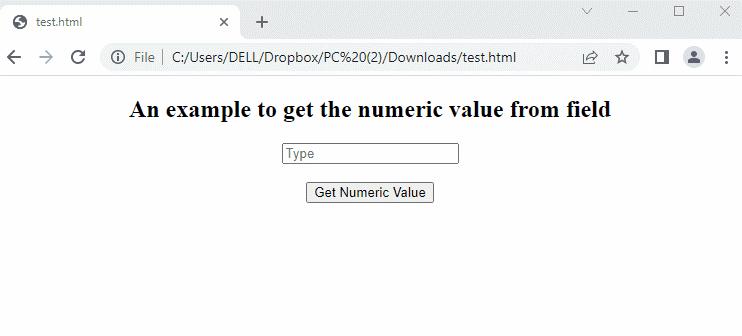 The output shows that the user first inputs any number.
After that, an alert box is generated by pressing the “Get Numerical Value” button.
The output shows that the user first inputs any number.
After that, an alert box is generated by pressing the “Get Numerical Value” button.
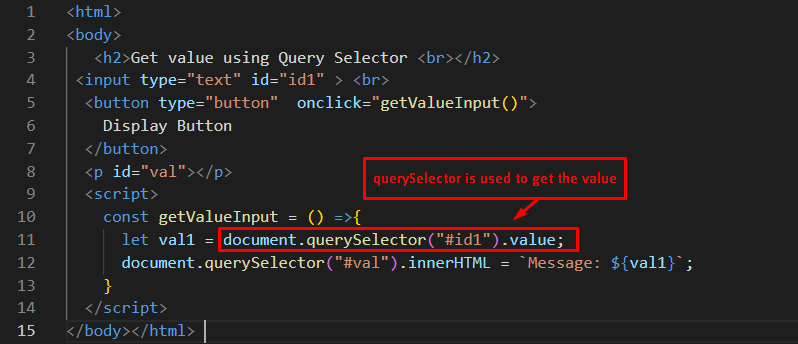 Output
 The output shows the message “JavaScript” by pressing the button in the browser.
 The output shows the “teacher” array of JSON objects in the console window.
 Output
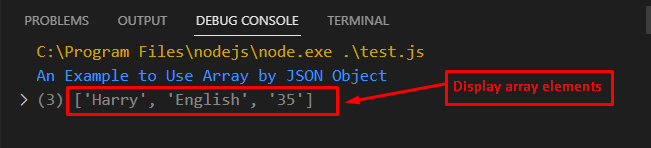 The output shows different values, “Harry”, “English”, and “35” by assigning properties.
 Output
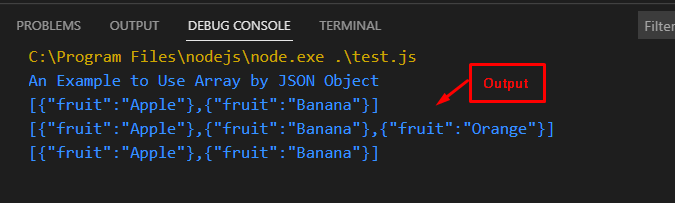 The output shows the above code execution by adding and removing the array elements “fruit”: “Orange” through the JSON objects.
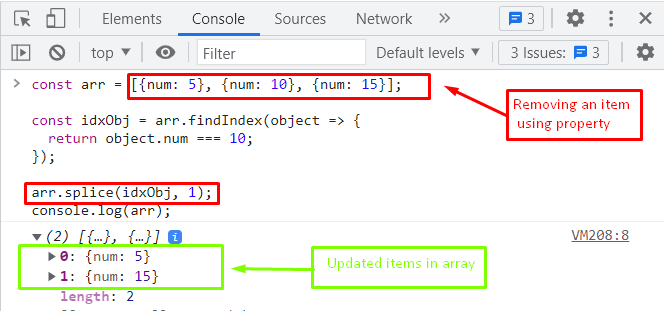 The output returns the new array, whose length is 2.
In this new array, the item whose value is equal to 10 is removed through the arr.splice() method.
The output returns the new array, whose length is 2.
In this new array, the item whose value is equal to 10 is removed through the arr.splice() method.
 Output
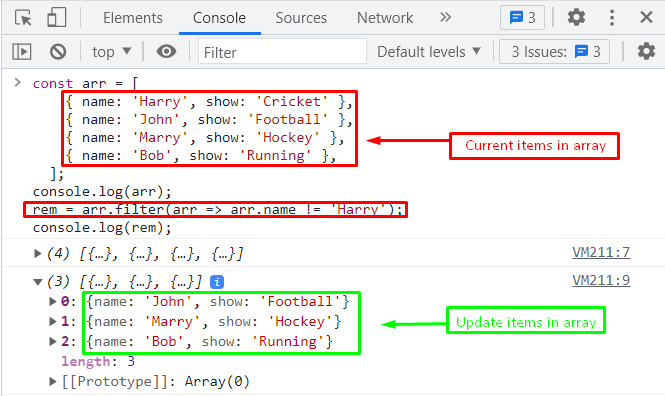 The output of the code returns the new array by removing a specific item whose value is equal to “Harry”.
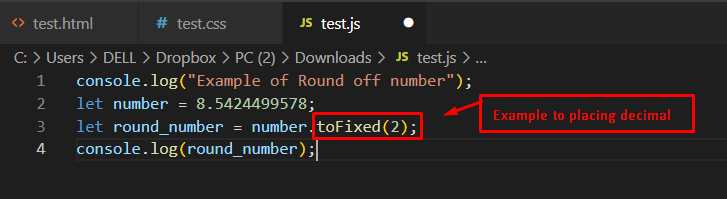 Output
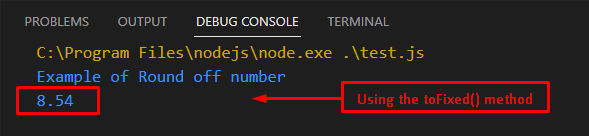 The toFixed() method is utilized to round a number to 2 decimal places, from 8.5424499578 to 8.54.
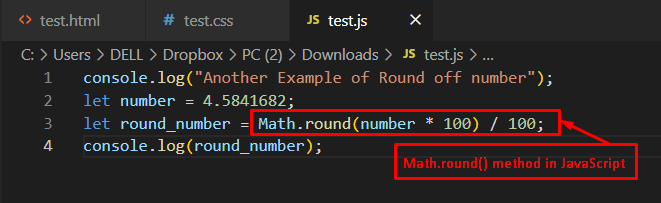 Output
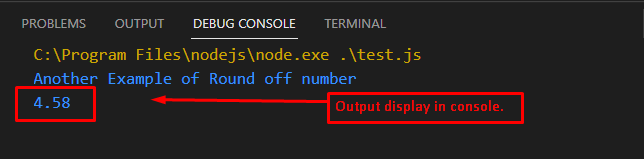 The output shows that the number 4.5841682 has been rounded off to 4.58 by placing the 2 decimal numbers.
It is possible through the built-in Math.round() method of JavaScript.
The output shows that the number 4.5841682 has been rounded off to 4.58 by placing the 2 decimal numbers.
It is possible through the built-in Math.round() method of JavaScript.
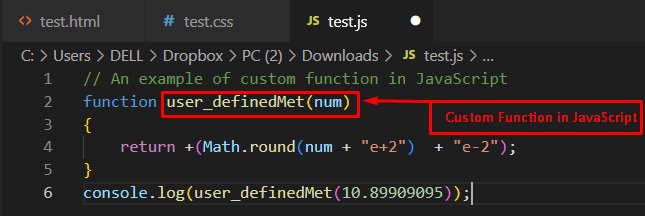 In this code, the method user_definedMet is adapted as a custom function to round a number by passing a num variable.
In this method, the Math.round() method is employed for rounding the number up or down based on the exponent e.
Finally, the console.log() method is utilized to display the output of a custom function by passing a 10.89909095 number.
Output
In this code, the method user_definedMet is adapted as a custom function to round a number by passing a num variable.
In this method, the Math.round() method is employed for rounding the number up or down based on the exponent e.
Finally, the console.log() method is utilized to display the output of a custom function by passing a 10.89909095 number.
Output
 The outcome of the above code execution rounds off from 10.89909095 to 10.9.
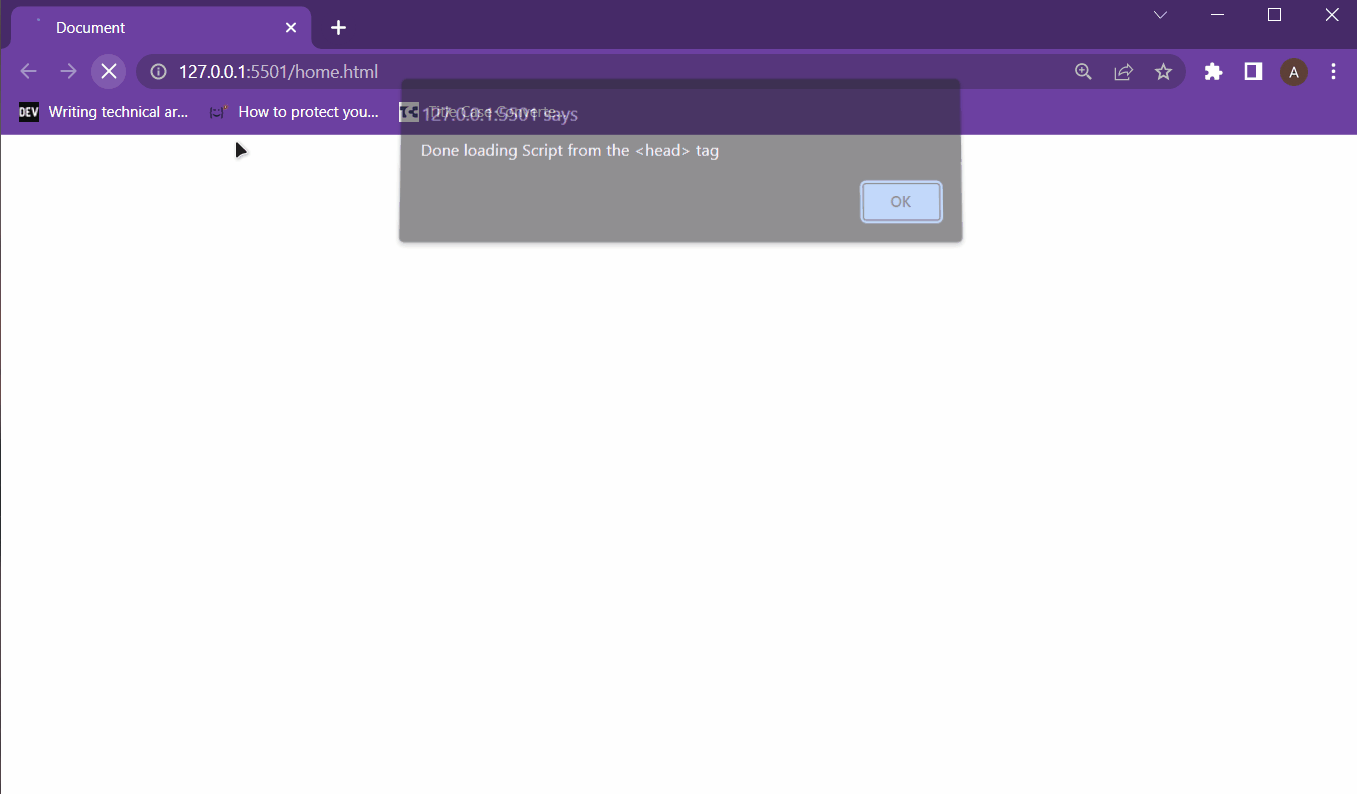 From this output, it is clear that putting the script in the <head> causes it to load even before the DOM is ready.
 It is clear from the above output that the script is working fine in the <body> tag
 However, opening the browser’s console shows the difference, because in the console there is this error:
 This error is caused by JavaScript trying to get the reference of an element from the body tag, which has not been yet initialized by DOM because the JavaScript in the head tag was executed even before the DOM was fully loaded.
So, in conclusion, placing the script in the head tag or the body tag comes down to the working of the webpage.
This error is caused by JavaScript trying to get the reference of an element from the body tag, which has not been yet initialized by DOM because the JavaScript in the head tag was executed even before the DOM was fully loaded.
So, in conclusion, placing the script in the head tag or the body tag comes down to the working of the webpage.
 To verify that this splice() method doesn’t affect the original array, simply print the original array onto the terminal as well:
console.log("The array after slice() method", returnedArray);
console.log("The original array is as", arrayVar);
Execute the program again to get the following output on the terminal:
To verify that this splice() method doesn’t affect the original array, simply print the original array onto the terminal as well:
console.log("The array after slice() method", returnedArray);
console.log("The original array is as", arrayVar);
Execute the program again to get the following output on the terminal:
 It is clear from the output mentioned above that the original array was not affected with the slice() method.
 It is clear from the output that the subarray has 5 elements subtracted from the original array.
To demonstrate the effect of the splice() method on the original array, print out the original array as well using the console log function:
console.log("The array after slice() method", returnedArray);
console.log("The original array is as", arrayVar);
Executing the code will provide the following output on the terminal:
It is clear from the output that the subarray has 5 elements subtracted from the original array.
To demonstrate the effect of the splice() method on the original array, print out the original array as well using the console log function:
console.log("The array after slice() method", returnedArray);
console.log("The original array is as", arrayVar);
Executing the code will provide the following output on the terminal:
 It is clear from the output that the selected elements were removed from the original array and moved to the second array which is returnedArray variable.
So it is easy to conclude that the splice() method does alter the original array.
It is clear from the output that the selected elements were removed from the original array and moved to the second array which is returnedArray variable.
So it is easy to conclude that the splice() method does alter the original array.
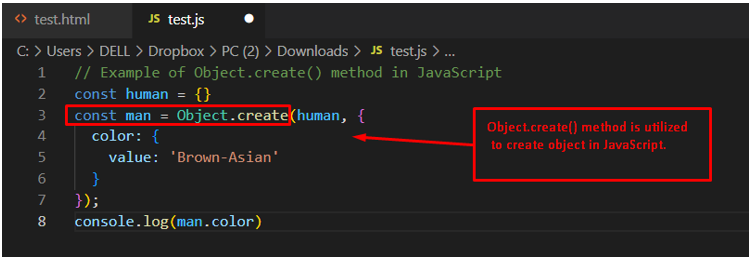 Output
The output shows that the color property of the man object is displayed on the console.
Output
The output shows that the color property of the man object is displayed on the console.
 Output
The display shows the properties of a new object me that is already present in the existing object school.
In this way, the Object.create() method retrieves the specified prototype of the object in JavaScript.
Output
The display shows the properties of a new object me that is already present in the existing object school.
In this way, the Object.create() method retrieves the specified prototype of the object in JavaScript.
 The output shows that only the year number is printed on the console.
 It is observed that only the month number is returned.
 From the output, it is observed that the date (25) is retrieved and printed on the console.
 The output returns the 6 that represents the Saturday of the week.
 The display shows the value of 8, which represents the 8th hour.
 The output returns a value of 4, which indicates that the current time is in the 4th minute of the hour.
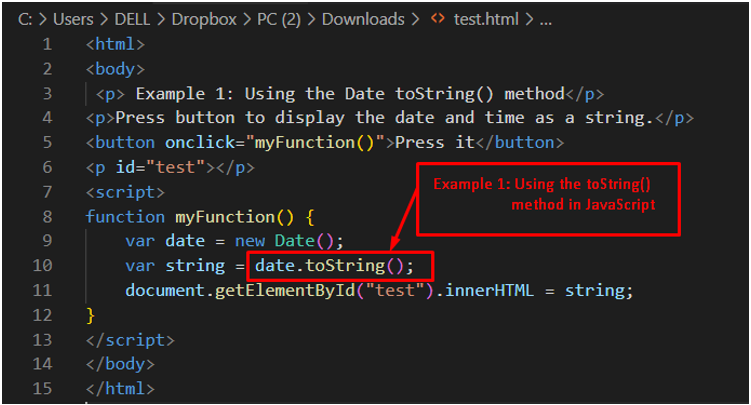 Output
The outcome of the above code is presented here.
Upon pressing the button, the current date, day, and time is displayed on the browser.
Output
The outcome of the above code is presented here.
Upon pressing the button, the current date, day, and time is displayed on the browser.
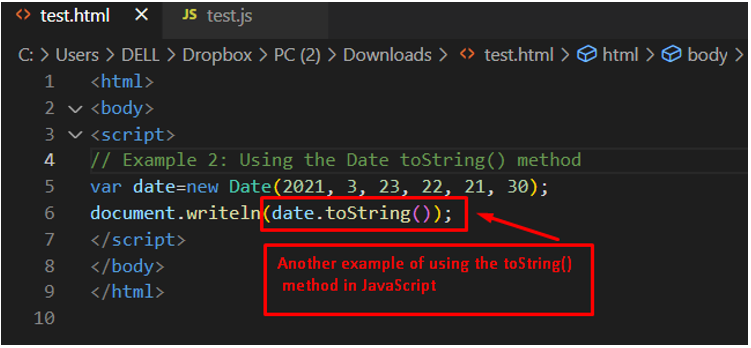 Output
In the output, the value presented in the date object is converted into string and is printed on the browser.
Output
In the output, the value presented in the date object is converted into string and is printed on the browser.
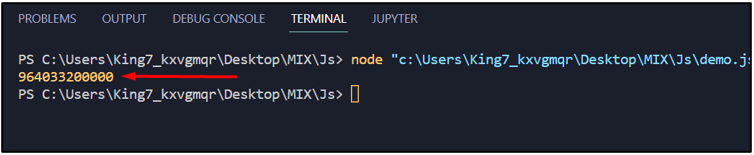 The output on the terminal is the number of milliseconds elapsed from 1970 to the date given in the string variable.
 The result on the terminal is a NaN, which means that it is “Not a Number”.
 This result is the number of years passed since 1st January 1970 till 25th Dec 2005.
 The webpage asks for the user’s first name, email address, and contact number.
 The webpage prompted the user that the name was invalid.
Try again with the correct name and incorrect email address:
The webpage prompted the user that the name was invalid.
Try again with the correct name and incorrect email address:
 The user was alerted that the email address is not valid.
After that, try with a valid name and valid email address but with an invalid contact number like:
The user was alerted that the email address is not valid.
After that, try with a valid name and valid email address but with an invalid contact number like:
 The webpage prompted the user that the contact number is not valid.
After that, for the final test, provide all the correct information like:
The webpage prompted the user that the contact number is not valid.
After that, for the final test, provide all the correct information like:
 With all correct information provided, the form validation is successful and the web application can move forward.
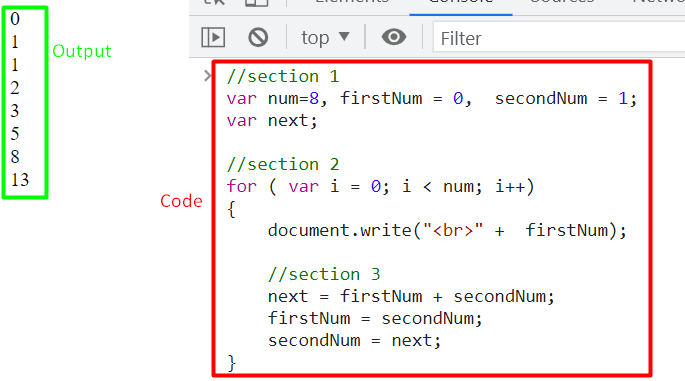 This is the easiest way to implement the Fibonacci Series.
If someone desires they can take user input instead of hard coding the maximum number in the series.
This is the easiest way to implement the Fibonacci Series.
If someone desires they can take user input instead of hard coding the maximum number in the series.
 The result of 5 + 10 was printed on the terminal as 15.
 The result, 35 was printed on the terminal
 The value of 150 + 270 was printed on the terminal as “420”
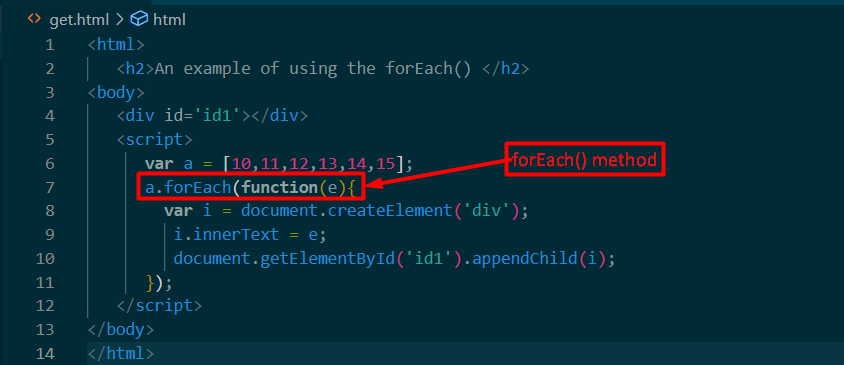 Output
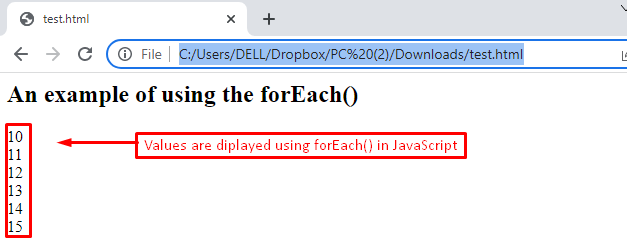 It is observed that the elements of the array are printed on the browser’s window.
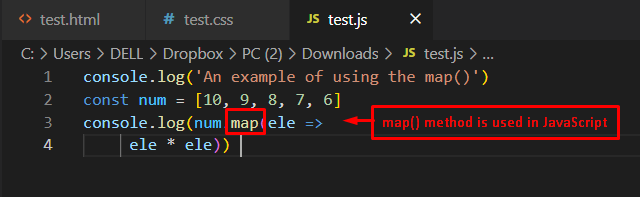 Output
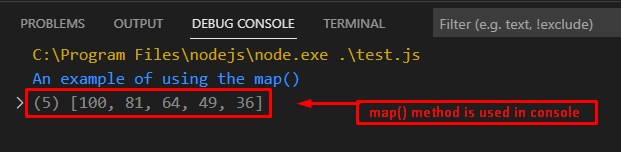 The outcome of the code shows that the map() method returns the square values 10, 9, 8, 7, and 6 to 100, 81, 64, 49, and 36.
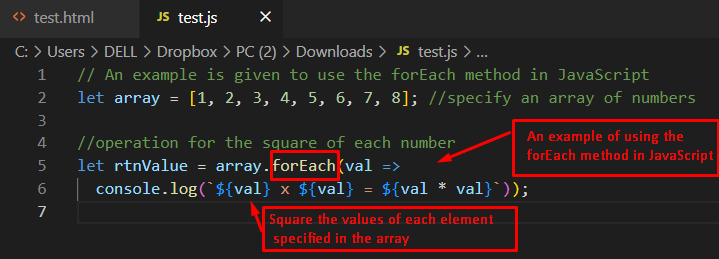 Output
 The output shows the square of all eight elements of the array in the console.
 Output
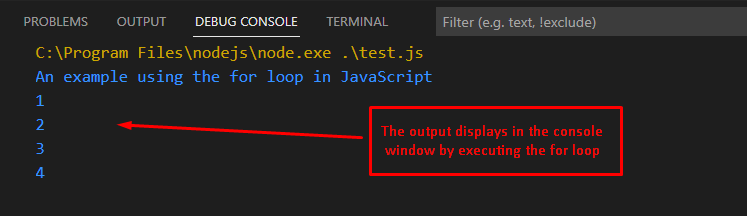 The output shows that the for loop executes the statements four times (as the number of elements is four in the array).
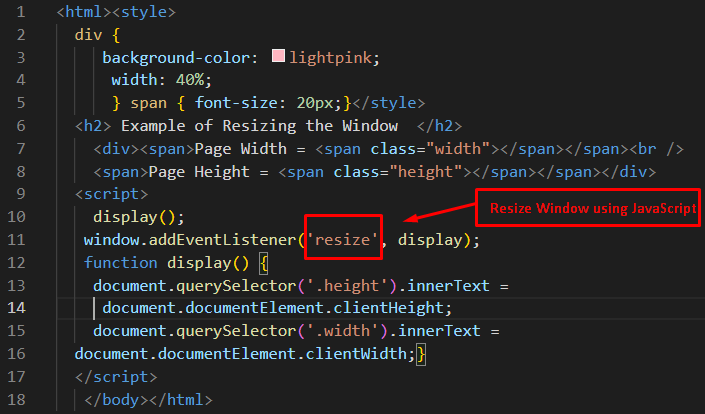 Output
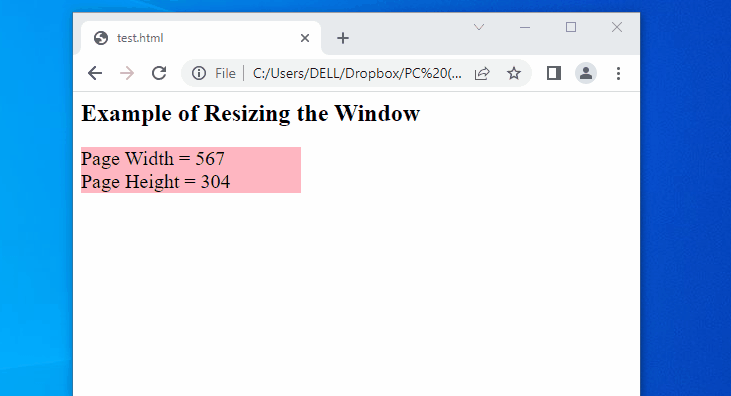 The output is explained here:
A message is displayed first with heading tags.
Initially, the Page Width and the Page Height of the existing window are set to 567 and 304 pixels, respectively.
The values of Page Width and Page Height are updated according to the dimension of the current window.
The output is explained here:
A message is displayed first with heading tags.
Initially, the Page Width and the Page Height of the existing window are set to 567 and 304 pixels, respectively.
The values of Page Width and Page Height are updated according to the dimension of the current window.
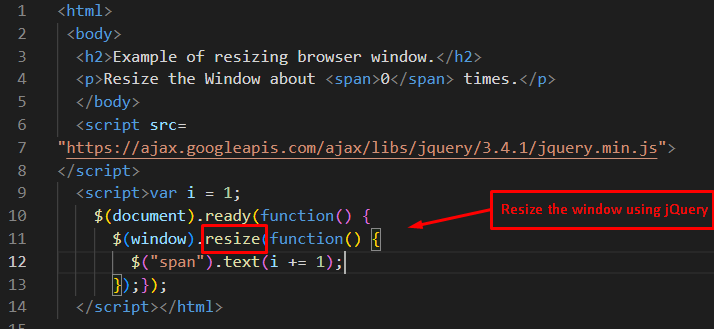 Output
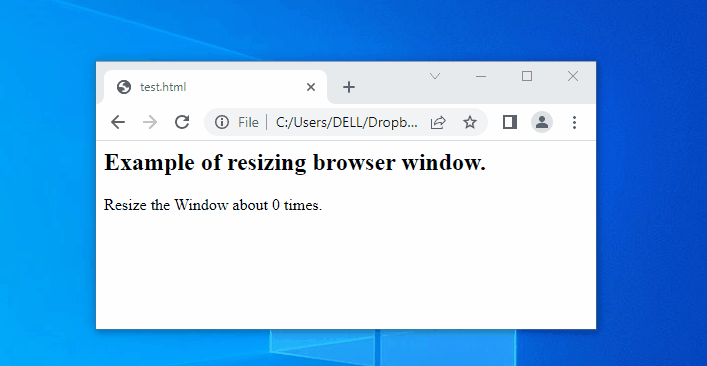 The output shows the execution of the above code.
It displays a value that dynamically updates with the size of the window screen.
It represents the number of times the window resizes.
The output shows the execution of the above code.
It displays a value that dynamically updates with the size of the window screen.
It represents the number of times the window resizes.
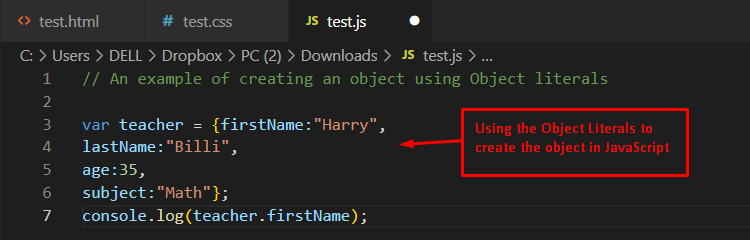 Output
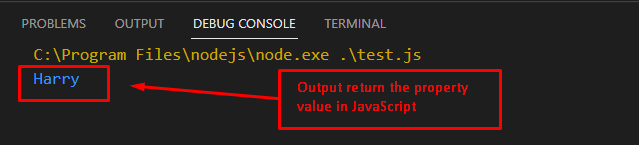 The output returns the specific property of an object by creating the object literal method.
Note: JavaScript 1.1 and earlier do not support object literals for initializing objects.
The output returns the specific property of an object by creating the object literal method.
Note: JavaScript 1.1 and earlier do not support object literals for initializing objects.
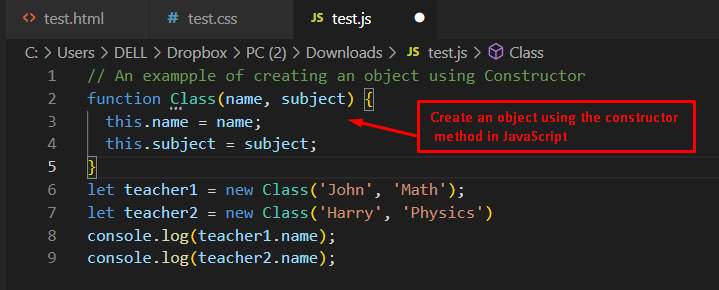 Output
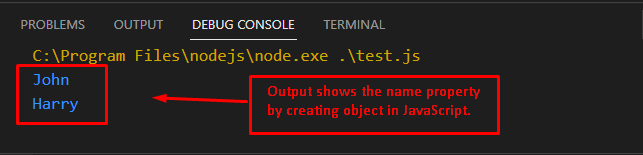 The output returns the names John and Harry that are associated with the properties of teacher1 and teacher2.
 Output
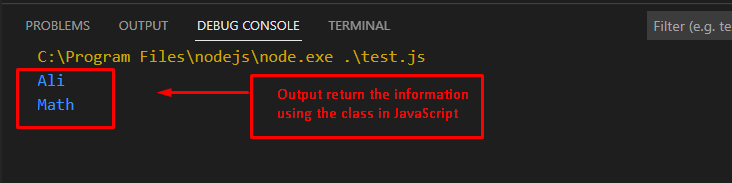 The output shows the execution of the above code in such a way that object teacher1 returns the name property Ali.
In the same way, the subject property of object teacher2 is returned by utilizing the dot operator in JavaScript.
The output shows the execution of the above code in such a way that object teacher1 returns the name property Ali.
In the same way, the subject property of object teacher2 is returned by utilizing the dot operator in JavaScript.
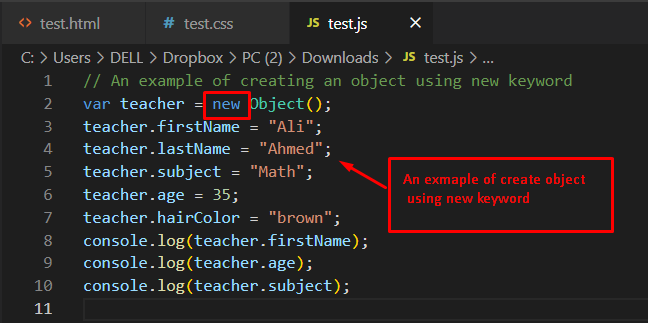 Output
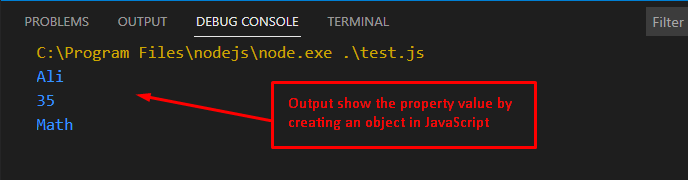 The output displays the execution of the code by utilizing the new keyword.
First, the teacher.Name returned the name of teacher Ali. Similarly, teacher.age and teacher.subject is utilized to display the age and subject of the teacher in JavaScript.
The output displays the execution of the code by utilizing the new keyword.
First, the teacher.Name returned the name of teacher Ali. Similarly, teacher.age and teacher.subject is utilized to display the age and subject of the teacher in JavaScript.
 The final value was printed on the terminal.
 All the values from the array were subtracted from 1000, and the final value has been printed on the terminal.
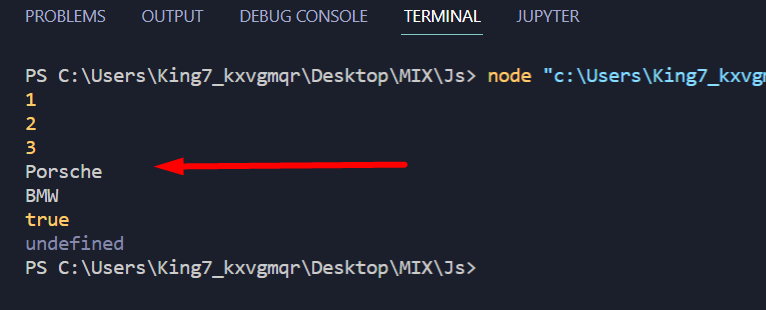 As you can see, every element was printed on the terminal
 Both of the elements of the array of objects was printed on the terminal.
To access a specific value, let the car made of the object carObj use the following line of code:
console.log(arrayVariable[1].carMake);
This will give the following output on the terminal:
Both of the elements of the array of objects was printed on the terminal.
To access a specific value, let the car made of the object carObj use the following line of code:
console.log(arrayVariable[1].carMake);
This will give the following output on the terminal:

 Output
 The output represents that a simple digital clock is displayed on the webpage which shows the current time.
 The div is not visible, because currently it doesn’t contain any other elements or text.
 And the linear graph has been plotted inside the div showcasing the percentages of different car makes from a survey.
 As it is visible in the output, the items of the drop-down list are not in the correct spot.
They should be:
Hidden until the button is clicked
Vertically inline with the button since it is a “Drop-down” list
So, let’s fix that in the next step
As it is visible in the output, the items of the drop-down list are not in the correct spot.
They should be:
Hidden until the button is clicked
Vertically inline with the button since it is a “Drop-down” list
So, let’s fix that in the next step
 The list items are now hidden, all there is left to do is to toggle their display property upon button press.
Let’s do that in the next step.
The list items are now hidden, all there is left to do is to toggle their display property upon button press.
Let’s do that in the next step.
 And the drop-down list is working perfectly fine.
 As shown in this snippet, you will get an output of the date corresponding to the milliseconds that you input into the variable.
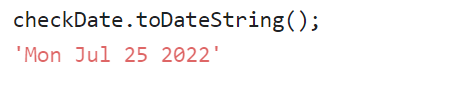
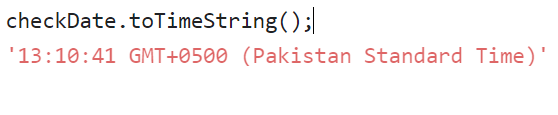

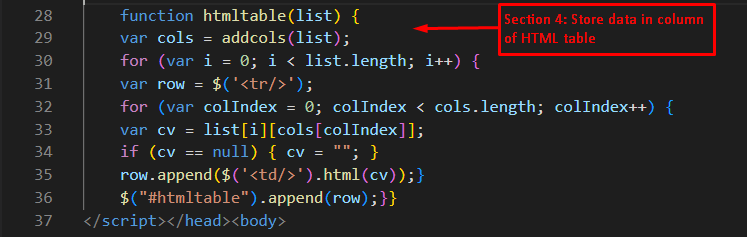 Output
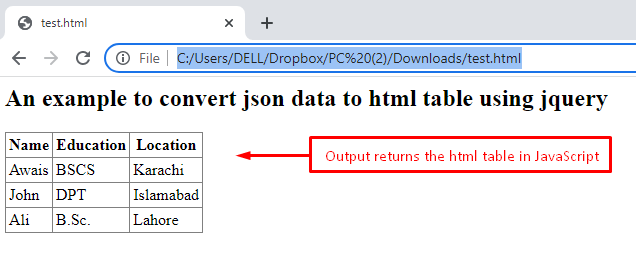 The output returns the execution of all the above sections of code in an HTML table.
The Name, Education, and Location are represented in the header.
Moreover, different values for these headers are presented in the table.
The output returns the execution of all the above sections of code in an HTML table.
The Name, Education, and Location are represented in the header.
Moreover, different values for these headers are presented in the table.
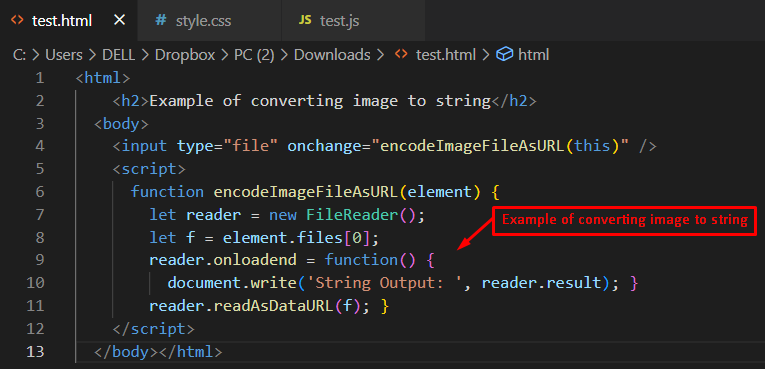 Output
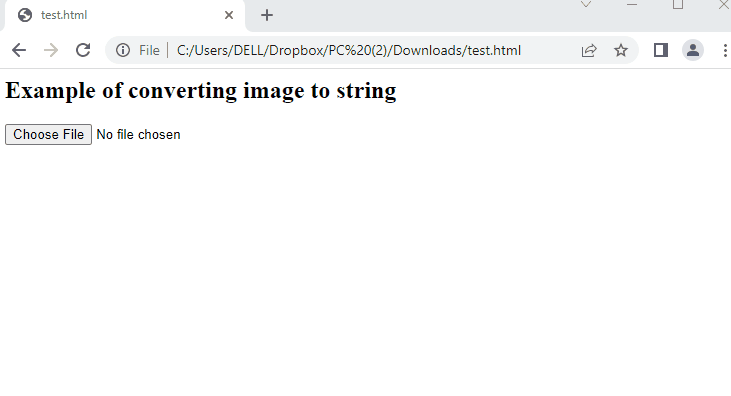 Upon clicking the “Choose File” button, the user needs to choose the image file.
Once the image file is selected, you will see the corresponding string on the screen.
Upon clicking the “Choose File” button, the user needs to choose the image file.
Once the image file is selected, you will see the corresponding string on the screen.

 The next output shows rounding off to the next whole number:


 The example above clearly shows how the Math.round() differs from the other Math functions since it rounds up the decimal into a whole number.
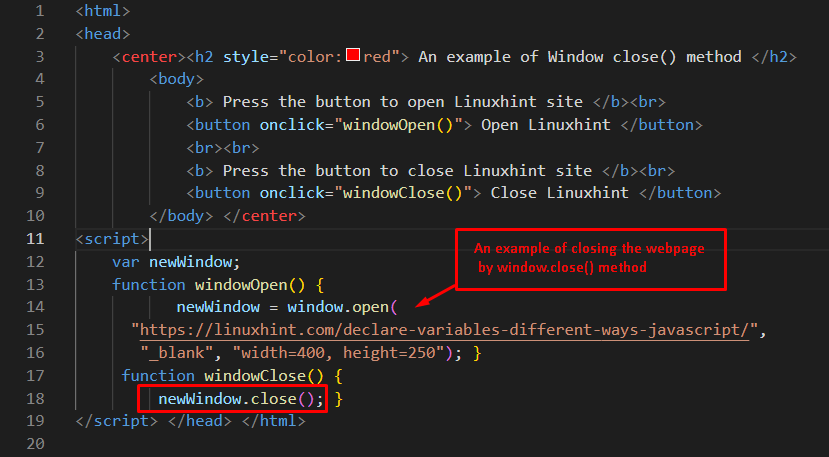 Output
 The output shows the execution of the window.close() method.
The link is opened using the “Open Linuxhint” button.
When the “Close Linuxhint” button is pressed, the window is closed.
The output shows the execution of the window.close() method.
The link is opened using the “Open Linuxhint” button.
When the “Close Linuxhint” button is pressed, the window is closed.

 In this example, it is very clear that the string “notpal” is not a palindrome and the program shows the output.
 Through these 3 simple stages, the result has been found for the question of whether a certain integer is prime or not?
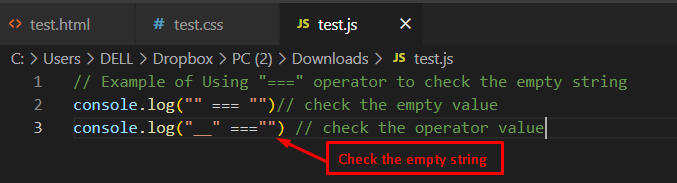 After the execution of the code, the output is given below.
Output
After the execution of the code, the output is given below.
Output
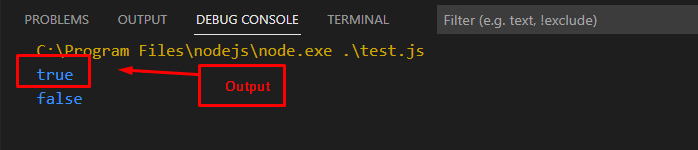 The outcome of the code returns values after validating/checking the strings that are filled or empty.
In this way, the first line returns the true value that validates the empty string code.
The outcome of the code returns values after validating/checking the strings that are filled or empty.
In this way, the first line returns the true value that validates the empty string code.
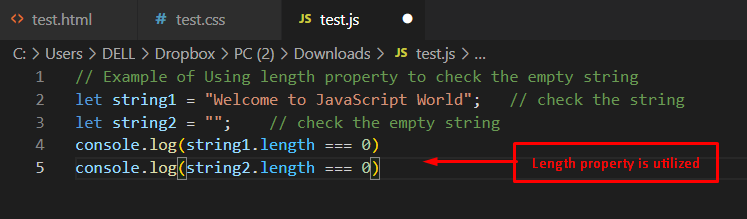 Note: The length property is not compatible with undefined and null strings.
Output
Note: The length property is not compatible with undefined and null strings.
Output
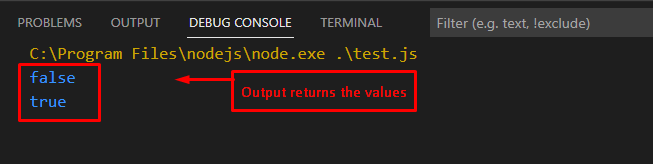 The above display indicates that the second value in the output is true, which validates that the string is empty.
While other values return false, which shows the strings are filled.
The above display indicates that the second value in the output is true, which validates that the string is empty.
While other values return false, which shows the strings are filled.
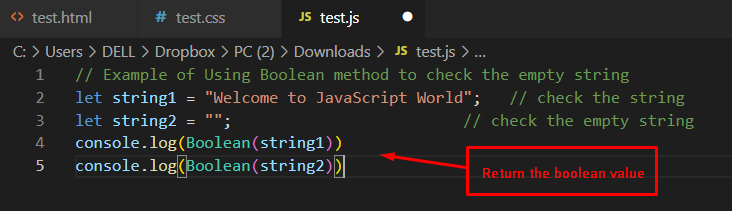 Note: The method does not compute the null and undefined strings.
Output
Note: The method does not compute the null and undefined strings.
Output
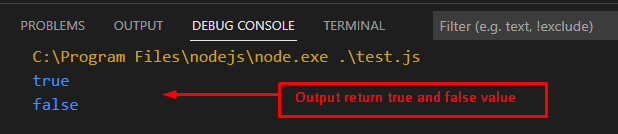 The same result can be seen in the output with the Boolean method that validates that the first string is filled, and the other is empty.
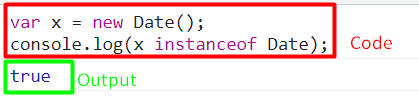 In this scenario, since x is an object created using the Date() constructor, the instanceof keyword returns true.
 Since the variable being converted is a Date(), it returns the milliseconds.
This indicates that the isNaN will return false.
Now let’s combine our two concepts into a function together to prove that a number is a valid date.
The code is given down below:
function validDate() {
var x = new
Since the variable being converted is a Date(), it returns the milliseconds.
This indicates that the isNaN will return false.
Now let’s combine our two concepts into a function together to prove that a number is a valid date.
The code is given down below:
function validDate() {
var x = new 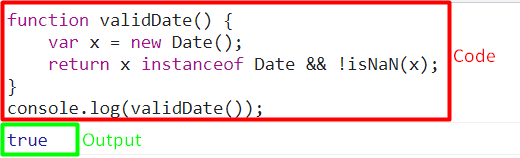 This example shows a valid date variable being verified.
 In this example, an invalid date exists, and hence the false shows that it is not a valid date.
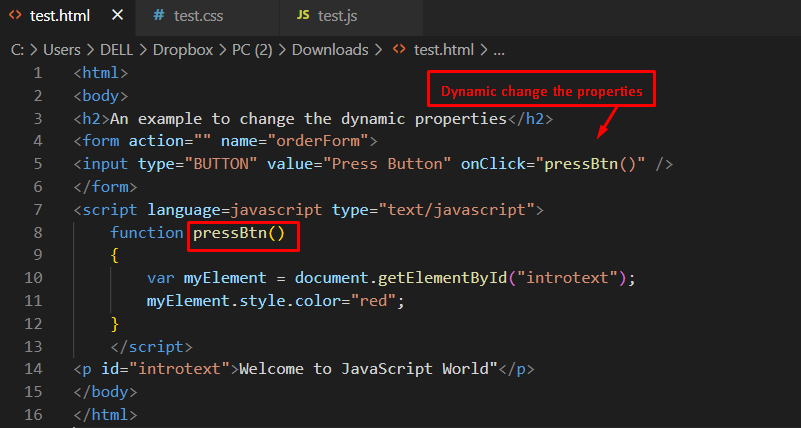 Output
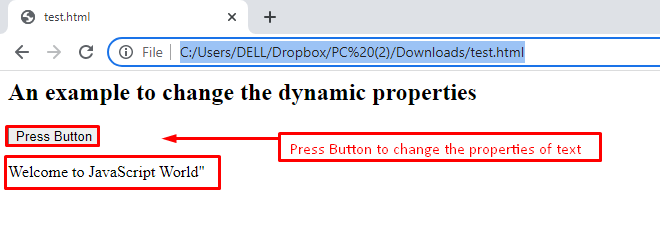 After pressing the button “Press Button”, the pressBtn() method is triggered, which changes the style attribute of this specific element dynamically.
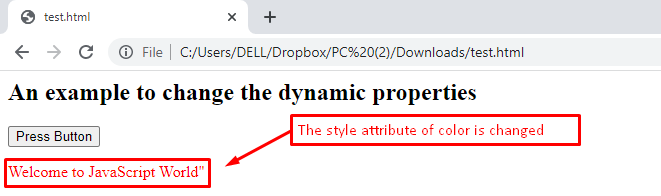 Finally, the black text color of “Welcome to JavaScript” is changed to red in the browser by utilizing the JavaScript pressBtn() method.
 The output is as follows:

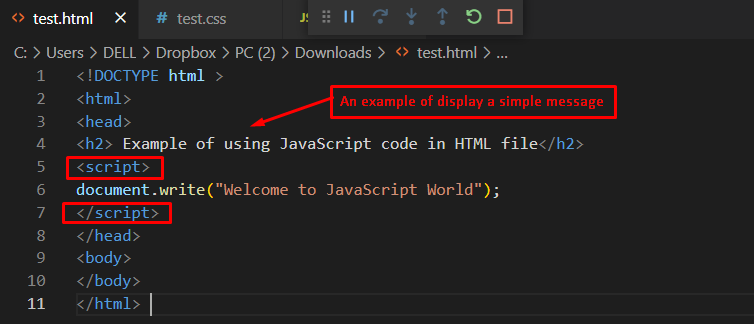 Output
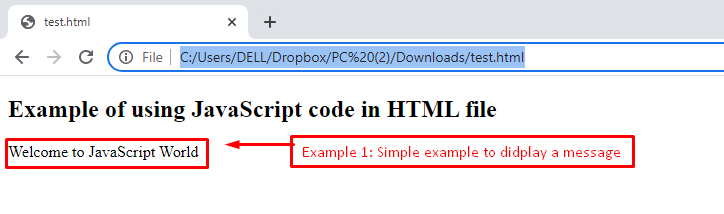 The outcome of the code displays the message “Welcome to JavaScript World” in the browser window.
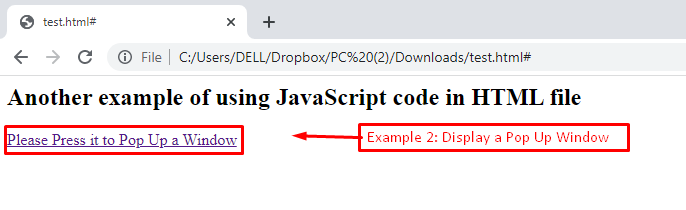 The outcome returns a link that is stated as “Please Press it to Pop Up a Window” in the browser.
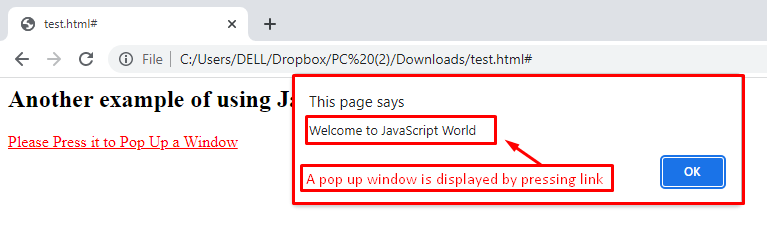 After pressing the link, a new pop-up is generated that displays the message “Welcome to JavaScript”.
Here you go! You have learned the concept of inline JavaScript and its application as well.
After pressing the link, a new pop-up is generated that displays the message “Welcome to JavaScript”.
Here you go! You have learned the concept of inline JavaScript and its application as well.
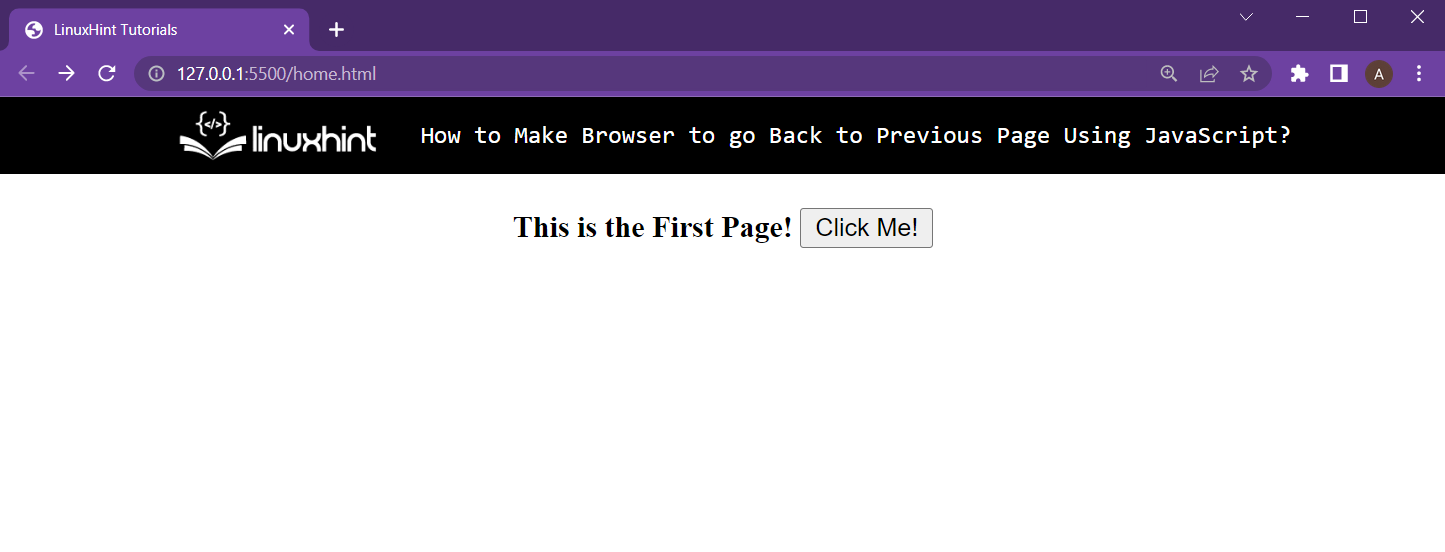 After that, create another HTML document in the same directory (this is important to make it a relative URL) and name it as secondPage.html.
After that, type the following lines in the secondPage.html:
<center><b>This is the second page</b><br /><br /><b>I'm in the same Directory as home.html</b>
</center>
Running the secondPage.html in the web browser gives the following outcome:
After that, create another HTML document in the same directory (this is important to make it a relative URL) and name it as secondPage.html.
After that, type the following lines in the secondPage.html:
<center><b>This is the second page</b><br /><br /><b>I'm in the same Directory as home.html</b>
</center>
Running the secondPage.html in the web browser gives the following outcome:
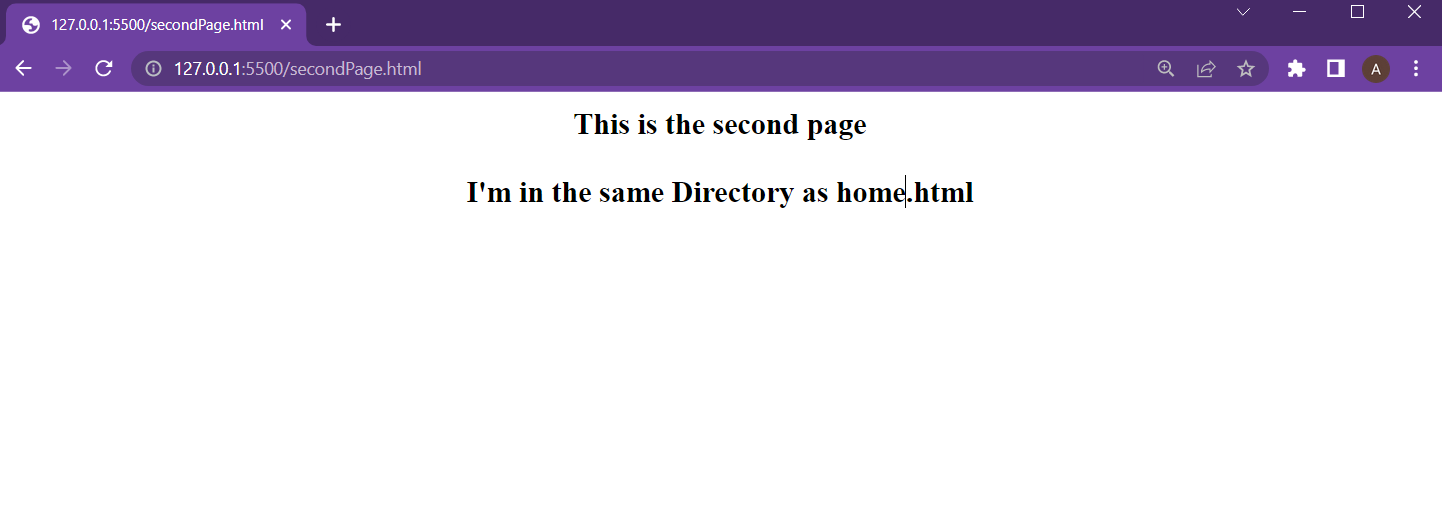 Setting up the web pages is done.
Let’s move to the two different methods for relative URL redirecting.
Setting up the web pages is done.
Let’s move to the two different methods for relative URL redirecting.
 From the output, it is clear that pressing the button redirects the user to the secondPage.html using its relative URL
 It is clear that the user was redirected to the second by using the Relative of the second page with the help of JavaScript.
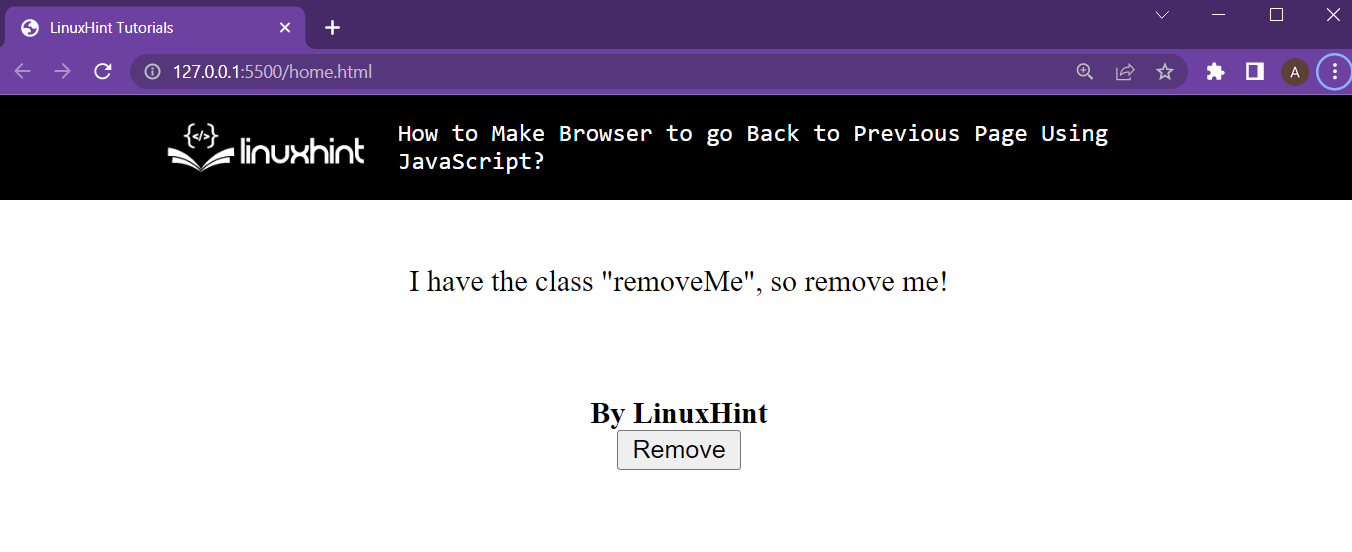 The button is added to the webpage, now in the <script> tag add in the following lines:
function buttonClicked() {
elem = document.getElementsByClassName("removeMe");
elem.remove();}
In the above lines:
The function buttonClicked() is created, which will be executed upon pressing the remove button
Inside the function, a reference to the element to be removed is created by using its className
After that, the remove() method is called on the element to remove it from the HTML document
Execute the code now to get the following results:
The button is added to the webpage, now in the <script> tag add in the following lines:
function buttonClicked() {
elem = document.getElementsByClassName("removeMe");
elem.remove();}
In the above lines:
The function buttonClicked() is created, which will be executed upon pressing the remove button
Inside the function, a reference to the element to be removed is created by using its className
After that, the remove() method is called on the element to remove it from the HTML document
Execute the code now to get the following results:
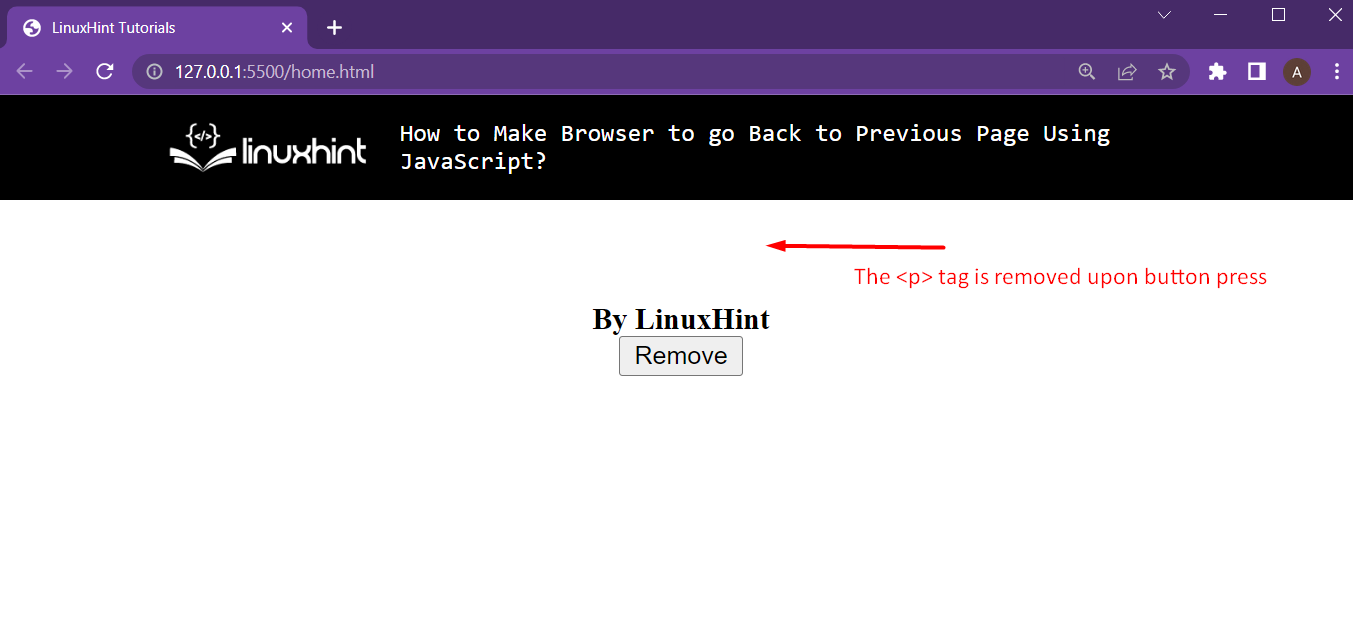 As soon as the button is pressed, the element with the className = “removeMe” is removed from the HTML document.
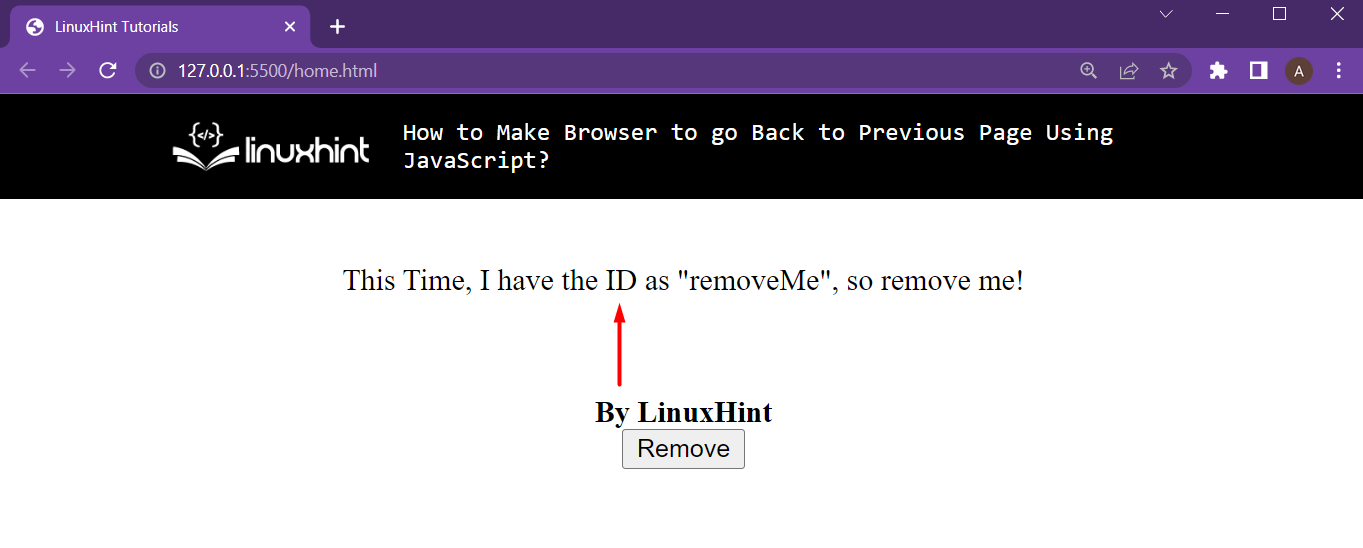 After that, in script file add in the following lines:
function buttonClicked() {
elem = document.getElementsByID("removeMe");
elem.remove();}
In the above lines:
The function buttonClicked() is created, which will be executed upon pressing the remove button
Inside the function, a reference to the element to be removed is created by using its ID = “removeMe”
After that, the remove() method is called on the element to remove it from the HTML document
Running the HTML element and pressing the button creates the following result:
After that, in script file add in the following lines:
function buttonClicked() {
elem = document.getElementsByID("removeMe");
elem.remove();}
In the above lines:
The function buttonClicked() is created, which will be executed upon pressing the remove button
Inside the function, a reference to the element to be removed is created by using its ID = “removeMe”
After that, the remove() method is called on the element to remove it from the HTML document
Running the HTML element and pressing the button creates the following result:
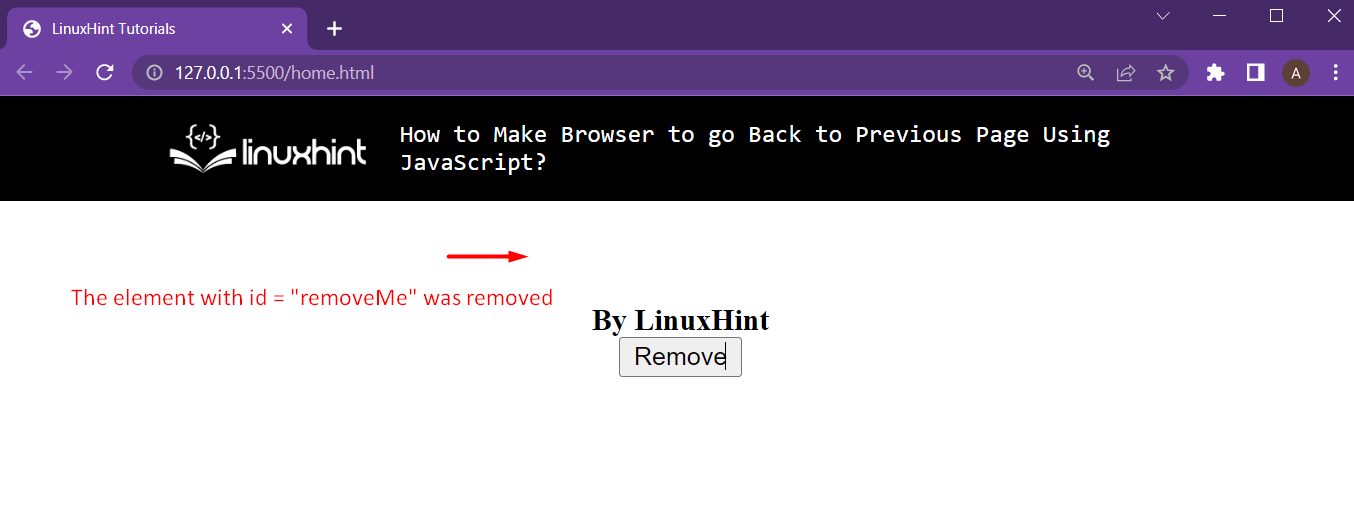 The element with the id as “removeMe” was removed from the HTML document
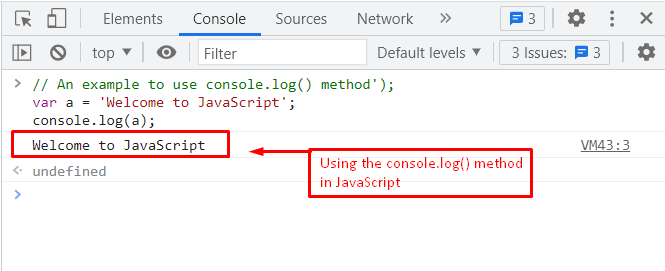 The output shows that the value of variable “a” is printed on the console.
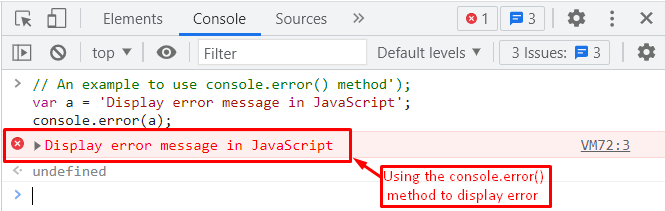 After executing a code in the browser console, a highlighted text is displayed as shown in the output’s image.
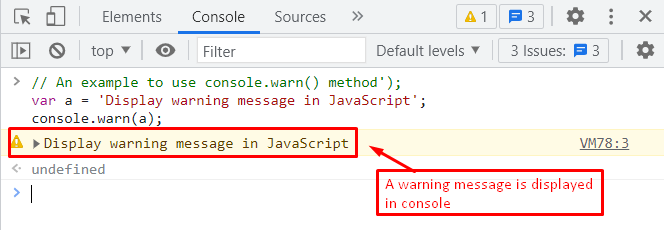 The highlighted text in yellow is used to present the warning message to the user by using the console.warn() method.
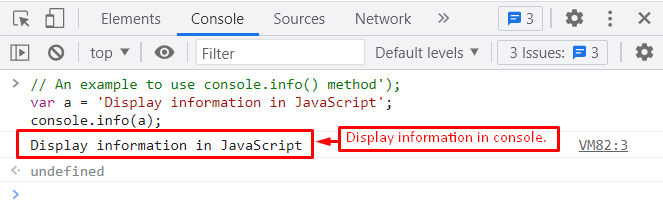 The outcome of the code returns a generic message “Display information” to the console window.
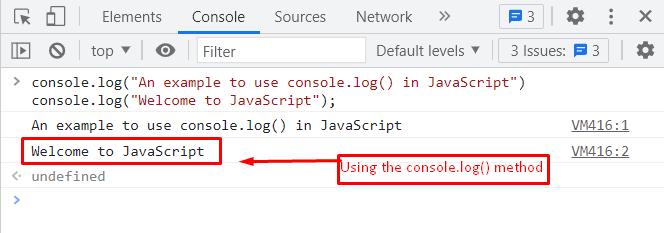 The output shows that two statements that were used with the console.log() method are printed on the console.
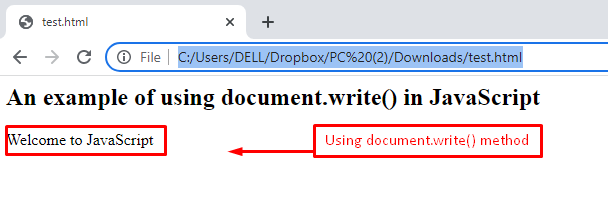 The output shows that the “Welcome to JavaScript” text is printed on the browser.
 The output displays the message “Welcome to JavaScript” by employing the innerHTML property.
 The output of the above code execution represents a pop-up window.
In this window, the passing string “Welcome to JavaScript” is printed as an alert to the user.
The output of the above code execution represents a pop-up window.
In this window, the passing string “Welcome to JavaScript” is printed as an alert to the user.
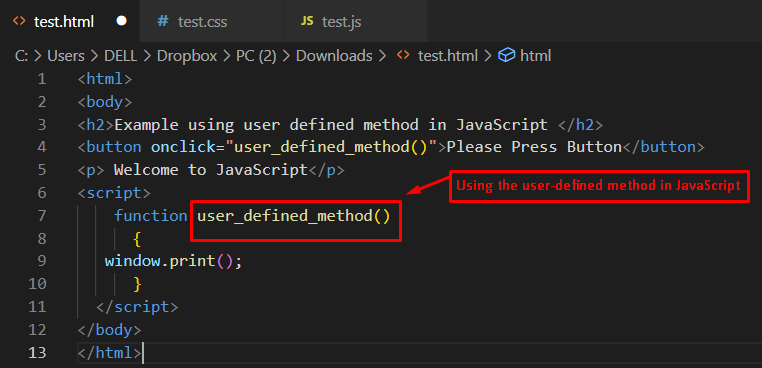 Output
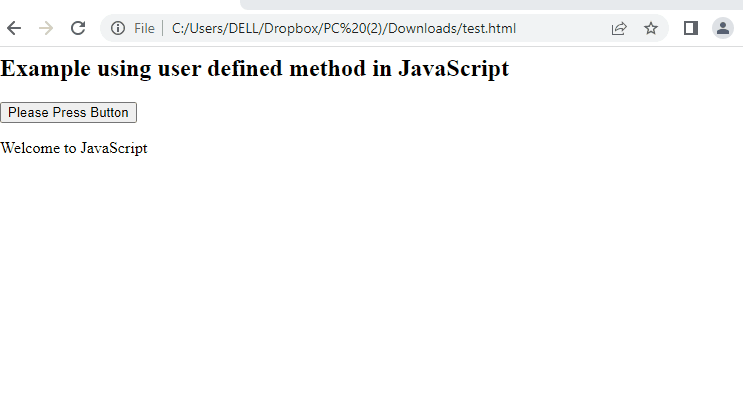 It is observed from the output, that if a user presses button “Please Press Button” the print dialgoue is opened which will enable you to print the web-page.
 The output returns an input field with two buttons.
Initially, the text box does not contain any numbers.
When the “+” button is pressed, the value starts increasing, while the “-” button decreases the value.
The output returns an input field with two buttons.
Initially, the text box does not contain any numbers.
When the “+” button is pressed, the value starts increasing, while the “-” button decreases the value.
 The webpage shows the link to move to the second page, but currently, that second page is missing, so create that in the next step.
 The button’s functionality to take the browser back upon button press is still missing.
For this, add the following script tag inside the secondPage.html:
<script>
function backButton() {
window.history.back();}</script>
In this script tag, the function backButton() is created which will be called on the button press.
In this function, the back() method has been applied to the property “history” using the browser’s window object.
After this, load the home.html in a browser and observe the functionality as follows:
The button’s functionality to take the browser back upon button press is still missing.
For this, add the following script tag inside the secondPage.html:
<script>
function backButton() {
window.history.back();}</script>
In this script tag, the function backButton() is created which will be called on the button press.
In this function, the back() method has been applied to the property “history” using the browser’s window object.
After this, load the home.html in a browser and observe the functionality as follows:
 There are a few things to notice:
At first, both the forward and the back button of the browser were disabled because of no history
Clicking the link takes the user to the second page
When on the second page, the back button gets activated
Clicking the button on the second page takes the user back on the home page.
However, the back button is disabled on the home page, and the forward button is now enabled
This means that the browser was not redirected to the homepage.
Rather, it was moved back from the history
There are a few things to notice:
At first, both the forward and the back button of the browser were disabled because of no history
Clicking the link takes the user to the second page
When on the second page, the back button gets activated
Clicking the button on the second page takes the user back on the home page.
However, the back button is disabled on the home page, and the forward button is now enabled
This means that the browser was not redirected to the homepage.
Rather, it was moved back from the history
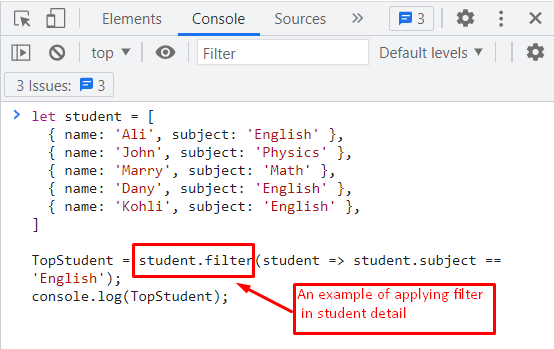 Output
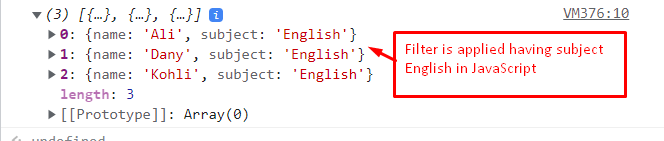 The outcome of the filter() method represents that those students named Ali, Dany, and Kohli study the English subject.
 The output shows the above code execution by filtering the values, which are divided by the number 2.
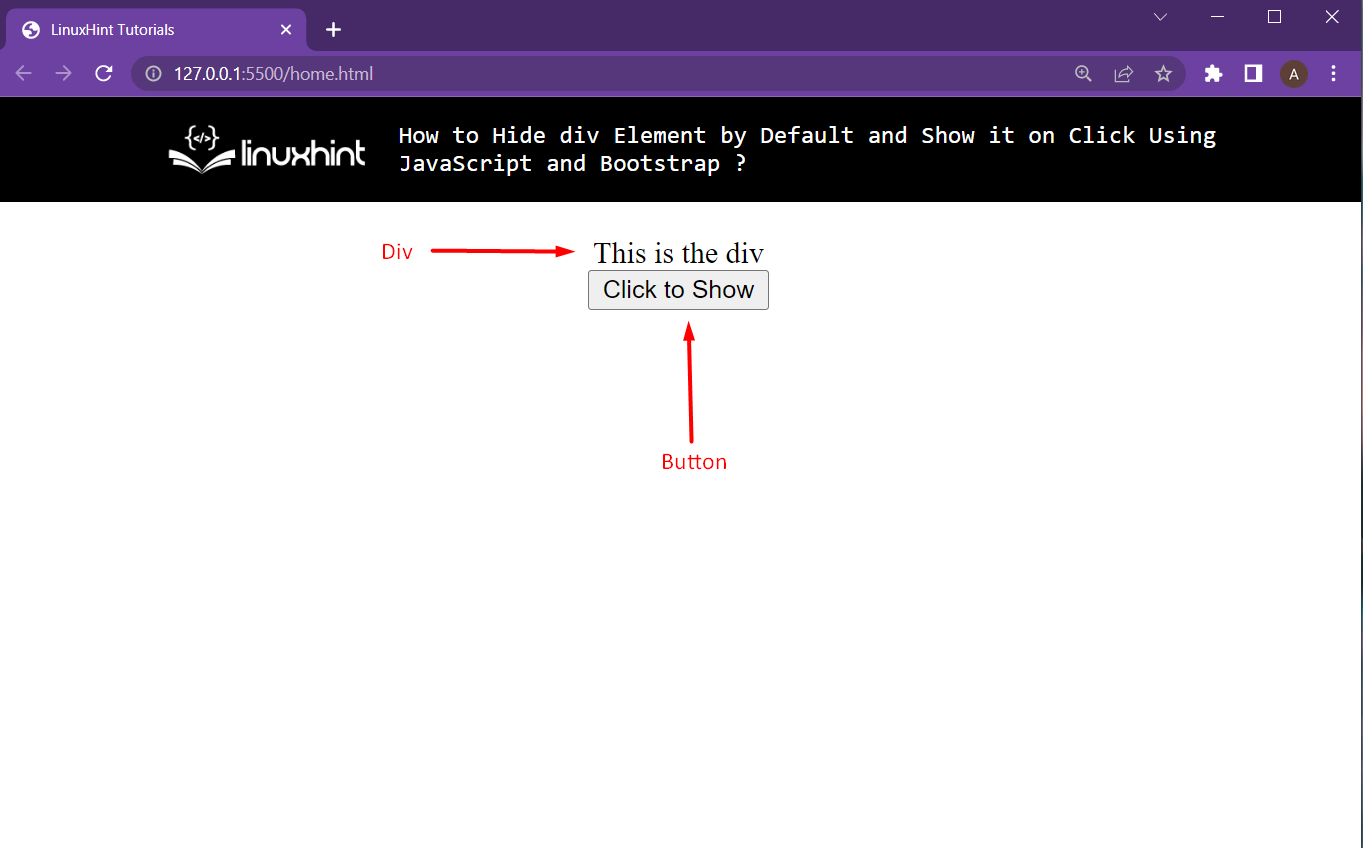 A div with text and a button are being displayed onto the webpage.
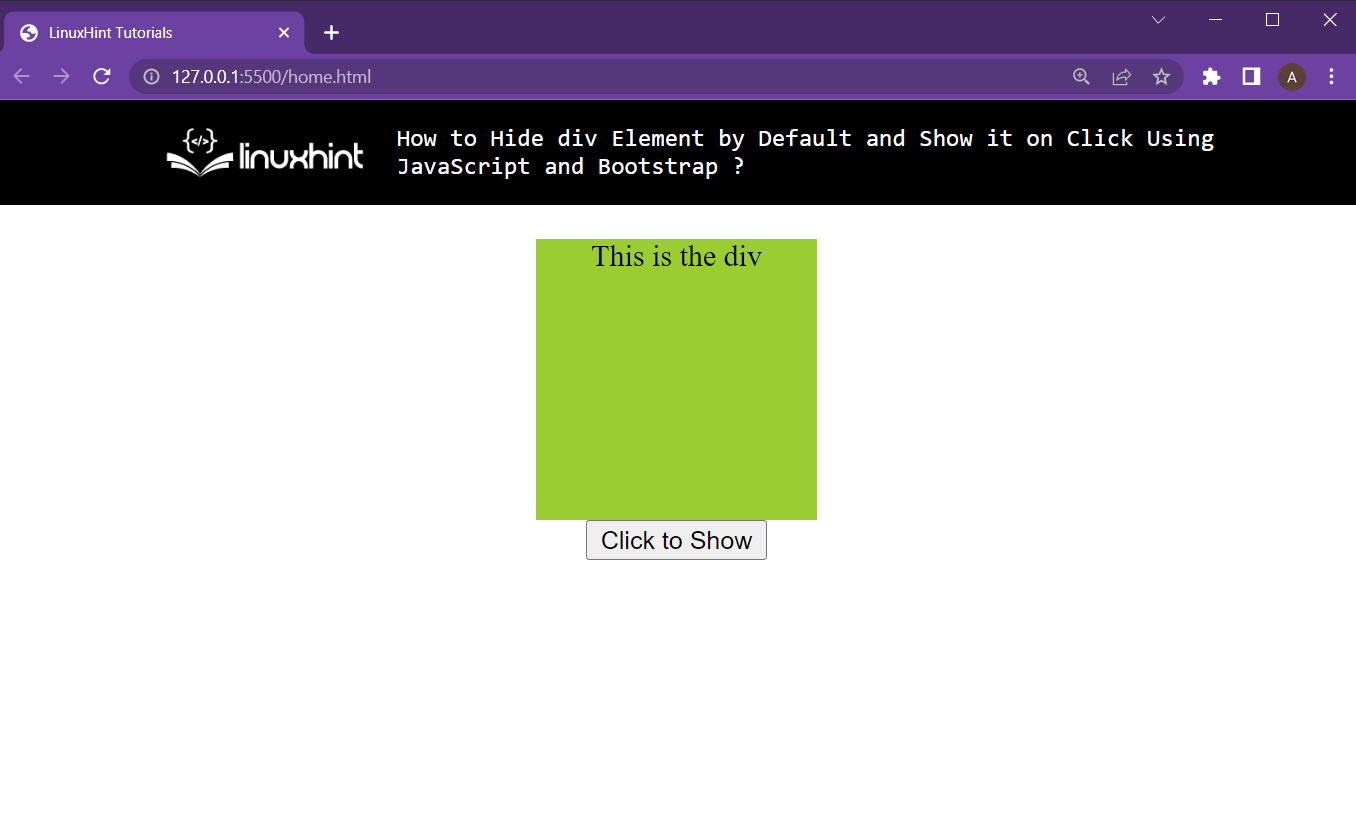 However, to hide the div at the start, add one more line to the CSS file which is:
display: none;
The whole CSS part would become:
#hideDiv {display: none;background-color: yellowgreen;height: 150px;width: 150px;}
Now, the HTML looks like this:
However, to hide the div at the start, add one more line to the CSS file which is:
display: none;
The whole CSS part would become:
#hideDiv {display: none;background-color: yellowgreen;height: 150px;width: 150px;}
Now, the HTML looks like this:
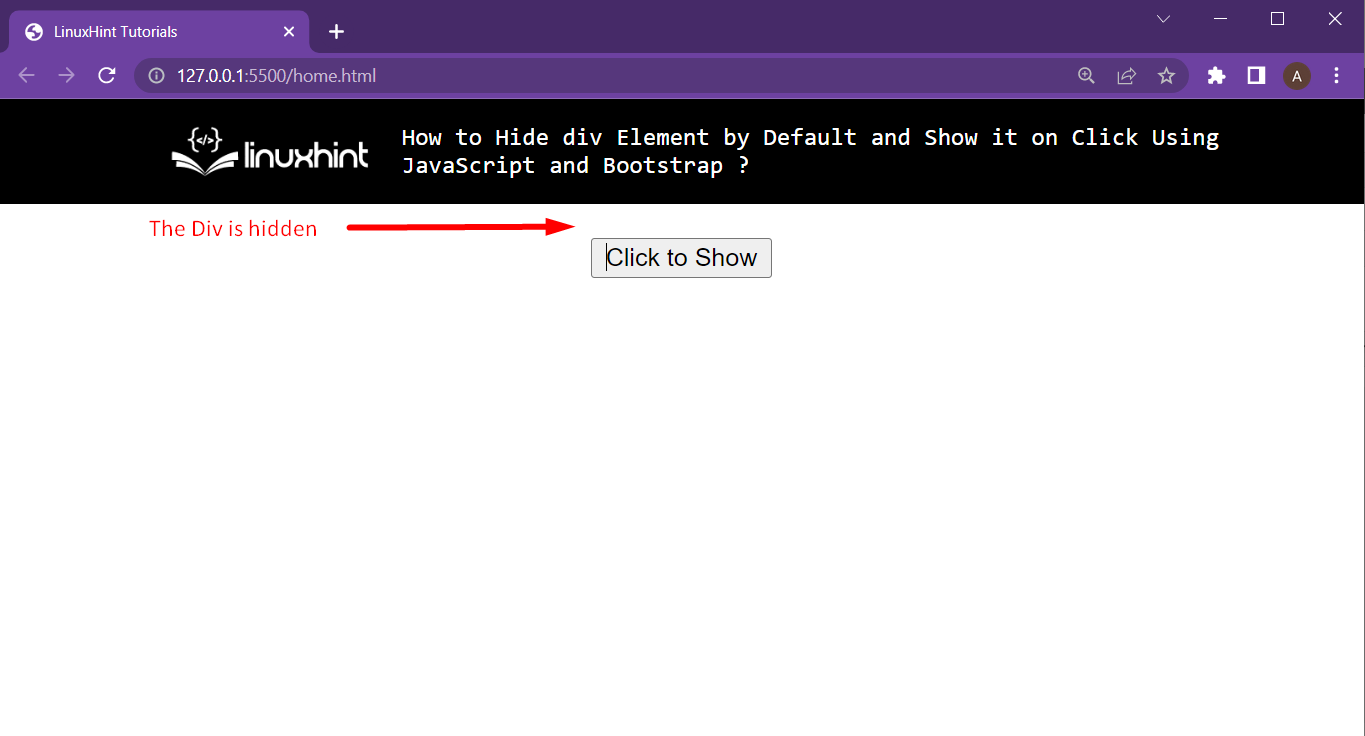 The div is not being displayed on the HTML webpage at the start.
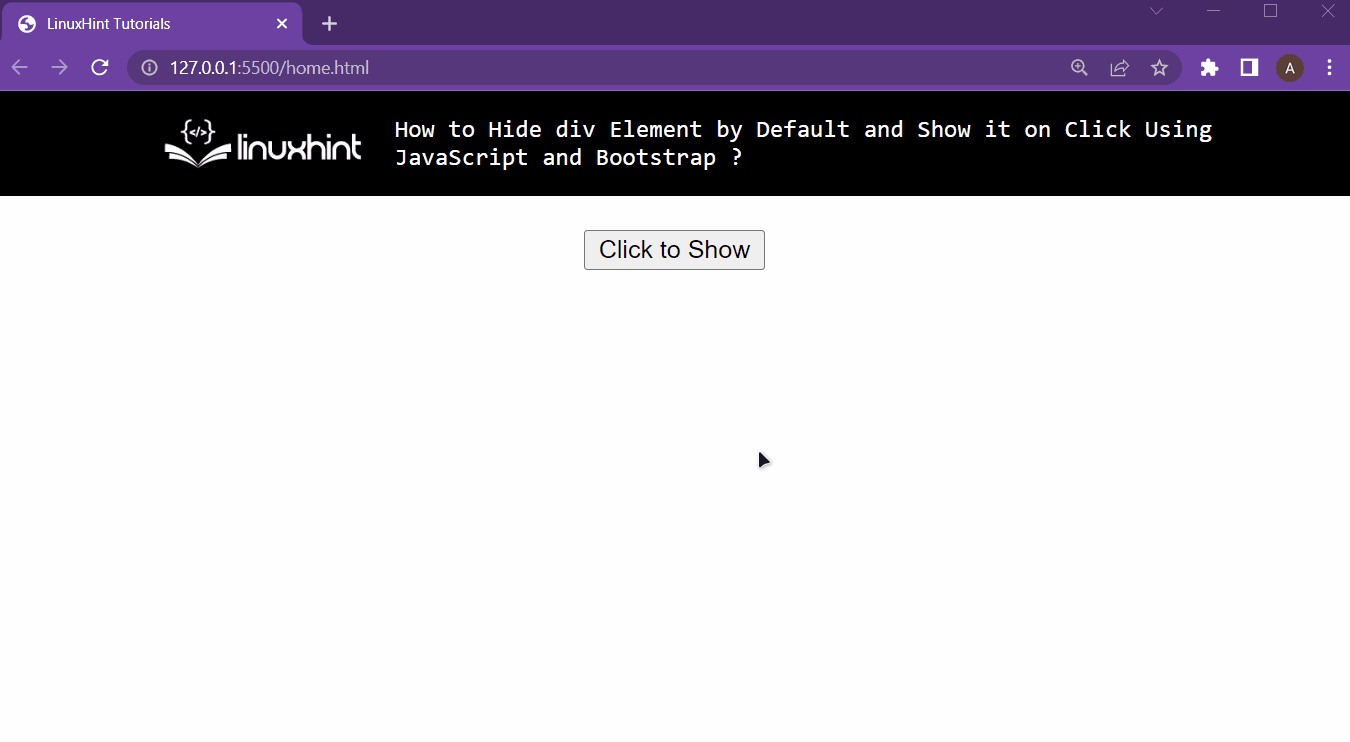 The div is displayed on button press and the problem has been fully tackled.

 Using these methods the first and last item of any array can be retrieved.
 Output
 The display represents a dropdown list by executing the above code.
At the backend, different elements are attached to a list, and each is assigned a value.
By clicking an element, the specific value is displayed in the pop-up window.
The display represents a dropdown list by executing the above code.
At the backend, different elements are attached to a list, and each is assigned a value.
By clicking an element, the specific value is displayed in the pop-up window.
 Using these methods, any JavaScript array can be sorted to clear duplicate values from it and leave behind an array with only the unique values.
 Currently, all types of characters can be written inside this text field:
 But this will change in the next section.
 It is now only allowing numbers to be written inside it and ignores other character
 Output
 The output returns a display in the chrome window using the removeEventListener() method.
In this display, random numbers are continuously generated that are associated with mouse movement.
A button is attached here named “Try Magic Button to fix it”.
It is used to fix the randomly generated number.
The output returns a display in the chrome window using the removeEventListener() method.
In this display, random numbers are continuously generated that are associated with mouse movement.
A button is attached here named “Try Magic Button to fix it”.
It is used to fix the randomly generated number.
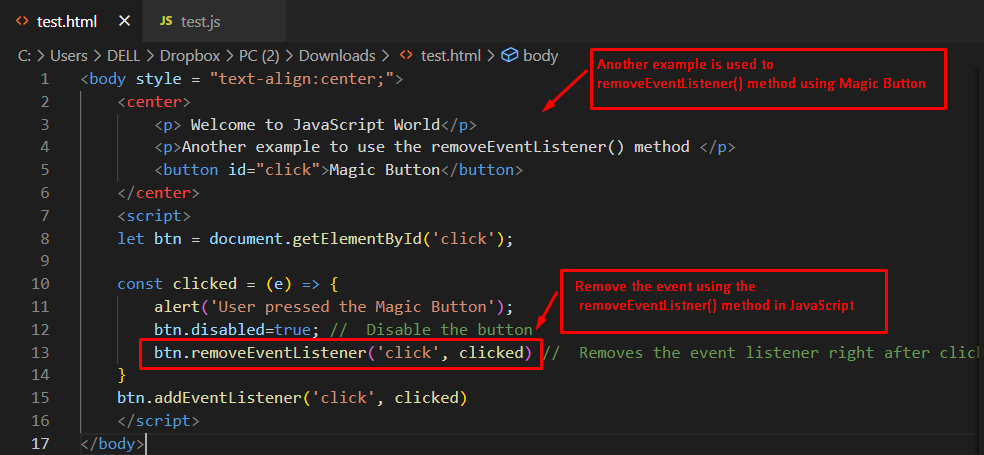 Output
Before clicking the button:
Output
Before clicking the button:
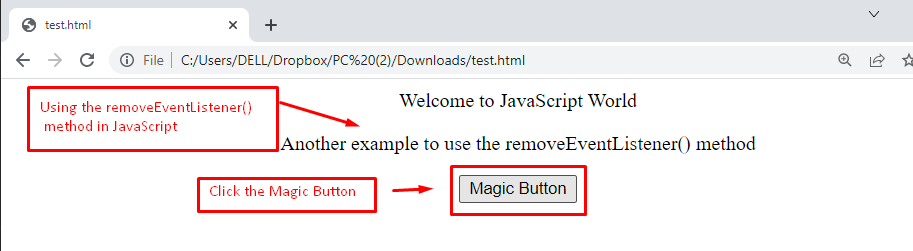 After clicking the button:
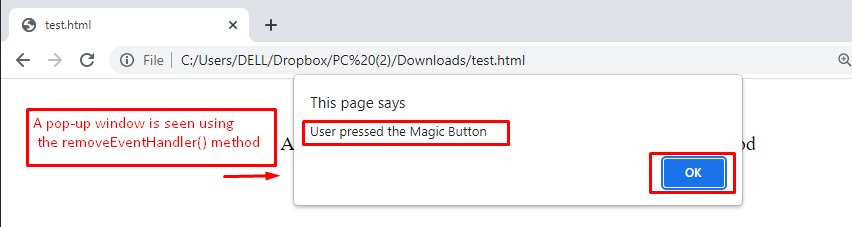 After clicking the Magic Button, an event is called that generates a pop-up window in the web browser.
 From the output, it is noticeable that the value of the date variable has been printed in the ISO stand mentioned above.
 The output in the terminal shows the date “15th of February, 2005” in the ISO format.
 The output shows that the character “h” was present inside the stringVar.
 The letter “h” in the small case was not found in the string.
Therefore, the result value is false
The letter “h” in the small case was not found in the string.
Therefore, the result value is false
 It is clear from the screenshot that currently, the file is empty.
Upon executing the above code, the following prompt is displayed on the terminal:
It is clear from the screenshot that currently, the file is empty.
Upon executing the above code, the following prompt is displayed on the terminal:
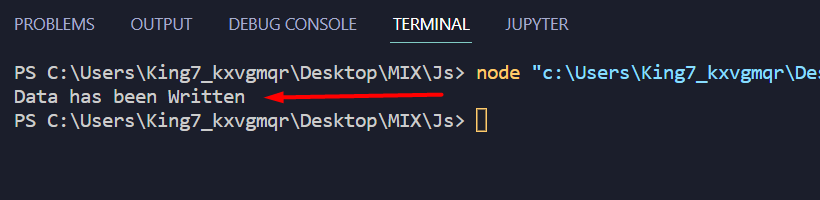 And inside the “test.txt” file, it shows:
 From the above screenshot, it is clear that the data was written to the file test.txt
 The display shows the name, id, age, and color properties of the teacher object.
 The output shows the old properties as well as the modified set of properties.
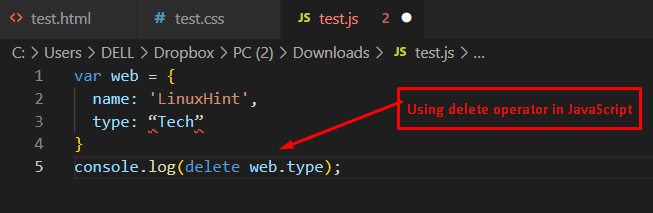 The output has returned true, which states that the type property has been deleted.
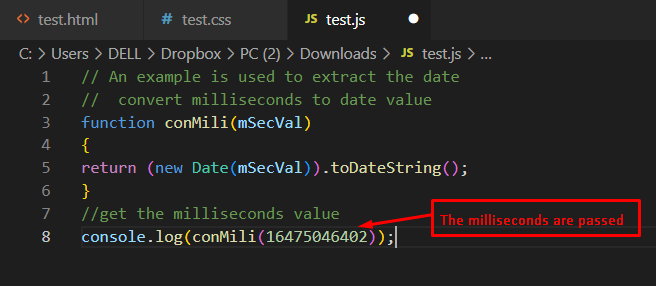 Output
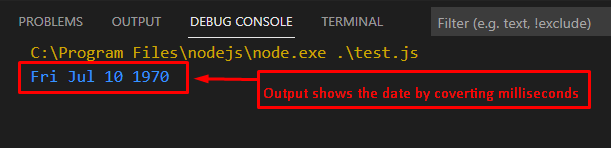 The output shows that the milliseconds are converted into the respective date and are displayed on the console.
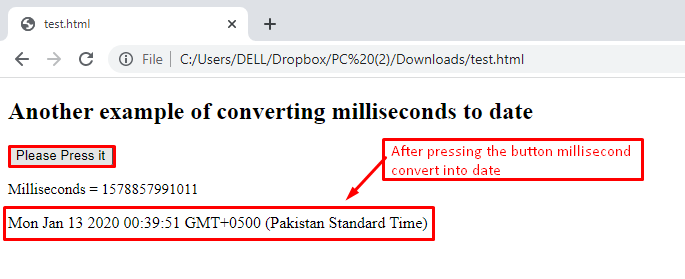 When the button “Please Press it” is pressed, the provided milliseconds will be converted into the date.
 Before executing the code, the code editor has marked that there is a problem in the function test() as highlighted in the above image.
While the same scenario is accepted in the case of the “var” keyword.
Let’s execute the code for further clarification:
Before executing the code, the code editor has marked that there is a problem in the function test() as highlighted in the above image.
While the same scenario is accepted in the case of the “var” keyword.
Let’s execute the code for further clarification:
 The output shows that the editor has thrown an error and has not allowed us to execute the code.
 After modifying the property value, the console.log() method is used to display the newly assigned value in JavaScript.
 The output returns the elements in the array by executing the above code.
In this display, the green color is pushed into the existing array by utilizing the colors.push() method.
The output returns the elements in the array by executing the above code.
In this display, the green color is pushed into the existing array by utilizing the colors.push() method.
 And then head over to the console tab:
 Since JavaScript is an ECMA standard for web browsers, the web browsers can execute JavaScript code snippets without requiring any external environment settings.
In the console, type the following lines:
console.log("Hello, This is My First JavaScript Test Run");
Hit enter, and the console will show the following:
Since JavaScript is an ECMA standard for web browsers, the web browsers can execute JavaScript code snippets without requiring any external environment settings.
In the console, type the following lines:
console.log("Hello, This is My First JavaScript Test Run");
Hit enter, and the console will show the following:
 The console.log() statement is a function of JavaScript that is used to print out data onto the terminal of either your browser or your code editor.
 This was possible because JavaScript was mainly built for HTML manipulations which included working with different objects of the browser.
You can also take the input from the user using the prompt() method and store that input inside a variable like
var city = prompt("Which City Do You Live In" + name);
Hitting Enter will display the following alert box with an input field like:
This was possible because JavaScript was mainly built for HTML manipulations which included working with different objects of the browser.
You can also take the input from the user using the prompt() method and store that input inside a variable like
var city = prompt("Which City Do You Live In" + name);
Hitting Enter will display the following alert box with an input field like:
 So fill in the answer in the input field like:
 After that, you can again use the alert box to display the user’s city on the browser’s window with the following statement:
alert("So you are from " + city);
With this, the browser will show the following alert box:
After that, you can again use the alert box to display the user’s city on the browser’s window with the following statement:
alert("So you are from " + city);
With this, the browser will show the following alert box:
 Anyways this was it for the basic introduction of JavaScript
 Output
 The outcome of the code returns the values of the array, including English, Math, and Chemistry, that are stored in the existing subject array.
 Output
 The output returns two values, cricket and badminton, by utilizing the array.values() method.
 This web page doesn’t do anything, this will change in the next step
 The inserted number was converted in the E-164 number format
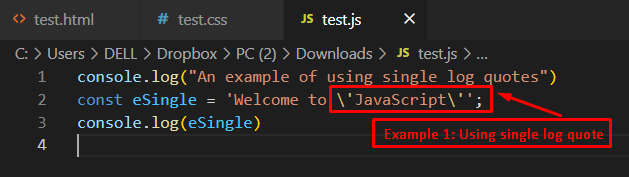 Output
 The output displays the message “Welcome to ‘JavaScript’ ”, in which JavaScript is highlighted within single quotes.
 Output
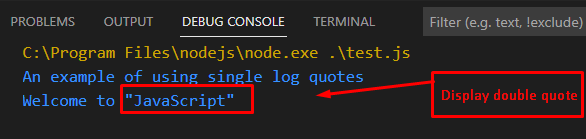 The output shows the highlighted word “JavaScript” within double quotes using escape characters.
 Output
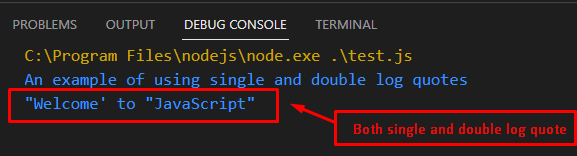 The output shows the execution of the above code to display single and double quotes in a string.
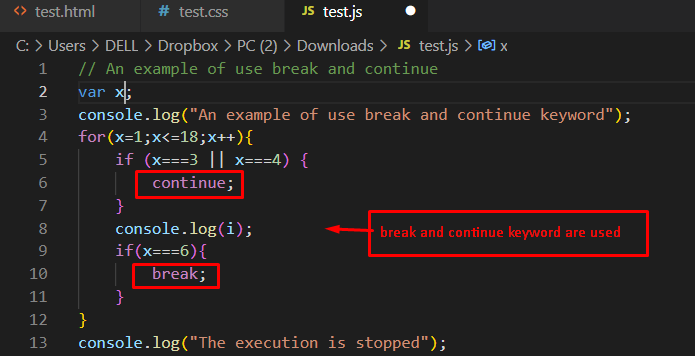 Output
 The output returns the execution of the above code.
In the display, values are presented as missing 3 and 4 due to the continue keyword.
Moreover, the break keyword breaks the code after printing the value 6.
In the end, a message is displayed “The execution is stopped”.
The output returns the execution of the above code.
In the display, values are presented as missing 3 and 4 due to the continue keyword.
Moreover, the break keyword breaks the code after printing the value 6.
In the end, a message is displayed “The execution is stopped”.